RaKa
Finding my way-
Posts
11 -
Joined
-
Last visited
Profile Information
-
Location
Estonia
Car Info
-
Model
Fabia
Recent Profile Visitors
The recent visitors block is disabled and is not being shown to other users.
RaKa's Achievements
-
The plastic is flexible enough to slip out from under the dash panel and other trims but it may need some apparently excessive force. DO NOT DO anything to the door seal as this will cause leak/damp floor issues. Raul
-
A few pics for you : An inside look at the bonnet release handle stopper clip: It can be removed with a flathead screwdriver and the handle pops off. The trim is held on by four clips, it is good to know their exact locations when taking it off: Just be careful not to break anything. The first time getting it off might be really difficult. On the other hand, if you break most of the clips, it'll be easier next time. You can get better leverage on the clips through the lever hole: And when the trim is off, you can see the bonnet release cable actuating mechanism: Quite a simple mechanism but plastic all over. I hope this helps. Edit: If you're a Brit, you'll have to hold the pictures up against a mirror to have the correct orientation.
-
I have a cheap XTRONS ELM327 clone Bluetooth dongle. Cost me 20€ inc. VAT, CAT, BAT and delivery. It shows e.g. rpm, MAP reading, oxygen sensor reading, speed and coolant temperature but not much more. The most useful feature is the diagnostic code read/save/clear function. If it hadn't had that, I'd have sent it back. Raul
-
Sorry to hear that you were unable to remove the lower dash panel. I didn't include pictures of that process because mine came off just as shown in the workshop manuals. Also, I didn't want to clog up the original post. But I can add pictures here. Instructions on removing the light switch here. The panel is pulled off towards the driver, not down. There is also the OBD socket but it doesn't have to be removed because it has quite long wires. When putting the panel back, note the metal clip-thingy that has to slide onto a support above the pedals. Hope that makes things a bit clearer now. Raul
-
Additional information: Door arrester also seems to be called a door check strap rod. The part number is 6Y0837249F Link to skodaparts.com page for the part. Correction: the spline bolt is M8, not M10.
-
Thanks Just realised that I should have posted this in the guides section.
-
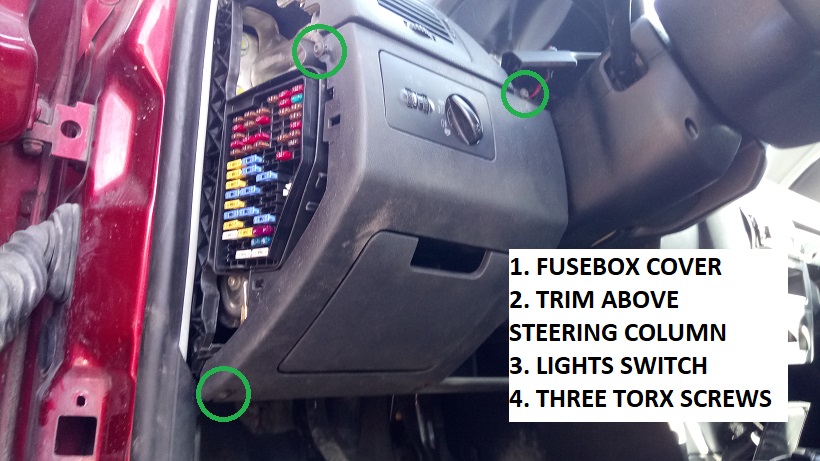
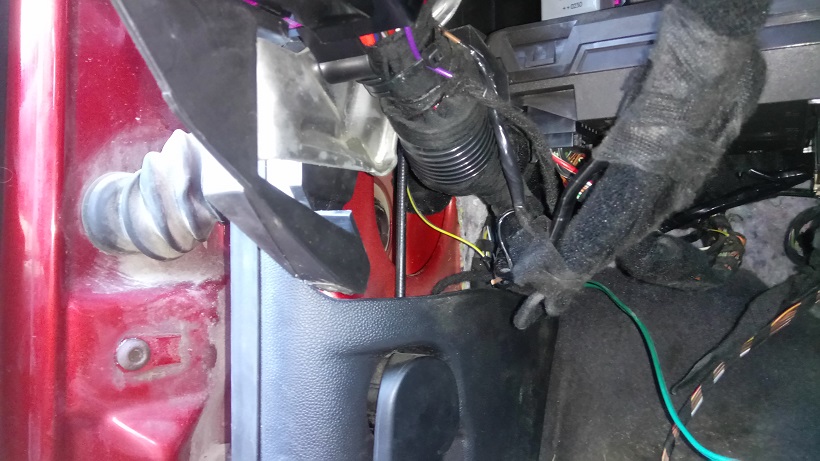
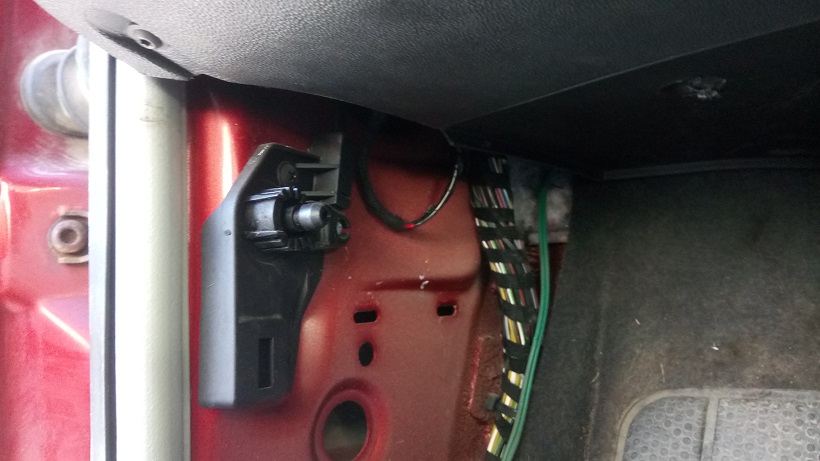
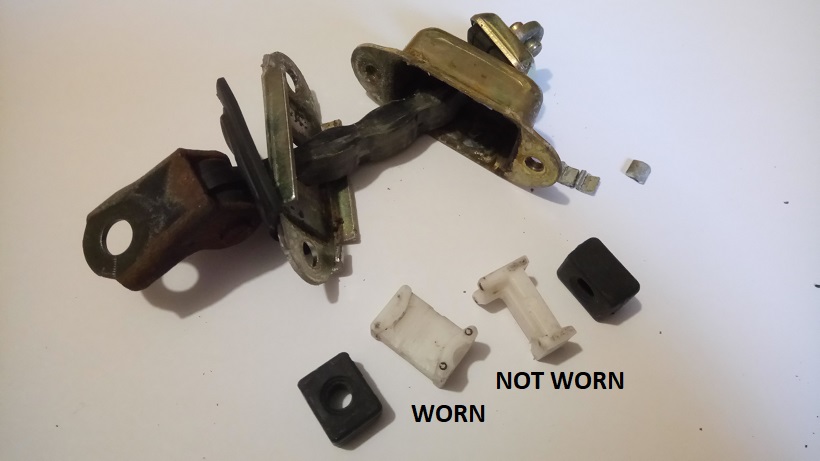
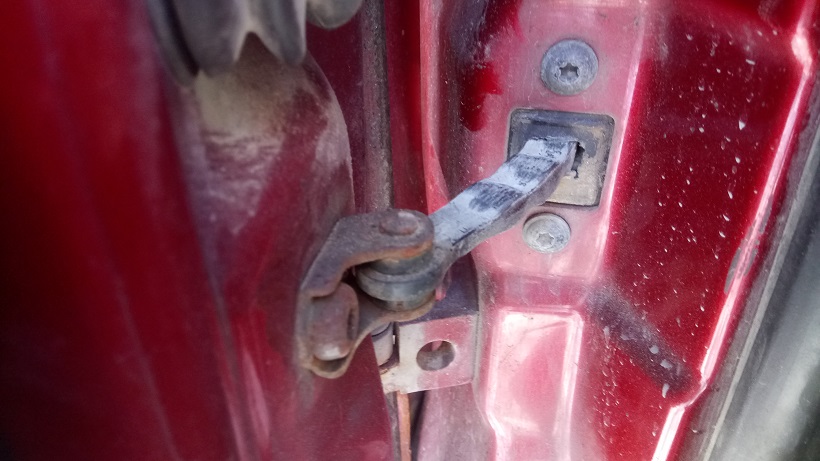
Hello It's me again, sharing experience on a fix. This time it's the driver's door arrester. The door arrester was worn out and even on the smallest inclines didn't hold the door open. It was quite a nuisance, so I decided to replace it. For me, it cost 15€. As a careful person, I gathered information before I dived right in. My first source, workshop-manuals.com says: 23 - Door arrester q Removing: – Remove door trim panel from the bottom of pillar A. – Release screws Pos. 21 and Pos. 22. – Push door arrester inwards and remove from pillar A. q Installing: – Installation is carried out in the reverse order. Unless I'm misunderstanding something, this information is wrong. At least concerning my model (12/2002 1.4 MPI Classic). After ripping off the trim, I was left with a handful of plastic and apparently no access to the arrester. Then I shined a torch and found a hole that was in the most part concealed by the bottom dash panel. After removing the bottom dash panel, I found that it is neither sufficient nor necessary to remove the pillar trim. This is actually good news, because removing the dash panel is much simpler than removing the trim. On the passenger side, the glove compartment is the piece to be removed. Swapping the arrester itself was quite simple: an M10 spline bolt holding it to the door and two torx 30 bolts securing it to the pillar. After releasing it, I had to guide it to the access hole and it was out. The new one is quite stiff so if you decide to replace yours, be aware of the danger of stabbing yourself with the sharp corner of your door. As you are too used to the door moving freely, you'll exert too little force to open it and lean in too early. Quite a nasty effect. At first glance, the arrester mechanism itself does not look serviceable, but when I pried it open, I found that you could (at least theoretically) restore some functionality. You can carve off some plastic from the worn-out half to (re)create the profile that interacts with the curved bar. You'll also have to add a spacer under one of the rubbers to compensate for lost material. The housing is originally held together by four bent metal flaps but they are not necessary when the arrester is bolted to the car's body. The arrester is symmetrical and can be installed on either of the front doors. This means that it is probably possible to combine two worn arresters into one fully functional one. A few bonus tips: when you are working on your car in the winter or early spring, tie a scarf around your lower back to prevent aches. Also, when working around footwells, clean the area beforehand in order to keep your clothes free of mud and dust. Additional pictures are available upon request. Hope this guide helps someone and reduces unnecessary expense of blood, sweat and tears. Raul
-
Fabia MK1 lights switch backlight solder joint repair
RaKa replied to RaKa's topic in Skoda Fabia Mk I (1999-2007)
Great! I'll check it out then.- 11 replies
-
Fabia MK1 lights switch backlight solder joint repair
RaKa replied to RaKa's topic in Skoda Fabia Mk I (1999-2007)
Actually, the first Fabia I checked out when I started looking for a car had a driver's side central locking issue. The car could only be locked from the passenger side. Quite possibly the problem was exactly the one you mentioned. Sadly this would not be a 15 minute fix. And definitely not something that I would check prophylactically for fun, what with all the rivets holding the panel in the door.- 11 replies
-
Fabia MK1 lights switch backlight solder joint repair
RaKa replied to RaKa's topic in Skoda Fabia Mk I (1999-2007)
Thanks. The electronics here are to our luck very simple, just some LEDs, resistors and diodes, nothing too sensitive. But of course caution is advised. Right now I'm wondering how many of these cracked joints may be present elsewhere in my car's electrical system.- 11 replies
-
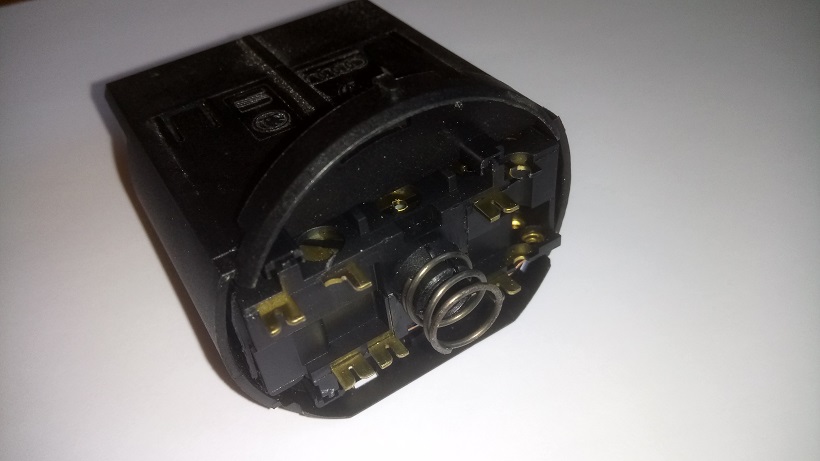
Hello I recently bought a 2002 Fabia which I really enjoy. Although it is a great car, it has accumulated some minute flaws which previous owners have not repaired. I am in the process of fixing them all and in this topic I'll share the process of repairing a cracked solder joint that caused the backlight LEDs in the headlights switch to flicker. 1. First you have to remove the switch unit from the car. To do this, you will have to turn the switch to the "0" position, push it in, turn it to the sidelights position (vertical) and pull. You will probably also have to use some kind of a trim removal aid (such as the dull kitchen knife that can't be used for anything but you haven't thrown it out because you do not throw away these things). The switch unit in place: The switch unit pulled out: A bonus picture of the system that keeps the unit in place and lets you remove it. With some imagination you can figure out the mechanics: first you'll have to turn the shaft clockwise (from this point of view), then push the knob in to bring it into alignment with the two trapezoid-shaped pieces and finally turn it back in order to move the two claws inward: The connecting wires are held in place by clips. Push the clips in and jiggle the connectors to remove them. Since I did it in the wintertime with -15 degrees centigrade, I managed to break a noncritical plastic part off the smaller connector. In warmer weather the plastic would be more flexible: 2. Now dismantle the switch unit itself. Gently ease your dull kitchen knife in between parts and bring them apart. There are four claws holding the switch unit to the faceplate and a few holding the knob assembly to the switch itself. Standard methods of plastic component disassembly apply: The PCB with the LEDs is held in place by the electrical connectors that power it. Gently ease it off: 3. Now for the main event. Locate cracked solder joints and repair them: If you do not have a soldering iron, you can construct something like this: a thick copper wire heated up by a gas lighter. This is also faster and safer than a soldering iron, if you use it correctly. Don't heat the tip directly, rather a portion of wire above it: That's pretty much it. Reassembly is the reverse of dissassembly. Thanks for reading. Raul
- 11 replies
-
- 2
-

-


