sirhc93
Finding my way
-
Joined
-
Last visited
-
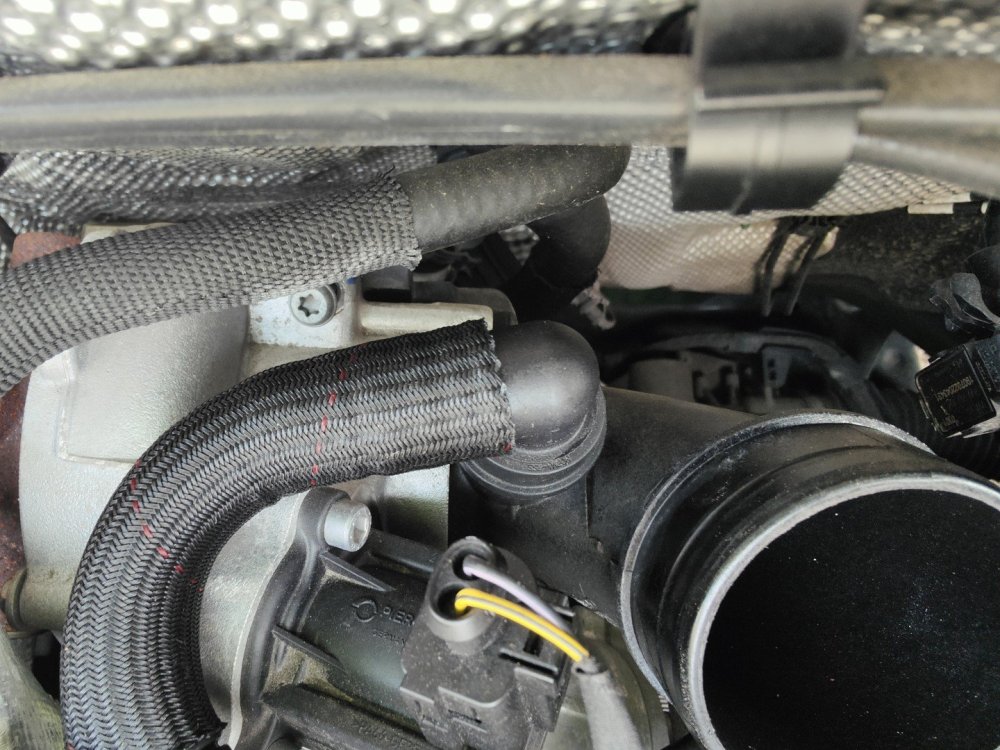
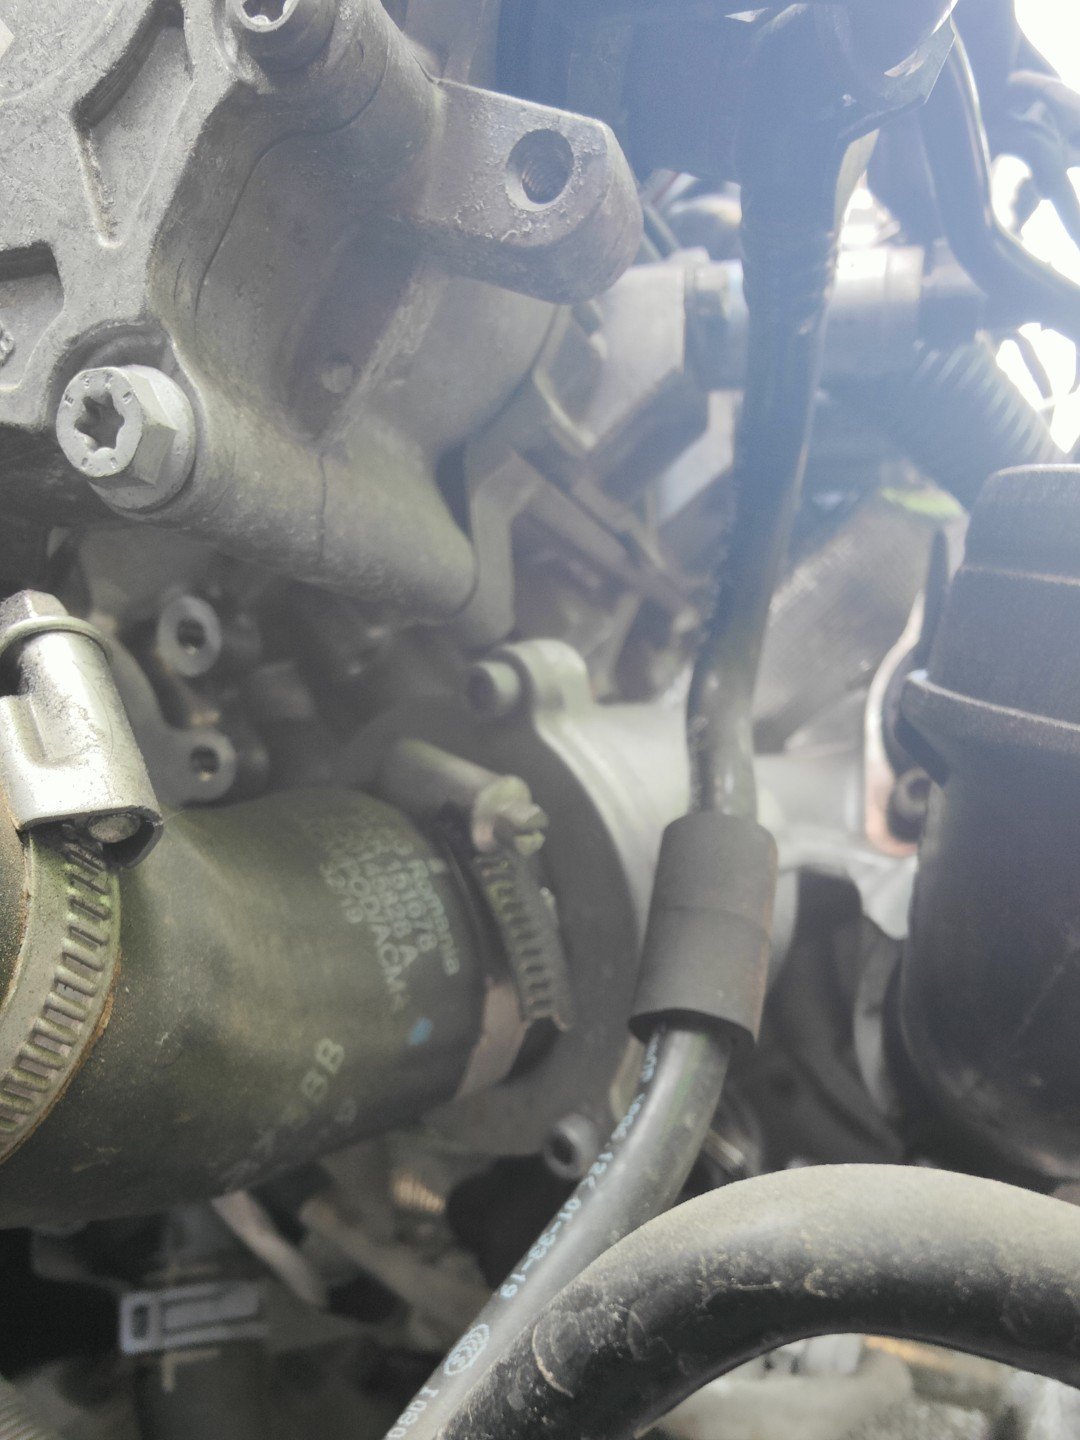
With the service pack I also treated myself to a Racingline Turbo Muffler Delete and a Racingline R600 Hi-Flow Turbo Inlet Elbow. These where a bit of a pain to fit as you have to do some hand contortionism to get the muffler delete bolt in and out. The elbow also wasn't straight forward as the hose that's connected to it is on there good and you have to give it some real force to get it off. I am glad I installed the elbow as I noticed the bolt that holds it on was completely loose. I have never touch that part before so no idea how it had managed to come so loose it was nearly falling out. Performance wise, I cant really tell any notable difference. Noise wise, the two combined with my induction kit has definitely increased the turbo noise and hiss.

-
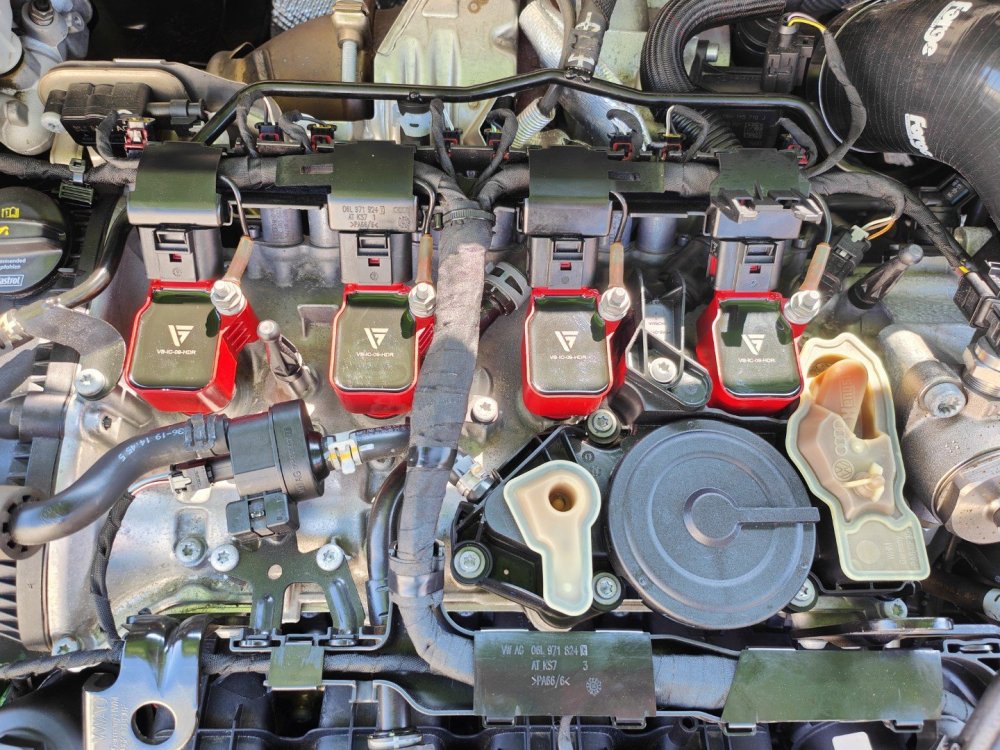
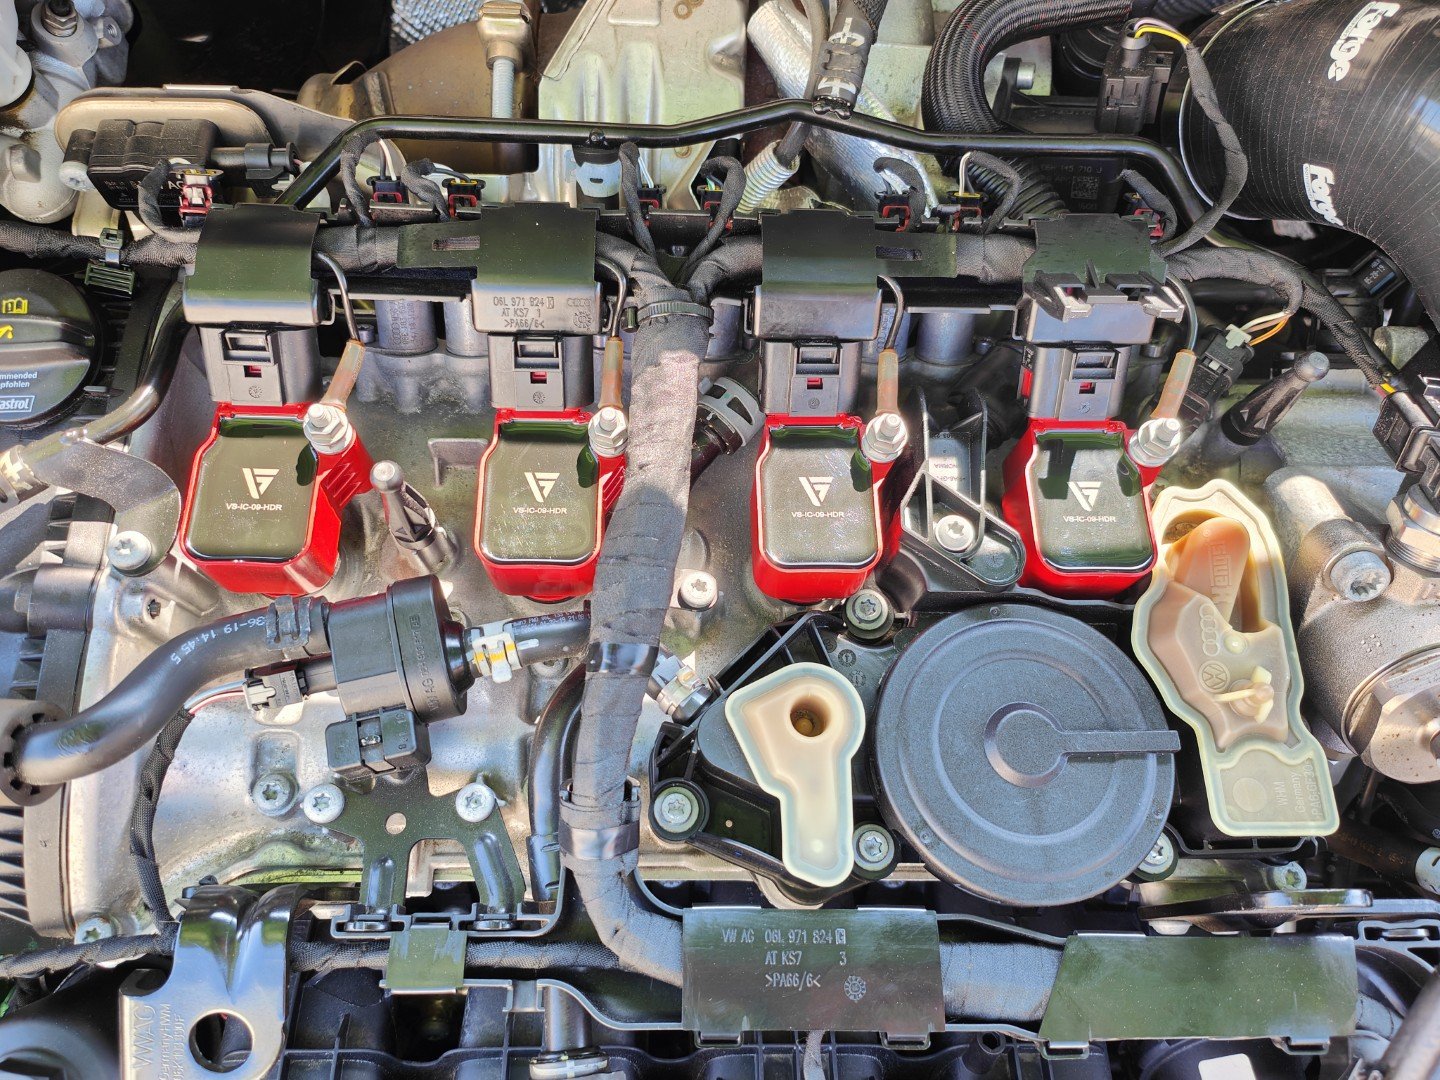
I have never really serviced a car fully before but I thought seeing as I no longer had a service plan with the dealership that I would do it myself for the first time. Of course on the way I would be making upgrades rather than just replacing OEM parts. Ignition coils - Probably didn't really need replacing but they cool in red and tbh the engine has been running so much smoother since installing them. I purchased and installed these before anything else on my service to do list, so these alone improve the engine running on there own. Spark plugs - Again probably didn't need doing, but they are recommended after 4 years. On replacing there was a little bit of corrosion on the old ones so maybe a worthwhile change. Oil/oil filter/sump plug - I bought the service pack on Progressive Parts as it was reasonably priced and made it easier to get everything at once. Went for the Genuine oil filter, Millers Oils EE Performance C3 5w30 oil, Racingline Magnetic Drain Plug. Air filter just needed cleaning and I had done the cabin filter last year and it still looked in good condition so wasn't needed this time.


-
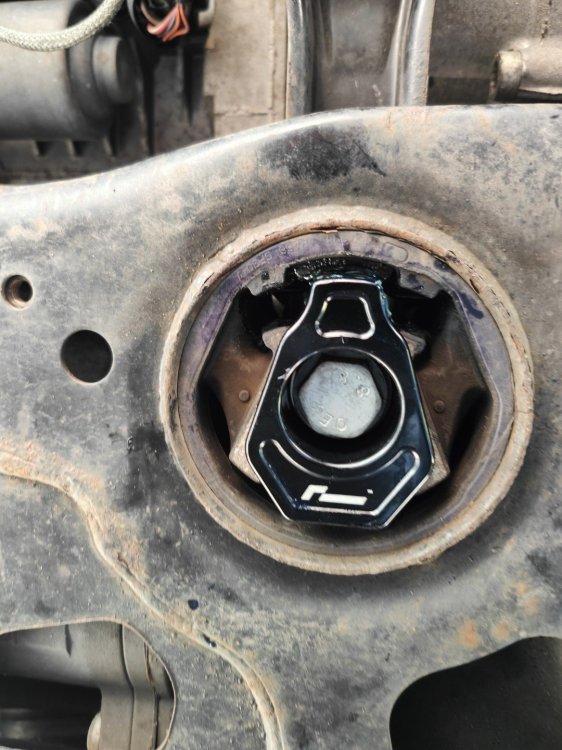
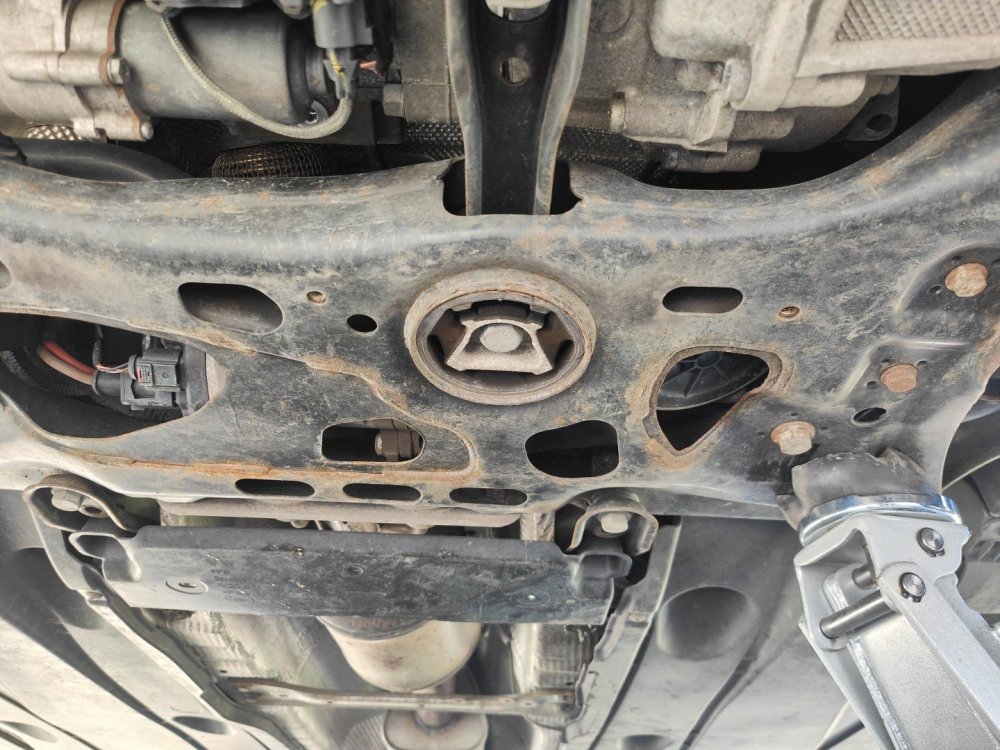
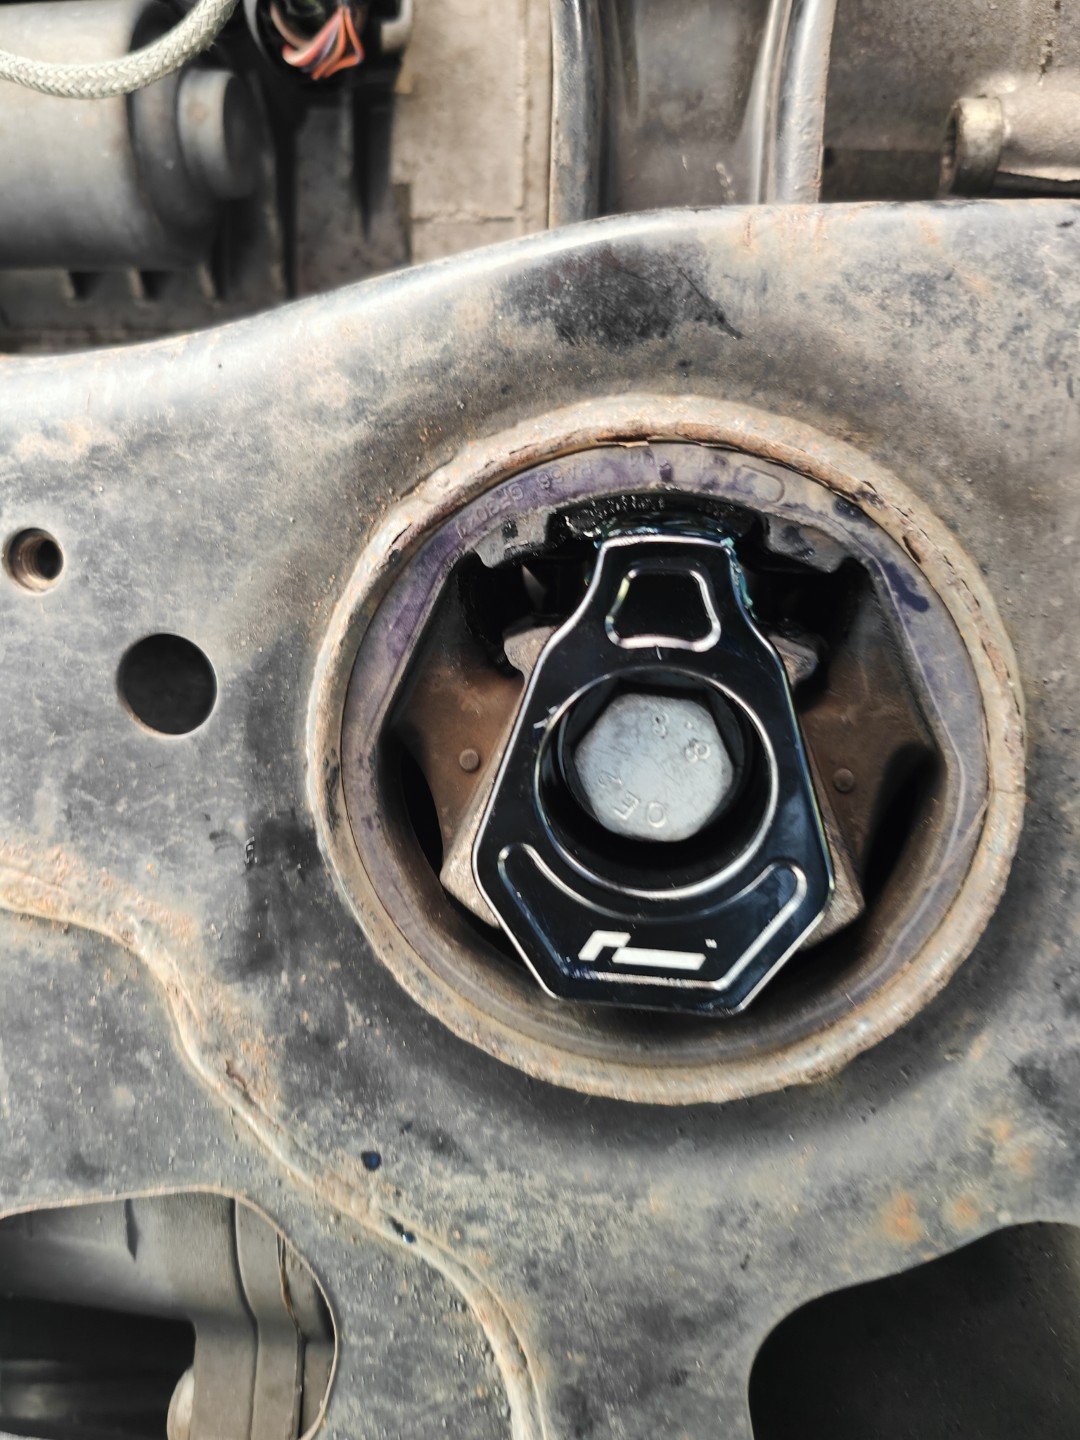
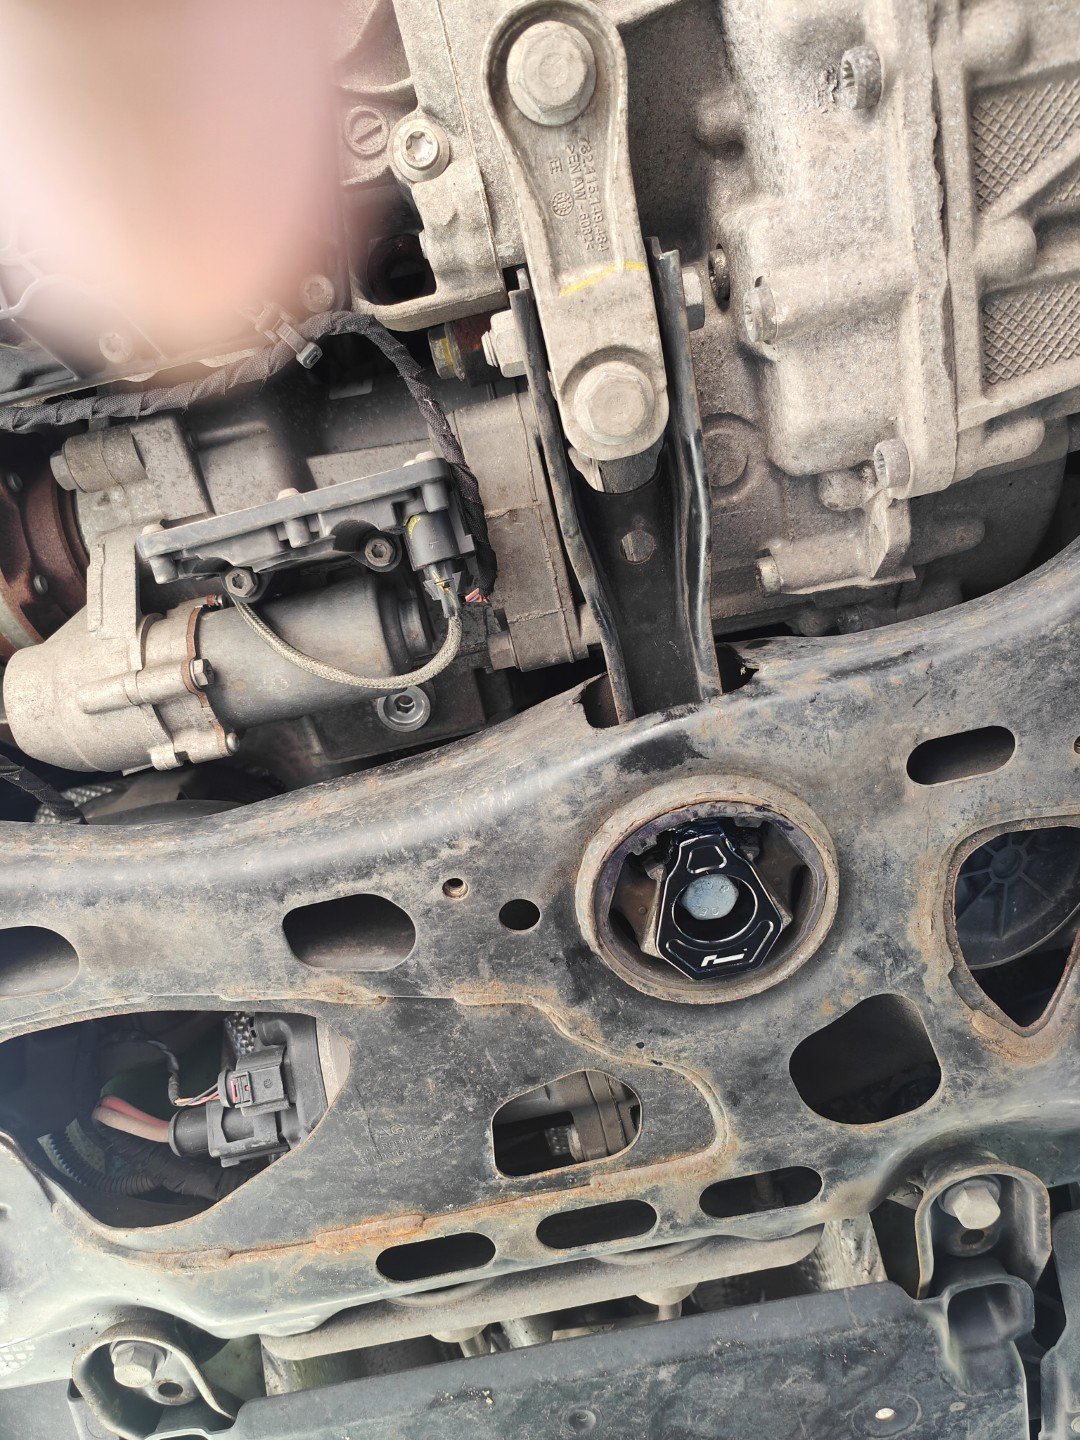
The Octavia with the remap suffered terribly from wheel hop. I'd never even heard of a dog bone mount insert until recently, but honestly apart from the remap, its the best upgrade I have made to the car by a long way. I purchased the Racingline Lower Engine Mount Twin Dogbone Insert (Version 2) coming in at just over £100 its not cheap for what looks like on the face of it is a small piece of metal, but what a difference it makes. It transforms the car launch as though the wheel hop never existed. Yes there are some harsher vibrations in the cabin to begin with although these almost disappear once its broken in and any slight cabin vibration after is 110% worth the performance increase. If you fancy this upgrade then you'll also need to get a new bolt like this one, as it needs replacing every time you take it out.


-
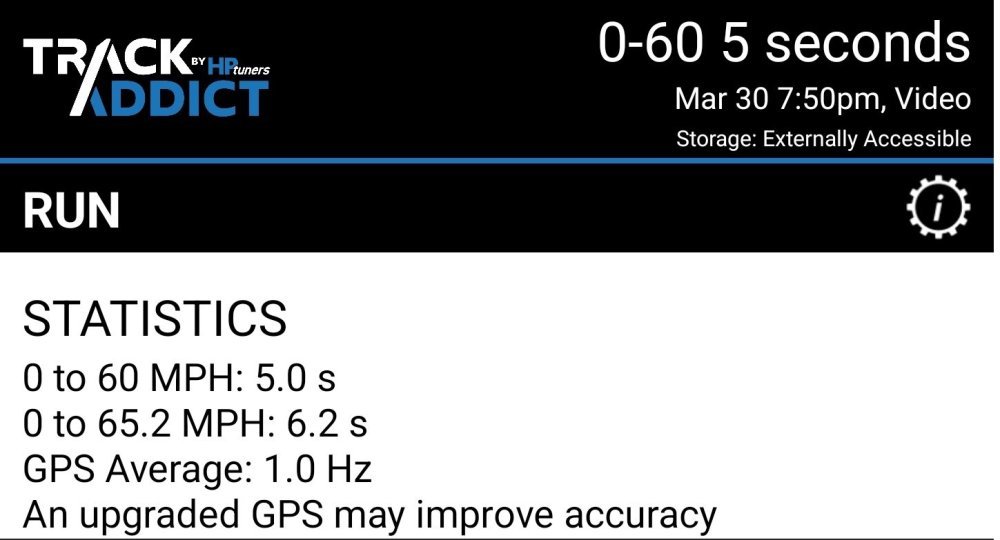
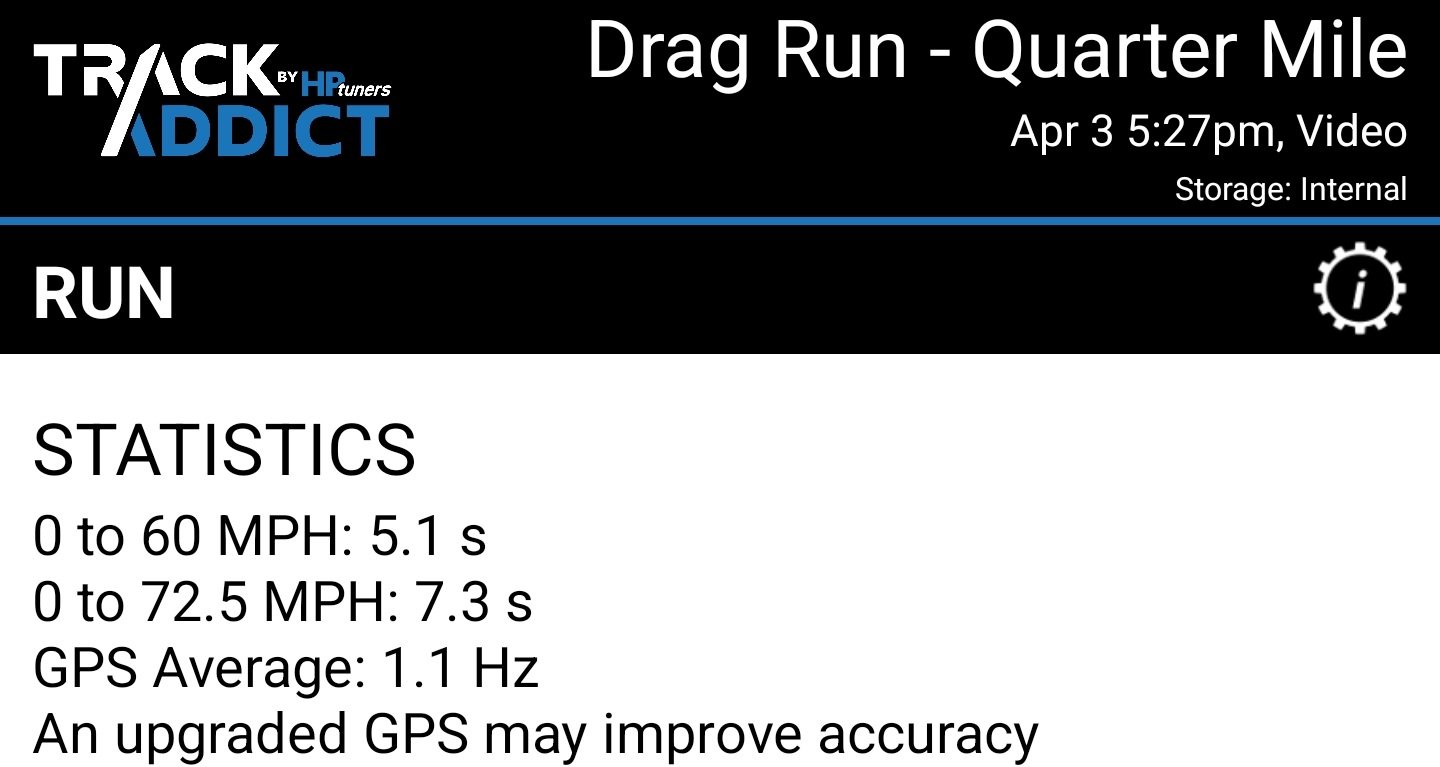
Remap time, how could I forget! This is out of order as I had this done a few months after buying the car. So, after much deliberation I went with a Revo Stage 1 on both the ECU and TCU mapped to run on 99 ron. Performance gains are night and day, although I have never had a dyno run we are definitely in the realm of 300+ bhp. Track Addict runs are reporting a very respectable 0-60 in give or take 5 seconds.

-
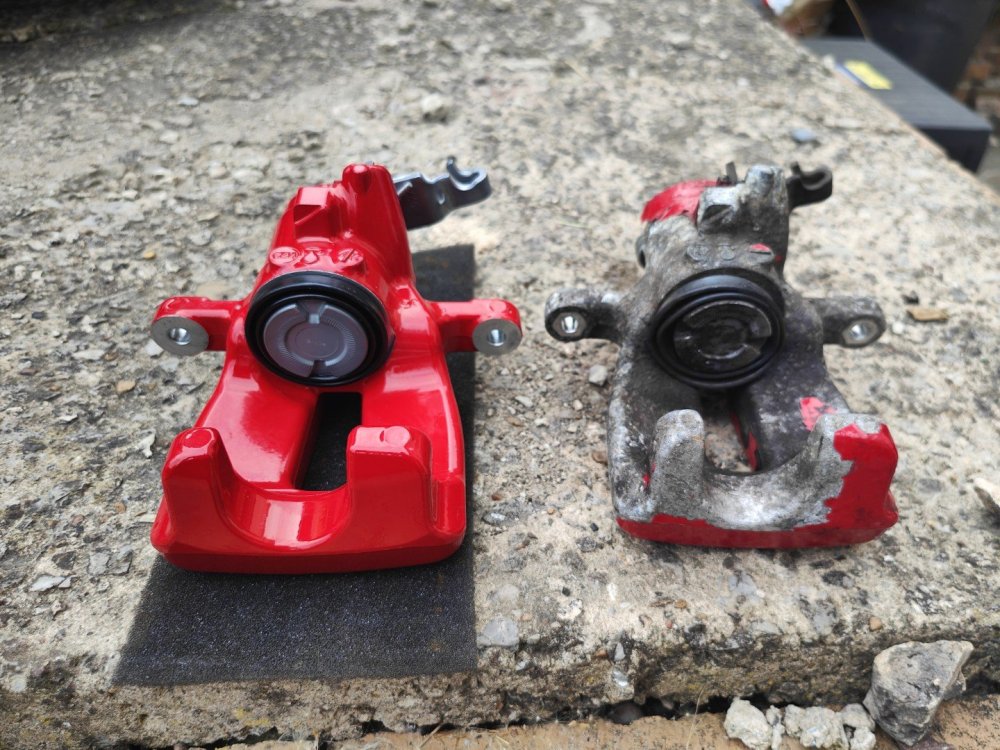
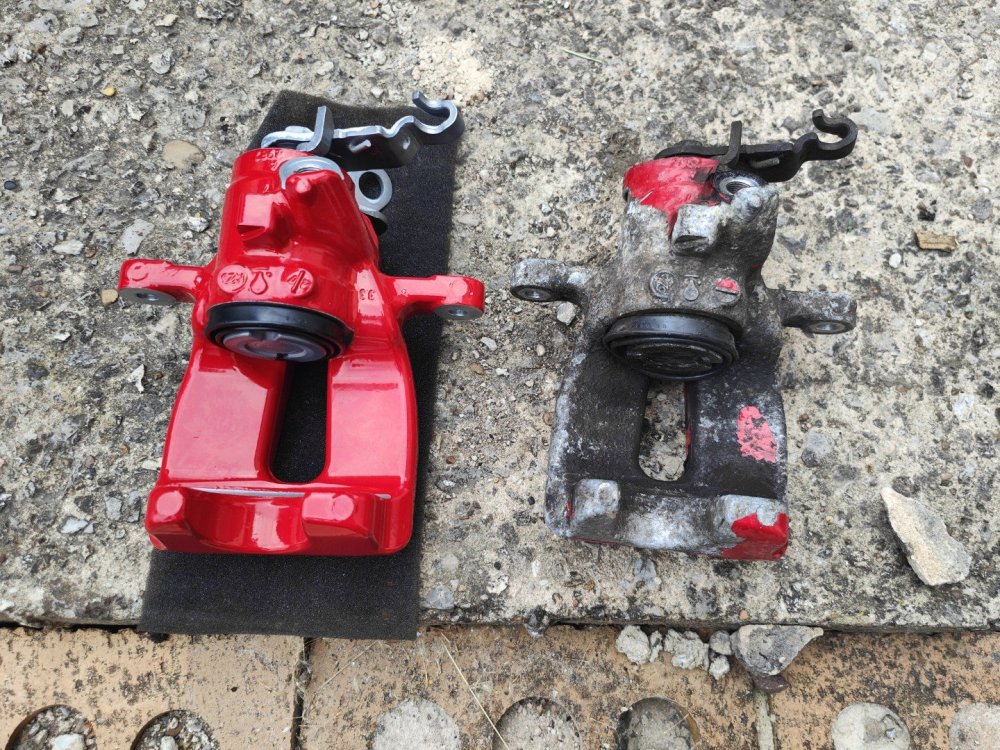
Next up are brakes! Well these where the bane of my life for a few months and I have only just sorted them out over the past few days. I wont go into too much details here as there is a whole topic on it here. I upgraded the standard discs and pads with this brake bundle from Awesome GTI. I also replaced my rear calipers as they were seized and in poor cosmetic condition. These were pretty pricey especially from Skoda directly, I ended up buying them from LLLParts for a lot less, although delivery took a few weeks.
.thumb.jpg.a1d79216071afb2c278e4e0ac6ca5d92.jpg)
-
Well MOT all passed fine and the garage couldn't find anything wrong, in fact they said I had done an excellent job on them. The brakes had started squeaking when driving again and when coming to a stop, so thought I'd have another try at resolving the issue. Before going I took the backs off AGAIN, fully cleaned all the grease off and instead of using the Bosch Superfit grease I had used before, I used Liqui Moly Anti squeal paste. I covered all contact point and applied a little to the back of the pads this time even though the install guide doesn't specify is required. On the way to and from the garage typically there was no sound and all seemed well. A week or so after they seemed better but not fully right still, so I took the fronts off and repeated the process of cleaning them up again and using the Liqui Moly paste on all contact points. Since then they have been spot on, not heard any squeaking and they seems to be operating as they should! I can still hear a slight whirring sound but I think this is just because of the J hooks, I have read on other forums that J hook discs can be noisier than smooth ones. So hopefully all is well from now on fingers crossed, thank you for everyone's input and advise it has been greatly appreciated.
-
I felt the same, they had plenty of tread left but couldn't get on with them when pushing the car. On paper there shouldn't be much difference, but I just didn't have the confidence you get with the PS4s. Thank you, even though its a small detail it does transform the look significantly, not bad for a couple of quid from China!
-
-
So when I finally got round to fitting my side skirts I came to realise that they now wouldn't fit due to the front mud flaps being in the way! I considered cutting the side skirts around the mud flaps but decided against this in case I messed it up. It was then a toss up between the 2 and as the side skirts were £100ish I went with those and cut my loses on the front mud flaps. Installation was a pain in the behind, I had to mark out where the sill jack points would fall and use a multitool cutter to cut enough clearance so I would be able to fit a jack puck or use jack stands in the future. Once I'd done this I applied a decent amount of Tiger Seal across the full length of the skirt where it would make contact with the underside of the car. I was careful not to use too much as I didn't want it to ooze out everywhere when compressed, which luckily it didn't. Now having never used tiger seal before I thought it would have a good initial grab, however the skirts were too heavy and gravity kept doing its thing and the slowly pulled away when I wasn't holding them. This is where I ran into another problem as the self tapping screws provided, weren't very self tapping! In the end I had to juggle holding the now Tiger Sealed side skirt to the car while I drilled 10 small pilot holes with a HSS drill bit. Finally got the screws in and that was that, obviously I learned my lesson and the other side was a breeze.
.thumb.jpg.51b27dd8b769e6cb4002574669a5681e.jpg)
-
Next up we have mudflaps. I am a bit of a clean freak when it comes to cars, as detailing is a hobby of mine, so I was getting annoyed with the dirt spray up the side of the car. I was deciding between OEM ones or something more aggressive looking like Rally Flaps. Decided on just the OEM ones for ease of fitment. Had to do some research as I don't this standard Octavia ones fit the VRS, so ordered these from eBay.
.thumb.jpg.5746d9313b9177465b167d84d86f771e.jpg.1e67262038288330af0f97c4cd3c7354.jpg)
-
-
-
I'm off work for a couple of weeks so will hopefully have time to post more soon. Enjoy America-land!
-
sirhc93 changed their profile photo
-
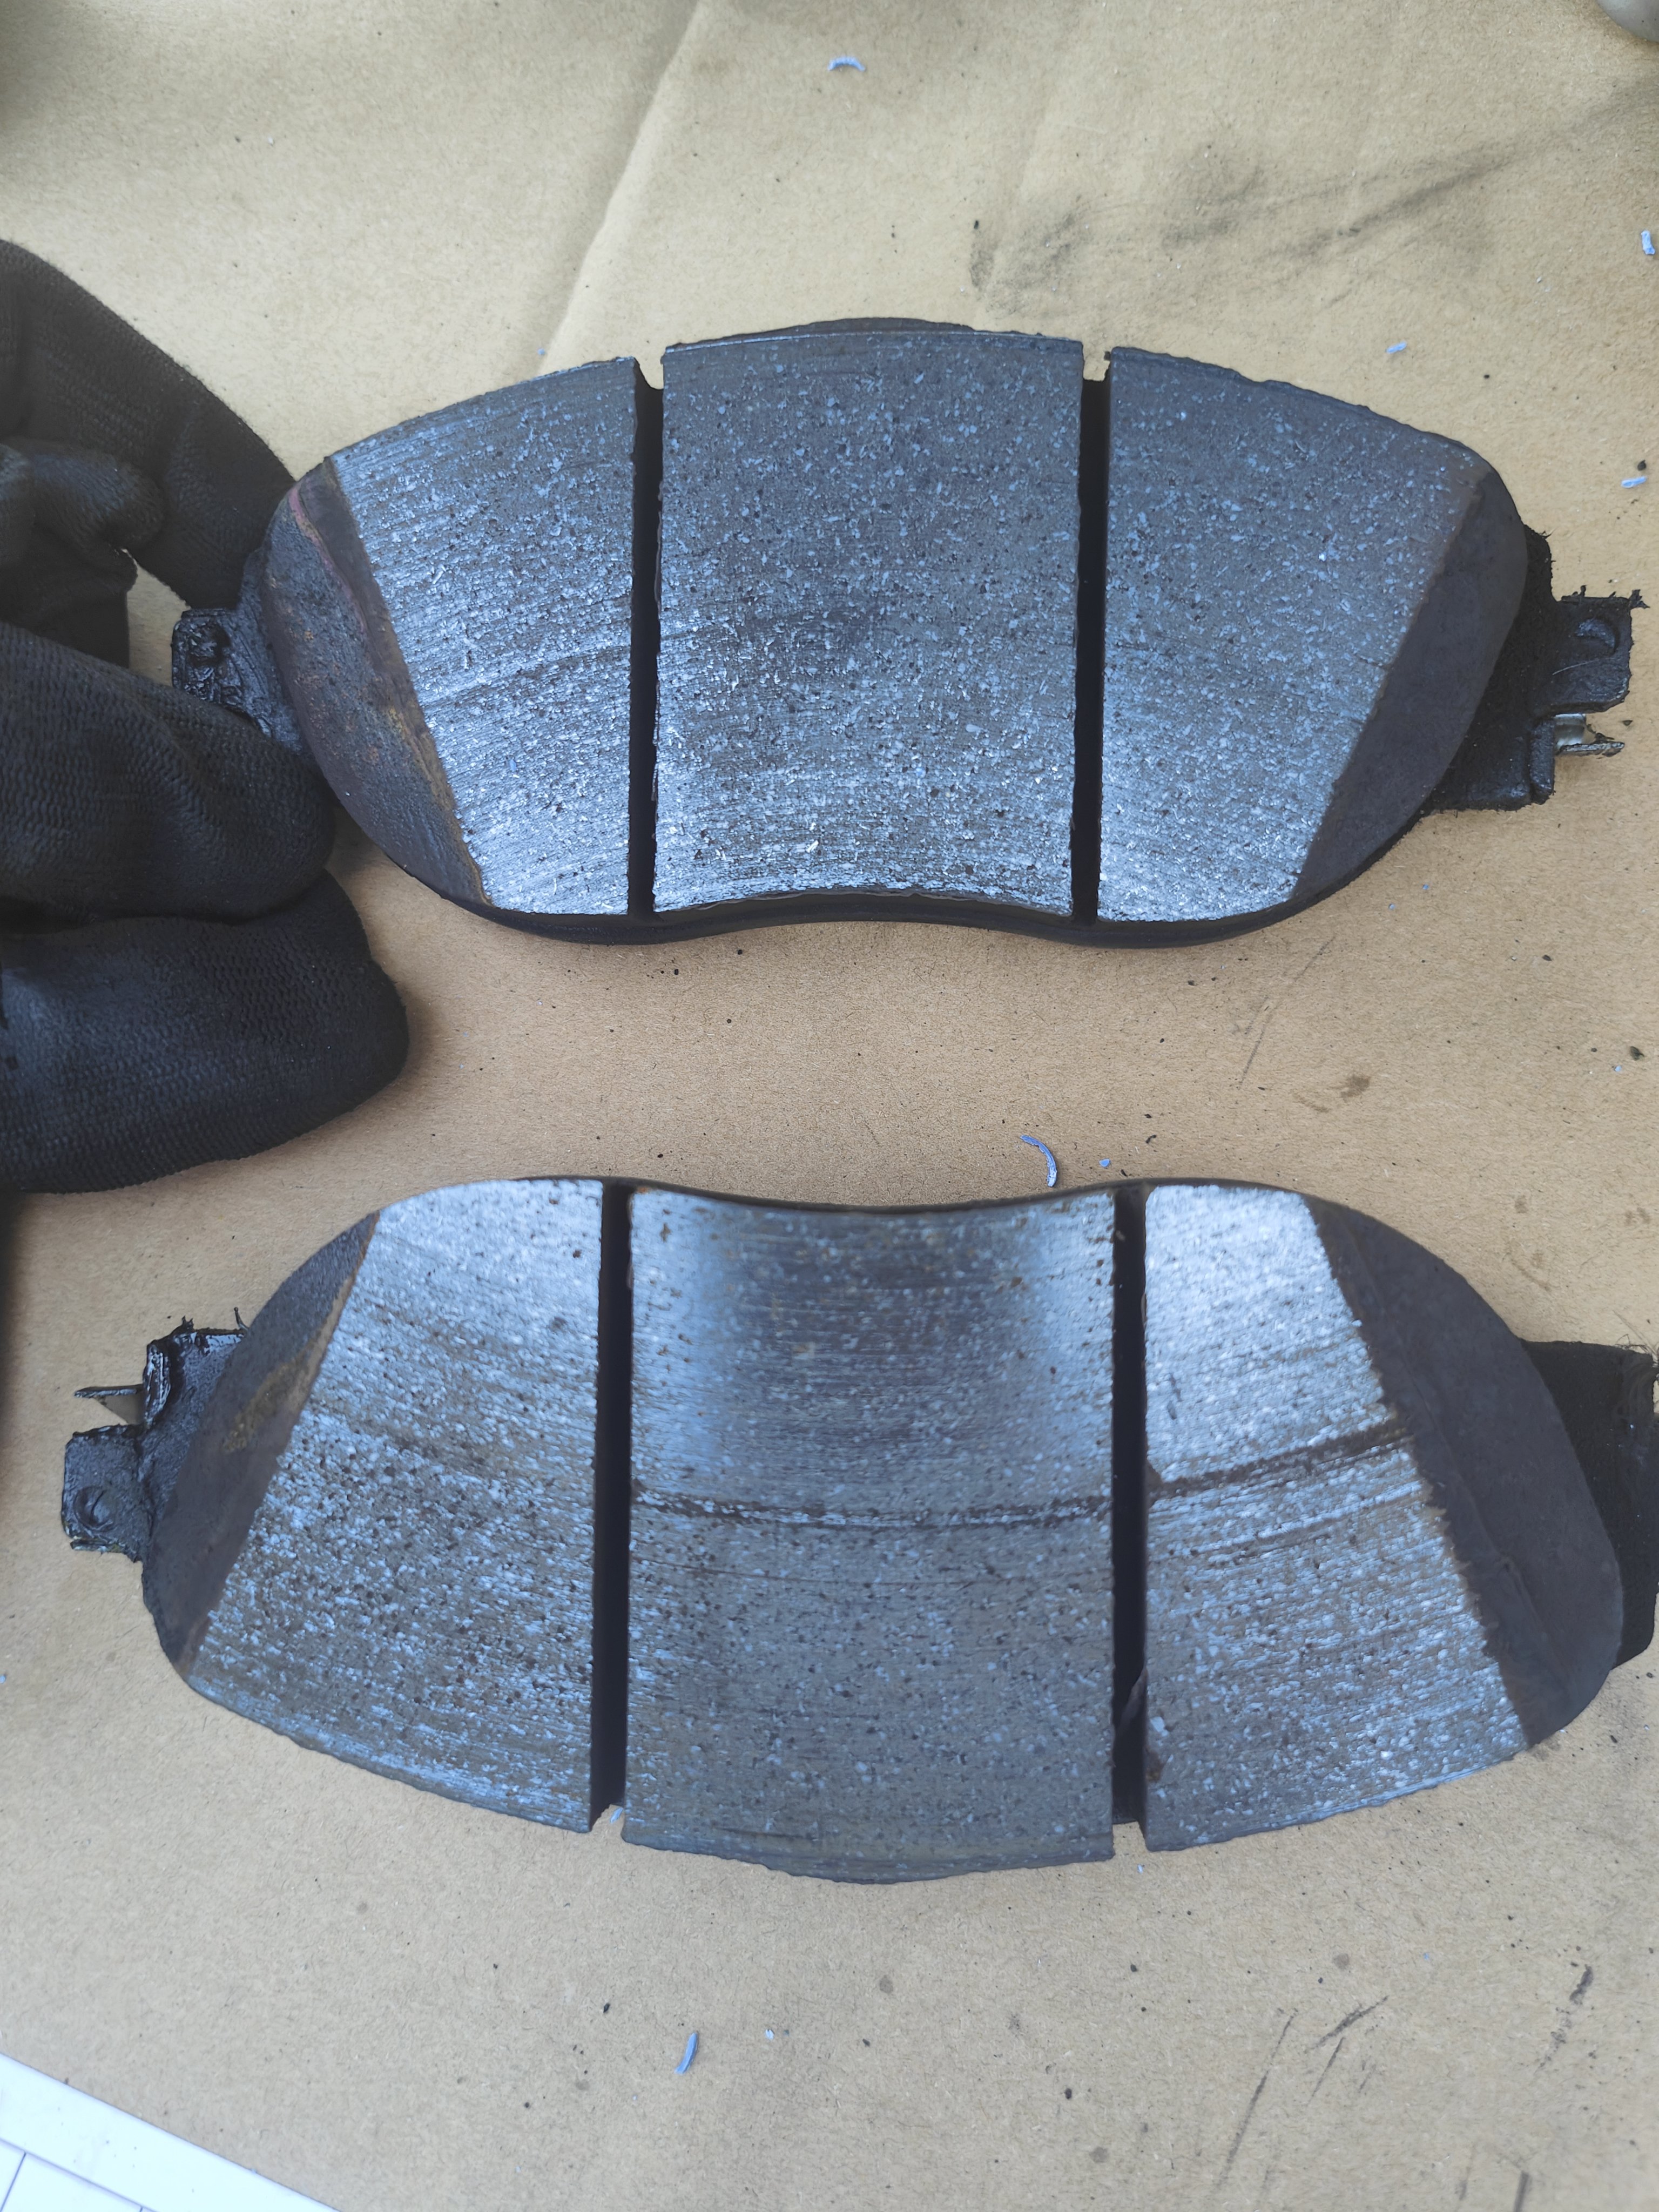
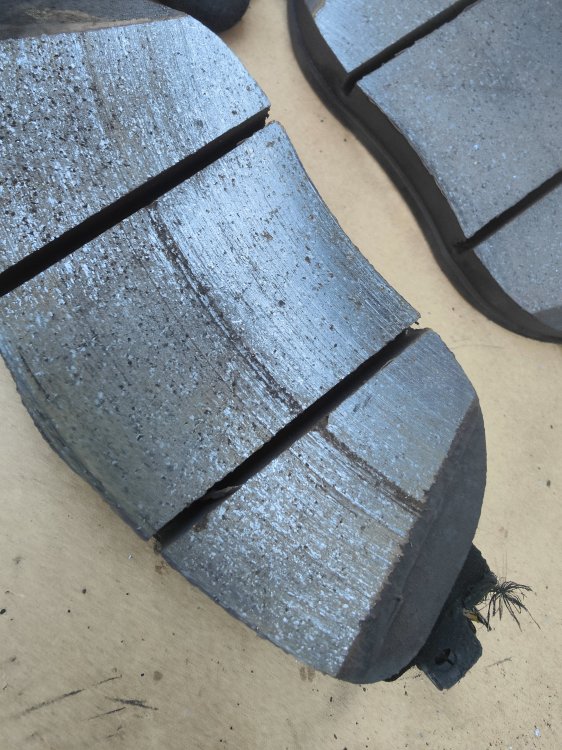
No issue with the brakes off, I think that was just the noise of my gloves when spinning the wheel! I currently have the front brakes off as I haven't revisited them yet since initially changing them. I think I have found a issue but not sure how or why it's happens. The front left outer pad has a large score mark in the centre of the pad. I don't understand what could have caused it as I couldn't see any trapped between the discs and pad?

-
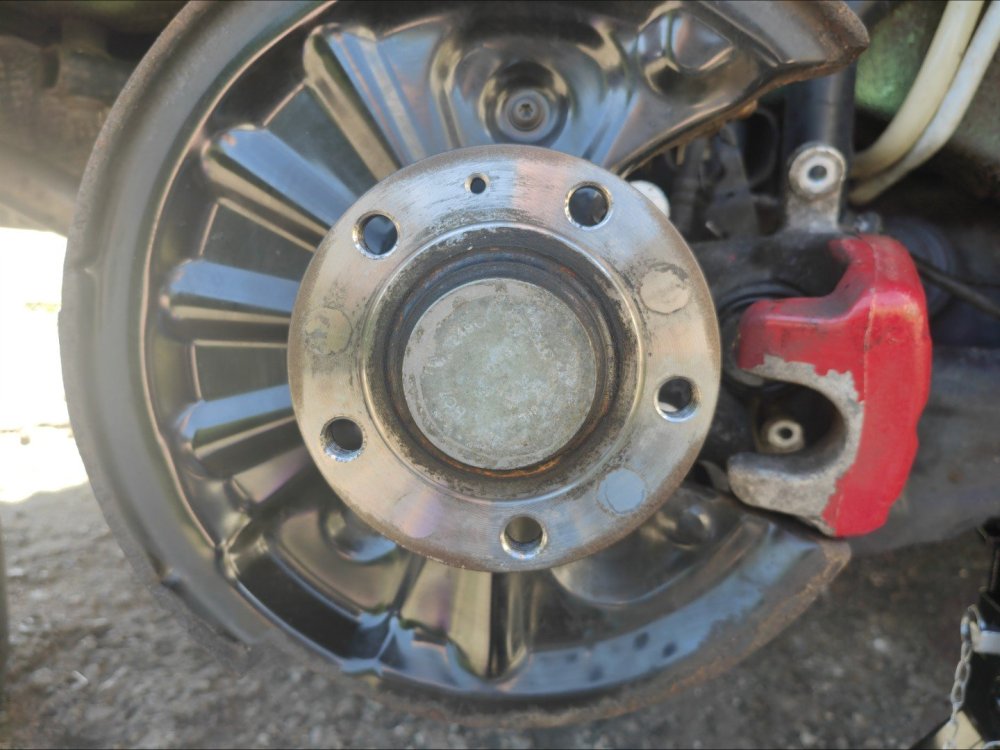
Update So I've been on a bit of a long winded journey with this and yet still I have more or less the same issue... Since last time I commented on here I have had the backs off again, bought a proper drill cleaner and got the hubs up like new. Fitted the brake again still catching and making noise! (So the issue is not the hubs) I took this as a push to just buy new callipers, which I did. Skoda dealership (Penistone Road Sheffield) wanted £390 for each rear calliper, even the guy on the parts desk was shocked. Shout out to him, I didn't catch his name but he was incredibly helpful and looked up the parts on online for me to find a better price, £250 each sounded a lot better. I bought all new bolts for the calliper carriers and callipers themselves while I was there. So 500 odd quid later and a couple of weeks wait the parts finally arrived and I set to work replacing both rears, which went pretty smoothly for once. After installing I bled the system with a pressure bleeder and all seemed well, but the pedal was a little spongy compared to before. Decided to bleed again as it was 100%, I'm glad I did as second time round I got loads more air out of the system and the pedal feel is so much better. So has all this blood, sweat, tears and a fair amount of cash solved my problem? No! Don't get me wrong I'm glad I have replaced them as they were in bad shape and they look so much better visually, However, they are still catching and making noise and have even started squeaking on random occasions when driving at low speeds but not applying the brakes. I am at a loss, I have literally tried everything I can think of, as well as everyone's suggestions. The car is due its MOT and service soon so while its at the garage I will get them to look at the brakes and see if there's anything they can do. After hub clean, brakes not installed. After calliper replacement.


.jpg.a7fa19fcaa859c31b22e462ada29ce75.jpg)

.jpg.9574de79b1436e033a4910bf6f4782ed.jpg)