Superbsport
Finding my way
-
Joined
-
Last visited
Everything posted by Superbsport
-
This is why I'm asking really as I thought the same. The guy at the garage assured me that if there was evidence of something such as a leak of fluid on to the clutch / flywheel assembly then they would honour it. However, I have to agree to the £450 to find out. It is driving me mad though as it makes it hard work to drive in traffic juddering all the time and is embarrassing when I have passengers. My wife has a Rapid Spaceback and I have no issues driving that, so at least I know its not my driving. Also I'm on my second Superb, other was a Mk2 manual with no such problem. So in conclusion either the first owner knackered it or there is a fault!
-
My 2018 1.4tsi Sportline 6 speed manual suffers from terrible clutch judder. I've had the car since it was 2 years old and 26K miles and it's now on 38K miles. It has done it on and off since purchase, but lately it does it more often than not. It used to do it when it was cold outside and for the first few set offs from a cold engine, but does it when warmed up now as well and whether it's cold or warm weather. I have the 'all in' service plan on the car so it has warranty on it. Has anyone else experienced this and had a dealer sort it out at Skoda's expense? My local dealer has said they'd strip it down for a cost of £450 and if there was some evidence of a fault they'd cover it, but didn't sound too hopeful in my favour and full cost is c. £1,500 for a new clutch (they would knock off the £450 from this cost). Look forward to any comments.
-
Thanks, I've had a quick look and it mentions wear indicator not available on these pads. I assume my current ones have a wear indicator, but I don't know for sure.
-
Hi all, my rear discs and pads need replacing, quite worn pads and discs in the usual terrible shape of scoring and rust. Currently on original factory ones at 4 years old and 37K miles. What have people put on if not going with standard OEM ones. Mines is a 1 4 tsi Sportline estate 6 speed manual. I'd like low dust and good quiet brakes. Dealer quoting £338 for fitting OEM. Thoughts and help appreciated.
-
Hi, mine doesn't have the electric tailgate I'm afraid, so I didn't encounter a problem. Seems strange though that this would cause a problem. I presume you have concealed your cable in the conduits? Could it be something snagging somewhere from the install which stops it shutting perhaps trapped in the boot trim or the switch when you clipped it back?
-
Thanks for the reply, I don't have a sunroof. Sorry, I should have mentioned that in my original post.
-
Hi, I have a 2018 Superb Sportline estate which has developed a roof rattle in the last 6 months. I initially thought it was my glasses in the holder and so thinking that was it I just put up with it, thinking I would line it at some point to stop it rattling. Took them out on a journey one day and it carried on and now it drives me up the wall as I hate any kind of rattle especially one I can't locate! Any ideas? I did fit a new dashcam in April with front and rear cameras, but didn't particularly do much roof lining wise other than tuck wires under edge, so I don't believe it's that.
-
Hi Thanks and sorry you're having problems. I connected all cables to test before installation and then simply plugged in post installation and it all worked. Possibly the main front camera is faulty, as it should be plug and play. Maybe see if you can get a new front camera under warranty. Or does anyone on here live local to you with same camera that could test to prove issue? Let me know if you need to anything else from me and if I think of anything I'll let you know.
-
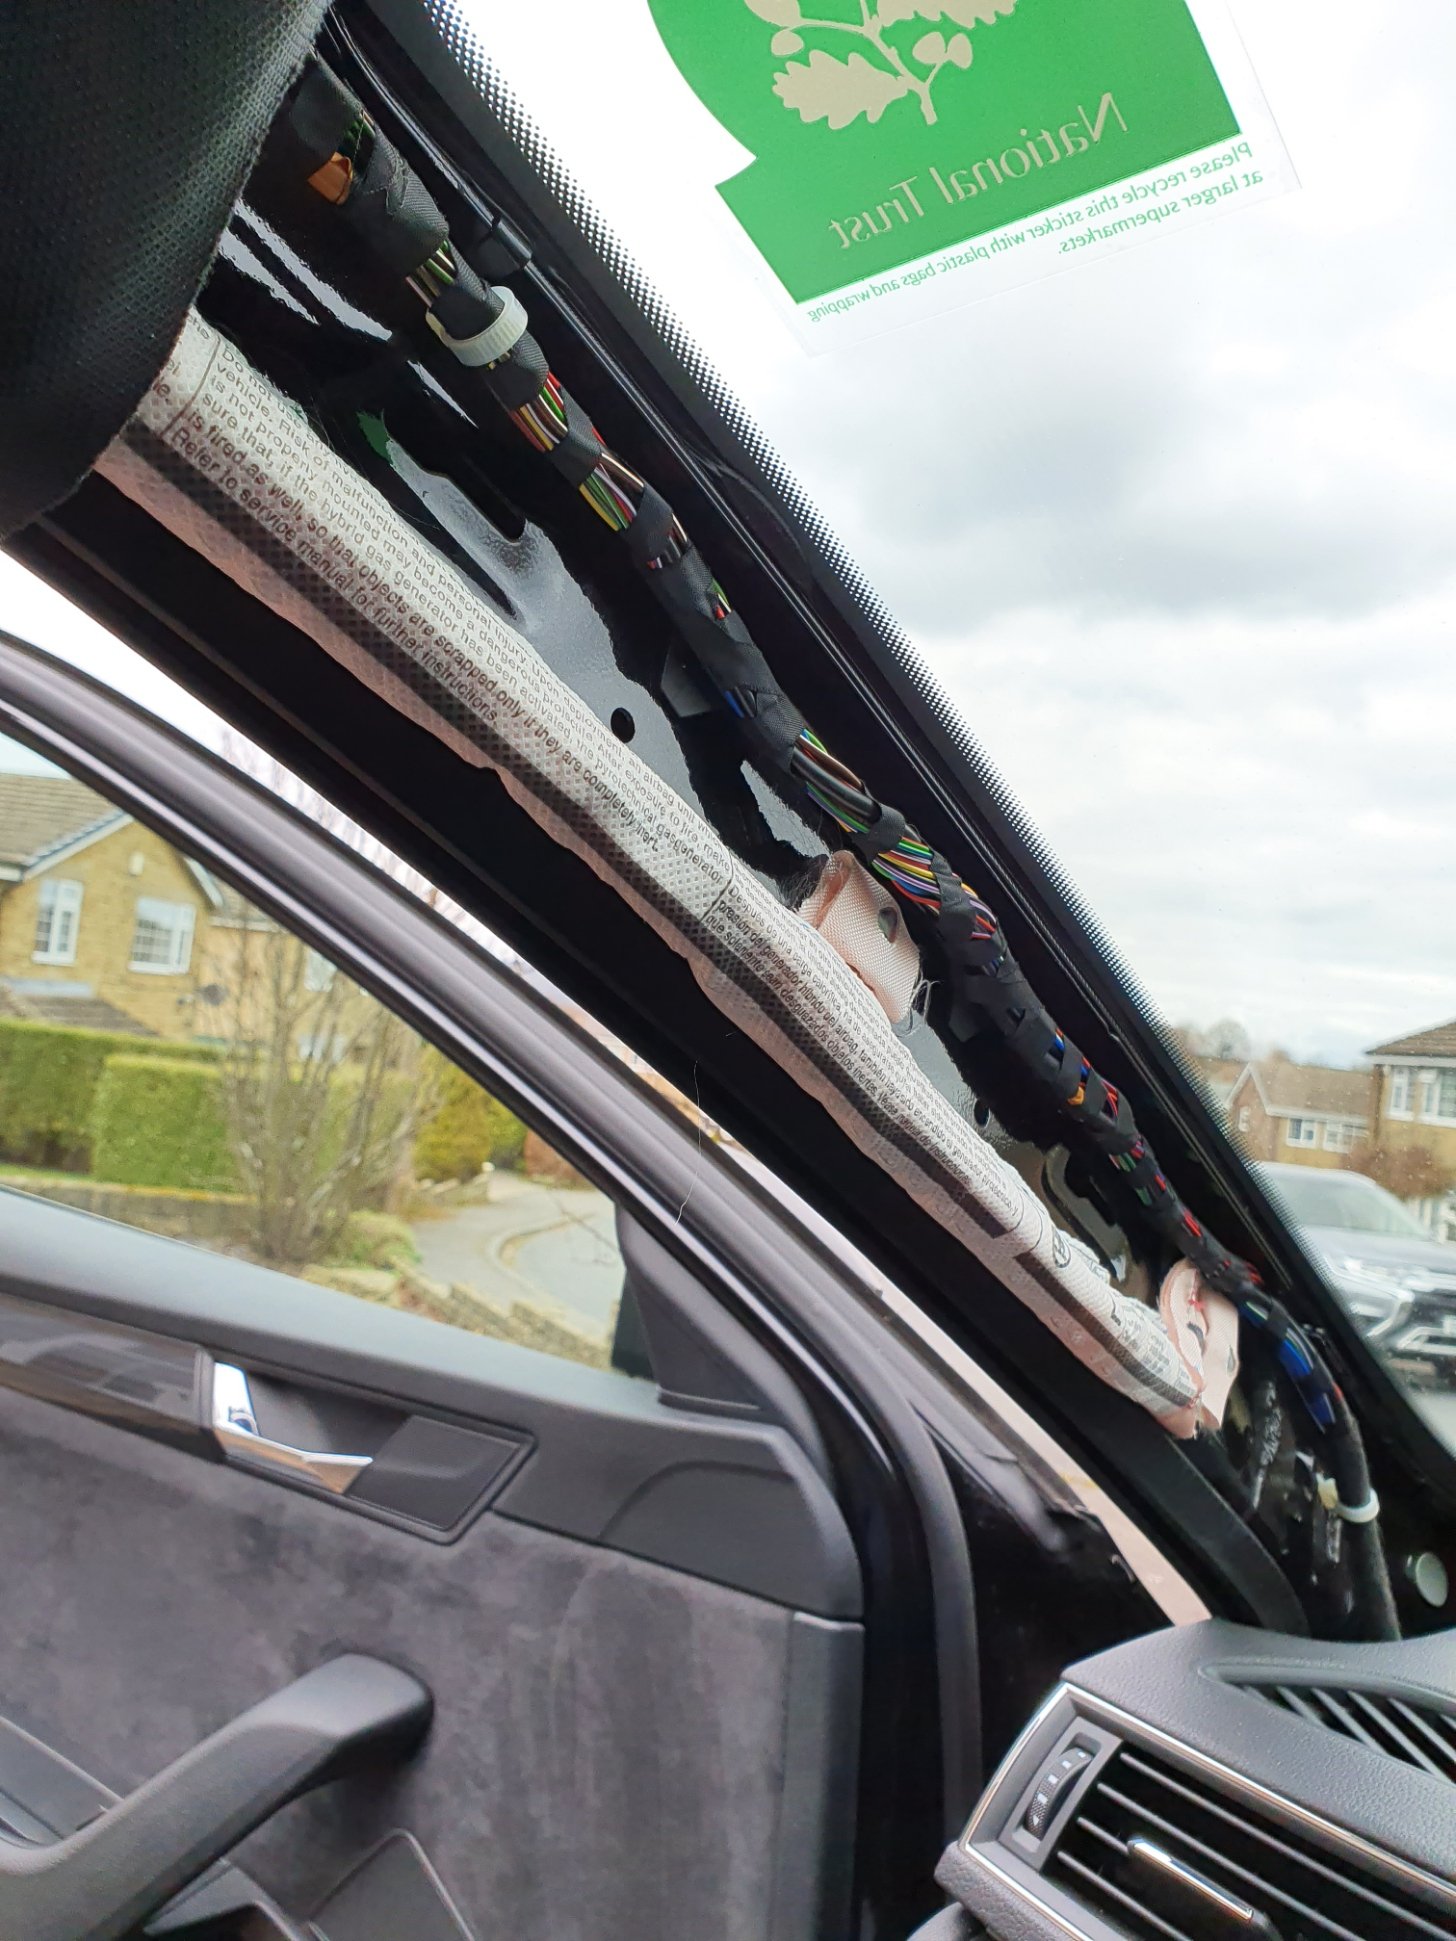
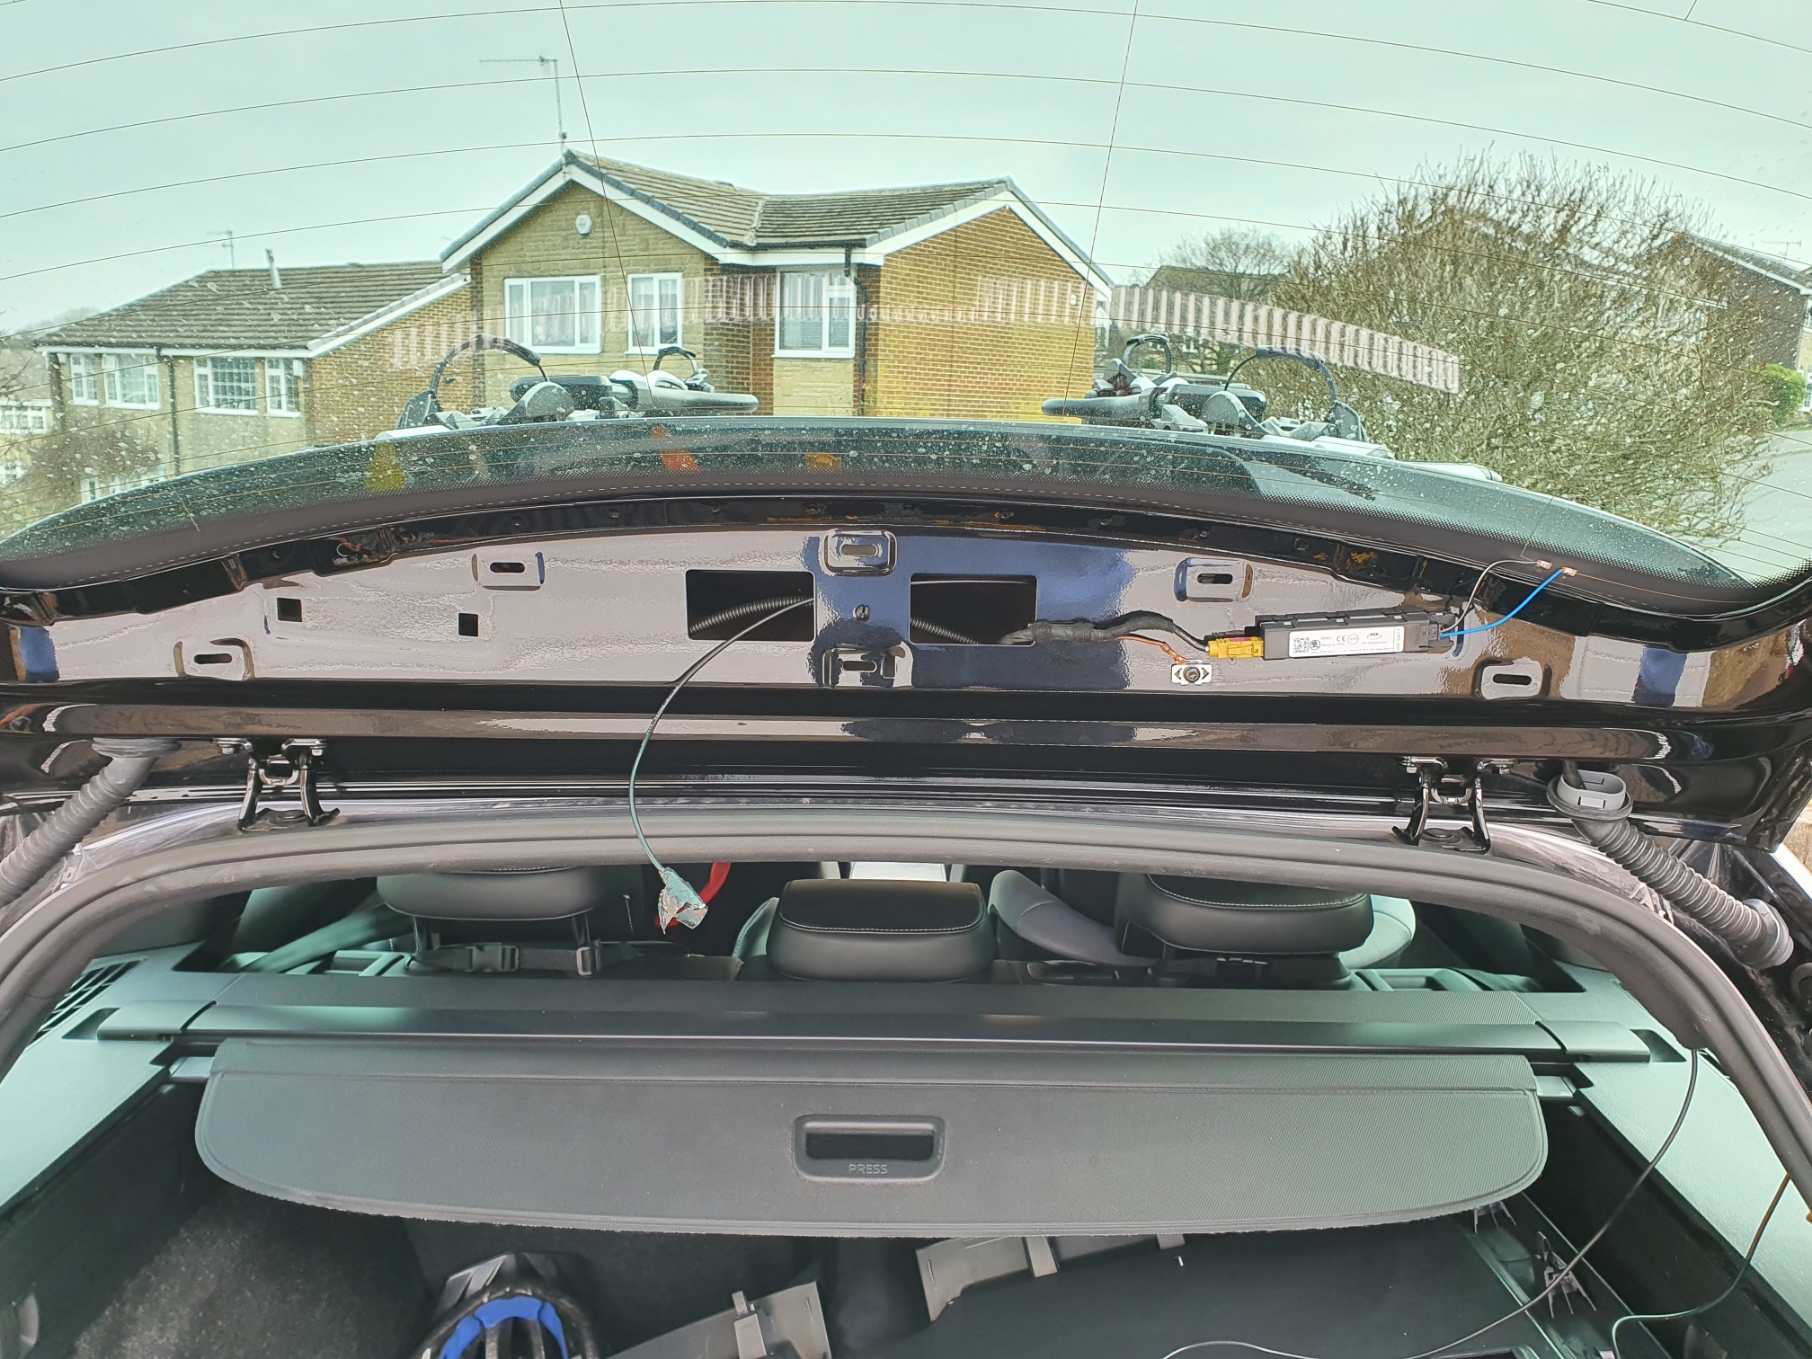
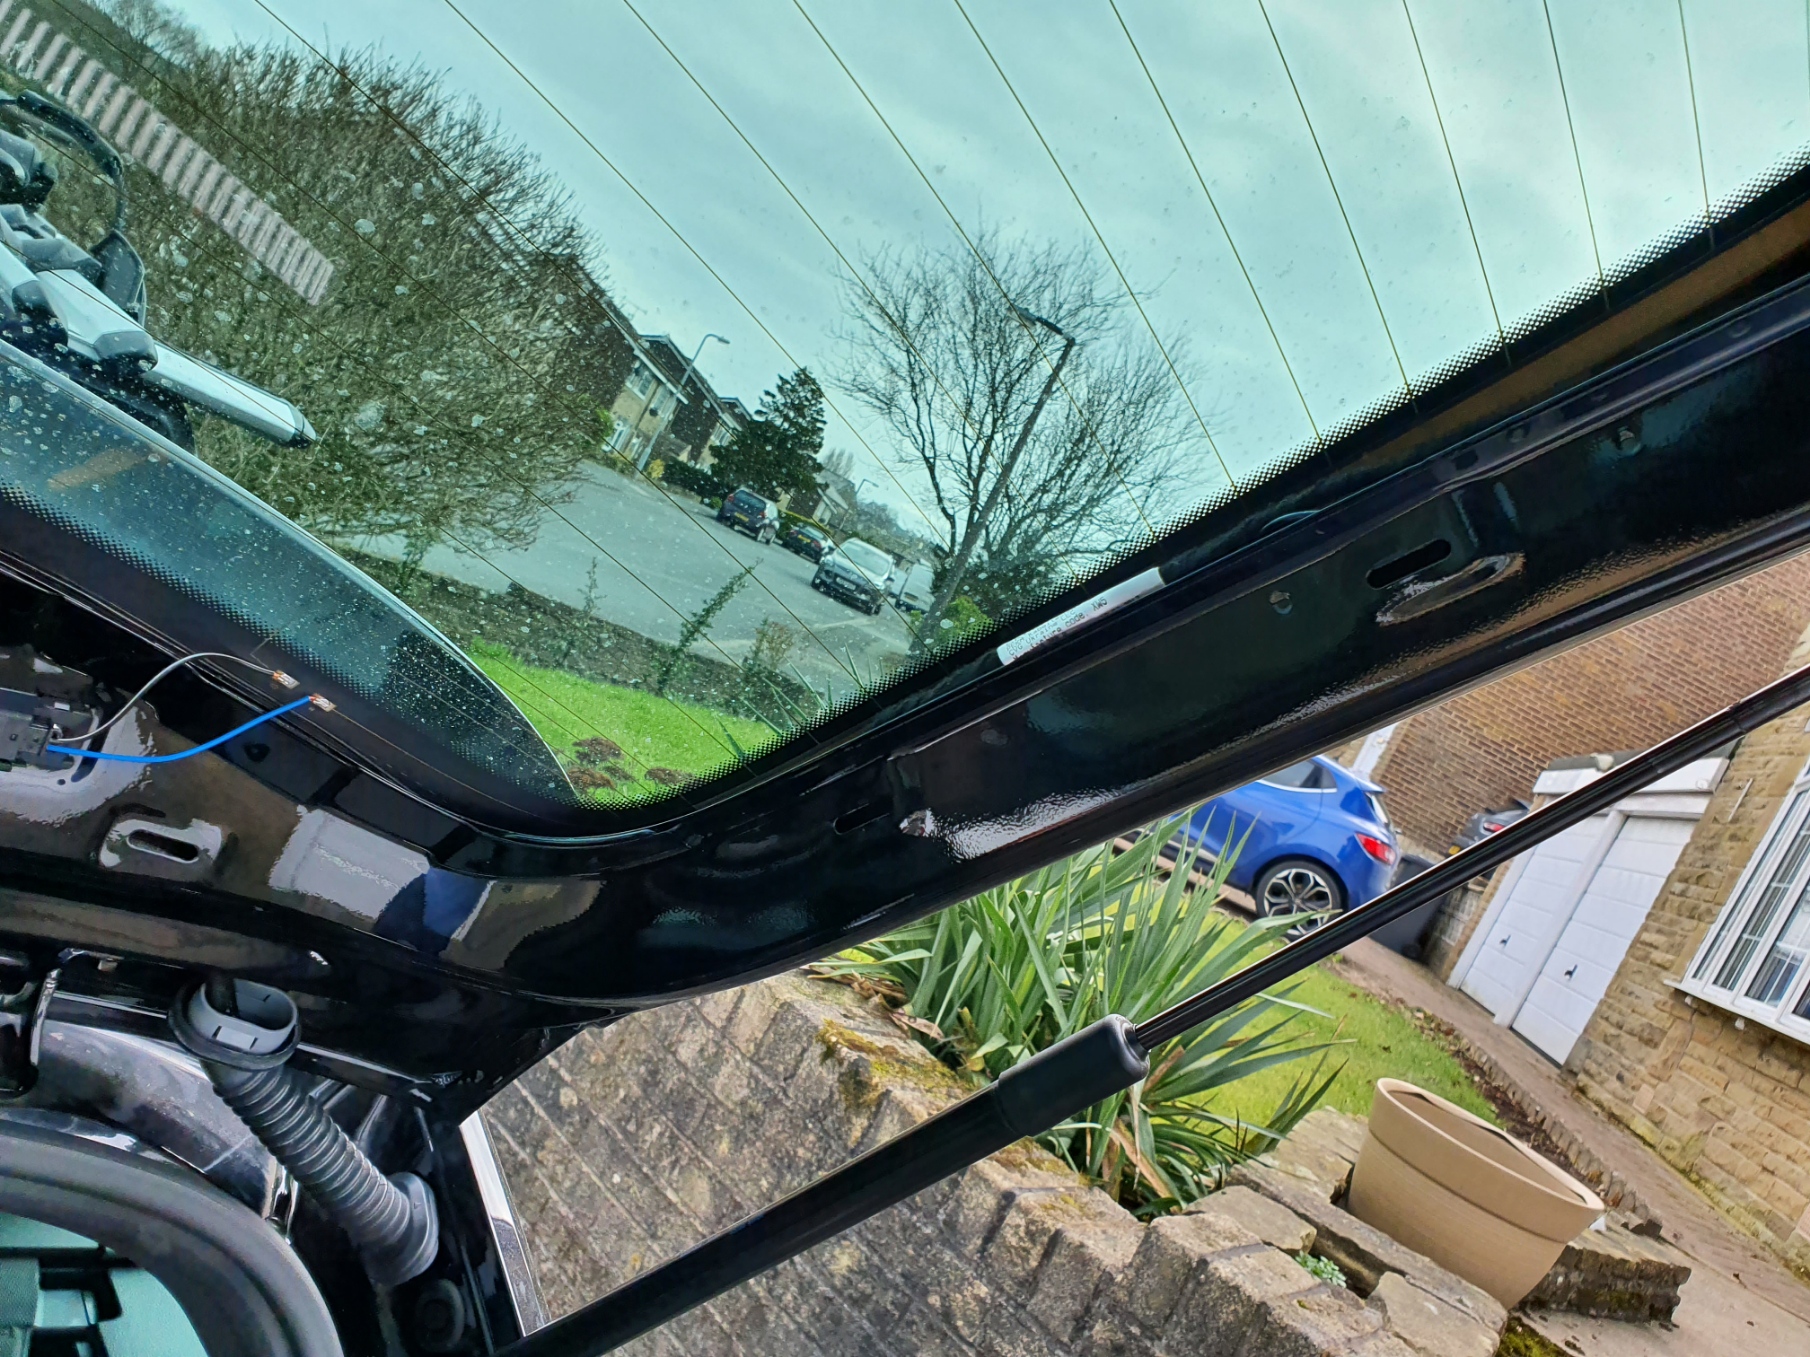
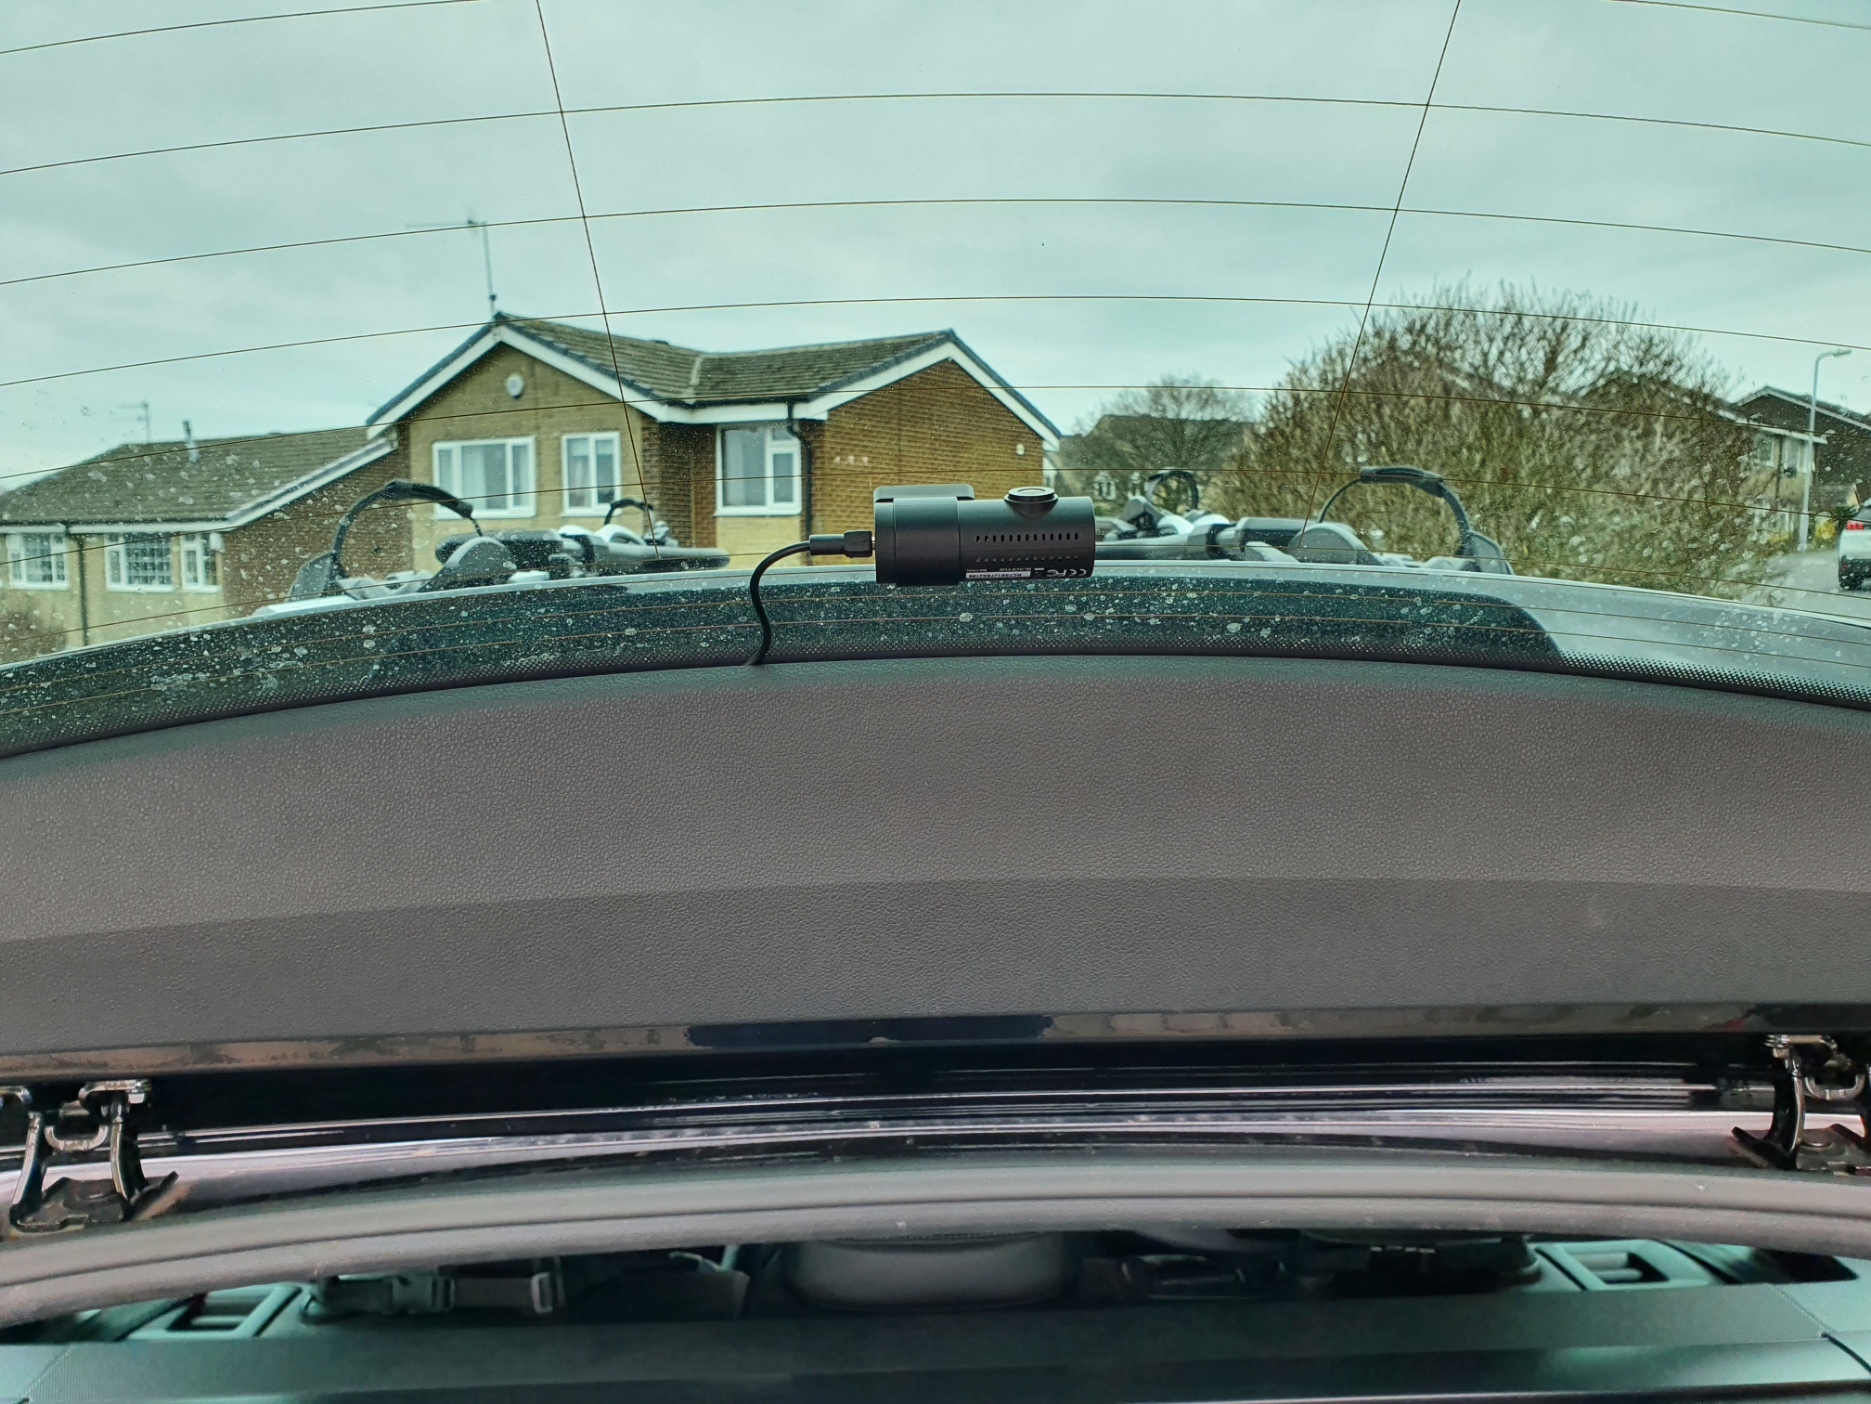
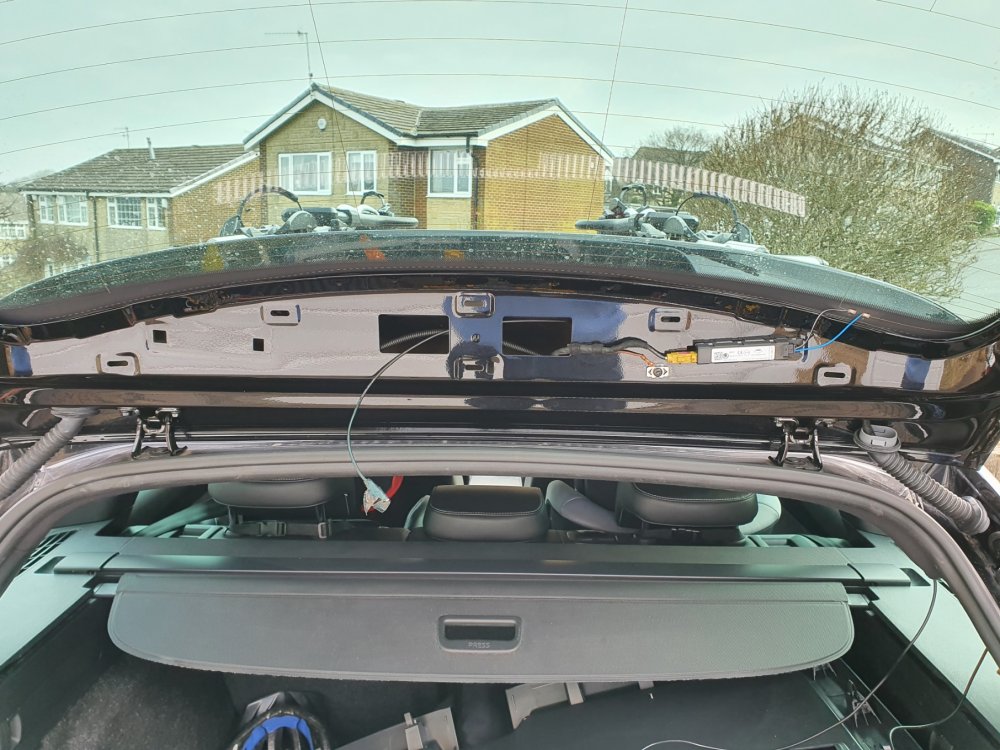
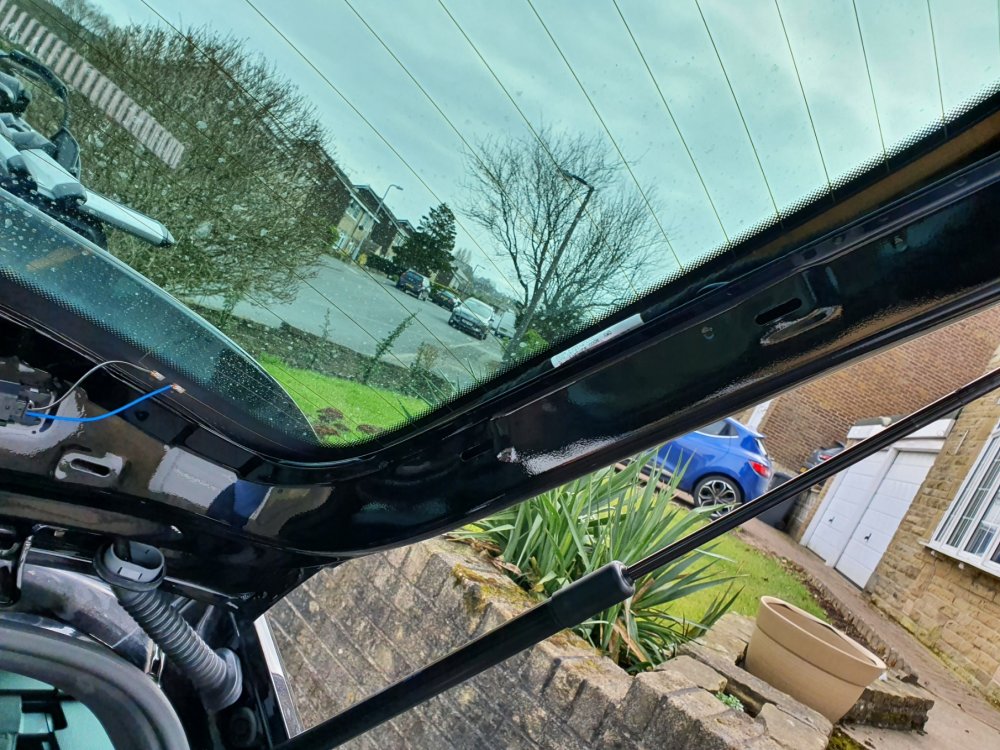
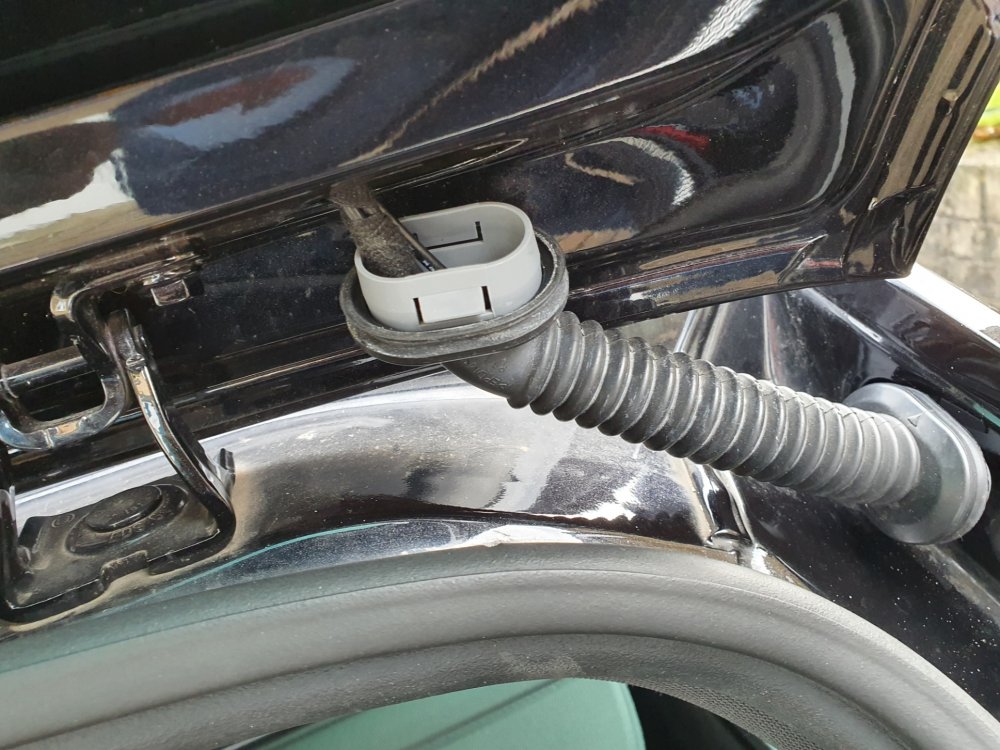
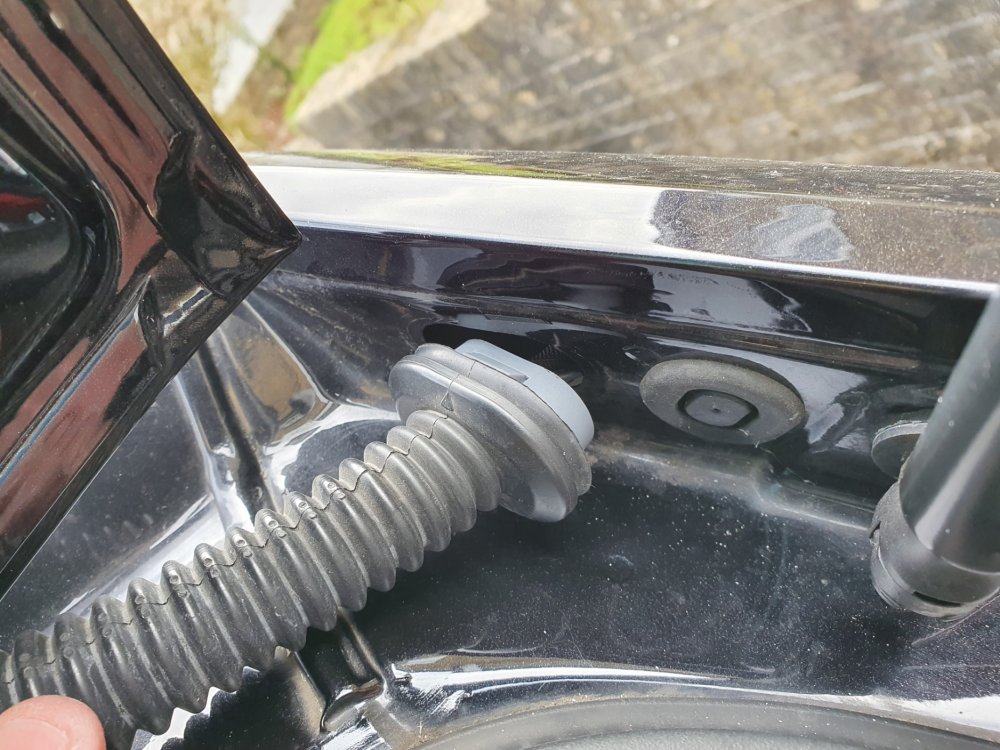
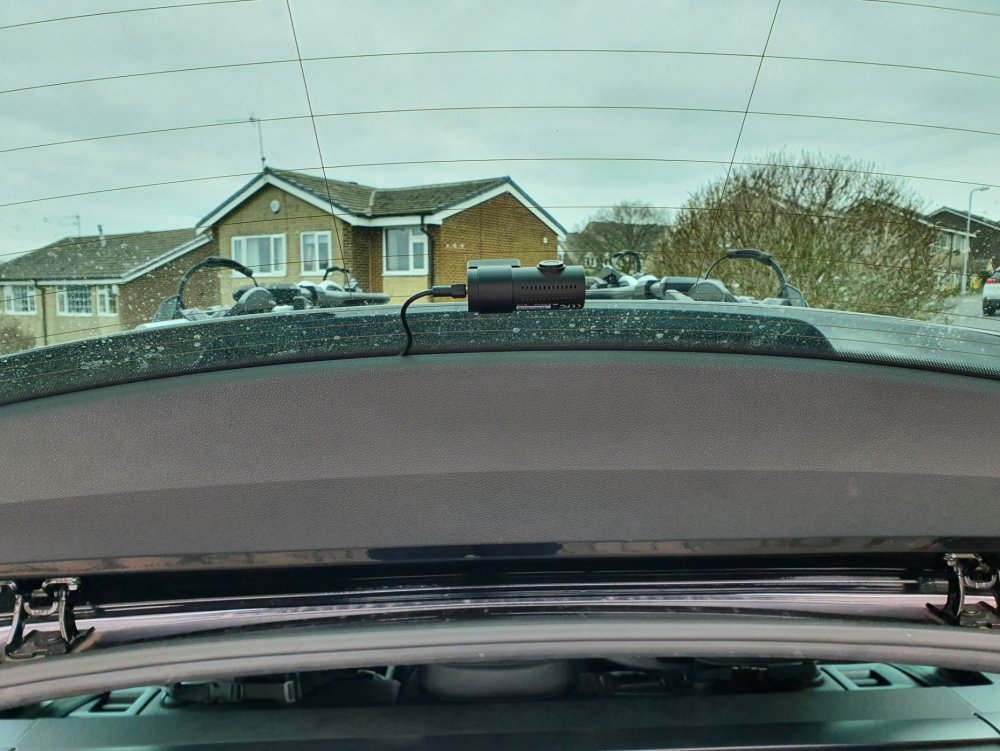
I have just installed a Blackvue DR-750s 2ch dashcam in my 2018 Superb Sportline estate (combi) and I wanted to share my experience of installing this dashcam should anyone else be considering installing a 2ch dashcam. I would also like to link back to @RoyF280 who did a post back in 2017 and I referred to his post a lot during my install, but I also referred to various videos and posts all over the internet and this forum for tips and pointers, which helped my install, which I did slightly differently, so thought I'd put my notes up here in case they help fill in any blanks etc. I haven’t got pictures of all of it, but have included some and can hopefully explain what I did enough to assist. First of all invest in some trim tools, you’ll need them to avoid damage to your trim. I bought some several years ago for a few pounds off ebay and they worked fine. Secondly a set of narrow cable rods, which can be had off Amazon / ebay for c£10-£20. Thirdly, set aside plenty of time, in my case due to having small children and limited spare time, I ended up doing this piecemeal over a week in total as and when I could spare a bit of time and when the weather was dry and I had daylight. I will point out the front install is a cinch and was done the first day I started in under half an hour, it’s the back that is the time consuming piece and as I had to build in research time and physically looking at the car to work out my plan of attack for the job, that coupled with kids and a full time job is why it took so long for me! Firstly, don’t be afraid of removing your trim! I was and wasted time trying to avoid it initially. All clips on the trim I removed were metal and none broke. They were a lot easier to work with than the plastic ones I’ve encountered in the past on other cars. Start with your A-pillar trim (the piece running down the edge of the windscreen) and I used the passenger side. Gently pull it away from the top where it meets the roof lining, there are two clips, the top one came out easily and then with a bit of gentle pulling and wiggling the trim, slightly pulling upwards, the second one went with a ‘ping’ and I could then, with a bit more wiggling and pulling up and away from the dash, free the bottom of the trim. The bottom hooks in behind a metal clip fixed to the underside of the dash. You then have the following exposed: You can now see the airbag, which you want to route your cable behind where you can see the manufacturer cables bundled together, when I had installed the power cable for the dashcam I cable tied it to these cables. Next pop the side trim off your dashboard, so you can get to pull the cable through from above. Just use a smooth flat trim tool in the middle and gently tease it out. It has around 6 clips from memory and it hooks under the door seal and has a hook moulded on the bottom vertical edge to hold it behind the lower footwell trim, remember this when putting back as you need to hook this in first then put it behind the rubber and then push it back in the clip holes. Most pictures I’ve seen show some foam wadding at the bottom of the A-pillar, mine didn’t have any (perhaps they were rushing to build it on a Friday teatime!), so the cable could be easily dropped through from the top of the A-pillar above the dash, if you have foam I believe you just have to poke it through as the other cables go through it. Make sure to leave enough cable to go up the A-pillar and across the top of your windscreen to where you wish to mount the dashcam. I have not hardwired mine (as of yet), but if hardwiring I understand the fuse box is behind the glovebox, so you have your cable in the right place now and can just take it from there. For me I carried on from here with the cable, I took the plug end out over the lower footwell trim near the door and then looped and tucked the cable back behind and under it into the footwell (difficult to explain, but you’ll hopefully see what I mean) and ran it under the inner lower door trim and then under the back edge of the carpet mat / storage unit trim under passenger seat and I currently plug in to the cigarette lighter in the dash. That’s your power cabling done and you just tuck the cable under the headlining across the top of the windscreen. So your cable should now run from wherever you want to mount it in the top of the windscreen across the edge of your headliner and down the A-pillar, all above and out of the way of the airbag. Next, the fun really begins! It’s now the time to get your rear cable through to the rear! I chose to run the rear cabling through the headliner. Leaving the front A-pillar trim off, go to the back of the car and pull off the D-pillar trim, being the last plastic trim on the left in your boot by the back window (see picture). To pull this off I wiggled it from hooking my fingers behind it at the top near the window, by where it meets the roof liner and my other hand on the edge by the boot seal. There are four clips and the panel slides forwards towards the back seat. In my case it suddenly broke free and flew out of my hands and in to the boot! No damage was done. Next gently pull the headliner down in the corner by where the boot seal runs round. Then, grab your thin cable rods and feed them gently into the headliner, the aim here being to run it down to the A-pillar at the front. Your curtain airbag resides in the edge of the headling running over the doors, so gently push the rods and twist whilst pushing to avoid snagging on anything, and try to get them to go level and slightly down to keep them under the airbag. At this point I pushed mine enough to get it to the middle of the back door and I gently peeled the rubber seal back on the back door and pulled the edge of the headliner down so I could see the rod and the airbag above and with my fingers, I pulled the rod a little to ensure it was running smoothly and passing under the airbag. I pushed a bit more from the boot end and then repeated again on the front door, but as the A-pillar trim is off, the headlining is easy enough to pull down at the front over the door and you can see your rod and the airbag above. Once you have the rods through, tape your cable to the rods and gently pull it back through from the boot. Now you have your cable hanging into your boot, but you don’t want any issues with the airbag. From here I spent quite a bit of time pulling the cable taught by wedging it at one end (front or back) and then pulling it up and across towards the drivers side and then repeated at the other end. The aim here was so I could get the cable into the headlining as much as possible and out of the way of the airbag. So at the front half, it is up near the back of the grab handle and comes over the middle of my windscreen and at the back it routes the same near the grab handle and goes across to the opposite corner of the roof on the drivers side. I have a little bit showing if I look in the headliner between the front and back doors, but it’s taught and away from the airbag, which will shoot straight down if triggered and making the cable be effectively behind it. I will stress here I am happy that my airbag will work, but you must be happy yourself with this set up, the key is to ensure nothing runs over the airbag or in the way of its deployment in an accident. Alternatives to running it this way will be all at floor level from front end to back, but in my case the cable wasn’t long enough and you can’t really avoid cable poking out somewhere on show, so it’s not a neat install, but safety is the primary concern here, so ensure you are comfortable. From here and sadly, the whole of the inside boot trim needs to come off, unless you are happy to have a dangle on your cable! Whilst this is daunting, it’s actually straightforward and I even priced up new panels should I have damaged any in the removal, around £60 for the bottom and £40 for the bit round the rear window (eBay, but genuine new parts). Not a cost you want, but not the end of the world. Anyway, I didn’t break anything and doubt you would as long as being careful. Starting at the lower boot trim, the bit with the boot lights and if applicable electric tailgate switch or pull handle if no electric tailgate. Pop out the lights and switch (I don’t have an electric tailgate so no switch for me) and if like me you have the rubber pull handle, unscrew this (note: need a torx screw driver). Then starting from the middle by the boot lock part gently pull and the edge ones will start popping loose. Work your way around the edges. The very edge corner one near where the trim meets the angle of the window is hard and needs a lot of force with your trim tool, but once this pops you find the rest will just come, with the exception of the opposite corner one. This just needs a little tug and the whole panel then comes downwards, as you’ll see it hooks into the upper tailgate trim that runs round the window. Having removed the lower part, move on to the upper part. There are two torx screws one each side to remove then again working from the sides, ease out one side at a time, there’s two clips (see picture) and when you have them unclipped on both sides (they are stiff and take some pressure to ‘pop’), I started along the bottom edge against the metal (not the glass edge as I didn’t want to slip on that edge and damage the heater elements). Again force is needed, but they will come and eventually with a wiggle this panel comes free and you see the following: Now what you need to do is get the cable up to that section via the rubber conduit either side of tailgate. I chose the drivers side as a lot less cables in that side, as the passenger side has the rear washer hose as well as cables, so that side is very full. You will need to pull off the opposite D-pillar trim to gain access to the driver’s side and then some more fun begins! You then need to pop the rubber conduit off at both points, just push each end in the middle whilst wiggling and they will come off from the body and tailgate. You then have it like this: Then with a long cable tie (or similar) try to route it through from the bodywork end of where the rubber conduit fitted first going down in to the D-pillar, then tape your cable and pull it through. Then you need to get the cable through the rubber conduit, I chose to massage it through as I couldn’t get a cable tie or anything else down as it kept fouling on the rubber. Some videos I watched suggested silicone spray to act as a lubricant, I didn’t have any! Once through here you just use another long cable tie to get it into the tailgate and across to where you want it. On the picture below you can see I have it hanging out of the middle hole: I later changed my mind and moved it over to the left of the two smaller square holes on the left side (the equivalent holes for whatever is mounted on the drivers side, being the heater element control unit I think). From this hole it is a lesser distance for the cable to poke out under the trim and allows the cable to be fed under the trim edge when clipped back on and the trim doesn’t bulge, which I thought it might if I brought it straight out of the middle as the trim clips are close to that. I taped the cable to the washer hose in the middle to secure it. Following this, I clipped the trim back on (bit of a faff, you’ll find a way) I did one side then a slight clip in the middle, followed by the other side, which kind of wiggled in to place, then fully clip the middle and put screws back in. Then slot your lower tailgate trim back on, which glides nicely in to place, remembering it hooks into the upper trim and to poke your lights and tailgate button through (where fitted) and just clip the remaining bits back in and screw in your grab handle and secure your lights and tailgate switch (if fitted). Finally remember to push your rubber conduit back on to the tailgate and body, secure your cable excess possibly in the D-pillar (mines in the roof lining) and clip your D-pillar trims back on and you’re done! Well you then need to position your front camera (if not already done) and rear camera and plug it in. My rear one looks like this and is just within the top of the wiper area: Finally, I can confirm that I have not suffered any interference with the DAB, a problem I know many seem to have with other dashcams. I understand Blackvue cables are quite well shielded, but this is something to be mindful of maybe testing to make sure you are happy before proceeding. Hope this helps and happy to answer any questions if I missed anything or didn't clarify very well.

-
Looking at RoyF280's pictures, it's the four clips along the back edge, but the wiper area part of the trim that won't come off. I will try as you suggest (when I next get a spare hour or so to mess with it) and unclip to bits I get to and then give it some more force, I reckon if I can get one free the rest will just follow. Out of interest which side did you run your rear cabling down, just wondering re the interference as I could run down the passenger side and then across (if I have enough cable) in case you went on the drivers side or is it the camera rather than the cable that's the issue? Also, which camera did you have as I heard the Blackvue ones aren't too bad for interference.
-
Hi clarksonline, thanks for your reply. I have read a few instances about the DAB, so I really hope after the hassle I have had so far, that it doesn't interfere. Perhaps I will plug it in for a few minutes before I finalise the install to see, as that would really annoy me if I do have issues with DAB. I had been looking at the post from RoyF280, but I just can't figure out how to get the trim off, I can see the clips, but mine just won't budge. I guess I just need more force perhaps, but it's hard to get in the gaps I do open up and there seems to be a lot going on behind that panel, so I really don't want to got poking a trim tool through and guessing I'm in the right area. On top of this, the rubber boot through which I need to pull the cable is full on the left (as RoyF280 alluded to in his post), so the right may be better, but then that means I will need to pull the other A pillar trim off and feed from there through, which is yet more potential issues if it's not quite as easy at the other side, plus the back trim on that side will need to come off and I currently have the other side's trim off. I have big issues with rattles in that like most they drive me mad and this is the first car in a long time that currently doesn't rattle, so pulling all this trim off is making me nervous! What turned out as a plan to upgrade from 1ch to 2ch has somewhat turned into a pain the rear to implement!
-
Thanks for the reply JR RS. I shall now pull out the cabling and start again, I didn't really want to take the A-pillar trim off, mainly for fear of breaking a clip or causing a rattle, but understand now and will do. How is it best to remove that? Also does the end dash panel pop off easily? I nearly routed the rear cable along the bottom, but couldn't figure out how to get it through to the boot area neatly, plus I have child seats installed so was trying to avoid having to remove coupled with only ever having limited time to do these things (see wife and kids for details!). How would I get it from rear passenger side bottom trim up to the C-pillar? Update to the above note, I have gone out again after work and I've not got enough cable length to make it work, so I'm going to route it through the headlining behind the airbag, it think I can do this fairly easily with D pillar trim off and work from there to the front. May switch cable to drivers side as well as more room in the rubber tube on that side to get to the tailgate section. Still need to figure out how to get the tailgate trim off, as it seems like it doesn't want to come off.
-
Thanks again JR RS. I went out first thing this morning before work (freezing cold here) and easily pulled the A pillar trim off and after re-routing the cables away from the airbag (I tucked them behind the other cables), I fitted the trim back on and luckily it was quite easy, which made a change for these things. I noted that my car didn't have the foam insulation unlike other pics I've seen including yours, perhaps they were rushing and forgot on mine, but maybe this is why it was easier to go back on! It appears I may have misquoted the C pillar in my original post, as I have a D pillar and it was this that I had got the cable up to initially having tucked it in to the C pillar from the headlining. I will continue to try with the cable as you suggested, but I may have an issue around the C pillar, which is different on mine and as you say I may have to route it differently from this point to the D pillar and then up, I'm also running the risk of the cable running out now that I've gone down and along from the windscreen / dashboard end, I've lost around 75cm. I don't suppose you know if there will be any interference issues with the rear dash cam coaxial cable running with the power cable down the A pillar and then branching off in the footwell? I just didn't really want the cabling on both sides of the car meaning both front trims off, plus the car seat on the passenger side is a lot easier to remove and refit, so I was opting for easier option here.
-
Thanks for the reply JR RS. I shall now pull out the cabling and start again, I didn't really want to take the A-pillar trim off, mainly for fear of breaking a clip or causing a rattle, but understand now and will do. How is it best to remove that? Also does the end dash panel pop off easily? I nearly routed the rear cable along the bottom, but couldn't figure out how to get it through to the boot area neatly, plus I have child seats installed so was trying to avoid having to remove coupled with only ever having limited time to do these things (see wife and kids for details!). How would I get it from rear passenger side bottom trim up to the C-pillar?
-
I've just upgraded my 1ch dashcam for a 2ch Blackvue DR750S-2CH in my 2018MY Sportline estate. The the front camera was a cinch to install, the rear camera is proving difficult. Can anyone help me? I've got the wire through to the back, but I've literally tucked it under the rubber door seal across the passenger side doors and pushed it in between the roof lining and b-pillar trim (looks clumsy here as now got a gap) and currently got it tucked behind the c-pillar trim ready to feed up to the boot lid, enter next problem! I can unclip the lower boot trim to a point, but then I'm stuck. I get it unclipped from either side of the boot catch and part way down each side then I'm stuck, I cannot pull any more of it off and don't know how or where to pull/prise the part off where it meets the top panel trim. I presume the top panel trim is easier, but as I can't get to there I don't know. Hopefully some of you can help with these last bits of my install. Also, for power, I was hoping to use the Conecta OBD cable to use parking mode, rather than full hardwire. However, this cable works in accessory mode and gives power for 5 mins after ignition turned off (per instructions) thus proving it has power in the OBD port, but when switched to parking mode (supposedly permanently on with voltage limiter) the dashcam immediately powers down when ignition turned off. Has anyone had one of these work before or is it that the OBD port won't work with this cable? Thanks in advance for any advice.