deanobanks93
Members
-
Joined
-
Last visited
-
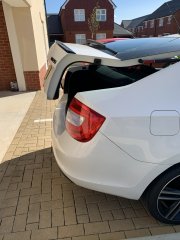
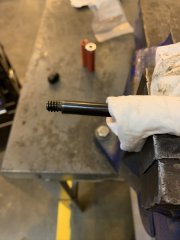
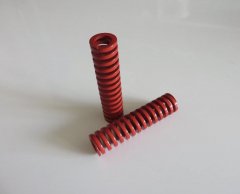
Here's a quick guide if you want to self-install die springs onto your boot / tailgate gas struts for automatic opening at the touch of a button. This is a well covered topic across the forum but I haven't found much information on how to implement the modification. Below is a video which shows what will be achieved through the embodiment of this modification: What you need: Flat Head Screwdriver Pliers Ideally a vice Rag/towel A broom 4 X Metal Washers Die Springs - Red Die Spring ISO10243 - Heavy Load (Hole DIameter 20mm and Length 76mm) https://www.berger-tools.co.uk/R__Red_Die_Spring_Iso10243__Heavy_Load/ The link above is where I've purchased the springs from at a cost of £2.38 each, total cost incl postage £8.36 Step One Open the boot and place the broom inside to support the boot so that it does not drop down when you have removed the gas strut. It doesn't have to be a broom, but that is the most likely thing you'll find laying around. Step Two Using the flat head screw driver, you'll need to pry off the clips at either end of the ball joint/ pivot. Do this at both top and bottom joints on both gas struts. You will now be able to remove them from the vehicle. It is a good idea, once the struts are removed to remove the support and lower the tailgate to the close position, to prevent damage in the event that the support fails. Step Three Carefully place the inner cylinder into a vice using some rag or a towel to protect it from damage. Be careful not to close the jaws of the vice to tightly as you may damage the strut. You want it to be tight enough to prevent the inner cylinder from spinning. Step Four Using pliers, twist the ball joint housing left to unscrew it from the inner cylinder. Step Five With the ball joints housing removed you can now place one the springs onto the inner cylinder. I've placed suitably sized washers onto both sides of mine to give the spring more of a base to push off. Once the spring is in place, re-screw the ball joint housing onto the inner cylinder tightly. Step Six Refit both gas struts onto their respective ball joints, ensuring that the inner cylinder attaches to the tailgate and the larger outer cylinder attaches to the vehicle. The metal clips can be fiddly to get back on to the ball joint housing and I would recommend a pair of long nose pliers to help you with this. It is important that they go back on otherwise your gas strut is not secure and will come off. This is how it will look with your tailgate / boot in the near closed position. You can see how well these springs compress. Notes Noise - As the boot opens the spring will drop down the inner cylinder and makes a metallic bouncing noise. This is not something that bothers me but could be a potential issue for some. An easy solution would be to implement felt washers on either end to negate this. Force - Please bear in mind that with the springs fitted to the gas struts, they need to be compressed in order to work. This means that you will need to force your tailgate/ boot shut. The amount of force needed isn't excessive but does sometimes mean that you will need to place your hands onto the tailgate lid to shut it. It also varies depending on the temperature, you'll find that in the summer it works perfectly but during the colder months the metal becomes more rigid and therefore has less stretch to open the tailgate. The image below shows how far down my tailgate now sits before it requires force to close. Height- Just be careful in low height areas such as car parks which may have lighting or signage above the vehicle. Rapid Spaceback - This will not work for the spaceback as the tailgate is much lighter than the model shown. That't not to say that it can't be done, but the specification of die spring required would be different. The process for fitting would essentially be the same. Ready Made - You can buy gas struts with the die springs already attached (see link below) for the price of £48 + £6 postage. They look well made and have a larger ball joint housing to support the spring, including a restraint for keeping the springs stationary upon opening. Entirely down to personal choice but one method cost less than £ 10, the other costs £54. https://www.ebay.co.uk/i/113725331347?chn=ps&norover=1&mkevt=1&mkrid=710-134428-41853-0&mkcid=2&itemid=113725331347&targetid=909180616022&device=c&mktype=pla&googleloc=1006476&poi=&campaignid=10204071741&mkgroupid=105678537727&rlsatarget=aud-381667280803:pla-909180616022&abcId=1145987&merchantid=6995734&gclid=Cj0KCQjwsuP5BRCoARIsAPtX_wE0hSvzl9GB6QfT9IKJdfoqLJSq-Sj3h4hmybHp8P1Of1GbWwYIH0AaAvn6EALw_wcB
-
-
-
-
-
-
-
Here is a quick guide on how to remove and install the rear make and model badges / Emblems. What you need Adhesive Remover (Autoglym Tar Remover , WD40 etc) Trim removal tool or dental floss Microfiber Cloth Tape (Electrical or Masking tape) New badges / Emblems (Rapid in Black Magic and Skoda in Black Magic) or lesser quality but cheaper (Ebay Acrylic Skoda Emblem and eBay Acrylic Black Rapid) Step one Make sure the working area is clean as possible. No need to wash the car completely down, but give the area a quick wash with soapy water and rinse with clean water. Ensure the working area is completely dry before going any further and out of the elements / weather. Step two Using the masking tape or electrical tape, mark the area around the badge as close as possible. This will help when installing the new badges. If you're just removing the badges completely then there is no need to carry out this step. Step three There are a couple of ways this step can be done so pick which one you prefer. First, using dental floss (this is a favorite) in a sawing motion from top to bottom. Draw the floss through the adhesive backing until each individual letter becomes lose. This method will prevent any undue damage to the paintwork but can be time consuming. Second method is what i used. Using plastic trim removal tools, use the most appropriate tool and push it in behind the lettering. Ensuring to not use to much force, lever the letters away from the body of the vehicle. You may need to adjust the position of the tool around the same letter to lever sections off at a time. This is quicker but could cause damage to the paintwork if you're not careful. The final way is risky but is lots quicker and less messy if you do it right. Using a heat gun or hair drier, apply heat to an individual letter at a time to reduce the effectiveness of the adhesive. As it heats up the letter will become lose and can simply be pulled away from the body. Be careful as applying to much heat in one area could cause the paint to burn or burn the adhesive onto the paint leaving unsightly marks. If you use a hair drier the risks of burning the paint is much lower but will take a lot longer for the lettering to become lose and can still leave a lot of residue behind. Step Four You need to remove the left over adhesive. To do this, use the adhesive remove and apply small quantities either to a microfiber cloth if you have a bottle of the stuff or spray directly onto the adhesive remains if it comes in a spray bottle. Allow a few minutes for the adhesive remover to do its work and then using a microfiber cloth to rub the remaining adhesive away. You may need to use a plastic spatula to help remove some of the more stubborn material or just your nails if you're careful. The area behind the emblems will have residual road grime, this is nothing to worry about and can be removed, so be sure to give the area a good clean before moving on. Step Five If you're removing the badges / emblems completely then you can now remove the tape and you're done! If you're adding alternative badges / emblems then you need to give the area a clean down with some clean water to that no adhesive remover remains. This will give a good surface for the new adhesive to adhere too. Peel the backing paper off from the new emblems. DO NOT REMOVE THE CLEAR FRONT! This is what holds the letters equally apart and remains on until later. You'll then need to line up the new badge within the edges of the tape that you put on earlier. Be careful to hold the badge / emblem away from the body as it is extremely sticky and will grab immediately. (I can assure you that although the car is dirty, the working area was clean in this picture) Once lined up press the badge onto the body, ensuring to press all parts of the letters and not just the center area to ensure the adhesive has grab entirely. With this done you can now remove the clear front and all the tape. I would advise not washing for at least 24hrs to give the adhesive enough to fix itself. Now repeat on the alternative side.
-
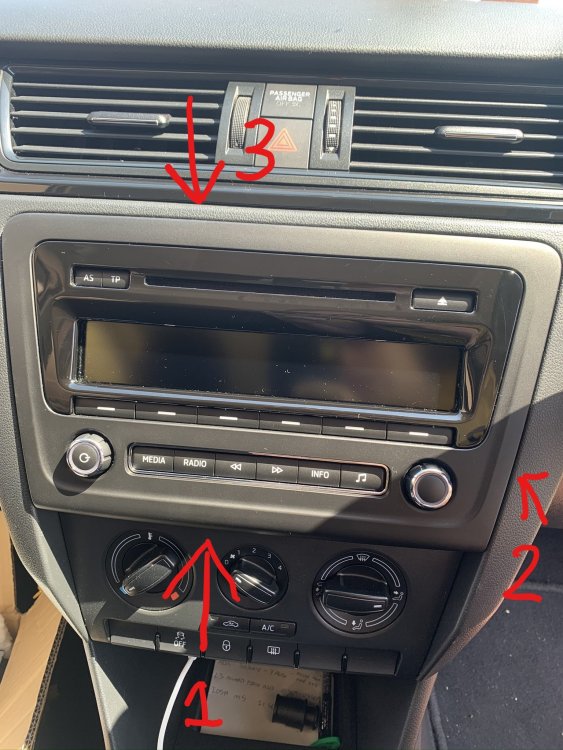
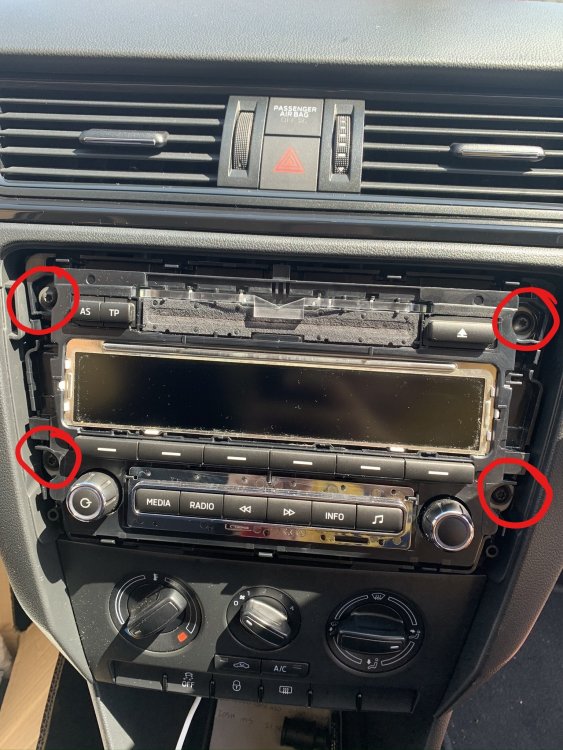
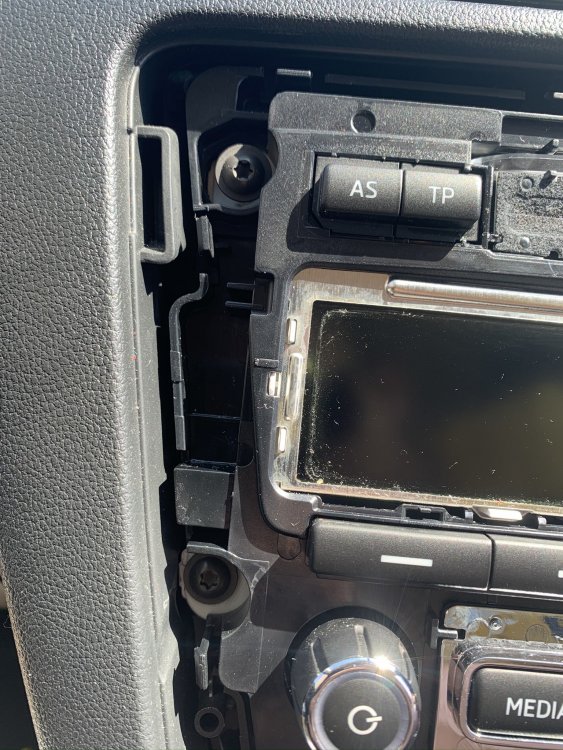
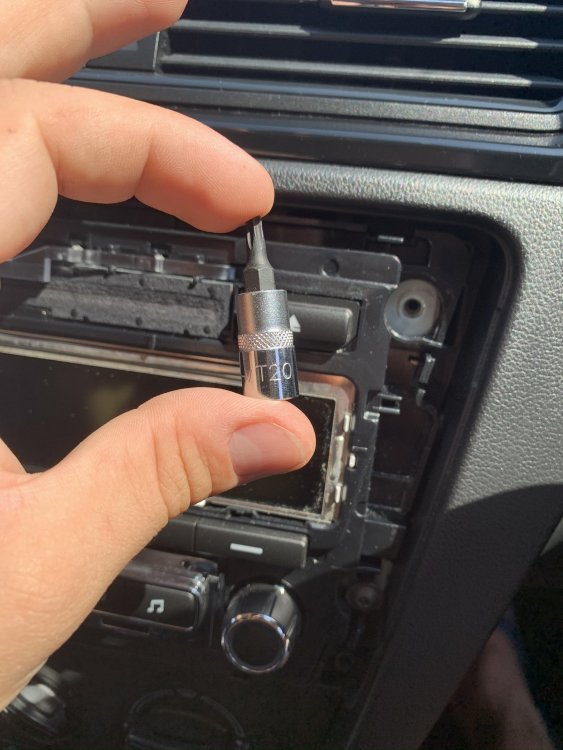
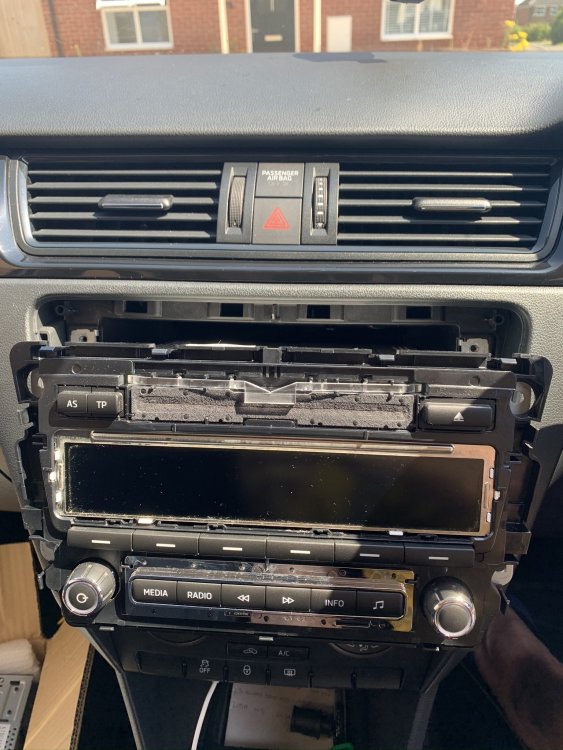
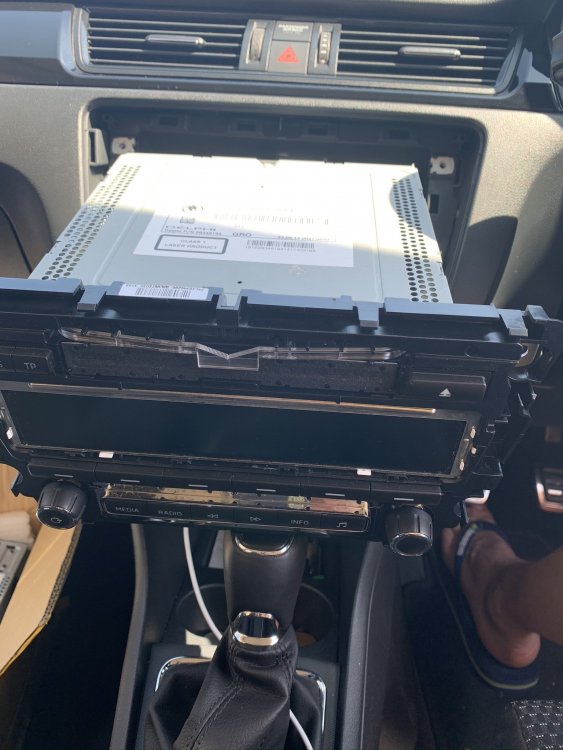
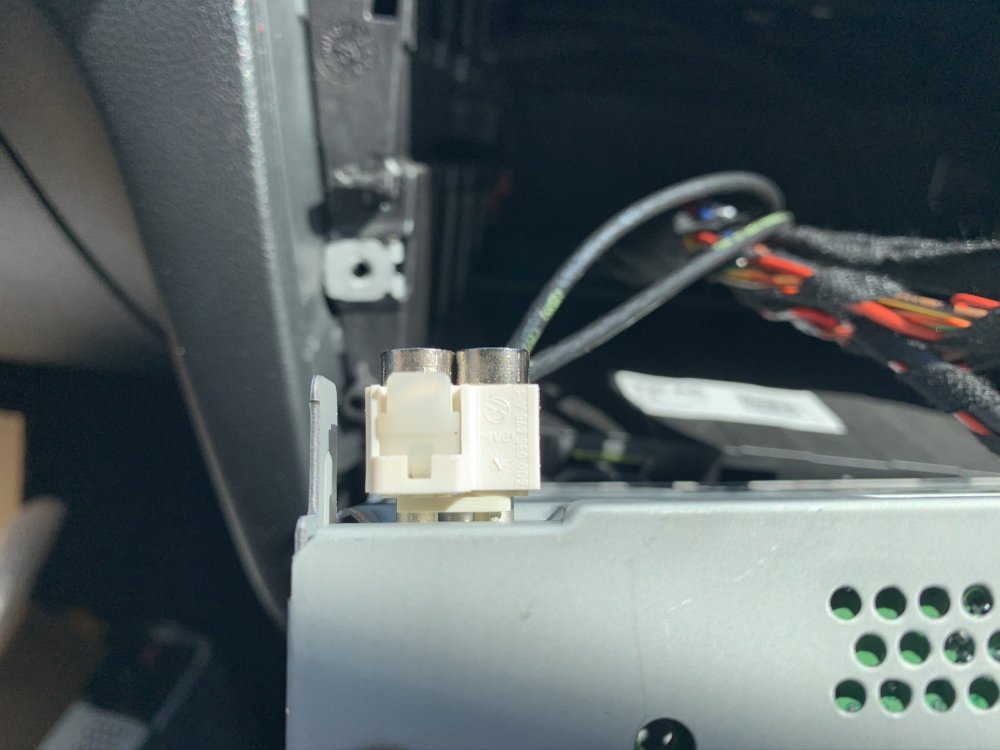
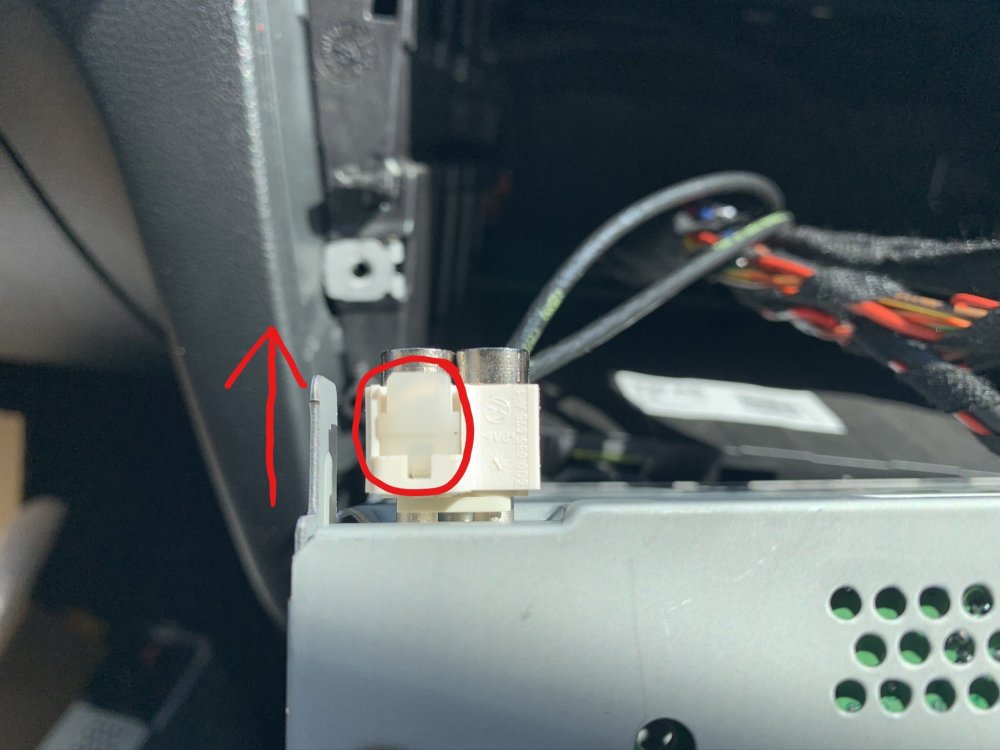
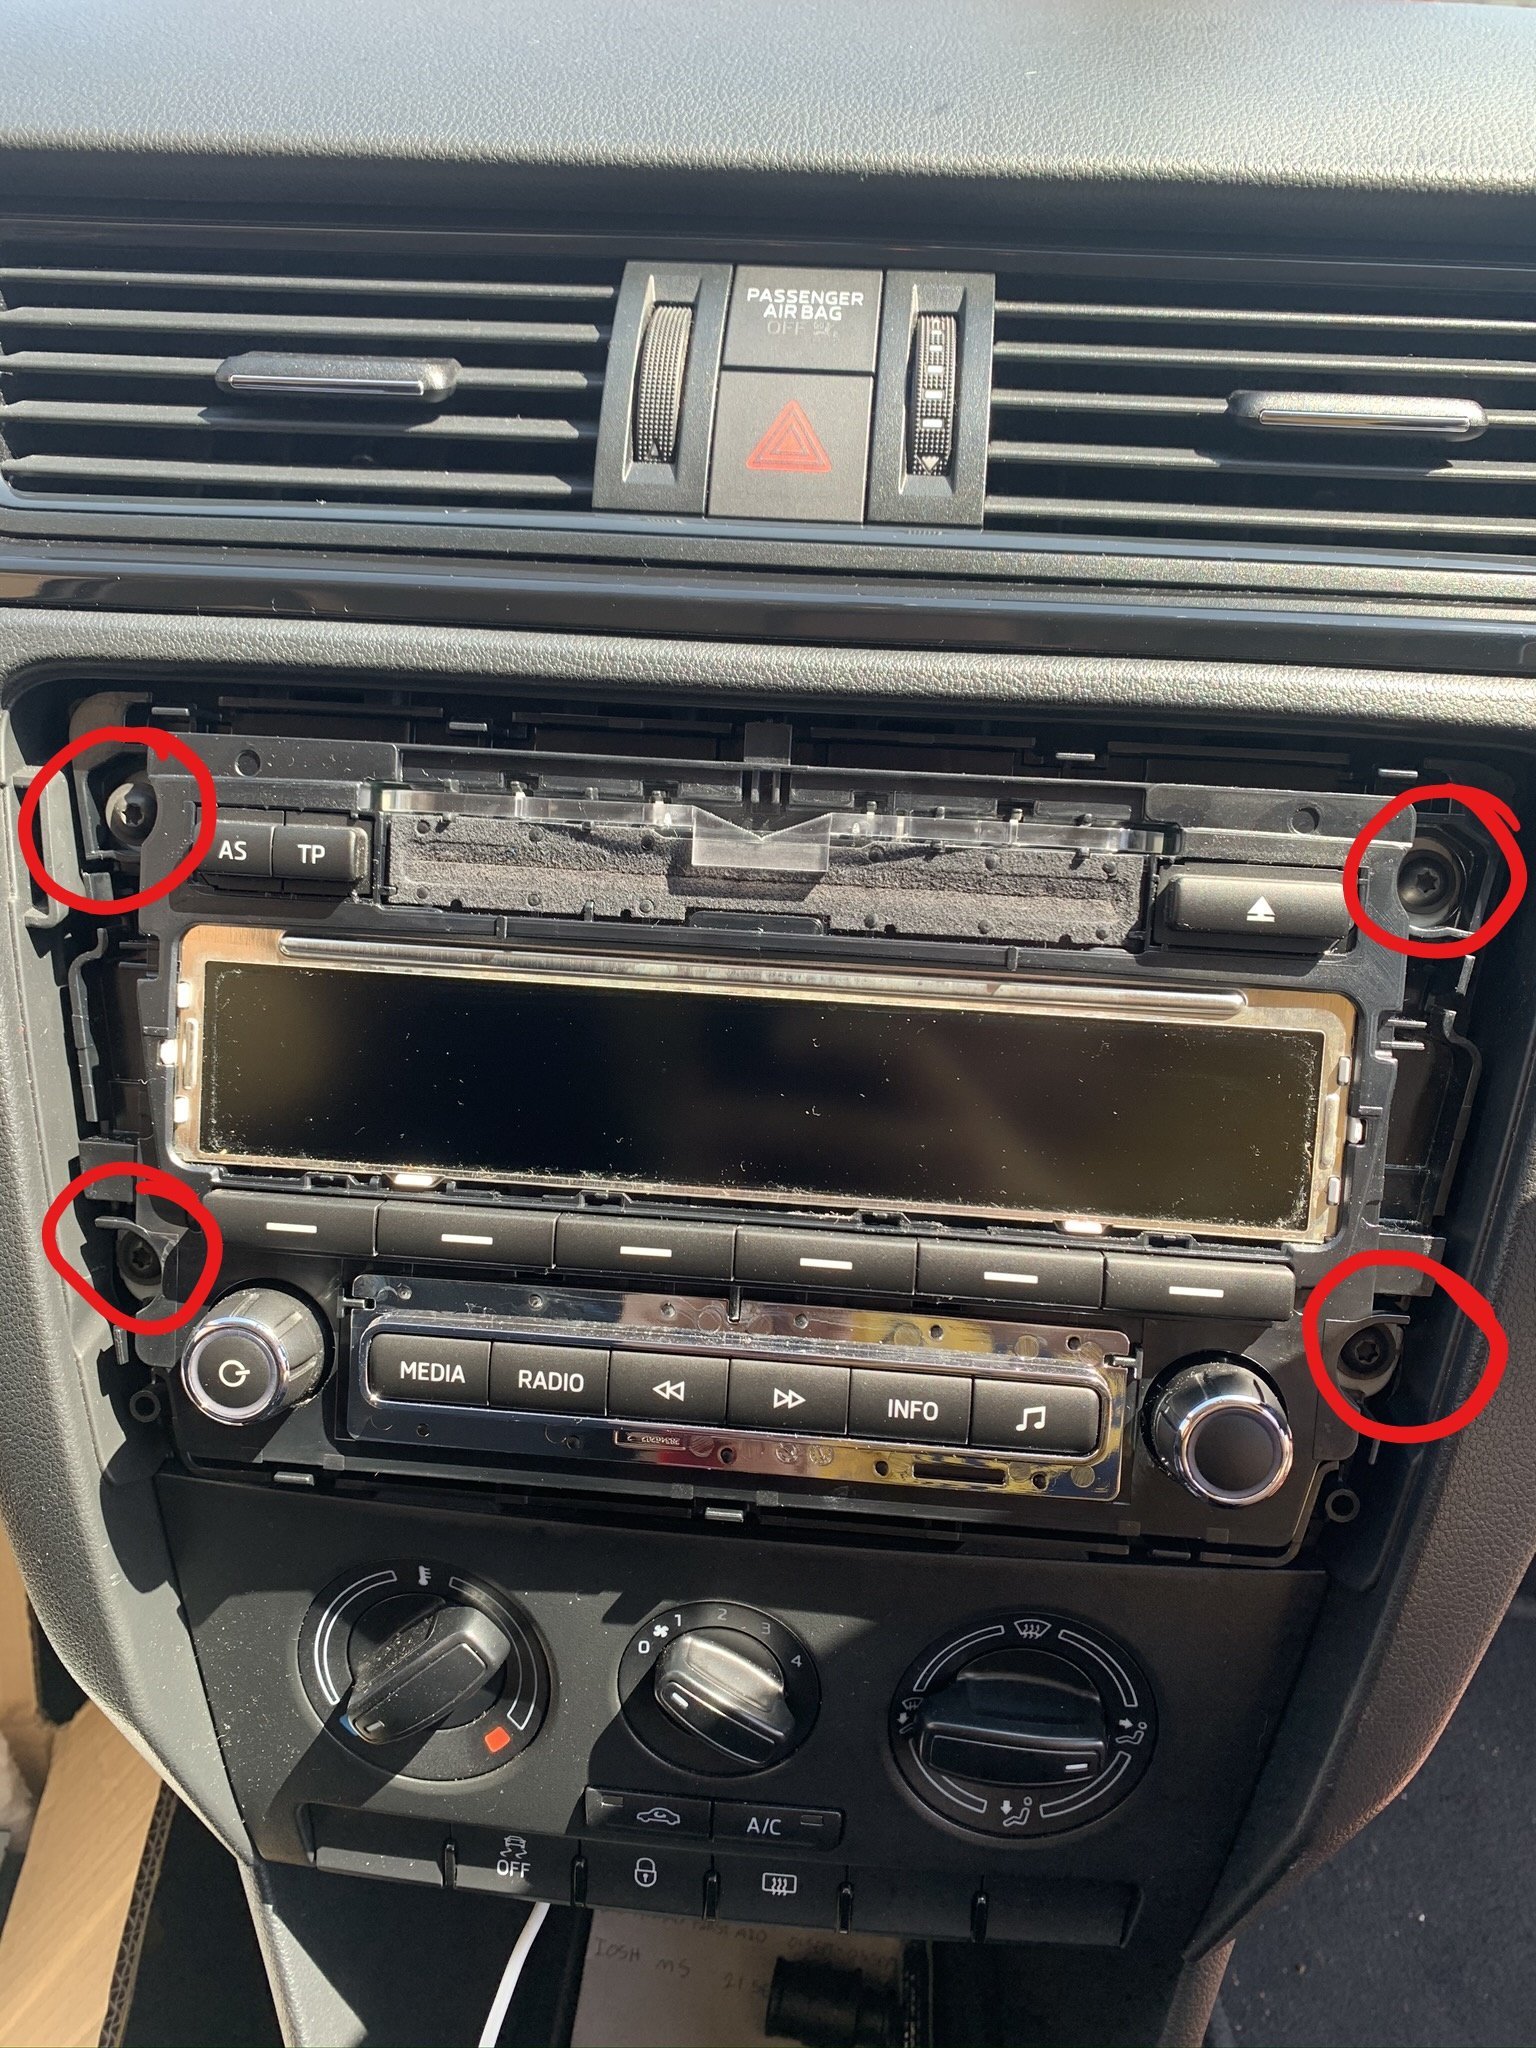
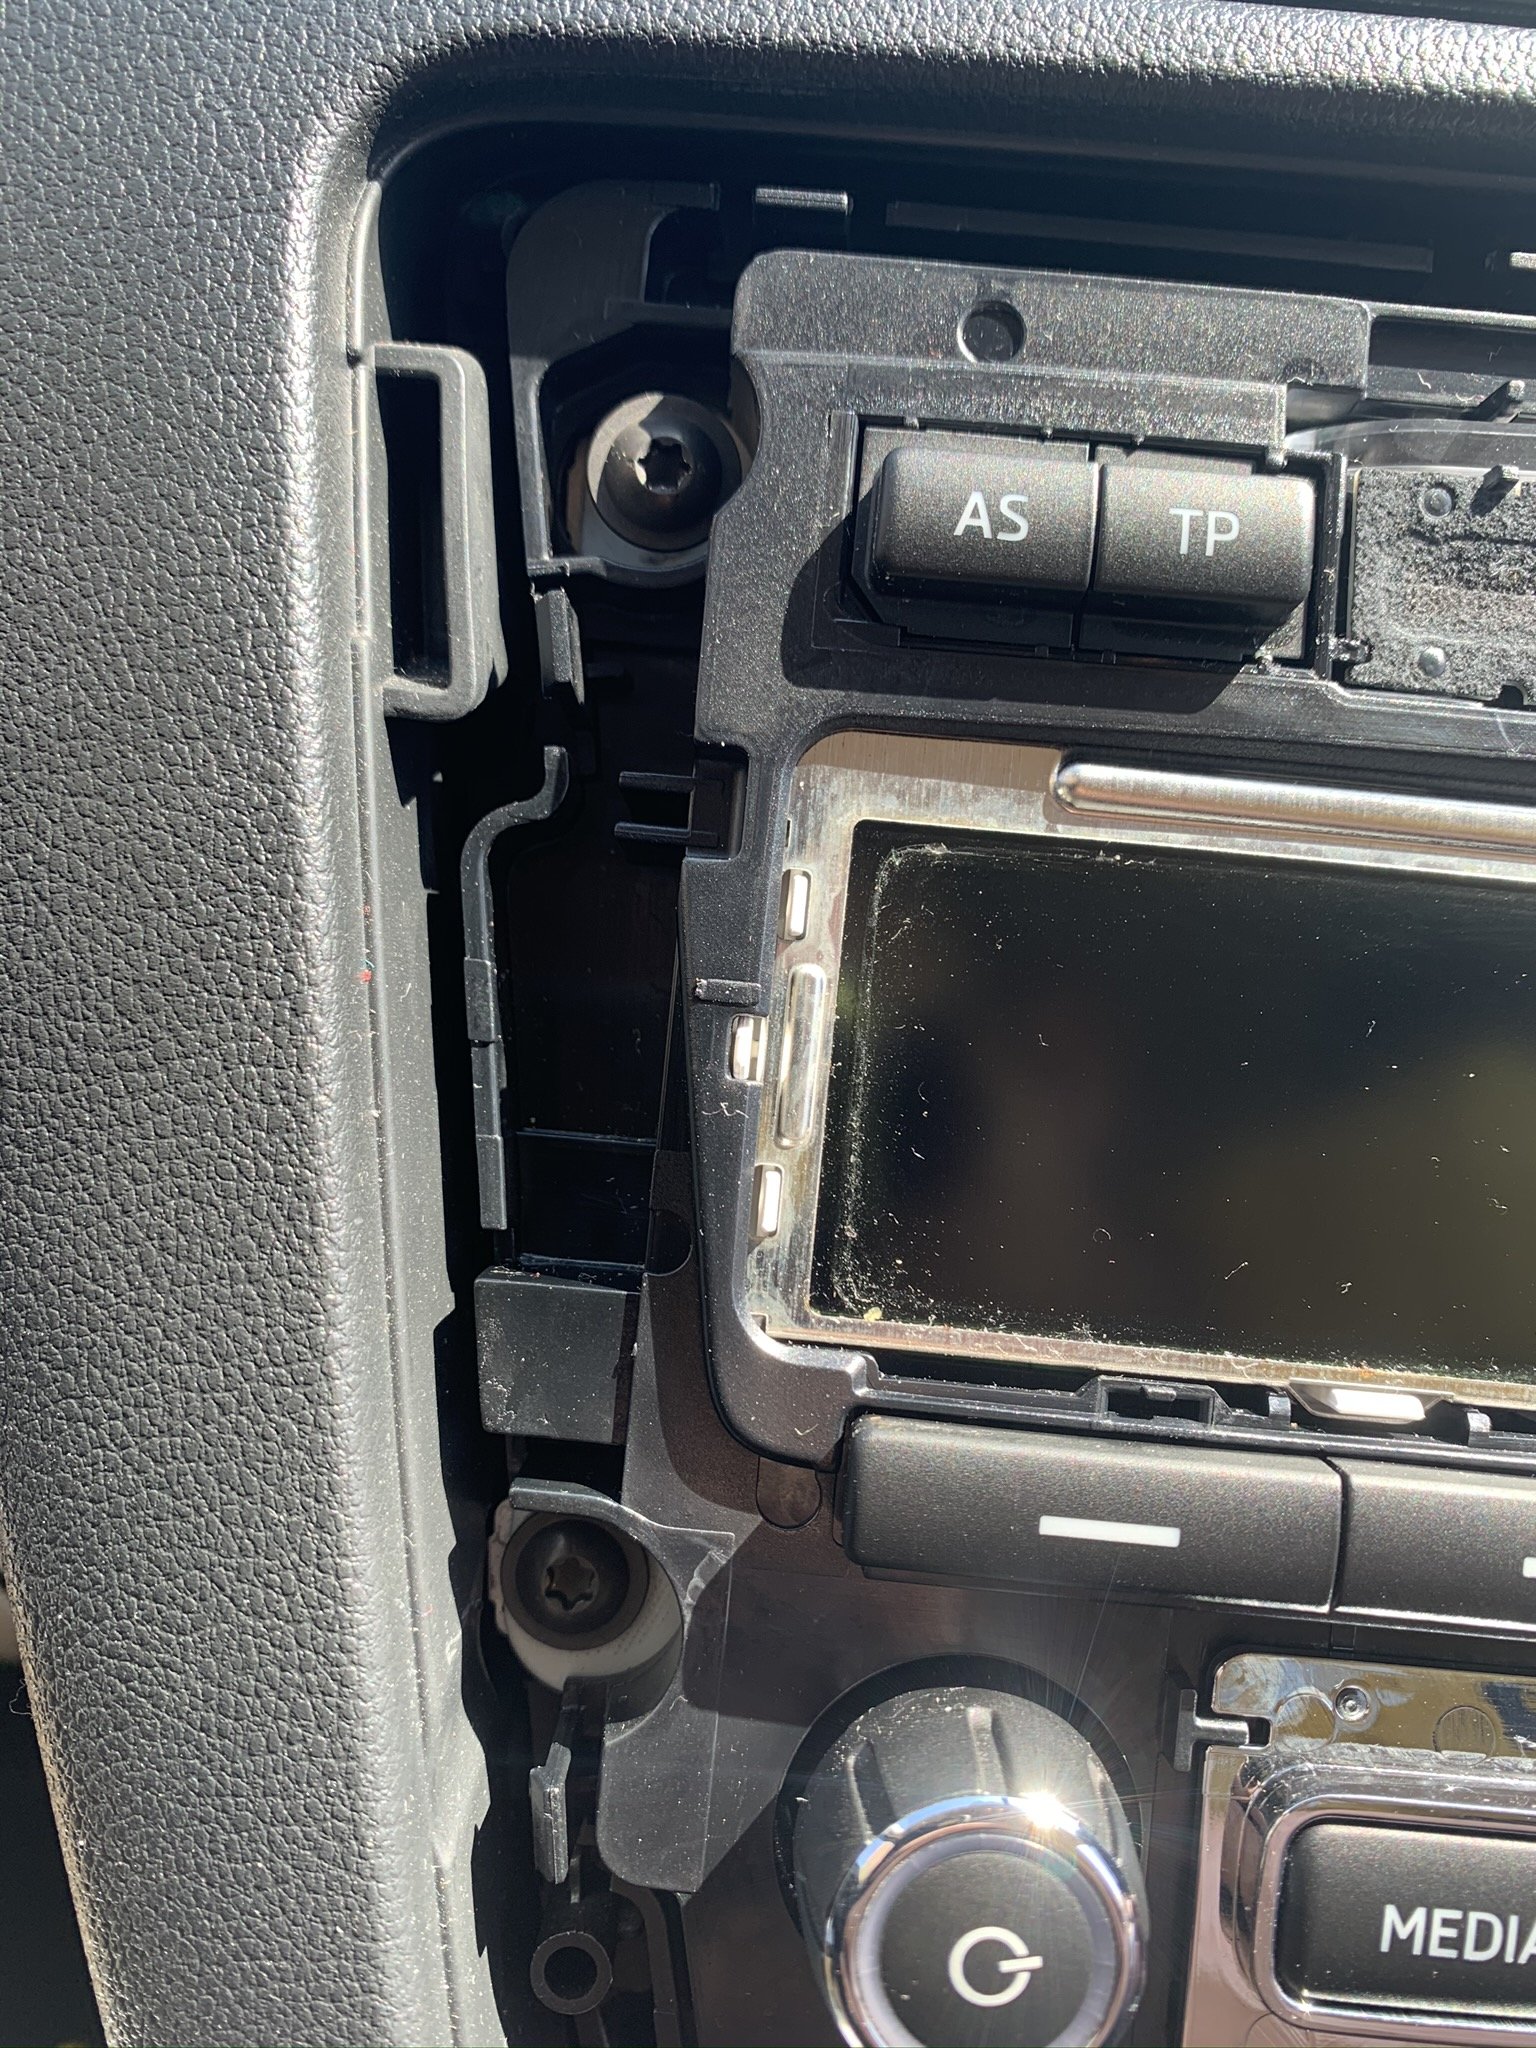
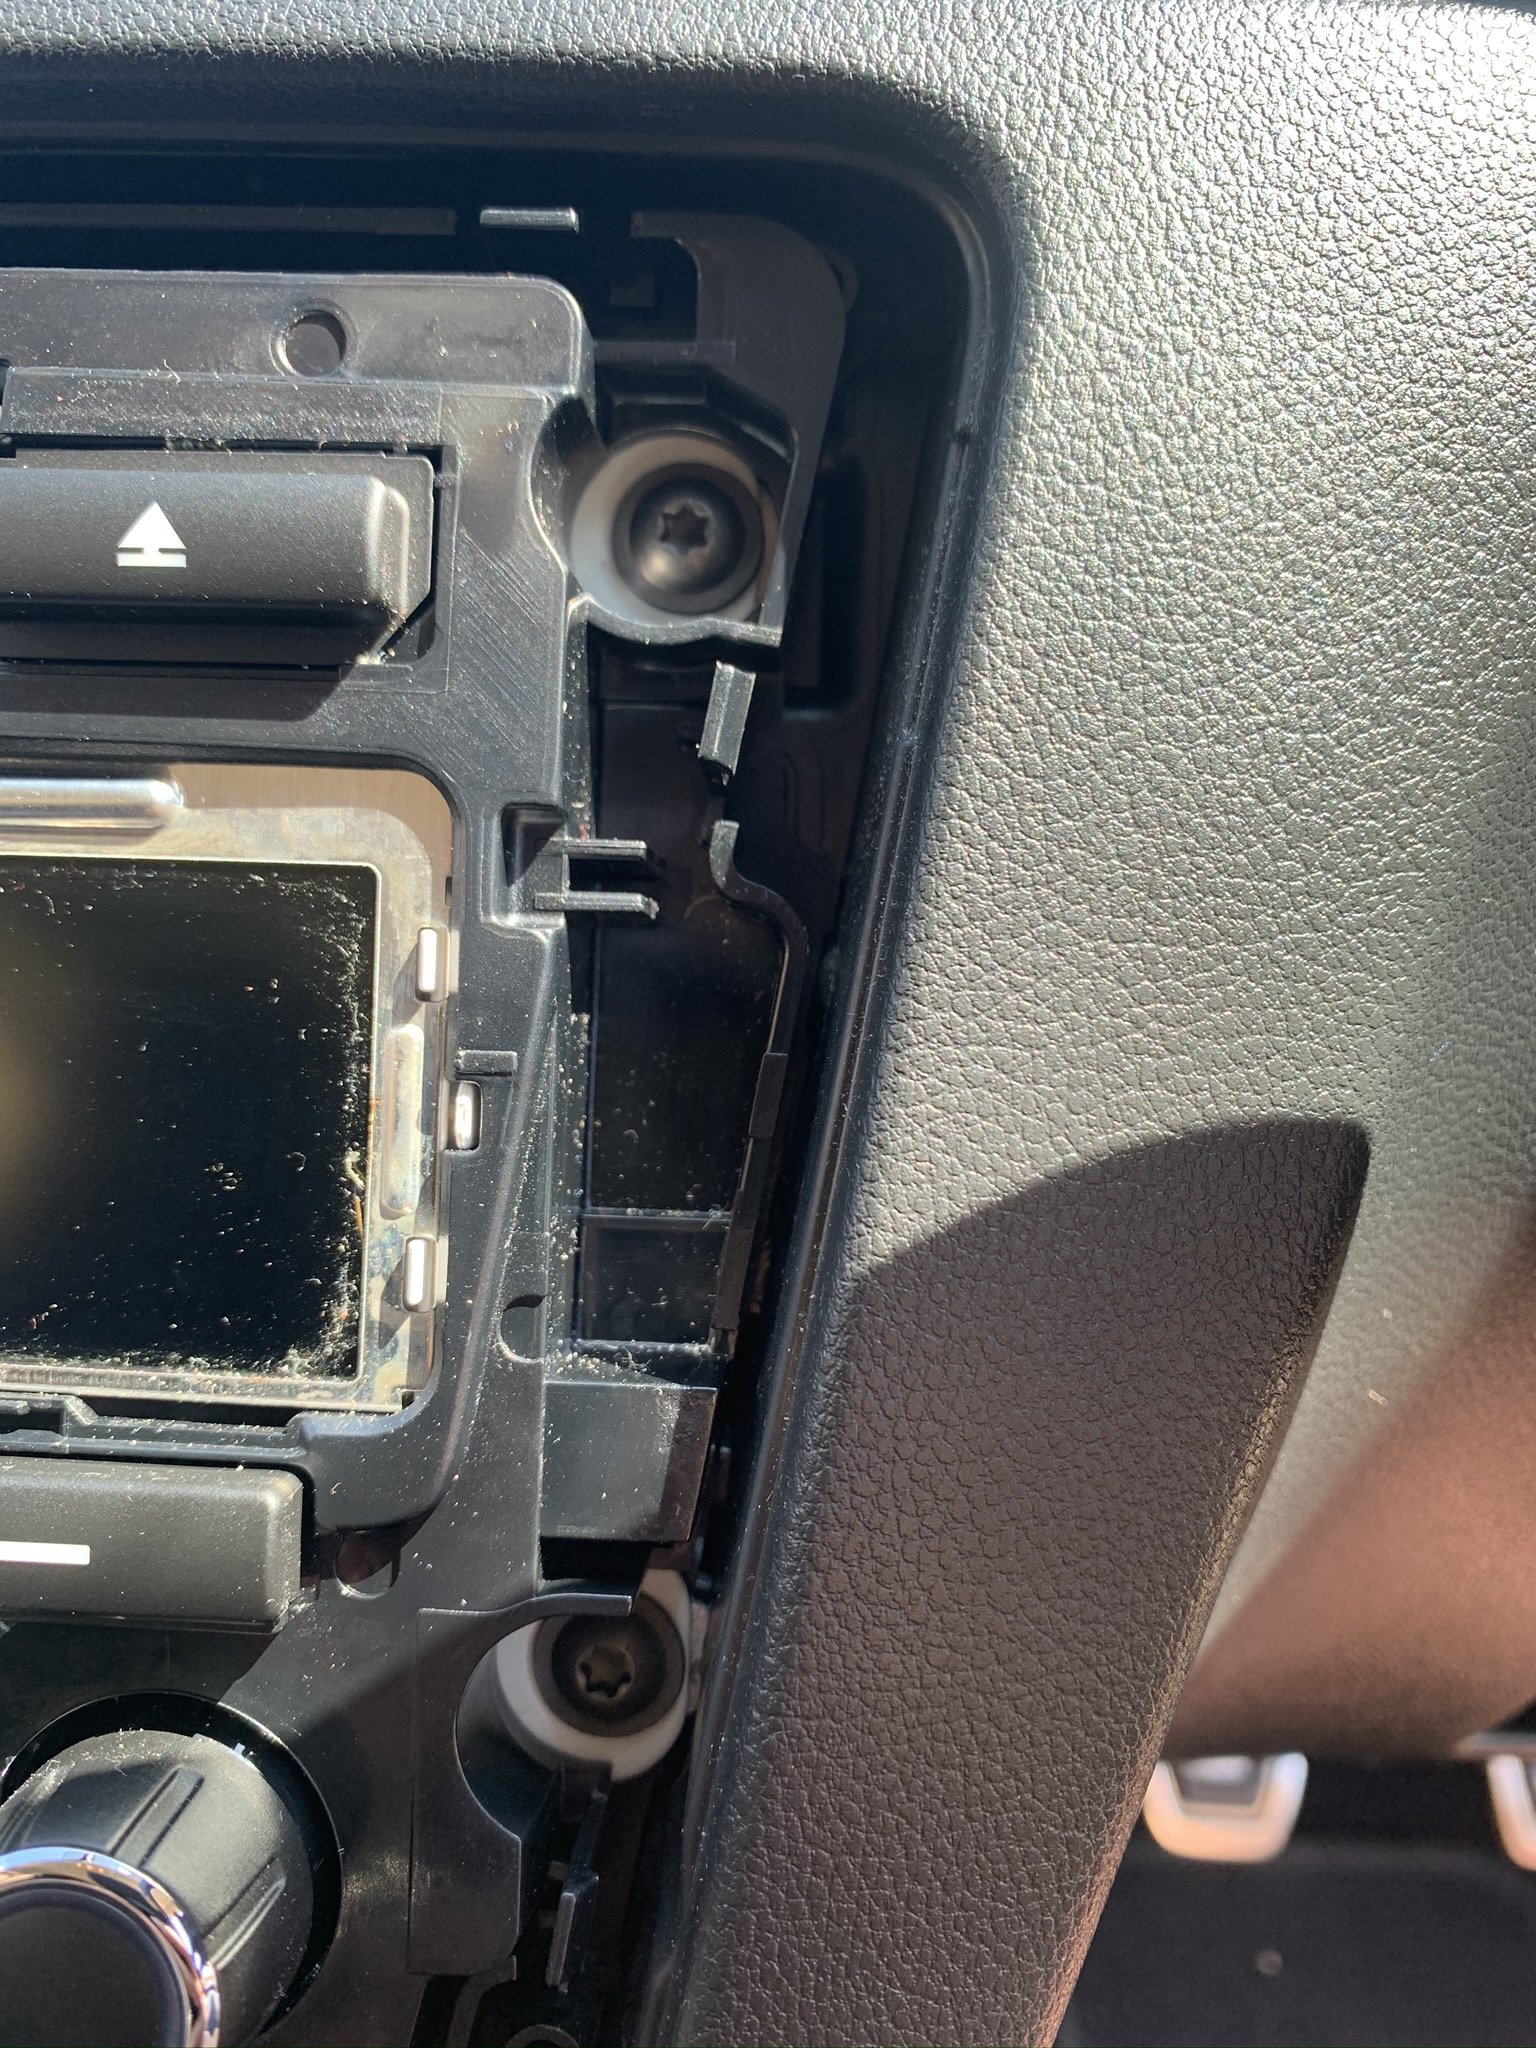
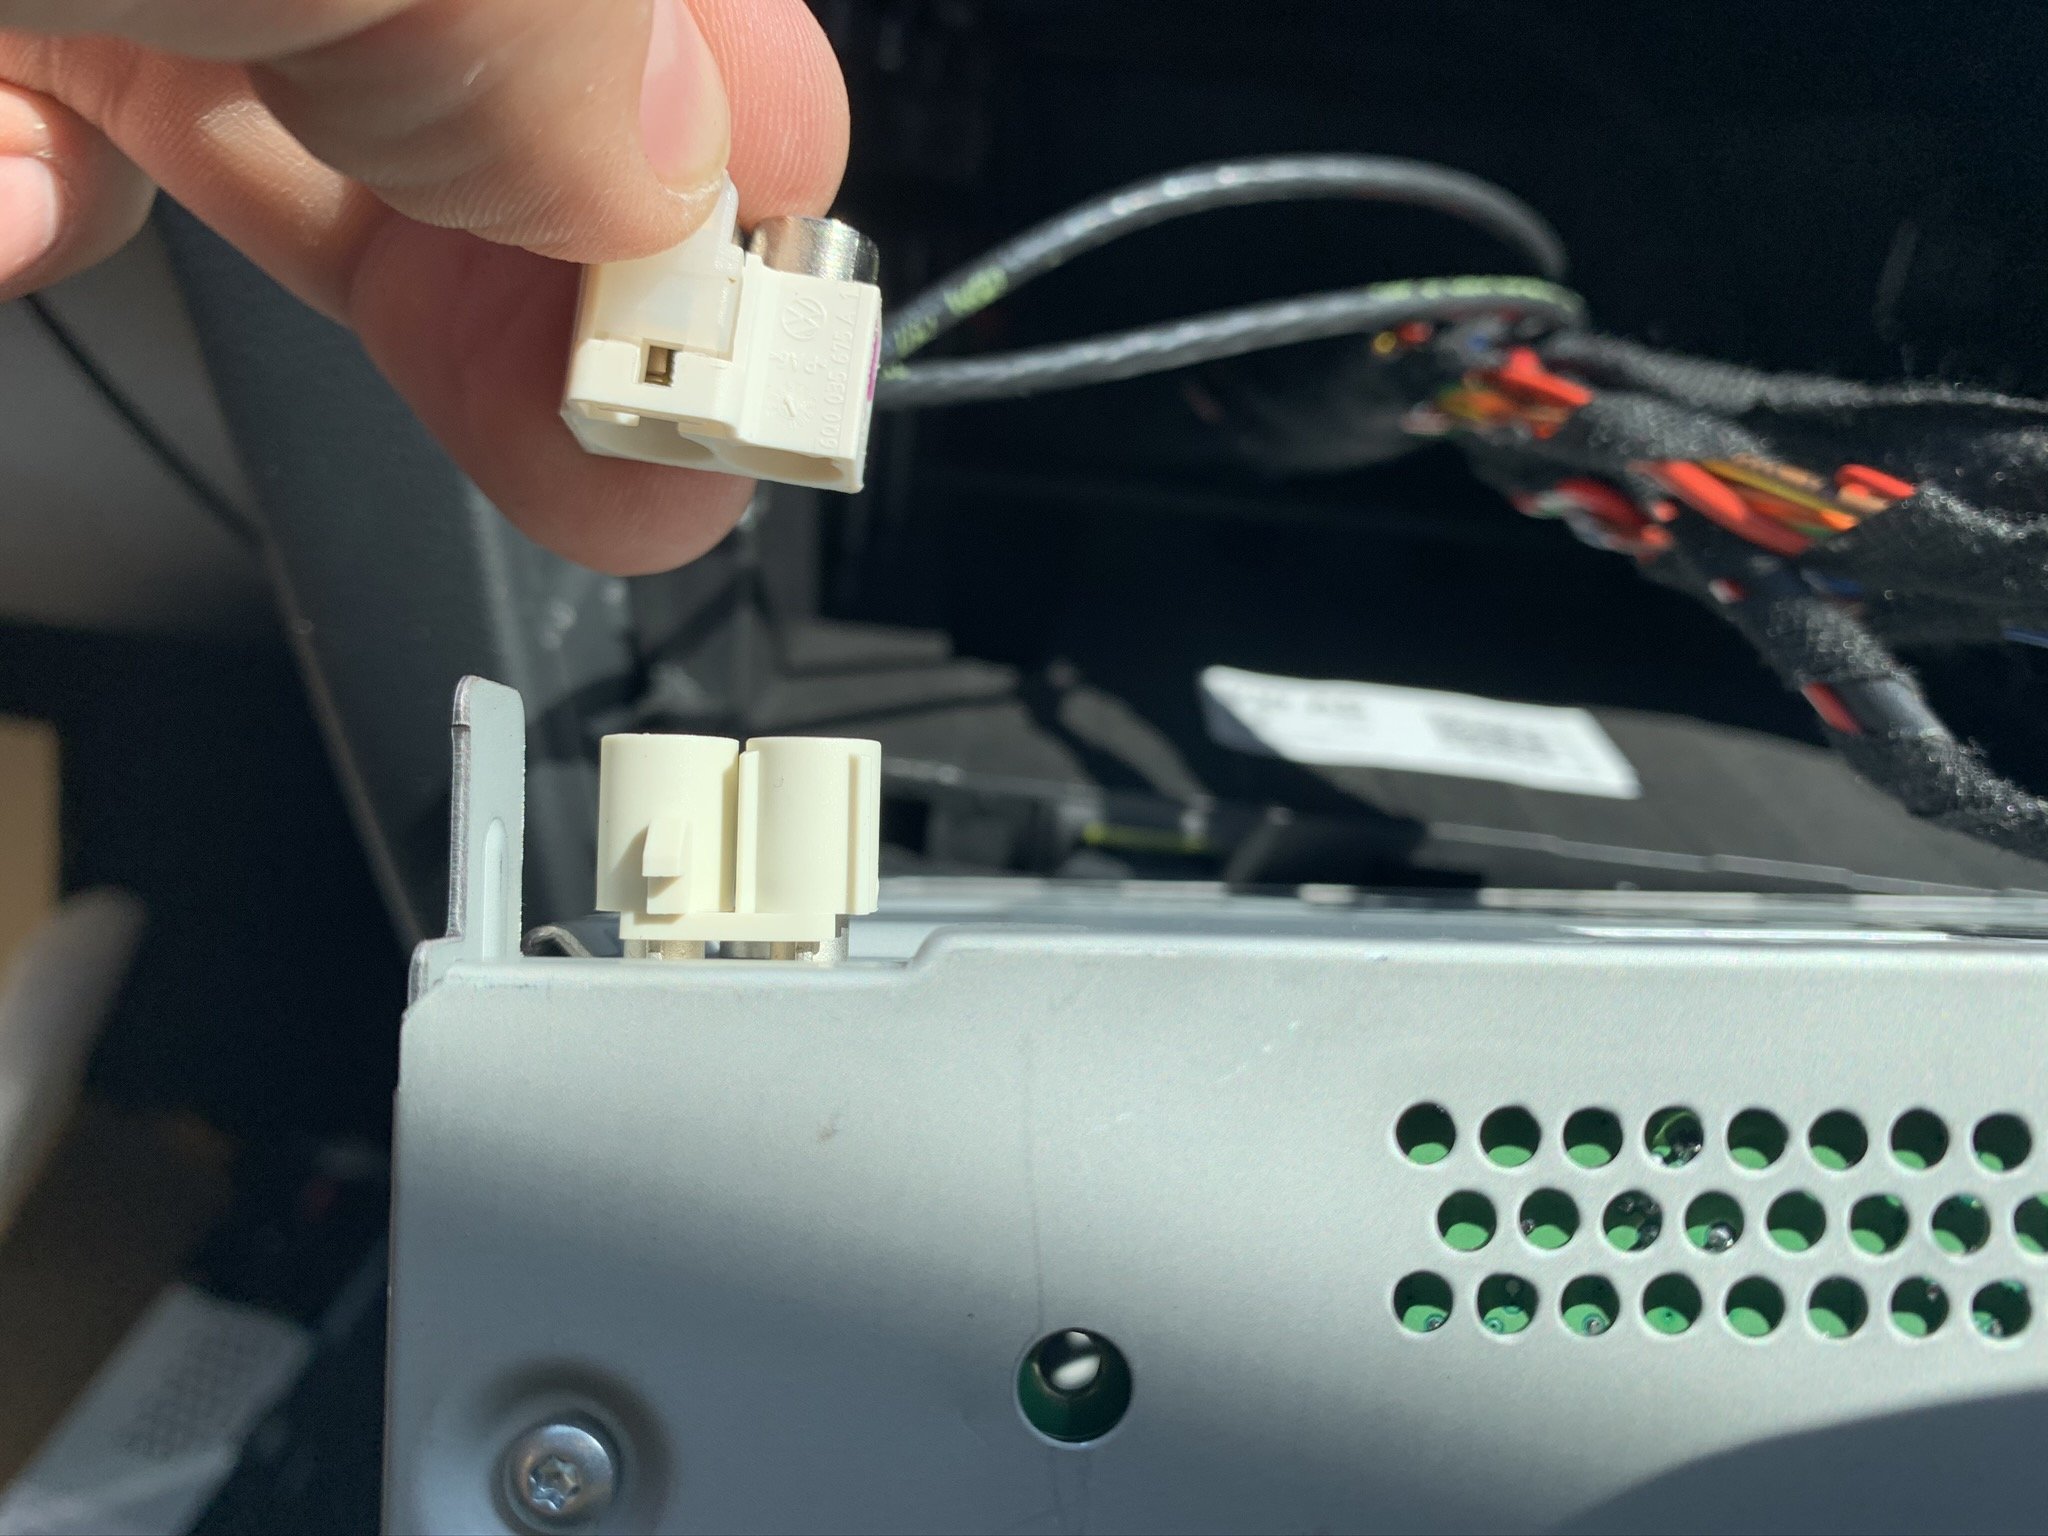
This is a guide on how to change the Skoda Rapid Swing headunit with the RCD 330 +, including links and pictures. This is a very simple and straight forward plug and play process but will hopefully help those make up their minds about making the swap/change. And help those who are not as technically astute. Purchasing a RCD 330 or RCD 330 + Before I go into the how to guide, here are a few details to consider before purchasing the RCD 330 + and where you can purchase them from. So I bought mine from Aliexpress and used a seller called Aidu Auto Technology Co., LTD (RCD 330 + Green Backlight LINK) Total cost including shipping - £201.29 (May 2020) There are others available on the store for less but these are the early models and don't include the green backlight to match in with the rest of the Skoda interior. Beware of customs duty! If your item is sent via Exped delivery such as TNT or DHL, then they will likely hand the item over to customs and will request proof of purchase value for tax purposes. Luckily i didn't have to pay anything but its just something to be aware of. However if you use the standard delivery method this is less likely to be intercepted by the customs team. (I'm not telling your to avoid paying any tax or customs that is rightfully owed by you) You will also need a Fascias for the new unit. Here are a few links depending on how much you want to spend but they range from £9.60 to £40.00. https://audiotechdirect.com/carav-11-455-rns-shape-2-din-fascia-for-skoda-rapid-2013-on/ Ebay Aliexpress Things to consider DAB - The RCD 330(+) are not DAB ready but you can get around this by downloading an app on your phone called "RadioPlayer". However clearly this will only work in areas with good signal and will depend on your phone contracts mobile data limit. You will also need to have your phone plugged in for AppleCarplay or mirrorlink to work. Navigation - This will only work whilst your phone is plugged in via either the iPhone lightening cable or android equivalent. Again this will use your mobile data initially and to provide you with real time traffic reports via maps. This will only be a problem if you end your journey in an area with no signal and require a new route to be planned. RCD 330 or 330 + - There isn't much difference in performance but if you want the full OEM look then paying a little bit extra to have the green backlight is something to consider. Plug & Play - If you're swapping the standard swing radio with ISO harness connector then you will have no trouble fitting this item. It literally plugs in and is ready to go, much less hassle then having to pay various amounts for different manufactures harness and adapters. This unit may fit other models which use the standard ISO harness but functionality maybe affected so please do your research first. (If you don't know what the ISO connector looks like, scroll down and look at the images and see if they match up) Size Comparison - How to Guide What you need: T20 Torx bit/socket/screwdriver Trim Pry Kit or just your hands (Use a screwdriver at your own risk and carefully) Step One Remove the fascia trim. Do this by prying the trim from the bottom first (1) and then both sides (2), finishing at the top(3). Step Two With the fascia now removed, you should be able to see the four torx screws holding the unit in, in each corner. You need to remove these, remember lefty loosey, righty tighty. Step Three Keep all the screws in a safe place as you'll need them to refit the new unit. With all the screws removed, you will now be able to pull the unit out of the dashboard. It may take a little bit of force and the trim pry tools are especially handy here if you have sausage fingers like me. I put the gear stick into 3rd gear and this allowed me to rest the unit before disconnecting the connections at the rear. Be careful to ensure the unit does not drop as this may damaged the connectors at the rear and/ or damage the unit if you wish to keep it or sell it. Step Four Look to the back of the unit and you will now see the ISO connector and aerial connection. These both need to be removed, so first the aerial: On the white aerial connector you'll see there is a opaque tab that is also circled in red. This needs to be pushed up, and then pressed inwards to release it from the unit. Step Five Remove the ISO Connector. Simply lift the locking lever and this will draw the connector out. Step Six Remove the original headunit out from the dashboard and place to one side. You should now have something like this. Step Seven Fit the Aerial adapter to the original aerial cable. Ensure the clip circled in red is lined up with the side with the tab. Push together and then push the tab down to lock together. Step Eight Fit the new Aerial cable to the RCD 330 or RCD 330+ unit by pushing it firmly onto the connector until it clicks in place. Step Nine Fit the ISO Connector to the RCD 330 or RCD 330+ unit The connector will only fit on one way but have a look to make sure all the pins on the plug line up with the pins on the unit. Press into place and use the locking lever to help the connector into place, ensuring the locking lever is fully down. Step 10 Fit the RCD 330 (+) into the hole in the dashboard, ensuring the four screw holes all line up. Fit the four screws a few turns each at first. This will give you some wiggle room to allow all four screws to be fitted easily. Once all in place, they can then be tightened just enough so they secure the unit in place. Don't over tighten them! Step Eleven With the unit now in place, turn the unit ON and check all the functions work as they should. If you find any problems with the unit, now is the time to rectify this with the seller. Step Twelve If you're happy the the unit is 100% working the final step is to fit the fascia which i've included links to. Put the fascia in place and gently push home all round until you hear all the clips click into place and the fascia is secure.