Concon255
Finding my way
-
Joined
-
Last visited
-
Happy to say that this has all stopped after changing the coil packs and spark plugs - no issues with ignition since. For reference I went with OEM coil packs and spark plugs as the car is not modified. The DSG issues also appear to have disappeared, but part of me thinks this is just me fearing the worst 😂 Thanks for your advice.
-
Appreciate all of the replies guys. Luckily it's replacement is going to coincide with the car needing a service in April anyway so I can have both done at the same time. I was going to go to a dealer to get the servicing done but with the water pump needing doing I think I'll take it to a Skoda Specialist indy to avoid getting shafted by dealer prices. Going to get a few quotes from local garages to compare, but seeing that some of you have had a water pump replacement done, how much did it cost you so I can have a ballpark figure in mind?
-
Thanks for your replies guys. After viewing the links and some other videos it sounds very similar to people that have had failed water pumps so it is most likely that as you said. However, the coolant level has stayed exactly the same for the last 6000-8000 miles. Are there any other signs that point towards a water pump issue to confirm it?
-
Hello, I've noticed that the my engine is making more noise than normal at idle, what I would describe as a rattle (when warm as the revs are roughly 700-800rpm). I've attached a video for reference. Is this noise normal or is it associated with something like the timing chain stretching or water pump failing? The car is a 2013 with the CTHE engine. Servicing has been done every year including oil changes. Thanks IMG_6660.mov
-
Hi everyone, I know this topic has been covered in some way or another to death and back, but I’ve not found a definitive answer after looking for quite some time. My car is a 2013 CTHE Fabia with 57000 miles on the clock. I’ve had it for roughly 5 months and I originally suffered a misfire (a flashing EML) at idle shortly after buying. After doing some initial test drives and OBD2 scans I put it down to an isolated incident and forgot about it. However, after a kickdown acceleration today the car suffered a bad misfire and a flashing EML again, which revealed cylinder 2 and 4 suffering a misfire. No limp mode or anything afterwards though and the car seemed normal again. I always fill up using Tesco Momentum so I wouldn’t put it down to fuelling. The spark plugs were also changed about 2-3 months before I bought it with Denso plugs so that should be fine. However, I have noticed quite high oil consumption (needing to use 1.5 litres in about 3000 miles). The DSG gearbox appears to also be sluggish at the moment when changing between 4th and 5th (it feels like I’m completely lifting off the throttle at full power) and slight juddering when reversing, but unsure whether this is related. Without doing much more diagnostics (I work full time and have a child so time is very short), is this pointing to a component which can be fixed with the engine and/or gearbox or more towards fundamental issues with the engine/gearbox? Any advice would be greatly appreciated
-
I've been following this topic after feeling that the Fabia has too much body roll, it's persuaded me to get one. Just had a look and the Whiteline RARB is 30% off at the moment, £135 seems like a bargain!
-
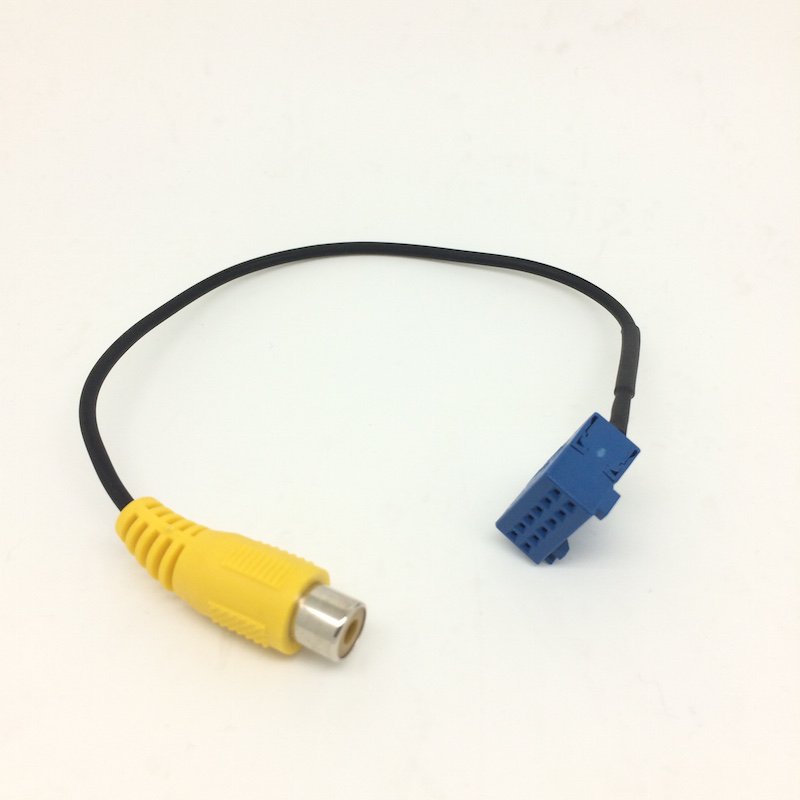
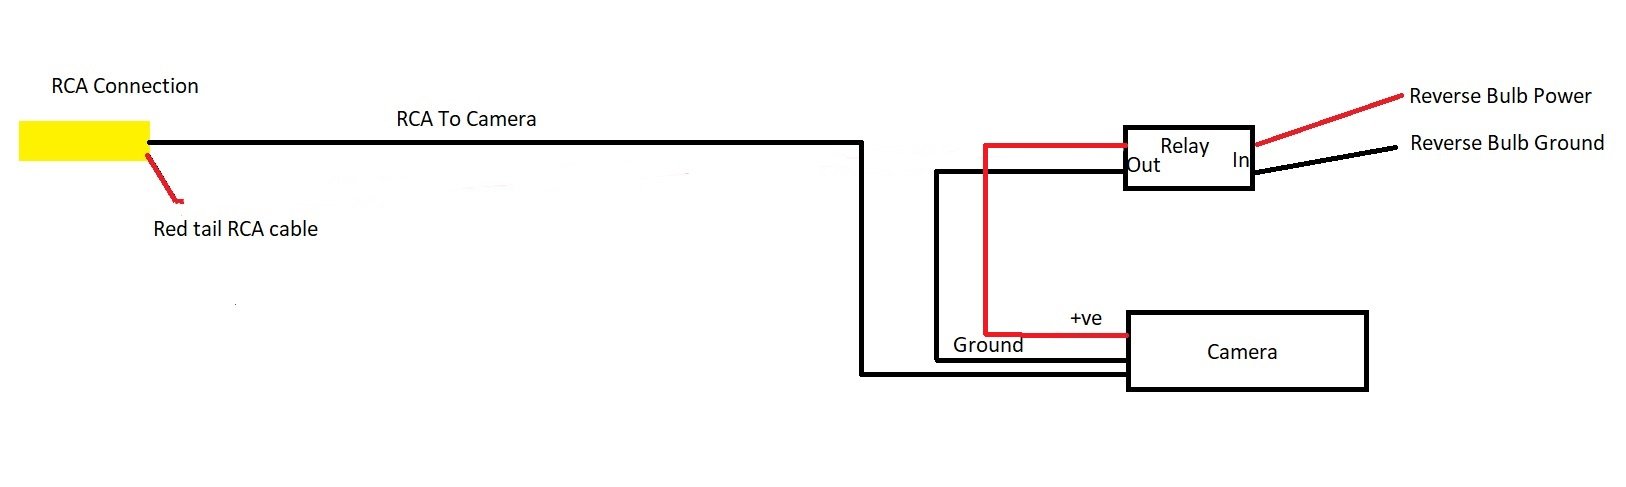
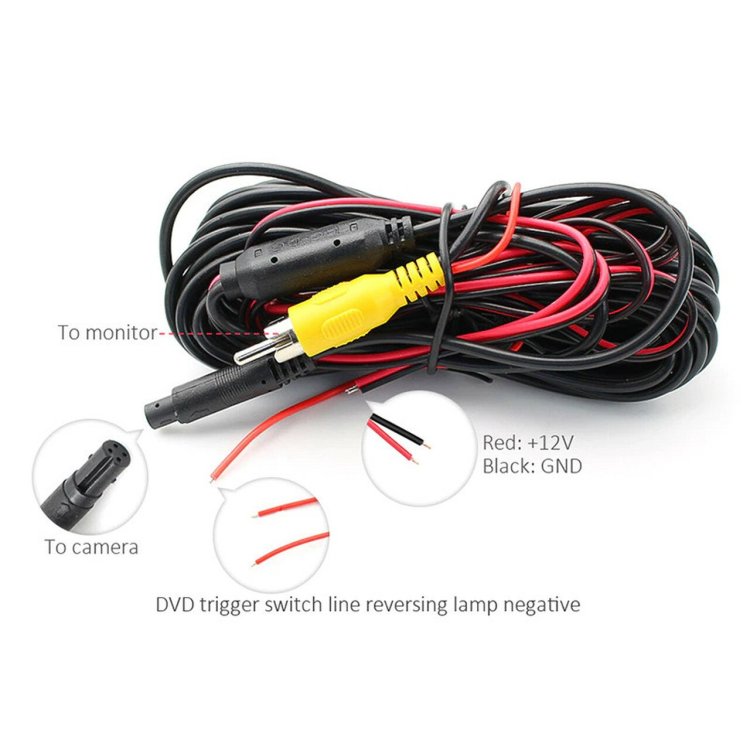
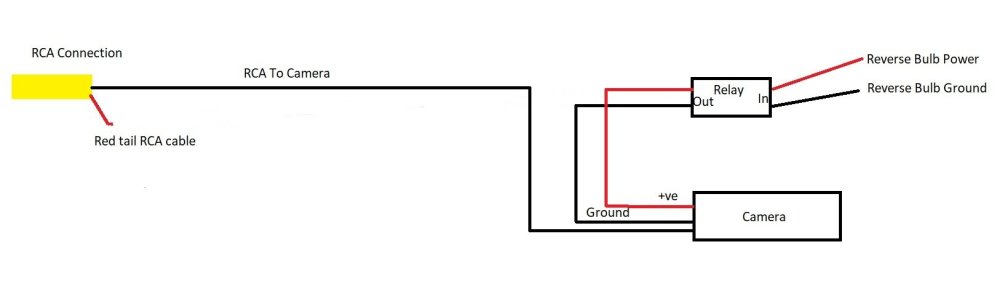
Hello all, I have just finished installing a RCD330 with a reversing camera and thought I'd do a small write-up as when I was looking for help I found myself endlessly looking through web pages! RCD330 Luckily, this install is one of the easiest installs you can do. I bought my RCD330 head unit from AliExpress (a seller called Lemon Shark), as they offered a green backlit one to match the car and it was on sale for a good price. The seller also included a Fakra antenna adapter and an AV camera adapter (for a reversing camera). To start, simply remove the trim around the existing radio. I could do this easily with my fingers starting at the top left hand side, but you may want to use a trim removal tool. Once this is done, remove the four Torx 20 screws (two each side) which will allow the radio to come out. For my Swing radio, there were two connections: the main wiring harness and the antenna connection. The main wiring harness is removed by releasing the buckle at the bottom of the harness, and the antenna is removed by pushing in the plastic tab. After removing this, they can be pulled out. If you are planning on installing a reversing camera: at the bottom inside the main radio wiring harness, there is one blue pin harness and one green pin harness. You will need to remove the blue pin connector from the main wiring harness, as this is where you will plug in the AV camera adapter connector. It looks identical to the first photo attached and is simple as removing the old one and putting the new one in. Important: remember to tell the seller of the RCD330 that you intend to install a reversing camera, as they will need to code it to enable a camera input on the screen. You also need to attach the antenna adapter, as the factory radio has a double fakra connection and the RCD330 only has one. Again, simply plug in. Once those new connections are all in, reverse the steps to remove the old radio; plug everything in. There is only the main wiring harness and the new single fakra antenna connection to plug in. There should be more than enough room to put the new radio back into the slot, but if you are having trouble, you can tuck the antenna connection in the hole in the back of the slot (right-hand side). Put the bolts in, put the trim back and that's all done! Reverse Camera Unfortunately, this install is not so straightforward. I was personally concerned about the quality of the reversing cameras being sold on AliExpress, so I opted to buy one from Audio Tech Direct. From their website, it said the compatible camera for a Skoda Fabia Mk2 was the Skod3 camera, but more on that in a sec... Step 1 - Installing the new boot release: To start, remove the boot door interior lining. This is held in by many trim clips that pop out when pulled. Once this is done, there is also a Torx screw holding in the inside boot handle which ideally needs to be removed. Once this is done, you will be able to see the boot release from the inside. Remove the connector in the original boot release. Back to the camera... the SKOD3 camera has two bolts which I assumed would screw in, but no! The original boot release is held in by a metal clip, so the new reversing camera boot release is not very secure. I ended up getting around this by winding the cable for the reversing camera around a metal structure point in the boot lid and cable tied it secure. I'm not sure when/if it will fall down, but that's a problem for another day; for now, it is secure. The boot release connector does fit, simply plug it in. For this particular camera, there is a connection between the camera and the main wiring (RCA, 12v+, ground) as shown in the second attached picture. This made it slightly easier for this next step. Step 2 - Threading wire from the car to the boot: Patience at the ready because this step is a *****. You will need to thread the main wiring --> camera connector through the rubber tailgate tunnel and up through the tunnel running along the side of the tailgate. You will need something long, thin and strong (I used an old wire coat hanger). You will also need to peel away the head lining, and I also ended up removing the C pillar trim (this is already covered at the bottom of another post named rear camera wiring for 2011 fabia). I did this part in three steps: Remove the rubber tailgate tunnel on the tailgate side so you can see all the way through to the inside of the car. You can reach underneath the head lining and feel the hole in the ceiling which leads to this tunnel. Once you are confident where the hole is, try to thread the connector through the rubber tunnel. Once this is done, remove the rubber grommet for the heated rear window and feed the coat hanger through to the top of the tailgate. Hook the connector and pull through to the hole for the rear heated window wire. Finally, feed the coat hanger through the bottom end of the tailgate tunnel and try to hook it onto the connector. Once hooked, give it a pull and hopefully it comes out of the other side! Then simply connect the two connectors together and pull the wiring from inside the car. You need to have as much of the wiring in the car as possible so you can connect it to the 12v+ and ground sources. The RCA cable is more than long enough. Step 3 - Connecting the 12v+ and ground sources: For this step, I ended up connecting to the reverse bulb +ve and ground. The instructions tell you to connect to a 12v+ ignition source, but I felt this was unneccesary and needed more work. You will need to remove the C pillar trim and boot lip trim. The C pillar trim has already been mentioned above. The boot lip trim is held on by a few pop clips and two plastic 10mm nuts in the spare wheel well. You will need to take out the spare wheel to access them properly. Once removed, the boot lip trim can be removed with a tug but be careful not to crack or break it! The plastic trim behind the rear left light will also need to be loosened. This is done by removing Torx screws along the top of the trim (now accessible after removing C pillar trim), plus a 5mm allen key socket and another torx screw located directly behind the rear light (I think one of them also doubles up as a luggage/net clip?) Once this is done, you will be able to see the wiring for the rear lights. Check carefully which is the reverse bulb wiring - for my car it was the brown wire (ground) and a light blue/borderline grey wire (12v+). Important: you will need a relay to go between the reverse bulb wiring and camera connections. The relay-in side connects to the reverse light wiring and the relay-out connects to the camera wiring. I have attached a simplified diagram showing this. I personally stripped the reverse wiring and wound the relay wiring around it, then used insulating tape to seal (I also did this for the relay-out to camera wiring). Once you're happy that the connections are secure, move onto the next step. Step 4 - Locating the RCA connection to the front of the car: Again I followed the 'Rear camera wiring for 2011 Fabia?' post for this step. If you follow the long RCA connection along the headlining and then along the top seals along the headliner and top of the doors, it makes this step SO much easier. Follow it along until you get to the A pillar, tuck it behind the trim and then you will tuck it behind the dash. Open the passenger (left) front door, and above the airbag on/off switch you can remove a piece of trim which enables access behind the dash. Remove it, then find the wiring and pull it through. I took a slightly 'easy way out' approach here, but the wires are completely hidden so it didn't bother me. I removed the soft material underneath the glovebox (above the passenger footwell), and threaded the wire along here. Finally, there is a small gap at the bottom left-hand side of the radio slot, which gives access to the top of the footwell. Make your two hands meet, then pull the wire through to behind the radio. Plug in the RCA connections and it is all connected. The red tail wire attached to the RCA is needed for other aftermarket head units that have a reverse signal wire. As the RCD330 has been coded for a reverse camera and the RCD330 interacts seamlessly with the CANBUS, there is no need for a reverse signal. You will probably find that there is a lot of cable spare - I cable tied it together and tucked it behind the glovebox. Step 5 - Test! I would highly recommend that you test it all works before putting everything back together, as it is a pain to put everything back and then remove it. Check the camera feed AND the reverse light works. Note: as the camera is tapped into the reverse light, you will notice that when you put the car back into drive/neutral/gear, the camera feed will freeze as the camera no longer has any power going to it. This isn't personally a problem for me as the camera feed eventually disappears once you drive off and I only need the camera feed when reversing, but this may bother some of you. If all is well, put all the trim back together and give yourself a pat on the back! 👏 I hope this helps some of you. If there are any questions I will try to answer them but this was very much experimental for me.

-
Long time reader but first-time poster on the forum. Just bought a 2013 Fabia VRS and loving it so far. In the process of installing an RCD330 and rear view camera so will do a basic write up of my experience following completion. But for now, hello everyone 👋