


Arminator
-
Posts
54 -
Joined
-
Last visited
Content Type
Profiles
Forums
Gallery
Shop
Events
Downloads
Posts posted by Arminator
-
-
Does the airbag and steering wheel (3 spoke) from a Passat 3BG 2002' fit my 2004 Octavia 1U5 (4 spoke)?
Yes it will and airbag connector should be the same. Also note that the same steering wheel has been used on Superb mk1.
-
You can buy a brand new from ebay. Then you need someone to pair it with Vagatcho and of course to cut the blade. I would suggest this one. I had a very good experience with this seller. He can tell you correct replacement part number. Also if you find his offers too expensive you can look for cheaper chinese alternatives.
Cheers
-
Well if part numbers differ the connector pinout also might differs although the connector looks the same sou you would need to rearrange pins. It can be coded for your car but with limitation, when I say limitation I mean the power windows controller will not operate because of lack of communication with CCM.
For example, if you have 1J0 959 799AH CCM and you replace it with 1C0 959 799AH CCM, your power windows won`t work and you have to replace power windows controllers on all doors to match you new CCM.
So the best bet is CCM with same part number.
-
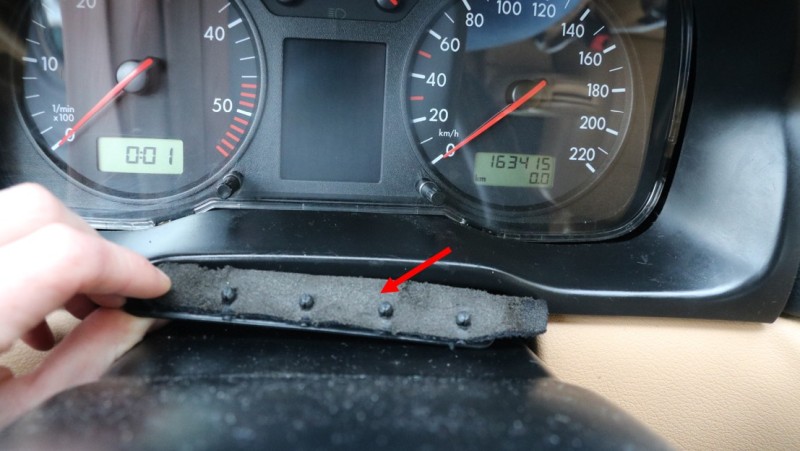
This is a small DIY Guide for how to remove instrument cluster from Octavia 1 (1U).
For this removal you will need:
-10 to 15 minutes of time
- Torx T20 srewdriver
- One small flat screwdriver or a knife.
Before start, as security precaution, remove the key from the ignition and disconnect the car battery, to avoid loosing immobilizer sync.
Also to note that this was made on LHD car. I assume that procedure is the same on RHD cars.
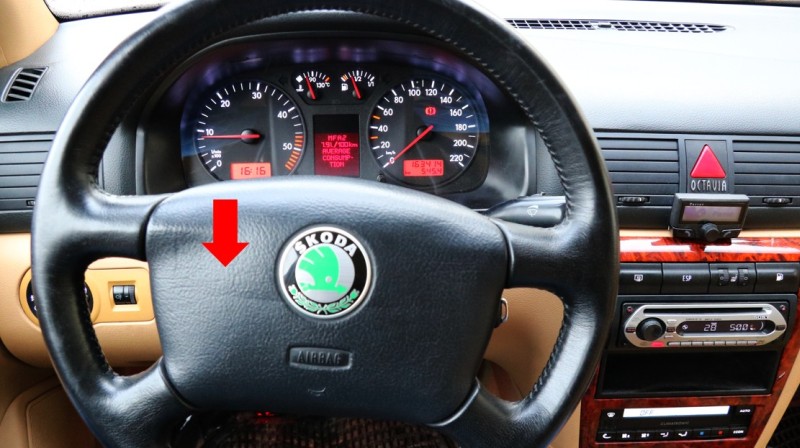
First you should lower and pull out the steering wheel as much as possible so you could have plenty of room for easier access to the cluster (Picture 1)

Now step by step:
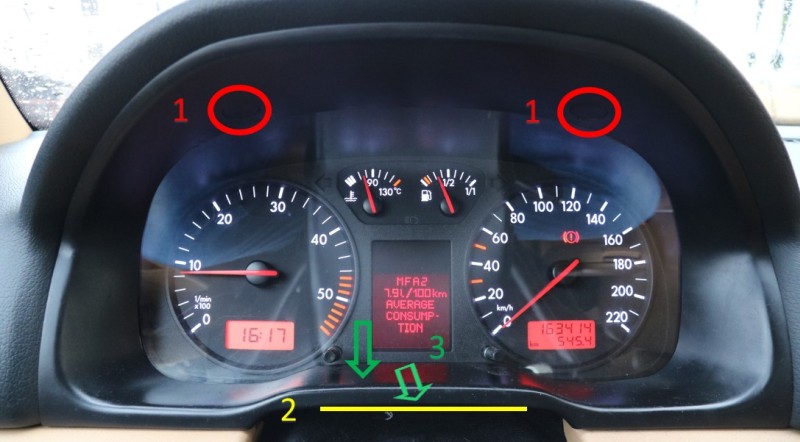
1. Locate two plastic screwcaps marked with red circle on the top of the plastic trim surrounding the cluster, you can you small flat screwdriver or a knife to remove it. After removing these two, unscrew two screws and the trim will be free of screws (Picture 2).
2. Use small flat screwdriver or a knife to detach clothes part from underneath the plastic trim (Picture 2).
3. Push the bottom part of plastic trim down as marked in the picture and pull it out gently (Picture 2).
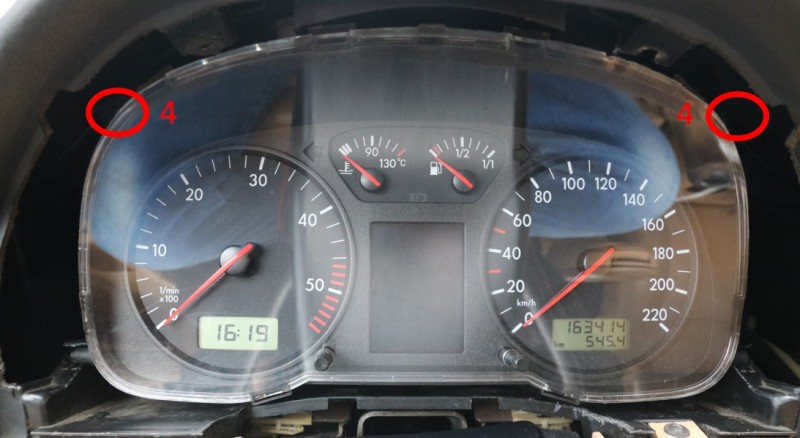
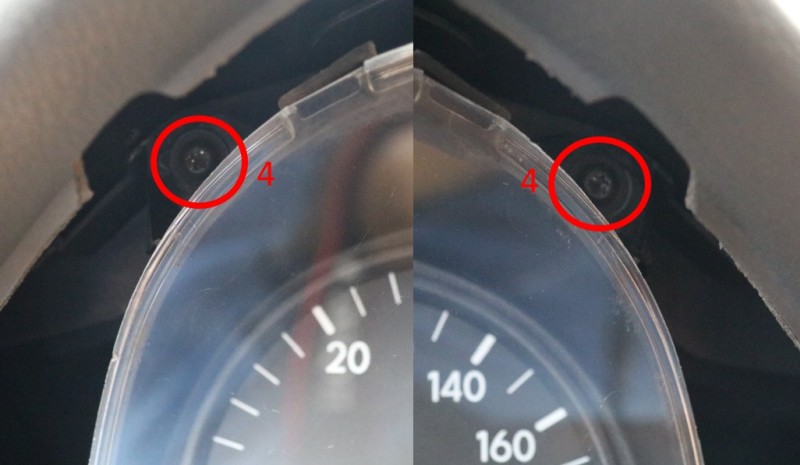
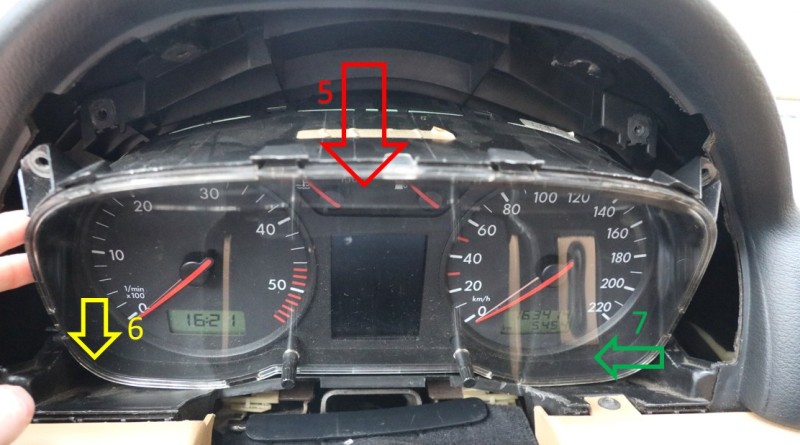
4. There are two torx T20 screw on the top of both sides of the cluster as marked in the pictures 3 and 4. Unscrew them.
5. Pull out gently the top part of the cluster (Picture 5).
6. Now easily pull out the small round handle of the cluster (Picture 5).
7. Now push the cluster a little bit to the left to release small round handle of the cluster on the right side (Picture 5).
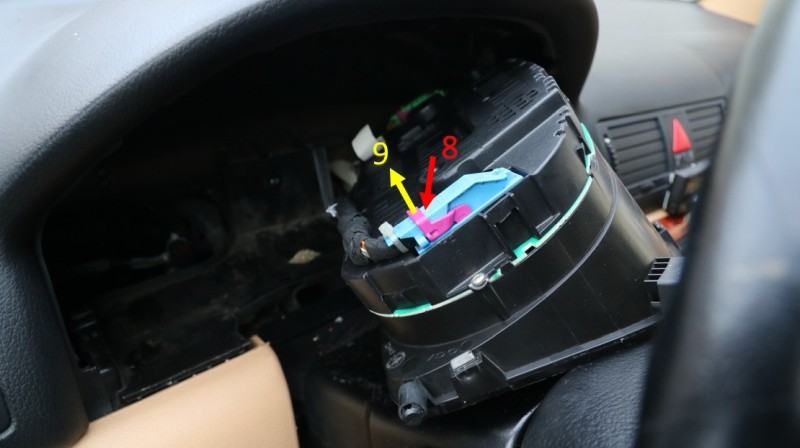
8. Use small flat screwdriver (or top of the knife) to move the little fuse which keeps the pink handle of the blue T32 connector from releasing (Picture 6).
9. Pull the pink handle up (Picture 6)
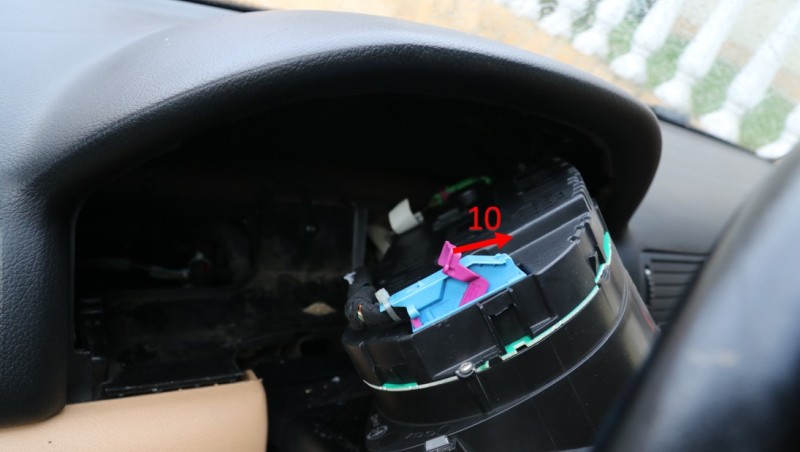
10. Keep pushing the pink handle up clockwise to release blue T32 connector (Picture 7). Leave and keep pink handle in this position because you will not be able to put the connector back to the cluster if the handle is moved from this position.
NOTE that steps 8, 9 and 10 are also for releasing the green T32 connector on the right side of the cluster.
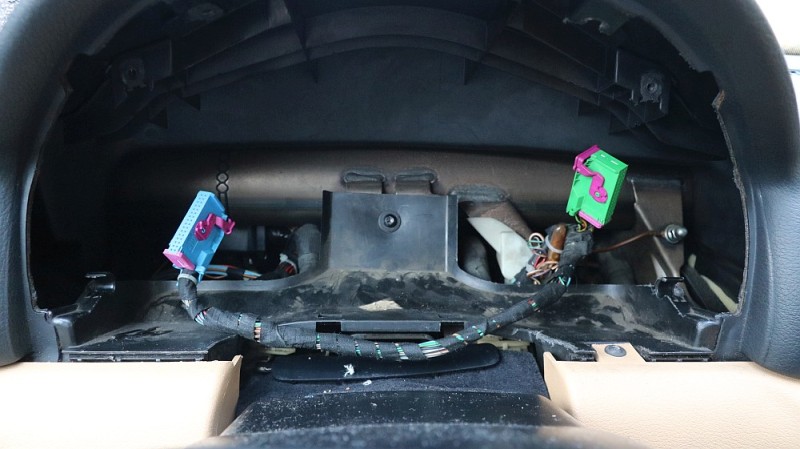
11. Now you can freely take the cluster out. (Picture 8)
Putting the cluster back is a reverse procedure. One tip: try to attach clothes part to the plastic trim before you return plastic trim to its position (Picture 9).
-
Regarding fuel cap, did you check the fuse at the fusebox (no. F 38)?
-
@zejdkoco1 Regarding RPM needle, well you could try taking out the cluster, disassemble it and try the needle for moving. May be the electromagnetic motor has died.
Usput, ako si blizu Sarajeva mogu ti rado pomoci
Samo se javi u PP... -
Did you check ECU connector (under the windshield tray)?
Do you feel any issues while driving (slow acceleration and so)?
-
Regarding code from ABS module - it is just reminder that you have engine problems. That means you have no issues with breaking system. When you fix and remove engine problems those codes from ABS won`t appear again once you clear them.
-
did you check fuses on your battery (under the hood)?
also you should check the fuses under the your steering wheel column. I`ll attach the photo.
-
so at the end it was connector-fault? happy that you have solved it!
-
unfortunately you will have to look for someone who has a VAG tacho to pair keys with the cluster...
-
connector seems fine. did you get a sticker with scratch able part that comes with you spare key? this sticker contains 4-letter pin code you can use for pairing your keys with cluster using vcds.
-
I mentioned this because may be some of the pins went wrong. to be more precise: Pin number 2 on Green 32-pin Connector is for reading coil for immobilizer 1 (from 05.99 prod.), and pin number 17 reading coil for immobilizer 2 (from 05.99 prod.). might be worth checking.
-
 1
1
-
-
here is a short guide how to program keys using vcds.
-
I have removed cluster few times and battery was connected every time and never had issues. Check if connectors fit housing correctly, that is probably the issue!
-
May be the key needs to pair with the control module in the car? Specially if some one before you has replaced Confort control module (which is in charge for central locking). If you have anyone with VCDS (diagnostics) near you it should be 5 minute job. If you would have spare key, which unfortunately you don`t have, you could do pairing on your own without VCDS very easily.
Good luck!
-
Hi
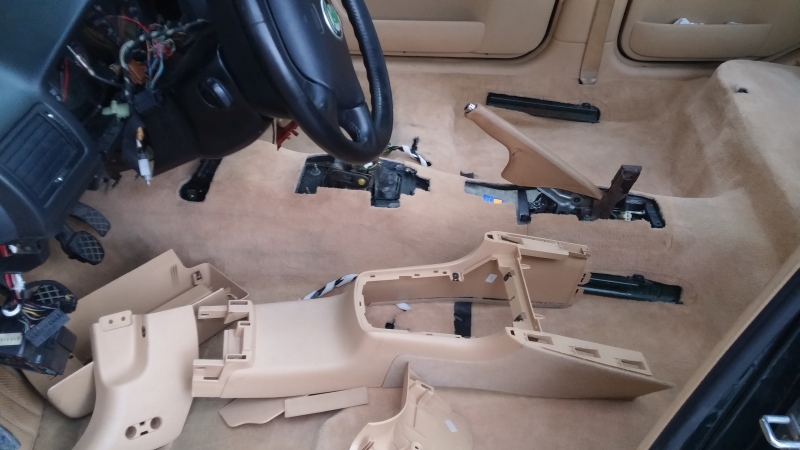
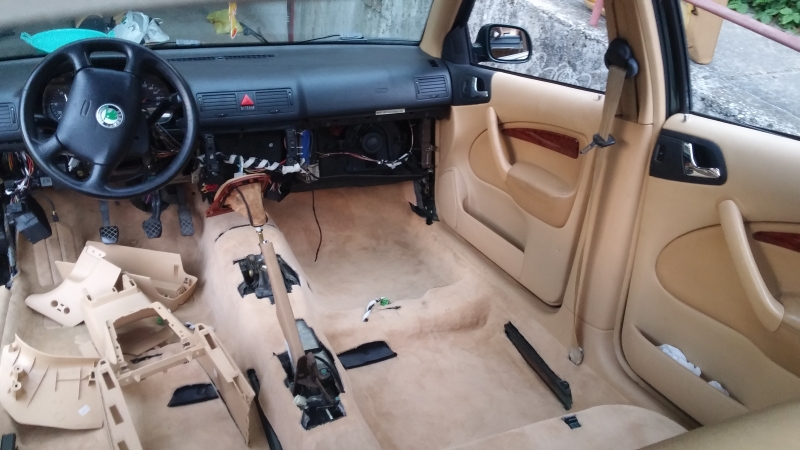
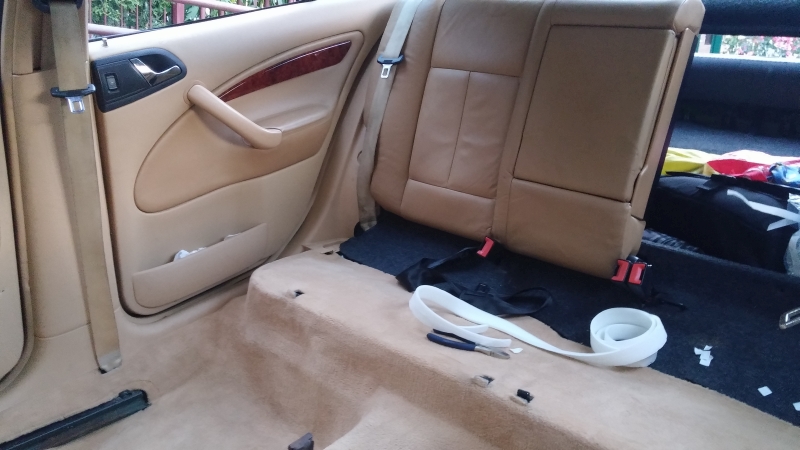
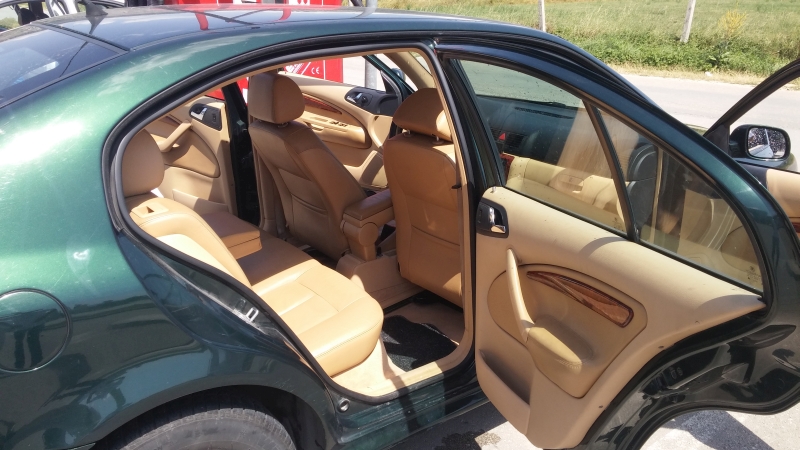
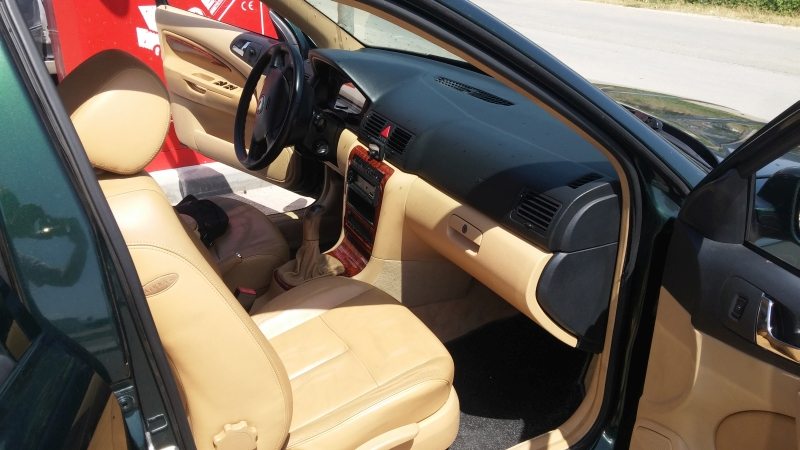
To give my little contribution... I have recently done same thing: Took my "elegance" interior and put in L&K one. Fortunately, I was lucky to find L&K interior in very good condition (and it was very cheap: 100€ for complete beige interior including door panels, carpet, seat belts and other beige upholstery parts). I also got leather steering wheel for 50€ extra. Old seats were not heated seats so I took complete installation from a donor car, and it was quite easy to fit as it is OEM. Regarding instrument cluster, I also replaced it with one from Golf 4, with huge display at the center. In reality you need about 6 to 10 hours of work and a lot of patience. I added few photos for you to see how it went.
Good luck in your work
-
Does anyone know what color is SMD on stock mk1 dashboard which is all in green? Are they white (going through greenish plastic) or are they green? I need to replace few of them and don't know what color to buy.
They are green. The plastic over it is in white color. You need 3528 sized SMD leds.
-
To give my small contribution.
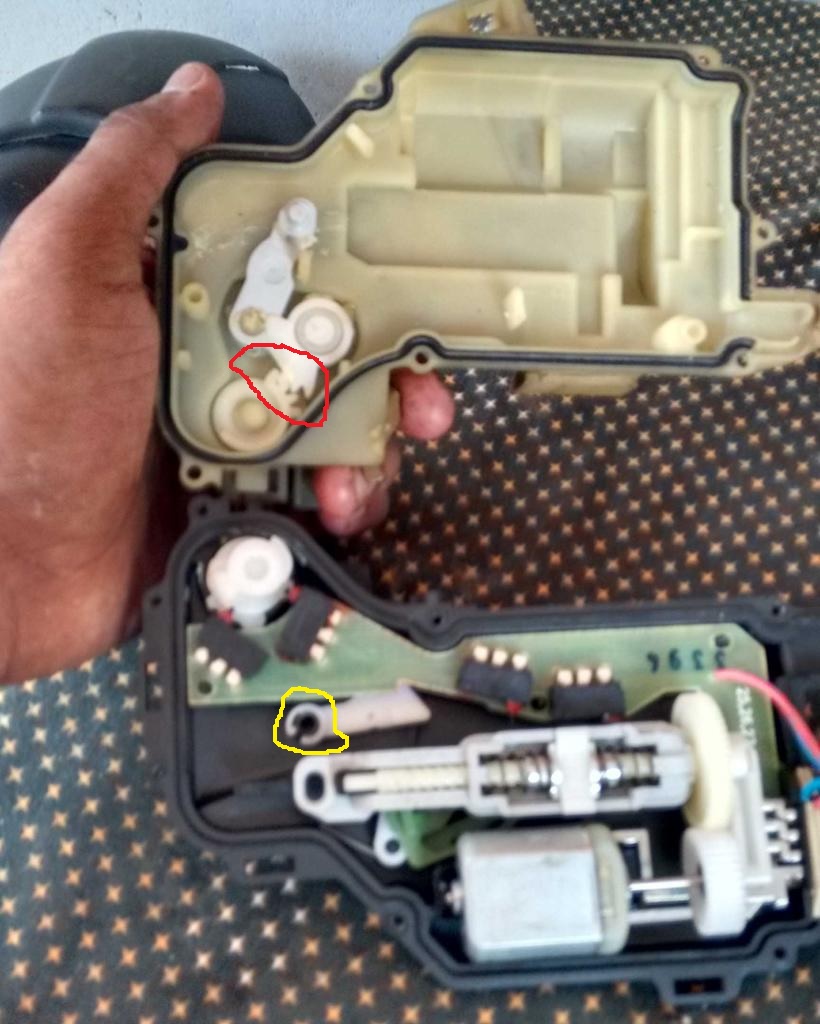
Few days ago the lock on drivers door of my started to make troubles. All doors would lock except drivers door. So I took the lock mechanism out and when I disassembled it I found the following issue. On the photo you can find attached, one part of the plastic in yellow circle got broken and it got stuck between plastics in the red circle jamming the door lock and not allowing it to unlock. I fixed it by removing the broken part and reattaching the rest of broken plastic to its holder by very small cable tie so it could move and be attached at the same time.
-
Hi all
I have a standard key door locking system with my Octavia and what would be required to change the central locking to a two button folding key fob and what parts would be need to change to do upgrade the central locking any help or advice would be greatly appreciated
Thank you all
Hi
As you can see in the description, I have Octavia SLX from 2000. It came with standard 2-button remote control central locking key. I replaced it with 2-button folding remote lock key and it was easy job. It cost me around 18€.
I bought brand new folding remote key with uncut blade (complete key electronics inside, cost for about 13€) over ebay (from china), took the immo-chip from the old key and put it in the new key. I got the locksmith to cut the blade on my new key (cost 5€). After that I just paired a new key for remote locking with the car`s CCM and that`s all. Now I have brand new folding 2-button key. Of course I assume that you already have a remote locking enabled.
-
1
-
-
Thanx for the info. Comparing how they look according to the images, they seem the same. 1U prefix is used for Octavia and 1J is for Golf (and Passat probably).
-
Could be faulty switch in boot door lock mechanism. That one triggers lights on.
-
Good one. I was just looking for this guide. Anyway do you know if motor from prefacelift headlights will fit facelift headlights?
-
Thank you for your replies. Unfortunately I already tried to replace a battery pack but that didn`t work out so I am looking for some other solution. It seems that for me it would be the best to stick with the used one that is functional until its batteries go out.
Thanx once more
Cheers
 Samo se javi u PP...


key replacement
in Skoda Octavia Mk I (1996-2004)
Posted · Edited by Arminator
well that is probably cheap chinese copy of a original tool which is waaaay more expensive... I`ve tried chinese copy of 3.01 Vagacho version and it didn`t work.