Gavs
Finding my way
-
Joined
-
Last visited
Everything posted by Gavs
-
-
🤣 Yeah I couldn't find a red one so was intended to re-paint. But yeah, need another because of rust. Had considered repairing but it's rusted right through. What about this one? https://www.ebay.co.uk/itm/155077301601 At least this one is the right colour.
-
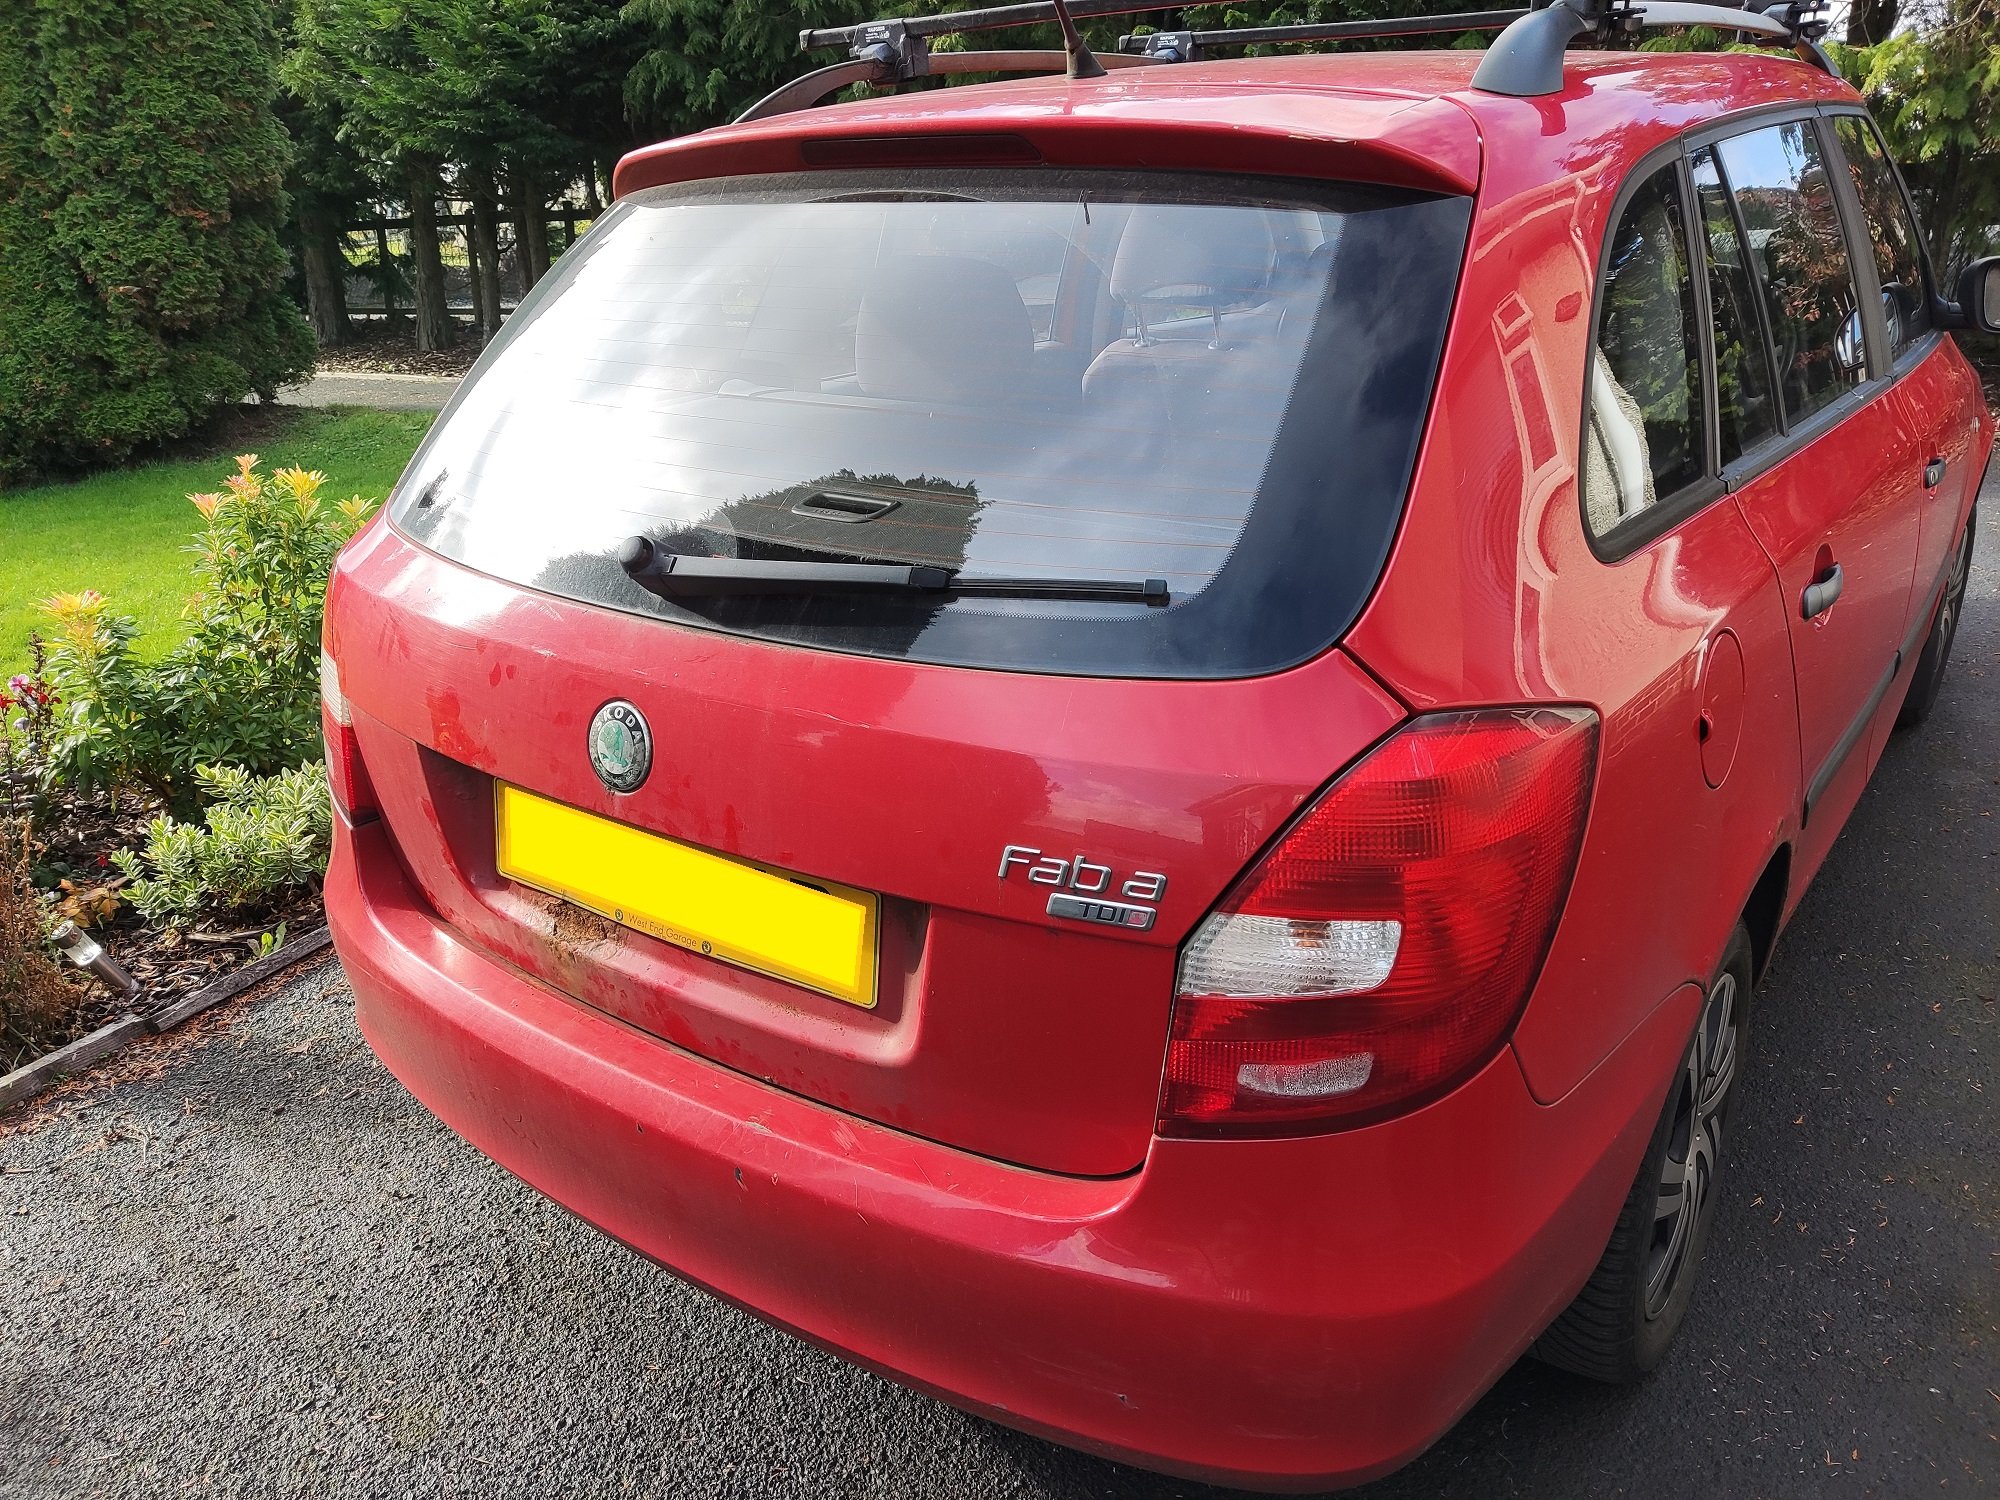
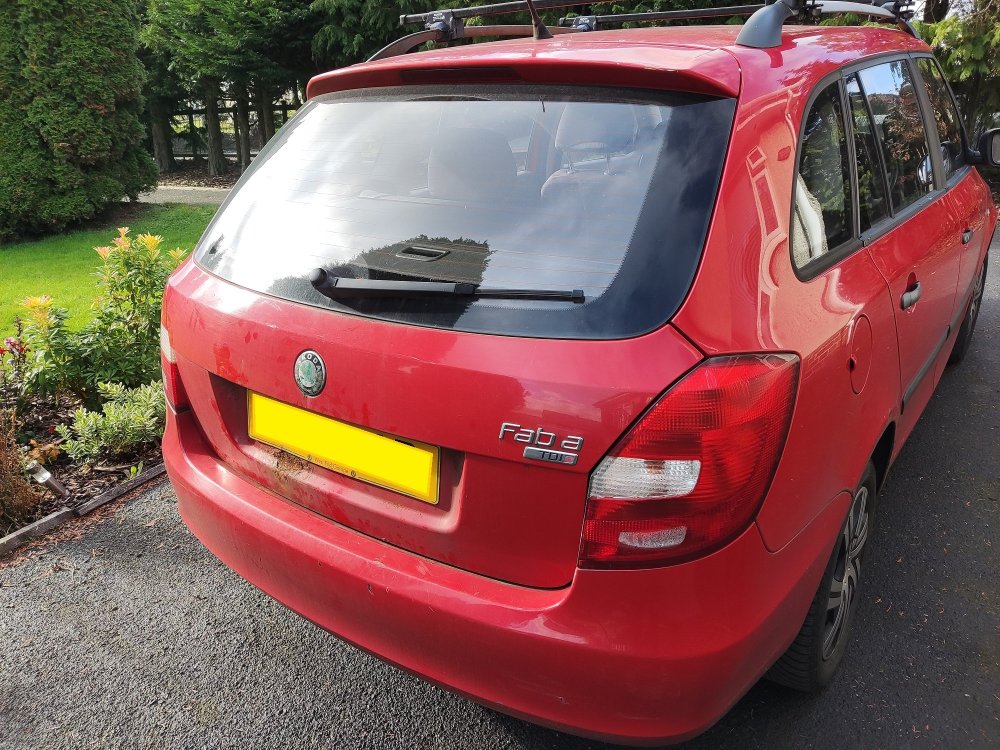
My car for comparison...
-
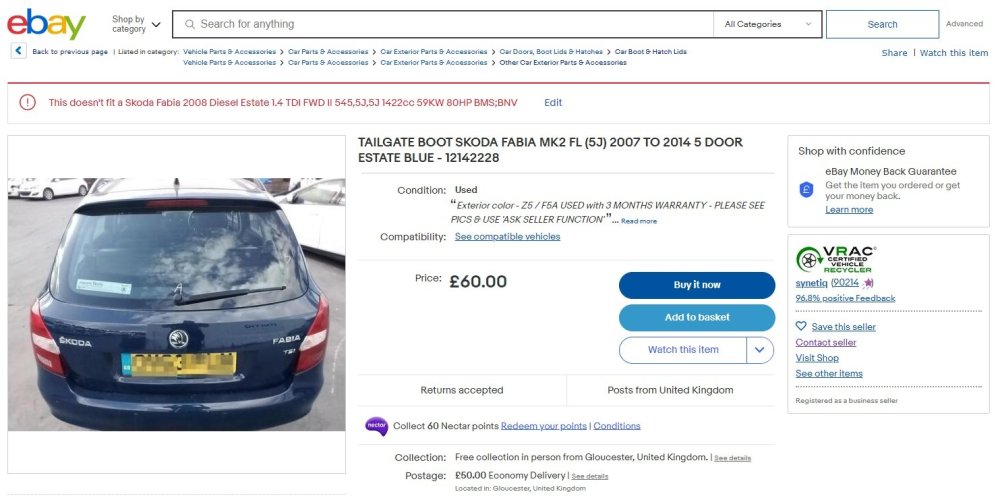
I'm looking for a replacement tailgate and essentially found what I think is the petrol version of my diesel. eBay reckons it's not a match...possibly because one is a diesel and the other petrol, but the body should be the same?!?...or is it to do with electrics / fittings? Any thoughts greatly appreciated. Scott
-
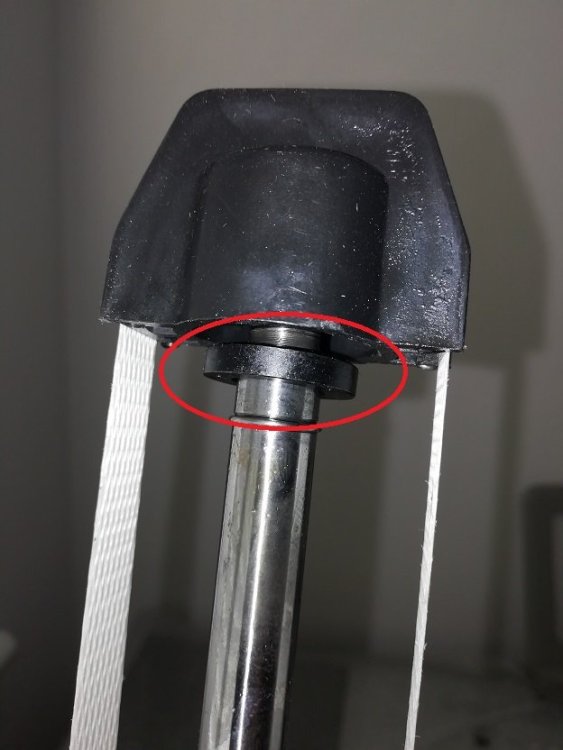
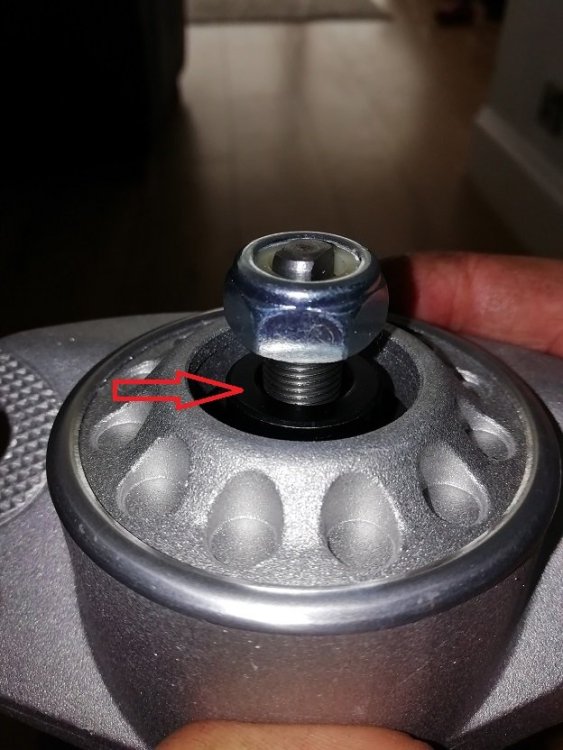
So I've bought some new shock absorbers and mounts. I noticed the new shock absorbers have a washer with them but the old ones (after removing the mounts) don't. I can only assume after some trial and error that it goes under the mount bolt or that I don't use it at all? Looks like the nylon on the new bolt will just catch and no more if I do use it...any thoughts?
-
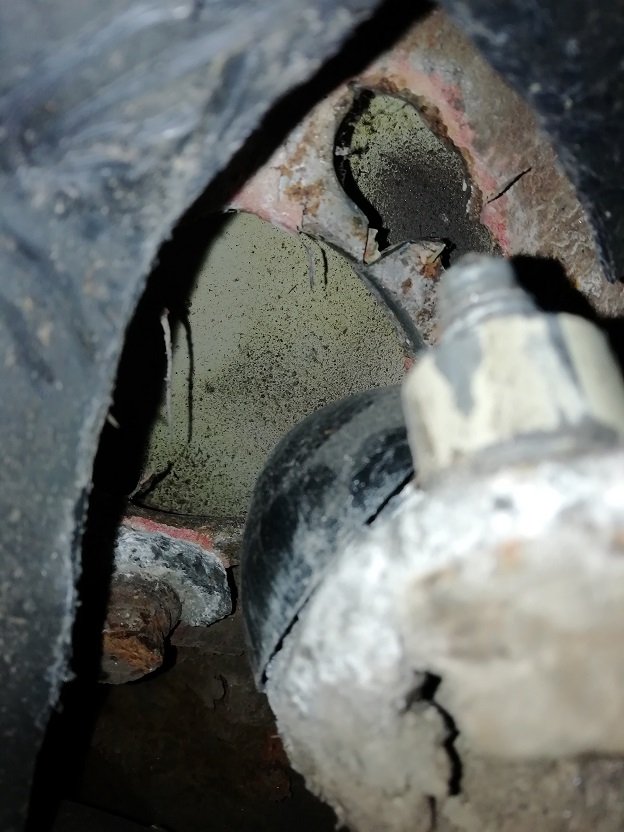
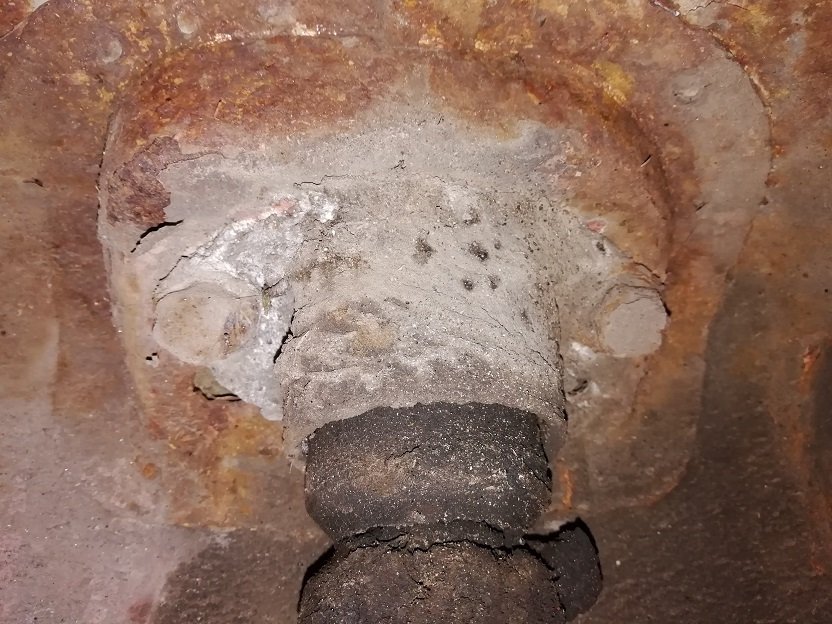
Probably a good idea, here is the other side that folks advised me to check...literally turning to powder. Came off no problem though...impact gun is your friend...I think!
-
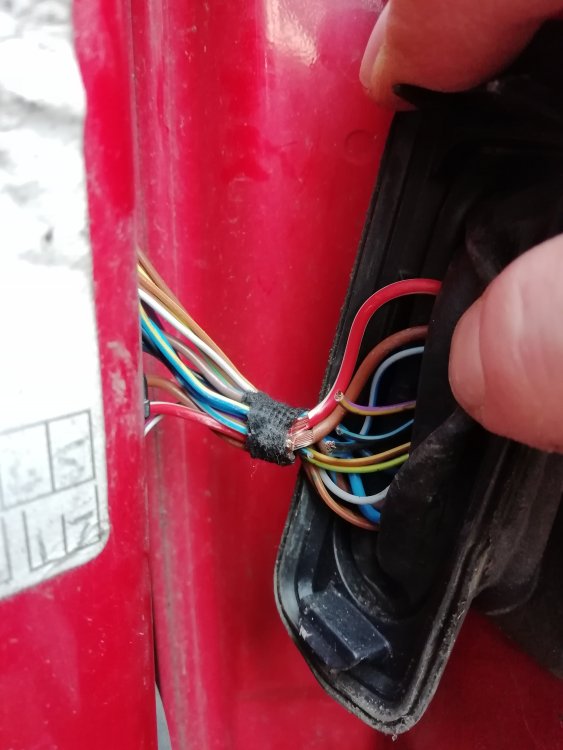
Same issue with my Mk2. Both windows suddenly stopped working and drivers door would only ever open or lock with the key (although the later has been the case for years)
-
Thanks for the replies folks. Think I have found a welding wizard that's gonna look at it this week. Thanks for the money saving tips and a heads up on checking out the other mount. I'm hoping for a few £££ I can get this car back on the road. Under normal circumstances I would probably be looking at another car given this one is 14 years old and 140k. Given the price of everything (including 2nd hand cars) I think I'm gonna need to keep kicking this old girl down the road.
-
Little tip I got concerning the heat shield. If you find the fasteners that held the shield in place have corroded away (and also corroded a hole in the heat shield)...get some plastic (think milk bottle tops or base of a plastic shampoo bottle). Place the plastic onto the studs that hold the heat shield in place, and using a deep socket, hammer the plastic onto the studs. Bingo, heat shield held in place and no more corrosion.
-
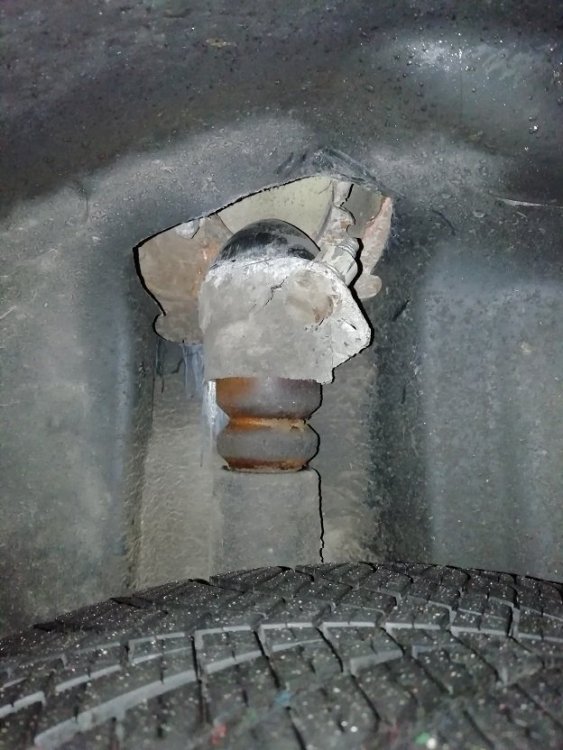
So for the past few days there has been a horrible banging sound from the rear of my car. Initially I thought it was just my roof bars rolling around that I had flung in the boot...until I noticed a definite handling issue going round a corner. A quick check revealed the shock absorber has separated from the rear mount...in drastic fashion. So I removed the shock absorber to see what the damage is. This doesn't look like rust, more to do with the state of the roads around where I stay. Shock mount probably broke first before it tore out the wheel arch mount. So I can replace the shock / shock mount but looks like a welding job for the wheel arch mount. Any thoughts or suggestions?

-
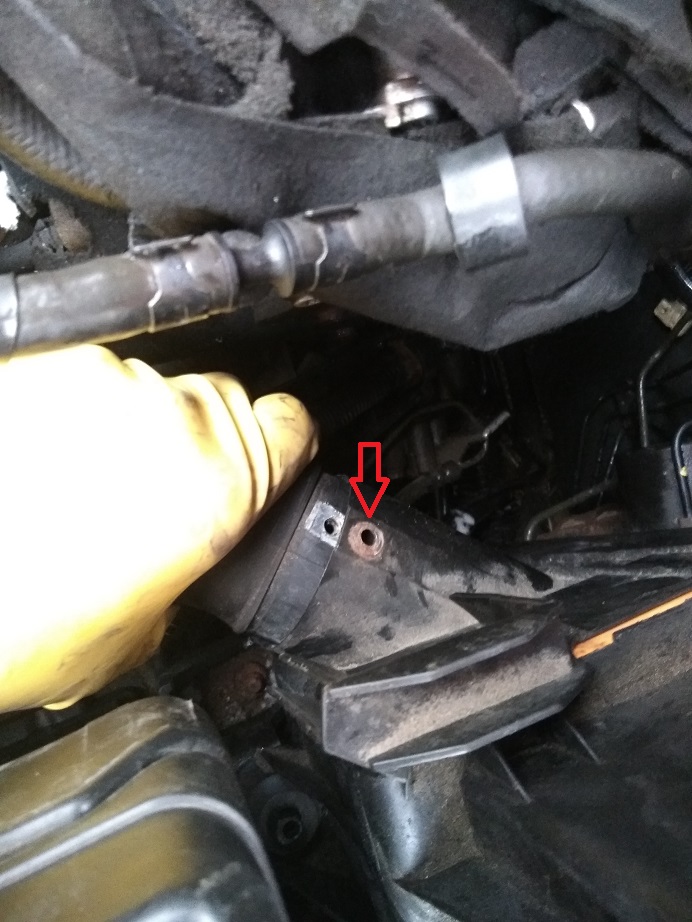
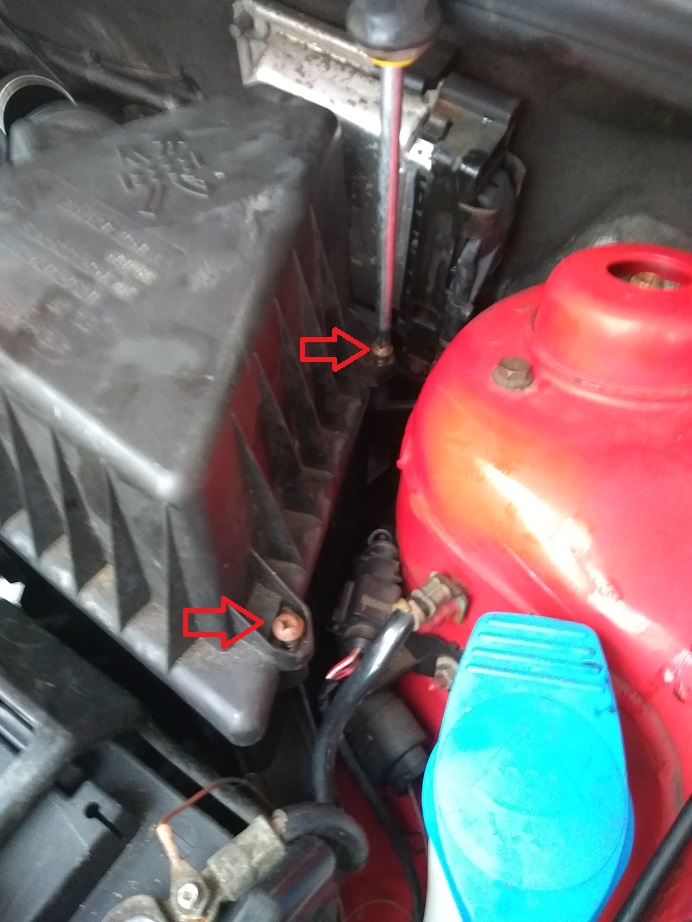
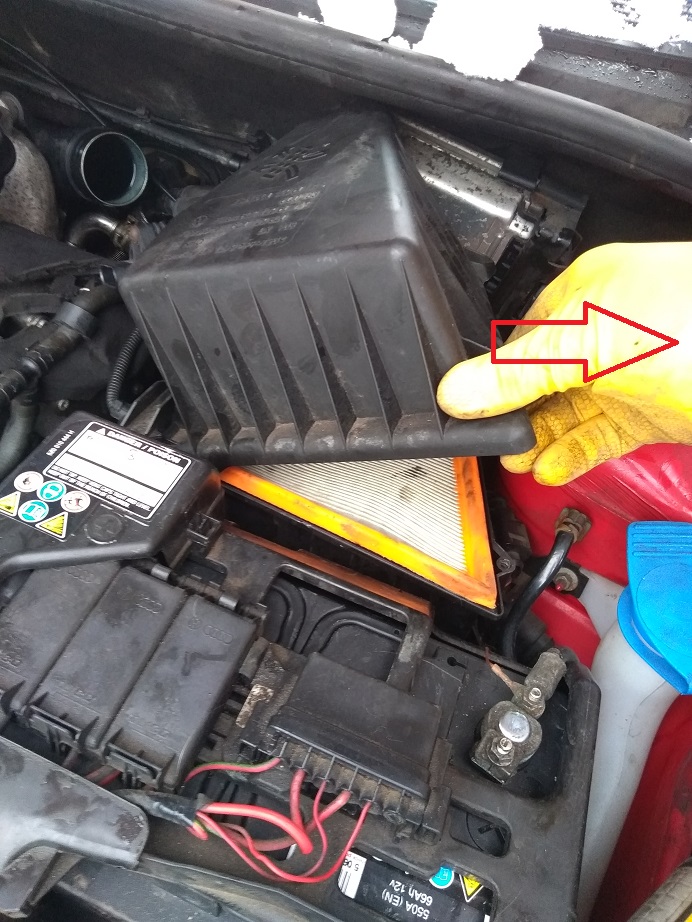
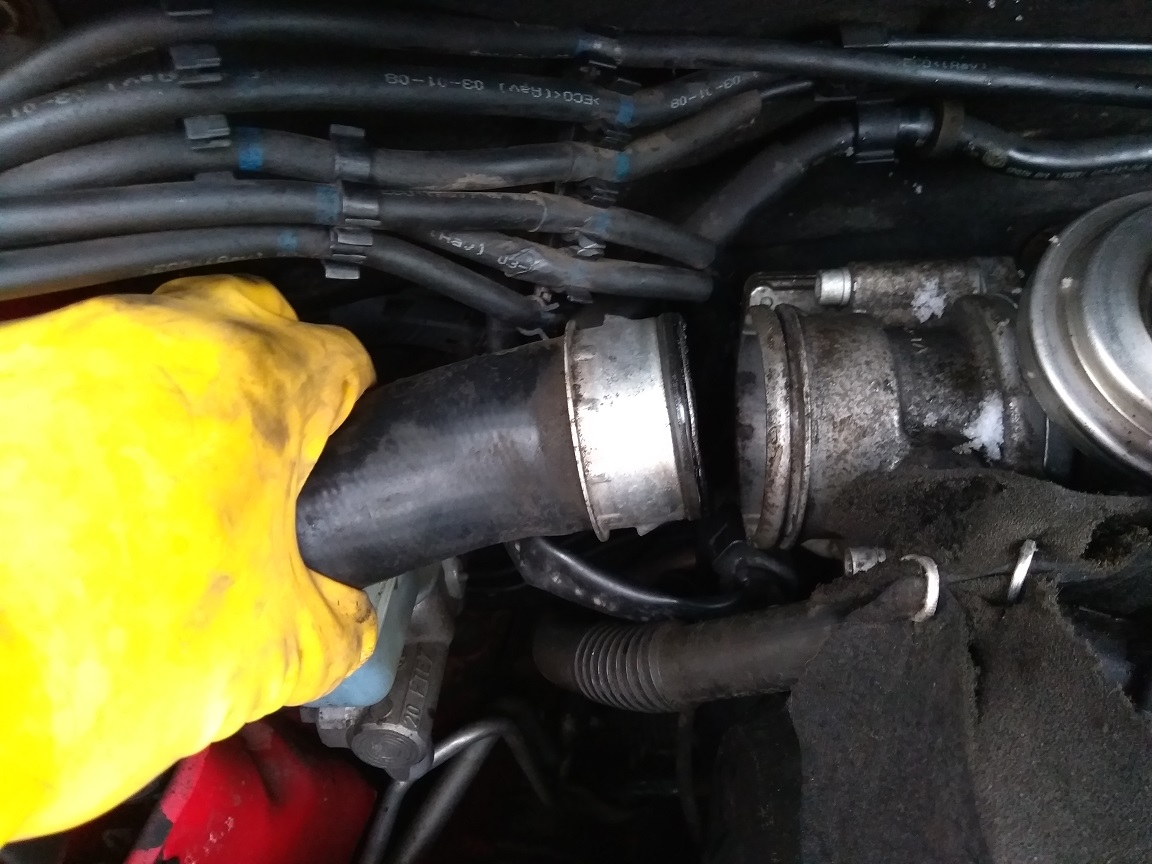
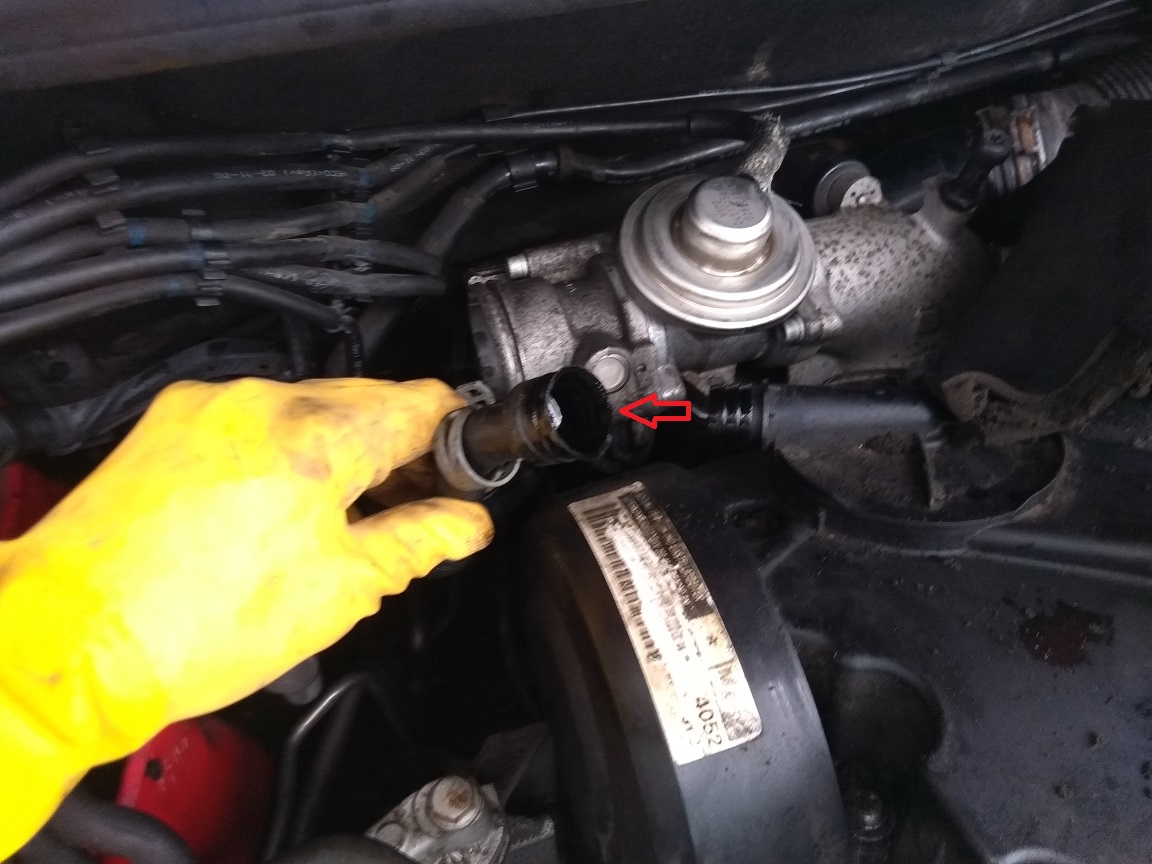
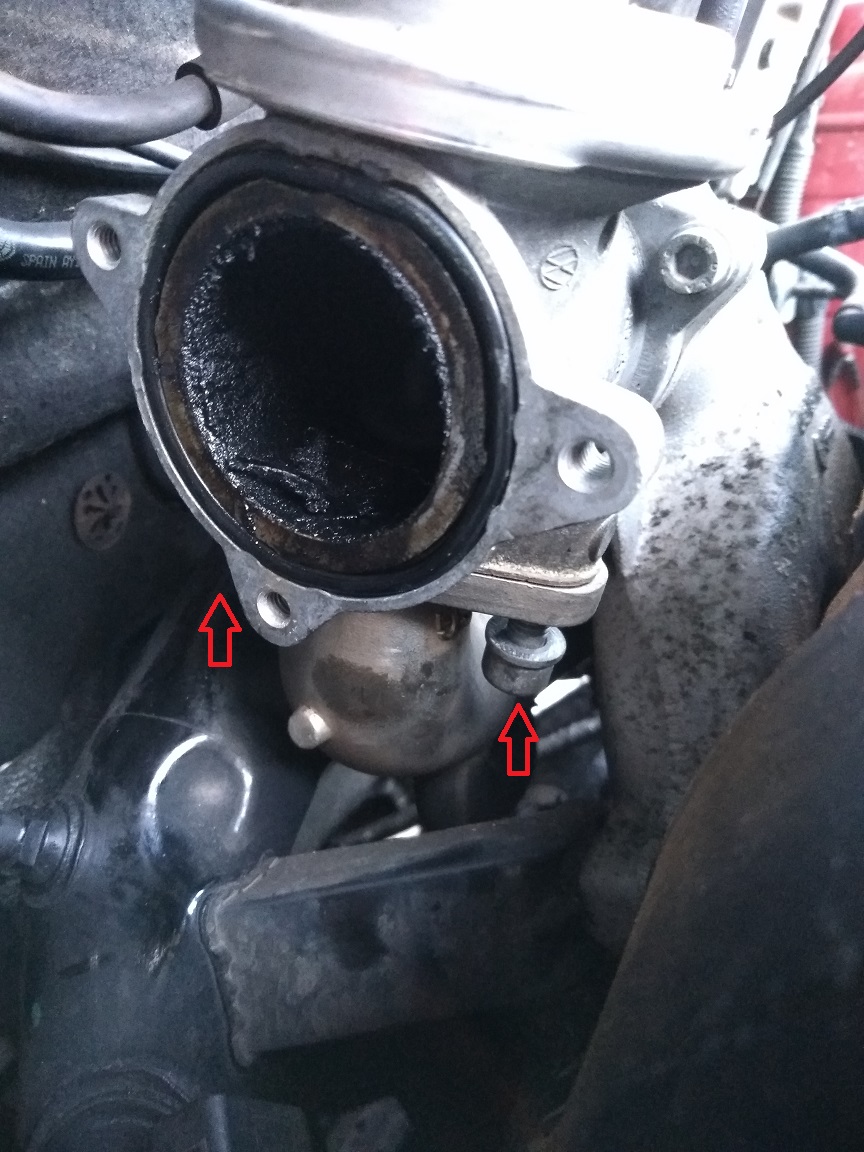
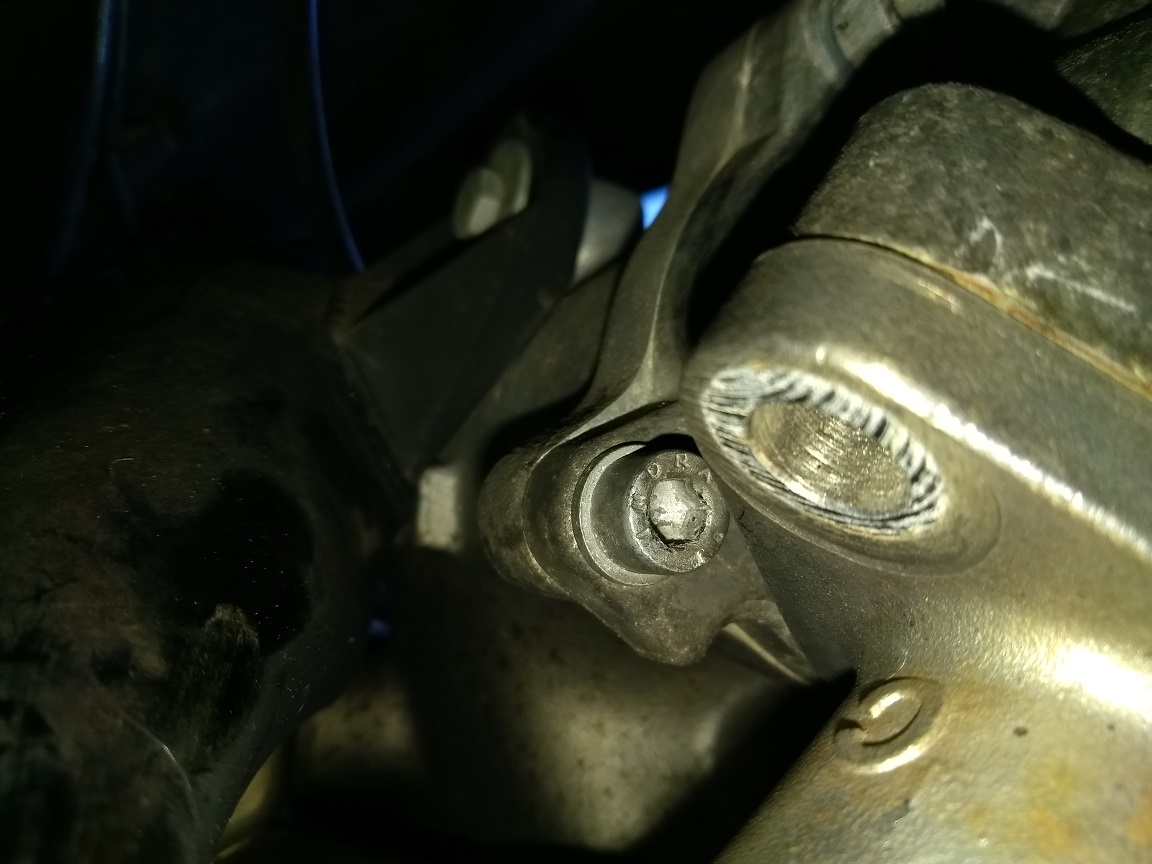
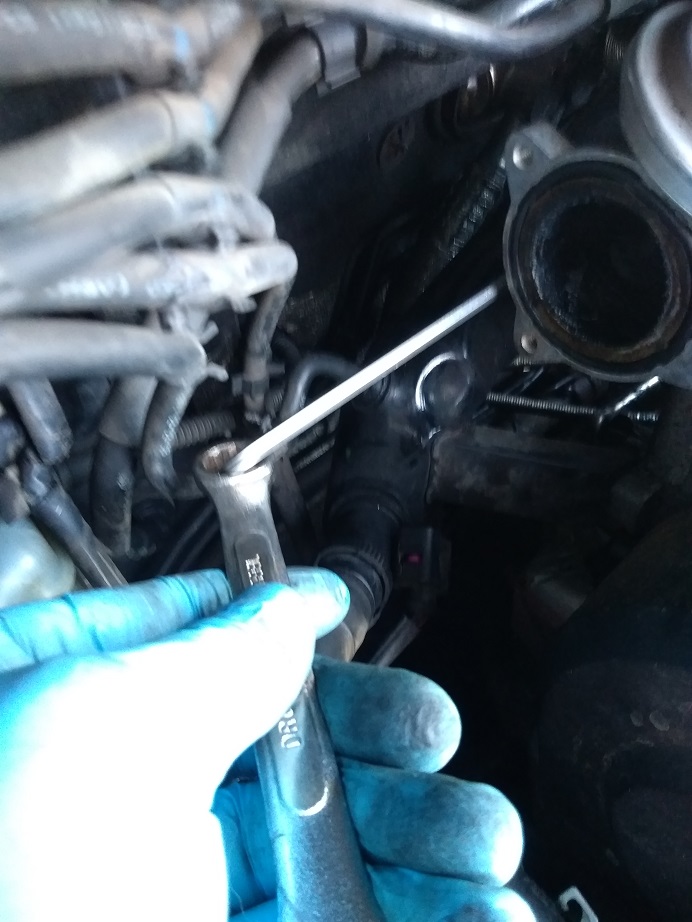
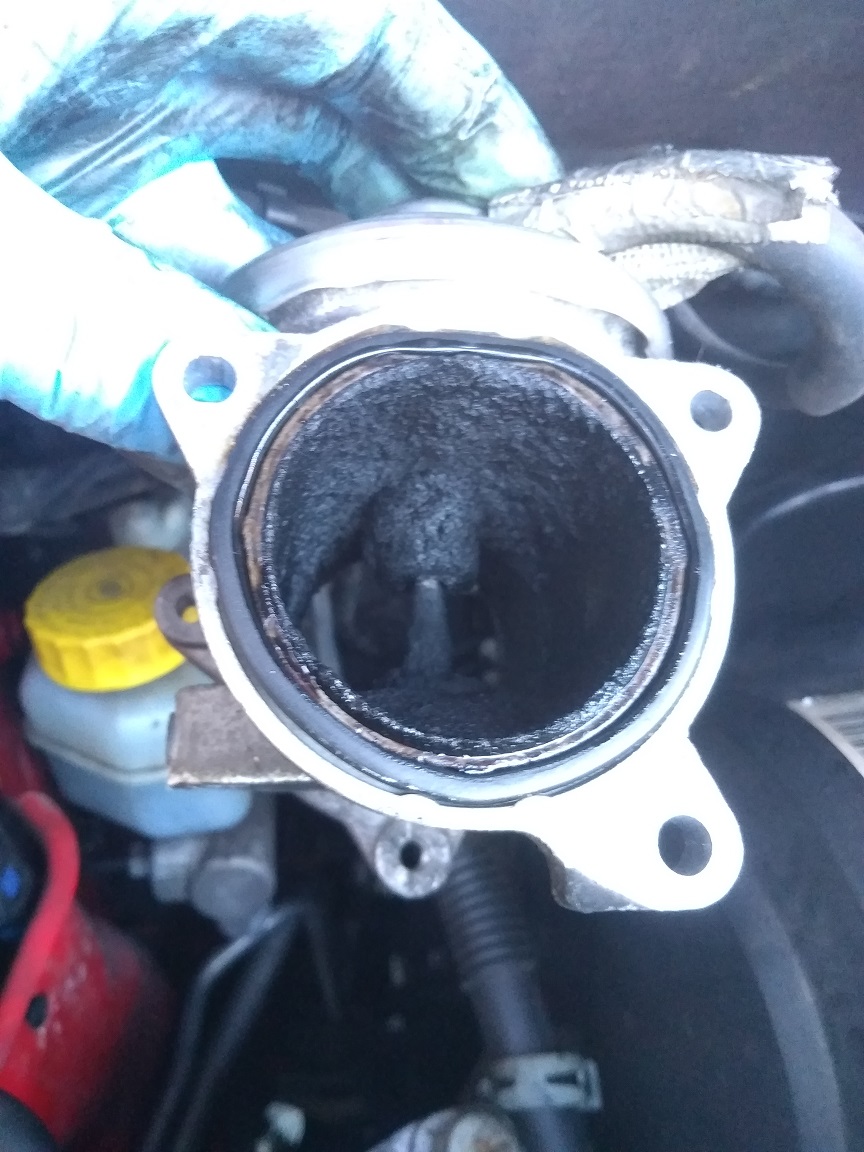
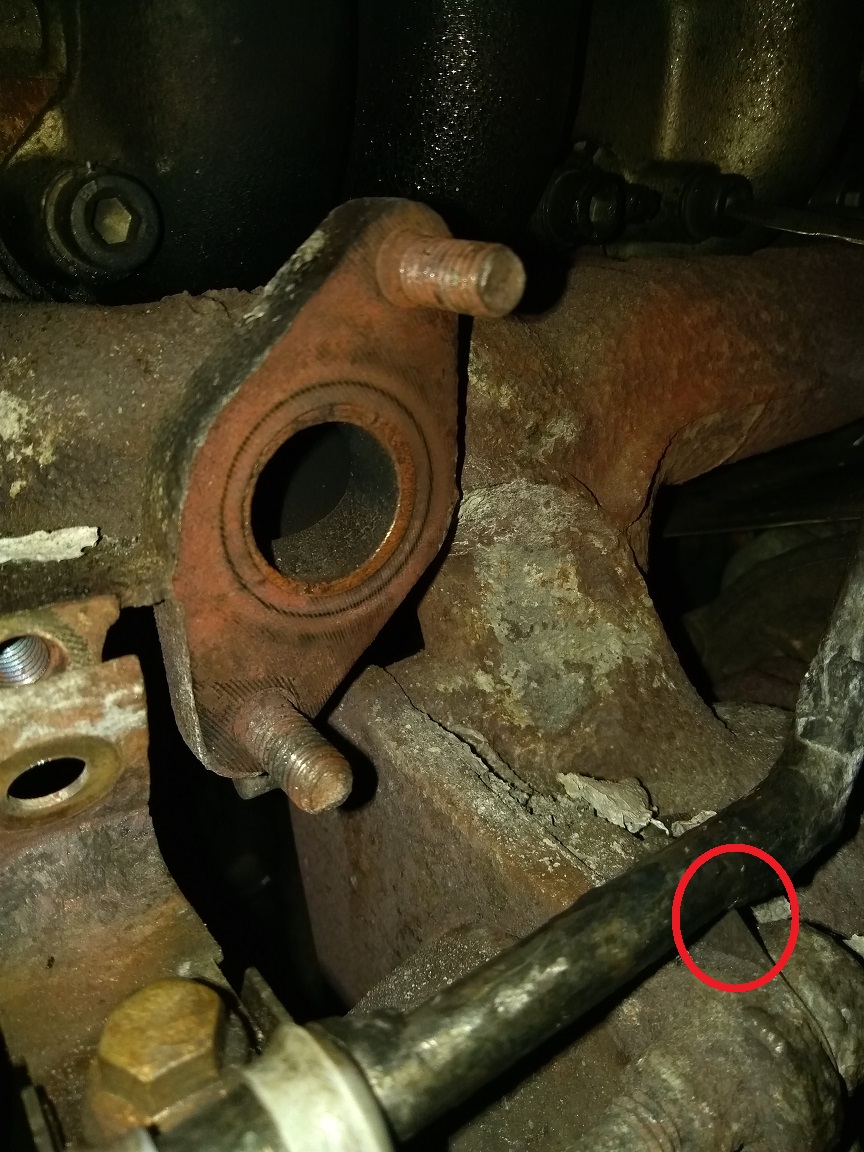
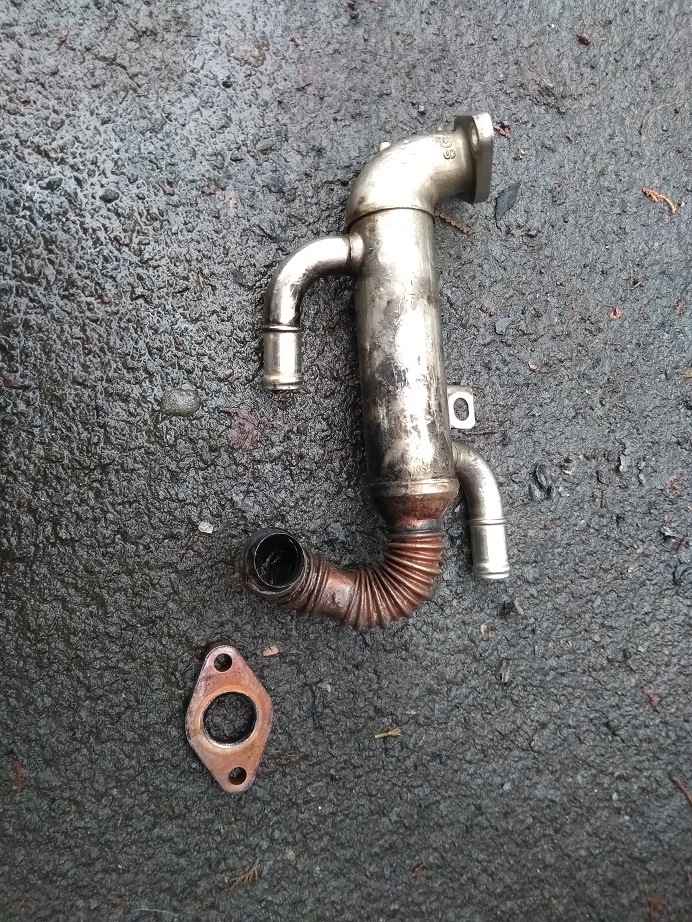
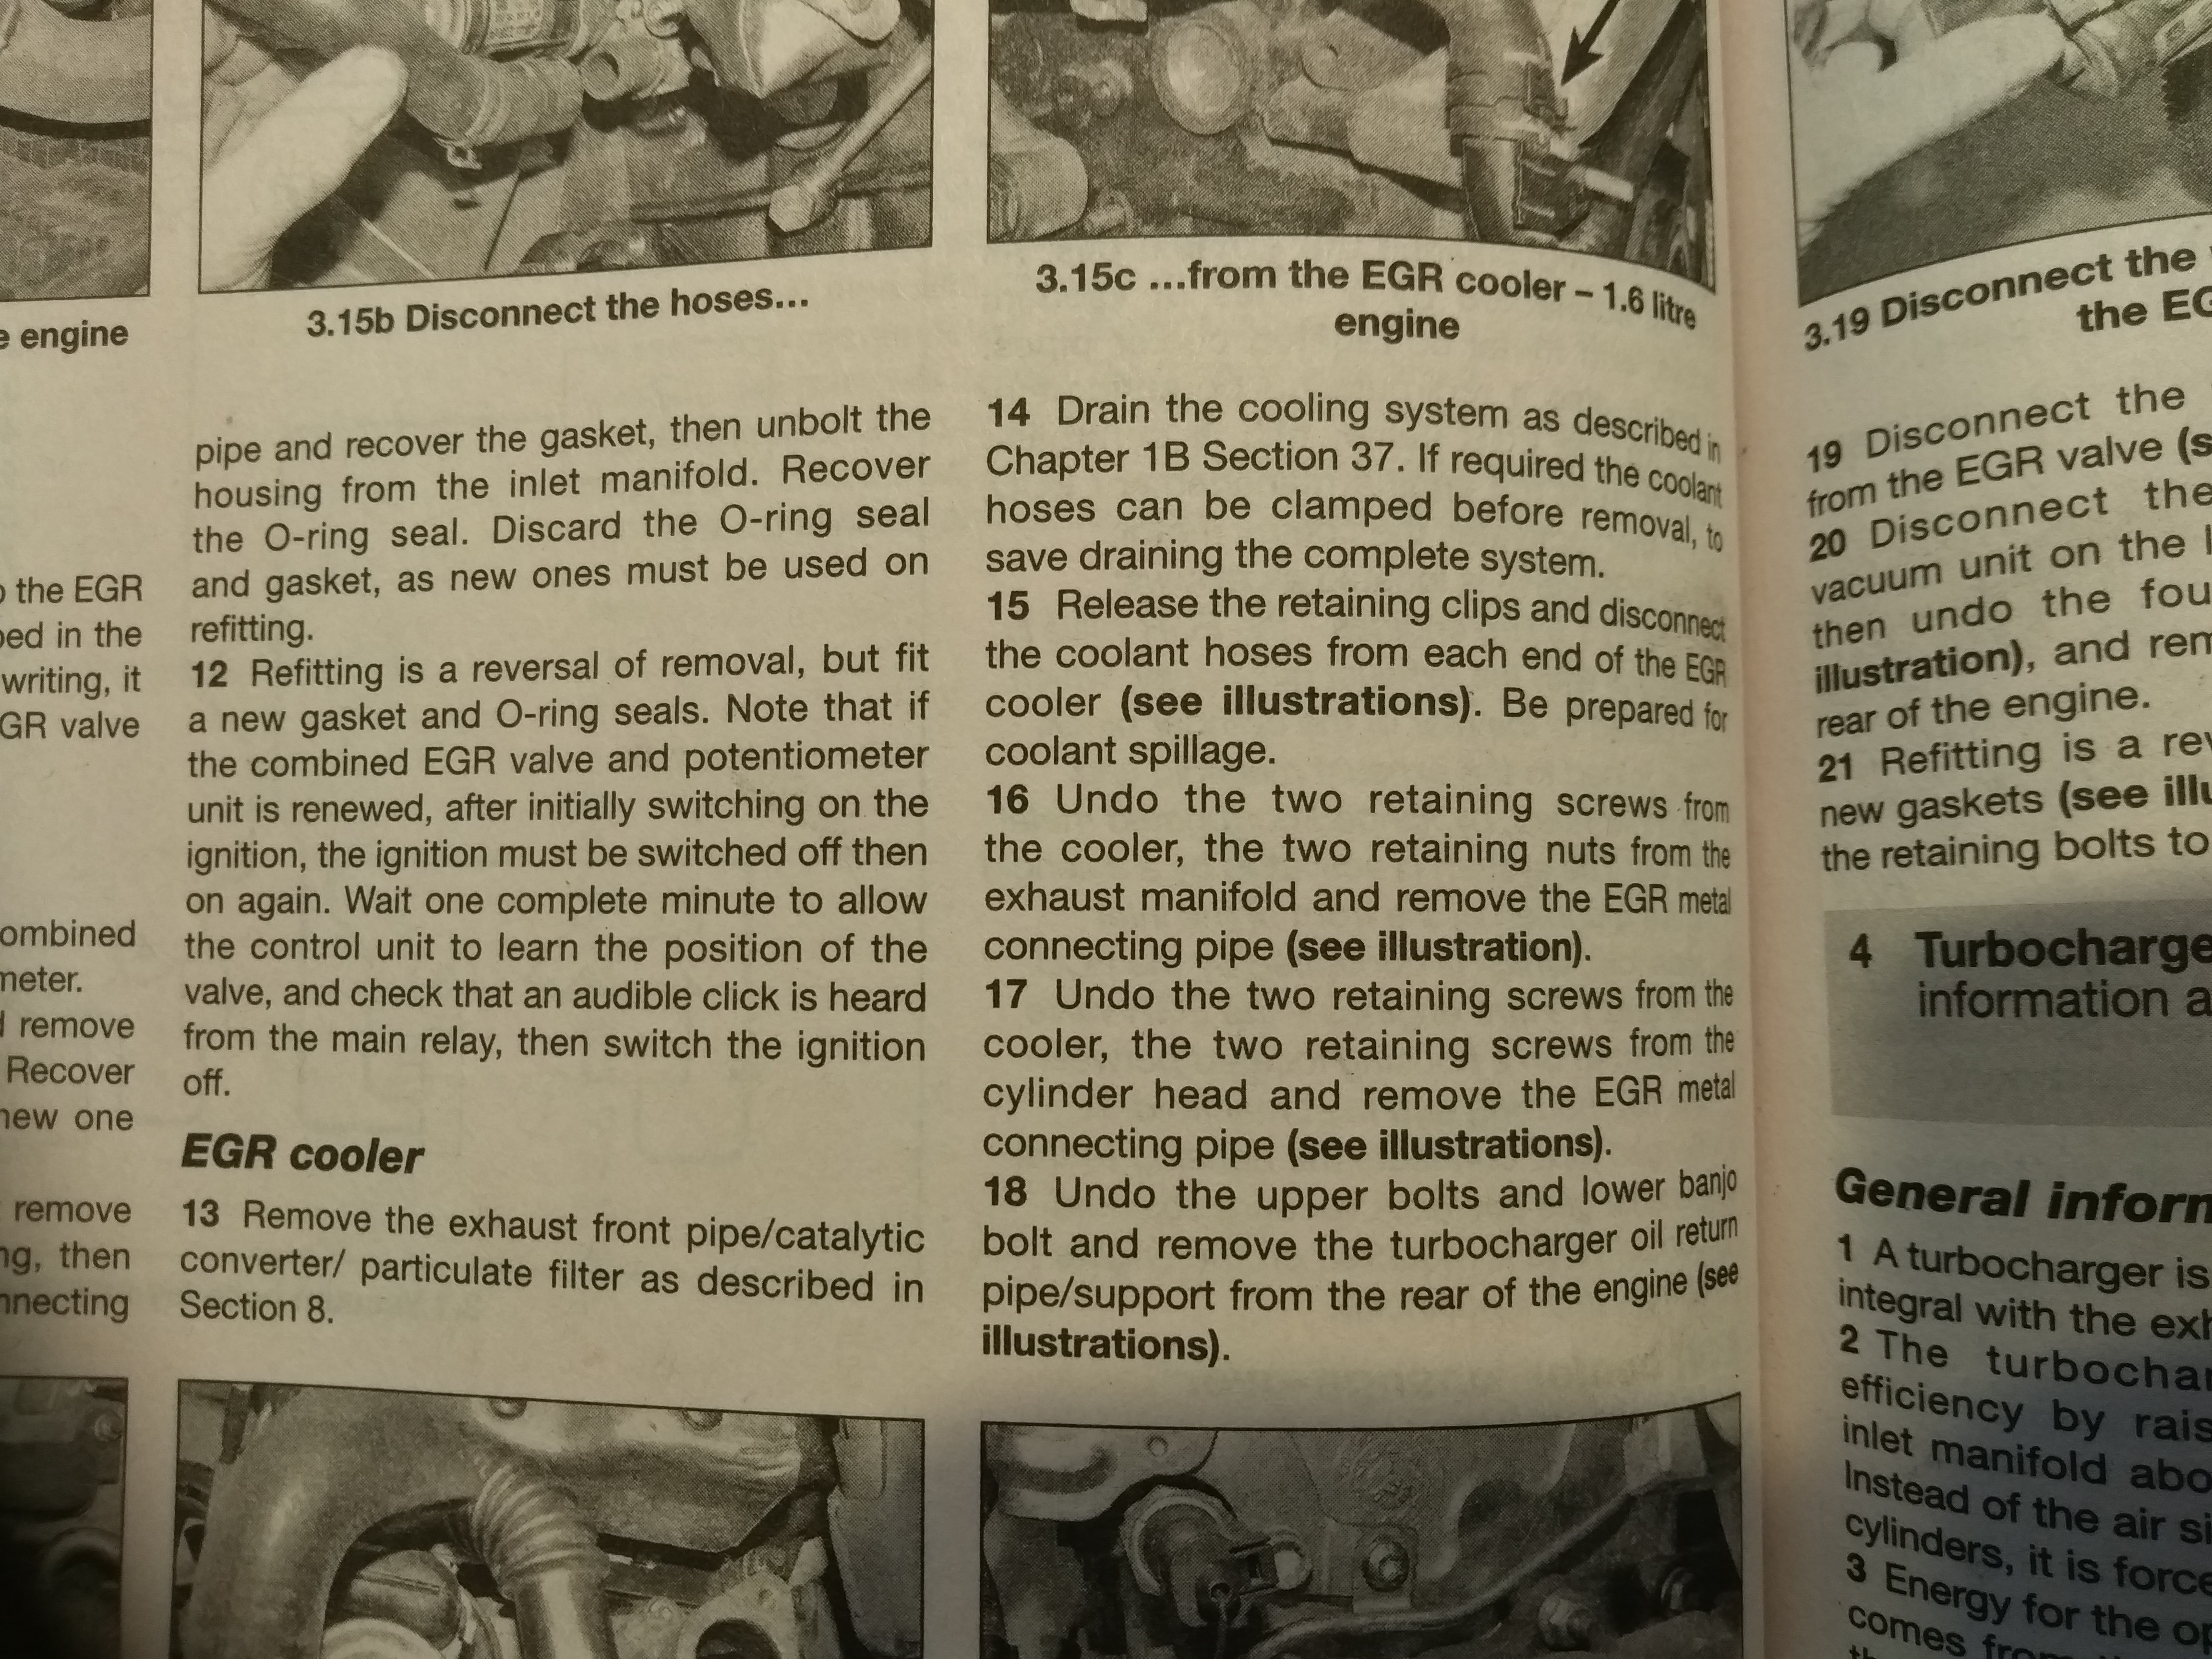
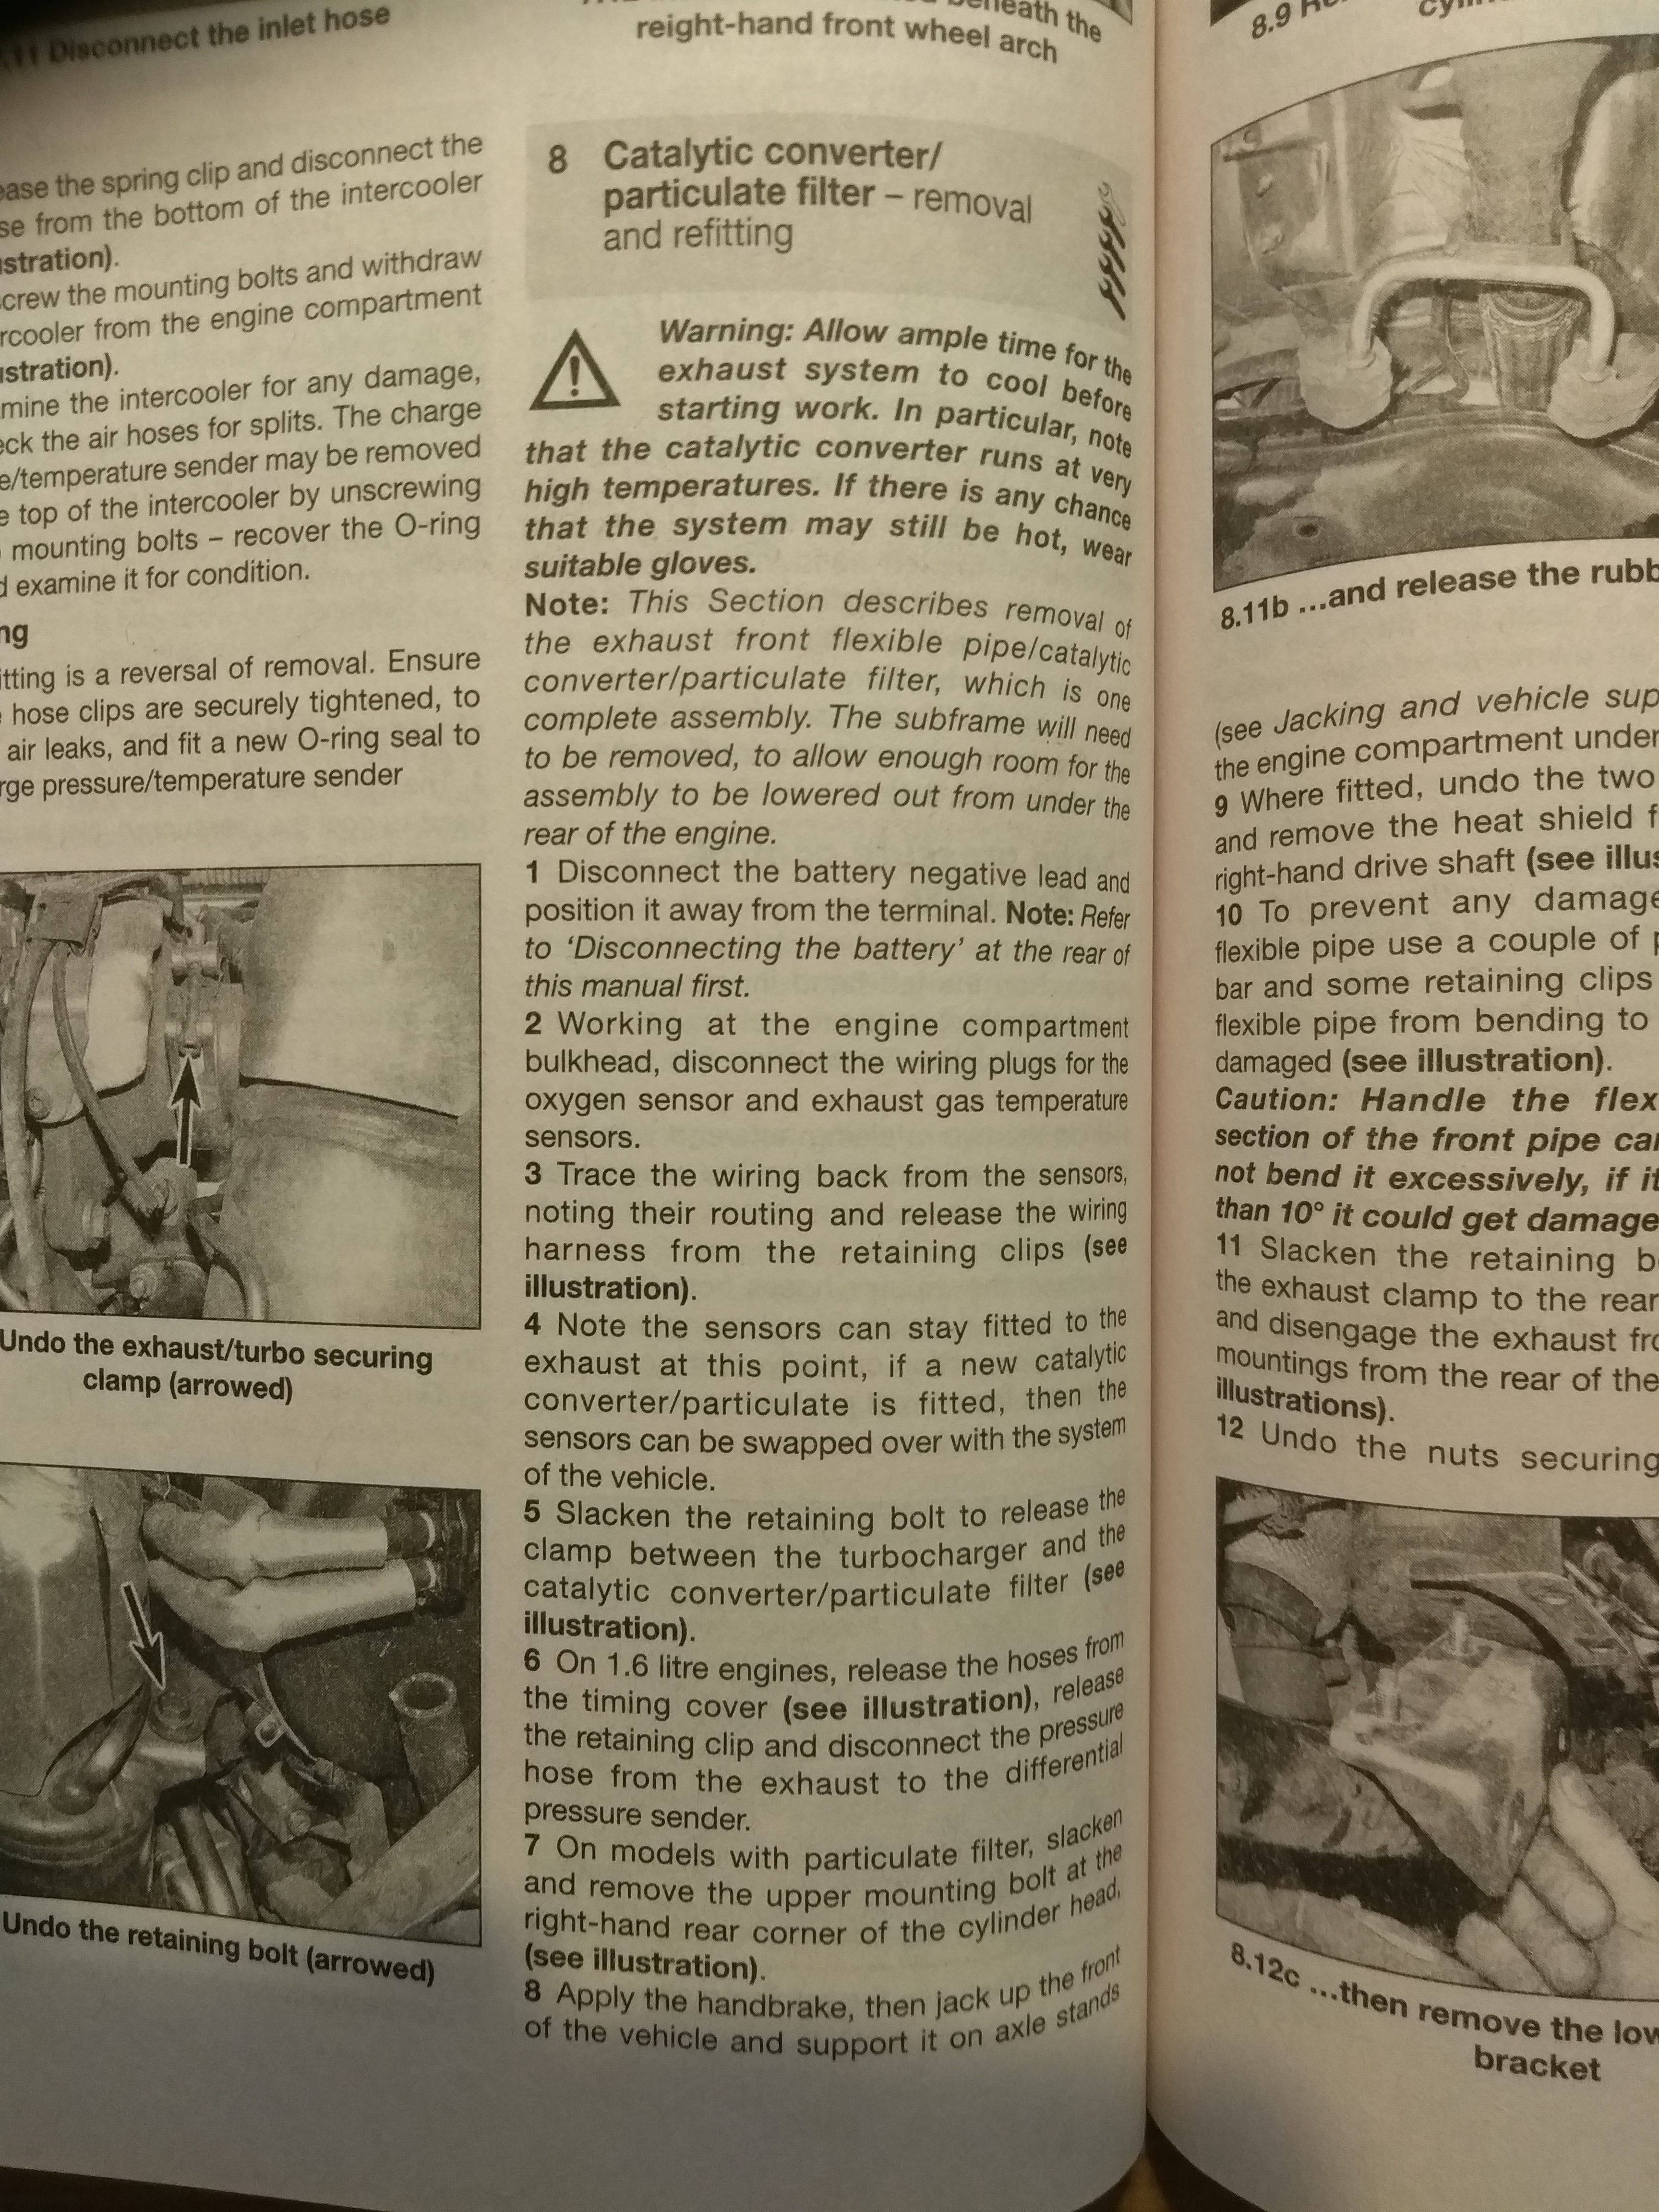
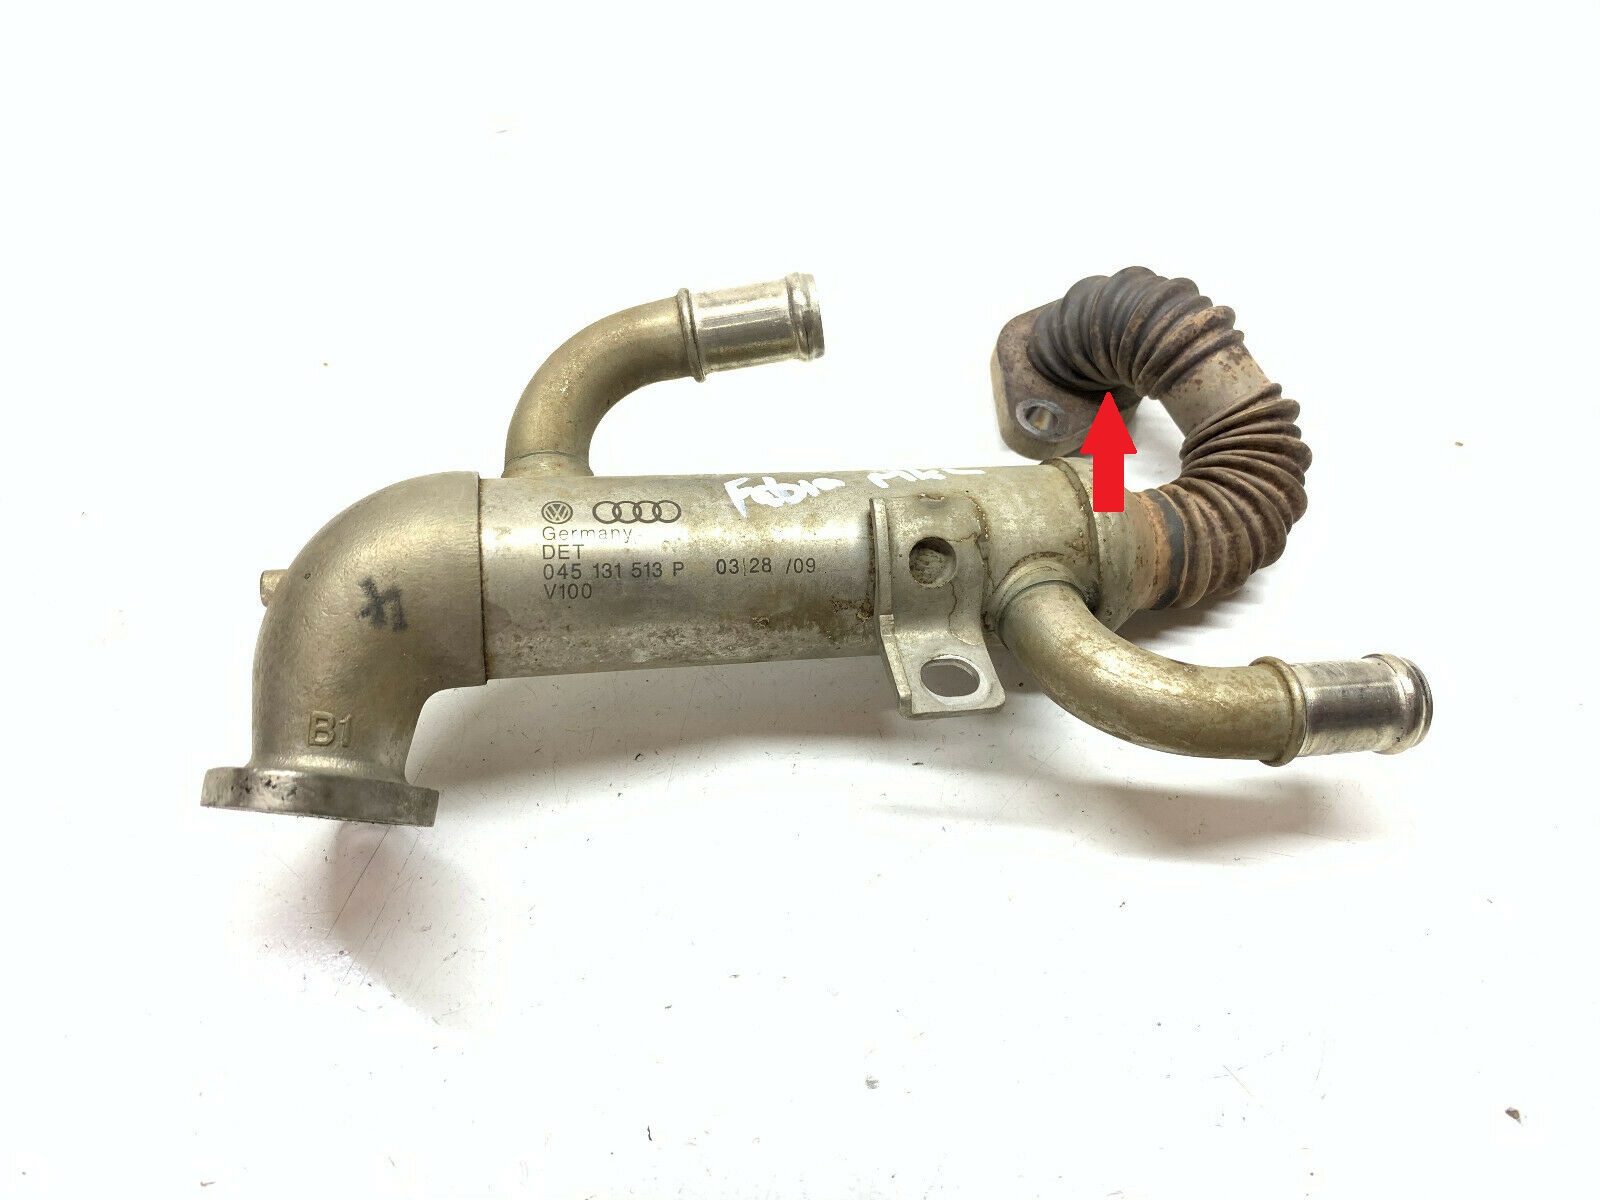
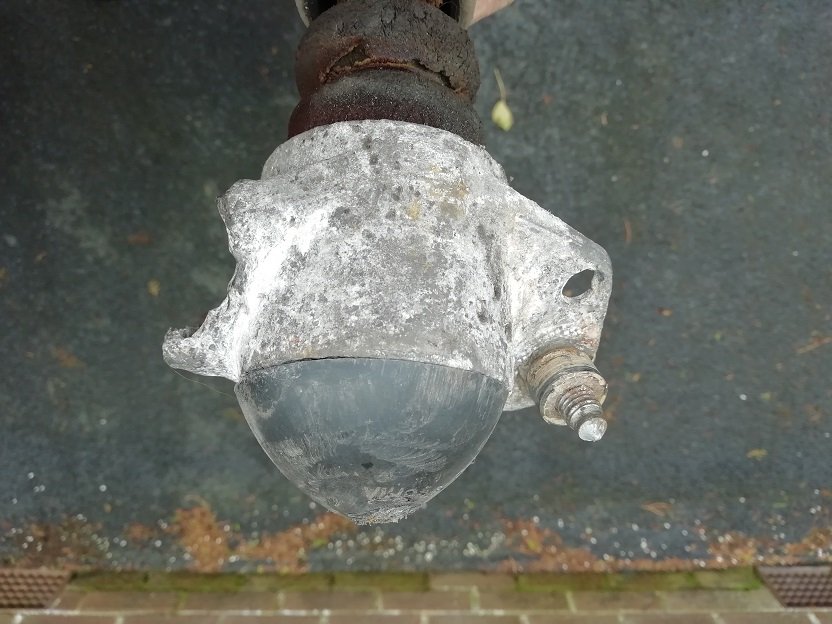
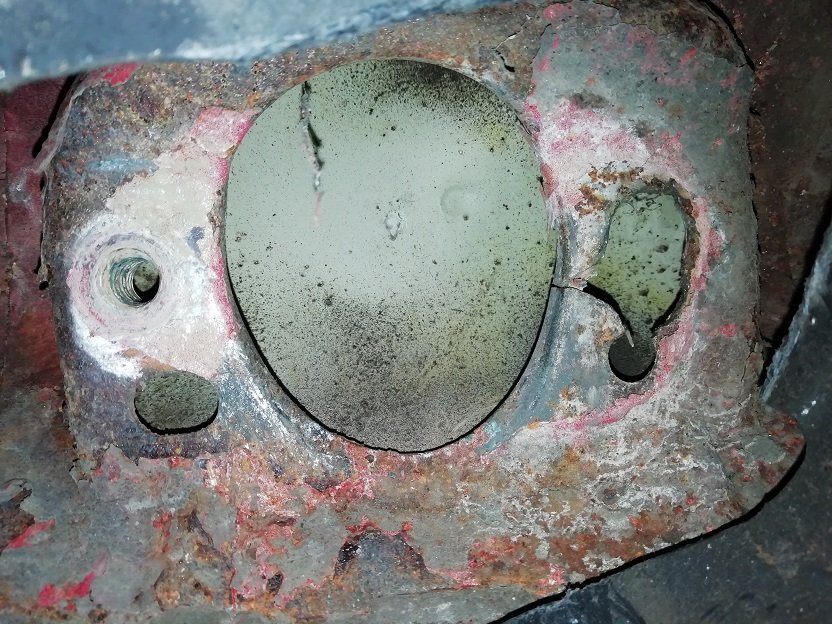
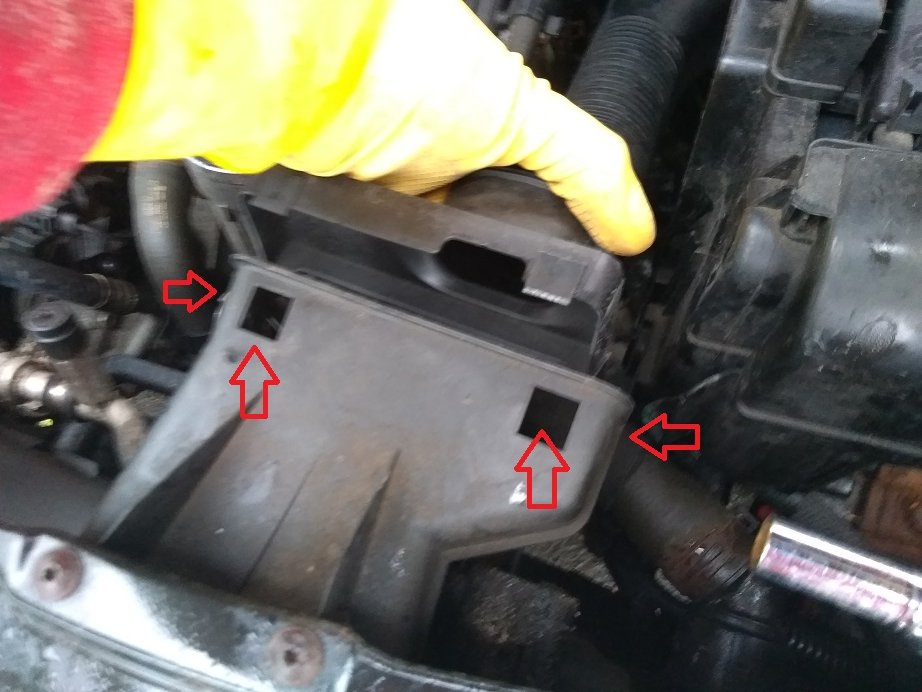
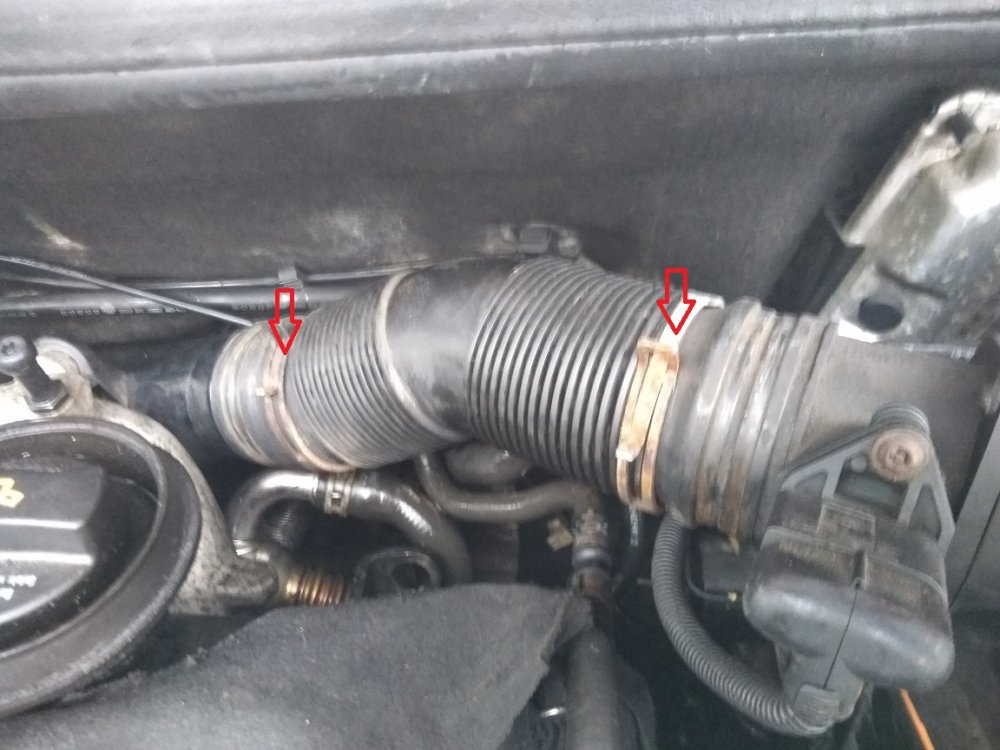
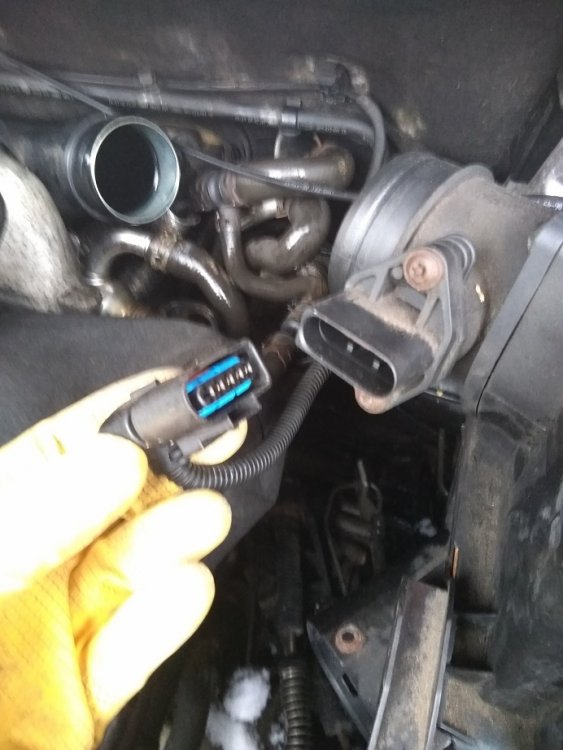
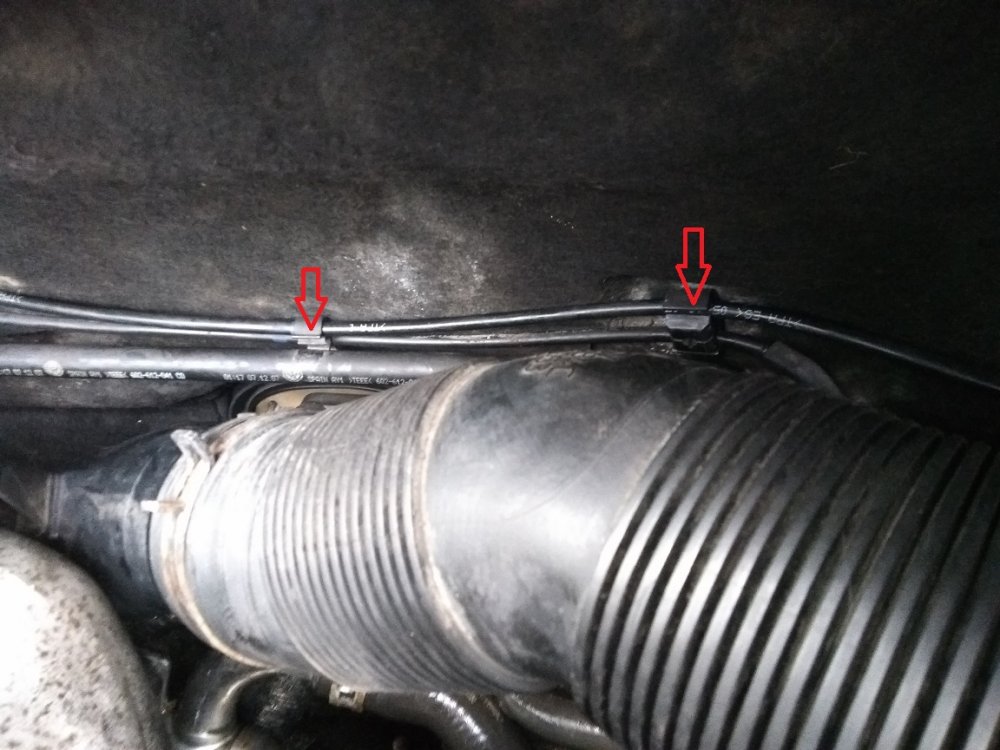
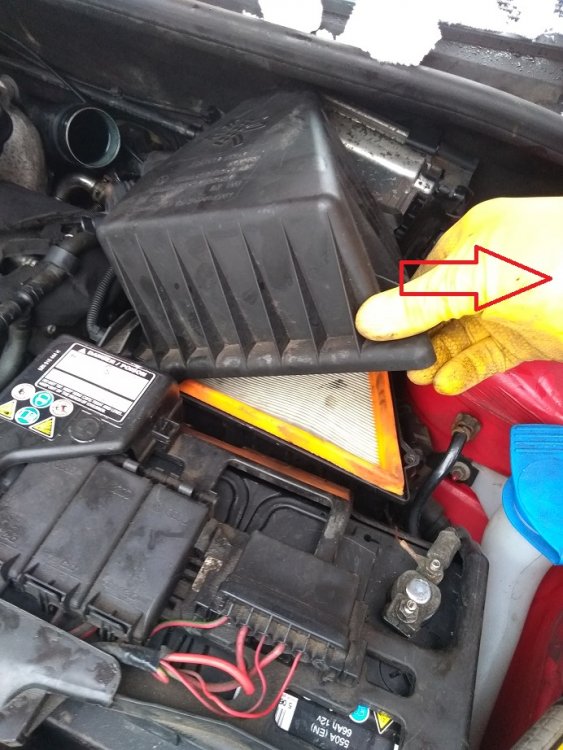
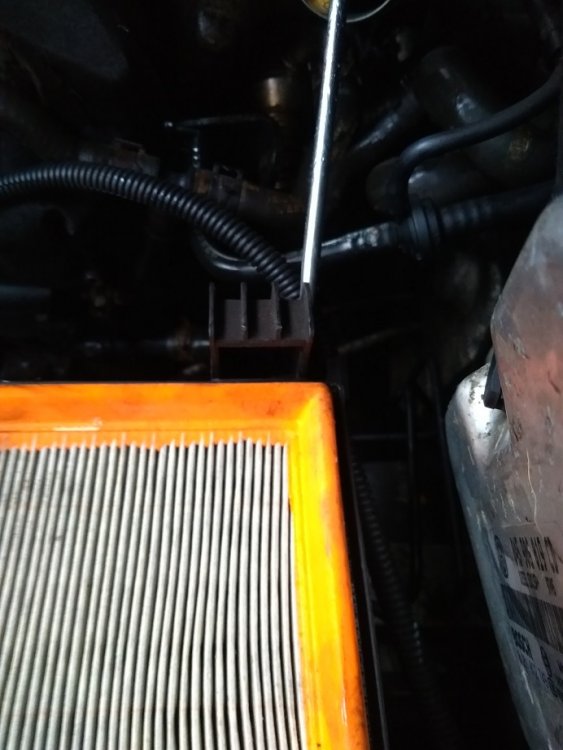
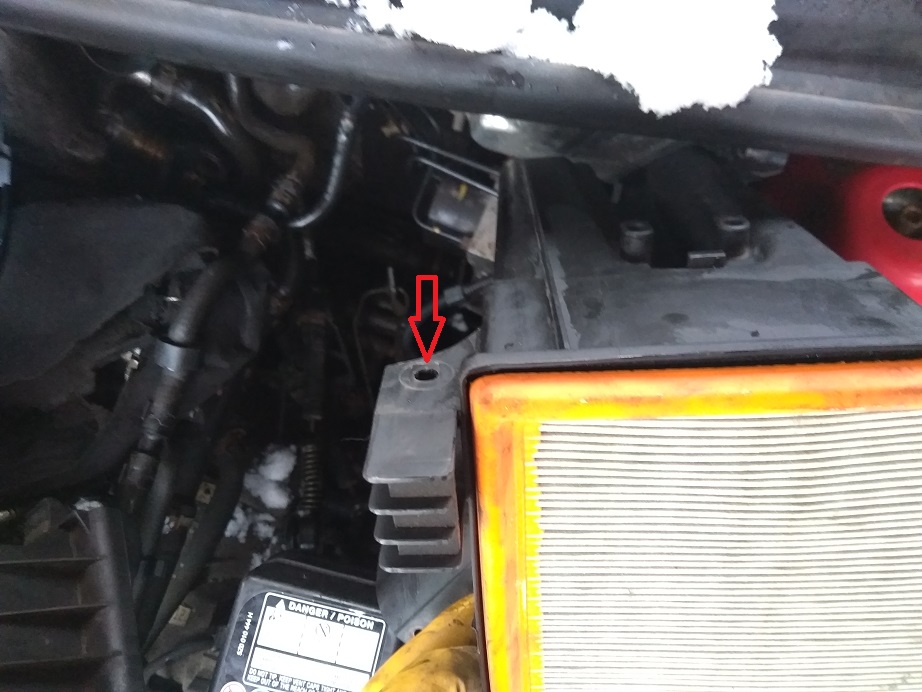
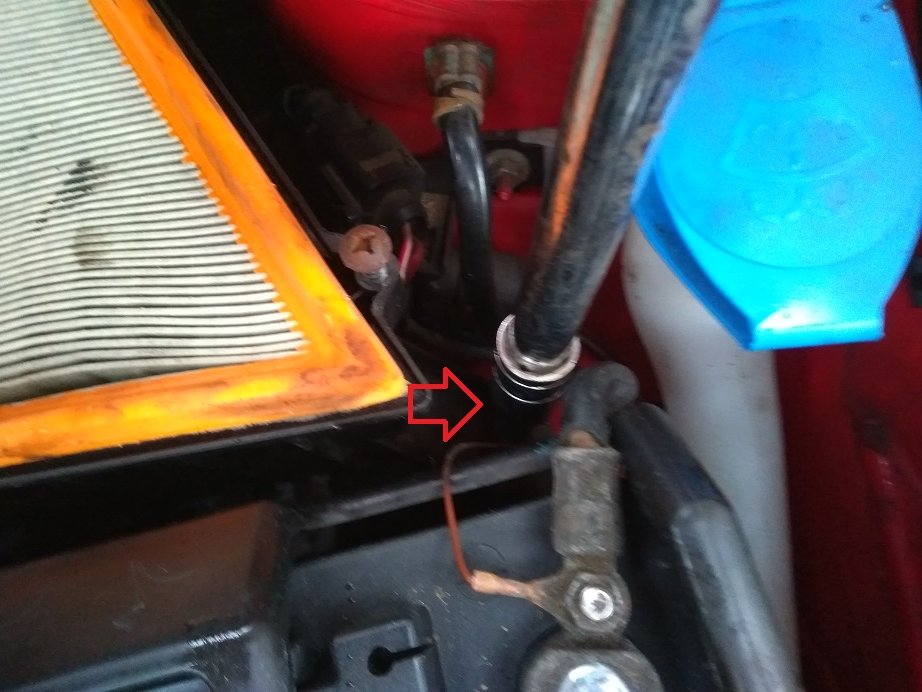
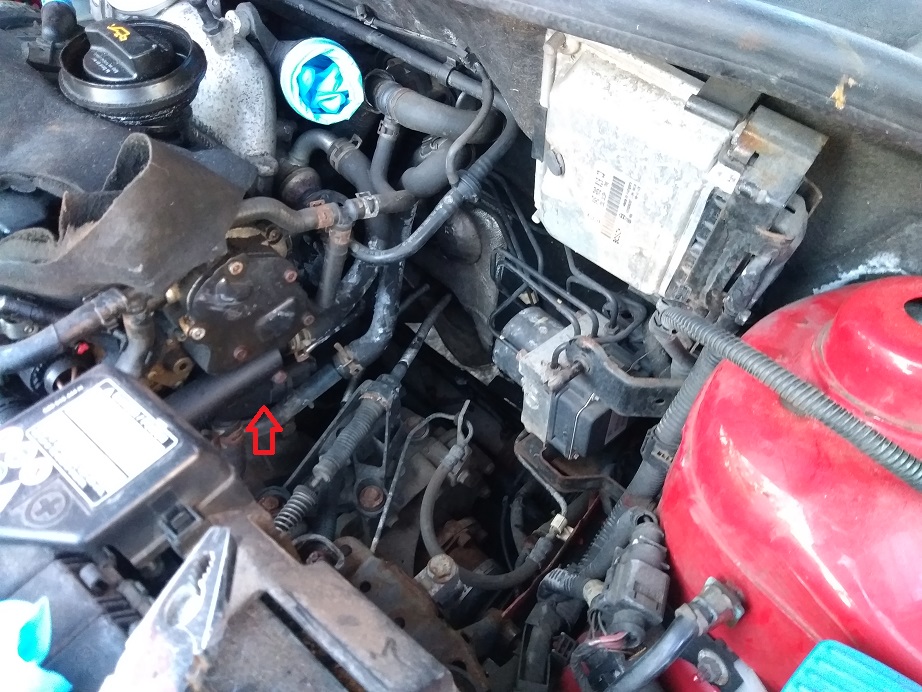
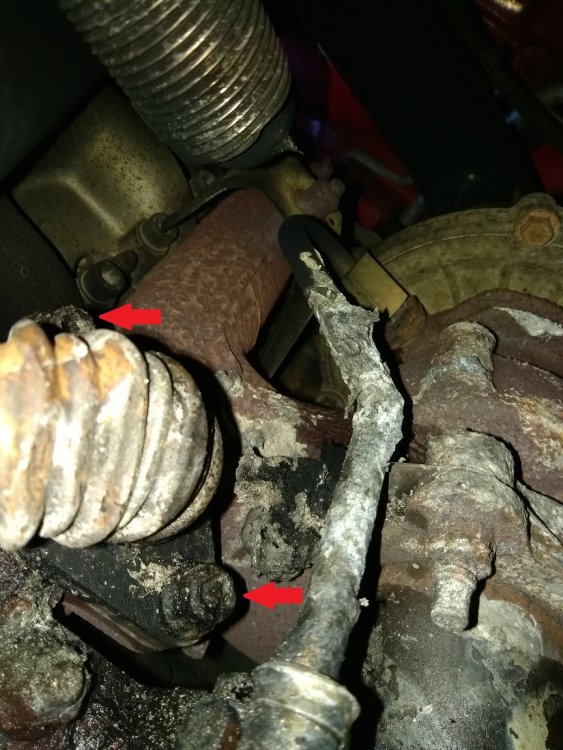
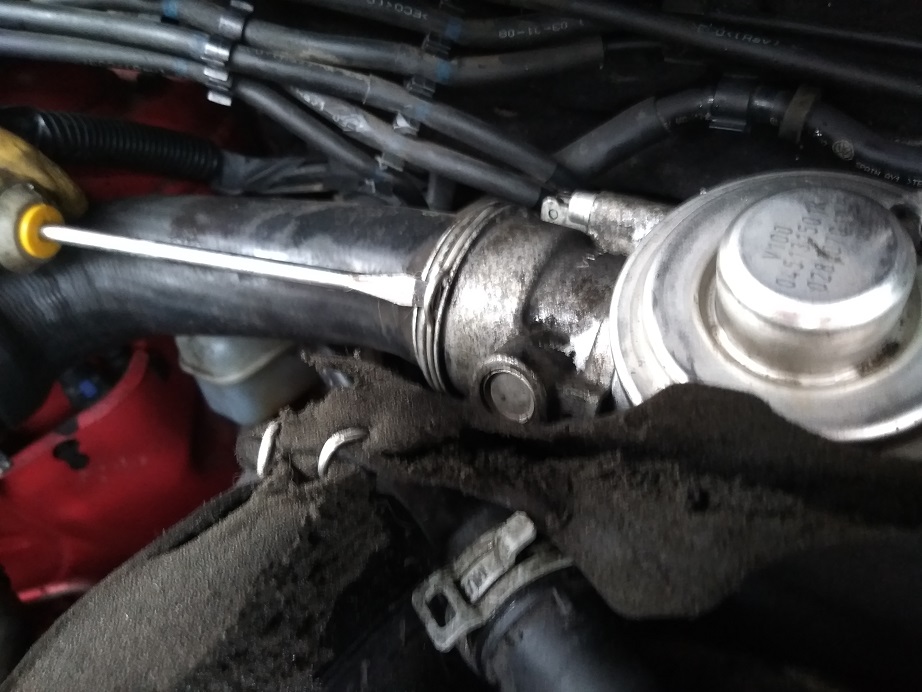
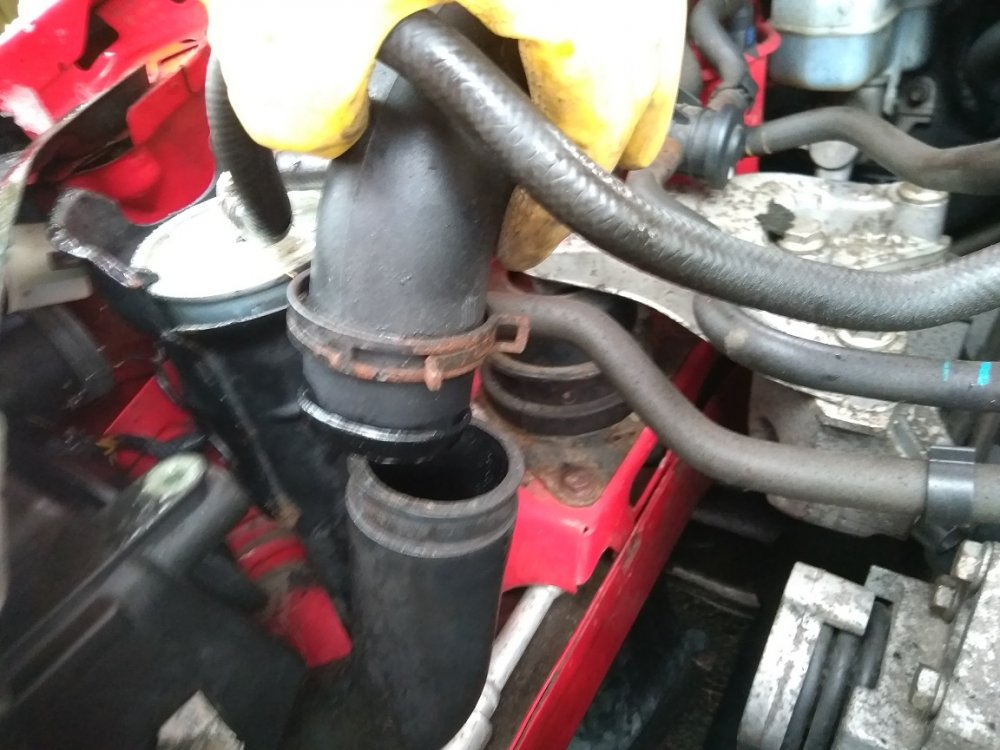
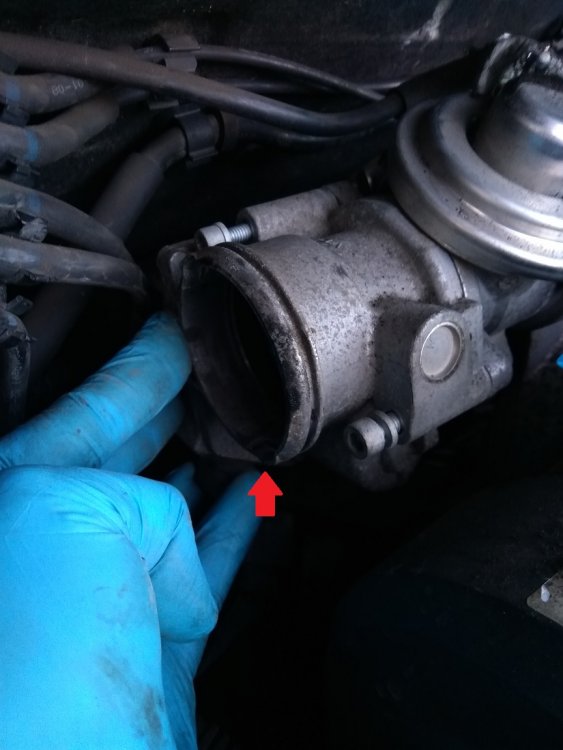
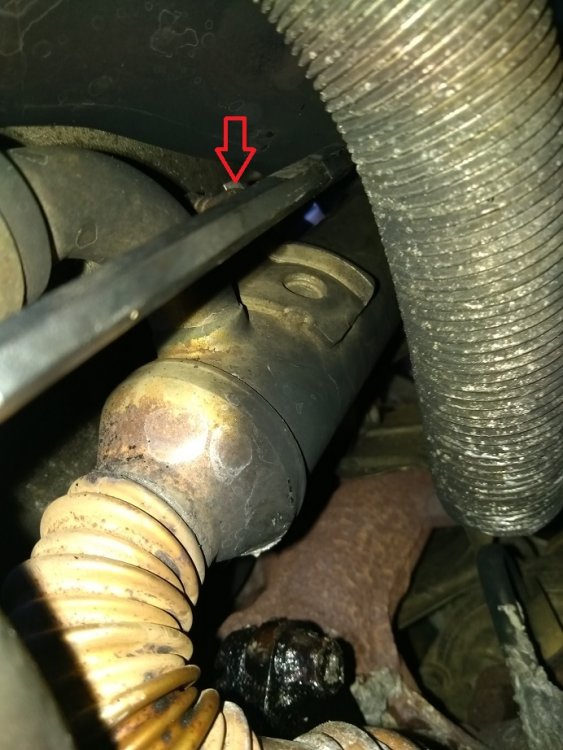
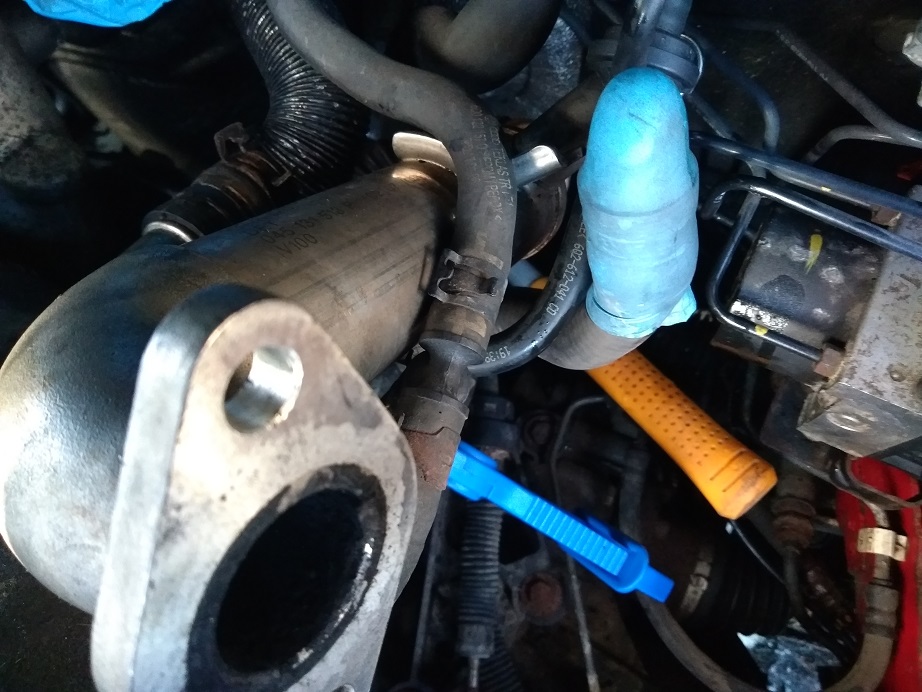
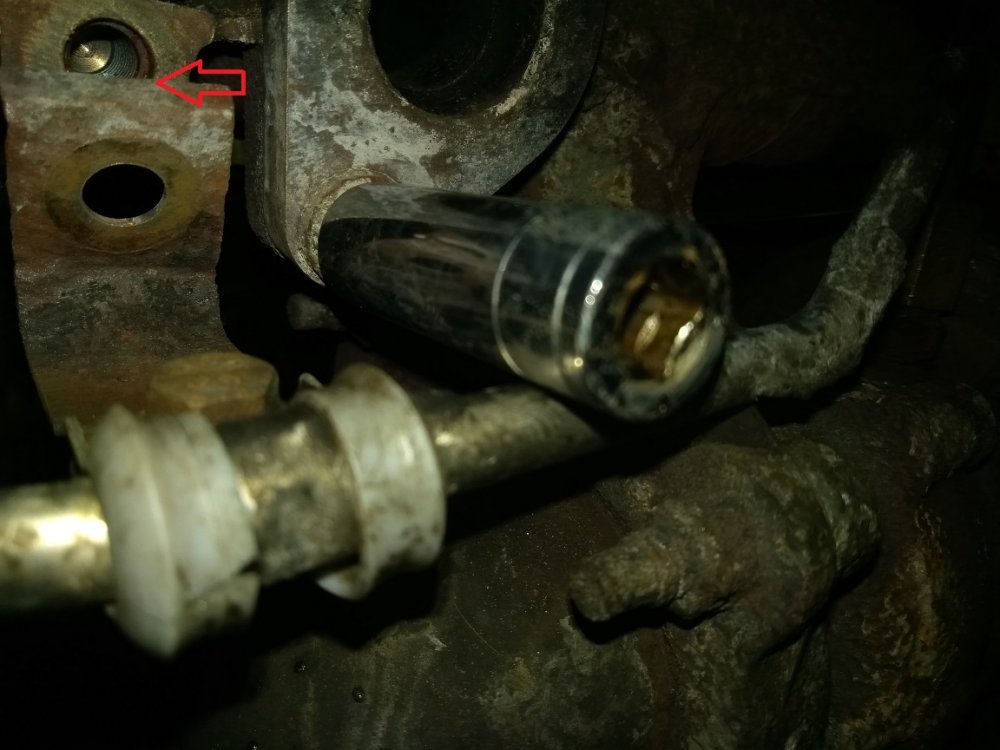
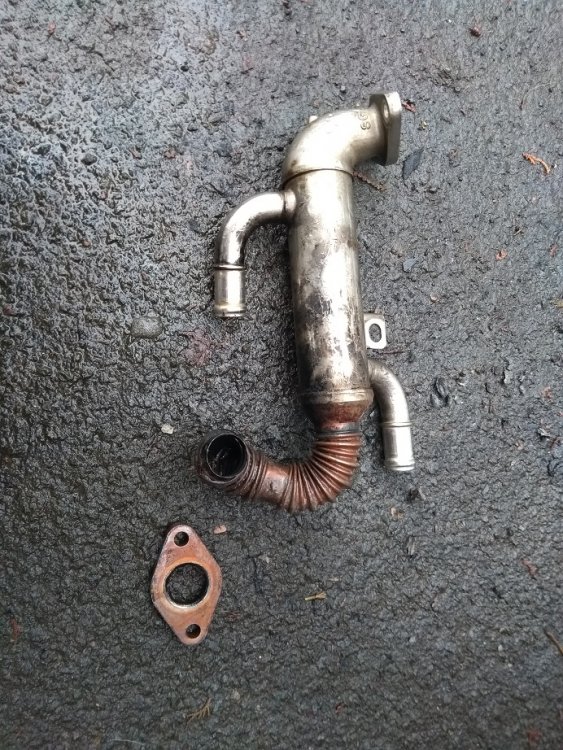
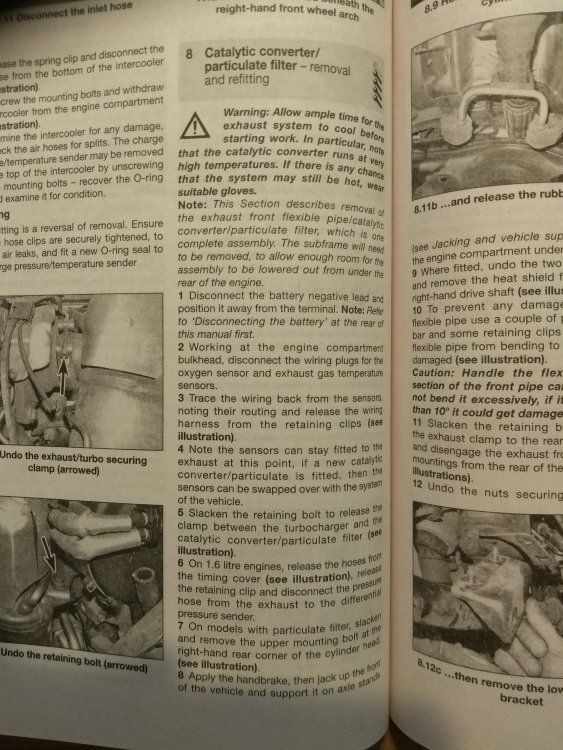
Firstly thanks to Wino for pointing out that I did not have to remove the sub-frame and accompanying parts to change the EGR cooler. For whatever reason the Haynes manual that covers my model does not have an entry for this type of cooler. Since there were no instructions and based on the advice from Wino, I opted to tackle the repair from the top. In all the repair is relatively straighforward, the biggest issue is access and the restricted work space, I think I only lost the head and flew into a rage two or three times. I had to do the repair over a few days because of the reduced daylight hours and in total it took me approximately 8 hours including removing, cleaning the EGR valve and also the exhaust repair putty that I had tried as a quick fix. (I have been told I should be paid by the job and not by the hour). To be fair you could probably save yourself some time by firstly removing the protective panel underneath the engine bay of the car. The amount of nuts, bolts and tools that I ended up dropping in the engine bay meant I spent at least an hour trying to recover them all individually before I finally removed the underneath panel. Not included is the time I had to spend cleaning the hall in my house when I dropped a tub of swarfega that exploded like a bomb absoluetly everywhere including over the ceiling (never pick anything up by the lid). So I searched for a brand new EGR cooler and discovered they were between £150 - £250. Given the age, miles and condition of my car I opted to take the chance and buy a second-hand cooler from eBay that cost me just under £30. I also opted to remove & clean the EGR valve as the EGR cooler is attached to it and you also need to remove the Intake Manifold Changeover Flap that attaches to the EGR valve also. It's purely optional but it will make it easier when installing your new EGR cooler so might be worth having some carb cleaner to hand and you can judge yourself. So as well as a replacement cooler, part No. 045131513P, I also bought / had these additional items for the repair; 1. Replacement gaskets at each end of the cooler. Note that both gaskets are different thickness & material so source them separately. 2. Replacement O ring for between the Intake Manifold Flap and the EGR valve. 3. Coolant fluid (Depending on how much you loose you might get away with not needing it straight away) 4. Replacement O ring for between the EGR valve and exhaust manifold (Optional) 5. PlusGas anti-sieze lubricant or similar (Optional) 6. Carburetor Cleaner (Optional) 7. Gas blow torch and a bucket of water or garden hose on standby (Optional) One thing I did not have but I think would be handy as well as save you some time, is an 11mm hex spanner (if there is such a thing). Two 11mm nuts hold the bottom flange of the EGR cooler onto the engine block and the bottom nut has what I believe is a solid steel oil pipe that runs in front of it. The pipe severely restricts access to the nut if using a socket. If you want to avoid having to remove the pipe and or make it a lot easier for yourself then try get the above mentioned tool. A regular 11mm spanner might and will probably do the trick. I will highlight the issue further on into the repair and you can decide for yourself. So the first step is to create space. I started by removing the air filter box and assembly. 1. Removed the screw that attaches the air intake hose to the air filter box and then remove the intake. Red arrow indicates position of screw (Picture 1). 2. Removed the air intake hose from the mount at the front of the car (4 lugs hold it in place, 2 top and 2 side) (Picture 2). 2a. Removed the hose that connects the air filter to the turbo by squeezing the hose clips (Picture 2a). Remove the hose and note which way round it goes 3. Removed the air mass sensor from the air filter cover (Picture 3). 4. Removed the two screws that secure the air filter cover (Picture 4). 5. Uncliped the vaccum hose that runs from the air filter cover (Picture 5). You could probably just disconnect the vaccum hose from the air filter cover. 5a. Lifted the air filter cover and moved to the right (Picture 6) then placed the cover out the way. 6. Followed the air mass sensor cable that I removed in step 3 and located where it is attached to the air filter housing at the back. Carefully used a flat head screwdriver or long nose pliers to pry / pull it out (Picture 7 & Picture 8). It may be easier to do this after step 7. 7. Located and unscrewed the bolt that holds the air filter box in place (Picture 9). Lift the box upwards and out of the car noting the rubber O ring and stub located between the box and battery that may be holding the box in place. You should now have created a large space that will allow you access to where the EGR cooler attaches to the engine block (Picture 10...ignore the red arrow for the moment, we will come back to this). At this point I was able to also remove the stubborn exhaust repair putty and get a wire brush in to clean up the nuts that I would be removing. 8. Located both the EGR cooler nuts holding it in place on the engine block and lubricated with anti-sieze (Picture 11). I went back and regularly applied the anti-sieze whilst working on the next steps. All that crap you see in the picture is exhaust repair putty. 9. Whilst the lubricant gets to work, I then moved to the left hand side of the engine bay and started to remove the intercooler hose. Pry out the clip holding the hose onto the Intake Manifold Flap (Picture 12) (Note the orientation of the clip if you managed to fully remove it) and detach the hose (Picture 13). 10. I followed the hose down to the front of the car next to the fuel filter. Released the hose clip and then completley removed the intercooler hose (Picture 14) 11. Released the clip holding the crankcase oil vent pipe and disconnected the pipe (Picture 15). I only did this to create space so may not be necessary. 12. I then moved onto the Intake Manifold Changeover Flap (IMCF) and started by removing the wiring plug attached at the bottom of the unit. Using a 5mm Allen / Hex Key I then removed the three bolts that hold the IMCF onto the EGR valve. (Picture 16) Note that the third bolt is underneath and marked by the arrow. Once the bolts are out the IMCF can be gently pulled away from the EGR valve and removed. Locate the O ring and check the IMCF for build up of soot and clean if desired. 13. I then located the two bolts underneath the EGR valve that hold the EGR cooler in place and using a 6mm Allen / Hex key, removed the bolts (Picture 17). 14. This step is entirely optional but I would recommend as refitting the EGR cooler is awkward and the extra space and visibilty will help. I removed the EGR valve via the three 5mm hex / allen bolts that hold it in place. The bolt underneath is awkward to access. I found a long ball end hex / allen key and spanner helped easily remove the bolt (Picture 18 and Picture 19). Remove the pipe that connects to the EGR valve and clean the valve as required. Here is my EGR after 140k miles (Picture 20). 15. Returning back to the EGR cooler itself I then used a long 6mm hex / allen Key to remove the single securing bolt that attaches the cooler onto the engine block (Picture 21). The picture Wino provided earlier in the post will give you a better idea of where it is. You might find at this point, like I did, that the EGR cooler is now free from the engine block and was being held in place only by the coolant hoses. In my case the EGR cooler had completely failed around the flange that attached onto the engine block (See Picture 24) 16. To make things easier and create more space I opted here to disconnect the EGR cooler from the coolant hoses and completely remove the unit. Using long nose pliers I undone the hose clips and moved them up the hoses out the way. The hoses were on pretty tight, possibly even under a vaccum. So here I used a flat head screw driver and carefully released the hoses enough that I was able to pull them off. I had purchased hose clamps but it turned out as long as they were held high, there was little spillage of the coolant. (Picture 21a...one hose has been removed, placed upright and covered to prevent any dirt entering the system). 17. Now onto the awkward part, removing the two nuts that secure the EGR cooler onto the engine block. So as well as Wino suggesting the use of anti-sieze lubricant on these bolts (I didn't apply a few days before as it was almost impossible to reach the lower nut without removing the air box as described above) I was also advised by an experienced mechanic to heat up the nuts/ bolts (I wasn't sure what I was dealing with yet) before removing them as such nuts / bolts that are subjected to high temperatures are notorious for breaking (and then your in a real world of hurt). So this meant I had to make absoluetly sure that there was nothing within the area that was flammable which I assumed would be unlikely given the high operating temperatures in this area anyway. So a quick check with a small inspection mirror and a garden hose on standby and I was ready to go. The fact as well that the EGR cooler had completely detached from the flange (See Picture 24) meant I was able to remove the cooler as per the previous step and manouver the coolant hoses were out the way. Had the cooler still been in situ I am unsure if it would have been possible to use a blow torch without burning one of the coolant hoses. I do suppose though that you could try and remove the hoses at this stage if they were in the way. Given the condition of the nuts it wasn't that obvious what size they were, but to cut a long story it turns out they are 11mm. Starting with the top nut I applied heat for a good few minutes before then taking my 11mm hex socket which I lightly tapped onto the nut with a small hammer to ensure it was completley on, straight and no risk of slipping. Applying a bit of force to tighten the nut initially (another technique I was advised to use) before then turning the other way and the nut started to turn and loosen quite easily. Now onto the bottom nut and here is where I got a little stuck. As mentioned earlier there is a steel pipe that runs in front of the bottom nut and as a result you can't get a socket fully onto the nut. To make things worse the nut was in such a condition that no 11mm tool, including a simple spanner would fit onto the nut (Picture 22...ignore the socket for the moment, note however the pipe). So it got to the point I thought I was going to have to remove the pipe but instead I noticed a few brackets holding the pipe in place and figured if I remove the brackets it might allow enough flexability to get the socket on...somehow. If you look again at Picture 22 I've indicated with the arrow where the first bracket bolt is located, I removed this bolt first. Go back to step 7 and look at Picture 10. In that area highlighted by the red arrow, following the steel pipe round the side of the engine block, you will find another bolt that holds the pipe in place, I removed this bolt as well. Going back to the nut, I then applied some heat before lining up the hex socket and begin hammering the socket onto the nut to ensure it was completley on whilst displacing the steel pipe. Don't think I tightened this one first but either way it came off no problem and I believe I created enough flexability in the steel pipe to allow it to bend with the socket. So the reality is that you could use a spanner and this is where you might decide to do so as opposed to doing what I done (I did try but couldn't get it on). It turns out that these nuts are only tightened to 9Nm anyway and given the nut was such a tight fit, It would have probably worked fine if I had persevered and managed to get the spanner onto the nut. For me I opted to give myself the best possible chance of getting these nuts off without rounding or breaking them and that meant using anti-sieze, using heat and using a hex socket as opposed to bi-hex 12 point sockets or spanners. So with the nuts off, I removed the flange and the gasket and cleaned up the mount (Picture 23) I've highlighted where I think the steel pipe impinges on the engine block and the extent of the EGR cooler failure (Picture 24). So all you have to do now is get your replacement cooler in place and more or less follow the instructions in reverse, I do however have a few pointer. Firstly remember and make sure you have found and removed the old gaskets and make sure you remember to fit the new ones as well as your new O rings on your EGR valve and IMCF. Manouvering the replacement cooler into place was a bit fiddly as I had connected the coolant hoses and re-installed the EGR valve. I would suggest if you can that you manouver the replacement into place first, particullarly where the EGR cooler attaches to the EGR valve. It might be however that it will be easier to connect the coolant hoses first but certainly keep the EGR valve off until the cooler in in place. Regarding the cooler hoses, if you choose to attach them before manouvering the cooler into position, attach the bottom one first. I then back-filled the cooler fluid within the EGR cooler via the top cooler inlet/outlet to minimise air in the system before then attaching the other cooler hose to the EGR cooler...remember the hose clips. I then removed the lid from the coolant expansion bottle within the engine bay and squeezed the coolant hoses on the EGR cooler. I done this until I no longer saw or heard any air bubble from the expansion vessel before poping the lid back on the expansion vessel. The 11mm nut that I had difficulty getting my socket over, I put that on the top as opposed to the bottom stud to make it easier to tighten the nuts back up. I had a torque wrench to set them back to 9Nm. If you tighten the nuts till they stop and then another 1/4 turn and you will be there. As always I'm certainly no expert and very much the reluctant roadside meachanic. Feel free to add any pointer or advice. Again thanks to Wino and hope this helps anyone that needs it. Stay safe, Gavs.


-
Thanks Wino...that's greatly appreciated 👍🏻 Can't believe I didn't spot that the instructions were for the 1.6. The clue was also in the pictures which had a completely different egr cooler...and probably the instructions I'll crack on with that repair then and come back and let you know how I got on. Again thanks for the info and mostly pointing out that I don't need to take half the car apart.
-
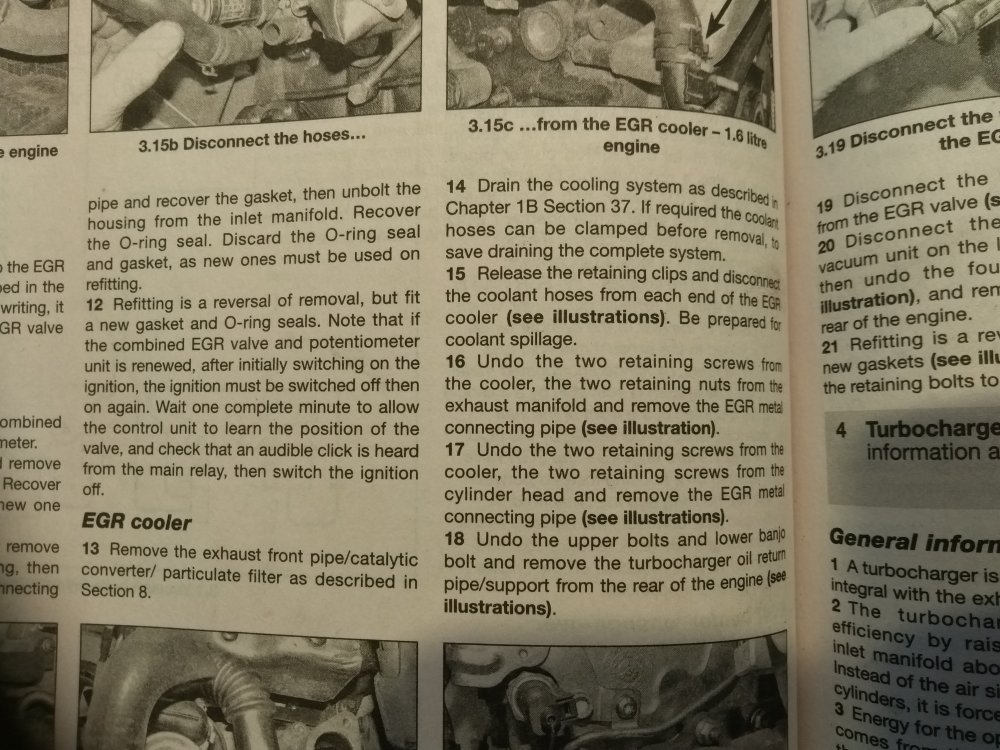
Hi Wino, many thanks for your reply. You've confirmed my thoughts regarding the exhaust flow direction. I had hoped it flowed the opposite direction and I could just remove the EGR valve and blank it there thus preventing the exhaust gasses going through the cooler completely...legalities and engine management aside 🤫 The YouTube video isn't for my make and model but according to the manual I would need to do something similar just to gain access. (see attached pictures). So I suppose that's my next question. Has anyone changed a cooler and how did they do it?
-
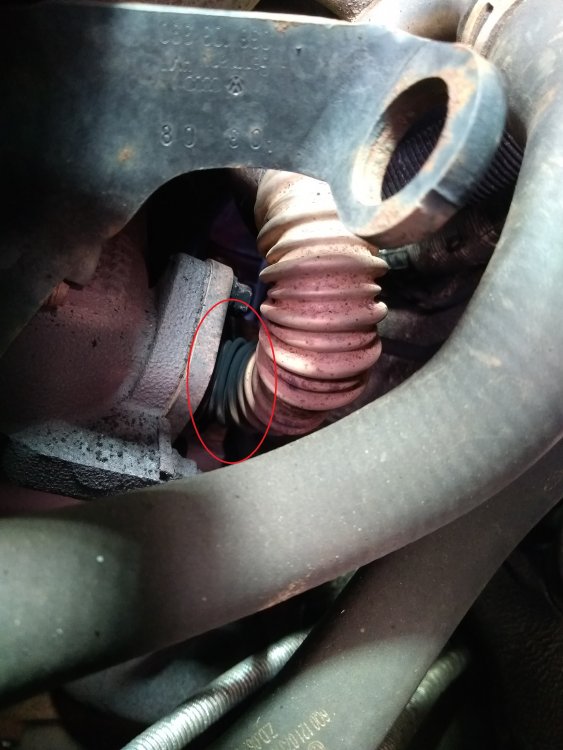
Hi there, im lookin for some advice or recommendations. I own a Fabia MK2 (08 plate / no DPF) 1.4 litre estate and for the last month or so I've noticed that above 2000rpm, there is a sound coming from the engine bay similar to having a hole in the exhaust...a bit like a tractor / aircraft engine. In addition I've been getting the smell of exhaust fumes in the car only when stationary (starting the car or at lights / junctions). So I done a bit of investigating and I found the issue. I've got a leak from my EGR cooler (see attached pictures). The cooler itself is at the back of the engine and difficult to access. I've consulted the Haynes manual and it requires the removal of the sub frame, steering rack and other stuff just to gain access from underneath the car. I've found this video on youtube that I think is pretty much what I'll need to do with my car https://www.youtube.com/watch?v=cZjFK3_tHqs (it does say easy-peasy in the title ) I have tried putting a ring of exhaust putty around metal pipe which hasn't been that effective. The putty usually fails after about 50 miles or so before I need to apply some more (it breaks and falls off). So now i'm at the point that I believe i'll need bite the bullet and change the cooler but I did have a brain wave Could I possibly use an EGR delete kit / blanking plate? The issue I have is that I am not entirely sure of the direction of exhaust gasses through the cooler and thus if it would work