


BATVANVRS
FREEDOM
-
Joined
-
Last visited
Everything posted by BATVANVRS
-
Sorted
-
Sorted
-
I used a flat screwdriver (very thin on) to just open up the clips either side, you will see it hear it ping open. Fitting everything back is the same process but just in reverse order. sensor 1st & don't forget to plug the wires back in, the plastic housing, then the mirror but at this point I might of done the mirror then the plastic housing, you will see so either way will work. (Mirror will be clockwise upon fitting) & don't forget the mirror has a button underneath so make sure a green light is on.
-
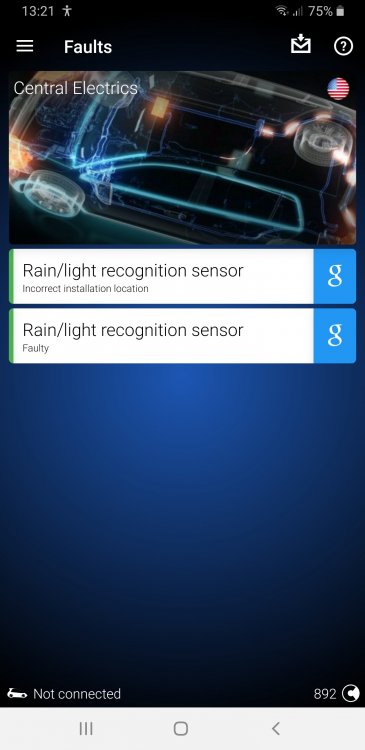
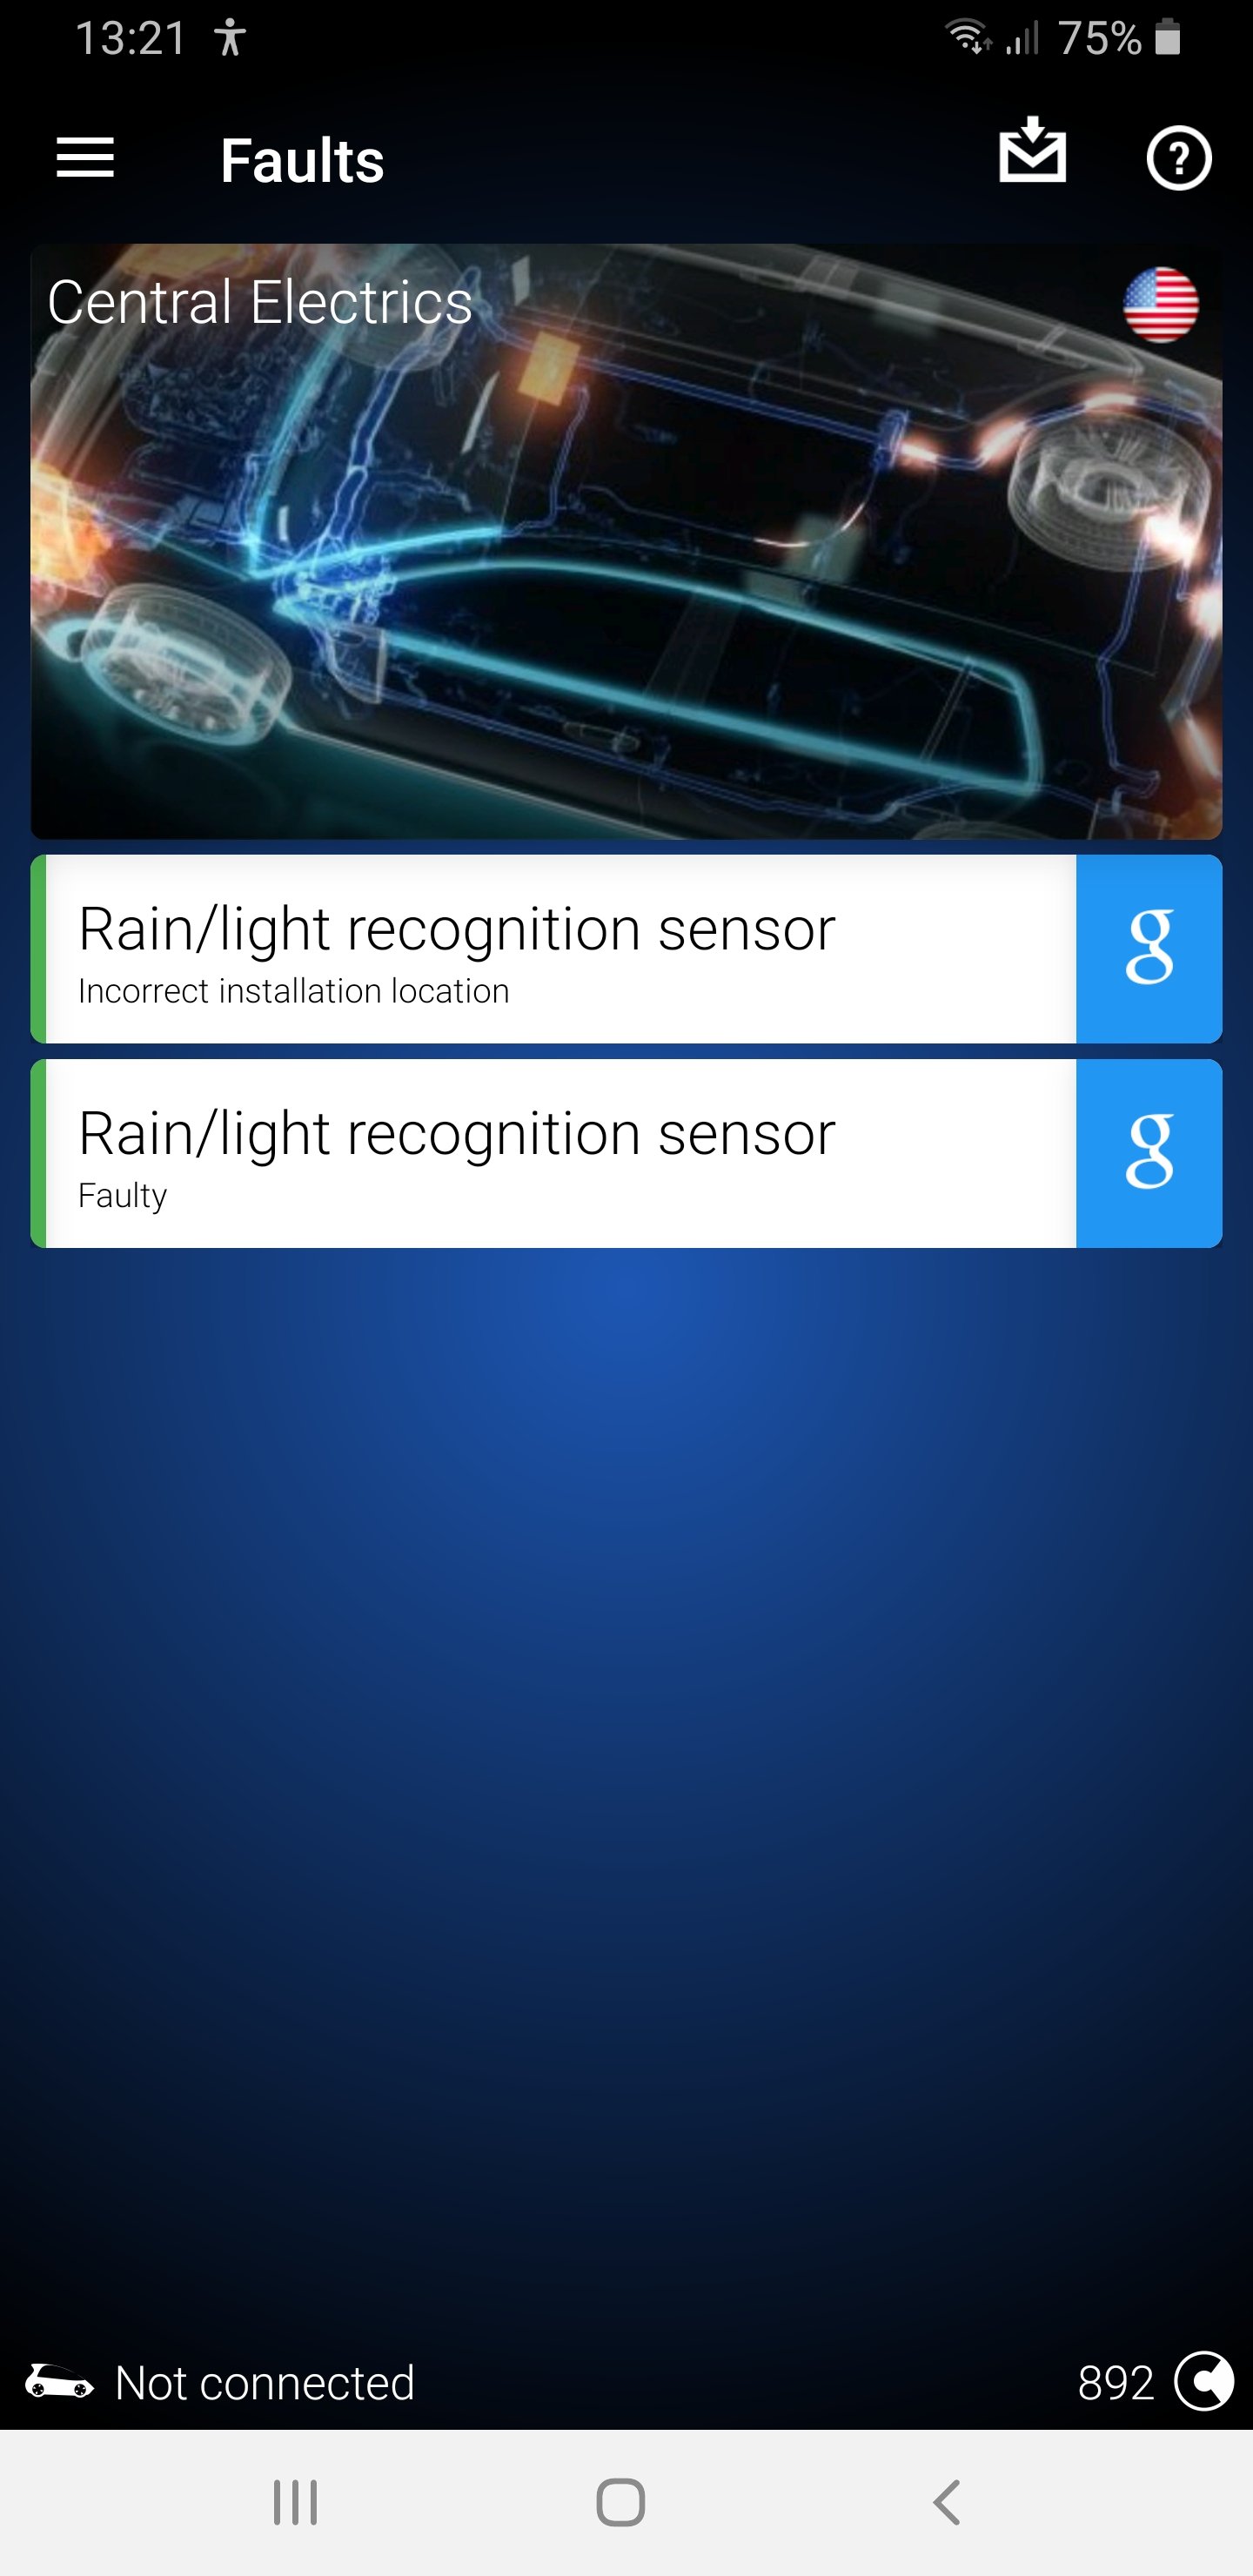
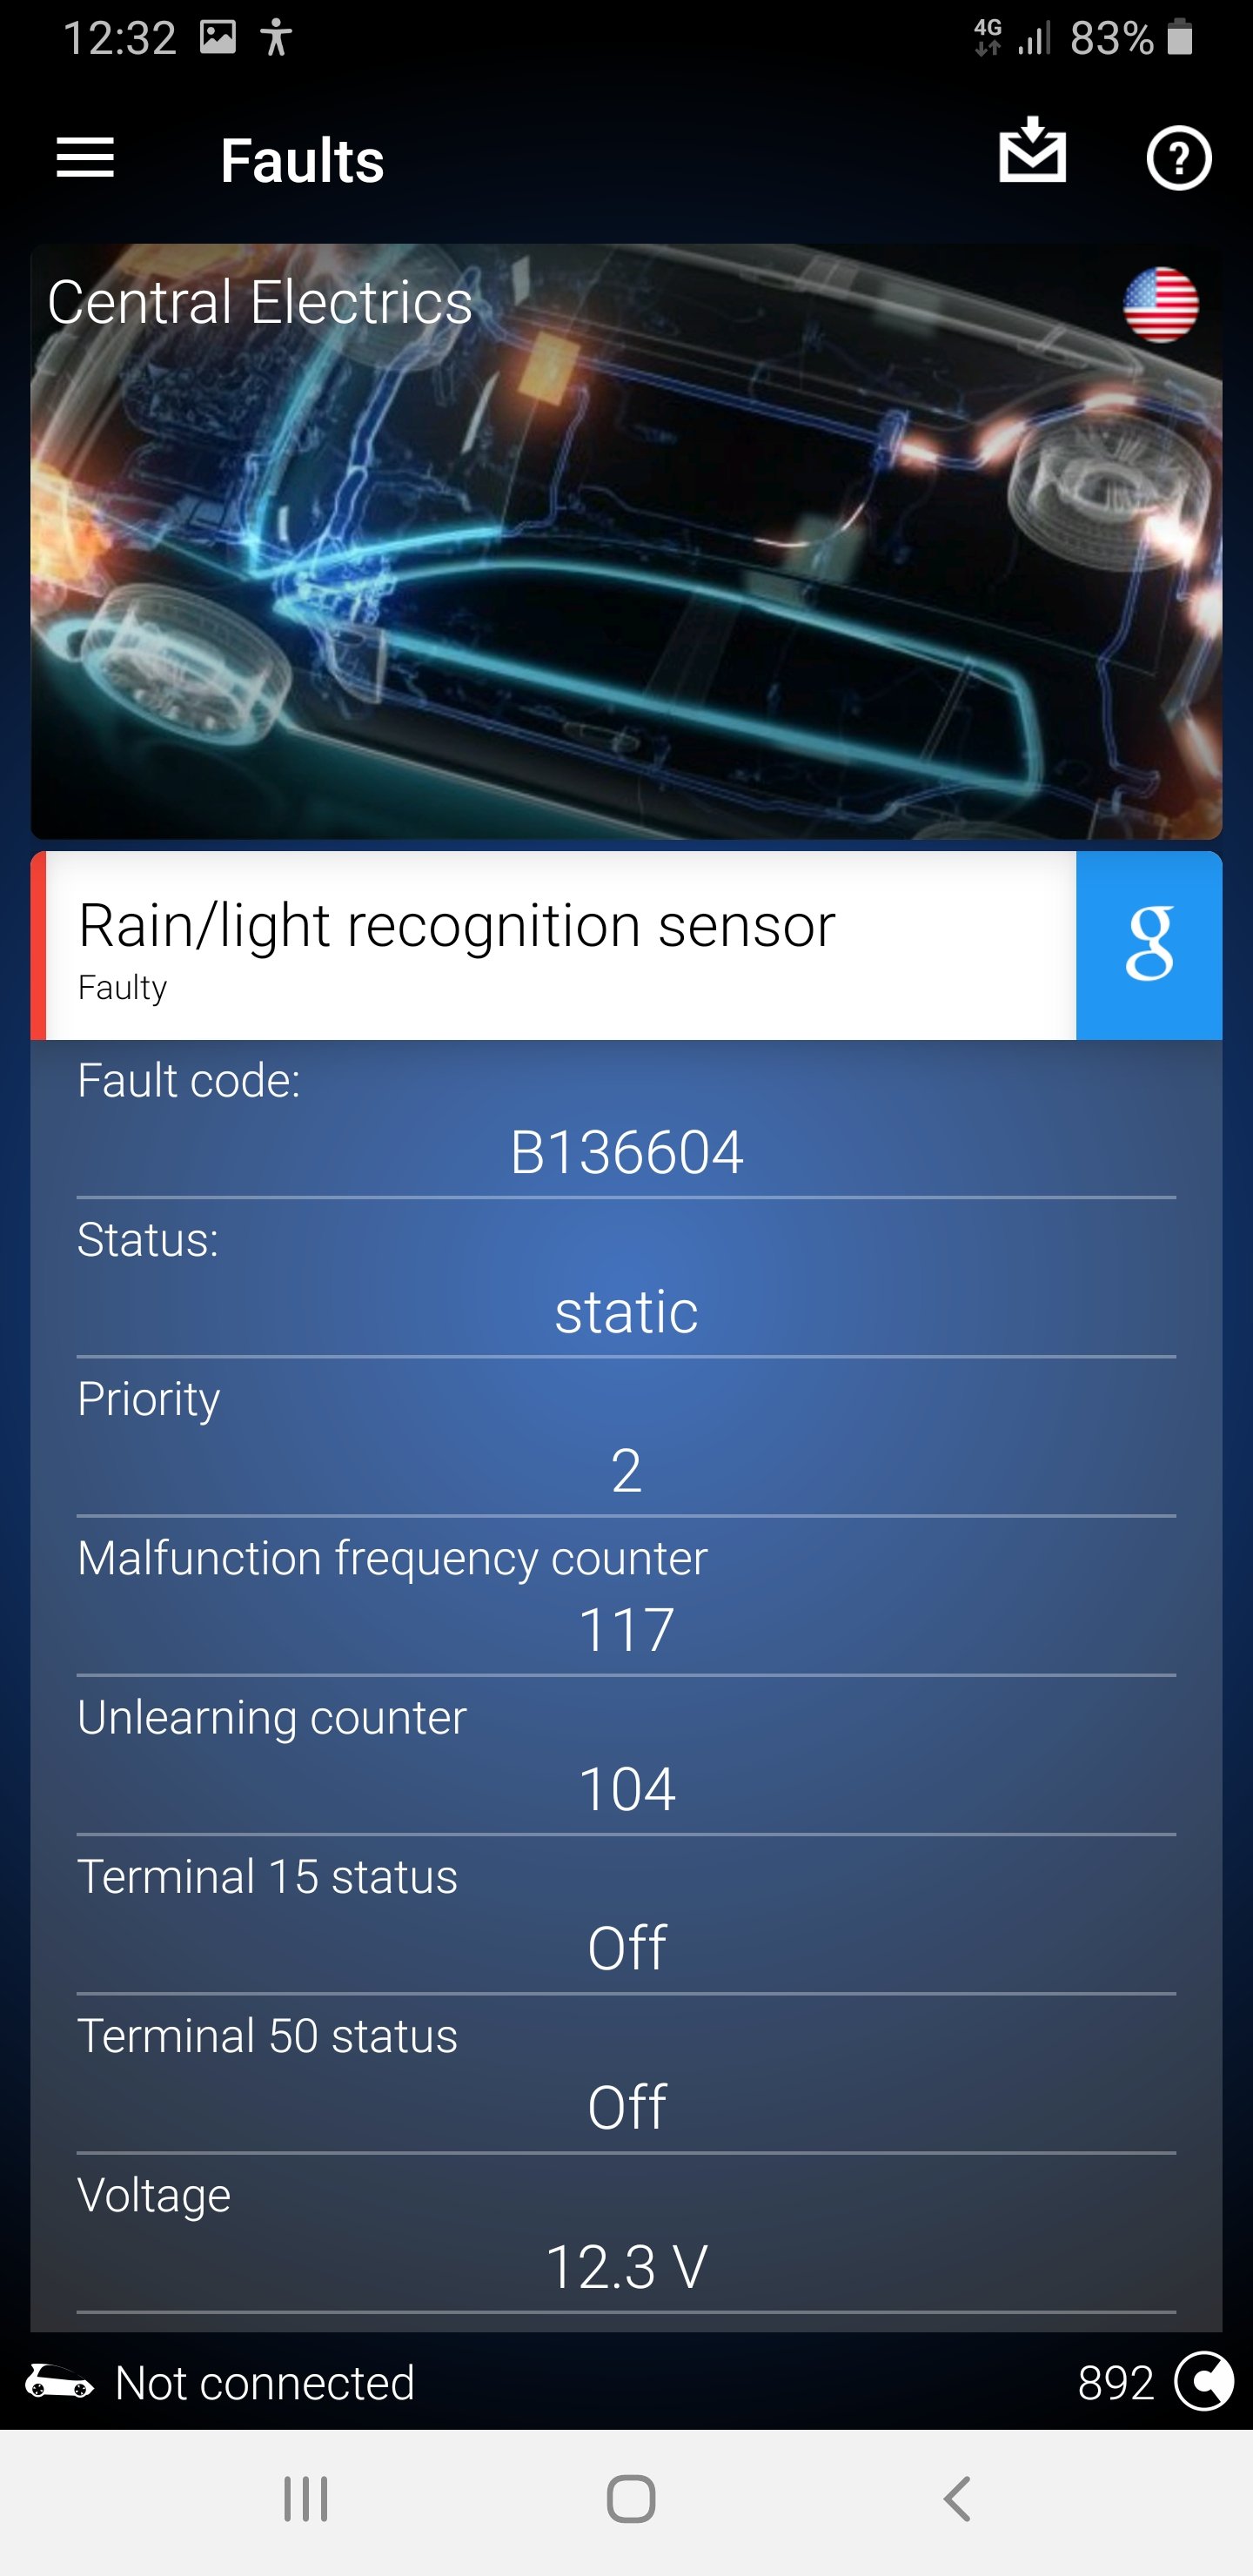
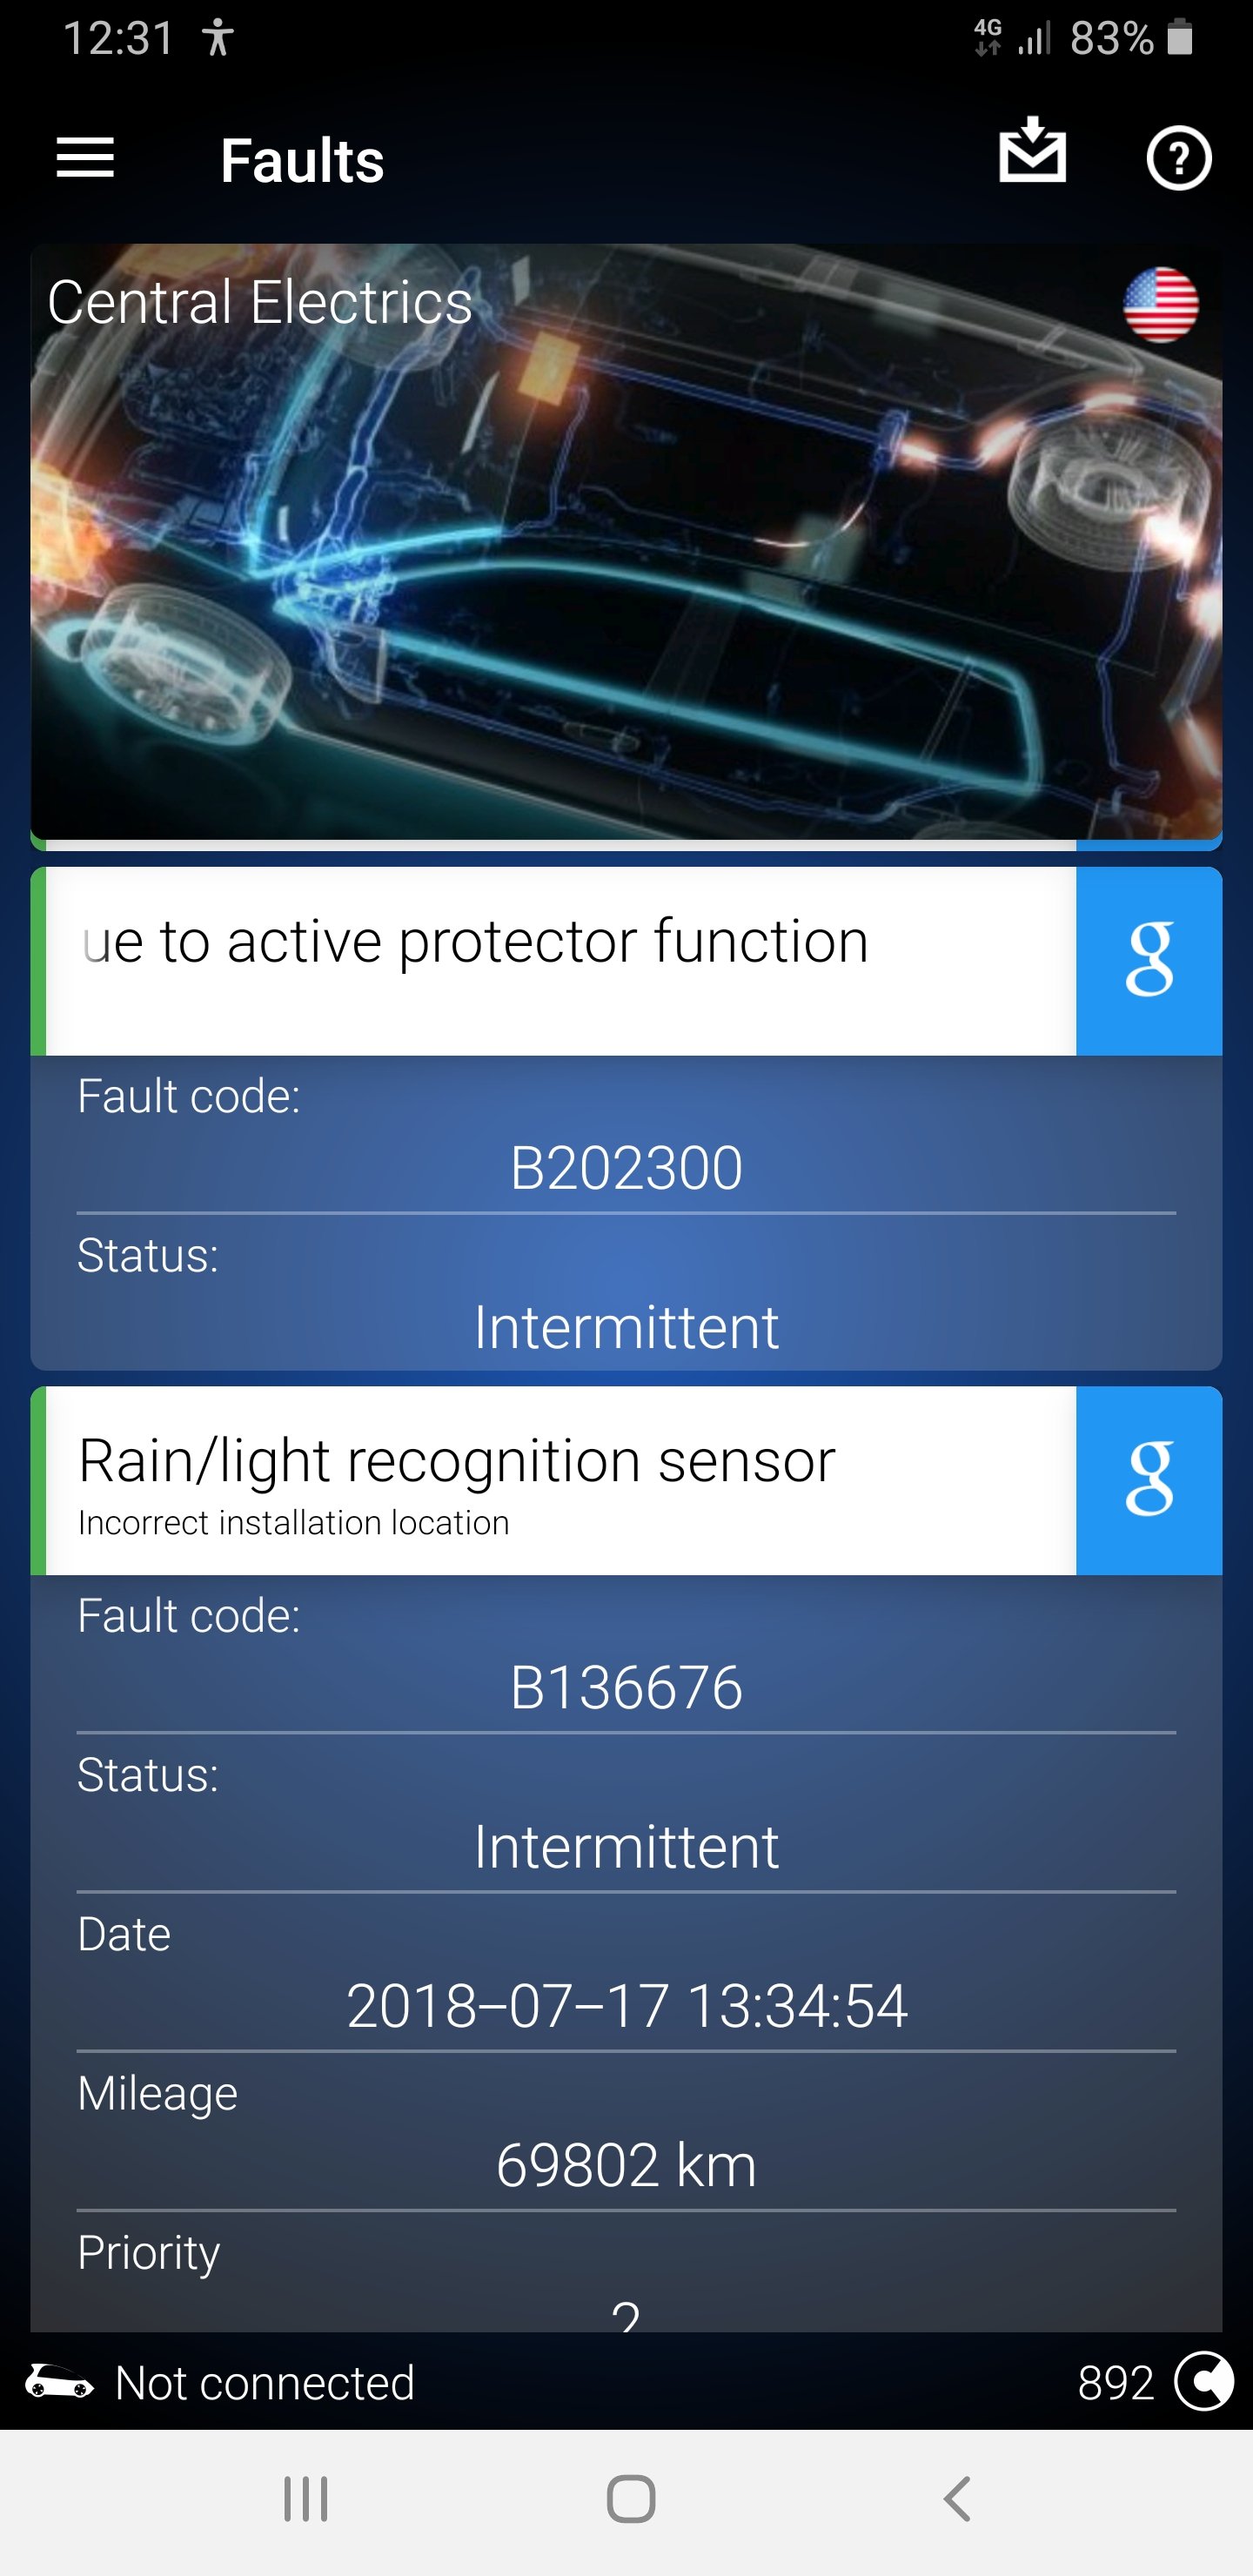
I use OBDEleven but the older model range (which is lower down within the link) The newer range/models (1st lot within the link) now support apple IOS where as before it was just android. https://obdeleven.com/en/products-pageyou can tell via obd11, to which I can tell you how (if you have obd11) or the other way is to disassemble the rear view mirror, turn it anti-clockwise with a little pull down & it should drop down (if I remember correctly) then use some flat plastic blades to unclip the black housing, you will then see the sensor to the left, you might have to just slightly open the retainer clip either side in-order for the sensor to come away but be careful of the gel pad on the sensor that is then on the windscreen, let the air get at the gel pad for a few mins & that will come away easy enough, unplug the plug from the sensor & on the back of the sensor will be the part number, you might not have an (A) (B) or (C) if 2013 vehicle, it might just be the part number but replace it for the same part number & it doesn't matter if the new part number has (A) (B) or (C) at the end of it, just as long as the part number is a match, number for number, letter for letter.Also had to do a battery change in October so purchased this exact one from Tanya batteries website, very prompt & 1st class service, used OBD11 to code the battery, just change the rated battery capacity should the new battery be a different in (AH) change battery manufacturer to the correct brand & serial number to the following (1111111112) & that's it...Job done.Just make sure that the one you purchase is of at least the exact same part number of the one you are replacing it for! or if it has a (A) (B) OR (C) as these are updated revisions etc...It wasn't until a month back that I noticed I was getting a humidity fault when reading with OBD11 & that was because of the sensor that I purchased did not match what my car was coded for! it was a ball ache but I got there in the end, I basically ended up buying another rain/light/humidity sensor but this time I purchased the correct part number of the one I needed (5Q0955547B) Also don't buy/purchase from this place https://www.cars-equipment.com/ Vaclav Pekar is the CEO/owner & cut a long story short sent me the wrong part number of an item even after confirming what was the correct part number to order, which cost me more but sent me a complete different one which was cheaper but most of all no good, then would not respond to any emails from me, which was the complete opposite behaviour prior to purchasing! Lucky I paid via paypal so had to open a claim to which he did not respond to at all...so beware. Sorry the info might be late but forgot about this thread.Yes but if you want quality then be prepared to spend? buy once & be done, buy the sticky ones from eBay & you will no doubt end up buying again. I purchased my Leno paddles from a member on here who was selling them, roughly half price ish but the quality & workmanship of these paddles are of top notch.All been sent to your email addresses with instructions...Anyone who needs 0490 for MIB1 only send me a PM!Still love these today another one of those mods that are simple but effective especially in everyday aspects of using the car etc. Enjoy themGarage Name: Unit18 Telephone: 01908 320 043 Address: 114 Tanners Drive, Blakelands, Milton Keynes, MK14 5BP Website: http://www.unit18.co.uk/ My Car: Skoda Octavia VRS 2.0 Petrol (63) Work Carried Out: 8th service carried out at 52,760 miles, genuine parts used, oil (5w-40 Liqui Moly) oil filter, new sump plug, new spark plugs, pollen filter, R600 air filter clean, Inspection and Lubrication full service, Service interval reset, work carried out by Lee who did a fantastic job as always with top quality workmanship as usual. Review: My 6th visit to Unit18 & nothing more to say than what I have already said prior/above...EchoHi folks 😎 Got a fault with my automatic lights (xenon) when the switch is in auto mode, the fault pops up on the dash & says something along the lines of "Automatic Lighting Fault Control" can't remember exactly, if I switch the lights to manual dipped beam the fault doesn't appear on the dash! Only when in Auto mode does the fault pop up. I've also covered the sensor on the windscreen with a towel & the lights do come on, remove the towel & the lights go off, if I put my hand on the back side of the rear view mirror & my mirror goes dark & if I release my hand from the mirror, the mirror un-dims (which is correct) So kind of confused 😕 Scanned & cleared with OBD11 & got these faults so would be very appreciated if anyone can shed any info as regards to what I can do to sort this out & my windscreen is clean 😁 Car: Skoda Octavia RS Year: 2014 Body type: Estate Engine: CHHB 162 kW (220 HP) 2.0 l Mileage: 81566 KM --------------------------------------------------------------- 09 Central Electrics System description: BCM MQBAB H Software number: 5Q0937084AA Software version: 0112 Hardware number: 5Q0937084AA Hardware version: H14 Serial number: 00011320800842 ODX name: EV_BCMCONTI ODX version: 011001 Long coding: 0F001A42C24722FB07A04082B10C07280000000000000000000000000000 Trouble codes: B136676 - Rain/light recognition sensor Incorrect installation location Intermittent Date: 2018-07-17 13:34:54 Mileage: 69802 km Priority: 2 Malfunction frequency counter: 94 Unlearning counter: 140 Terminal 15 status: On Terminal 50 status: Off Voltage: 14.5 V Outside air temperature: 23.0 °C Status Bremslichtschalter (HW): On Status Bremslichtschalter (CAN): On Off: operated Parking light: not activated Automatic high beam assist: not activated Low beam: not activated Parking light left: not activated Parking light right: not activated Letzte Weckursache/ Werte [00;2E]: keine Störschutzursache CAN-Bus_aktiv: On B136604 - Rain/light recognition sensor Faulty static Priority: 2 Malfunction frequency counter: 117 Unlearning counter: 104 Terminal 15 status: Off Terminal 50 status: Off Voltage: 12.3 V Outside air temperature: 18.0 °C Status Bremslichtschalter (HW): Off Status Bremslichtschalter (CAN): Off Off: operated Parking light: not activated Automatic high beam assist: not activated Low beam: not activated Parking light left: not activated Parking light right: not activated Letzte Weckursache/ Werte [00;2E]: Pin A32 Heckdeckel Softtouch TasterPin CAN-Bus_aktiv: On I hardly use the auto mode to be honest & my xenon lights do the up down left right business but would also like to know if the AFL's only work in auto mode or do they also work in manual dipped mode? Thanks.

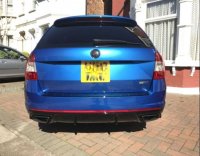
 I'm kind of thinking to replace the rear diffuser on the VRS estate, I did watch the hollowman video on YouTube & it seems pretty simple I've been looking at this Rieger version https://www.ebay.co.uk/itm/292062886954 Already in gloss black & ready to fit I have also looked on Superskoda's website but they don't seem to have the exact same one as the Rieger. Superskoda has this stick on version (all I could find that looked similar to the Rieger) http://www.superskoda.com/Skoda/OCTAVIA-III/Octavia-III-rear-bumper-center-diffusor-Martinek-Auto-GLOSSY-black But think I prefer the Rieger style, has anyone got any pictures of either of these fitted to there VRS estate & if you have the Rieger version, is it just a simple unscrew (old) & re-screw the (new) so to speak, its it secure as the factory one & is it prone to marking easy if on standard (OEM) springs setup. Thanks.

Important Information
Welcome to BRISKODA. Please note the following important links Terms of Use. We have a comprehensive Privacy Policy. We have placed cookies on your device to help make this website better. You can adjust your cookie settings, otherwise we'll assume you're okay to continue.