burntcrisps2
Members-
Posts
33 -
Joined
-
Last visited
Profile Information
-
Location
near Banbury, Oxfordshire. UK
Car Info
-
Model
Her:- Skoda Yeti Elegance 4x4 2.0 TDCi (140) Me:- Ford Focus Zetec 1.8 TDCi (115)
Recent Profile Visitors
888 profile views
burntcrisps2's Achievements
-
Thats a bummer for sure, but definately one of the problems with fault codes as once cleared there is no history log archived anywhere to my knowledge. Not sure that egr cheat device is street legal and suspect it isnt looking at ebay wording! but then maybe it is? However it is indeed interesting to see something exists. I might have a go at running some Wynn’s Diesel EGR Extreme Cleaner through the engine if I get the same issue again. Not anywhere near the same as removing and cleaning manually but might get the worst of the crud off and give a bit more life to the egr system.
-
Well I am of the mind that the EGR is probably the real culprit as nothing looked wrong with TV, but can’t prove that at present. Fault code was same as original which points to TV, but error codes don’t really prove much sometimes. Will have to see how it goes over next month or so. It’s a shame the egr is not easily accessible as I would remove connecting pipework and use some egr3 cleaner to blast the main amount of crud off it like I have done on other brands, Ford Focus and Renault Clio. That’s one of the reasons I wanted to get a cgon hydrogen fuel cell fitted to the yeti as if it truly gives a more complete burn there would be less crud going round the egr circuit. Cgon went bust and have resurfaced/ been bought by another outfit... atmos-clear, but that route may never happen as I was always waiting for a case study of an ea189 fixed vehicle to be done, to prove suitability. If egr does fail then will have to see if VW honour their commitment to resolve foc, but that window closes end of 2019 for the yeti, so kinda hope it fails during this year or just keeps going till we swap the yeti for an EV in a couple of years time. That may even be a Skoda e-vision! If we can stomach going with vag again that is. Yeti gets new oil and oil filter every year as mileage is only circa 6 to 8k max. And has done since new so trust that helps as per voxmagna comments. piph, trust you get yours done foc, please let us know if you do.
-
Right a quick update on this thread. Yesterday the wife was driving the Yeti and had been to Bicester, reasonable run, stayed there a while to do some shopping, returned to Banbury and stopped to do some more. On starting the car to return home it stalled and on restarting it stalled again and third restart it ran but then went into limp home mode with the MIL light on and the glow plug light flashing. So she got home and explained. I thought OK probably the Throttle Valve stuck again. I stated on here and also listed in my service schedule that I would take off the Throttle Valve yearly and clean. I didn't have the time to do this in December (never a good time to service a car!) so thought I would do it later in 2019 as I need to replace the rear disk pads and was planning on doing together in the warmer weather. So today I set to and got the pipework disconnected and using a mirror looked at the Throttle Valve. Surprised to see it was almost as clean as when I put it back on some 14months ago. Decided to take off anyway and check everything, removed the cover to see if the gears and motor were all good and working, which they were, so replaced throttle valve, pipework and cleared all the fault codes. Reference excellent info from voxmagna here... Throttle Valve Replacement EA189 Tdi Yet4x4 @50K https://www.briskoda.net/forums/topic/442249-throttle-valve-replacement-ea189-tdi-yeti-4x4-50k/ Started engine. All working fine and test drove so its all good again. Suspect the stalled engine and restarts made the stupid car throw a wobbly and an error code which put it into limp home mode. The good thing is the turning the exhaust return feed round by 180 degrees most definately is working well and keeping the throttle valve clean. Anyone reading this thread, that simple procedure is a MUST do as it will save issues later down the line. Wish I had known about it earlier and I would have done it years ago, but then Skoda VAG should have done this as at a standard service and not me. Having seen how clean the throttle valve is after 14months I doubt it needs removing yearly to clean, but will keep it on my schedule list for now and maybe do in summer months next year. Took pictures of the throttle valve to show how clean it still is. Just a light film of oil which is what you expect in the recirculation system.
-
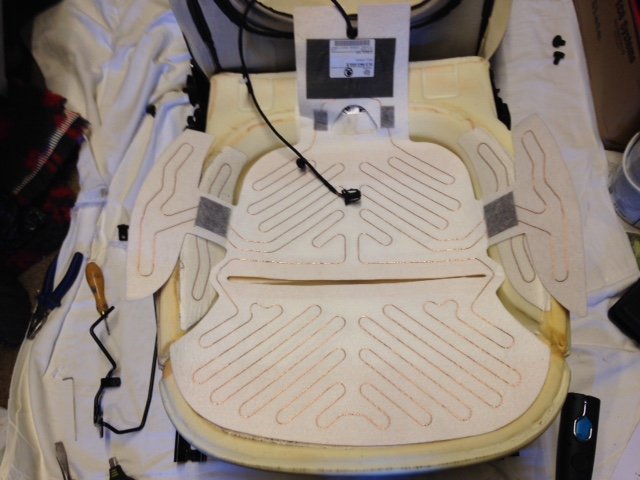
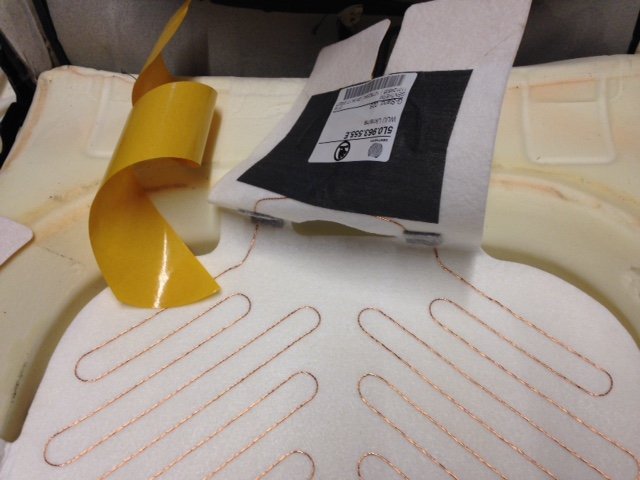
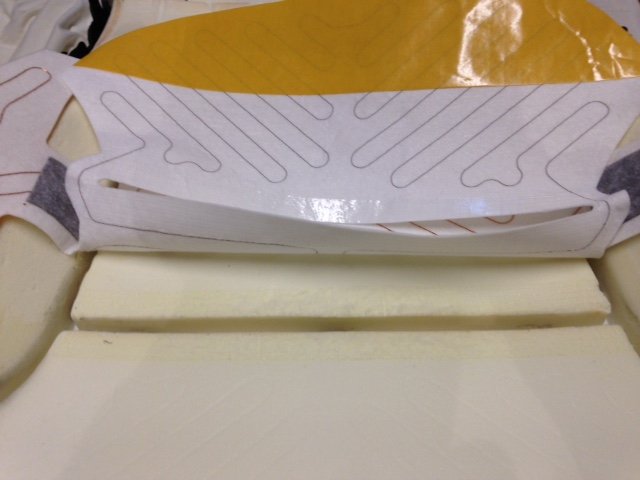
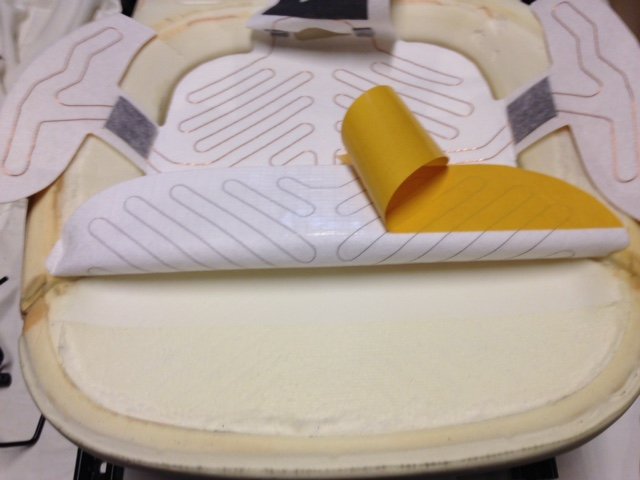
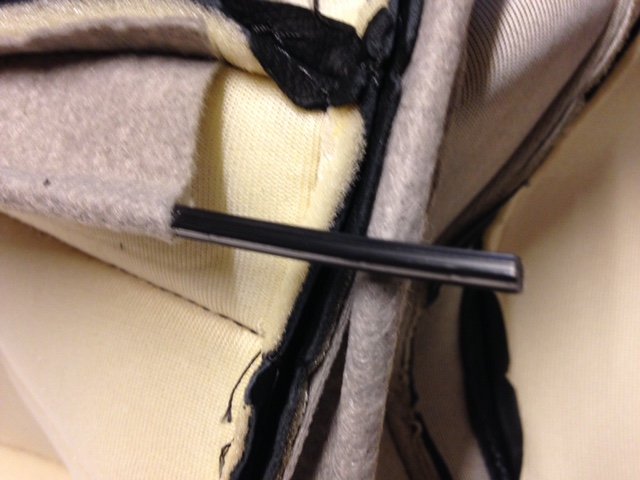
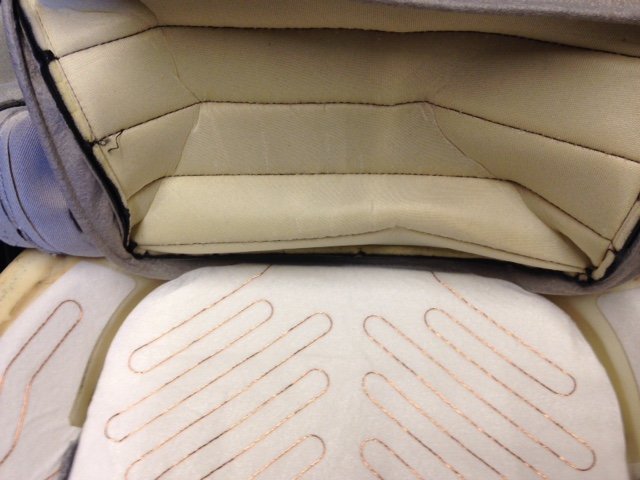
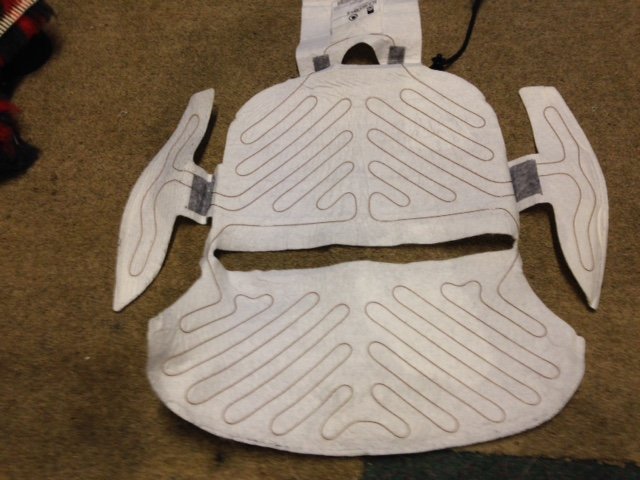
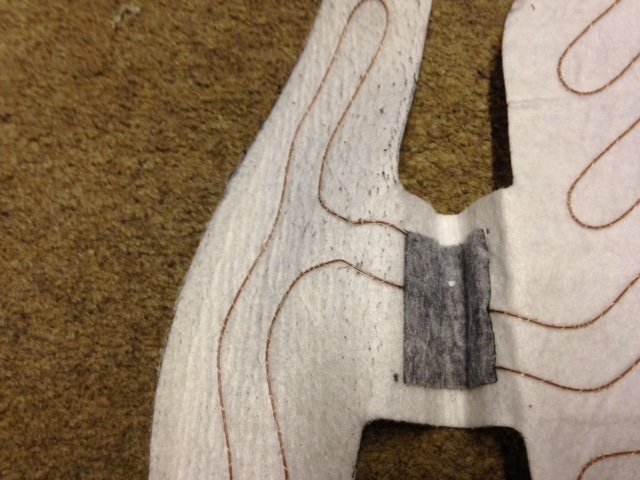
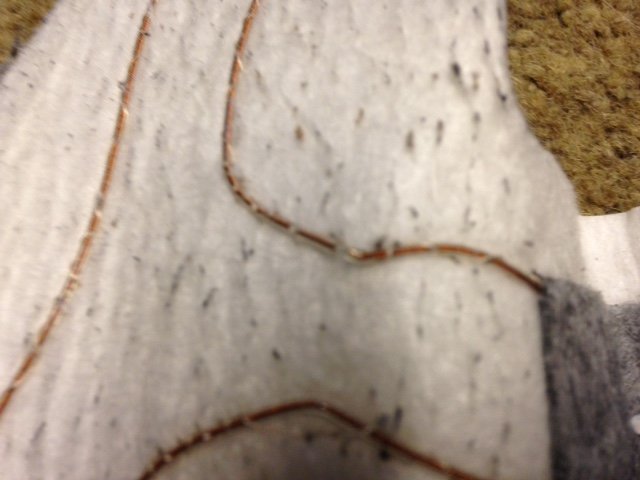
Replacing 2011 Yeti Elegance 4x4 drivers heated seat element Requirements for job 1. A replacement heating element 5L0963555E cost £40.62 30Apr2018. This is for leather seats on Elegance drivers side base heating element. NOTE: Correct item required for Model of car as different versions for Leather/Cloth seats. I believe 5L0963555D is correct for cloth seats. Quote reg/VIN # to dealer to obtain correct part. 2. M10 Spline tool for removing/replacing seat bolts. 3. M8 Spline tool for removing/replacing seatback bolts. 4. T30 Torx tool for removing/replacing some seat plastic panels. 5. Pliers to pull expanding plastic rivets. 6. Small screwdriver or bradle for removing/replacing expanding plastic plugs. 7. Large flat blade screwdriver, preferably well used with rounded corners on blade for prising various parts free and also replacing seat cover into clips. 8. Torch 9. Mirror 10. Some silicone spray to apply to the head restraint bars and mechanism. (optional but probably required on vehicle that’s 3 years or more old) 11. Another pair of hands! Will be required to help replace seat cover into clips. 12. Total time to do, about 4hrs. half a day. The drivers heated seat element failed (base of the seat), whilst the backrest continued to work correctly. So rather odd to have a cold bum, but a warm back! This happened early on in 2018 and I reviewed the procedure for doing this myself or getting the garage to fix. Whilst I couldn’t find a good guide on the web or this forum, I did have access to the Skoda workshop information for doing this and decided I would do this later on in 2018 and went ahead and sourced the replacement part from Skoda (end of April) since the cost was a mere £40 compared to at least £150 to £200 for the dealer fix. So I had in mind to do this over the summer months, but since it was so hot left till the end of September and the onset of some cooler weather, but still pleasant and dry. I have attached the Skoda workshop information, which doesn’t actually show the removal and replacement of the heated elements, but gives the overall process. When you review these you will see that metal C clips are used to hold the seat cover in place and you need to cut these C clips and replace with new ones and use a special pair of pliers to recrimp these C clips. That element alone was enough to make me think this little fix project was going to take some time to do without the special tool and also pry apart the old clips. However this was not required as you will see in the process and pictures below. This is true for our Nov2011 build Skoda Yeti and presumably later builds. This may not be the case for earlier build models. Procedure to replace 1. Fully Unlock and Park the car with plenty of room by the driver’s side, so the doors can be fully opened front and rear, with the ability to get the complete seat assembly out and past the vehicle. 2. Check if you require a radio code. Not required if factory fitted radio/satnav. Installed from new. 3. This is MANDATORY with vehicles fitted with side airbags. Disconnect the battery earth lead. (This is somewhat at odds with my lifelong electronics knowledge. It always used to be remove the Hot lead, Positive, but now most cars state it’s the Cold, earth lead. No idea why this has changed over the years.) Once this is done you will lose the trip miles information and the Clock will also need resetting when you reconnect the battery. You will also get some TCS/ESP errors on the MFD display. You need to drive some 5meters for this to reset correctly. See attached documentation. I originally discovered this when I replaced the battery end of 2017 as it was failing to hold a charge. 4. Remove the headrest. (I didn’t do this but discovered it was required when I tried to remove the seat assembly from the car. In the process I discovered the headrest was stiff to move, so removed and lubricated all the headrests (front and rear) and sprayed silicone grease into the holes and also on the shafts. Totally solved issue with all the headrests. Like new again!) 5. Adjust the seat base so it is as high as it can go. 6. Adjust the seat back so it is leaning as far forward as it can go. 7. Move the seat fully forward and remove the 2 rear bolts. 8. Move the seat fully backwards and remove the 2 front bolts. 9. Now lean the seat assembly backwards so you can gain access to underneath. 10. The Skoda info implied that it was possible to disconnect the wires under the seat base, but in fact that’s not the case. The cables all disappear into a small cut-out inboard from the front seat bolt and rail. Flip the carpet cover up and you will see 3 connectors. Oddly the outer 2 connectors remove by pulling up once locking clips are depressed. The middle one (yellow) needs to be removed downwards and you need to remove it from the clip holding it to the metalwork. A pain for sure. Some odd design! The larger connector has a cable tie mount into the bodywork. Large screwdriver required to lever that out. However having the seat assembly leaning backwards gives good access. 11. Wrap the loose cable connectors around the bar where it is tie wrapped so they don’t get caught when you remove the seat. 12. Carefully remove the seat assembly from the car (it’s fairly heavy and cumbersome) and place on a work surface or bench. (My garage is full of a house clearance so I had to work on the floor on a cleared area. I do have a carpet tiled garage floor, but also put some old dust sheets down to work on top of that. If you have a bench (with access to all sides) it will make life easier as you will be working at a good height and not on your knees. 13. Starting on the left handside of the seat, pry off the backrest adjustment round knob using a large screwdriver. It has 3 clips that hold it on. 14. Pull of the height adjustment lever, by again using the large blade screwdriver to lever it forward. It might be possible to pull off by hand depends on your grip levels. 15. Now remove the expanding plastic rivet and then back. Use a bradle or small blade screwdriver to push the centre plastic bar out and then grab it with pliers and pull out. 16. At the front there was a Torx screw T30 holding the plastic rather than another expanding rivet. Easier to remove. 17. You now have to bend and wriggle the side plastic off. Seemed best to pull the rear part out and then move forward and up. See picture for view of parts that clip over metalwork. 18. On the other side remove the other expanding plastic rivet. It should be noted that at this stage it is worth undoing the seatbelt catch and moving to one side as it aids removal of this plastic cover and also as I discovered it needs to be moved so you can access one of the seatback bolts. There is also a plastic clip into the metalwork that you can access from behind and ease out with a large screwdriver blade. 19. Now remove the 4 seatback bolts, 2 from either side. You really should remove the cabling to the backrest heated panel at this stage, but it looked to me to be easier to support the backrest on cushions so it lay flat and no strain is put on the cables as there is enough length to do this. (Second and third picture show seatbelt before and after moving to gain access to bolt.) 20. Next step was not detailed in the Skoda instructions. I looked at removing the seat cover and realised the metalwork bar down the outer edge needs to be removed. There are 2 @T30 Torx screws and that comes of easily. 21. Now we can actually get the seat cover off to replace the heater element. The cover is held in place by what looks like a section of car door seal. Its U shaped and clips over the thin metalwork. There are 3 sections, one across the front and pieces down either side. Start at the front at one end and press down on the seat to relieve the tension and roll it out and off. It’s effectively clicked into place so expect some clicks as it undoes. 22. Once you have that done, start on one side and do the same and then repeat on the other side. 23. You will now see the seat cover is attached across the middle and down the sides below the side bolsters in those foam grooves. I expected these to be metal C clips, but it turns out the design must have changed and these are basically plastic C clips with a star shaped plastic bar section in the fabric which clips in. All that is required is to gently use a large screwdriver blade to ease the clip apart and out pops the seat cover. The plastic C clips are buried deep in the foam seat so it was not easy to take a picture, but trust its clear enough to see. 24. There are 3 clips across the middle and then there are 2 down each side and 3 across the back section. Took a number of pictures to show element and placement which is stuck in place with the element tracking under and around various parts. 25. Now get the replacement element. 26. Ensure it’s the same pattern and see how it will fit. Basically you will need to fold and push it down into the groves at the sides and the back. Check how this works while you still have the sticky tape covered. 27. Now remove the old element. Not quite that easy as you would think the sticky tape would fail over time. In some areas it was welded to the foam and removal meant some foam removal too. Try all round in different areas and you should find like I did that some came away easier than others work on those sections first. Once you have it starting to peel off pull it back at an acute angle and ease off with your fingernails. I lost a couple of millimetres of foam at the most in a few places. Other areas will remain a bit sticky from the old tape. 28. Once it’s fully unstuck, remove the cable underneath by unplugging and removing the cable tie clamps, one black and one white and move aside. 29. Now place the new element on the seat foam and align as best you can. Its foam so it’s never going to be a precise fit. I lined up the centre grove cut and tried to ensure the cable element was equidistant either side of the centre groove cut. Once you are happy it’s in its correct place I decided to stick at the rear, as it’s the smaller taped area and work forward doing middle then front. Then do the two side bolsters as these areas need folding down into the grooves. I was surprised to find the sticky tape will easily unpeel, so you can do a bit of repositioning should you need to. Pictures below showing this. 30. Lastly do the rear connection area ensuring the cable follows the original route under the seat and push in the new cable tie mounts. I couldn’t accurately remember which holes, but of course you can look at the passenger side and check how it’s routed there. The white cable tie is 3 holes down (and you can see where it cuts into the foam base) and the black one is by the larger cut-out in the base. The cable is fairly taught under the seat base metal. Once connected check the cable routing at the rear of the foam and stick the last area down. It’s fairly easy to see the original sticking areas so it should be pretty much the same for the replacement. 31. Then ensure the star shaped plastic bars are central in the fabric of the seat base. Pulled one out to show it here. 32. Then place the seat cover over the rear and pull forward and you will see that you need to press the seat down to compress the foam whilst getting the bar section back into the middle C clip at the rear. I could not achieve this on my own. This is where you probably need another pair of hands! Makes it a doddle for sure. Carefully line up the bar with C clip and gentle press down with a large blunt screwdriver blade. Do the 3 at the rear, then down the sides and finally the 3 across the front. 33. Now the seat cover is in place it’s just a matter of getting the edges rolled over and clipped back into tension. 34. Do this by pressing on the front edge at one side and roll the channel over and onto the metal and feed along the full length and press up firmly to clip into place. Do the same on each side. 35. Now it’s just a matter of replacing everything you took off the seat in reverse order. 36. Replace the complete seat assembly back into the car. 37. Lean in backwards before bolting in place so you can reconnect the 3 cables. Do the yellow one first and reclip back onto its mount. Do the other small one then the larger connector and remember to push the tie clamp back into the metalwork. 38. Lean the seat assembly forward to its correct place and loosely bolt into place. 39. Move the seat forwards and replace the rear bolts. 40. Check all 4 bolts for correct tightness. 41. Reconnect the battery earth lead (push down quickly so there is little sparking). 42. Start the engine and drive the car 5 metres to remove the TCS/ESP error message in the MFD. 43. Adjust the Clock to the correct time. 44. Enjoy a warm bum again on cold days. Lastly I looked at the old heating element to see where it had failed. As expected I guessed it would be the driver’s door side bolster as this gets the most flexing over time. In fact all it takes is kneeling on the seat to lean in to get something out of the car to severely stress this heating element. I suspect this happens to many vehicles. I doubt the backrest heater ever fails, just the driver’s seat base and occasionally the passenger’s seat base element. Sure enough it was easy to see the break in the element. I noticed the old element seemed to be a single core design, whereas the new replacement seemed to be a multi-strand core design, so it should survive longer. However I really can’t see the point of heating the bolsters as it’s just not required. The base is all that’s needed to be heated in my view. The part number label hides the connections which contain a thermistor (for temperature control) and then the connections for the heater element. The connector can be checked for the correct resistance. The thermistor reads somewhere around 8.5Kohms when I checked (suspect this is in the range 7K to 10Kohms depending on room temperature.) The element should of course read a short circuit s/c, but will be open circuit o/c if it has failed. You can check across the connector. Pin/cable colours are blue and brown/black for the …thermistor and brown and yellow/black for the heater element. Would I do this again? Well it lasted 6 years from new, so the replacement should last beyond the 10 years we will keep this car before being replaced with an EV. The passenger side may of course fail in that time, so I suspect I would probably do it again myself as I at least have done it once and have a typed up guide. Noticed someone has fixed a heater element by soldering it back together. Suspect that will work for a while and then fail again as the element is now stiffer due to the solder joint. If attempting this fix I would remove the element from the drivers bolster and join along the foam groove so it never gets distrubed. Trust the info and pictures will help others attempting this repair. Safety precautions when carrying out repairs on the airbag system.pdf Work sequence when connecting the battery.pdf Assembly overview of covers and upholstery for backrests.pdf Assembly overview of covers and upholstery for seat.pdf Removing and installing seat height adjusting elements.pdf Removing and installing storage compartment on passenger side.pdf Removing and installing the backrest frame for the seat frame.pdf Removing and installing the front seats.pdf Removing and installing the lumbar support.pdf Summary of components of side airbag unit.pdf Summary of the components of the front seat.pdf
- 10 replies
-
- 6
-

-

-
- heated seat
- drivers
-
(and 6 more)
Tagged with:
-
Agree with you on current diesel technology. Before they fitted DPF's and all this regen stuff, diesels suited any driver type. Now its decidely limited. I am still waiting for a case study to be done of a cgon unit fitted to an EA189 fixed diesel engine (might be October), which has the potential to keep the engine cleaner and the EGR system, so should in theory last much longer due to cleaner emissions. Next year will almost certainly ditch one of our diesel cars and go EV route, that might be a Kia Niro EV. Will see whats available next year.
-
Great write up which I found really interesting and detailed. Like the Kodiaq a lot, but our Yeti is likely to get replaced with an EV, so expect that might be a Kia Niro EV next year, although thats not a given. Depends what else might be available. Would love a Yeti EV like this... http://www.kreiselelectric.com/en/projects/electric-yeti-4x4/ but thats not on the cards as probably way too expensive to convert our current Yeti or a more recent end of line model.
-
If anybody is reading this thread for the first time, I can report that the fault code has not returned since doing the cleaning and the car has been running without any issue for about 8months now. I am still logging regen cycles and its settled down to the roughly 200miles between, but depends on driving/journeys as expected.
-
Another update on our Ford Focus fitted with cgon ezero1. Unit fitted middle of January 2018. Genral trend is improving mpg as can be seen from the trendline in the attached excel sheet. Another couple of tankfulls (added to chart) doing mainly motorway and some rural trips.
-
Another update on our Ford Focus fitted with cgon ezero1. I had hoped to replicate a journey I used to do some years ago commuting to Bracknell/Ascot on a daily basis, which would have given some comparative data albeit not a scientific test, just some real user data. I used to average 50mpg over a period of one year. However, my plans were thwarted by the ‘beast from the east’ and the house clearance we would be engaged in was dramatically changed due to a burst pipe. So the data is different due to 2 people travelling in the vehicle in one direction and returning with back seats down and fully loaded with tons of goods. Previously the the commute would have been a single person only. So I was expecting sub 50mpg from these journeys. The data shows consistently improving mpg over the period, with the last 54mpg being something I would only expect from trying to maintain a steady 55mph on A roads, not travelling at a fairly steady 70mph motorway speeds, semi-laden and reverse direction fully laden. Whilst I see comments from others saying can you do a steady this that or other speed and all manner of other data relating to other testing parameters, this is not and has never been a scientific back to back test, it is just real data obtained from a vehicle fitted with the device. In order to conduct a true back to back test I would need an underground facility of miles of tunnels that would maintain a constant temperature, humidity, wind resistance and an autonomous vehicle repeating many identical back to back before and after tests, along with many identical vehicles all repeating the same exercise. Automotive manufactures don’t do this now and the likes of Millbrook, Mira, Bruntingthorpe and other test facilities are all outdoors, so have many variables which cannot be excluded. And if this is done, it is not 'real world' conditions that the average Joe Bloggs would achieve with a given vehicle. It is actually pretty much impossible to repeat daily back to back driving on any road in the UK, (except maybe some isolated Scottish roads) on which to maintain some repeated average speed commute, but temperature, wind, humidity and other variables would all affect data. I only need to cite the atrocious state of the highways in this country along with constant roadworks, accidents, detours, etc. which mean no one actually does a consistent daily commute with the exact same conditions on a daily basis. My interest has never been increase in mpg, it has always been about finding a device that will improve the DPF and EGR systems fitted to our Skoda Yeti 4x4 which has the infamous EA189 engine fitted and has had the dubious VW fix applied which I later found out did not just remove the cheat software, but basically makes the DPF and EGR work at least twice as hard and will likely wear out prematurely before the original design intention. The cgon ezero1 seems the best option to prolong the life of these expensive components. I do hope to get this organised with cgon very soon once they have done a case study with an EA189 fixed engine. Any increase in mpg is in my view an added bonus, the objective being a cleaner burn and less crap in the DPF and EGR systems. As I have stated before as a long time diesel driver, I will be replacing the Focus with an EV soon and the Yeti in about 4 years time with another EV, unless Hydrogen fuel based cars suddenly plummet in price in the ensuing years. Data below for those on this forum who actually have an interest in the data collected, not for those who are continual wingers and sceptics (flat earth society members)…
-
Update on Ford Focus. A complete tank full with cgon fitted and active has returned the following results. Slightly more miles using slightly less litres of fuel. Car achieved 53.0mpg doing 568miles from this tankfull, which is better than the previous mpg for similar mileage and similar travel scenarios. Updated graph for info.. The sceptics among you will draw your own negative conclusions, for sure. More miles and tankfulls required of course to see if trend is positive, but even if I had a regular commute over 30miles or so, that would not be a scientific analysis as far too many variables, but it would be a real world set of data which most moaners on here seem to forget. Any lab tests are just that and anything done on the road has many variables also, so the only way to do some truly comparative tests would be to have an underground track at a stable air temp, with autonomous vehicles driving same route repeatedly using at least a batch of 10 vehicles all of same design and batch run. Even then that would not be comparing apples with apples as no manufacturer makes 2 cars that are identical in a batch. No word yet on Yeti case study, but hopefully some progress this month.
-
Update on Ford Focus. Just filled the tank, but this is not a full tank with cgon fitted, only ~80% and I have done a fair number of short runs in cold weather such that the engine never reached anywhere near full operating temperature, which is not normal for me. I have also done a few long runs on motorways cruising at ~70mph, so both scenarios are worst fuel economy scenarios. Last few years have seen some regular commutes so including graph for that below as its fairly representative of economy. Early 2017 shows 3 similar mpgs and this was several days a week runs of nearly half an hour, but only some 13miles distance. Next 2 include some longer steady 50mph runs down to Swindon and back. Since the battery was disconnected during cgon fitment, the ECU will probably be in a new learn mode, so that presumably has some affect, possibly adverse. So car achieved 51.3mpg doing 560miles from this tankfull, which is better than I expected for motoring done. Need to see what a full tank achieves next and will have some more motorway runs as we need to do a house clearance in Berkshire and also a run up to Preston and back so maybe have some more data later in month or so.
-
I am continuing logging regen info. until we get cgon unit fitted. Seems the next regen was much shorter in miles, but that was actually due to being in an hour long traffic jam, so to be expected. The regen distance is still higher, but only ~240miles rather than the first one at ~375miles after throttle valve clean. Not sure why it should have been so high after clean, but still seems better than before.
-
It’s good to see such manic vitriol on this forum, but highly undesirable! If you are of the opinion that it doesn’t work and can’t possibly do so, then fine say that once in this thread, then get lost and go and be a grumpy old man on some other forum thread. Let those that are open minded discuss and find out what others have discovered and proved themselves. I have found this forum (and other auto forums) such a great place for very helpful guides, information, troubleshooting and this one such a great help for the last 6 years, but I am sorely tempted to just cease providing independent information, because of the morons on here. I wish there were more women on this forum as they would be far more open minded than those on here who know it all, but actually are no help whatsoever. I will not give up though and will give regular updates for those that are interested. I am made of sterner stuff and will not bother reading the pathetic adverse comments in this thread. I am, as stated before, a long time Customer Service(s) Manager and worked with all manner of nationalities worldwide some of who have been the most objectionable individuals imaginable, and then some! I am a logical trouble-shooter and as with everything I take all things with a large pinch (well bucketful) of salt, especially marketing bumf. I have worked with marketing people and they never provide the whole truth, but always overstate numbers. That’s true of all companies, governments too. If this product is only half as good as it appears then it is still worthwhile. My goal is quite simple. We bought a Yeti which we will keep for 10years. I need to ensure the next 4years is as trouble free from EGR, TV, DPF, EGR Cooler issues as possible, because VW screwed up and have halved the life of the components due to their changes in the EA189 fix, rather than simply removing the cheat software. I will get our Yeti fitted with a cgon device and provide as much detail as possible regarding that and at regular intervals afterwards in this thread. I will also provide info on our Ford Focus at regular intervals as data becomes available.
-
Quick update on my fitted cgon unit to Ford Focus 1.8tdci Unit was fitted at 118,874 miles. Fuel tank filled at 118,756 miles. So 118 miles without hydrogen fuel cell. Car normally averages around 50mpg or less, with mixed driving and usually does around 560miles on a tank and at best has done 600+miles when driven carefully and on a regular run to Rugby and back doing a steady 45 to 50mph. Did a long motorway run at a steady 70mph and tank is now half empty. Usually trip computer shows at best 300miles left and the same driven on trip/odo. Currently its showing some 375miles left and trip computer is saying 57.6mpg, which is some 5mpg better than normal. Considering 118miles were done before fitment, I am expecting some good numbers for this tank, considering some ~21% was used already. Guess I should have filled when cgon fitted, but a creature of habit and run full to near empty. Will post full info when I have it, but I am not doing the 35K miles a year that I did for most of my working career. Road Trip (ios app) log file export to Excel showing most of mpg. history for those naysayers on this forum.
-
Just an update on my cars and cgon unit. I have had a cgon unit fitted today to our old Ford Focus 1.8 tdci Zetec which we have owned from new. It is 15 years old, has done 118K miles and had an egr blanking plate fitted 6 years ago. It is of an age that it does not have a dpf fitted but does have a cat and it is the original exhaust system as fitted at the factory. Car was manufactured in Saarlouis, Germany, delivered November 2002 It's been a solid and reliable car that does over 50mpg average. It was fitted at a local tuning company in Banbury (Angel Tuning) who have just become installers. One of the them was having their own vehicle fitted today (big V6 Audi) which regular does runs to Germany and back. As they are primarily a tuning remapping outfit they do not have MOT emissions testing (which is a shame as I wanted to see some before and after info). I have some basic pics of the install which I have attached fyi. Best place for this fitment was beneath the battery tray as surprisingly little space in this older engine bay. Really neat install, with everything hidden and neatly and professionally done. Some customers like it this way, other want it visible apparently. If it gets transferred to another vehicle, then blanking plugs are supplied to bung the hole just after the maf sensor in the inlet pipe. A wire is connected to the map sensor as part of the install. Used for info on engine running etc. There is an app available (actually unreleased) that the installers and customers can use. Currently only android, ios very soon. Some screenshots showing much of the info available on the install screens... on the google play store here... https://play.google.com/store/apps/details?id=com.companyname.CGON3__0_Mobile&hl=en I don’t have any real test data to share at present other than I took it for a test drive after fitment. It does seem to be more responsive and pull more when accelerating hard. That’s subjective of course, but it did seem better through the gears compared to the drive into the fitment facility. What I do have is the full history of the vehicle, including all data giving actual mpg of this vehicle since day one. It averages over 50mpg, so will be able to comment in the future on changes to that. Any diesel of this age and mileage and no dpf will show plumes of soot on hard acceleration. I did this hard acceleration multiple times and could see no evidence of any sooty exhaust in the rear view mirror and being a nice sunny day it would have been easy to see, as it usually is! I will try this again with the unit turned off and then on and compare on a longer test run. I expect to be able to progress soon with our fixed Yeti ea189 once cgon have done a case study. I have been logging dpf regen info via the vag dpf app and I also not surprisingly, have all the mpg data for this vehicle from new. They have invested around half a million in a PEMS and hub-dyno setup and that is significant as there are very few in this county, only places like Millbrook etc. so it should be interesting to see the case study.


.thumb.png.c0f0287281cb72c181130ce8b987e5bc.png)

