DoctorBoostaLot
Members
-
Joined
-
Last visited
Everything posted by DoctorBoostaLot
-
Thanks! It's not bad. That was where the factory stonechipped it to, so I did it, to the best of my ability, as they did. As you've seen and probably read, the stonechip doesn't help with corrosion much, you think it's untouched and shiny clean underneath to find there's a lot of rust creeping around... which was a bit worrying. The car was my daily driver for 6 years and lived outside and the previous owner was the same. The car will probably be garaged now while I own it. You don't want me doing your car 😛 You can do it! Thanks Gaz! The web is full of incomplete threads where people lose heart or sell on projects, as I was photographing it for my own benefit, it made sense to share for others in the same boat, well Furby!
-
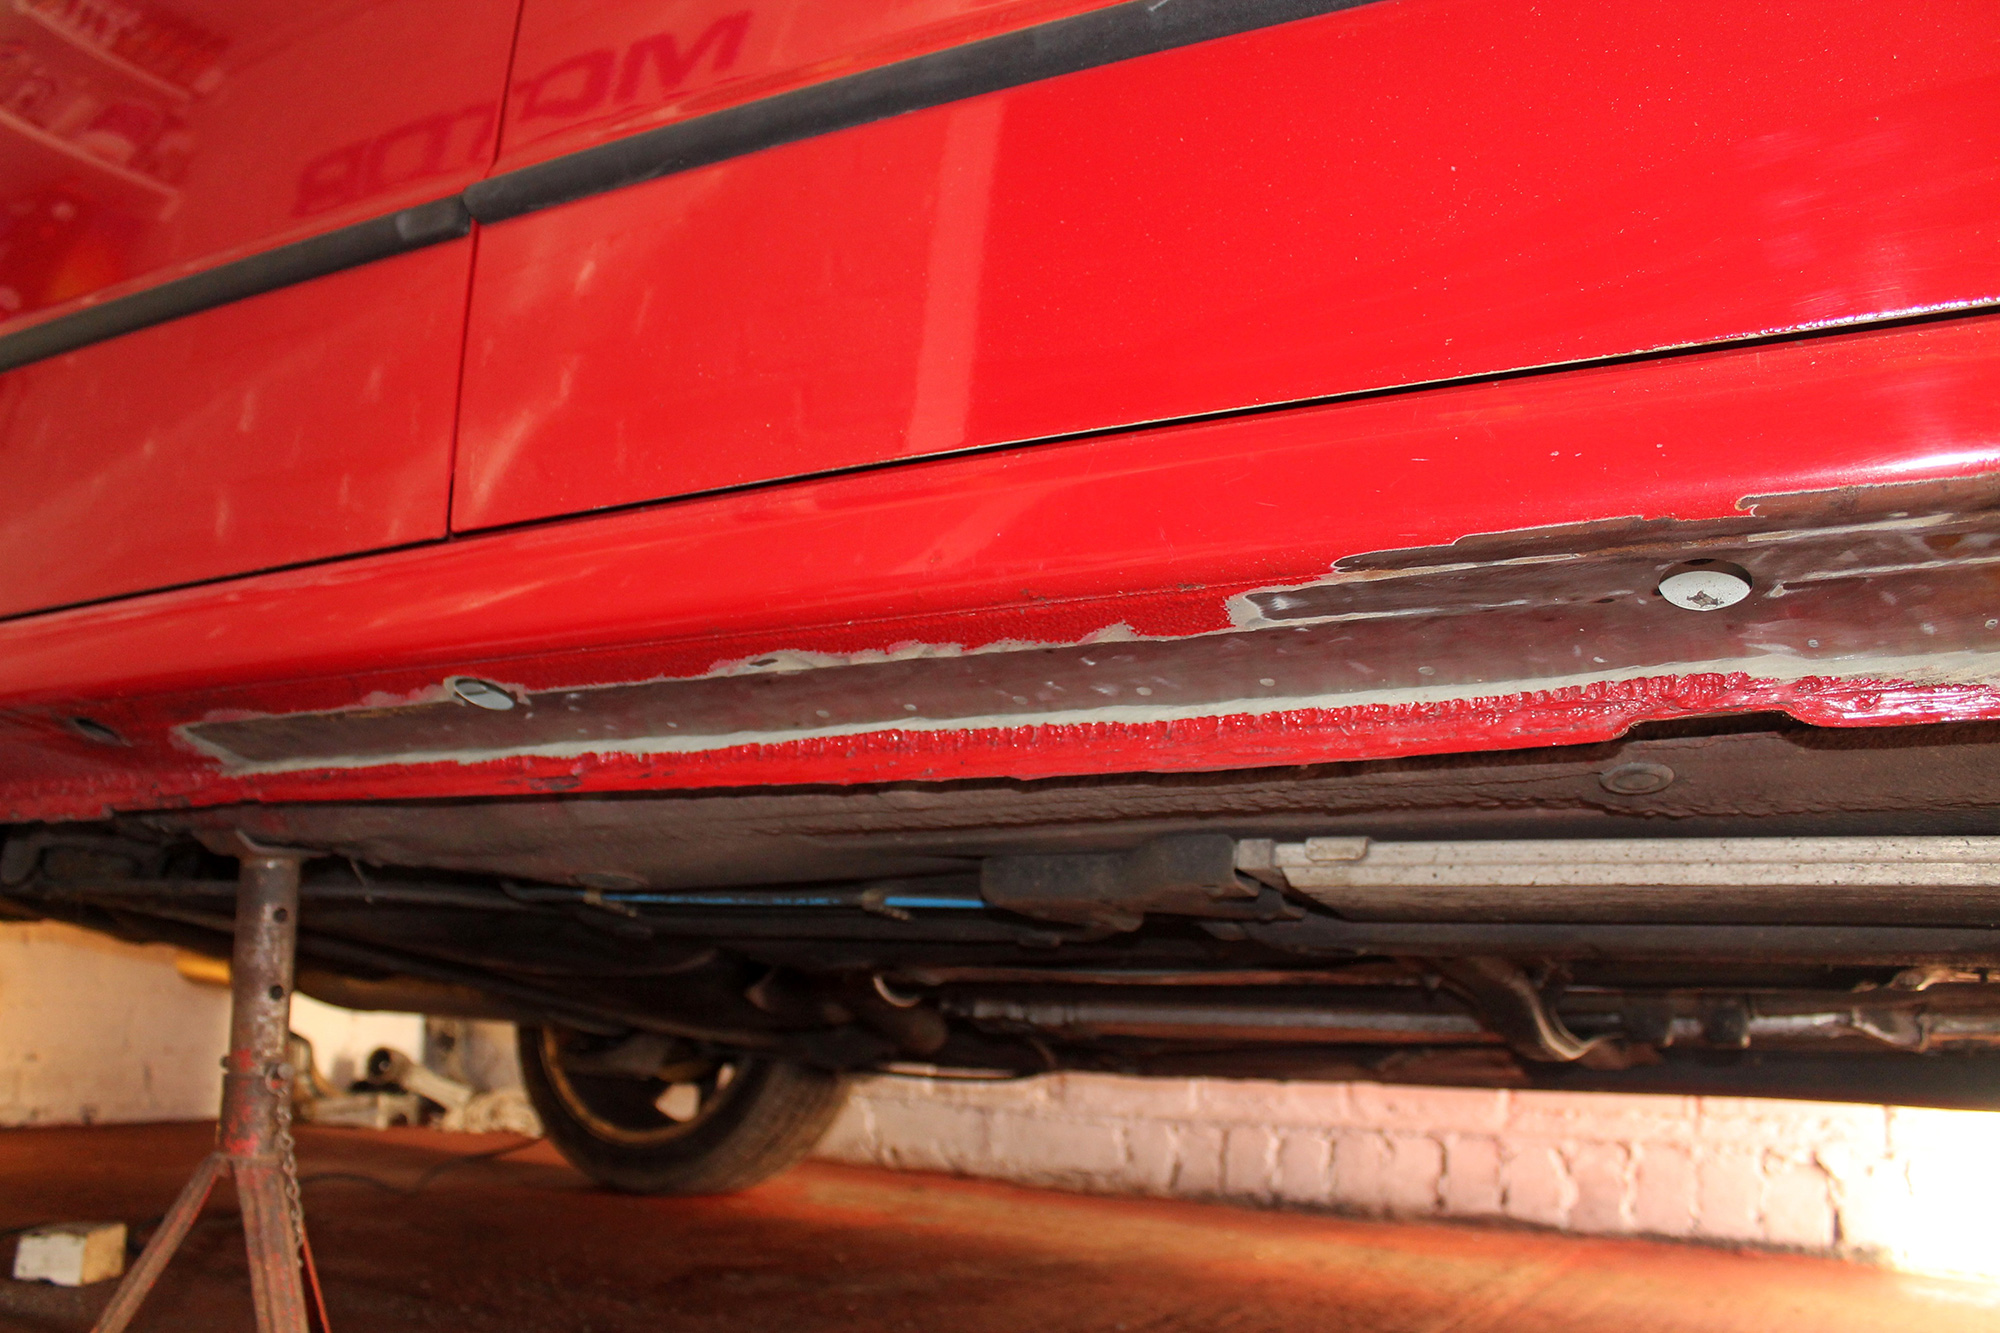
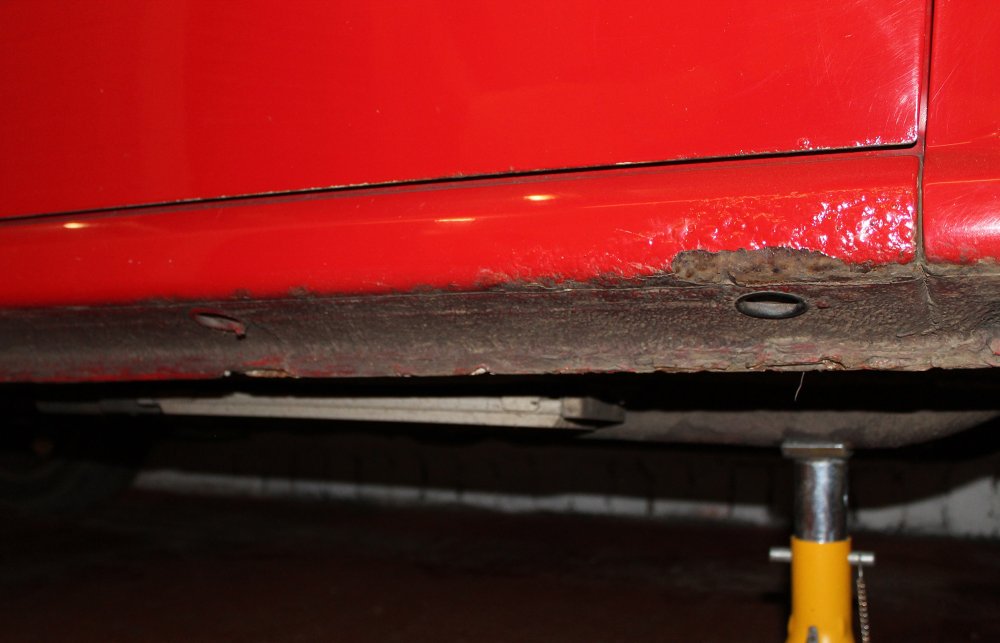
After part one which covered my repair section on the O/S sill I thought I'd upload the second half of the mission. With the area wiped clean of any oils, wax, etc. I filled and sanded the area with 80,180, 320. Keeping tight as I could but I had little choice as to how far I up I went as the repair went quite high near the front post. Bagged the car up and zinc painted the bare steel. Then a coat of primer. Seam seled any gaps and covered the area much as the factory did. Sprayed with grey Gravitex where I wanted the stonechip protection. With the tape removed the line was pretty neat. (I still needed a touch of filler and dab of primer in the lower picture.) Moved the masked area to where I was going to add colour.... Getting the basecoat down... Yeah, 3 decent coats covered that OK. Gunned on 4 coats of lacquer, 3 would have been fine but I mixed more than I needed! Yeah, happy with that, the odd speck of dirt which you'll get pretty much anywhere... Match doesn't look to bad either, which was a relief! Daylight was also a pretty decent match, blended out with some Fadeout thinner. Maybe I should have faded out a bit further up but I didn't want to respray the thing! I was only doing the repair on the sills! I've just got to denib and a slight mop once I've done the N/S. Then wax the cavity & refit the rubber bungs/grommets. Rich
-
Upload us some pictures and lets have a look. As others have chimed in, rubberised underseal is good - UNLESS the rust is already there and working its way around. Clear off the iffy areas, wirebrush wheel it off, rust neutralise it then some underseal / seam sealer. ONLY then try something like Lanoguard. I had a Mk1 Scirocco Storm that had super rusty, alright rotten sills and sill returns, don't get me started on older Beetles, those rusted like hell. My Furby is great in comparison. My A4 Avant is much the same being a 2004/5 with very similar mileage. I think the old fellas had it right, it wasn't pretty but apply your used engine oil to the underside of your car every year. Here's another channel I follow, you'll see what I mean about rust under the seam sealer. If you approach the rust like they do here then you'll be golden.
-
Thanks dude! You're only about 15 mins from me then in Halesowen! The inside of the lip (facing the inside of the car) is fine actually. Which is welcome news! I did have a quick dig there, but it's all good. All the steel is back to shiny and I'll put a touch of rust converter on the odd pitted bit, which there isn't much of. Be time for a dab of filler, seam sealer, stonechip and paint soon. Be nice to see the sill in primer at least.
-
Yeah, he's got a great channel. Another one I like is this guy, ,
-
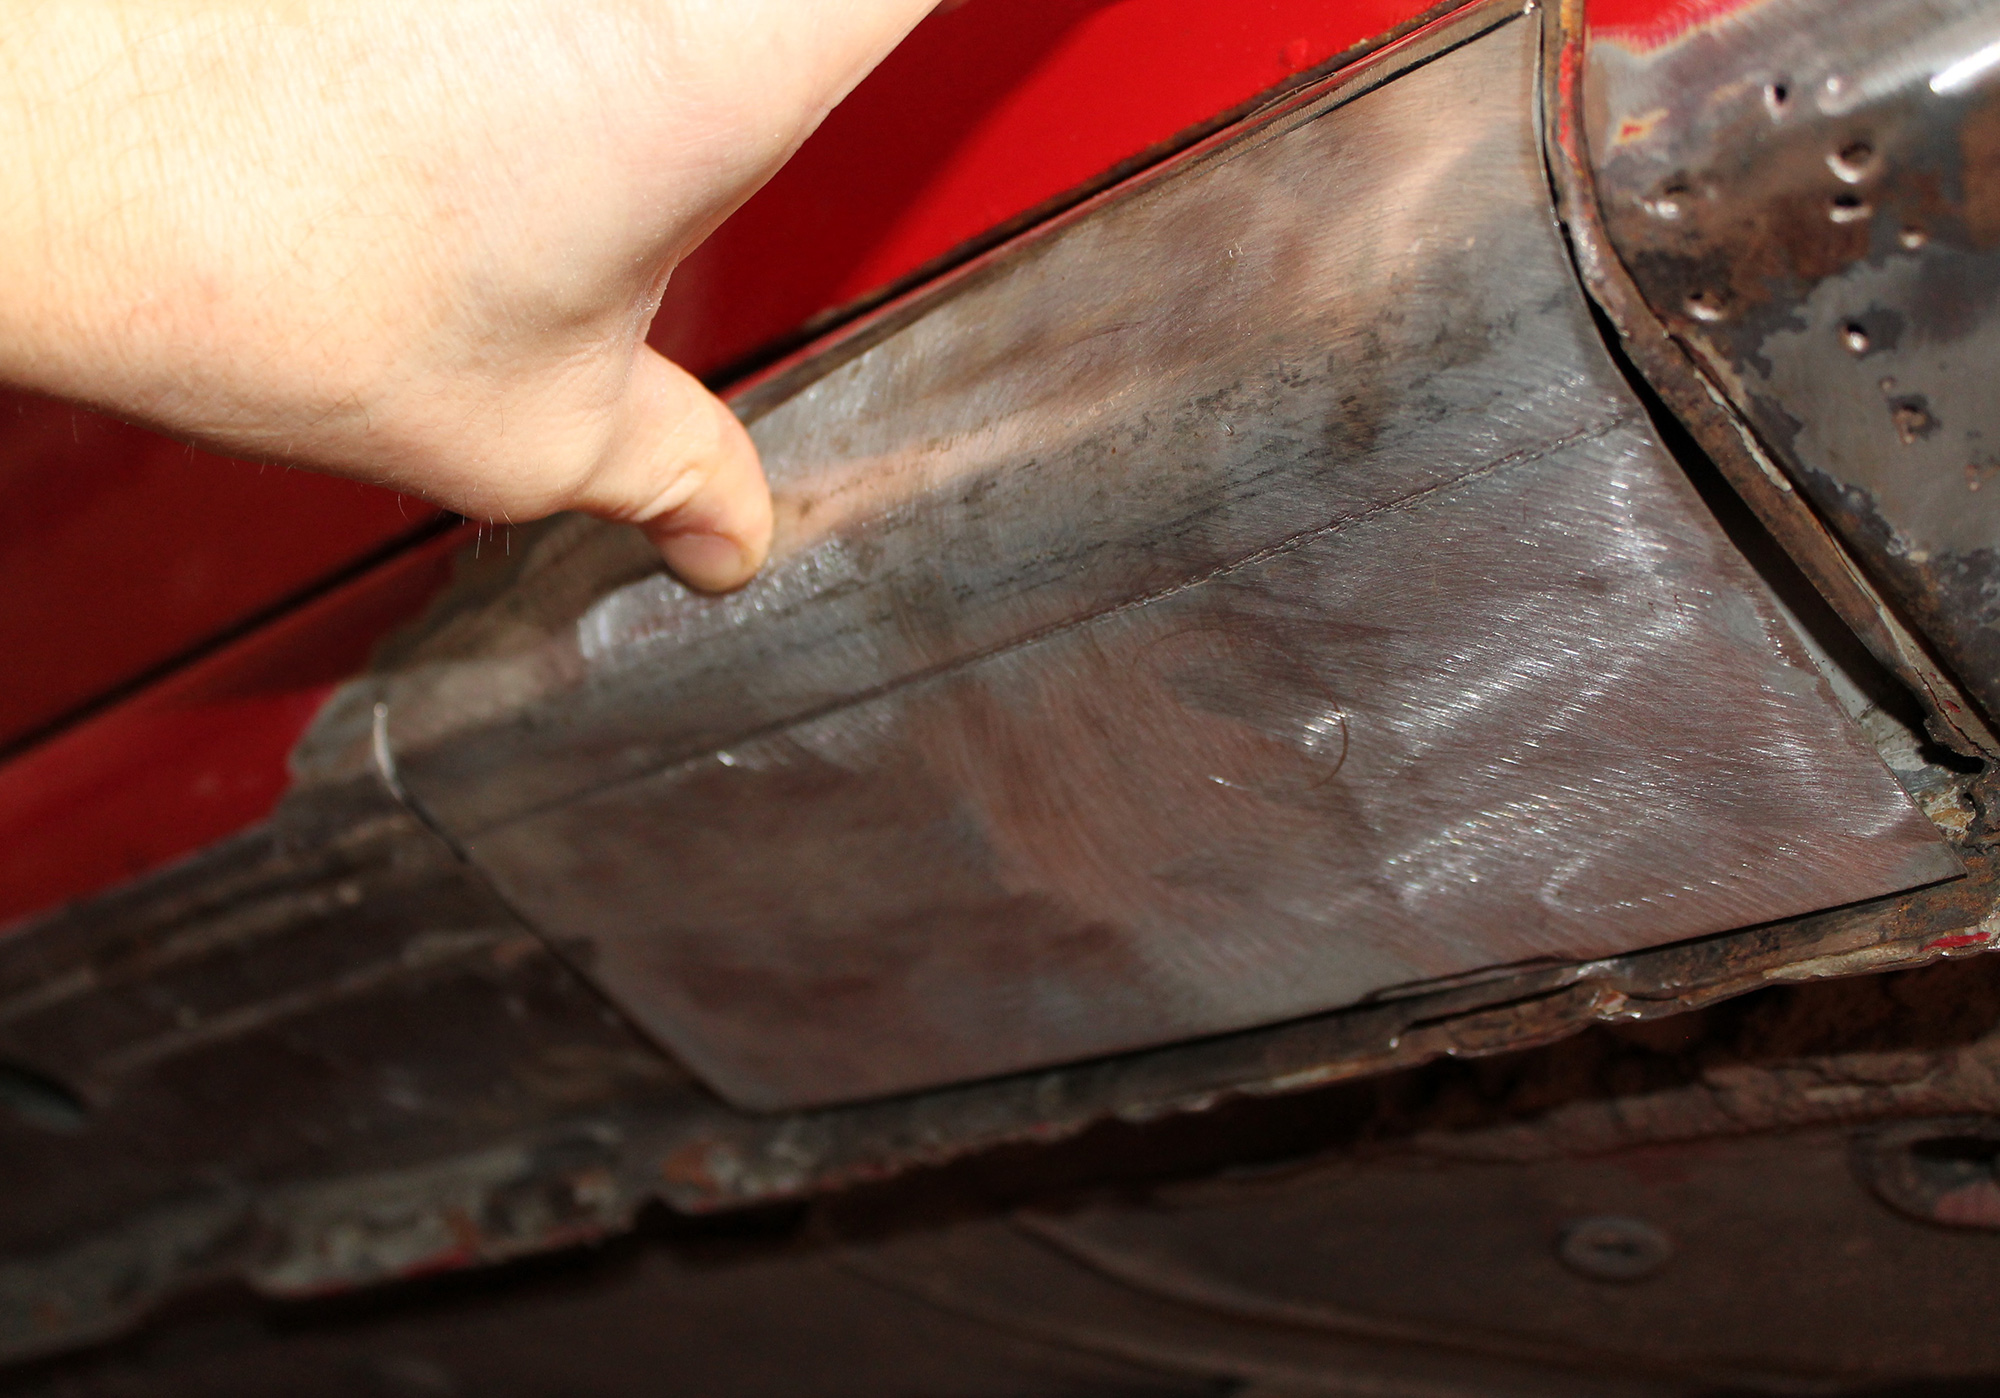
Well you could if you want. You'll need to linish off the zinc before welding and galvanised is even worse for you. You don't want anymore impurities in the weld than you can avoid. I measured the steel as 20g, about .9mm and it's a bit easier to bend than 18g. I did use a little 18g as well. I bought the steel off eBay. Cardboard, marker pen, scissors. Make your template, make sure you're happy with it then cut that out in steel. A compressed line to blow cool air onto the weld is also a good idea to keep the chance of distortion down. Also I'd a die grinder and carbide cutting tools to help get into the corners when cleaning up your welds. These about 6mm or 1/4" shank. Don't confuse these with Dremel size which is about 3mm. If you decide to put a bit more strength into the sills, when jacking up with them you could also do this. (This is right by the front access rubber bung) You can see in the corners where the tool has been chewing out the weld to leave it smoother. (See pic below) Rich
-
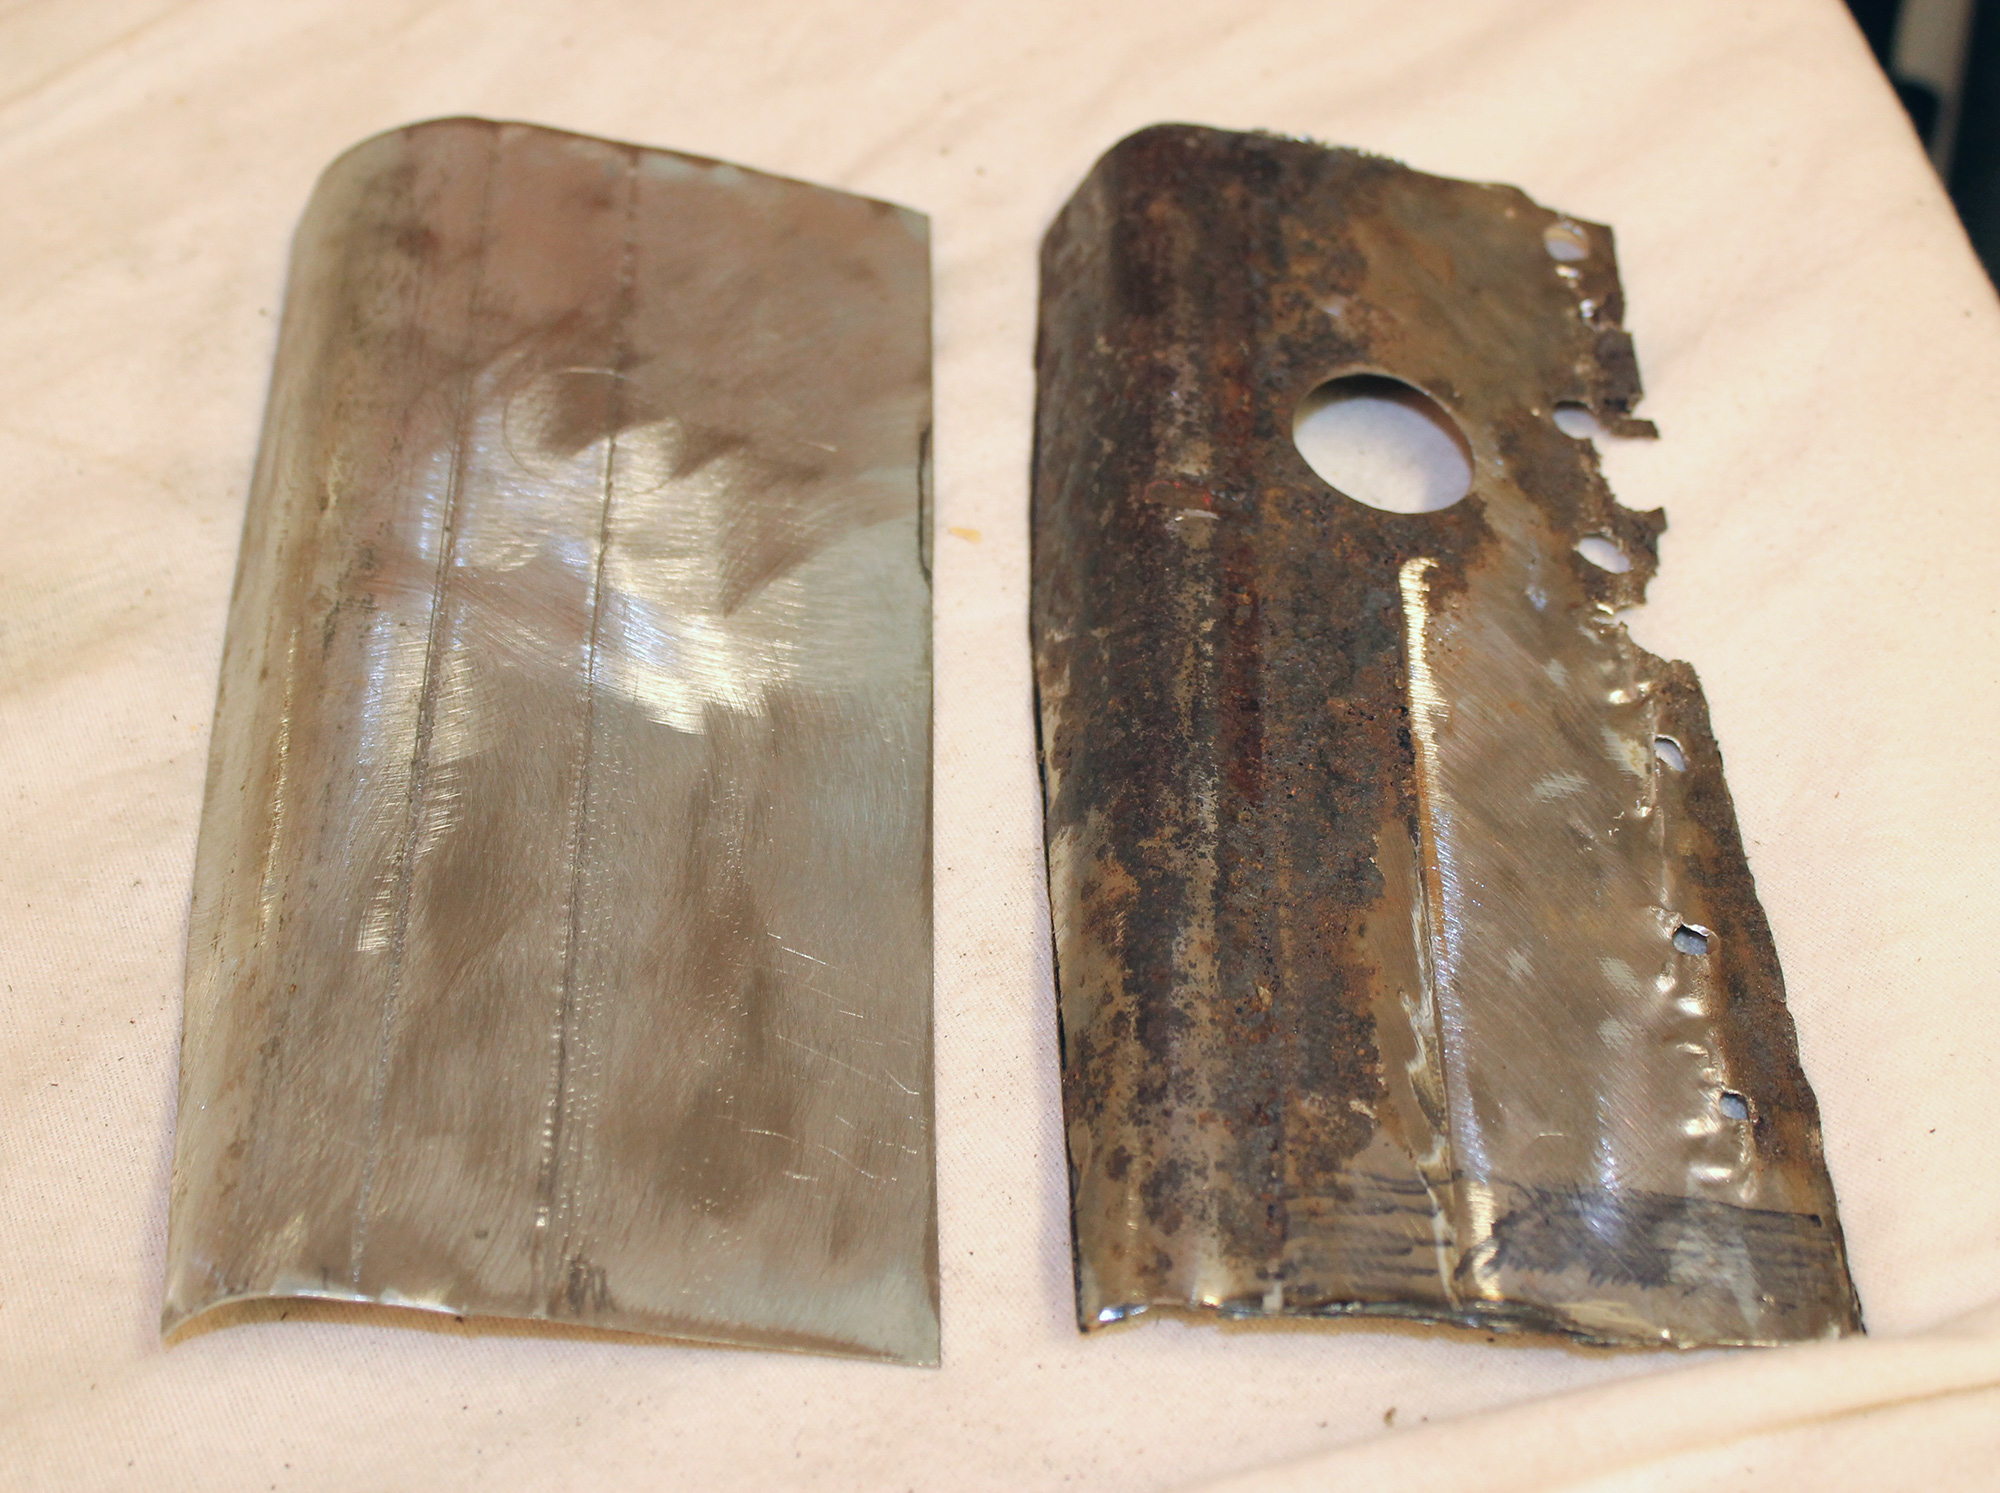
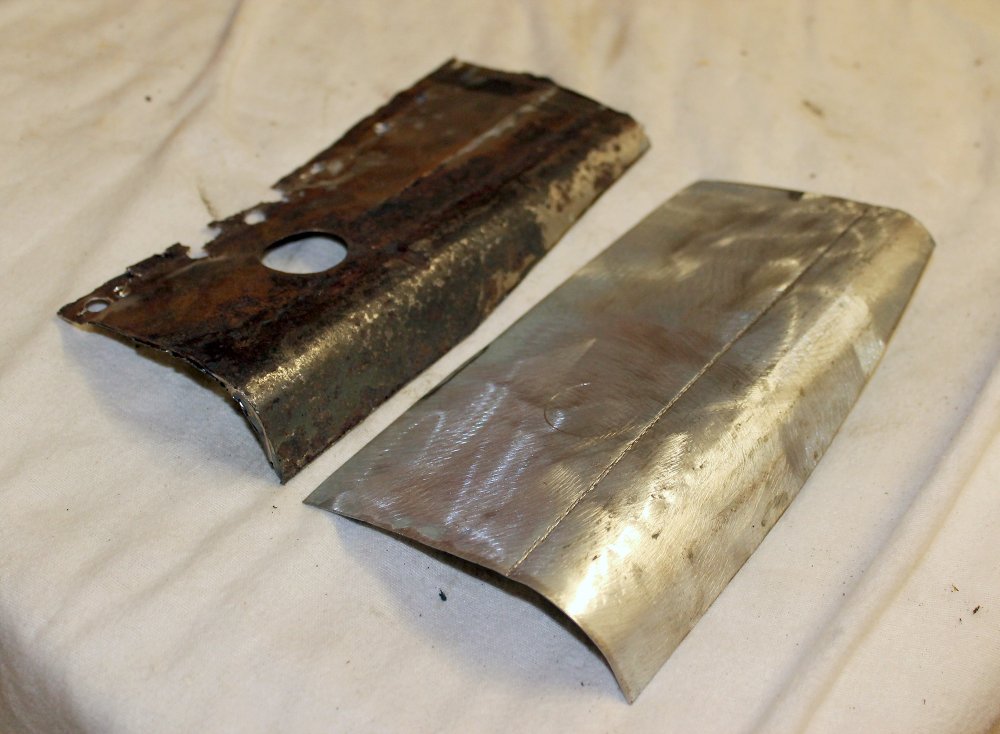
I searched thinking there would be a thread like mine but as there wasn't I thought I'd upload some pictures incase it helps someone else out. Hopefully you can see what's involved and what to expect. You "may" get a replacement panel off eBay but I've no idea what it would be like. It wasn't too hard to form a replacement piece out of 20g mild steel. Don't get galvanized, zinc coated or without, as long as you use a Weldthru paint for joins and can squirt some paint into the area once done. Sprayable wax after paintwork too but that really should come after a bodyshop, for obvious reasons. If you've access to a steel folder and guillotine all the better. I didn't but it would have made my job a little cleaner. I haven't welded anything on a car in years! Also don't be surprised to find the bottom of the front wings shot too.... 😕
-
Simpler than you'd think! The steel was placed in a vice, mark a line with a marker, small narrow cold chisel and beat small dings tight to each other to stretch the steel. Right up close to the jaws of the vice about 1mm away.Just work that chisel bashing left and right. If anyone needs me to take some photos to help clarify it I can do. That's all there is to it, I think I saw something done like it on youtube and it turned out OK! I'm a hack but there is some inspiring stuff of metal restoration and forming on youtube like this channel.
-
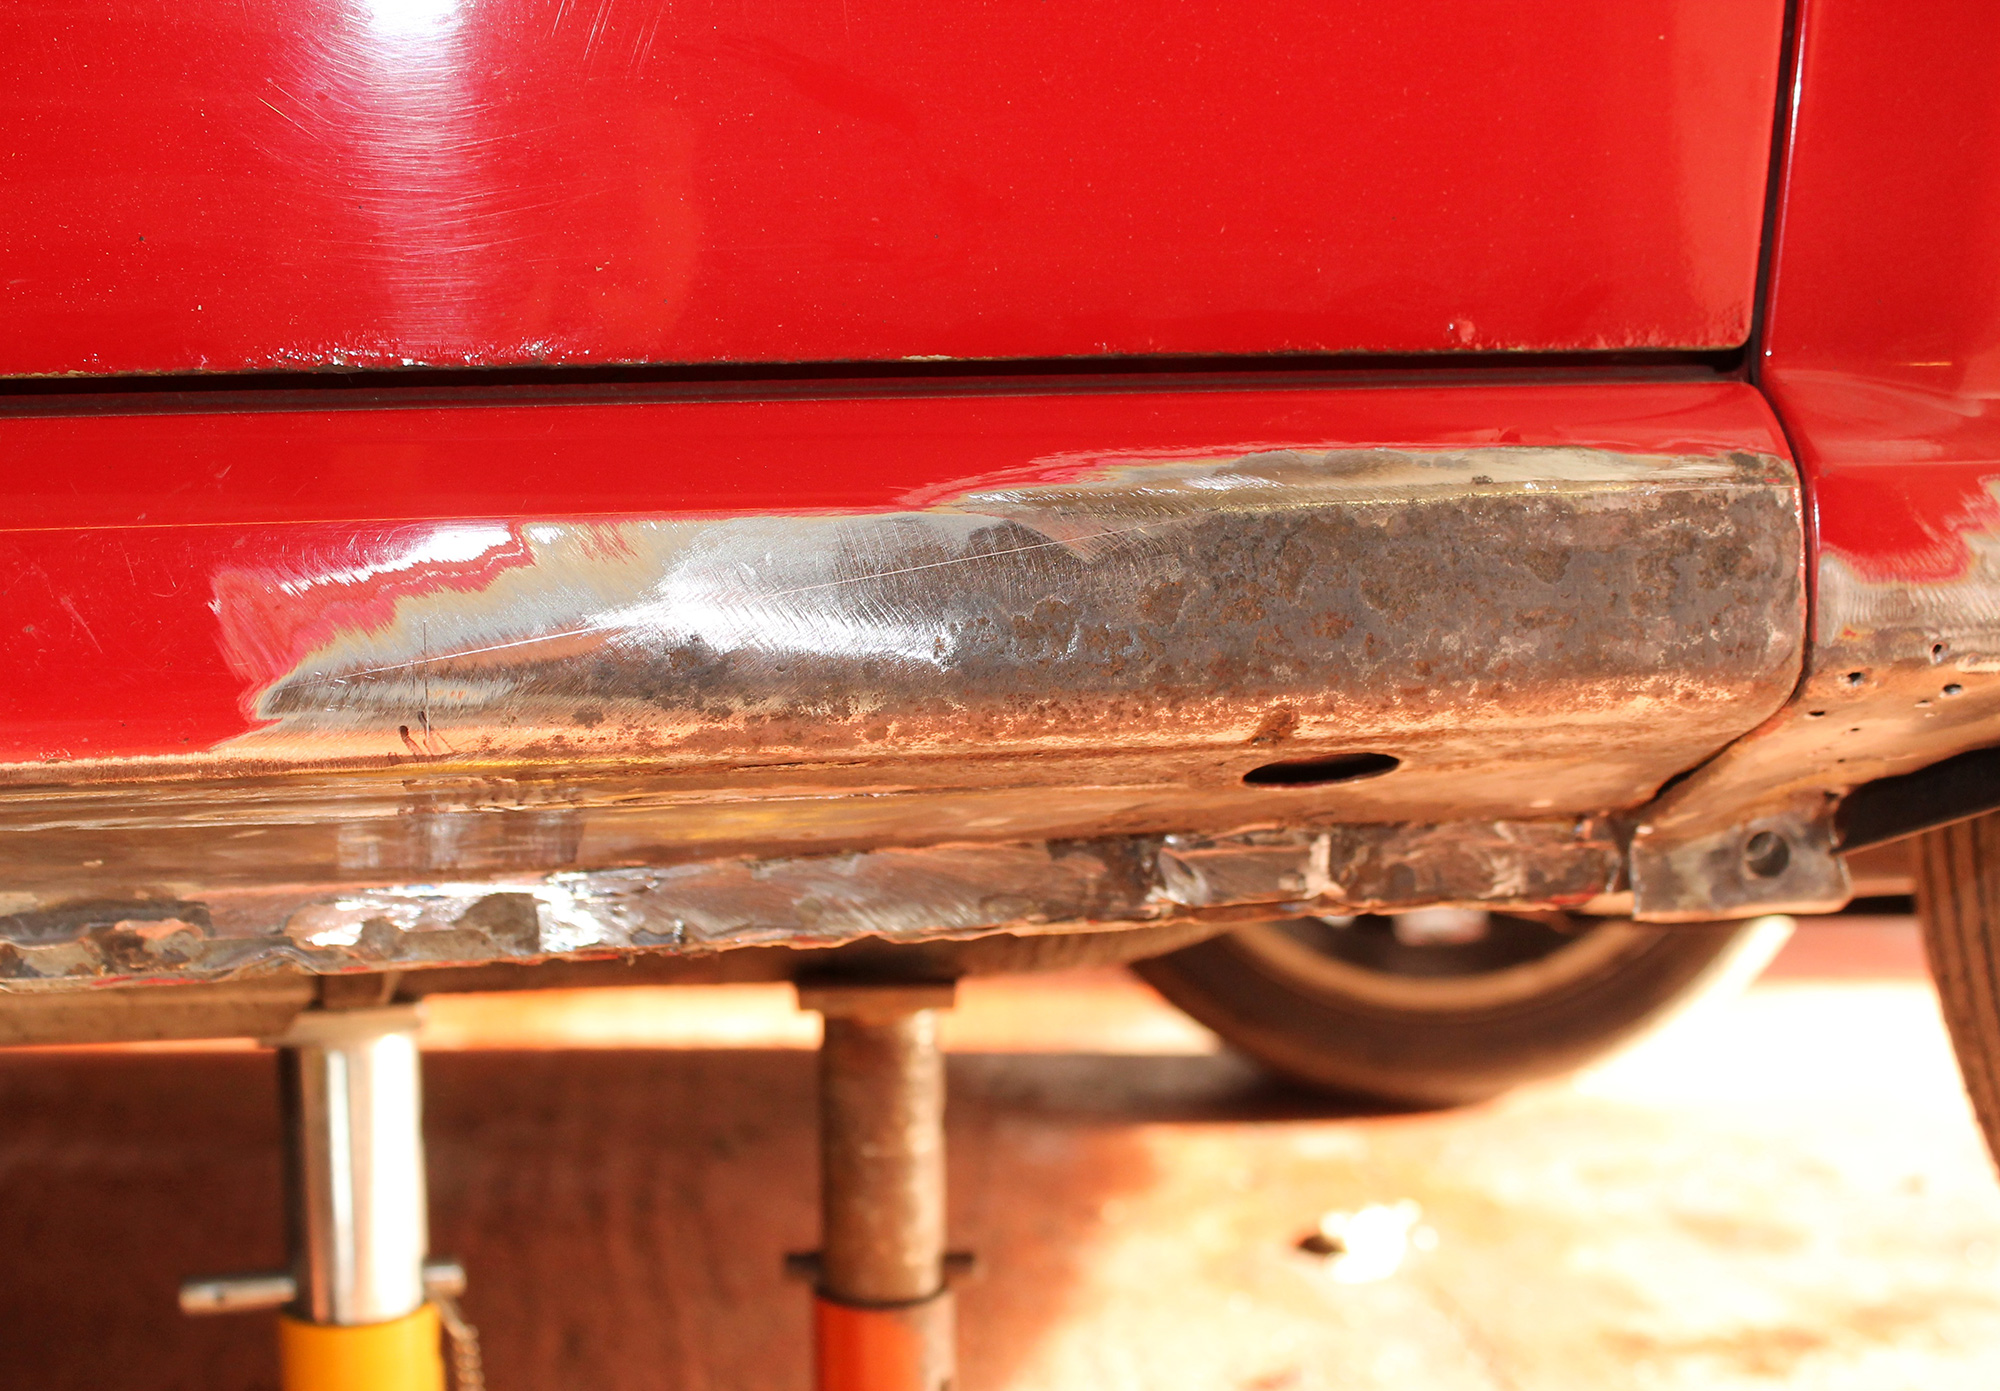
I ended up replacing the lower edges of both wings are they too were really rough. Like a Tea-bag! (See above pictures). Not like you'd know it from the exterior though. A dab of filler, seam sealer and primer after this.
-
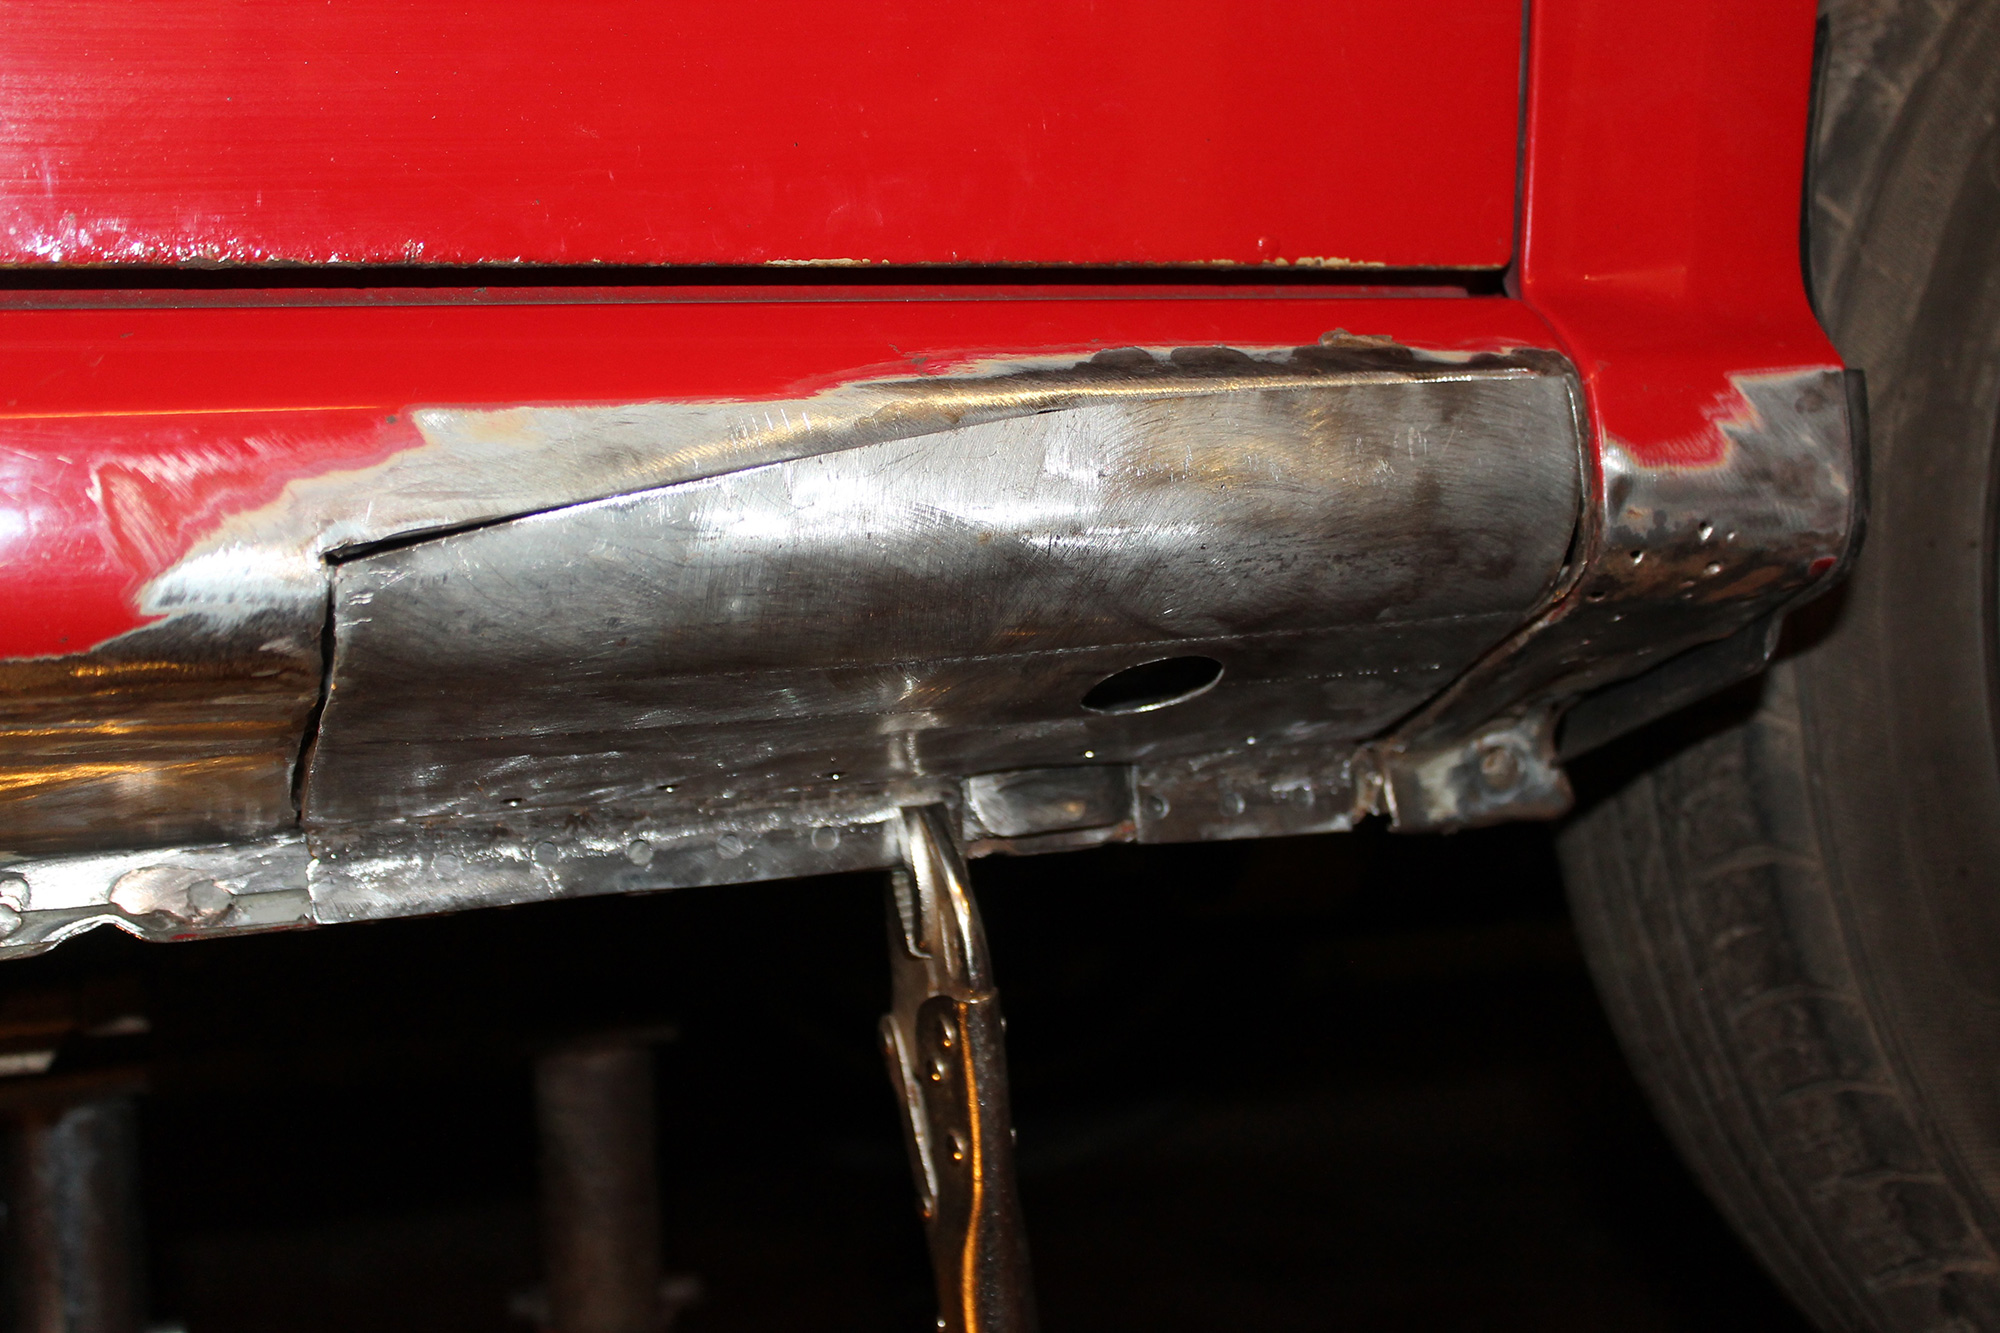
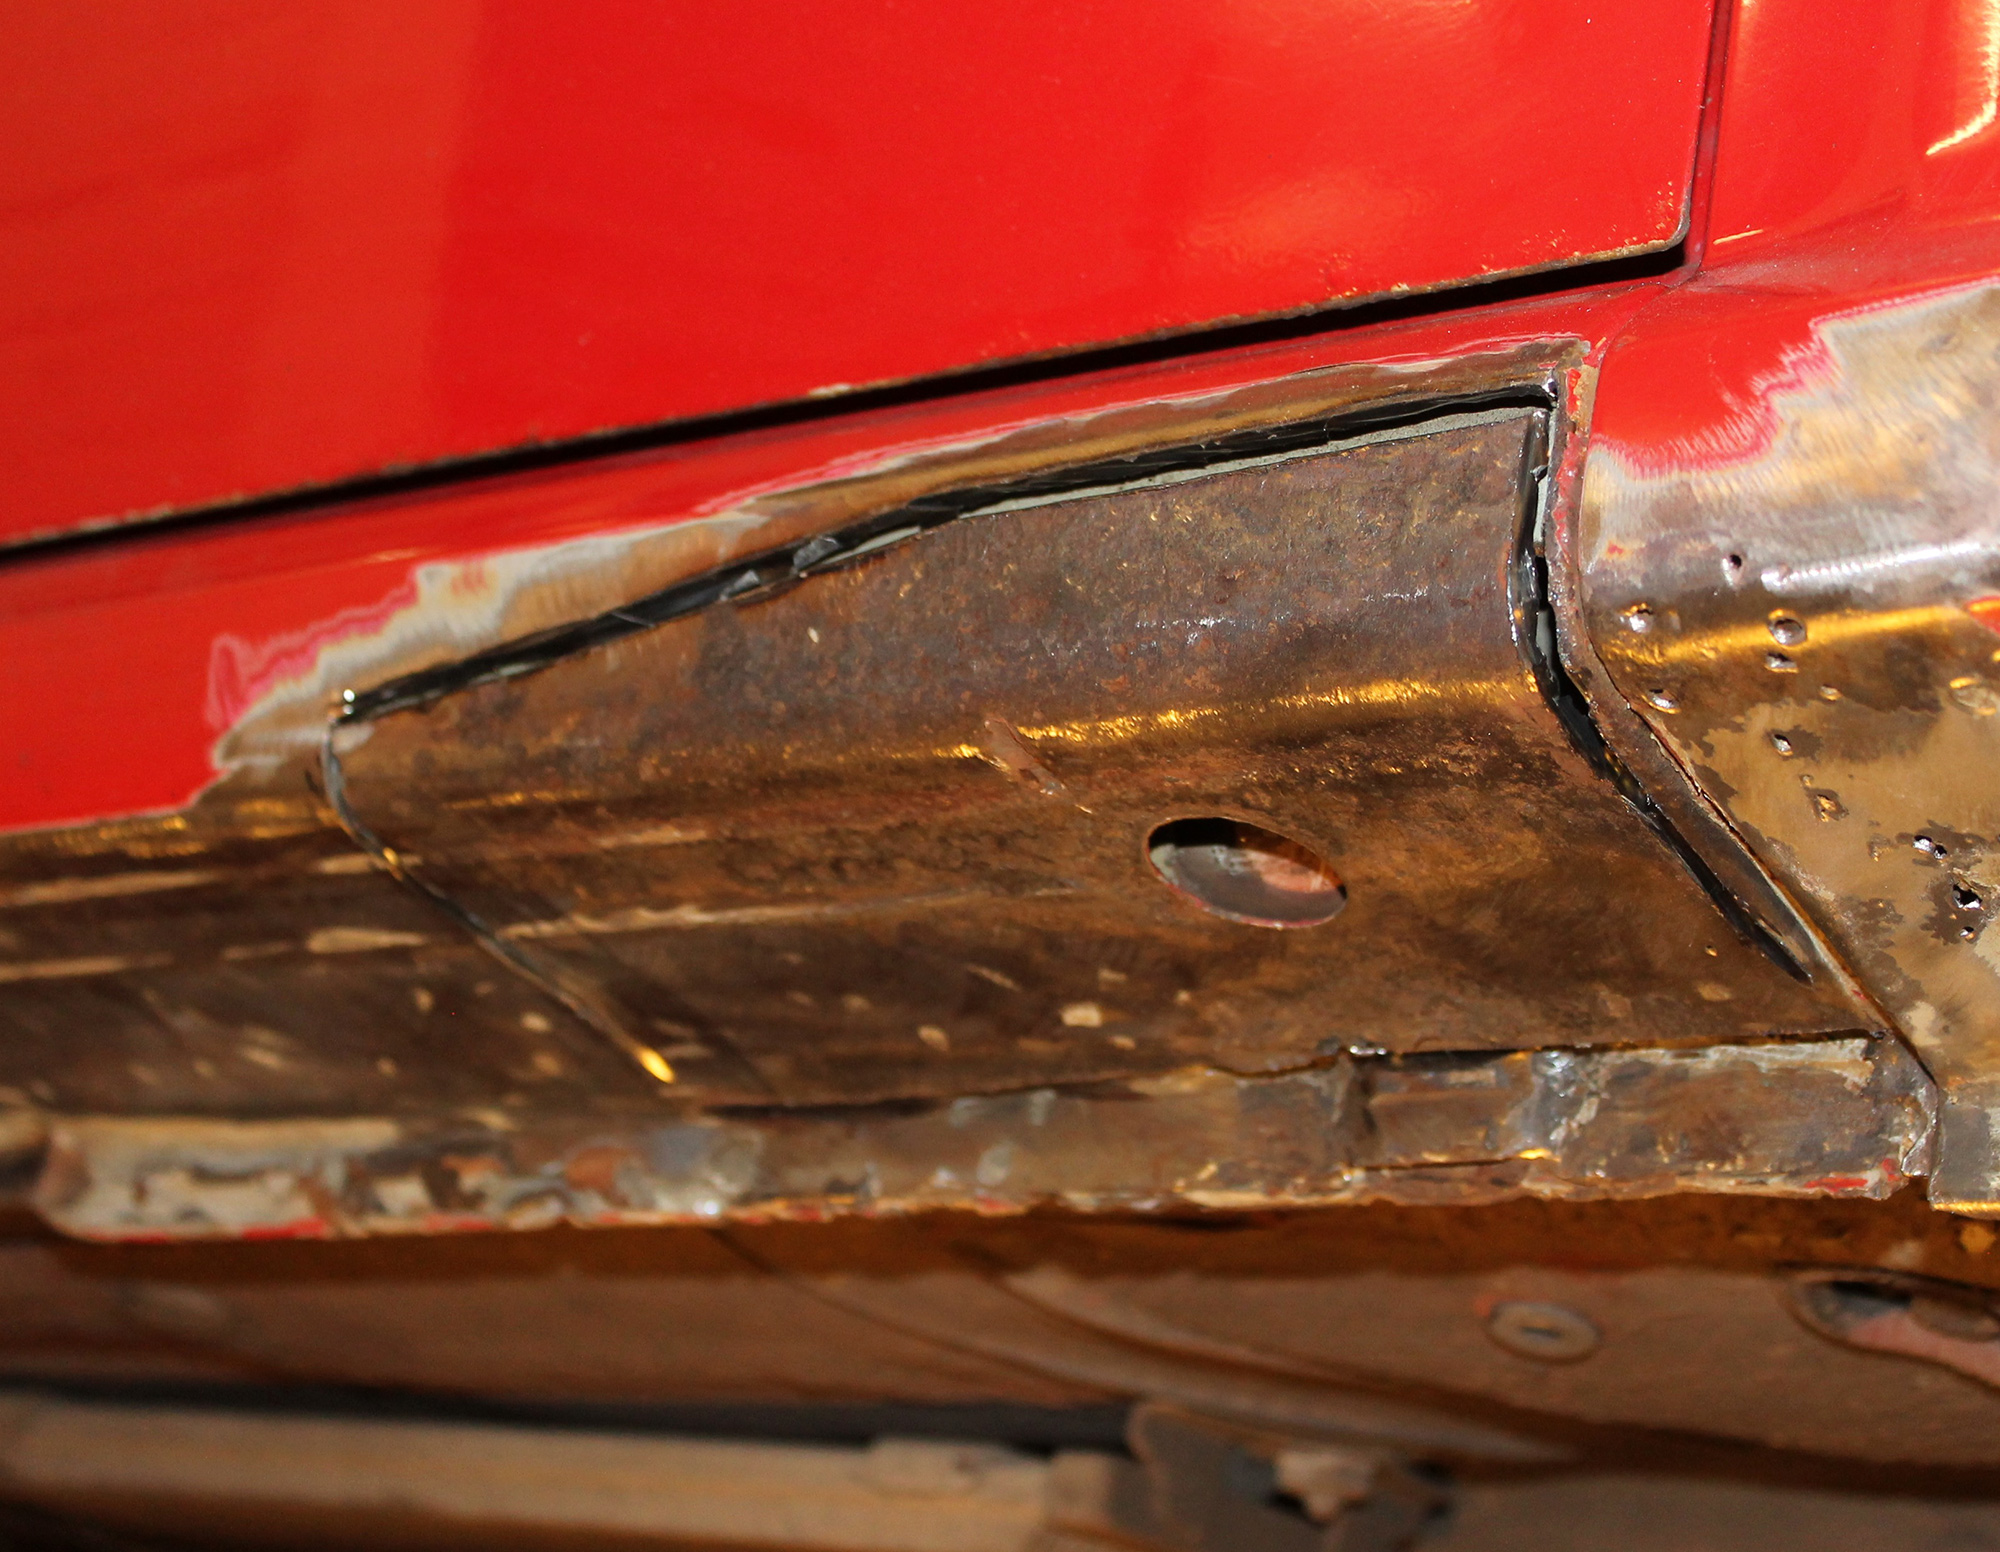
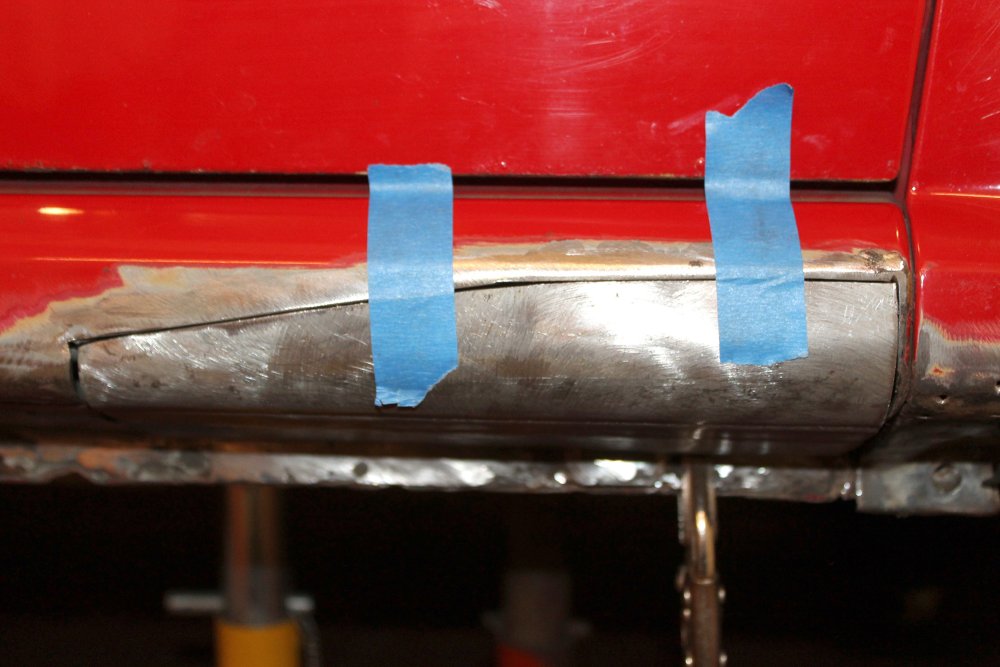
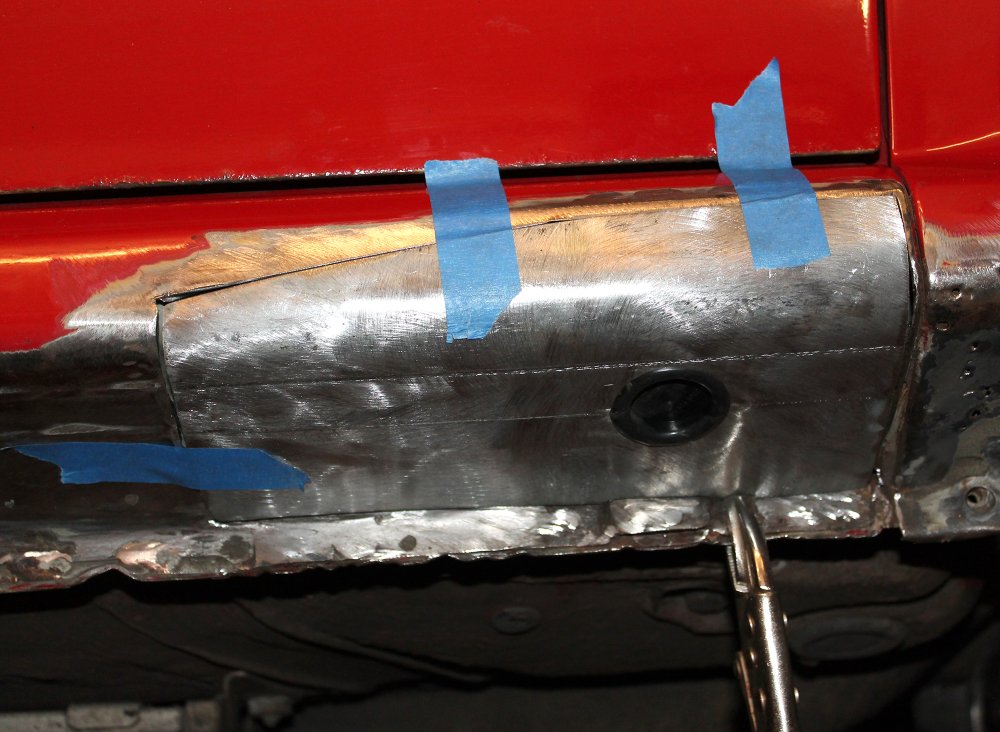
Clamped into place, it's almost in the right position, just needs a tap with a hammer here and there. Started tack welding it in, using a broken seam / pulse welding so the weld runs around the complete repair. Hopefully your repair will as good as this, if not better. Mindful to keep the horizontal line on the sill as straight as possible. The patch is also attached through the plug welds to the inner sill, don't forget that one. Still got the lower edge of the wing to repair of course but that's a simple enough one. It stil needs more grinding at this point but I'm waiting on a finger grinder (power file) to get into the corners. Near impossible with round discs! And this one gives you an idea of how much the patch went in, I really couldn't leave the corrosion in. Once the wing is repaired I'll add the smallest amount of filler, prime and reseal the lower sill edge to keep the rust out. So that update with paint to come at some point but this is awkward job really, the rest is pretty straight forward really. Hopefully these pics give others an idea of what to expect and how I went about with the repair. Rich
-
Ah, OK. I'll upload and link the rest of the pics here. Thanks Ken.
-
Part 2 of the sill welding With the patch almost ready I added the lower lip to the repair piece. Holes for the spot welds drilled along the bottom edge and where it touches the inner sill section. Sprayed the inside with a weld-thru zinc primer and offered into place with some Molegrips. ...and that's all I can show you as I'm out of storage space! 😕 But it's all welded in nicely and welds ground back. Went in pretty nicely really.


-
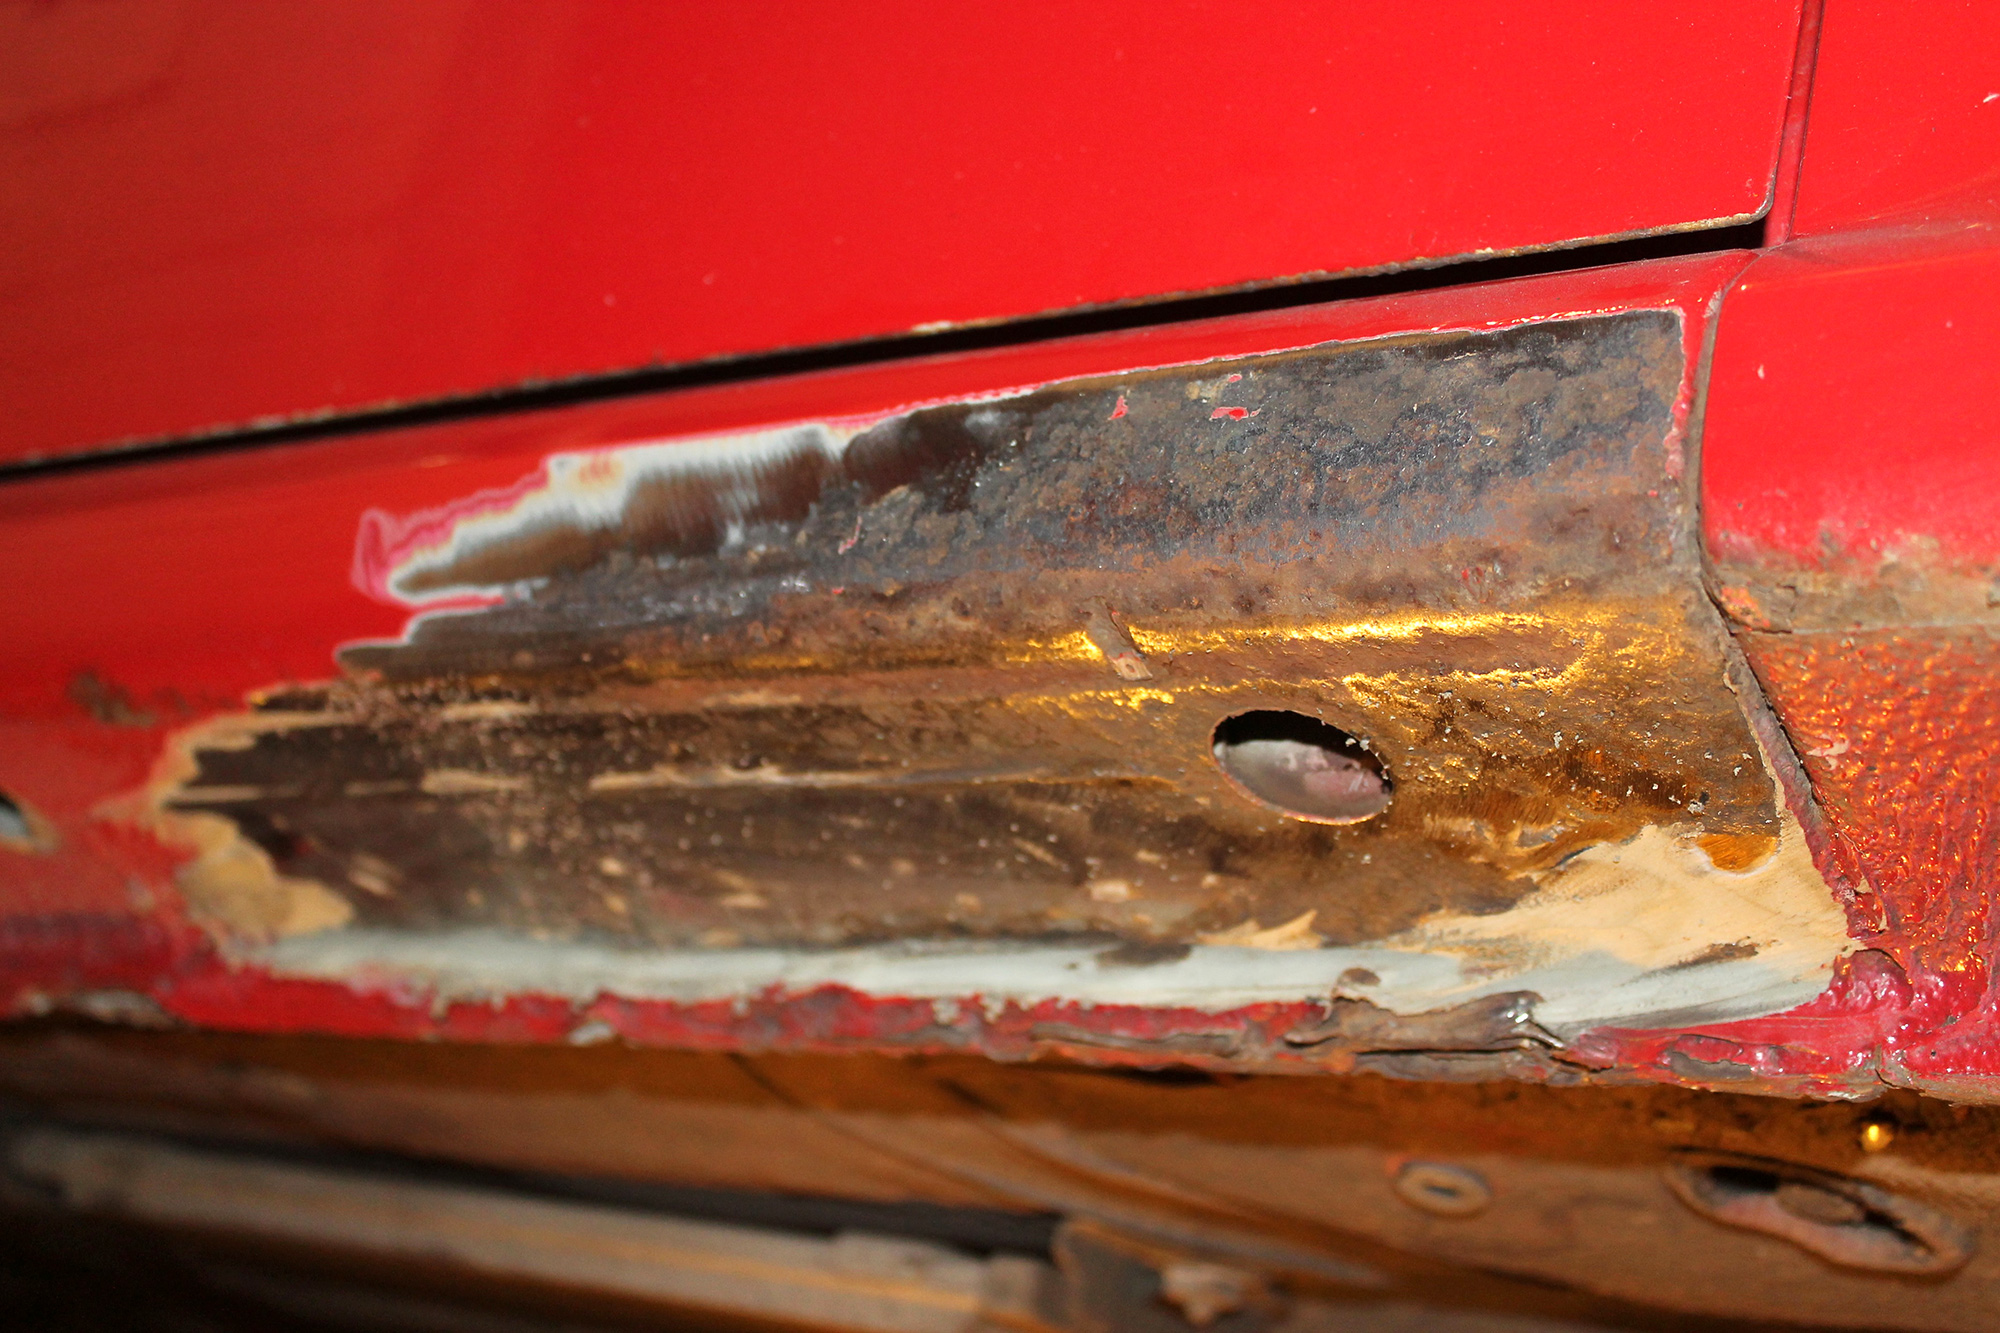
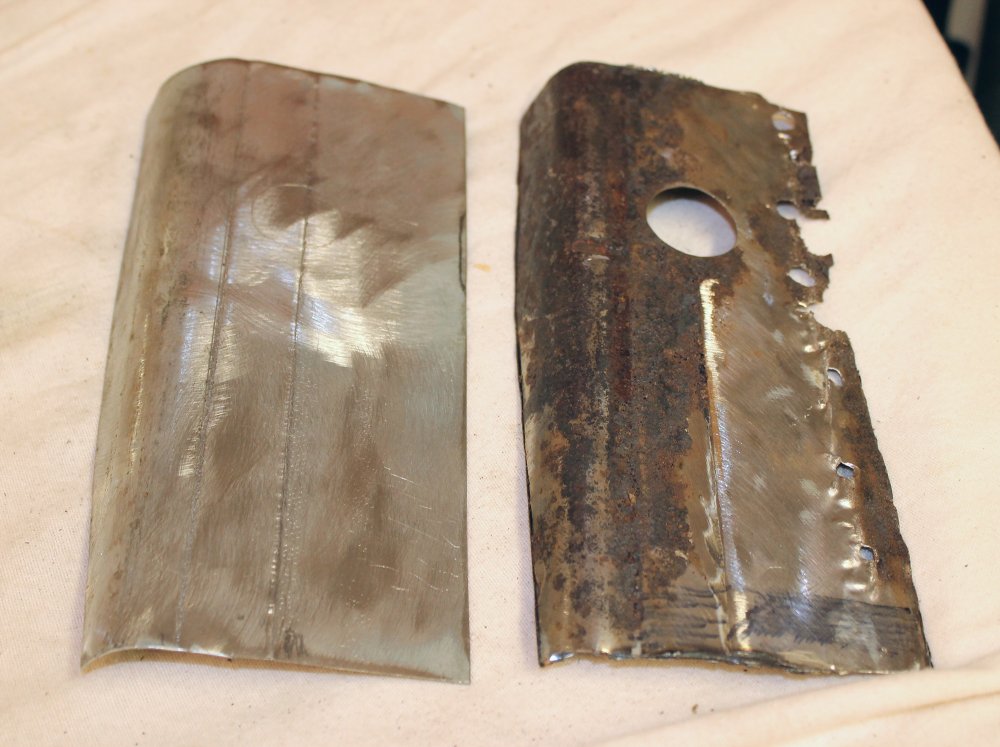
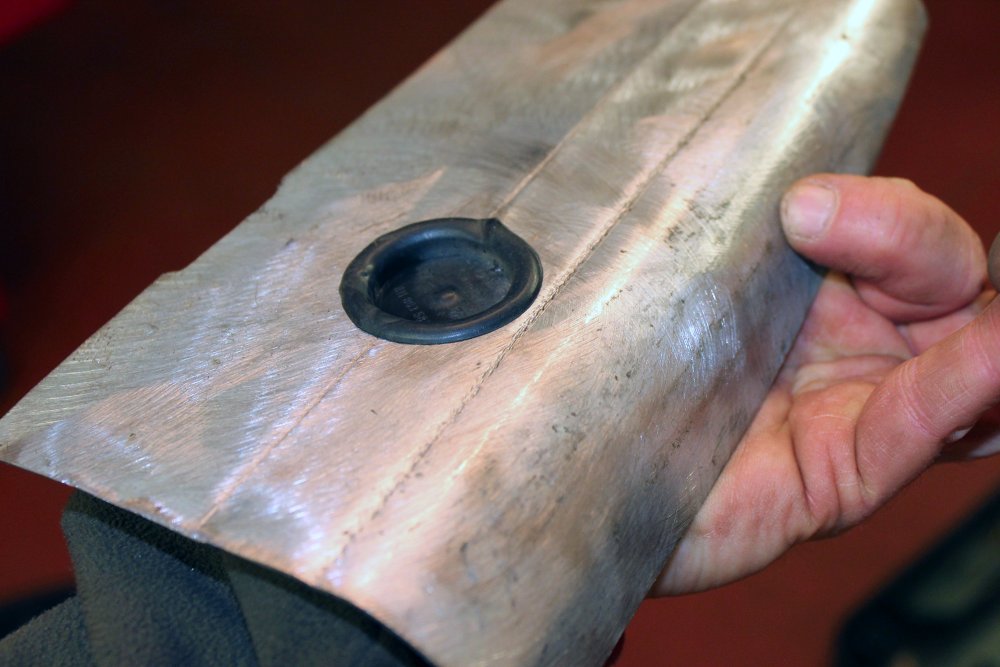
That rubbery underseal made quite a mess / cloud of smoke being removed by the way! (cough, cough). Note the peppering of rust at the bottom of the wing. You wouldn't have even known that was there as it corroded from inside.... 😕 Let's start chopping it out then! Angle grinder and cutting disc at the ready! If you are making your own panel try to take the template out in 1 piece if you can. Lower returns are fine, just some surface rust to clean up, the inside of the sill was good, just mucky due to factory waxoil type stuff.... I've had repair panels of varying quality over the years and I didn't need a complete sill so with some 20 gauge (0.9-1.0mm) mild steel I started making a replacement up. (I didn't photograph all of this sorry, I was busy making!) The templace was made from the old one with some overlap to allow for the width of the cutting disc. Also I started forming the 1st swage line that runs from front to back... Yeah, that doesn't look too bad. You can see on the right where I had to drill out some spot welds where it attached to the inner sill. Don't miss those. Also marked where the access rubber plug was too. With a bit of Racing tape, OK it's blue Scotch tape really, let's see how it fits. Marked a centre, drilled and filed out the hole for the plug / bung. Also the 2nd swage line has been added so it looks a little more factory. Offered up. Slightly notched around the raised / water drain area below the plug. Next up will be to weld a return to the panel and start welding it back in. Stay tuned Furby fans! 😛


-
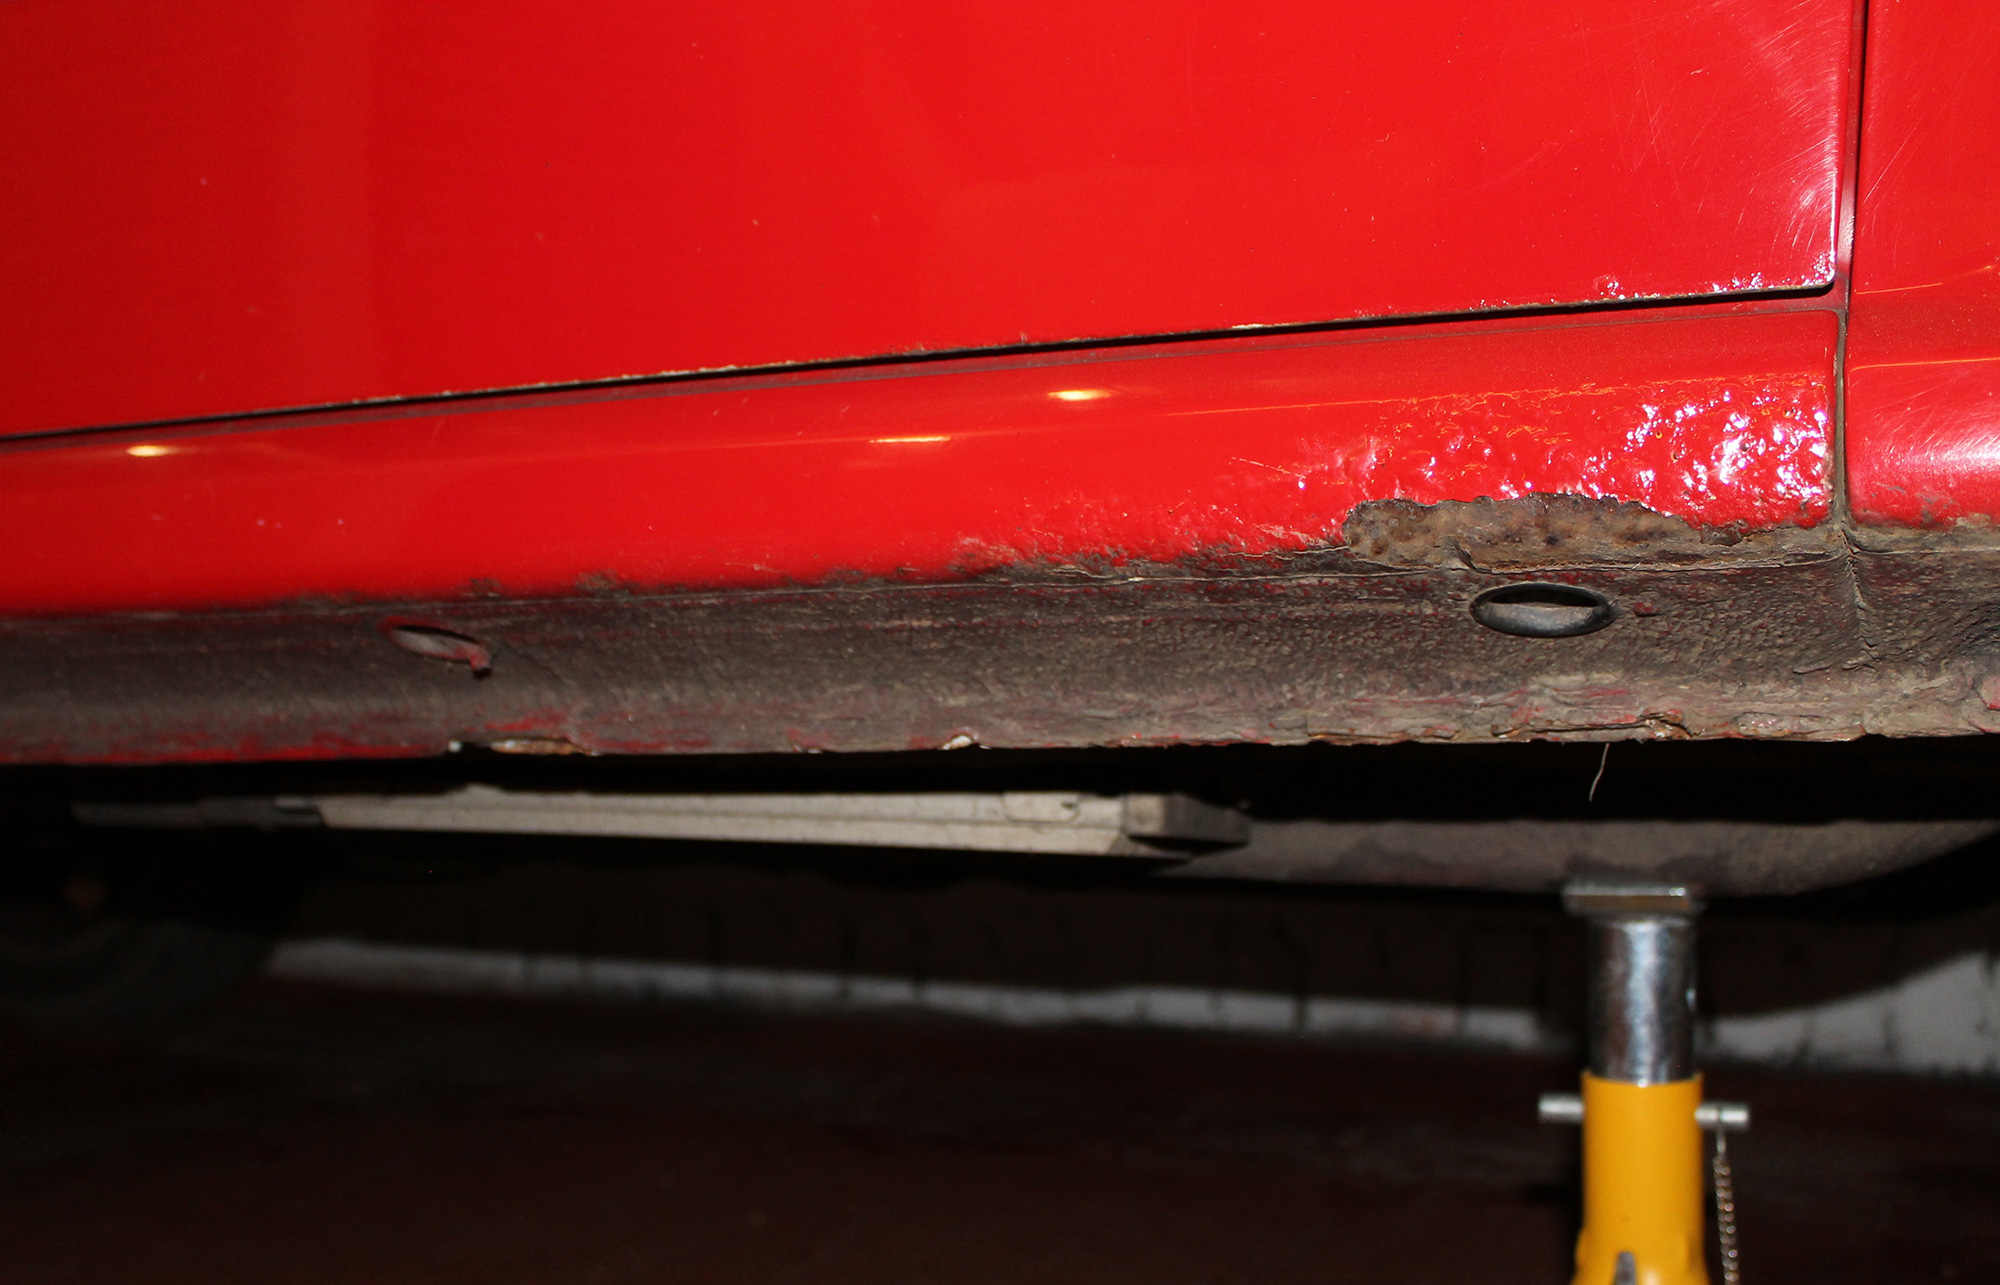
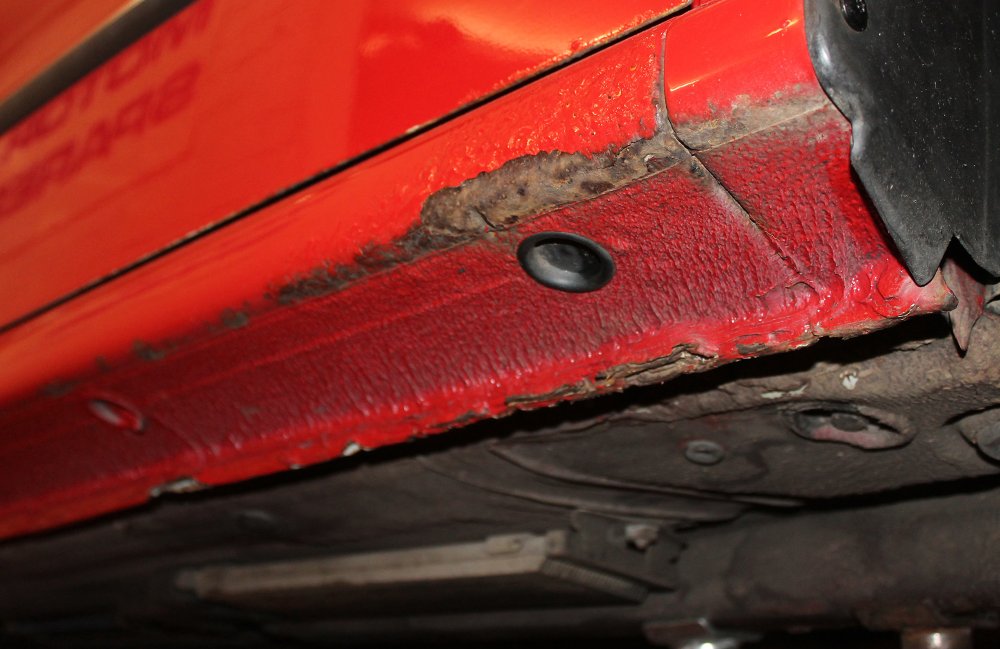
After doing most of the mechanical jobs on my Mk1 VRS Fabia I thought I'd have a look at the sills. Now I knew the front edge of the sills were the worst area on the car for corrosion, I just wasn't sure how bad it was going to be. I started off with cleaning off all the road tar, dirt and grime that gets missed being that low down the car. So it's supposed to be that colour, right? Er, no. That's a stack of crud mate... Some TFR squirted on here and left for 5 mins started moving this lot. Some of it was a bit more stubbon than you'd think too.... With a rinse it looked a bit better! Why didn't I do this years ago? So, how bad is the rust? Well, it's not very nice... gawd how bad it is it I wonder? With an angle grinder and linishing disc it was time to start investigating. In some ways it wasn't too bad, the majority of the sill was OK, it was just the front and that was worse than I thought it would be! Front edge was really heavily pitted with some bad edges where the spot welds are on the lower join. I scribed a line around the area to be removed. As close as I could keeping the patch as small as possible but there's no point in leaving anything bad in. (To be continued!)


-
-
Not the fronts, the previous owner did, so thats that then! A Life Long warranty is impressive though.
-
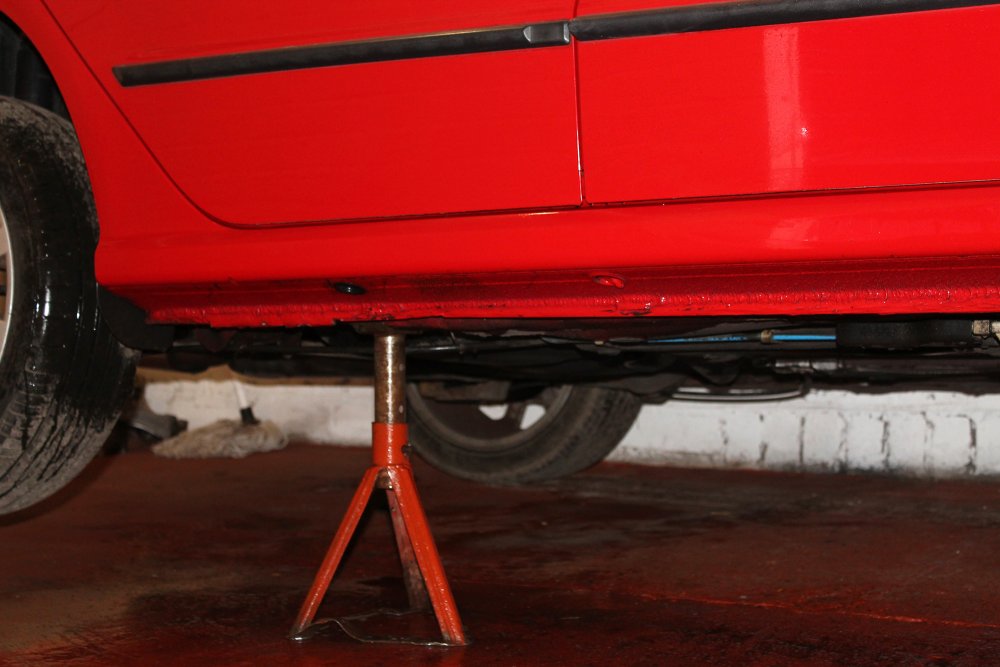
I was thinking more a case of leaking seals due to old age or mileage. I had "old" Bilsteins leak back in my Mk1 Escort days.... that was when they were affordable! Not like I'd want another Ford now.
-
Oh really, that's what it's for. I did wonder if it was a damper setting. So are the inserts rebuildable or will Bilstein refurb them if they need it? The struts are back in now mind you....
-
OK, who's this bloomin Hooligan? Gotta be one of you lot! https://www.youtube.com/watch?v=xLpfez6-y7s 😝


-
Thanks Carlton! That's that mystery solved then! I did have a good look on the interwebz before posting here as I couldn't find the answer for the life of me. Mine is lowered but only slightly about 20mm and I don't think I've ever gotten close to the stops. Thanks for uploading pics. 👍
-
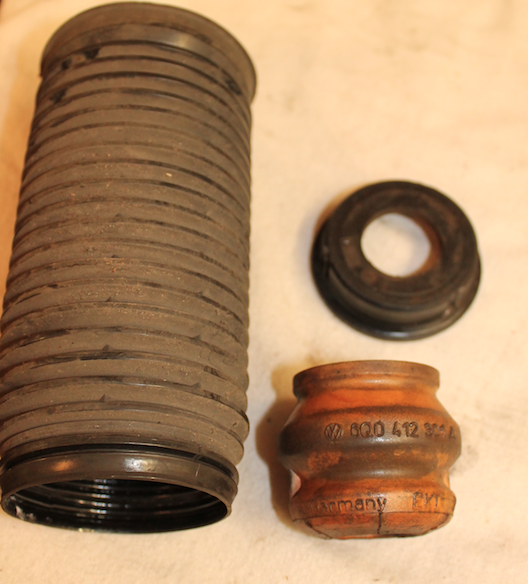
I'll do that. Yeah, the boots are definitely going back on too. Thanks dudes.
-
According to the part number B8 Sprints 35-052180. And they're as rusty as hell! N/S was worse but O/S is flakey too. It feels like the paint is really thin on mine. What a mess! But came up OK with a repaint.

-
Thanks, you see what I mean though, it doesn't show in that diagram either. I've found what looks like them "strut dust caps" on Seat parts though so maybe they came in the kit but only belong on Seats? Anyone else know better than us? 😛
-
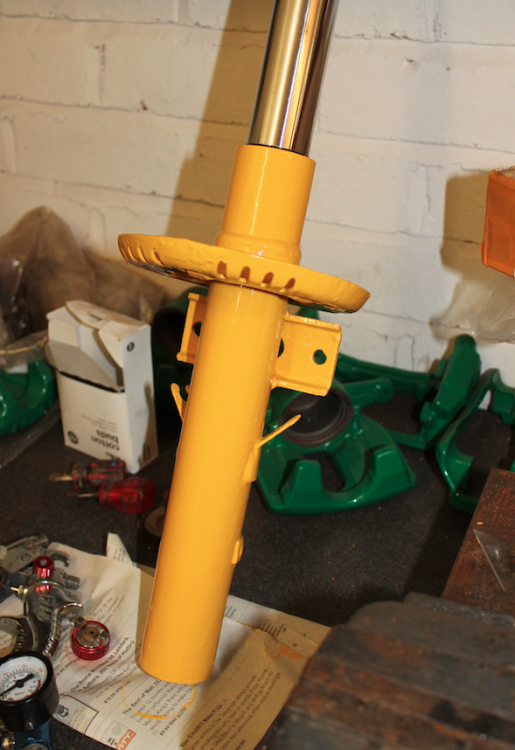
Hi all, On the front end of my Mk1 Furby VRS it has Bilsteins and Eibach springs. During the freshen up I found half a coil broken off and while stripping found a plastic on top of the rubber bumpstop. Can someone tell me is this factory, aftermarket or just plain wrong? My gut says you wouldn't put plastic in between the top metal area of the mount and a rubber bumpstop doing it's job. I'm asking as I couldn't find it in diagrams or videos, anyone know? Or is it just a random piece of plastic off another car a mechanic thought came off it? It's the black "top hat" hard plastic piece above the stop in the lower picture. Thanks in advance!
-
Yep all solid advice! I did exactly that you know on the one with dodgy threads, quick swap, me, "I won't lose much fluid, I'll be quick." and used a rubber glove under the cap. Seeped, nipped it, seeped again and nipped it. Damn thing wouldn't seal, kept going and still managed to about lose all the fluid and then finally stripped it. I've got VCDS lite (and cable) on a laptop and once all the other jobs are done I shall see how I go with it. It's had a pedal which slowly sank to the floor before but now it's worse. Brakes seem good, once you've pumped 'em up..... 😐