HLJ80
Finding my way
-
Joined
-
Last visited
Everything posted by HLJ80
-
Hey there, that sounds like wiring issue. The wires of the struts disintegrate and can be a bit trippy. There is a video here on removing/changing struts albeit an estate but might be worth checking wires are not broken. https://youtu.be/8Bg_1EPHXvA?si=J6aY-FtStFsUQWpY You'll also find vids on YouTube for the saloon powerboat, this was the first I've found. Still haven't worked out a solution to mine. It's either the struts or the control unit I think, might have to take it for a diagnostic as not had any joy from anything on the thread.
-
Hey there, thanks for this. Have replaced the lock mechanism but no matter how many times I reposition the metal bar it latches to (which is the only adjustable piece that I can find) I end up with either: 1. The boot closes and the latch latches onto the metal bar and does the pull down, but when driving the display shows the boot is open and makes the ding ding ding noise or The boot doesn't physically close properly all the way (99.9% closes but I have to push down the last 2 mm for the latch to click.), the display does not show boot open or make the ding ding ding noise but the boot lid needs to be slightly lifted when opening for the motors to start to lift it automatically.... The pieces involved are: 1. Lock latch mechanism (replaced) 2. Metal bar under sil (no sensor, just manual adjustment) 3. Gas struts (not adjustable as far as I can see) 4. Release motor and cable to lock latch (no problem there as far as I can see) 5. Control unit (can't see any option to set anything here via OBD link or options and nothing mentioned on this in Elsa)
-
-
-
-
-
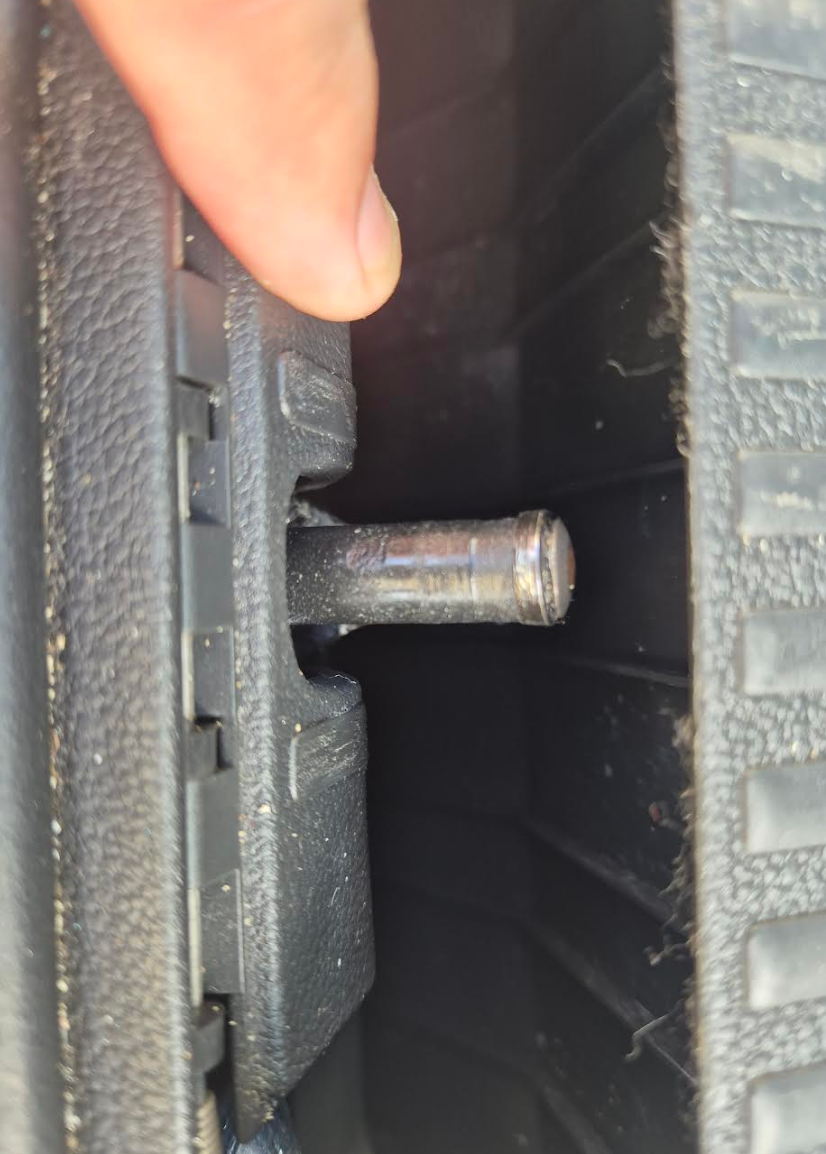
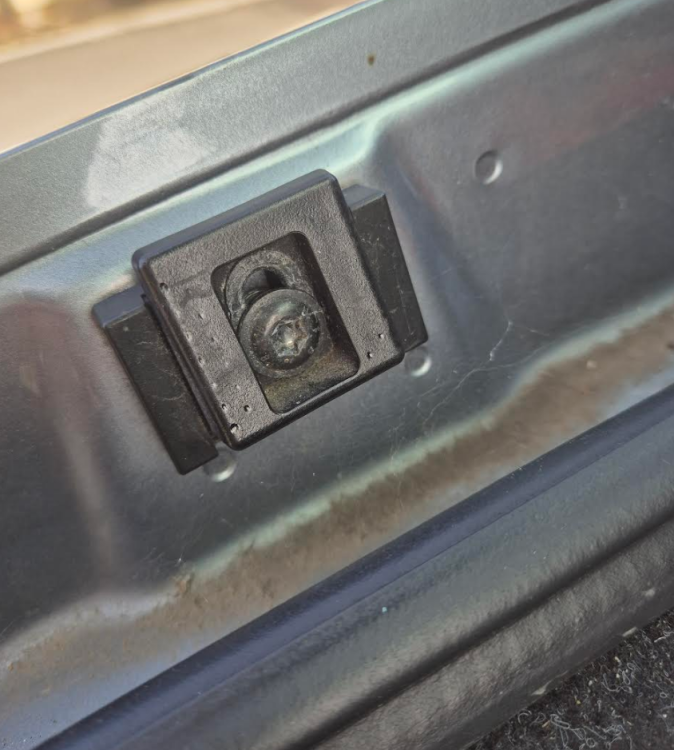
Hi all Have replaced the electric latch mechanism but issue not resolved and I don't think the issue was the latch mechanism. Same issue, boot would close but alarm would sound to say boot open and display sign would come on. I've found that the metal piece under the spring loaded flap in the boot sill, that the latch latches onto (photo 1) can be adjusted left and right and higher or lower by loosening the bolts securing it, repositioning and then retightening the bolts (evidently to align the latch. The problem I have is that no matter how many times I reposition it (down to millimetre changes) I end up with 1 of 2 eventualities: 1. The boot closes and the latch latches onto the metal bar and does the pull down, but when driving the display shows the boot is open and makes the ding ding ding noise or The boot doesn't physically close properly, but the display does not show boot open or make the ding ding ding noise..... The best I've got so far is a situation where the boot 99.9% closes but I have to push down the last 2 mm for the latch to click. However, the boot lid needs to be slightly lifted when opening for the motors to start to lift it automatically.... Any ideas anyone? Is it alignment? Is there a guide on that anywhere? can't see anything online. Also, these things on either side of the boot (photo 2) can be adjusted and I think form part of the alignment but again can't find any guides online. p.s. Ive had the whole sill off, there is no sensor under the spring loaded flap. just the metal bar.

-
-
-
-
-
Hello all I have an issue with the car display showing the boot is open when it isn't and the chime warning going off when driving. It is a MK3 SE (2015) with power boot. The boot is closing and when locked does the secondary pull down close but dash is still showing boot open. Have: lubricated the latch Checked nothing stopping the close Tried opening and closing via different methods key/handle/interior open button I've seen a couple of threads but nothing conclusive on how to fix. Anyone had the same issue and know a fix.? If latch replacement necessary has anyone done this and is there a guide anywhere? Many thanks
-
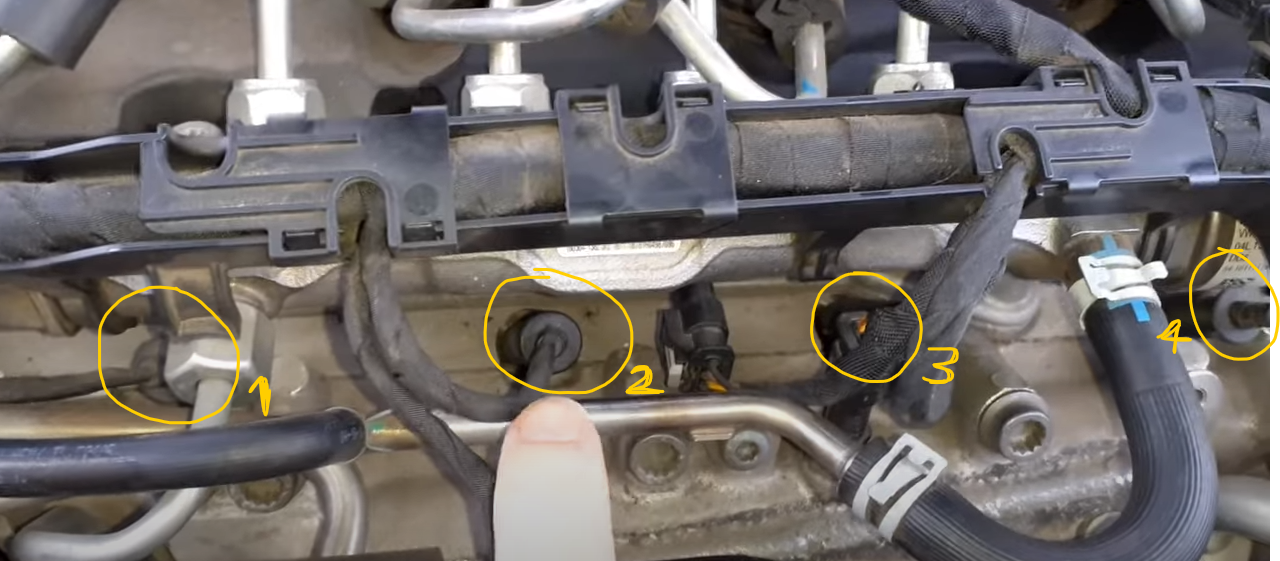
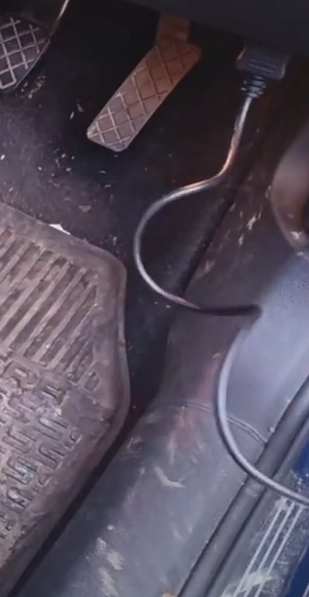
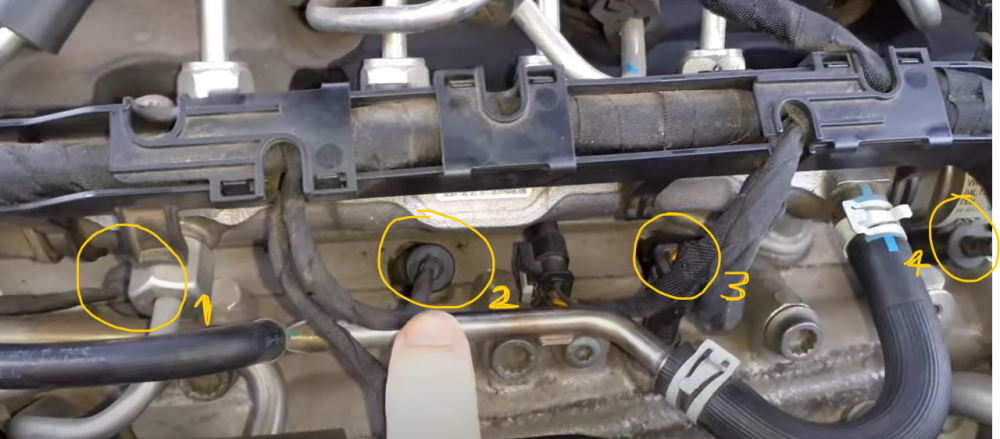
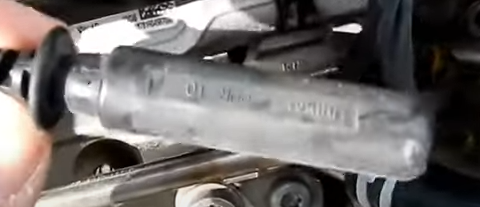
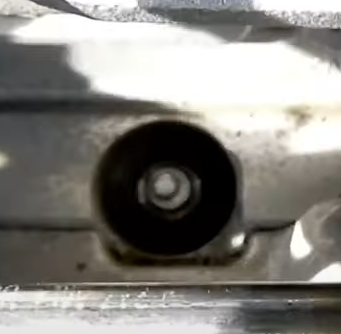
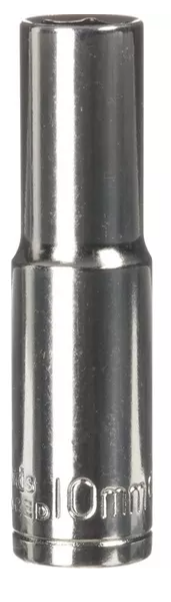
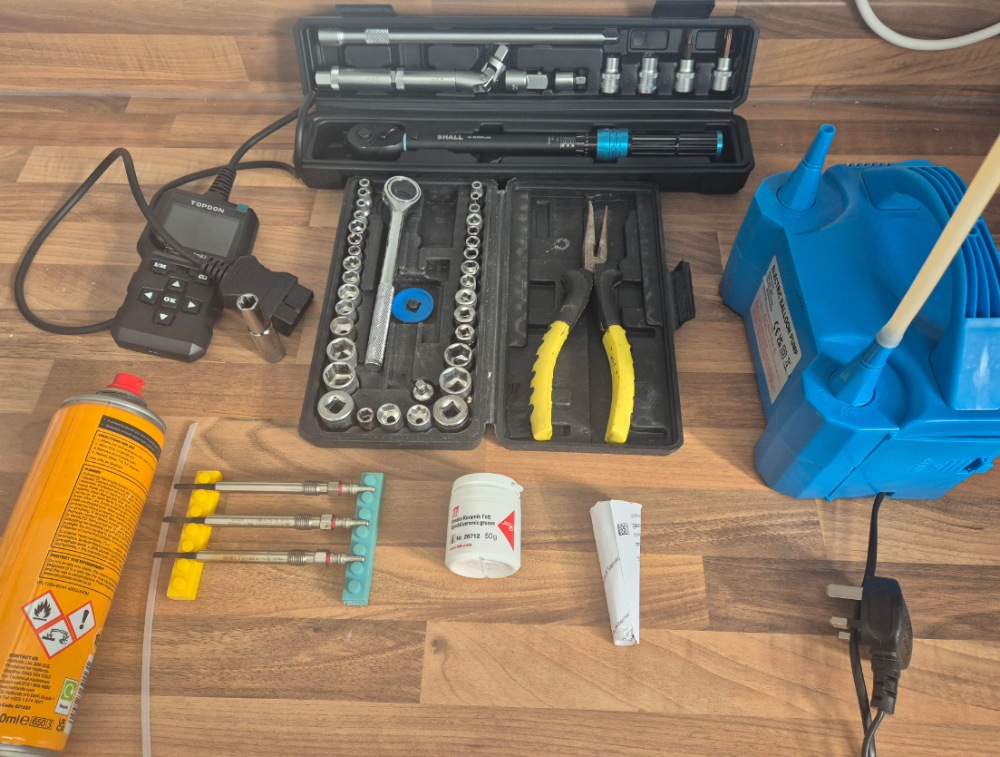
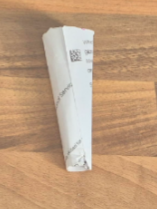
As promised, longer description of process and materials used to fix the issue. Items purchased: TOPDON Artilink400 OBD2 Code Reader - Source: Amazon.co.uk Price: Approx. £29 with voucher 3 X Bosch glow plugs for Skoda Superb Mk3 2.0 TDI - Source: Halfords.co.uk Price: Approx. £11 each with discount Shall 11-Piece 3/8" Torque Wrench Set, (5-60Nm) - Source: Amazon.co.uk Price: Approx. £28 with voucher febi bilstein 26712 Grease for fuel injectors / glow plugs, pack of one - Source: Amazon.co.uk Price: Approx. £12 Penetrating release spray - Source: Halfords.co.uk Price: Approx. £3.99 Additional items used (already owned): Ratchet kit 3/8DR 6PT Deep Socket 10mm (this is the socket for glow plugs 1,2, & 4) Long nosed pliers Compressed air pump (we have one for blowing up balloons for parties but with a tube attached, this works just fine for blowing away any dust and debris) Multimeter Small paper cone made from a rolled up utility company letter OBD2 reader, deep 10mm socket, Torque Wrench, ratchet set, compressed air machine, penetrating spray and tube, old removed glow plugs, glow plug grease, paper cone, long nosed pliers Youtube video tutorials followed: Skoda Superb Mk3 2.0 Glow Plug Replacement by Rob Camper - "youtu.be/vE6rQomb2Nk?si=C94e-Z0Sdl9v_jan" Skoda Superb 3 glow plugs change by Golf Wagen - "youtu.be/5BVmd3aORDk?si=PXq30STYC56RE0YW" Replacing Glow Plugs - Audi/VW/SEAT/Skoda 1.6TDI CAYC Engine Code - Audi A3 8P by Auto Knight - "youtu.be/cGh3dXYoC4w?si=x3i61M4kpSaIVIS4" All props to these guys, I've taken images below from their videos too Step 1 - diagnosing the fault - With ignition OFF, I Plugged in ODB2 reader. - The connection is under the drawer to the right of the steering wheel. Mine is a purple colour. - Turned on ignition (but not starting car), this will allow the OBD2 reader to access the onboard computer and read faults. - Fault shown was "P0671 - Cylinder 1 glow plug circuit/open. " - this means that the first of the glow plugs has an error. location of the OBD2 connector Step 2 - understanding the job - The car has 4 glow plugs - They run from left to right on the top of the engine, under the engine cover, and each has an electric connector attached to the top of it. - Plugs 1, 2, and 4 are normal glow plugs with no sensors and can be bought for between £10 and £17 each. They are removed with a 10mm deep socket - Plug 3 is a special plug with a pressure sensor. These cost a lot more. I've seen them from between £150 - £250. - As there is no fault with plug 3, I decided NOT to replace that one, but as the others were relatively cheap and were coming to the end of their lives I decided to replace all of the others (1,2 and 4) still image showing location of the 4 glow plugs with electric connectors attached Step 3 - prepping for removal - Took the car for a short journey to get the engine warm, returned home and parked where it would stay over night. - With gloves on (as the engine was now hot), popped the bonnet and removed the engine cover. - Unclipped the black plastic holders holding down the wires (you can see these rectangular clips above the coloured circles in the picture above). This just gives you a bit more slack on the wires to unplug them. - Using the long nosed pliers, unplugged the electric connectors from plugs 1, 2 and 4 - As you can see from the photo above, plug 1 is down behind some pipes and wires and is the most tricky to get at, so had to be patient and ensure I didn't damage anything with the pliers. - The electric connectors take some pulling to disconnect Glow plug electrical connector unplugged - when connectors were off, I used the compressed air machine with a tube to blow all dirt and debris out of the recesses where the glow plugs were (see image below). I spent some time on this to ensure there was no loose dirt or debris in these recesses. - I then soaked the plugs in the recesses with penetrating release spray and left them for a couple of hours. - I went back and reapplied the penetrating release spray after 2-3 hours, left the connectors off, but put the engine cover back on, closed the bonnet and left them to sit overnight in the release spray. - In the morning I popped the bonnet, removed the engine cover and reconnected the 3 electric connectors and the rectangular wire clips. Each of the connectors needs to be pushed down firmly onto the glow plug, and there is a definite "click" that can be felt as the connector latches onto the plug. Make sure they are down firm and you feel this "click" plug in recess Step 4 - plug removal - Took car for a drive to get the engine and plugs hot. - Returned and parked, turned off engine, opened bonnet, removed engine cover. - Unplugged electrical connectors from plugs 1,2, & 4 as above - Reapplied release spray to glow plugs - Used a ratchet with a long vertical bar and the deep 10mm socket shown below. - As MChris has mentioned above, I used a "gently as you go" method rather than a sharp turn. Gently applying pressure in a counter clockwise motion and gradually increasing pressure but not by a lot. With all of the steps above and this gentle pressure the plugs came straight out without any issue. Step 5 - new plugs prep and install - Using my Multimeter I tested the old plugs. (Watch Auto Knight's video listed above on how to do this). The plug from cylinder 1 definitely had an issue. - I tested all of the 3 new plugs I was putting in to ensure there was no problem before I put them in. - I then Applied febi bilstein 26712 Grease for fuel injectors / glow plugs to the new plugs around the thread and body but not the glow end, and not above the thread. (Again. watch Auto Knight's video listed above on for this) - As I had applied grease I needed a way to ensure the grease would not pick up any dirt as I was sliding it in. To do this I made a rudimentary paper cone (shown below) from a letter, and secured it with tape. I then cut the bottom of the cone so that the plugs easily passed through. - I positioned the paper cone into the recess of plug 1 (shown below) and then slid the greased glow plug in via the cone. This way, if the plug touches anything it touches clean paper and the grease doesn't pick up any dirt. - I repeated the above step for plugs 2 and 4, making sure I wiped any grease out of the cone between each plug going in. - Once all 3 plugs were in, I removed the cone and used the socket and vertical bar to initially gently hand screw the plugs in to ensure the threads were biting properly, and then used my Torque Wrench to tighten the plugs to 17 Nm. - I then replaced the electrical connectors, making sure they were pushed down firmly and the "click" was felt signalling the connectors latching to the plugs. - I reconnected the rectangular clips holding the wires, and replaced and sealed the engine cover. - With ignition OFF, I Plugged in ODB2 reader. - Turned on ignition (but not starting car), and read faults. - Cleared Fault "P0671 - Cylinder 1 glow plug circuit/open. " - Turned off ignition and removed OBD reader. Took the car for a good run and all fine, warning light has gone and not reappeared. Hope the above helps.
-
Cheers MChris Yes, did it all yesterday morning with very much the same method you outline above. Used a compressed air gun to clear out dust and debris from plug recess, soaked the plugs in penetrating fluid over night, replaced the caps and took the car for a run in the morning to get warm, then gently gently and the all came straight out no fuss. Will put a longer description with photos and what I used in due course but all good now, car happy and fault has not returned.
-
Plugged in ODB2 reader. Fault is P0671 - Cylinder 1 glow plug circuit/open. Will try gently replacing the glowplug myself and if can't release it I'll take it to the local mechanic.
-
Apologies, ECS light (Emission control system) not EMS
-
Hello all. Skoda Superb Mk3 tdi se Day after a long journey 200 miles, the EMS light has come on on the dash. Car seems to be driving ok with no apparent loss of power. Have ordered an obd reader to see what fault is and pencilled in an appointment for later in the week. Wondering whether it may be the egr being clogged, and wanted to ask if anyone has used the spray egr cleaners on a similar model and to what success. Will update thread based on obd reading etc.
-
Hello all Looking for recommendations for an independent garage in Bristol area for service and MOT. Car is a 65 plate Mk3 SE L EXECUTIVE TDI.
-
Hi all I was quoted around £160 by Skoda garage for part and painting. Found a second hand part on ebay, and sanded to plastic. Bought primer, matched colour code paint, and clear coat on internet. 2 coats primer, 2 coats paint, 2 coats clear coat and wet sanding = job done. Cost £37 all in + my time
-
Model: SUPERB SE L EXECUTIVE TDI - 2015 Hello all The recent cold snap in the UK seems to have broken the clip on the back of the headlight washer cover on driver's side, and during a trip it has dropped off so I need to get a replacement. Any recommendations for stockists and more importantly, they apparently come unpainted so any advice on getting them painted to match car would be gratefully appreciated. Thanks
-
-
UPDATE No error codes re: light Removed Right outer (the non working one) Some water inside Removed left outer (working) and plugged into right side - Worked fine So water ingress it is rather than faulty wiring or fuse. Will be ordering a replacement and will post results. Many thanks all who contributed.
-
That's really helpful, many thanks
-
Hi there I'm having the same isue at the moment. Thread: Can't see lots of water ingress though. Do you mind if I ask a couple of questions? 1.when you say: Do you mean you disconnected the working left hand side lights and plugged them in on the right? Did you do this for both the inner and outer sections or just the outer? 2. Was the fault with the inner section on the boot or the main outer section? 3. How did you fix the issue? Did you buy a new unit? If so where from? Thanks
-