russ17
Finding my way
-
Joined
-
Last visited
Everything posted by russ17
-
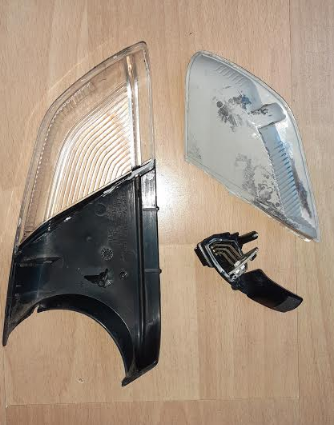
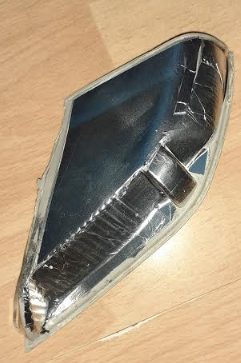
I had an issue on my door mirror indicator, where the indicator unit had suffered water ingress. Luckily, the indicator functions, but is light output was low. I decided to refurbish the indicator. Is separated the outer cover of the mirror cover using these You Tube guides and The indicator unit is glued together, but by carefully inserting a blade , the clear lens part can be separated from the reflector part of the indicator. The indicator has three orange LED's. On mine, the reflective coating has been dulled by the water ingress, so I applied some double sided tape over the dulled reflector, then used some tin foil on the double sided tape as a reflector. I glued the parts back together with 151 Fantastic Elastic glue £1 https://www.poundland.co.uk/19623-151-fantastic-elastic-glue/ It now works as well as the other indicator. Hope this helps
-
I have looked at the Haynes manual, and the instructions for refitting the glass into the regulator, state that you should replace the two plastic "spreader plugs". Also, it states to fit the larger plug into the hole in the glass, then fit the smaller plug into the large plug. Then you should lower the glass (with both plugs fitted) and engage the plugs into the plastic bracket on the regulator. I had fitted the glass into the plastic bracket on the regulator, then tried to fit the plugs into the hole in the glass, but i found it difficult to push the smaller plug inside the larger plug, using the access hole in the panel.
-
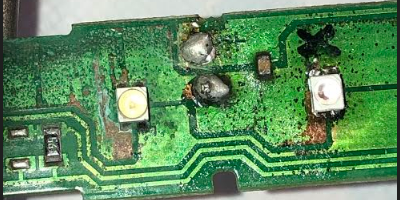
I have now completed the repair of the high level brake light, by replacing the two bad LED's and can confirm that these: https://www.ebay.co.uk/itm/152408458719 are a suitable replacement for the original LED's. The original is on the left and the new one on the right (by the black X) I manged to replace it using a standard fine tip soldering iron, which can be bought as a kit for about £11 https://www.ebay.co.uk/itm/Soldering-Iron-Kit-Electronics-Welding-Irons-Tool-Adjustable-Temperature-60W-UK/142927811015?epid=19035047006&hash=item21472951c7:g:c6sAAOSwDyldUQes. May also be worth buying a multi meter as they are invaluable for fault finding on car electrical systems, and the diode test can be used to test the function of the LED's while still soldered to the PCB, without power. They LED's are are in 3 blocks pf 4 LED's, so when the meter is connected across any of the LED's, 4 will light dimly (assuming the polarity is correct), but if not correct, you wont damage them) , showing they are working. You can also check by connecting 12V DC on the two terminals of the PCB, which will show if all LED's are working. The meter below has "auto range", so just set it to DC Volts and the meter will adjust the display to the appropriate range. https://www.ebay.co.uk/itm/H01-Auto-Range-4000Counts-Digital-Multimeter-Backlight-AC-DC-Ammeter-Voltme/324331922925?hash=item4b83b065ed:g:~qUAAOSwJ7FfhDU~ I used some flexible adhesive like this: https://www.poundland.co.uk/19623-151-fantastic-elastic-glue/ for £1, and clamped the two halves together overnight. The glue also worked really well for sticking the door mirror glass on to the heated mirror pad! Regards Russ
-
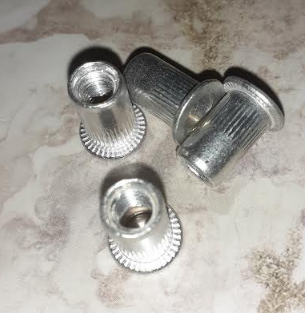
I agree with you about using rivets. At least Rivnuts are a viable option. I would say the trickiest part is drilling out the old rivets and removing the two part, plastic dowels, which hold the glass into the plastic carrier(s). Its one of those jobs which isn't technically difficult, just a bit fiddly, but having the Rivnuts means you can at least remove the regulator panel if needed, which you cannot do if you use normal rivets. Pushing the dowels into carrier can be a challenge, because you need to be careful not to press on the glass too much as you could break off the lower part of the glass which has the hole in it, which will be the weakest point of the glass, due to the hole(s) . Regards Russ
-
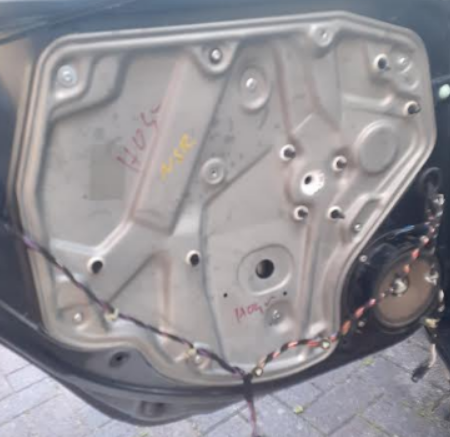
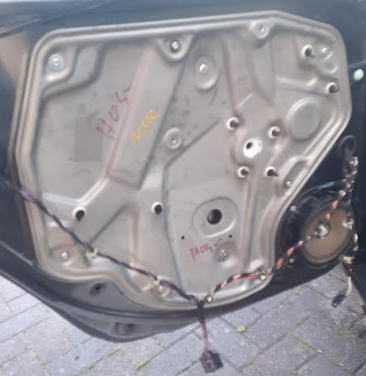
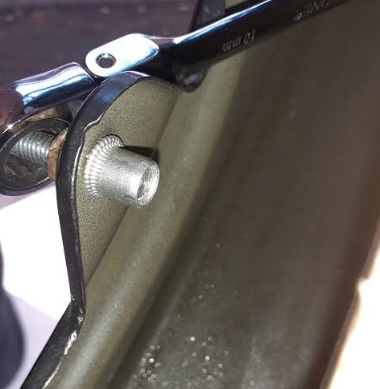
HI When you say "door panel cover" do you mean the metal one I pictured here? This is the part, I was told, was "the regulator". So this is the part that I secured with Rivnuts. I purchased this as a whole part, including the track, the cable and the motor, so I did not need to rivet the regulator track on to the regulator panel. This is on a Mk2 Octavia, I think Mk1 Octivia is a different regulator unit. The internal door panel trim (AKA Door Card) is fitted with some screws and a few clips. The other side of this regulator panel (the inside) looks like this: https://www.ebay.co.uk/itm/353189547441?chn=ps&norover=1&mkevt=1&mkrid=710-134428-41853-0&mkcid=2&itemid=353189547441&targetid=1055001932367&device=c&mktype=pla&googleloc=9045641&poi=&campaignid=10204071303&mkgroupid=104953043274&rlsatarget=aud-629407027585:pla-1055001932367&abcId=1145987&merchantid=7410404&gclid=Cj0KCQiAifz-BRDjARIsAEElyGKLLlbJDP1VkTkcLhhA2e8KyLDpvPvZpNEYZ8Df3WPNsl3kHIsxVqwaAhbQEALw_wcB The white plastic glass carrier runs on the black metal track and has a pair of cables which wind around the gear unit (white triangle bit), which is driven by the motor (through the panel). The cables/plastic carrier/gear are available as a kit: https://www.aliexpress.com/item/1005001562354481.html?src=google&albch=shopping&acnt=494-037-6276&isdl=y&slnk=&plac=&mtctp=&albbt=Google_7_shopping&aff_platform=google&aff_short_key=UneMJZVf&&albagn=888888&albcp=9604713100&albag=99283534296&trgt=296904913880&crea=en1005001562354481&netw=u&device=c&albpg=296904913880&albpd=en1005001562354481&gclid=Cj0KCQiAifz-BRDjARIsAEElyGJz0nOR8ugCgr8mA1Ivl0lbBHteINA69JRND7kUK0cIW81yanu33o4aAp6REALw_wcB&gclsrc=aw.ds But as both the cables are sprung at the carrier end, they can be difficult to fit, so I opted for a used one, for ease. It took me a total of about 5 hours including taking the internal trim off, drilling off the rivets, fitting the Rivnuts and re-assembling. Good Luck
-
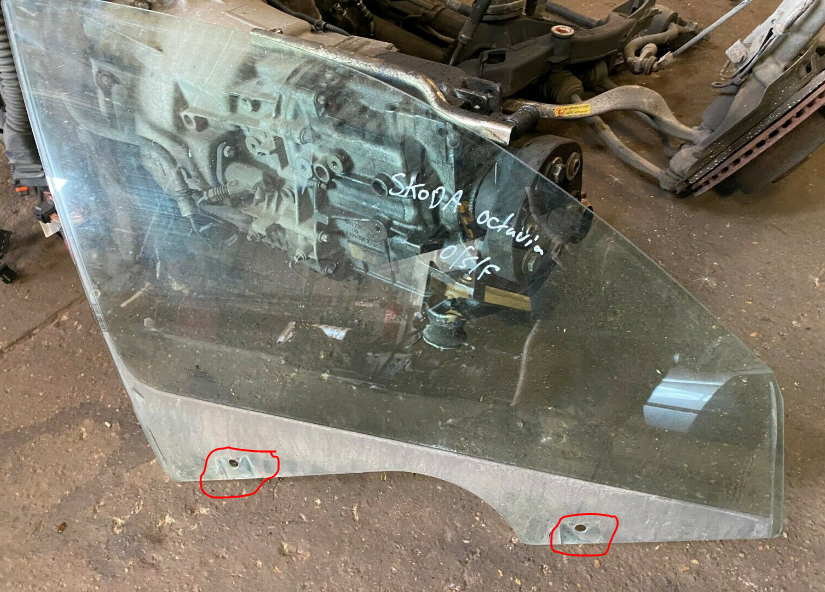
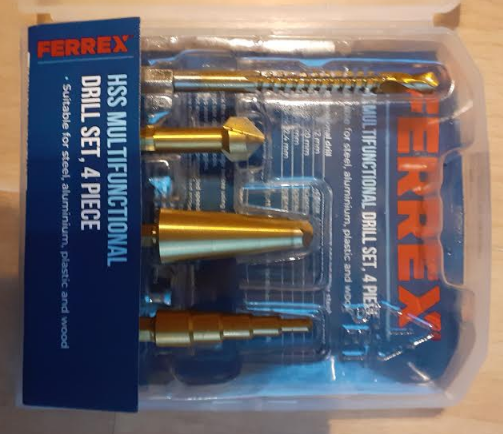
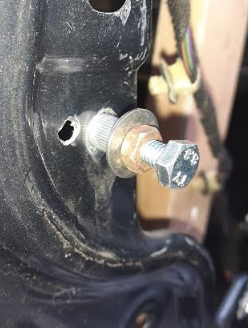
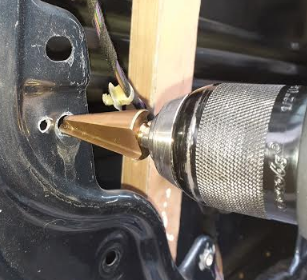
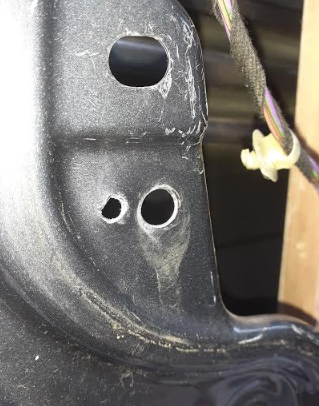
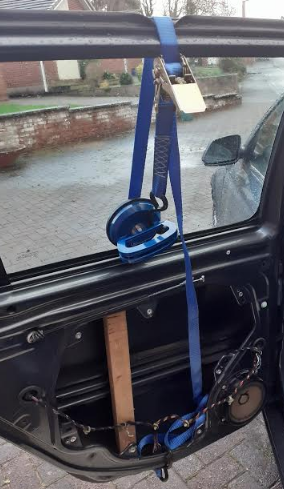
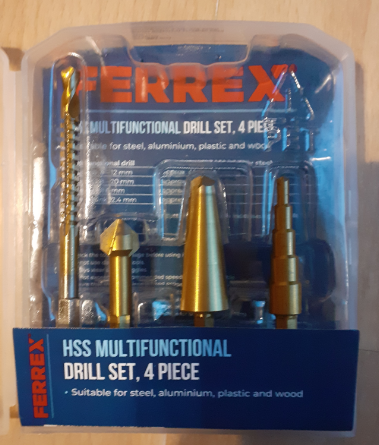
Hi, Just thought I would share my experience with a window regulator replacement on a 2007 Octavia 2. This is the left rear regulator. I used a bodywork dent puller suction pad and a ratchet strap (strap not really needed as the suction cup rests against the window rubber) to hold the window up while I replaced the regulator. The plastic window holder on the regulator had broken, along with the cable. I bought a 2nd hand regulator with the motor from an auction site for £16 . I didn't fancy re-fitting the regulator to the door with rivets as I don't have lazy tongs (large hand riveter), so I decided to buy a set of Aluminium Rivnuts with steel thread inserts from an auction site for £6 for a 100 mixed set (25 each M4, M5, M6 & M8). I bought aluminium Rivnuts because research showed that fitting by hand works best with Aluminium Rivnuts, without the need for special tools. I used a tube or cone drill (2nd from the right), from Aldi for £4.99 for the set. I opened the holes in the door frame to 9mm, which is the required size for an M6 Rivnut. This type of cutter is much better than a standard HSS twist drill when drilling sheet materials as a tube drill doesn't "grab" as breaks through the material like a twist drill can, plus, a twist drill can leave a slightly "out of round" hole, whereas a tube drill makes a perfectly round hole. Once the hole is drilled, remove the burr from the front and rear of the hole, using a counter sink bit (included in the set I bought). Now insert the RIvnut, with an M6 bolt, an M6 nut and two washers. Make sure the bolt is screwed in flush with the end of the Rivnut, to ensure and even spread of load on the thread as you set the Rivnut in place. Using a socket drive, hold the bolt (and the Rivnut) square to the hole in the panel, and using a ratchet spanner, tighten nut onto the RIvnut. The Rivnut may spin at first, but keep going and eventually it will bite on the rear of the panel. Then it will start to deform as it is drawn towards the panel. When the spanner starts to get tight, slow down, otherwise the Rivnut thread can be stripped. Once spanner is tight (don't go mad), slacken the nut, then remove the bolt from the Rivnut. The use of Rivnuts made it possible to remove the regulator unit for test purposes, which would not have been possible if rivets had been used. To get the glass to sit in the plastic holder on the regulator unit, remove the motor from the regulator (3x Torx T30) then move the plastic glass holder on the regulator up to the top of the movement, MAKE SURE YOU DON'T LET THE PLASTIC GLASS HOLDER GO OFF THE END OF THE REGULATOR TRACK, AS THERE IS NO END STOP!!!! Remove the rubber grommet, which then allows you to see the regulator track and the alignment hole on the plastic glass carrier (can only seen when the glass is lowered). With the glass slightly lowered (about 50mm opening) offer the regulator into place, while locating the glass in the plastic carrier. Now move the regulator into place and locate the metal dowels (on the rear of the regulator) into the locating holes in the door frame. Now fit the M6x25mm screws to hold the regulator in place. Once all screws are refitted, lower the glass using a pair of needle nose pliers to drive the regulator gear, until the hole in the glass is visible through the access hole (access hole in panel is approximately 40mm diameter). You can now push the larger plastic dowel into the glass, through the plastic glass retaining bracket (it should "Click" into place in the glass). Now gently push the small dowel into the larger dowel, which causes the larger dowel to expand slightly. Re-fit the rubber grommet. Check that the window can go up and down by turning the regulator gear with the needle nose pliers (carefully, but don't put anything in the splines of the gear, as this is what the motor drives). When you are happy with the operation, re-fit the motor with 3 screws. Re-connect the multi way plug to the rear of the motor. When you try the window, it will not do "one-shot" function until the window has been lowered fully (and is held there to mark the end of travel position) and the same for the upper movement. Once you have performed the upper and lower end of travel operations, the "one shot" function will work. Hope this helps. Russ

-
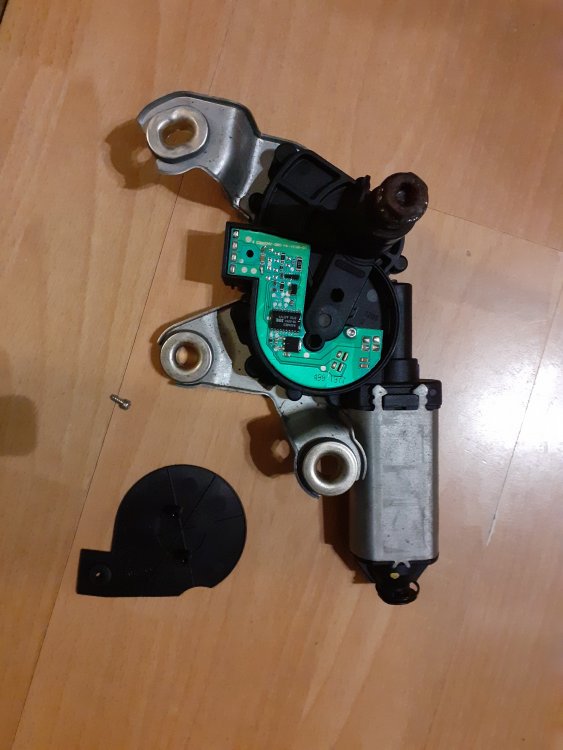
Hi All, I have produced a guide on performing a full strip down and repair of the rear wiper motor on an estate car. Should work for hatchback, assuming the gears are not seized too badly. My guide is attached. I want to thank forum member J.R. who inspired my repair. His thread is here: Regards Russ Octavia Estate Rear Wiper Motor.pdf
-
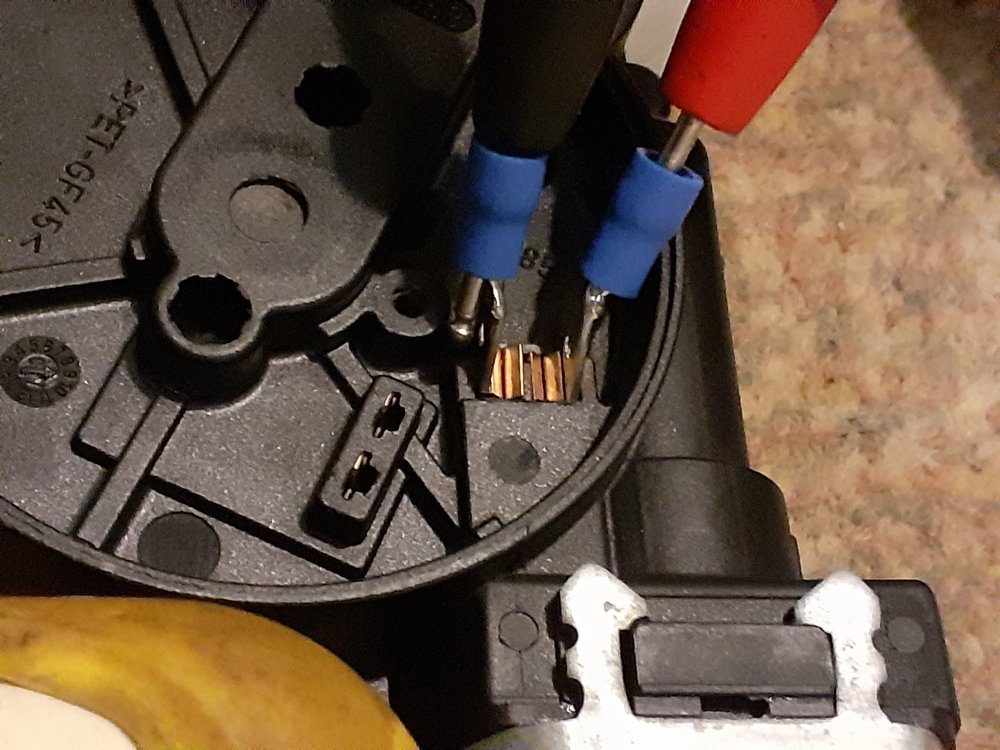
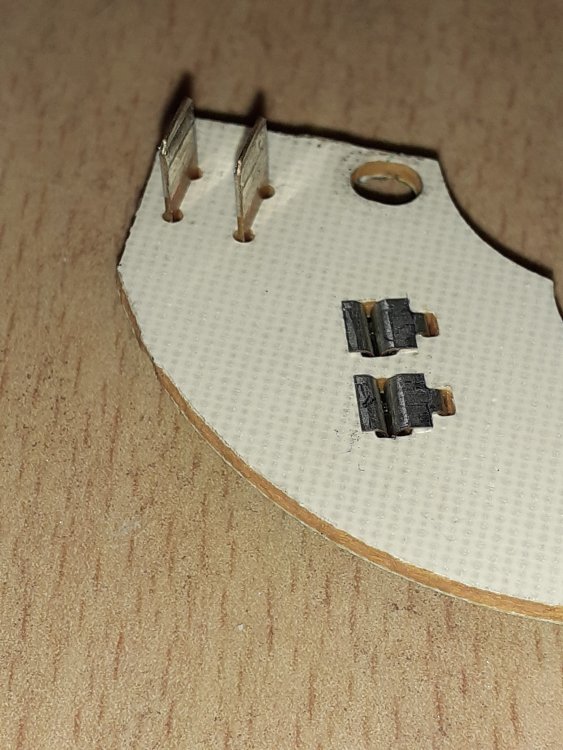
Hi, I understand that you have disassembled the motor from the gearbox. I have a similar issue on my estate wiper. I have removed the gears and the CANBUS PCB, now I want to separate the motor from the gear unit. It seems to be held in by four large metal tabs. Bending them away from the body will allow the motor to be separated from the gear box, but a cannot see how the brushes are held in. Do the brushes come out as part of the motor, or do they stay in the gearbox unit? The close up image is the contacts of the motor, after the CANBUS PCB has been removed. The PCB is held in place by two torx screws (one gets removed by removing the cover), then you need to gently lever the PCB up as the motor contacts and the "fingers" which contact the gear, to allow self parking, are located in sockets on the underside of the PCB (last picture). I wanted to do this to allow direct testing of the motor, without risking damage to the CANBUS PCB. In the image you can see the correct polarity of the motor - +12 V to the outer terminal and ground to the inner terminal.
-
Hi Mac I actually removed both bad LED’s and tested them with my multimeter and one was OK, so I refitted it, but it is slightly dim compared to the others. The other is definitely dead. Russ
-
Hi I have now disassembled my brake light (being careful when removing the washer nozzle from the brake light!!). I my case I have one slightly dim, but still still functioning LED and one that has failed. They are arranged in 3 "blocks" connected in series with each block consisting of 4 LED's, making a total of 12 LED's. The LED's are RED (not white as I had previously thought) and appear to be narrow viewing angle 30 degree, possibly these: Red LED They are expensive to buy, due to the minimum order cost, but 5 can be obtained for £3 Here I haven't ordered or confirmed that these are the correct LED's for the job, and it may be that all 12 need to be replaced to maintain an even illumination. If that is the case, it still works out cheaper at £9 for 15 (or less on an offer) than replacing the whole light, at £30 or more. I will update once I have replaced the LED's Russ
-
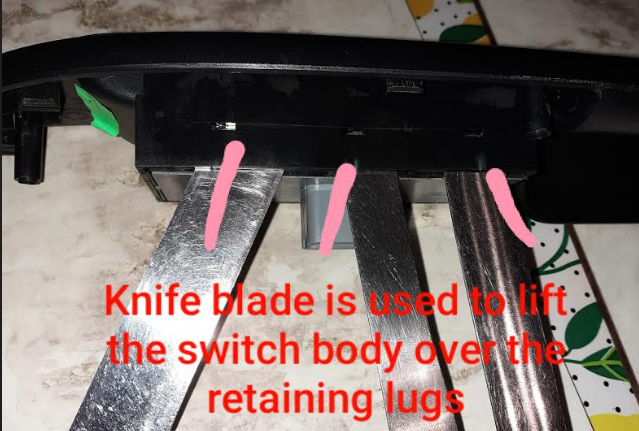
Hi Forgot to add the picture of using the butter knives to separate the grey switch carrier from the main body. The fit is very tight, and you need to get three knives in each side, if you have that many knives! the pink lines indicate the holes in the body where you can just see the five retaining lugs per side, two at each end and one in the middle. Russ
-
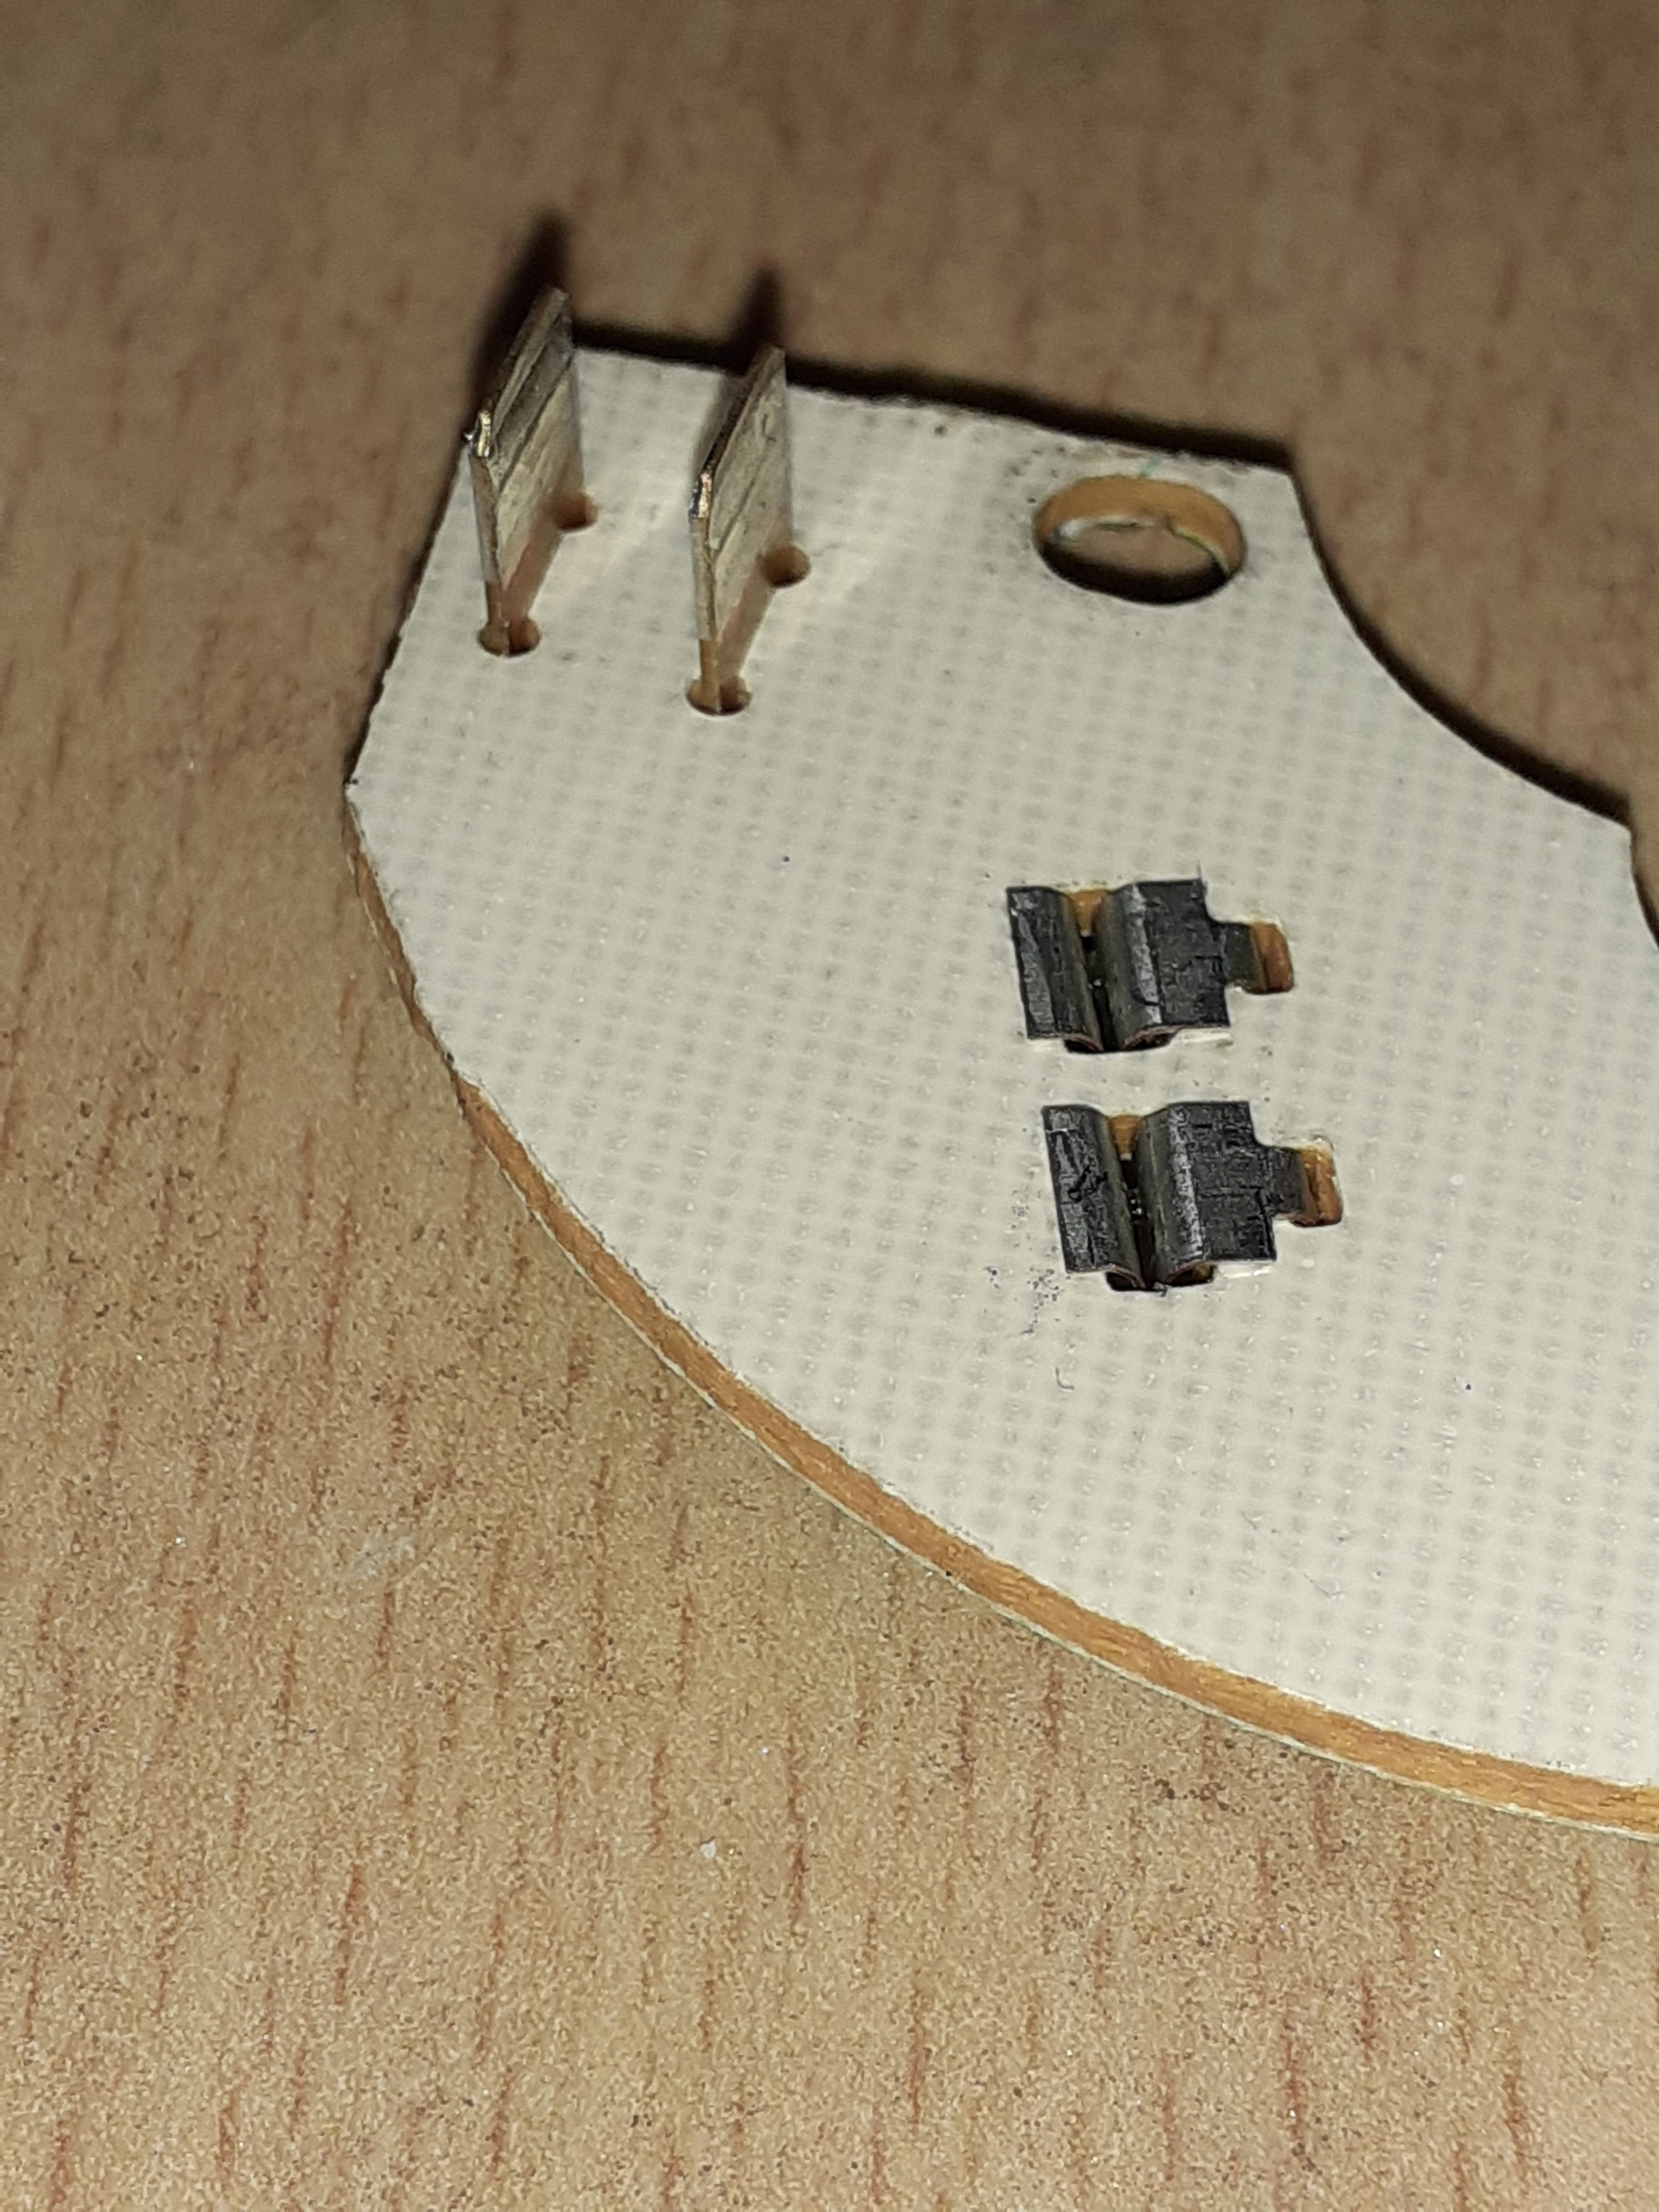
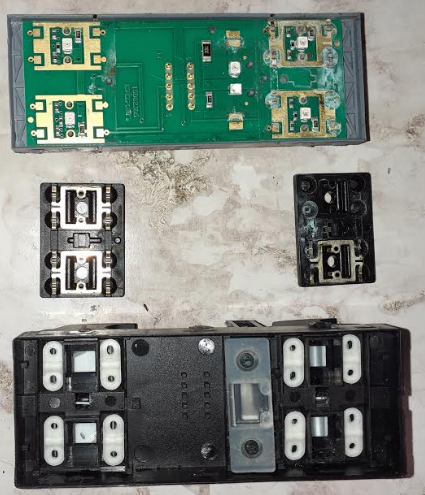
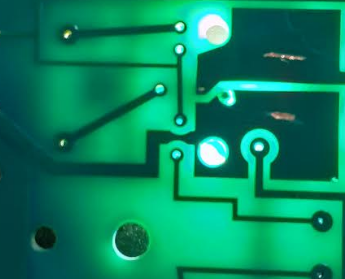
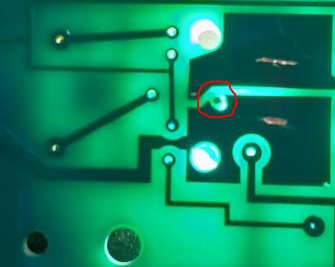
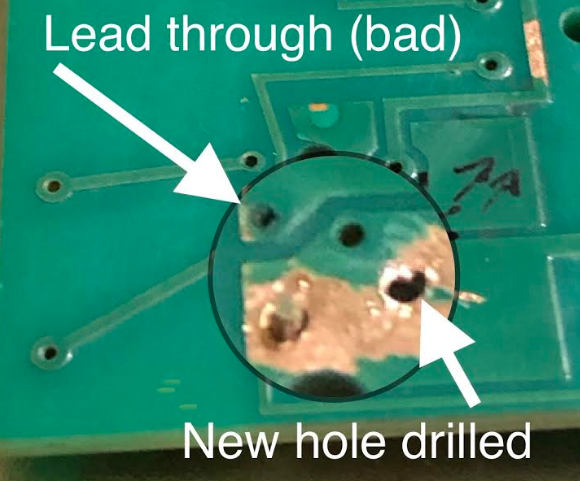
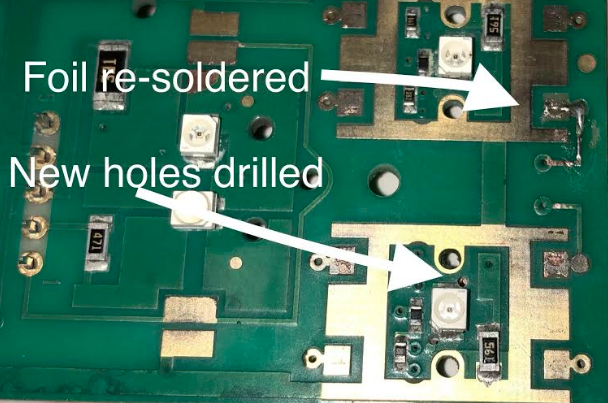
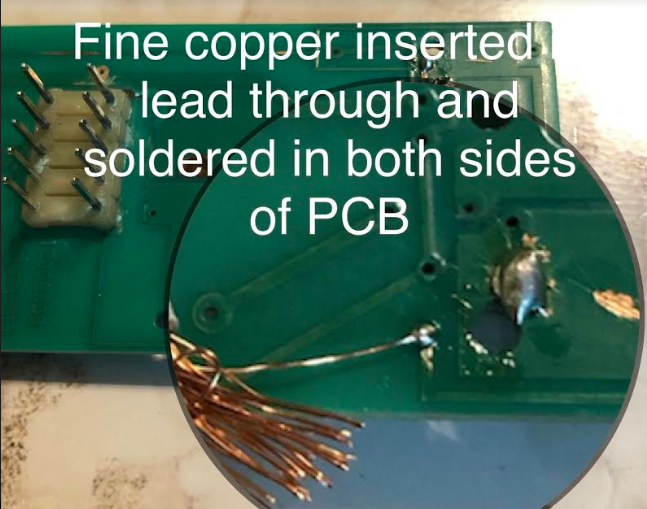
Hi, My Octavia Electric Window switches were faulty. There was no back lighting on any of the switches, the passenger side did not have down or one shot down and the driver side up was intermittent. The rear windows were fine for up down and one shot function. The rear window child lock did not operate, but it had back lighting. I decided to open it up to see if it could be repaired. Getting it apart is quite tricky as the latches that hold the unit together are very tight. I used some butter knives inserted along the sides to release the latches, but there is a risk of damaging the latches permanently. Once you have released all the latches on one side, you can move to the other latches and hopefully, this will allow the switch unit to pop apart. Once open, the corrosion was evident. Some of the "lead through" holes in the PCB were corroded and therefore open circuit. In the picture above, the large copper areas are directly under the back lighting LED for each switch, and each area had a lead through, which was open circuit. In total, there were 7 lead through connections for the back lighting which were open circuit. I also found 4 bad lead through connections for the passenger switch functions which needed new wires fitting. In order to fix the connection, I drilled a 0.7mm hole though through the PCB next to each back light LED, so that the hole would connect the copper tracks on both sides of the PCB. I then inserted a single strand of 0.1mm copper wire (a single strand from a flexible cable) in the hole and soldered it on each side of the PC to re-make a new lead through. You have to ensure that the wires are kept a s close to the LED's as possible, as they could interfere with the tactile switch frame that sits on the PCB. This was a difficult job and I am not proud of the quality, but it serves its purpose. The rear window OFF button uses conductive rubber pads to bridge two copper tracks. This function was restored by cleaning the PCB with a fibreglass pencil and cleaning the conductive rubber with some isopropyl alcohol (tape head cleaner fluid or vodka at a push!). The layout of the connections to the connector are: Pin 1 - Rear Windows Lock Off (command to ECU) Pin 2 - Rear Windows Lock ON (Orange LED) Pin 3 - 12V for Backlighting for all switches (Green LED's) Pin 4 - Ground (0V) Pin 5 - Front Left Window Pin 6 - Front Right Window Pin 7 - Rear Right Window Pin 8 - Rear Left Window Pin 9 - Not used Pin 10 - Not used The four functions of each switch (UP, one shot UP, DOWN & One shot DOWN) are determined by the resistors on the PCB. When a particular resistance is measured by the ECU between the relevant pin for that window and ground, the ECU performs that function. For example, when you press the right front button fully forward, you get One Shot DOWN function, this is because the switch will connect a particular resistor between Pin 6 (Front Right) and Ground. The ECU interprets the resistance and translates this to the required function. I didn't measure what the different resistance were for the four functions per switch. All windows perform their correct functions and all back lights now work. Hope this makes sense Russ
-
HI MrJayy, I have a an identical problem to you, but with semi-automatic temperature control. I am led to believe that there is a flap motor, which controls the air mix temperature. Could this be the issue? Do you ever fix yours? Regards Russ
-
Hi, Old topic I know. Had a 2008 1.9TDi Octavia as a company car. at 4 years old and 110,000 I bought it as my private family car. While as a company car, it was on a variable schedule, roughly every 18,000 miles. After I bought it, the car was serviced by a Nissan dealer who, unbeknown to me at the time, used the incorrect oil. 6 months later, it threw a conrod! Despite proof in the service record that the incorrect grade of oil was used, there was little point pursuing it as it would have cost more to try and prove the oil caused the failure on a >100,000 mile engine. Got some money back for it though as it was an Elegance , which I speced up with Xenons, Cream Heated Leather, seats, TPM, OEM Bluetooth (fitted as a kit, not available as an option in 2008), Columbus Sat Nav and DVD Players in the Headrests. it was a £20K car in 2008. Now I have a 57 plate 1.9 TDi Octavia Estate with a BXE engine. This one has done 170,000, so far, so good!
-
Hi Thanks for the detailed instructions. I have one failing LED in my brake light, so the plan is to attempt a repair, as I have some SMD LED's which are used in the back-lighting of LED TV's (50 for £3.00 from China). Regards Russ