aerofurb
Members
-
Joined
-
Last visited
Everything posted by aerofurb
-
I have LED rear lights and asked the supplying dealer, Allams, if they'd code the tail lights to be on with the front DRLs, this was when the car was new. They were more than happy and did it FOC. My understanding was that it couldn't be done by VCDS as others have said.
-
It appears the initial model list now includes all the various different interior options.
-
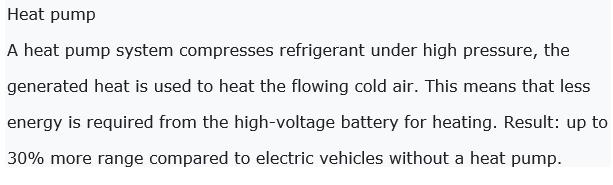
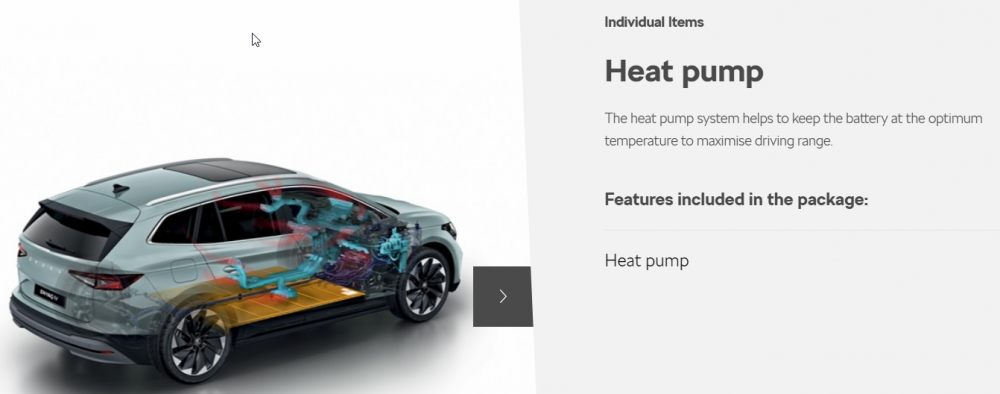
Thanks. I do know what it does but I'm wondering why Skoda UK appear not to - according to the configurator heat pump option information. I emailed Skoda UK last week asking if they thought it had a different function for the UK market but alas, no response - which is, unfortunately as good as it gets with Skoda UK in my experience....
-
I think if the heat pump option was used for battery conditioning, VW and Skoda would have made something of it - another selling point to the system. Skoda UK mention it - but don't mention the use of the heat pump for heating the cabin...
-
I'm sure it will have an effect on the range in cold temps, what I'm not convinced about is Skoda UK's claim that the heat pump optimises the battery temperature (with no mention of it being a more efficient method of heating the car's interior).....
-
Well, to sort of answer my own question, from the German configurator Which translates via Google to: So, it would appear that either the UK spec heat pump has a different function or whoever writes Skoda UKs configurator is, er, perhaps wrong. I can guess which is the right answer...

-
The replacement oil drain plugs I bought have captive steel washers and the one I took out (from the Yeti) was the same. Looking in the workshop manuals, there are either plus with captive washers or plugs with replaceable washer/seal/gasket. I agree - replace like for like and if it's a captive steel washer, you either reuse the plug/washer 'assembly' it or bin it and fit a new 'assembly', which is what dealers seem to invoice for on a service.
-
I found the Castrol oil at a very good price at Amazon. Having read about some people having issues with oil filters on Citigos, I bought genuine Skoda filters (for the Citigo and Yeti) through The ŠKODA Shop | Horton ŠKODA (theskodashop.co.uk) - the Lincoln Skoda dealer. I've had excellent mail order service from them over the years, everything from filters to wheels. I did buy a couple of new oil sump drain plugs through Amazon. Interestingly, the captive washer on the plugs is steel so it shouldn't be an issue re-using a drain plug. As for the pollen filter, the Yeti one took 30 seconds to remove. A gently shake and vacuum and refitted - it was like new.
-
According to the Enyaq Skoda UK configurator, the Heat Pump assists with battery temperature control: Strange then that the VW ID.3 information makes no mention of this, merely that the heat pump reduces battery load compared to the standard heating system. Heat Pump | Electric Car Software & Tech | Volkswagen UK Anyone one know whether the heat pump does actually assist with battery temperature control?
-
It will be interesting to see how the service costs are calculated with the EVs....
-
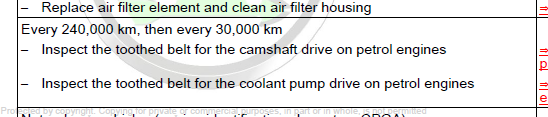
Thanks, James. So the engine manufacturer says inspect the cambelt (initially) at 150k miles with no calendar based interval (replacement dependent on condition) and the UK importer ignores that applies no mileage based inspection (or replacement), just a calendar based replacement. Furthermore, from your screenshot, it would appear that the water pump drive belt is ignored whereas the manufacturer gives it the same inspection periods as the cambelt. A cynic might say that VAG UK (the same conflicting information is out there for the Up! and the Mii) sussed that most of the Citigos will be low mileage so let's tell everyone the same replacement period as for all the other VAG UK engines and no one will notice. Nice little earner. I don't subscribe to the UK being that climatically different - the UK is classed in the same area by VAG as all of the European land mass, Ireland, Iceland, USA etc. We're not that special. Out of interest, I had a look at my Citigo's cambelt today. Five minutes to whip the cover off (cambelt is fine) - makes sense to make the inspection easy as that's what is called up in the workshop manual. Changing the belt does look pretty involved hence the cost (a fair few hours wok) but then the manufacturer isn't expecting the belt to be changed periodically. If Skoda UK (and the other VAG marques) had the customer's best interests at heart based on experience gained in the field, that would be great. Trouble is, if you Google Citigo/Up!/Mii 'cambelt failure' you don't get any instances of failures, only talk of confusion as to the replacement/inspection periods thereof. On the other hand, the Haldex V pump filter used in many of the VAG all wheel drive vehicles (including my Yeti) is well-known to block up (it's supposed to stay clean for life) and cause Haldex pump failures. The internet (and Briskoda) is full of examples of this yet Skoda only ever change the fluid - in accordance with the workshop manual. I cleaned my Yetis filter a month or so ago - and it was almost totally blocked. If Skoda UK (VAG UK) were customer focused, you would expect them to offer to clean the pump filter when changing the fluid. But then again, perhaps it isn't enough of an earner....
-
James - I've liked your post and appreciate your willingness to post from the 'other side of the fence' - been there, done that many times with my work related forums where engineers are well out numbered! But a serious point re the cambelt. I cannot find anywhere in the Skoda workshop manual for the Citigo that says the cambelt is replaced at a set time - be that mileage or calendar based, yet above you say that all Skoda are due at 5 years?
-
But when you disconnect a customer's dashcam, do you leave it disconnected, inform the customer it is disconnected or reconnect it? If you want to quote GDPR laws and not filming on private property, I'll counter that with potentially invalidating someone's insurance in which it has been declared that the car is fitted with a dashcam (and both my cars have front and rear dashcams seeing as we're counting...) and a discount on the premium given in respect of this. I don't think the discount is for having an inoperative dashcam installed. Duty of care to the customer? Does your customer service staff cold call customers and try and sell cambelt replacements to due to car's age for a known vehicle that does not require periodic cambelt changes? Believe me, I am well aware of customer service and servicing customers 'vehicles' - try dealing with light aircraft owners that have mandatory annual inspections carried out on their aircraft, their 'hobby' aircraft that they don't want to spend money on having it inspected but the law says they must. It doesn't make them happy bunnies when they get £2k+ invoices for an inspection they know they don't need but they have to have done! If I still lived close enough to use Allams (or even near Rochdale.... ) then perhaps my current viewpoint might be different.....
-
My point re the dashcam is the fact that the car should have been returned to me in the condition I gave it to them - if they disconnect the dashcam for whatever reason, they should reconnect it or inform me that they disconnected it and left it so. I have no idea why they latest idea is to send me a video of one small section of my tyres....
-
Don't get me wrong, I don't have an issue with set price servicing and costs but if it can't be considered 'value for money' then it would be nice to at least feel that the person who was carrying out the servicing understood about what they are doing to my car. At my last ('last' in various meanings...) visit, I did not come away thinking the car had been serviced by knowledgeable people. Prior to me booking the Citigo in for the service, the dealer contacted me (they'd sold the car when new to the first owner and maintained it since) to tell me that the cam belt was due replacement. I asked them if they'd like to think about that - a 4 year old Citigo that they knew had no more than mid 20k miles on it (not that they asked the mileage). From what I can see in the proper Skoda Citigo workshop manual: So, what if I wasn't in the know and took their word for it that the cambelt needed changing....? Twice on the Yeti servicing at the same establishment, the front dash cam has had the power lead pulled out. Now if they really don't want to be filmed when servicing the car (won't see much with the bonnet up...), or perhaps they don't want me to download the data and see how they drove it, that's one thing. The first time I didn't realise in the dark they'd pulled the lead (it's behind the interior mirror) until halfway home. They could have plugged it back in after they did whatever they did that they didn't want filmed or told me they'd done it so I could plug the power lead back in. It's on my insurance (I get discount on the premium) as being fitted. 'Value for money' from a main dealer is something beyond the total invoice price, in my humble opinion.... PS I always felt I got value for money from Allams - just so you don't think my complaint is with all dealers!
-
Strangely, if you access the Skoda UK website via Skoda Auto (then to choose your country) then you get the above 'Enyaq iV 60 Nav' information and price as in the screen shot above. https://www.skoda.co.uk/electric-hybrid-cars/enyaq-iv If you go direct to Skoda UK, then nothing has changed... https://www.skoda.co.uk/new-cars/teaser/enyaq-iv SUK configurator shows the original price/info. (Edited to make the links work!)

-
I'm with you on this one, for sure. Last summer, the main dealer that supplied my Citigo carried out the service and MOT and the cost was £386 for not a lot of parts or indeed labour - oil, oil filter, brake fluid and I had the rear drums 'cleaned and adjusted'. Admittedly, the brakes were transformed after the adjustment but I came away less impressed than I should have been... It failed its MOT at the first look as both headlamp beams were too low... Then they obviously realised that I have them on the lowest setting as most of my commute is on narrow (slow) back roads so I have them set to illuminate the near road as much as possible. More worrying was when one of the after sales people came through and said there was a problem with my car as, because I'd smeared copper grease on the wheel bolts (winter/summer tyres so the wheels get swapped), 'the bolts won't tighten - they just keep turning'. I asked to speak to a higher authority and suggested at this point they fit the rear wheels as best they can, drive it out of the workshop and I'll pay for what they've done and tighten the bolts myself. In the end, they allowed me into the workshop to use the spare wheel brace in the boot and hand tighten the bolts.... Then I signed a disclaimer on the paperwork saying I'd tightened the rear wheel bolts myself. Okay, I get HSE and 'we must adhere to what the workshop manual' says' against potential liability but it gave me no faith in the technician being able to deal with anything slightly 'outside the norm'. I've used copper grease on wheels and bolts for over 40 years without an issue. As a light aircraft engineer by trade , one gets used to having to think about the job you are doing as not everything is in the manual and you certainly can't plug a computer into 95% of them to look for error codes. Most light aircraft labour rates are around £50/hr depending on where you are in the country. End result, is I won't be taking either the Citigo or my Yeti back there and in fact have spent a couple of days over the Christmas break servicing the Yeti - all in accordance with the servicing requirements from the official Skoda workshop manual. I bought the Yeti one and found the Citigo here. Strangely, for the first time in years, I wasn't asked to complete a 'how well did we do' survey after the Citigo visit.... What is concerning is the lack of adherence to the intervals for replacing parts in accordance with the intervals specified in the workshop manuals. Even though this dealer knew that Allams had changed the diesel fuel filter on the Yeti (it was in the service record that they printed off), they changed it again after 35k miles when it is due every 56k miles. I wasn't asked if I wanted it done and I assumed that I could trust these people. The result is that the dealer has lost the business of two cars as whilst I like having a full service history on relatively new cars, I don't think it makes that much difference to the trade in value when the time comes. I'll service both cars myself and have a local garage carry out the MOTs. When the time comes to change car(s) then this dealer will not be on the list. I never had an issue with Allams, by the way.
-
As promised - a guide I have written: Yeti Haldex V Oil Change & Pump Filter Clean - Skoda Yeti Guides - BRISKODA Apologies for the low res pictures there - I haven't time this evening to suss out why the hi res ones didn't load. If anyone wants hi res pictures or a PDF of the whole thing then PM me.
-
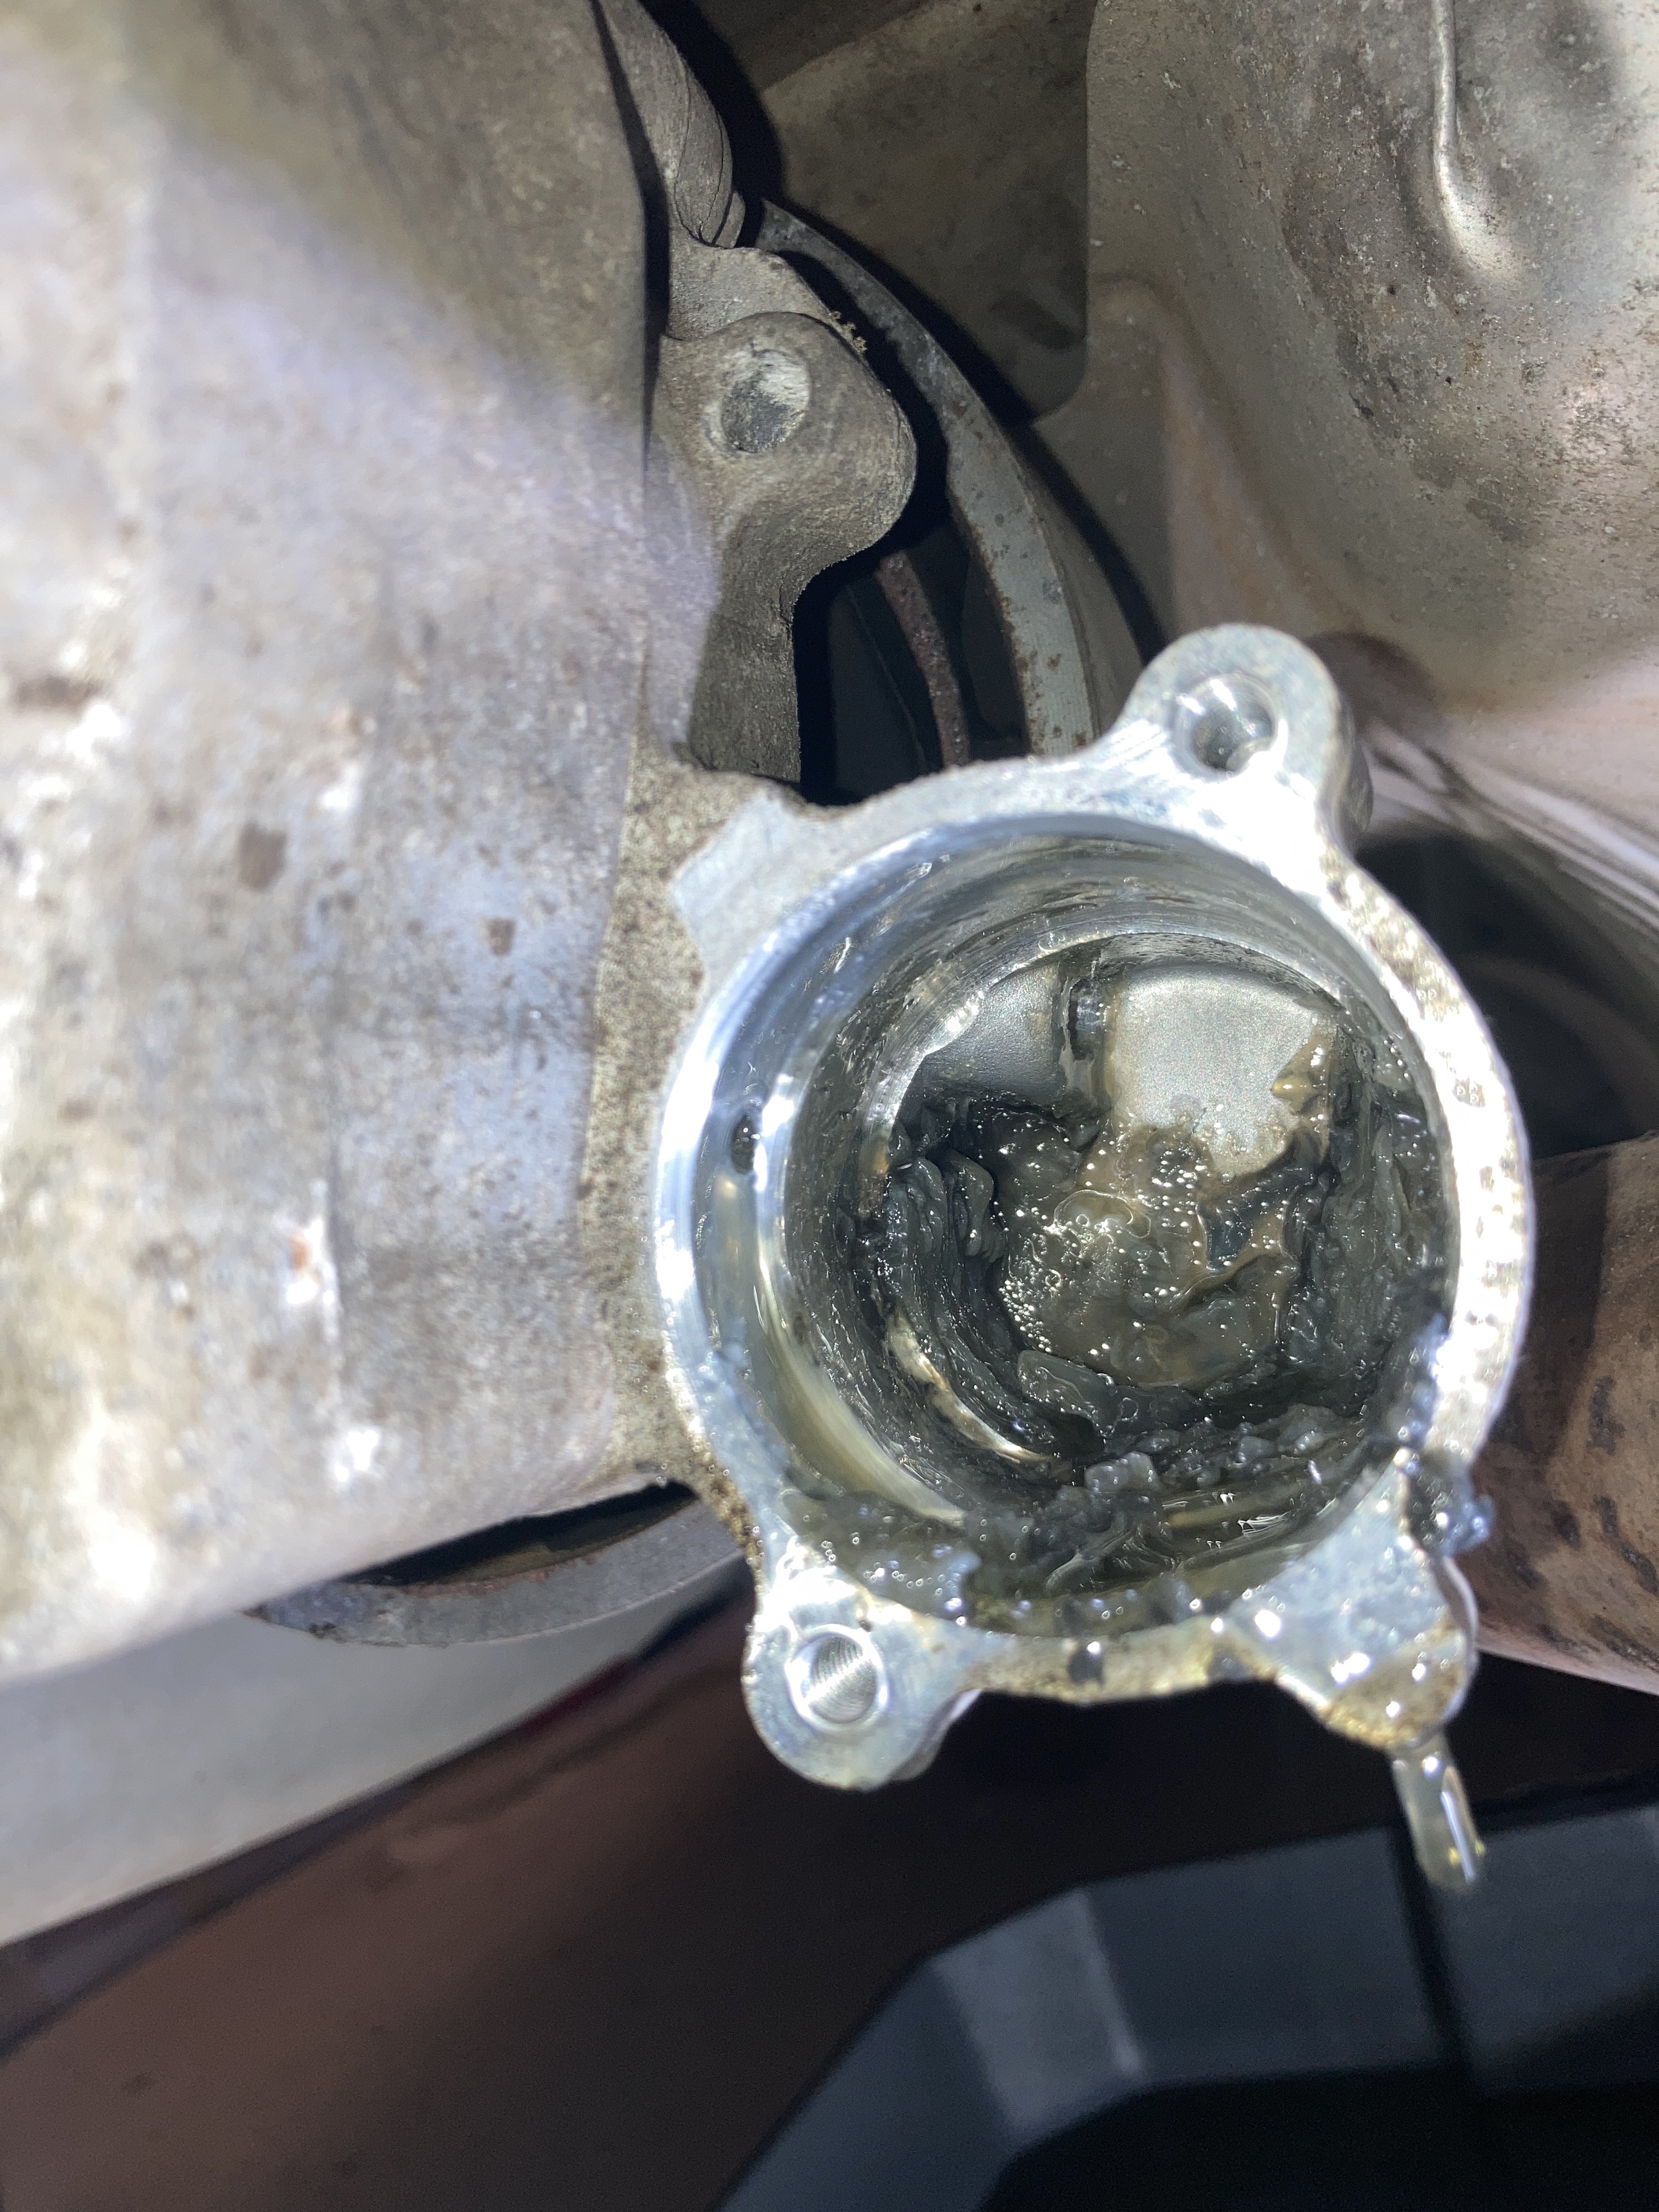
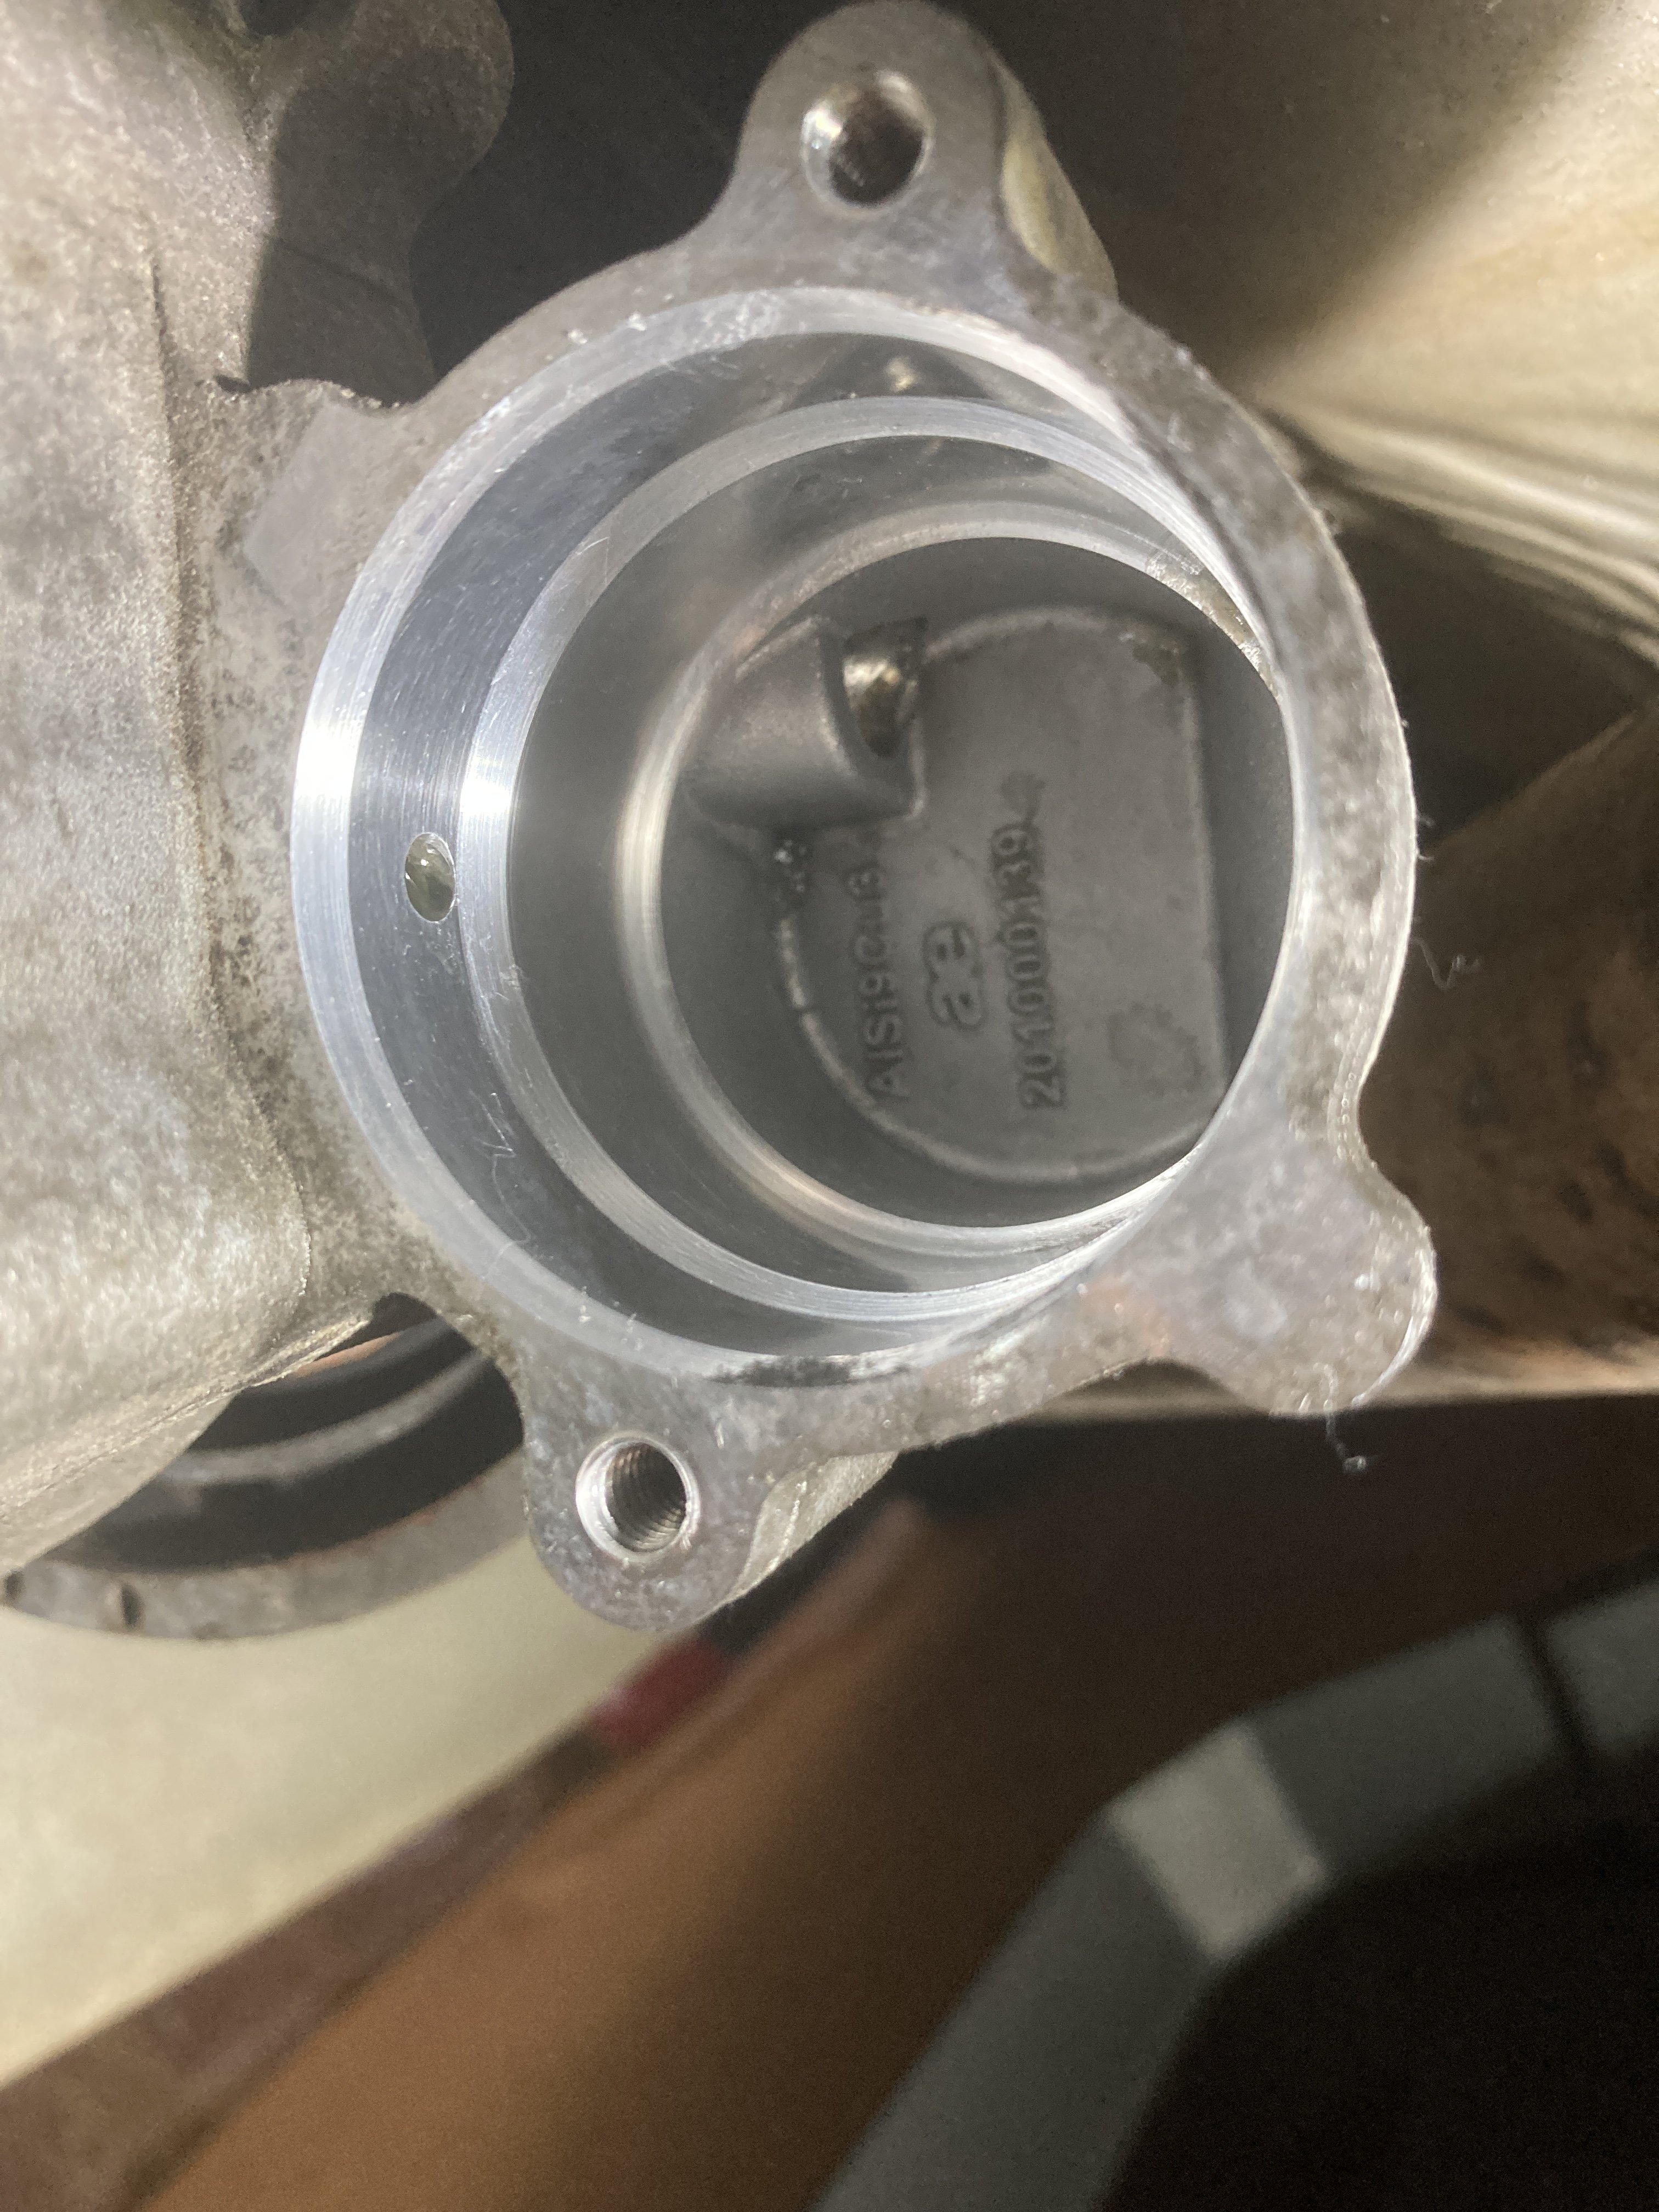
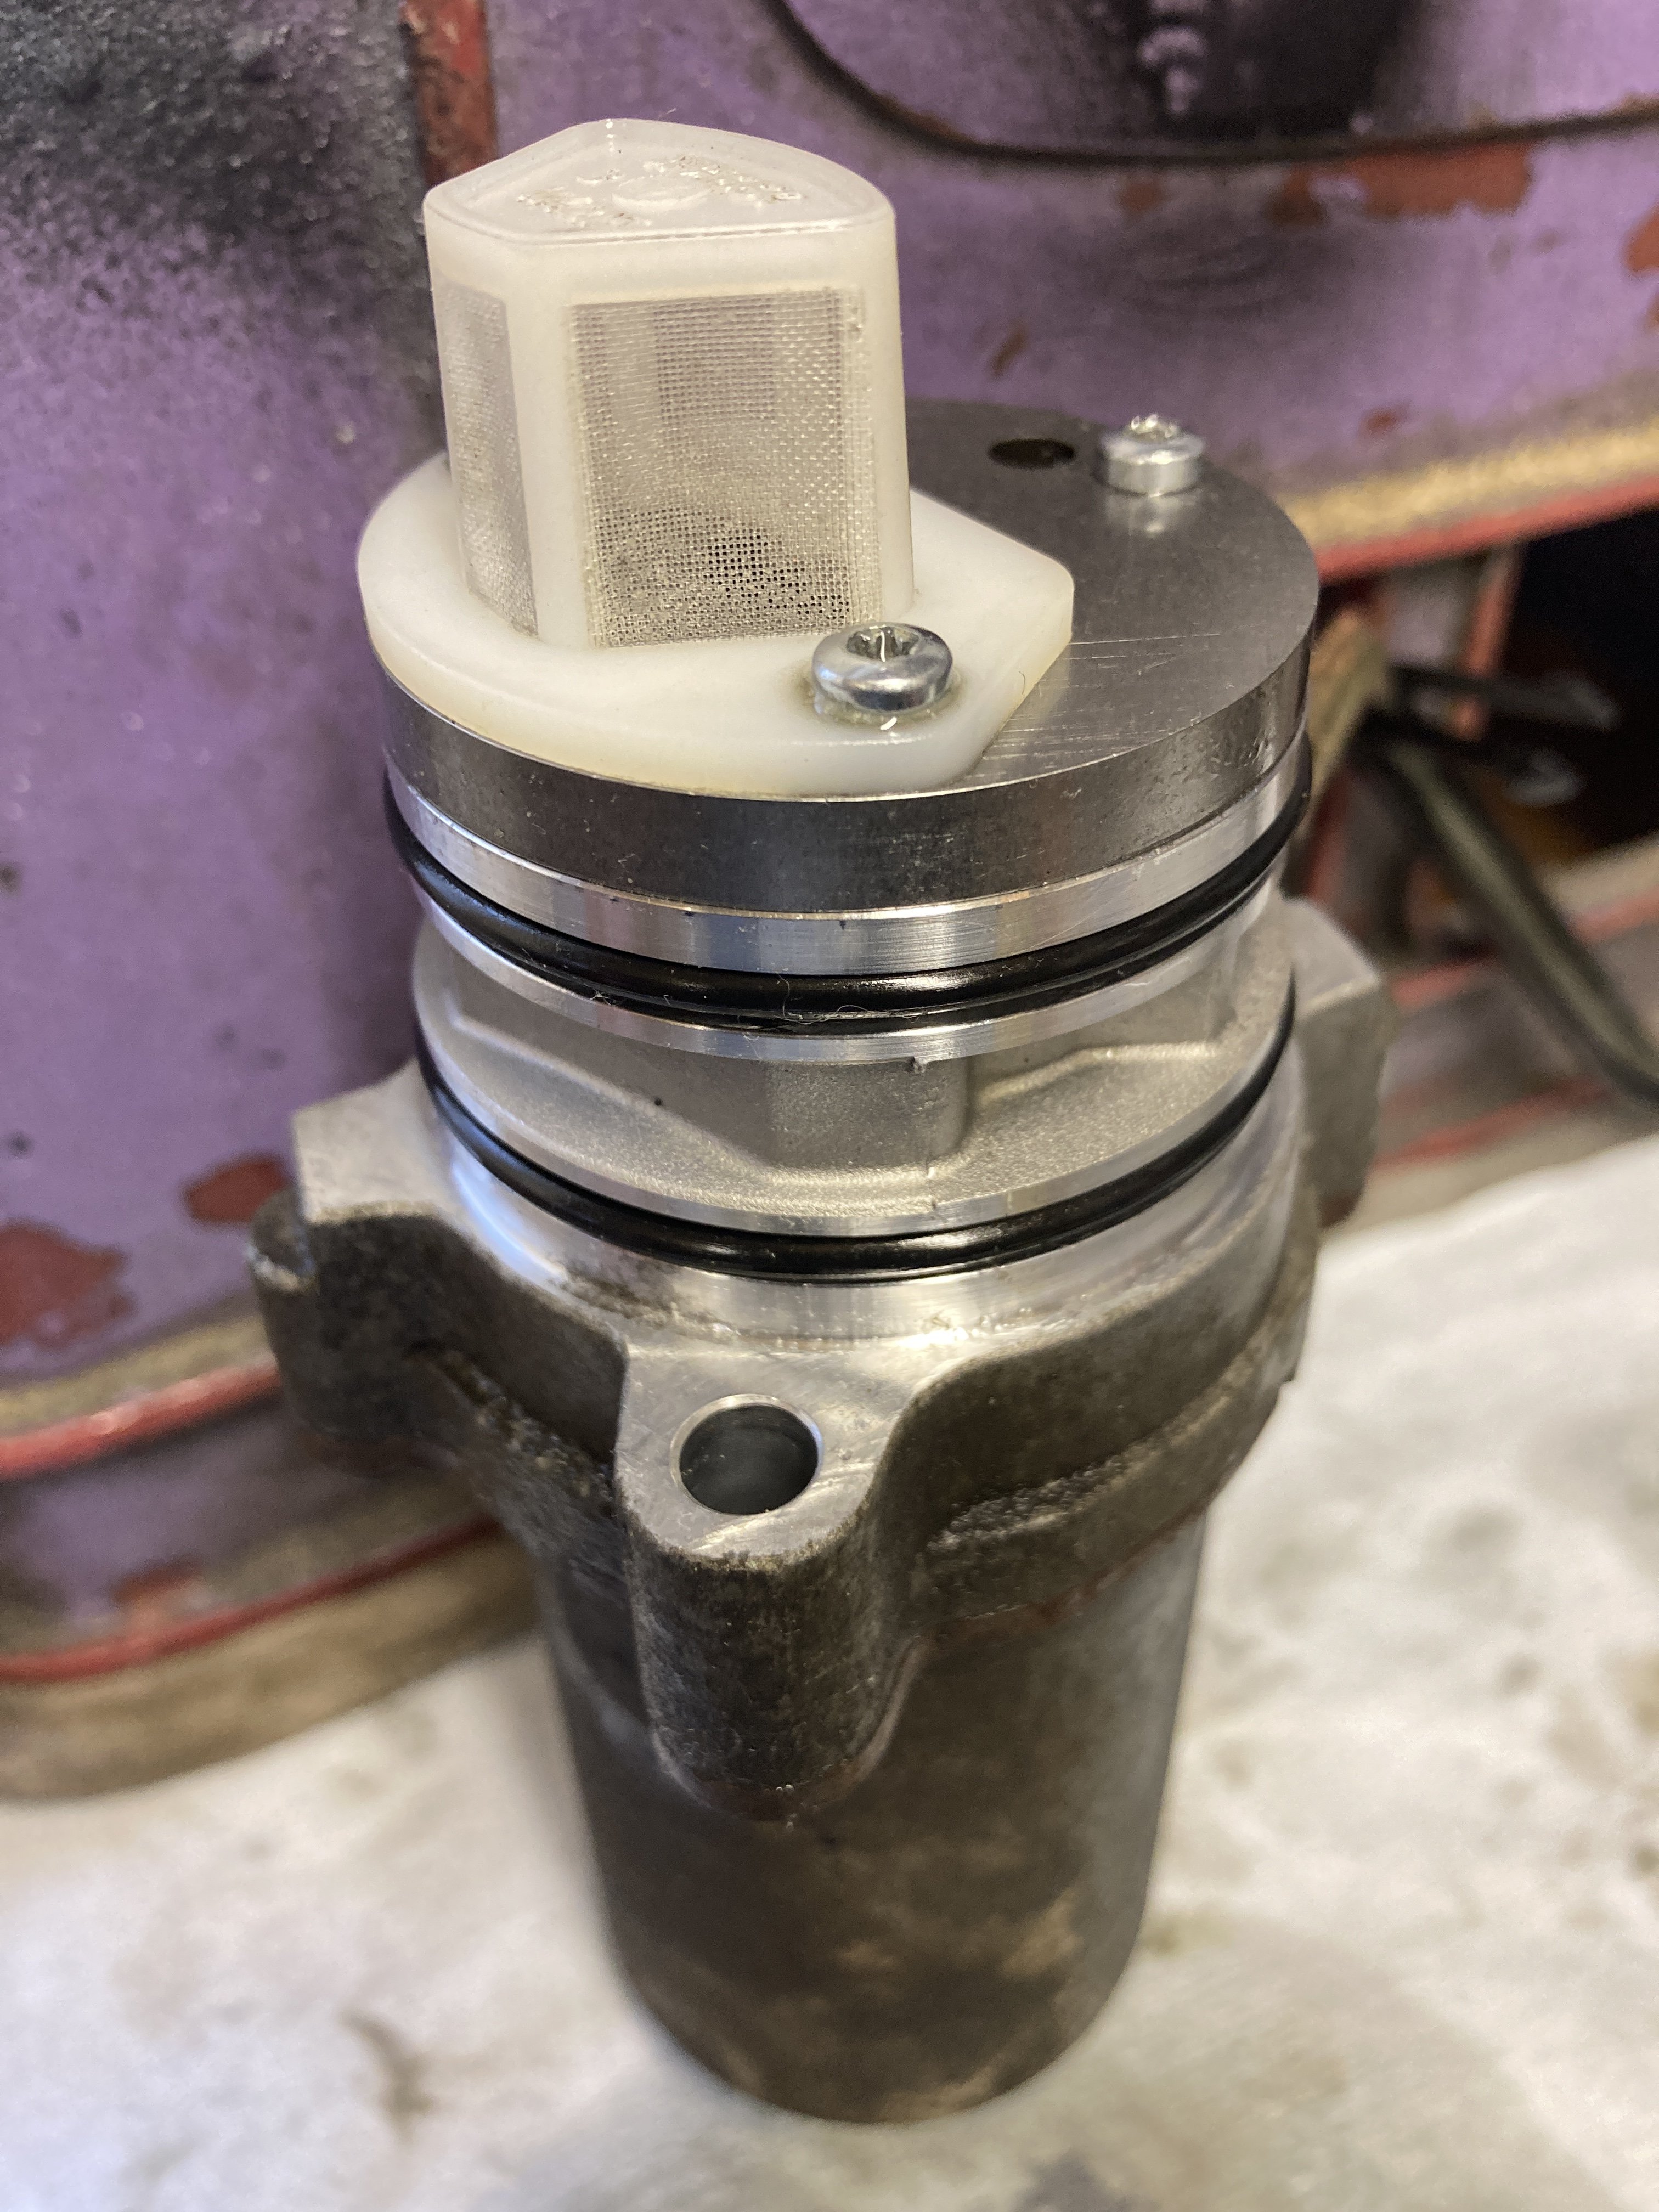
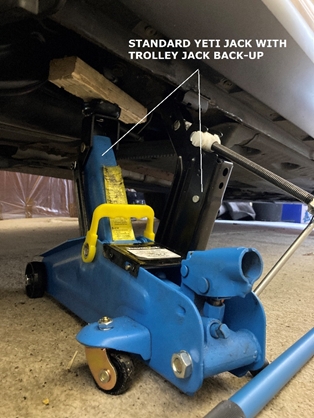
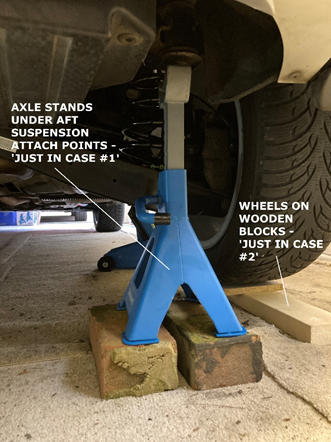
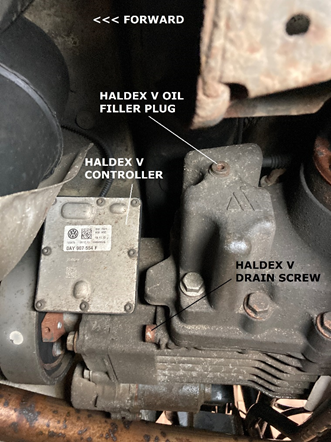
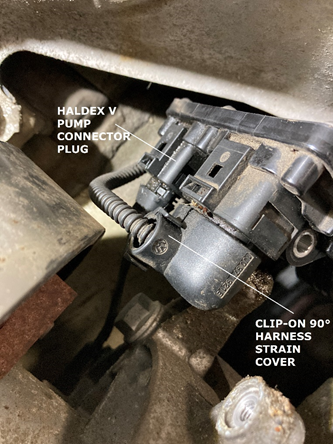
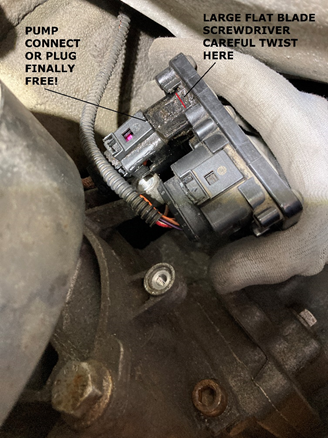
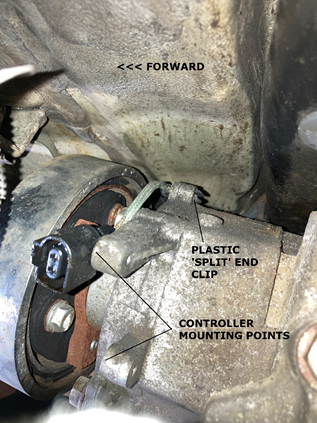
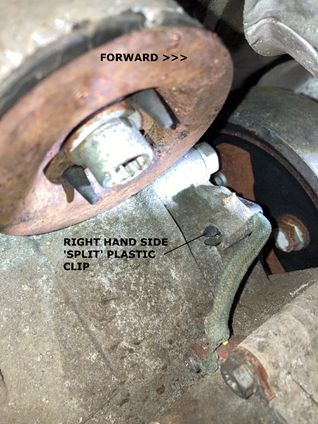
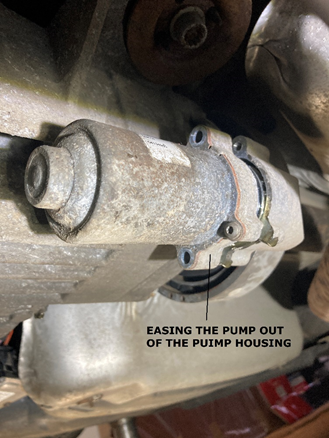
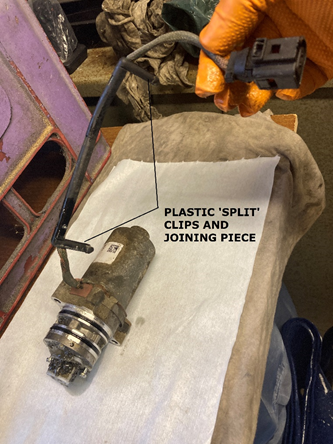
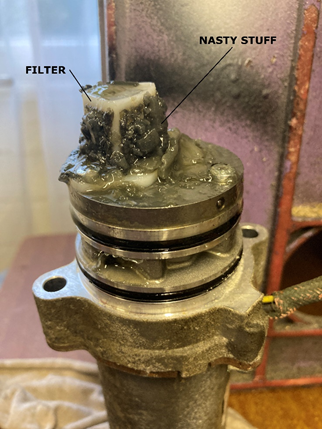
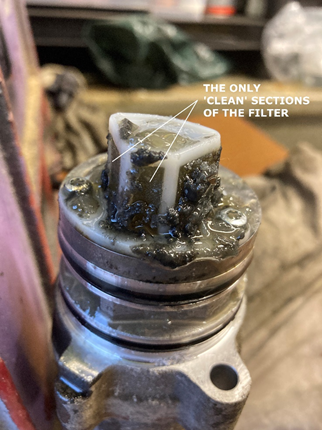
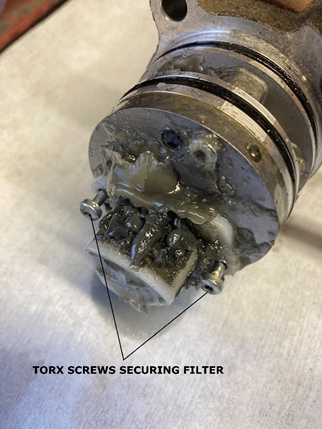
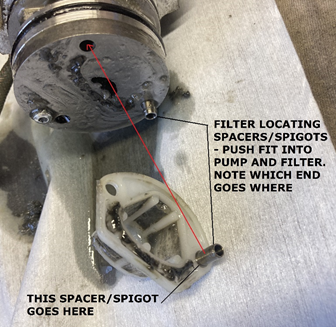
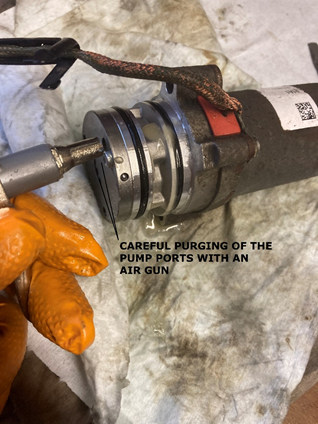
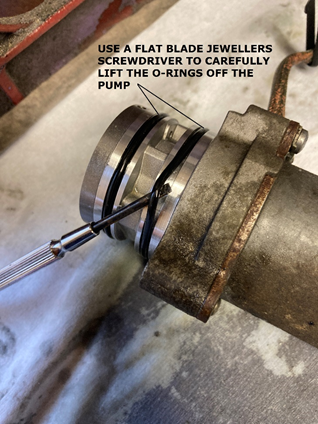
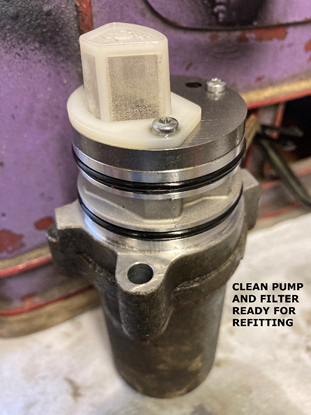
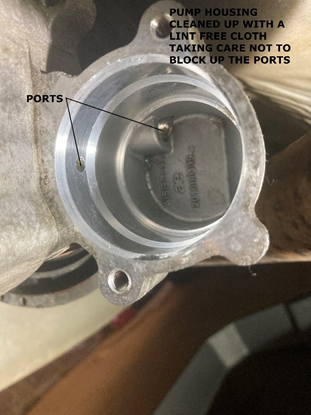
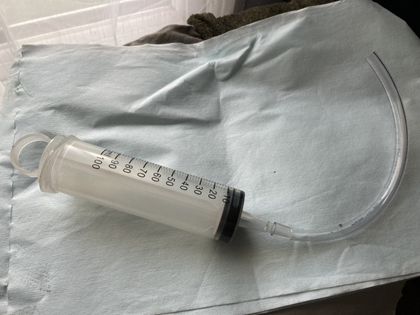
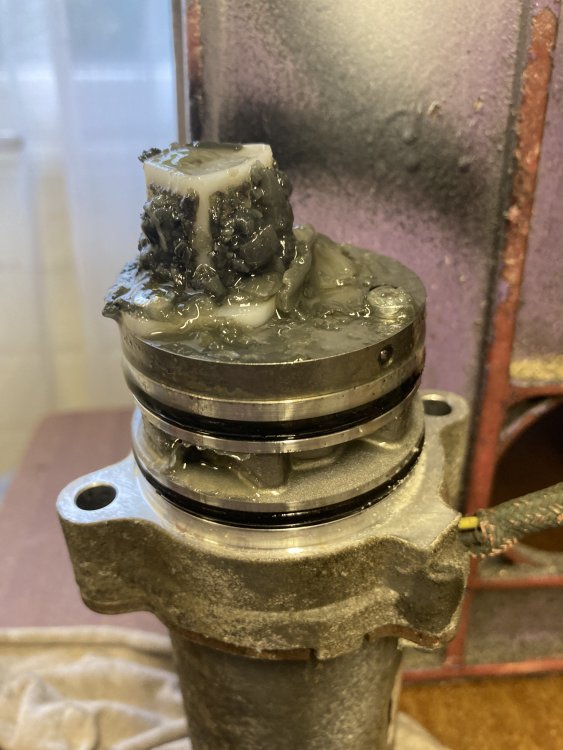
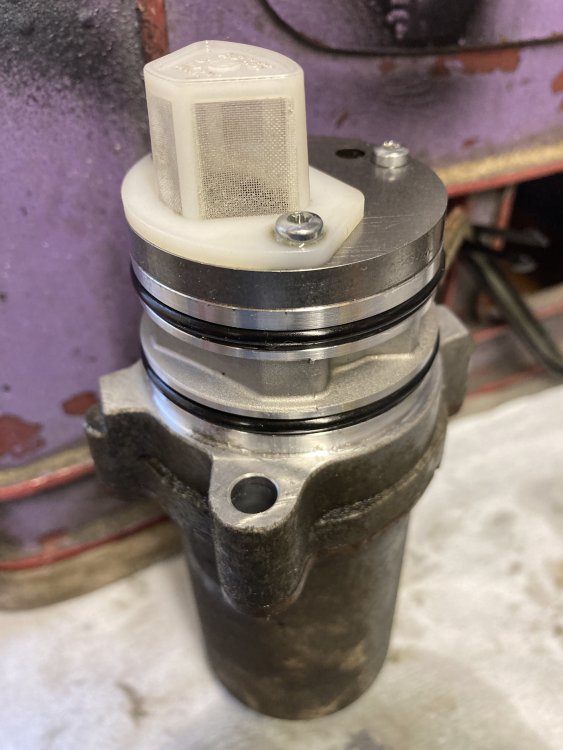
Coming soon when I get the pictures to appear... INTRODUCTION As I mentioned previously in another thread, I decided to have a go at changing the Haldex oil and clean the filter on TIBET III’s Haldex V unit after reading the threads on Briskoda. The idea of this guide is simply how I did it, based on advice from others but it maybe, that I did things slightly differently to others or perhaps I had a problem that others haven’t encountered and which someone else might find useful to know about. It is also Yeti-specific. SERVICE HISTORY After reading about the pump filter issues on the Haldex V and having lost faith with the MK dealer for various reasons, I decided to do it myself. Experience level – I’ve maintained my cars over the years (I’m an aircraft engineer by trade) but more recently, with the cars being under warranty, I’ve let the dealer do it. I reckon anyone who is competent at basic servicing tasks (oil and filter changes etc) can cope with the Haldex V oil change and filter clean. JOB PREPARATION One of my concerns was jacking (safely for me!) the Yeti giving me sufficient room underneath to do the job without struggling for access. I’ve never really trusted the drive on ramp idea so it was going to have to be jacks and axle stands. To jack the Yeti up, I used the standard car jack on one side and a straight lift mechanical pillar jack on the other (actually a 4.5T Land Rover jack). I prefer to rely on mechanical lifting but had in addition a trolley jack on the jack pad inside and aft of the Yeti jack. The LR jack had the good old slotted ice hockey puck to protect the sill flange. The axle stands I positioned at the rear suspension attach points just forward of the bumper behind the wheels. They weren’t taking any weight as such but were there in case the world moved from under the jacks. This may not be an ‘approved’ support point but their role was one of protecting me in the worst-case scenario. I also had wood blocks under the wheels which meant I wasn’t going to get squashed even if someone nicked all the jacks and axle stands whilst I was looking the other way… Perhaps this was all a bit OTT but I had the kit, it doesn’t take long to do and you’re a long time dead. The service kit came from haldexrepairs.co.uk – an excellent and useful website, lots of good info and tips and a good service. The kit was complete including everything from the oil and replacement drain and filler plugs to a pair of gloves. Brilliant. ON WITH THE JOB DISCONNECTING THE CONTROLLER The first thing was to run VCDS to check for any errors but everything was fine. It also warmed the car and everything up. No idea if the Haldex system likes being warmed up but it won’t do any harm! I knew one of the most ‘difficult’ tasks was accessing the pump harness to enable the pump to be removed. In actual fact it wasn’t too bad but even with a torch and mirror, once again the adult-proof VAG plug on the controller was impossible to undo. Yes, I’ve watched all the ‘how to guides’ but it didn’t push further on, the locking tab wouldn’t budge and the plug stayed fast. Plan B was to remove the controller from the Haldex unit to allow better access to the plug. This worked a treat. It’s held in place with two 10mm bolts but it still needed a gentle prize to free the controller from the Haldex unit mount after removing the bolts. This meant I could now get to the plug although it didn’t budge until a subtle and careful twist with a large flat blade screwdriver provided just enough force to ease the plug clear. The other connector plug on the controller has a clip-on 90° cable strain relief cover on it. Removing that enabled more flexibility to access the pump connector plug. The harness is held into position on the top of the Haldex unit above the drive shaft by two plastic split clips. It was easy to do one from the lefthand side (above where the controller was) and the other from the righthand side. The trick is two squeeze the end of the clip together from the aft side and then push the clips forward and out of the locating holes. The two clips are actually joined together by a length of split plastic. The workshop manual says to lower the main final drive unit down for access (7 turns) but I’m not sure why you’d need to. DRAINING THE RESERVOIR & PUMP REMOVAL Delighted with getting the pump electrically disconnected, I slackened the filler point plug and the drain plug - both are Allen socket head screws (8mm for the drain plug and 5mm for the filler plug). The drain plug must be more than just a drain plug as it’s pretty long and torqued (according to the Yeti workshop manual) to 40 Nm. The filler plug is much smaller and shorter and torqued to 15 Nm. I gave the area around and above the drain and filler points a good clean to prevent any crud getting inside the unit. With the drain plug removed, the oil drained into the drip tray and removing the filler plug allowed a full flow. I was impressed as the oil looked pretty clean. Perhaps my filter was going to be okay… DRAINING THE RESERVOIR & PUMP REMOVAL Delighted with getting the pump electrically disconnected, I slackened the filler point plug and the drain plug - both are Allen socket head screws (8mm for the drain plug and 5mm for the filler plug). The drain plug must be more than just a drain plug as it’s pretty long and torqued (according to the Yeti workshop manual) to 40 Nm. The filler plug is much smaller and shorter and torqued to 15 Nm. I gave the area around and above the drain and filler points a good clean to prevent any crud getting inside the unit. With the drain plug removed, the oil drained into the drip tray and removing the filler plug allowed a full flow. I was impressed as the oil looked pretty clean. Perhaps my filter was going to be okay… Whilst the reservoir drained, I set about moving the pump. The first thing to do was to give the pump and the housing a good wipe down to prevent any dust and dirt from unduly contaminating the pump. This was easy with two Torx screws to undo followed by a very gentle tap with a nylon hammer and then a wriggle and out it came, releasing a bit more fluid. FILTER AND PUMP CLEANING I couldn’t believe just how blocked up the filter was – and the congealed mess left inside the pump housing on the Haldex unit – exactly as others had found. It’s strange – almost like grease with little substance when you touch it. It didn’t seem to be water/moisture contamination. The next job was to remove the filter which is held in place by two Torx screws. Then it was a case of gently easing the plastic filter clear. It sits on two locator bushes that also act as spacers and should protect the filer from being crushed when the Torx screws are tightened. I used warm water and a small paint brush and some washing up liquid to clean the filter and then once rinsed, left it to dry off whilst I cleaned up the pump. The pump cleaned up easily and I used a small blast of air from my compressor to clean the old fluid out of the ports. It was then a case of replacing the O-rings, removing the old ones carefully with a very small flat blade screw driver being careful not to damage the pump. Incidentally, there was a couple of patches of light corrosion on the pump (on the mounting flange). This was easily removed with a Scotchbrite pad – don’t use wire-wool as this can cause dissimilar metal corrosion if stands of the wire-wool get embedded in the aluminium pump. I also use lint-free cloths for the cleaning to avoid fluff and stuff getting into the bits where you don’t want fluff. With the O-rings replaced, I blew air through the filter to ensure it was dry and refitted it to the pump. There seems to be two ports in the pump housing – presumable an inlet and an outlet. I scooped the gunge out being as careful as I could to avoid pushing any of it into the ports. REFITTING THE PUMP AND FILLING THE RESERVOIR As with all good Haynes manual advice – installation is the opposite of refitting. Before fitting the pump, I gave the O-rings a good coating in fresh Haldex oil to lubricate them as the pump is refitted. It slipped in a treat and I secured it in place with the two Torx screws. I made sure the harness had the correct routing before I fully pushed the pump home. Once the pump was properly installed, I locate the right and then left harness clips and then reconnected the pump connector plug to the controller, the 90° harness stain relief cover to the other controller plug and refitted the controller to the mounting points on the Haldex unit. I used the airline to give a light blast through from the filler point after putting a very small amount of fluid into the reservoir to help flush it through. I had a small syringe to do this with. A big 100 ml syringe (and a length of plastic hose) comes with the service kit from Haldex Repairs for the main filling. Next job was to fit the new drain screw. The service kit came with new drain screw and filler plug but the original ones could have been reused – there was nothing obviously wrong with them. The new ones obviously have new sealing washers on them. As mentioned, the drain screw is torqued to 40 Nm according to the workshop manual. With everything secure, the next task is to refill the reservoir. The big 100 ml syringe with the service kit works a trat with a plastic hose that just fits in the filler point. I found you had to be careful not to block the filler point completely and that made it pretty much airtight and difficult to operate the syringe. The reservoir took most of the fluid and some started to over flow out so I refitted the filler plug. FINAL CHECK AND VCDS ERROR CHECK AND PUMP RECALIBRATION Next job was to check everything was clear and I lowered the Yeti pretty much to being off the jacks. I started the engine and let it run for 5 minutes. I then used VCDS to run the ‘learn pump’ program as suggested by Haldex Repairs. You could clearly hear the pump running through a specific cycle. The tone changed as the pump filled up. A quick jack up again enabled another oil level check of the Haldex reservoir. What I had initially thought to be fluid flowing showing the reservoir was full but with a more concerted effort on the syringe, I found I got a fair bit more into the reservoir and when it was really full it really did flow out! Unfortunately, I forgot to get a picture of the refilling but that’s a pretty simple job – just be careful not to put too much effort into operating the syringe and end up blowing the plastic pipe off. I used probably 800 ml of the 850 ml supplied in the bottle. Although the car was jacked up at the back, it probably wasn’t that much of an angle so I think the reservoir is pretty good on the level. Another good look round was done as a final leak and security check. I then ran the engine and again went through the VCDS error code check and ‘learn pump’ program. All appears good. I am at a loss as to how the system worked with about 80% of the filter blocked – perhaps it wasn’t. I haven’t been in any snow for three years now. Anyway, job done and as others have said – it is a job that has got to be done. If you’re not up to it then it shouldn’t be too costly to get a garage or dealer to do it – you’d just better point the dealers to Briskoda or the Haldex Repairs website to find out how to do it! Next job will be to take the Yeti out for a road test this weekend. Forecast for snow on Friday…. PS Apologies for the low res pictures, haven't got time this evening to suss why they didn't load - if anyone needs hi res pictures (or a PDF of all of the above) then PM me.


-
And I’ve written a few guides in 10 years of owning Yetis... One of my concerns before embarking on this latest job was safe access (likewise with Dale, too...!), so I will indeed be including how I secured TIBET III safely in the air - not something that may have been covered for the Yeti in other type’s ‘how to guides’.
-
I’d just like to add my thanks to everyone who has posted on this Haldex thread and the other ones with all the helpful info and advice – and especially for the heads up on cleaning the pump filter on the Haldex 5 unit. I asked Allams to do the oil change at 3 years (47k miles). It wasn’t on their to do list as standard service items. At 6 years I assumed the dealer at MK would do it (and I forgot to check beforehand) and it wasn’t done, so it was on my to do list. Then I read the pump filer cleaning info and that became a high priority now being 6.5 years and 88k miles. I bought the service kit from haldexrepairs.co.uk and I’m well impressed with their service and the info on their website. Yesterday, I jacked the Yeti up (many jacks and axles stands) and got on with the task. Probably the most difficult job is undoing the adult-proof pump harness plug from the controller… Yes, I watched all the videos but it’s still impossible! In the end, I unbolted the controller and that made it all possible. The oil looked pretty clean as it drained out and I wasn’t expecting to see the pump filter (and pump housing) in the condition they were – a sort of congealed mess covering at least 80% of the filter. How well it was working, who know. I ran a VCDS check before and after as well as the ‘pump learn’ program from VCDS. I don’t blame the dealers – the manual doesn’t tell them to pull the pump and clean the filter but it certainly should. I am surprised the dealers don’t even have the oil change on their radar – but then, MK told me my Citigo cambelt change was due (it doesn’t get replaced according to the Skoda manual), failed the MOT on it for having the headlights too low (then they found the headlight adjuster on the dash) and told me the wheel bolts ‘won’t tighten, they just keep turning because there’s copper grease on them’…. I won’t be going back there. Anyway, thanks again for the wealth of good info once again on Briskoda. I took a load of pictures and will write up a bit on how I did it in case it’s of use to other Haldex V owners. And after cleaning....


-
The biggest threat of danger to the bulb change is to your finger nails as you pull the light units off (after removing the screws) but the difference in illumination brought about by LED reversing lights is well worth the risk! It's all very well saying put up lights on your drive - what if it isn't your drive you're reversing into?! Incidentally, the LED bulbs are probably 7+ years old and have survived 100k miles (not all in reverse...) only sometimes bring on the bulb failure warning light (and then it's only the left one). It seems to do it only it if I go into reverse straight after engine start and before the light system has done its self test. Ignition off/on resets the system again.
-
Yes, it is!
-
The reversing lights are part of the bulb failure alert system. I've had LED reversing lights on all three Yetis (transferred them from one to the next). TIBET III very occasionally indicates a 'check left reversing light' but it is always working. The bulbs were bought through Superskoda and they don't sell them anymore by the looks of it. Interestingly, on start up, each reversing light flashes 5 times which is presumably the bulb failure system sending a small number of volts through each reversing light in turn and whilst the low power isn't enough to illuminate a standard bulb, it does these LED bulbs. That's my theory anyway as to why they strobe when the ignition is switched on! PS The light from the LED reversing bulbs is fantastic compared to standard and it's never been flagged up on MOTs as them being too bright.