Jump to content

JussiG7

Members
  • Posts

    104
  • Joined

  • Last visited

Everything posted by JussiG7

  1. Sorry, I had forgotten the topic totally! No photos, but a short story: 1. The old regulator was so tightly bolted to the car and rusty, too, that I had to break it ! Just cut thin slices from the regulator until I reached the level, where the allen bolts did not get thinner any more. I used my angle grinder with a thin cutting plate. 2. Installed the new balancer to the same place and tightened it with bolts. The spring bolt to the same position where the previous had been. 3. Installed all the four brake pipes very carefully and slowly. 4. Bleeded the brakes and... went to the annual inspection. And that´s it !!! The brakes worked very well in the brake dynamometer, and still are working. Which is good as we now have a hard winter here! Merry Xmas to all and many thanks, too !!! Johann Sebastian Gren from Finland
  2. Thanks about your comment ! Yes, there is a possibility to adjust the regulator while bolting the arm to the rear axle. I hope, however, that I can fit the new one to the same marks that I do before removing the old one. I have had two Felicias before this one. In both cars the engine broke as they had about 300 000km behind. But they had been in bad homes This one has been treated well all its life, so I believe that though now driven 345 000km, it may reach even 400 000km, which is really good!
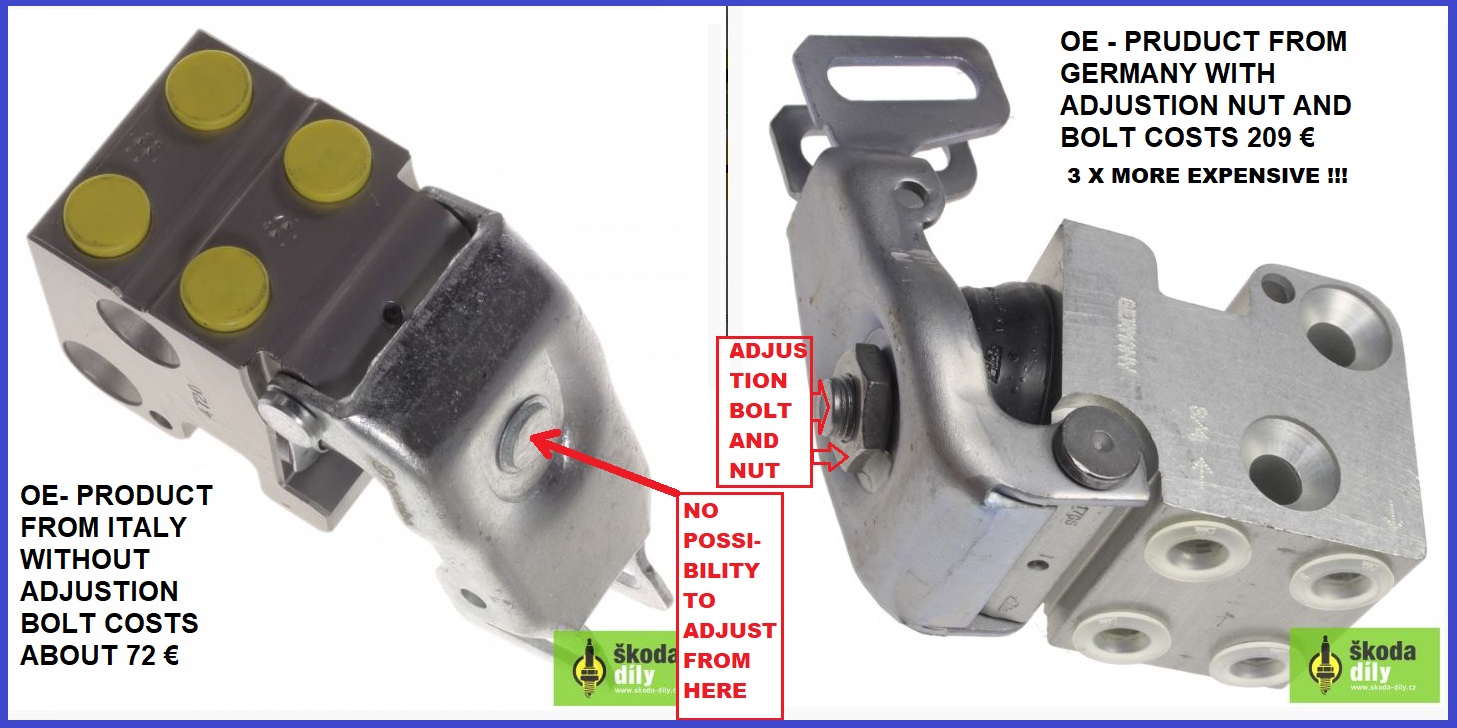
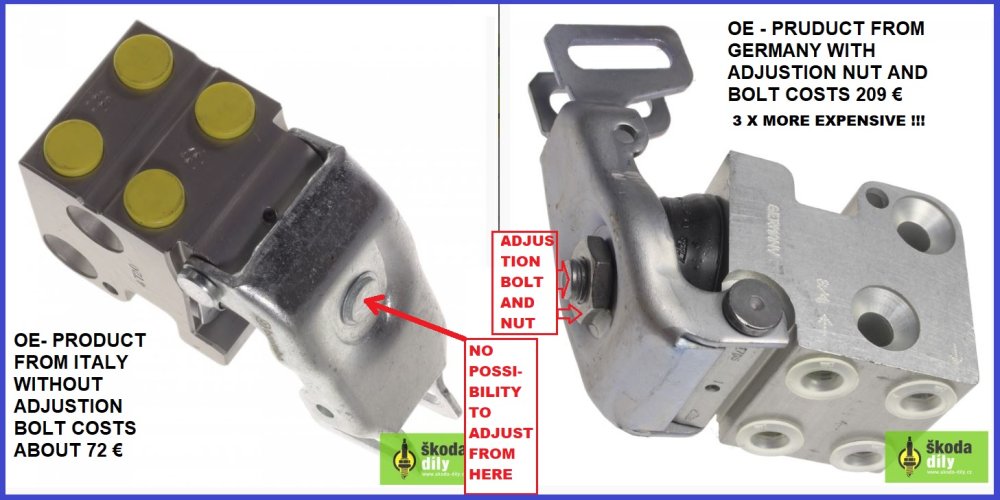
  3. Thanks again! I suppose I shall not use this car more than 3 years max. So, I ordered the cheaper Italian OE - part from Skoda-Parts.com . The German alternative would be 3 times more expensive, but it seems to have a possibility to adjust the valve with a bolt and nut. Actually, I had to adjust the old regulator a bit two years ago, because it gave too much brake power to the front wheels versus the rear wheels. But I suppose that also the Italian version works well the first 20 years. Would you have any comments to this subtopic? JussiG7, Finland
  4. Thanks about the additional information ❤️ It surely helps, if something would go wrong removing those original bolts. I´ll let you know how I succeeded, but it may take some time, because there are so many other things to do before that. Greetings from Finland, JussiG7
  5. Thanks a lot ! Maybe they have been cross threaded and even over tightened, but that is not essential. What really means, is that the old regulator must be removed without rounding off those allen bolts in a way or another (thanks about the hint to remove the exhaust rear section). After that all the four pipes must be attached very carefully so, that the pipes are in the right angle (maybe also pushing the pipe in with another hand) and the bolts are screwed into the right threads. And not too tight 😇
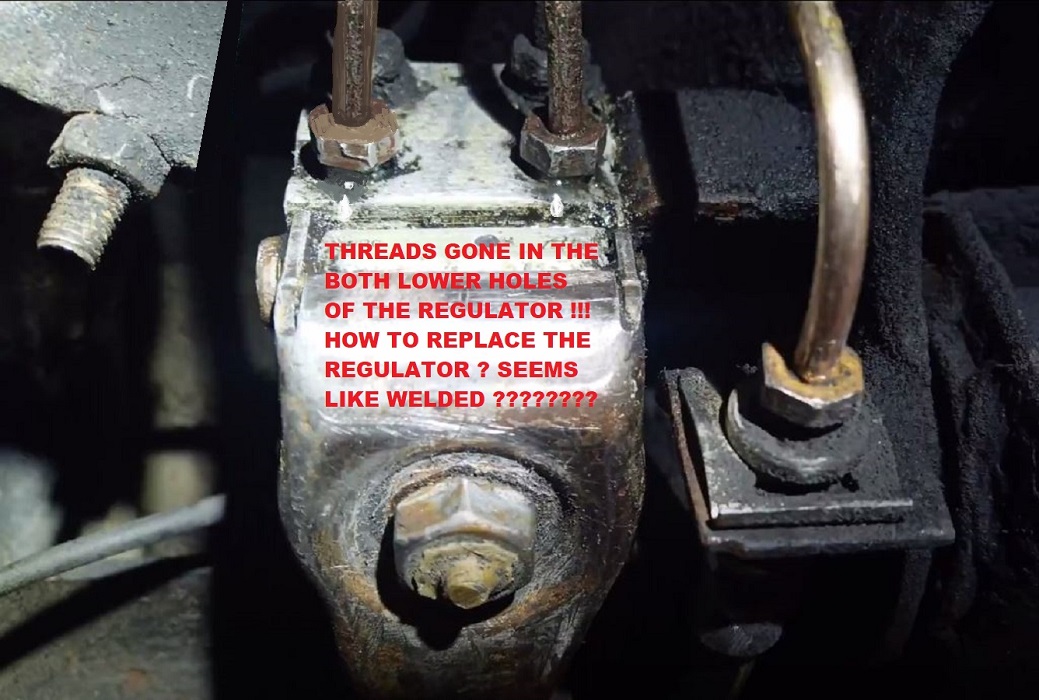
  6. Hi guys! I managed to change all the rusty rear part brake pipes and also all the brake hoses, but now it seems, that the threads in this 23 y.o. regulator are gone. So I should change also this regulator/balancer/compensator. They are rather expensive, but that is not the main problem. The main problem is how to remove the old regulator and to attach the new one. It seems like being welded into the body of the car or at least to the rear axle ? Regards, JussiG7 from Finland
  7. Hi guys !


    One short question: How do I get the old broken brake balancer removed from my Felicia Combi LX 2000. ?


    It is impossible to fix, as the threads for brake pipes are gone forever.


    Thanks,

    JussiG7 from Finland

    FELICIA BRAKE REGULATOR BROKEN, HOW TO REPLACE IT.jpg

  8. Hi again! The hot June is gone and the cool July has arrived here in Finland! So, a little bit back to topic. My friend found out the reason why the crankshaft got seized. Somehow the bigger end seal, the left one had popped out from its place, and that made the crankshaft seize, as the pulley was tightened. So, now the engine would be ready to be installed if we get the old one removed. But everything depends on my friend, because that green Felicia of mine is now located in his farm on country side. And I got tired of waiting and bought in the beginning of June - nothing worse than - almost the same kind of Green beast as the former was. This one is from the year 2000 and mileage is higher but condition is much better, because she has had only two owners before me. Two old guys, 10 years both, and a perfect service book from the beginning to today. No rust, no welding, no dirt, almost like a new car !!! So, at least, my Felicia hobby seems to go on. And I believe that also that older one shall be in traffic some day. With those two previous Felicias I had to start repairing as soon as I got the trade done. But this one seems to be flawless With Joyful Greetings Jussi G from Finland 1996 and 1998 Felicias.wmv
  9. I am not perfect, far from it But the problem is, that here in Finland we don´t have that kind of people that would repair only an engine. We have got garages for car repairs, and engine repair shops to plan the cylinder heads or grind the crankshaft journals etc. But for this kind of job there are no places. Right now my friend called me, and asked to have a time-out to search the engine properly. So, I allow him to do it. He is wiser than me. If there would happen a miracle, I´ll let you know. But, as I said before, the times of the Felicias seem to be over in Finland, which makes me sad. This car served me 4 years, and is now 22 years old. My attitude to it is: "Well done, my friend, Rest In Peace" With kind regards, JussiG
  10. Does a proper measuring mean a dial gauge? I have got good feeler gauges, but I suppose that measuring with them means for you "without measuring properly" ??? Of course the tolerances are tight, but when the parts are the same as before opening the crankcase - despite conrod bearings - I suppose there is a possibility of success, however. I am not a mechanic, but my common sense tells me, that the same parts that have worked 170 000 km are able to work further, with some exceptions: 1. If they are too worn out, they shall not work very long 2. If they are installed wrong, the lubrication may not go thru the whole system as it should -> engine shall seize 3. If there is not enough axial play (or it has been divided uneven) , the engine shall seize But from my point of view your attitude is: Because I have opened the cap of one main bearing, the game is over, and nothing can be done any more, everything is lost. Better carry that engine straight to waist station metal recycling.... Maybe I shall even do it ! I am getting fed up with Skoda Felicias, that are so rare here in Finland, that it is almost impossible to get any spare parts here. Felicia era is over here in Finland, it must be admitted. I only tried to prolong it, but better admit the truth, and buy the VW van that works also as a residence Thanks about all the advises during many years. Maybe it is time to say good bye now ! JussiG7 from Finland
  11. Thanks about the encouraging news! So you got your crankshaft locked only by changing the timing chain? Without touching bearings of the connecting rods or crankshaft? Maybe I shall trust the miraculous power of oil and measure bearing plays and crankshaft ends´ clearances and after getting them wide enough, I shall try the "right end problem" once more with very oily parts. At least it is worth trying. Musty say, because the engine has been open for months, I have forgotten to lubricate all parts again. And it of course means something to the mobility of each part. Thanks!
  12. Thanks about those videos! About the first video: There is a good hint how to remove a top side main bearing. But it is possible, that you did understand my text wrong, because I am not so good at terminology . About the 2nd main bearing I told you: And that means: I removed the cap of the 2nd main bearing to see the wear surface of the lower bearing while it was all the time in the cap. I touched it (with oily fingers) but I did not remove it from the cap. And the upper bearing I did not touch at all, I did not move it from its position. And the cap was installed the right way, not the opposite. So, what could go wrong? 🙄 The guy in video says that many people think that the "tang" is the thing that holds the bearing in its position, as it is in reality built only for installing purpose, it means defining the axial position. And the radial pressure coming from the cap (with lower bearing) torqued in its position keeps the upper bearing in its position. That is clear for me. And centering the crush in the lower bearing was also a matter of course. About the second video: I haven´t got a dial gauge, but I do have a feeler gauge. So it is possible for me to measure the connecting rod side clearances and the axial play of the main bearings. But, as I see it, it is not the first thing to do, because the crankshaft locks for another reasons, like I shall declare you later. And the third video: Lots of talk about standard and different cut bearings. Not important for me. Vertical Oil Clearance in standard and undersized cases. I see no connection to my case. So, as you have that theory about one of the three main bearings having no play, I agree with you. But the most acute problem seems to be in the right end of the crankshaft outside the crankcase. I attach some pics and a video. The easiest way to get rid of that locking situation would be some kind of washer above the crankshaft shoulder. But as there was no washer in the beginning, as I opened the timing cover, the problem should be solved the other way, if possible. Link to the last video: https://www.youtube.com/watch?v=4QVhgDMCZGw&feature=youtu.be
  13. Hi! On the previous page I mentioned several times in several comments, that I checked the main bearing number 2 to see the condition of the cap side (lower) bearing. While the two other main bearings were on their places with right tightness, I still can´t understand, what could change the axial play, as the same cap with the same bearing was put back to its original place. I attach here the photo from page three. But something has happened with the crankshaft´s position, however, cause my friend found out that the locking of the crankshaft is obvious to be due the thing that happens in the right end of the crankshaft. And describing it without illustration is difficult, but I try: Because the shoulder of the crankshaft is now located about 500 micrometers too deep, tightening the pulley causes that the thick supporting ring (that should roll) goes against the stable outer guiding ring (that does not roll) and not against the crankshafts shoulder, that is a rolling part. And that seems to be the first reason for the locking. If it were passed, there might occur also that phenomenon of crankshaft rubbing against the bearing with the smallest play. This problem with the thick support ring tightening against the guiding ring was so simple, that it never crossed my mind, because I couldn´t understand that in general nothing would have changed in the location of the crankshaft. Must say that I am still quite blown away with both theories, though I´ve at least seen the simple case that my friend noticed, and understand something about your theory of the lack of the axial play (it is not visible, I mean, with my eyes I see that there are little gaps on both sides of the main bearings, except near the flywheel, I can´t see it) Excuse me, if there are spelling mistakes, I am so tired.
  14. Of course I touched the main bearings! First I removed the 2nd bearing cap (the central) to see the condition of the old bearing. Found it ok, so I torqued it back to 75 Nm. And then, trying to find out, what might be wrong with those two guiding rings, I opened the first main bearing cap and torqued it back to 75. It should not move the whole crankshaft anywhere. I have gone thru those pages 13-14 to 13-16 and found nothing new, ´cause I have screen captured and translated them at least twice. "Examining axial play" gives me the information that there should be no noticeable axial play. But I haven´t got a dial gauge. And it tells me that the tolerances are rather little. But as there has not been any grinding, it should work as it did before. And I see the Figure 1 at page 13-5. There is a special tool "axial bearing support bush MP 1-112" (of which I have never even heard) to prevent the axial play. But so what? As I was not grinding the crankshaft, I assumed that there would be no need for that kind of tools. Now, only clear problem that I have found in my "private investigations" is, that the both guiding rings around the main bearing number 1 seem to have a lot of play in the direction of the crankshaft diameter, not axial play. And that play seems to have caused some trouble, especially with the inner guiding ring, so that it did not fit well automatically despite the fact that the lug was opposite the slot. In the beginning I thought that it would be enough if I get the lug opposite the slot. But now I have found out, that, because of that diameter directional play I have to be very careful to get that ring well positioned. Can´t explain it better, but right now I am going to meet my engine. And trying to check that inner ring as well as possible. And if there are some kind of cracks or damages in it, I´ll try to grind them away with P800 water sanding. That is all I can say now. Some pics about the objects. Yes, and I think that I am not seeing what you mean 😷
  15. Hi! I didn´t change the crankshaft and the main bearings. Only those bearings of the connecting rods. I have almost all phases on video or on pictures. Must organize them to remember all the things that have happened since I began to service this engine. But we forgot, with my friend, to celebrate the 1/2 anniversary of the whole Skoda engine swap case, so the first of May might be a good date for it :) And after it, find a solution for the problem. Thanks about interest !!!
  16. Well. I downloaded some pdf information from the Romanian site, and I have used its exploded views to see the structure better and to get many torque numbers. but if you mean a book published by Skoda Factory, I really don´t have it. Here seems to be some kind of e-manual for Skoda Felicia, but I have not downloaded it. Is this, what you are talking about? https://www.emanualonline.com/Cars/Skoda/Felicia/1998-SKODA-FELICIA-Service-and-Repair-Manual.html
  17. Today I was back again meeting the engine meant to roll at least 100 Mm. Clutch is ok with that old friction plate. Timing end is properly set with those good guides of Haynes And crankshaft shall go on with its original main bearings, only connecting rod bearings replaced. But quite almost in my goal there occurred a new problem. The inner and outer guiding rings and the thick support washer (with its shim) were placed just as they are told to. It means: 1. Guiding rings´ lubricating grooves face away from cap 1 (the first main bearing cap). 2. Guiding ring lug positioned to the main bearing gap in both rings (inside not so easy). 3. The thick outer support ring facing its inner chamfer towards the cylinder block. 4. Tiny little shim placed to the crankshaft end as the most outer part before the pulley. And then beginning to tighten that pulley (with Woodruff Key in it) tight. Should reach a torque of 120 Nm as far as I know. But already in 60 Nm there occur problems. The crankshaft is not rolling any more. What might be wrong ??? I shot some videos, but am not able to attach them, cause my editing program stopped working and they are too big. Maybe I can share them via YT : https://youtu.be/L5sc9k29yMg and another shorter. My smartphone camera does not take macro videos: https://youtu.be/PsO_uOgd1qM
  18. They are interchangeable, at least in the beginning. But that lip goes too close to crankshaft´s end while under pressure, so it shall cause slipping clutch in the long run, I suppose. Right now my temporary VW T4 van has so many urgent problems, that I have to concentrate in it. And, of course, birds watching
  19. ...and it is the same thing with those main bearings of the crankshaft. I´ll rather use those old ones than replace them with different kind of pans, because they seem to be in rather good condition. And THEY are easy to replace with the engine fitted to the car (as easy as now).
  20. OK. It´s at least nice to hear some kind of explanation for the phenomenon 🙂 There are still some facts that I can´t understand. 1. The commissioning date of my green Felicia 1.3 MPI is 28.10.1998, and the commissioning date of the red Felicia (from which the engine is taken) was 03.07.1998, so the both should be the model 047141034 or 047141034X , that means, before 01.99. And thus they should have that lip. 2. In that LUK clutch kit there stands in Skoda-Parts- site that this kit is suitable for Skoda Felicia MPI AMH engine 50kW/68PS 08/1996 - 12/1997 and further 01/1998-08/2001. So, Skoda-Parts.com (earlier only Skoda-Dily.cz or Skoda-Diely.sk is able to sell only the lip model to all 1.3 MPI AMH engines, which is astonishing, if it is only for older cars ! I did send some e-mail to mr. Martin Blaha to the company, but was not able to receive any response before the weekend began. And obviously also they have not as many officers as before, because of this Covid19- case. As it is now clear that the plate with that lip shall not work well in the long run, I right now see only one choice, and it is continuing to use that old plate, that was, however, 7,5 mm thick, as the new one is 8,5 mm. It has on both sides possible friction material about 2 mm:s until the rivet heads come too close. The better solution would of course be a brand new friction plate, but I really don´t know, where to get that newer model [for cars from 01.99 (codes 047141034D or 047141034DX)]. Can anybody tell me ? Regards, JussiG
  21. Thanks about the fast response, but I must say that it really makes me not happy at all !!! The basic problem seems to be, that if I want to get the best possible OE- parts, I find only friction plates of wrong type, like here: The whole kit from LUK Germany: https://www.skoda-parts.com/spare-part/201011-clutch-1-3-1-3mpi-luk-9232.html Or the plain friction plate, OE- part from Germany: https://www.skoda-parts.com/spare-part/047141034x-clutch-plate-1-3-de-9184.html If I search for a friction plate that looks about the same as the original one in my engine, the only clear possibility would be a Chinese one: https://www.skoda-parts.com/spare-part/047141034dx-clutch-disc-190mm-cn-2474.html I sent a reclamation to Skoda-Parts.com to Czech Republic, and waiting for the answer. Thanks to Corona, I am not busy, because the owner of my VW Transporter (that is only in temporary use) is stuck in the USA, so I can use that car at least till the end of the June Let´s see, what happens! Greetings, Jussi
  22. Here we go again, still alive, guys! After many delays I got my engine service and swapping project continued today. From March on I had one problem over a month bothering me. It was the difference of the old and new friction plates. I had to dismantle the clutch a bit to find out, how big the problem might become maybe later. So, it was a question of the new plates bore lip, that is easy to see in the photo attached. And I swear the plates are photographed from the same sides, though it may not seem to be so. Why is the newer plate made with such a high bore lip, as the old one has no lip at all ? It is easier to centralize, but while the friction material starts to wear, the is a danger for that lip to touch the end of the crankshaft and the clutch begin to slip. I dared not to grind the lip lower with an angle grinder, because it might cause an unbalanced clutch. So, my question is: Shall I leave it as it is now (2 mm between crankshaft end and friction plate bore lip), or grind it lower? Then another problem occurred as I was changing the connecting rod big end bearings first (was easy), and thereafter started to try to replace also the crankshaft´s main bearings. I found out, that it is obviously impossible to replace the upper pans without removing the whole crankshaft, so I shall leave the old ones. But also the lower pans seem to look different, though these new parts were from Skoda-Parts.com and OE- quality. Now I´m so sleepy that must apologize if there are mistakes in my message. Must go to bed. Spring greetings from Finland, JussiG7
  23. Now the new friction plate is centralised with a wooden tool, and thereafter the pressure plate bolts tightened slowly in diagonal sequence until finally tightened to 25Nm with torque wrench. I suppose that also the left side of the engine is now ok. So, next week would be the crankshaft bearings in the row, and after refitting the oil pump and the new sump the newer engine would be ready for the swap, which shall happen totally outdoors. So, thank God, we are now in March and not in the middle of the winter !!!
  24. Having read the Haynes advise about not using a petroleum based solvent I ended up to polish it with steel wool and a mask. Here is the result. Now back to work again.
  25. Hi! It is clearly friction material, the friction plate has left its pattern in the flywheel. And why? Because the plate has been resting against the flywheel at least two years, because the car has not been used. I find it not surprising, because our climate has become so humid. Here is the bigger pic of the plate. 100% sure no overheating.
×
×
  • Create New...

Important Information

Welcome to BRISKODA. Please note the following important links Terms of Use. We have a comprehensive Privacy Policy. We have placed cookies on your device to help make this website better. You can adjust your cookie settings, otherwise we'll assume you're okay to continue.