Jump to content

DensYeti

Members
  • Posts

    106
  • Joined

  • Last visited

Everything posted by DensYeti
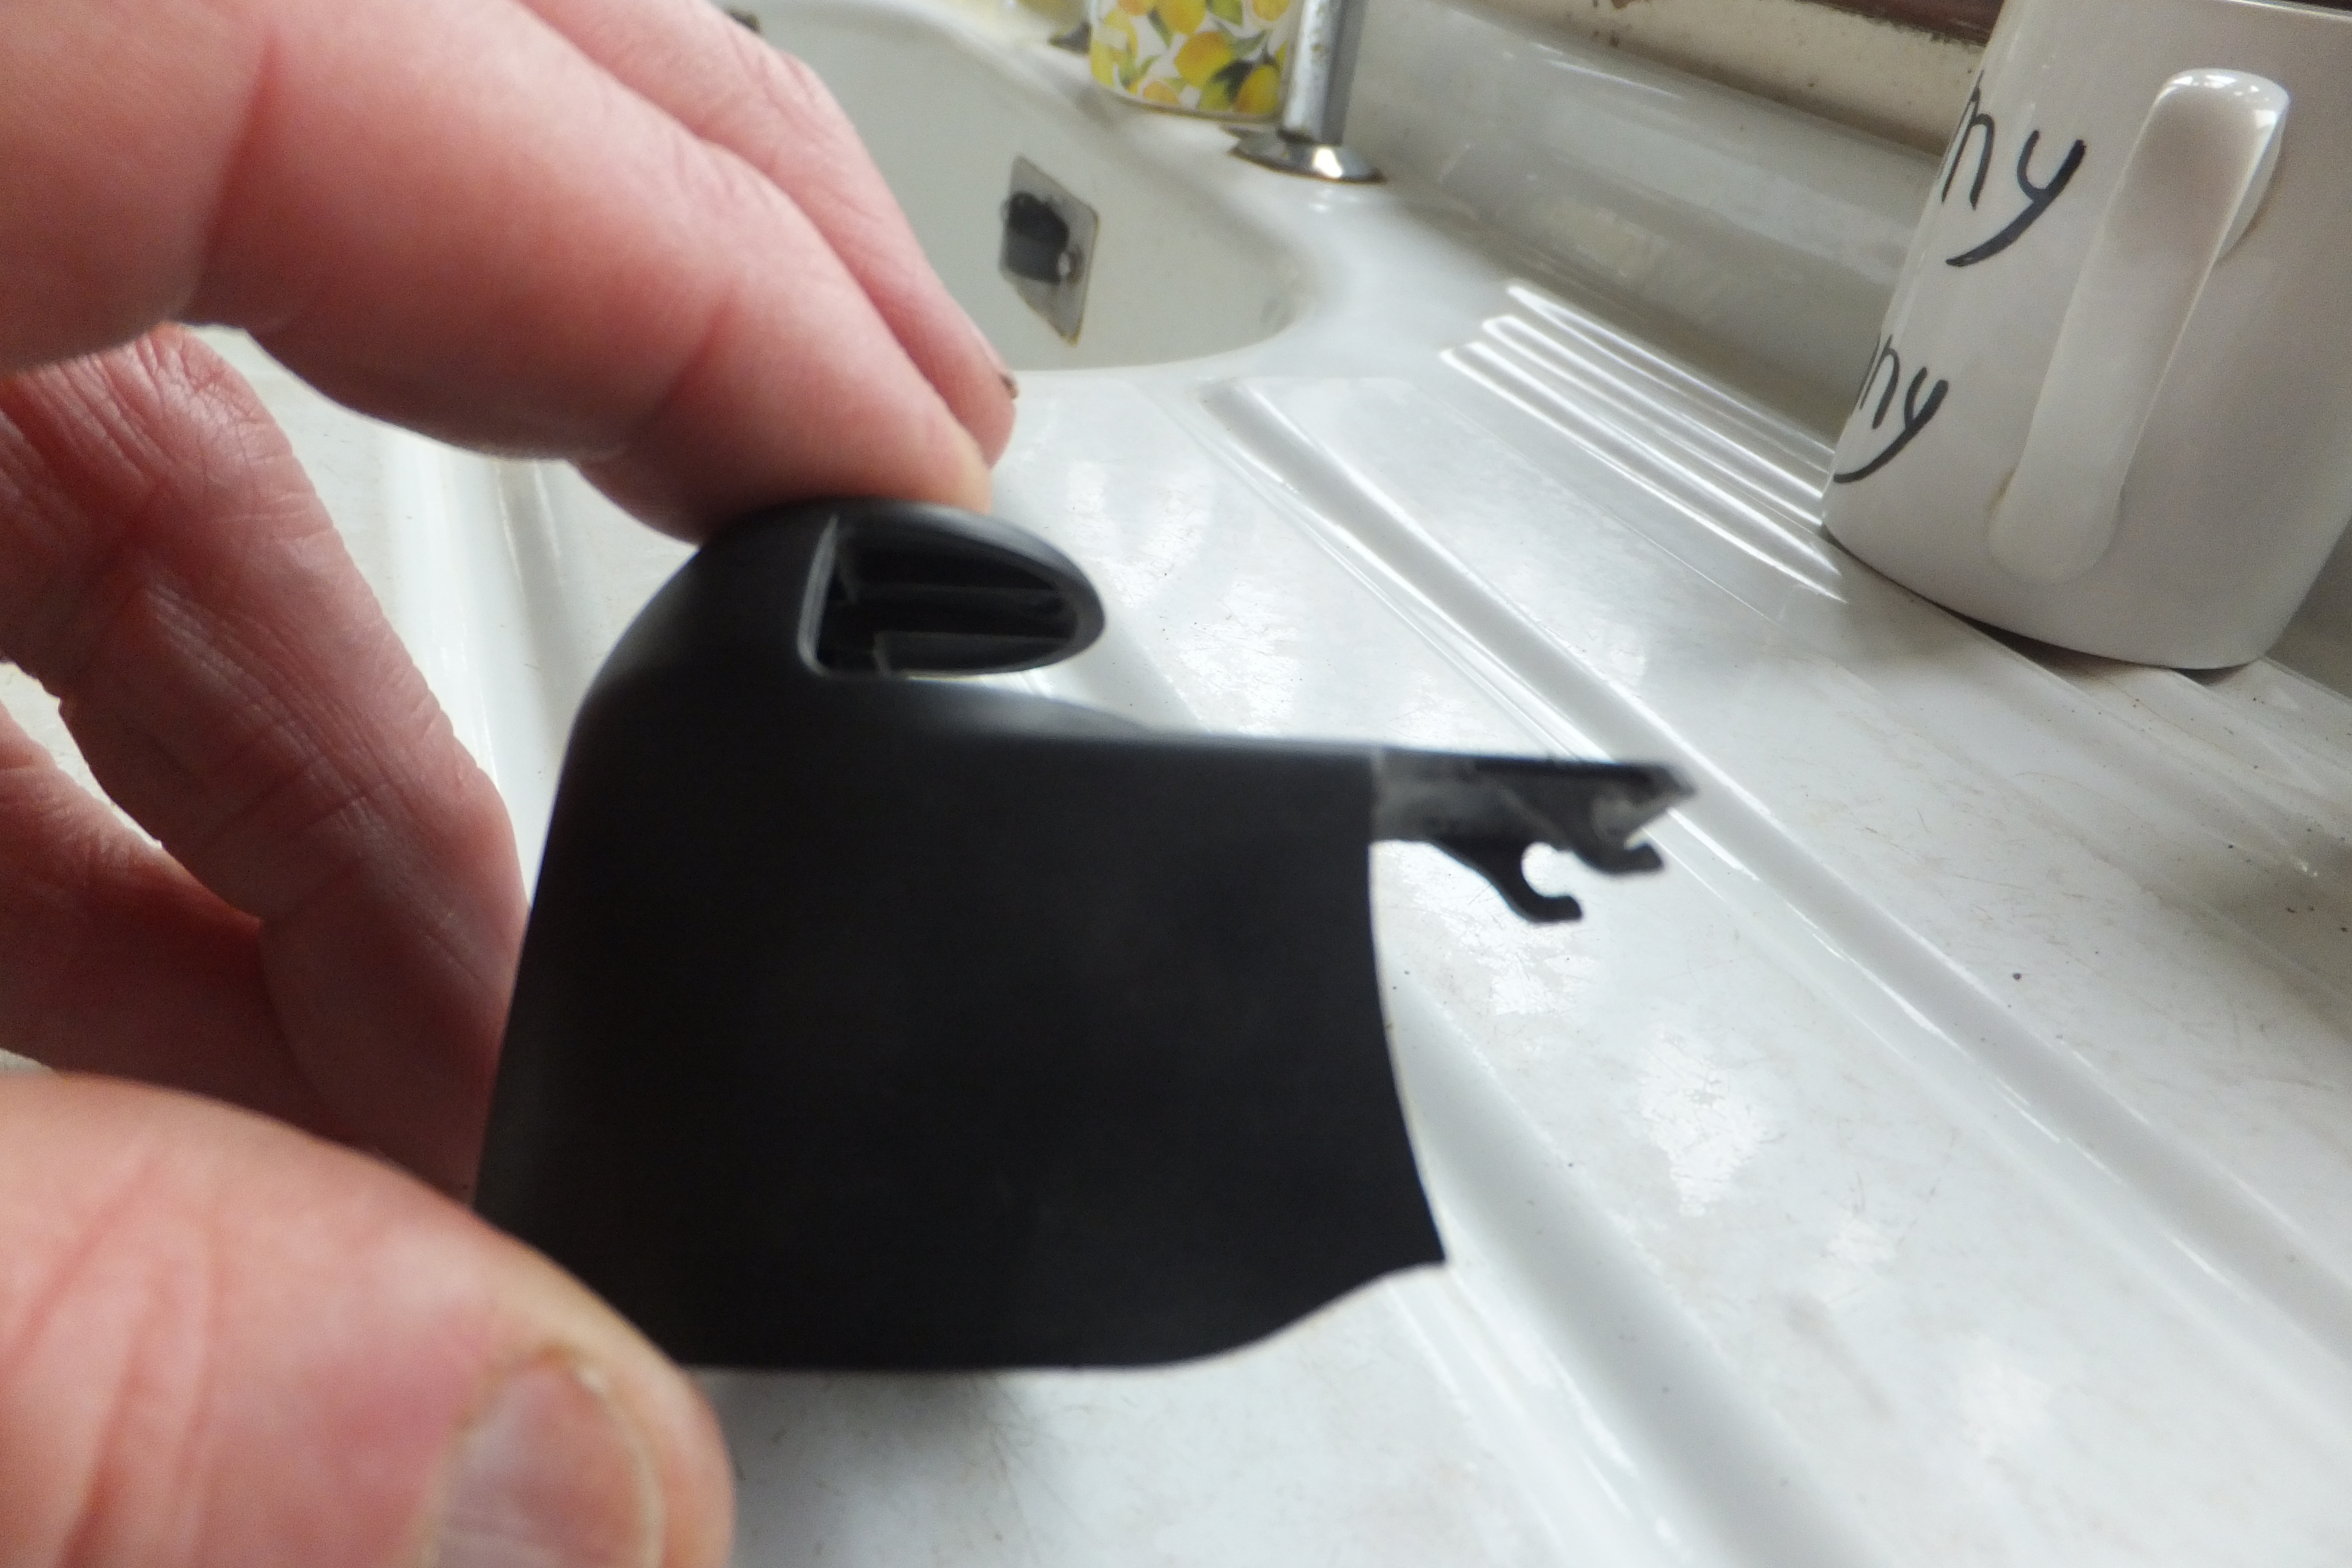
  1. 2010 1.2 Tsi S petrol 60,156 miles from new 26/12/2010 ABS and TCS warning lights came on intermittently at first, stayed on for a while then went off. Came back on again some time later then off. This happened over a few days. Then both came on permanently and have stayed on. Local garage that does my service pluged in and said rear nearside sensor showing up with fault (therefore TCS will also show). No urgent problem just be aware no ABS. I am used to driving without ABS all my driving life with vintage, PVT and classic cars so not bothered. 1. Is the rear sensor a magnetic or light sensitive device? 2. I live in rural area and up a farm track so it can get rather mucky underneath so would that cause malfunction? 3. What does sensor look like and where is it located and is it easily changed? 4. Any other possible cause such as a loose plug/dirty contacts and where likely? 5. Are sensors known to be not too robust? I have a pit so can get under easily......maybe just a good clean up around sensor? Awaiting optimistically Dennis
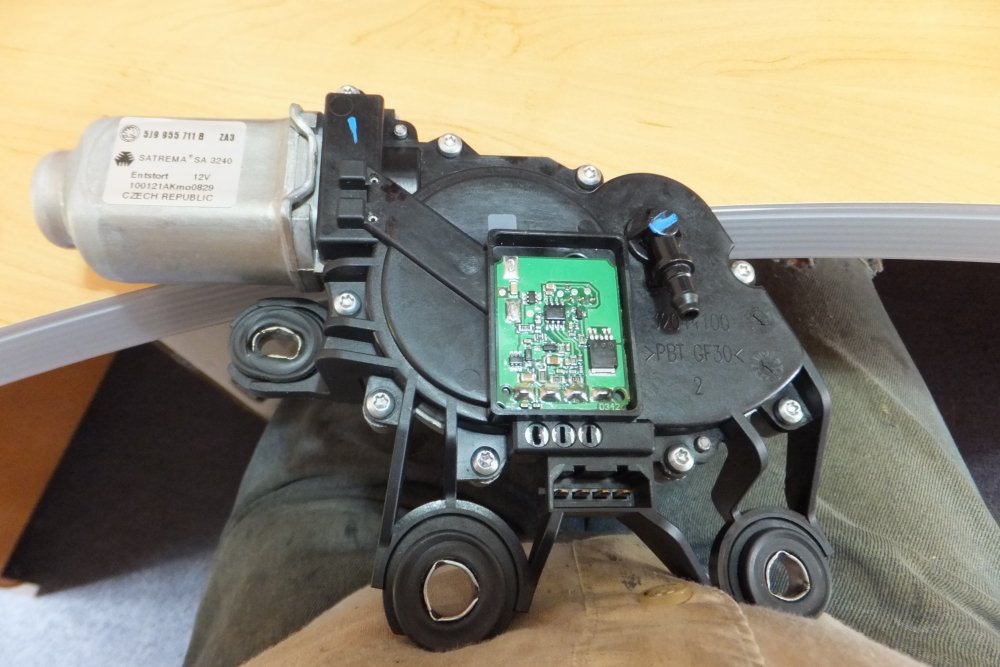
  2. Yeti 2010 1.2 Tsi Petrol. FAULT Rear wiper became intermittent. Stayed parked when switched on or rear wash given a push. Left on and go to wiper and give it a nudge and it behaved normally; sometimes it would work normally strait away, sometimes if left on and driving along it would start working again. Eventually it stoped working altogether and nothing ever started it New wiper fitted by garage (at my cost I was busy doing other work) and new wiper works in a simple fashion. Great! What it does:- occasionally selecting reverse it will do one sweep; Parks in one position (unlike previous new which used to park a little higher at first then after (was it two sweeps?) it parked in fully down position: switch on wiper and it does a few sweeps and parks (only ever in one position) then carries on doing one sweep at a set time till switched off. I like to fix things so diagnosed possible loose connection, worn motor brushes etc. I have now just had time to examine wiper unit. Plastic lid comes off easily, must pull the washer jet off the wiper blade end first then remove the 9 T15 TORX screws. Directly on the motor are 2 tag-strips sticking up that make with 2 terminals on the lid. Connecting a 12V to these runs the motor smoothly every time ( must connect + and - right way round to get motor turning in right direction). On the lid there is a box with a lid that lifts off and inside there is a printed circuit board (PCB) which obviously must deal with number of initial sweeps then time delays between following sweeps and the two different parking positions. The 2 terminals above the motor connect along a channel to the PCB (2 little white dots at top of that channel running from PCB box to motor) On the motor lid is the input socket with 4 terminals. I have determined that what must be the negative (earth?) side of the motor's 2 pins (lower goes to the first terminal of the plug on the left looking at the photo and the top motor terminal is the +. I can see where the 4 plug pins join and solder to the PCB (bottom of PCB) and where the 2 outputs to the motor are soldered to the PCB (top left of boar). The mechanical parts inside all look in unworn condition and anyway I hate throwing away such units. I am thinking of options: 1. Replace lid with PCB on it with new one; 2. Replace PCB only after unsoldering old one. 3. connect wire from plug to motor so wiper works as a simple on/off with the column stalk (ok so would be continuous but maybe one position would provide 1 wipe only). Would this possibly damage any other circuit/control unit on the car? I am retire electronics engineer and have worked on far more complex equipment to component level replacement. Has anyone got a circuit diagram of the PCB with a functional description/readings? It might be an interesting challenge to repair it! Does anyone supply the lid only with the PCB? Does anyone supply the PCB only anyway?
  3. Wife pulled up at junction then went to pull away but pedal was on floor (engine running ok) and no reaction to pressing pedal. People behind helped push her to side of road. Checking the pedal she found it was just floppy up and down. Walk down to nearby local garage just opening and they said either borrow the courtesy car to go OAP early morning shop and they would go up and look at car later in day or call RAC. She went back to car switched on and started engine and found pedal was up in correct position so drove the 3 miles home. I have had a look and pedal feels ok going up and down with no odd catching or resistance and all seems well. Can anyone offer an explanation as to what might have happened?? What is the mechanism that sends the signal to the ECU.....rotating resistor?? If pedal was just floppy and on the floor why was engine not revving with stuck throttle open??? A mystery. Dennis
  4. 2010 1.2 Tsi basic model. My rear antiroll bar snapped off completely, just outboard of the mounting bracket!!! Surprised to see the bar is HOLLOW. I am a conservative driver so no wild cornering. Milage only about 58,000. I drive in first gently up our farm track of 0.6 miles. Anyone else had this problem? All rubber bushes in links were ok. Dennis
  5. Wiper arm freed up and removed/greased and temporary back on. Still no reply from Skoda UK. Can anyone recommend which make would be better / more reliable - Magneti Marelli or Febi Bilstein.
  6. VIN TMBKF75L6A6029066. Wiper parks either..... 1. against body or2. just above ( think it is normal....every second sweep parks position 1. then position 2, then 1. etc.). It became erratic as to whether it would wipe again after parking......this whichever position it was parked in. A nudge on the wiper arm would get it going again. Recently failed to move even after nudging.......but push/pull of base of wiper arm towards and away from glass (i.e. moving motor spindle in and out of motor) and it started and carried on normal behaviour for days and luckily for the MOT. I therefore suspect a parking switch in the motor (or brushes, if it is not a brushless motor, becoming stuck in holders or just worn down). I have just done a full rebuild of a 1980 Lucas wiper motor for my other car, which included cleaning built on parking switch contacts, new brushes, repair badly burned brush holder mounting plate and cleaning/greasing and now working well. I suspect Yeti will require new motor (with built in parking switch?) BUT BUT BUT have see the part number 5J7955711 has 3 different suffixes - A, B, and C. I do not want to risk burning out the column switch/control system by plugging in a wrong motor (perhaps with different order of wires in plug). Does anyone know what the difference is between the three motors with same part number but different suffix? 5J7955711A 5J7955711B 5J7955711C Have emailed Skoda cust svc UK, 26 Mar, asking what difference is but so far (3 APR) only an automated generic reply of no help whatsoever. I have seen 2 makes of motor advertised but neither says which suffix it is compatible with. Which of the 2 makes would be likely to be more reliable - Magneti Marelli or Febi Bilstein? Self isolated in isolated Devon countryside.......Dennis
  7. BPZ how about opening up the motor and letting us know what you find. does it have brushes? are there parking switches?
  8. SO Please please please give details of how it is done...what tool where to leaver against....picture of clips and what they go into...etc.
  9. Any answers to this one please? Tailgate wiper has now stopped in the position just above the bodywork and will not go again even with nudging as previously. Is there another thread on the wiper motor....I need to know contact/circuit diagrams and how it works. Fortunately it worked for the recent MOT!!
  10. Llan.....wrong 3. He means 3 in the top diagram.....the "clips" " recondition or renew". I am about to try take off tailgate trim to get at wiper motor which when in either of the 2 parked positions sometimes will not start again without moving the wiper arm a bit, then away it goes and stops and starts ok till next intermittent time when it will not start. I understand it is easy to break something on these clips (the turret??) which may need a new trim!! So please what is knack to getting clips released? Photo of assembly showing clip and turrets would be good. Any pointers what to get at and contacts to clean for the wiper parking positions; one positioned right against the bottom of the glass and second position just above (after every second wipe??) (Have just done comprehensive overhaul of wipers/switches on my Lucas system fitted to my Reliant Scimitar). I have switch cleaning fluid and contact grease. Dennis
  11. I am a bit surprised that this topic is still going on for so long with people still being conned by unwilling dealers in view of the information previously available since around 2012. This site and the Yeti owners site give all the information to fight any unscrupulous dealers (for that is what they are in claiming to know nothing about the VW 1.2 Tsi timing chain debacle) The unfit for purpose timing chain was recognized by VW and they fitted better chains/sprockets/tensioners in 2011, 2 years after that engine came out in 2009. A TPI was issued to all dealers/franchises giving the details. I think there is a copy of the TPI somewhere on site. I suffered This problem about 3 years ago and a totally wrecked engine with pistons in sump. Car out of warranty but lowish mileage The nearest Skoda main dealer claimed no knowledge of a problem and Skoda UK were no help either though they offered a part payment. I persisted with main dealer who claimed no knowledge of the TPI. When I produced a copy of it to them they were a bit shocked and retorted "where did you get that?" End result - a new engine was fitted totally free of cost to me, though I was out of pocket from all the time and fuel used in the journeys back and forth (60ish miles round trip to main dealer) and the cost of getting the car trailered to them for their first look when they failed to change the chain, which then led to final wrecking out on the road. £4000+ of bills avoided. Stick with it and look back through this subject and arm yourself with print outs of the evidence, especially a copy of the TPI and reference to the German magazine that highlighted the failure of the chains way back when it was happening (2011/12?). Also 'Honest John' (journalist of Telegraph fame) has dealt with this fault andVW dishonesty. I feel there should have been an automatic SAFETY recall..... just imagine going down a busy motorway at 70mph when the engine blows up .......... This sort of case must surly be what the motoring ombudsman in UK aught to sort out? Den
  12. thats all right I'm 75 years old and still going strong! Woops No I didn't look at date.......just interested me because my boot light is not working.....plucking up courage to remove tailgate trim eventually.
  13. I wonder if www.skiffy.com has any of the nylon bits or may be persuaded to make them. The linear actuator must be a fairly common thing used in all sorts of different applications.......I can't imagine Skoda/VW had the bits specially made? Dennis
  14. 2010 1.2 Tsi S Yeti - manual gearbox. Is there an actual drain plug? I have seen in the workshop manuals.com site the OAJ gearbox check oil level description showing the plug to remove for inspection ......but can find nowhere (on internet etc.) anything showing a drain plug for the OAJ 6 speed manual box. Does one have to suck the old oil out via the inspection plug hole?? I know that Skoda say no oil change required as oil is there for life of vehicle.......that is ridiculous (what they really mean is "for SHORTENED life" VAG have lost all my confidence and SKODA UK likewise as they have an extremely poor customer service attitude and just deny any problems exist. SO IS THERE A DRAIN PLUG OR NOT?
  15. Thanks Richard. I am beginning to put the pieces of this problem together.......have learned that there is that plug/socket at A post. Would now like a DETAILED information of where the wires go to in the door. My second car is now out of action (Scimitar) as I am going for a hip replacement Thursday week and will not be able to drive for a good many weeks so put Scim on SORN as tax Ran out today. So fault has come at awkward time, especially with lots of other things happening all at same time......fairly isolated in countryside. If the problem was with the Scim then easy-peasy I would have no hesitation diving in and fixing it, but I know how stupidly awkward it can be to take bits of modern trim to bits and how easy it is to damage the way they fix together by plastic hooked tongues Does anyone have the wiring diagram for the door circuits please? and a very detailed description of what to take off and how to take it off? Dennis
  16. Yeti 2010 1.2TSi petrol. Faults now happening. 1. All 4 window switches on drivers door have no effect.....passenger side switches operate passenger side front and rear windows ok. 2. Press LOCK on key and only passenger side and tailgate central locking work... and indicators flash as normal except drivers side mirror teltale....key needed to manually lock drivers door....drivers side rear door fortunately permanently locked. Double click to unlock and indicators flash and passenger side and tailgate unlock (tailgate only unlock button also works ok). 3. the red (alarm activated?) warning light on drivers door continues to flash even when driving along.......as if car parked and central locking activated and all doors locked. Is this due to a live feed at A post being broken in the rubber harness cover between A post and door so there is no power getting to the window switches and to the central locking motors in front and rear doors? Help Dennis
  17. More dismantling and pics. Problem of what keeps plug in solved? See photo of old base and at the back of where the plug goes you will see a rectangular depression. I assume there is a matching protrusion on the plug at the end of the wires. So the back end of the plug needs to be lifted slightly to clear the depression before the plug can be pulled back out. Lens, with socket, removed from behind front plastic cover in base. Green pen pointing at top one of 3 LEDs. This unit was stuck by glue to the bottom cover all round the edge and sounded like cracking plastic as I prised it away from the base with a screwdriver Closer view showing LEDs mounted on the little white square bits with 2 silver metal terminals on the top. Even closer. The 3 blurred bits slightly to the left of the LEDs are the round ends of the rounded ribs that run the length of the lens and presumably carry the light along them. I will try a voltage across the pairs of terminals for fun......but what V? This seems to be as far as I can go with the dismantle. The ribbed lens is fixed to the white board the LEDs are mounted on.
  18. Should only cost £20.????....an LED is usually very cheap now. It is not a high tech circuit. The LED chip requires a certain voltage depending on maker and output. So to achieve that voltage (usually lower than supplied) a resistor is required in series so that some of the voltage is lost (voltage drop) across the resistor, thus leaving the required lower voltage to drive the LED. Even if the design allowed for the lens with LED fitted to be easily removed for replacement without having to dismantle the whole mirror casing (admittedly fairly easy once you know how) surly it would be cheaper and easier.
  19. Thursday 15th. Woope. Called at main dealer and "technician" came out to look, opened up and had a bit of a pull with wires (me winced!) , he then levered wire end of plug up a bit and levered at other end a bit and out came plug with a little more wiggle and pull. I showed him the new piece from Italy and he plugged in and tested and repeater worked so he put it all back together again.....just a little difficulty alining one of the screws into one pillar hole. (gave him a big kiss.......no not really) Asked how much......no charge. A bit of faith restored to this dealer so now 60% on my 'garage ability score board' (see previous story of timing chain and wrecked engine debacle). Sorry but he was not a very-good-at-explaining-person so still not 100% sure what he actually did to release it but seems like lift up wire end a bit then leaver out from other end. I tried to watch as closely as possible. So the Italy one is a replacement at a good saving as long as you are not in a hurry....pity about the £13 post/packaging Lets hope it lasts.
  20. Mirror base received from Italy Tue. 13 Feb. Still none the wiser about removal of plug (or is it bulb holder??) Shows two vertical pillars in base with holes that torx screws through main body screw into. Also silver lighting unit held to base by two cross head screws.to The two upward protruding tags on the left of the front black bit, and the body they are on actually stick a bit forward of the silver bit but hope that it will all get tucked back flush when it is pushed into the front cap. This shows very plain plug holder with the three connection pins just under the top of the flat bit This weather, and needing the car is preventing me from actually opening up the mirror again to try and work things out again. This shows the black plastic sticking out a bit from the lens bit Tomorrow, Thursday 15 Feb, Big expedition to nearest main town with dealer to fall on their mercy to advise "how to do it" . Dennis
  21. The Italy place.......second of the two websites you gave above....ie without puddle light. https://www.ebay.co.uk/itm/INDICATOR-MIRROR-SKODA-YETI-09-WITHOUT-LIGHT-COURTESY-RIGHT/401449392011?hash=item5d783f978b:g:IoYAAOSwrslaXiS2
  22. Thanks. So how about the start of a new permanent topic HOW TO UNDO ELECTRIC PLUGS. This would be a topic containing only actual practical information that could be added to as people found out how to do each item (added to under moderator control) The subject would require headings of model of car, variant of the actual bit in question, how to get at the plugs/sockets, photos showing the items (this would differentiate such differences as seen above with the two different mirror/lighting where though apparently similar, the plugs were very different and located differently). My new bottom section should be arriving tomorrow, Friday, so very much hoping it is exactly the same with same socket and that it will become obvious how locking mechanism works. Dennis
  23. Unfortunately significantly different. (I haven't a clue how to get this MacBook to do translations either )
  24. Just been on longish telephone call to SKODA UK to try and find out how to unlock the plug to pull it out.........basically they would not tell me! Said government law under health and safety prevented them telling such information!!! I explained that all I wanted to know was what locking mechanism held the plug from vibrating out (usually just two plastic lugs/clips) but got nowhere just a lot of waffle. They pointed me in the direction of the website ERWIN.SKODA-auto.cz for technical info on the electrics.......yes you guess..a paying site. I told them in no uncertain terms what I thought of their CUSTOMER MIS-SERVICE (That especially after having had to go through the replacement wrecked engine debacle) Sorry all for the rant. So does anyone know what locks the plug (3) in place? Dennis
  25. OK plucked up courage and got front upper cover off. Unscrewed the two T10 torx screws and eased bottom assembly with repeater off . Will try to put more photos with arrows and captions up later. Next silly question is how does the plug with wires come away from its socket. I tried gently prising along the top with a screwdriver but it did not seem to want to just pull off. Are there hold-on lugs that need squeezing or prising up? For testing what is to be expected on each of the 3 wires? 1. Orange 2. Yellow 3. Blue/black
×
×
  • Create New...

Important Information

Welcome to BRISKODA. Please note the following important links Terms of Use. We have a comprehensive Privacy Policy. We have placed cookies on your device to help make this website better. You can adjust your cookie settings, otherwise we'll assume you're okay to continue.