AlastairHeff
New here
-
Joined
-
Last visited
Everything posted by AlastairHeff
-
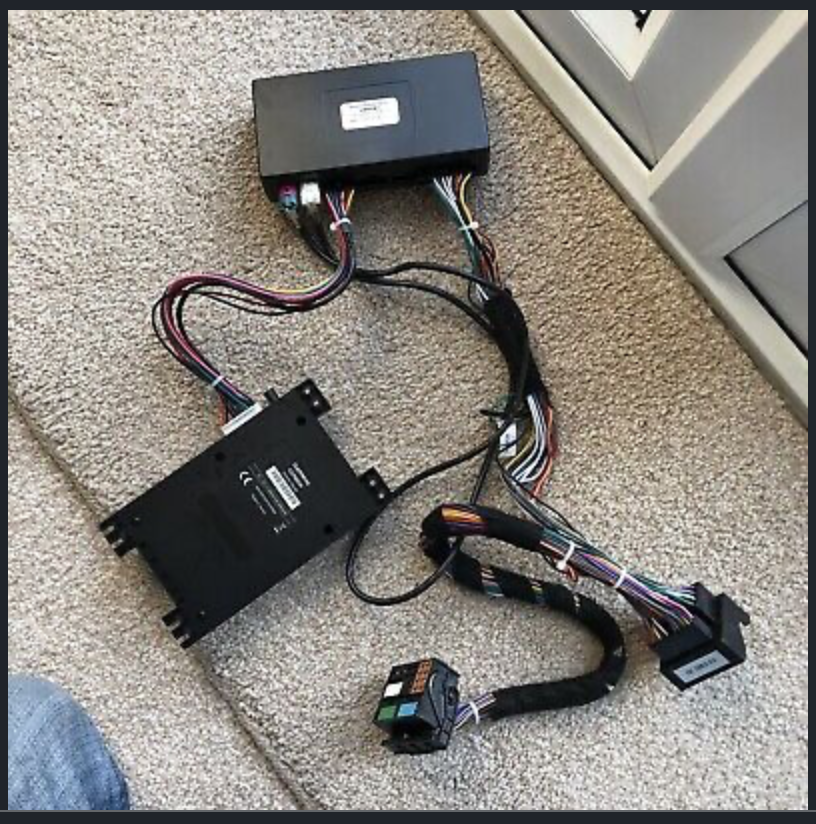
Successful GVN60 firmware and maps update guide Thought I'd give something back to this very helpful forum; it took a day but I managed to update my GVN60 successfully today (mostly with info pieced together from here). Finding the SatNav I cannot pretend this will be comprehensive as where the SatNav itself is located depends on how your dealer / garage installed it. But I will give some tips that helped me find mine. The SatNav unit is actually two bits of hardware linked by wires - I found the below photo helpful to know what was what. The bit at the top is the video unit; the bit on the bottom left of the photo is what you need to find - it contains the all-important SD card slot. I first removed a T20 screw on the panel on the centre console in the passenger side footwell (if you sit in the passenger seat - it'll be to the right of your right shin). This allowed me to pull back (slightly) the plastic trim; some people have had the SatNav unit fall down from behind this. So the unit could be here. Mine wasn't - but I did find the video unit. I couldn't pull it out but could identify it by touch. I felt where the wires were going and worked out that the SatNav unit itself was actually behind the USB / cigarette lighter panel. You can pull this panel off (from just below the climate control buttons) - press your thumbs outwards on this panel (just to the left / right of the USB port / lighter bit) and quite firmly pull down. It's a bit stiff but I did it multiple times and didn't break it! I could just see the top of the SatNav unit poking up from further down in the centre console. I could just get my hands behind where the USB port was and feel the top of the unit; luckily the unit was the correct way around to allow me to access the SD card. To access the SD card slot, I squeezed the sides of the top of the unit I had access to and popped open the door. I then felt with my fingers and (hallelujah) could feel the SD card slot. Next step; update firmware. Getting the firmware onto your SatNav Get a standard size 16 GB SD card and have an SD card reader (I have a Mac so that made it easier as older ones have them built in). Format it to FAT32 Download the 2.90 firmware update from this website. This will give you a file called: GVN60_KWEU_290.exe in your downloads. Next step - now I had a BIG problem at this step because I don't have a Windows computer. Either find someone who does or use a virtual machine with Windows installed on it (I had set one up for my PhD but otherwise wouldn't have had a clue how to do this). Once you're on a Windows machine, double click the above executable. Click 'Run' then 'Extract' and you'll get a file called GUPDATE.GCD. Put this file into a new folder called 'Garmin' on your otherwise blank SD card. Turn your car off, get access to the GVN60 SD slot, put the SD card into the device, close it all up, put the panels pack in place and turn the car on. My SatNav software started immediately and was clearly doing something different - it took a few minutes but eventually seemed to be done and opened into the usual first screen. If you navigate through settings to the about section you should see that your software is now 2.90. Getting the maps onto your SatNav The key thing to this is to get hold of the maps. Now there are a lot of links on this site to a website called "Uploader.net". This website offers ludicrously slow downloads and you basically have to pay about 6 euros for 48 hours access. Problem was, the whole website was in German for me and I gave up trying to make it work. Luckily I eventually found an alternative link that is free and actually worked for me. Navigate to this website Navigate to the adamramzes post. This user has left 7 "dosyaupload.com" links to 2019 maps. Note you must create a gpsurl account to actually see the links but they do appear once you've done that. Navigate to all 7 links and download - this website offers no limits and fantastic speeds so you'll have all about 10 GB in about half an hour. Once you've got all the links, open an extractor programme. On Mac I used 'The Unarchiver' available on the Mac App Store (I think Windows users can use WinRAR which has an unlimited free trial version). Open all 7 files you've just downloaded simultaneously within the extractor software - it should combine them all and create a single file called 'Kenwood_NTU_2019.30_EU' Within this file you'll find autorun.inf and a folder called Garmin. Take the SD card - delete the Garmin folder there (as you've already updated the firmware). Then drag autorun.inf directly into the root SD card folder (i.e. not within any folders on the SD card) and then drag the Garmin folder onto the SD card as well - it'll take a while (the whole lot is 10.14GB in total). Lastly, re-insert this into your SatNav unit; you have to keep the SD card there as it reads the maps off of the card. You should be able to see the 2019 maps within your "My maps" section of the settings. Hope this helps someone who, like me, almost went mad trying to do this!
-
Good news - managed to prise open the Nav unit that's lodged behind my USB / cigarette lighter ports - you have to squeeze the edges of the unit to open the little compartment where the SD card lives. Got the SD card in after that and successfully updated the firmware - happy to provide details if anyone wants more info. Next question: does anyone know where the 2019 maps can be had? There's an uploaded.net link above - and I was happy getting a 48 hour premium account but when I tried to sign up (which required my phone number) it said my chosen payment method (credit card) wasn't allowed (it told me this in German)! Anyone know of any alternatives or have gotten around this issue?
-
Thanks for the reply again - I think I've found the correct bit (bottom left of photo). Is anyone able to explain how to open it? The device is wedged into the space behind the usb plug (accessed just below the infotainment unit). I'm fairly sure I've got the left-hand side of the device as shown on the photo below (oriented top down in my car). It appears that (in the picture) the sd slot will be on the left side within what looks like a little door that will pivot upwards - is that correct? I'm basically trying to open it in situ so very tricky to manage so want to be sure I'm pushing and prying in the correct direction before breaking it!
-
Wow - can't believe it can be "unfindable" - typical. Anyone got any hints for finding the nav unit itself?
-
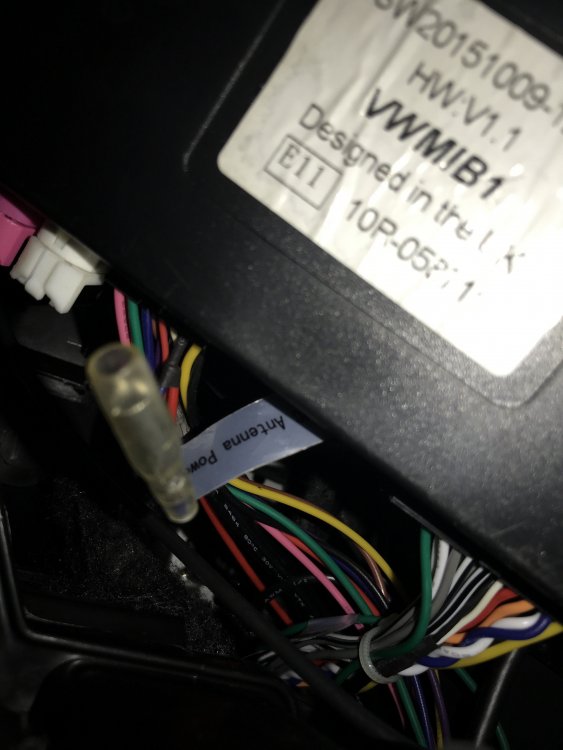
Hi all - just trying to follow @BeckiKeiko's excellent guide above. I've removed the screw on the centre console panel in the passenger footwell and can physically bend the panel back to feel underneath it and have found what I believe is the SatNav (see awkwardly taken photograph which from Googling appears to be the GVN60). However, unlike a few other commenters (e.g. @Charliesbus) mine doesn't simply drop down when I bend out the panel - the wires attached are too short. Any advice for getting the SatNav out? I'm trying to find the SD card slot to update firmware + maps and have tried finding it with my hand by pulling on the sides of the unit as @BeckiKeiko said but haven't been successful. Any and all advice very much appreciated.