aaaaplay
Members
-
Joined
-
Last visited
Everything posted by aaaaplay
-
You just need an M4 Torx bit, pretty much every screw in the interior is the same - see my cooled glovebox retrofit guide. I lost one and had to order it through the VW dealer, our local Skoda dealer is always hard to get onto.
-
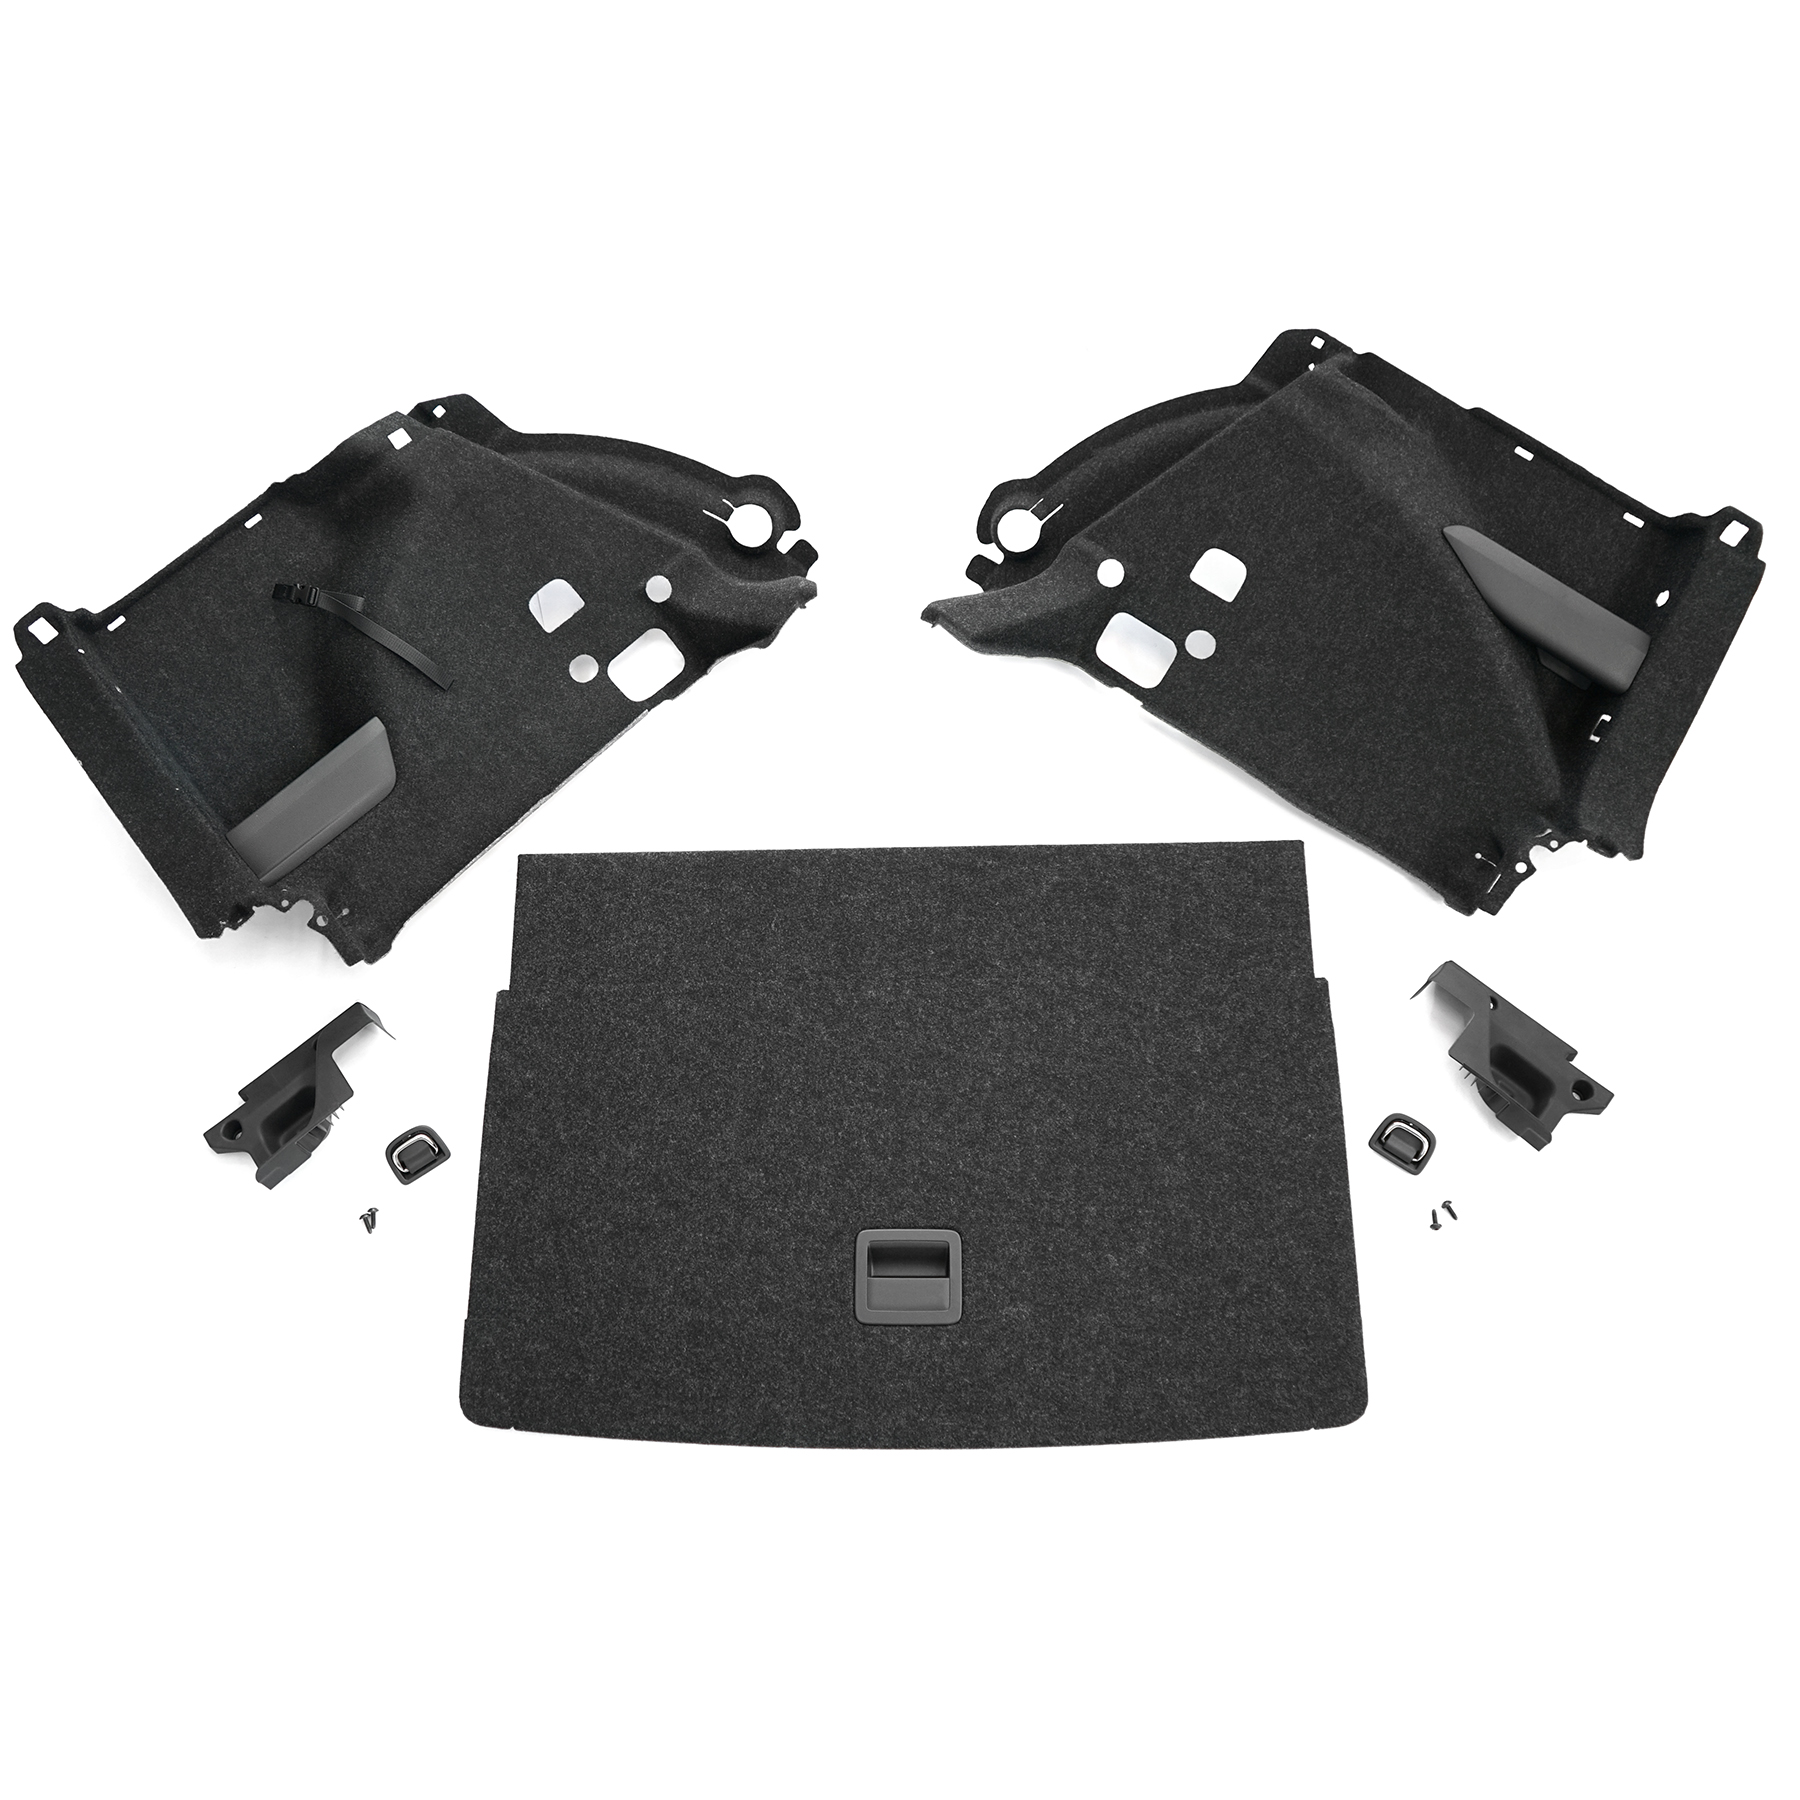
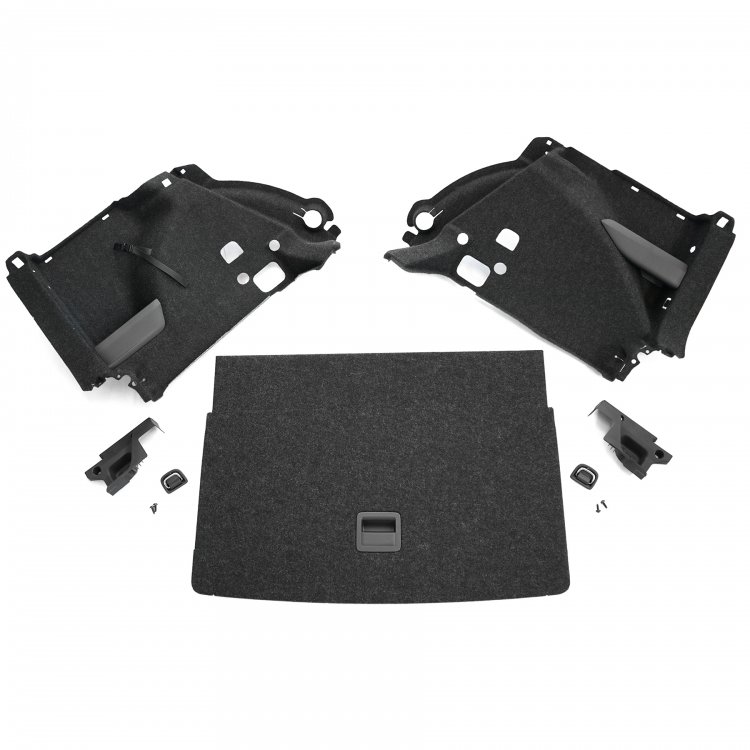
They have the Kamiq version for sale here: https://shop.ahw-shop.de/original-skoda-kamiq-variabler-ladeboden-kofferraum-nachruestung-gepaeckraum-anthrazit I'm sure there is a Scala version available. I can get you the part numbers (I think) for 1x loading floor, 1x cover, 1x mounting bracket left + right, 1x trunk trim left + right, 2x lashing eyelet and 4x mounting screws. You might be able to do away with the left and right trunk trim and just cut holes in your existing trim.
-
Yes it is possible. You will likely require the wiring harness and it will need to be coded to your vehicle. By default Scala's and Kamiq's come with lowline RVC with washer jet, but you can get the highline RVC which includes dynamic guidelines and a better picture, it will have an extra wire connecting it to the CANBUS. Here are a few links to different companies selling the kit. https://www.carcommunications.co.uk/genuine-skoda-scala-highline-reversing-rear-view-camera-kit https://www.kufatec.com/en/skoda/scala/scala-nw1/complete-rear-view-camera-for-skoda-scala-nw1-43815
-
You're welcome. Very punny!
-
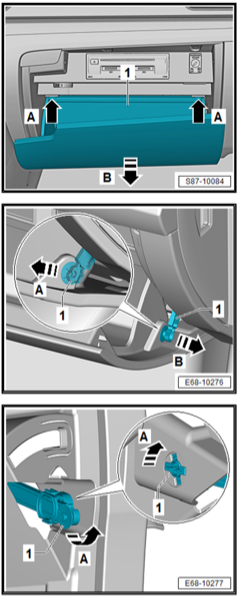
Note picture 1A and 1B are the last two images.
-
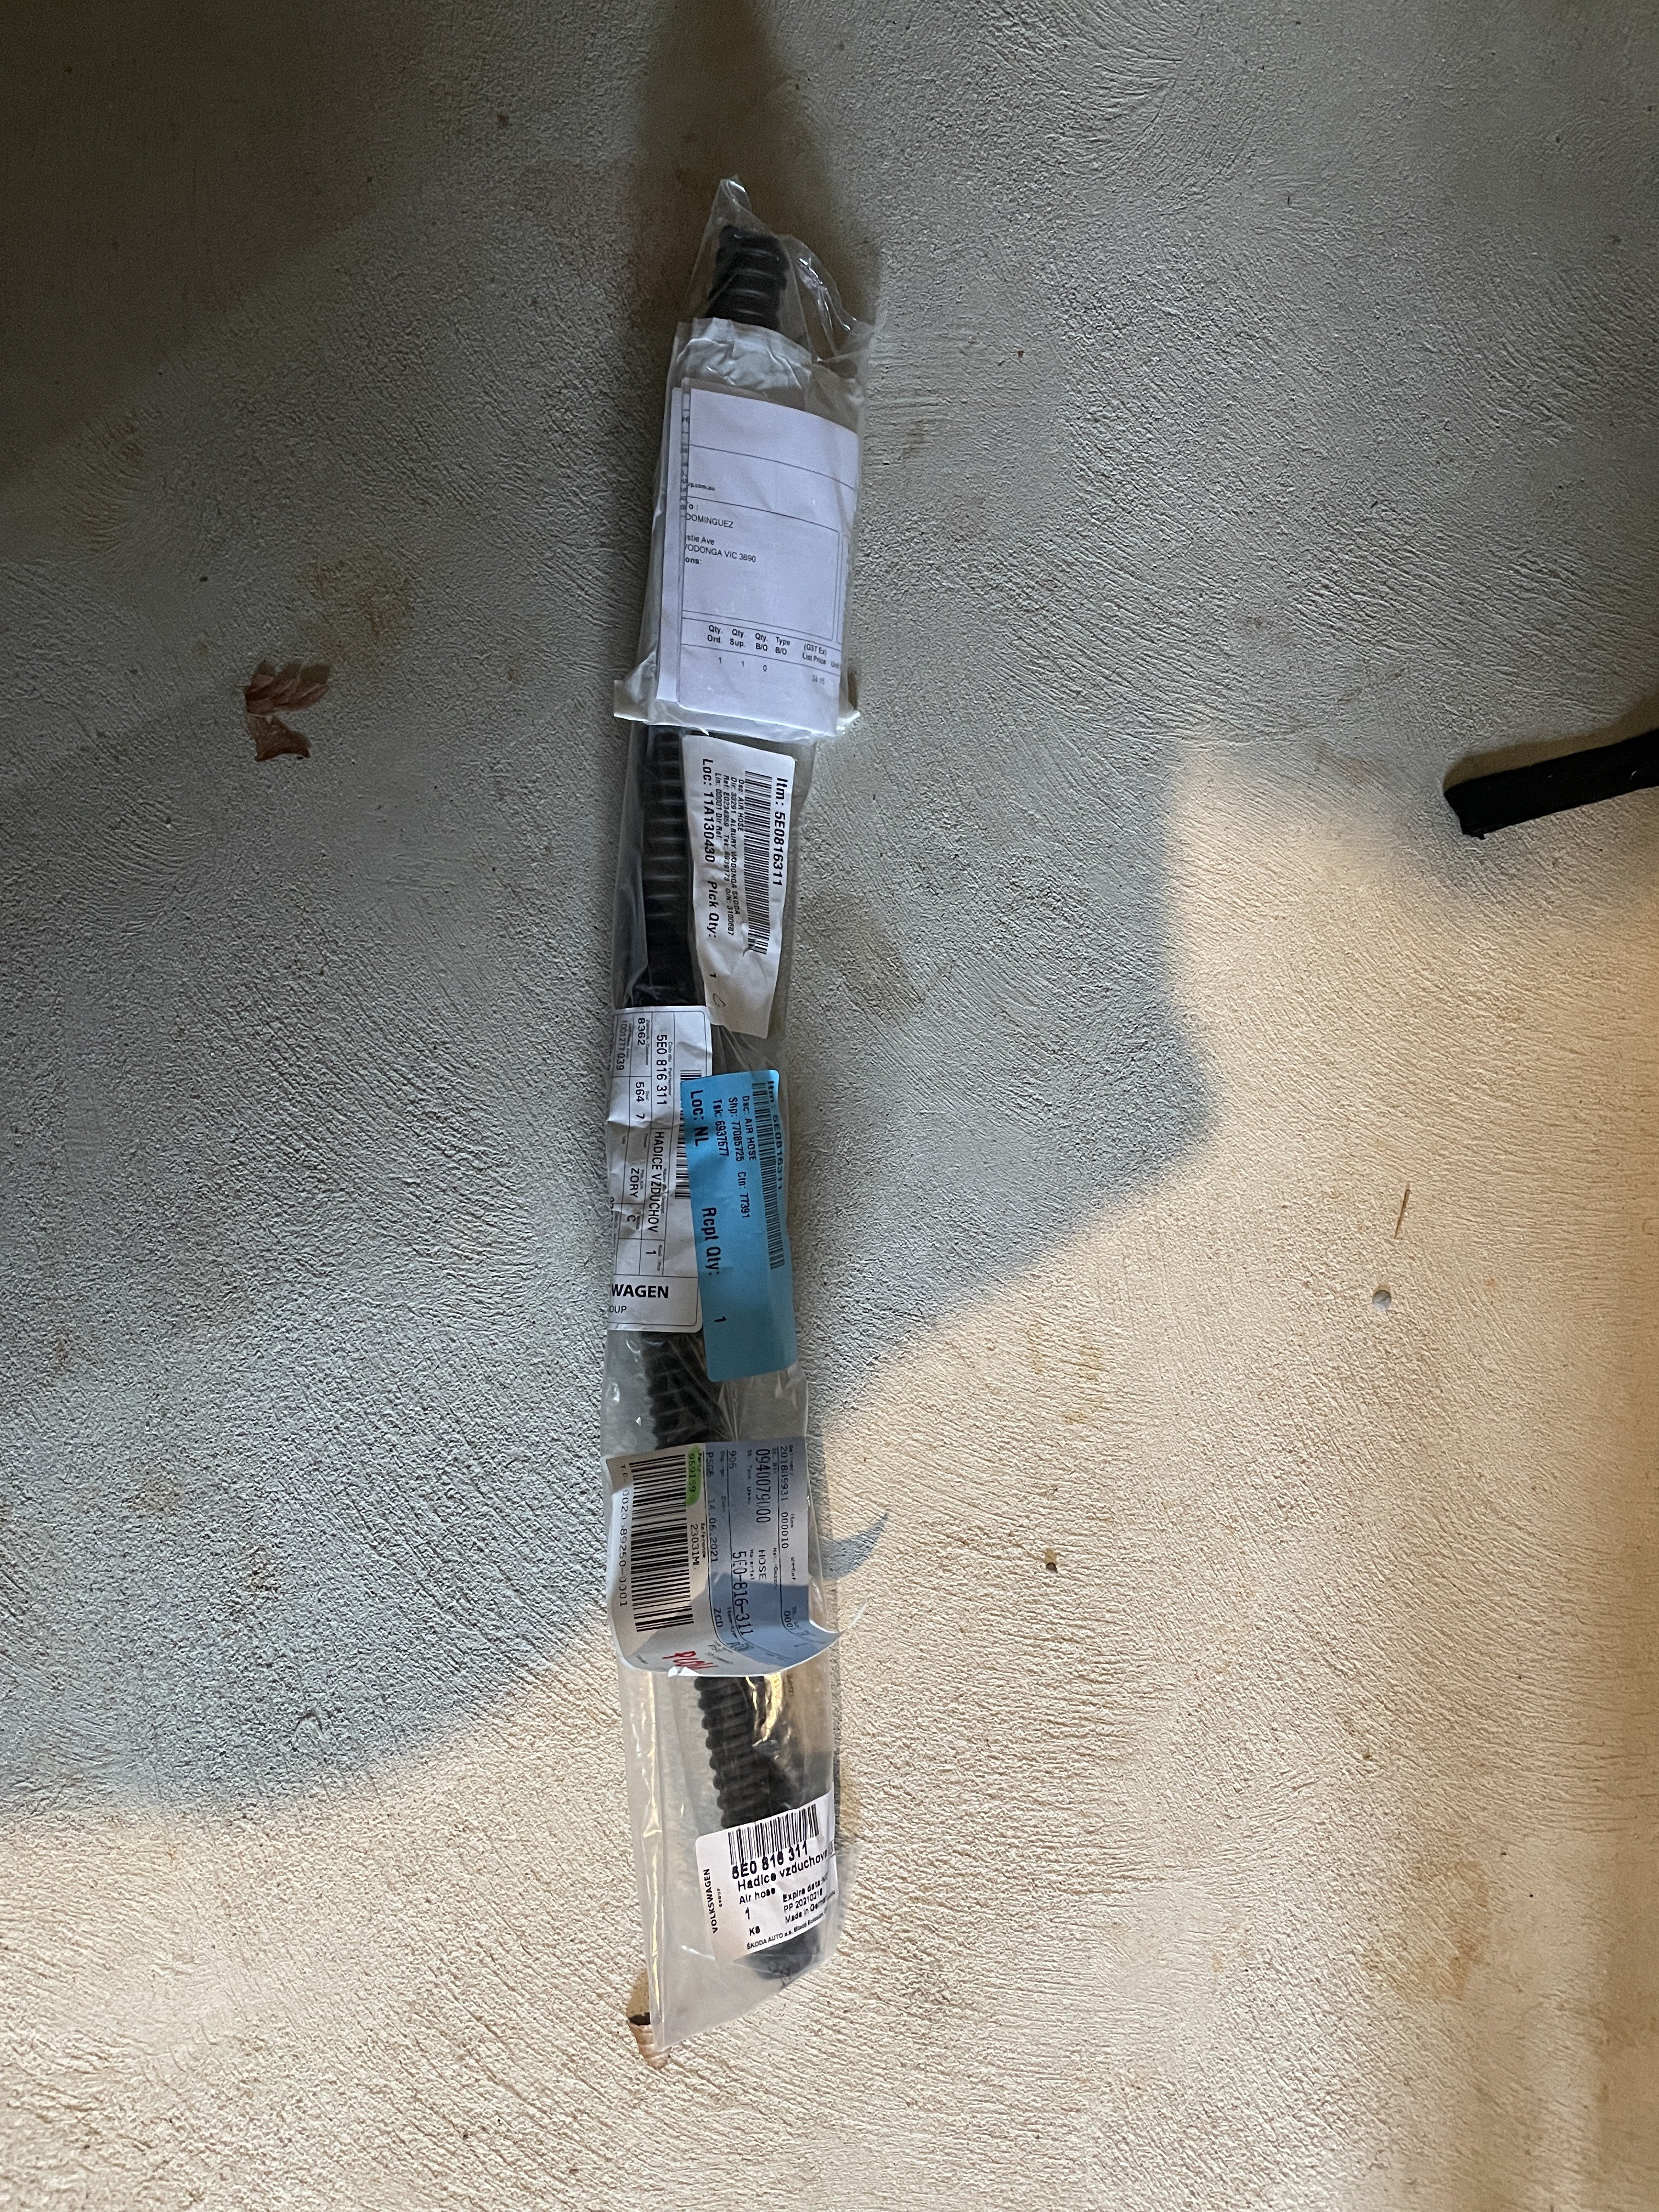
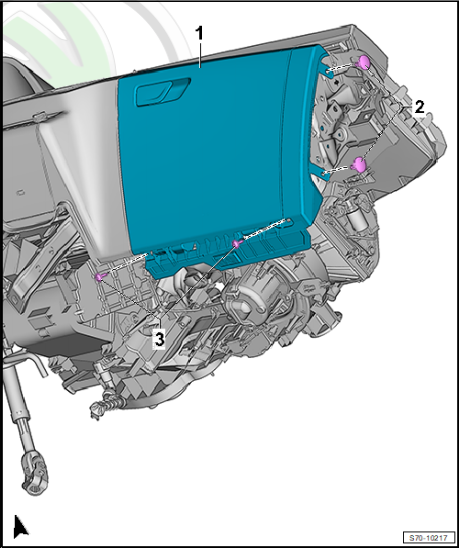
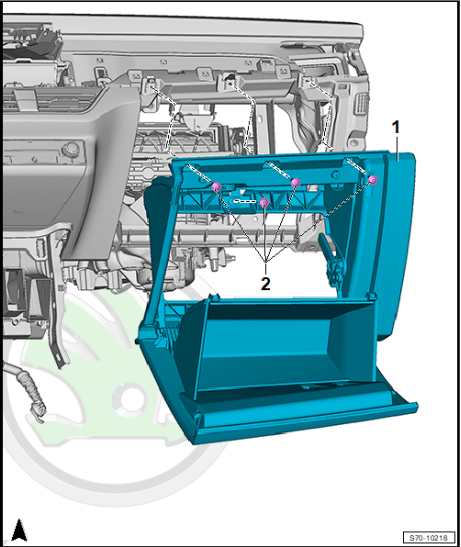
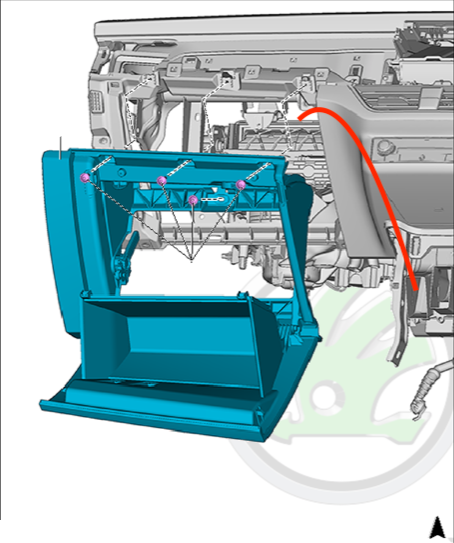
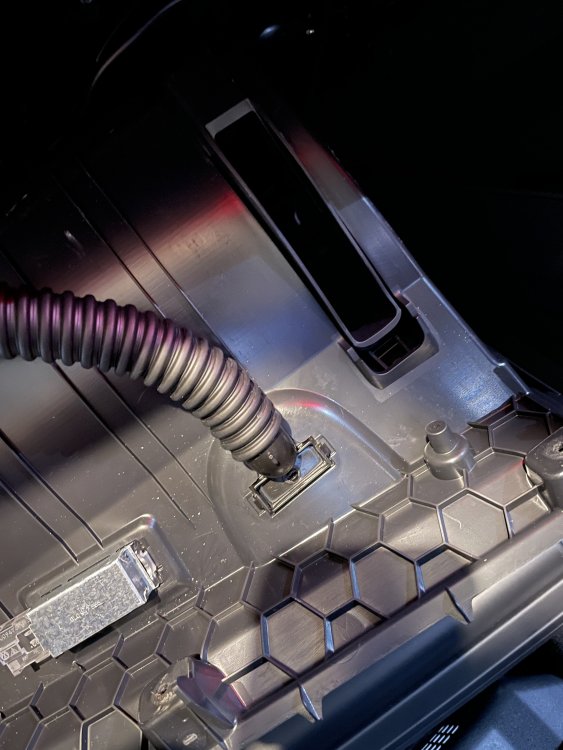
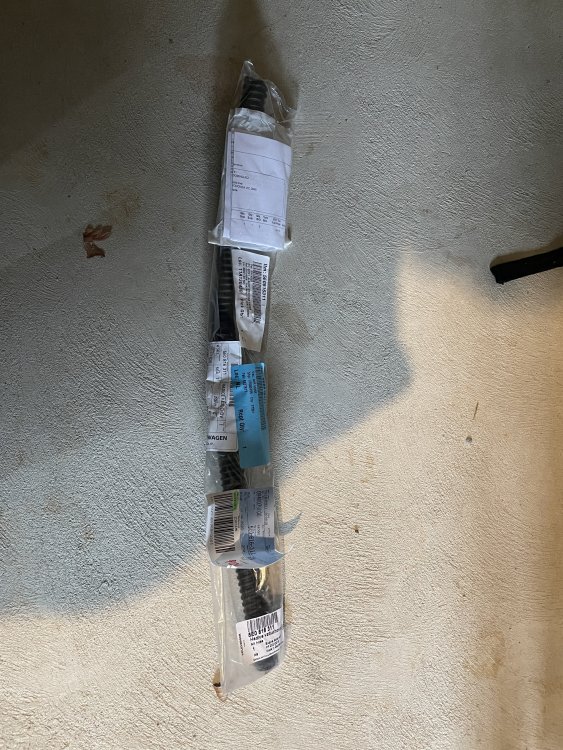
Car used in this guide: MY2021 Skoda Kamiq Monte Carlo with automatic climate control. Model applicable: Kamiq/Scala 2019-onwards Time: 30-60 minutes depending on experience. Parts required: Cooled Glovebox Pipe (Air pipe) #5E0816311. (Picture 1A) Cooled Glovebox Valve #5E0816355. (Picture 1B) Tools required: Screw driver with an M4 bit. Flat head screwdriver or plastic rivet removal tool. Steps: Removing the glovebox: 1. Remove side dash panel cover 2. Remove plastic rivet x2 (picture 2 item 2) 3. Remove screws x2 (picture 2 item 3) 4. Open glove box. 5. Detach the glove compartment from the dash panel (picture 5). Release two tabs, the glove compartment will fall out. NOTE: the “brake element” will likely fall out, be sure to keep an eye out for the inner cog (picture 4 item 1). 6. Remove screws x3 (picture 3, item 1) 7. Detach the plug from the glove compartment light. Pinch and remove. 8. Disconnect other plugs, if applicable (depending upon vehicle equipment [e.g. foot well light and brake element/light switch]). 9. Remove glove compartment from vehicle. Installing the hose: Remove the capped off of the air conditioning outlet. Unfortunately, this is not easily found or photographed. In a right hand drive vehicle, this is best located by placing you hand between the thin foam insulation in the footwell feeling for some metal pipes near the centre console, (WARNING: if you have used the heating recently these will be warm to hot) near those pipes will be a rubber cap facing outwards towards the passenger door (picture 5), pull it off. Before feeding the pipe down, spray a small amount of white lithium grease (or similar), it will help to attach the hose. Feed the air pipe down behind the left side, in the gap just above the cabin filter. (Picture 6). Install the cooled glovebox valve into the top of the glovebox by pressing the valve up and into the gap, not from above. Attach the air hose to the cooled glovebox valve (picture 7) and reassemble (following the glovebox removal instructions in reverse order). Notes: If you loose any of the glovebox screws, the part number is #N90698606. If you break the plastic rivet, the part number is #4B0863907A This may work on models with manual climate control, but it hasn’t been tested. I am not responsible for any damage done to your vehicle as this guide is for educational purposes. Be away that Skoda will make changes from model year to model year and that the vehicle tested may differ from your. Photo Credit - Pictures 2-6 from the Offical Skoda Kamiq Workshop Manual - General body repairs, interior

-
It is listed a bit cheaper here: https://shop.ahw-shop.de/original-skoda-kamiq-variabler-ladeboden-kofferraum-nachruestung-gepaeckraum-anthrazit
-
I managed to find the part numbers on my own. This seems to be this boot floor: https://www.oemvwshop.com/658861411-wr9-luggage-compartment-floor-for-vehicles-with-higher-cargo-platform-anthracite-p2335690/ Boot floor: 658861411WR9 left side: 6578645119B9 right side: 6578645129B9 bolt: N10751101
-
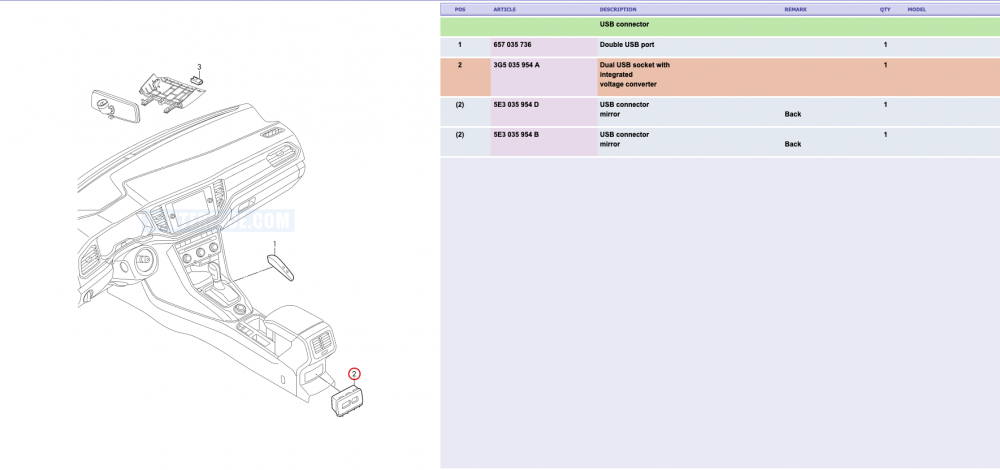
I found this (see 3) in a parts diagram for the Kamiq/Scala but there is no part number referenced.
-
I know that you said you had no luck sourcing the parts, but do you happen to have the required part numbers?
-
Here in Australia we seem to be having the same issue. We don't have Skoda Connect offered here (VW doesn't have CarNet either), so we have to rely on the update portal, which seems to be tell those of us with an Amundsen that we have Columbus head units and that no updates are available. Further we are not a supported country for the downloadable radio logo files. Like VolkanB said, we also don't have radio stations broadcasting their logos. Worse still is that we are not offered DAB+ as an option on any Kamiq or Scala, and it have been deleted from the Kodiaq and Karoq recently too. Someone at Volkswagen Australia (manages Skoda and Audi in Australia) really has a disliking against digital radio.
-
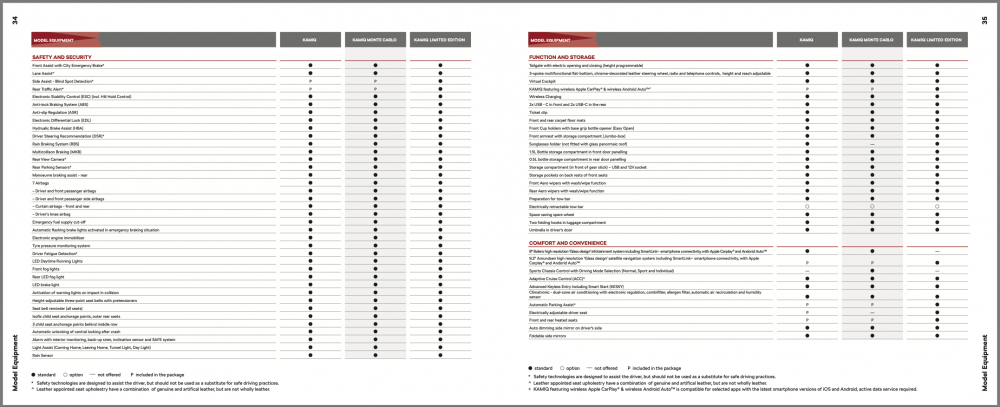
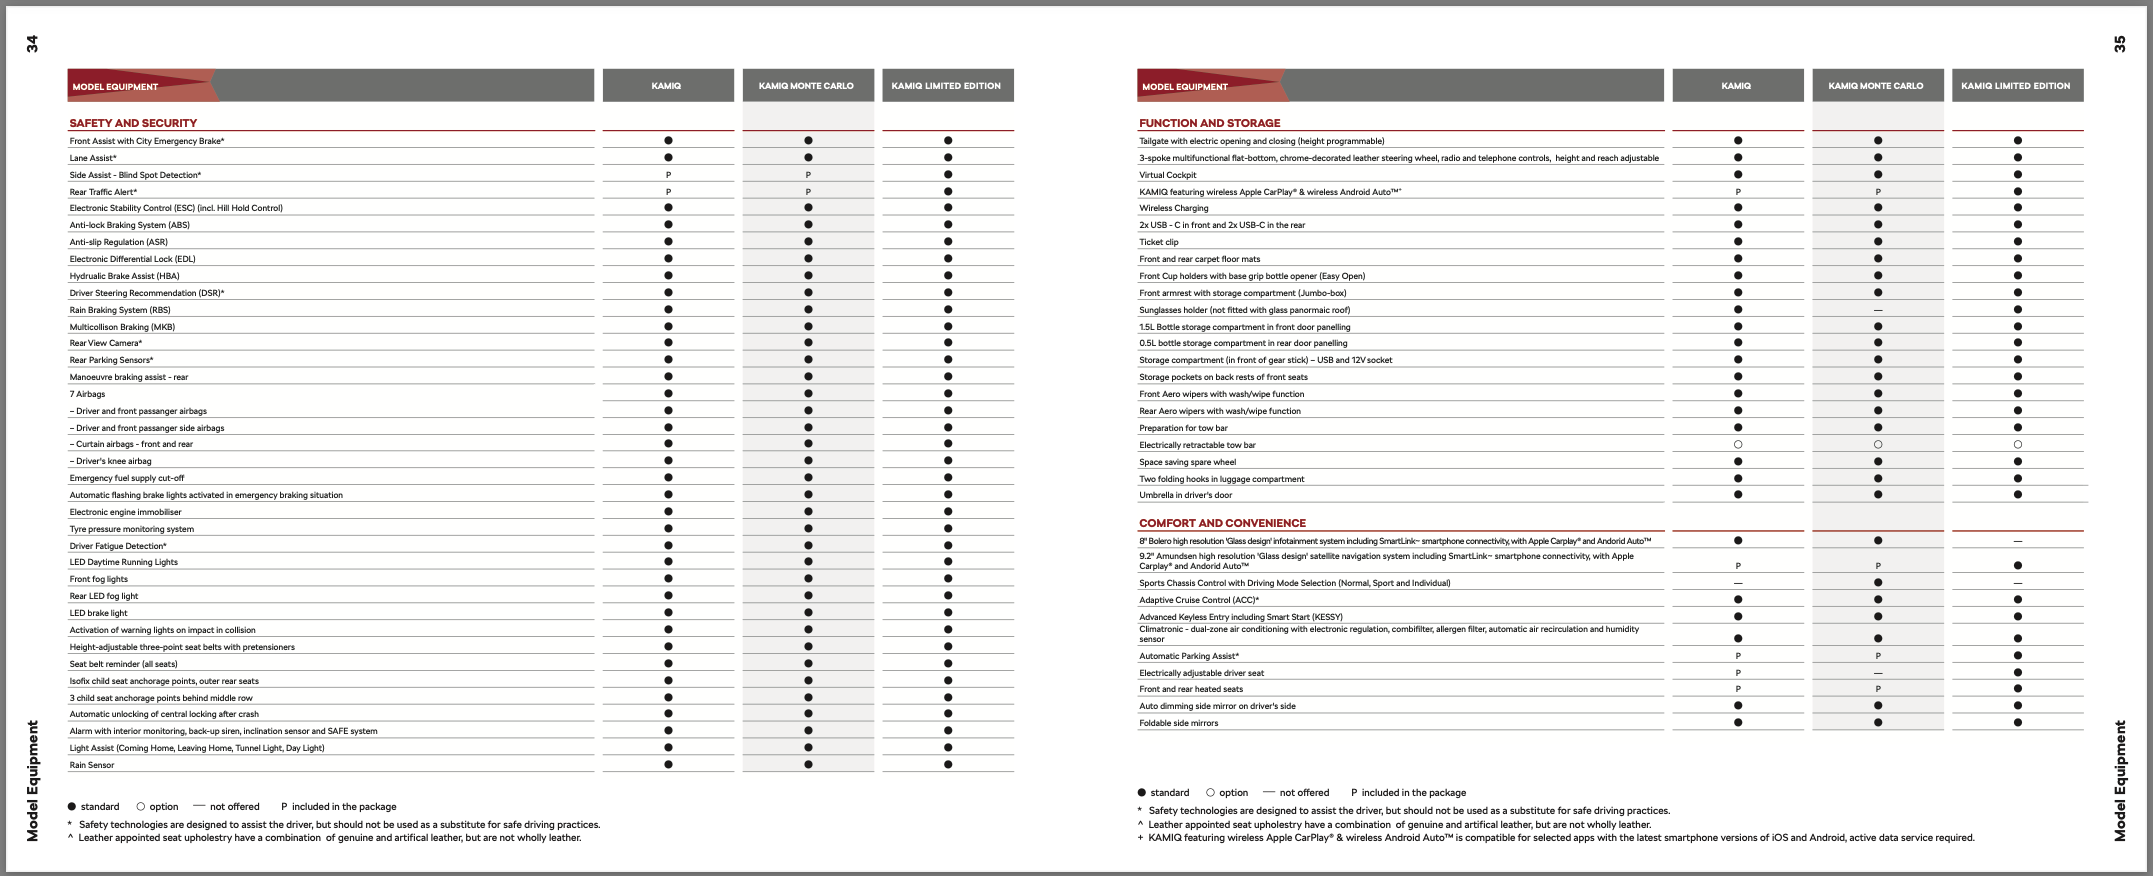
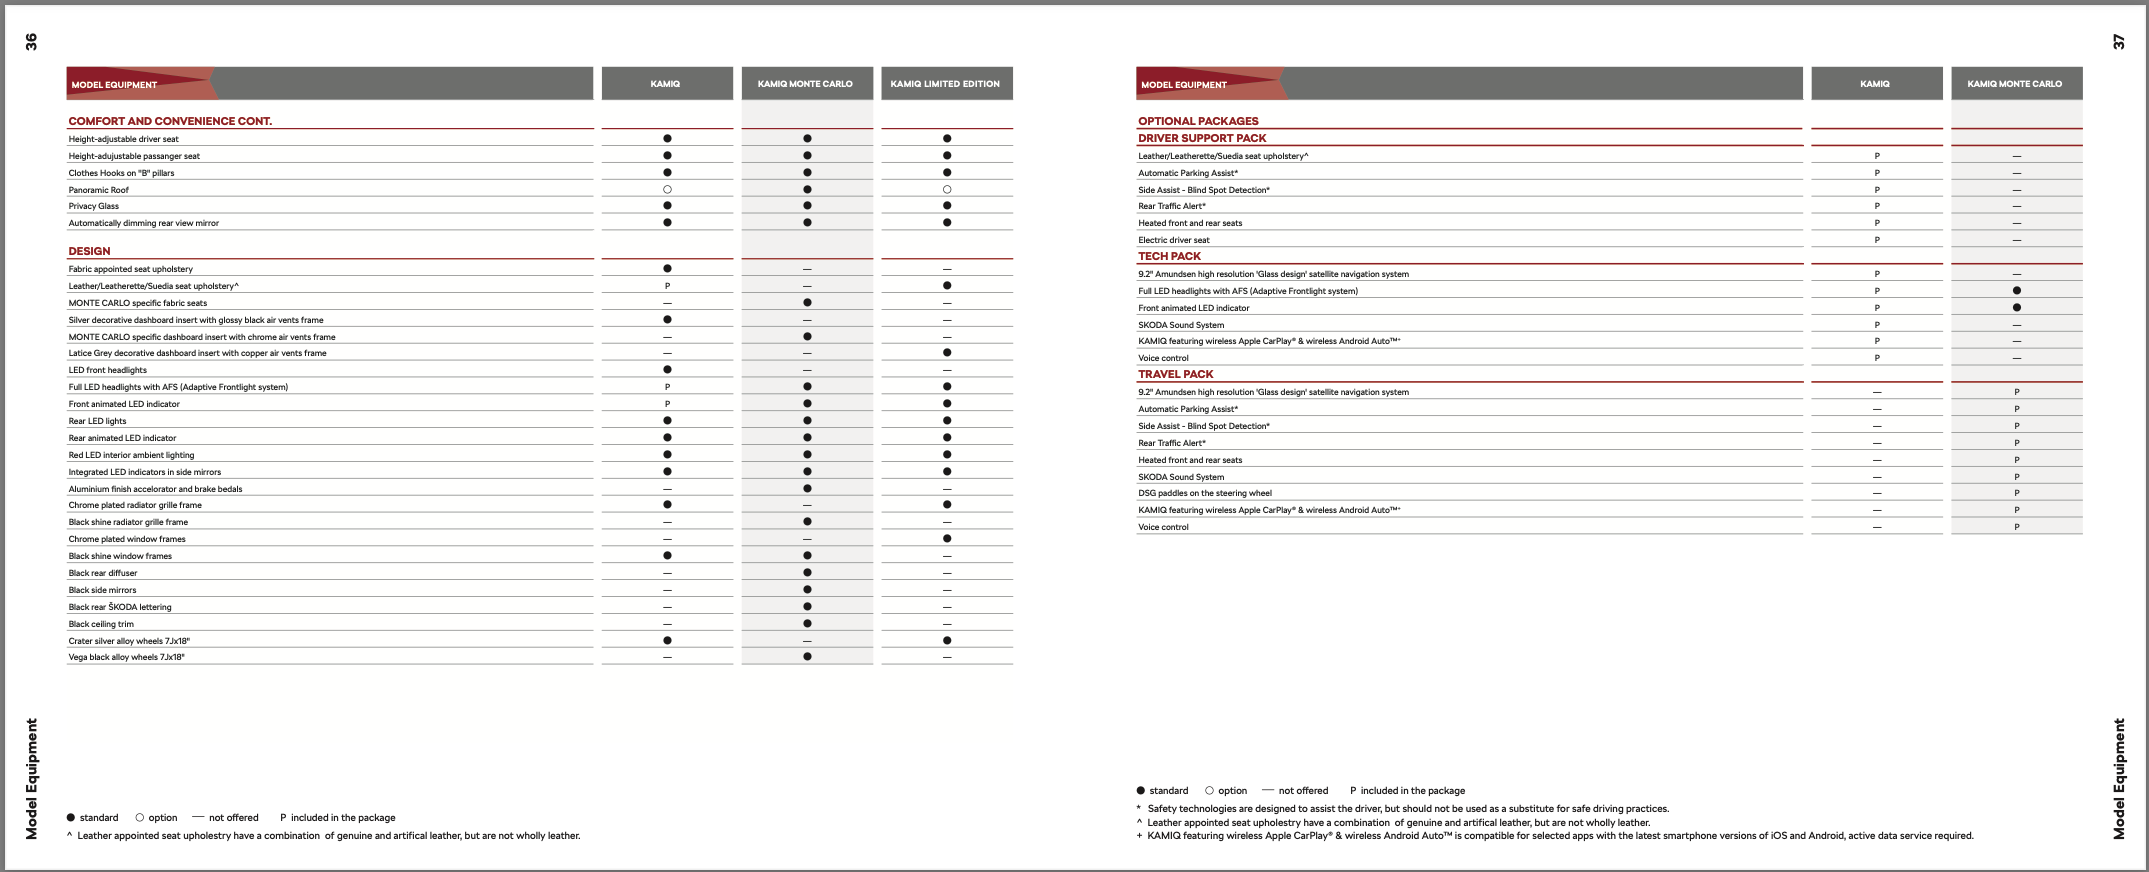
Wow you guys get some truely basic specification in the UK. Ie don't even have manual air conditioning as an option, climatronic is standard. Our MY2020 even got boot nets included as standard. In Australia our line up is as follows: Kamiq 85TSI manual – $26,990 (15,000 GBP) Kamiq 85TSI auto – $27,990 (15,600 GBP) Kamiq 110TSI Monte Carlo auto – $34,190 (19,000 GBP) Kamiq 110TSI Limited Edition auto – $35,490 (19,800 GBP)