zelea2
Finding my way
-
Joined
-
Last visited
-
I have the adapter to remove the valve. I've taken it off when the upper part of the engine was dismantled. Space is also not a problem. No, you can't take the upper timing cover off without taking the left engine mounting bracket off (no access to lower screws). When I took the valve off in the past I had a 18mm spanner holding the intake camshaft fixed. Is it safe to try to replace it now relying only on the timing chain and camshaft lobes to keep it in place?
-
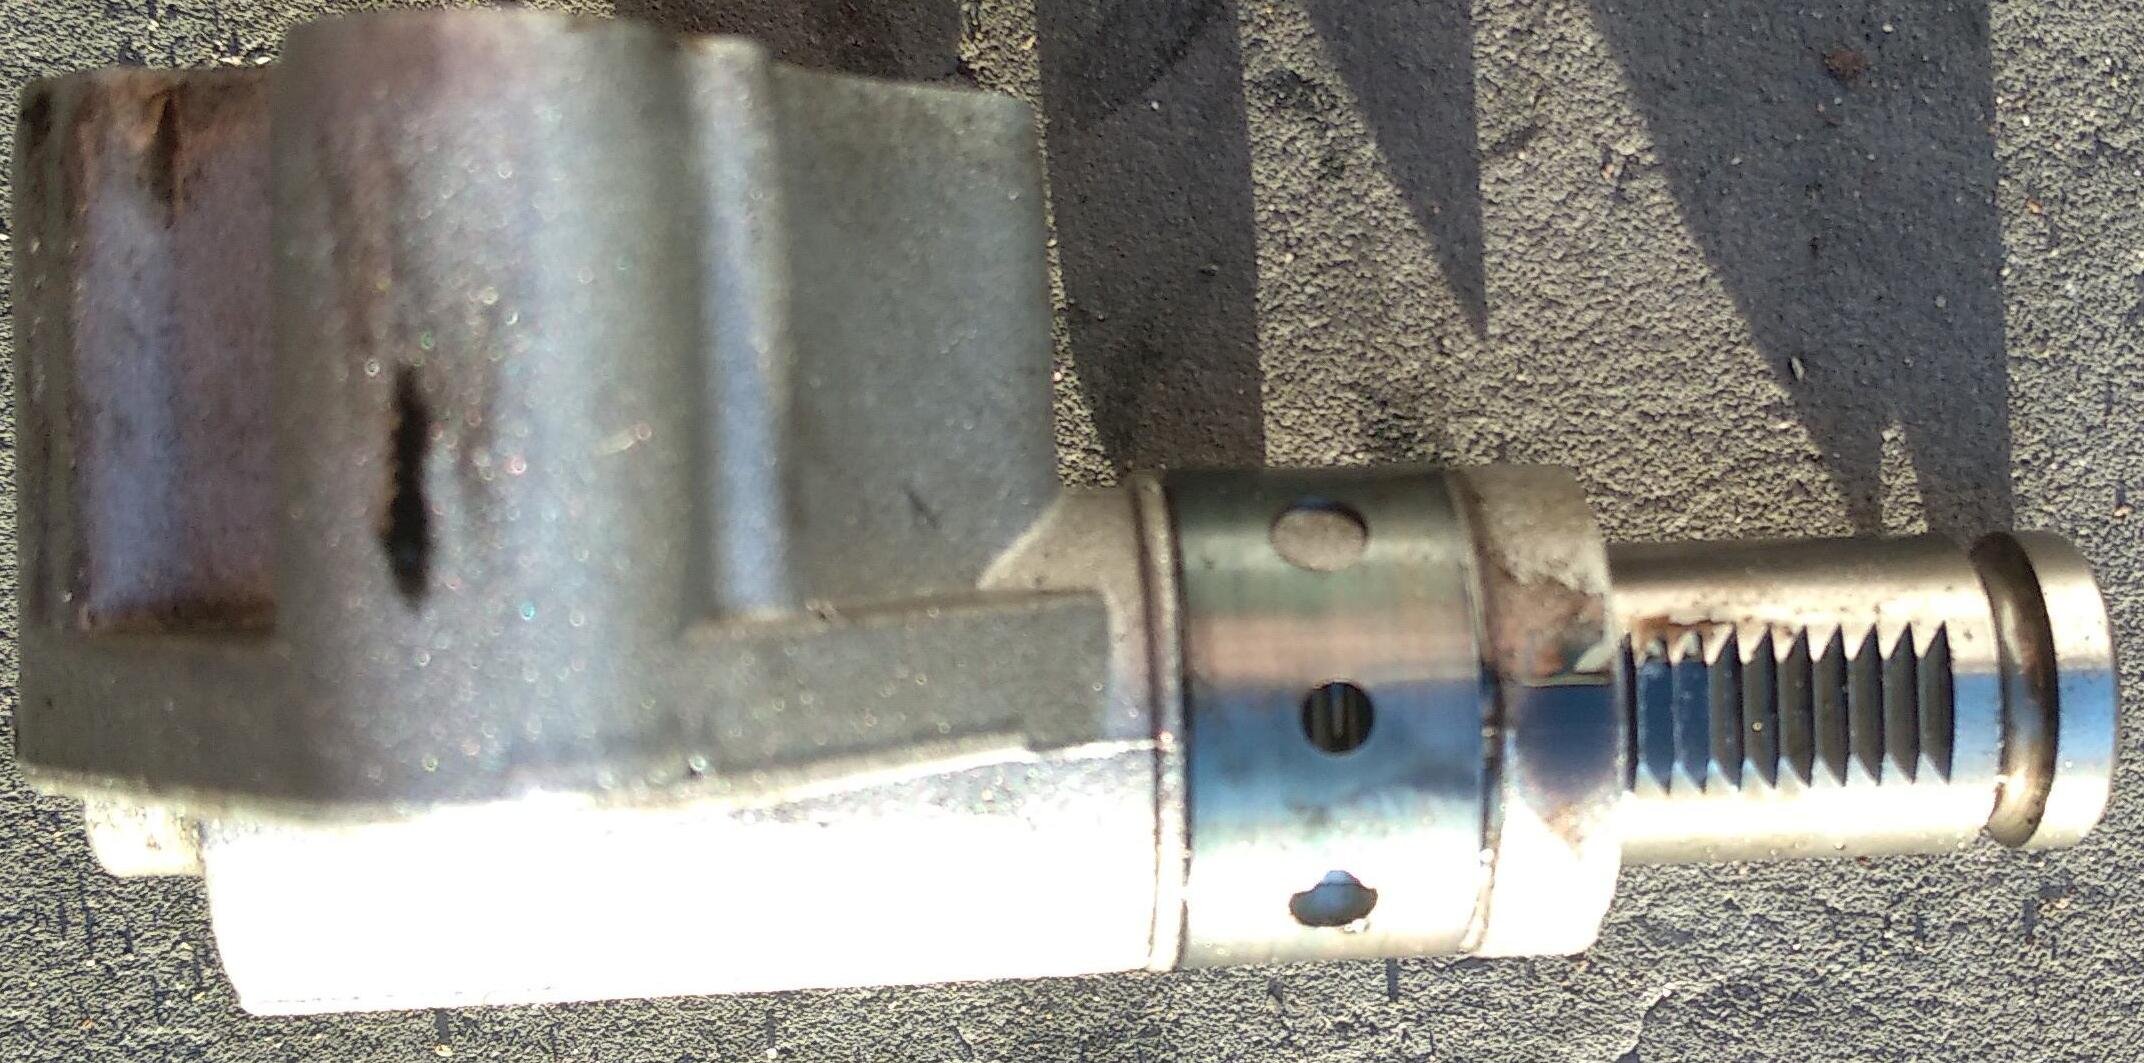
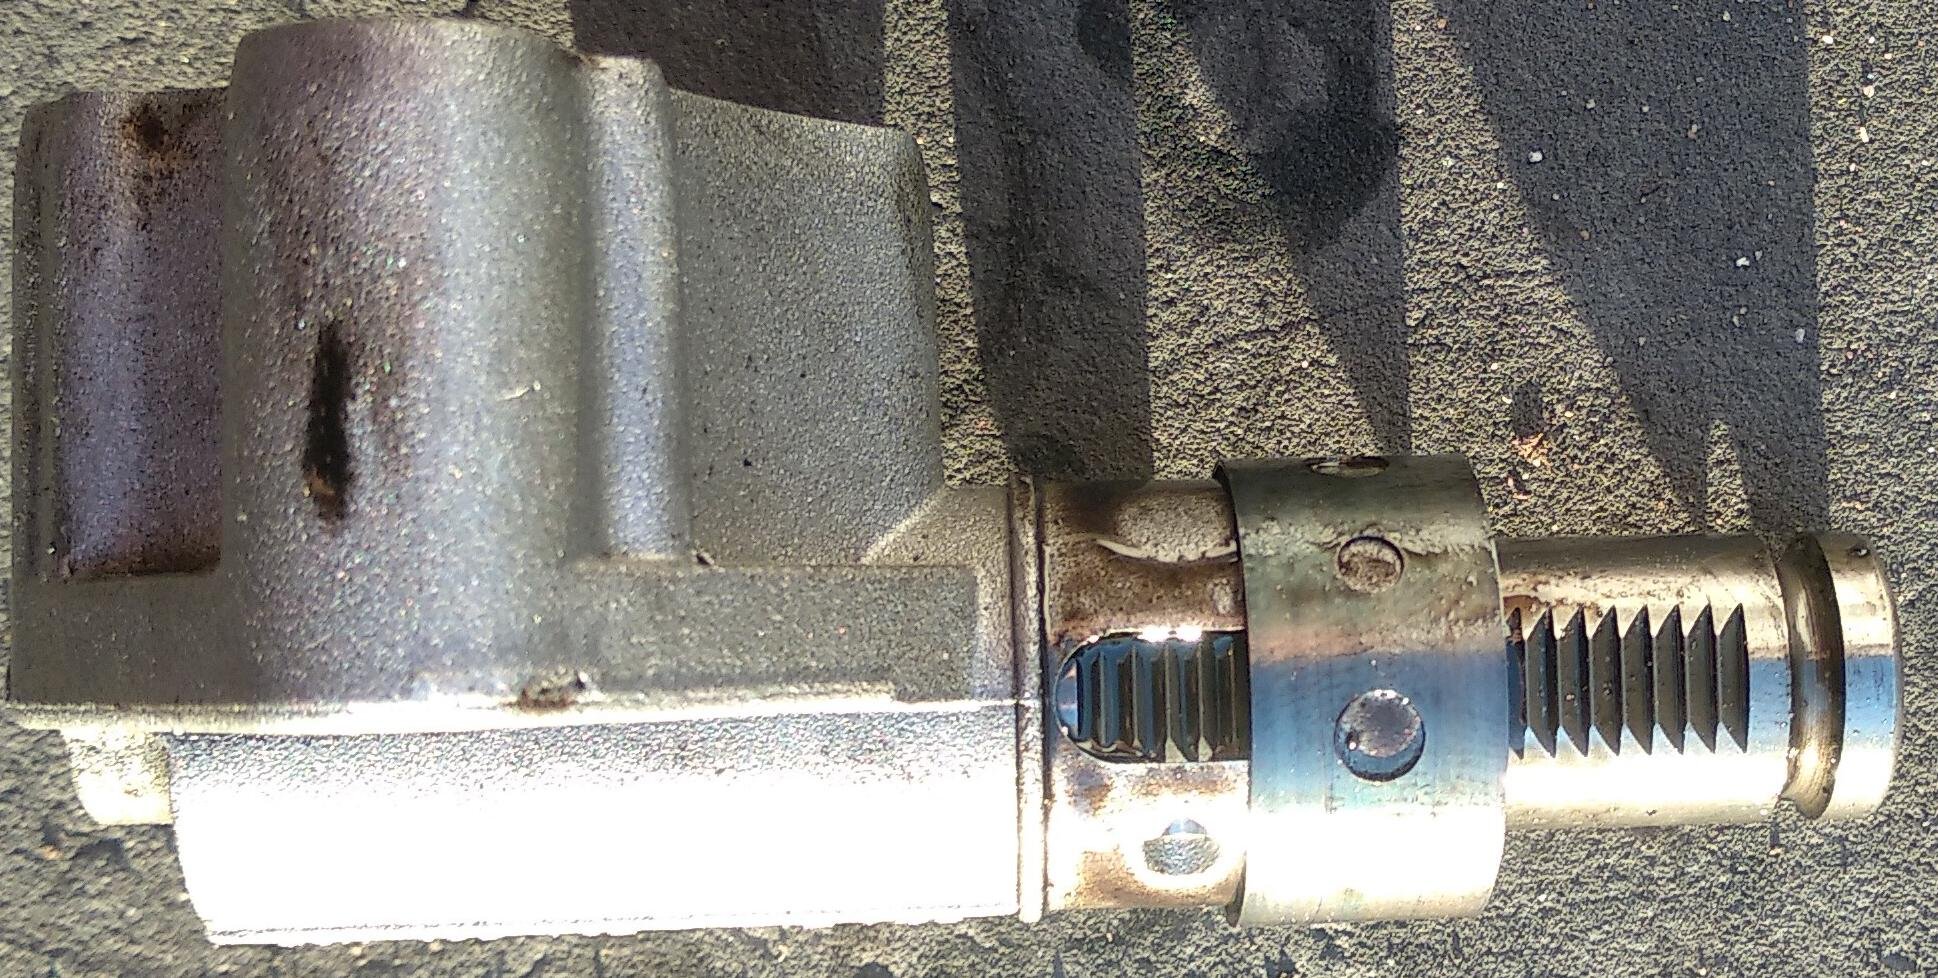
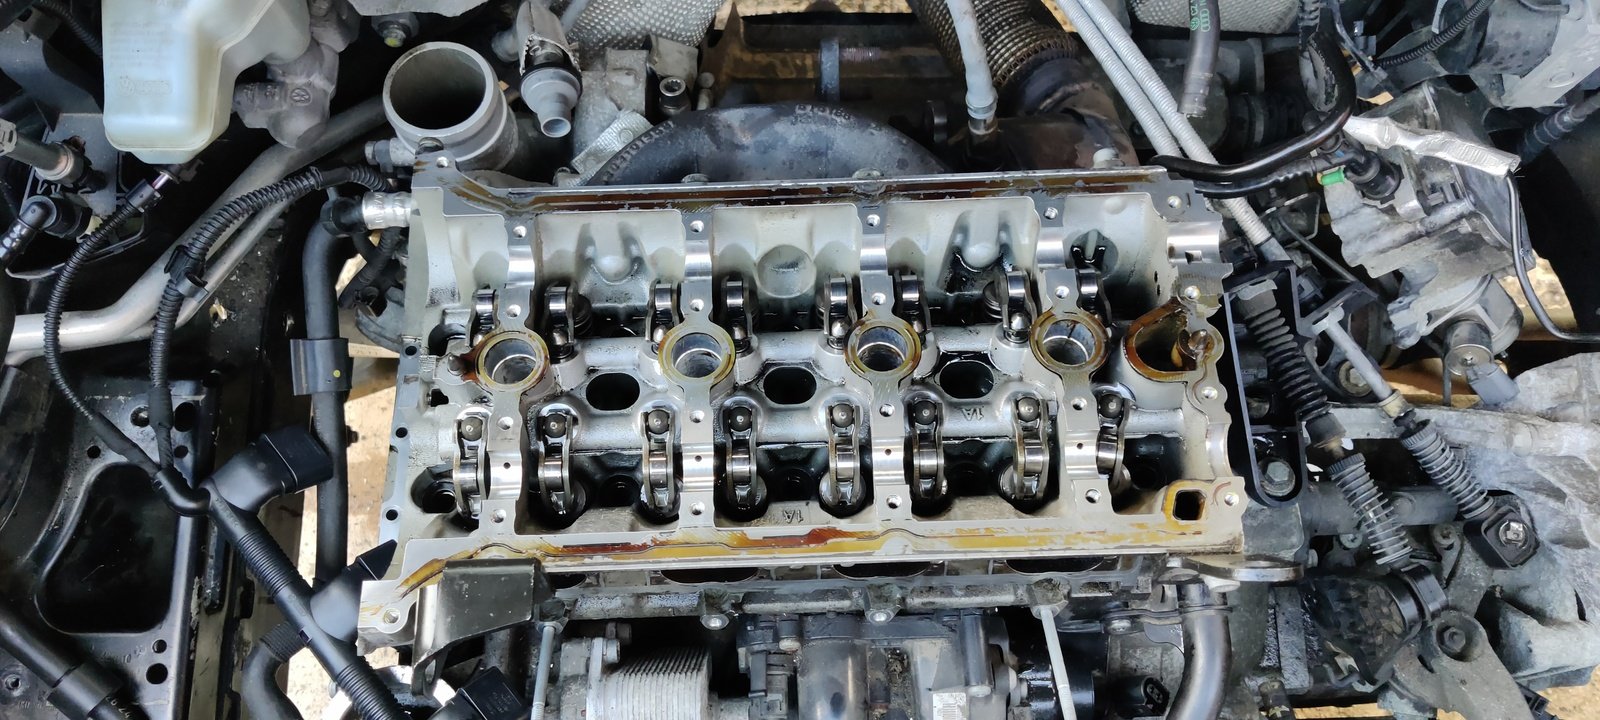
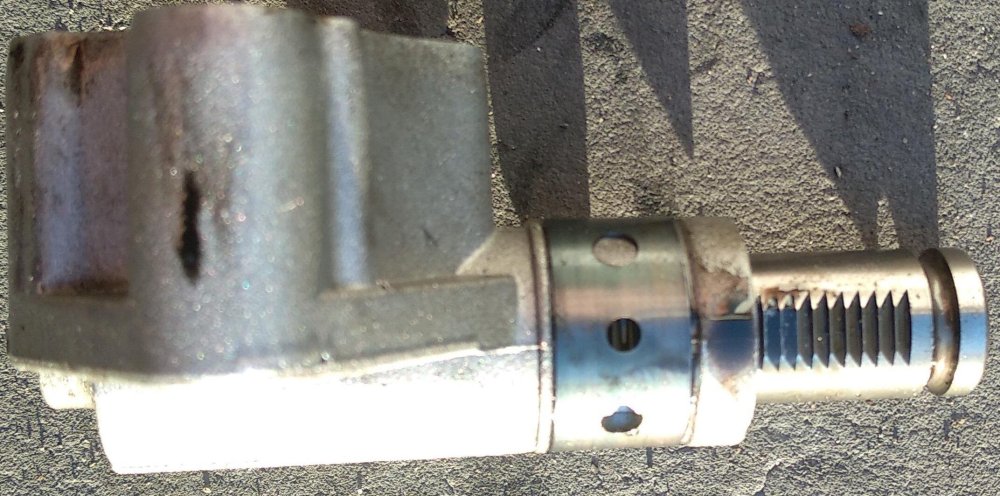
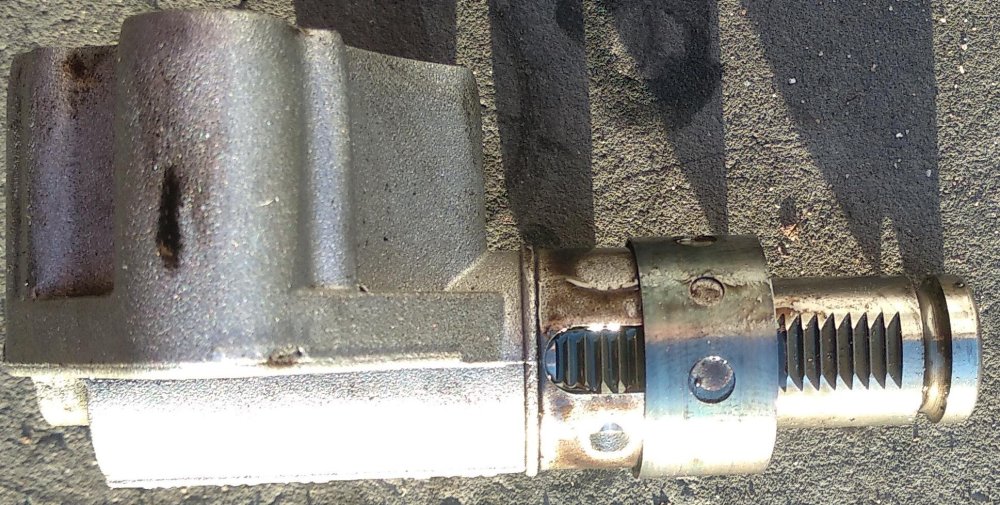
000017 - Bank 1: Camshaft A (Intake) P0011 - 000 - Retard Setpoint not Reached (Over-Advanced) - MIL ON As I've mentioned in another topic I'm getting the above error on my engine. Now that the weather is improving I've taken the solenoid out and checked it. It moves freely and when I apply 12V is pushes strongly the pin outwards. VCDS on my running engine shows no timing adjustment, it is stuck at 6°. The camshaft control valve (06H 109 257 C) surface is flush with its body but when I try to push it in it doesn't move at all. So I think replacing this part will solve the stuck timing. I have the following question: is it possible to replace this valve without taking the upper timing cover off? Maybe by using a 90deg impact screwdriver? Or will this damage/shift the camshaft intake lobes? This makes a huge difference for me: half an hour job compared to a full day job (taking engine brackets off, jacking the engine etc.)
-
Just a follow up: I've done now more than a thousand miles with the car with no problems at all. I've noticed that my previous oil consumption issue is gone, the oil level is still the same as when I've filled it after the repair. It could be the new valve stem seals or something else I've done when I've rebuild the engine. My fuel consumption is also better and I attribute this to thoroughly cleaning the nozzles of all injectors. I've since also passed the MOT with flying colors. The engine is running great and has lots of power. I have one nagging issue though, I keep getting one error every time I rev up the engine with little or no load: 000017 - Bank 1: Camshaft A (Intake) P0011 - 000 - Retard Setpoint not Reached (Over-Advanced) - MIL ON My first thought was the timing might be off by one dent but I've triple checked all the chain marks and position when I've assembled it back. I've then measured group 93 several times at different dates and I get excellent values: Group 093: Camshaft Adjustment Adaptation 760 /min Engine Speed (G28) 17.3 % Engine Load 18.0 % Engine Load 16.5 % Engine Load 0.88° Phase Position Bank 1 Intake 1.49° Phase Position Bank 1 Intake 1.44° Phase Position Bank 1 Intake The phase angle should be in the +/- 4° degrees interval and mine is even better so I'm not worried about the timing anymore. There might be a lot of other causes for the above error: - I have a new crankshaft sensor - the new chain was at least 1cm shorter than the old one (which elongated over time) - maybe camshaft timing control solenoid or valve are not working well (since the error comes back only when I rev the engine) For now (until the warm weather comes back next year) I think I'll just ignore the camshaft error.
-
So how much did this repair cost me? The answer is around £900 with half of that amount in tools that I can keep. I will probably return the injector kit because the hammer and extraction tools are rubbish and I'll replace that with just the dies to install the injector teflon seals. The US PRO 42pc set was of bad quality and I'll probably bin that. In this repair I have reused the crankshaft bolt, the lower chain cover (I've removed it carefully) and the camshaft bridge. I've only replaced the head bolts and all the gaskets. Parts: £131.24,Timing Chain Kit B18778 £121.35,Valves Kit B18634 £105.81,Gasket Set, cylinder head TS0063BT £15.59,Sealing Substance 75000400 £11.46,Permatex 81950 Ultra Slick Engine Assembly Lube, 4 oz, Red £7.90, Visbella RTV Silicone Hi-Temp Black Gasket Sealant For Oil Sump Engine Oil Pan £18.08,Injector seal kit F 00V H35 007 £19.31, Camshaft Position Sensor 0986280600 Bosch 07L905163 07L905163C 06H905163A £10.62, 9873 MANNOL Intake Valve EGR IAC and Throttle Body Cleaner Diesel Petrol 400ML £9.95,Chemico Valve Grinding Paste 100g Fine & Coarse Grade + Lapping Stick Tool Set £7.50, 50x VW Audi engine cover undertray splashguard wheel arch Torx Screw £11.01,Sealey SCS104 Bentone Grease for Brakes 500g Tin £469.82 Total Tools: £57.99,DEPSTECH Dual Lens Endoscope Camera, 1080P Dual Camera Borescope Inspection Camera with 7 Adjustable LED, Zoom Waterproof Snake Camera £59.99,Mekanik Timing Tool Kit R4 EA888 16v 2006 onwards Compatible With Audi A3 A4 A5 TT Q3 Q5 £20.99,HFS (R AUTO Solid Valve Spring Compressor Automotive Tool Set Repair Tool Kit £22.94,Professional Petrol Engine Compression Tester Kit Set for Automotives and Motorcycles £49.99,18pcs Injector Puller Installer Removal Tool Set and Service Kit For Petrol VAG Vehicles 1.4,1.6,1.8,2.0,2.7 V6,3.0 V6, 3.02V6, 3.6 V6 and 4.2L FSI £16.95,DAYUAN 11pcs Valve Stem Seal Remover and Installer Removal Extractor Installer Plier Tool Kit £9.95, Magnetic Torx Extra Long TORX Screwdriver Set Star Set T15 T20 T25 T30 Torx Drive £15.90, US PRO 42pc Set Hex, Allen, Torx, Star, Spline Bit Sockets 3/8" 1/2" DR 1486 £15.35, US PRO Tools 9pc 1/4" 3/8" 1/2" dr Impact Extension Bar Set For Sockets 3462 £18.95, US Pro Tools 3/8 Impact Spline Bit Socket Set Extra Long S2 Steel 7-Piece M5-M14 £16.95, 9pc Stubby Impact Spline Bit Socket Set M4 to M18 in EVA Foam Tray US PRO TOOLS £25.78,Male Torx Star Impact Deep Sockets 9pc 1/2" Drive T20 - T70 by Bergen £21.99,9 PCE Impact RIBE bit Socket Set R5 R6 R7 R8 R9 R10 R12 R13 R14 1/2" Drive £10.72,Kora 77 Rubber Block £6.99,BGS - 1/4" Drive, 300 mm - Straight Lock - Extension Bar - Pro Range - BGS 2210 £10.99,LEXIVON Impact Socket Adapter and Reducer 4-Piece Set | 1/4" - 3/8" - 1/2" Impact Driver Conversions, Chrome Molybdenum Alloy Steel (LX-112) £19.99,LEXIVON XZN Triple Square Spline Bit Socket Set, Premium S2 Alloy Steel | 10-Piece European Style M4 - M18 Set | Enhanced Storage Case (LX-145) £16.79,Youyijia Torque Wrenches 1/4" Square Drive Torque Wrench 5-25Nm Adjustable Wrenches Ratchet Wrench with Double Scale Drive Torque Micrometer Chrome Va £9.99,10 x SabreCut SCTKA10 50mm T10 T15 T20 T27 T30 T40 Impact Screwdriver Driver Bits Set Single Ended Torx 10 15 20 27 30 40 Heavy Duty Including Storage £5.25, 10pcs 22mm Brass Wire Wheel Brush for Dremel Rotary Tool £434.44 Total
-
Thanks, I've figured them all by myself. I have very good news, my engine is now fully rebuilt, it started at first crank and it's working fine. I've even made a quick 5 mile test drive and it seems to have more power than before (probably because I've cleaned it thoroughly). I've also measured the cylinder compression and I have 11kPa for 1-3 and 10.5kPa on cylinder 4. This was the most complex car repair I've ever done and being successful boosted my confidence a lot. The most complex tasks in order of difficulty were: - putting back on the left engine bracket (with the 3xM10 spline screws) - installing the intake manifold - connecting the 3 pipes back to the turbo exhaust (under the car with space for just one hand).
-
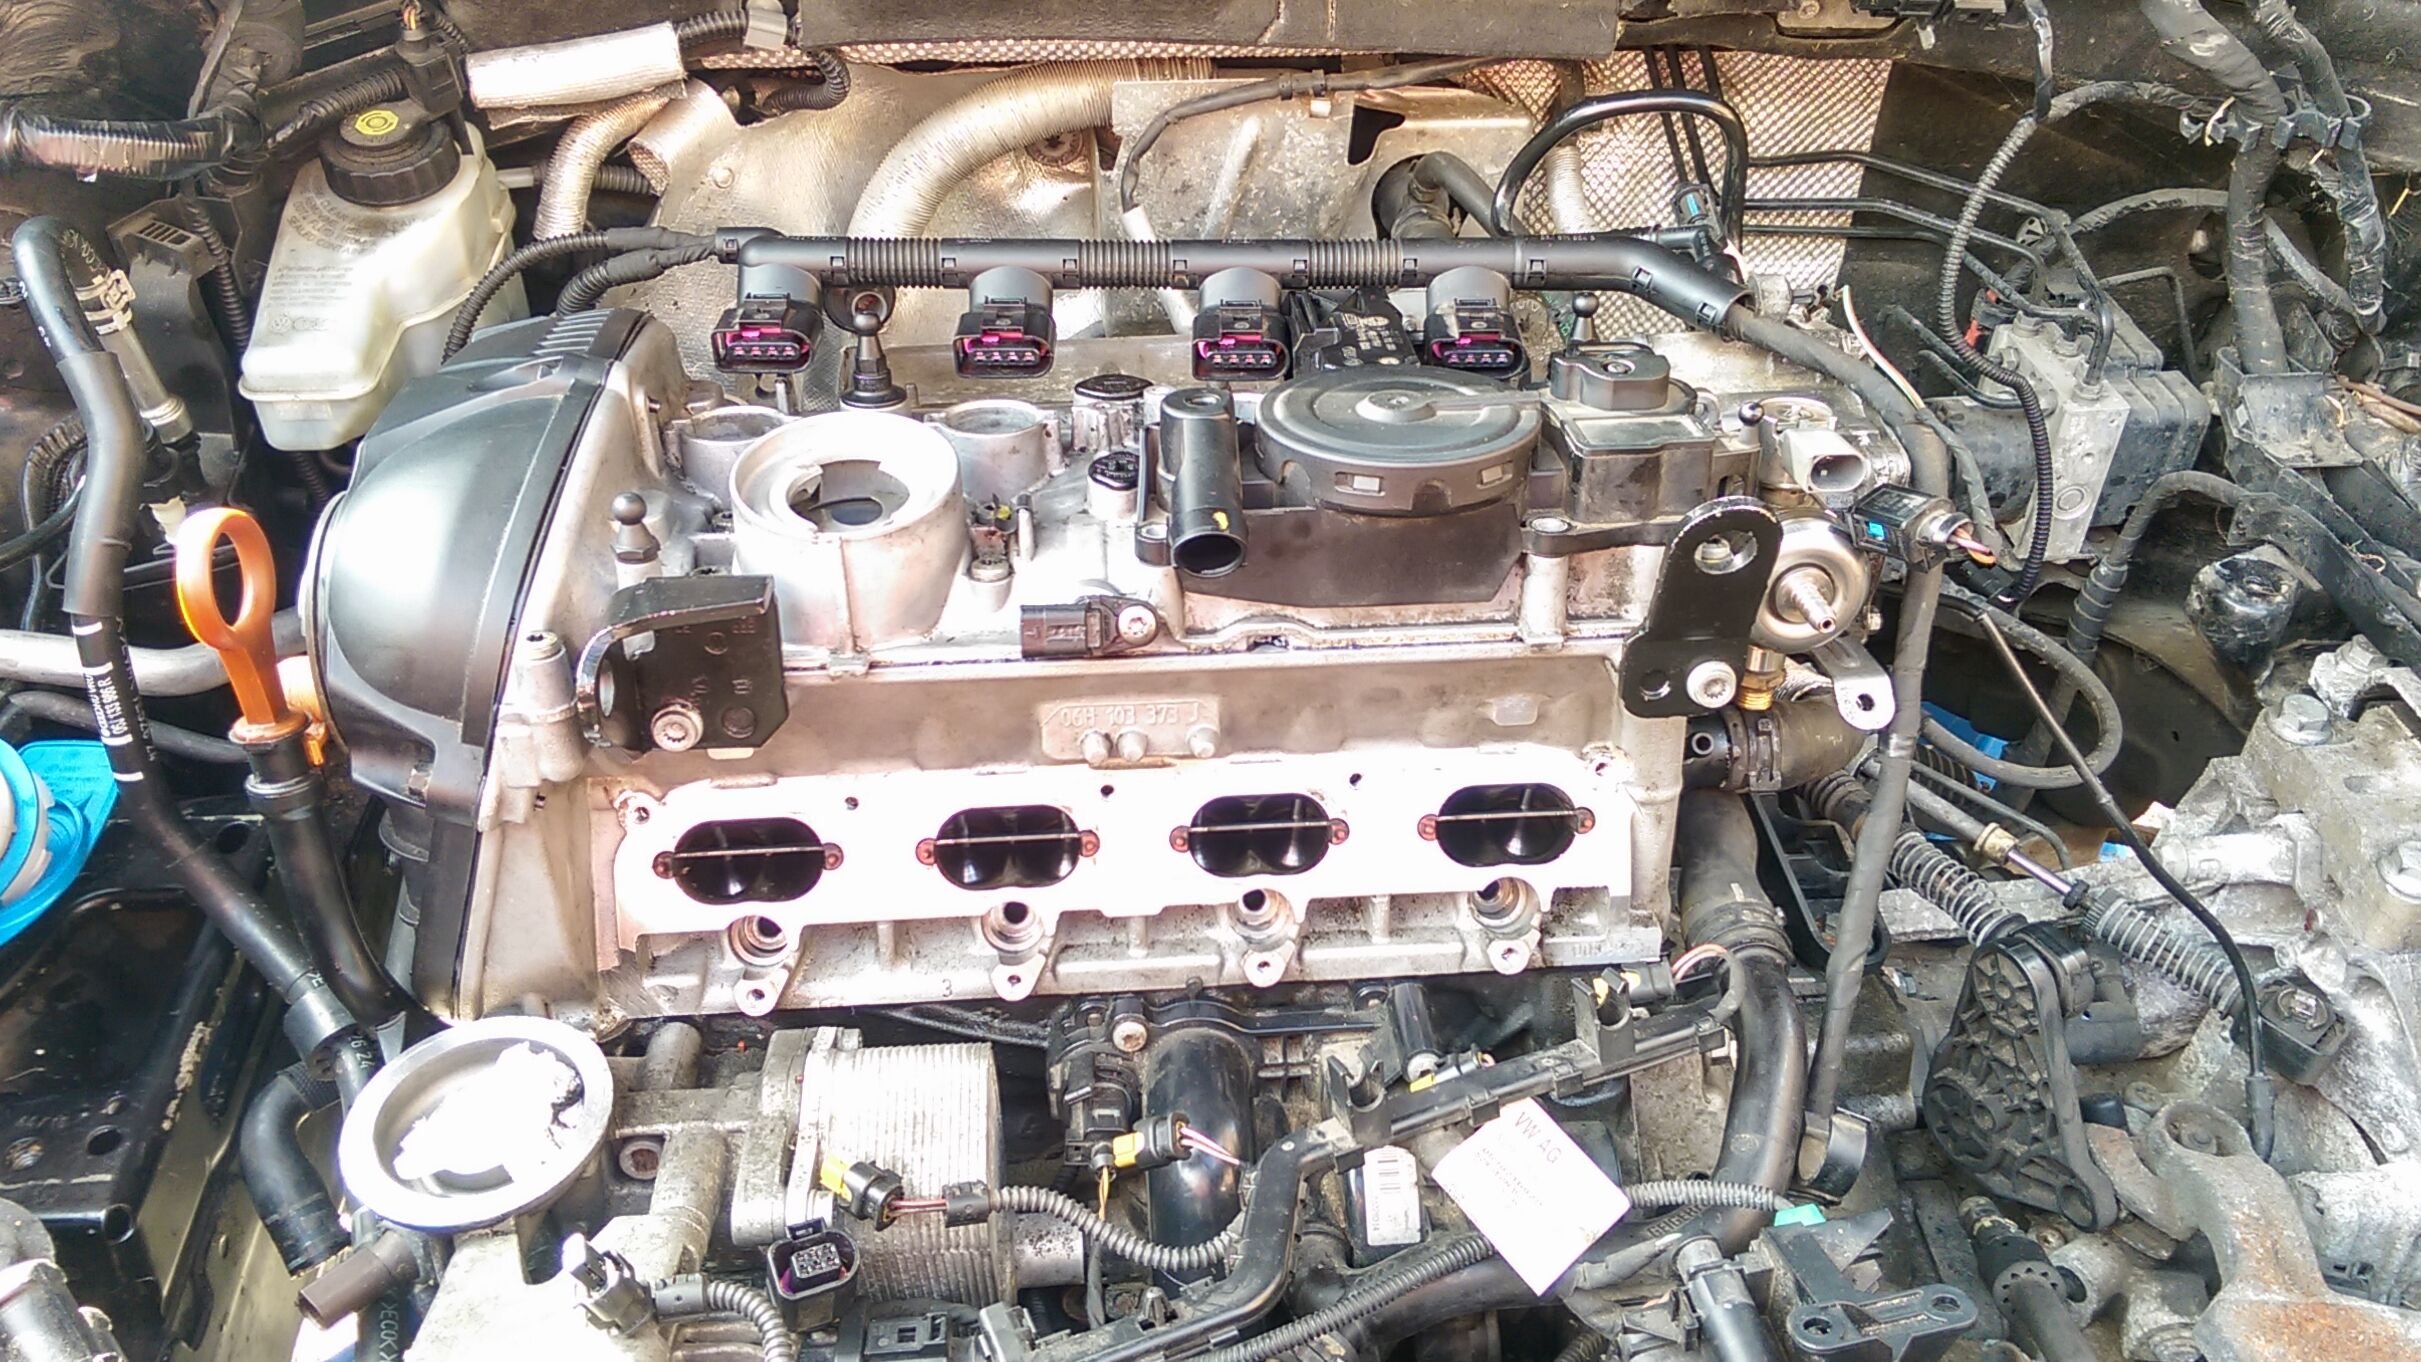
Cylinder head and cover are back on the car, engine timing done, chain covers back on. I've put new teflon and rubber seals on the injectors and I'm ready to put the intake manifold back on. I wish I've taken more detailed photos because there are still a few hoses which I'm not sure where they go 😉 One dreadful task still left to do is putting back that left engine bracket. I'm slowly getting there.

-
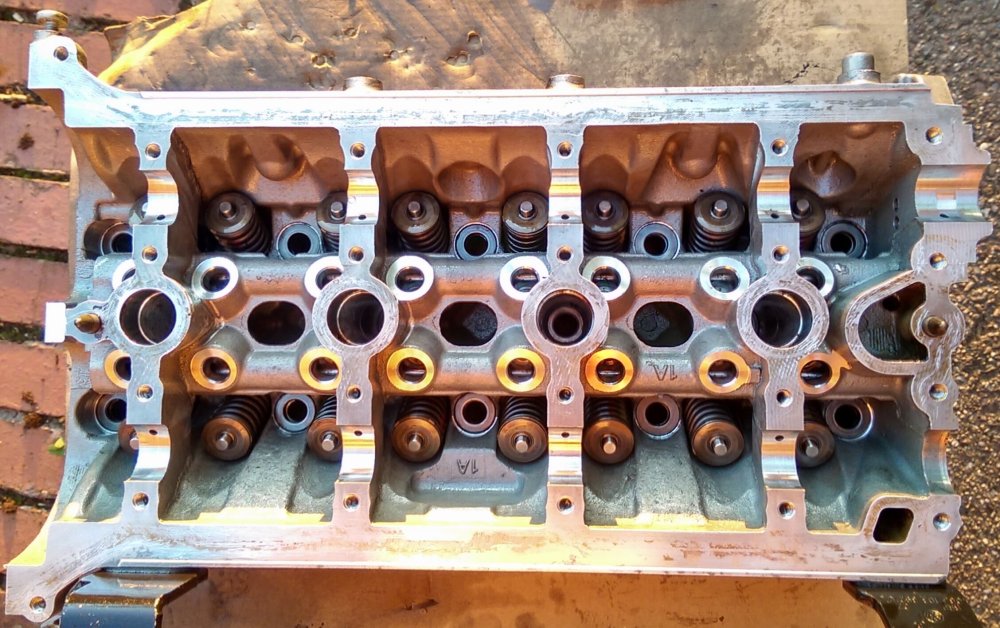
I have a question: what is the correct sequence when installing the new chain once the head is bolted down? The valve crankshafts have no bearings and are held down by the head cover screws (10 each). Should I leave these screws loose until I adjust the chain and then torque them down just before releasing the tensioner clip? I'll use the micrometer to set cylinder 1 at the maximum height and use the marks on the two crankshafts (and timing chain) to position them and lock them with the tools from the timing kit.
-
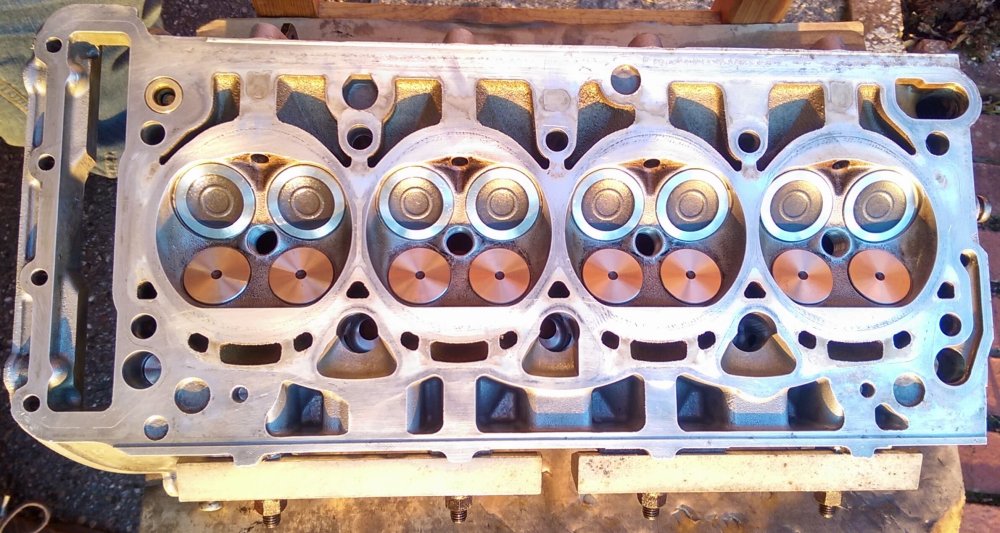
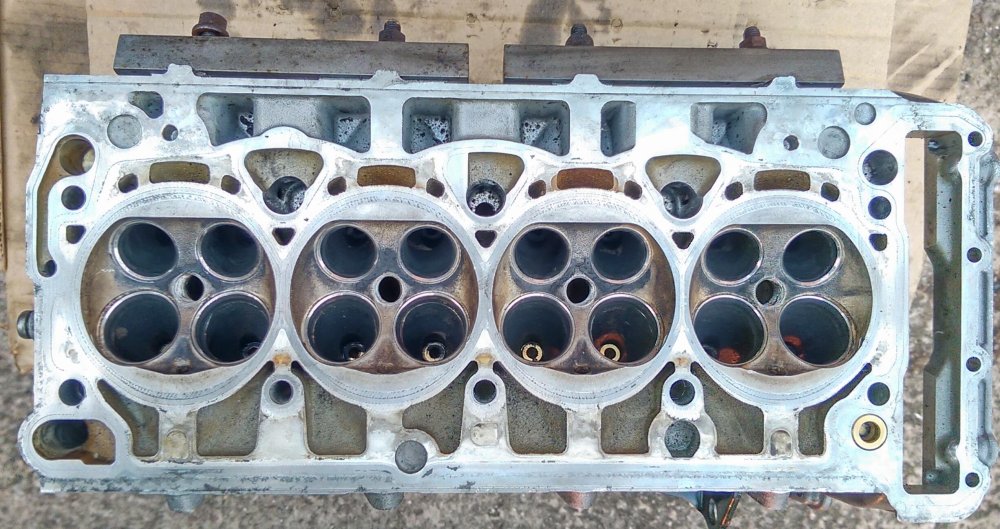
I haven't counted but I've spent at least 20h cleaning the cylinder head and installing the new valves. I had to go into every nook and cranny to remove the old sealant, clean the head cover, the exhaust manifold, polishing the inlet and exhaust ports, polishing the injector ports, lapping the new valves into place and so on. The exhaust threaded pins (from both ends) where quite rusty so I've used a tap and die kit to re-thread them and I can now turn them by hand. When lapping the seat for a new valve I've first used the coarse paste, removed one suction cup from one end of the lapping tool and stick it in an electric drill. Then I've cleaned the paste, reapplied fine paste and finished the lapping by hand. You could hear the change in pitch when the seat and valve were perfectly polished. I was about to put the head back on when I've noticed in my gasket set 16 green caps which turned out to be valve stem seals. I wasn't even aware those could be changed and no one here mentioned them. I am now convinced those are to blame for my increase oil consumption given the state of the old spark plugs and valves which were covered in a thick layer of carbon. The green rubber was much harder on the used ones compared to the new from the set. I just wish I've noticed them one day earlier because I had to take the valves off and put them back on again and instead of half an hour it took me another 4h. For the valve removal I've used this tool which was incredibly good for its price. I've used it twice on 16 valves and it hasn't bent at all. For the stem seals you need yet another tool. This one was also cheap but not as good. I had to file down the extractor (which looks like a forceps) clamps to make them close better and the gripping ribs are not deep enough. It takes several pulls until you can remove one valve seal. The insert tool from this same kit was perfect. It pushed down only on the metal part of the seal evenly on all sides and they are all changed now. Tomorrow the cylinder head and exhaust turbo go back on the car.
-
Yes I'll manually lap all new valves before installing them with this valve tool
-
I don't think the valve guides or seats have been affected in any way, there is no mark on any of them and the old valves were not stuck. I don't have any experience with changing valves but am I wrong thinking that I only need to replace them as is? All changed parts are OEM. This is what I've ordered: Timing chain kit Valves Gasket set
-
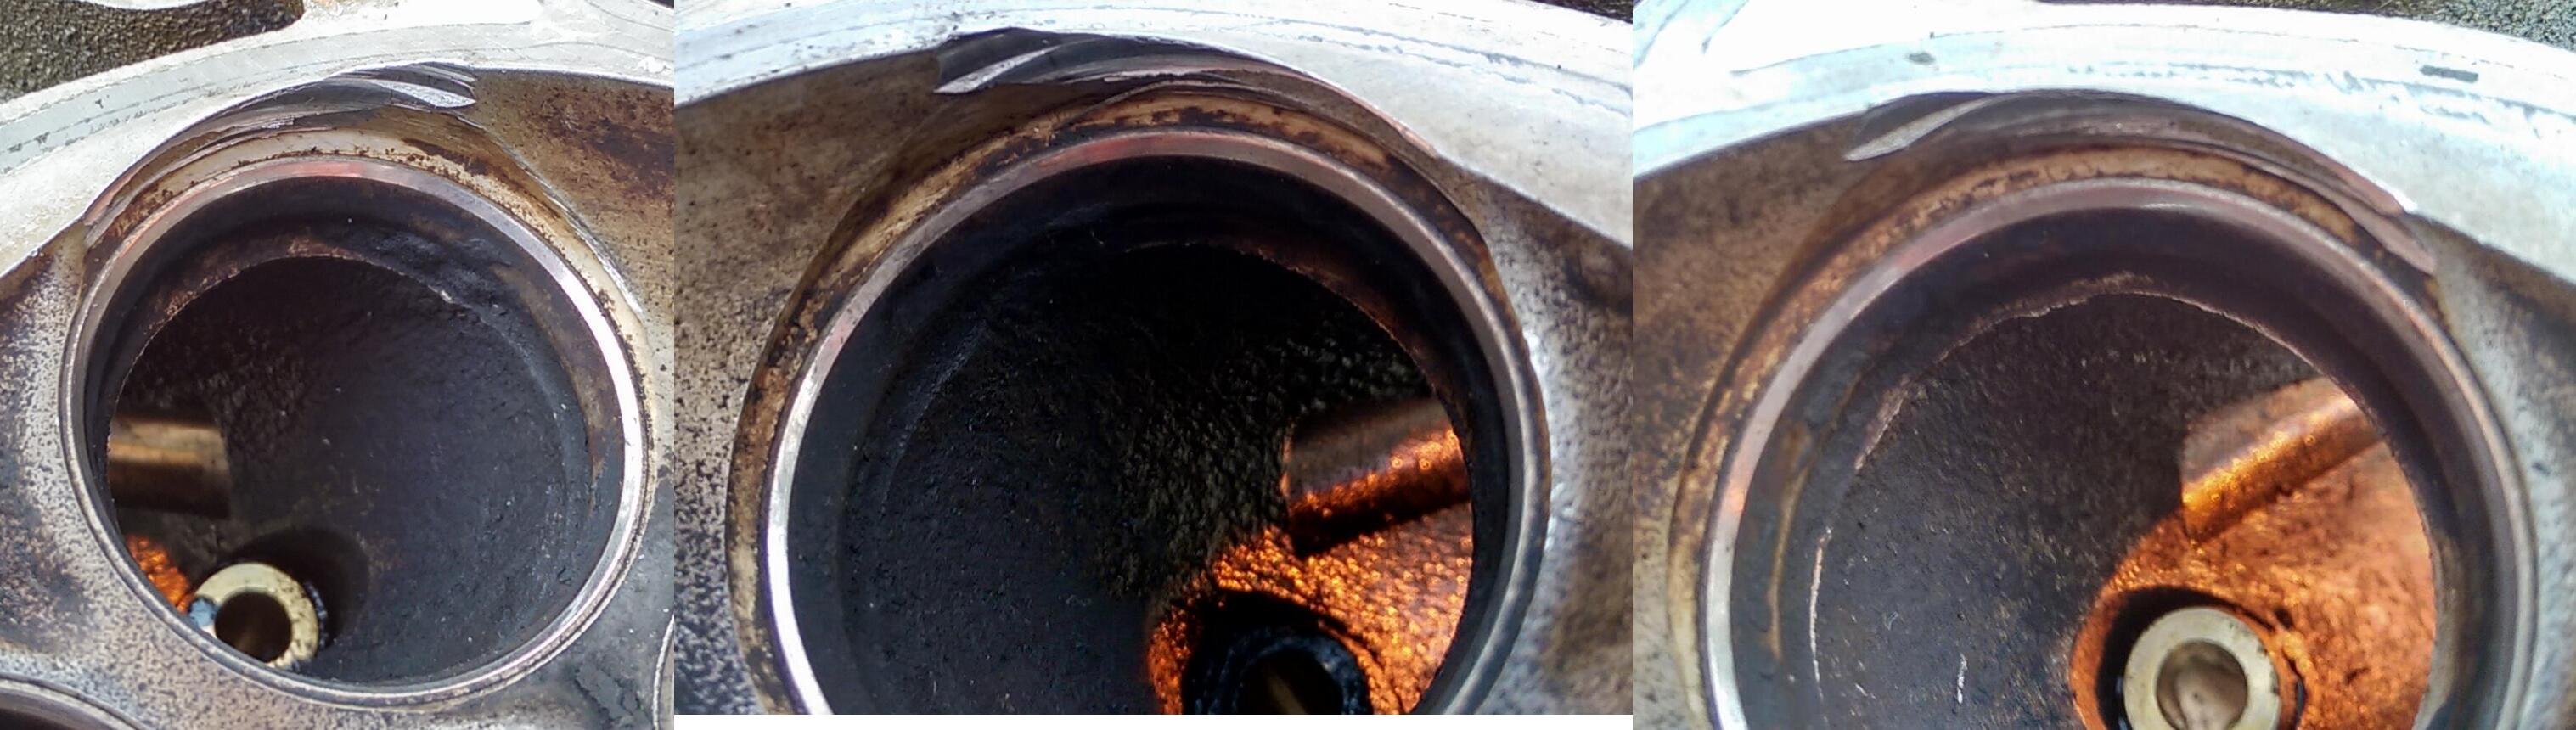
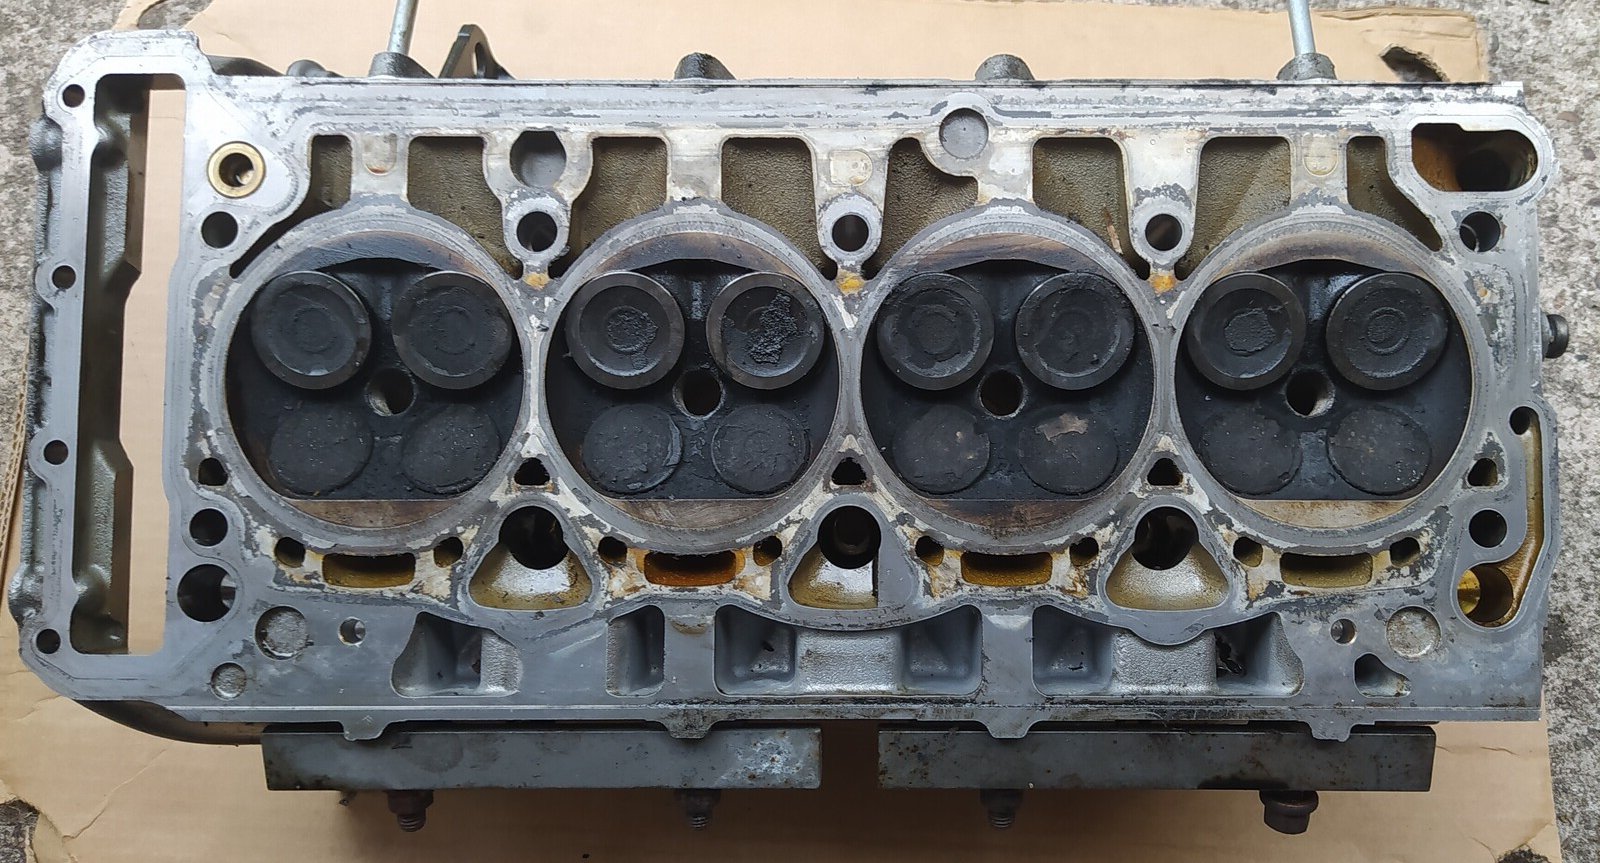
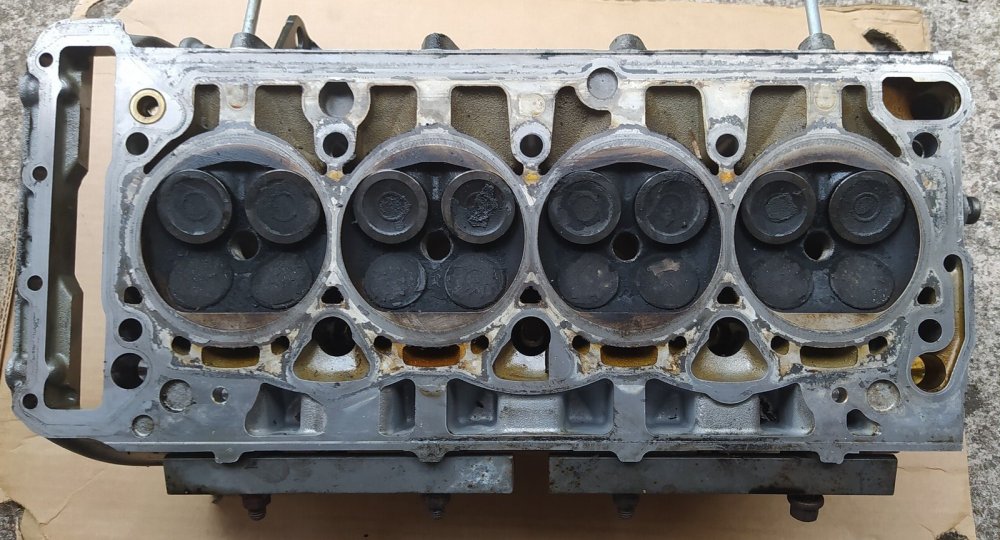
I took the valves out and I've spent a few hours cleaning the head (very time consuming). All valves came out with just a hand push. I've used a combination of intake valve solvent, kerosene, kitchen paper towel and the green slightly abrasive kitchen towel for the two mating surfaces. I've been very careful not to scratch these surfaces. Then I've used a Dremel with a wire mesh disk to clean the inside of the valves port. There is no damage to the valve seats and the head seems to me in good condition so I'll reuse it. Three out of the eight intake valves have crushed the lip of the head (the crush can be seen in the picture). For those I've used a chisel shaped knife with a flexible steel blade and I've removed a tiny amount of the aluminium where it was crushed and I'm pleased with the result. I wasn't able to clean the exhaust valves (I've tried a lot of solvents); the deposit on the valve surface is almost like stone and I don't want to use flame or any mechanical grinding. So I've decided to change all the valves. When I put it back together with a new head gasket should I also use a spray to cover both sides of it or is the gasket by itself good enough?


-
I've read that the PCV valve could be stuck open and make the oil consumption increase. Is there a way to check if mine is still working properly or should I just replace it for good measure?
-
The faulty timing chain tensioner had no wedge at all under the metal clip (probably it was so worn that it fell through the little hole. I hope that little piece of metal has been flushed with the oil. Also the camshaft bridge had the metal mesh torn apart (but not loose). I've read there is a new bridge model with better filter so I'll buy the new version. As I've mentioned earlier the engine had an increased oil consumption in the last 3 months prior to this fault (oil sensor lit every three weeks or so after oil top up). Do you have any suggestion for what else should I check while the engine is opened to find why it was all of the sudden burning more oil.

-
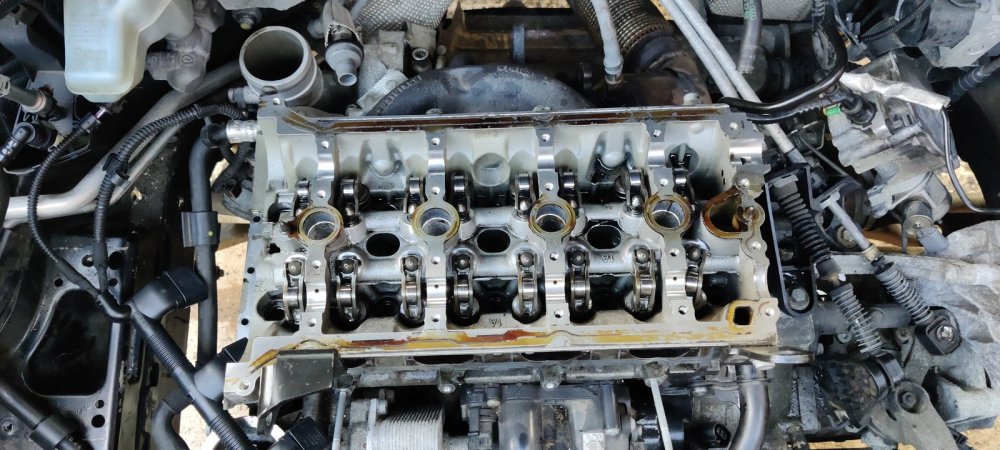
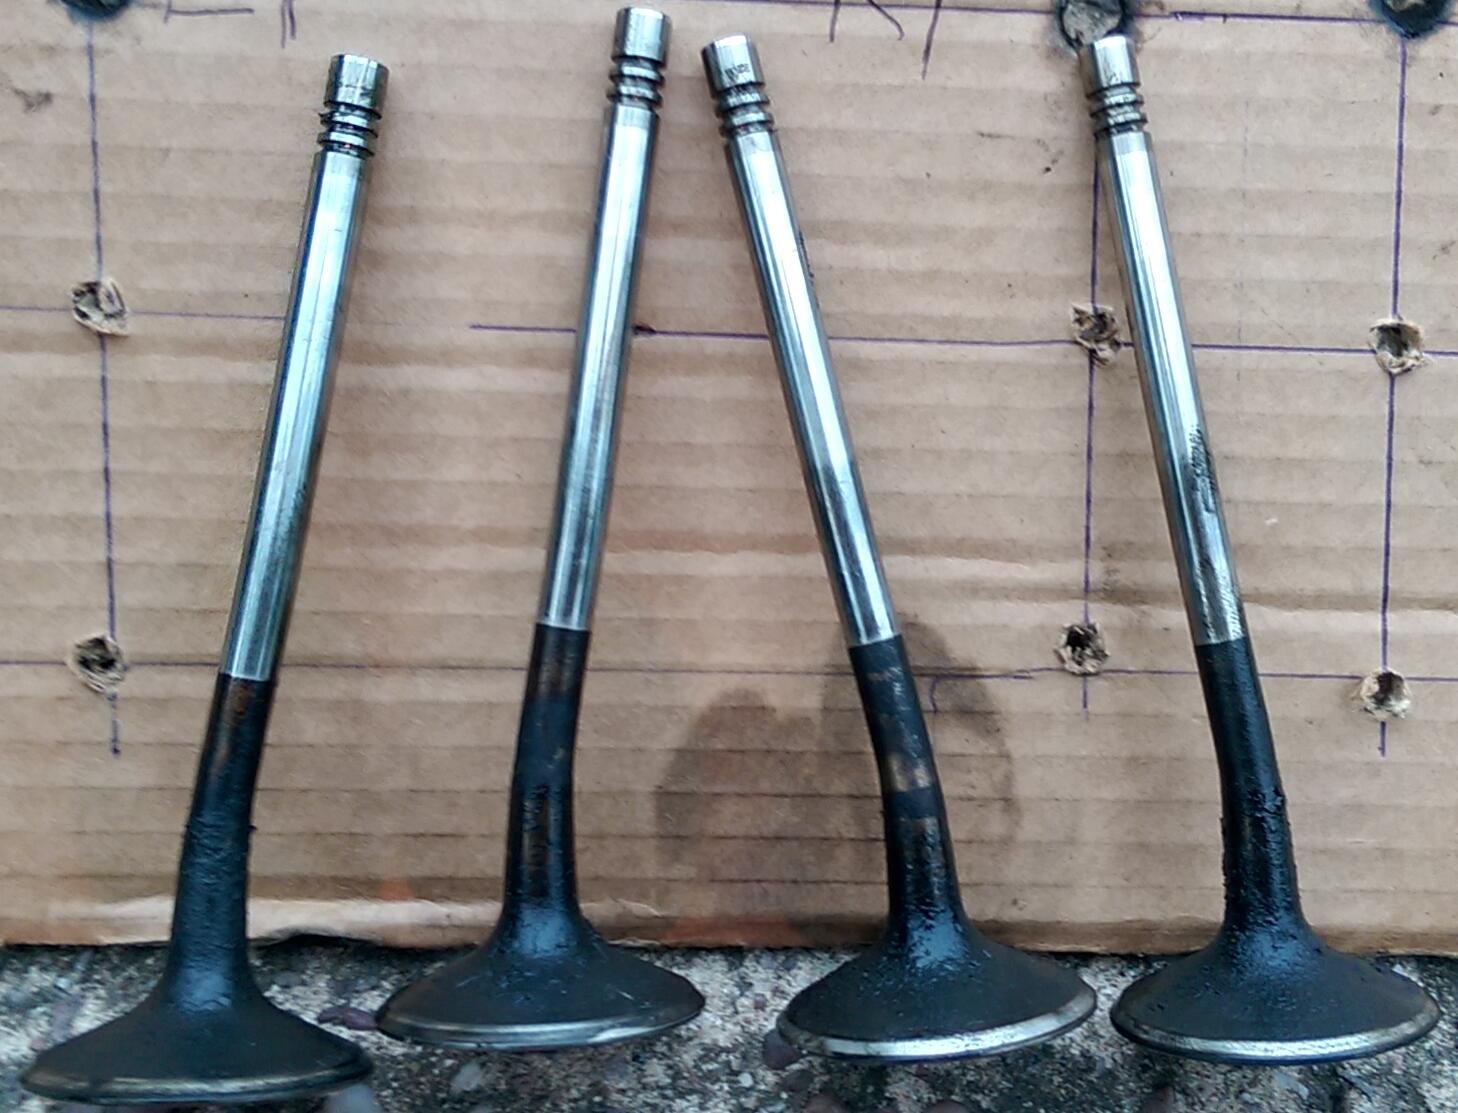
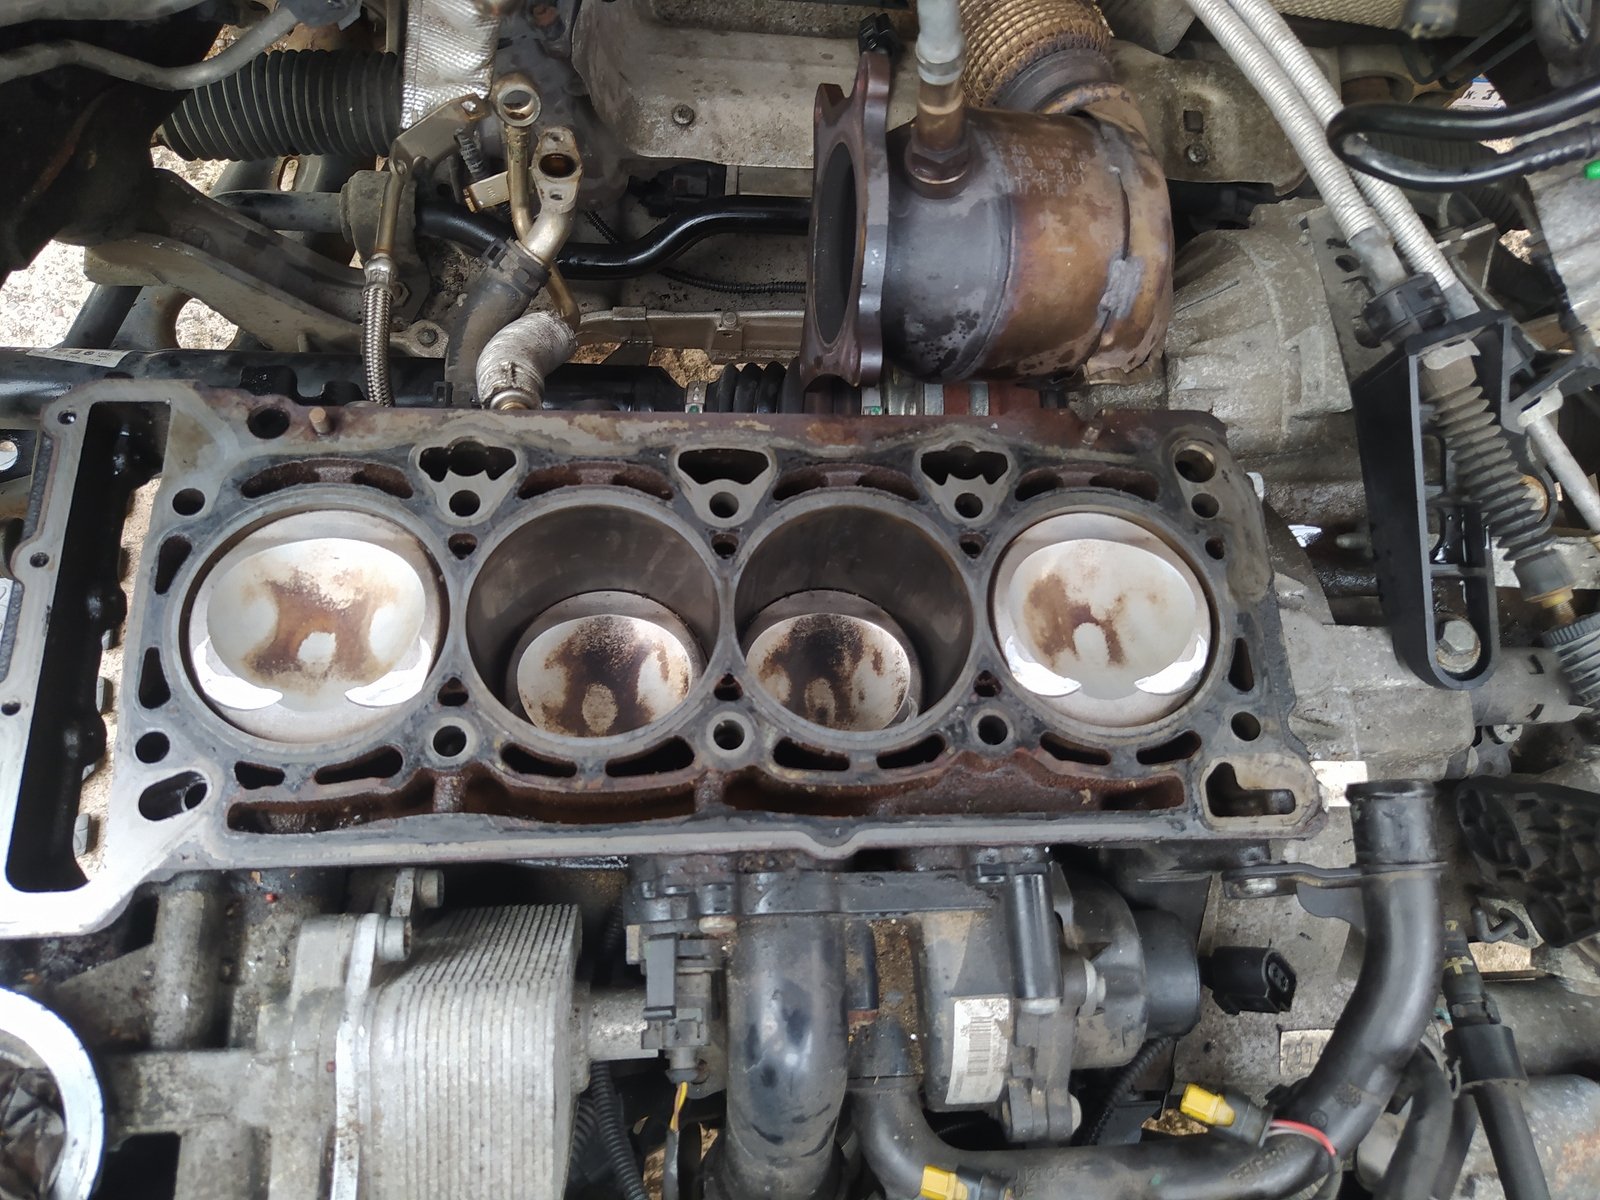
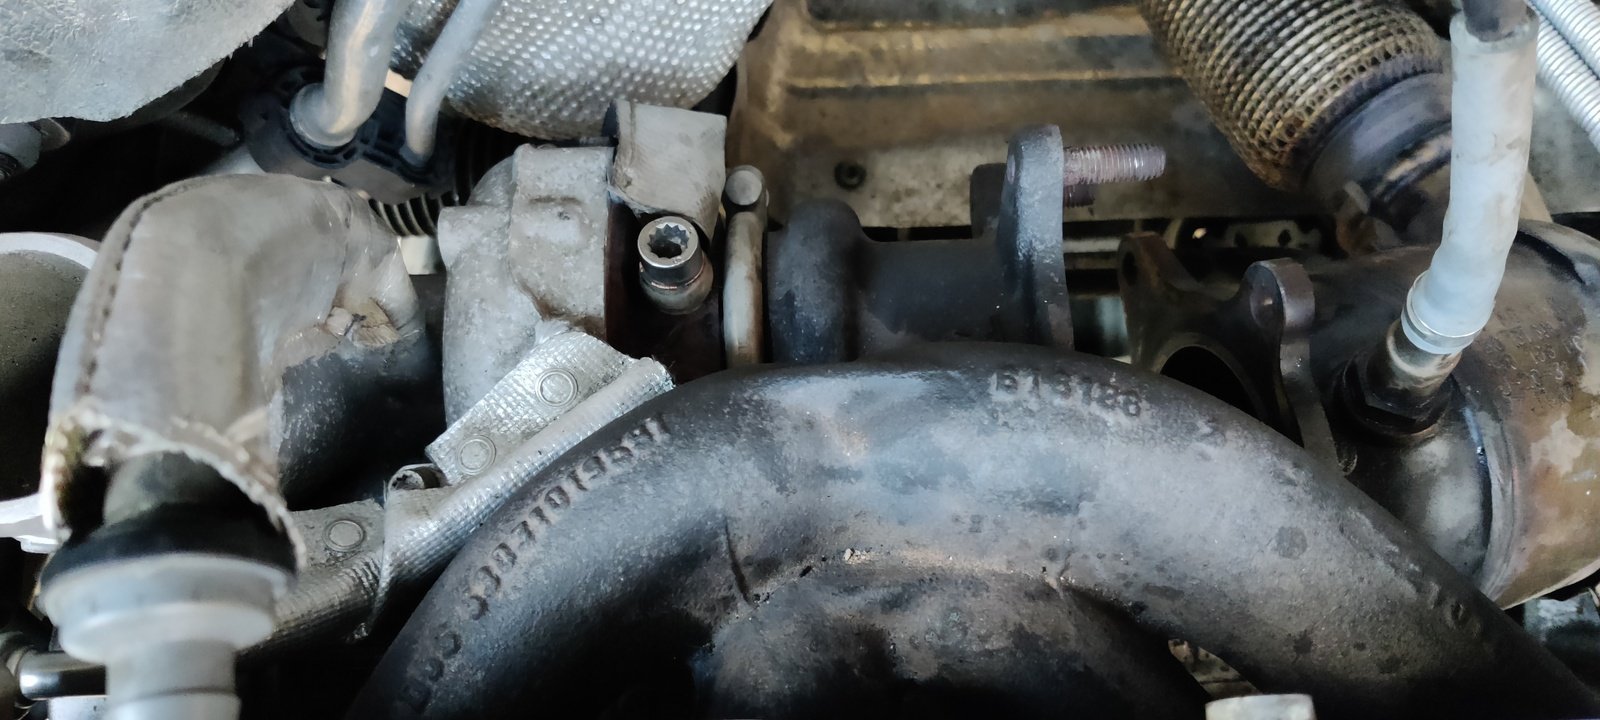
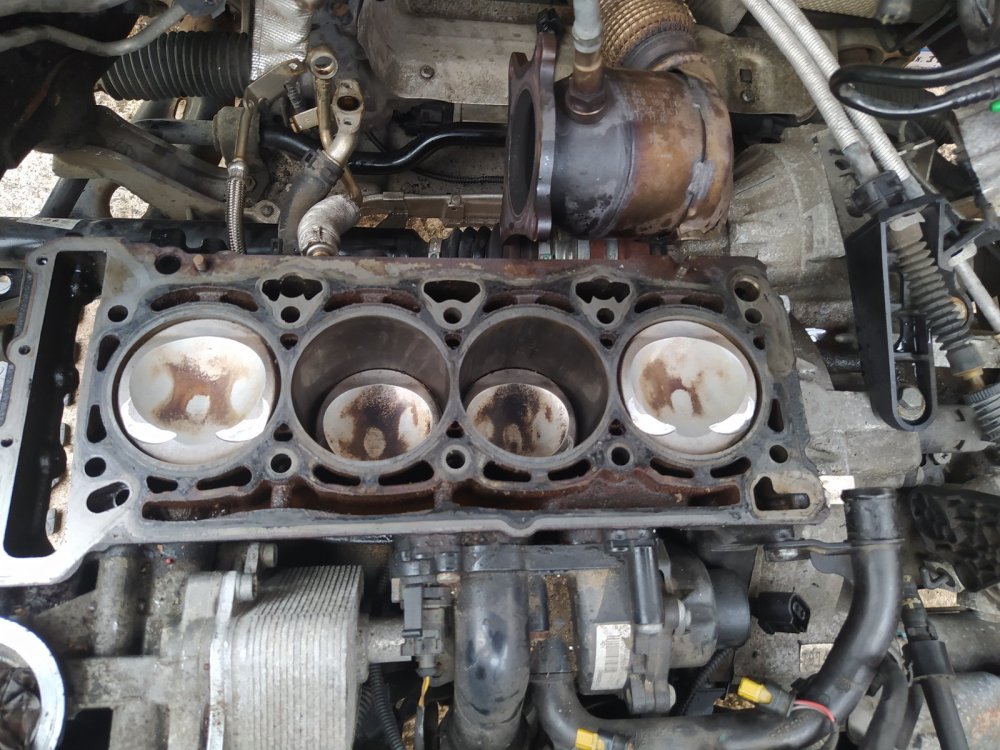
To release the head and exhaust manifold I had to raise the car and engine even more so I could slide under. After removing a plastic round shield I've gained access to a bracket (3 screws) holding the turbo exhaust and 2 oil pipes and one coolant pipe all accessible from under the car. The head was not heavy at all and I could lift it by myself. Finally I've got access to cylinders. The pistons are in very good shape not even a scratch. I think I've been lucky and the chain didn't slip too much. The valves have horrible carbon build up but the exhaust valves were not bent at all. Now I'm waiting for a tool to remove the valves. Is it better to just clean the exhaust valves and reuse them or should I change them together with the intake ones?
-
I've managed to remove the chain covers, timing chain and shafts. I took the head cover off and removed the 10x M10 Ribe bolts from the head (in the proper order). I've removed the little firewall from behind the engine and was able to remove 5 out of the 8 nuts securing the exhaust manifold to the head. I've later seen that the exhaust manifold should come off together with the cylinder head so I've separated the manifold from the exhaust (lambda sensor side - 4 nuts). The head still doesn't come off and I'm not sure what is still keeping it in place. Should I try to remove the exhaust turbo or are there any more screws holding it down the engine block?