distrnc
Finding my way
-
Joined
-
Last visited
Everything posted by distrnc
-
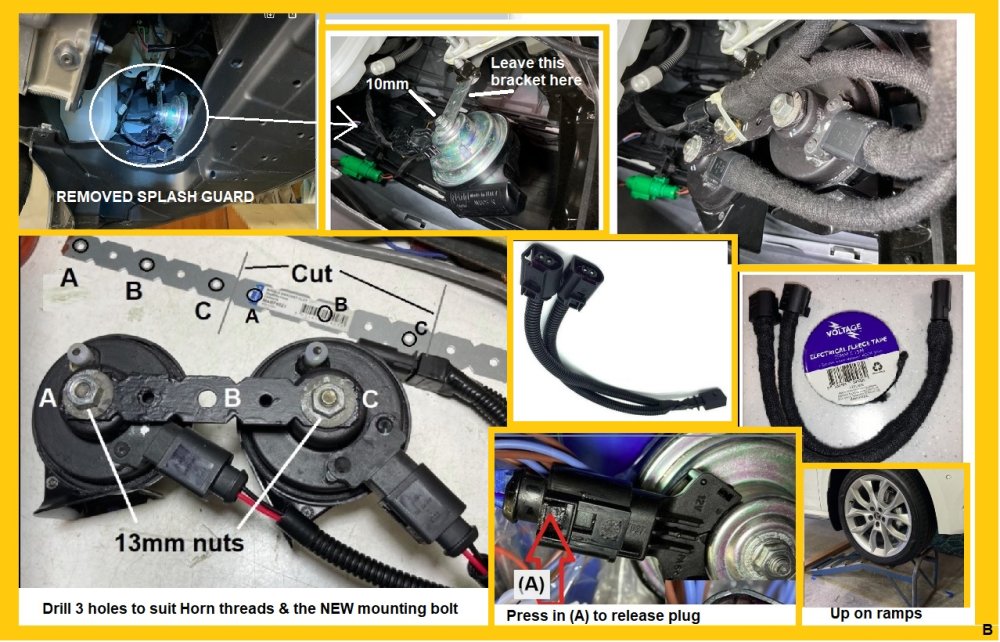
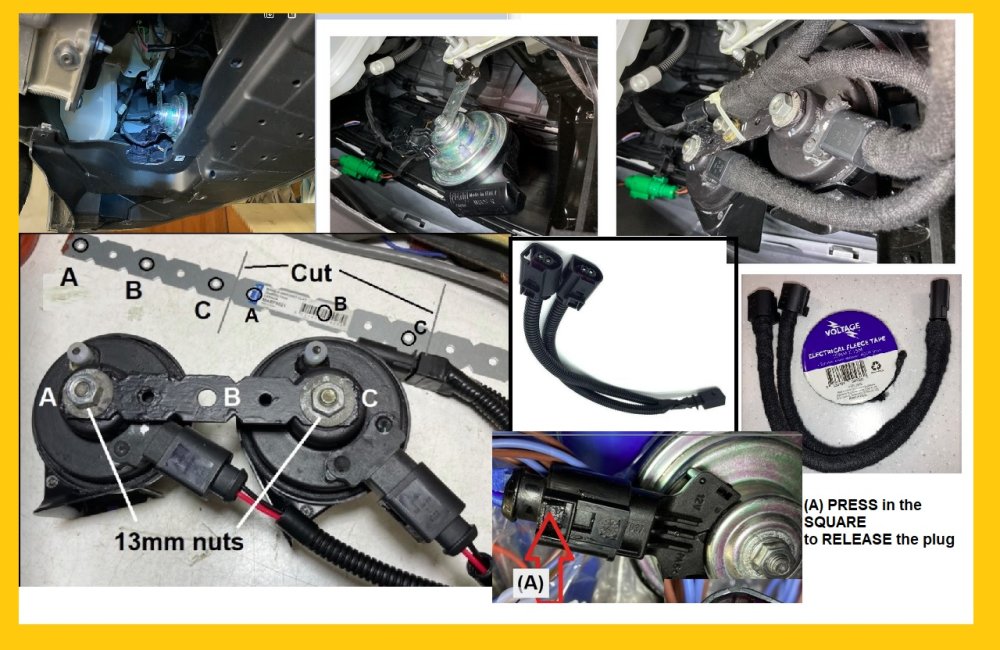
My Kamiq now has DUAL sounding horns .. buying a 2nd hand VW Polo Dual horn set and a Splitter cable.. both on Ebay. Leave the vertical bracket there, I made a new bracket for and attached the dual horns, bolted it to the existing vertical bracket, plugged in .. yay ! 30 Sept 2023 = Test that your existing horn does work before start, Car up on ramps, remove 9 x Torx #25 screws, to remove underside plastic underside splash guard. = On the existing SINGLE horn, .. Unplug wiring , by 'pressing down' the SQUARE piece at the wires end, to be able to pull the plug off , then remove 10mm nut, then attach your manufactured new bracket [with the Dual Horns mounted on], to the existing vertical bracket ( using a new bolt/nut ) & plug into the car horn wireloom plug ... do a TEST toot ! Cable tie the plug to the bracket. = To Make a bracket , I bought some perforated metal strap, cut to length and 'doubled' up for strength, drill 3 holes { A B C } to suit dual horns and centre mount attachment bolt and painted black. I bought the SECOND hand VW OEM Dual Polo Horns on Ebay. search: " Volkswagen Polo dual horn 6 " { some on ebay come with a bracket that may or may not suit your car }. There are plenty of other VW dual horns to choose from .. I chose the Polo because it is a smaller vehicle. ( a smaller horn size ? ). .. Maybe also search other VW models for a dual horn .. Beetle, Passat, T-Cross, Golf etc. Audi's - Seat's etc. I bought second hand VW OEM horns and NOT the copies or those ones with interconnecting loose wire sets. Also, maybe this company suits ? https://www.ebay.co.uk/str/vwbreakersyard = Bought a splitter cable. := AliExpress .. [ there are MANY ! ] . . .{ just copy and paste each item to search } (a) " One To Two Harness Snail Horn Plug High Low Horn Cable For Polo Golf Jetta ID.4 " (b) " For VW Santana Jetta POLO Golf 6 Jetta Bora High Low Tone Horn Cable Snail Horn Plug Connector One To Two Wiring Harness " ... (c) "The New AUD-I Jetta New Fabia two special Line Beam Horn Polo GLOF 6 Bora Mallet modification one turn two Plug" . . . (d) " For POLO Golf 6 MK6 Jetta Passat Audii Bora High and low tone horn cable Snail horn plug One out two harness " (e) " For VW POLO Golf 6 Jette Bora High Low Tone Horn Cable Snail Adapter Plug One To Two Harness Cable " ===================== := Ebay. . . [ if you can find any stock ] (i) " High and low tone horn cable plug One out two For POLO 2011-18 Golf 6 Jette Bora " (ii) "Modified Harness Electrical Horn Connector Plug For Skoda VW Audi" . . . (iii) " For VW / Audi / Seat / Skoda High Low Tone Horn Cable spiliter Harness adaptor " = Wrapped the splitter cable wire loom in Fleece tape.
-
this is my overview of Kamiq single to dual horns 30.Sept.23
-
My Kamiq now has DUAL sounding horns .. buying a 2nd hand VW Polo Dual horn set and a Splitter cable.. both on Ebay. Leave the vertical bracket there, I made a new bracket for and attached the dual horns, bolted it to the existing vertical bracket, plugged in .. yay ! 30 Sept 2023 = Test that your existing horn does work before start, Car up on ramps, remove 9 x Torx #25 screws, to remove underside plastic underside splash guard. = On the existing SINGLE horn, .. Unplug wiring , by 'pressing down' the SQUARE piece at the wires end, to be able to pull the plug off , then remove 10mm nut, then attach your manufactured new bracket [with the Dual Horns mounted on], to the existing vertical bracket ( using a new bolt/nut ) & plug into the car horn wireloom plug ... do a TEST toot ! Cable tie the plug to the bracket. = To Make a bracket , I bought some perforated metal strap, cut to length and 'doubled' up for strength, drill 3 holes { A B C } to suit dual horns and centre mount attachment bolt and painted black. I bought the SECOND hand VW OEM Dual Polo Horns on Ebay. search: " Volkswagen Polo dual horn 6 " { some on ebay come with a bracket that may or may not suit your car }. There are plenty of other VW dual horns to choose from .. I chose the Polo because it is a smaller vehicle. ( a smaller horn size ? ). .. Maybe also search other VW models for a dual horn .. Beetle, Passat, T-Cross, Golf etc. Audi's - Seat's etc. I bought second hand VW OEM horns and NOT the copies or those ones with interconnecting loose wire sets. Also, maybe this company suits ? https://www.ebay.co.uk/str/vwbreakersyard = Bought a splitter cable. := AliExpress .. [ there are MANY ! ] . . .{ just copy and paste each item to search } (a) " One To Two Harness Snail Horn Plug High Low Horn Cable For Polo Golf Jetta ID.4 " (b) " For VW Santana Jetta POLO Golf 6 Jetta Bora High Low Tone Horn Cable Snail Horn Plug Connector One To Two Wiring Harness " ... (c) "The New AUD-I Jetta New Fabia two special Line Beam Horn Polo GLOF 6 Bora Mallet modification one turn two Plug" . . . (d) " For POLO Golf 6 MK6 Jetta Passat Audii Bora High and low tone horn cable Snail horn plug One out two harness " (e) " For VW POLO Golf 6 Jette Bora High Low Tone Horn Cable Snail Adapter Plug One To Two Harness Cable " ===================== or := Ebay. . . [ if you can find any stock ] (i) " High and low tone horn cable plug One out two For POLO 2011-18 Golf 6 Jette Bora " (ii) "Modified Harness Electrical Horn Connector Plug For Skoda VW Audi" . . . (iii) " For VW / Audi / Seat / Skoda High Low Tone Horn Cable spiliter Harness adaptor " = Wrapped splitter cable in Fleece tape
-
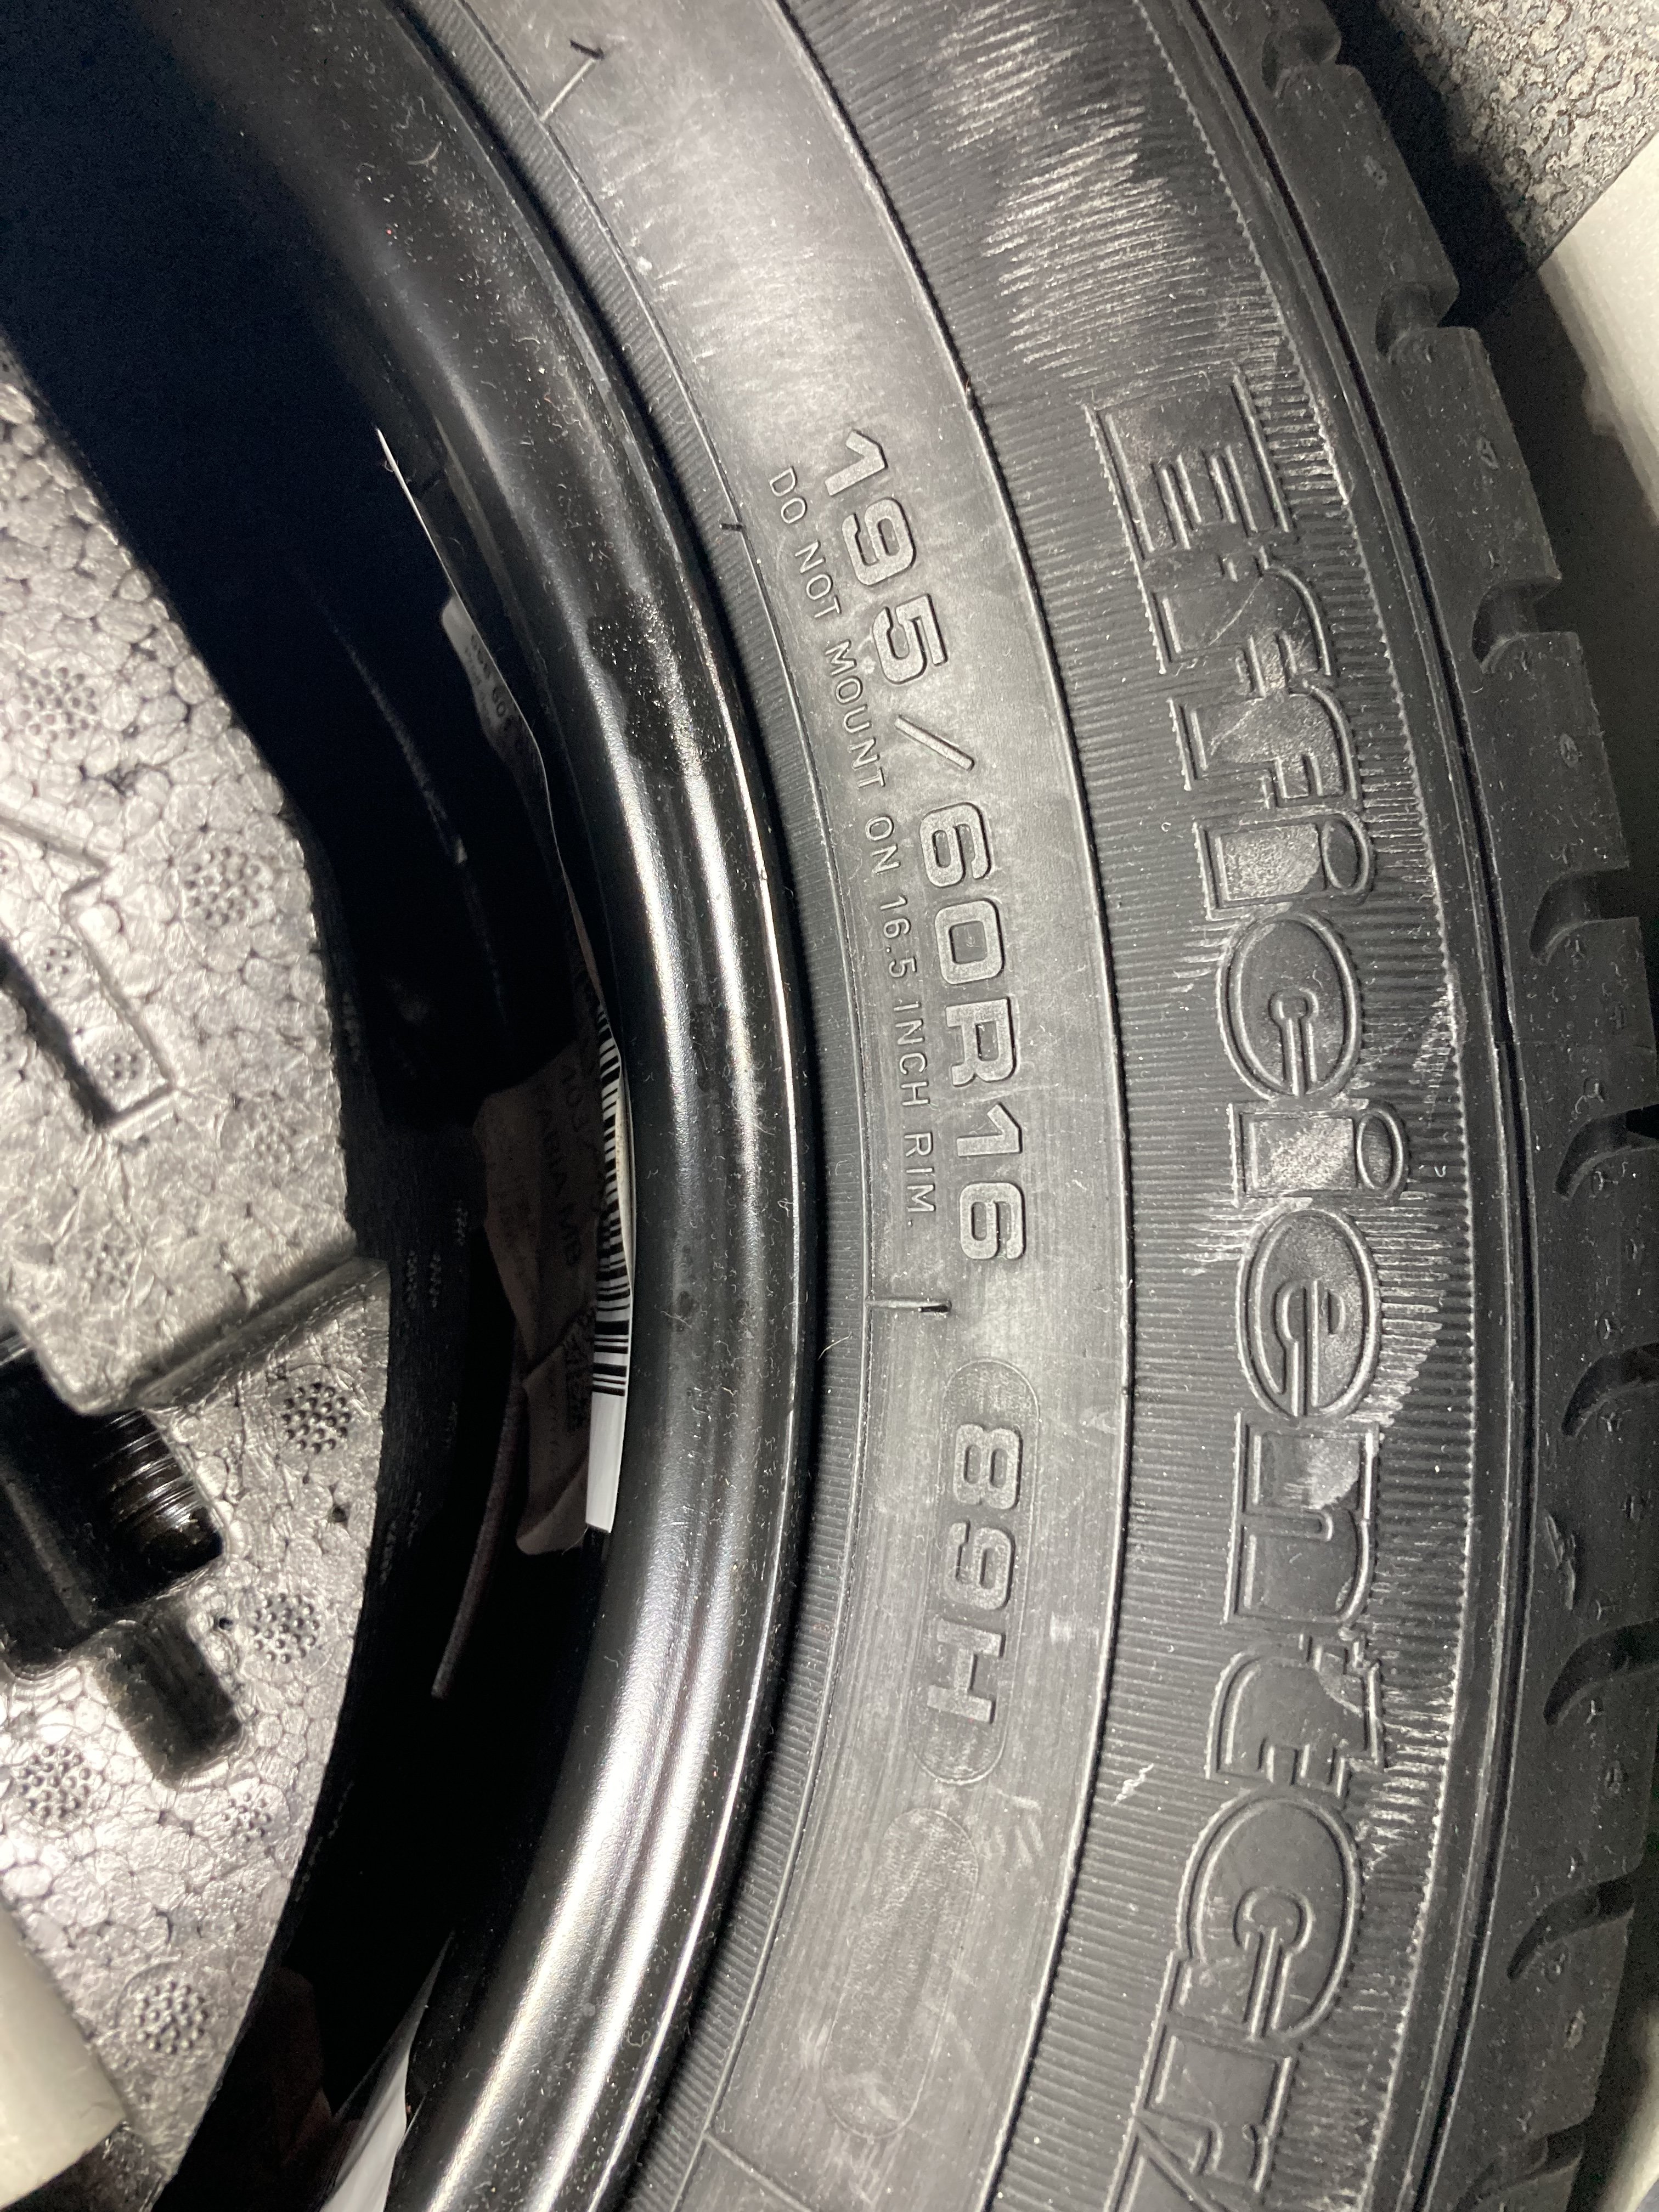
This is the spare for Kamiq 18” Crater wheels. Goodyear 195/60R16 89H 10/2022.

-
PS, the white bits of tape are for me, because I am old, as makes it easier to see/ locate bits when pulling part / back together. rgds distrnc
-
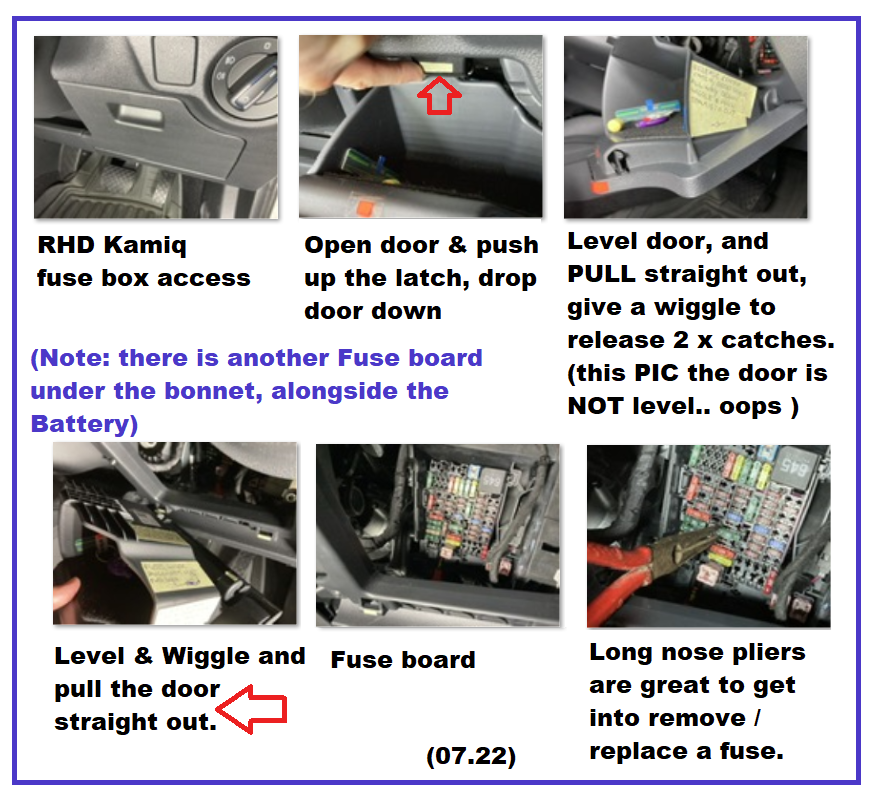
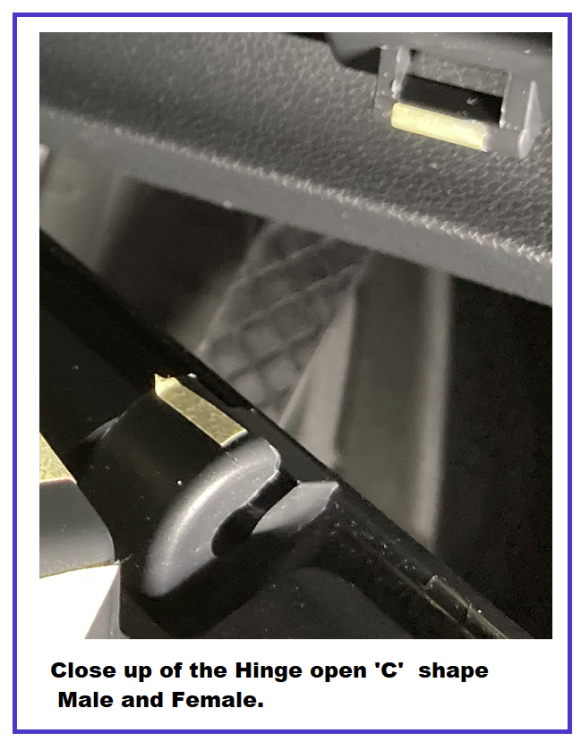
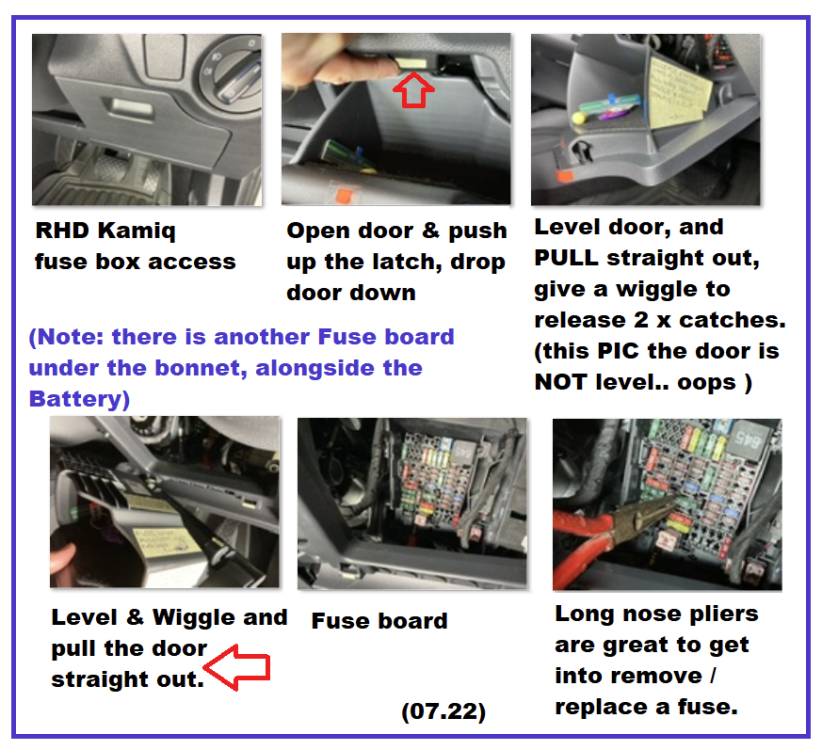
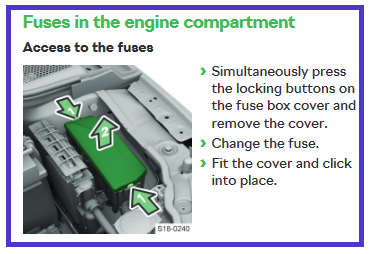
Hi AlexUK51, Kamiq MY21 Once the door is LEVEL to the floor, slight WIGGLE pulling out pressure on the LEFT and RIGHT sides to release the 2 x hinge catches. [The FEMALE hinge part is an 'open C' shape Male /Female. ] ( see pic ) When refitting the fuse door, ENSURE the door is LEVEL and Wiggle in LEFT and RIGHT pressure to the sides, as you push back in. FYI: There is this ANOTHER fuse board under the bonnet. ( Picture from Skoda Kamiq handbook ) rgds distrnc
-
Hi lastgasp, Does this suit ? From Kopacek 'Skoda' it's a parts sales web site. Kamiq - hood power damper set Producer: KI-R Cat. number: KAM-HDAMP " DOUBLE power hood damper set for your Kamiq, holds your hood opened smoothly, great sportive look, functional accessory for your Kamiq " Description: - fits ALL Kamiq models - grade A quality - comes with all neccessary installing hardware - functional accessory for your Kamiq - great sportive look for your engine bay ( < sportive or supportive ? ) - power dampers are for both sides (left/right) !!! " http://www.kopacek.com/Skoda/KAMIQ/for-Kamiq-hood-power-damper-set-KI-R rgds distrnc
-
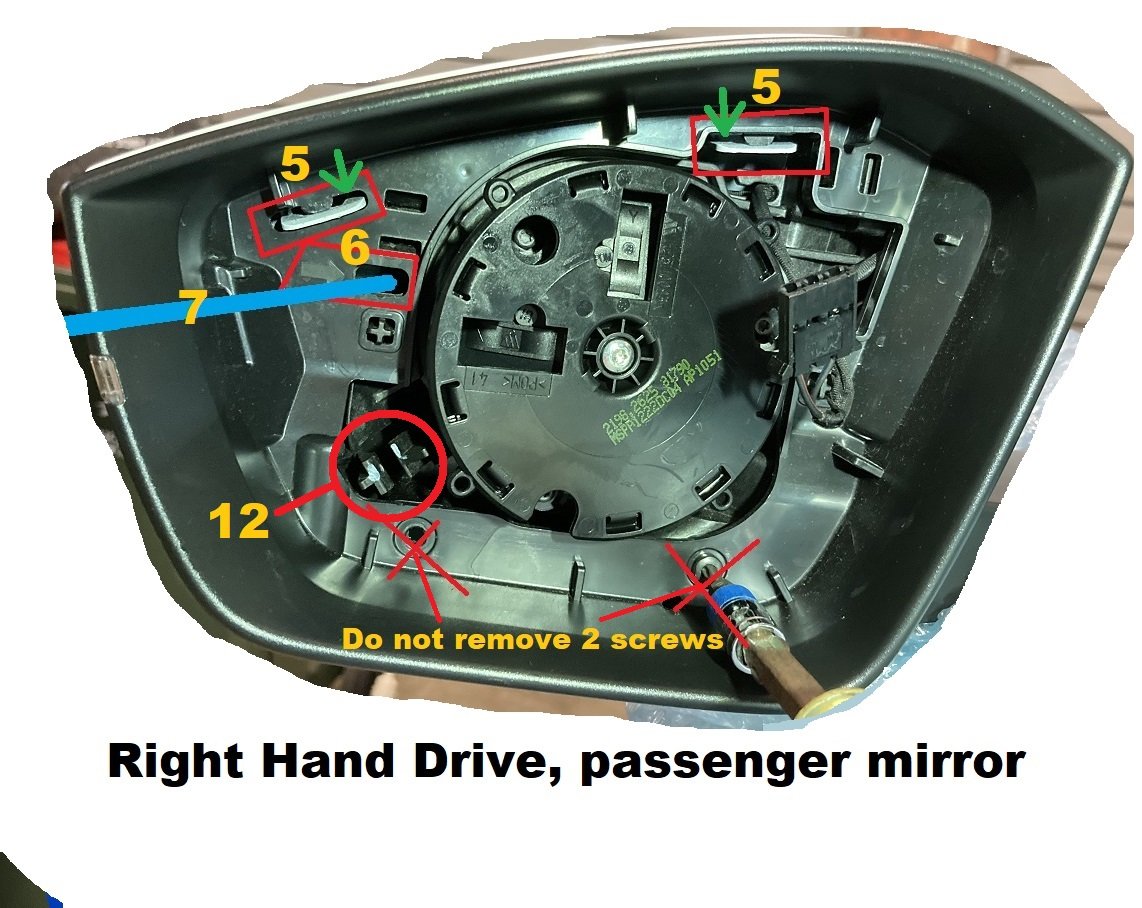
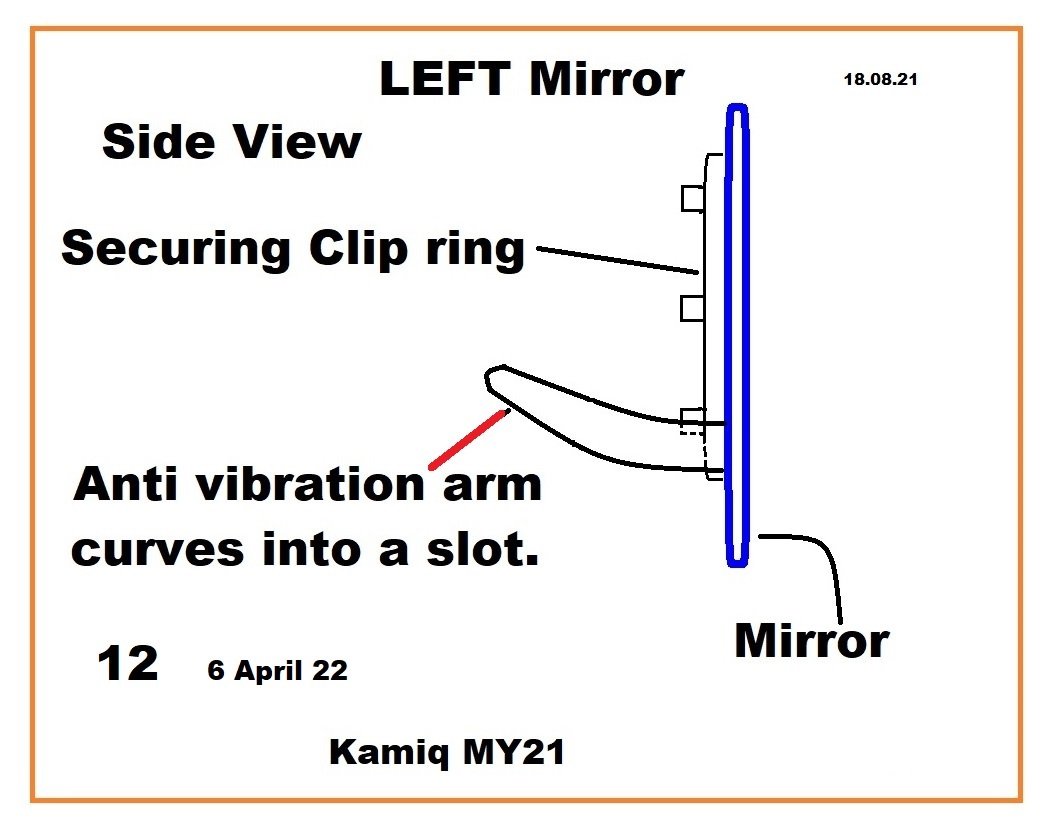
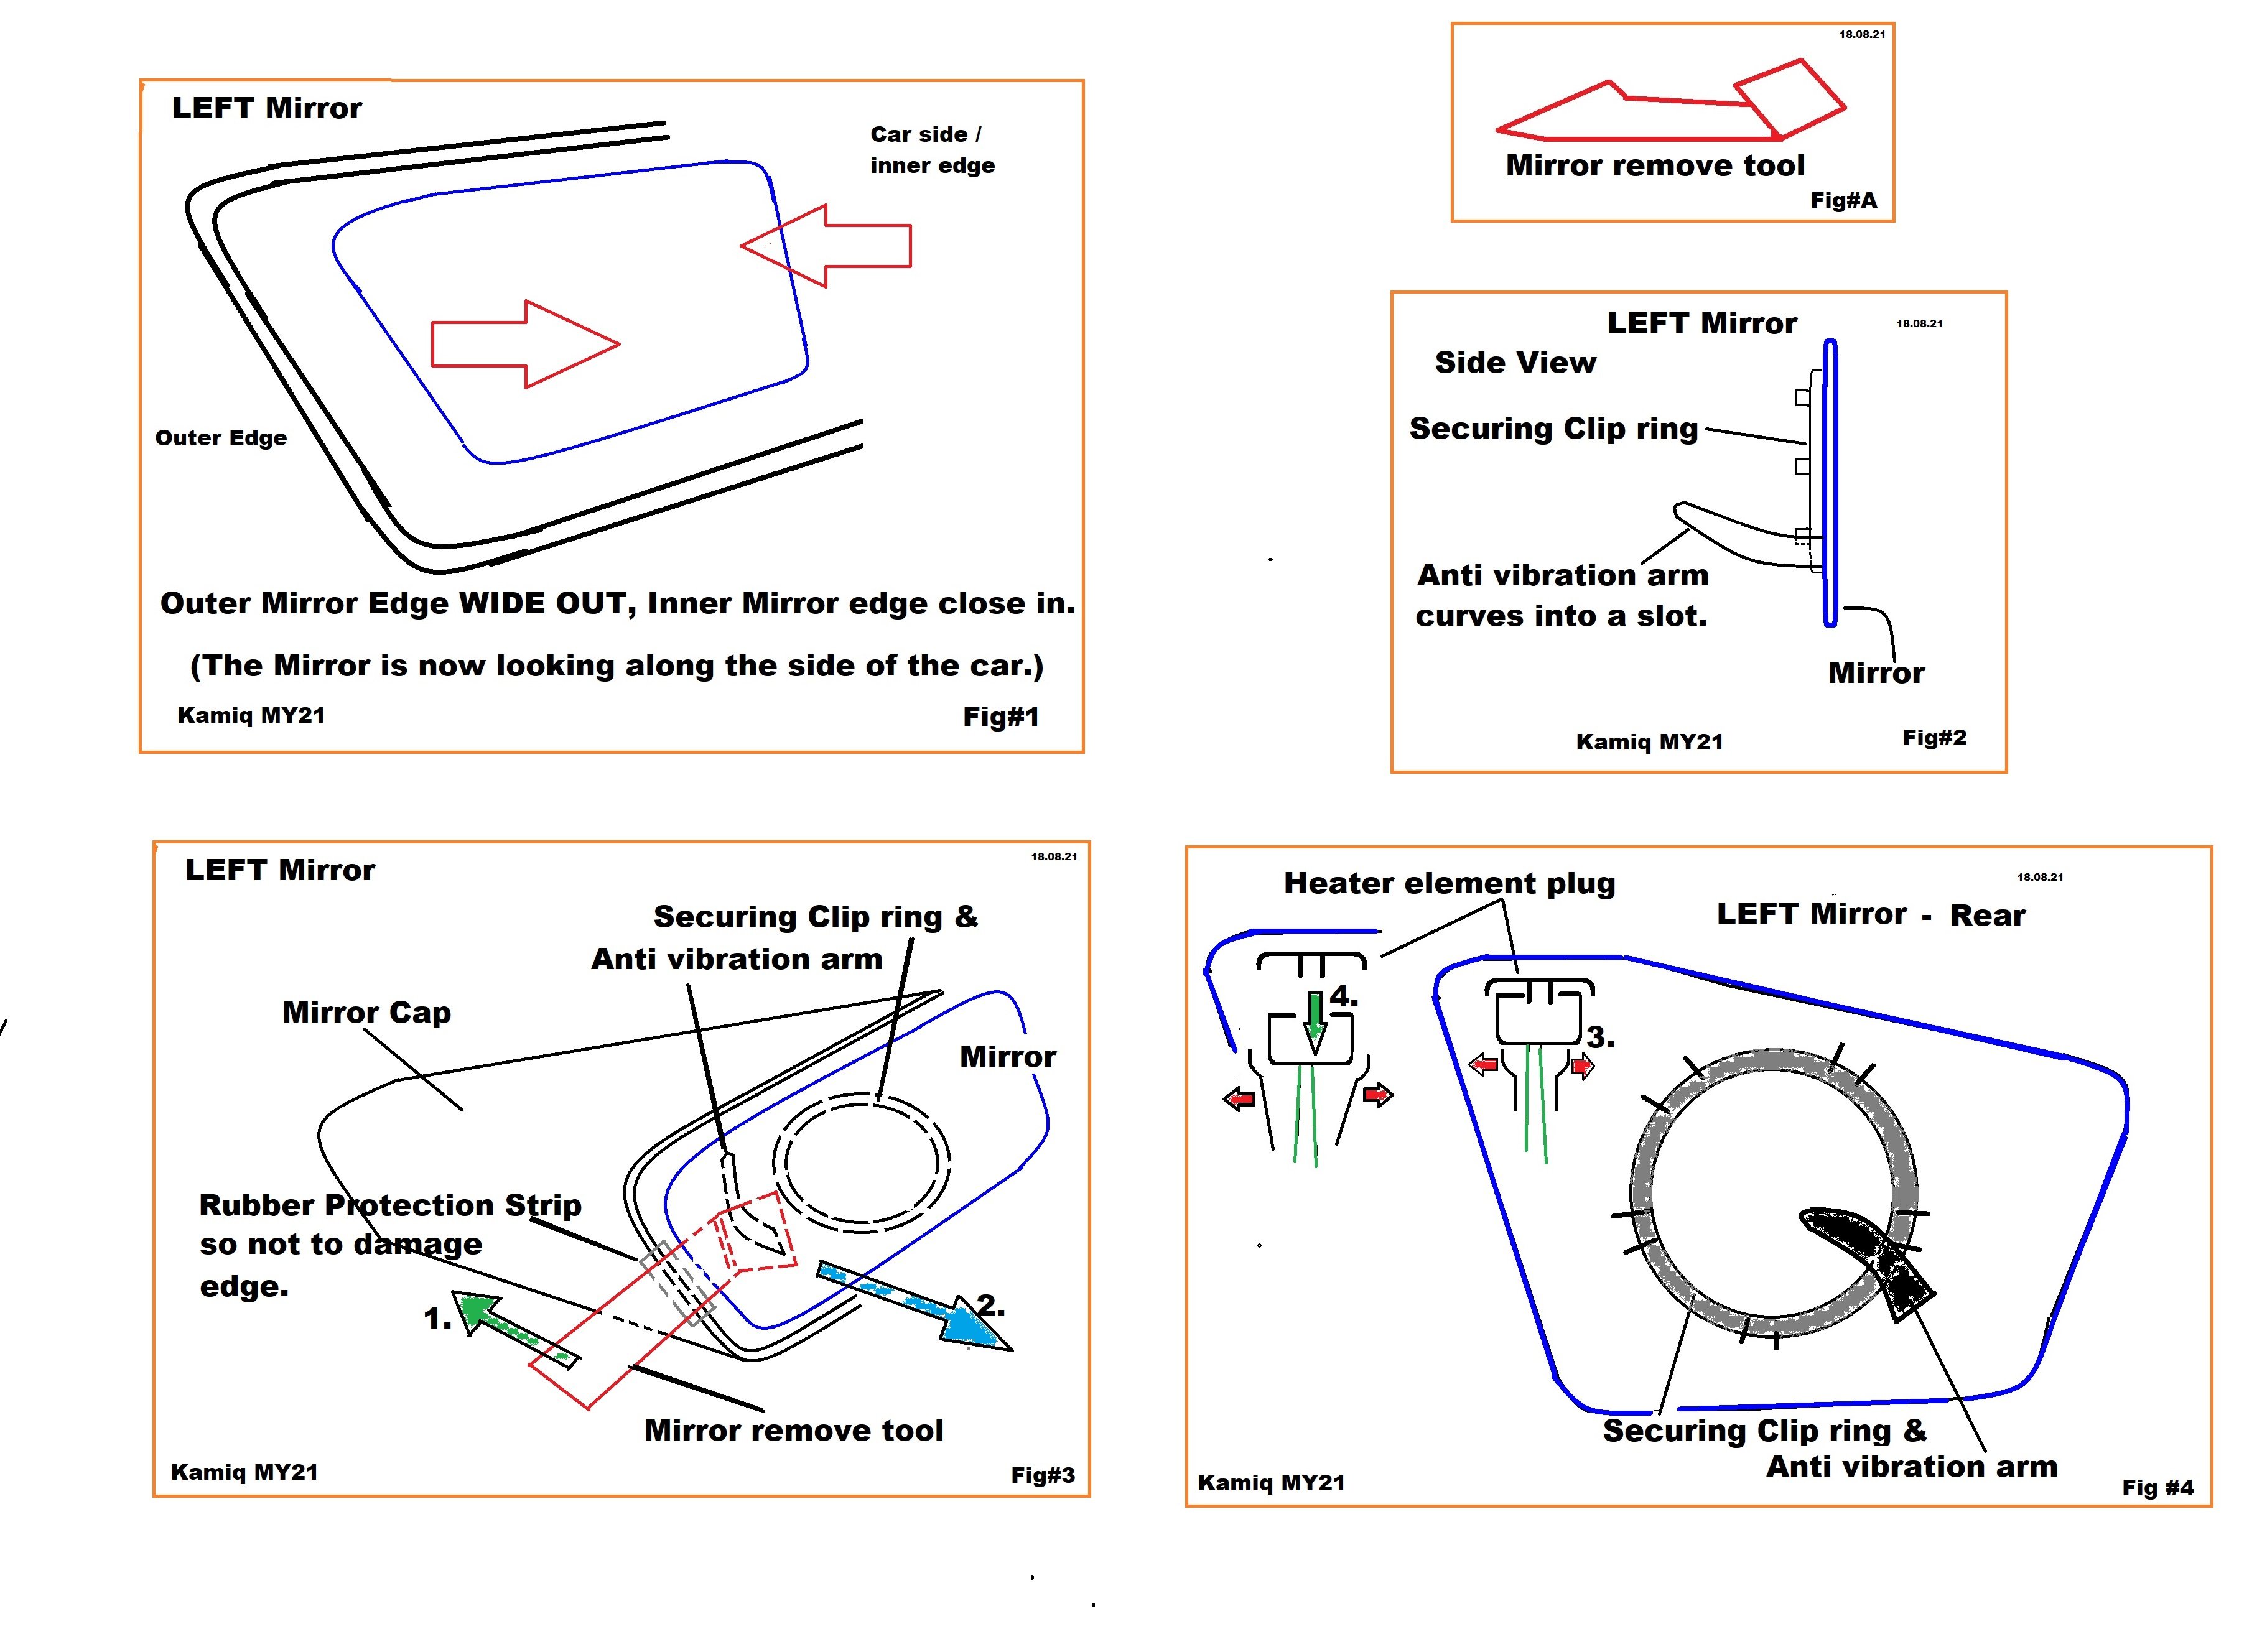
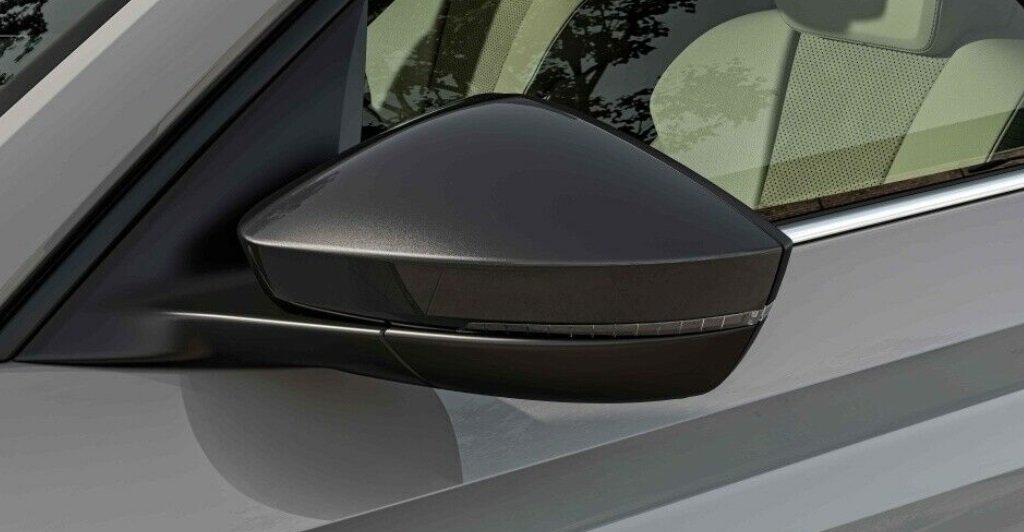
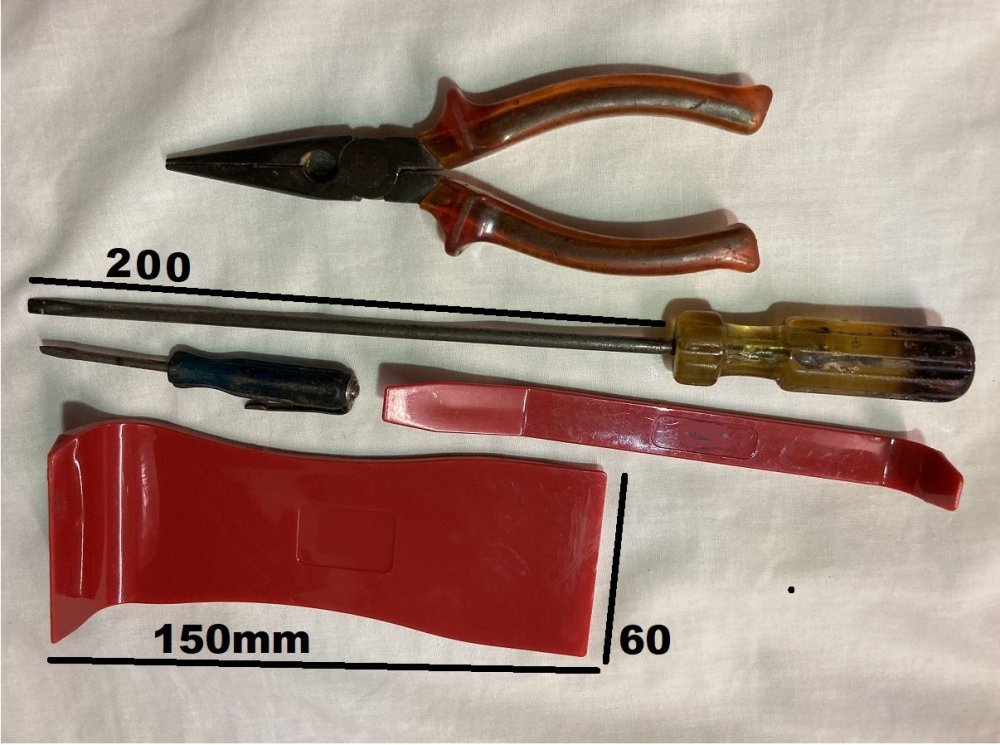
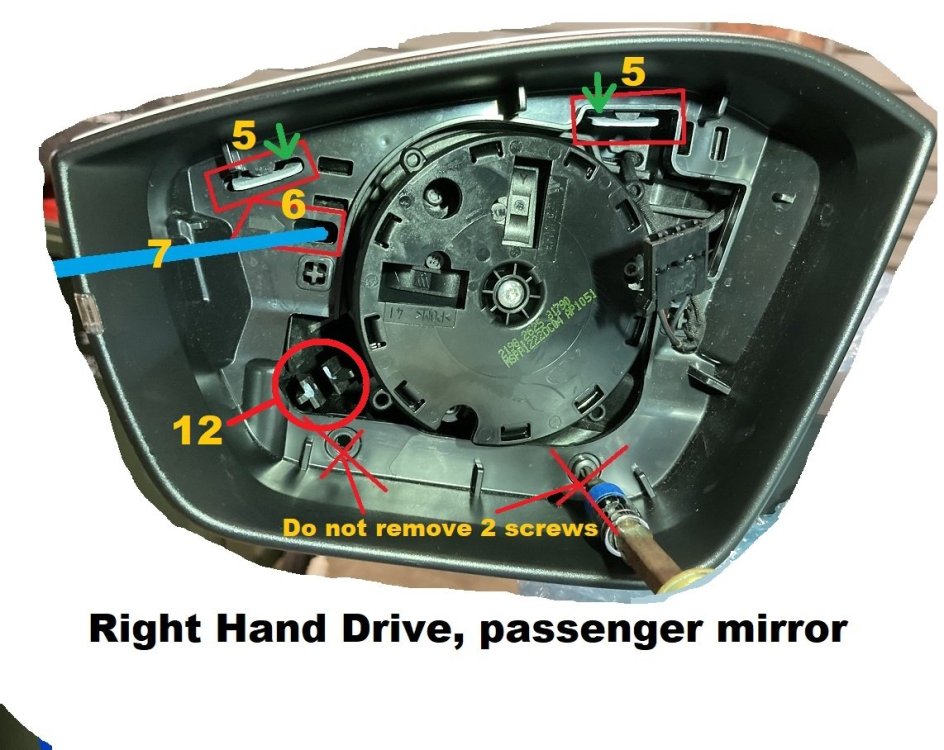
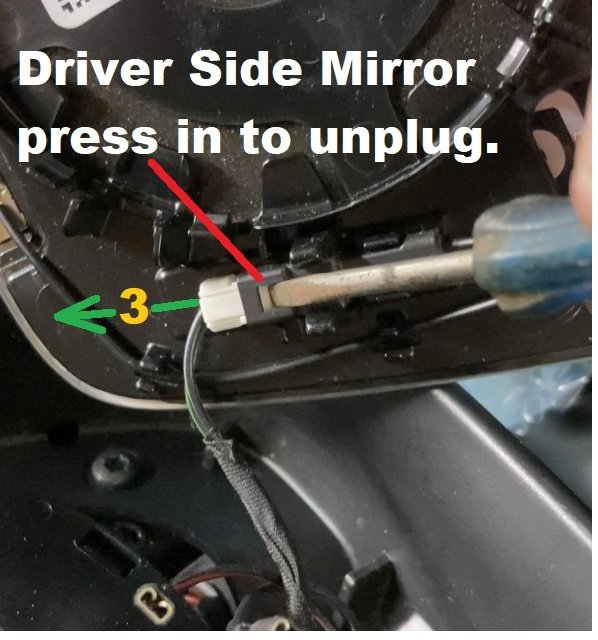
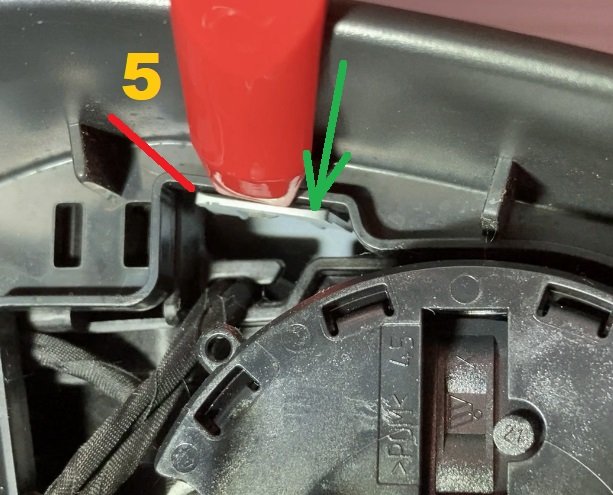
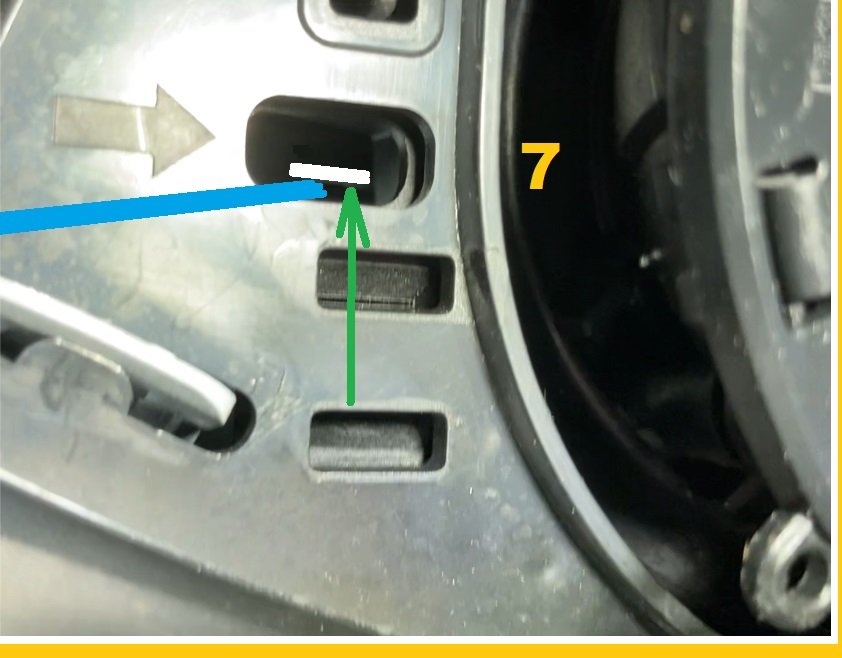
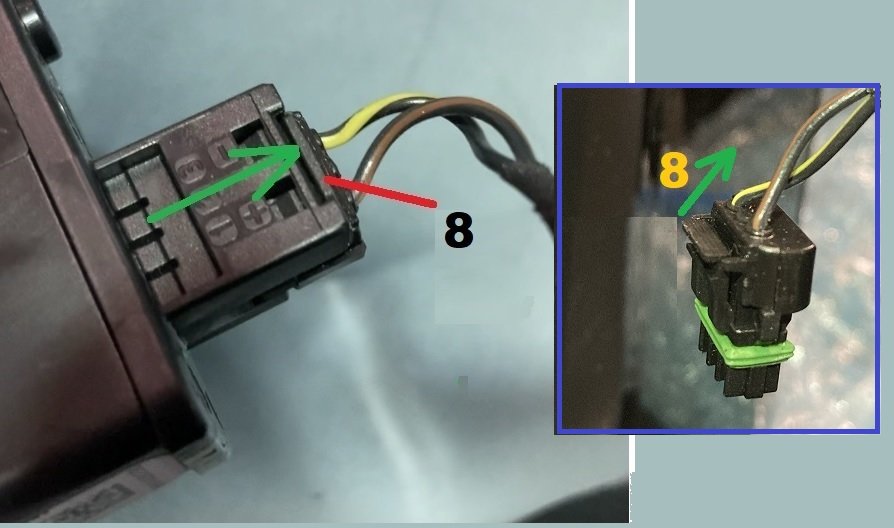
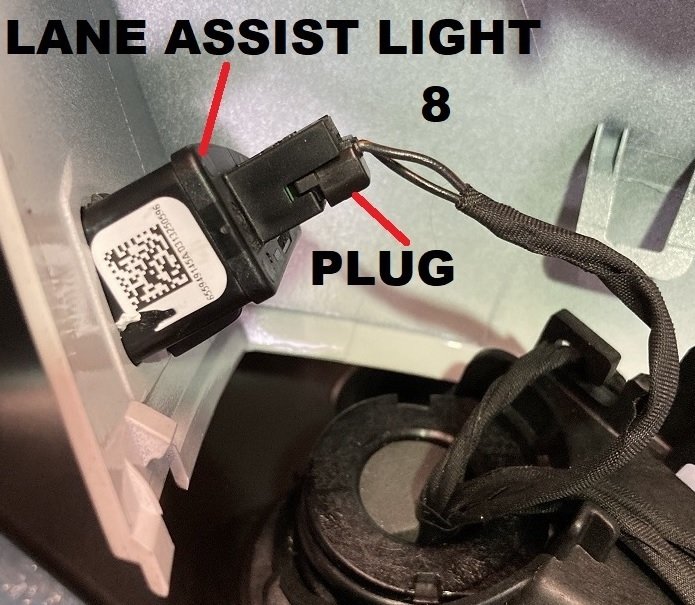
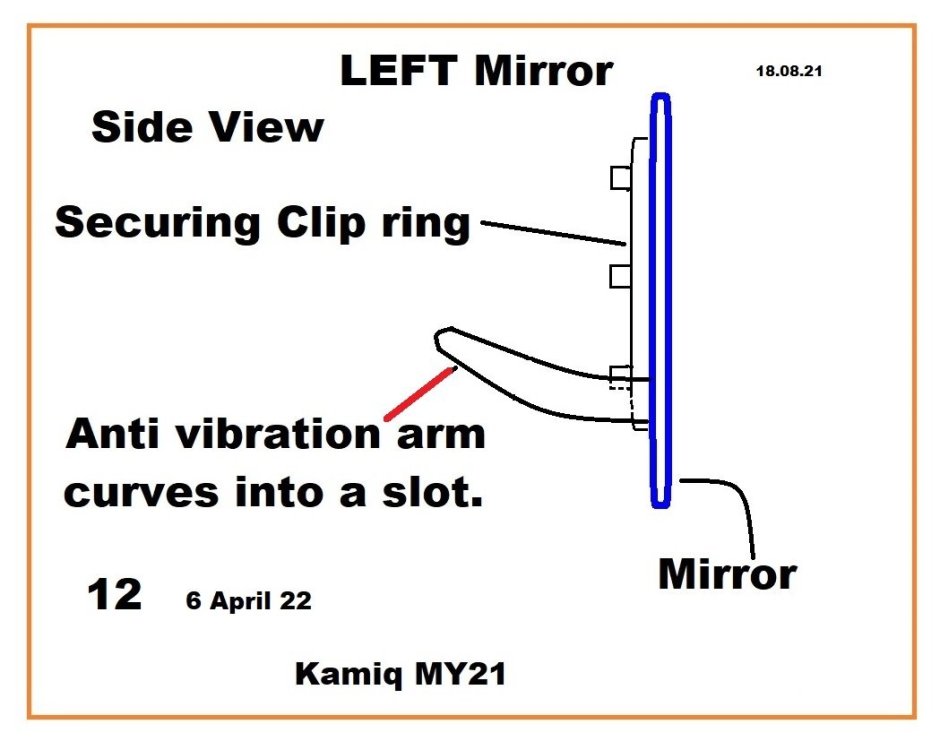
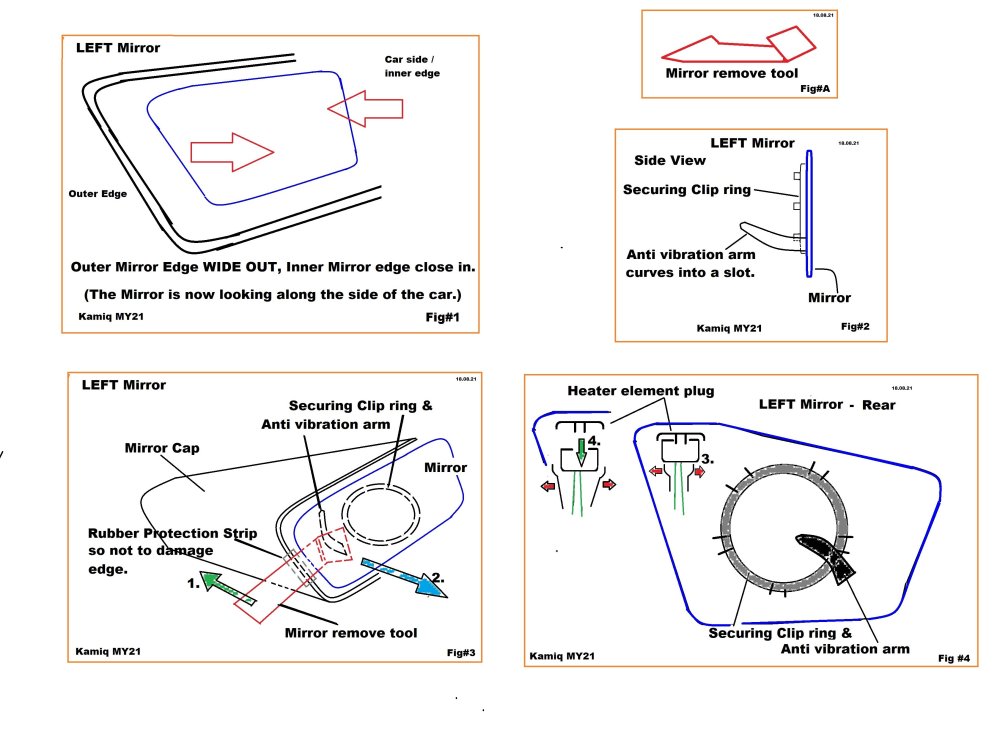
Hi. all, I have this solved ... 6 April 2022 There was a HIDDEN clip behind the cover, an arrow ( in plain sight ) showed the resolve. Kamiq My21 NW4 Mirror Caps remove April 2022 ( Probably the same for the Scala ) READ EVERYTHING BEFORE YOU COMMENCE WORK. The photo Item Numbers refer to the Text Line number. Check that have received the Mirror Cap to suit your Model " without LANE ASSIST or with LANE ASSIST as the LANE ASSIST cap has a rectangle slot cut for the LANE ASSIST light. Time: 15minutes each side Tools: Large plastic 90' trim tool to release / snap the mirror off its retainer. 150mm L 60mm W Long nose pliers to remove wires off the driver side mirror Small blade (2mm wide )screwdriver to depress the driver side mirror plug Thin blade long (200mm) screwdriver to LIFT the lower central cap retainer clip. Small trim tool to depress DOWN the TWO Upper cap retainer clips. Time: 10 mins each side. 1.Open front car windows. 2.Turn Mirror IN so it is WIDE at the outer edge, using large 90' trim tool, behind the outer edge, pop the Mirror off. 3.Remove the Mirror cables/ plug, (drivers and passenger sides are slightly different) put Mirror on the dashboard. 4. Re-adjust the Mirror control, so the Mirror retainer base is back to centre. ( this makes it easier to refit the Mirror and to into the Anti Vibration slot, see photo ref .12.) 5.Using the Small Trim tool, ( or a screwdriver blade ) pressing DOWN on the TWO upper Mirror cap clips,( which are the same colour as the existing Mirror cap) and at the SAME time pulling the Mirror cap towards the front of the car to help release the clips. BUT WAIT .. there is ONE more clip to release the Mirror Cap .. see 6. 6.Look inside the housing, towards the outer edge, there is an outline of an ARROW pointing to a slot in the housing., it is JUST below the OUTER clip in 5. The slot gives access to the LOWER Central retainer clip. 7. With the help of a flashlight, Insert long thin blade screwdriver into this hole, at an angle, to LIFT the small clip up, and pull the cap off. BUT WAIT ! Do you have LANE ASSIST, as there are cables attached to the LANE ASSIST Light see 8. . .. otherwise step 11. 8. If you have the LANE ASSIST lndicator in your Mirror cap, Remove the wiring plug by lifting the SMALL flat clip on the Upper side of he plug, lifting to release the plug from its retainer. 9. To remove the LANE ASSIST light, compress the centre mounted clip along one side, pulling the light outwards a little, then with minor twisting, releasing the two retainer BUMPS on the opposite side. 10. Insert / snap in the LANE ASSIST light into the NEW Mirror cap, and plug in. 11. To fit the Mirror Cap it is basically , line it up at the LANE ASSIST folded over edge end FIRST , then ensuring the CENTRE LOWER FINGER NAIL LOOKING CLIP is inserted under the Mirror body plastic lip, then the Mirror cap just SNAPS into place. 12. Reattach the Mirror wires / plug, Refit the Mirror onto its circular mount, by pressing/snapping it on in the centre of the Mirror AND CHECKING that the Anti Vibration ' banana ' shape piece is inserted back into his orifice. rgds distrnc
-
Hi Olderman, thank you You have gone into so much effort. that is generous of you. Ahh right, yes .. the Caps slip off easily in all the Vids I have seen .... ... as i have seen most all of the YOutube videos for all models of Skoda / VW / AUDI that i can find, Just that the Kamiq cap looks similar.., just not the same, thanx for your write up and link. ps: i also tried begging, walking away .. & counting to 100, followed by ... a write up on here !
-
Hi Olderman1 …sadly no, rgds Distrnc
-
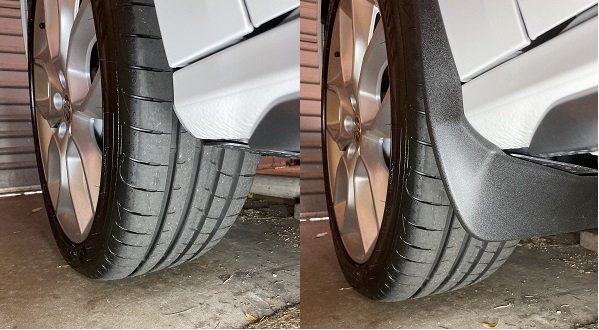
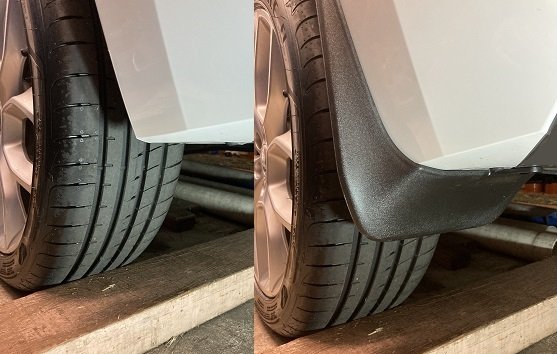
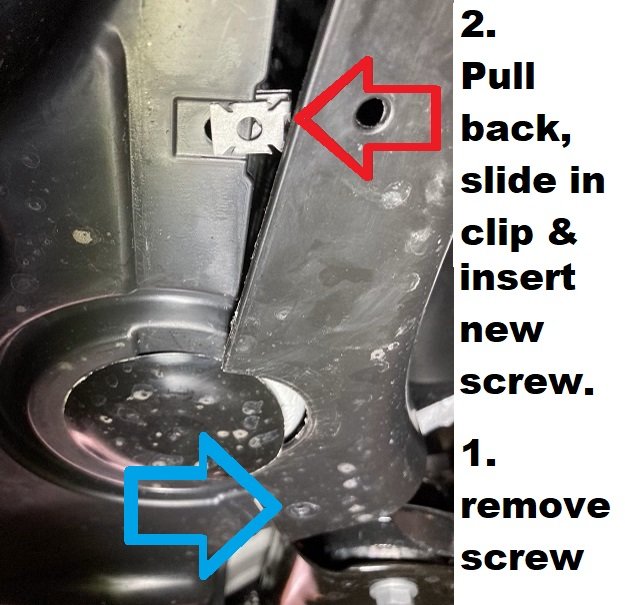
Hi Dman, 30Dec2021 These mudflaps are easy to fit, 5mins each corner, no need to remove the wheel. 1 x Torx 25 bit , (and i THINK it's a .. ) 1x 5mm drill bit. The instructions, metal clips, screws + Plastic clips come with the kit. Basically remove screws fit mud flap refit screws The front does require 1 hole ( each side ) drilled in the plastic inner wheel sleeve, just turn the steering wheel to make room for drill. At the Front, there is also underside CLIP to be fitted, remove screw ( BLUE ARROW ) pull the plastic to one side, slide in clip & screw in ( RED ARROW ) and , refit original screw ( BLUE ARROW ) . See photo DON'T tighten any screw until you have positioned the mudflap hard against the car, then tighten. [ Sorry to duplicate this post, as I CANNOT find how to delete/amend ) ] [ and amended photos to JPEG ] rgds D
-
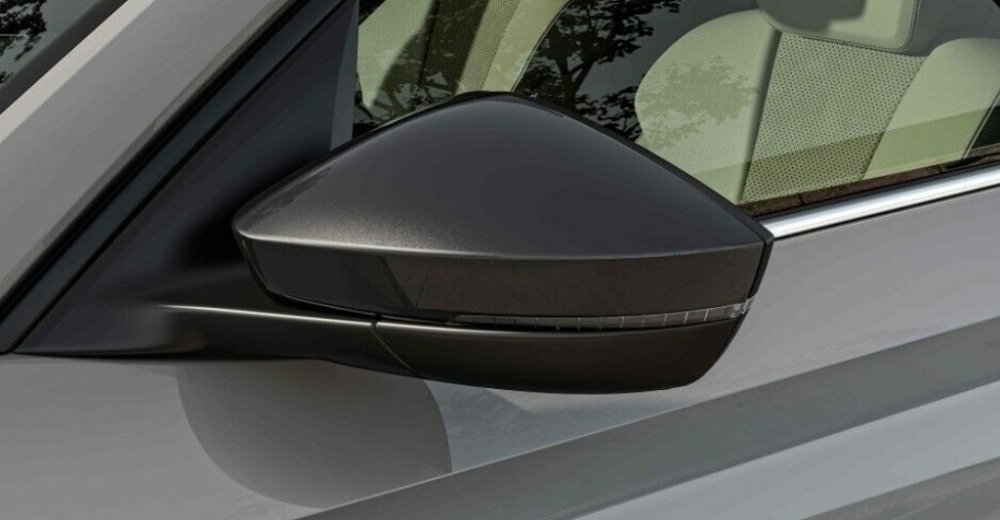
Hi all, 29 Dec 2021 Kamiq MY21 I want to change the CANDY WHITE mirror caps, to Skoda OEM Monte Carlo 'Metallic Black' mirror caps ( with side assist 654 072 530 A ) I can get the mirrors out, and the 2 x internal mirror cap clips popped behind the mirror, BUT i cannot get the caps off ... sheesh .. Have you done this ? what is the secret ? thanx D
-
Hi Dman, These mudflaps are easy to fit, 5mins each corner, no need to remove the wheel. 1 x Torx 25 bit , (and i THINK it's a .. ) 1x 5mm drill bit. The instructions and the bits come with the kit. Basically remove screws fit mud flap refit screws The front does require 1 hole ( each side ) drilled in the plastic inner wheel sleeve, just turn the steering wheel to make room for drill. there is also underside CLIP to be fitted, remove screw pull the plastic to one side, slide in clip, refit screw. DON'T tighten any screw until you have positioned the mudflap hard against the car, then tighten. regards D IMG_4366.HEIC IMG_4372.HEIC IMG_4444 15 fb arrow.heic