jeallen01
Members
-
Joined
-
Last visited
Everything posted by jeallen01
-
Further update: I had the rear "Special Active" shocks (and new FEBI estate bumpstops) fitted last week and the ride at the rear over small ripples in the road surface as certainly improved considerably, although it's still quite "solid" over larger bumps etc, and there's even less roll at the rear when going round bends (NB: I fitted a GTI/VRS rear ARB several years ago). I'm now considering having the front shocks (and top mounts/bearings) changed and again the "Special Active" ones could be in the frame - so does anyone have any more comments/info on that option? BTW: I did contact the importer again to ask about the difference between the "standard" Special Active shocks P/N 8745-1006 and the P/N 8745-1038 ones quoted for the “Skoda Octavia 2, HD Susp. & 4x4, Sedan & Combi Koni Special-Active” - and the reply was that "The dampers for the model with HD suspension ie VRS model are a little bit firmer than the ones for the regular models, as they have firmer springs" - In which case I would be sticking with the "standard" ones! Thanks in advance.
-
Good morning I'm probably going to have the front shocks changed and - given the current 135k mileage - also the top mounts & bearings, and so I was very interested to find this thread, which is quite enlightening. However there is one area that does not appear to have been addressed, i.e. that the top mount bearings can be either ball-bearing or rubber - so what is the difference (apart from cost) in the two types and why would you choose one over the other? Thanks in advance.
-
Slight update - after having to put further action on hold for nearly a month, I took another look at the whole situation and finally phoned and discussed the rear springs/ARB/shock issues with the UK Koni importers -> they recommended Koni "Special Active" rear shocks (P/N 8045-1084 - FWIW) and so I ordered a pair from DC Performance (see below! 😀) and they arrived a couple of hours ago - hopefully to be fitted sometime next week. Then, this morning, and having now found at least one thread on this forum about the "Special Active" shocks and peoples' experiences with them, it would appear - and I really hope - that I have probably now made the correct decision for my requirements, but "time will tell" ???????? BTW: the chap at the Koni importers said that the 4 companies at the top of their website list of dealers were their main outlets, and that, ATM, they seemed to be competing at how to make the least profit from selling Koni stuff!!!!! -> DC Performance then seemed to be winning that "race at" £173.52 the pair, inc 24hr DPD delivery, and so they got the order!😉
-
Thanks and that looks a bit like those " rubber spring helpers" that you (used to be able to??) buy to insert between the coils of coil springs to stiffen them up when carrying heavy loads - looks like they act a bit like variable rate springs, but I assume you'd have to start with fairly soft standard length springs that haven't already compressed in use. NB: took a look at the video out of interest, but not yet ready to actually do anything about the car. OTOH, would a "coilover" solution work as well or better, and if so then can anyone suggest suppliers (in the UK) which might be worth trying?
-
Thanks for the info, and sorry for the long delay in replying but we have a lot of "family problems" relating to my (more than me!) elderly and very stupid brother-in-law to deal with ATM - will get back to this issue when I have more "free time"!
-
The former where the coil spacing varies along the length of the spring, such that the initial compression is quite "soft" but then stiffens up as the spring is compressed further.
-
Thanks but that's not what I'm looking for - which are variable rate springs, & preferably around standard height, or only a slight drop because of the likely quite variable loads there from almost nothing in the back to "quite a lot" in the back.
-
Good morning I think it's about time for a springs & shocks update and I know Bilstein do full front and rear spring & shock sets - but ATM I want to concentra ONLY on the rear for both "need" and cost reasons in view of a house move and thus carrying heavy loads in the back at times later this year. In that context, I'd like to get a set of variable rate springs and adjustable shocks for the rear end ONLY (Fronts may follow later!) - so can anyone point me towards a brand/supplier that could provide those? Thanks in advance - and Happy New Year!
-
I fitted a set of Mintex 312mm disks & M1230FE pads to the front of my Octy a few years ago, and the pedal instantly became a lot firmer and with no "slack". Since they were properly "run in", they have worked extremely well and are very progressive - touching the pedal lightly gives "normal" braking, and then as you push the pedal harder and harder the braking becomes steadily and progressively "more effective" (as SWMBO will confirm, and often complain about after the car pulls up very quickly!). "Copes" very well with stopping the heavy estate when travelling "quite fast" (good remap!) and no signs of fading noticed in "normal use". The only downside I've found is that the pads are bonded, but also rivetted with copper rivets, to the backplates, and one of the rivets seems to have been too long and sometimes (mainly at very low speeds when the steering wheel is turned) I get a nasty squealing! I did take that pad out and filed the exposed end of the rivet down a bit and the sqealing stopped, but came back a bit later as the pad wore down a bit more. Maybe I should get a new set of these pads, but never got around to it as I do far less miles than I used to (especially in the last 18 months). Apart from the latter, been very happy with them and I would certainly get the same ones again (and they are relatively inexpensive at under £30 a set on ebay)!
-
I don't think it is a coincidence because the "steering wheel" only came on after the sensor fault showed up - and the Ross-tech site does mention it as a possibly linked cause. BTW: my steering was no heavier than it was with the symbol not showing.
-
Couldn't find the right existing thread in which to post it, but some people might find this "enlightening": I've got a right rear wheel ABS sensor issue (yet to be solved, but hopefully today) and that, in turn, appeared to have caused the dreaded "steering wheel" warning light on the dash, and running VCDS threw up the "G85" fault code. I tried all the possibe the Ross-tech instructions and advice as to how to clear it via VCDS, including taking the car for a "short drive" after having used VCDS - but nothing seemed to work. Then, yesterday, I decided to go and get a replacement ABS sensor and so drove about 12 miles to GSF in the Harrow Rd in NW10 but couldn't park anywhere near the place, and so drove another 6 or 7 miles to Lloyds at Wembley - with the "steering wheel" light on all that time. Got the sensor (a "cheapie" but it'll have to do for the moment), and then back in the car and drove off, and, about a mile later, I noticed that the "steering wheel" had disappeared, and it didn't reappear during the following 10 mile drive home! - is that what Ross-tech call a "short drive", because I wouldn't ! Tip: don't bother going to the GSF shop in NW10 unless you get someone else to drive you, and/or then walk to the shop - IMHO, it's a very stupid place to have a car parts/accessories shop ! PS: to the Mods - please move this to a more appropriate thread if possible
-
Update Thanks for all the suggestions and, well, it actually proved quite easy when I followed the instructions in the guide that I downloaded on Tuesday, and that allowed me to specifically delete ALL the stored BT phone links and ALL my stored contacts - so that worry was resolved in a fairly simple way BTW w.r.t. the hire car: - I did take a quick look under the rear of the vehicle and it does have a torsion beam as opposed to IRS, so it looks like "torsion beam on 1.5l & below.. " statement should be expanded to include the 1.6 TDI versions. - This morning I realised the door mirrors don't appear to have as wide a viewing angle as those on my own Octy because the mirror pods don't seem as wide on the Mk IV (on my Octy, I increased the viewing angle by fitting the driver's door mirror glass from an LHD vehicle, and that did really make an improvement) - I think the lower engine stabilizer is already showing signs of wear (at 21k miles!) because there are signs of transmission shunt at times
-
Thx for reminding me about that option, and I might have to do just that - well, after all, it's a rental vehicle and so "who would know?" (and quite a few previous renters might even, although actually never-knowing, "thank me"!) !
-
Thx, and that seems to begin to tie up with what I found elsewhere later: "Did you mean: A7 Octavia Amundsen Infotainment Navigation.pdf Infotainment Navigation Amundsen Owner's ... - Skoda Auto https://ws.skoda-auto.com › Data › A7_Octavia_A... PDF Chapters, table of contents and subject index. The text of the Owner's Manual is divided into relatively short sections which are combined into easy-to-read ..." I will be trying that out tomorrow, but, however, what it doesn't include is any confirmation that deleting the phone's BT contact from the infotainment system ALSO deletes the actual contact numbers that appear to have been accessed when I (STUPIDLY!) agreed to allow that access. I say that because, on Page 43 of that downloaded pdf, it says that the Phone Book has up to 2000 free memory locations for imported phone contacts and each contact can contain up to 5 telephone numbers!!! Page 43 then explains how to use the Phone book and how it updates each contact, but doesn't tell you how to delete a contact!!! That sounds to me like a breach of the UK & EU General Data Protection Regulations!
-
Thanks - and I've had the Mk II so I long that I forget whether it did or it didn't have the triangle (but I suspect that it was there because it DID come with the correct First Aid kit and false floor)
-
Good afternoon, and this is a somewhat "Urgent" request for info as the car is "going back" very soon! Just over a month ago somebody rear-ended the Octy on the A30 - not much damage and should be back from the repairers on Thursday/Friday, but in the meantime I have the above Octavia estate as a courtesy car. Being (too!) curious, I connected my new phone (Moto G30 - very nice, so far!) to the infotainment system and VERY STUPIDLY gave it access to the contacts on that phone . The car will be going back in the next few days, and I really want to delete that connnection AND all my contact numbers that are now on that system. I downloaded the "relevant (NOT) vehicle info from the Europcar website but that's of absolutely no use at all - therefore can anyone tell me how to delete all that stuff pronto? BTW: seems like a lot of the previous renters never tried/managed to do that - there's at least 6 oid phone connection names showing! Thanks in advance PS This is the first time I've driven any Octavia later than my old Mk II, and it's "quite nice" but not actually "as nice" as I hoped it would be, e.g.: - the driver's seat doesn't seem to slide back as far as that in my Mk II (that's important to me because of an arthric knee) - infotainment system only gives the mpg figures after you stop & switch OFF (if there's a way to get the figures on the move, I haven't found it yet, but I've been ill for a few days and didn't drive the car) - the "stop start" was a bit annoying until I figured out how to restart the engine quickly - no spare wheel, tool kit (or even a warning triangle!) or rear compartment false floor, but I suppose that's "normal" nowadays, especially on a low spec rental vehicle - don't know if this one has the rear torsion beam or IRS but would be curious to find out (this being a 1.6l vehicle and thus slightly above the "1.5l & below" category that appears to have the beam, as discussed in another thread) - as I'm not about to get "down and dirty" with this vehicle (personally, I suspect that it does have a torsion beam)?
-
Thanks to both of you, and I hope it will help someone somewhere to sort out similar issues PS: This was another occasion when I was very glad that that I bought those 2 sets of trim tools over a decade ago
-
Well, I did the job this afternoon, but it did "fight me a bit", and thus some tips for anyone who has to something like that: The tools you'll proef bably need: - at least 1set, definitely preferably 2 sets, of trim tools like these - you need the larger ones to get enough leverage on the door trims to get them away from the seal - a soft-headed hammer like this one to hammer the seal firmly back in place (would have been very difficult without it) and you'll need to use it quite a lot - a large flat-bladed screwdriver, and the right size of Torx bit, to remove the front lower door trim The "process" I used: - Starting at the old seal on the B post (the most accessible), lever as long a length of the trims as possibe back to so you can get a grip on the seal and put a trim tool behind it to pull/lever it off as far as you can (and then stick some trim tools behind it to stop it snapping back in place - that's another reason for having 2 sets of trim tools as you may need quite a few). - then work around the top, and then the bottom, of the door opening, gradually easing back the trim panels and pulling/levering the seal out - remove the cover over the fuse box unit, and then the trim on the upper A post to allow you to pull the upper part of the seal off down about as far as the fuse box - Pull the bonnet release lever off its "spindle", and then release the two fixings (1 large-headed plastic "screw" and 1 torx screw) that hold the front sill trim in place - Lever that trim up so you can pull the rest of the seal out - my trim piece was a pig to lever up so I jammed large trim tools and the big screwdriver in below it and gradually moved them forward as I pulled out the seal as far as the A post - at which point you should be able to pull the whole seal out from the door opening Now comes the even more difficult part - fitting the replacement seal: - Again starting at the B post, lever/hold the trims back and gradully feed the seal over the chassis flange and then hammer it in place with that soft headed hammer - if you don't do that, then it'll probably not fully seat right down over the flange - Again, gradually do the same thing along the top and bottom of the door opening, and work you way forward until you to the front top and bottom edges of the opening. - work your way down the A post from the top - the section next to the fuse box is a pig because there is very little space between the flange and that fuse box - do the same up from the bottom corner until your have nearly completed the fitting of the seal - and then be prepared for a "fight" to get that small stretchy bulge that occurred in my case to fit down snugly over the flange - again a lot of hammering! - make sure the seal is firmly seated all around door frame and then refit the loose or removed trim panels - take your time with the trim panels (especially the A post one or you may break something). NB: I didn't find any loose/removable trim clips, but I did find several metal "brackets" welded to the chassis, and I assume they are there to hold some of the trim in place against the seal - so make sure you get the trim firmly reseated over those. - make sure the seal overlaps the trim all the way around the door frame (check the opposite doorframe seal as that should be correctly fitted if it's never be removed/replaced) At this point it should be, or at least it was in my case, "job done" as the door should then close easily and firmly over the replacement trim Total time taken (including several trips to the garage at the other end of the garden for various tools :( ) was about 90 mins, but you could probably do it quicker as I'm "not young" and I have a somewhat debillitating sinus infection ATM. FWIW: the replacement seal must have been from a later vehicle because it had a "Yr 2012" label but it fitted my 2007 car - and the P/N was 0000366601 (this is the driver's door seal).
-
Also Many thanks as it's been a long time since I have had to do anything like this, and taking into account that this a s/h seal and it might have stretched a bit!
-
Chris Many thanks - that's great, and so it looks like I should be able to replace the seal (hopefully tomorrow) without too much time and trouble
-
Evening all! The seal that runs around the inner edge of the driver's door frame (i.e. on the chassis, not on the door itself) has got badly torn (I have no idea how that happened) and so I need to replace it. I've got what I hope is a half-decent s/h seal off ebay, and now need to fit that. Thus my question is: do I just pull the old one off, and then push the replacement one into place around the inner edge of the frame, or are there "trim clips" which might fail and need to be replaced? - and, if the latter, then does anyone have any recommendations for what I need to buy, and from where to get them? Thanks in advance for any info.
-
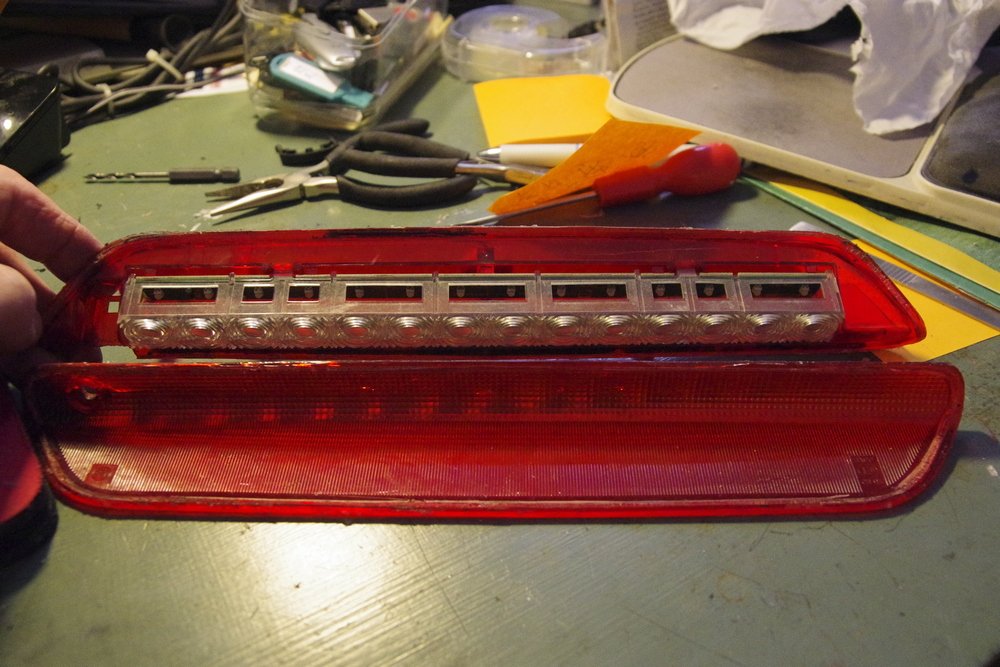
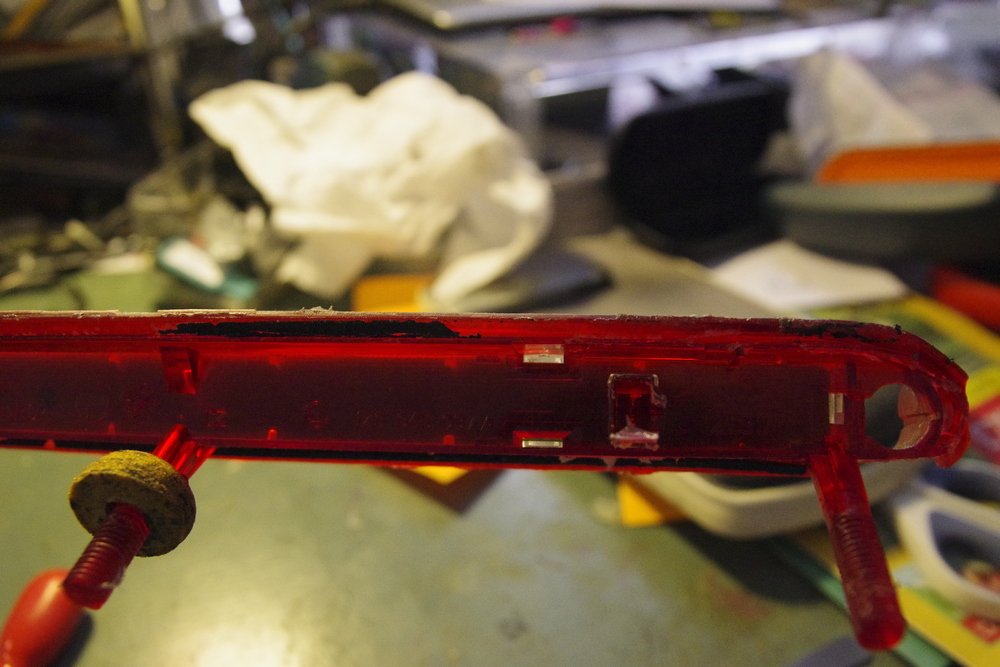
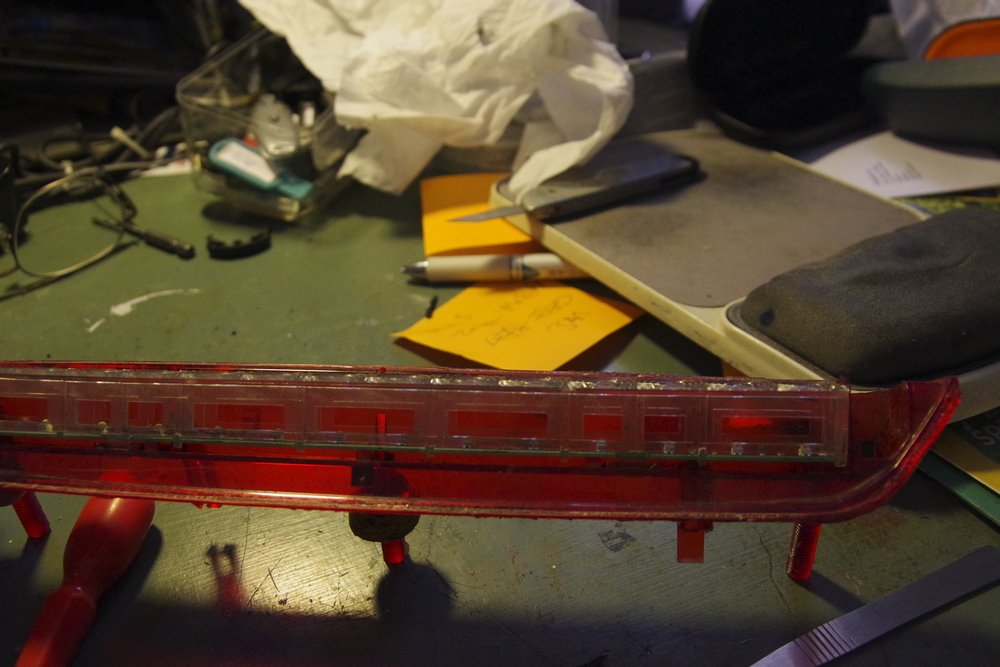
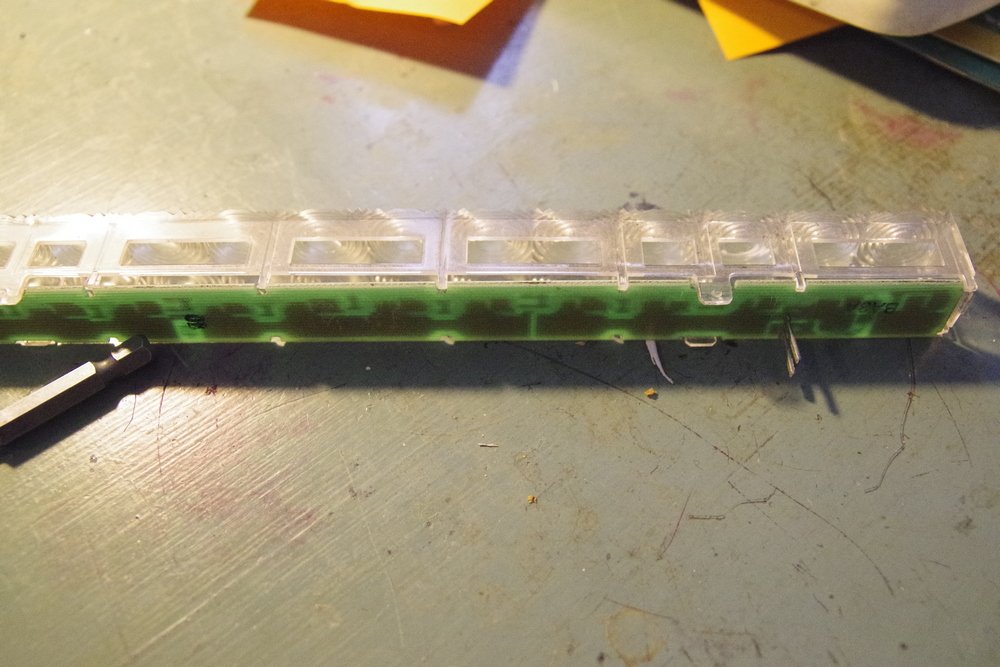
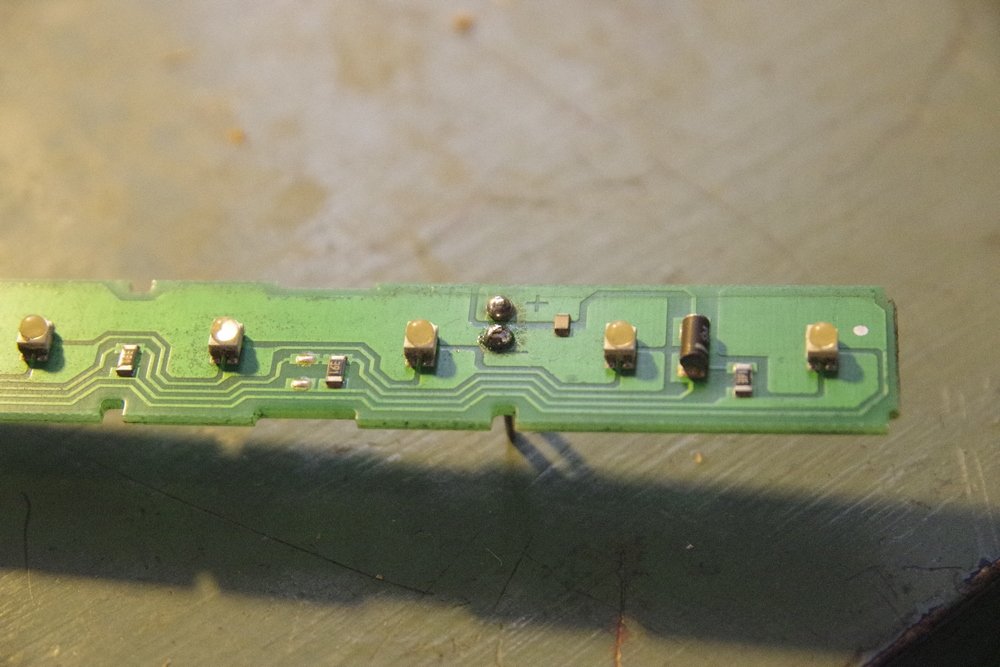
Good afternoon. This is an FYI for anyone who finds that the High Level Brake Light has totally failed (as I did in the pre-MoT check a few days ago) - Bare bones guidance only: - Remove the two interior trim panels on the tailgate - You now have access to the light fitting, and so unbolt from the tailgate (1 or more nylon nuts on threaded studs which are part of the fitting) - Run a semi-sharp blade gently around the fitting, and push from the underside, until you can push it up and out of the tailgate - be careful not to damage either the 2-core cable to the fitting or the pipe to the washer (or, of course, the paintwork!) - Carefully disconnect the plug on the 2-core cable from the fitting, and then the washer jet from the fitting - both have lugs on the sides which need to be gently released. - If the Amber outer lens of the fitting has not already come away from the main body (as mine did as I tried to get it out of the tailgate), then gently run a sharp blade around the edge until the two parts separate. - You will now see the clear inner lens assembly over the LEDs on the Printed Circuit Board (PCB) - it is held in place by lugs/latches at both ends and 1/3 of the way from each end, so gently lever the lens up whilst releasing the lugs. The PCB then simply unclips from the Lens. - Near one end of the PCB, and on the other side to all the LEDS, there is a pair of metal pins - these are marked "+" and "-" on the track side of the PCB, and are the terminals for the 12V input to the LED assembly. - Chances are that the soldered joints that attach them to the PCB are broken &/or corroded - so carefully clean the joints with a sharpish tool until you can see bright solder, and then reflow that solder with a small soldering iron whilst adding just a little more to make the soldered joints more secure. Having done that, all 14 of the LEDS should then light up (as mine did) when fed with 12V to the two power input pins.! If they don't then you have probably got the supply polarity wrong and so switch the external leads. Reassembly of the fitting is pretty much the reverse of taking it apart - probably the biggest issue is how to refit the outer lens to the main part of the fitting. Both items appear to be marked "PC" which I assume means "Polycarbonate". and a little googling indicated that you can use a wide range of adhesives, notably cyanoacrylates ("superglue") and expoxy resin, but I tried the solvent cement I use for joining PVC water pipes and it seemed to work (although I did have to clamp the parts together for a few minutes to let the adhesive set). After that, it is a matter of refitting the plug on the 2-core cable to the pins of on the fitting and then the reinserting the washer jet (with its foam sealant ring!!) into its hole in the fitting, and then remounting that on the top edge of the tailgate - having added some sealant to the edges before you finally push it into place - and finally refitting the nylon nuts which pull it snugly down onto the body of the tailgate. Then you have the relative nightmare of getting the two parts of the tailgate trim back in place - I did that on my own because I had to, but I would strongly suggest that it is really a 2-man job! PS: Don't know what the VAG price for the fitting is (dread to think) but the aftermarket part from ECP works out at around £34-£36 dependent on whether you order it off ebay, or through a branch and use a discount code. So, if you don't think you can repair your own fitting, then this is also roughly how to replace it with a new one. Some pictures are attached - these were actually taken as I reassembled the fitting, but are shown (I hope) in roughly the order you see as you take it apart - and the 2 pins to be resoldered can be seen at the top edge of the PCB in the last shot, i.e. IMG023a.jpg