CrimeaRiver
Finding my way
-
Joined
-
Last visited
-
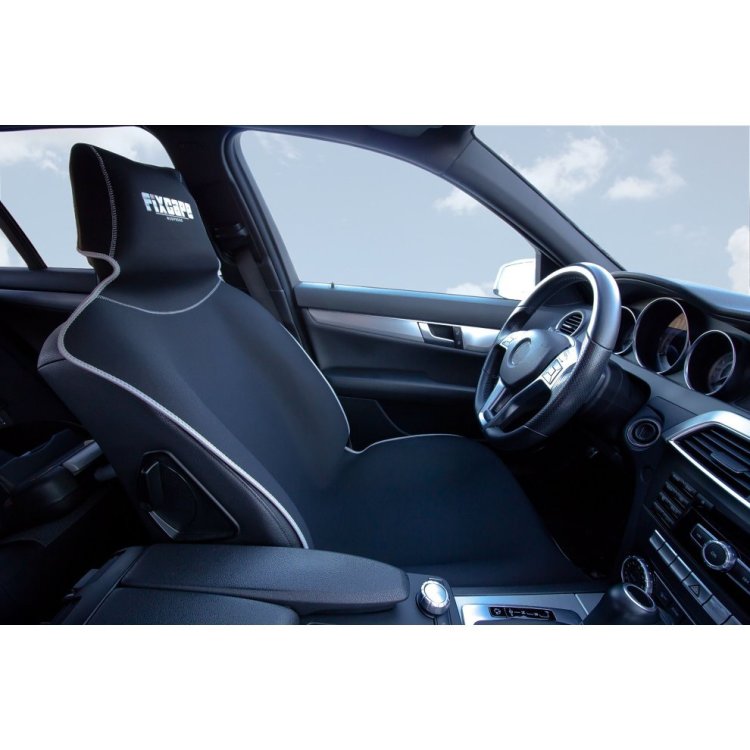
Not leatherette but I've found these to be excellent: Fixcape seat covers, available from Amazon for about £25 each. Made of neoprene with a nylon outer surface for your bum and back. They sort of drape over the seat and are held in place by the 'sharkskin'-like surface of the neoprene and the headrest. Also, they don't squirm around or rumple much on the seat like some of the nylon ones I've used in the past, plus they're totally waterproof. During the winter I quite often get into the car soaking wet and muddy after a ride on my mtn bike and don't have to worry about buggering up the seat upholstery. If they do get really wet they're super quick and easy to remove and dry or clean. Recommended.
-
Pretty sure those plastic widgets ('H' in you diagram) are part of the template kit and are not sold separately by Skoda. As long as you have the large plastic templates LAH77001 you can make the holes in the roof more or less the right size. When I did my roof rails, the template kit didn't have the plastic widgets ('H') but it was no big deal getting the holes to the right size. Have a look here:-
-
I seem to remember that after you've removed the screw that holds the hook in place you can only then remove the hook after the panel is lifted out. It's really easy to forget to reverse this when you reassemble everything resulting in having to partially remove the panel to refit the hook!
-
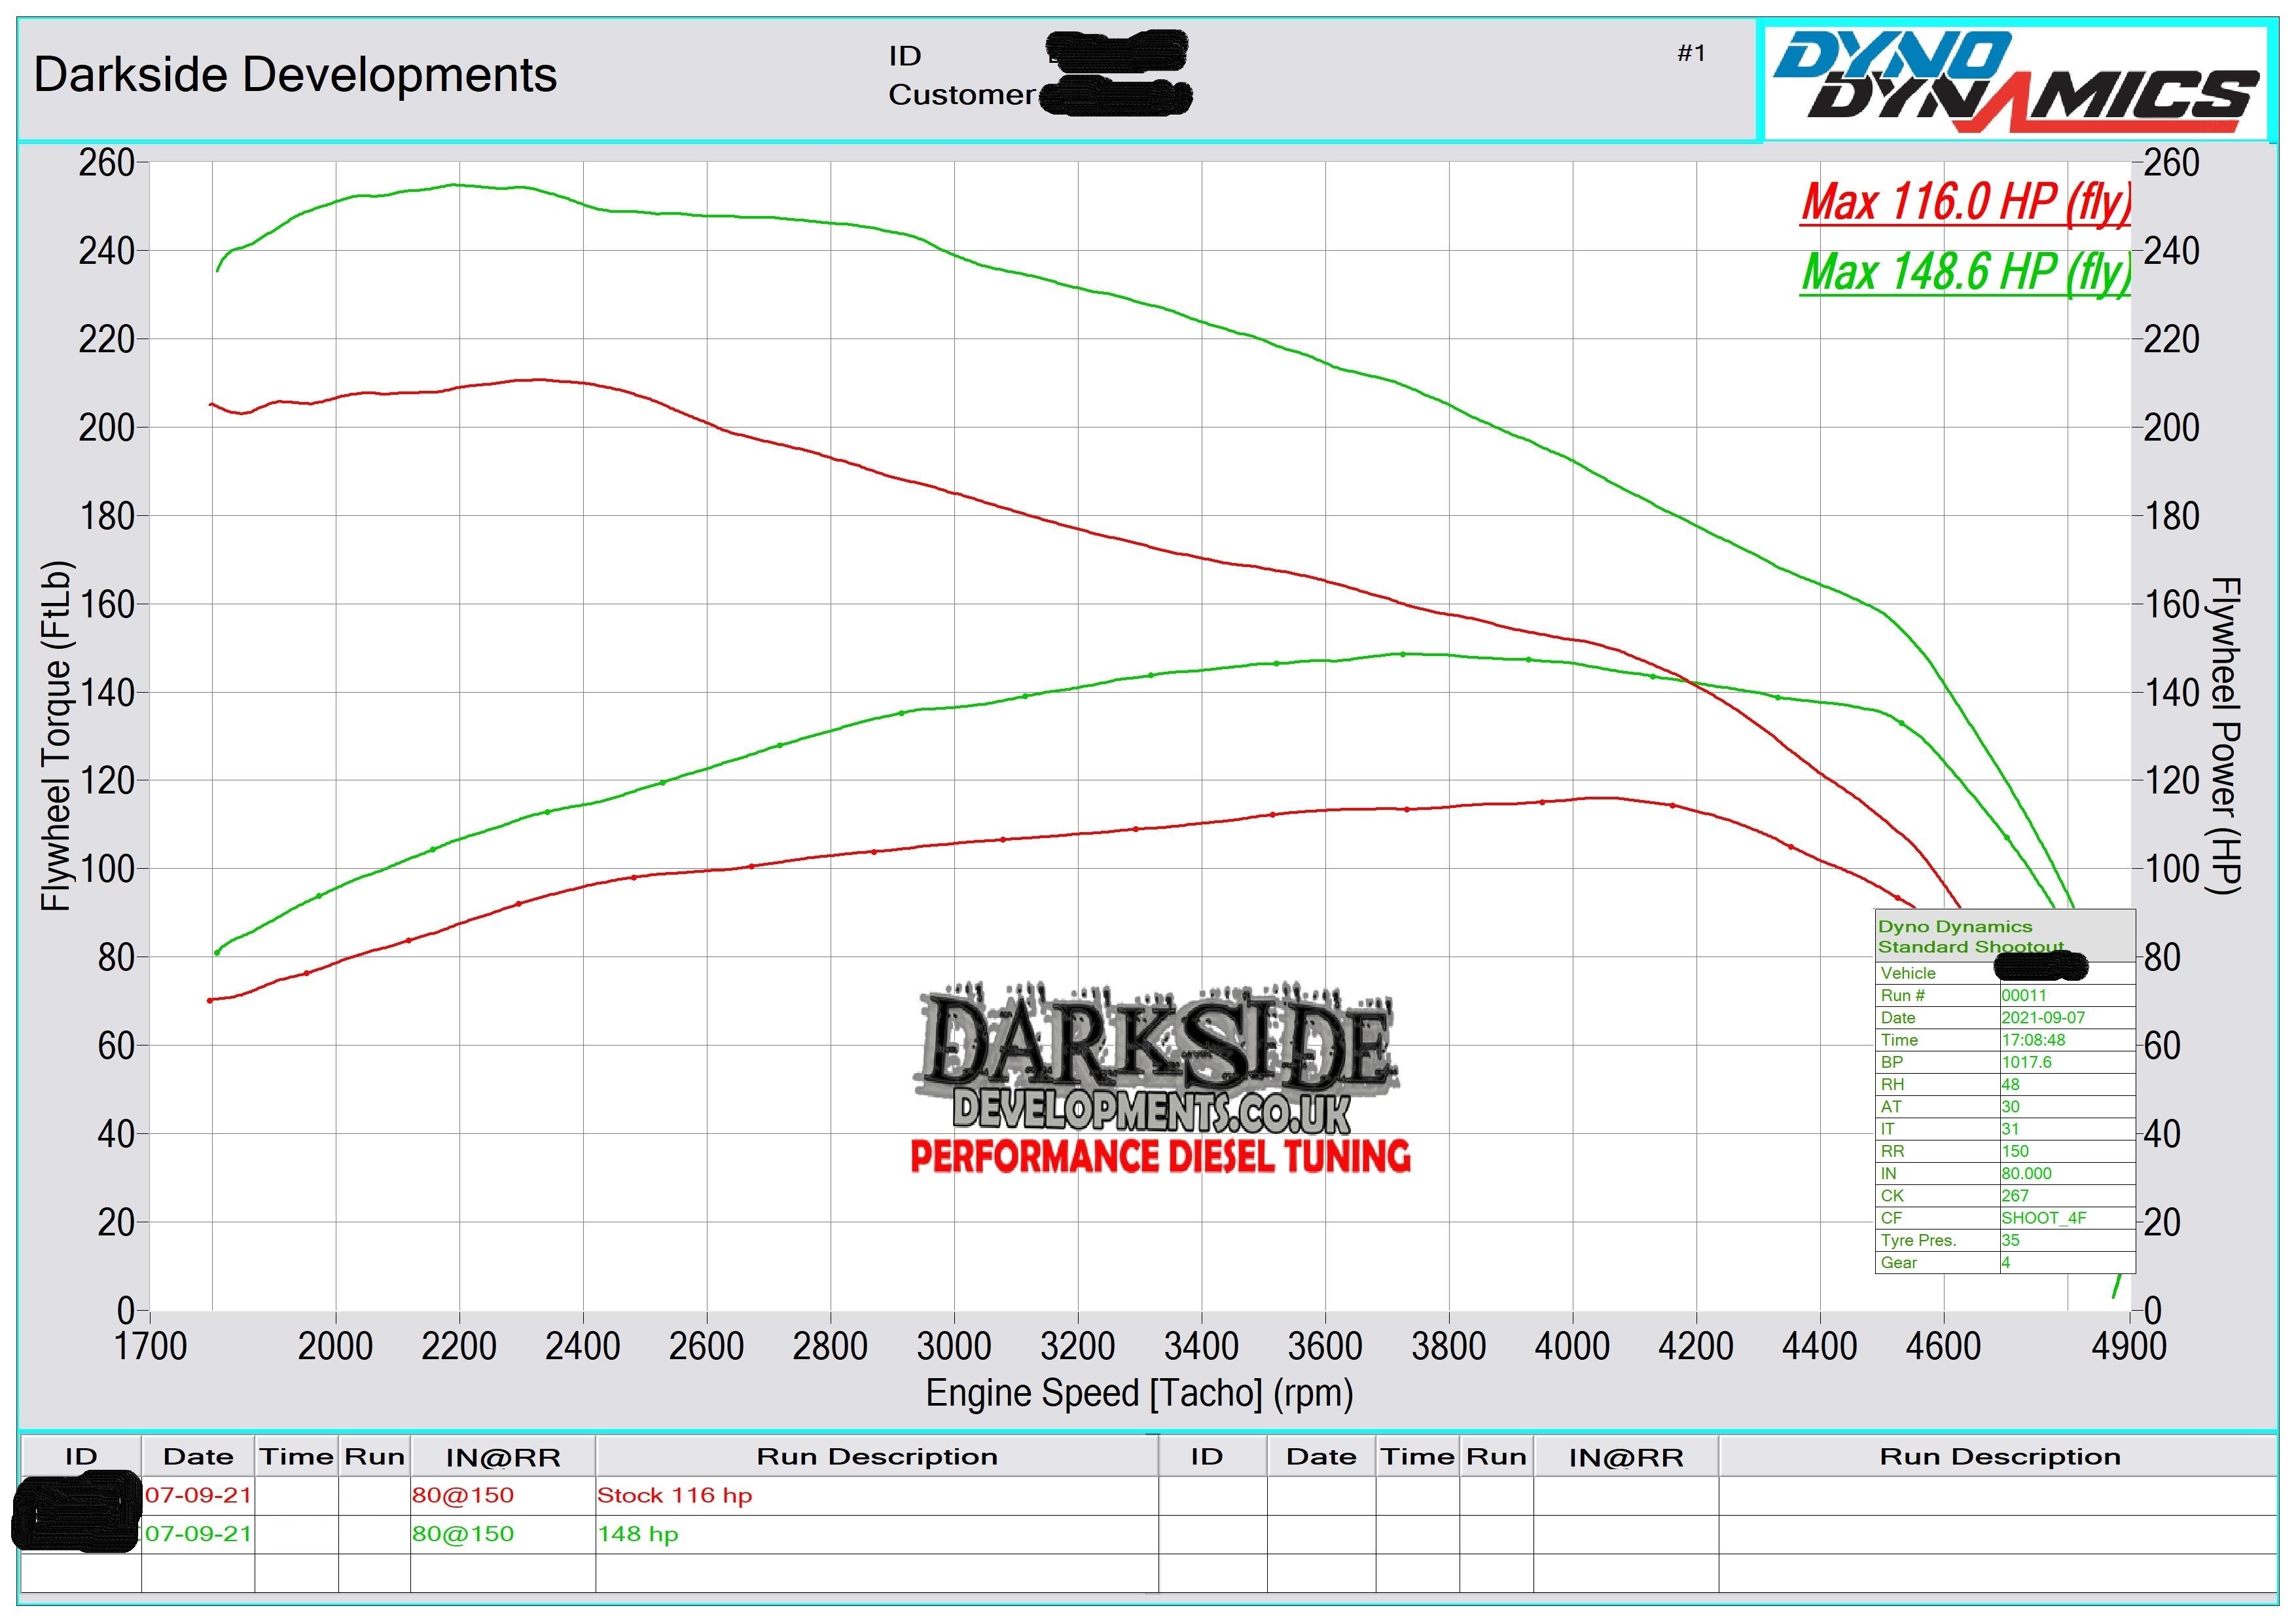
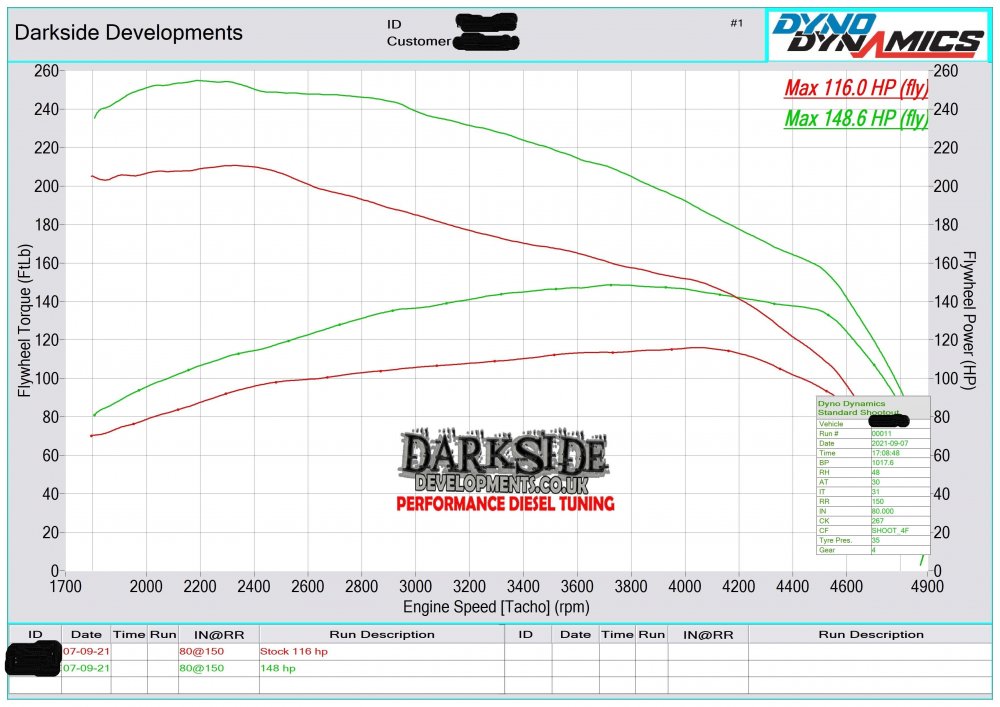
I had a similar train of thought before I bought mine as well. I ruled out the petrol models (lacking in torque for towing) and all the diesels apart from the 1.9Tdi. It has the well regarded PD ('Pumpe Duse') engine with 105hp which is a bit gruff though long-lived, economical with enough torque to tow a small trailer. The 1.6 diesel engine has the same power output but has a DPF plus some other well documented reliability issues. Just had mine remapped to 148hp at the flywheel (about 133hp at the wheels) by Darkside Developments nr Barnsley. Not a 'knock your socks off' improvement but gives a better and more accessible spread of torque which will be ideal for towing my medium sized dinghy trailer. For ultimate practicality try to get one with roof rails already in place, ditto a tow bar.
-
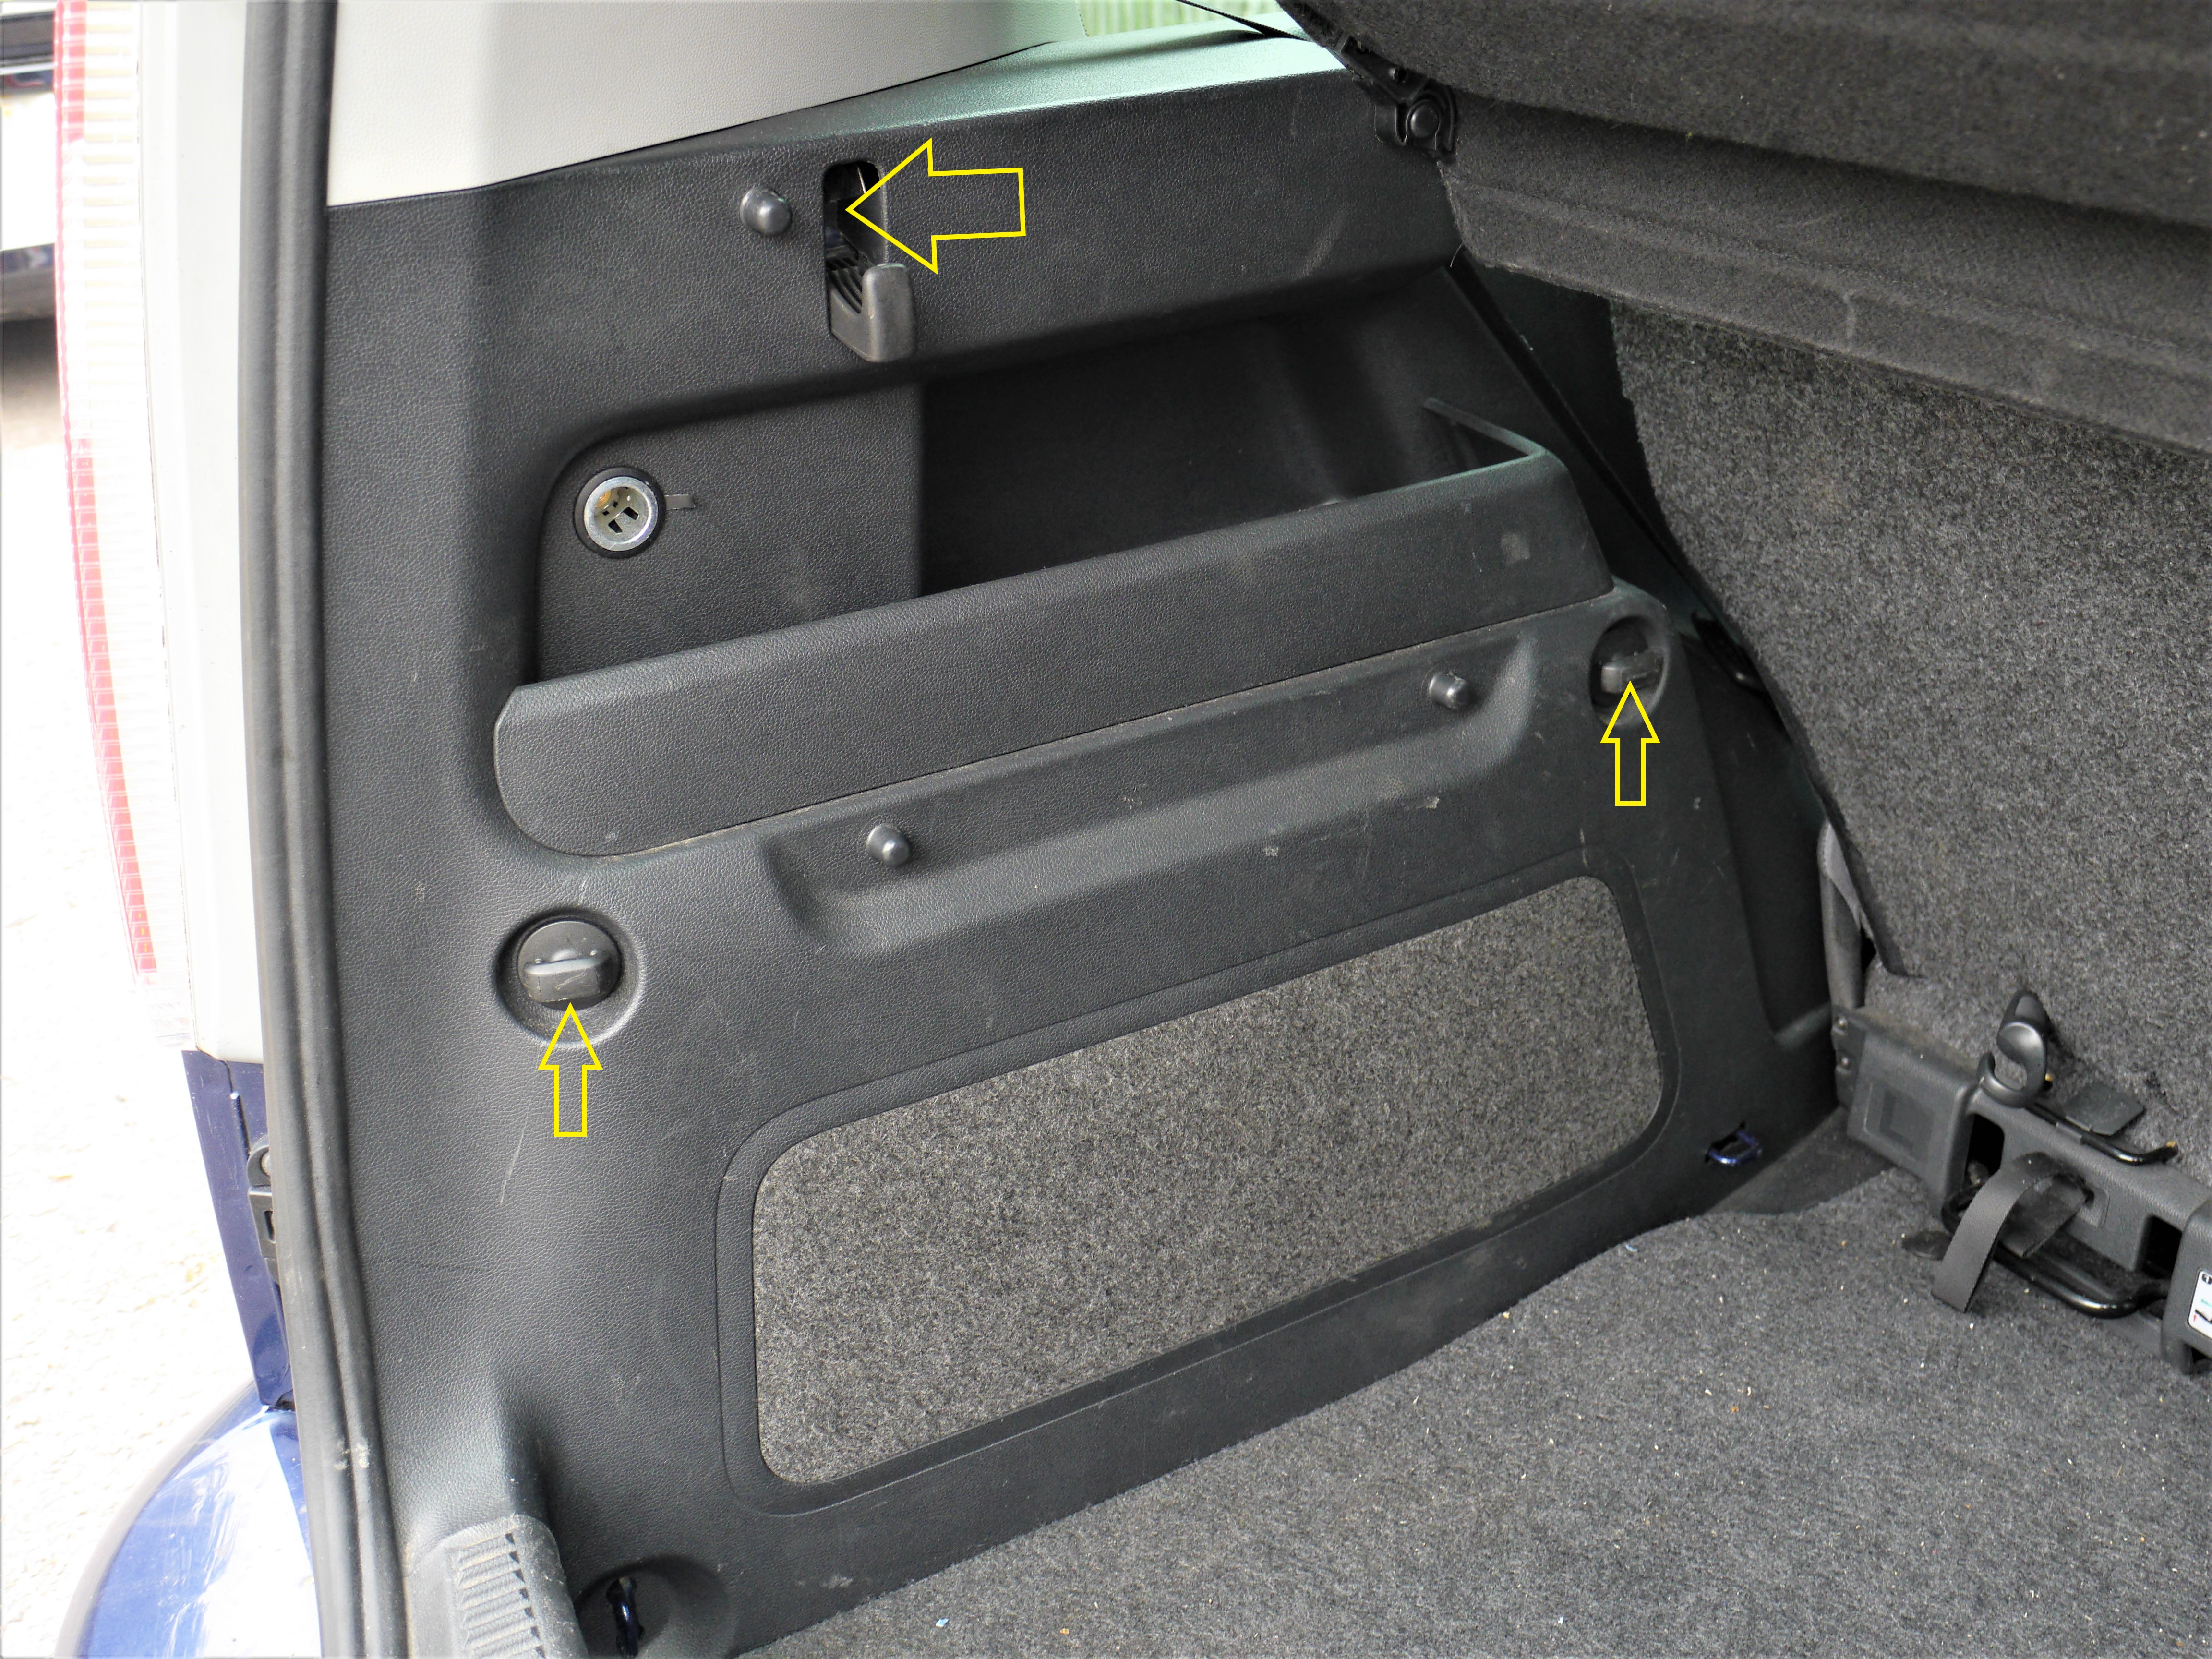
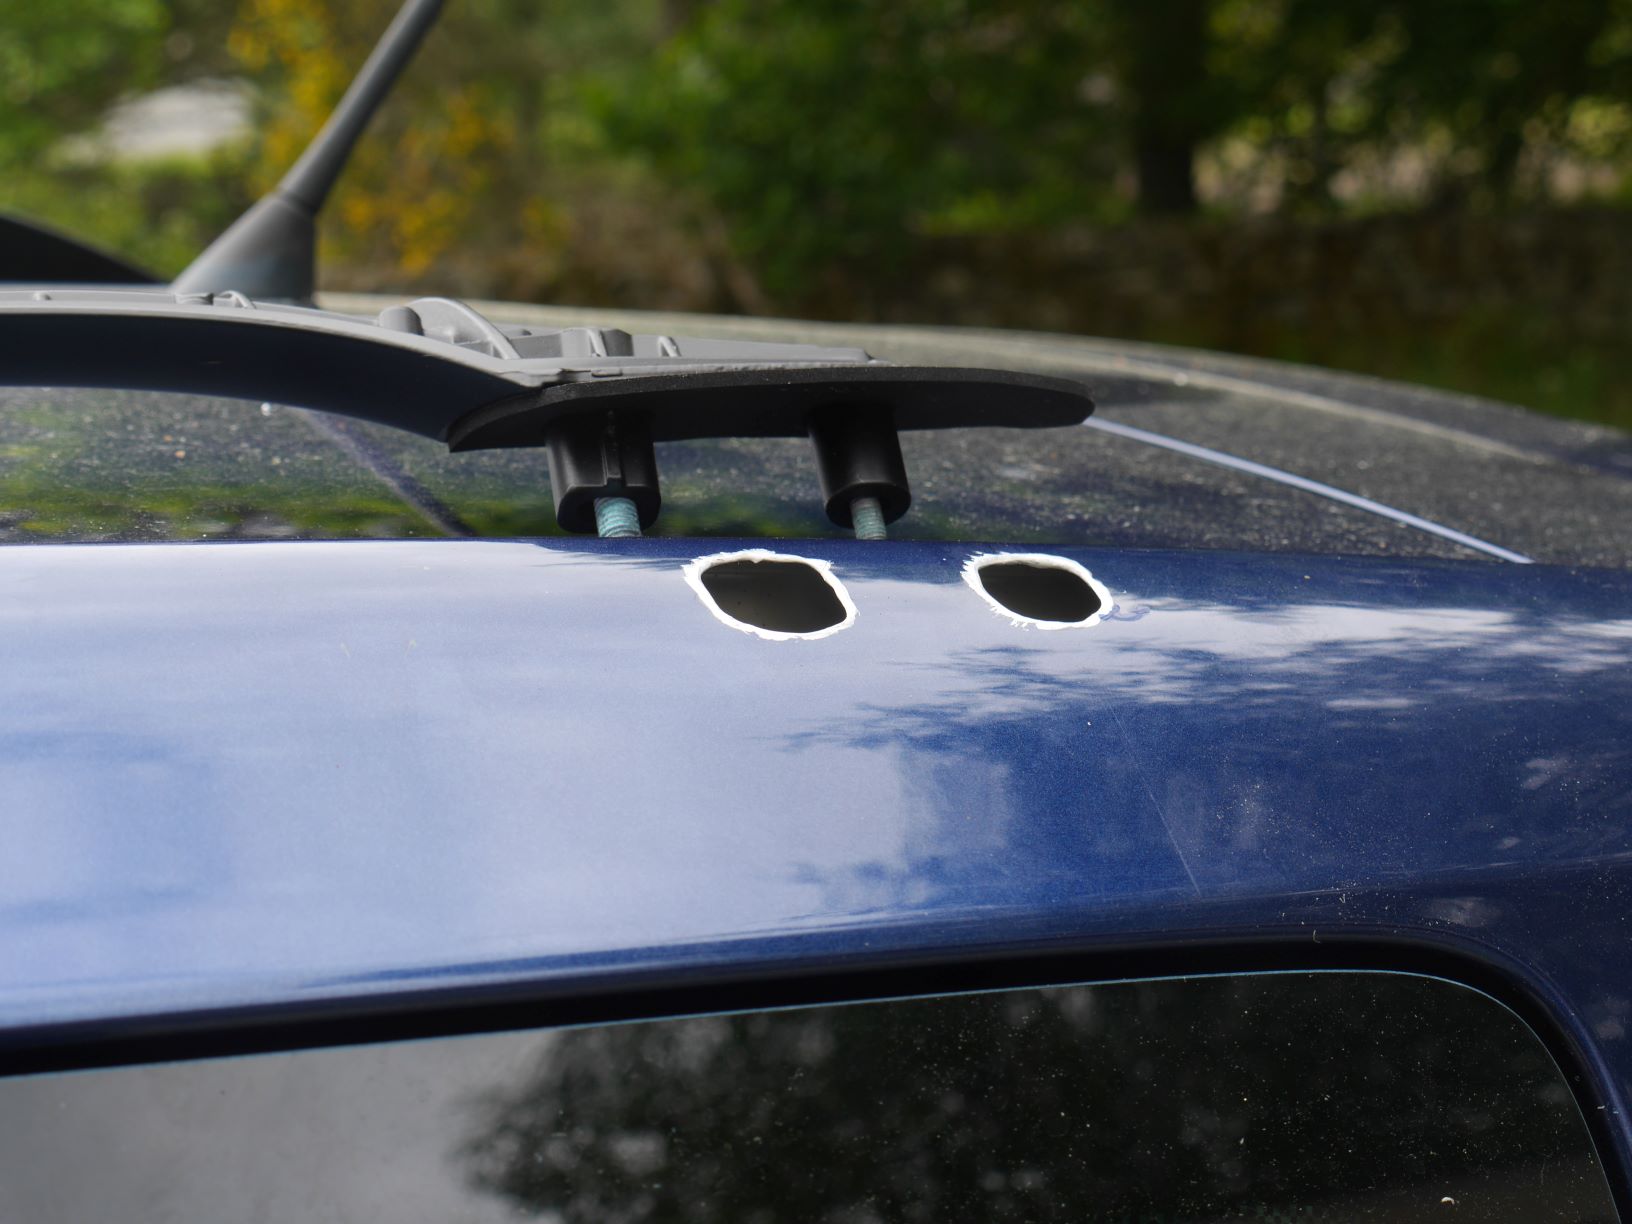
A fiddly but not too difficult job. You have to remove quite a lot of stuff in order to eventually remove the side panels. You'll need a long trim removal tool to pop out some of the more difficult to reach plastic/metal fasteners. Just wrenching at the whole panel may snap some of the push-fit plastic clips. A long trim tool gives much more precise leverage. All the metal fasteners have a Torx head. You'll need to remove the plastic trim below the boot lid slam panel before you start on the side panels. Also remove the rubber seal around the boot aperture. From memory you have to remove the upper panel (light coloured one in my photo) as well. Removing the seats will ease access for this job. There's some metal screws to remove, some hidden by rectangular caps (shown by the smaller arrows in the photo). One is tucked away behind the hooked luggage shelf support (larger arrow). Seem to remember a few metal screw fasteners, too, but these become obvious as you progress with the job. I also recall taking some of the floor panels out as well. Once these have been removed you can start carefully unclipping the push-fit clips with the trim tool. It's all a bit awkward but do-able. Hope this helps!

-
View Advert Skoda Fabia Mk1 Estate. 1.9 Sdi. 'Comfort'. 2003. 68,000 miles. FSH + more. Skoda Fabia Mk1 1.9 Sdi Estate ‘Comfort’. 2003. 68,000 miles. £1350 Just two owners. I’ve owned the car for just over 3 years. Outstanding condition. Impressive maintenance/service history. MOT expires 31st January 2022 Ice cold air con! Two keys. No DPF as standard! Location. Scottish Highlands nr Aviemore (midway between Perth and Inverness). Just off the A9 and convenient for the main line railway. The ‘slug’, the ‘snail’, the ‘cockroach’…it has many nicknames all reflecting the modest performance of its 63hp non-turbo diesel engine. But it’s not the whole story! Once moving it keeps up with motorway, dual carriageway and ‘A’ road traffic just fine. Overtaking takes a bit of planning though, best to just sit back and go with the flow. Oddly enough it’s a very relaxing car to drive. On the upside, come the apocalypse this is the car/engine combo that will rise out of the ashes and just keep going on and on and on. It’s an utterly bulletproof and un-burstable engine. Economical, too: I struggle to get less than 65mpg irrespective of what sort of driving I’m doing. 70mpg+ is possible if lightly laden and using a considerate right foot. Selling because I need a car that will tow and that isn’t something the Sdi will do. The car is in really great condition. Bodywork, trim, engine and running gear are all top notch. The pictures are an accurate reflection of the car’s condition. It has a brilliant, complete and fully documented service history with all the receipts. I even have the purchase receipt from when the car was bought new from the supplying Skoda dealer. I’ve been really careful with the bodywork and the car shows little or no rust. All the wheel arch liners were taken out and the arches pressure washed, dried and then protected with wax spray, including the notorious ‘pockets’ at the bottom rear of the front arches. Good tyre condition on all 4 wheels. I've done the routine oil and filter changes (x4 since 43k miles) myself with more involved mechanical work carried out by my local garage. Prior to 43k miles the car had 14 oil, filter and various other fluid changes – all documented. Some of the other maintenance work in my ownership:- 43k miles – timing belt, tensioner, water pump and poly belt. Brake fluid. 47k miles – new driver’s door lock mechanism 49k miles – injection pump timing checked and adjusted. 55k miles – new rear dampers (Sachs), top mounts, dust sleeve and rubber buffer 56k miles – new front brake discs (ATE) and pads. New reversing switch fitted on gearbox. New F/N/S wheel bearing. 65k miles – F/O/S wheel bearing, F/N/S suspension arm, wheel alignment checked & adjusted. New rear brake cylinders, shoes and fitting kit. 68k miles – new rear wiper motor (Valeo) I have a Word document I can email you detailing ALL the servicing and maintenance the car has had since it was new in 2003. Let me know. Minor issues: 1. The steering light very occasionally illuminates on the dashboard, usually in cold weather after the car has stood unused for a while. I think this is a battery condition issue. Switching off the engine and restarting the car extinguishes the warning light. The previous owner fitted a cheap battery just before I bought the car which may be coming to end of its useful life. It starts the car OK though. Because of this issue I keep the car hooked up to a CTEK battery conditioner when it’s not in use. 2. Some very minor surface rust at the front end of the sill on the driver’s side – just visible in one of the photos. 3. 3 or 4 paint chips on the bonnet but only in the clearcoat. Some very minor tiny scuffs in the clearcoat elsewhere but you’d have to look very carefully indeed to find them! In general, the car has been very well looked after and the price reflects this. The car is on a SORN which means test drives are a problem but you’re welcome to drive it up and down the cul de sac road outside our house. Questions welcome and viewing strongly recommended! Advertiser CrimeaRiver Date 15/07/21 Price £1,350 Category Cars for Sale
-
View Advert *SOLD* Skoda Roomster ROOF RAILS TEMPLATE. Part number LAH770011 **NOW SOLD** Skoda Roomster ROOF RAILS TEMPLATES for sale. Skoda Original Equipment. Part number LAH770011 These are the absolutely essential large templates you'll need to locate the hidden captive nuts in the roof of the Roomster in preparation for retro-fitting roof rails. Suitable for cars with or without a panoramic roof. The actual roof rails themselves are not included in the sale. Comprises two large plastic templates, one for each side of the car. The templates worked a treat and located precisely (and without drama) the captive nuts below the metal skin of the roof line. Does not include the small plastic mini templates that are used to enlarge the holes you'll be drilling. The small templates are useful but not totally necessary for enlarging the holes. I managed a successful installation without them. My thread (on this forum) detailing the installation of the roof rails can be found here: https://www.briskoda.net/forums/topic/494554-roomster-roof-rails-installation-diy-with-pictures/ In good used condition. The cheapest list price I could find for these when ringing around Skoda dealers was £105. I'm offering these at a bargain price because mine doesn't come with the mini templates. Quite expensive postage due to the templates being quite long although very light. Located nr. Kingussie in the Scottish Highlands so if you're passing by you could collect and save a few ££. Advertiser CrimeaRiver Date 15/06/21 Price £40 Category Parts for Sale Shipping Estimate £20
-
(There was a part number error in the original posting above which I have now corrected.)
-
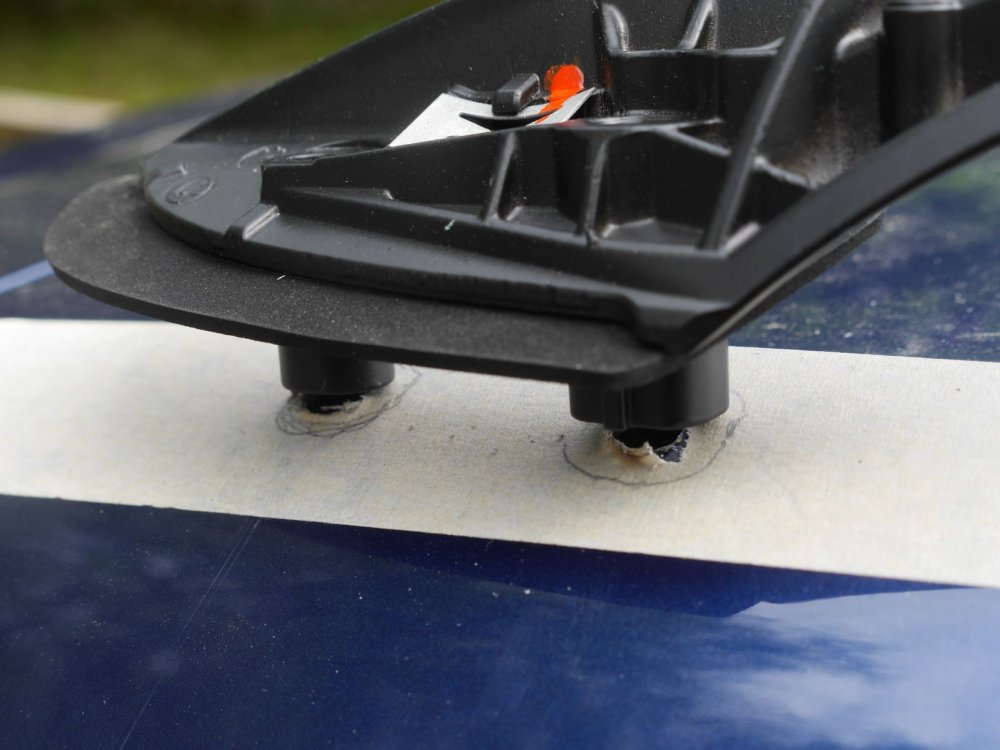
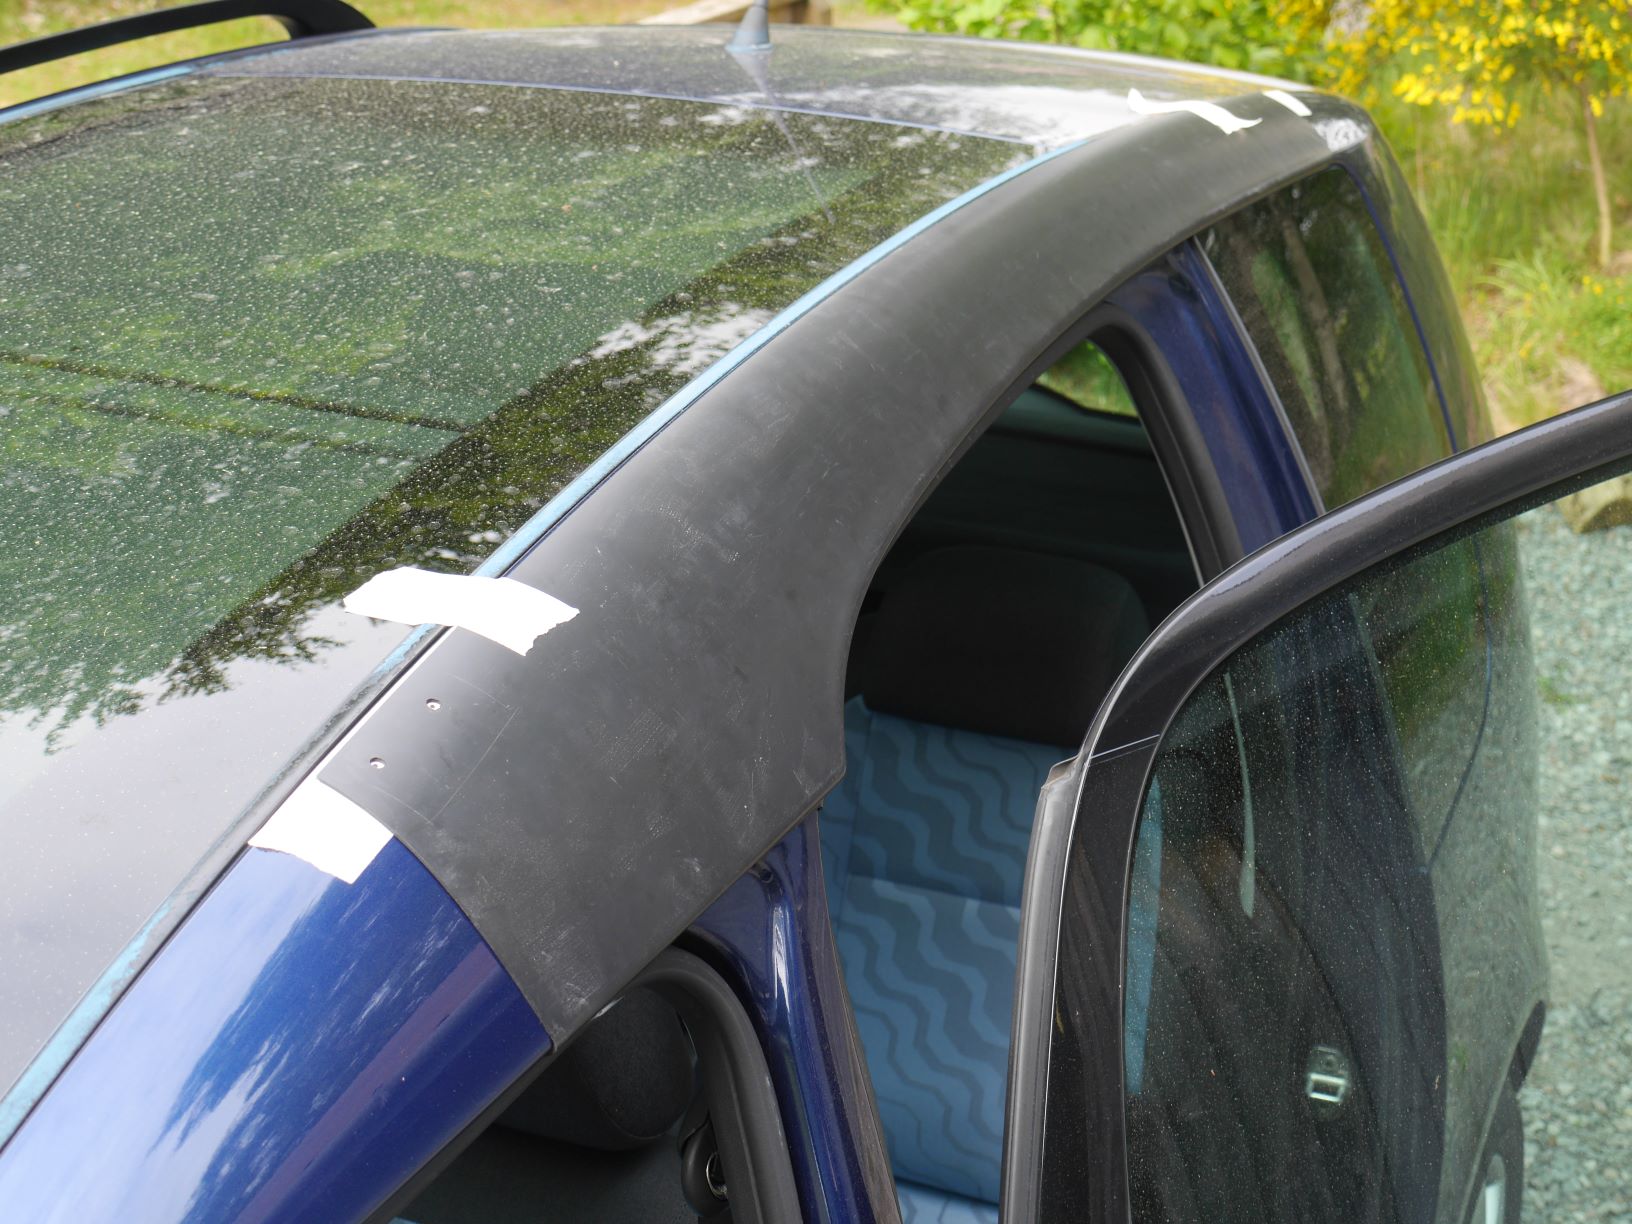
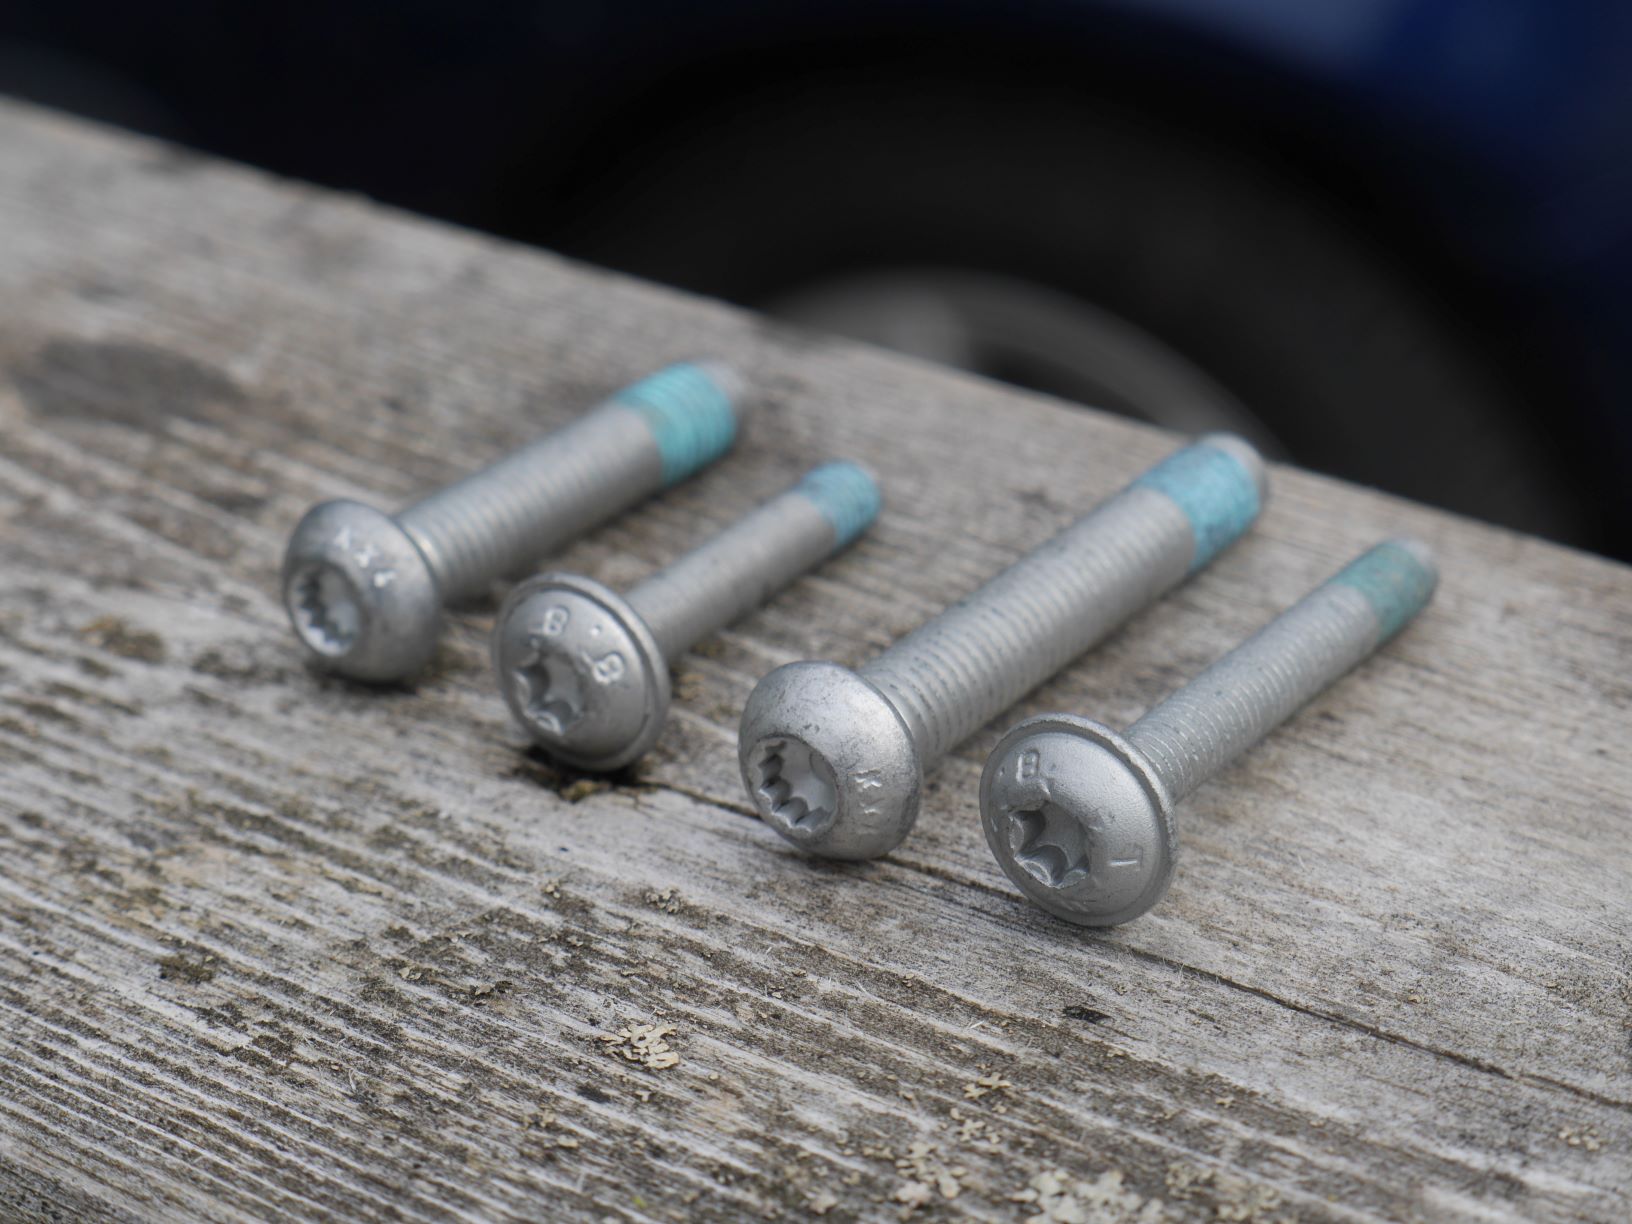
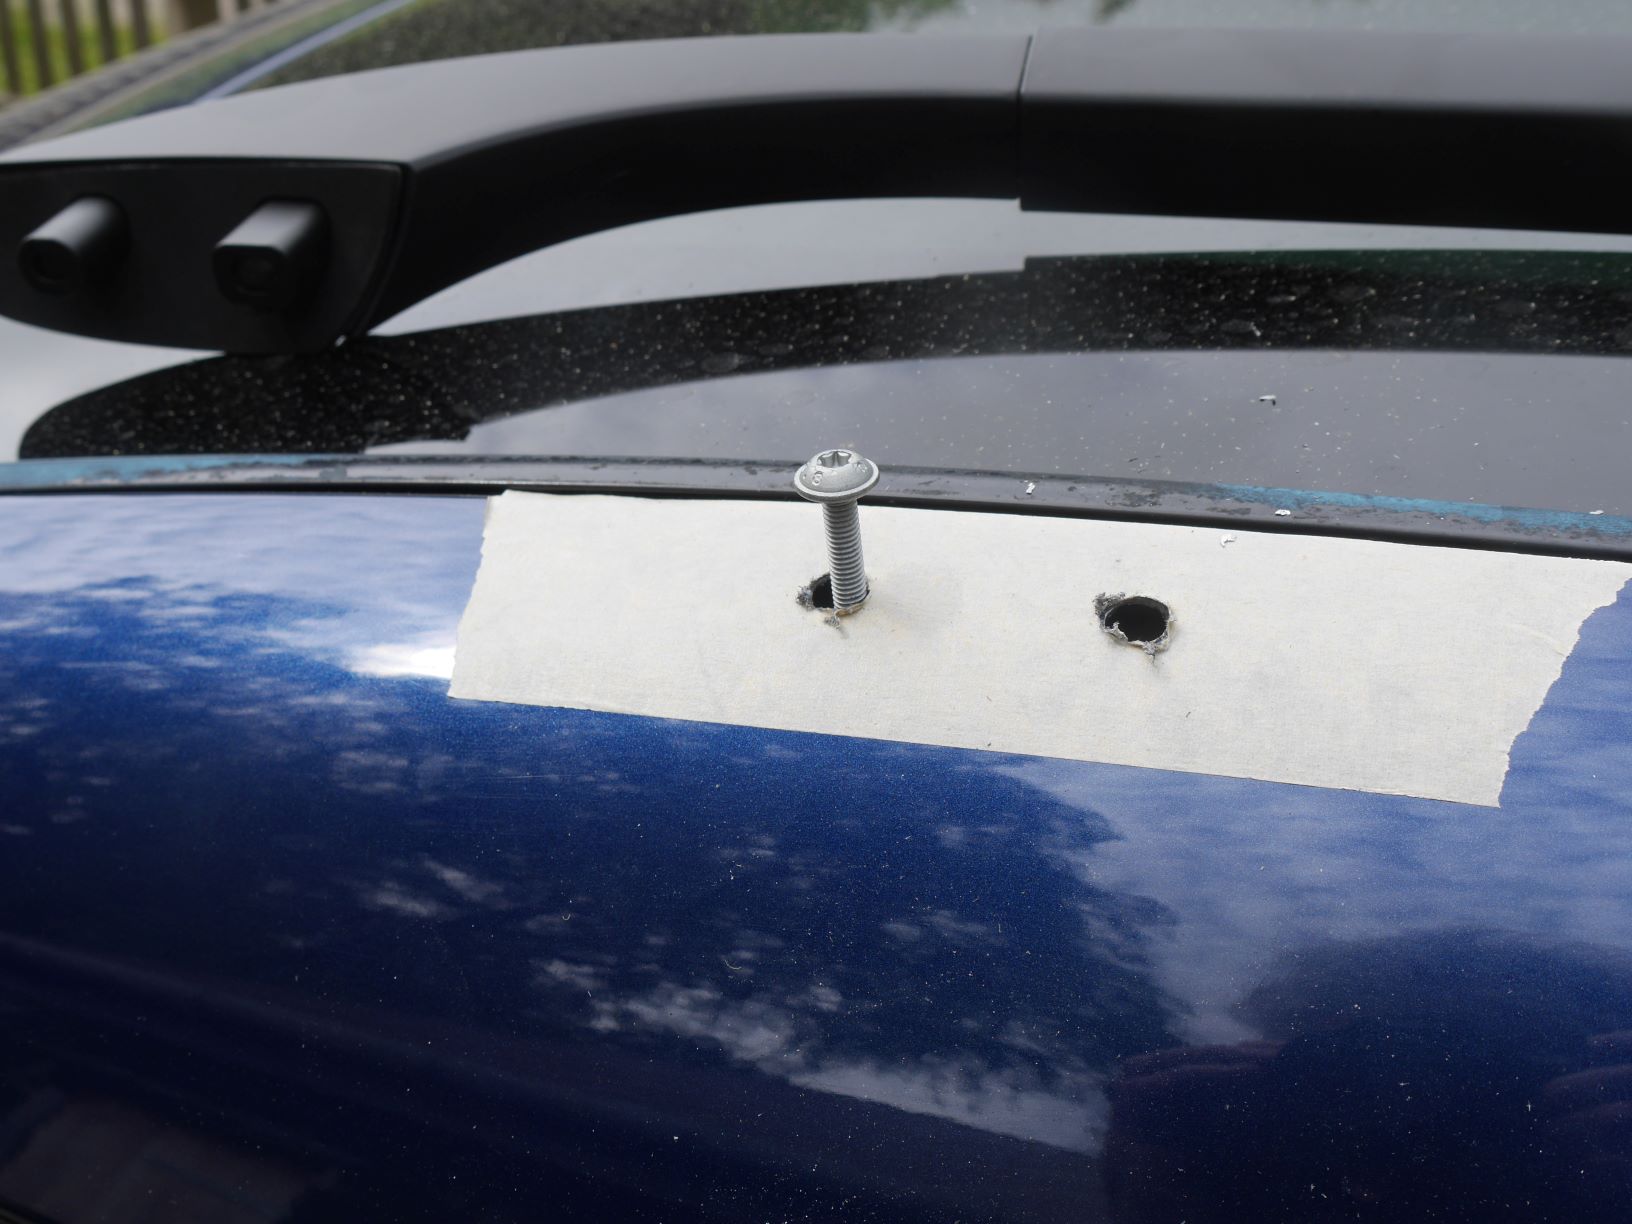
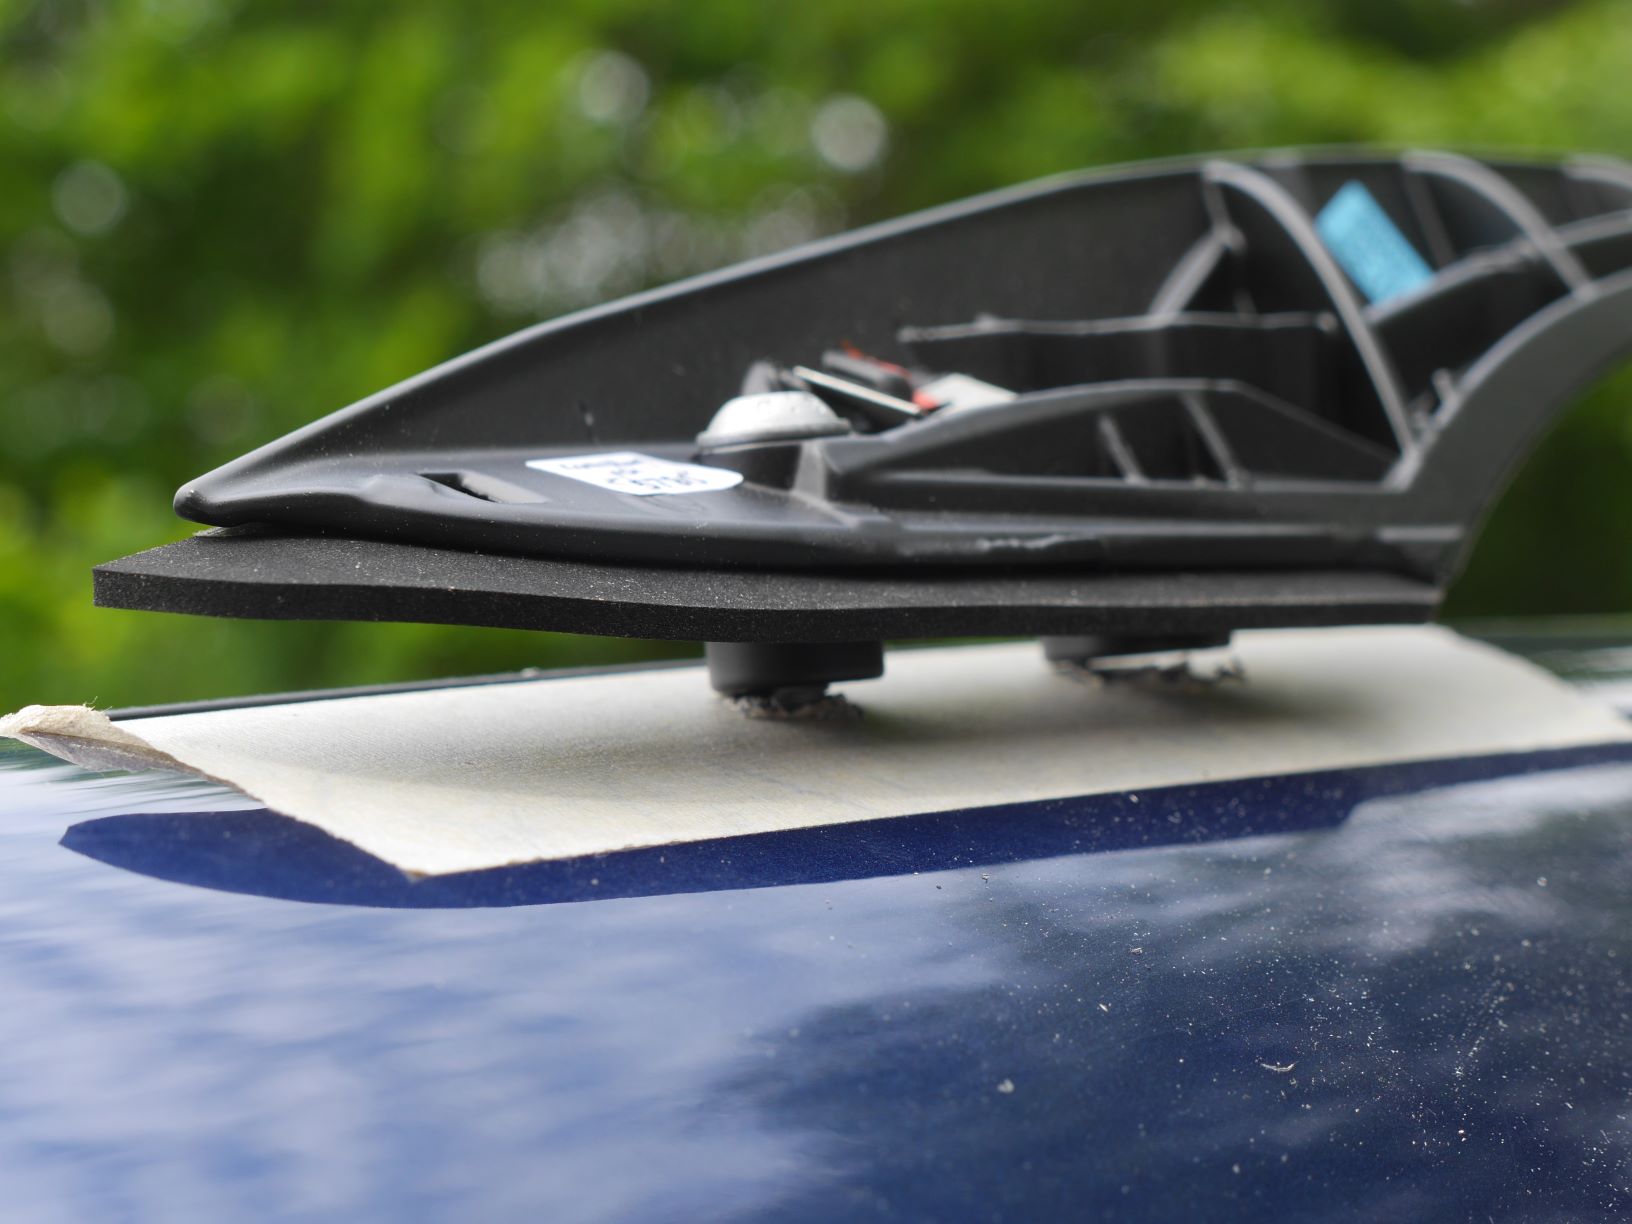
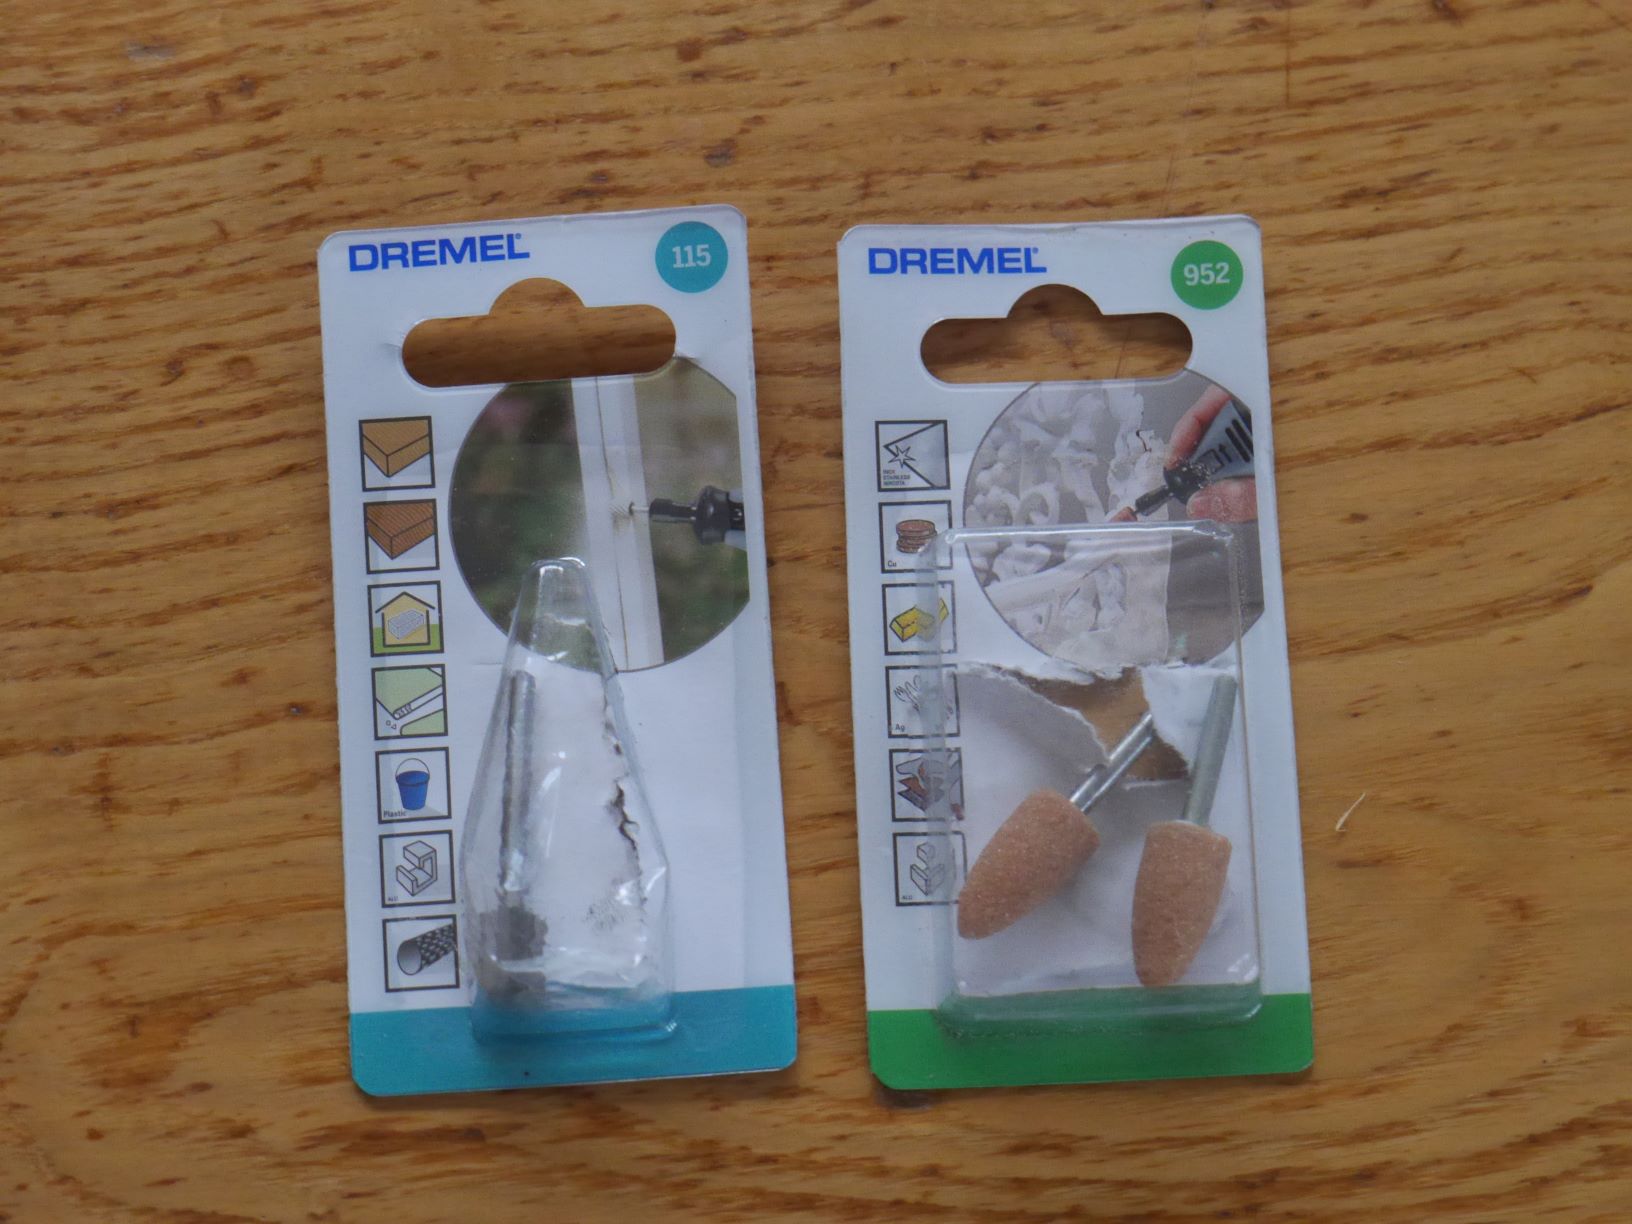
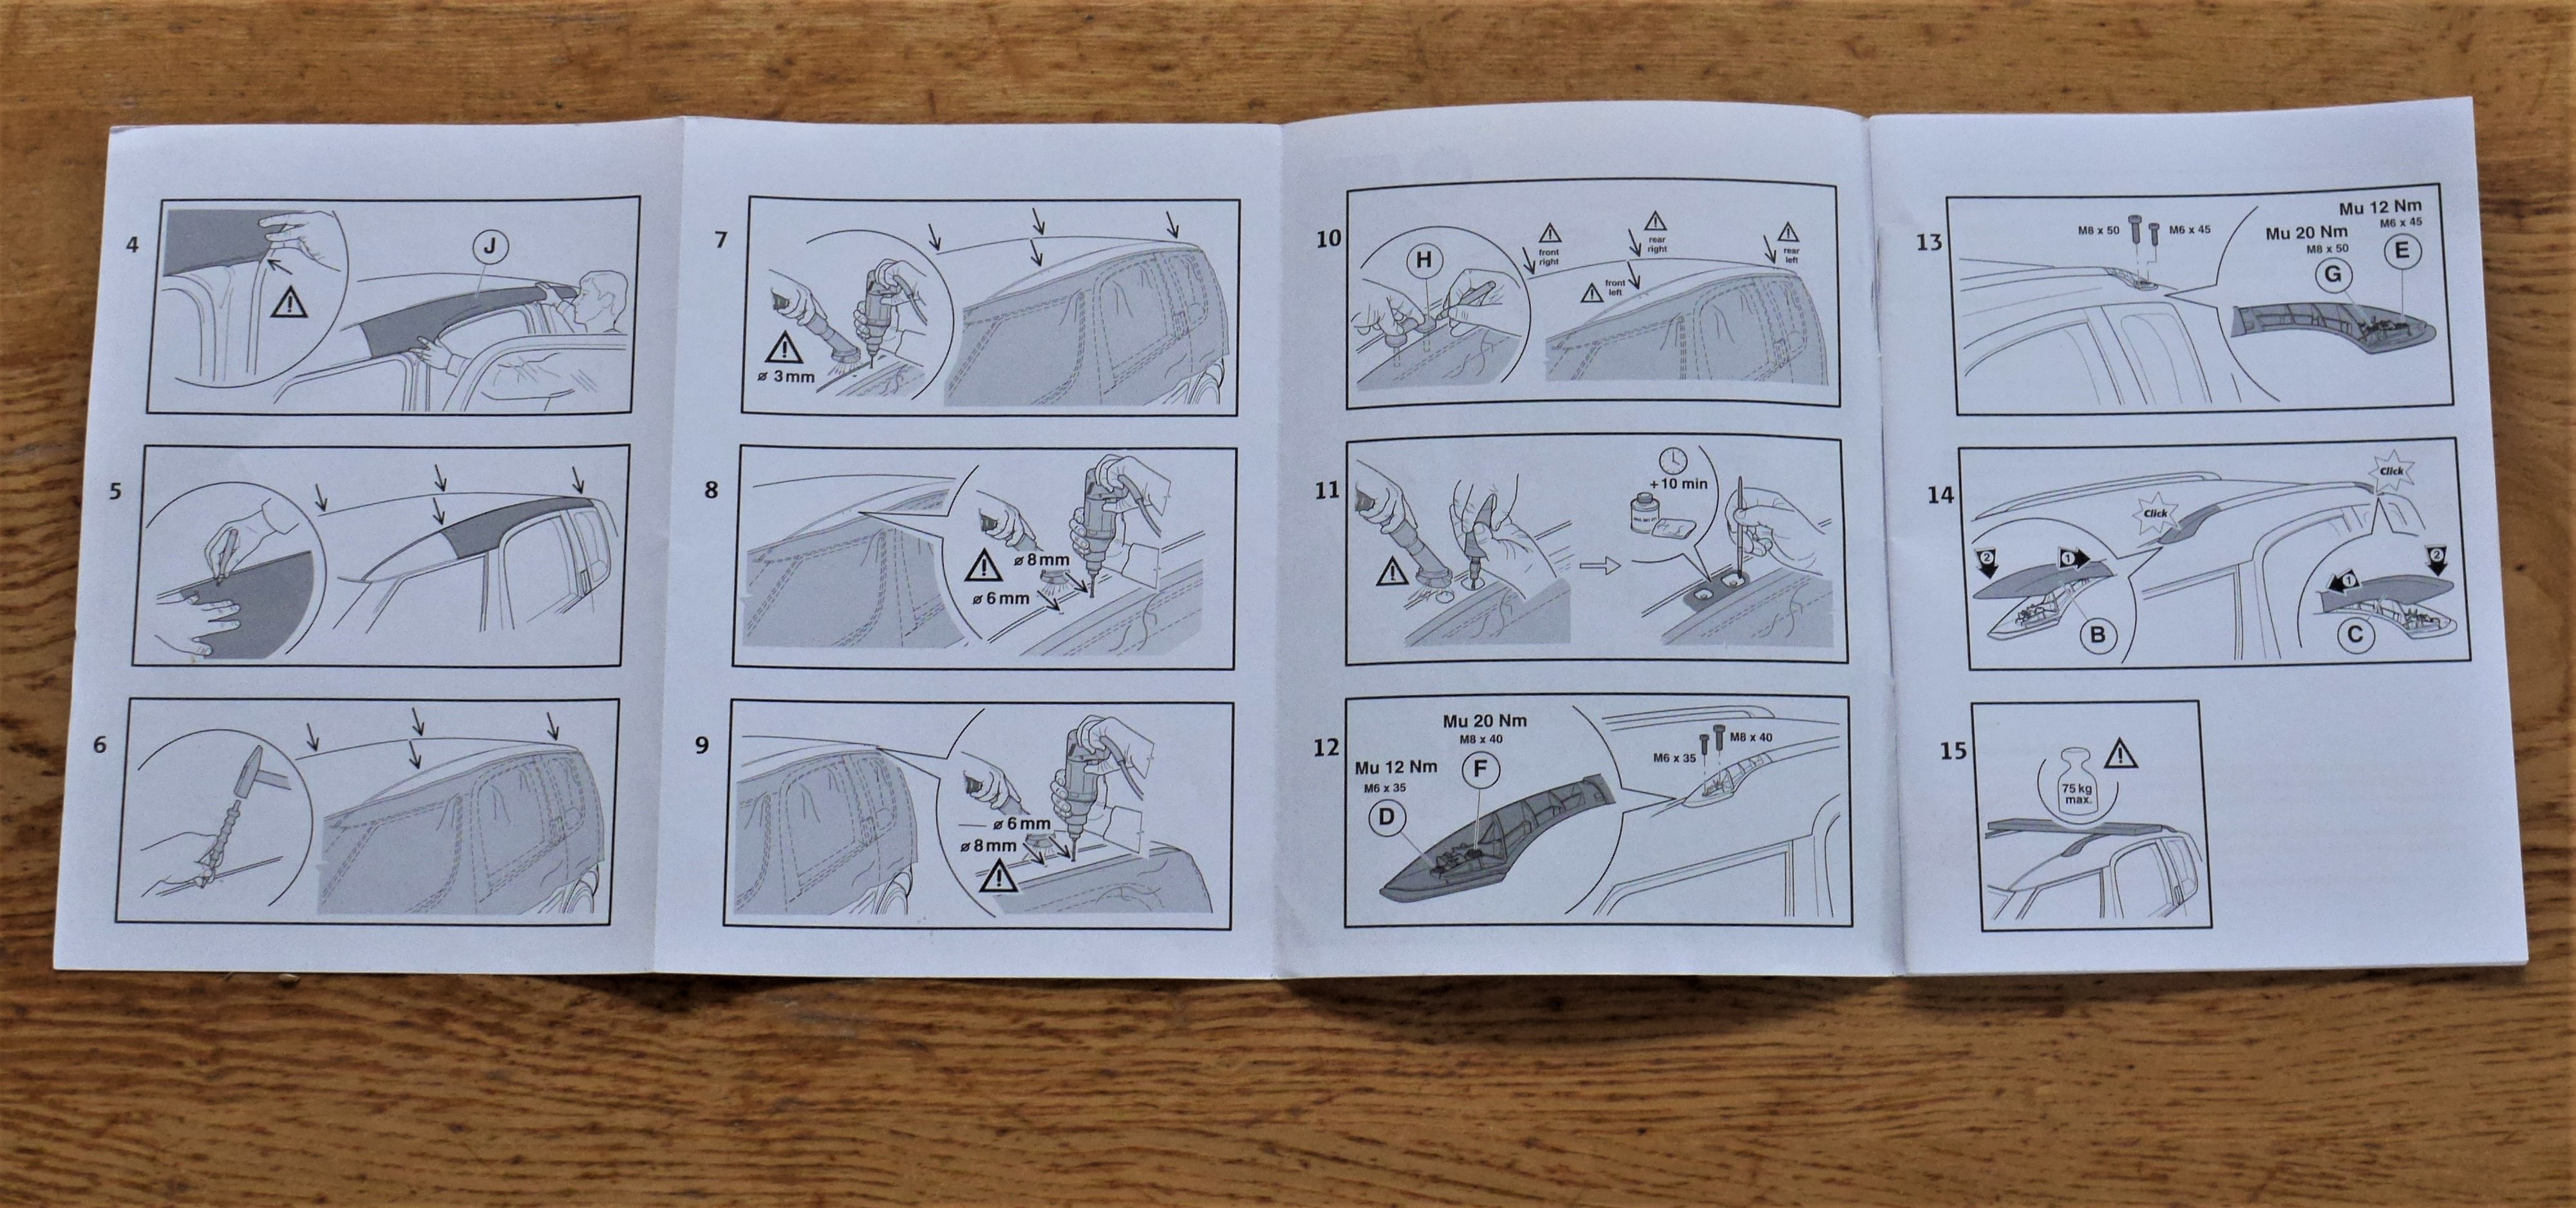
There have been various threads and postings on this DIY installation job but not a step-by-step guide. Have just fitted these on my 2009 Roomster with a Pano roof and thought others might benefit from my fumblings! The Big Picture The roof rails can be retro-fitted to cars with or without a Pano roof. There's no difference when it comes to installing the roof rails. If you're not too handy with tools (or have limited access to tools) and you have deep pockets, then definitely get a Skoda dealer to do this job for you. There's been mention on the forum of Skoda dealer Parts Department staff producing low 'book price' labour quotes. Accept the quote! Drilling into the car to locate some hidden captive nuts certainly feels a little 'balls out' (even using the Skoda template) so the job is not for those of a nervous disposition either! However, if you're a bit of an impecunious bugger like me and have done a few more technical things on your car then this job is definitely do-able....as long as you have the right tools. Stuff you'll need:- The roof rails themselves. Skoda part number: LAH770001 The roof rails template. (Attempting to do this job without the large templates would be a nightmare and if you get it wrong it might require an expensive visit to a bodyshop to put right your mistakes). Skoda part number: LAH770011 . There are two of them, one for each side and they can't be mixed up. If you buy this installation kit from a Skoda dealer then it will also come with a selection of small plastic templates that allow the accurate enlargement of the pilot holes you'll be making. I didn't have these small widgits so had to ad lib a bit but nevertheless achieved a satisfactory outcome Tools Power drill, Dremel drill thing (or die grinder, or similar), 1/2" or 3/8" torque wrench (that goes as low as 12NM), a Torx and a splined bits for torqueing down the securing bolts. A sharp-pointed centre punch, hammer & needle nose pliers. Consumables Drill bits: 3mm, 5mm, 6mm, 8mm. HSS or similar. I broke two of the 3mm bits so have a few spares of these smaller one. Dremel or die grinder bits to expand and clean up the quite large holes you've made. Paint: Primer (I used rattle can of acid etch primer, sprayed a bit into a jar and used and a very small artist's paint brush to apply the paint. Plus some sort of quick drying top coat to seal the primer and keep the weather out. (Above) #1. One of the large Skoda OE templates in position on the Roomster. It's made of cheap plastic but carefully and accurately moulded to the contours of the roofline and B pillar. Don't leave the template out in the sun just before you use it - which is what I did - because it expands lengthways at least 8mm or so which was a bit alarming and gave quite a locational error at the rear rail fixing points. I let it cool down to below room temperature and then got busy marking the centre of each aperture onto the masking tape I'd put down in the general location of the bolt holes in the roofline. (Above) #2. A bolt set for one roof rail shown. 4 bolts per side, all different sizes. M6 and M8. The two longer ones go at the rear fixing points. *Note they have Torx and splined socket heads. (Above). #3 The captive bolts are located beneath the black dots....I hope! Make a dot in the centre with a pencil or Sharpie then lightly punch it with a centre punch. This will reduce the chances of your drill wandering around too much when you first start the 3mm hole. (Above) #4 Using a selection of drill bits progressively make the holes 6mm and 8mm. The 6mm holes are at the front end and rear end of each rail. (You should be able to see the captive nuts down in the holes....and yes, they were there thank God, pretty much spot on!) If you have the selection of small plastic hole templates in your installation kit this is when you insert and trace around them to give you the finished hole sizes sizes. I didn't have the small plastic widgits so had to use other freehand methods to sketch the larger holes onto the masking tape. (If you have the small plastic widgit templates then you can skip the next three photos.) (Above) #5 My free-stylee approach to sketching the larger holes. As a temporary measure, place the longest 6mm bolt into the hole at the front of the car and lightly screw it into place. Finger tight only. (The bolt you're using will eventually be used to secure the roof rail at the very rear of the car.) (Above) #6 With the roof rail lightly attached at the front of the car, next swing the roof rail over where the rear holes are and temporarily tape it in position. They won't line up, which will freak you out slightly (or a lot). You'll assume the roof rail is too short, or the template was wrong , or the captive nuts in the wrong place. Or all of those things! But don't worry everything will come good. (Above) #7 Trace around the projecting pegs onto the masking tape at the front of the car. (Above) #8 Drill 3mm holes then enlarge with 5mm until all the drilled holes merge and the excess metal in the centre can be pulled out with needle nosed pliers. (Above) #9 Dremel time! Smooth out the edges of the holes. Test fit the roof rails. Make sure there's clearance all round each protruding peg since you'll need to rust protect the edges of each hole so you don't want any pegs rubbing on the sides of the holes. Make sure you hoover out all the metal chipping that have fallen into the holes. (Above) #10 The Dremel with one of the metal grinding bits I used - Dremel grinding bit 115. A steady and firm hand is required when using this tool. You definitely need face protection when this thing is cutting metal at 22000 revs. The grinding bit was just about up to the job of cleaning up the holes but only just. No way could it have been used to remove most of the 'meat'. (Above) #11 Also used Dremel grinding stones (right) to smooth off any final rough edges around each hole. (Above) #12 Remember photo #6 above, the one where the holes didn't line up? Well, with the two holes at the front of the car now complete and front pegs dropped into place, miraculously the pegs at the rear of the vehicle become aligned. Witchcraft! Next step is to drill and enlarge the rear holes similar to previous steps. (Above) Paint protection for the holes. I used acid etch primer and then some anti corrosion stuff I had lying around in the garage. It's at this point you'll want to touch up any nicks you created when using the Dremel or die grinder. I had a couple that needed minor attention with a body coloured touch up paint kit. (Above) Almost there. A test fit of the roof rail. Torque down the bolts at each end of the rails. M6 bolts torqued at 12NM and M8 bolts at 20NM. Nearest the camera you can just make out where I nicked the paintwork with the wayward Dremel. I fixed the paint prior to final fixing. (Above) The finished job. The plastic cover trims at either end of the rails snap into place easily & securely after you've torqued down the rails. (Above) The 'Destructions'! Each set of roof rails comes with a easy to understand set of written and diagrammatic instructions. Well worth referring to. Hope this helps! End note: If money was no object I would definitely let the dealer do this job!