smokinmonkey
Finding my way
-
Joined
-
Last visited
Everything posted by smokinmonkey
-
I did mine myself and 1 extra step before you remove the plug.. Get some kitchen roll and a long screwdriver or something pokey and clean around the plug / absorb all the extra plusgas before removing. There was a good bit of grime and I'm pretty sure you don't want that flying in once you remove the plug.
-
Open the bonnet, pull off the plastic engine cover, then watch the start of this: https://youtu.be/i2AEvaPXzn8?si=0J1heJ7Nn9op-Q71&t=80 Pressure sensing plug is the 3rd one over, it will have extra wires running to it
-
Mechanic said he'll only replace one due to the risk of doing 4 and 1 of them snapping
-
Hi tdog, I have the same fault code for glow plug cylinder 4. I'm only replacing the 1 plug. Can you remember if 4 was just a regular glow plug, or the more expensive pressure sensing plug? From what I've read online there are 3 regular and 1 pressure sensing.
-
No help here on how to remove but I had my alternator removed, reconditioned and refitted plus fan belt replaced for £160 total by my local independent mechanic. (listed as £90 materials and £70 labour on the invoice). So it might be worth getting it reconditioned if there's a place local to you?
-
Instructions state: "Remove the temperature or pressure sensor Insert the probe through the opening and Drain spray in the direction of the particulate filter." I'm searching on here, YouTube and Google and can't find any mention of temperature or pressure sensor in relation to DPF location? A guy in a YouTube tutorial shows him removing the O2 sensor and spraying the DPF cleaner in there? Car is a mk3 2.0 Octavia Scout if anyone has a location / description / picture with arrow they can point me towards lol.
-
Hey Geoff, Digging up this old thread, but just wondering what happened with the dpf as your oil ash was nearly full back when you posted this, and you seem to have kept the car for another while after? My oil ash is currently at 74.4, so trying to figure out what the future has in store 😂
-
Well did you find out what was wrong in the end? I'm in a similar situation.
-
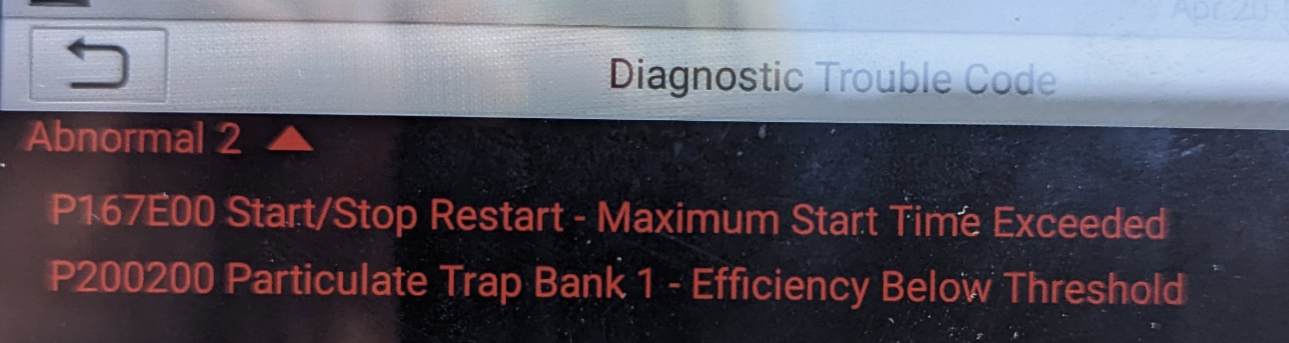
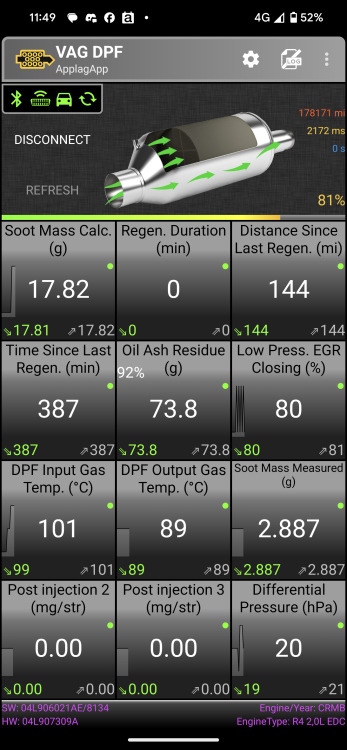
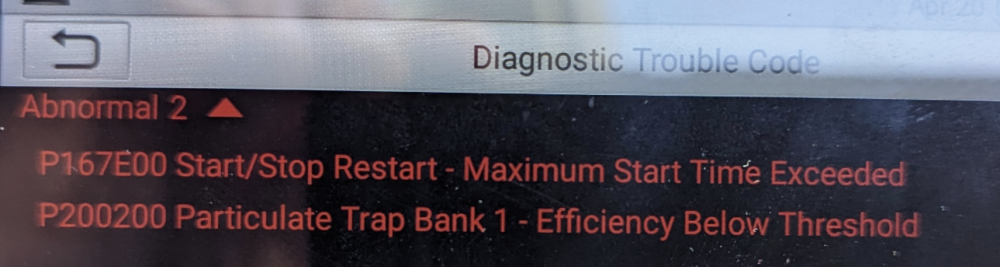
OK I totally under estimated the mileage. 178k Also just bought the DPF app and it's showing 73.8g of ash and 92% full. Could this be causing the issues I've described?
-
2.0 TDI 150 hp Will update post Edit: seems I can't update the original post
-
Hi, I've have this Octavia for the last 6 or so years. Current mileage: 170k+ (might be 172 or 175 I can't remember lol) Have had the alternator refurbished and battery replaced in the last few years. Serviced every year with oil, oil filter, and fuel filter always changed. For the last year or so it's had random starting problems (a hard start every few weeks), it's always started but sometimes it will turn over a few too many times and seem like it won't start, and then it does. More recently it's happening now (like once a week, instead of every few weeks). On the most recent occurance it turned over maybe 10 plus times, then started and a small amount of smoke came from the exhaust. The dash also displays "start stop system unavailable" or "lane guidence unavailable". I read about dashcams causing battery problems and I installed one a few months ago, it's not hardwired, but stays constantly plugged into the USB port and only powers up when the car is switched on. I wondering if there's anything I can do / try / test before going to my mechanic. I've also attached a read out from car diagnostics that I had a friend just do. Thanks.
-
Hope you got the airbag sorted. For anyone reading, disconnect the negative terminal of your battery before removing the seats. And put the seats back / reconnect all wires etc before reconnecting the battery. This will save you from having to reset the airbag light. Also some airbag systems have capacitors which take a while to discharge, so I would disconnect the battery about 30min before removing the seats just to be sure. You can clean the dash / the boot etc in this time flif you're removing the seats for cleaning purposes.
-
Any guide or tips on how to remove the entire unit? I've got mine "opened up" where I can see the circuit board for the switch etc but would like to remove the entire unit and try to repair
-
Hey Stuart, All sorted now, had just bought the new matrix to fit myself (following the video of the guy fitting wrong first time lol) when the same pipe went again! Had to get recovered and brought to mechanic, so he fitted the new matrix, expansion tank and coolant pipe when they all arrived. The heat in the car is now warm within about 3-4 minutes of running vs when I bought the car I always thought it was slow to warm up the air. The silica bag has probably been leaking slowly for 3-4 years as this is a night and day improvement on heater warm up time.
.jpg.f7b87d5d9af6850a0a34c523f0499efd.jpg)
.jpg.8bcd070d207046e29e62964b3d4cb98b.jpg)
.jpg.aa4b1dbce163947aed347205f5a85aa3.jpg)
.jpg.85c5435937f3c49da864a6758cbbe87b.jpg)
-
Had my clutch replaced by an independent Skoda mechanic for £440 labour. I supplied all parts, including new cylinders etc. Replaced everything. Edit: 2015 manual Scout
-
Hi, I'll try to explain the situation as quickly as possible. 2 weeks ago I was driving on motorway, the driver side heating went ice cold, and passenger side went cooler. Then a while later, both sides were ice cold. Then pretty soon after low coolant light / beeping started and I hit the hard shoulder immediately. (BTW I noticed a "slight" difference in heat before the motorway breakdown. Driverside was cooler before coming up to heat ages after the passenger side). Had 5L with me as I have a phantom "coolant leak" and need to top it every few weeks. Filled it up and started engine to have it dumped out on the ground. Needed recovered, the problem was a hole in a plastic connector. Part was dealer only, local mechanic fitted and replaced coolant. Said the level might drop and to check / top up etc, which it did. Now since collecting the car the heat still isn't working properly. Luke warm on passenger side, cool on driver side. I read about the silica bag splitting and blocking the heater matrix. I've watched a video of the replacement and decided to do it myself. BUT... Both pipes on the heater matrix are hot? So does that not mean that coolant is flowing through OK? But all the other symptoms point to heater matrix as I read everyone saying that the core is blocked as the hot coolant enters the passengera "heating part" of the matrix first and the exits on the l drivers, so that's the cause of the temp difference from the vents, but both pipes down in the foot well behind the dash are hot? Any help / input would be appreciated.
-
Yes I'm 150bhp and 288mm
-
For anyone looking this info, I've got a 2015 octavia scout. I bought the 312mm as recommended here... wrong size. Mine takes the 288mm discs. I'd advise taking the wheel off and measuring to get your size.
-
Can you tell me if you just re-soldered the top of the pin so it matches the "good" pin. As you can see from my photos, one whole side of the switch mechanism on mine is corroded. I have tried cleaning it up with a small screwdriver and electrical contact spray but it didn't make a difference.
-
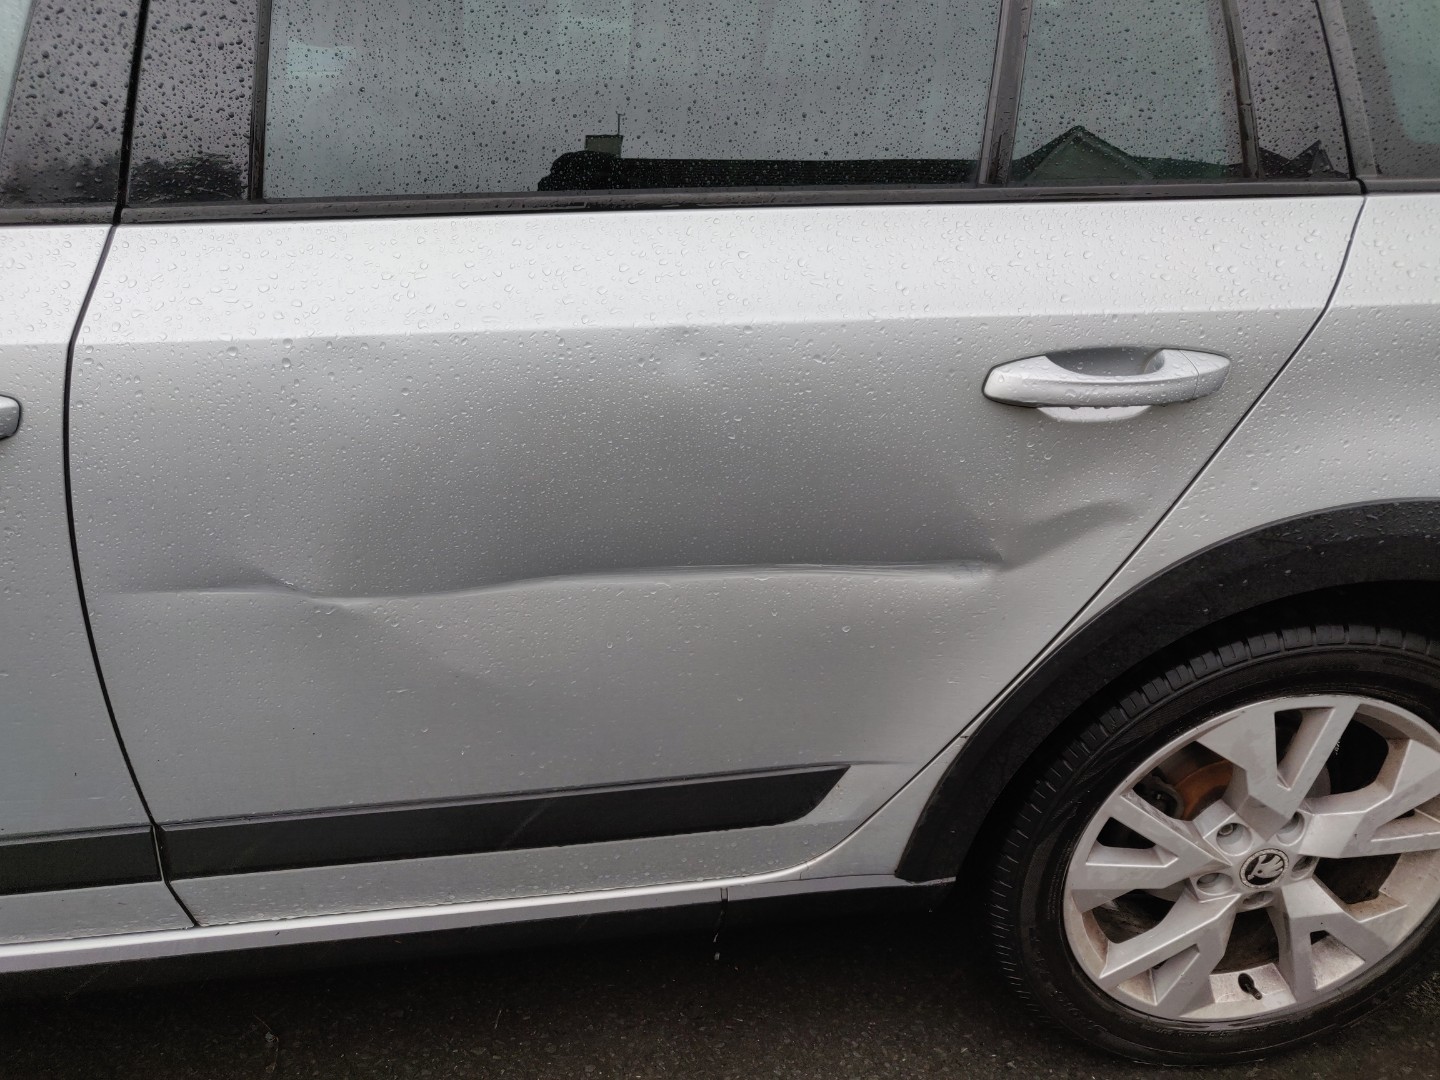
Hi all, So I just had a little argument with a trolley bay in Sainsbury's carpark. Basically turned out too tight in a tight space and caught the entire backdoor. No damage to any other panels. Would you look at trying to fix this large dent / scrape, or just look out for a 2nd hand door?

-
This is a simple procedure that anyone can do as long as you have access to axle stands, ramps, car lift etc. I'm writing this guide to pull together all the tools needed and steps required to carry this out. This was my first time and I spent more time going back and forth looking for sockets etc than actually doing the work! Required: torx head screw driver (screws that hold plastic under tray) 14mm socket (bolts that the under tray) 1/2" drive preferred 13mm socket (drain nut on oil filter housing) <<< this might actually be 12mm, I'm going by memory. But you need to use a 1/4" drive, 1/2" socket in same size doesn't fit. 32mm socket (to open the actual filter housing) 1/2" drive required 19mm socket (to open the drain plug on the sump) 1/2" drive 1/2" and 1/4" extender bars (to reach the oil filter housing) New oil (I used 5w30 fully synthetic) Oil filter Container to catch old oil (minimum 5L in size). Funnel for container (I used a wide mouthed bucket to catch mine so didn't need a funnel) Old clothes / overalls (the oil WILL splash no matter how careful your are) Optional: cable ties to hold back wires and pipes cardboard or sheets to catch oil spills rubber or latex gloves kitchen roll/blue roll Small hook or pick set (like this: https://www.halfords.com/workshop-tools/garage-equipment/garage-essentials/rolson-4-piece-pick-hook-set) Scissors Step 1. Get the car raised up. I used a set of ramps. If the car is cold, let it run for a few minute to heat the oil a little. This will make it flow out faster. Step 2. Remove the under tray. Get underneath with your torx screwdriver. The plastic under tray has 3 bolts at the bottom (towards the middle of the car), and 4 at the top (towards the front of the car, 2 on left and 2 on the right). The torx screws are located along the side of the tray (3 on each side) and 3 along the top (between the 2 sets of bolts on left and right). 9 screws in total. Mine had less as some must have been lost during previous work. Set the screws safely aside and grab your ratchet and 14mm socket. First, loosen all the bolts and then proceed to remove them. When you're down to the final 2 bolts, use your arm to press up against the weight of the tray, otherwise it might fall and possibly snap at the last bolt or might just hit you instead. Set the bolts aside for later. Step 3. Replace the oil filter. The oil filter is located towards the front of the engine, just behind the fan. Look up from underneath and you should see this: I used cable ties to pull the wires and rubber pipe out of the way so I could get better access. Then I grabbed my 1/4" ratchet, extender bar and the 12mm or 13mm socket. Put down your cardboard or rags and grab your oil collection container. Open up the small drain bolt in the center and catch all the oil that comes out. Next grab your 1/2" ratchet, extender bar and 32mm socket. Open up the oil filter casing, catch the oil and then pull out the old filter. Your new filter should have 2 rubber rings, one tiny and one large. The tiny one is to replace the ring on the drain plug, and the large one replaces the ring on the filter housing. Do this now, and use some kitchen roll to clean them up a bit, especially the treads etc. I couldn't get the old rubber rings off, so had to use a small hook tool to grab underneath. Insert your new filter into the housing, then replace the drain plug on the housing. Now screw the housing on using your hand, tighten with the 32mm socket. I didn't use a torque wrench, just went until it was lightly tightened. IMPORTANT: If you used cable ties to hold back wires and pipes, grab some scissors and cut the cables ties now. I forgot, finished the job and replaced the under tray and then had to take it off again! The cable ties / wires etc could possibly foul the radiator fan and cause some trouble. Step 4. Drain the old oil Pop your bonnet and open the oil filler cap. Grab your cardboard or rags, 1/2" ratchet, 19mm socket, and container for the old oil, slide back towards the middle of the car to find the sump and drain plug. You should this: Loosen the bolt with the socket and then open it the rest of the way by hand, have your container ready as this is gonna fly out fast. Once all the oil has drained, replace the sump bolt and tighten with the ratchet (not super tight!) Dispose of the waste oil at your local recycling center. Step 5. Replace the under tray and fill with new oil. I put the bolts in first, by hand and then tightened them up with the 14mm socket. Then put the screws back in. Now fill up with new oil. I think the 2.0L Octavia TDI takes 4.6L of oil, but don't quote me on that. I bought a 5L of oil, filled it with 4L, let it sit for a few minutes and checked the dip stick, then topped up a little, let it sit, checked the dip stick again. I think I used just under 4.5L. Don't forget to replace the oil filler cap once you've filled it with new oil. And you're done! Put away the tools, get the car off the ramps / axle stands / whatever and get cleaned up. If I've missed anything out or made any grave mistakes, let me know. I changed my oil and filter yesterday. Was going to do the fuel filter too but had got the wrong one. Will get it changed next week.