Jump to content

SotonEd

Finding my way
  • Posts

    17
  • Joined

  • Last visited

Everything posted by SotonEd

  1. I reckon so from what i saw in a pre FL workshop manuel. It’s worth taking a look at the end of the seal at the door hinge end and if it looks like it will slide out under the mirror fitting then you’re in luck. Top tip to remove it is to start loosening it in the middle of the window and as soon as you get one part free then free up the door handle end then slide it out.
  2. I got the seal from Skoda-shop.com and it was about £19 and spent enough on other parts to get free postage.
  3. Yes that’s my post. Top tip: spend the EUR 8 and buy an hour’s access to the Skoda manual library to download the workshop manual that shows how to get the door card off if it’s a face lift model. 👍
  4. So I changed the seal this afternoon which took about 30 seconds but taking the door card and the mirror off took a bit longer(!) especially as I had never done it before. Still didn’t break any clips as used set of trip removal tools (maybe a bit lucky) and it was relatively easy to do. 👍
  5. So had an hour spare this afternoon and so worked out how to do it. The answer is that if you have a pre facelift Octavia, you can pull it straight off (put the window down and start gently pulling in the middle) and slide it away from under the mirror. If you have post FL Octavia then you need to take to take the door card off along with the mirror. I’ve got a post FL version so I need to get a couple of trim removal tools to avoid risk breaking the retaining clips.
  6. Not yet, I ordered the part and when it arrives next week, I’ll find some time to give it a go at replacing it over Xmas. That said as and when I do, I’ll post my findings on how to do it
  7. No, looking to replace it as somebody decided to run a key down it…….
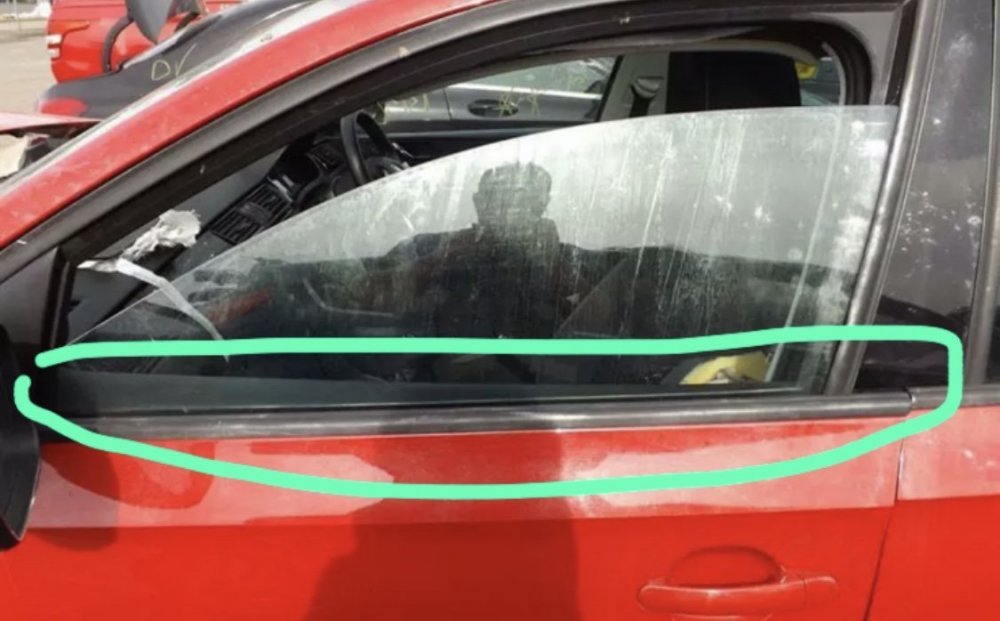
  8. Hi all, Has anyone replaced this seal before and if so, can it simply be pulled out or do i need tools/to dismantle the door card?
  9. I got all of the parts from: https://www.skoda-parts.com/online-store.html except the Ali Express item. I found all of the items were roughly the same price as when the thread was first posted. If you are going to do it one point I didn’t fully get was that the lighter comes out first and then the black surround comes out second. Also I managed to partly break the plastic clips when removing the lighter and so it might be worth considering adding one of these to the original order (https://www.skoda-parts.com/spare-part/6y09193419b9-expansion-tube-14288.html). It’s a ridiculous amount for what it is but turns out to a 5-% of the cost of buying a lighter removal tool.
  10. Just done this today using the guide - super easy and took about hour all in. My only two suggestions would be: There’s more space to thread the wire through if you remove the air vent ducting. It simply lifts in and out as it’s not screwed in When removing the lighter socket without the tool make sure you don’t snap off the two black plastic lugs as it’ll be difficult to fully reseat/retain the lighter socke once refitted
  11. So in case anyone wants to do this on a UK model, here are a few thoughts as the video and instructions are mostly correct: Once you undo the first T20 screw on either side, undo the other obvious T20 screw as it will give more range to be able to look up under the ‘ash tray’ area. There appears to be no phone booster and cable at least on the vRS and there’s no need to remove the first cable shown in the instructions There is no magic move, hidden tab to remove the gear stick trim, you just need to take a deep breath and pull it from the front edge The wire that provides power to the light in the ash tray is much shorter than in the photo as it is bound into the wiring loom. To give yourself a little more scope, unclip the loom from the frame in the front passenger foot well. Being a right hand drive car, the fuse box is behind the glove box and so the 10mm nut does not exist. In order to complete the circuit, I attached the ring connector to the obvious T30(?) silver screw that is behind the glove box area that mounts against a metal plate. Hope this proves useful! 🙂
  12. Just ordered one of these off of Amazon and it should be here tomorrow to fit into my ‘19 vRS. Any top tips or is it as straight forward as the video makes out?
  13. Ok so just need to sense check something... Got a 64 plate Oct Mk3 1.6l and over the last few months at random times, the coolant temp would suddenly rise to 130’c and then drop back down to 90’c and not do it again for weeks. Following it doing it two in a week on holiday - agin no pattern - found this thread and arranged for my trusted local garage to change out the water pump (electric one) with a genuine VAG replacement which was done last week. Since then it has done it again, twice which has left me a tad confused. After it happened, I checked for error messages using a hobbyist ODB2 reader and couldn’t find any. So on the basis that the replacement pump wasn’t faulty the only reasons I can think of are as follows: 1. The garage didn’t change the water pump 2. A temperature sensor is faulty and is throwing random errors exactly the same as the pump 3. They changed the wrong water pump I’d like to discount the first one as have been using them for years and the owner is a family friend. Seems quite random that a temperature sensor has gone bad and I know that they changed the electric pump. The only other thing to add into the mix is that they did it without needing to change the belt which I’m not sure is correct. I appreciate that a lot of people do this at the same time and frankly I should have requested this but I don’t know enough about this engine design to comment one way or another. I’m going to call the garage to discuss today but does anyone have any thoughts on this?
  14. Thanks - will do. Did some research today and seems that there are specific tools for removing these 12v sockets without dismantling the car. Has anyone used one of these VAG ones: https://vw.snapon.com/SpecialToolsDetail.aspx?itemid=21700163 There are also these more generic and cheaper ones like this: https://www.amazon.co.uk/Dorman-Cigarette-Lighter-Socket-Removal/dp/B00TQ3P0CU#customerReviews This video may be useful for others:
  15. @Wino thanks will do. Probably won’t be until until tomorrow but that sounds promising as i was thinking the same thing. I just can’t believe that when Skoda designed these cars they did it in a way that wasn’t easy for them to assemble i.e. fit boot trim and then the socket as otherwise there would have to be a long power/fly lead to do it at the same time. Then again...what do I know!?!?
  16. @JohnnyType2 thanks for the information and I was afraid that might be the case. For reference is there a workshop manual type resource available on the internet or part thereof which explains how to do it? I’ve no problems doing it but don’t want to break anything in the process.
  17. Hi all, Need some help with this. Have a 64 plated black edition which I had for a year and whilst the front 12v socket works fine, I’ve just noticed the boot one is dead i.e. 0 volts measured using a multimeter. I’ve checked fuse 40 but that looks intact as that’s the only fuse I can see referenced for the 12v sockets. Is this correct or are they separately fused? If there is only one due, I’m guessing it’s the socket/a wire has come loose etc but how do I get it out? My initial thought was to try to unscrew it or to remove the part of the boot lining to access it but that looks to be an epic job. Am I missing something as have checked various websites including this one and can’t find an answer to this. Any thoughts much appreciated.
×
×
  • Create New...

Important Information

Welcome to BRISKODA. Please note the following important links Terms of Use. We have a comprehensive Privacy Policy. We have placed cookies on your device to help make this website better. You can adjust your cookie settings, otherwise we'll assume you're okay to continue.