BramptonTrev
Members
-
Joined
-
Last visited
Everything posted by BramptonTrev
-
An update from me - turning the seal over, as per the post 04 Nov 2023, continues to be ok and the light unit has not needed any further drying out.
-
Last Post. Other A catch all place for anything I missed. Radio Interference. There has been some concern about rear dashcams interfering with car radios. The Viofo does not interfere with the car radio wherever the Viofo is placed. It would appear that the interference arises from cheap 5v (or other) power supplies. I found this topic very useful - https://www.briskoda.net/forums/topic/475045-dashcam-interference-with-dab-any-advice/
-
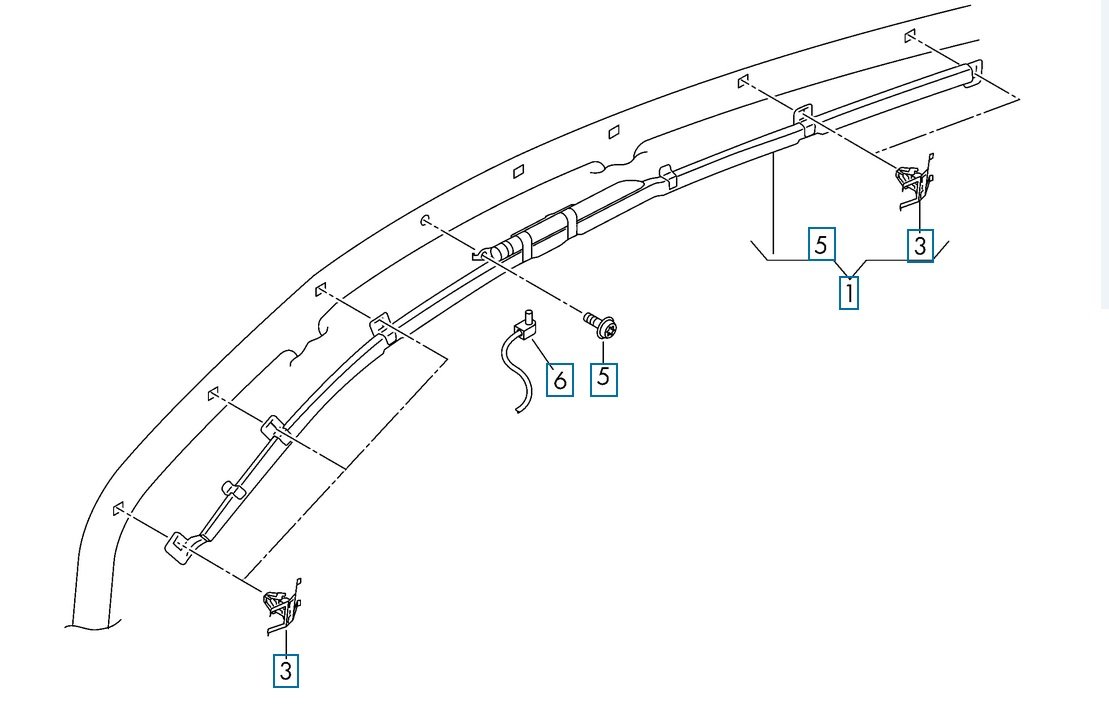
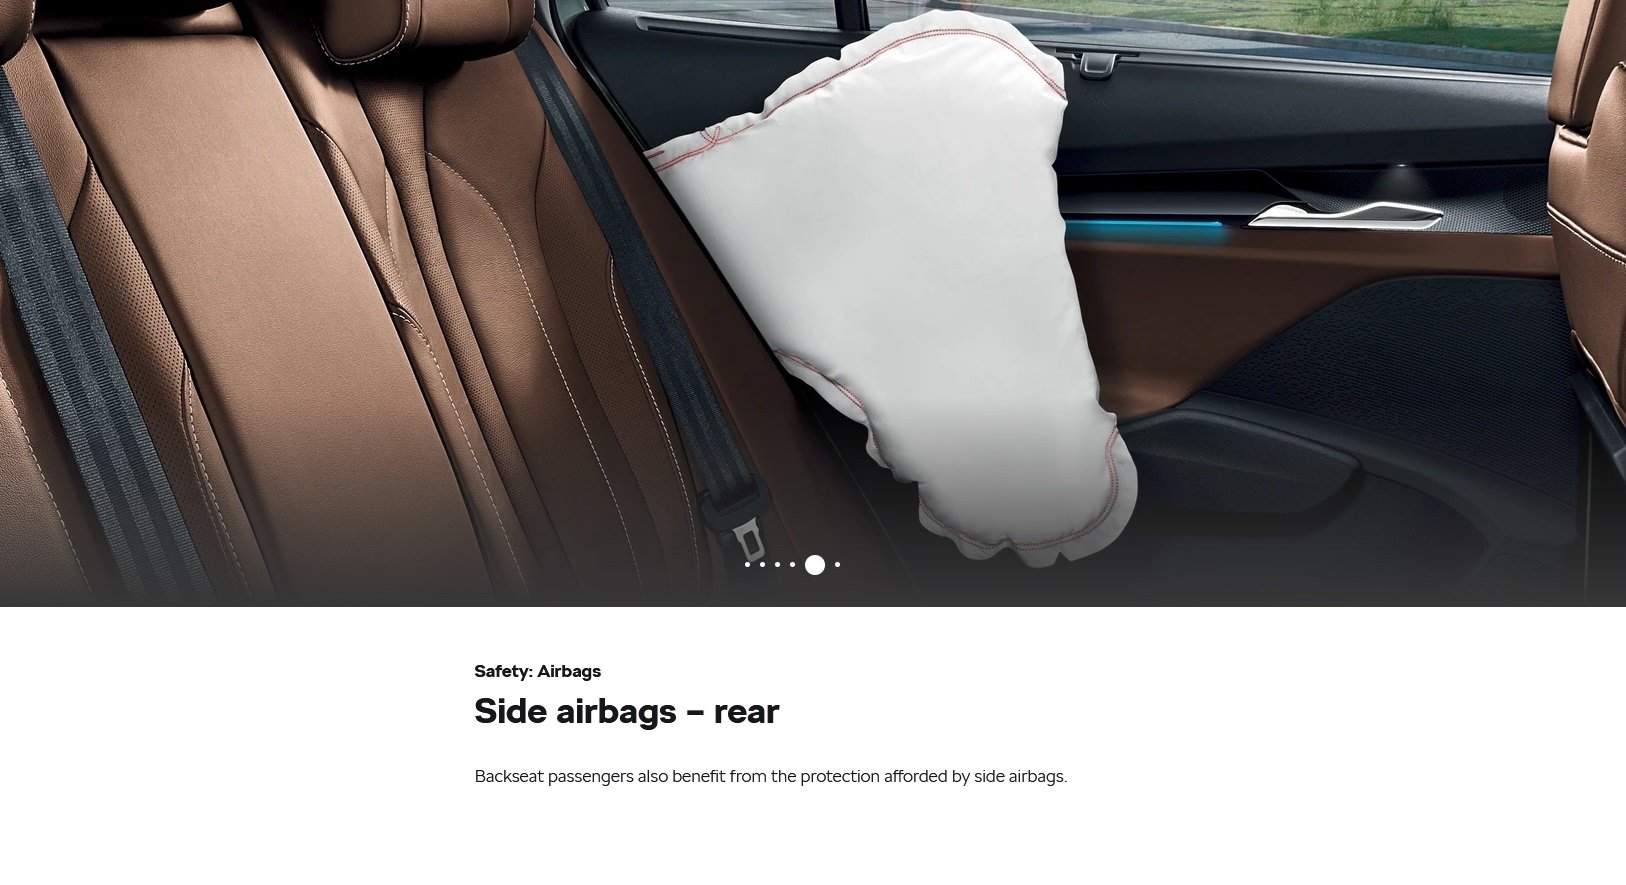
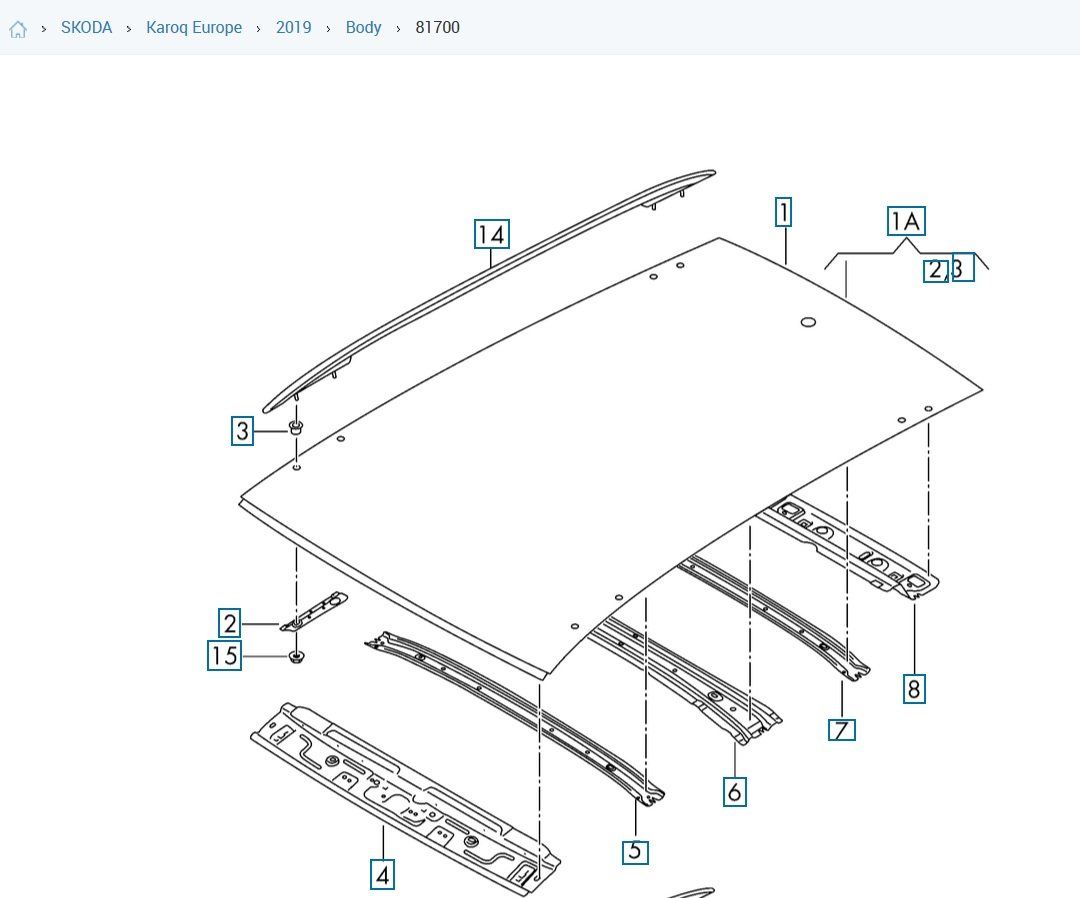
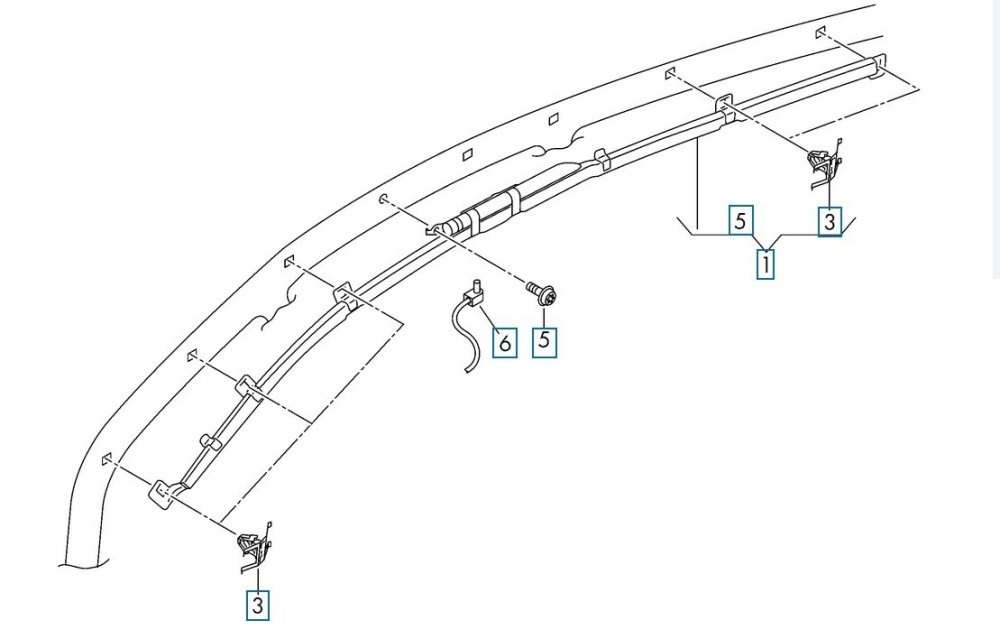
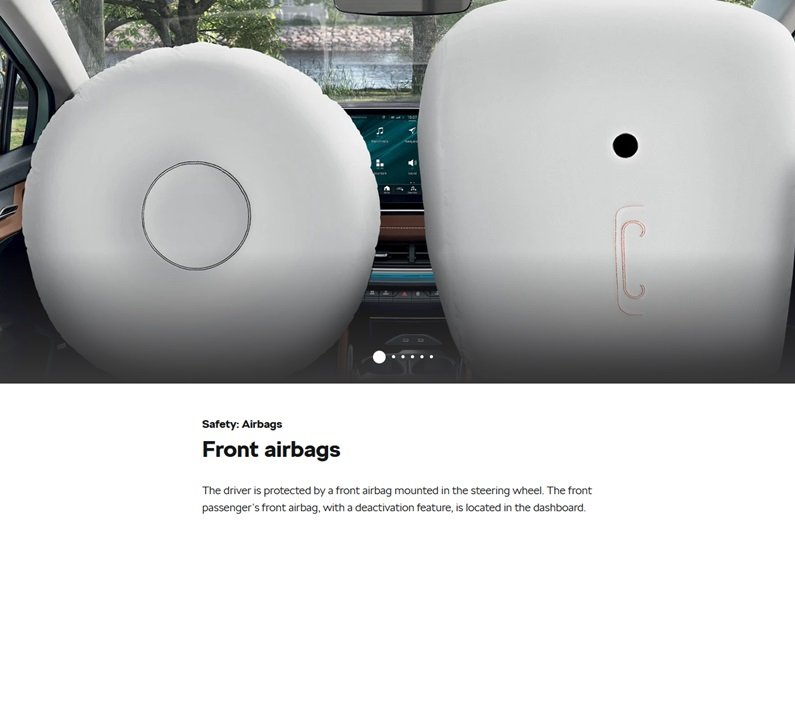
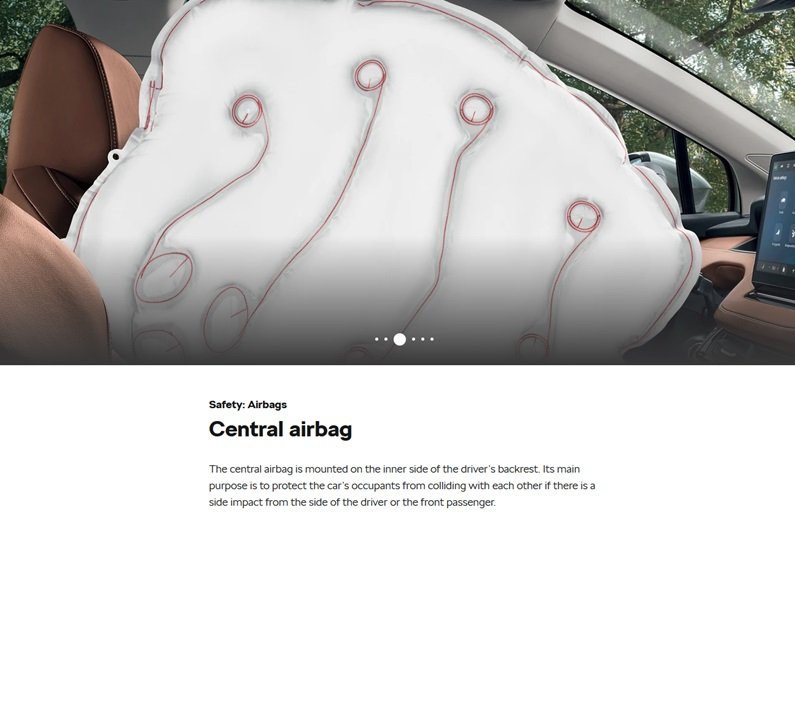
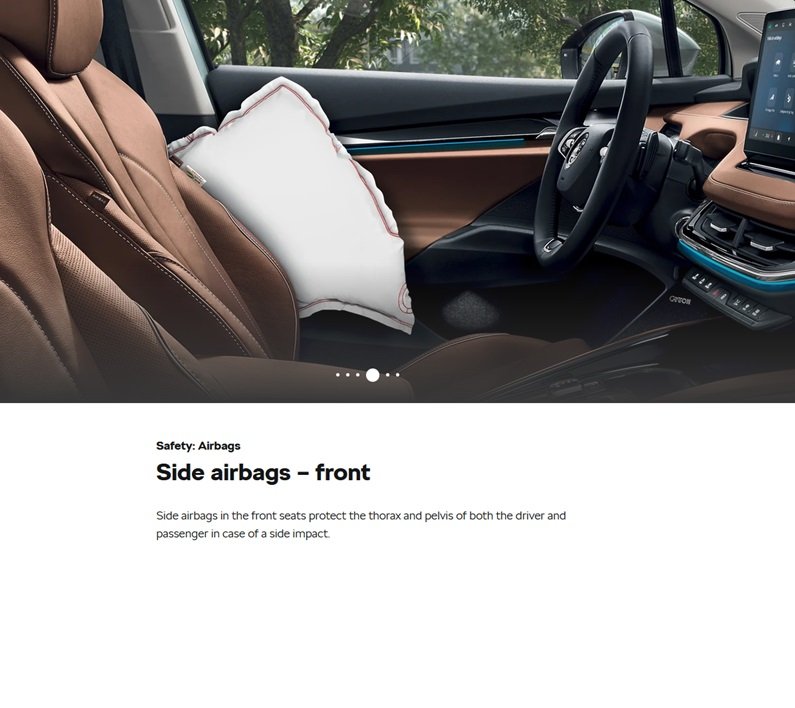
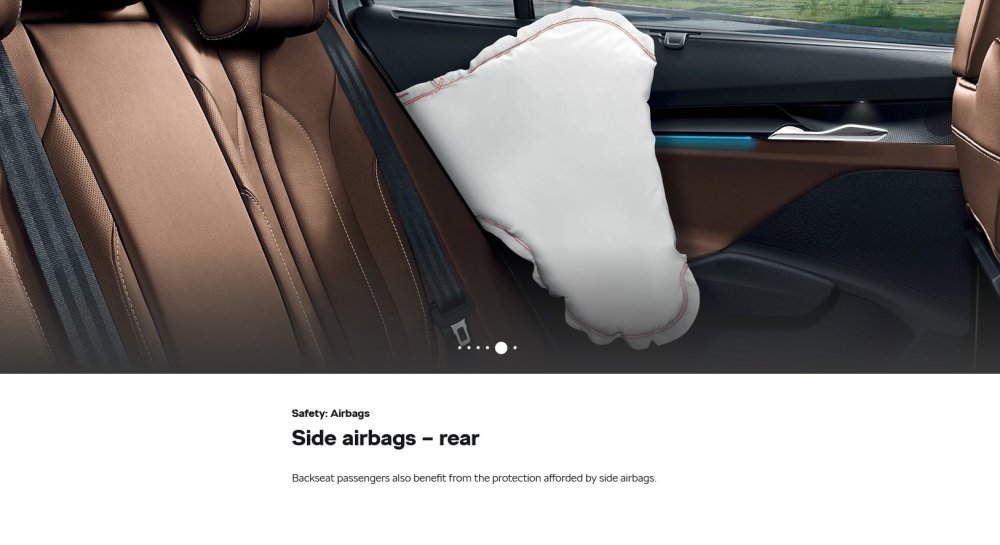
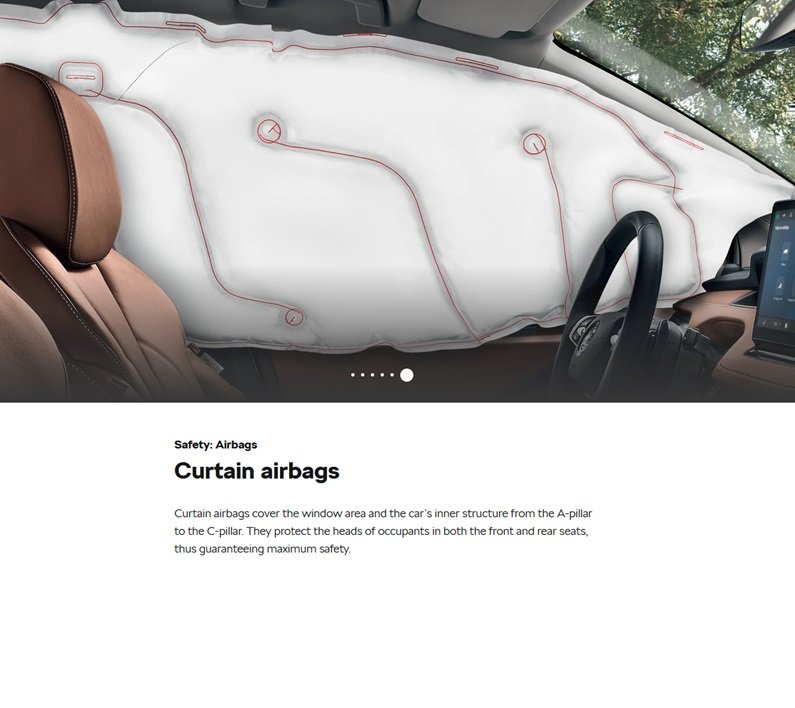
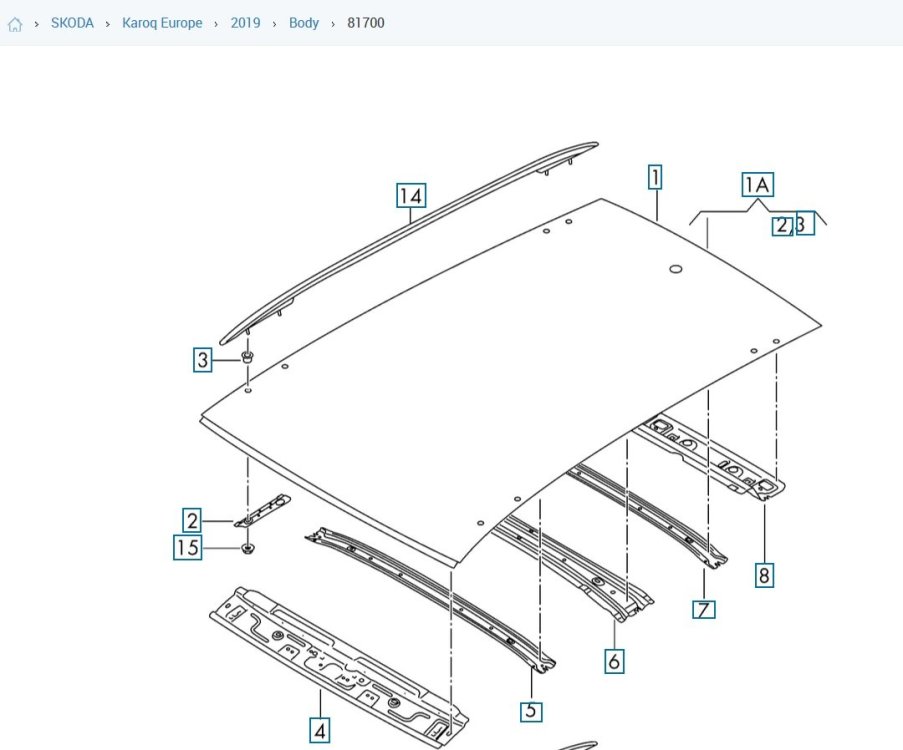
Airbags There has been much said, in various places, about avoiding the airbags. So where are the airbags? Image 1 is the parts diagram (catcar.info) of the roof curtain airbag – the diagram shows one airbag running the full length of the side of the roof – there is one each. Skoda have a Safety brochure, https://www.skoda.co.uk/discover/safety, which has a section on airbags - scroll down to the airbags section. The individual images are also attached

-
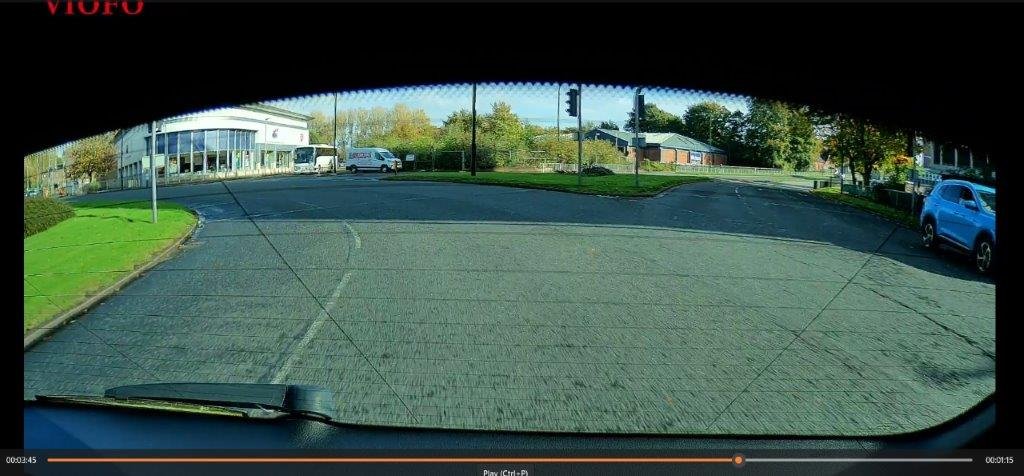
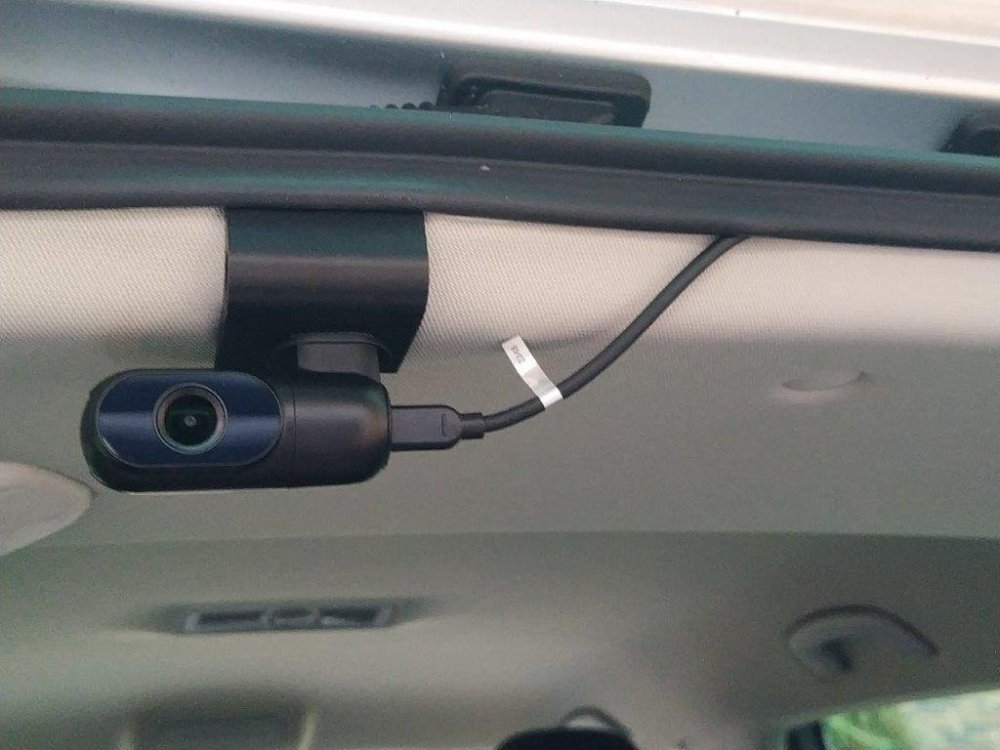
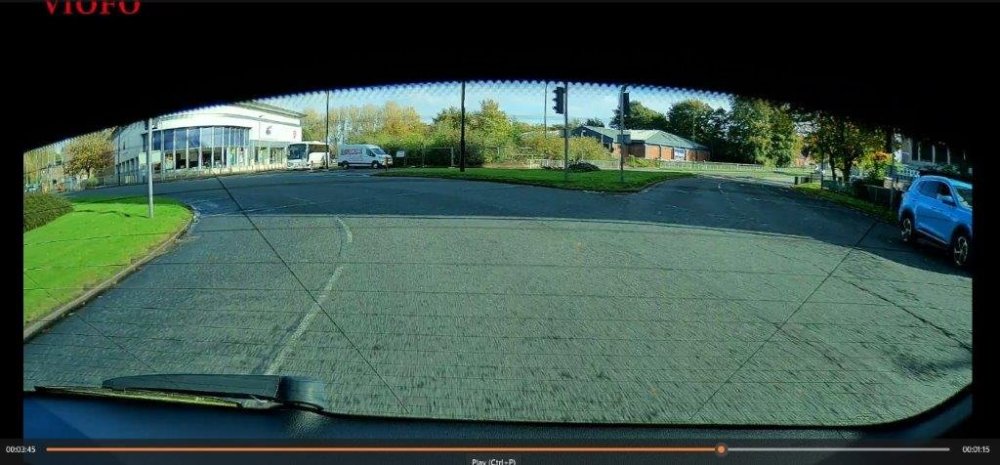
Threading the rear dashcam cable through the headling. The plan was to push the PVC conduit cover through from rear to front and then pull the rear dashcam from front to rear. The rear dashcam cable has a straight USB-C connector at the camera end and a right angle USB-C connector at the front dash camera end, hence easier to thread the small straight USB-C connector through the headlining. So at the rear of the car, the PVC conduit cover was eased under the headlining about 15cm to the right of where the headlining clip had been. The PVC conduit cover was eased in and at about ¼ of the way along the roof, the PVC conduit cover stopped – it had hit a smaller cross member. So the PVC conduit cover was eased back 1-2 cm, the leading edge was allowed to drop (i.e. flex) on it’s own and then the PVC conduit cover could be moved gradually further forward until it came to a second stop which was the medium sized roof member across the centre of the car. Easing back and forth, did not work, so the PVC conduit cover was pulled back out and a slight bend made on the leading end. The PVC conduit cover was fed back in (at the rear) and was able to pass the medium centre cross member and the 2 small cross members by easing back and forth. The next big stop was at the big front cross member – it was obvious from the internal roof design that there was no way the PVC conduit cover could be flexed downwards to come out at the top of the windscreen. So the PVC conduit cover was pulled back about 1/3 and slid over towards the centre light aperture. I found that I could put my hand in the centre light aperture and feel the PVC conduit cover nearby. The revised plan was therefore in 2 parts using the centre light aperture. The PVC conduit cover was fed in from the front windscreen. This took a bit of effort and manhandling to flex the PVC conduit cover to bend almost 180 degrees in the front passenger seats so the leading edge would go in and carefully easing the headlining away from the car roof. Note – the headlining is not very strong so spread your leverage over a few inches to avoid a sudden bend and potential damage at one point. The PVC conduit cover was fed in to about the centre roof member, then the end slid sideways towards the centre light aperture. The PVC conduit cover will not come out of the centre light aperture due to the way the aperture is constructed, so you will need to put your hand in and fish out the PVC conduit cover which will require adjusting how far in or out the PVC conduit cover has been pushed and the direction of travel from the front windscreen. Then pull out about 50 cm of the PVC conduit cover The rear dash cam cable is then taped flat to the underside of the PVC conduit cover at the front windscreen end. Pull all the PVC conduit cover through the centre light aperture and most of the rear dashcam cable – lift the rear dashcam cable up as it is fed in at the front windscreen so as not to cut a round groove in the headlining edge.. Leave enough rear dash cam cable hanging from the headlining at the front windscreen so the rear dashcam cable can be connected to the front dashcam unit and have 10-20cm of cable spare. Any spare cable at the front windscreen can be tucked up into the headlining above the front windscreen. Photo 1 – the rear dashcam cable taped to the PVC conduit cover ready to be pulled through the headlining. Detach the rear dashcam cable from the PVC conduit cable. If the rear dashcam cable has become coiled in any way, then uncoil. Go to the rear of the car. At about 15 cm to the right of the headlining clip hole, feed the PVC conduit cable into the headlining. Aim the PVC conduit cover just to the right of the centre light aperture, and as earlier, fish out the PVC conduit cover and pull 50cm through the aperture. The rear dash cam cable is then taped flat to the underside of the PVC conduit cover at the centre light aperture end. Pull through all the PVC conduit cover back to the rear of the car and all of the rear dashcam cable ensuring the rear dashcam cable is not taut inside the headlining but there is some slack inside the headlining and , of course, at the front windscreen end. Check you have enough slack rear dashcam cable at the front windscreen. My rear dashcam cable was about 5.0m long with 2.5m being used at the front windscreen and through the headlining. There was up to 2.5m hanging out of the rear headlining – so loosely coil up the surplus at the rear of the car – I used 2 Velcro cable ties to hold the surplus rear dashcam cable in a coiled loop, 15cm in diameter. Ensure you have enough spare rear dashcam cable at the rear dashcam end to connect up – any spare rear dashcam cable can be tucked into the rear headlining. The DC03 mounting was clipped over the rear edge of the headlining about 15cm to the left of the headlining clip hole, the rear dashcam was attached and the rear dashcam cable attached. IMPORTANT – once you have attached the rear dashcam to the DC03 with its sticky pad, the rear dashcam WILL NOT come off – so may be do a trial by tieing the rear dashcam to the DC03 using string, or other (I used plastic cable ties). Test the system with car parked. Check all the channels on your radio – there should be no interference except on maybe 909 or 693 (BBC Radio 5 old channels) which may have engine type interference. Note we had a Vauxhall Agila 1.2 and 909 or 693 always had a bit of fuzz. When everything is working ok, re-instate the centre light, sun visor clip and headlining clip - I used a new eBay headlining clip. Tidy up any visible cabling by tucking behind the headlining. Photo 2 – job done. Photo 3 – a typical view.

-
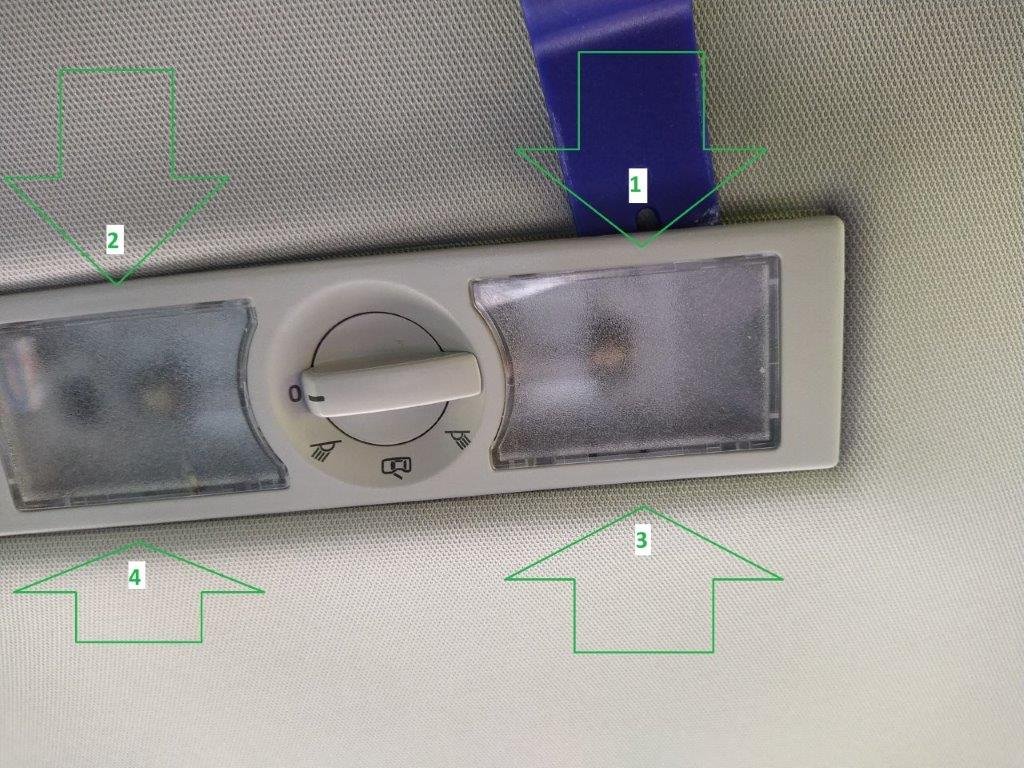
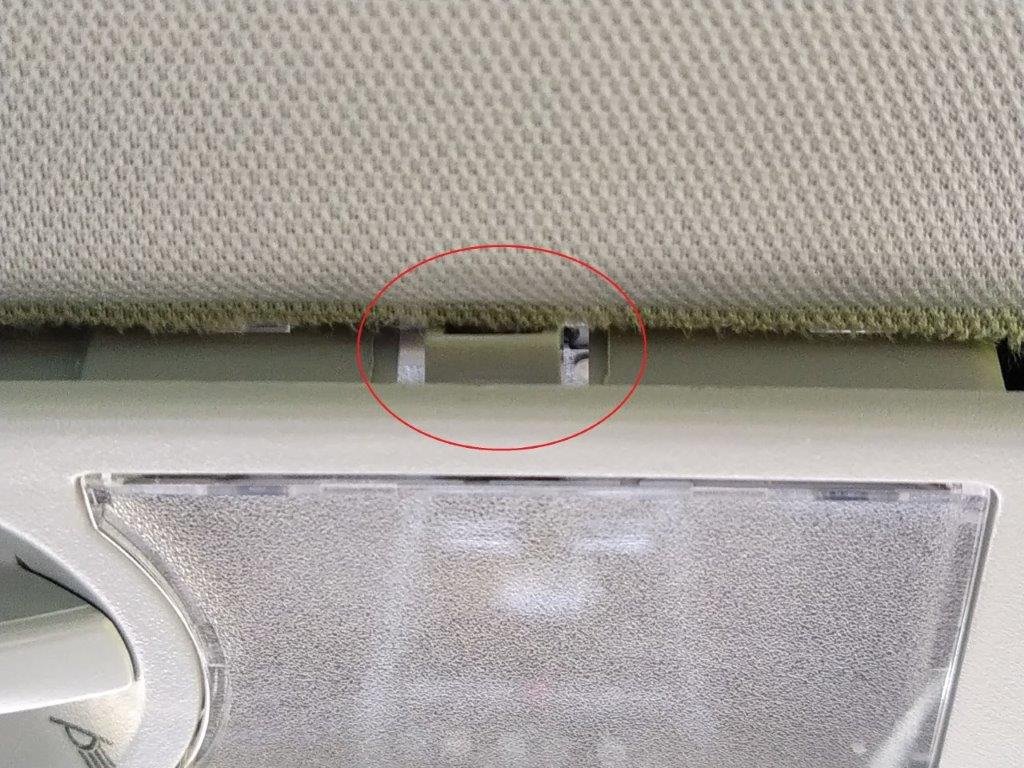
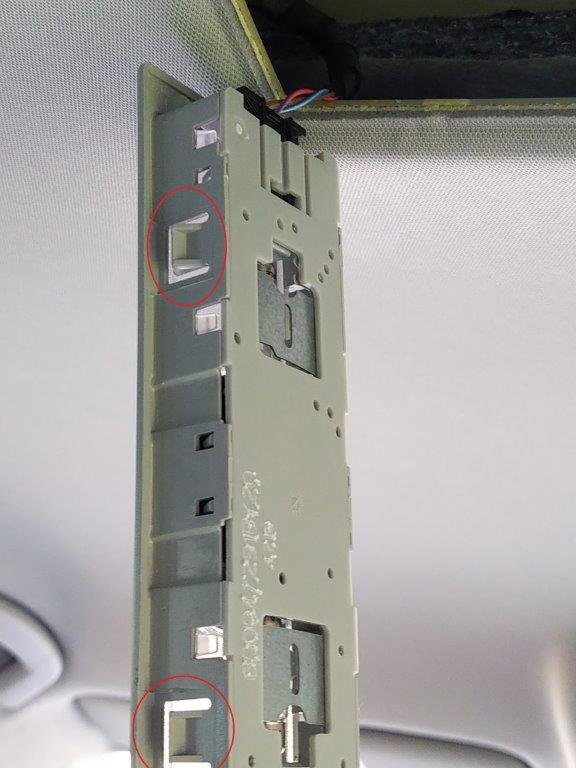
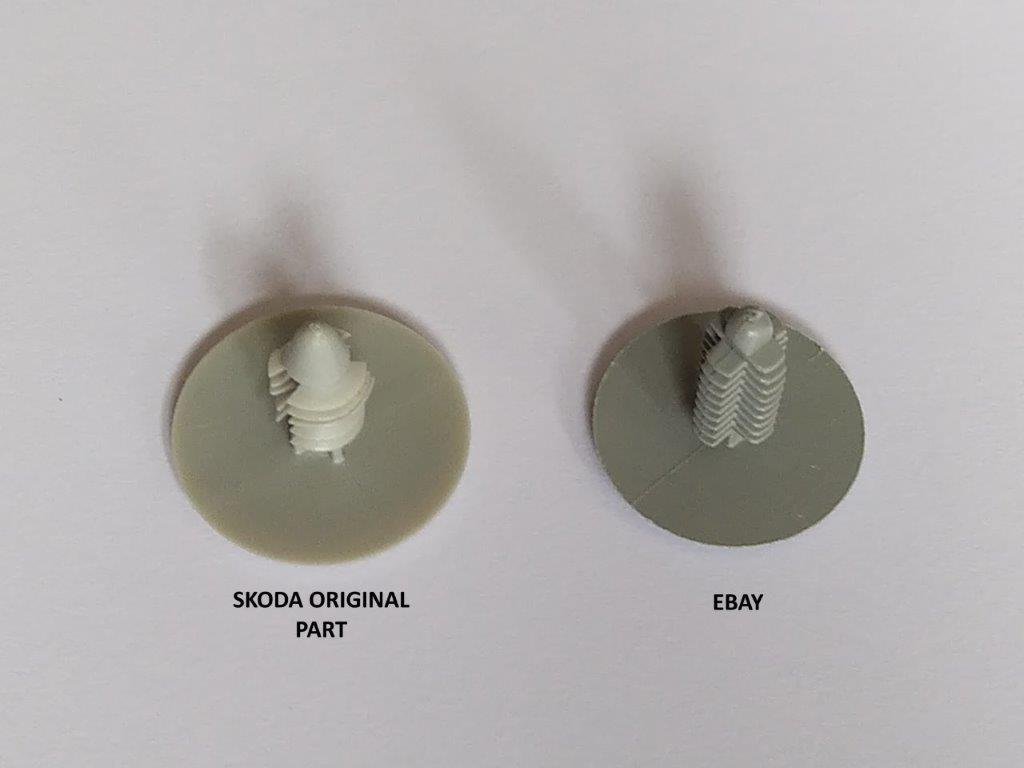
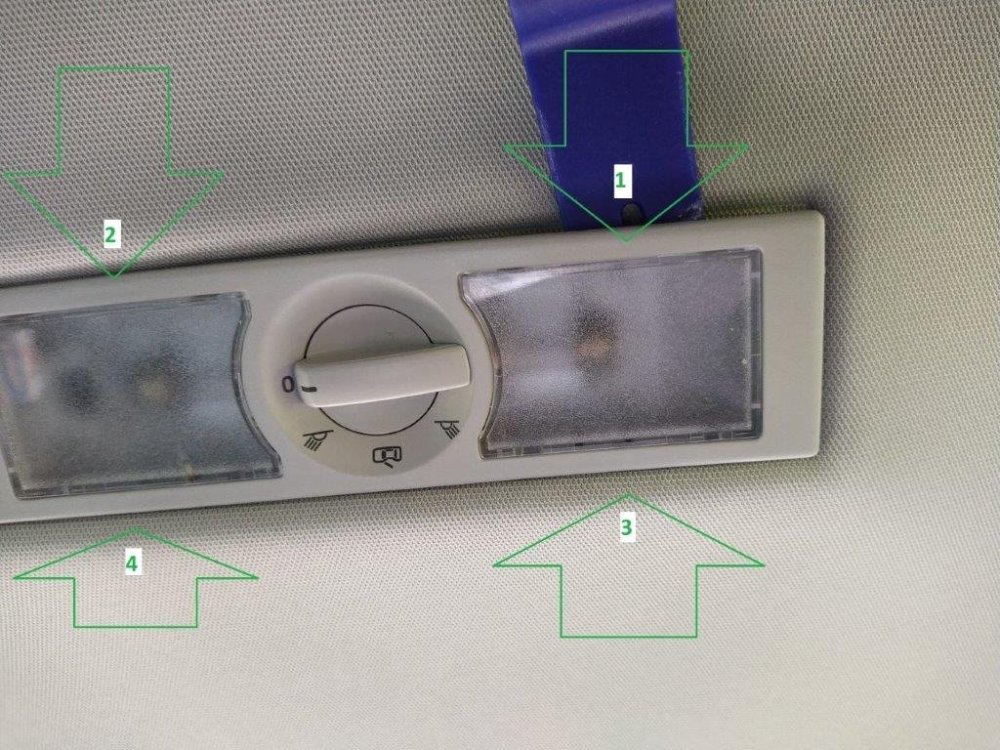
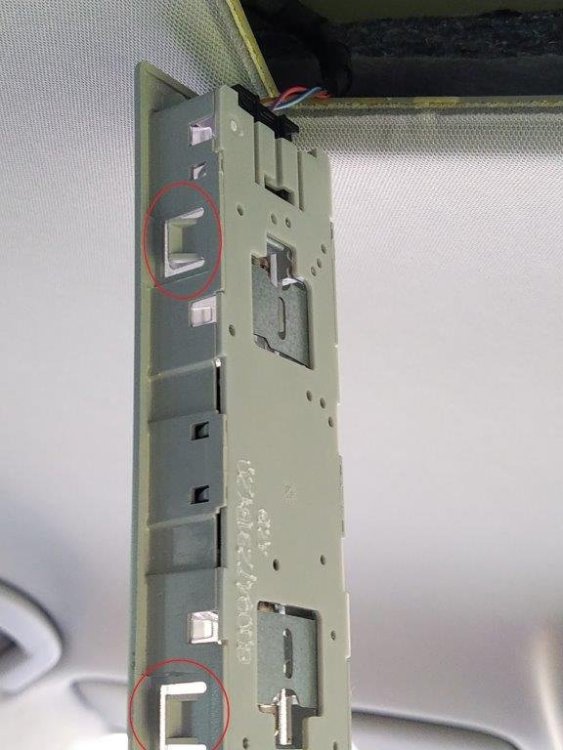
Removing the centre light Photo 1 - There are 4 clips/prongs/tabs moulded into the side of the light unit at locations 1, 2, 3 and 4. You will probably need 2 pry tools. So push the pry tool in at 1 about 1mm so you are pushing the clip/prong/tab and gently lever out. Repeat at 2 but you may need a second tool inserted a 1 to prevent location 1 popping back into place. The light unit will not fall out but will be trying to rotate itself back into place so wedge something into side 1+2. The repeat for 3 and 4 and gently pull the unit out from the offside end. The wiring cables are attached to the nearside of the lighting unit. When the lighting unit is out, it will hang from the wiring cables. Photo 2 shows a moulded-in retaining clip/prong/tab for the centre light unit. Photo 3 - Centre light pulled out and hanging from nearside wiring. The retaining clip/prong/tabs, circled in red, can be seen as part of the centre light fitting moulding. Removing push-in headlining clip. To remove the rear headlining clip, slide a pry tool in from one side and lever off a little, gradually move the pry tool around and lever off as you go. It will probably take 3 or 4 revolutions as the clip gradually releases. Photo 4 is a picture of the underside of the Skoda original clip (on left) so you can see the ‘tree’ which gradually releases. On the right is an eBay alternative non-genuine part. I replaced the Skoda original part with the eBay part. Photo 5 - There appears to be a 1.0mm diameter difference between the clips. The eBay part is a good colour match and works OK as a replacement. eBay listing - Plastic Car Trim Panel Fir Tree Spruce Button Clips Retainer Black Dark Grey UK - https://www.ebay.co.uk/itm/295491946715?var=593586611794 -


-
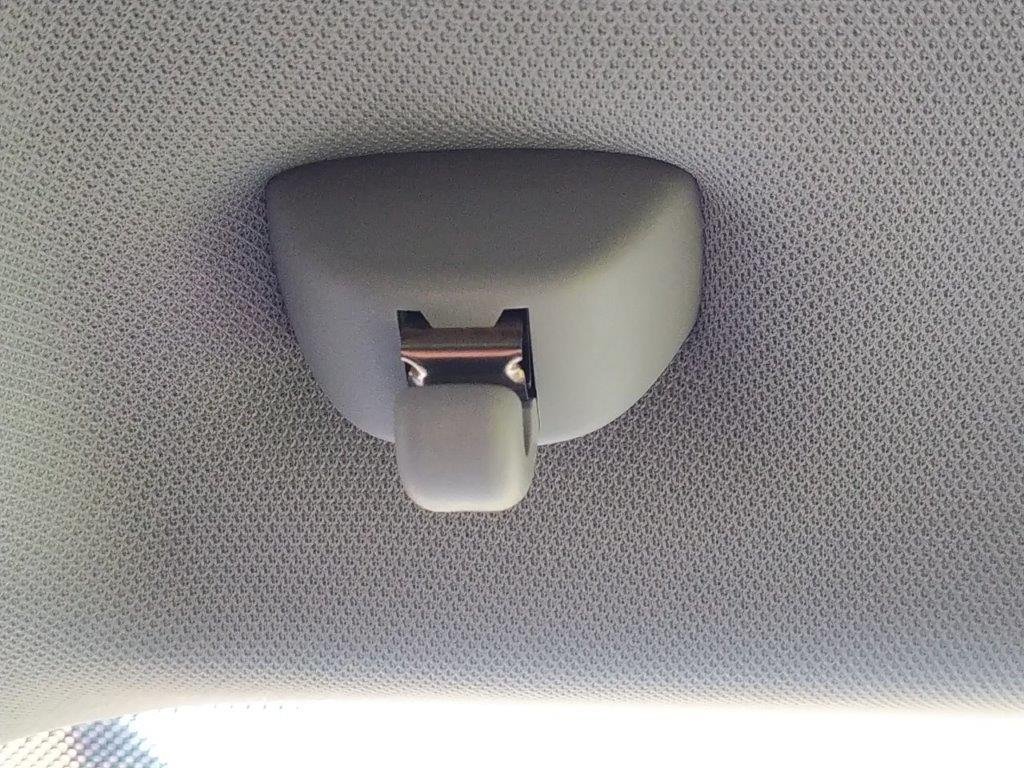
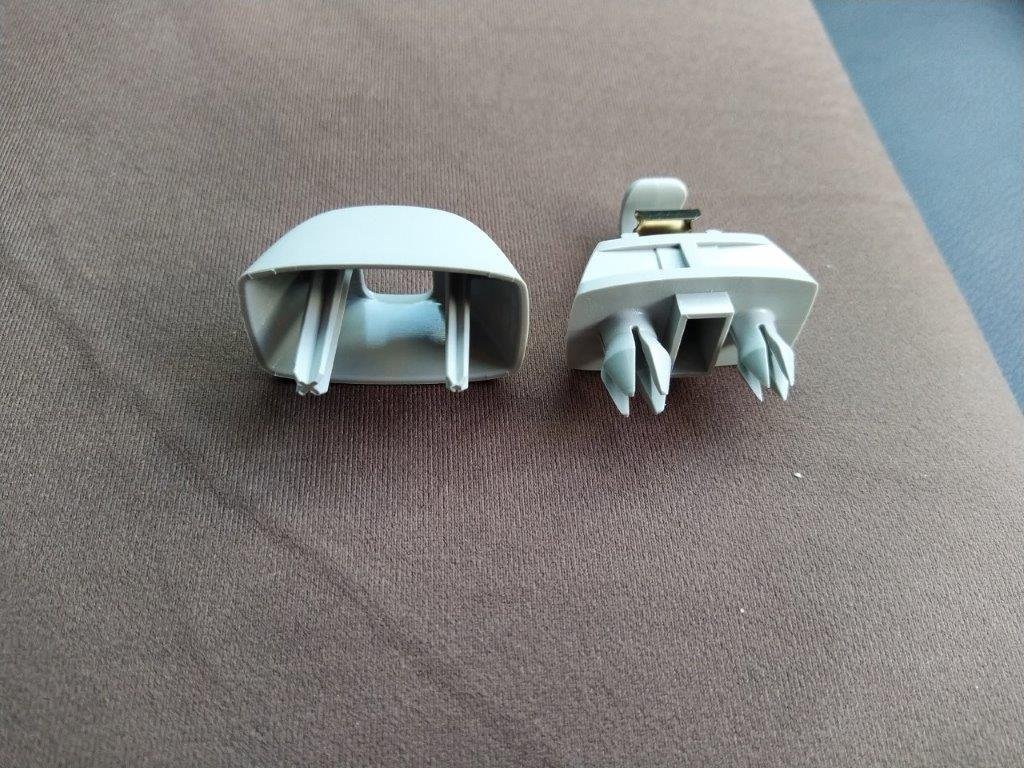
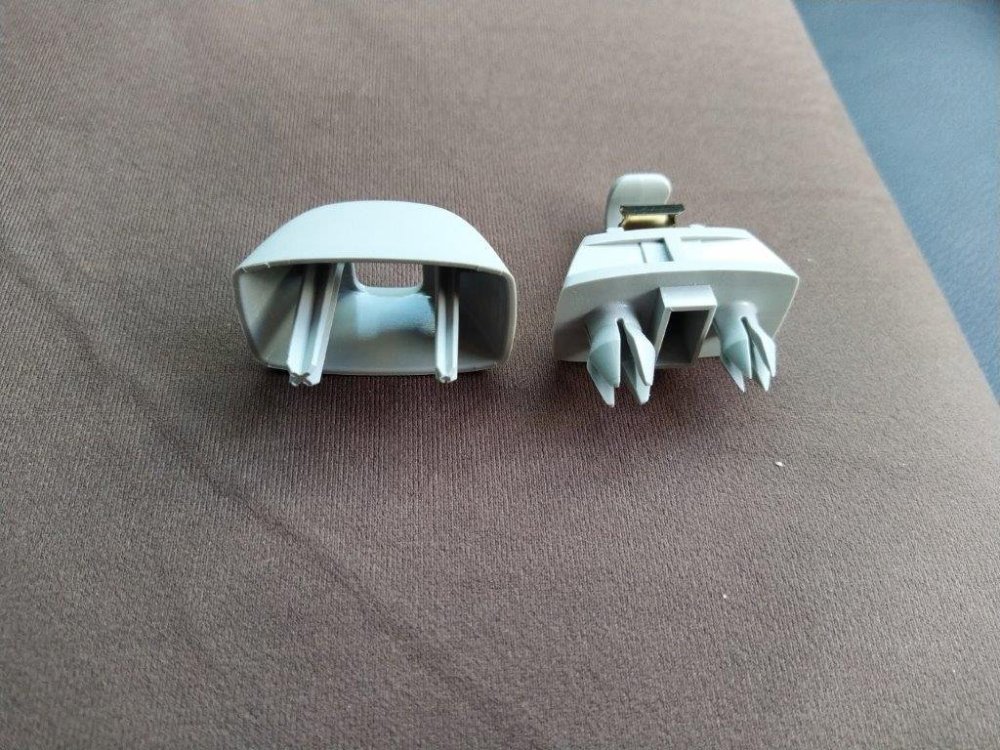
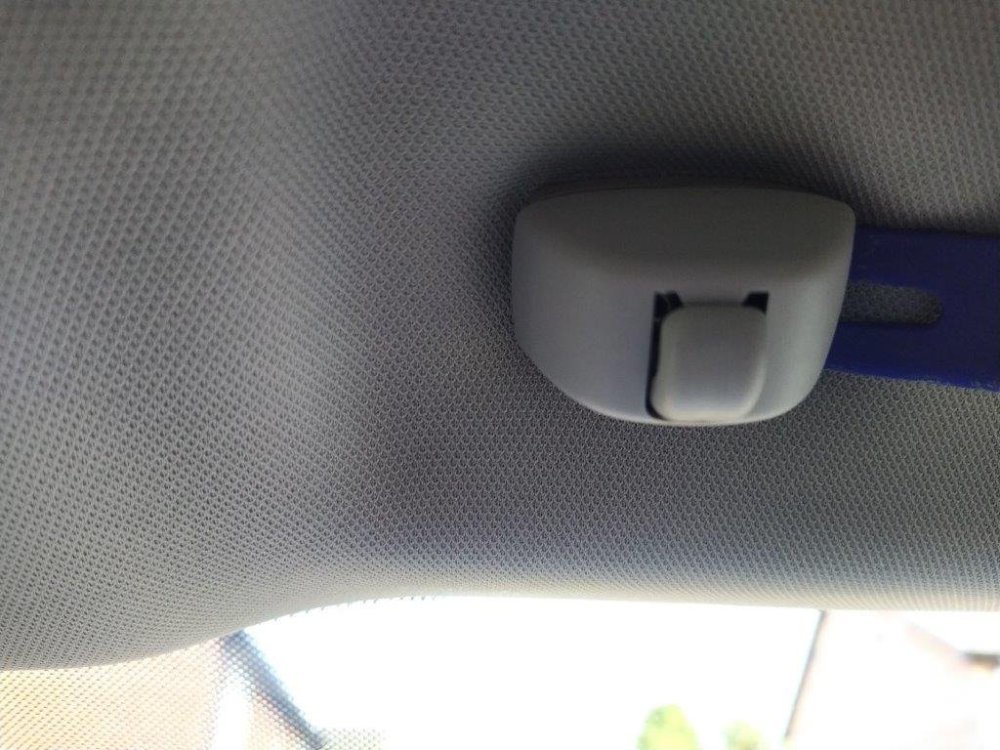
Removing the sun visor clip. Photo 1 - Clip as installed. Photo 2 - Clip removed showing the 2 parts. On the left is the cover – note the cover is 1mm thick. The cover’s 2 prongs push into the 2 prongs on the clip base forcing the clip base prongs apart and thus holding the sun visor clip in the front roof member. Note the different size prongs. Photo 3 - Here is another view of the sun visor clip parts, the cover being on the left. Note the area highlighted by red circle – this acts as a friction grip to slow down/inhibit the removal of the cover. Photo 4 - To remove. insert a pry tool at one side but only just, i.e. 1 mm and no more – I found it required less force and was easier to remove inserting the pry tool at the side. If the pry tool is inserted more than 1mm, the pry tool will be under the sun visor clip base and that will be impossible to remove. Gently and gradually increase leverage and the cover will pop off from one side. The cover can then be pulled straight out, evenly from both sides, about 5mm whence it will be retained by the ‘friction’ part of the cover. When you pull straight out you are pulling the cover pins out of the base unit pins so the pull must be straight. The cover will now be a bit loose – so pull straight again – it might be a bit fiddly and difficult due to the ‘friction’ part of the moulding. When the cover is off, you pull the base unit straight out – comes out easily. Photo 5 - Here are the holes in the front roof cross member – you can clearly see the different sizes for the different sized prongs. Thus the sun visor clip can only be installed one way round. It is the same sun visor clip on both sides of the car.


-
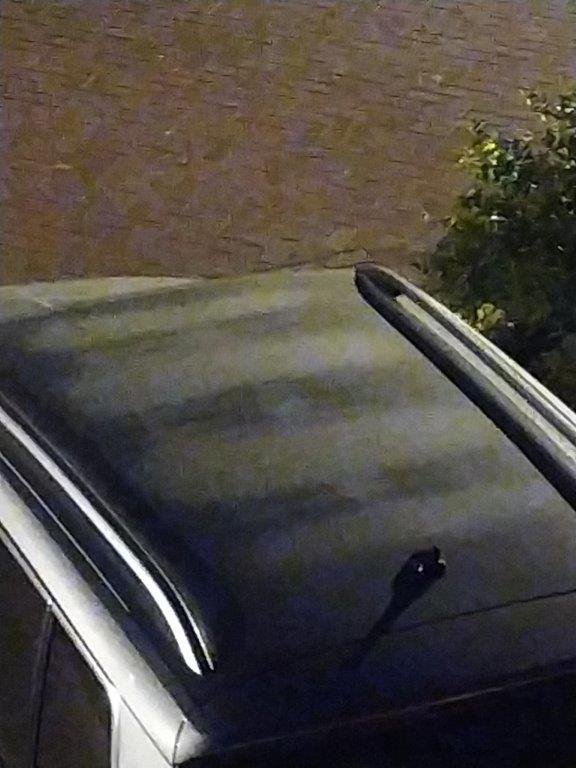
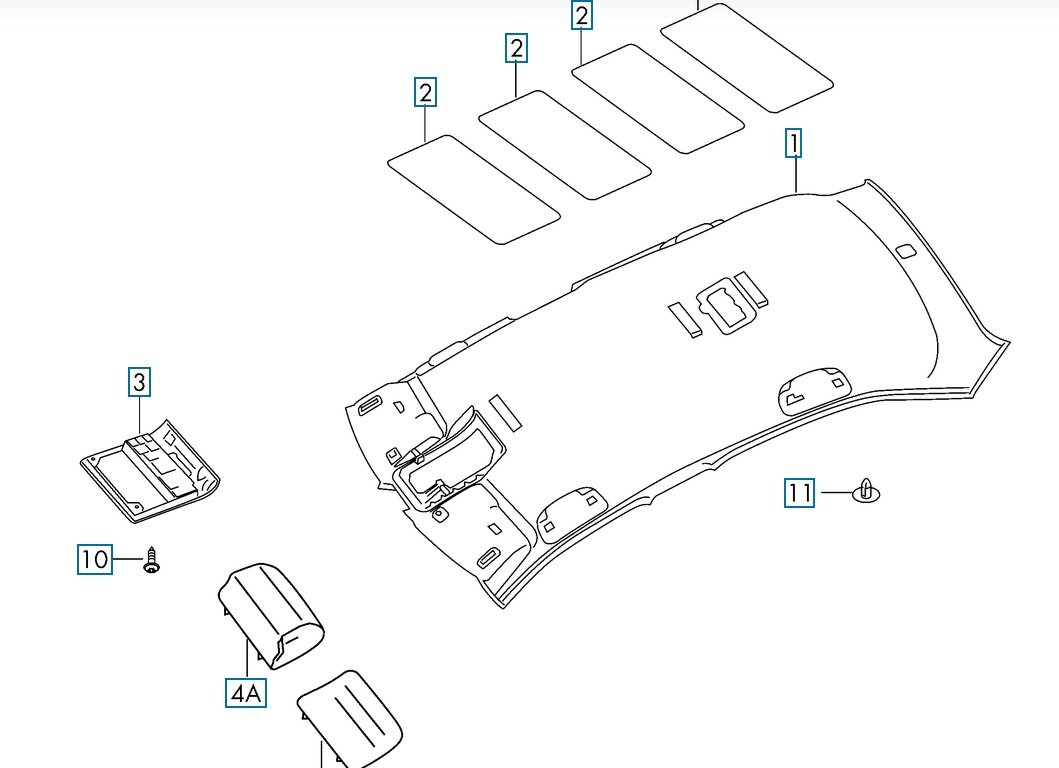
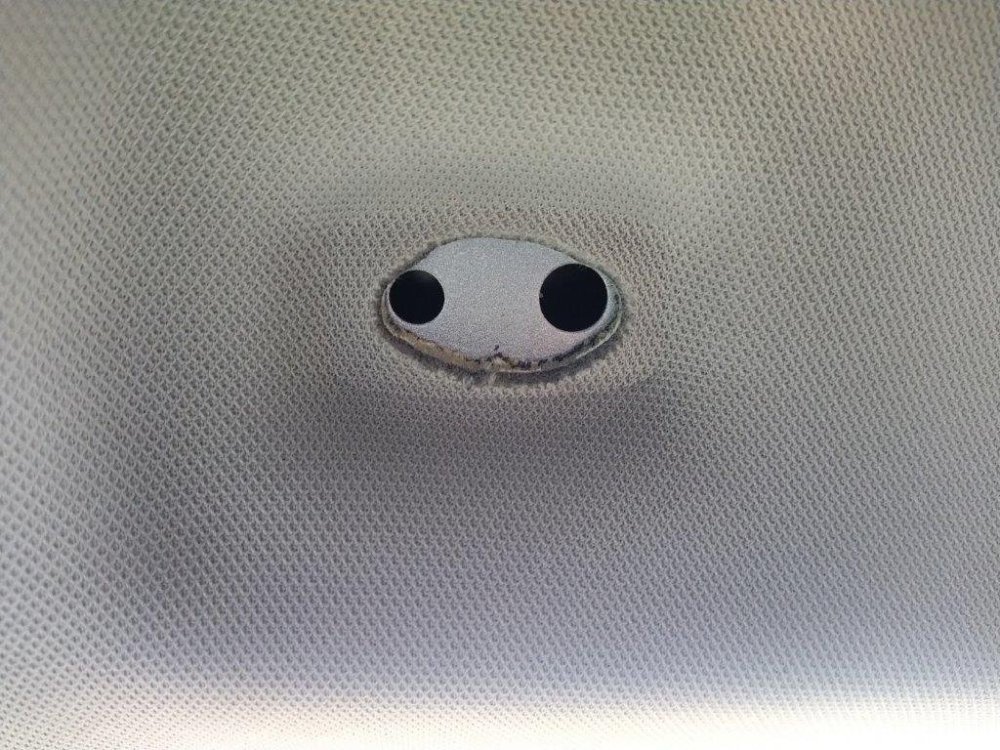
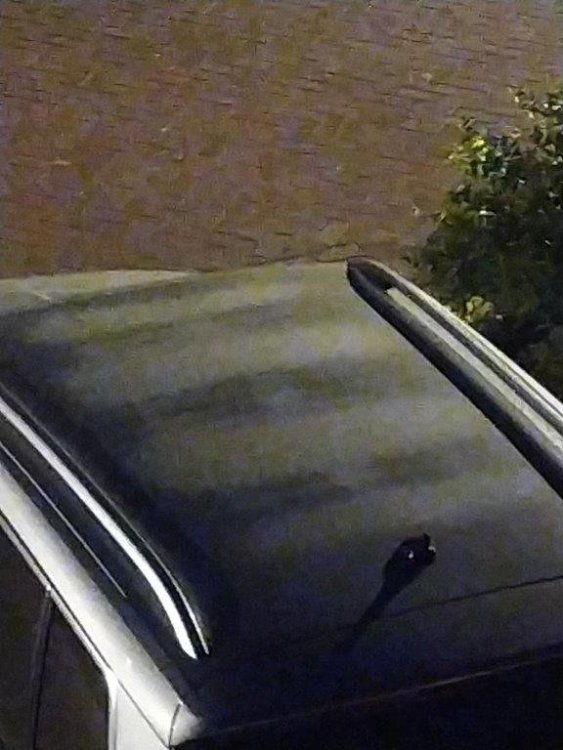
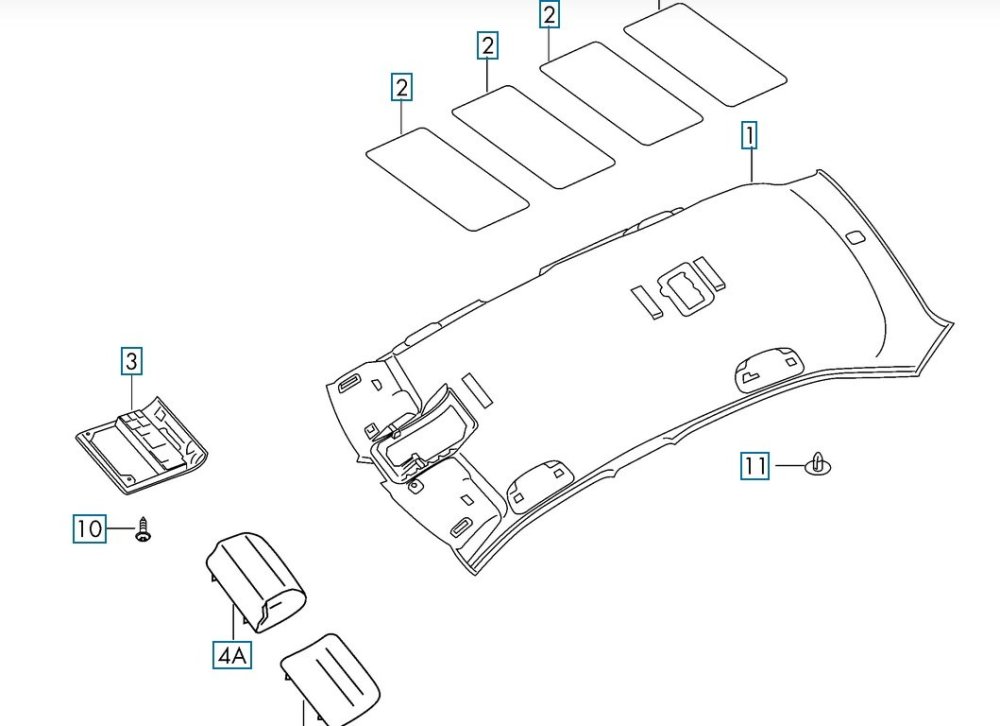
Rear Camera Install As part of my research, I found most of the rear dash cameras were installed on the tailgate door glass and the cable was then routed inside the rubber flexible housing for the tailgate electrics. By accident, I came across a home made metal mount that was screwed into the headlining (near the grey push-in headlining clip) and then later a purpose made 3D printed mounted bracket. The rear dashcam is mounted on a DC03 bracket from dashcams.co.uk https://www.dashcams.co.uk/product-page/rear-window-dash-cam-mount-bracket. To run the cable from front to rear, you will need: something to help thread the cable through – apparently electricians have flexible fibreglass wands for threading cable through house voids and routes, but I did not have such and had to improvise and used the cover off a length of PVC mini trunking – I had a 2m length in stock some car interior panel levers or pry tools to remove several items that hold the headlining in place, viz front sun visor clip, central interior light unit and the grey push-in headlining clip at the rear. First photo - this is the cover off a 2m length of PVC mini trunking. Notice there is a slight bend at the end which is to help the PVC mini trunking cover to negotiate roof members. This bend is at about 5cm – 10 cm from the end and pushes the end about 0.5cm down and out of alignment – that will be sufficient. Here is an example of a conduit - https://www.cef.co.uk/catalogue/products/29745-16mm-x-10mm-pvc-mini-trunking-white-3m-length - pick the thinnest and narrowest you can find. The length needs to be the longer of windscreen to centre interior light + 20cm or tailgate opening to centre interior light +20cm. The cover is used flat side up. Some other useful information at this stage. Second image is the roof structure. So you can see there are large cross members front and rear, a medium sized cross member in the middle and smaller cross members at ¼ and ¾ along. The rear dash cam cable will be passing below these items or obstructions. Info from catcar.info http://www.catcar.info/audivw/?lang=en&l=c3RzPT17IjEwIjoiQnJhbmQiLCIyMCI6IlNLT0RBIiwiNDAiOiJLYXJvcSBFdXJvcGUiLCI1MCI6IjIwMTkiLCI2MCI6IkJvZHkiLCI3MCI6IjgxNzAwIn18fHN0PT03MHx8YnJhbmQ9PXNrfHxtYXJrZXQ9PUNafHxtZGw9PUtBUiAgfHxFcGlzPT04MzR8fEVpbnNhdHo9PTIwMTl8fE1haW5Hcm91cD09OHx8QmlsZHRhZmVsPT04MTcwMHx8R3JhZmlrPT0wODE3MDA4OTM%3D Third image – the car roof on a frosty night – the dark areas are the roof cross members. Fourth image - is the headlining which shows how the aperture for the centre light is ‘reinforced’. Items numbered 2 are sound deadening mats/insulation. Above each door opening, it looks like there is an airbag unit – so there are probably 2 on the other side which are not shown – or maybe where the above door grab handles are located and attached. Items 3 and 4 are the sunglasses holder in the front roof light assembly. Courtesy of catcar.info. The rear dashcam cable will be passing about 10cm to the offside of the centre light opening structure and front roof light structure. The cables for the centre light go to the nearside of the roof.

-
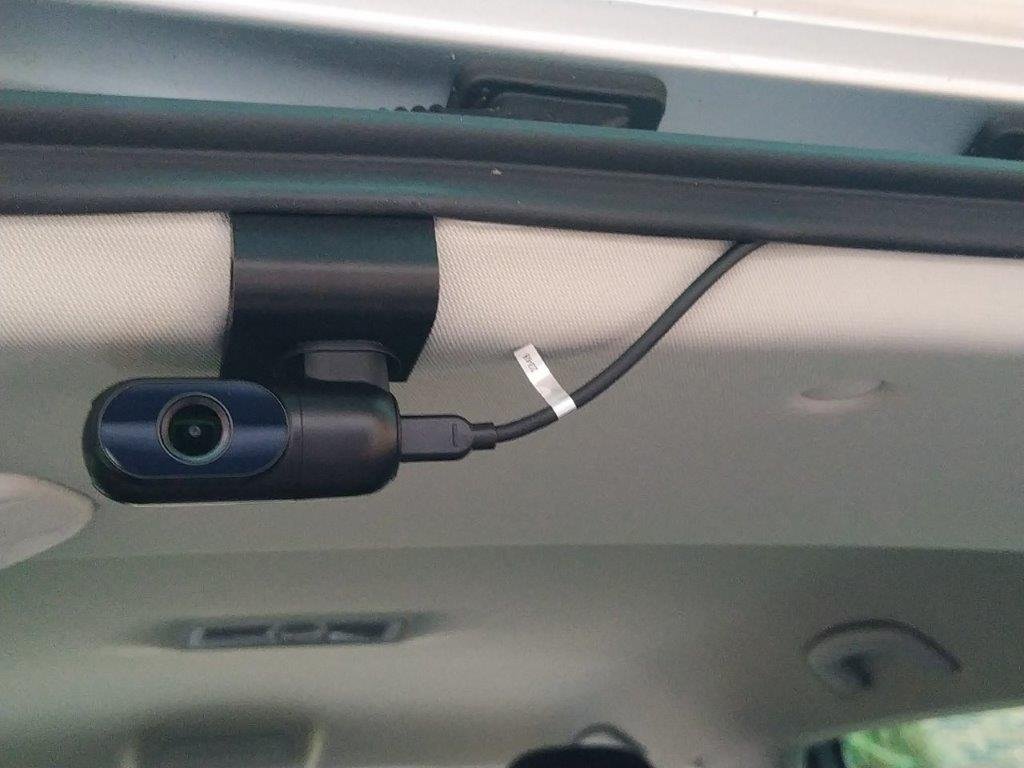
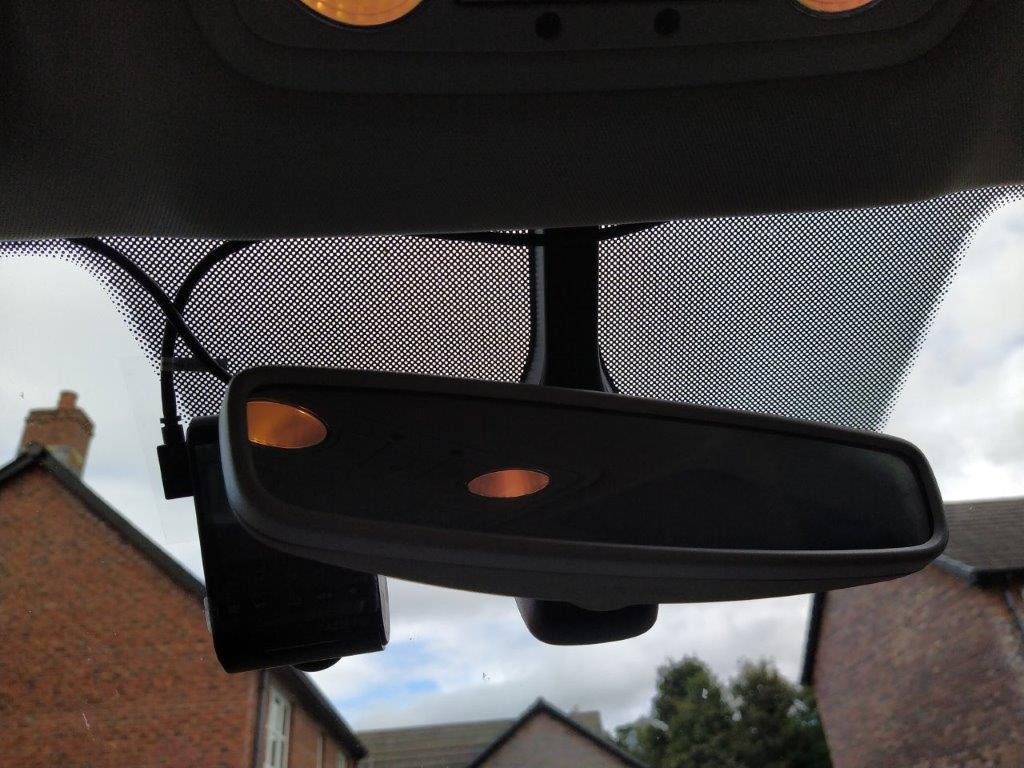
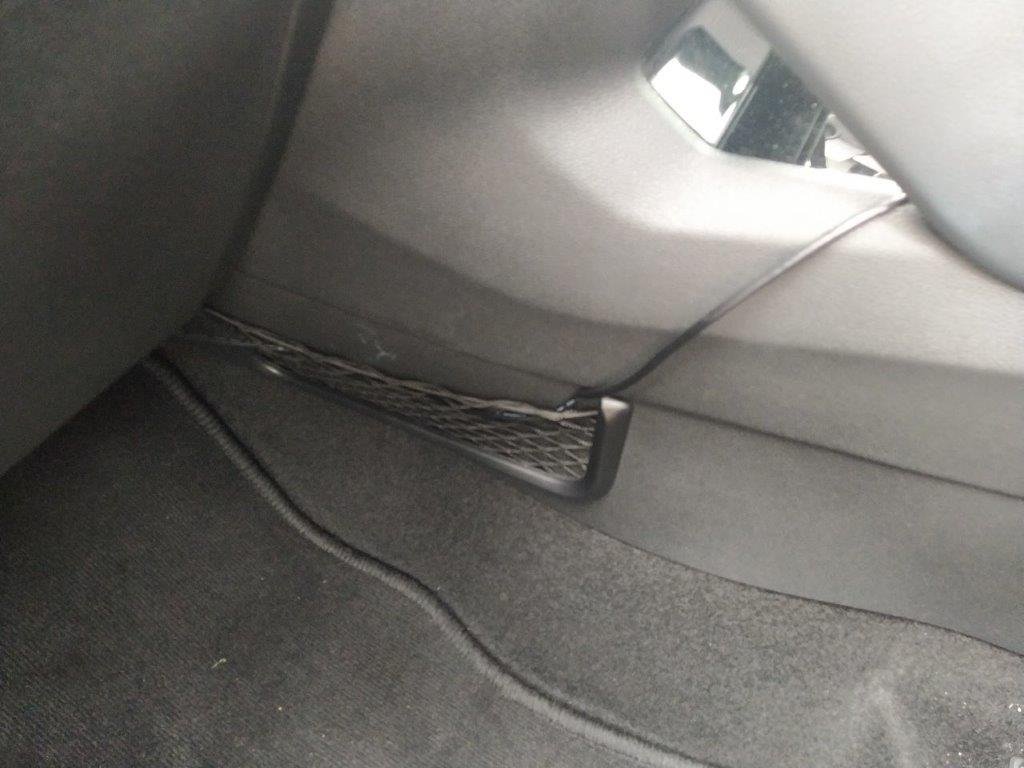
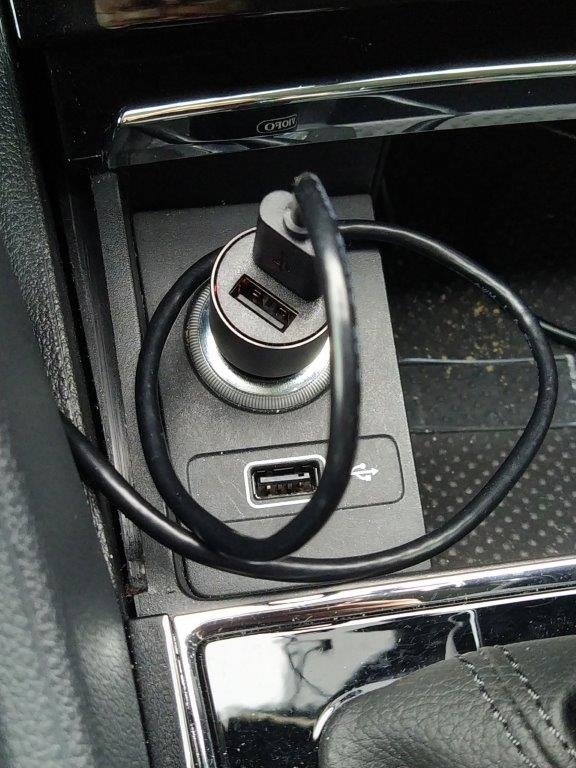
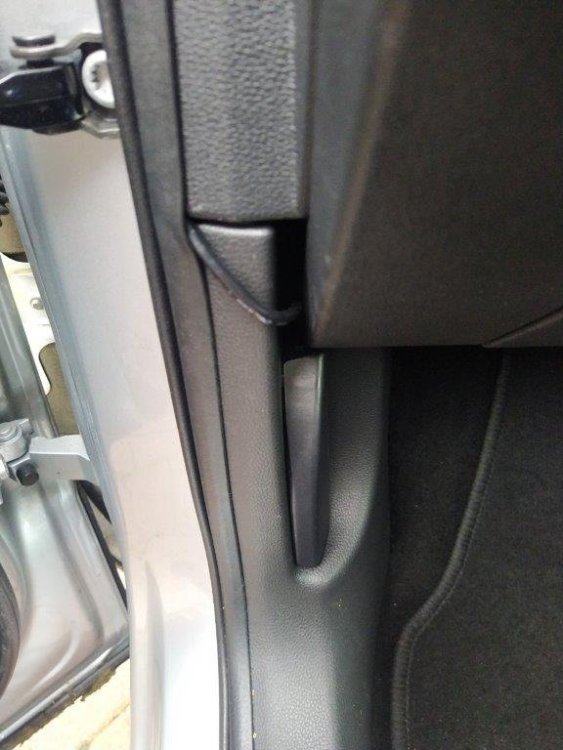
Front Dashcam Install The front camera was installed first and followed all the usual advice. It is mounted to the left of the rear view mirror and so is not visible to the driver. The power cable goes: · into the edge of the headlining at the top of the windscreen · left just inside the headlining to the top of the A pillar · down just inside the A pillar cover windscreen side – I tried to get the A pillar cover off but it would not move easily so gave up · between the top of the dash front panel and the bottom of the A pillar cover – this was most easily done by starting at the door end where the softer dash panel would give way more to allow the cable to be pushed in · down behind the front door rubber seal · out above the bonnet pull · behind the glove box and loosely cable tied · out through and in the mesh pocket · and then powered out of the cigarette light outlet. The power cable is hidden except by the bonnet pull and the mesh basket before the cigarette light outlet. Some photos follow. First photo – dashcam unit mounted on windscreen. The power cable comes out of the top (hidden behind mirror top left) and goes left. The cable on the left side of the dashcam unit, has a right angle USB-C connector, then goes up and right and is for the rear dashcam. You can see it is visible across the support for the rear view mirror. After about 10cm, the cable disappears into the headlining. Second photo - Power cable exiting door seal and passing above the bonnet pull. Third photo – Power cable exiting from behind the glove box and passing through the mesh pocket and on to the cigarette light outlet. Fourth photo – Power cable exiting from behind the glove box and passing through the mesh pocket and on to the cigarette light outlet.


-
So I have now installed my dashcam and the cable for the rear dashcam runs through the headlining. Therefore I thought it appropriate to document how it was done. Along the way I investigated many aspects so this may take more than one post, e.g.: Front camera install Rear Camera install – may be in more than one part Air bags Other – credits etc. I would like to thank anyone who responded to one of my posts requesting more information, various forum topics (here and elsewhere) related to this subject (dashcam install, radio interference, etc), Karoq online manuals, Karoq parts diagrams, etc. The camera. I wanted a front and rear dashcam with 4k resolution for the front as I thought that would be better. I bought a Viofo A229 Pro 3 Channel 4K HDR Dash Cam, 4K+2K+1080P Front Inside and Rear Triple Car Camera off Amazon which was supplied by a UK reseller for Viofo https://www.amazon.co.uk/dp/B0CLVCGDWT?ref=ppx_yo2ov_dt_b_fed_asin_title. I preferred a UK supplier to avoid any import issues as the Viofo online shop is in China and used Amazon as I thought that would be better for resolving any issues if any arose. I bought the 3 camera version as it was not many more £s extra for the 3rd camera , the interior camera. I bought a hardwire kit which I have not yet used as I was concerned about stationary battery drain as the car is not used daily
-
As the rear camera in on the rear window, do you get any interence with the radio? I have just bought one of these for mounting off the rear edge of the headlining - yet to be installed. https://www.dashcams.co.uk/product-page/rear-window-dash-cam-mount-bracket DC03 model.
-
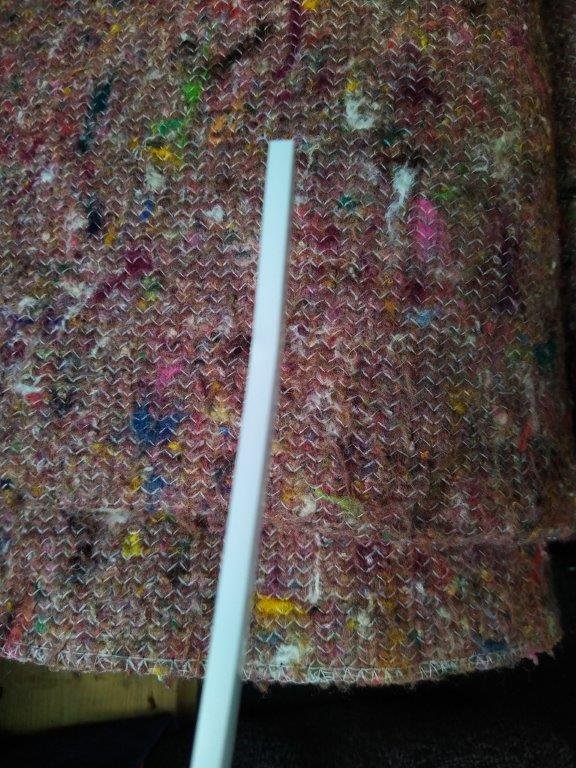
The metal strip looks like a magnet - certainly acts ;line one - to hold the torch in place in the holder.
-
Do you have a picture of where the cable comes out at windscreen and rear window please.
-
I like this idea. Is it just clipped over the edge of the headlining? I have a Karoq, and there is a 28mm diameter fir tree push in clip dead centre in the headling about 10cm from the rear edge - so I was thinking about something similar - take of the fir tree push in clip and use the hole to mount a flat plate, assuming the fir tree clip goes into a hole into a metal cross member of the rear edge of the roof. Saves messing about with the rubber cable gaiters onto the rear window
-
When you say go through the headlining how close to the side and how did you run the cable? I am thinking of running the cable through the headlining from the rear, to one side of centre, so it passes by the centre light and the front centre light assembley and comes out by the clip (not swivel side) of the passenger sunvizor - planning to use an electricians style cable puller thingy to push through from back to front. I am currently working out how to do it and have a few ideas from looking (A) Skoda air bag safety brochure which shows where all the air bags are (2) the repair manual fpund on this site which shows how to remove parts and (3) the parts listings off catcar.info. My next step is to 'hang' the rear dashcam cable from the headlining (fasten a few strong cotton threads around the edges of various fittings) and experiment to check for interference.
-
I have are a rear view dashcam to install, a Viofo A229. I am looking at running the cable through the head lining, from where the hatchback door cables enter the roof (through one the flexible rubber bellows connections) then straight to the front and out near the mirror. There are 2 of these rubber cable bellows connections, one each side of the roof aerial and about 9 inches away from the centre. Any advice on which side near the centre to go? Our Karoq is right hand drive UK. The nearside (left when viewed from the rear) might be best as the front dashcam is on that side of the central mirror. I am looking at feeding in a cable threading device and pushing through from the rear to the front, although one website suggested the cover for a square section white conduit might be better to avoid having the cable threader recoil itself. Is it Ok just to push it through near the centre line or are there obstacles? How far away, or near to door pillars, are the airbags? I can find various forum topics for different car models but not one that appears to go through the centre of head lining. Several go along the side or edge of the roof hiding in the roof lining, but the air bags are there. For info, I have already installed the front dashcam and using the many forum topics for info.
-
I have found this installation guide really useful. We are looking to install a dash cam - I have looked at Currys and Halfords and then found a review site https://www.nytimes.com/wirecutter/reviews/best-dash-cam/ which recommended a Viofo A229 Pro 3Channel - https://viofouk.co.uk/product/viofo-a229-pro-3ch-4k-2k-1080p-hdr-dash-cam/. The User Manual can be found here https://www.google.com/search?client=firefox-b-d&q=viofo+a229+manual on the dashcamguide website. I like this dashcam as it has a 4k forward camera. I also require a rear view camera. Has anyone installed such a camera? Does anyone have views on the viofo brand? The camera requires a microSD card. Viofo have their own brand which labelled as Industrial Grade https://viofouk.co.uk/wp-content/uploads/2022/08/viofo-256gb-industrial-grade-microsd-card-u3-a2-v30-high-speed-memory-card-with-adapter-support-ultra-hd-4k-video-recor.jpg but I usually buy SanDisk - so I am looking at a SanDisk Extreme Pro https://www.amazon.co.uk/dp/B09X7DMBVF/ref=sspa_dk_detail_1?pd_rd_i=B09X7DMBVF&pd_rd_w=Co69Q&content-id=amzn1.sym.46187d6a-4306-4bc6-830c-7b2085e0e39f&pf_rd_p=46187d6a-4306-4bc6-830c-7b2085e0e39f&pf_rd_r=46J1FW02SFACQ490VQVZ&pd_rd_wg=K841Y&pd_rd_r=c666a339-046a-4ede-b29d-998def95a029&s=computers&sp_csd=d2lkZ2V0TmFtZT1zcF9kZXRhaWw&th=1 What quality of Sandisk does anyone else use? I require at least 12 hours continuous recording, hence selecting 256gb. What size memory cards does anyone use - size of card, camera resolution, and how many houirs covered? I plan to use the 12v cigarette style socket intially so as to be able to keep the dash cam operating in parking mode, i.e. parked in car park, engine off etc. Thanks in advance.
-
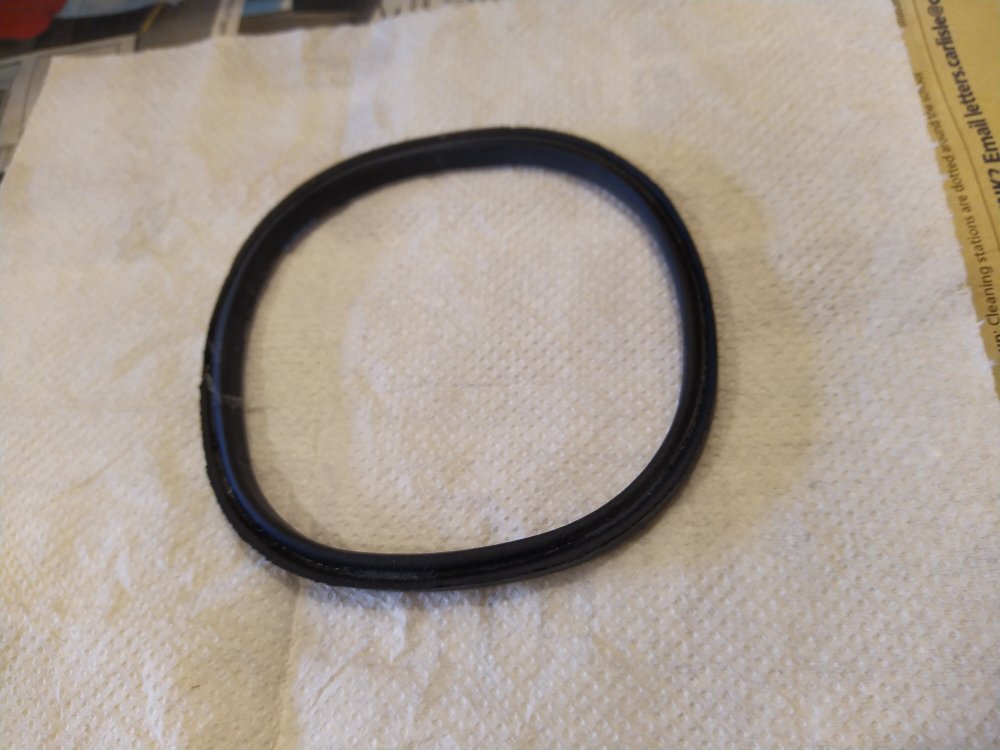
As the seal had an impression of the lens unit pressed into it, I took the seal out, turned it over and put it back in, presenting a clean newish face to the lens unit. Anyone know of a part number for this seal? Looking at Skoda Karoq parts diagrams it is part of the light grey bulb holder unit and not listed separately.
-
Viorel_92. Thanks for the photo. I took my light cluster apart agin today, and guess what, moisture on this particular seal. So I now assume that is where it was leaking. Photo attached of the seal on it's own.
-
I would be interested to know which seal as there did not seem to be an obvious seal to me. Picture perhaps?
-
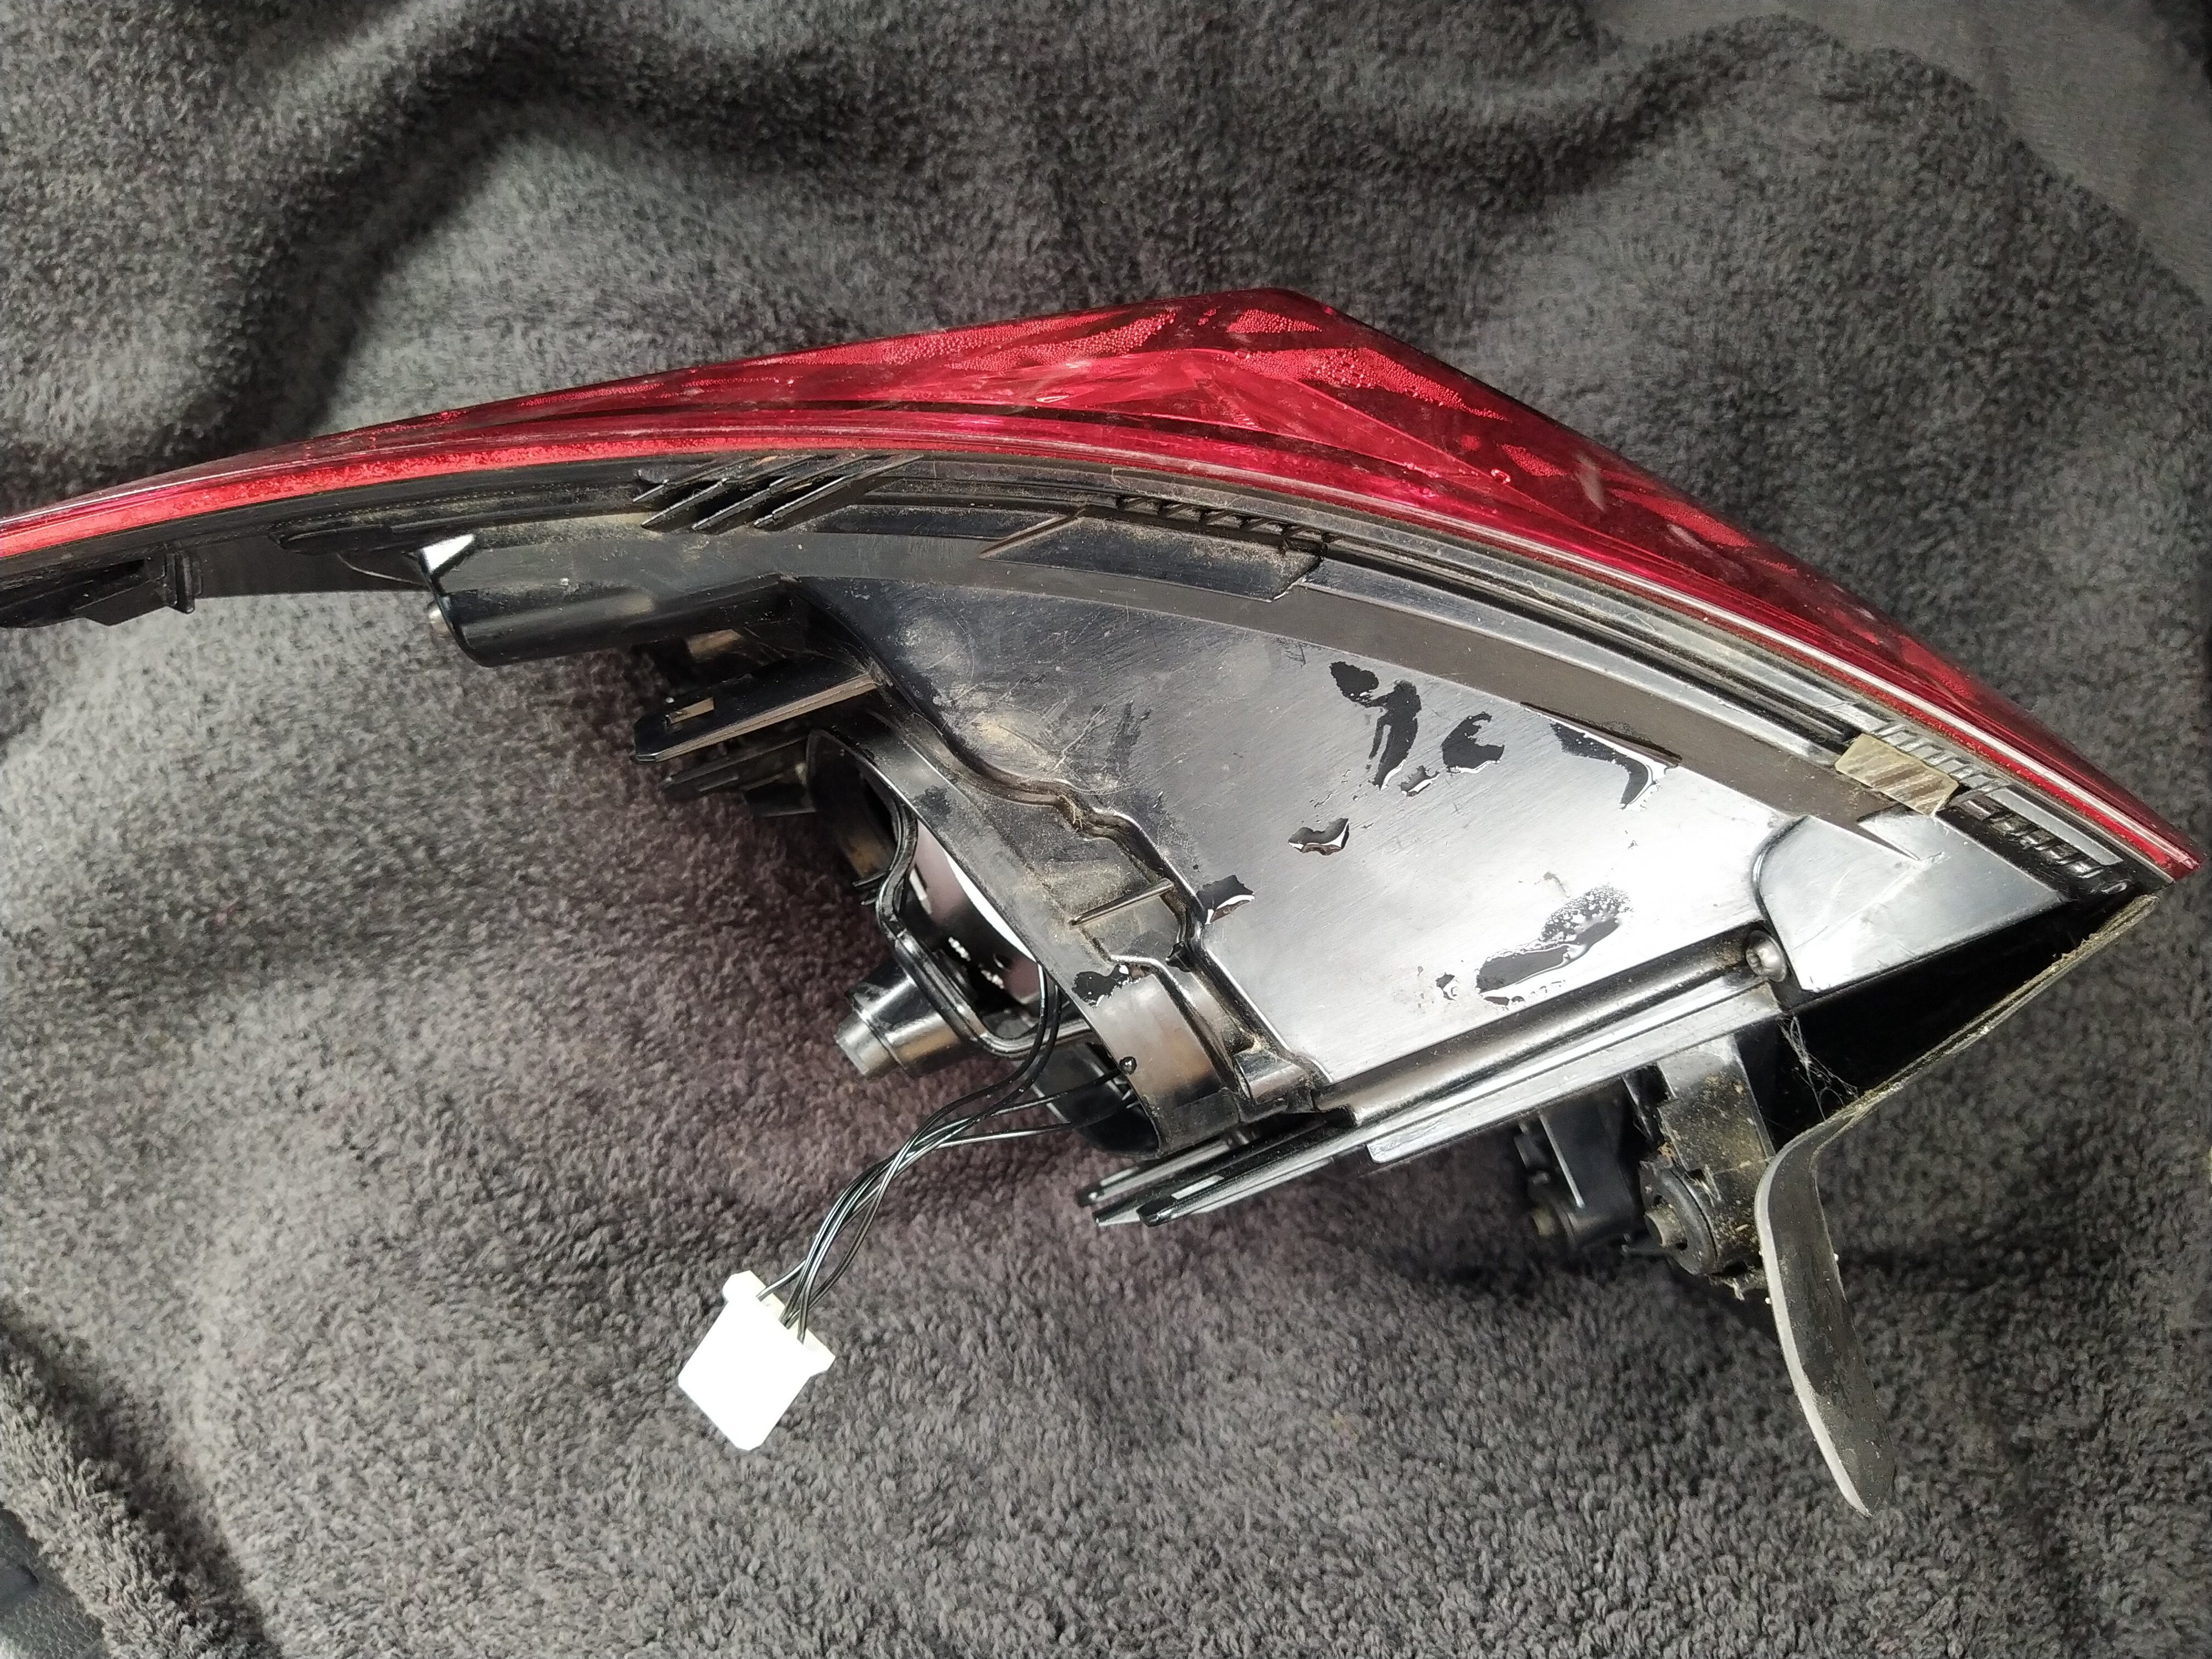
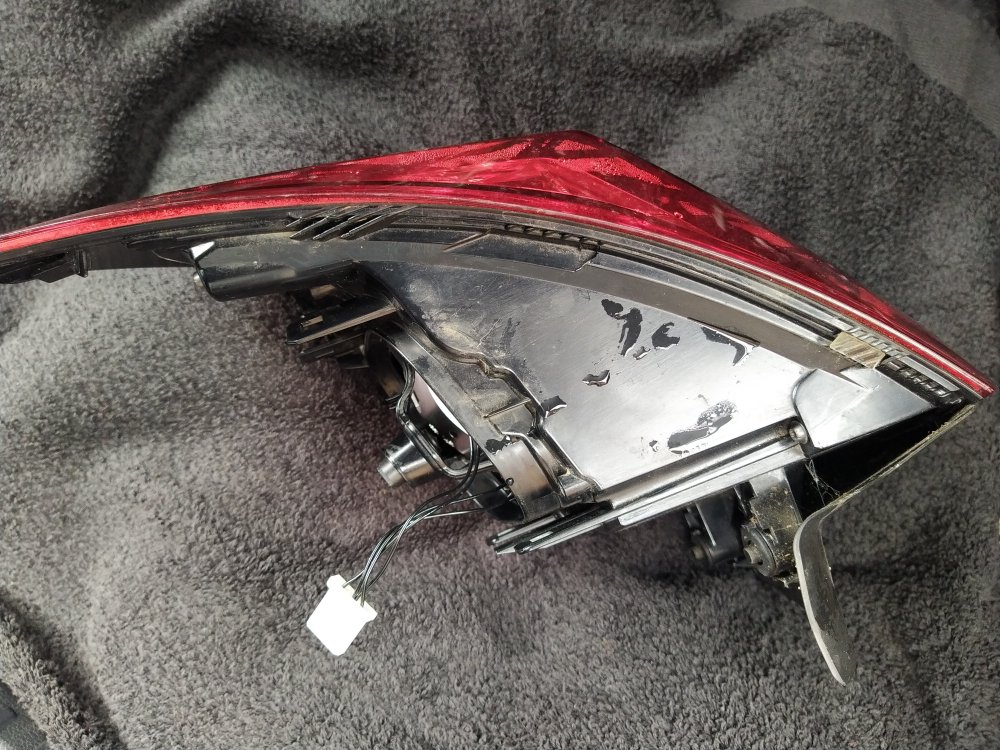
An update. I found out what was the item that fell in behind the bumper on removing the light unit. It is a small clear plastic spacer about 5mm wide, 15mm long and 1mm thick with self adhesive to stick to the rim. There should be 2 on the upper side and 1 underneath. Photo attached. You can see one of the upper ones. The other upper one did go on similar 'fins' at the opposite end - so I improvised with a sellotape double sided sticky pad. The 4 screws hold the inner reflector assembley in place but as the whole unit is sealed undoing the screws merely result in a loose internal unit. A tip - when removing the grey bulb holder assembly from the lens unit, beware that the 2 halogen type bulbs can easily fall out if caught on the lens unit - they then fall inside the lens unit which means a lot of rotating the lens unit to get a bulb to fall out. The lens is now dryish. I dont really know how the water got in - my guess it was using a hopepipe for washing the car and a lot of water got through the gap between the light cluster and car body - there is a 1mm gap all round - most of the water will have drained away down the back of the bumper but some may have got i around the halogen bulb opening.
-
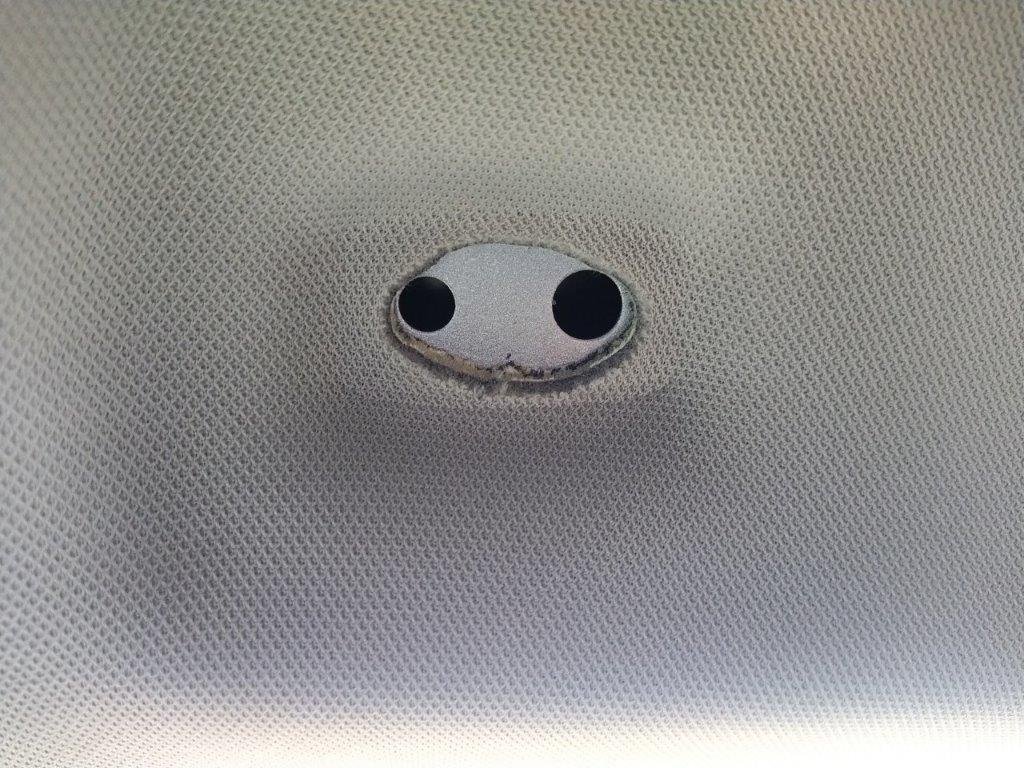
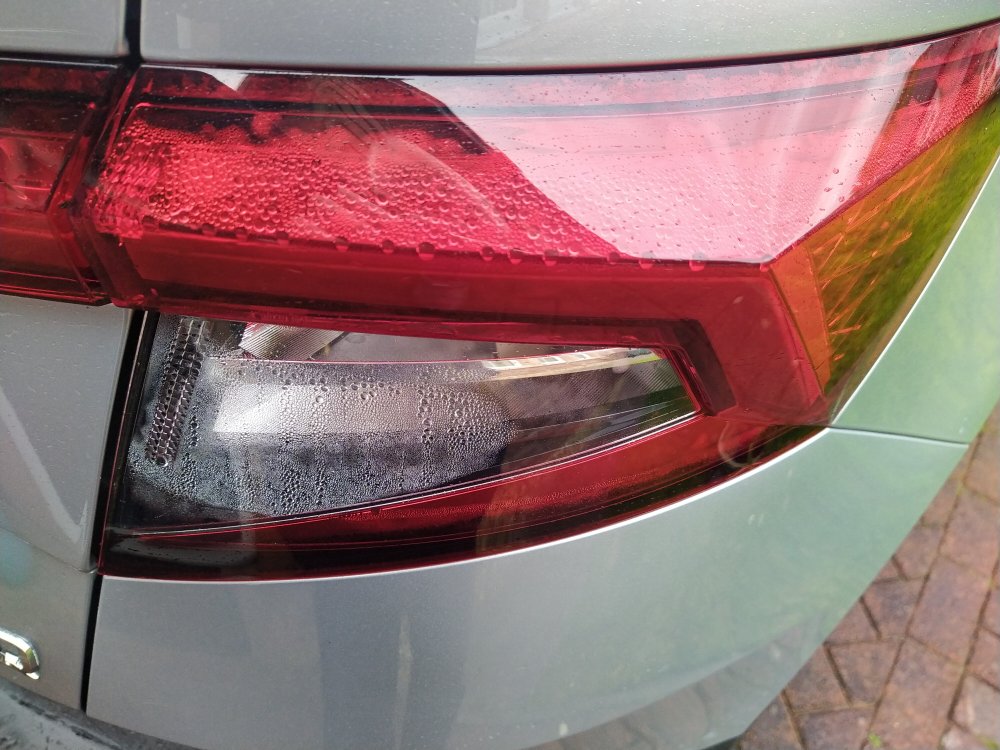
I have condensation in my Karoq's offside rear light cluster - photo attached. The karoq is 68 reg and has done about 38k miles. So I followed the instructions in the Skoda Workshop Manual to remove the rear light cluster - many thanks to the forum member who published a thread with lots of links to workshop manuals. I unscrewed the big spring loaded retaining screw and eventually the light cluster pulled out horizontally and away directly backwards from the body. Something clicked and it sounded like a small part falling down into the bodywork hole behind the bumper - anyone know what this might have been or was it simply a spring loaded plastic clip making a noise when I removed the lamp cluster. I shined a torch down the bodywork hole but was unable to see anything. I detached the halogen bulb holder (two bulbs). I was not able to disconnect the wiring loom plug - too difficult to work out which was the springy bit that needed depressing or whatever. So I now have the halogen bulb holder assembley connected by its wire back into the body and and the led/lens body connected by a few thin black wire for the leds. I was not able to disconnect the led wires - the plastic springy could be depressed but the connector was a very tight fit and would not pull put and I did not try some pliers or screwdriver or other implement. On rotating the lens unit several times, a large amount of water drained out, seemed like 0.5 pint. On attempting to put the halogen holder back into the led/lens unit, more water poured out. So a bit more of rotating the various parts to ensure the led/lens unit was empty and eventually all went back together and into the car and it all seems to be working ok. So, the following questions: * has anyone tried to unscrew the lens unit from the led holder part - there seemed to be 4 spider/torx screws holding it all together? Does it come easily apart? * anyone know how all this water might get in? A bad seal between the lens unit and the led holder. The Skoda workshop manunal does not include any details on further dismantling the rear light cluster - it only desecribes enough to change the halogen bulbs. Apologies if what I have said are halogen bulbs are actually LED bulb looking like halgens.
-
No - I did not go looking for a part. And currently the flap is as shown in the photos.
-
Fixed. The video was very useful. I watched it a few times before removing the glove box. It was the light connection. All now working again. Thank you
-
Dark now. No light from glove box. I guess it got disconnected when the pollen filter was changed. We are using the car a lot for a day or so and therefore will follow the video at the week-end. Thanks again.
-
Thanks. I have got bright sunshine at the moment so cannot determine if the glovebox light comes on, so will check later. Also the connection point is not visible so could be a case of needing to remove the glovebox so a job for a few days time.