prt57
Members
-
Joined
-
Last visited
Everything posted by prt57
-
I use the hose compressor but on my Golf the flexible hoses at the back of the car had aluminium internal strengthening tubes so the hose compressor I used would not stop the fluid escaping and then dented the internal aluminium piping as well so needing the rear brake line to be replaced so lots of time to lose fluid.
-
Yes, I suppose so. What I think I’m understanding from this is that the fluid in the ABS is not flushed out as part of a normal fluid flush and it needs VCDS to open valves in the unit. On a similar theme, the fluid leading to the clutch slave cylinder is not flushed out either unless you ask as part of the brake flush. last year I had the clutch changed in my Fabia and I watched as the fluid was flushed through to the bleeder block and it came out a very dark brown. Probably never been done in the previous 16 years.
-
I think I have the same fault with our Mk 4 Golf in that the initial biting point on the brake pedal is lower than before. Maybe 6 years ago I had the rear callipers replaced at a local place and the pedal bite came back lower. I took it to VW for a brake bleed and it came back perfect. I will have described the low pedal to them on booking in. last year I had to change one of the rear callipers again due to handbrake problems and I know air did get into the system so I sent it to VW for a bleed but did not mention the low pedal and so it came back the same. I was baffled but this thread is making sense. I’m going to VW to ask them about this again this morning for a VCDS bleed rather than the ordinary bleed just to refresh the fluid every two years and see what they say.
-
That sounds good, thank you. Do you have a link to the parts you bought?
-
I use Shell Helix Ultra 5W-40 which is a 502 specification in my 1.4 BBZ. Decent oil to keep my car running smoothly at 111,000 miles. I change it twice a year on average and it rarely uses any in between services.
-
Yesterday whist driving to work in my 2005 Fabia estate BBZ "elegance" I noticed a rough feel to the edge of the chrome effect on the top of the gearstick. I could not resist picking it as I drove along and a big sliver of the chrome from the top of the gear knob peeled off. After a bit of research it seemed that the chrome/plastic top was glued to a white plastic carrier with 4 little legs on. These little legs allow the chrome top and carrier to be embedded into the top of the gearstick. Being the elegance model the gear knob is leather rather than just the hard plastic on other models and so it would be good to keep that. I used a pick to remove the chrome cover and carrier from the top of the gear knob. It just pulls up and off. I tried to strip the remaining chrome from the top of the plastic carrier with caustic soda and then Nitromors. The chrome did not budge but the exposed plastic had been affected and is not smooth any more so no good! Reading around, I think that I might be able to buy a new chrome top with the gear shift pattern on and carrier from Skoda but no doubt it will be pricey. Being bank holiday , my local Skoda dealer is closed so I cannot enquire about availability etc. I also found a replacement none genuine Skoda Fabia 5 speed gear knob / gaiter and lower frame on Ebay but as mentioned, the gear knob looks like a hard plastic. After checking the compatibility section of the advert, it appears that it will fit my car but I'm wary of buying in case it will be a poor quality. So what are my options in order to smarten things back up again? What have other people done to rectify a similar problem?
-
That was my other option but I tried something similar but it would not stick to the plastic. Fine on the window side though. This was the 3M double sided tape used to stick uPVC glazing bars to double glazed windows. Does your foam based tape stick to the type of plastic used for the scuttle?
-
Apparently Gorilla glue is not good with most plastics. my best thought so far is butyl tape. Very sticky and water proof.
-
It is actually possible to buy the channel from VW. It just pushes onto the bottom of the windscreen to be held in place. However, the mastic bonding the screen to the car prevents me getting the remnants off the back and therefore cannot get a new one on and into place. Simply, all I need is some sort of adhesive to keep the scuttle stuck to the bottom of the windscreen via using the overlap of about 1 cm. Good point about the Tigerseal. Other folks have talked about Windscreen fitting companies using a bonding material that locks everything in place for ever. At the moment I am thinking about a bead of Butyl tape. Very sticky and it should be possible to separate it if I need to access the ecu again.
-
There are many knowledgeable experienced people on here who I have come to respect over the past couple of years. I just need the best type of fixing material to allow the plastic scuttle to bond to the glass windscreen.
-
First of all, an apology, this is about our Mk 4 Golf GTi that I bought new in 1998!! I have asked for assistance in all the right places about this but no joy. This forum has been a great help to my Fabia so hopefully with this too but please forgive this VW intrusion. The GTi has an upgraded turbo fitted and so needed to be mapped to suit. It has the old AGU engine with a basic ecu and needed to be bench flashed rather than live mapping through the OBD port. So I removed the wipers and pulled the plastic scuttle away from little channel at the bottom of the screen to get to the ecu hidden underneath. Disaster, the little channel that is reinforced with aluminium just crumbled away. 24 years of oxidation meant the aluminium turned to white dust and the plastic disintegrated. Now there is nothing to hold the scuttle to the windscreen and it will just rattle around not to mention, little to protect the ecu from the weather. I’d say there is about 1.2 cm of overlap between the scuttle and the bottom of the screen and it will sit flush if held lightly in place but will move away if let go. My question is what can I use to seal the scuttle to the bottom of the screen using that overlap? it needs to be swift to act as I cannot stand out all night holding the scuttle in peace until the glue etc sets. Also waterproof and able to withstand daily live on a car. Regarding the remap it all went smoothly and so the car is now at about 225 BHP and the torque capped at 280 lbs ft to reduce the chance of bending a rod! Well worth doing as it is a bit of a sleeper now. Many thanks!
-
I’ve also had bad jobs done at Audi & VW main dealers. A few years ago the local VW garage stripped the sump plug on my Mk 4 GTi. They had to fit a brand new sump. Local Audi garage ripped the fasteners out where the undertray attaches to the arch liners on my S3 due to overzealous tightening with the zip gun but would only pay for 50% of the damaged parts as I could not prove it was them. Also, they won’t service modified cars any longer and my S3 8P is at stage 2+. Consequently, I have never been back. My son now will only use a trusted independent garage but even there you have to be careful as last time the final bill was approx £150 more than the true amount until I queried the amount. Maybe time to get a bus pass!
-
Luckily, on the side that had the stripped nut, the taper of the track rod end was tight into the location on the steering arm and I did have to use a splitter. On the other side where the nyloc insert was missing, it only needed one tap with a hammer on the side of the steering arm to shock it free.
-
The job is done and well worth doing as well. As mentioned in my first post, the spring clip was damaged on one of the track rod end boots. I changed that one first noting the nyloc ring was missing from the nut on the damaged component as I removed it and I then used the recommended tightening technique with the new part. However, on the other side, the original nut holding the track rod end in place on the steering arm was only finger tight and the thread stripped. As the rack was changed twice last year this is there the damage and poor workmanship must have occurred. Certainly no replacement nuts were used and grossly overtightened to strip the thread. I used what appeared to be a knowledgeable establishment for the refurbished racks and the fitting. Maybe I was attracted by too cheap a job so big lesson learnt. It is certainly a good job that I checked but worrying that I have driven maybe 3k miles since the last rack was fitted!
-
Thank you very much for your excellent info TMB. I need to get the car back on the road due to work tomorrow lunch time and Monday plus a course all day Sunday hence having to resort to ECP. The Lemforder parts are available at 8.00am as the more expensive option. Researching elsewhere suggests they might be an OE supplier for VAG
-
Hi, whist fitting new front discs and pads on my Fabia estate 1.4 16v BBZ today, I noticed that the spring retaining circlip on the track rod end rubber boot was all mangled and out of place. No doubt happened when I had my steering rack replaced twice. So on checking my trusty Haynes manual the tightening sequence says stage 1 - 20Nm then stage 2 - angle tighten a further 90 degrees. However, I just watched an Autodoc video where it was just tightened to 47Nm and nothing else. Bearing in mind my Haynes was published in 2006, which is the correct technique to use. I have always trusted Haynes for many years but I don't want my wheels doing their own thing! The locknut on the track rod looks challenging at 50Nm. any tips on this one as I don’t have anything other than a conventional torque wrench. Also looking on ECP, it looks like there are some cheap companies that make track rod ends that I have never heard of. At the expensive end there is Lemforder, is this company any good?
-
It’s worth checking the rear main oil seal for any leaks and replace if in doubt. It’s a clutch out job if it leaks badly in the future.
-
Hi Wino, Thank you for your thanks!! I cannot believe I was tackling this over a year ago. Time flies and apart from the dodgy refurbished steering rack episode and a replacement alternator everything has been OK in my “Elegance” since. Thank you for your offer of a spare micro switch but for me, it something does not work and I’m unlikely to need it, the component goes in the bin!!
-
Just to report back after a week and 120 miles that my fix using the heat shrink cable tied into place over the plunger has stopped the warning light flashing up on the dashboard. Worth considering if your car is suffering a similar problem.
-
Reporting back after 40 miles of mixed road driving including bumpy country roads - no flickering warning light on the dash. The benefit from my fix (bodge) is that the light still illuminates if the seat is folded down as the plunger can still move in and out.
-
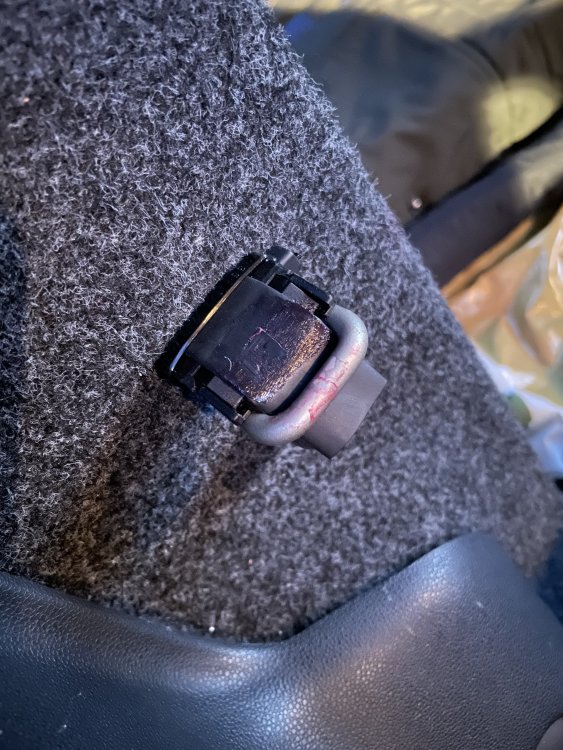
Well, I’ve had a go at a little mend but only time will tell if it is fixed. As mentioned earlier the external plunger looks a little marked as the seat was up and down on a regular basis in the car’s early life. I had a think about how I could pad out the plunger and experimented with different thicknesses of insulation tape stuck to the plunger to see if the concept would work. then as seen in the photo, I cable tied a 15mm width piece of heat shrink with another single thickness inside into place to match the 5 thicknesses of insulation tape that seemed successful. A gentle smear of rubber grease above and below to keep things slippery finished the job off. So far so good with the seat back latching perfectly. Normally, the seat I would put down to carry a load is the passenger side rather than this one. I tried 20 seat up and downs and the cable tie / heat shrink stayed perfectly in place and the light went out perfectly each time. I’ll test it more thoroughly over the next week.
-
Does it not push to break the circuit rather than push to make? Not checked yet but just interested.
-
Thank you for your replies. My mk 4 golf does not have this function and so I was quite surprised to work out what was causing the intermittent light flashing, so I don’t need it. Although I have not worked out how to access the plunger switch, just disconnecting and insulating the wire terminals would do a perfectly good job. No VCDS here! Originally, the car was bought as a van/car and I think the seats spent quite a lot of time being flattened and then returned to upright. I can see a little wear on the plunger tip so maybe it just needs to be pushed in more to make a total disconnection. I’ll see what I can do to build up the tip a bit more and report back.
-
Good morning everyone, on my Fabia estate there is a dash warning light to remind me if the larger section of the rear seat back is folded down. In my car’s case, with the seat back in the upright position, I will get an occasional flicker of the warning light on the dash. The switch is operated by a plunger which is held in the open circuit position when the seat is upright. Pull the seat back downwards and the circuit is made. In my case all appears to be working correctly but maybe the plunger is not pushed away enough by the seat back causing the light on the dash to illuminate going over a bump etc. I have slackened the little rubber seat back stop probably designed to prevent rattling in the hope that the seat isn’t pushed as far away from the plunger but this does not appear to be helping. so essentially, I need a way of pushing the plunger in more whilst the seat back is upright. Any suggestions?
-
Final update after a couple of days. The dash battery light issue where it would stay on until the engine is revved is fixed. Just to help others, I checked all of the wiring that can be suspect under the car to the front of the gearbox and there were no cracked or broken wires. I installed a reconditioned alternator fairly easily. The plastic connector block and main electrical cable connection was rotated more clockwise compared to the original so a tip is to loosely install the lower fixing bolt to allow the unit to pivot towards you allowing easier connections of the cables then rotate back into place before installing the upper mounting both then torque up the bolts finally. Now on starting the car, the battery symbol goes out straight away so no revving needed now!