Weti
Finding my way
-
Joined
-
Last visited
-
Hi all, Seems I'm having the same issue with my 2016 2L tdi yeti. First noticed symptoms yesterday. The water temp normally rises to 90°C then stops. Yesterday after start-up from cold, it rose beyond, to approx 100-110 then settled back to 90 for the remainder of the journey. The car was left 7 hours until restart so properly cold and noticed the same issue but with more swings in temp (higher - to 120 but never below 90). Pulled over, aux fan on, blowers on full speed and temp etc. I nursed the car home at low revs. Today I'm trying to learn how to disconnect the brown solenoid electrical connection which I can see on the LHS of the engine, above the timing belt cover. It seems a little awkward to remove and I don't want to fracture the plastic. I'm trying to learn to do this cold so when the pump cover retracts, I can easily do it with the engine being hot without the risks of burns etc. Advice appreciated.
-
I have copy but have reached my data limit on here so cannot share on the platform. DM me your personal email address and I'll share. I'm not sure if you've read through all the comments on here but United232 disappeared after some time. That makes it difficult to know how successful his treatment was long term. Others have tried it with varying degrees of success, myself included. In a nutshell 232's approach is to remove the fly catcher/windbreaker net (call it what you will) from the sunroof and appear a low viscosity sealant to the gaps in the structure of the frame. It's incredibly difficult to work with, has the potential to drip through and stain your seats and people are generally over-eager to apply more than is required. 232's report also fails to address the possibility for multiple ingress points. Whilst I followed 232's suggestions, I did not have real joy in eliminating water ingress. Water can make its way past the main roof seal and bypass the a-pillar drains regardless of using the 'miracle' sealant. I suspect these are real points of ingress and you should inspect the adhesive between your car body and the main seal. If it's compromised, it'll let water in for sure. Ultimately you need to know what you're dealing with (i.e. where your leak is coming from) before you can tackle solving it. That may mean gutting your interior. That's how I fixed mine. I found an addition leak path and have since prevented ingress. It's been leak free for months in all weathers. I still haven't replaced my headlining though and will monitor for as long as I feel necessary. 232's report is good for highlighting a few key hurdles in taking your car apart. It seems daunting but once you start, it just becomes a logical progression of taking more and more out. Very much like a jigsaw.
-
That is a very good and easy way to check. The sound deadening around the toe board is very absorbent and can easily hide litres of water before you even know you have a problem.
-
It's a fair while since I've provided an update on Weti so here goes - I stripped the interior to just the front seats back in October when I first noticed my problem (no carpet, sound deadening or headlining) to understand where the water was coming in. Over the last 6 months or so I saw water coming in as the OP described and like many attempted to resolve the issue with Captain Tolleys, with limited success. Around 6 weeks ago I made a further modification to the sunroof rubber using a bicycle inner tube (I shared this proposed solution back in October but have since refined it). Thankfully, I have not had a drop of water through the sunroof since the revision. If it withstands this evening's absolute downpour (I have no reason to expect it won't) I'll reassemble the interior and share with the rest of the group what I have done providing there is still a big enough audience. How have other group members been getting on with their Weti issues over the Spring period?
-
It would be to keep rain at bay. There is an issue with water ingress through the sunroof and I will be away for a few weeks so unable to monitor it and remove the water that has leaked in on a daily basis. I do not want to return to a flooded car so need to slow the ingress before I can effect a repair.
-
Hi, can anyone recommend a suitable car cover for a Yeti? A car specific one would be great (I have looked but have found one, or found expired links from other threads), alternatively a generic cover which fits well would be appreciated. TIA
-
🤣
-
I forgot to say, the first thing that drew my attention to this thread was the weird ticking/glugging sound coming from the rear of the car when it rained and my heater fan speed was high. Another member had complained of a similar noise. I assume other people are hearing this even if their roof miraculously isn't leaking (as if!) as it is associated with the rear drains. When you drop the headlining you can see the rear drains do not run progressively or should I say directly downwards. As the glass roof is nearer to front of the car than the rear, the rear drains initially take a more horizontal path and as a consequence of the way they are routed, they exhibit a bit of undulation. The low points of these dips obvious take longer to dry out as the water has to rise over a small hump to do so. This could only really happen if you were to drive or park on a steep incline. So, as the speed of the heater fan increases, so too does the cabin pressure. This finds its way (probably through such cracks in the cassette I described above) and out through the drains. Because the rear drains have this dip, the air flows over the water, pushing it with it but not fully clearing the hump. It flows back and forth creating the glugging sound (which sometimes sounds like a muffled car indicator sound or at least has similar frequency). I have used a 3M adhesive cable clip and stuck it to the roof in such a way that it guides the drains in a more direct path without the undulations. It's been like this for a week and i've not heard a peep from it. Beware if you do this not to alter the angle of the ball joint too much as it connects to the rear of the cassette. You really want it to point downwards but to get the hose to point downward you need a compromise with the orientation of the joint. You don't want to cause water to leak out of the joint in the rear of the car too.
-
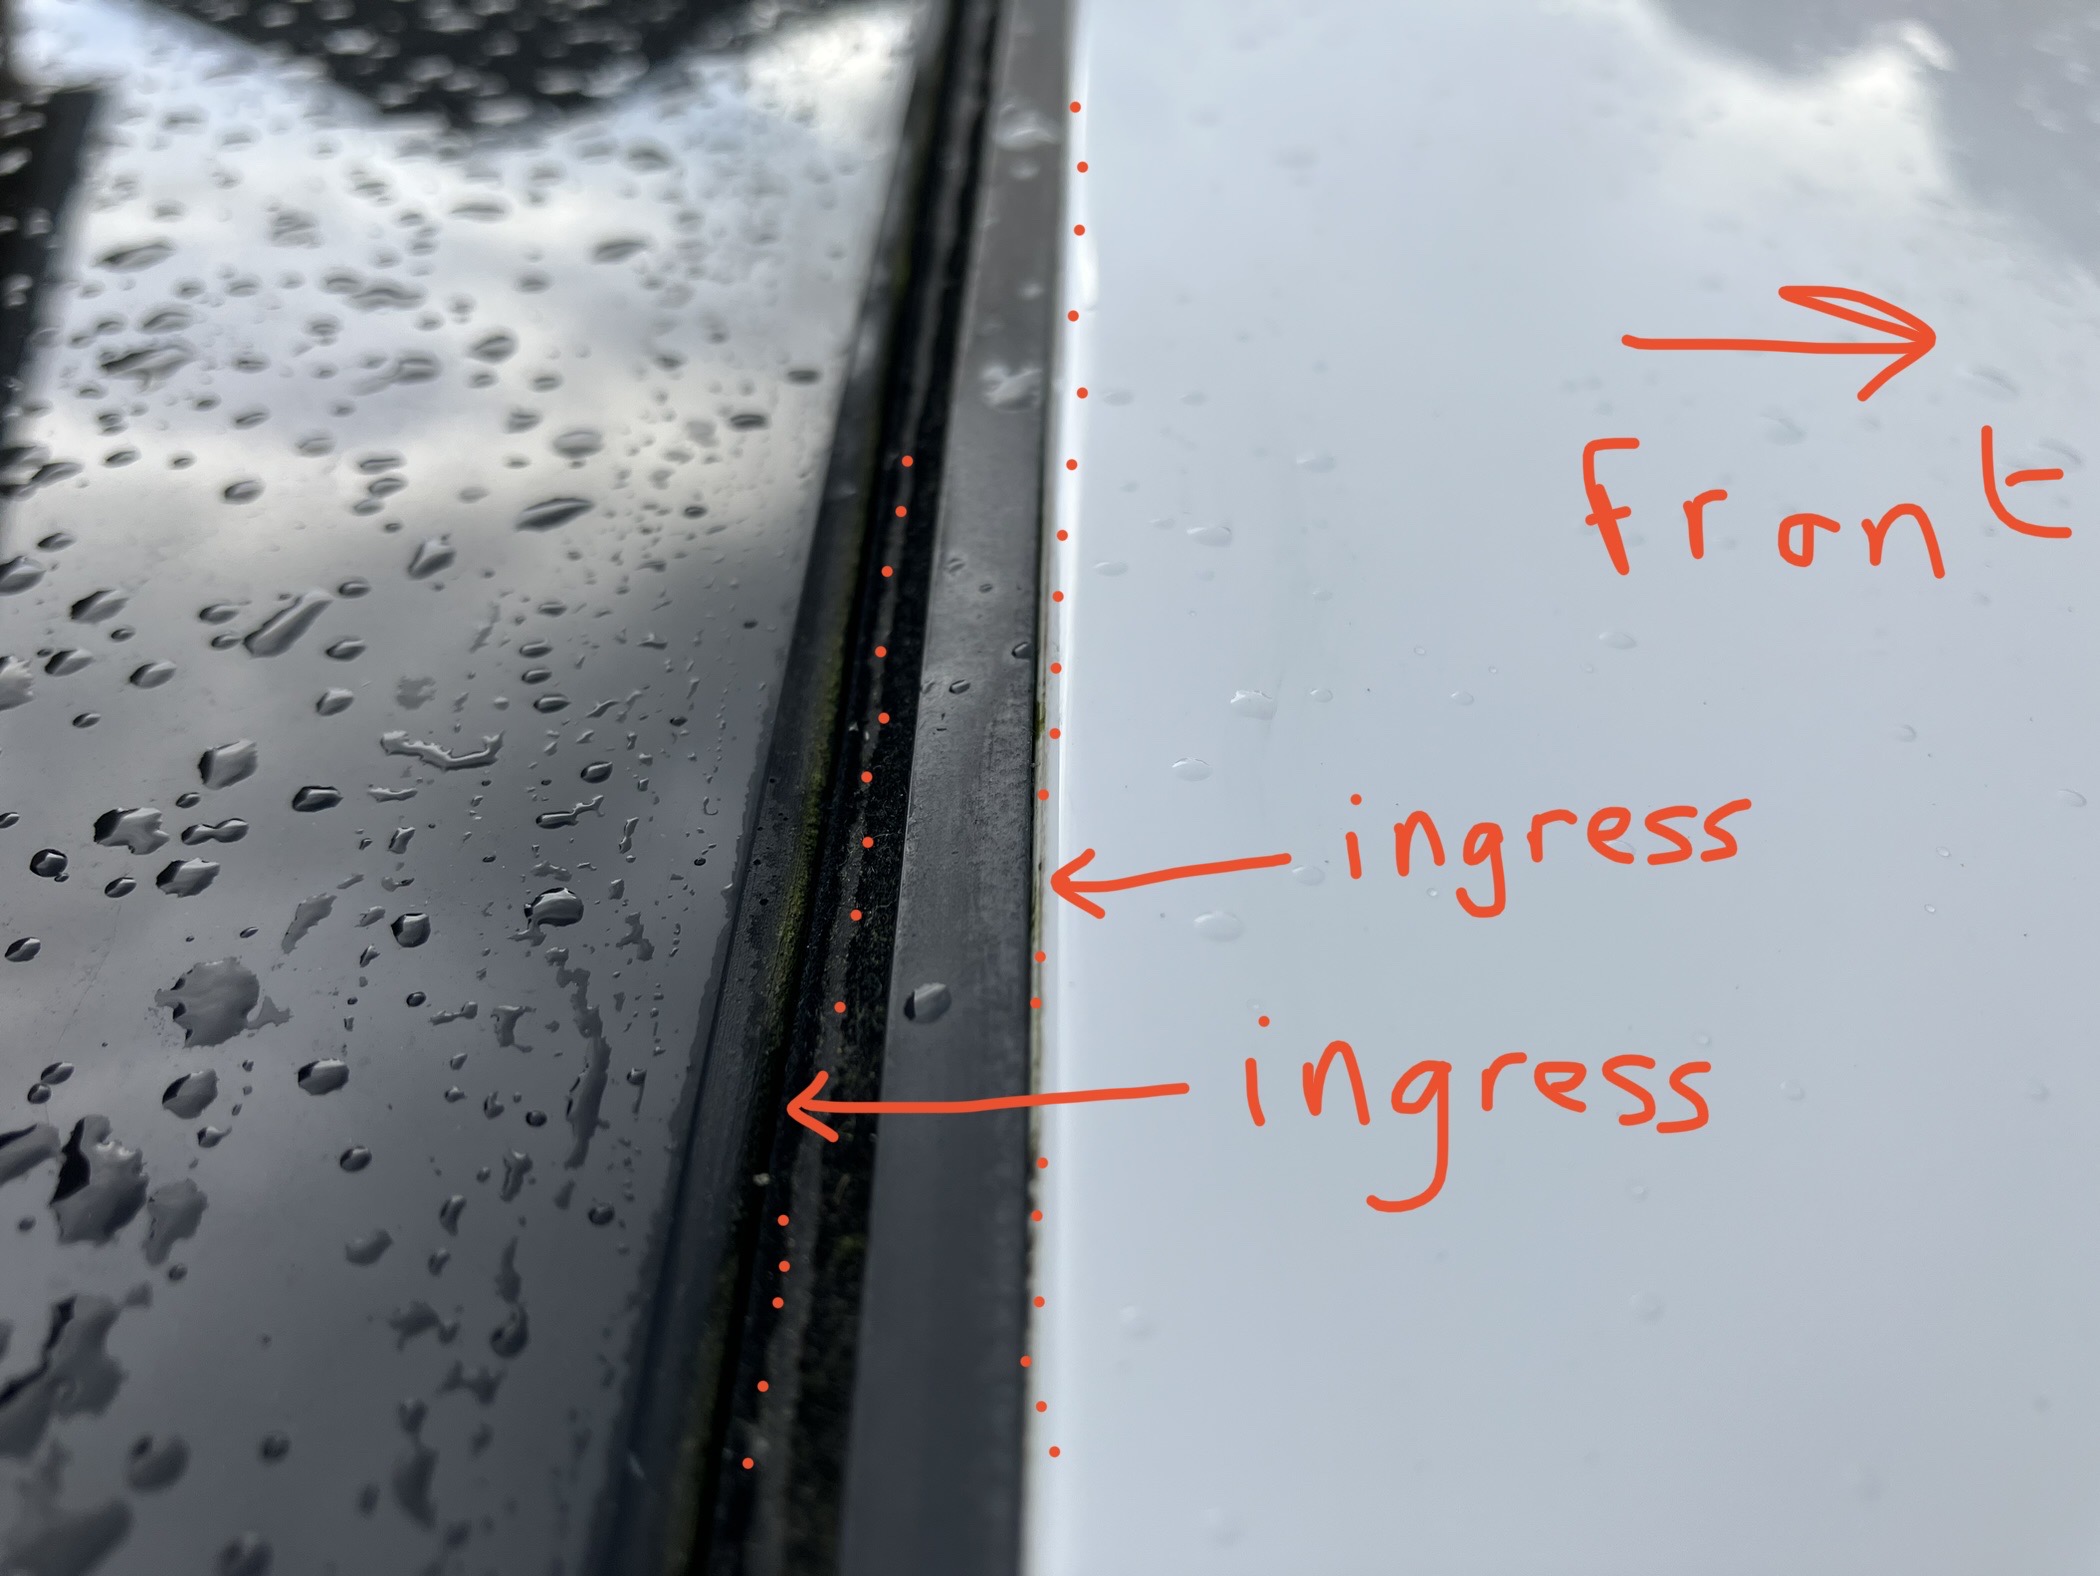
From what I've seen with mine, there are a number of ingress points. 1) Where the plastic front tray overlaps with the aluminium side channels as per the OP's post. You need to remove the wind buffer to access these. 2) The water that comes through the rectangular slots across the front aspect of the plastic tray has nothing to do with the drains. The rectangular slots are physically separated from the main water collection area which leads down the drains. For water to come out of the rectangles, it has to come from: a) an overflow which can happen from blocked drains; b) water which breaches the finishing trim at the front of the glass but doesn't lead into the collection tray (see an earlier post of mine where i have a cotton bud in this gap). 3) There are two gaps which for some reason are designed into the plastic frame. They are at a high level and sit above where most people complain the water is coming in from. If you shine a torch up or down the big crease you tend to stare at, you can see light exiting the other side. The gaps are slots about 1mm wide and about 10mm long. Water can easily seep through them but because they are higher up, I think this is why you tend to see sporadic ingress. it is less likely but not unlikely water in the main channels will find a path across them. I know for sure water is getting in here as on Saturday I applied Tolleys to both gaps on both sides but the had to shut my roof because of a downpour. The white sealant which was in the gaps I described was then displaced by the fresh rain and could be seen on the underside of the large crease. I do not know what these gaps are for, maybe they are breathing holes. Given they certainly let water in, they need sealing. I'm also not sure Tolleys is the tool for this. it's too low in viscosity and takes too long to cure. Super glue is probably a better choice. it's faster curing and doesn't flow so easily. It is more likely to sit at an elevated point and not migrate through it like Tolleys is seen to. 4) At the raised leading edge of the inner plastic-aluminium section, where the inner glass rubber makes its lateral turn, there is another ingress point. Water which has found its way up high can also enter this trap and head below. At the same point, if you lift the rubber, there is yet another slot which you can shine light directly through. I'd take the same gluing approach with this. Given all this entry points, I'd be surprised if any car with a pano roof wasn't wet inside. If you're unaware of the problem, you're unlikely to have sought the knowledge of one of these forums and are likely to think your issue is recent. In reality, water has probably been trickling in to your car for months and years until you see it pooling through your carpet. Given what I've see, I would not have a new cassette as they aren't good in the first place. Same with the seals - they are designed to let water pass, it's just how you dispense of the water once it's under the roofline.
-
Absolutely this is the case. When I removed my headlining, I could see the entire roof, front and rear, was covered in condensation. Once the floor was dried out, the condensation effect stopped. Have you removed your carpets? This is the best way to dry the foam in the peddle area of the footwell which retains water incredibly well.
-
I appear to have inadvertently deleted some of my text. I also wrote: I checked the underside of the opening pane of the roof and the surrounding pane structure. These were wet. This supports the theory that water on the underside can track laterally until it seeps through the gaps mentioned. I’m curious about what @Grantola you propose about the wind deflector exacerbating the issue. With the wind deflector there, it will take up more space and offer more surface for water to sit against. Without it, water would attain the critical mass it needs to break free of a surface and flow towards the drains. Since the deflector sits very close to the gaps, I think your idea has gravity.
-
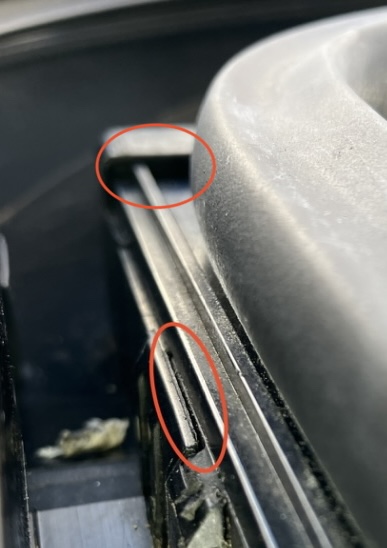
@GrantolaThat is good news. I’m glad to hear your car is dry. Is this an unusual result under normal circumstances? If so, a great sign and evidence to suggest water could be entering from multiple paths. To confirm, you haven’t removed your headlining? My wind deflector has been out for the entire time I’ve had the inner tube repair and is still out. As I saw ingress last night, the wind deflector is not the sole reason it is finding its way through. I ask if you have removed the headlining as it’s much easier to see what’s going on by being able to check from above and below. This morning, I saw a drop on the passenger seat. This is the first indication of water coming in from the NS too. By being able to look upwards, I can confirm it’s the same location as we’ve discussed. I also lay tissue paper across the driver’s seat and steering wheel which were dry (surprising given it hammered it down) but there was a drop hanging ready to fall. If you shine a light upwards you can see the light in the areas highlighted below. Given light can get through (and it’s not a direct path) I now have no doubt this is how the water is entering and landing on the seats (again, with the headlining there, it drops onto the lining and tracks across to the A-B pillars). The gap circled nearest the windscreen is quite large and may also need something physical present to block that route rather than sealant alone. Maybe more rubber, combined with sealant? I’m kinda miffed I haven’t fully prevented it but intrigued by the challenge it presents at the same time. Question is, can I fix it before Christmas as my girlfriend is threatening to throw out my headlining and interior trim so she can entertain 🤣

-
Weirdly, the website is randomly allowing and disallowing photo uploads. These are the areas I’m referring to as potential ingress points and corroborates what you are suggesting @Grantola there’s no way the channels are filling that high that it’s over spilling so guess water is hitting the main inner seal shown to the right of the image where the glass sits and then runs down the path you are suggesting. Though it ’s a big gap at the top, I suspect it narrows somewhat as I previously mentioned, the ingress was slow.
-
@Grantola I’m glad you remarked on this. This is the area I also think water is still coming in to mine. I can’t fathom how though as the water level would either: 1) need to be filled in the channels so high that it can overspill the break in the plastic. When I opened the sunroof last night during a pause in the rain, I found the whole area essentially empty. This suggests it is not filling up and is draining well. 2) water is somehow tracking sideways across the glass until it hits the inner main seal and then down the break in the plastic. I guess since I’ve seen water breach the main outer seal, this is how it’s still getting it. I just cannot understand why it designed this way unless it is to let the structure breathe/aerate etc. Either way, if your car is soaking in these conditions, the path could do with being eliminated, at least partially. Even in extremely heavy rain yesterday, and whilst driving the car, only minor levels of ingress were observed. The amount of water removed from the car, like yours @Grantolasuggest either a slow accumulative effect that we only observe when the footwell squelches or it’s pouring in somewhere. I’m beginning to favour the former though as I’ve driven the car in some pretty horrid conditions since I stripped the interior and water has not poured in. I guess a dribble here and a drop there, with nowhere to go except sit on the floor pan, eventually adds up to litres.
-
@Grantolatrim the ends of the inner tube so they do not interfere with the running channels of the roof. Though it’s not shown in full in the second image I posted, if you look carefully, you can see a taper to the inner tube as it runs towards the corner you highlighted as Mech. Also try to ensure the tube fits fully under the seal and over the seam of the metalwork. The adhesive appears compromised at the front of my roof so water can pass both sides of the seal. If it passes on the front side (closest to the windscreen, see image below) it could miss the inner tube if it isn’t inserted deep enough, and still end up running out of the two rectangular slots (you still have your headlining in so won’t be able to see these). Whilst I’m discussing this, I may as well give a further update for my car. It has been about two weeks since I made the inner tube repair and it has rained quite substantially in that time. I have used the car daily with frequent rain and until this evening, I have not seen any further ingress. Then whilst driving it in a downpour, a drop or two landed on me. I could see where it came in and suspect it is from another opening in the side channels. I’m having trouble uploading the photograph but will try on another post. The water trail was away from the overlap between the aluminium and plastic joint so I still believe it is not the culprit. I have removed the carpet and soundproofing which were largely dry. The heavy insulation on the toe board (pedal area) is still sodden though and will be slow to dry without encouragement. I have blocked up all the air blower outlets into the front and rear footwells apart from those directly above the area the water has collected in the OS footwell. I also lift the insulation when not in the car to promote circulation of air.