Rainmaker
Members
-
Joined
-
Last visited
-
@Evolution13 That poster is a little outdated. Texaco are 99 RON too these days, with their 'Techron' (at least under US branding) PEA based additive. As for Shell and Greenergy's shared facilities, that's true. Additive wise, Shell have always leant heavily on their PEA ('Nitro+'/nitrogen cleaning) content, though Tesco have been less vocal about their own additive package. Shell have also removed focus from their 'FMT' (friction modifier) recently, though the small print shows it's still present. As I'm sure you know, Greenergy (controlled by Trafigura, part-owned by Tesco) supply Tesco, Esso and others. I do have historical spec sheets for V-Power and Momentum 99 (the latest data I could find for them), and the differences are pretty stark. M99 had a higher MON than V-Power (which explains why tuners love it), but a lower olefin/aromatics content and higher oxygenate content (more power, better charge cooling but potentially lower MPG). The old Millbrook report showed injectors and cylinders/piston crowns were marginally dirtier on M99 than V-Power, suggesting Tesco may be relying more on older PIBA/PIBSA/PIBSI type additives rather than PEA. Those other additive types are decent at preventing deposit buildup, but less effective (or ineffective) at removing existing deposits. PEA specifically survives the combustion process, which allows it to remove deposits further up/downstream of the combustion chamber, which is why aftermarket additives with PEA (like Oilsyn Petrol Power DNA, Techron et al.) are so effective, and so many others are basically snake oil with an upper cylinder lubricant.
-
I know, but the forums are littered with folks claiming higher octane gives them more power (it definitely alters feel and torque demand per throttle %) and MPG. While the energy content is similar between grades (depending on BOB/base stock make-up, ethanol percentage and aromatic/olefin content vs oxygenates), the argument/theory is often that the increased knock-resistance allows timing advance to a degree that permits leaner operation and/or better extraction of underlying BTU. On the 2.0 TSI, it certainly can. On the 1.5 TSI, I think my data is pretty definitive. I don't have any 'evidence' outside of my own data, but I'm not trying to present any. My thread and my testing was about octane in this particular engine. I'm not selling anything, and I don't care either way. I did, however, notice a significant drivability improvement and economy uplift while using Hybrogen, so I commented on it. I also found their other product actively hampered economy, which I also reported. When I removed Hybrogen mid-test, leg MPG dropped and tank averages drop back to my historic ~30 mpg baseline. With it added back, legs improve again and tank averages rise back to mid-30s MPG despite ambient temperatures and routes remaining consistent. That lines up with Oilsyn's claims, but I don't care to push the issue — I'm not selling the stuff! That's just what I've found (time and again).
-
Real evidence of what? I don't get the dismissive hand-wavy attitude folks have to things like this. I wondered whether 99 RON would give me any further economy benefit over 95 RON, so I tested identical routes over 11 tanks of fuel/~4,000 miles; and found that for my 1.5 TSI, on my driving cycle, with my driving style (police-trained advanced course tutor) that it didn't. The paired matched-route analysis and deltas are all provided in the dataset, and when I ran analysis (limited by the small sample size) the data was significant to p <0.05, and 95 RON was the overall best fuel for this engine in my use-case. The fact Hybrogen allowed me to extract extra MPG by widening the torque curve and making the torque demand more linear (resulting in more ACT engagement and less transient fuelling events) is a happy side effect, but it wasn't the point of my post. Even if you disregard the additive completely, since it's a consistent presence one can still compare the octane differences across matched routes. Whether unadditised or not, I have found no consistent uplift in economy on ≥97 RON fuels in this engine, though feel did change materially causing a paradoxical MPG reduction due to less elasticity in the throttle travel vs torque demand on the ECU.
-
...which wouldn't have been possible without the increase in power and torque provided by the additive. I already provided the links, you just need to read them. 😂 Queen's University, for example, showed a 12% improvement in economy and a 14% improvement in power. I'm not selling anything, I just found my data interesting and figured others might, too. It's always funny to share a large dataset and have the immediate response be 'Snake oil!' with no analysis, no null hypothesis, no further testing, no counter data — just a hand wave and off we go (I'm not referring to you directly, I'm speaking generally).
-
They do. V-Power is basically polyether amine and inorganic friction modifier, and it's 20ppl more expensive than the cheap stuff. Ditto most other brands. Go actually sell two grades of 95 RON, regular and 'Xtra' (with additive). Or, you can buy a PEA based additive and get the same thing (often with higher effective treat rates ppm) at a fraction of the cost. Same as anything else, really. Unleaded petrol is a fungible good, additives not so much. Either way, I can be quite confident that anything over 95 RON is wasted in this engine for my duty cycle, which is my point.
-
Nobody said it changes effective energy or raises BTU? In fact I specifically suggest that the cleaner, more consistent burn allowed more ACT engagement and less throttle travel, which directly contributed to easier driving and higher overall MPG. If you read the university studies quoted on the tech sheet, the dyno runs show a consistent increase in torque and power across the area under the curve, but especially at the lower end. That makes for much smoother inputs with less transient fuelling events, which correlated to much better economy overall.
-
The fill history table is in the dataset I linked (though it needs tidying). It was mostly Costco 99 with a couple of tanks of M99 where practicable.
-
Hi everyone, I haven't posted on Briskoda meaningfully in a long time. I used to be very active in the Superb sub-forums over the ~15 years I've had Škodas. I've read with interest the many MPG threads on here over those years, and always wondered about my own cars, too. So, I decided to actually put the matter to bed. In my previous Superb (2.0 TSI 220ps DSG) I felt 99 RON gave a power and MPG edge over 95 RON fuel. The BMW X2 20i xDrive that followed it, definitely so! When it came to my 2024 Mk I Kodiaq 1.5 TSI EVO ACT DPCA 150ps DSG SE-L Executive (7 seats, 19" wheels), though? I wasn't so sure. The car 'felt' sharper, but MPG didn't seem much different. I'd never actually tested it, just gone off 'feel' and transient leg/tank MPGs. I decided to log every fill and every single journey(!) over 11 tanks of fuel and 4,000 plus driven miles. I have tested 95 RON, 97 RON, 98 RON (blended) and 99 RON — as well as various additives like Miller's Petrol Power ECOMAX (no difference), Redex Petrol System Cleaner (smoother drive, mild MPG uplift), Archoil AR6900-P Max (large MPG uplift, dull/flat drive), Oilsyn Petrol Power DNA (strong PEA detergent, lubricious — raised MPG floors but introduced a lot of ECU adaptation and 'unsettled' feel, somewhat capped MPG ceilings). Then, finally, I came across Oilsyn Hybrogen Road. Hybrogen is an interesting one, and as soon as I read about it I knew I just had to test it. It is the only additive I've come across that clearly advertises a positive MPG gain. That is, dosed at only 1:3000 (1ml per 3 litres of fuel) it claims to increase torque, power and MPG above and beyond an identical factory-clean engine when used in either petrol or diesel road fuels. Not 'cleans back to factory and restores lost MPG', but actually physically raises MPG, period. It's not a detergent (directly), nor does it affect octane or lubricity. It's a nano-colloid which basically acts as a dispersant, surfactant and combustion modifier. It removes water from fuel (eg ethanol blends), cleans the fuel system, and — most importantly — aggressively homogenises the hydrocarbons in fuel (petrol or diesel) for a consistent and clean burn. That, they say, results in a higher MPG while increasing power and torque across the whole area under the curve. Sounds like woo?... Long story short, my average MPGs (mostly short, urban journeys from cold tested across pair-matched routes and drive cycles) ended up at: Fuel mix Tank average MPG Uplift over baseline Unadditised 95 RON ~30.0 - Unadditised 99 RON ~30 - 95 RON + Hybrogen 37.4 24.67 % 99 RON + Hybrogen 34.5 15 % Hybrogen long term average 36.0 20 % I should add that the 95 RON + Hybrogen tank includes a return trip from Devon to Liverpool. As such, the 99 RON + Hybrogen tank (~35 mpg) and its 15% uplift is more representative overall of the realistic tank average of this fuel/additive mix day-to-day. For example, if you read the full dataset, tank 7 (95 RON + Hybrogen) closed at 35.2 mpg and didn't include a longer motorway leg. However, the long term average (30 -> 36 MPG) includes a fully representative mix of driving in both cases, and the overall average increase of 20% over unadditised baseline stands validated. Fuel mix Urban MPG Pence per mile Unadditised 99 RON ~30 24.0 Unadditised 95 RON ~30 22.7 99 RON + Hybrogen 34.5 20.8 95 RON + Hybrogen 37.4 17.9 I tested by running a tank of X mix first, then took the uplift measurement from the second subsequent tank of the same octane/additive mix, to allow time for ECU adaptation and fuel trims to settle etc. Interestingly, withdrawing Hybrogen (diluting it out of efficacy) caused MPG to regress back to the same ~30 MPG baseline tank average, restoring back to mid-30s MPG once reintroduced on subsequent tanks. I also ran paired matched-route analysis and various other statistical tests on the (large!) dataset, and the winning fuel for this engine in my mixed driving cycle is unequivocally 95 RON + Hybrogen. There was no benefit in 97–99 RON fuels at all (this engine is not knock-limited in regular driving), and in fact they were harder to extract good economy from because the higher octane shortened the torque response vs throttle travel, resulting in a 'hair trigger' and more transient fuelling events. While the numbers might seem outlandishly large, please remember that (1) independent testing — including university testing — on the Oilsyn website shows similar numbers across various engines and regimes, and (2) my uplift came unambiguously from both the additive's direct effect on fuel, and the secondary effects such as the broader torque curve allowing gentler throttle at cruising speed, prolonged ACT engagement etc. Combined, the uplift is what you see above, and it's repeatable. The full (mildly anonymised) dataset and all my notes throughout can be read on Github as a Gist if you're interested. GistŠkoda Kodiaq 1.5 TSI fuel economy: Oilsyn Hybrogen additi...Škoda Kodiaq 1.5 TSI fuel economy: Oilsyn Hybrogen additive test - fuel-test-anonymised.md TL,DR: If your car says Min. 95 RON then — unless you're lapping the Nurburgring at three figures and ten tenths — just save money and use 95 RON (and Hybrogen!). No matter the scenario, from urban short hops from cold, through fully-loaded fast ~300 mile motorway runs up Devonshire hills with 7 people on board while pulling a roof box and hundreds of KG of luggage, 95 RON worked out both most economical (MPG) and cheapest at the pump. Please note I made no money from this testing, I wasn't paid for it, I'm unrelated to Oilsyn or any other fuel additive seller, and I'm just a long-term member here who decided to answer my own question as best I could. This is what resulted from that! Take from it what you will. Personally, I'd never go without using Hybrogen again. Not only does its modest cost (~1 ppl extra) pay for itself and then some, but the annual savings as detailed in the full report are huge (up to ~£500/year at 10,000 miles of mixed driving). Full fuel costs, pence per mile and other metrics are included in the full report/dataset if you're interested. Cheers!
-
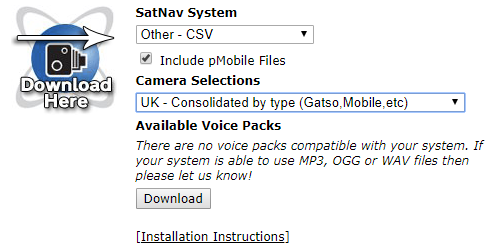
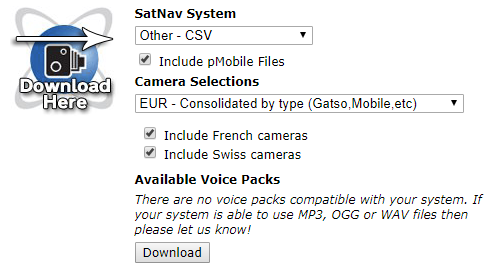
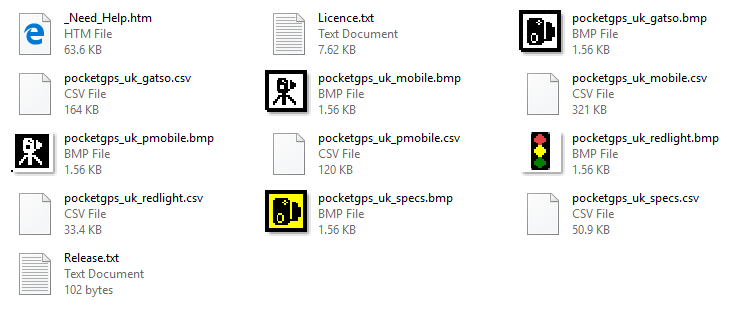
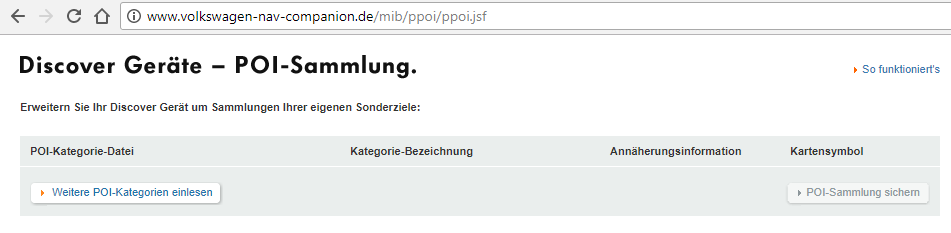
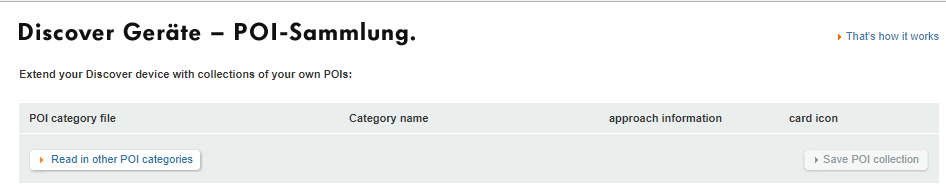
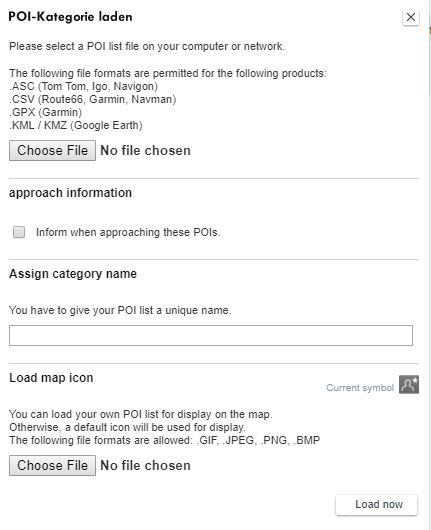
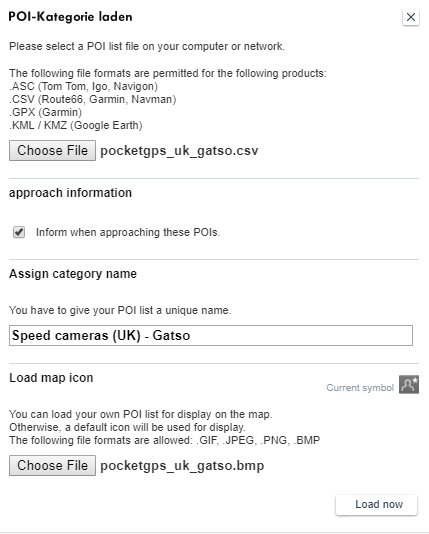
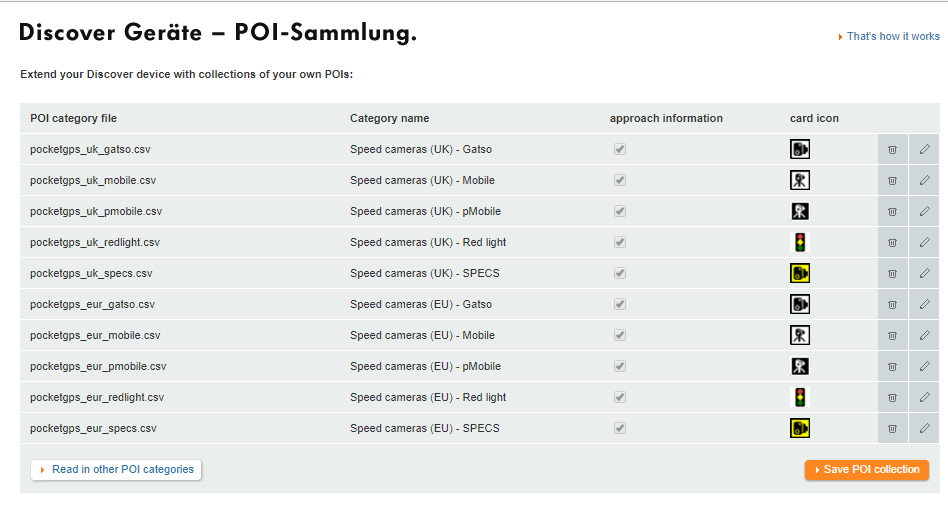
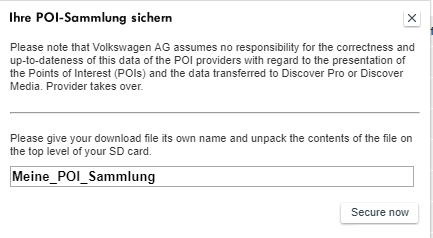
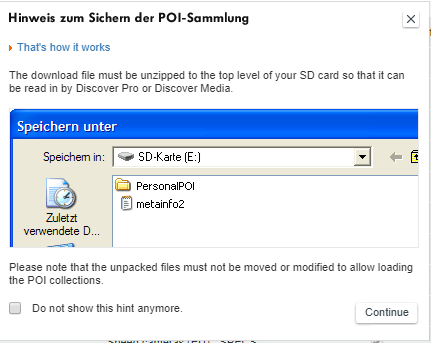
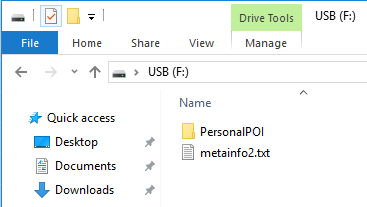
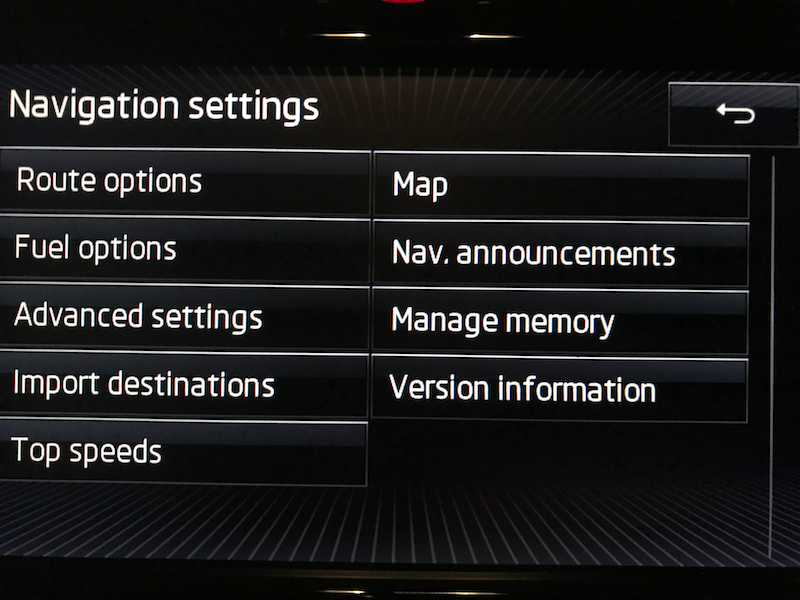
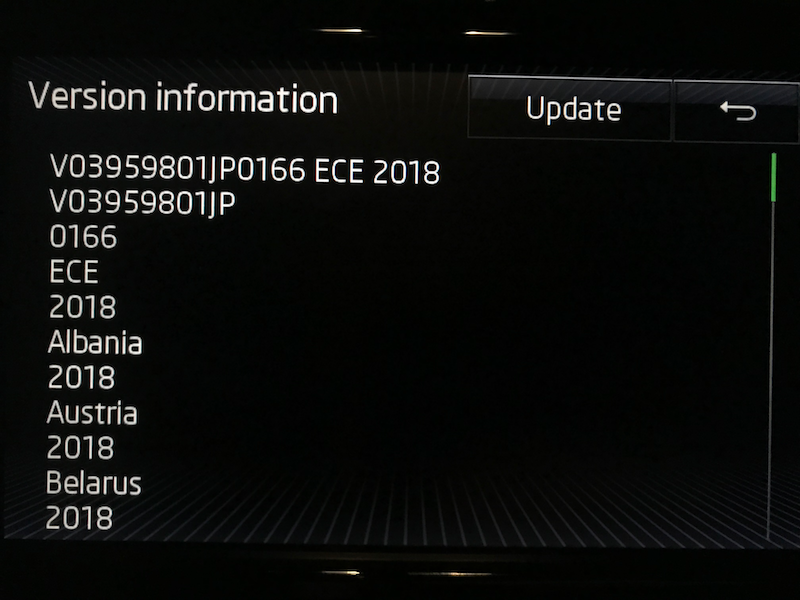
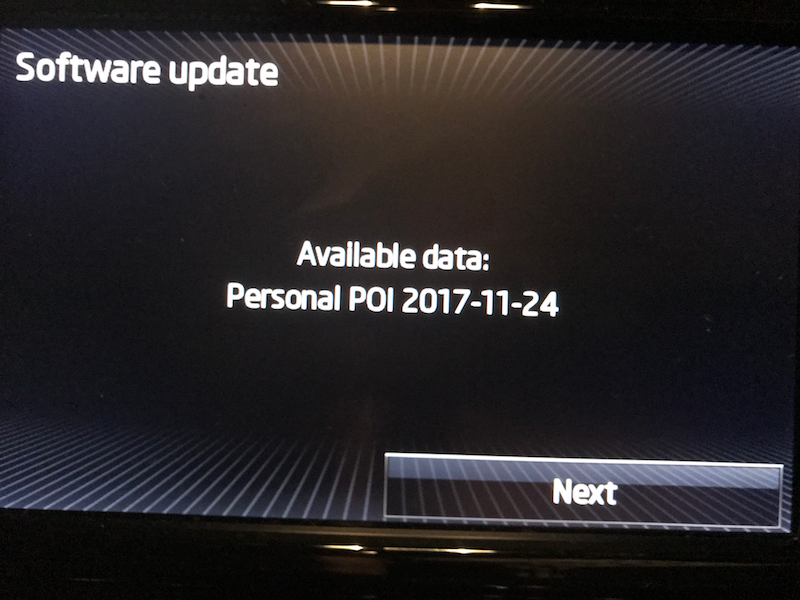
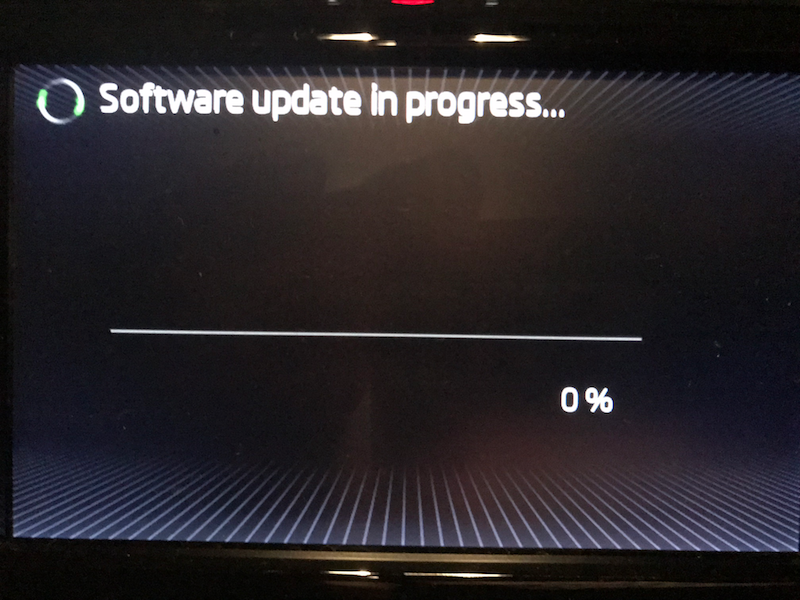
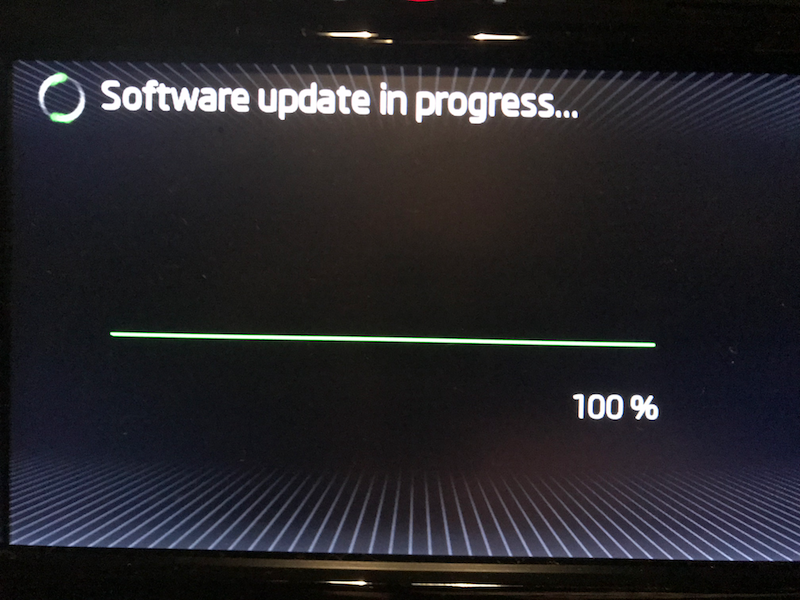
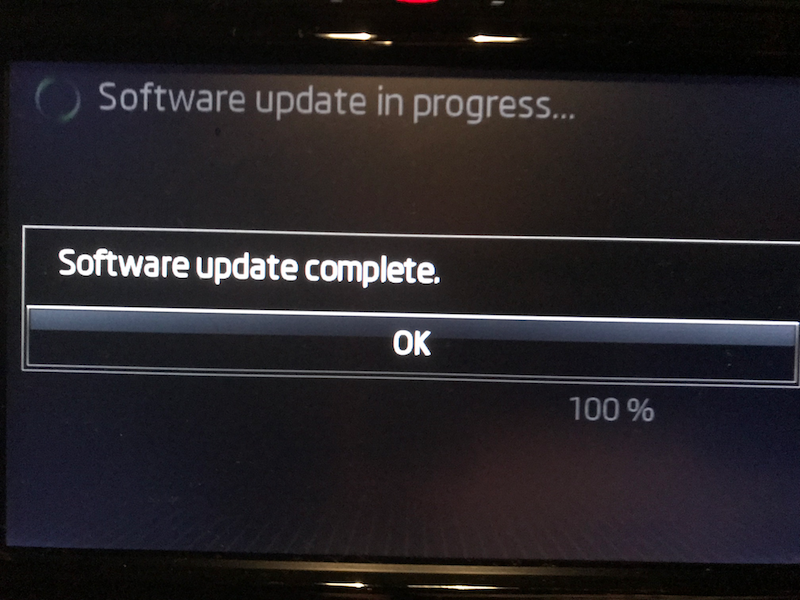
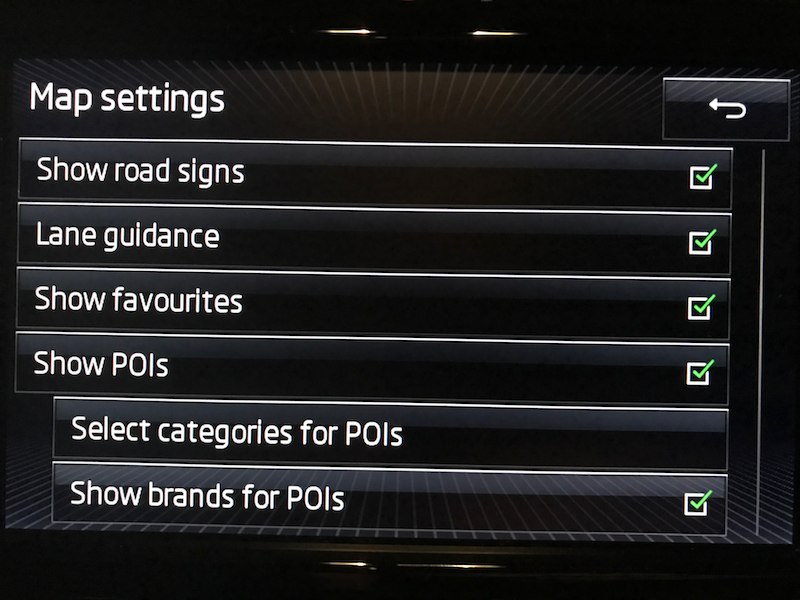
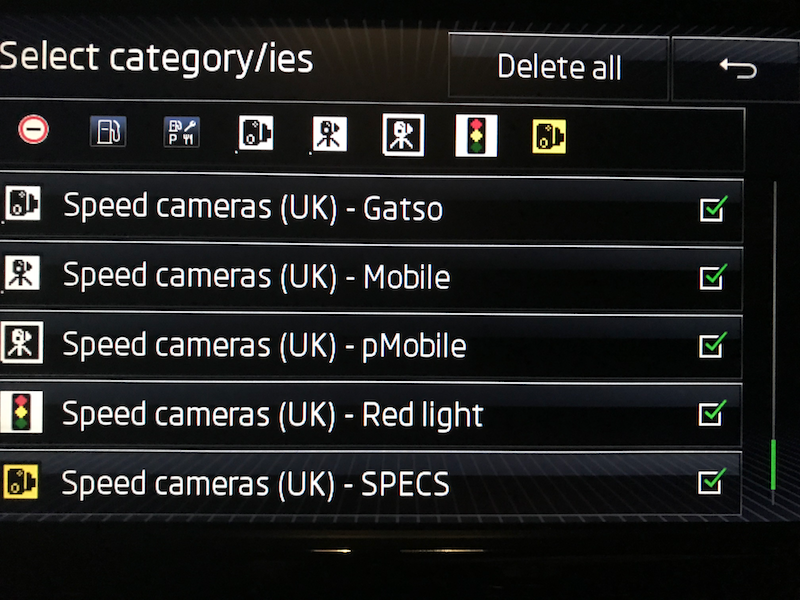
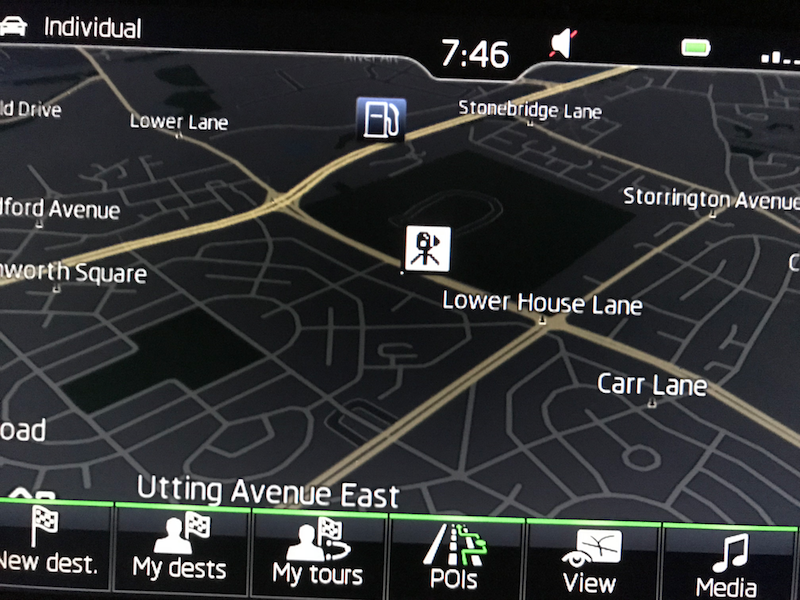
*** AS OF AT LEAST 29th MAY 2018 THE VW SITE LINKED BELOW HAS BEEN REMOVED. THIS GUIDE IS THEREFORE NOW BROKEN. DO NOT FOLLOW THIS GUIDE UNTIL (IF) THIS NOTICE IS REMOVED. *** It's that time again. Rainmaker's decided to write another guide lol... These days speed cameras are everywhere, and even law abiding motorists will occasionally creep over the limit either through momentary inattention, a limit artificially too low for the road and conditions (making it easy to speed without realising) or for any number of reasons. This guide isn't here to debate the legitimacy or necessity (or lack thereof) of speed cameras and speed enforcement. The author has his own views, but they're irrelevant here. Either way, people on Briskoda often ask about whether it's possible to add speed camera locations to the Columbus unit, and if so - how? Here is your answer. Acknowledgement and Introduction First of all, none of this would have been possible without @BillyJim writing his original (wonderful) guide and translating some German for us. Since the time he wrote his original guide, however, several things have changed. You now need to use a different URL (website address) to access VW's POI site, and you also need to substitute their metainfo2.txt file with an older Skoda one for it to work (VW's site updates changed the file and broke compatibility with Skodas). I've tweaked and updated the guide, with step by step screen shots, to hopefully help out the new (or not so new) members who regularly ask about this. Note that although I used Windows to make this guide (we have Windows, Linux, MacOS and BSD machines in our house) the basics are the same across operating systems. If you have any individual queries (eg using Finder instead of Explorer, or using command line on *nix instead of a GUI) just ask away and I'll help you out. So, without further ado, here we go: Prerequisites A Skoda with a Columbus nav unit. A subscription to PocketGPSWorld (£19.99 a year at the time of writing). Some other providers are available, some even free, but none even close to as good or as comprehensive. If you want to skimp and not do it properly, just use an app on your smartphone and save yourself the hassle. A computer with a fairly modern(ish) operating system and browser. A USB drive or SD card. Terminology Columbus: A sat nav / infotainment unit on some (higher end) Skoda cars POI: A 'point of interest'. This is a programmable function on your Columbus which allows you to import marker posts for, well, points of interest. It can be banks, a brand of petrol station, or - helpfully - speed camera locations. PocketGPSWorld: The best database of speed cameras, updated weekly. Hitherto shorthanded as PGPSW. Gatso: A stationary speed camera, rear-facing (it snaps the back of your car as you drive away from it). Often - but not always - painted yellow. Mobile: A classification of camera location on PGPSW. Known and verified 'hot spots' where police are known to site camera vans or traffic cars to use a hand held / mobile speed camera. pMobile: A classification of camera location on PGPSW. Unverified (by PGPSW) 'hot spots' for mobile camera sites, submitted by the user community as and when they come across them. Due to the nature of 'mobile' it's obviously impossible to retrospectively confirm the sighting, but as mobile camera sites are often (usually?) reused by law enforcement, the community works on trust and adds these sites to the camera database. Subscribers have the option to include this category in their weekly database download, or not, depending on their preference. I recommend you use them. Red light: A camera at ATS (traffic lights), used to detect people going through the light 'on red'. Nowadays often also combined with a speed camera. These combined red light / speed cameras are often called 'speed on green' cameras, and can be referred to as 'RedSpeed' cameras on PGPSW. SPECS: Variable speed limit cameras. Contrary to seemingly popular belief, these don't actually snap your speed as you pass them and decide whether or not to issue a ticket. There will be one or more pairs of cameras through a variable speed limit zone (eg roadworks, variable limit 'smart' motorway). Some or all of these pairs will be 'live' and will be the ones doing the actual detection. Basically your reg is snapped at live camera 1, and again at live camera 2. Since speed = distance / time and the distance between the two cameras is known, it's easy to then work out your speed based on the two times you crossed the cameras in question. You can't slow down as you pass each camera and then speed up again, as so many seem to do on the motorways - you will get a ticket. Getting the database First go to the PGPSW website and log in. If you don't have a valid subscription create your account and then pay the £19.99 to access the camera database. Go to the blue 'Speed Cameras - Download Now!' tab across the top of the site, and then click 'Download speed cams' under the date at the top of the menu that appears. The date is the last camera database update, and they roll out every week. You will need to go to the options just below the headers/menus across the top and choose your camera database. Set the 'Sat nav system' option to 'Other - CSV'. Then in the next box choose your camera type. We'll focus on UK here but you can grab whatever you like. Note that the Columbus has a POI limit. You can load as many into the unit as you want, but can only display half a dozen at a time. My preference is to get UK and EU cameras (two separate downloads), sorted ('consolidated by type'). That means you get a database listing gatso, mobile, pmobile, red light, SPECS cameras as separate entries on your Columbus unit, with different icons for each. This makes it easy to drive cross-country on back roads with the sat nav open and zoomed out, and be able to see at a glance what's coming up in the next mile or two camera wise. Because of the Columbus display limit it means you can only display UK -or- EU cameras doing it this way. That's no hardship though as you don't drive in the UK and the EU at the exact same time (yes, I know, but you know what I mean...). Switching them over takes seconds, so no hardship. Your other option is to take the cameras as a single file. This means you'll get all UK (or EU, etc) camera sites but they aren't sorted by type. You'll simply know there's 'a camera' ahead, but not what it is. Your call. Once you've decided which database type you want, and set the two options, click Download to have your browser download the files to your PC (or Mac, or whatever). One thing to note - and it's explained on the page at PGPSW - is that in France and Switzerland it's illegal to display 'speed camera locations'. You are allowed to display 'accident hot spots' though. Police do sometimes check, and if they find you with camera alerts, it's an on the spot fine! So for EU cameras, you have a specific tick box to choose to have those countries or not. Personally I tick them, but use a hazard icon instead of a camera icon for them... More on that shortly. Once you have your file (or files), you need to extract them on your PC. They are in .zip (compressed) format. All modern operating systems understand this natively with no need for extra software. Windows Explorer, macOS Finder etc all understand 'zip'. You may also already have 7Zip, WinZIP, WinRAR or other archive software which does the job. Either way, right click your file(s) from PGPSW and choose 'Extract to [folder name]' and they will unzip into a new folder next to your original zipped download. You will see the new folder contains all the camera database files (CSV files) and some handy icons for the Columbus (BMP files). I've also (13/3/18) added some newer images (see end of post) which look really smart on the Columbus display. You may use either, or a mixture - it's up to you. Converting the files so the Columbus understands them Now we need to visit VW's website. Skoda has a POI page but it's very broken, has been forever, and they refuse to acknowledge it. It's German, but don't panic! You can easily follow this guide as it's actually just a bit of button pushing. Google Chrome browser will actually offer to automatically translate the page for you, so if you use that you're golden. If not just follow my pictures. Now to the business end of things. Click the button on the left (Read in other POI categories). It will open a box that allows you to upload your database and image file(s). Click the top 'Choose File' button and choose your UK camera CSV file. If you have - like me - chosen multiple database files 'consolidated by type' then start with the Gatso file (it's the first one in your file chooser window). After choosing the CSV file, make sure you tick the box underneath to 'Inform when approaching these POIs' if you want the Columbus to beep as you approach a camera! It's actually a bit useless in a way, as it will beep for a camera on either side of the road (Columbus doesn't support directional functionality) and it can beep rather close to them giving limited - though still very workable - time to slow down on approach. Still, better to have it than not imho. Your call again. Assign a category name. I use 'Speed cameras (UK or EU) - Gatso (or SPECS etc)'. Click 'Choose File' under Load map icon' at the bottom of the box, and now choose the right icon file. This will be gatso.bmp for the Gatso database and so on. If you have a single camera database just use the provided camera icon, or else the 'hazard' warning triangle I have attached here (especially for those pesky French and Swiss 'accident blackspots'! ;)). You're done - or at least for this one if you have multiple databases/camera types to add to the list. Repeat the steps above for any other database files you may have (camera types, different countries etc) until you have all your desired POIs listed on the site, like this: Now click the orange button on the bottom right to 'Save POI collection'. A box will pop up in German giving you a default file name, and the chance to change the text before you save the file. I just leave it as default but you can change it if you wish. Either way, when you're ready just press the button at the bottom right to proceed. Another final pop up confirming your file will download. Just click the button on the right to continue to the download. Now your browser will download the converted Columbus friendly POI files. This only takes a moment or two as they're actually very small files. The format is one text file called metainfo2.txt and a folder called PersonalPOI. You need to delete the metainfo2.txt file, as it's designed for VW cars and won't work on your Columbus. Your attempts to add them would just fail. Once you have deleted that metainfo2 text file, you can substitute the Skoda friendly one at the bottom of this post in its place. Just click it to download, and put it next to (NOT INSIDE!) the PersonalPOI folder. You can now copy these two items (metainfo2.txt and the PersonalPOI folder) to a blank USB drive or SD card, plug them into your car, and upload to the Columbus. Your USB drive or SD Card can be in many formats, but FAT32 and NTFS both work OK. Adding (or updating) the POI in Columbus Finally just plug the USB or SD card into the car. Start the Columbus unit (or turn on the ignition). Go to Nav and click the Settings cog. Go to Version Information and press the Update button. The car will search and find your files on the USB / SD card and load them onto the unit for you to decide whether to use the update or not. We want to do just that. Ignore the date (it will quite possibly be wrong sometimes, but it won't affect your POI upload or the fact the camera database is up to date). Just click Next. Once it's finished (this will take a moment or two) click OK. You can then go back into the nav settings cog and click Map, and tick the box to show POIs. Next click 'Select categories for POIs' and tick the relevant camera POIs to be displayed on your Columbus. For example in the UK choose your single UK cameras POI, or all the separate UK camera POIs as necessary. Then you're done! Use the back arrows to get back to the main nav screen (basically going through the above menu process in reverse). Your POIs may not show immediately - don't worry if that's the case! They will show up shortly, and may even need the ignition cycling and a short wait before they're all parsed and loaded. They will load though, as long as you've followed the above steps. Please note that if you also use other custom POI categories (a favourite fuel brand not already included in Columbus' defaults, camp sites / caravan parks, a supermarket chain, whatever) then these will need to be re-added with each update, as well as the speed camera POI files. Essentially, Columbus wipes the entire custom POI dataset and overwrites it with your 'new' data each time you run an update. So, you can't just update the speed cameras as you'll 'lose' the other POIs when you do. As such you'd need to also re-add your other POI category/categories in with your weekly camera update files. That's about it. If you have any questions or problems, just post below. Have fun, and drive safe! ADDENDUM (21/3/18): User @wombatek has requested that I add a link to an alternative (free) service aimed specifically at Columbus/Discover users; the Radar Database. The website is again European based, and allows visitors to download a ready-formatted set of POI files. As with the VW site listed in the guide above, you may wish to visit this site in Google's Chrome browser to take advantage of the auto-translate option. The site is straightforward to operate without this, however. The cameras in the provided database are mostly static and from European sources, but surely better than nothing if you don't wish to - or can't - pay for a PGPSW subscription at the moment. Simply tick the box next to the Union flag, tick the box at the bottom (to enable warning sounds on approach), and then click the left-most of the two big download buttons to get your files in .zip format. Unzipping this archive gives the usual folder and metainfo2.txt ready to go onto a USB or SD card to update your Columbus unit as per the guide above. I haven't yet tested this so don't know whether you'll need to replace the metainfo2.txt file with the one attached to this post. If you test it before I do, please drop a reply at the end of this thread. Untested and unverified, so as always YMMV. CLICK THE BELOW METAINFO2.TXT LINK TO GET THE NECESSARY REPLACEMENT TEXT FILE, AND THE HAZARD WARNING ICON IF YOU WANT FRENCH AND SWISS CAMERAS FOR EU DRIVING. metainfo2.txt