BigJakk
Members
-
Joined
-
Last visited
Everything posted by BigJakk
-
Hello all, I was just wondering if anyone has had any experience taking out 'small claims' type civil claims in regards to pothole damage to their vehicles. Long story short, I work on an industrial estate where the access roads, whilst publicly accessible are not adopted by the local authority. The roads are not well maintained at all and for the second time in just over a year I have struck a pothole which has caused instantaneous deflation of the tyre and damage to the alloy wheel, which has buckled. The buckle is on the outer edge of the wheel and cannot be repaired. I don't particularly want to make an insurance claim through my insurer given the implications of that and to keep costs down I am on sourcing a second hand wheel to mount the new tyre to. However, I cant help but feel a bit aggrieved by all the hassle and outlay on this. I am aware that other vehicles have suffered similar damage on the same pothole in the days after my incident, and it has now been filled in which to me is confirmation that the road surface was defective. I have the incident where the damage was caused to my vehicle on dashcam as well as 'daytime' dashcam from the next morning showing the pothole more clearly. I have attempted twice to contact the property management company who are responsible for the site in writing, however had received no response almost a week on. Out of frustration, a bit of google has led me to the HM Courts and Tribunals 'Money Claim' which seems to deal with such 'small claims'. I've been through the online eligibility tool and this seems to suggest that the circumstances seem to fit their service, however I just wondered if anyone on here had had any experience with it and could advise if its worthwhile? Thanks in advance, Cheers
-
Top tip on tne accessory catalogue. Ended up getting back onto the dealer. The guys on the phone weren't clued up to it but once I finally.managed to get to someone on the parts desk they were aware of the 'Accessory Catalogue' They managed to get them to find the part number from the 'Accessory Catalogue' which came in at £230. The only caveat is it's coming from Czech Republic so they reckon the lead time will be a couple of weeks. The OEM part would have been available in a coupleof days apparently, but £640+ was just too eye watering for me. Cheers guys 👍
-
Thanks Carlston, I'll try running that past the local dealership tomorrow, see how I get on. My current ones are anthracite so looks like they're still in the catalog If there's no joy with the dealer, Ive LLLSpares online who stock them, has anyone had any experience buying from them by any chance? Cheers
-
Hello folks, Have had a stressful morning st the tyre fitters who advised theh can't get a wheel to balance and think it might be buckled. Taken Offending wheel to a nearby repairer who have confirmed it's got a very slight buckle which can't be repaired due to it'd location. I've rang Skoda who've quoted £600+ for a new Gemini. Had a look on Ebay and there are a few but none local and all look rough and om wary of getting one used to find a similar issue. I wondered it anyone on here was aware of any decent replicas for the Gemini design that might be a touch cheaper? Cheers
-
Hello folks, The individual driving mode allows setting of different 'Engine Sound' modes from Eco-Sport I actually quite like the sport Sound however the dashboard vibration from the soundaktor is very annoying. I've set it to Comfort, which eliminates the vibration/rattle but the engine sound is much less noticeable. I just wondered does anyone know if these settings affect anything else or is it just the soundaktor - (I dont think there is anything active in the exhaust on these cars) I was considering getting obd11 and deactivating the soundaktor and then putting the Engine noise setting back into 'Sport' but if the only thing this setting is changing is the soundaktor I may as well just leave it in comfort. Cheers
-
Update from my mate earlier in the week that the SOS was going off pretty much every journey and the infotainment was taking forever to load up. He's been in to Skoda today who have applied some updates and replaced an antenna and this appears to have fixed the SOS and infotainment issues. He has now been able to connect to the car using the Skoda app, however as he only has one key cannot become the primary user and smartlink is still showing as "not available" He's been quoted for a second key, but isnt particularly bothered about having two keys unless it will fix the smartlink issue. Just wondered if anyone knows if two keys/becoming primary user will fix access to smartlink or is it like on older models where there is an additional fee required to activate smartlink thereafter? Cheers
-
Roger dodge - I've let him know, see how he gets on with them. Cheers 👍
-
Thanks 👍 It's only a small triangular slit in the boot seal and a area about an inch or ao long on the drivers door sill where it looks like the previous owner has kept scuffing their foot against it getting in/out so was thinking application using a needle or toothpick or similar would probably work and saves leaving an unsightly mess all over the seal. Cheers
-
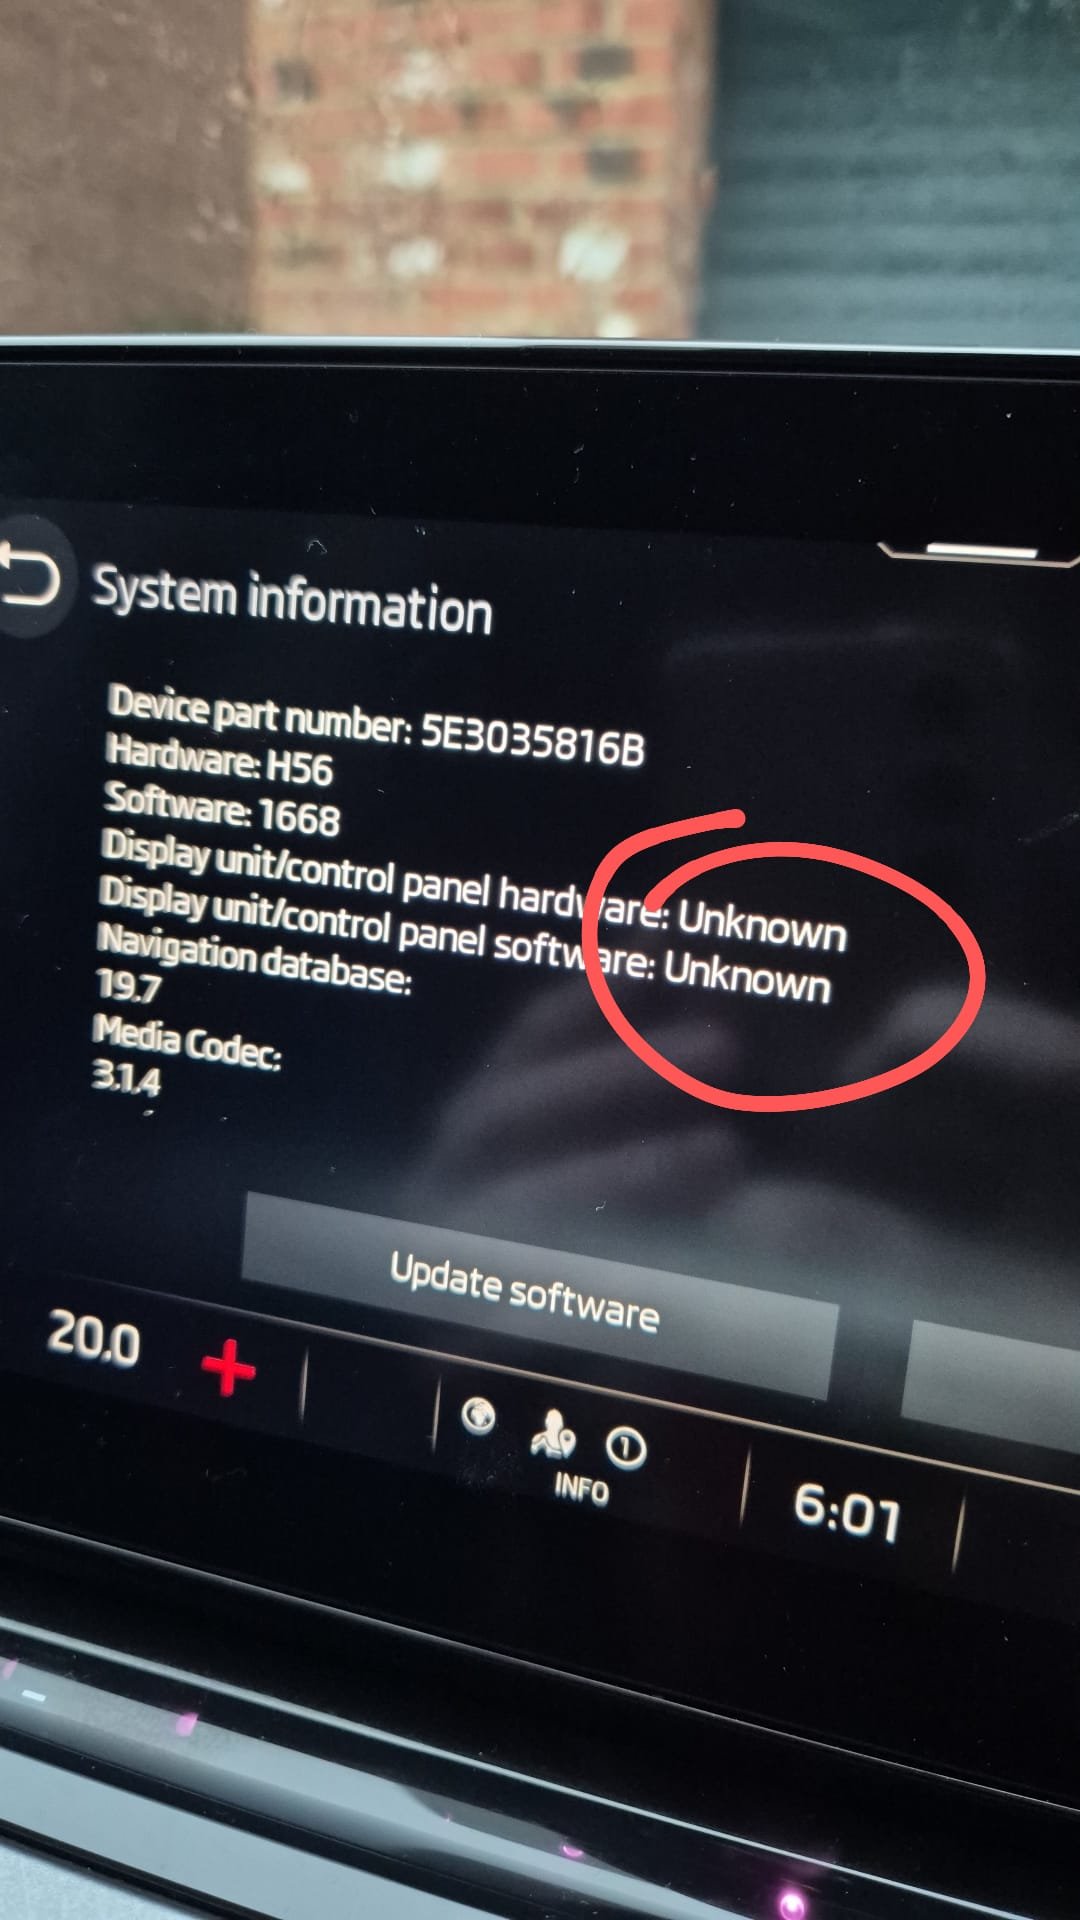
Hes still having no joy with it, he has managed to get the car setup with the app and connected to his home WiFi. When he tries to link up the app to the car the headunit shows "Sorry unable to load your settings" He's tried searching for updates but it just sits spinning for ever showing "Searching for updates" He's sent the "Software Information" screen through, which is attached below. I'm no expert on the MK4 but it looks like it's quite an old version and some of the software versions are showing as "Unknown". Interestingly, he's had the SOS button 'pop' while yes been driving about today -- can't help wonder if they are related. Cheers guys
-
Before I took mine in I considered just deleting the resr wiper as I know they go wrong time and time again, however the washer pipe on the hatch seems a bit of a headache as to what to do with it, didn't fancy inadvertently giving the inside of the boot a wash down one day 😝
-
Hello folks, The missus recently picked up a new (to her) Focus, over time we have noticed that there are a couple of small nicks in the door rubber seals on the drivers door and the boot hatch. They're quite small and there is nothing to suggest they are leaking or anything - so it doesn't justify going out and buying new seals at silly expense, however im conscious that if left they will only get bigger over time. I was wondering if anyone could recommend a sealant or rubber cement type product that is suitable for the job of closing them up and is good for quite fine application that wont look too obvious - if it looks too obvious and unsightly I'll end up getting told off! Cheers
-
Hello Folks, Apologies for a lack of detail, but I am asking this in behalf of a friend who picked up a 2022 Mk4 1.5 SE Combi yesterday from a used car dealership. On his way home in it he's tried to use the android auto however when trying to access SmartLink he just gets a blank screen with "SmartLink: This Function is unavailable". I know on some of the earlier iterations of Smartlink in years gone by you had to pay an activation fee for Android Auto/Car Play through the dealer but thought this would be a standard thing nowadays without an additional cost attached? It seems the garage havent reset the headunit as it still has the phone book in there from the previous keeper, so I've advised him to do a factory reset of the infotainment and register himself as the primary user for the vehicle and then repair and set up his phone. I'm about 30 miles down the road so trying to help from a distance which is a bit awkward - just wondered if anyone else had encountered the same issue and could offer any suggestions? Cheers
-
Just in case anyone else should have this issue -- I managed to get it replaced under Skoda Approved Used Warranty free of charge, suggesting that its a warranty-able item. As per Phoenixboys comments, I initially dook it to DSM in Middlesbrough who were useless and couldn't replicate the issue. Ended up going to the dealership in Darlo with it and they sorted it and another issue out no issues at all. Cheers
-
Just in case anyone else should have this issue in the future and come searching here, the lighting unit within the door trim needed replacing. I still had some Skoda approved used Warranty cover left on the car and they approved this as a warranty repair so I managed to get it done free gratis 😀
-
It seems we have a similar scepticism when it comes to main dealers. I've got access to a diag tool so will have a look before it goes in, even though they'll insist on doing it again if it does go in. While it does look quite snazzy it's not the sort of thing I'm inclined to spend an arm and a leg on to sort out -- struggling to find much in the way of DIY for it, a couple of folks on here and the Golf forums complaining that they've had them pack up too and sounds like a full door card off job. Cheers
-
Hello folks, Noticed the other day that the interior ambient lighting on the rear nearside door card isn't illuminating. All the other interior lights, including the other three door strips are okay so I'm assuming it's not a fuse. I've tried changing the colour setting in case it's just a particular colour gone on the LED strip but no joy. I think the LED strip itself.must have died. Car was bought with approved used warranty so I've booked it in to be looked at howevet got the warning of "if it's not classed as a warranty item you'll be charged £140 diagnostic before any repair". My understanding is that electrical items are included under the warranty but just wondered if anyone had had any similar issue and been able to get it done under warranty as I don't really fancy getting stung over a little led strip. Cheers guys
-
Arrived in the post the other day, the phone was struggling to connect to it via Bluetooth at first but clearing Android Auto's cache data and rebooting the phone did the trick. Only used it on a couple of short journeys so far but seems to be spot on. Connects quickly, no connection or audio drops or anything - no discernible difference from the cabled connection. Thanks for recommending it, saved me a few quid. Cheers
-
Cheers, thanks for posting the link -- that's considerably cheaper than the motorola device so I've taken a punt on it. If it's a bit hit and miss it can always go in the missus car. Cheers
-
Thanks, Adaptors and dongles always seems to me, no matter what the application, they always seem to throw a wobbler once on a while. The Motorola one, while a bit more expensive than some of the other amazon options, seems to have been developed in conjunction with Google which was the main reason for considering it so glad to know it's compatible. Cheers 👍
-
Hello all, I know this is peak laziness but so as to avoid having to plug the phone into a cable every journey I am thinking of purchasing the Motorola MA1 Android Auto Wireless dongle for my Mk 3.5. I've had a nose about online but cant seem to find a supported vehicles list for the device, so just wondered if anyone on here has used them with success? In particular im concerned that it might be a permanent draw on the cars battery if left plugged in, which then kind of defeats the object of buying the thing. Cheers
-
I did consider giving the dealers at Monte Darlo a ring, just to see if they could get it done a bit quicker, might give them a buzz. I agree with the Warranty sentiment - I usually like having a crack at stuff myself - but when the warranty is technically included as part of the purchase price of the car, seems daft not to use it I generally have nothing to do with main dealers - I've got a back street fella does servicing stuff, while Vasstech are pretty good locally for any specialist jobs - although they are quite keen at "finding issues" when you take it in for other things and did quote me £400 for front discs and pads only on my last one which I had a good chuckle at.
-
One of the many mods I did on my MKI VRS (loved that car) was to fit R32 Aero Wiper arms. As above, I wouldn't be hitting anything with a mallet/hammer or using spanners or screwdrivers as levers given the proximity to the windscreen, especially the rear wiper spindle. Penetrating fluid (proper stuff, not WD-40) applied copiously and left to sit overnight is your friend. In that case I had to use a wiper puller to get the old arms off, the one I used was from Laser tools and had "claws" that gripped the backside of the wiper. https://www.lasertools.co.uk/Product/4751/Wiper-Arm-Puller It was crap - It ended up gouging and making a bit of a mess of the metal of the wiper arms - wasn't a concern to me at the time as they were being replaced, but if I were putting them back onto the car I would have been narked, Based on that experience, I would suggest trying to get a tool that has a flat duckbill/crowsfoot design - similar to a ball joint separator - to spread the pressure on the wiper arm. I would also suggest trying to get something between the tool and the wiper arm (bit of card or a microfibre or something) to protect the wiper arm. Not so much for this case, as it seems the wiper spindle is integrated into the motor, but another tip I've seen for taking wipers on and off is to reattach the nut so that it sits just proud on the spindle, so that the thread on the spindle doesn't get mushroomed by and force applied to it during removal. Best of luck 👍
-
Appreciate the heads up -- im definitely gonna replace it one way or another, I've read a few bits from people now who've 'refurbed' them but it hasn't lasted long as per KD's post. Hopefully I can just get it done under Warranty next month - im hoping it deteriorates and becomes a more persistent fault by then, as we all know what dealers are like with their "diagnosis" of faults -- if its intermittent, they'll claim they cant find anything wrong and ill get stung for it. Hope you get sorted out with Autodoc 🤞
-
Cheers -- hadn't even thought to look on there 👍
-
Will keep my eyes peeled for you KD 🧐 Rodders, out of interest whereabouts did you source a replacement unit from and roughly how much are they? I've seen all sorts on ebay ranging from 40 quid up to about 200. My issue is very much an intermittent issue at the moment and I did baulk a bit when the dealership said if they cant find an issue, or they do but it isn't covered by warranty then its £140 quid for the "diagnosis" alone -- pfffffft! I don't have much faith in dealerships - I've got a good few weeks before the appointment but if it doesn't deteriorate any further and become more of a persistent problem before then I might just source a replacement myself as I don't trust th4e dealer to say they couldn't find anything wrong when they looked at it and biff me for the 'diagnostic' charge.