phs12
Members
-
Joined
-
Last visited
Everything posted by phs12
-
I'm thinking I might get the TRW GSK1512 kit from Autodoc as they have the gliders in (cheap) as well. They seem hard to find in the UK and if I have to order separately from a dealer, I'd have to drive or pay an additional postage charge. I've emailed a local motor factor to ask if they can source the TRW kit but doubt they'll be price competitive even if they can (even with Autodoc's £8+ delivery charge).
-
Must be ok then.
-
I've seen on videos a small amount of grease being applied to those gliders but wonder if that could be counter-productive as it might attract brake shoe dust and an anti-slide effect?
-
Can't help @roguegoblin but could I ask where you bought your pre-assembled kit from, as I want to buy the same for my Mk2. I've seen a TRW one on Mister Auto and Carparts4less have a Pagid with £10 off when you spend £50+. It appears to be the same kit as for the Mk1.
-
Just because several threads on here suggest it makes the job easier. You obviously disagree.
-
I think you meant item 8 @Breezy_Pete
-
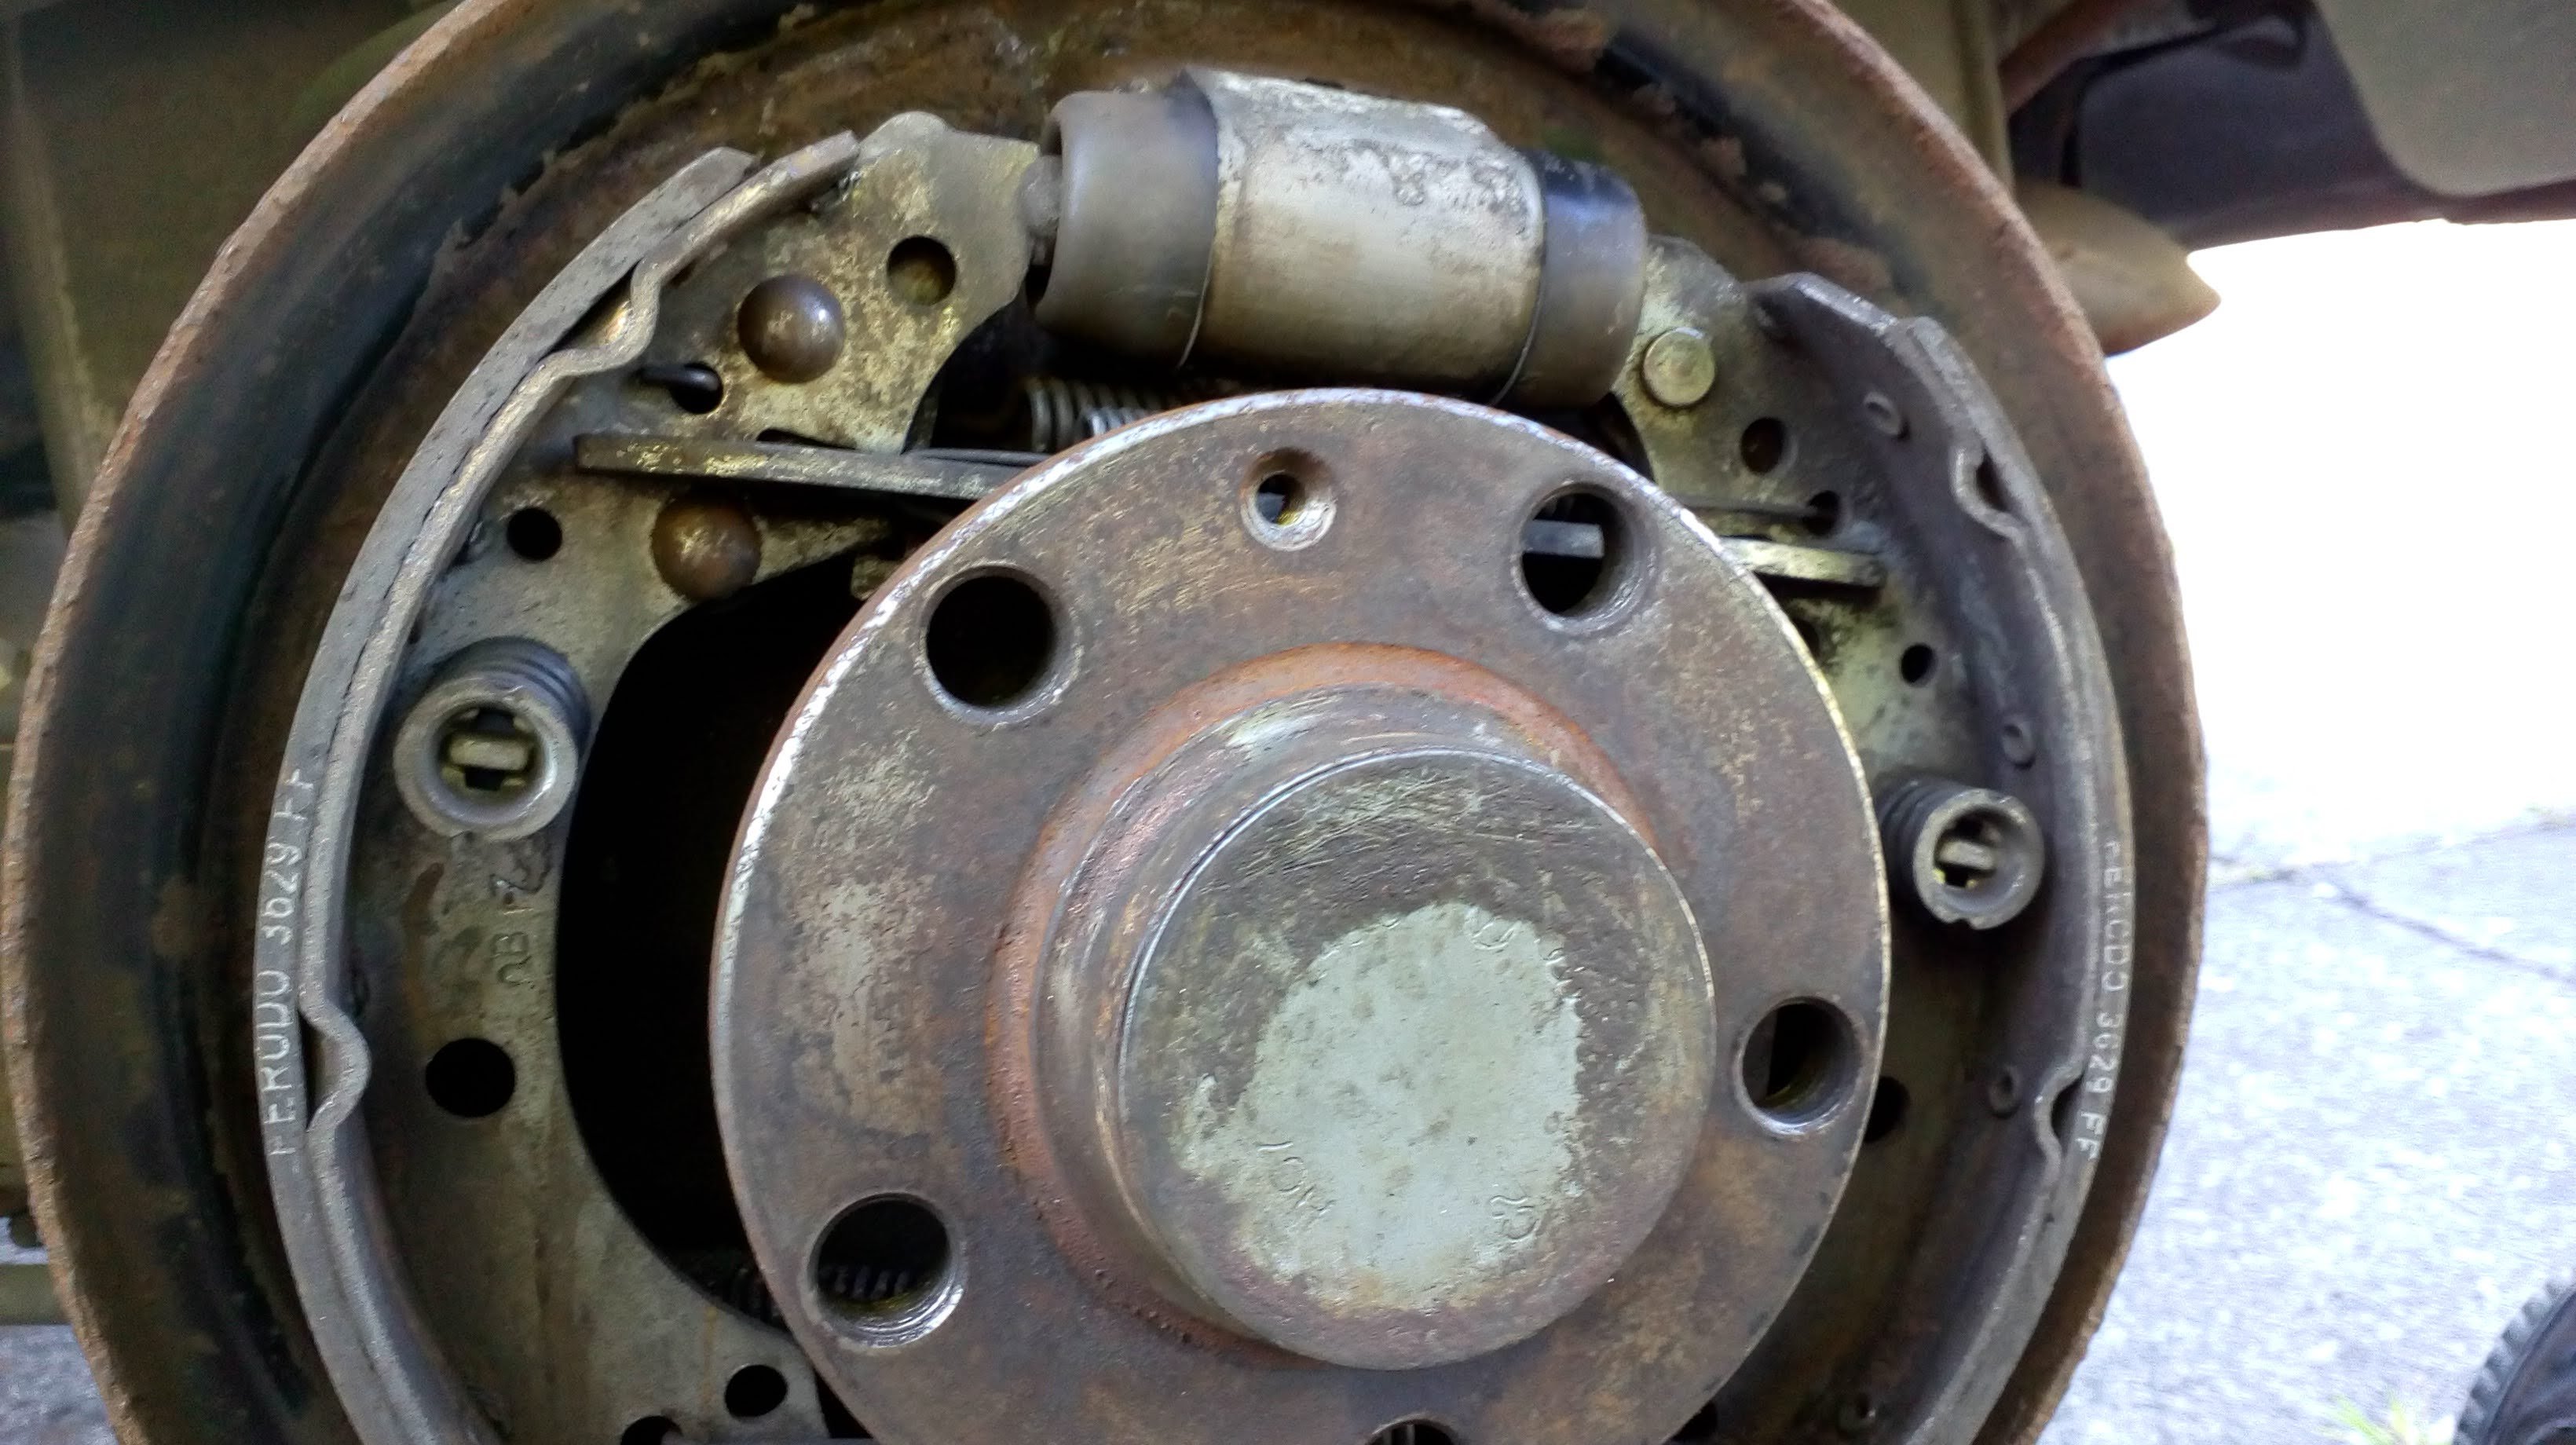
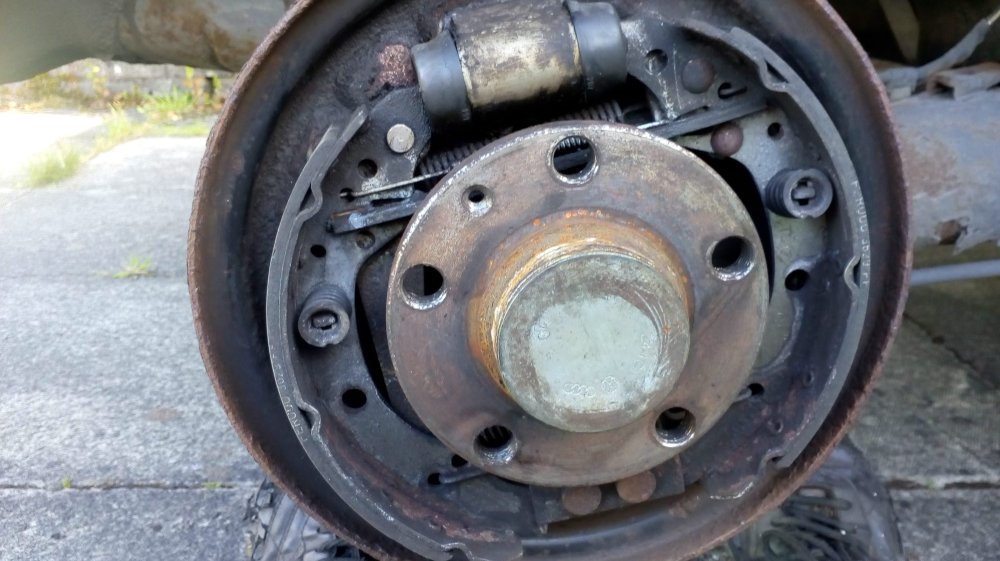
Just back from a 1,000 mile trip to Scotland. Felt that the handbrake that I only adjusted back in August was already not gripping as well as it should and still getting that clicking when pulling away after a cold start. So, yesterday I had a look and found this (unrelated to the handbrake problem); The dreaded leaking wheel cylinder (the brake fluid not showing up too well on this pic where I'm holding the rubber open); If you look at the 2nd pic on my original post and compare it to the near side, it's obvious now that it was already leaking at that point, I just didn't recognise it. Any recommended brands of cylinders/shoes/fitting kit? Anyone know OEM manufacturer? Is it the cylinder with one or two mounting holes? I already removed the hub nut cover, to check and it's 30mm, which I have a socket for. Edit: Mileage is 80k btw. Also, best way to clean off the brake fluid from the drum? I tried brake cleaner (one I got from Lidl) and it didn't seem very effective.

-
What's the top (larger) bung for?
-
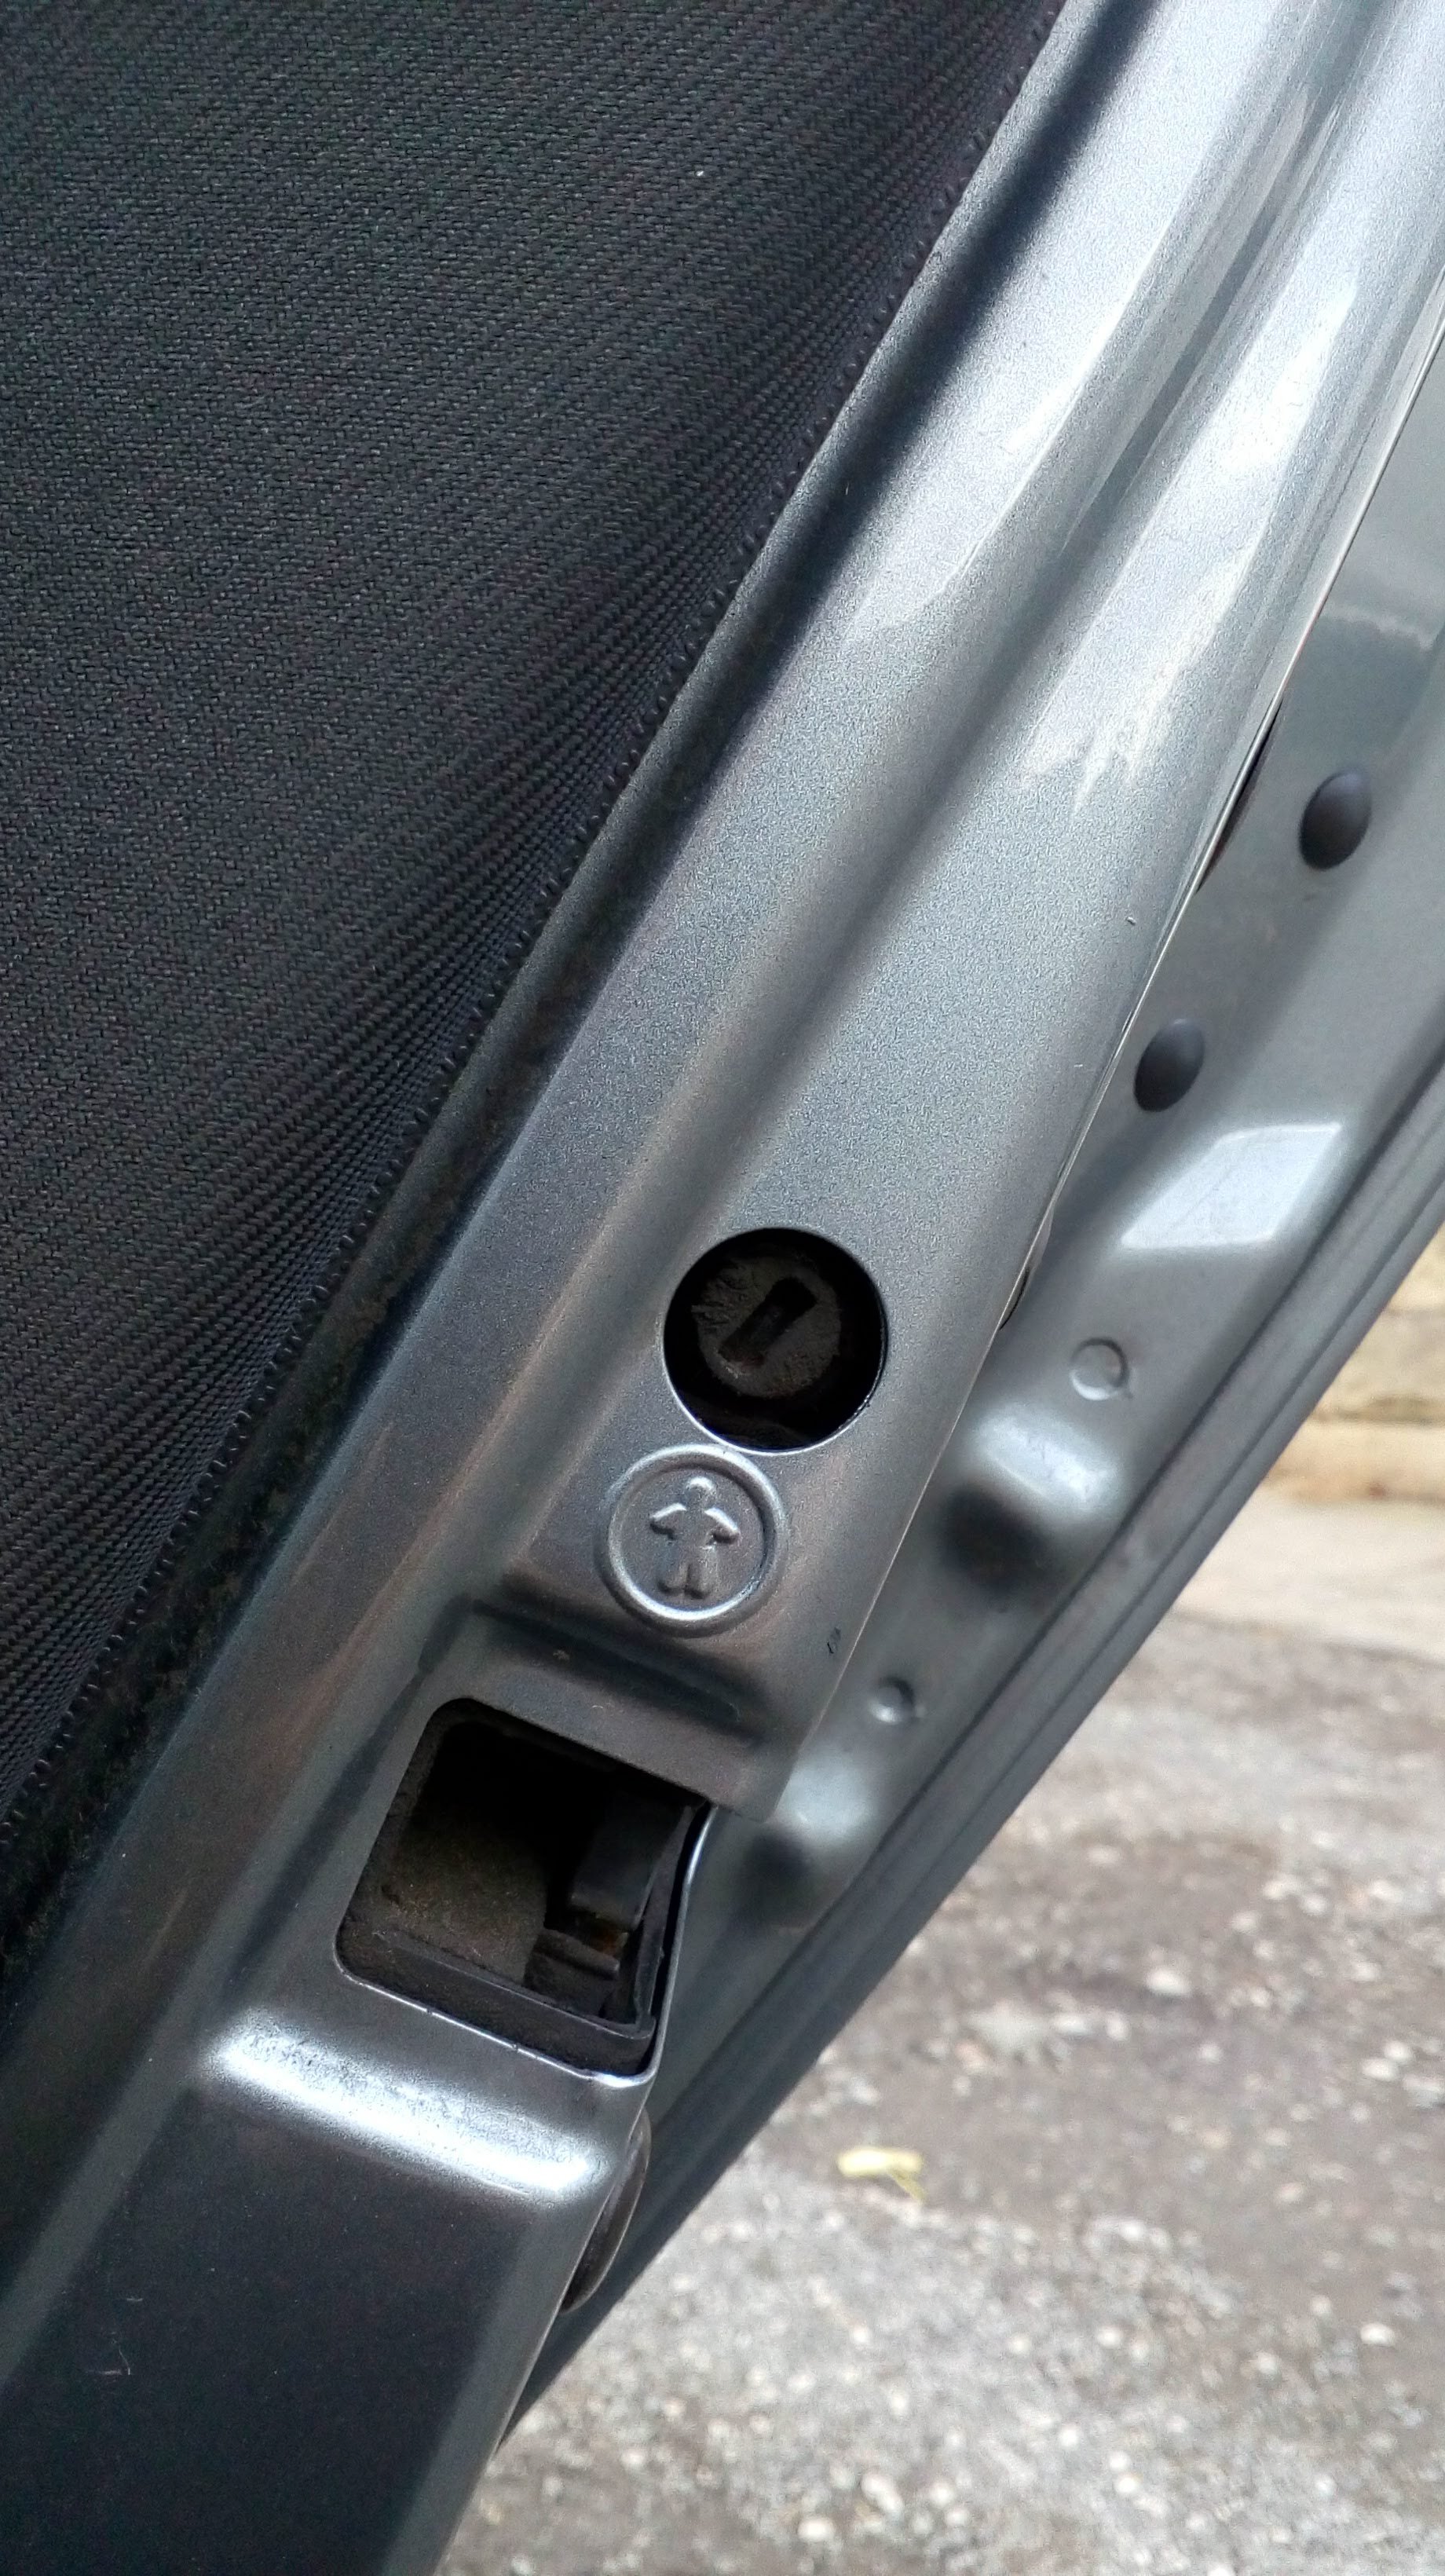
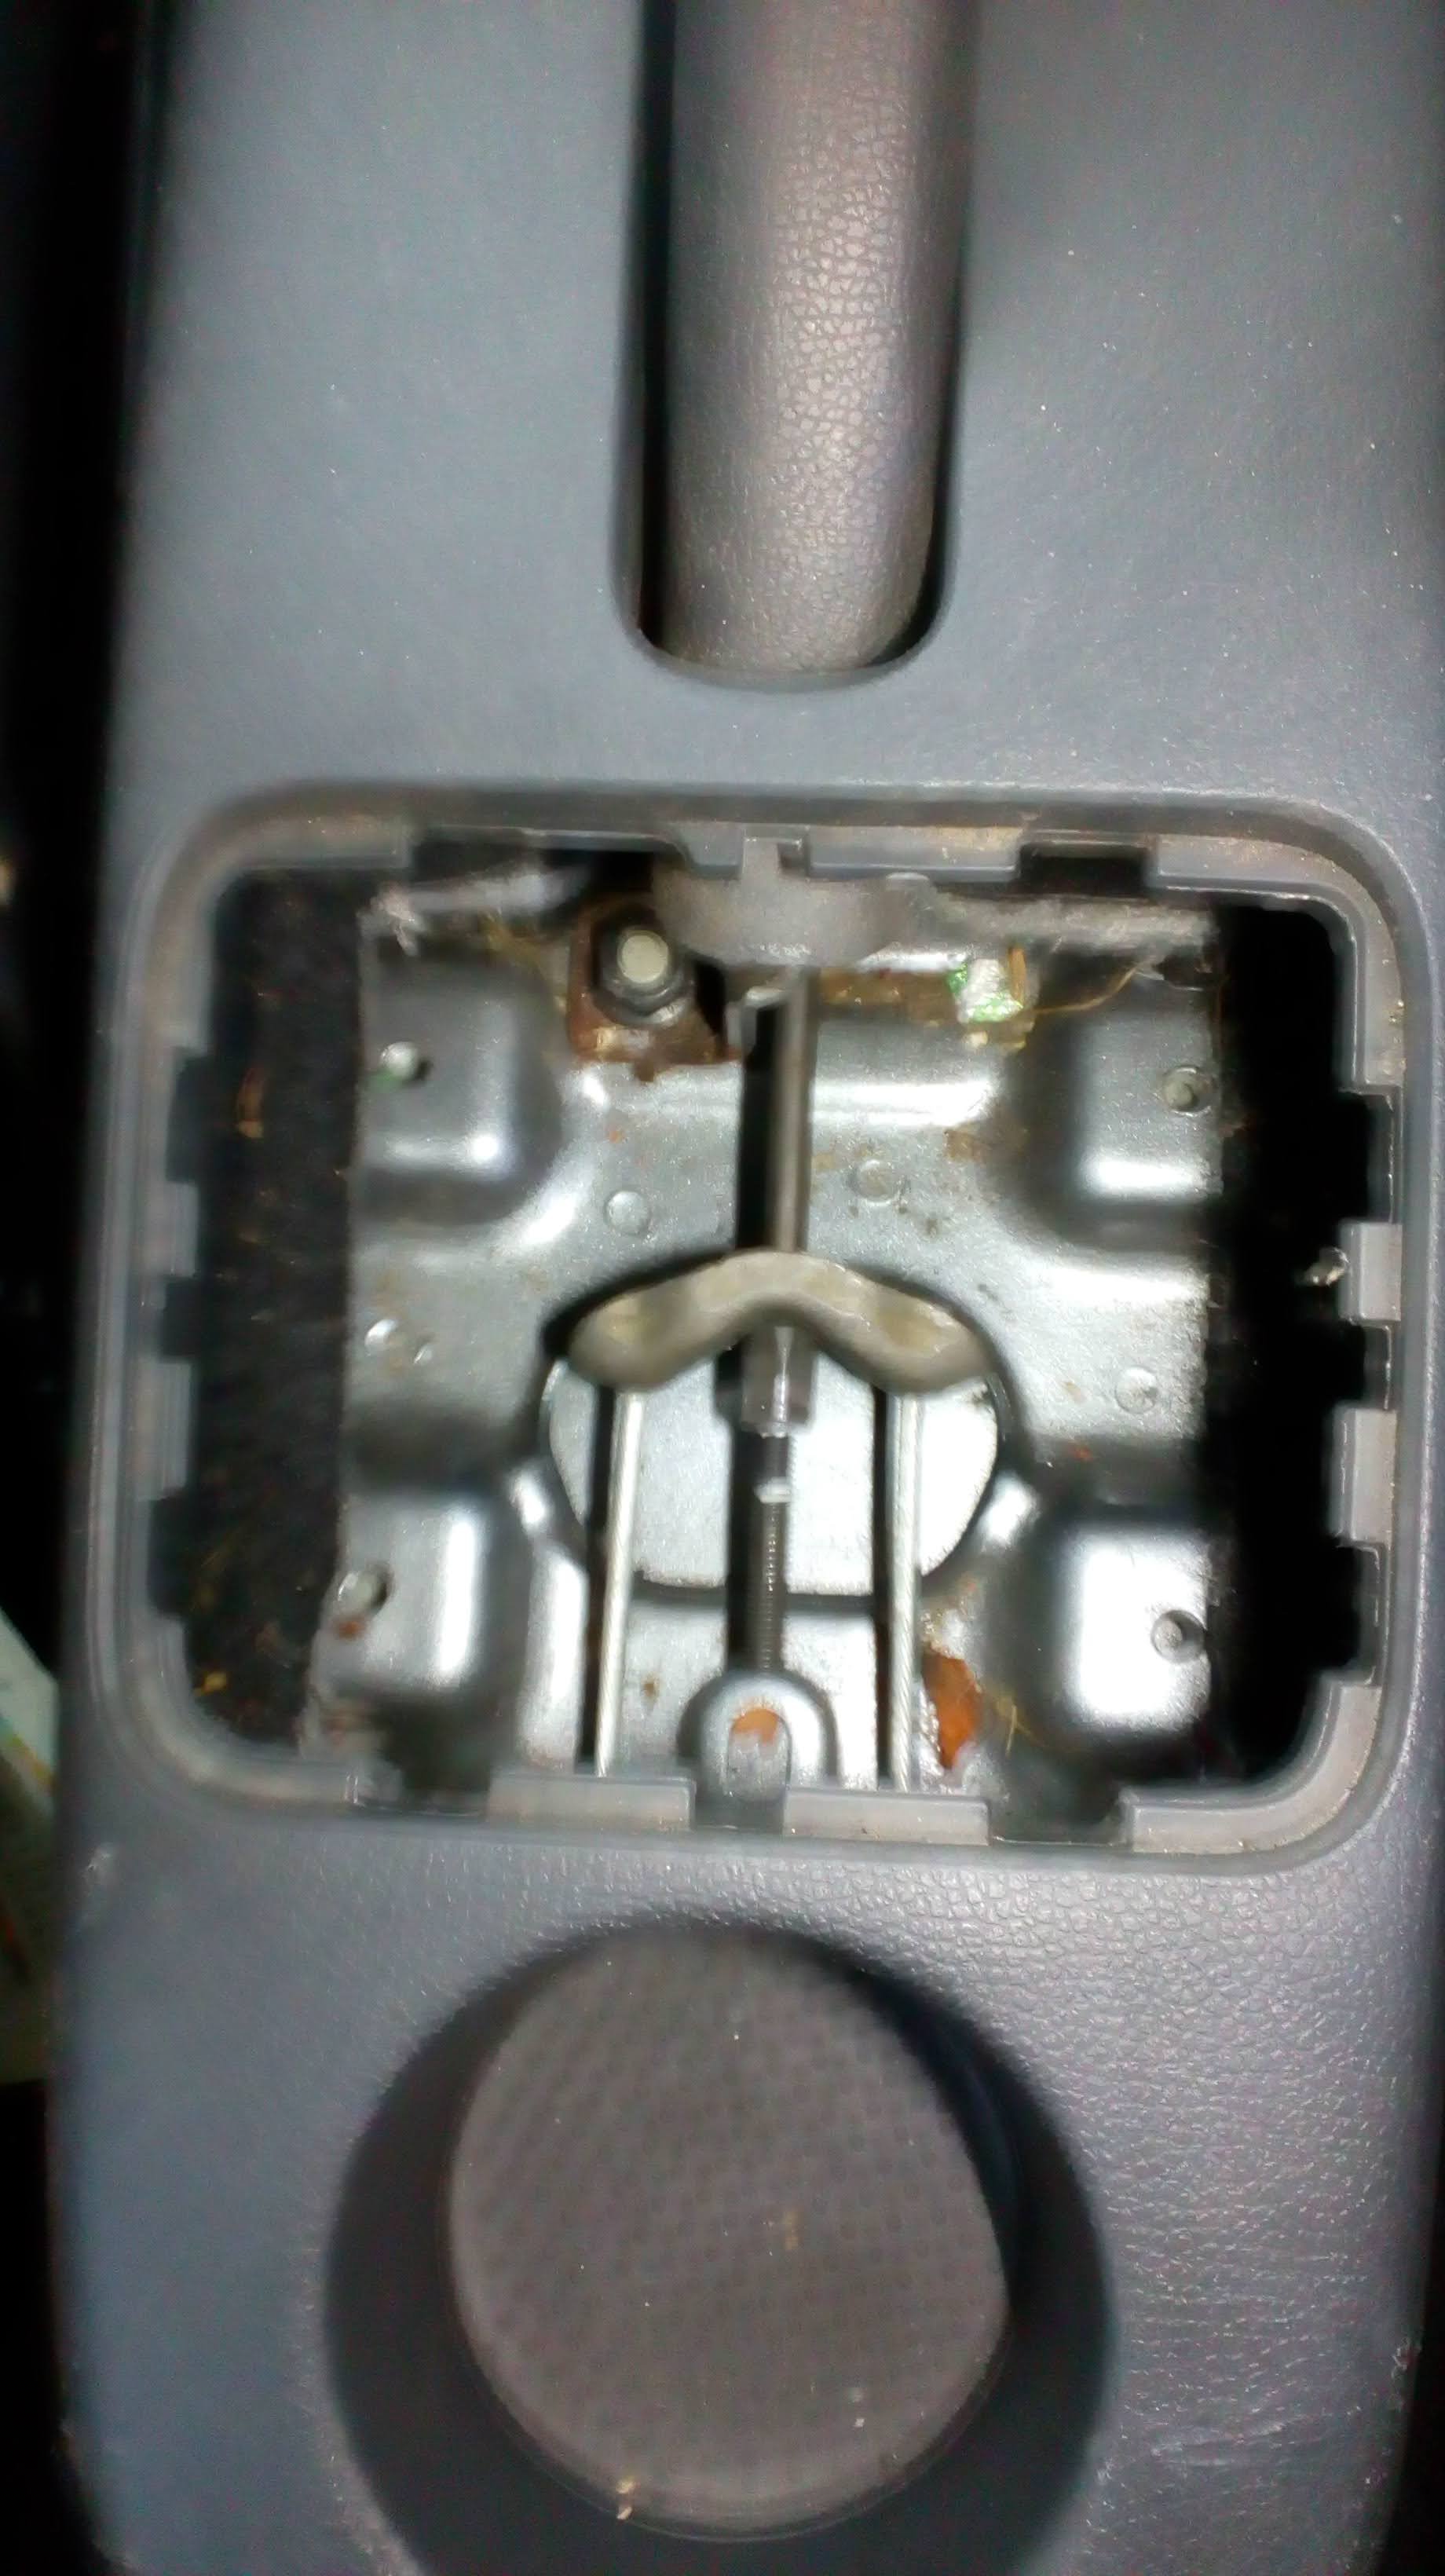
Thanks @rum4mo Here it is; Remove the 2nd from the top plastic cap, insert key in slot and turn quarter turn, anticlockwise I think it was. Door was then locked from the outside as @rum4mo says. Not to be confused with the child lock; Anyway, in the end I didn't need to know. I removed the battery and left the car unlocked. I thought it would take at least 2 days to charge the 60amp battery with my partners 0.6amp Optimate Battery Conditioner (she used to own motor cycles). That was why I wanted to try and lock it. I actually woke up to a green light this morning telling me the battery was now "Good" although a test result of 12.58v (off the charger for an hour) was a bit below what I was hoping for (12.7v) but can't really complain considering it's the original battery (12 years old).


-
I think what @rum4mo is intimating at here is there's some kind of mechanism on the inside of each door that allows you to lock doors individually, effectively what used to be a child-lock. It appears that you have to remove a cap to access the mechanism. I'll have a look tomorrow.
-
You can lock the drivers door with the key, but not the others and my Fabia doesn't have interior lock buttons like some older cars which enable you to lock the three non drivers doors then use the key to lock the drivers door (and unlock it when ready to re-fit the battery).
-
This was exactly what I thought I could do. It's what I used to do on my 2004 Clio, but thinking about it now, that car only had an immobiliser (no alarm). When I did this and took the negative lead off the battery, it set the alarm off.
-
Is this possible? I wanted to remove the battery with the central locking keeping the doors closed. My partners A3 has a switch for temporarily deactivating the alarm.
-
This is a photo of the grommet. When trying to remove it, it's worth bearing in mind your attempting to get that lip at the bottom through a hole in the engine that is smaller than the diameter of the grommet, so you really have to give it a good tug.
-
You were right @rum4mo, broken crankcase valve which I replaced today.
-
Great guide and great photos @Mintyfresh😉 I did this today. My observations; 1. As you said, it really is quite difficult to get the pipe off the throttle valve. Those clips don't stay off once you release them as they don't clear away from the pipe when released. The only way I could get the pipe off was by wiggling it from side to side whilst pulling upwards. 2. The rubber grommet was very difficult to remove. Mine was very soft and squishy, so that when levered with a screwdriver on each side there was no resistance from the grommet because of the soft material. I even tried a car upholstery removal tool but the slot in it was slightly too big and the grommet just gave way as I levered it. Eventually I got it out by levering and pulling at the same time. To my great annoyance, there was nothing left in the hole; I could have checked it with a small mirror and not spent 15mins trying to remove it. The valve I bought was a Febi Bilstein 175530. which I got from Parts In Motion for £17.78 (inc delivery), which was cheaper than any ebay seller for that brand.
-
MOT passed today, so boot must be ok😊 I'll clean up next time I'm under the car.
-
The car passed its 12th MOT today😃 Advisory for "Oil leak, but not excessive". Any regular places for leaks on Fabia 2?
-
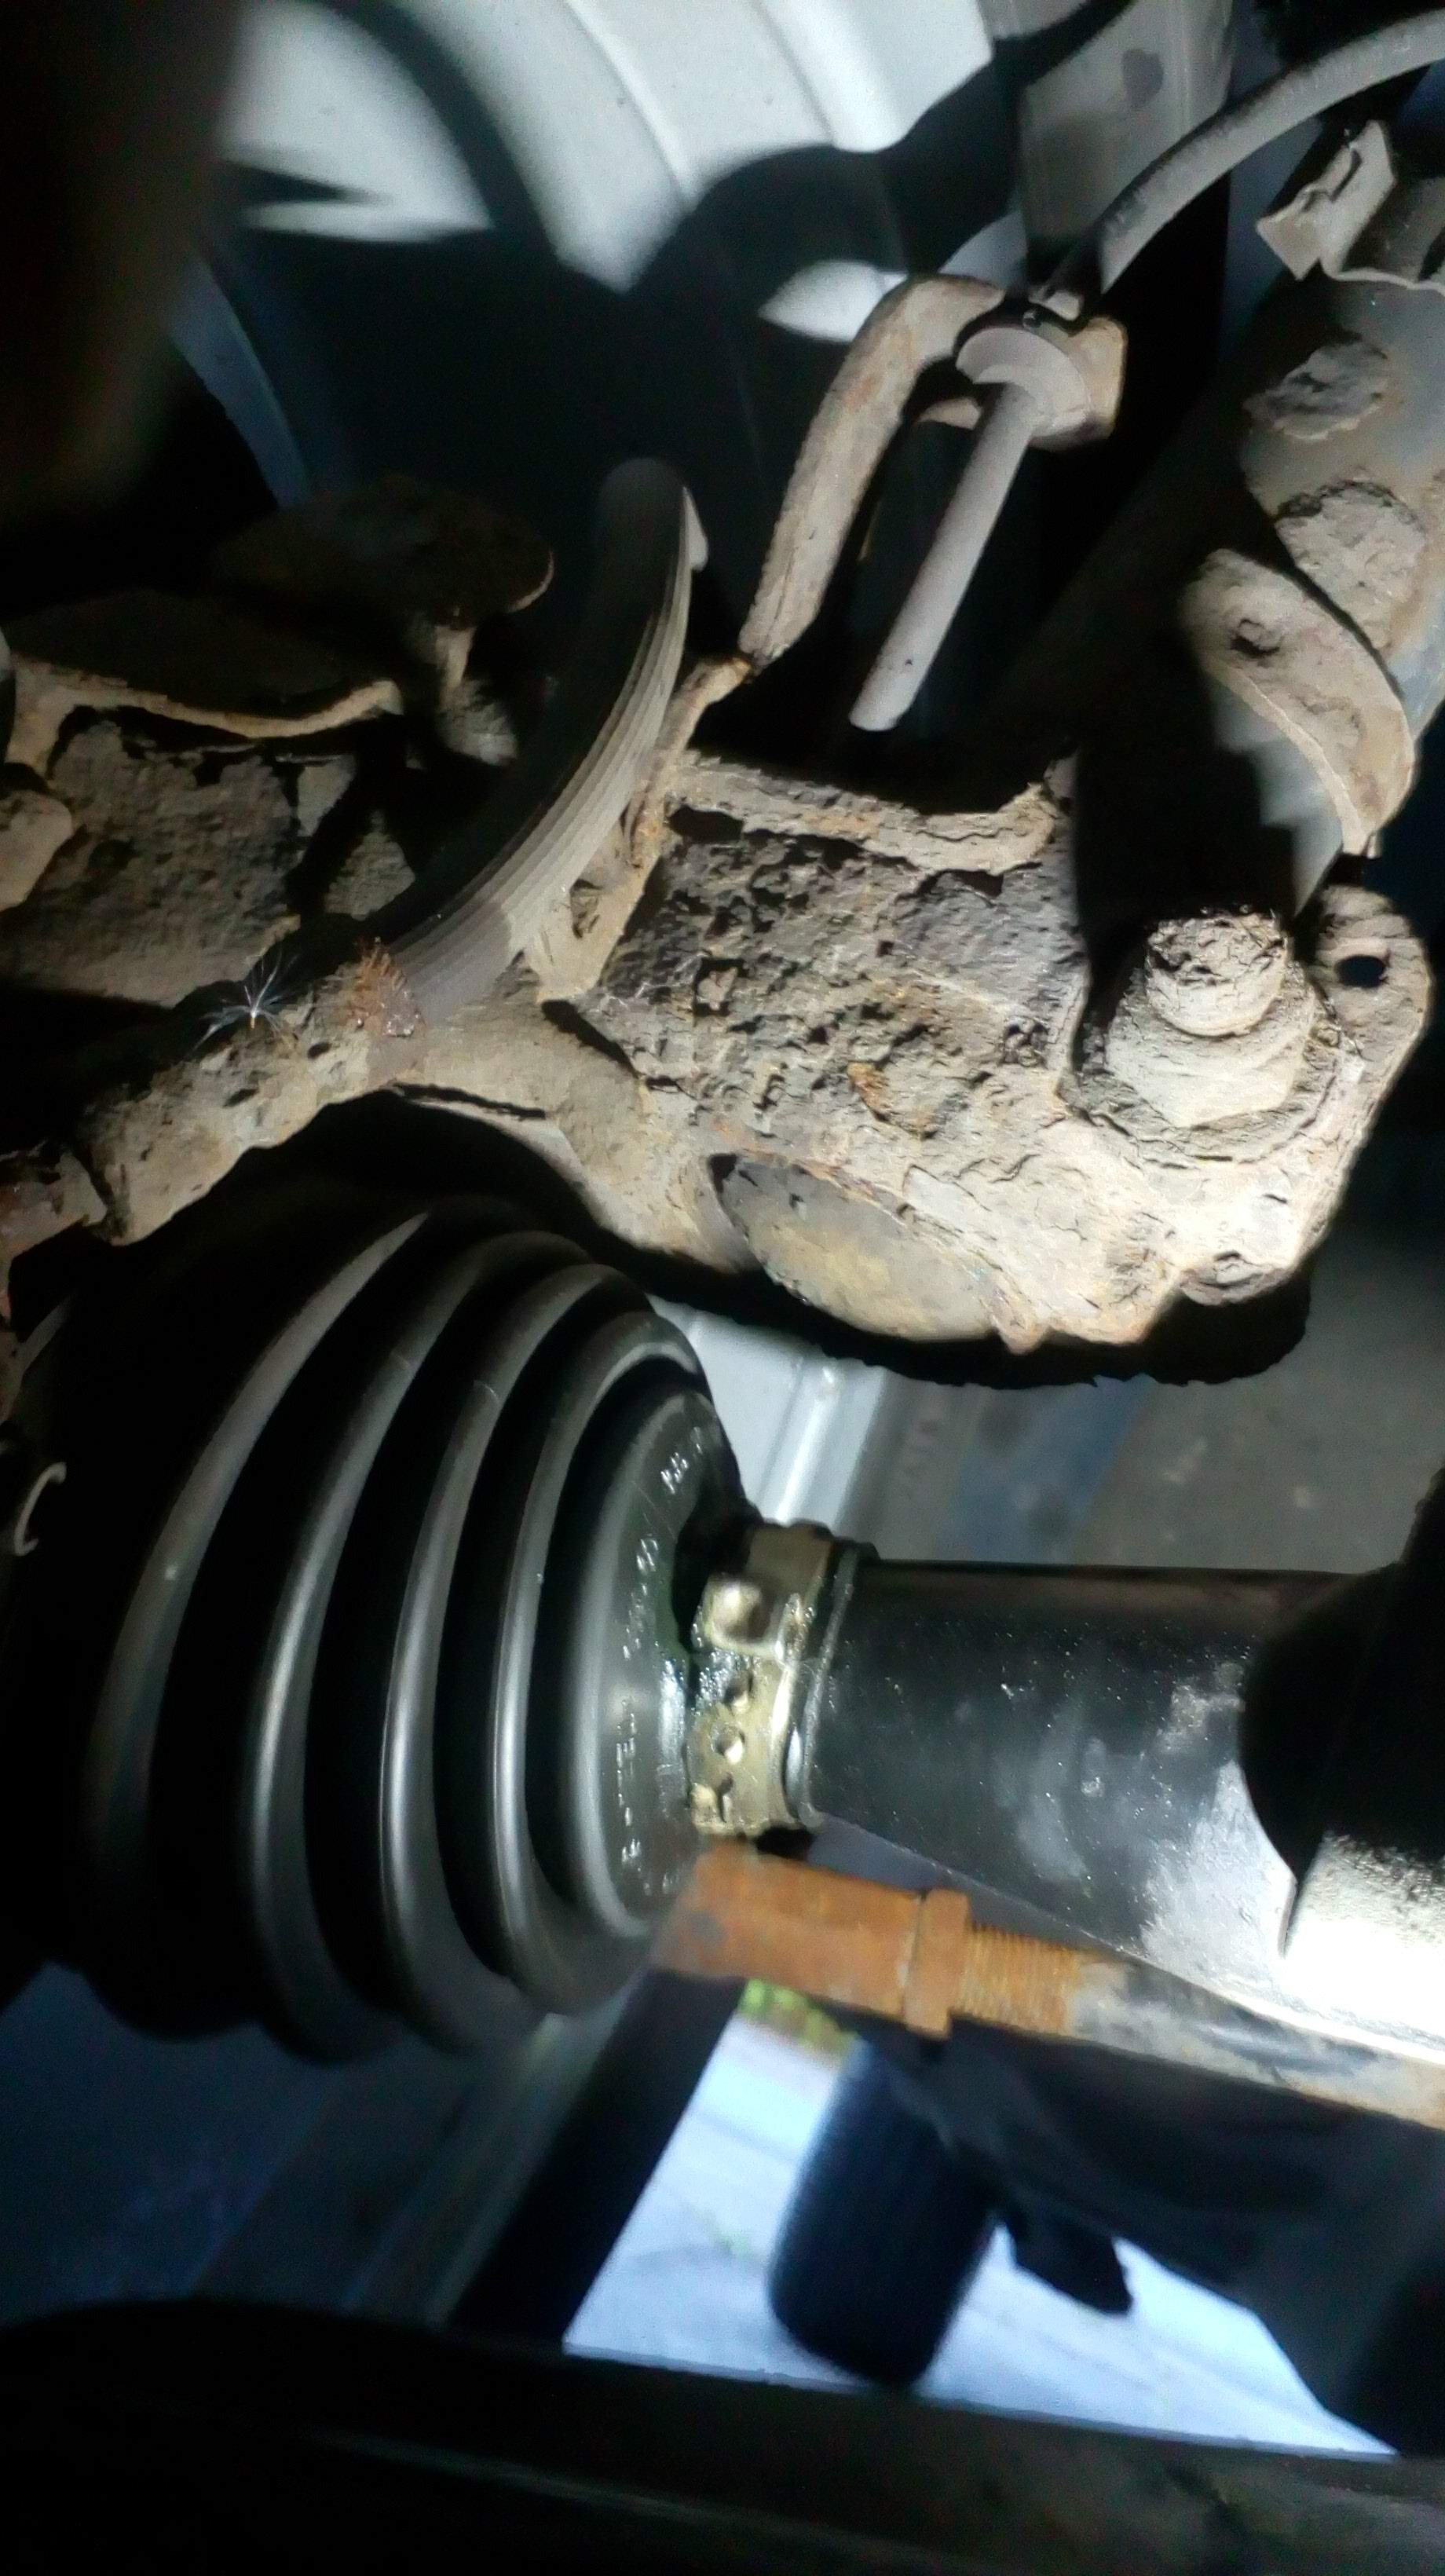
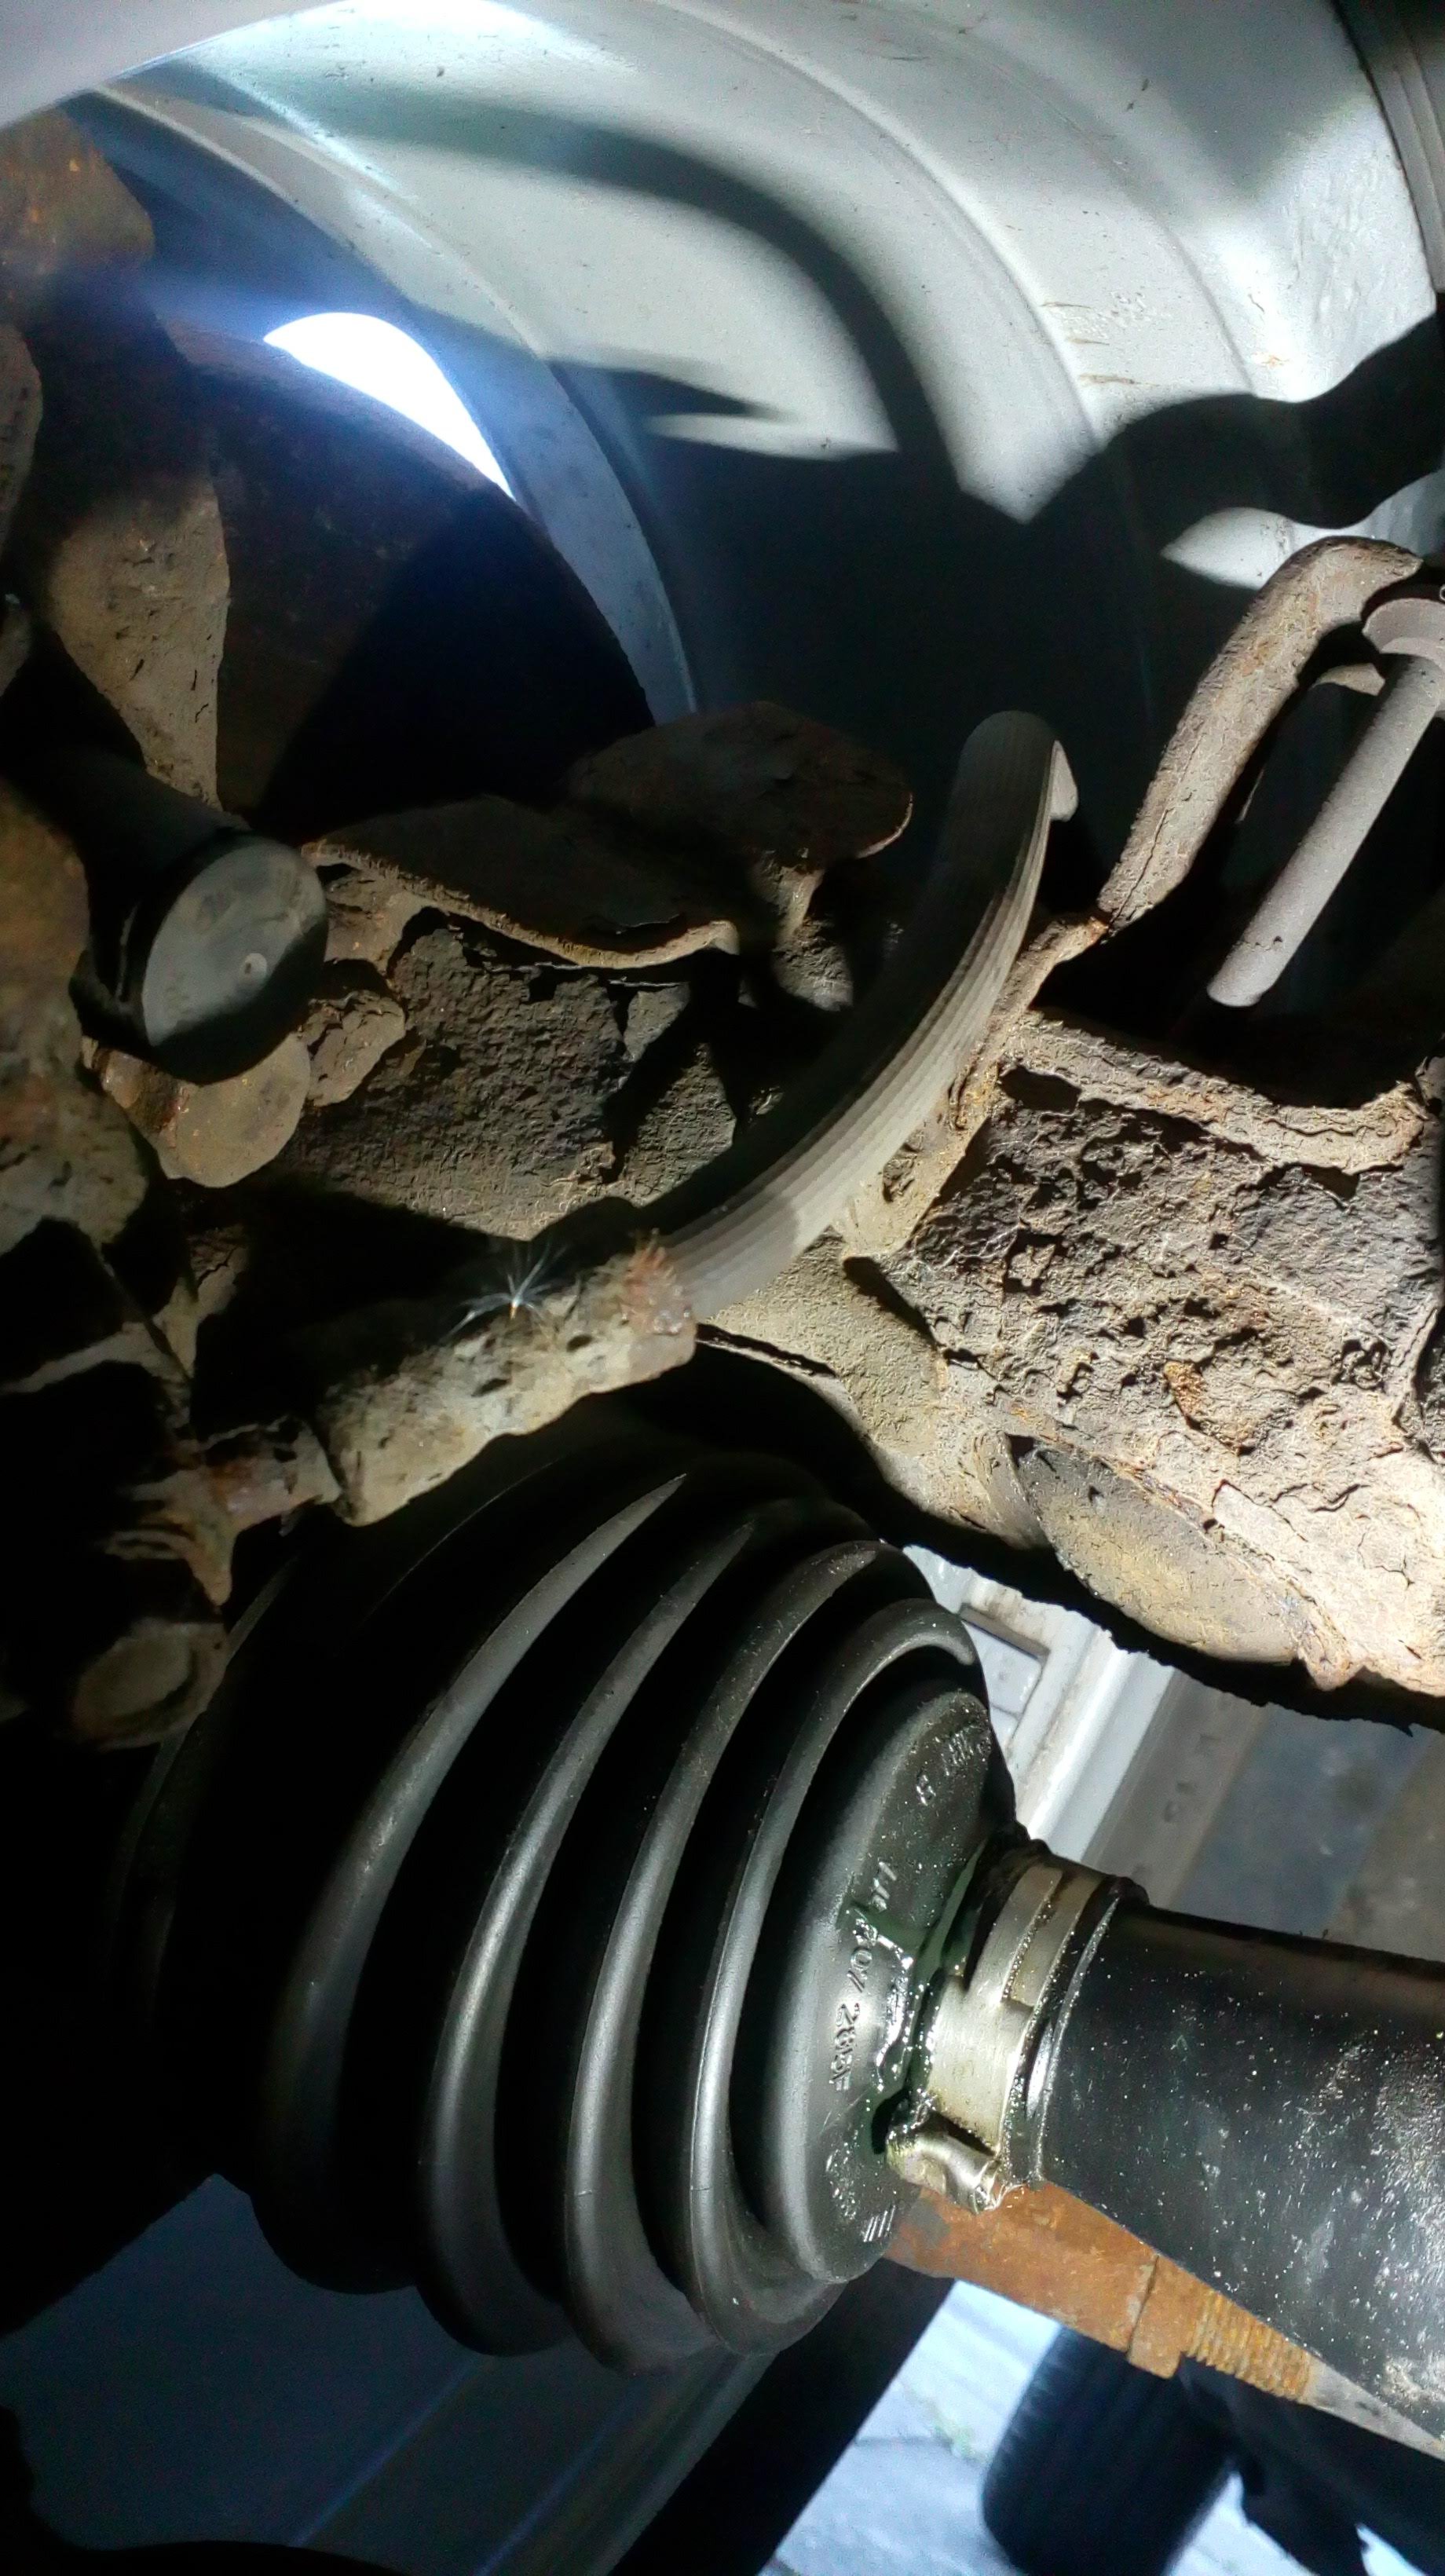
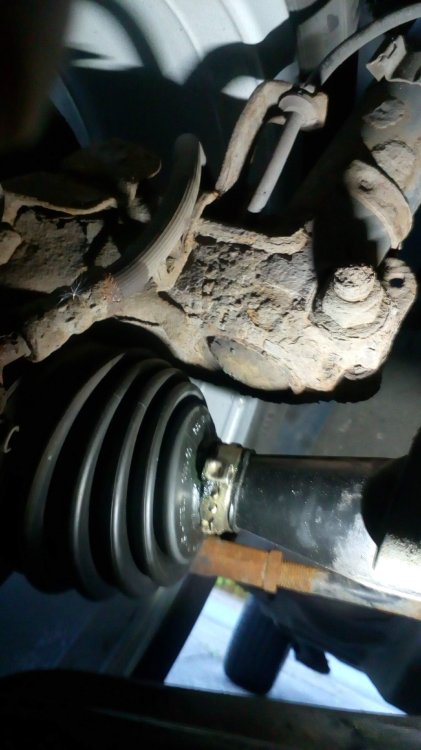
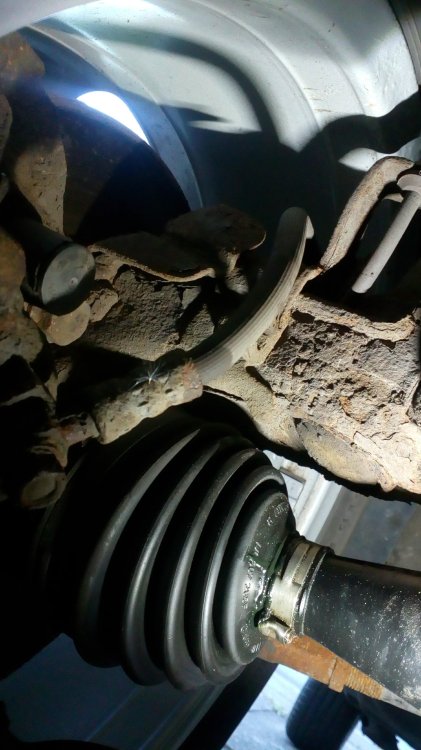
The second photo is with the offside wheel turned clockwise about 30 degrees. It's the area aound the inner clamp we're looking at. I appreciate it's hard to pick out the detail from the photo. The Fabia is 12 years old and 78k miles.
-
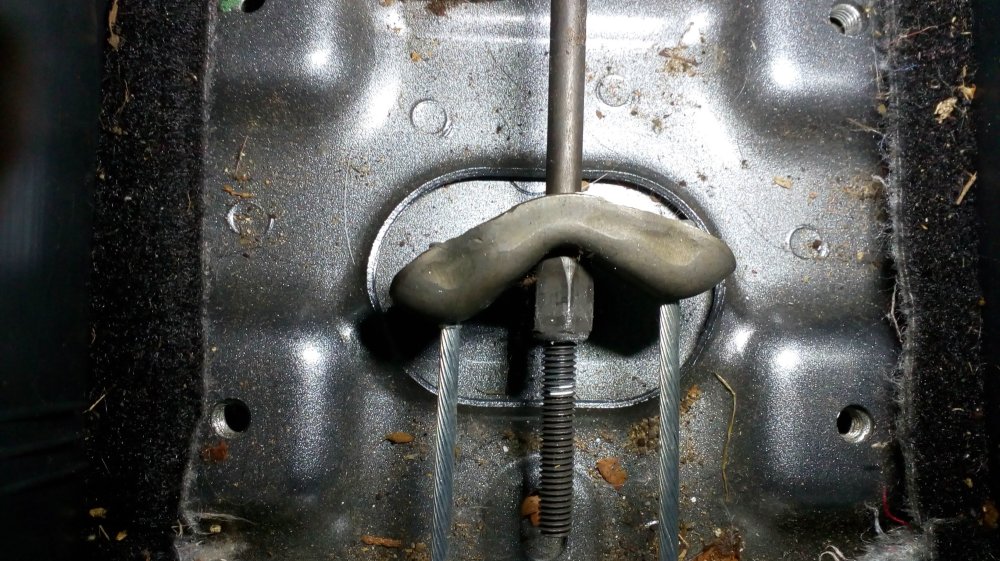
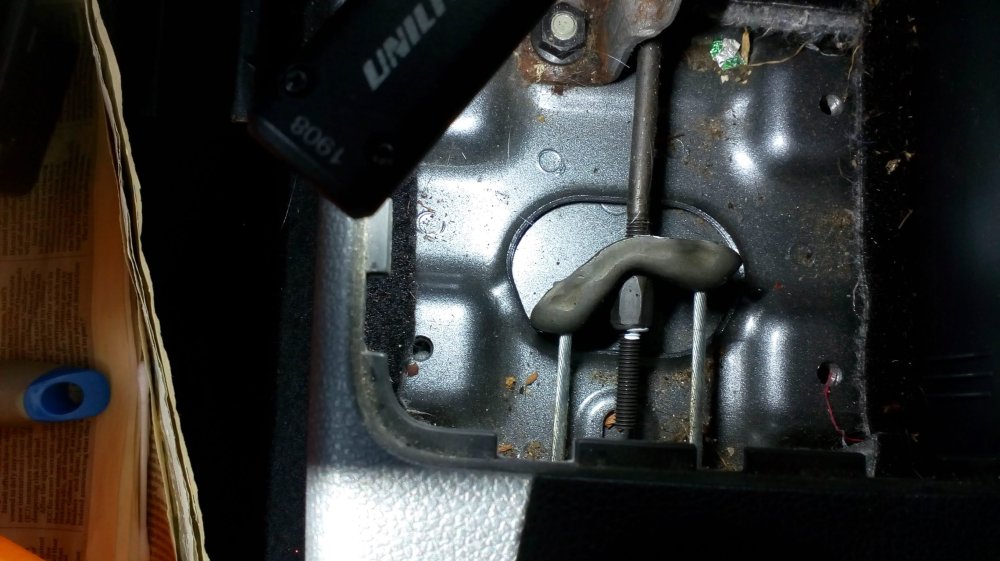
Quick before (top) and after (bottom) photo update on the handbrake yoke (handbrake off in both pics). Not sure how to get the photos side by side on here. Not perfect but much better than where it started. 21/08/24

-
Thu (22/08/24) Only really had half a day (food shopping in the morning and by the time I'd got to my mum's then had lunch it was about 3:30). Front Pads 1 Raised the front and supported on axle stands. Somewhat optimistically as it turned out, I removed both wheels and set to work removing the brake pads for a clean up and regrease. Before removing the wheels, I attempted to turn both. The near-side turned normally but the off-side was very stiff to turn indicating a problem. After some time researching on the internet to try and find what caliper I had for anything specific about removing the pads from these calipers I gave up and just had a go. The caliper seemed to be marked 542. Seems to be a large caliper for a Fabia but maybe that's because it's 105PS? It looked like the first thing to do was remove the wirey spring that clipped onto the top and bottom and into two holes in the caliper. Then I removed the two guide pins (each protected by a rubber cap) using a 7mm Hex bit. Thankfully, no turning nut to hold with a thin spanner as on some cars. After some light hammering, I managed to remove the caliper and tied it up to the coil spring, first removing the inboard pad from the piston. The outboard pad was stuck fast and wouldn't budge. I sprayed the contact points with penetrating fluid and left it a while. I eventually managed to release the pad, cleaned up all contact surfaces, greased with Ceratec and re-assembled. And that, was all I got done yesterday. Today (23/08/24) Front Pads 2 Did the same with the near side (the pads weren't stuck) which probably took half the time. There's always something to slow you down though. I'd already cracked open the rear bleed nipples (7mm) on Tuesday ( swiftly closed up), so now it was time to try those at the front. With a nice fat 10mm nut you'd think it would be no problem but a 10mm socket wouldn't fit. I tried a 10mm spanner on each of the (is it five) possible positions but on one it would not fit. Spent 10mins with a grinding attachment in my dremel type tool carefully grinding off what I assume was a burr on each of those sides until eventually the spanner fitted on, but tight. Then I used a 6 point socket from my impact set on a T-bar and after several applications of penetrating oil it cracked open.Phew! Bleeding Fairly straightforward with my years old Gunsons pressure bleeder. Followed the Rear Left, Rear Right, Front Left, Front right sequence. The fluid came out light green on the first wheel but got progressively darker as I moved on, looking dirty black by the finish, so probably not bled for a while. Underbody checks I'd already jacked up the rear to do the bleeding, so got underneath and checked the exhaust mountings, underbody fixtures (lots of plastic protection), then at the front, checked CV boot condition. steering gaiters, tie rod ball joint dust covers, lower suspension arm ball joint dust covers. Finally, while the front wheels were off, I gave them a clean on the inside with a mildly acidic wheel cleaner as it's obviously much easier to clean this area while the wheels are off the car. Replaced the wheels, torqued up and lowered to the ground.
-
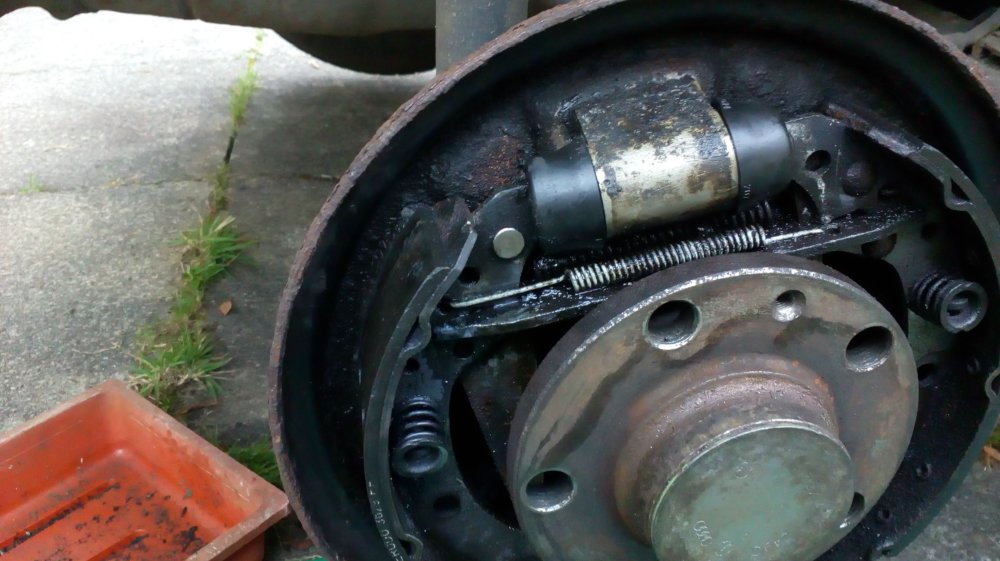
Thanks @Murdockman and Pete. I don't think the self adjusters are missing, just the near side is missing its spring.
-
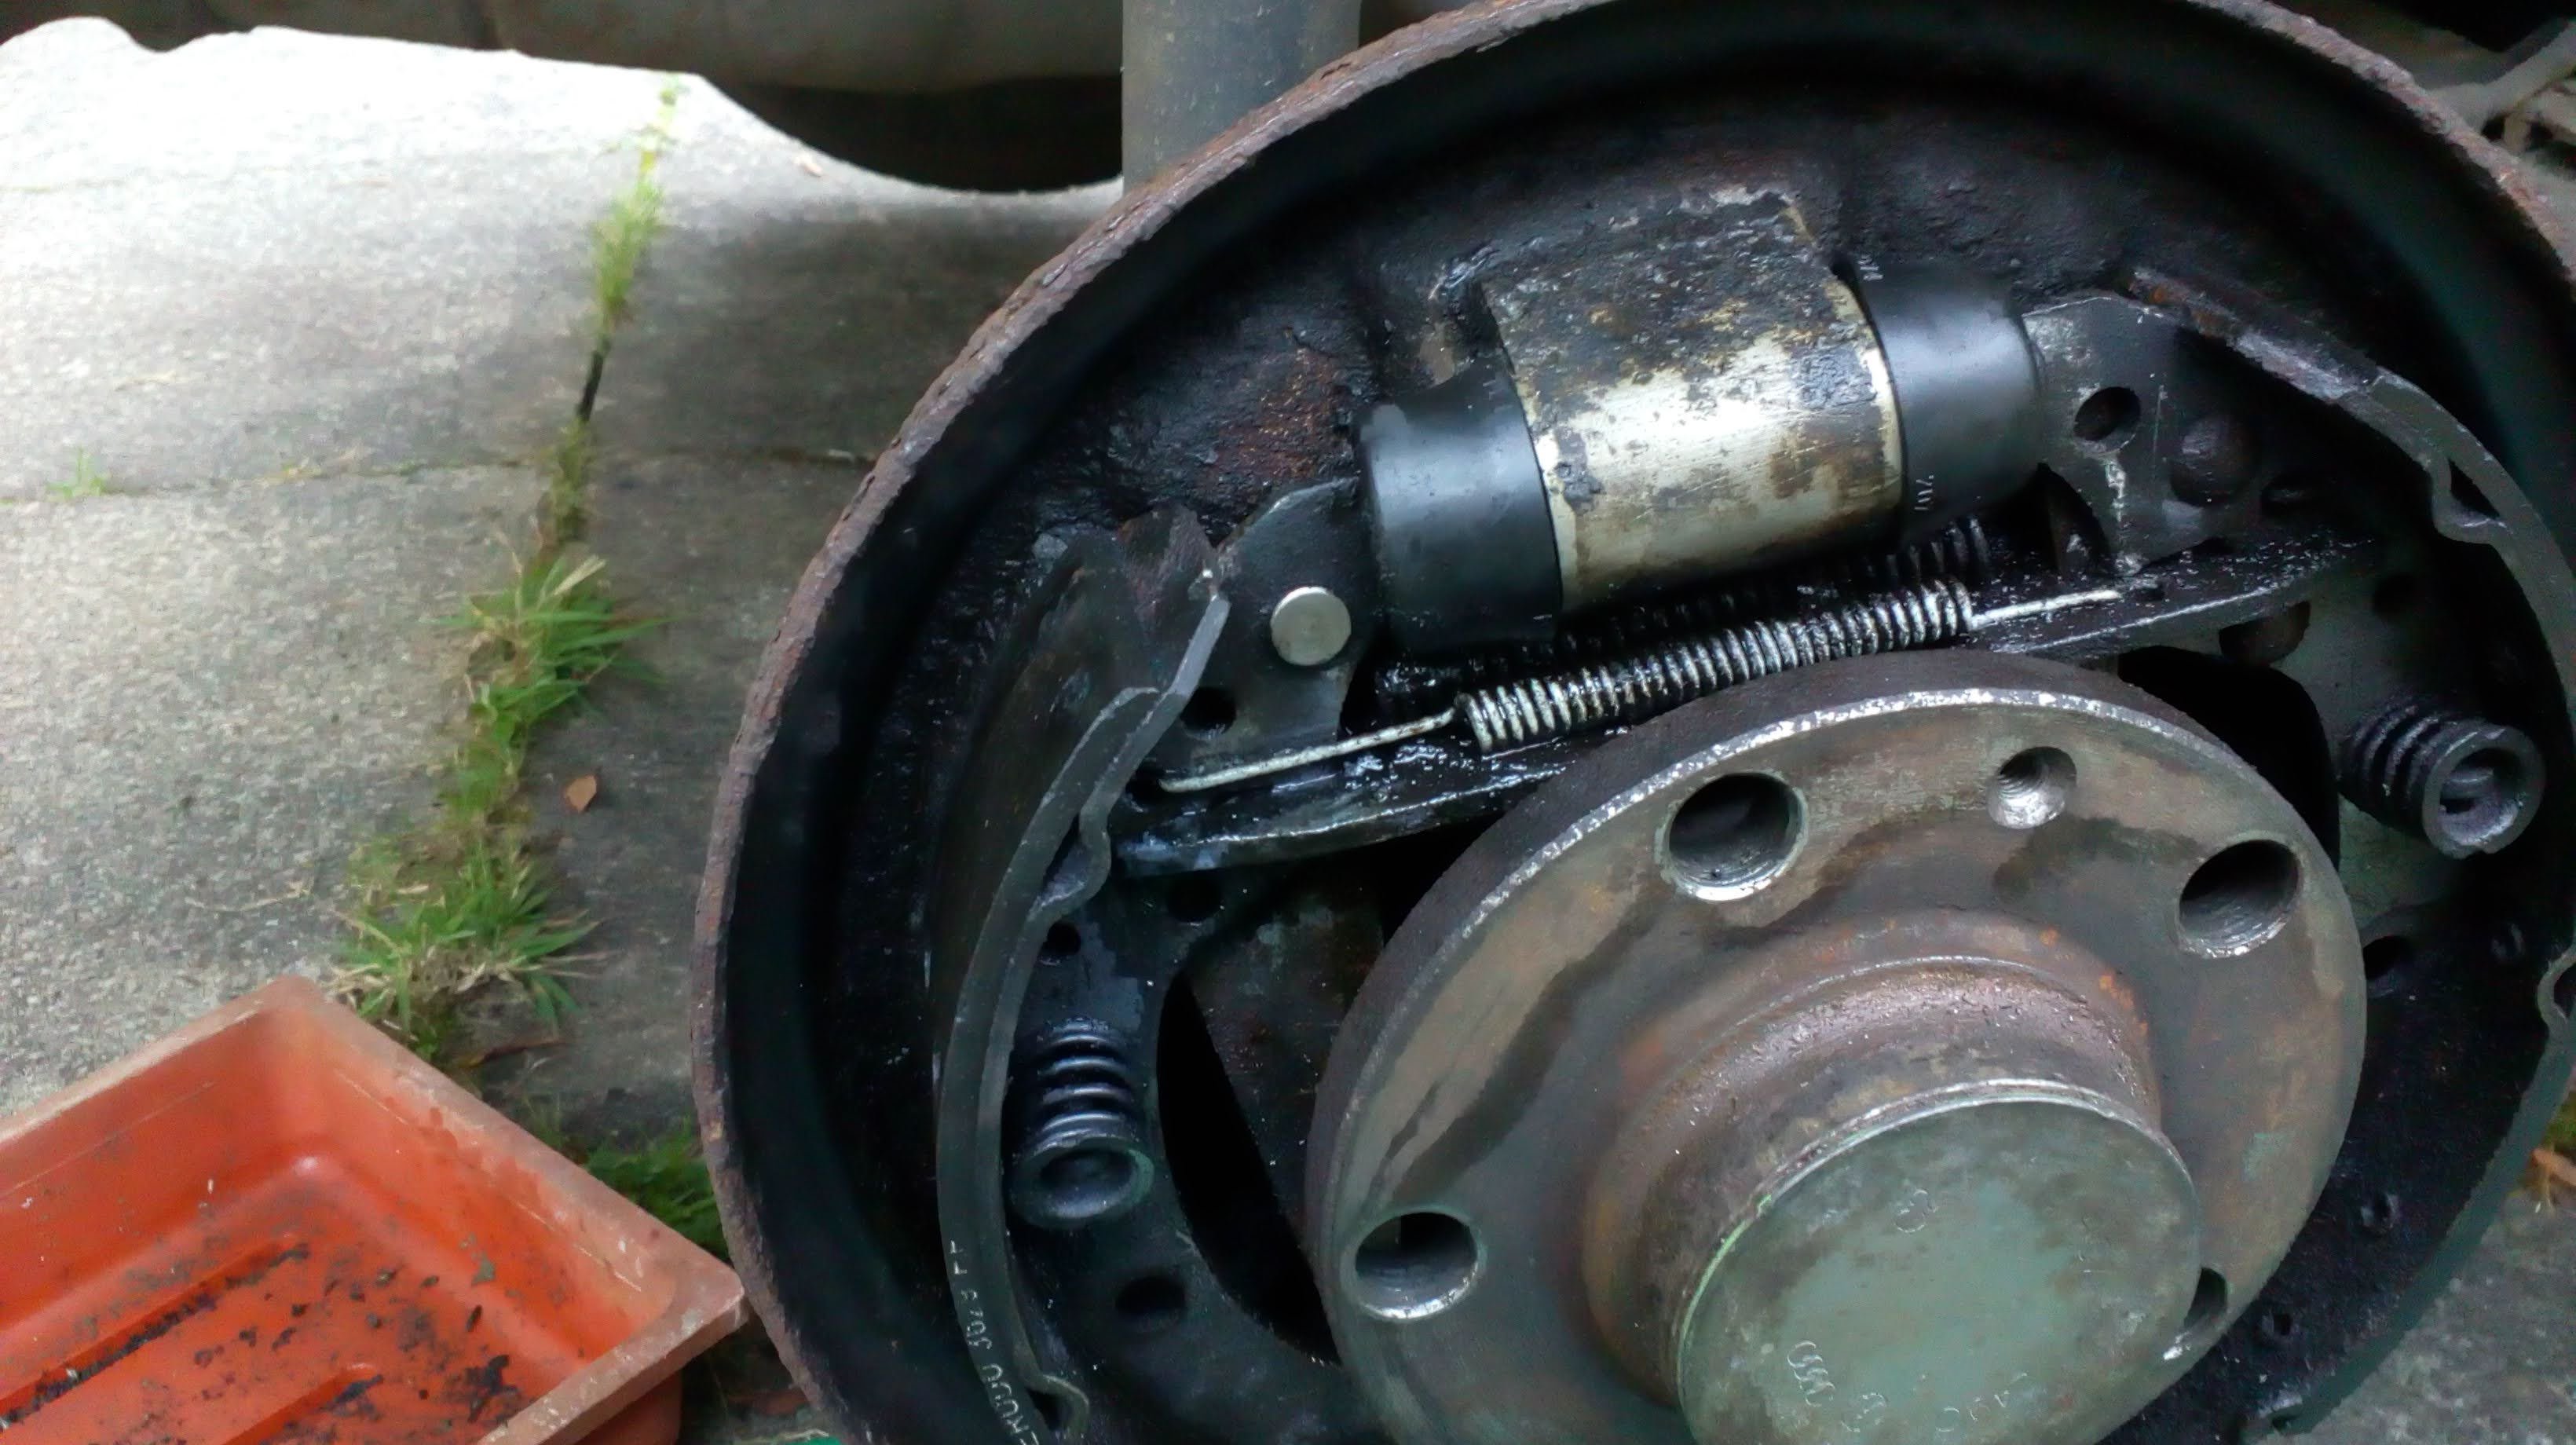
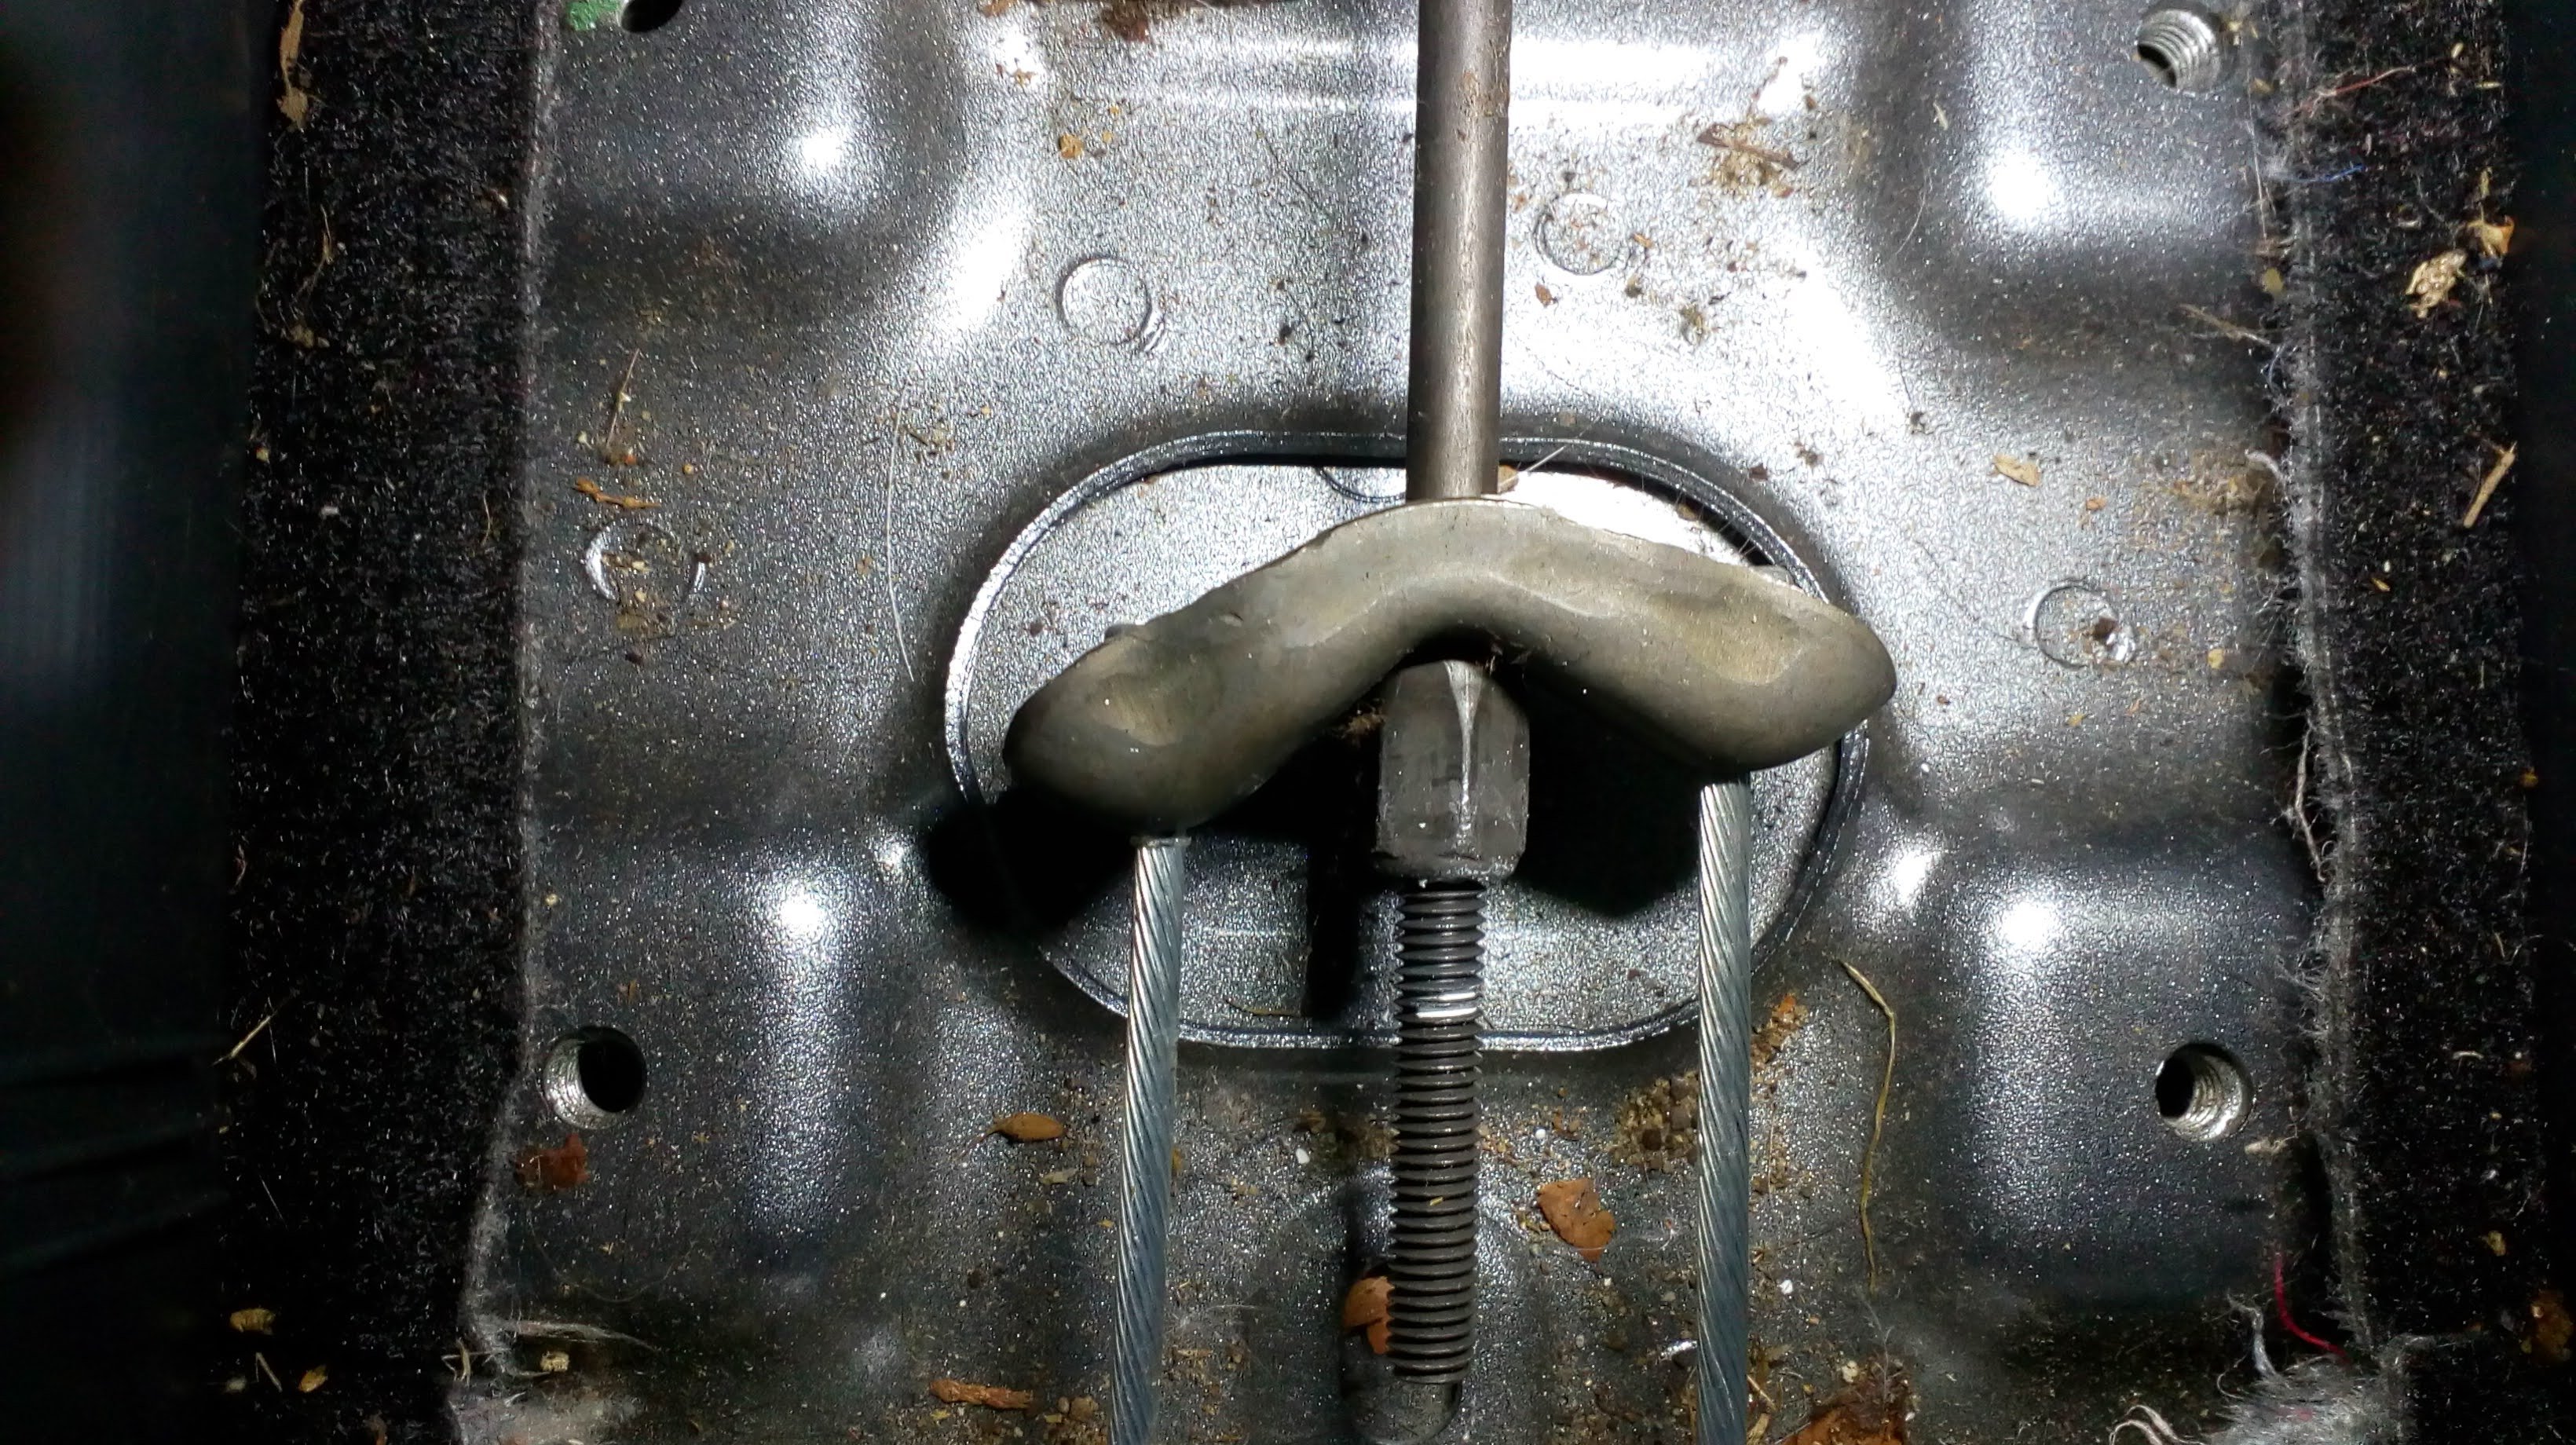
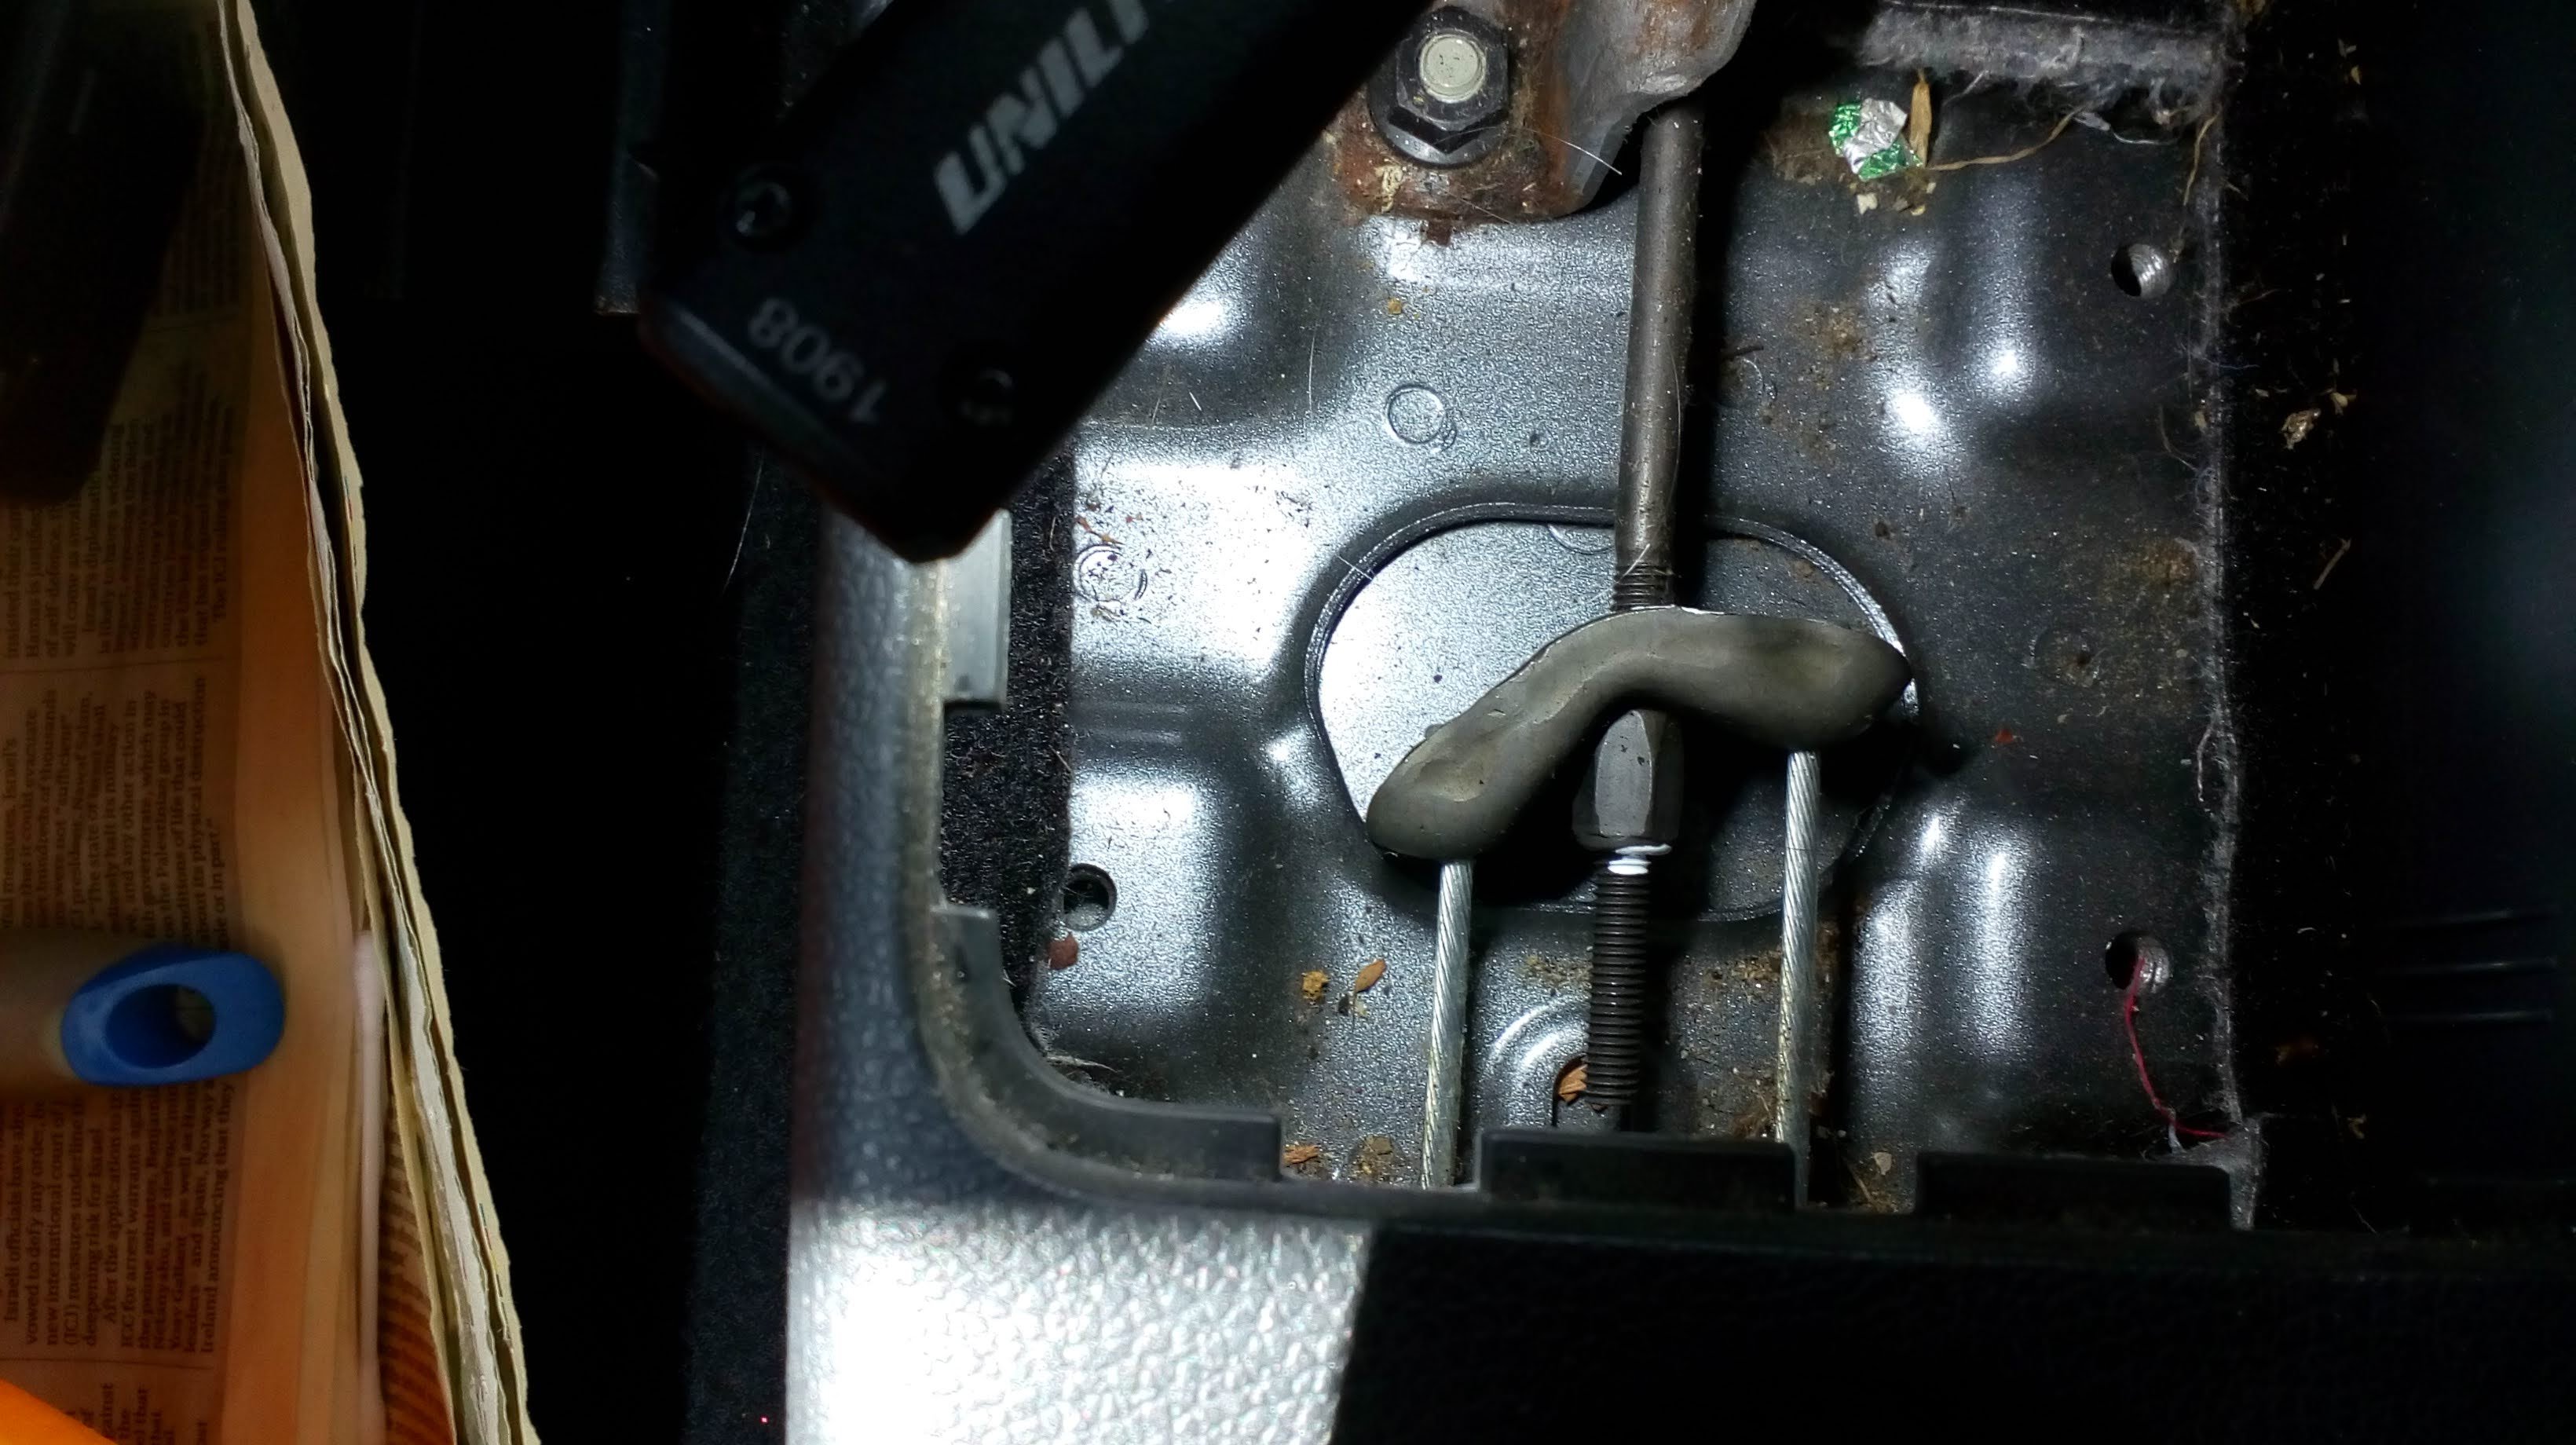
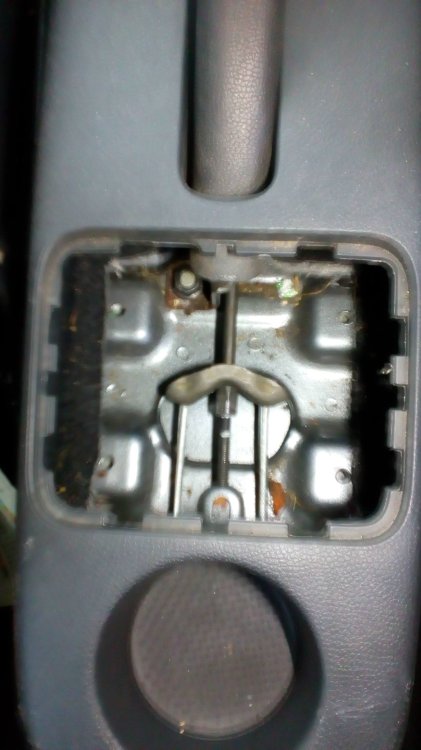
Jacked up the car and placed on axle stands. Removed the rear cubby holder to reveal this; I marked the current position of the yolk (?) with Tippex. The drums were covered in flaky rust, so I pressed on removing as much as possible with a wire brush. With the handbrake off, the near-side wheel was very free and the off-side would hardly move. Removing the drum securing screws proved no problem with a Torx bit in a 3/8 ratchet. First removed the fully released near side wheel by locating the adjusting wedge through the wheel bolt hole and pushing upwards with a screwdriver. Brushed out the dust with a container situated under the drum and cleaned off as much of the remaining deposits with brake cleaner. When I did eventually manage to remove the other side, I realised there was no spring attached to the wedge on this side. Here's a picture, but it's too dark on the inside so you can't see the lack of a spring. Wondering now how important the spring is and whether I have a suitable/similar one taken off another car? After a few solid taps on the drum, I managed to remove the off-side and followed the same cleaning sequence as for the near-side resulting in this With a screwdriver pushed to the right against the handbrake adjuster on the left, I noticed that the lever didn't return to it's starting position (at least it did move). Faulty handbrake cable spring? The handbrake adjuster on the near-side worked ok (returned to starting position). Put both drums back and began adjusting the handbrake cable. On one click of the handbrake, the off-side began to have slight effect but the near side was nowhere near however much I adjusted the cable. I'd noticed a bit of a ridge on both drums but nothing I thought was excessive enough to cause the imbalance. Nevertheless, I proceeded to remove the off-side drum and got to work on that ridge, first with 80 grade emery cloth. I was doing this at my mum's house (garage, drive (I have none), and although I'd brought grinding attachments with, I'd forgotten to take my drill. I did have a dremel type tool with me though, so got to work with a tiny grinding bit in it. Removed a fair bit of the ridge, replaced the drum and tried adjusting the handbrake cable again. Was amazed to find that removing that ridge worked and I was eventually able to adjust the handbrake so that it now holds on 4 clicks. It really is trial and error turning that adjuster nut until both sides are holding, getting in the car, adjusting the nut maybe 4 1/4 turns at a time, getting out of the car, putting gloves on to turn the drums, gloves off, releasing the handbrake, adjusting again and so on until both sides are holding; must've been 20 times I did this to get to this; Note the original white mark and a startling amount of adjustment required (or maybe it's not for those that know?) So two things to worry about, the missing spring on the near-side and the non-returning handbrake lever on the off-side. Also, whether I should have removed a similar ridge on the near-side, otherwise the shoes are not pushing evenly against the inside of the drum when the footbrake is applied and will be less efficient.

-
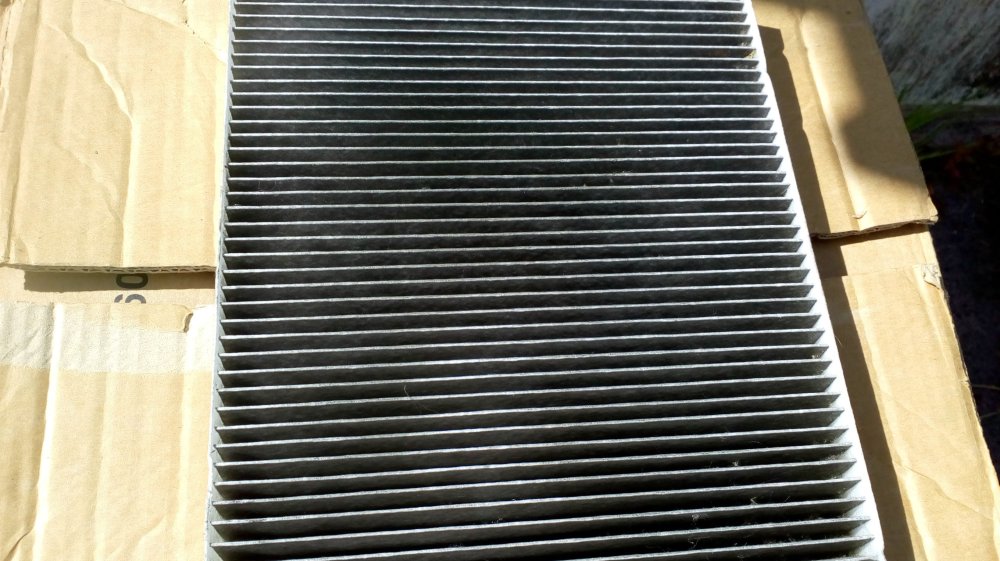
Only just got round to starting the service yesterday. Shopping list was; VW 502 type Oil Oil Filter Cabin Filter Brake Fluid Front Wipers (for future fitment) The Air Filter was checked on Monday and was still clean as I've only covered about 1k miles since the car was purchased. After searching through ECP, CP4L, GSF and Halfords, to my surprise the latter was just about the cheapest for every single part. This included £5 off a minimum £30 spend by joining their Motoring Club for Free plus 10% off "Car Parts" on the 2 filters. My final purchases were; Halfords 5W40 N4 Oil (5 litre) £27.79 MANN W712/94 Oil Filter £8.86 after 10% discount Bosch Pollen Filter £6.13 after 10% discount Comma DOT 4 ESP Brake Fluid £10.49 Bosch A502S Wipers £20.78 No Sump Plug at Halfords, so a visit to GSF (no Skoda dealer or TPS nearby) procured one for £3.07. 1. Oil Change Here's the old filter. https://imgur.com/a/XWygRVo Difficult to check whether this was the correct item. Crosland website unhelpful and refers you to ECP as sole supplier. I only needed to jack up the front offside to access the 19mm Hex drain plug. Amazingly easy to withdraw the plug without getting oil down my arm and no spillage at all. Filter easily accessed from the top, but can't recommend the chain type filter I have for this job as it's more suitable when there's a side on approach. Just about managed to loosen it for hand untightening. No oil spillage as the oil drains down away from the filter. Left the oil to drain while I got on with other things. 2, Cabin Filter The old one pretty dirty. [img]https://i.imgur.com/GpO34qR.jpg[/img] Not changed since 2018 and 37k miles the service history suggests. Already checked this a few months back, so knew it was only a 5min job. Just push the two clips inwards and the cover comes off. Slide the old one out and the new one in observing the air flow arrow on old and new filter and hope that the old one was in the correct way round (air flow pointing towards the driver's side)? Are we allowed to upload files direct, like this? 3. Next was inspecting the rear brakes. I already knew there was a problem here as the handbrake had locked on solid one day in the winter (since read it's a Fabia thing) and the handbrake wasn't holding great. MOT time approaching so this needed sorting. I'll start a new thread for this as it might help others more than if it's on this one. Whilst the car was up at the back, I took the opportunity to try cracking open the bleed valves after a double application of penetrating oil. All good there with a 7mm ring spanner after I wire brushed off the surface rust. Working today but I'm on with more items to address tomorrow.
-
Thanks for posting @andyknoxville. I have same problem. £60 diagnosis said broken wires in passenger loom but interested to hear yours was in the drivers side wiring from the switch.