DrCorbyLee
Members
-
Joined
-
Last visited
Everything posted by DrCorbyLee
-
From my own experience, the car seems to decide it's OK to restart the regen on next journey once it's fully up to temperature and then no need to trash it to get the DPF up to temperature as it injects extra fuel to maintain the required temperature. As an example the regen I described allowing to finish last week had started whilst picking up the kids from school (6km round trip at 50km/h max) and was 1 minute into the regen when I got home. Was then allowed to complete whilst poodling around town never exceeding 2,000rpm and often sat with cruise control on in 4th at around 1,200rpm (DSG in manual, I drive like an old lady trying to save fuel :-). But the only way to be 100% sure it's restarting and finishing correctly is to monitor the system. Carrista is a useful app in itself (although you need a subscription to access details of diagnostic error codes beyond first free month of use) but won't show you any DPF data beyond any error code that would be issued once the dash warning light comes on. Other than VAG DPF the only other way I know to view the DPF status is with VCDS (which also has mobile version that can run on iOS or any device with web browser) or OBDeleven. Both (especially VCDS) are serious investments compared with VAG DPF + Carrista Dongle option and from what I've seen the presentation of DPF data is nowhere near as user friendly, just a list of values. Maybe you could try and find a cheap 2nd hand android tablet off eBay to use VAG DPF with? From what you describe it certainly sounds like you don't currently have any DPF issues but would be a little concerned about the oil ash residue limit with the mileage you have. Not 100% sure what happens when you hit the 100% limit, believe it doesn't cause the car to immediately go into limp mode or anything like that but may well give a dash warning light. And as it is only a calculated value you may or may not have physical problems with the DPF starting to give high pressure drop (i.e. blocking) when it hits 100%, it could even happen before the 100% limit. Not sure where you are based but maybe you can find a friendly Briskoda member with VCDS who would be happy to do a one-off scan to determine the current status of the DPF to see how close to the oil ash residue limit you are, map is available here
-
From my own experience (my 2013 car has covered equivalent to 170k km) the logic controlling dpf regens isn't as clever as you give it credit for. It simply calculates the soot loading until it reaches 100% and then triggers a regen to burn off the soot to down below 25%. I suspect a regen occured somewhere in your 500km run as I usually get no more than 300km between regens on such long runs and then needed a second at end of 20km run. My car hasn't had the emissions cheat software fix, if your's has then the regen interval will definitely be shorter So the behaviour could be perfectly normal. However, my own car is predicting that it will reach 100% oil ash residue (the material that isn't burnt off by the dpf active regen) loading at around 240k km which may start to cause problems. So you could be close to that situation or actually having problems. Only way to be sure is to monitor the dpf performance using an app called VAG DPF. Needs an OBD2 adapter to plug into car diagnostic port but even with the recommended Carista adapter (which also allows troubleshooting and customisations with the Carista app) it isn't a big investment and more than worth it for piece of mind. Once you have monitored the dpf status for a while you will be able to spot the signals that a regen is happening without the app. Surprising how often I'll arrive home and based on stop/start not working and high idle speed know a regen is in progress so switch on the VAG DPF and go for another short drive until it's finished. Total regen duration tends to be around 15 minutes, earlier this week spotted a regen 1 minute in when I arrived home, just took a 3 mile drive around town at max 50km/h for it to finish. Better that aborting multiple regens which will eventually cause problems and cause car to throw a fault.
-
Easiest way is to purchase a map update disc from ebay. V17 maps (released late 2019 from recollection) are the latest available for variants of the VW RNS510 (which the Superb II Coumbus is). I've used this chap for my last couple of map updates https://www.ebay.co.uk/itm/124881169278 . Please bear in mind that these ebay discs are burnt onto dual layer DVDs rather than being original factory "pressed" original discs and older Columbus sat navs often struggle to read the 2nd layer on these discs, possibly due to issues with laser strength as they get older. On my own car I had done 4 or 5 updates from original factory V9 without any issues before trying V17 which refused to load properly. Managed to eventually get it to work after cleaning the laser lens using a cleaning disc but for a short while I had no maps available as the update had cleared the old map data from the hard drive but new map data hadn't been fully installed. Some sat navs will simply refuse to fully read these copy discs. There is an alternative install method which uses a temporary firmware loaded from a CD that then opens a backdoor to allow you to load map data stored on an SD card (so not reliant on problematic reading of dual layer DVDs). Same chap also list the necessary for that option but also bear in mind that this also comes with a slight but real risk of bricking the sat nav by firmware corruption if it goes hideously wrong. I've also seen your related post in different tread. It maybe that a map update isn't what you need. If the hard drive partitions have become corrupted as seems possible I'm not sure a new map will install correctly. You may need to reinstall firmware to repartition the drive. Again, same chap on ebay can help with supplying the necessary and I'm sure if you explain your issues he can recommend the best course of action.
-
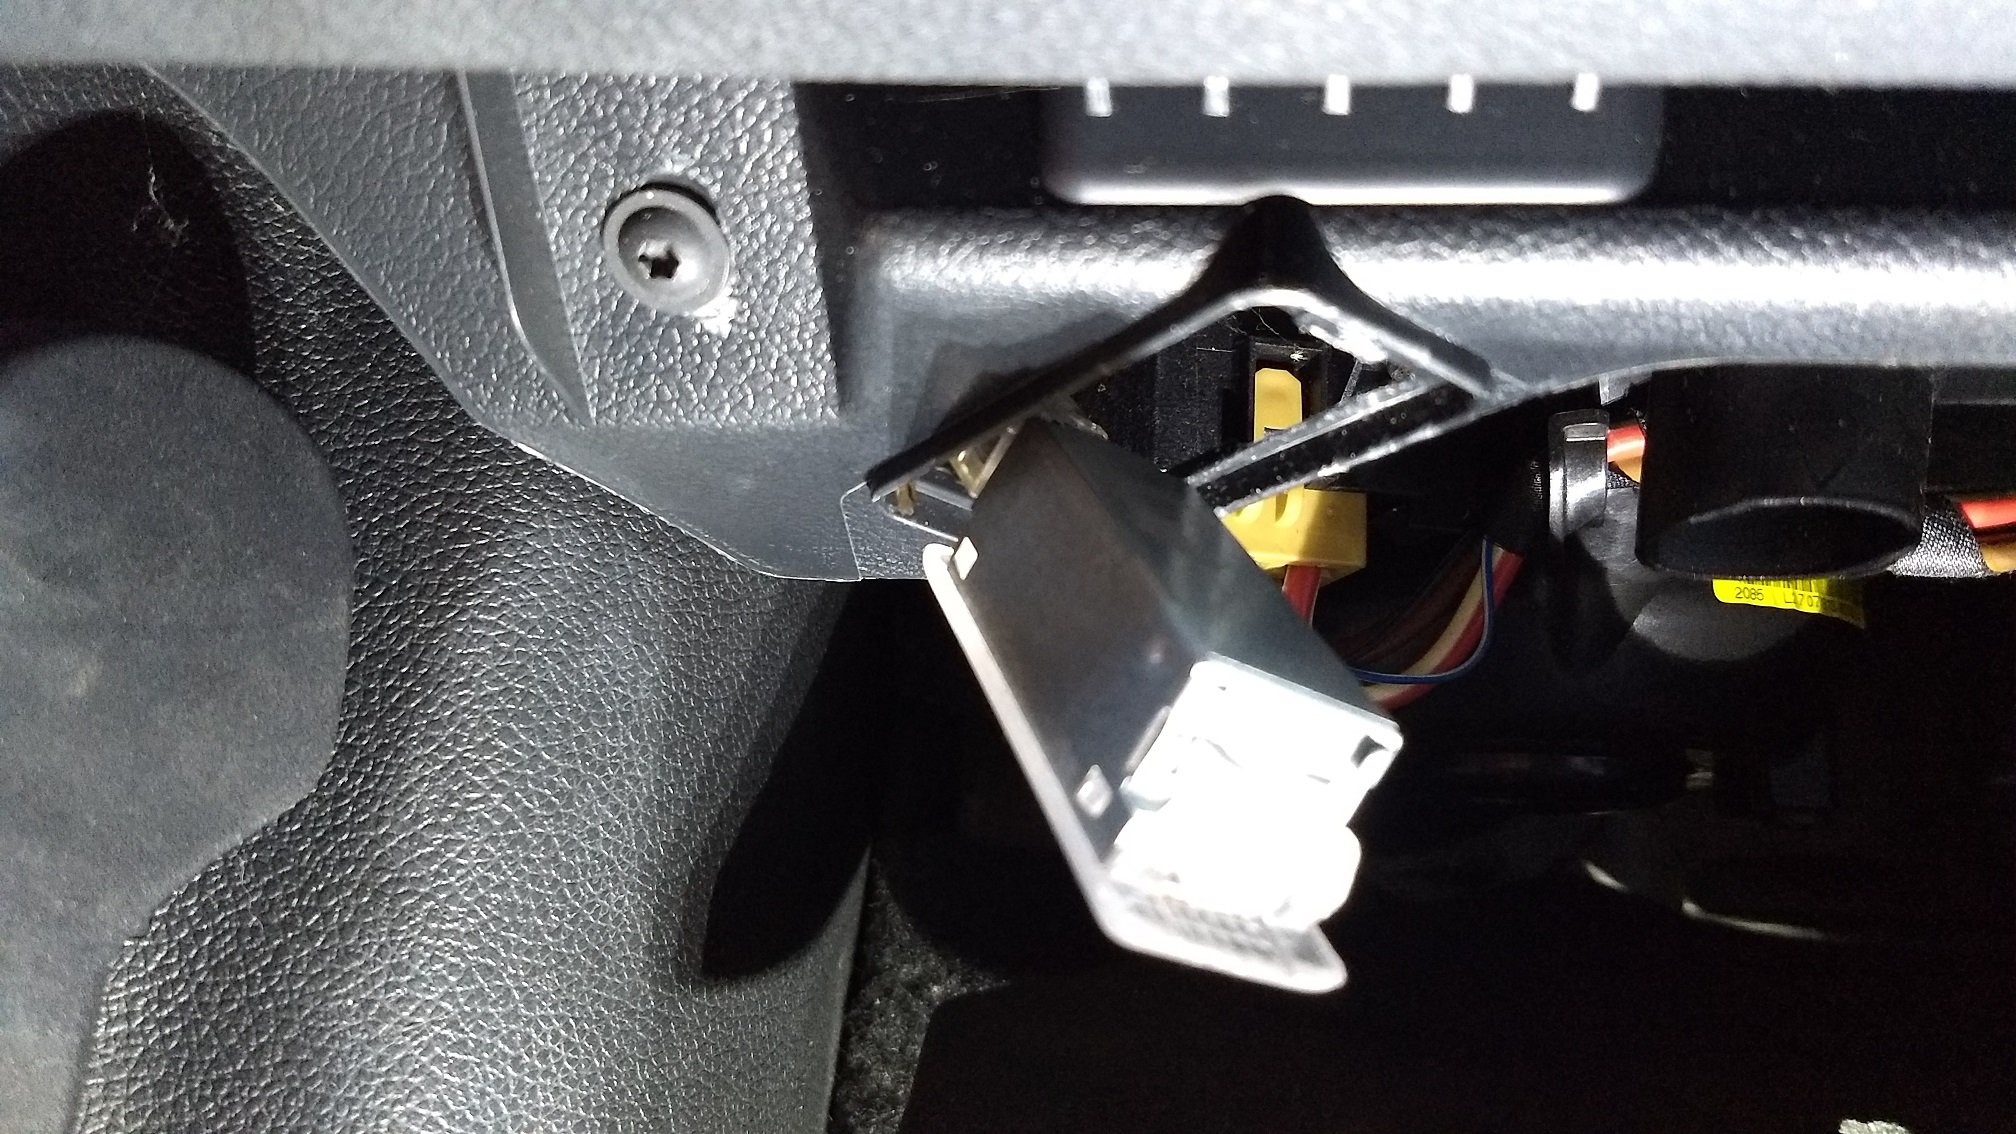
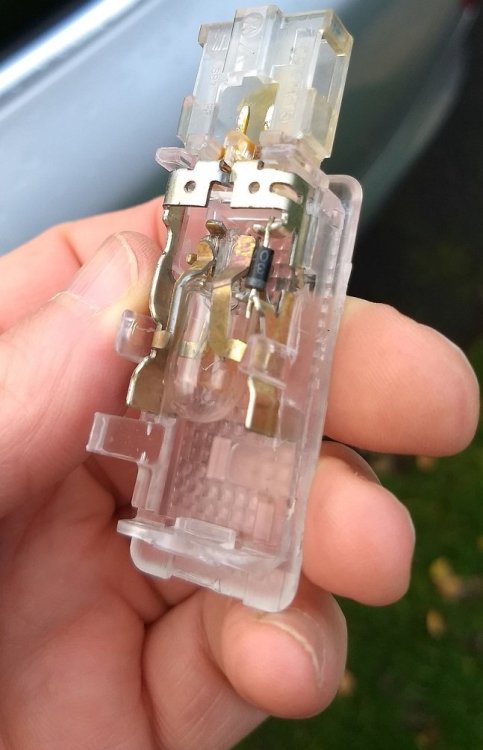
So much for "simply clever" - these are an absolute bitch to get out as although they are the same lamp holder as the boot lights, their location means it's very difficult to see what you are doing and there's not a lot of space to work whilst draped across the sill (plus I'm not quite as supple and thin as I was 30+ years ago which was the last time I used to routinely work on my own cars :-) They are so tight a fit that a plastic trim tool wouldn't do the job, needs a strong + wide (but short) flat blade screwdriver to lever them out. The release mechanism is on the end (short side) opposite the wiring connection so on the passenger side one it's the end closest to the door. If in doubt have a grope behind the plastic trim it's mounted in and you'll soon identify which end the wiring comes in on. It's then just a case of of prodding the screwdriver under the end opposite the wiring connection, pushing to release the locking tab and then levering it out. Feels like it will break but keep going. At least on the passenger side you'll then find the lead feeding it is so short you can't get to disconnect the plug which has locking mechanism built in. I ended up feeding the whole lamp back through the mounting hole and removing the flexible cover that hides the footwell ventilation ducts and outlets alongside it and pulling it out from there. That gives you just enough slack to access the connector locking mechanism and disconnect. Then when refitting it was easiest to have the cable + connector sat in the mounting hole whilst holding it from behind the trim and then pushing the lamp holder onto it (the connector self locks as cable connector seats into the lamp holder). Once the lamp holder is out you have to carefully remove the metal reflector to access the bulb. There are four tabs on plastic lens moulding that hold it on - I used small flat blade terminal driver to lift the reflector off each tab in turn to allow it to be removed. Then when you have changed bulb, the reflector just pushes back into place. Bulbs themselves are standard 5W5 wedge bulbs readily available from Halfords and the like although better value to buy a pack of ten decent quality Osram bulbs from ebay or Amazon for just over a fiver delivered Attached are a couple of photos that may or may not help you, one shows the lamp holder having just been levered out. The other shows the lamp holder with reflector removed to you can see the actual bulb holder / clamp mechanism. In my case it wasn't the bulb that was at fault, in wrangling the holder out of the trim it started working again. Fitted new bulb anyway and put back in and immediately stopped working again. What I think is the issue here is the diode that is fitted to the footwell lamps. These aren't in the physically identical boot lamps, I suspect it's something to do with the variable brightness of the footwell lamps. This provides some information on this setup: Given the bulb is OK , holder is gripping it tightly and wiring looks good it has to be something to do with these diodes which are a push-fit into the lamp holder. The diode connection looks good to me so suspect it's the diode itself that is at fault, I wonder if there's a dry joint internally which gives intermittent continuity. The diodes are readily available for few pence each e.g. Amazon have a pack of 50 available for less than 2 quid delivered. Just a case of levering the old diode out and replacing it with a new one (with leads cut to correct length), making sure polarity is same as before.
-
Just tested these bulbs - installing one of them gave bulb failure warning 😞 Also tried the higher output LED bulbs that I'd previously bought from same manufacturer for boot lights (but were too big for those holders). Thought I was onto something as no bulb failure warning was issued when I installed just one of these. But soon as both installed got the bulb failure warning. The monitoring of the number plate light circuit must be extremely sensitive. So think SkeidaFin is correct, only way around this is to add additional resistors to the circuits or use something like the complete LED number plate lamp modules and resistors (with heatsinks) as in my initial reply.
-
Mine's a 63 plate facelift and had exactly this. In the course of a day went for intermittent loss when opening the door to permanent total loss. It's a lottery which wires break first, I guess losing a speaker is better than central locking of electric windows but was annoying to have essentially mono system for couple of months until sorted as was just before start of lockdown No 1. If one wire has gone then others won't be far behind so took decision to get complete new loom (which now has longer wires to stop it happening again) fitted at dealers. From recollection was just over 200 quid all in so not too bad. Seems likely you have the same problem but your issue could of course be a dodgy speaker or loose connection onto it.
-
Passenger one on mine had been intermittent for a while and recently gave up the ghost totally. Will look at changing bulb soon as get decent some decent weather when not at work. But at first glance they look identical to the boot lights in estate tailgate which need a flat blade screwdriver or, ideally, plastic trim tool to push clip at one end in and then lever whole thing out of mounting hole. Will let you know how I get on.
-
I'd certainly expect the side lights and DRLs to be monitored as they are a safety item. Hoping my bulbs arrive tomorrow, will let you know if they work in my number plate lights
-
I've just ordered some bulbs from ebay (https://www.ebay.co.uk/itm/393610898339) to upgrade the boot lights in my 63 plate estate. If I get chance will also test fit them in number plate lights and revert accordingly. One thing to bear in mind is that it's possible that not all of the bulbs you have already upgraded are monitored. The number plate lights definitely are (I know as it's the only bulb that has blown in the 8 year life of my face-lift car which has factory LEDs for side lights etc), maybe it's just the other bulbs you have upgraded aren't? Worst case you'll need to add additional resistors to the number plate light circuits to provide additional load to fool it into thinking it's got a standard filament bulb installed rather than the low wattage LED bulbs. Or I have seen complete replacement LED number plate lights with resistors built in e.g. https://www.ebay.co.uk/itm/124370506861 - you'd need to check part number of your originals to see if those are suitable
-
Ah, had seen your other thread re parasitic drain. I'd always assumed that the actuator latched onto open and closed positions and so didn't need power on permanently to hold it open or closed. But I maybe if the actuator isn't making it to full stroke it could carry on drawing current although that's just a guess as never stripped down to see how it works or seen an exploded diagram. But if you want to try disconnecting then you could do this this from outside the car. Very easy to remove the whole flap and filler assembly (one screw from recollection) and you can then gain access to wiring off the back of the actuator. Could cut wires and make both ends safe and waterproof with glue lined heat shrink by pinching the the open end of tubing with pliers when hot to seal the end. Then if that cures your battery issue you can still retrospectively splice in new actuator if you decide it's worth it to replace.
-
Have a look at this - Unfortunately if you want to disconnect to install a replacement actuator properly you do need to remove trim in the boot to gain access to the connector. If you want a quick bodge then easiest to access the wiring from outside (via filler aperture) and cut the wire from the old actuator and then splice the wiring on new actuator to it using solder and glue lined heatshrink tubing or glue filled solder splices e.g. https://www.amazon.co.uk/CAMWAY-Adhesive-Connector-Terminals-Connectors/dp/B07R5YM2QN. The latter work very well but from my own experience you do need a decent variable temperature heat gun to get the solder to melt without damaging the outer tubing. In my own case I never bothered, my locking fuel cap has now permanently failed unlocked and I'm happy the risk of anyone trying to siphon fuel or maliciously poison tank content is negligible.
-
I'd agree based on that table. When I looked autodoc were cheapest if you pick the right time to order based on what discount sale they have on at the time. Just done a quick check and complete parts (springs, dampers, bumb stops, cover, spring caps and all bolts) for my car comes to £218 today including VAT and delivery. To find part numbers of bolts etc try http://www.oemepc.com/skoda/part_single/catalog/sk/markt/CZ/modell/SUP/year/2011/drive_standart/632/hg_ug/511/subcategory/511001/part_id/2561497/lang/e. Malwarebytes always warns me about going to this website but then never actually picks up any threats so is OK I think. You can then search for the skoda part numbers at Autodoc to get OEM part numbers and prices. Interestingly they reckon the damper for 2011 is CP and Autodoc shows a total of 32 different versions of the 3C0 513 049 xx part number varying in the last two letters for a single sachs damper (https://www.autodoc.co.uk/sachs/1224280) further confirming my thought that BR, CP and CR are essentially the same damper As an aside, I wonder if with a decent set of spring compressors you could actually swap out the springs (and the plastic caps off each end of spring) without disconnecting the damper negating the need for any new fixings if you wanted to just try new springs?
-
No, 2010 was swap from Mk1 to Mk2, facelift is the midlife "smartening up" of the Mk2 that happened somewhere in 2013. My November 2013 car is an early example of a facelift car. So at 2011 you are definitely pre FL which would make damper end in BR. Finnily enough the delaer who did my work reckoned my dampers were CR rather than CP as per the PDF. I suspect that there isn't a huge amount of difference, if any, in the dampers when the last 2 digits change and so CR, CP and BR are I surmise essentially the same damper with a different part number label on. It's only when the main part number changes that they are significantly different e.g. Pre FL weight class 5 and below has 3C0 513 029 xx dampers whereas weight class 6 and above has 3C0 513 029 xx dampers . I worked up a bill of materials for when I was looking at doing swap with OEM bits which has details of all the bolts etc you need. Worth changing the plastic/rubber seats at each end of the spring as well I think as they are cheap and could explain your noise on speed bumps if they are damaged and allow metal on metal contact between spring and seat. Agree if you are DIY then worth swapping springs only to start with
-
Even at 108K miles with most of it fully loaded, the dampers on mine showed no sign of leaking or pogo'ing if you did a bounce test on rear of car. But their performance obviously deteriorates with mileage (and I guess time to a lesser extent) as with the new ones fitted, the car is so much more composed over speed bumps and rough surfaces. New springs obviously help but you still need correct damping for them to work as designed. If budget allows then I would say change springs and dampers to ensure you get best payback in terms of improved ride from this investment. If you can find a decent independent mechanic willing to do the fitting, brand name OEM parts aren't expensive, when I initially priced up sach branded dampers and springs with all the necessary fitting bits were not much over 200 quid from Autodoc thanks to one of their sales that seem to happen every other day. Only reason I didn't go down that route was I couldn't find anyone to fit them. Would have done it myself as not difficult as long as you have a lift to make access easy. Way too old to be lying on driveway in pouring rain skining my knuckles to save few quid, hence why I went for dealership and genuine parts.
-
Exactly the same reason why I've invested in sorting the rear suspension as not a chance of finding anything similar in Mk3 superb for the 25K I paid for mine when it was 3 months old with 3K on the clock back in early 2014 so biding my time and keeping the old girl running until I stumbled onto a bargain. WRT damper versus spring, they don't know what they are talking about! As long as you select a spring in the same chassis group you should be OK e.g. the same damper for my facelift car covers the full range from weight class 5 all the way up to weight class 14 so the standard damper would certainly be fine to cover jump from class 5 to 8 as suggested for you. It's not like you are buying an after market uprated spring, all these springs are standard factory fit . Yes, the uprated springs will be slightly stiffer but from my own experience the ride quality with a stiffer new spring and new damper is infinitely more comfortable than that with the knackered sagging old setup
-
The consensus seems to be that the majority of UK and Irish cars with standard chassis have the rather soft weight range 6 springs fitted at the factory, I assume in an effort to better cope with the crap roads we have over here. Definitely worth confirming exactly what you currently have fitted, either by checking paint marks on the springs like chimeaera suggests or, if like me you are lazy and colour blind, sweet talking local Skoda parts department and asking them to quote for replacement of the standard parts and confirming the corresponding PR codes. You can then decide how far to upgrade the weight range. Given the amount of weight my car always carries (a minimum of 170kg in boot) I made the decision to go up 3 weight ranges to 9. Even with that increase the car still only sits 8mm too high on rear when empty apart from spare wheel (which only happened when it came back from having the work done) which is actually still within the factory tolerance of +/- 10mm. So in your situation where it sounds like you are looking to improve ride quality / clearance when empty rather than for load carrying capacity as I'd gone for, I'd be looking to stick with a spring in the same standard chassis range (as your G15 PR code for front suspension suggests) rather than going for heavy duty or higher chassis range (which in any case wouldn't be correct for your chassis and would likely throw out handling as would never be combined with the standard chassis setup you have on front) but go up 2 weight ranges to 8. I suspect that this means empty your car will sit a little above the design ride height (but well within the tolerances although I guarantee it will look odd as you will have grown accustomed to the stance with sagging rear suspension)) but when you do load up the boot or tow, you will still sit considerably higher than you currently do even when empty. With the prices you have been quoted, are they from a main dealer or independent? The labour for my complete swap (springs, dampers and all the single use bolts and replacements for all the plastic/rubber bits associated with springs and dampers) at main dealer was only smidge over 200 quid including VAT so the quoted labour for just the two springs isn't necessarily a bargain. Again, just my take on it but if you are planning to keep the car going for another year or two as I am, I would definitely consider also getting new standard dampers installed at the same time if the budget can run to it. The dampers were around 125 quid each and whilst yours won't obviously be as worn as mine having done 50K less even though couple of years older, in conjunction with the new springs I reckon it will make it feel like a new car again. And the last thing you want to do is spend 150 quid getting teh new springs fitted and then find that doesn't give the ride quality you'd hoped for and so then have to spend similar sum of labour again to fit new dampers.
-
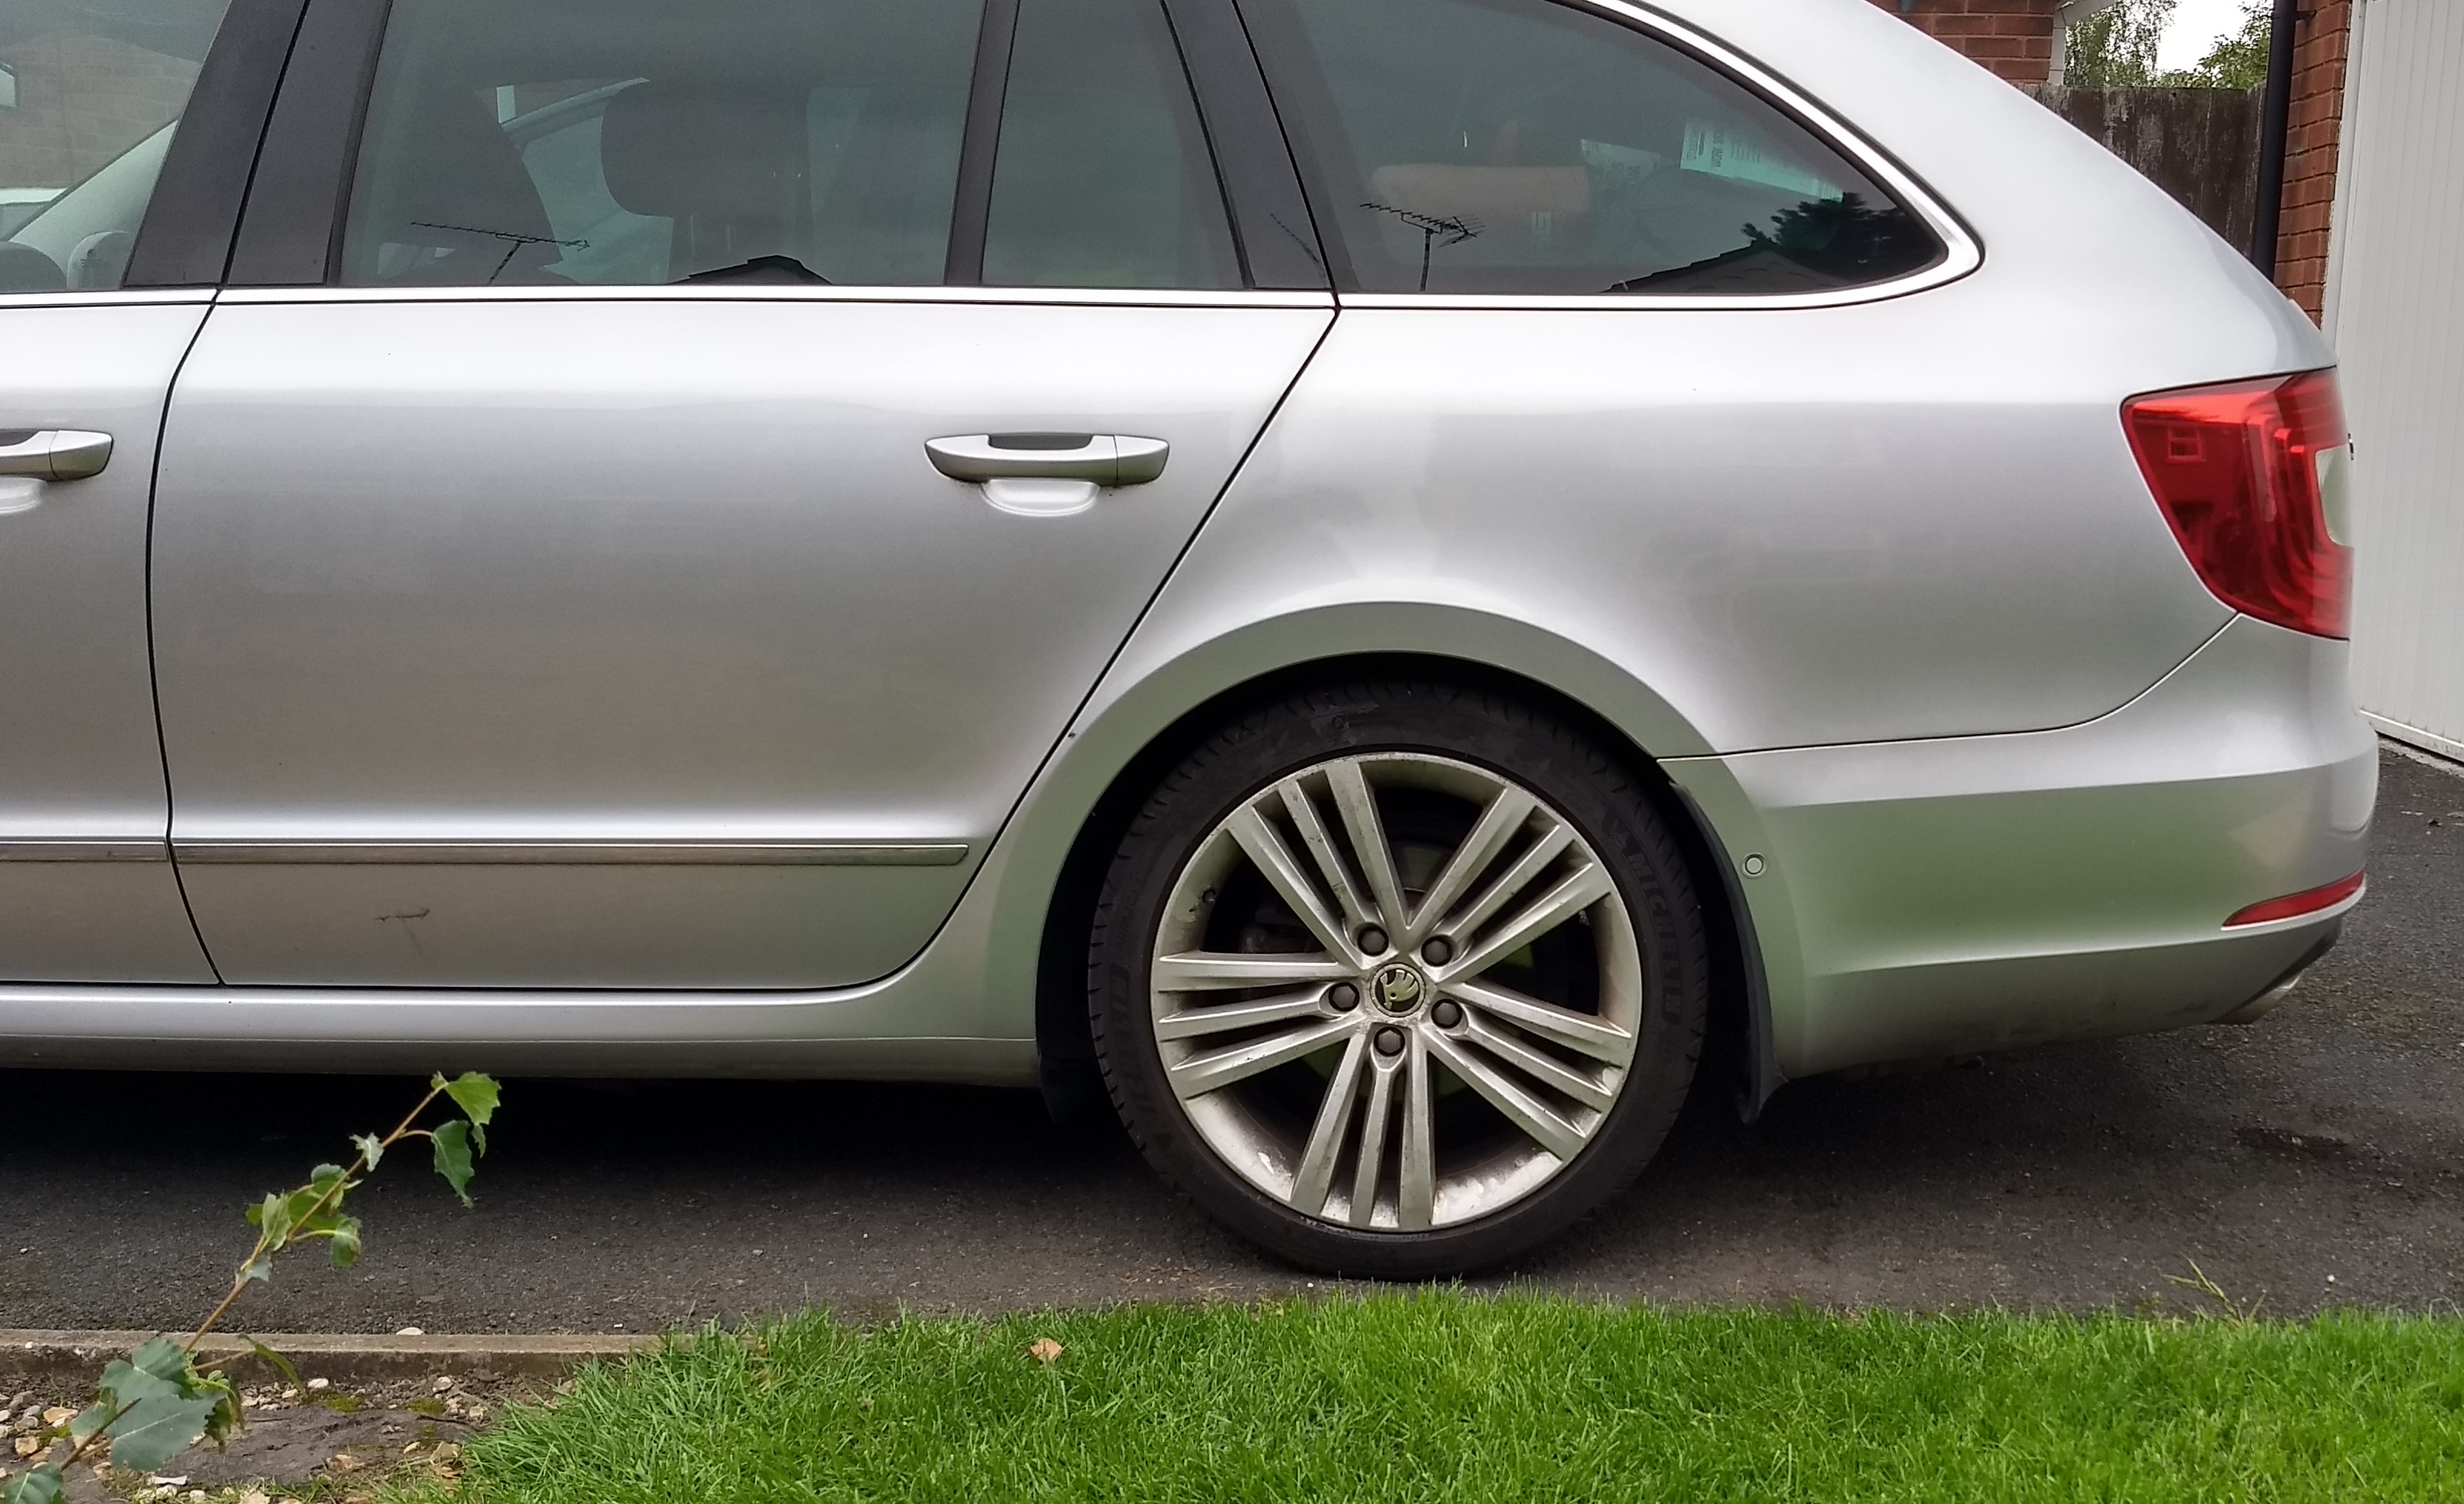
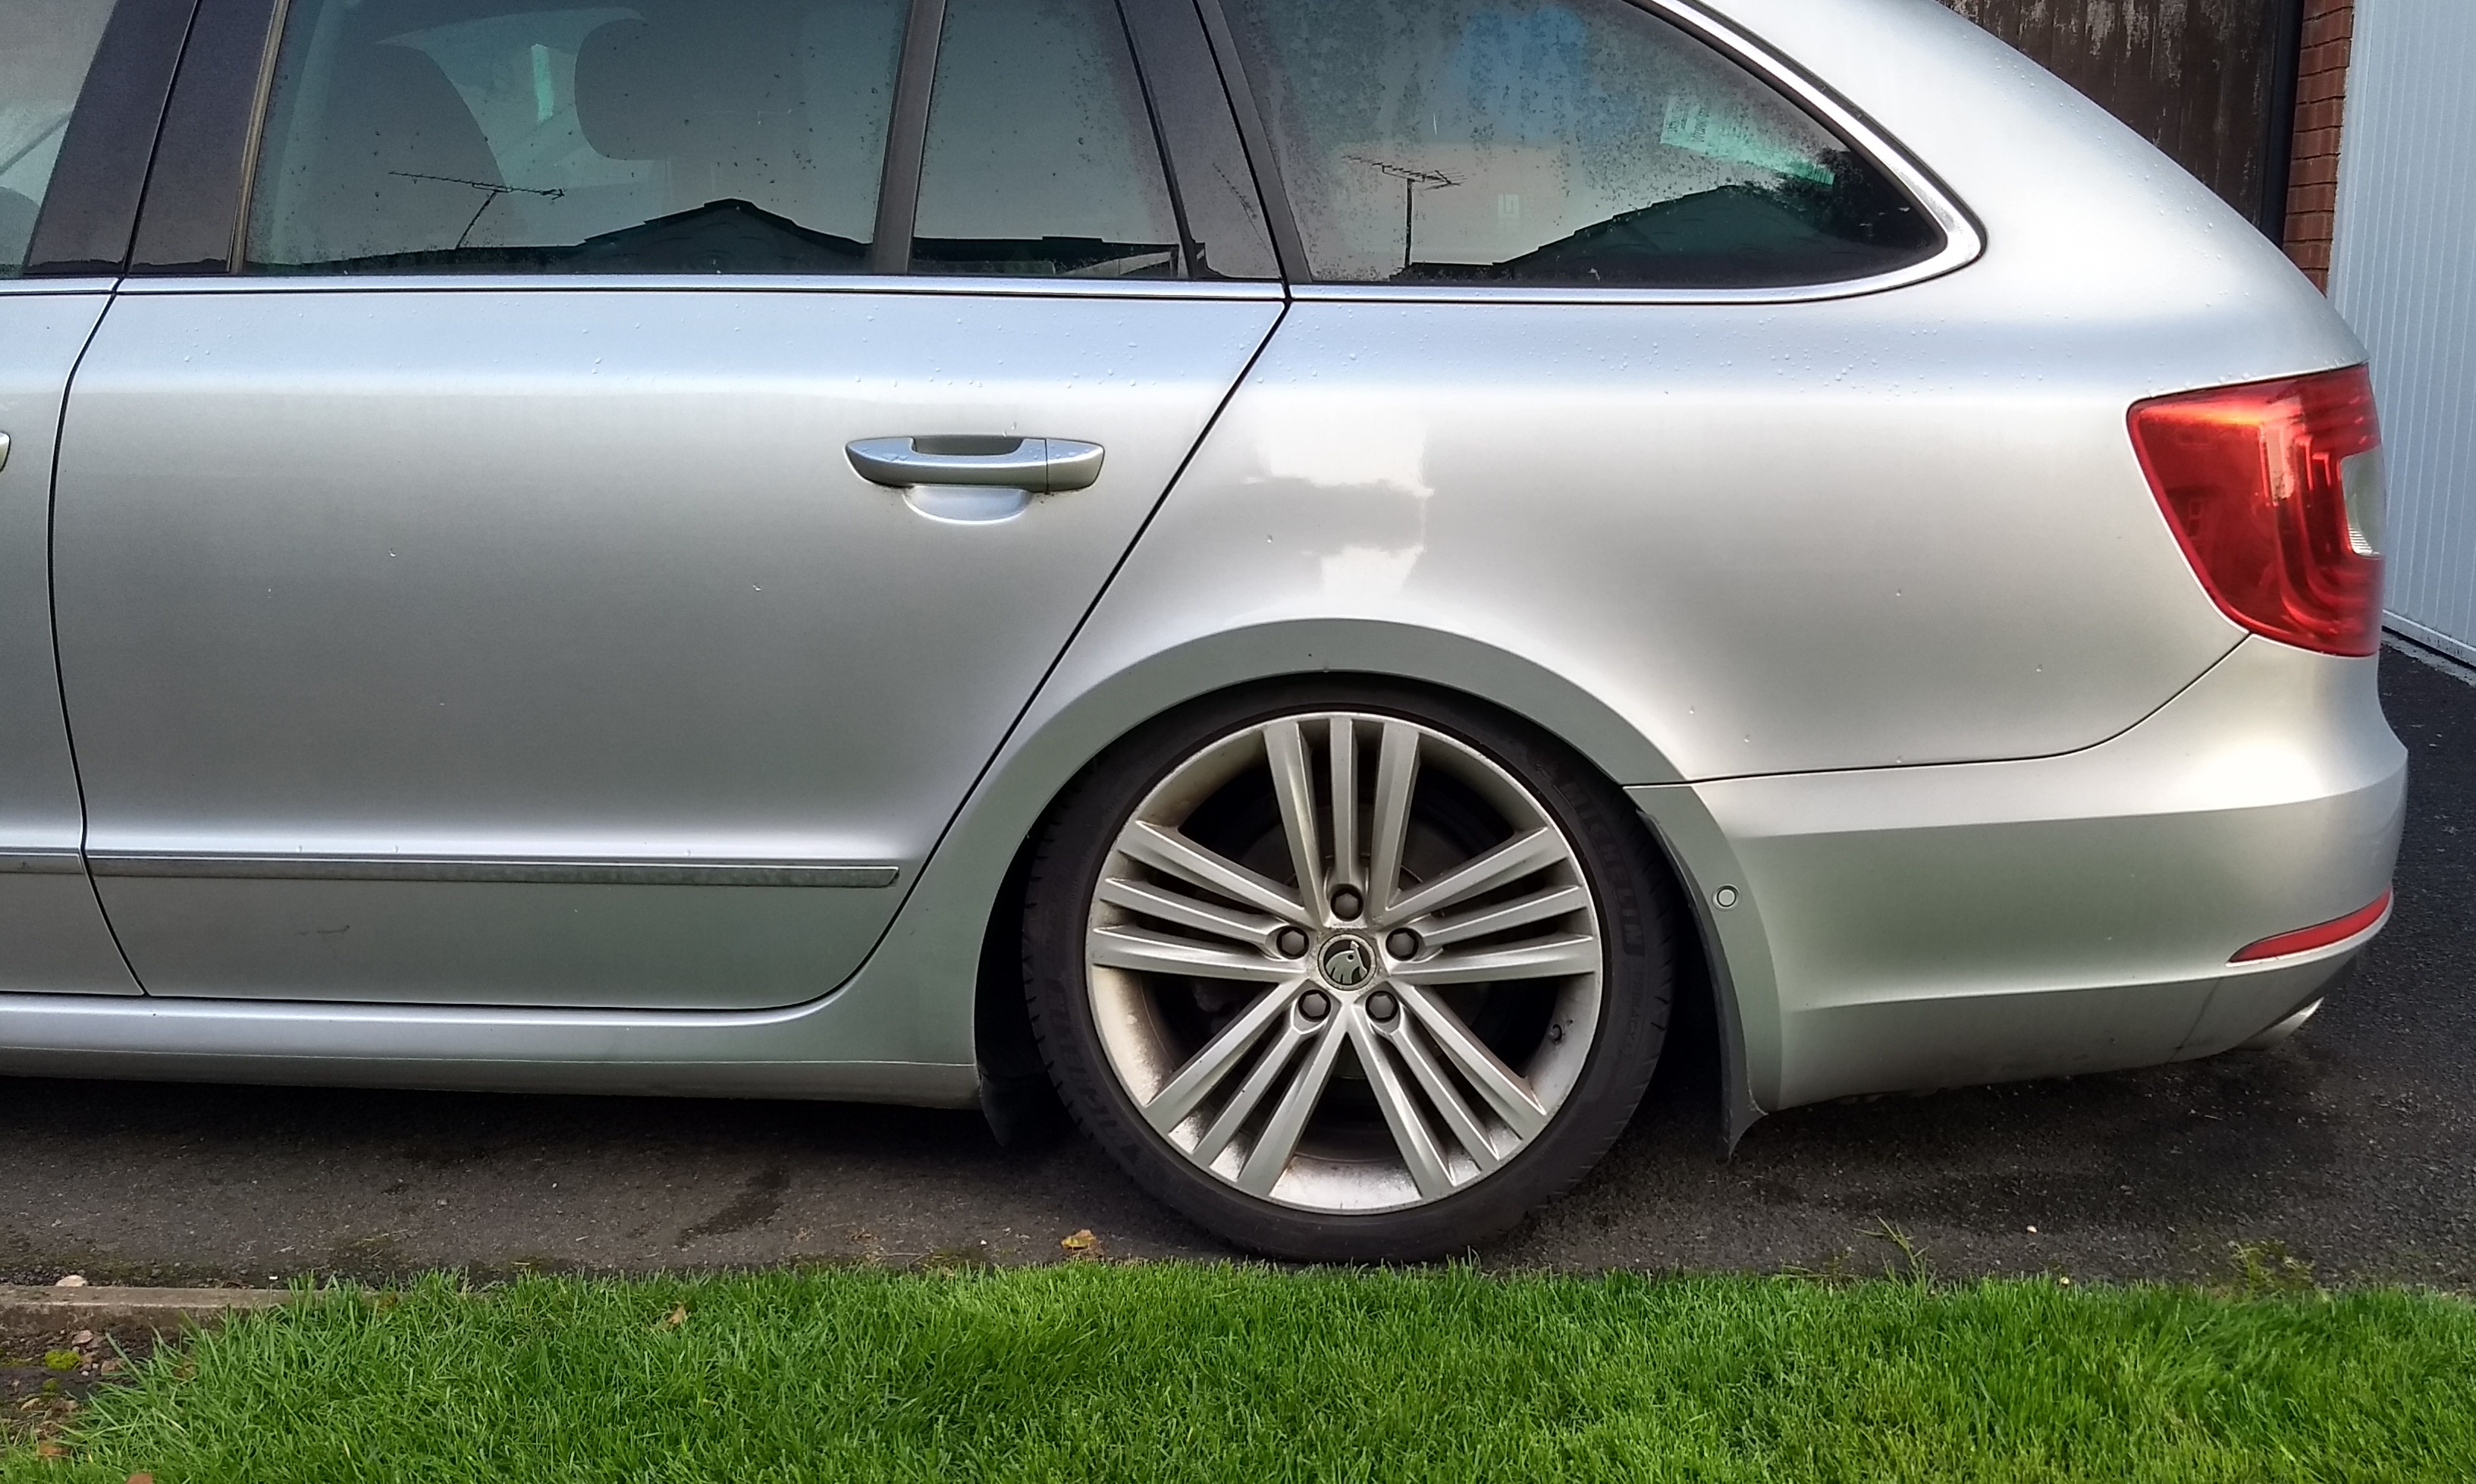
Hadn't realised photo attachments came through without file names which described what each shot was . In the order in post they are as follows: After swap - empty After swap - fully laden, Before swap - empty Before swap - fully laden (although I suspect you could guess the last one, the missing tyre wall at the top is a bit of a giveaway ;-)


-
I was the member that ulfnilsen referred to in previous post. Since I went self employed in 2015, I always have at least 170kg of kit for work in the boot (and often on the back seats, I know I really should buy a van as everyone on site keeps telling me) of my 63 plate TDI 170 DSG 4x4 estate and the arse end was starting to sag, to say the least, in the 108K miles / almost 8 years since it left the factory (bit like myself after 55 years on this planet :-). Got to the point where I was struggling to get over even the smallest speed bump at crawling speed without something scraping. Book ride height for the rear on standard suspension like mine is 394.1mm +/- 10mm. Fully laden ride height was less than 310mm so was sagging at least 85mm and even with the boot unloaded for the first time in at least 5 years when I was weighing the kit I carry, ride height was only 340mm, a sag of around 55mm. So decided to bite the bullet and replace rear dampers (and rubber sleeve/cover), springs (and plastic end caps), bump stops and all the consumable fixings. Local Skoda dealership kindly helped me identify the existing springs and damper by confirming the associated PR code for my car, 0YF for weight range 6 springs and 1JA for standard dampers. That was the same as ulfnilsen. He'd gone for weight range 8 springs, 3C0 511 115 AG and the original 3C0 513 049 CP damper and was pleased with the result. But as I am carrying at least another 30kg I decided to go up one step more to weight range 9 springs, 3C0 511 115 AH, again with the original damper although in my case the correct part number was 3C0 513 049 CR according to dealer. Was originally going to use OEM equivalent parts but when I had a price from a local, well respected, VW independent he would only use genuine VAG parts thanks to bad experiences in the past. Was about to go down that route when decided to see what the Skoda dealership would charge, they were actually about £20 cheaper overall thanks to the independent charging list price on parts and insisting on quoting for a minimum 3 hours work (and charging for more if he hit problems) whereas the dealer I assume quoted based on fixed book timings and so ended up cheaper despite hourly labour rates being roughly twice the independent. 20 quid is 20 quid and the independent didn't offer a courtesy car so the work was completed yesterday at Autosales Burntwood and whilst my wallet is now lighter to the tune of £718.08, it has absolutely transformed the car. Front suspension is sat at 387mm (a few mm low but still in tolerance) whilst rear is now 403mm empty (about 8mm high but still in tolerance) dropping to 369mm fully laden. That's still 16mm below the minimum book value but half the depth of the tire wall is no longer hidden in the wheel well (there's now actually a gap between the arch and tyre!) and ride height looks spot on to my eyes. And all the clanking and majority of harshness in the ride has gone despite being on 18" 40 profile tyres and still on original front suspension. I suspect it was like this when I first got the car (was a 3 month old dealer demonstrator) but the slow deterioration in ride quality in the 105K miles + 7-1/2 years I've owned the vehicle meant that I'd gotten used to the appalling ride quality as it grew to seem normal. Just wished I'd done it couple of years ago as only planning to keep it for another 12 months although they will at least now be comfortable months. Next job is 2 new rear tyres and 4-wheel alignment as the rear camber and toe-in are a mile out which coupled with the extreme loads carried and possibly my driving style when not motorway cruising (4-wheel drive means safe to boot it at every junction and roundabout, so I do, which I assumes biases the torque (and hence wear) to the rear) likely explains why rear tyres last on average just under 12k miles (compared with 24K average for same Dunlop RT Sport (and later on, Michelin Primacy 4) tyres on the front) although they don't wear particularly unevenly, usually no more than a mm variation across the width of the tyre. Anyway, attached are before and after photos, both empty and fully laden, to illustrate the transformation in ride height. I'm sure the fully laden before photo must win me a trophy for the most lowered Superb in the world :-). Hopefully someone else will find this information useful and happy to receive PM's if anyone has any questions.
-
My request for information about internal trim removal wasn't to gain access to the fuel flap assembly as that is extremely easy to access to and disconnect from the body with a single screw to be undone (once the flap is open of course!), it was to gain access to the electrical connection which is inside the body behind the load area side trim. The cable from the locking mechanism itself disappears from behind the fuel flap assembly through a grommet into the load area and hence you can't in theory replace the fuel flap assembly unless you can get behind this trim to disconnect plug from the socket on main loom. I have seen reference to others cutting the lead from the the locking mechanism inside the wheel well and making a wire to wire direct connection onto the new fuel flap assembly (e.g. solder cut ends of wires and seal with glue filled heatshrink tubing) to allow the fuel flap assembly to be replaced without access behind load area trim. WRT my own issue, there was something more fundamentally wrong with my fuel flap than a simple lack of lubricant. Whenever the flap was stuck and eventually forced open with multiple actuation cycles / pressing and pushing the flap (essentially as chimaera suggests) the actual lock plunger was found to be free moving (although I always added additional lubrication). Eventually the lock plunger operating mechanism failed completely, I can no longer hear the solenoid clicking when the car is unlocked. So suspect the solenoid was on its way out and operating intermittently and eventually gave up the ghost. Fortunately it failed open. Means I no longer have a locking fuel flap. But the way I look at it is if someone really wants to nick a tank of diesel or pour something in to contaminate it, a fragile plastic 1/4 turn plunger lock isn't going to stop them prising the flap open so haven't worried about fixing it since it failed back at the tail end of Lockdown No 1 last year. If you were really worried you should be able to find a lockable replacement for the actual fuel cap (like the good old days pre everything being electronic).
-
Just gone out to car to confirm my recollection and yes, incoming calls do ring over the car speakers. I can't see any ring specific volume settings on my Columbus but try phoning your phone when connected to the car and when you see the incoming call, turn up the volume on the Columbus. That trick works to adjust sat Nov announcement without having to delve into menus whilst driving, wait until it makes an announcement and then use the volume knob (or roller on steering wheel) as it temporarily acts on nav volume rather than radio or whatever you were listening to at time of announcement. If that doesn't work maybe try another phone to confirm if the issue is with the car or phone. I suspect the latter, maybe you can individually adjust ring tone volumes for phone and Bluetooth connections (my Motorola with vanilla install of Android doesn't, maybe others with custom Android installs or iOS do?).
-
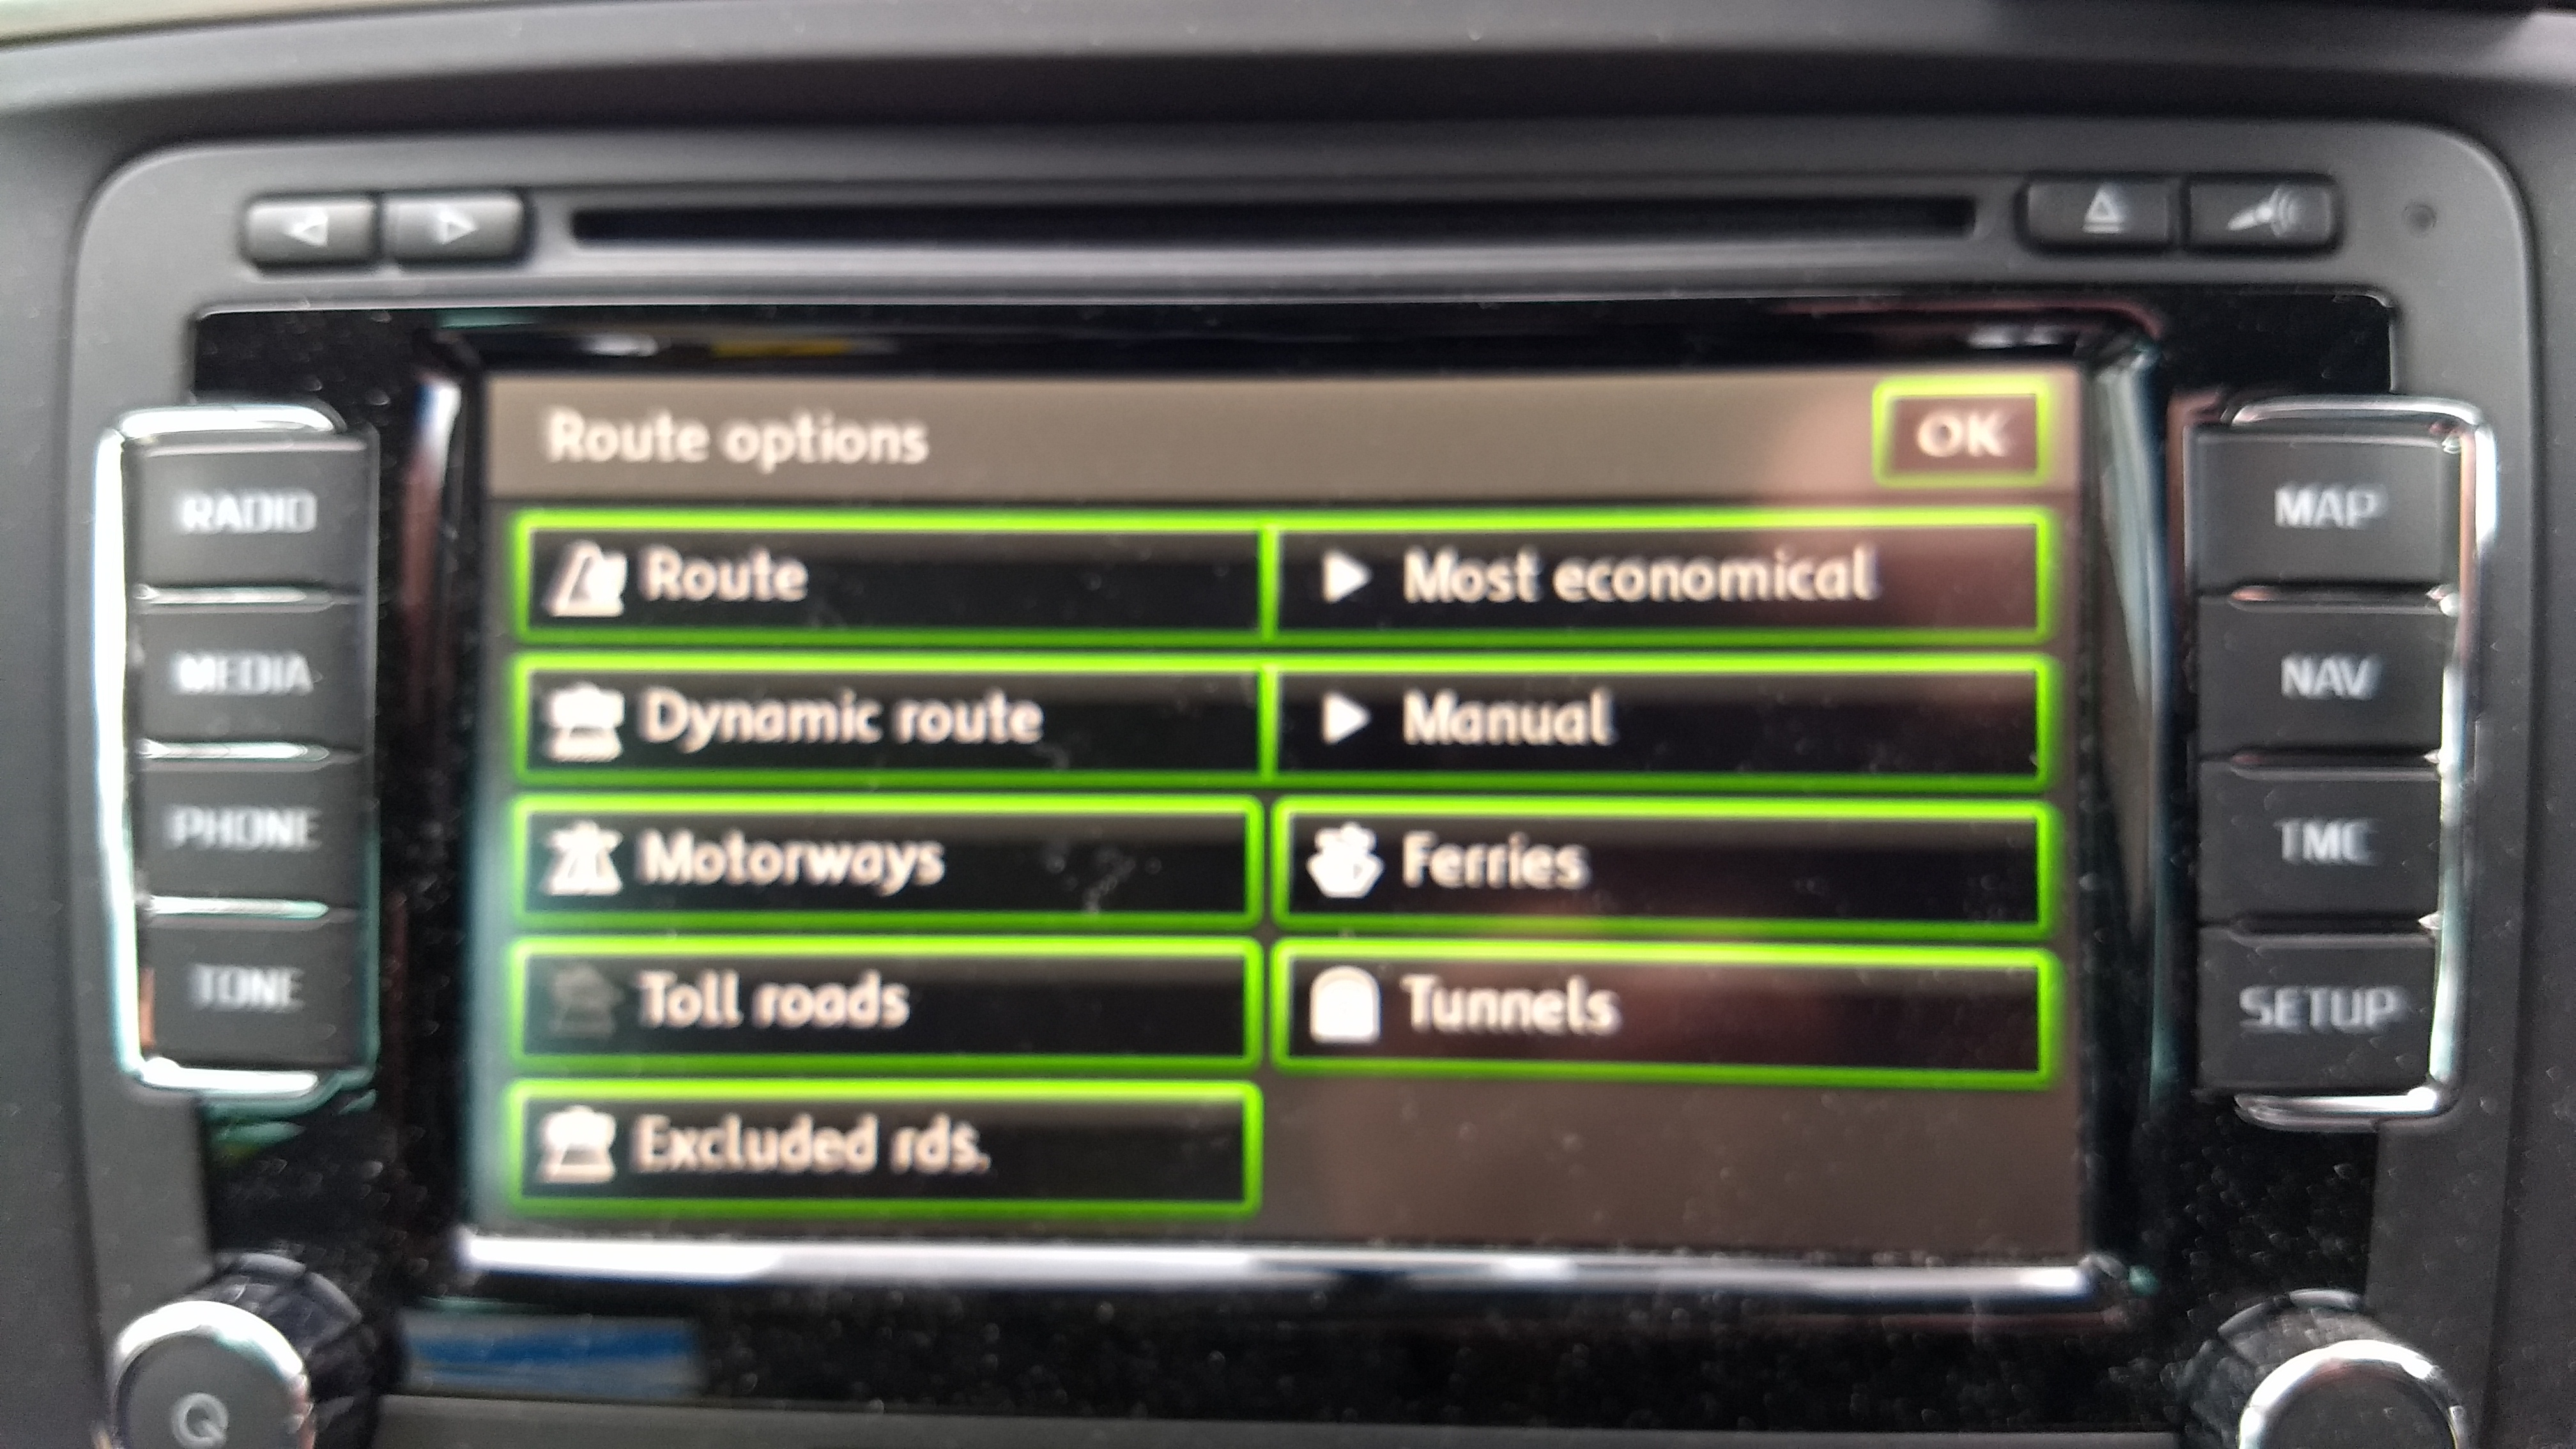
Find route options (e.g. on main map screen, press the button to left of time display that normally shows distance/time to destination to bring up a menu that includes link to Route Options) and that allows you to exclude certain features from your route, including toll roads. When greyed out they are excluded from the route, see attached

-
Have bought from this guy on eBay in the past - https://www.ebay.co.uk/itm/124562562405 Just bear in mind that the Columbus units can start to struggle to read the dual layer DVDs used for non-genuine map updates discs. My own 63 plate had no problems with first 4 updates I did but then struggled with the V17 update. Needed laser lens cleaning with cleaning disc to allow update to complete properly
-
In a similar situation, albeit with passenger door (the driver's door regulator failed and was replaced under extended warranty 18 months ago) which failed couple of months ago. Last week I finally got around to booking it in at Skoda dealership and was booked in for this Thursday but had confirmation this morning that the regulator is on back order so had to cancel awaiting confirmation of when the part will be available, hopefully before current extended warranty expires. Suspect yet another knock on effect of Brexit.
-
Had a 20 plate iV as a courtesy car last week whilst my Mk 2 was in at dealers for couple of days and it displayed this grammatically challenged exit message more often than not (but strangely not every time). So I suspect this is standard on MY21 cars but does feel rather unfinished. Hopefully the next firmware release will be proof read by a native English speaker before being released into the wild rather than just relying on Google translate again!!