vborovic
Members
-
Joined
-
Last visited
Everything posted by vborovic
-
From the top off my head, I think there is an offset option that goes both ways, something like -10 to + 10 litres ... to be used with extreme caution of course.
-
In any case, I'm less stressed while driving a car with a proper fuel tank, compared to a car with only the batteries, since you can't just sip extra electricity from a jerry can ... 🤣
-
Maybe on paper, I've had the car on 0 miles remaining, fuel needle fully down, wondering if the car would even start or die of fuel starvation, and it could never accept more than 54 liters (maybe .20-.30 +, at most). I don't know where the missing " 6 liters" are in that case ...
-
The actual tank capacity is 54 litres on the Mk2 ... On another note, I'm happy If I manage to squeeze 500 kms out of mine (bit of a heavy drinker the car) ... 😅
-
Maybe this can help you out (read from that point onwards):
-
Easily configurable on such systems, you could probably import your custom picture as well. You can learn more about the headunit here: https://www.caraudiocentre.co.uk/product_m-zenec-ze-nc2010_p-23719.htm
-
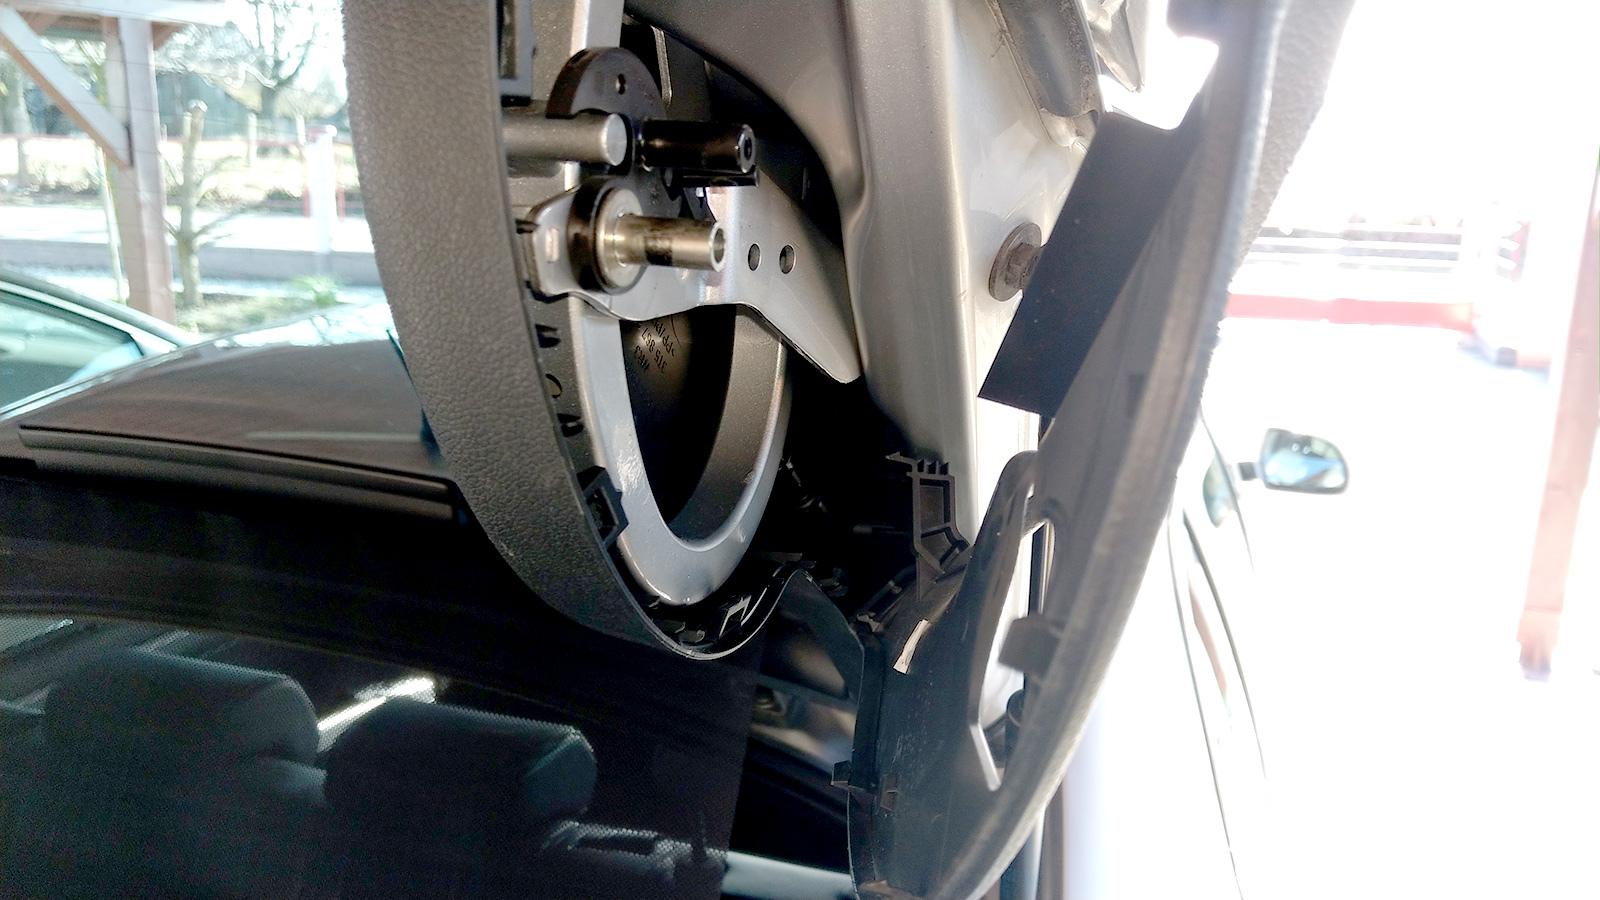
Recently I had some radiator issues on my Superb ... luckily the level sensor in the coolant container works, so it started detecting that the coolant level was too low. So, naturally, you just top it off and continue driving ... and such a fix held up for a week or two. I never found any coolant anywhere in the engine bay or under the car (and no, it can't just evaporate without any trace). So i figured the coolant container must be leaking somewhere, since I saw some scale traces on the sides , and some coolant drops on the bottom, like there was some leak on it, which gets active with the increase in system pressure. A few days afterwards, the coolant error came once again, and it started appearing more often. Did some close inspection, and found out that the radiator was leaking, ever so slightly, on the bottom right front facing side (you could see it through the bumper), and this was the obvious leakage source. Replaced the radiator, topped up the coolant and was happily driving until two days ago. Started the car and was greeted with the well known message that the coolant level is too low. Topped it up, and saw a coolant puddle appearing below the car after starting the engine (some half liter went down over a few minutes). I was confused, since all the apparent sources of leakage were inspected and fixed (previously all the hoses were checked, just in case - no cracks or any other visible damage on them). Well, the hood (bonnet, for you brits ... ) was up once again, and I tried to find the source of leakage, and this time it couldn't be a small one judging from the amount of the coolant that leaked within minutes. After some time under the hood, the issue was found - the radiator coolant hose adapter which connects to the cabin from the engine bay (under the windscreen). The culprit was the plastic connector, which, over time, failed to properly seal, due to various whatever-it-was that was slowly accumulating over the rubber o-ring inside. The connector is a Y-shape element, and luckily, it structurally failed on the smaller hose when dismantling (literally fell apart), which meant the adapter definitely had to be replaced (without that failure, I'd probably just replace the o-ring, without paying much attention to its general condition, which was concealed with the hoses). I've managed to figure out the OEM part number by doing an online search (the connector is widely know as a "pa66 gf30", which is imprinted on the adapter body, although you'll hardly get the proper part by that alone). The part no. in question (mind you, a 3.6 CDVA engine) is 1K0122291C. Prices vary, I've managed to obtain a new one (Febi Bilstein mfc.) locally for roughly 4 GBP (you'll find a MSRP up to 20 or 30ish GBP at some online shops). It helps for the procedure if you have smaller hands and proper tools. The only thing that was taken off under the hood was the air inlet hose that goes from the air filter box over the engine to the air inlet valve/flap. The car is now 13 years old, with 223.000 km on the clock. Not sure if these adapters are known to fail/degrade as it was in my case, but I'd suggest to anyone having a similar age car to inspect this part before it disintegrates/melts/crumbles/whatever in the coolant hoses, making the repair that much harder. P.S. The smaller, missing head piece of the Y- element was still stuck in the thinner hose (which connects to the coolant fluid container on the upper left side of the hood), and was successfully pulled out with a screw that was screwed into it while still stuck inside the hose. The thin cylinder part was basically dust/gunk that was stuck to the sides of the hose, and had to be dug out.
-
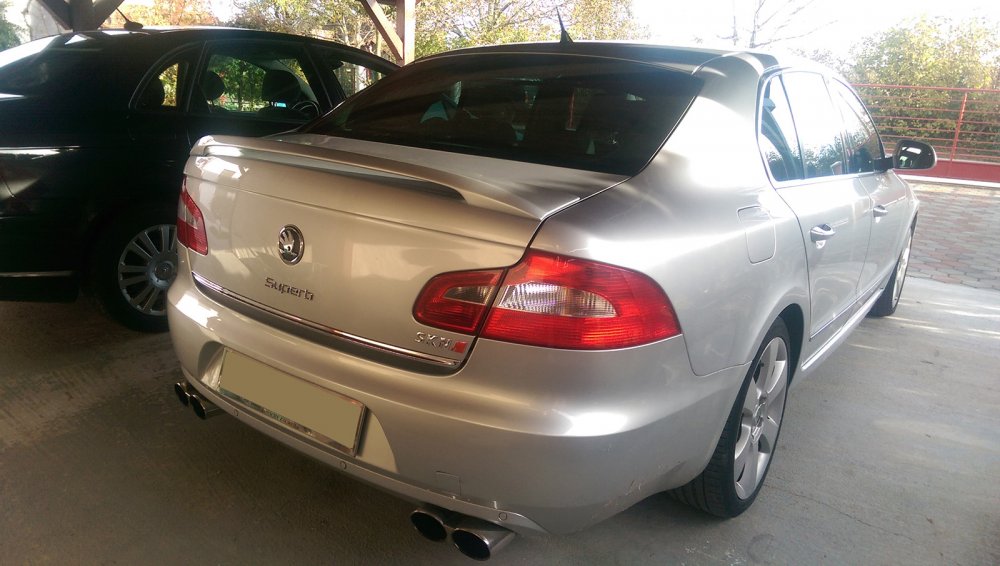
I did the swap on my car today. What I've noticed is that on the light car colours, the new lights black base colour better complements the car as opposed to the genuine indicators clear plastic (makes it better looking and more in sync with the wing mirror black base).
-
Some of you may have been faced with an issue of missing taillight caps, genuine part.no. 7L6945285. You're free to order one such piece (or more) from any source, including the dealerships, but the prices aren't low (starting from around 4-5 GBP a piece - yes, a piece, not a set). You could try and obtain them from a breaker yard, don't know about the price (and they're used, possibly at least one broken clip, etc.). What if I told you there is an extremely cheap alternative, that beats the genuine part in both quality and the way it clips to the taillight, and requires juts a little bit of DIY (cutting the extra plastic, because the original cap length won't allow you to push it in place in the taillight). Well, here it is. In my case, out of 4 in total, I had 2 caps missing, one was genuine, one was something who knows from what. Anyways, what you need is this: https://www.aliexpress.com/item/22mm-Diameter-Round-Plastic-Blanking-End-Cap-Tubing-Tube-Insert-5-Pcs/32807481896.html The price is currently $0.63 for a set of 5 (I've actually received 6 caps) and free shipping worldwide. You just need to cut the extra plastic (after the first thread) with a scalpel or a similar tool (watch your fingers) and after that just clip in place. Perfect fit, better that the genuine part (clips all around, not just by having two flimsy hooks on each side), they actually fit so tightly, I don't know how I'll get them out if I'll have to
-
If anyone has the same situation as my self, I'd like an opinion, if not, maybe I'll provide it in due time myself. I've noticed that the short boot opening mechanism (mostly regarding the short dampers) isn't working as it should, which I believe is due to old age of the car (10 years). It will only slightly lift the boot (after pressing and holding the boot key on the remote), nothing higher. Now, this is not something that i use very often, but when I do, I'd like for it to work, and I'll have to repair this. An extra factor comes into play in the form of a rear spoiler (which I put on, replacing the stock rear lip on the boot). The spoiler isn't that heavy, maybe 4 kgs at most, but surely it adds just enough weight to keep the boot down compared to before when 2 out of 5 times the boot would manage to squeeze itself out (pushed by the aging genuine struts). Now, here's the thing, the stock strut OEM part no. is 3T5 827 552, and there are several brands available (locally, I could get Magneti Marellis, but I can also easily order online, going for Johns, Kilen or Stabilus - the last one being 3x more expensive than the first one mentioned - Lift-o-mat, something magical). Now, all of those have a declared pushing force of 310 N. I did some extra research, and found on the net that there are universal struts (required 40 cm, or 403 mm precise) available that have forces of 400-600 N. What would you do? I can grab the Marellis locally for 20 GBP a pair and just try my luck, or opt for the universal ones with stronger pushing force (at least on paper), which are mostly no-brand, no warranty, and who knows how long they will actually work and how they'll work. Feedback appreciated