newbie69
FREEDOM
-
Joined
-
Last visited
Everything posted by newbie69
-
Ah, I never measured 0-60 stock but it definitely starts with a 5 at the front based on my JB4 measurements.
-
Didn't have the Dragy when stock but I had measured with a 10Hz GPS system the stock time a few times, and was around 16.5" - 17" Plenty of the current stage 1 dragy slips though if you look at the first pages! Latest one was a 1/4 mile pass of 12.18" (one page back but also added to the first page for consistency)
-
That is INSANE, I had no idea it was that bad. I wonder how the sales of >400bhp cars have been affected from that, even if you have a comfortable life and 6 digit year income you just can't accept donating such a chunk of it to the state idiots. Even more because this correlation of private car's kw and environmental impact is completely beyond any scientific study, i wonder if you have a similar tax for say the BTU of the air-conditioners? Has anyone looked into that? Anyway this can go really off-topic so I'll just leave it to that. But i have one question: how can the car be registered with lower bhp even if it's imported, when the manufacturer's data show otherwise? Is there some special exception for american muscle??
-
Lucky Shy... your neighbors must be two hot girls in their 20s that are extremely social and like to party all the time aren't they? I mean in that case I completely understand all that sympathy, if not it would just not be enough to prevent me from getting my mid-life crisis V8 for sure. I mean sure don't let it idle for 10 minutes, just turn on and drive and it should be fine as long as you don't run some silly exhaust on it. I'm all for good neighbor relations but getting their permission over which car to drive is a bit too much, but then I do have a closed garage so maybe it's easier to speak
-
Yeah I saw that but apparently according to owners there was no such thing as "optional titanium exhaust" or Akrapovic option, they have mixed up the packages. There was a titanium package which was about different wheels and some other minor mods and then there was the Sports exhaust option (not in titanium though) which is probably what that car has at least. Still, such a sick sound, even more for today's standards and that's due to its engine. You can throw any exhaust you want on a 2.0 TSI and it won't even come close to that sound.
-
Well you could buy it now to scratch that itch you're having and keep it off the car till you're ready to go stage 2 at a later stage. Or throw it on and drive around with the CEL, i think it can be erased afterwards, it's not as if it would affect performance AFAIK. But in any case the cost of stage 2 map can't be the issue, can it? Get APR's downpipe and the stage 2 remap should be free, at least that's how it was in the past if you have APR Stage 1 like you do, you can thank me later You'd need a 10Hz GPS device like Dragy or P-Gear if you wanted the times to be accurate, phone GPS is not reliable enough.
-
Would the worse economy and road tax make you go broke though? Also, read a few posts back about living only once, it's all the argument you'd need really. Actually I don't think you have heavy family duties as in children and their endless... stuff? At least you haven't mentioned anything about it so the Superb doesn't really make much sense now that i think about it, you could/should be in an RS5 enjoying life Not sure if the car was stock in that video or it had a res delete (which is a fairly easy job anyway) but the engine noise was unreal, if someone asked me what it is without looking i'd definitely say some sick italian V8, made me go straight to car ads...
-
It's a couple of weeks I think (not sure as I don't use the car daily lately) that moving my foot below the virtual pedal sensor has stopped opening or closing the boot. This had happened once in the winter when the car was quite dirty and muddy but now it's been washed a few times since I first noticed and it still doesn't work. Ideas what to look for before taking it in? (if i can even bother)
-
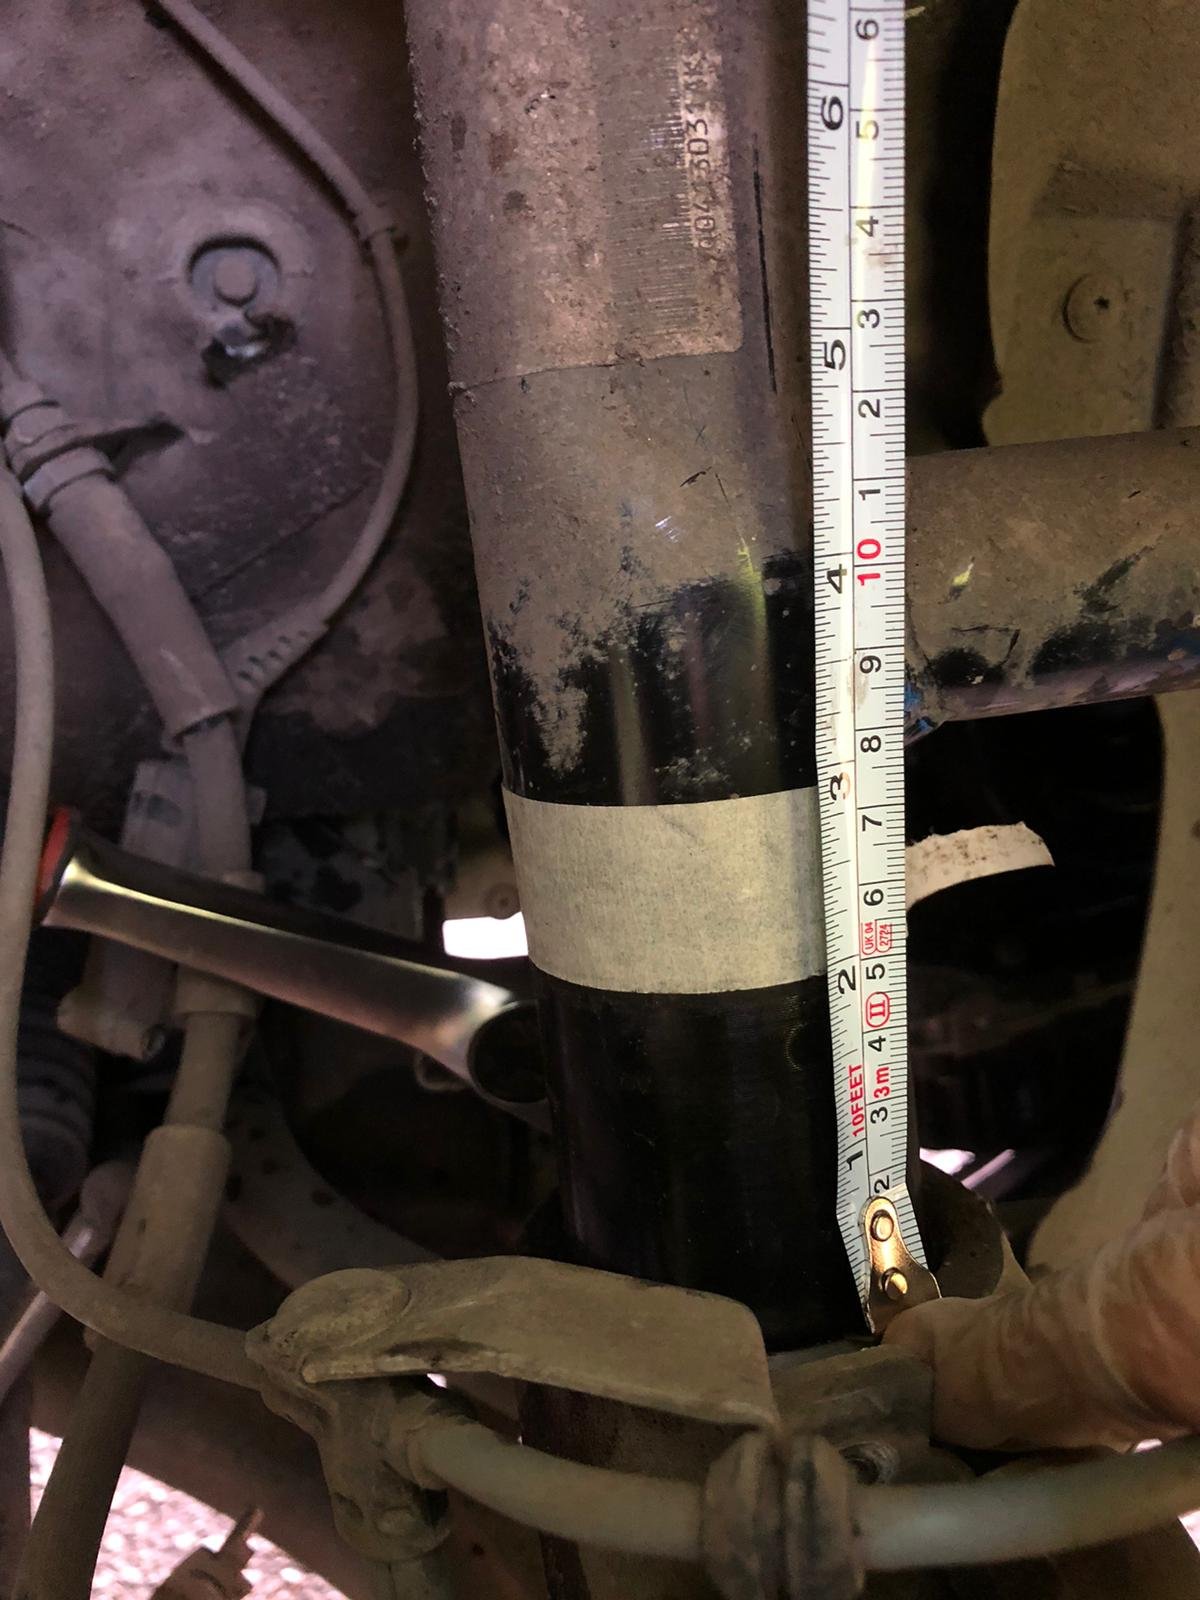
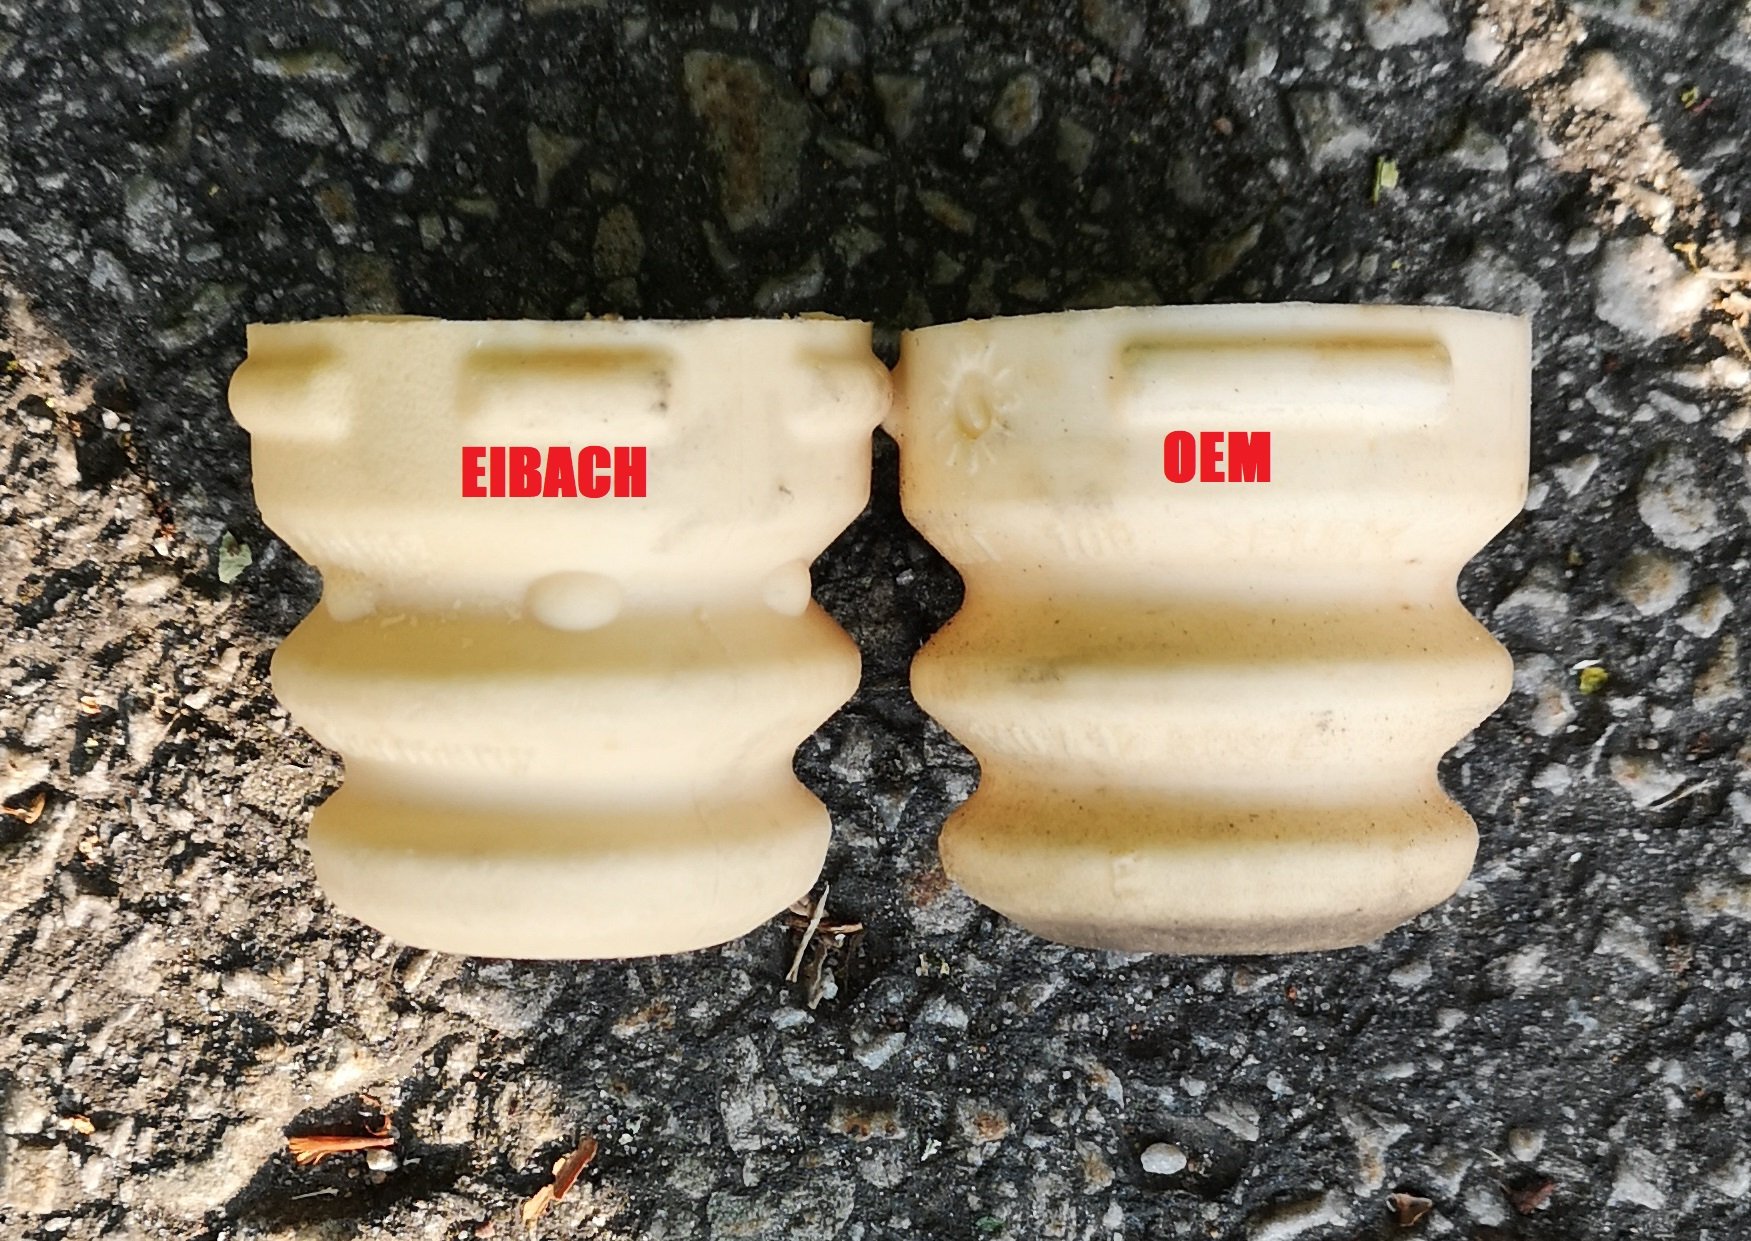
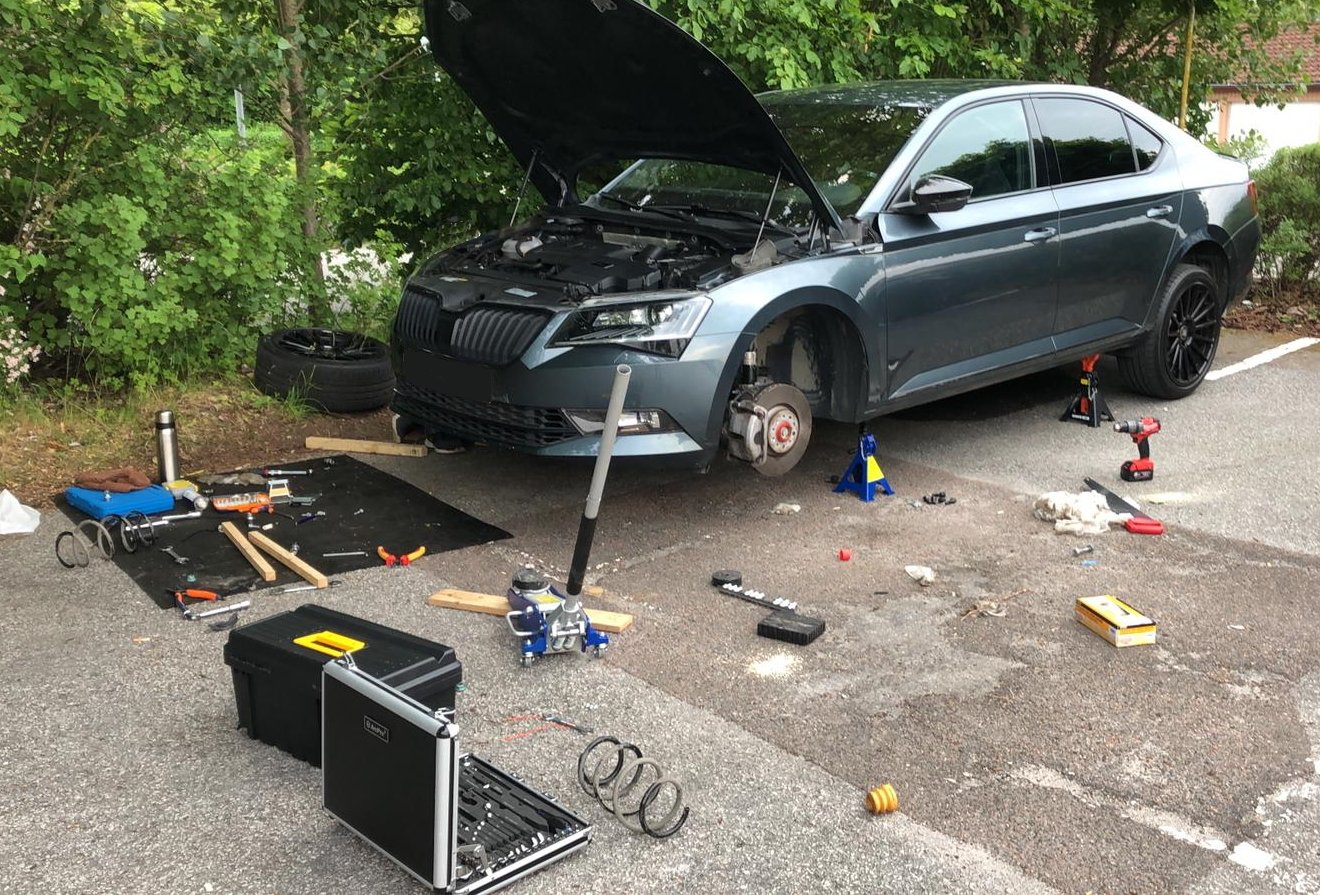
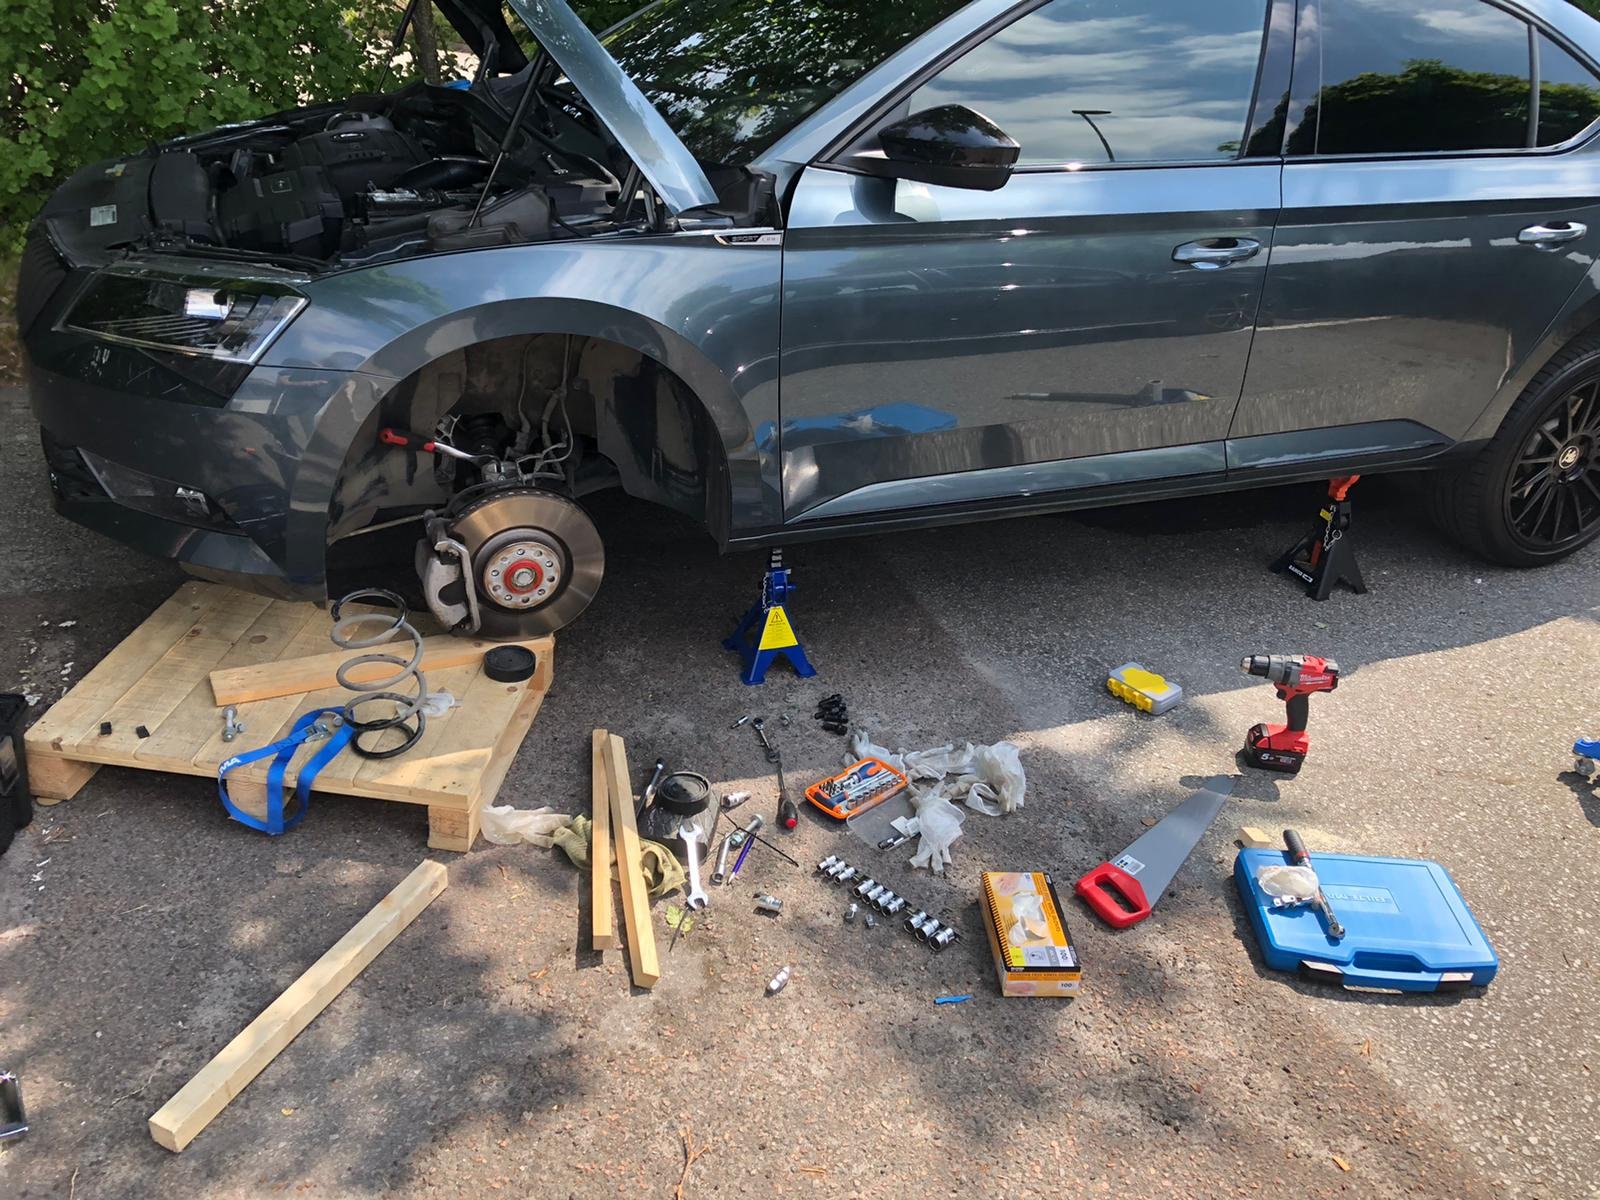
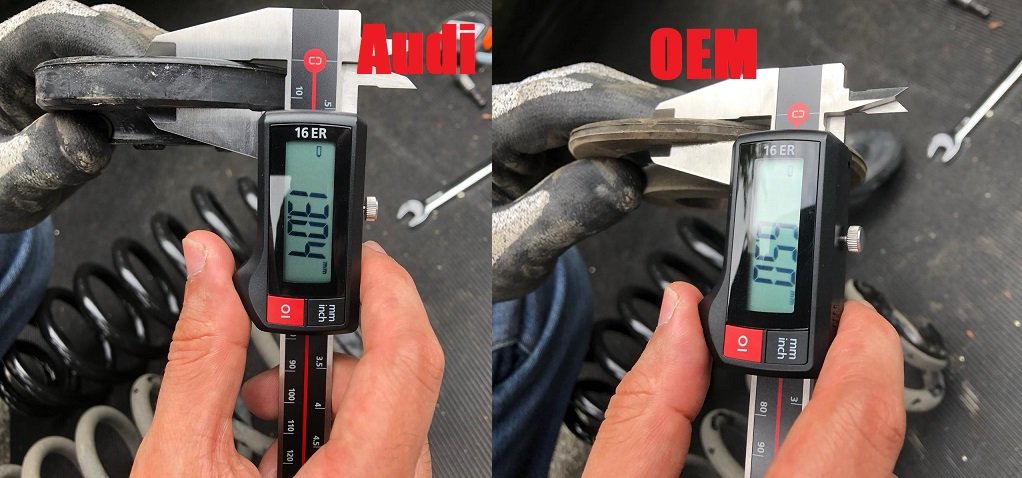
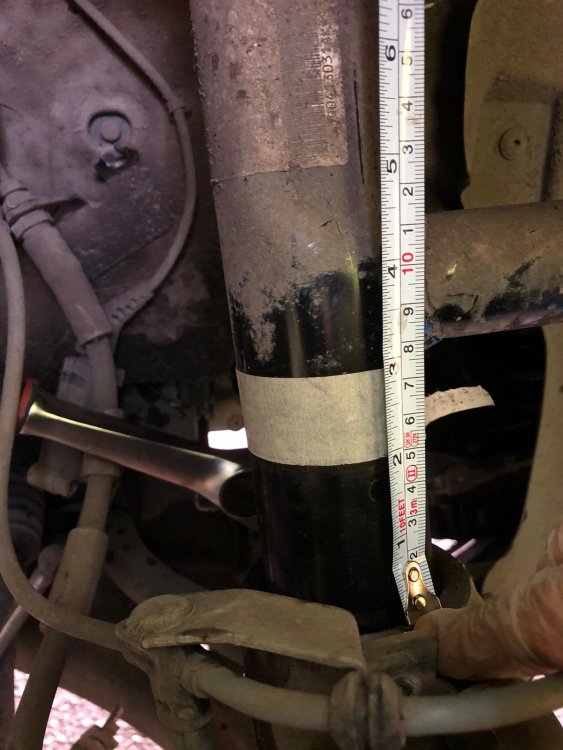
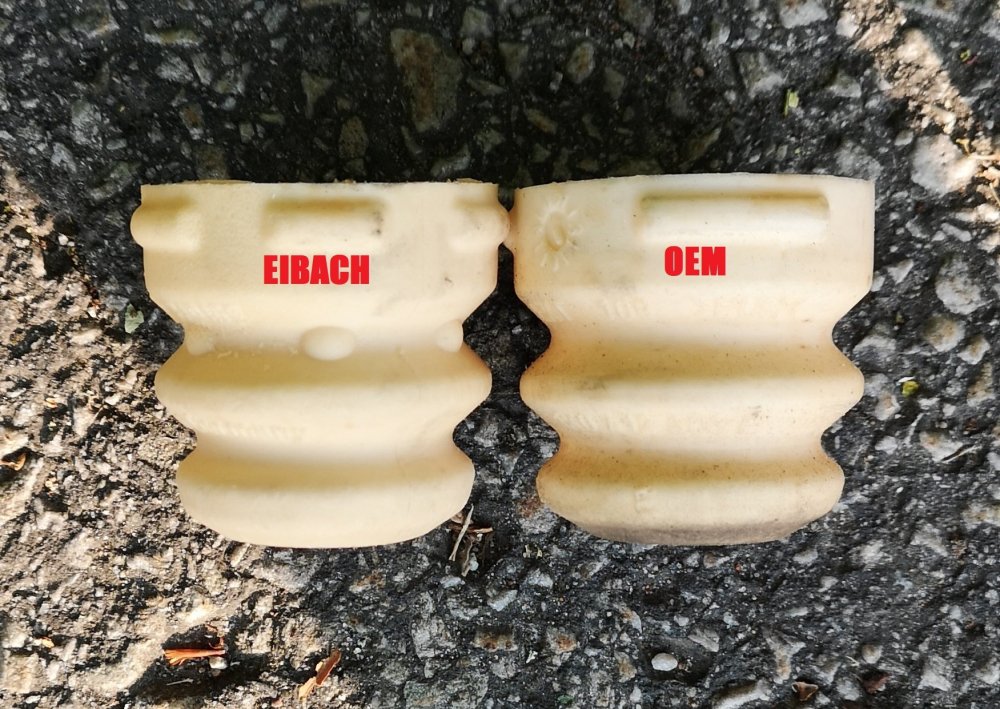
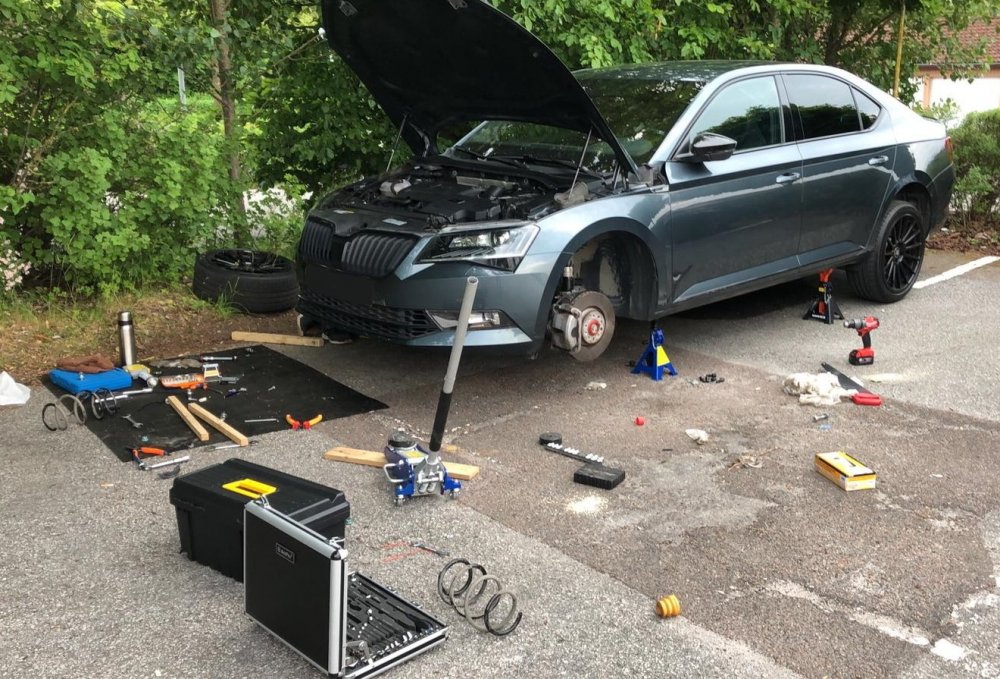
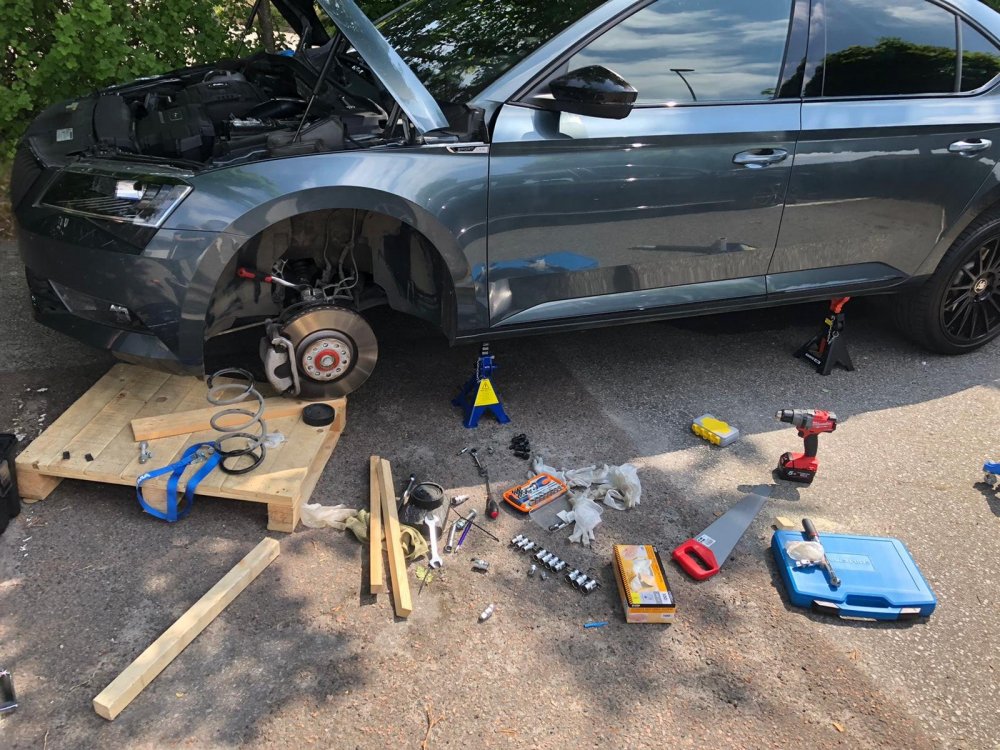
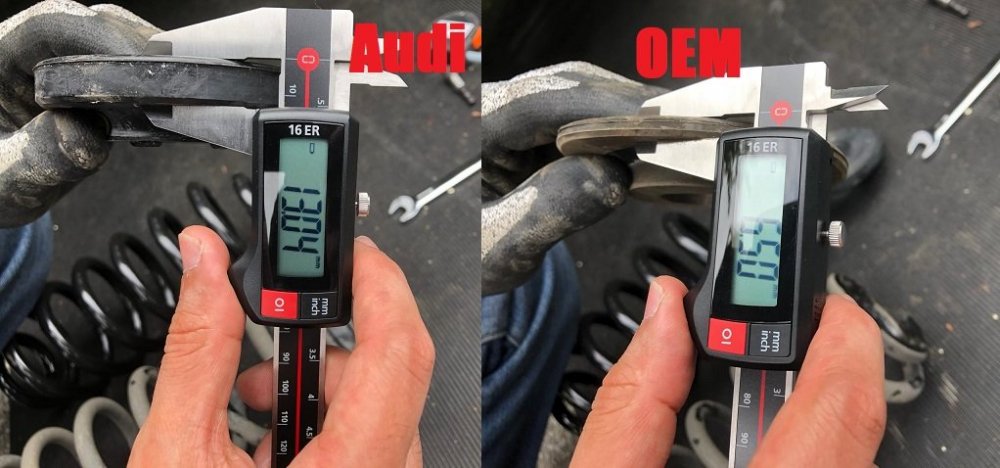
Ok so I wanted to put up a mini guide for this as all my info for this prior install came from MK7 Golf GTI's and R 's which are 95% the same but not identical. There's a few threads on the internet and YT where you can gather the big picture of the amount and type of labour involved in this job (l will link them below) and I don't plan to repeat all of it but rather build upon it with my own DIY oriented tips and findings on the 272 (280 is the same). Also because we struggled a lot at some points (probably because it was my first time messing with springs on my own) so If I could save another guy's time and trouble doing this for the first time I'd be very glad. It's a PITA job if you haven't done it before, especially if you follow the "easy" 2x4 method that seems to be so popular online like I did. As someone said it's half art half science and you have to work by feel at certain stages otherwise you might be stuck with a half removed/installed strut... It took me and a buddy that was helping me out close to 6-7hr for the two fronts but that's because we got stuck at some point, I'm pretty sure I could get them done again in 4hr max now that I know the tricks. Rears are really easy, 2hr is probably all the time you need so around 6hr in total. Getting the strut out: So the start was really easy: I removed wheel, lifted the front of the car (i did both ends to avoid working at an angle), and unscrewed the plastic leveling arm bracket, the brake line bracket on the knuckle and the DCC plug (both sides). Then I just undid the end-link nut and the triple square bolt and nut that keep the strut in place on the knuckle and ready I was for the 2x4 method. This refers to a 2x4 inch wood block, used to lift the strut up and out from the knuckle (by attaching it to the strut and jacking it up with a jack) without needing to drop the axle too low or undoing any drive shaft or ball joint bolts or brake calipets etc. It's the approach with minimum fasteners replacement so I guess that's why it's popular with the DIY-ers but retrospectively I'm not too sure it's actually quicker than removing the shaft from the knuckle, especially the first time, and especially during the re-install stage which is where we got stuck. This video shows it very well: My comments on this: * Before you start dropping the lower control arm: put some masking tape to mark the height at which the strut is seated inside the knuckle. You'll thank yourself later when it will be going in very slow and hard and you won't know how much more you should continue to drop it. Here's mine while going back in, the bottom of the mask needed to go down to the top face of the knuckle seat (50mm more at that point) * Install your spreader or 1/4" ratchet at the knuckle as shown in the vids and guides, and start wiggling the LCA via the brake disc (pull towards you and push towards the inside of the car) so that the LCA starts to drop as the spreader keeps it loose. It should do quite easily at the beginning, like 2-3cm immediately. Then reposition your spreader lower, below the strut's little tab at the back (you'll feel it blocking further drop back there) and repeat and you should have the strut out/LCA down by a total of 6-8cm (3"). The little tab will be fully ABOVE the bolt hole. Only then proceed to the 2x4" otherwise you'll need to compress the spring dangerously high. * Don't use an actual 2x4 piece (not even the guy in the vid uses one i believe), it's going to be too big for the available space. I went with a rectangular 45x45mm (1.75x1.75") piece and it worked a breeze, much easier to get in and out and position as close and as parallel as possible to the strut which is what you want in order to avoid going in at angle and end up snapping it mid-way. * Install your piece of wood as parallel and as close as possible to the strut (sorry no pic of that). Also drill as small a hole for the bolt as you can (12mm is fine, i did a 10mm and slowly "ate" a couple mill around it with the drill bit for a snug fit). That way the wood doesn't even need to lift the strut itself, it's all done via the hole and the bolt and it's still very rigid. * Now, have a friend SLOWLY jacking the wood up and keep wiggling the brake disc to help release the strut. Even with the spreader, the knuckle probably won't be that loose to simply lift the strut out by jacking so go slow and patiently. If it's not right you'll start lifting the entire LCA with the strut (and the whole car) up from the jack so back down, reposition your spreader at the top if needed, and repeat jacking and wiggling the disc. It should soon come out. * Once it does, rotate the knuckle away from the strut's axis so that it's got room to decompress once you release the jack. Then just undo the 3 small bolts at the top and the strut should drop right out. <<< STRUT OUT, that's 20% of the whole job done >>> Now on to spring removal: Videos show the GTI/R springs simply extend 1-2 cm with very little force so no spring compressors needed. The Superb however sits higher from factory, even the Sportline. I expected the release wouldn't be so light and i was right. When the last thread is out the springs decompress a couple of cm and shoot the top mount and nut a few meters forward. It's probably not going to kill you but you definitely don't want to stand in its way and trying it, it's a fiercer release than on the GTIs and Rs. Still I wouldn;t get compressors when doing it again but make sure you do as I did and have the axis of the spring clear for the release, be above it and step on it steadily and use a standard ratchet (not some sort socket) so that your hand is away from the spring's shooting path, here's a short clip of that: Re-Installation Nothing to note here, remove spring, install new spring and seat it correctly on the rubber base, use Eibach's supplied bump stops (they look identical to OEM), put back the spring bushing and top mount, ALIGN them properly by checking the alignment marks! and start screwing the top nut (you can simply compress the spring by hand for the first few mm needed. Here is where it pays to have a special 21mm pass-through socket and a 7mm Allen key as you won;t be able to put the exact amount of torque (the damper piston with the inner screw will be spinning. I didn't so I had to improvise, I tightened it up to where it felt really snug and also noticed there were installation marks from factory and I was already maybe half a turn past them so they should be good. No funny noises/clanks after anyway Once the strut is assembled again, vids say "just follow reverse order". yeah, reverse order my ar53... Notes: * DON'T tighten the 3 top mount bolts as you'll never be able to tilt the strut to the required angle to sit in the knuckle again, just a couple of threads to prevent it from dropping should be fine. * Re-insert the spreader if you removed it before, re-attach your wood to the strut, jack it up to clear the knuckle, rotate the knuckle and align the strut and knuckle as concentrically as you can by eye, then lower the jack SLOWLY so that you ensure the strut starts seating properly. Unfortunately it won't just go back in by the spring's force. First time we had a tiny small angle between strut and knuckle axes which was enough to stop anything from moving further. Moving the jack below the LCA and trying to jack it up to force the strut to drop in resulted in jacking the entire car up... After lots of swearing and re-trying we figured it out: * After the strut is in a few mm, and ONLY IF you see it;s going in straight and not at an angle, move the jack below the LCA and SLOWLY jack it up while at the same time wiggling the brake disc the same way you did for releasing, so that the strut is allowed to drop deeper every time. Re-position the spreader as you go so that you don't obstruct the tab to drop and it once it's fully in (your marking tape will tell you that without doubt) you're done. Re-tightening the bolts and connectors is straight-forward and that's 40% of the job done. The passenger side is another 40% and the rears I'd attribute a mere 10% of the total time needed for each one. A nice mess mid-way... REARS Those are probably 3x easier I'd say (actually 4x according to my time estimation above ). One leveling arm only as well as the DCC plugs το disconnect and you can start undoing the 3 bolts needed: a) end-link bolt-nut b) shock bolt-nut c) wheel bearing bolt-nut. * I'd recommend starting from the end-link on the inside and working your way out as i feel doing that last will put too much force on the end-link after everything is loose and the spring still pushing. * You will need to use your jack to align the different holes to facilitate the re-mounting as you're fighting vs the spring at that point. The arm to wheel bearing joint is a really tight fit so a screwdriver will be most probably needed to do some micro alignment for the screw to go in and out properly. >>> I opted to replace the top spring pads/bushings with the Audi TT ones (OE part number: 8J0512149 ) as suggested in some threads to avoid reverse rake. Those are ~6.5mm thicker so the rear sits 6.5mm higher. It turns out it was a wise choice as you'll see Coming back soon with photos of the end result and the handling changes
-
BRIEFING After more than a year with a JB4, around a month back I decided to find out whether I had been missing out on some extra oomph... JB4 is good for 340bhp/430Nm on these cars and average times of 13.0" for 100-200km/h and sub 5's 0-100 (my PB was 4.8"), it is a solid improvement over stock, plus you keep your warranty intact. However coming from a faster car I soon got used to it and then I was really intrigued by REVO's claims about GPF cars actually not being as restricted as originally expected, in fact making even more torque with the same boost levels as the pre-GPF cars and mapping to the same 370bhp as before. I decided this had to be put to the test, purely for sciencitfic purposes of-course. I also got a R600 intake and a Racingline turbo inlet pipe to replace the stock items but I did install them after I did a few measurements with only the REVO map and all stock hardware to compare. https://www.onlyrevo.com/blog/all-new-gpf-stage-1-software-for-2-0t-ea888-gen-3-is38/ At the same time, the tuner warned me that the DQ381, is occasionally struggling even with stage 1 torque levels which is well on the 500Nm side. I hadn't noticed any slippage with the JB4 but then that was making 70Nm less and the truth is, I had not been entirely happy with the box's behaviour during manual operation and launching the car. Manual mode on the DQ381 is much jerkier than on the previous DQ250 to the point it made it unpleasant to me to drive it in manual, whereas my DQ250 car before was being driven in M mode, 95% of the time. Also, when using Launch Control, the car would often bog down as if ESP was kicking in (it shouldn't on a AWD car in Launch mode). In an attempt to adress all than then, I went for the TVS's stage 2+ DSG remap at the same time as the ECU remap. The stage 2 refers to the extra clutch clamping pressure, whereas the "+" in the name is essentially a side-remap so to speak, including several drive-ability and life extension features being added (more info in the link below), as well as having various modes and behaviours optimized (response times, shift points etc). I knew TVS as top DSG specialists hardware-wise and their DSG map reviews were excellent so: "add that to the basket too..." https://tvsengineering.com/en/dsg-transmission/dq380-dq381/?fbclid=IwAR0ABBTfq8HoVxf3egD_5WUFCWgKc0YHC1mLGHmMvVcKpnoJC5VNfqEa3sE
-
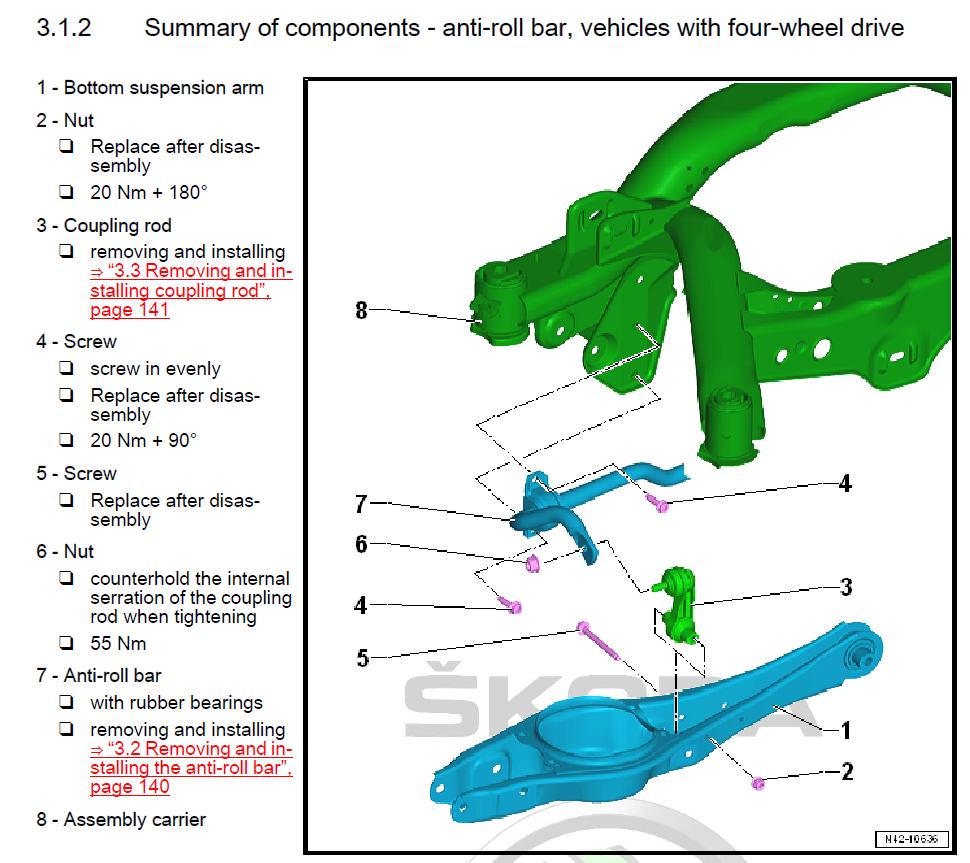
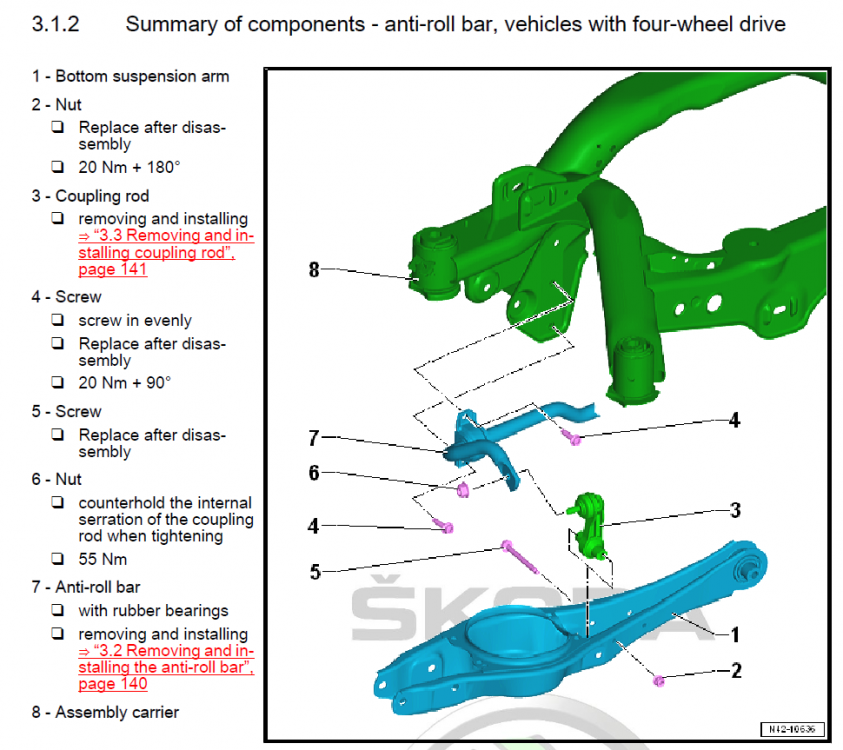
This has become a hot topic lately, a few people have ordered or are about to order an upgraded rear arb and many more are asking about it so I reckon it would be helpful to have this information gathered in one thread, instead of scattered in various (sometimes not even related) threads. Information about possible options, installation and reviews of-course. I've went for the H&R 25mm one, the model number for the 2.0T 272/280 AWD cars is: 33581 HA5. The model number for the 2.0T 220 FWD is: 33851 HA for the 24mm one and: 33851 HA2 for the 26mm one (apparently the FWD has two options) The bar already arrived today but I will hold off installation until I get the replacement OEM bolts and nuts on Monday, needed for the job. Below is the illustration of the items from the Skoda manual as well as a small table I made with all the involved fasteners for upgrading the rear arb and end-links (if needed), numbers and torque figures. FASTENERS INVOLVED: # in Skoda manual Title OEM No. Torque Quantity REPLACE Tool #4 Bushing bolts M8x30 N10765801 20Nm+90 4x YES Triple square No.10 #6 ARB to droplink self_locking nut N10286110 55Nm 2x NO 16mm socket + Triple square No.6 for inner screw #5 Hex head bolt M8x85 N10776501 - 2x YES 13mm socket #2 Hex nut N90183804 20Nm+180 2x YES 13mm socket UPDATE: Link of a very clear video of the installation on a Mk7.5 Golf R (identical setup)
-
Right, so I thought instead of just a write-up of my impressions of the unit, why not have a dedicated thread where everyone can post all JB4 related information, experiences, questions, results in one place. It's the case in other VAG forums and I know it's quite helpful for anyone looking for JB4 related information. Also, since this was the 3rd time I have installed the unit (1st time on the Superb) I thought I'd share some conclusions and tips that helped me during the process. Installation: ========== For anyone who hasn't done this before, it can seem a bit tricky at first but following a few good practices can make life a whole lot easier. This is not a step by step guide as instructions do come with the unit but more like a few areas to draw attention to on how things could be better carried out more easily. The unit has 3 plugs that are connected at different sensors in the engine bay. Two of them (B and C) are straightforward plug out and then in, but the bottom one (D) is the tricky one. To access it, you need to lift the car slightly and remove the plastic under-tray held by T25 screws. I did it at my garage using a jack and lifting the left side of the car just a bit to allow me to unscrew all the screws. Then, to un-plug it you should have definitely practiced your grip on those connectors as they need a special technique and if you haven't worked with VAG cars before it will seem harder than it is. All it takes is a good press-pull (actually: pivot) of the top tab to release, you can usually (but not always) hear a "click" when it does, then you just pull the connector out. Problem is you can't place your hand exactly as you'd like due to the connector being at a funny angle so practice so as to be able to do it without looking at it. You could also use a screwdriver to pry it open but take care with that as you could brake something. The AFR wire and positap connector, just follow the instructions on the manual (they are good on that part). Finally, the routing of the OBD cable and the USB data cable (for those who didn't opt for Bluetooth connection) through the firewall. This is where I'd lost a couple of hours a few years back as the place behind the firewall is so tight you are just working by feel. How I prefer to do it eventually: Get a bit of steel wire to use as a "driver" but not too flexible (3mm thick would do). Attach the molex plug at its end and enter the engine bay from the oval opening with an upright angle (60-70 degrees roughly). You will need to cut a cross slit to the grommet to get through. Helps to have a friend checking what's coming out at the other end otherwise you should be pausing to check if you're good. When you are done, leave the steel wire there and attach the USB cable (the thin end going to the computer not the JB4 end) so that it can get to the cabin when you pull the wire back in through the grommet. Then just arrange all the cables below the steering so that they don't get in your way (I used cable ties) and you're good to go. It's good to drive normally for the first minutes after first installation, then gradually give it full throttle for the ecu and gearbox to adapt fully, ie. don't expect the full effect the first time you floor it. Then again it should not be a particularly long process either. Start with Map 1 at first to make sure all feels fine and no errors, lights come up (shouldn't but just in case some wire is not secured in place etc), and even do some logs to confirm this. Then if all looks fine you could switch to Map 2 which is closer to an actual stage 1. Driving: ======= So the million dollar question: How does the unit feel on a 272 AWD Superb? Impressively linear. You won't/shouldn't get any unexpected power spikes, hiccups, noises or other weird reactions. In fact, the unit goes completely un-noticed and has no effect during your regular off-boost driving (you can easily check this by seeing actual boost being the same as ECU requested boost). The extra power is in relation with the throttle position and aggressiveness, when you ask for it, you get it, based on the way that you asked. And what you do get is not some explosion of power as I already said (would be hard to get this with just stage 1 power levels) but a noticeably stronger, more convincing will to accelerate hard up to the red line without any hesitation. As stock, after the instant "get going" effect wears out (above 40mph) the cars feels like it makes progress but not particularly fast, more like in a fixed speed building state. With the JB4, the car wants to accelerate harder and harder the higher you go in the rev range, as if some limiter has been removed. Flooring it in 1st is hilarious, instant, almost electric slap so be prepared (and that was without Launch Control even), 2nd gear throws you back fiercely, 3rd still goes pretty strong and even in 4th you're accelerating significantly. The power delivery as a whole has expanded and is more interesting to explore the upper departments... But it never feels "injected" or "enforced" on the car, you could easily believe this is how it left the factory. Coupe of things to note: - My driving was done with Map 2 as after a quick check on Map 1 there was no point in wasting more time there. Map 1 will have a less pronounced effect on all of the above as it tapers more the extra power. - The car has a pedal box already which definitely amplifies this instant low speed pick-up and I think one complements the other into a great combo. Again, expect a less pronounced effect without it. Rough data: ========== Haven't yet had the opportunity to safely compare 0-60 times but judging from the rest of the acceleration figures I got and the way the power is laid down in the first 3 gears (the new 7speed helps there) it definitely feels it can do mid 4's. Update will come in due time. 100-200km/h (or 62-124mph for the UK guys): Stock, the car did it in 16.6". On Map 2 and no other mods whatsoever this dropped to 11.9"-12.1" which is ridiculously good improvement for a mere stage 1 without any other mods whatsoever. For reference, this is significantly faster than the latest 540i xDrive and S6, and still faster than the latest S4/S5, 440i etc. so not too bad. Still for people coming from relatively powerful cars, and especially above 100km/h, you will feel it's ok but nothing extraordinary. The good (or bad, that depends... ) thing is this platform can handle a lot more power so up to you really where you feel it's enough. For the time being I'll just add the Racingline filter and turbo inlet pipe that I got out of my previous 2.0 TSI and call it a day till the situation with the GPF downpipes clears out, then we'll see. I somehow feel I ultimately won't be able to resist a proper upgrade on this car.
-
I had posted about the car reverting to Normal driving mode in the other thread of first impressions, but since it was early days with the car I wanted to experiment some more and set everything up properly. Now, after 3 weeks of playing with the settings but more importantly confirming this with other fresh owners of MY19 cars and the user manual itself I believe it is a given that MY19 cars or at least MY19 cars made after a certain date have this behaviour from factory. So, I have set up 2 different profiles, assigned them to different keys, the car detects the key and greets the assigned user and remembers ALL settings that particular user has set, as it should be. There isn't any issue of profiles forgotten or of keys mis/non-assignment. The only thing which is not remembered is in which Driving mode the driver left the car in before turning off. Well, not exactly. You see, in the 1st user profile, I have set the Individual mode to DCC Comfort and Drive to ECO. In the 2nd profile the DCC and Drive are set to Sport. Whenever I select one of the two user profiles, the actual Individual settings of each one are correctly stored and retrieved. 1st one will have an in Individual mode of Comfort + ECO, the 2nd an Individual mode of Sport + Sport. I don't need to re-register those. It's just that after turn on, Driving mode is ALWAYS set to Normal by default. Is my car broken? Well, already another MY19 owner ( @Avskum) who picked up his car just last week (mine was built on the 17th of January so I assume everything after that date at least should be the same) confirmed the same reverting to Normal on his car and I would appreciate whoever reporting which behaviour their cars show on this, to supplement it with the build date. @SteHaworth you should be picking up in the near future so would be good to know what's the case with yours too. Furthermore, I found two pages of the user manual (finally) confirming this is normal: Page 56 on the PDF, regarding options that Personalization remembers: "Driving mode - the last selected mode, mode setting Individual" At first I thought it meant which mode you were last in, but actually I think it means not that, but which settings you selected in Individual mode, not which mode the car starts in, as happens in mine. Page 244 on the PDF: "After switching the ignition off and on, the drive is set to Normal in the current driving mode. To change the drive setting, select the relevant driving mode again." That is pretty clear I think. It would be interesting to compare the content of the same chapter/page of MY18 user manuals and see if that statement exists there. Regardless, I am pretty sure this behaviour can be changed via VCDS. Browsing the 09 - Central Electrics module the other day, I found an adaptation called Personalization or similar and that seemed to hold several User profile parameters. If only it wasn't half in German half English... PS. Re-reading the 2nd bit I quoted from the PDF it refers to the Drive aspect (the gearbox mode) and not the driving profile so not the confirmation I was after really. Still...