voxmagna
-
Posts
279 -
Joined
-
Last visited
Content Type
Profiles
Forums
Gallery
Shop
Events
Downloads
Everything posted by voxmagna
-
If you read through the post replies you should get your answers: Unlikely there is a wiring fault. Most likely the wires inside the motor have corroded or the brushes are sticking. Your option is to test the pump resistance at the connector with a multimeter. If it's high (bad motor) then second option is either to replace the pump or if you are electrically skilled, disassemble the pump as done in this thread and check for stuck brushes or corroded internal wires.
-
Has anybody ever seen a copy of a Skoda PDI? I bought a used VW with claims it had undergone a used car inspection. I found a load of faults without looking too hard. I got them fixed because I argued with VW customer service that any inspection worth making a claim to customers about was worthless based on my checks and findings. They wouldn't give me a copy, despite their claims. If somebody here is buying a new Skoda, do you get a check list setting out what is checked and the results found on the car you accepted? Another wheeze some stealerships do on used cars is to tell you they only do a used car PDI after you have agreed to buy it.
-
Since many of the parts exposed to contamination are made of plastic these days, I could design an electronic 'particle detector'. For anybody wanting to do it, I would suggest a Hall effect sensor: You scan the surfaces with a magnet over a thin tissue wipe to magnetise the particles, then go detecting them with the electronic Hall sensor, or you could cheap out and extend the playback/record head on an old cassette tape recorder for those that remember them! That way you get to find the embedded particles before they go rusty and become visible. If Skoda want to investigate the problem professionally, they only need to remove and X-ray the problem parts to show up surface metal contamination. I hope the polishing/detailing works for the OP. It didn't work on my white window cill. Polishing them out just took off the rust coating, they were still there and went rusty again in acid rain. I saw a really nice looking white Yeti in my local dealership. Hmm, perhaps I might think twice choosing white?
-
Years ago new cars were sprayed over with a sticky waxy goo to give them protection, particularly during sea container shipping. It was then the job of the last delivery point dealership to remove protective coatings, prep. and inspect the car for delivery to the customer. Still, the problem with rail dust I guess is the same as my angle grinder: The steel can come off red hot and embeds itself in surfaces it lands on. The stuff that comes off brake linings is just the same since they now embed a lot of steel in the lining composition. Train bogeys have huge brake linings whilst the wheels and axles are always being worn down and refurbished. Have a look around your windscreen and other glasses with an eyeglass magnifier to make sure there are no particles stuck to those as well. That happened to my double glazing.
-
All this points to NOT trying to do anything yourself and have the dealership say it's your fault! My simple reckoning is if your new Skoda has a finish/contamination problem that can't be seen on other dealership showroom cars, then it has to be rejected. One reason is the longer you have it the more chance they could say you parked it somewhere and collected the iron dust after delivery. Another reason is there could be more new cars with the same problem and by complaining and causing somebody to pay to rectify your problem, you raise awareness. All new cars should go through VAG formalised pre-delivery checks. Find out if this was done for your car and why it wasn't spotted (forgive pun!). If the paint and finish blemish check is not on their pre delivery inspection form then it should be. If your argument for rejection is accepted I would be asking for a loaner and a trim/accessory upgrade as compensation for the inconvenience and lack of confidence you must now feel in buying the Skoda brand. Hell, Skoda had problems with 'rust' in the past and we don't want to see a re-incarnation of rust in another form.
-
Following up on the 'contamination' possibility, it looks just like the white polyester coated window cill next to my garage door where I stupidly used my angle grinder near the window. The steel particle grindings coming off the disc hit the paint and being red hot embed themselves in the surface. You don't see anything for a few days until the metal spots go rusty and stain. If you look at a particle under a magnifier and try scratching it off, is it loose on the plastic surface or embedded in it? if it is what I suspect it will be near impossible to remove. If you test a brown spec with something like Jenolite rust treatment and the spec turns pink to black, then it is definitely steel particles. I would be surprised if the Skoda factory were using grinding machines near their cars during assembly. Once out of the controlled factory environment, the cars are stored in lots, travel on transporters, ships and could have been in a place near to grinding work. If the finish was just dirty with those spots and they clean off is one thing, but if they are 'embedded' I would not accept the car if I was paying for it. The problem with grinding specs is you can appear to clean them off but they stay embedded and the stains come back.
-
That looks like it with a similar series part number. So you need the following connectors: 1 off 1J0 973 702 1 off 1J0 973 802 Bridge them with longer wires and 'T' splice and sleeve for the led. Then no interference with the stock wiring if the pump needs replacing in future and you solve the problem of their short wire making it harder to access the plug to pull out of the controller. Found these cheaper: http://www.ebay.co.uk/itm/Audi-VW-Skoda-2-Pin-Plug-Waterproof-Connector-Kit-1J0-973-802-1J0973702-JPT-/191707222602?hash=item2ca2a4124a:g:UvEAAOSw9r1WD-Cc
-
Ideally, you also need the matching other half as a wireable connector. I've always found it hard to get those to make 'breakout' leads for testing because the other half is always a module mounting version and only techis wanting to do other things would need them.
-
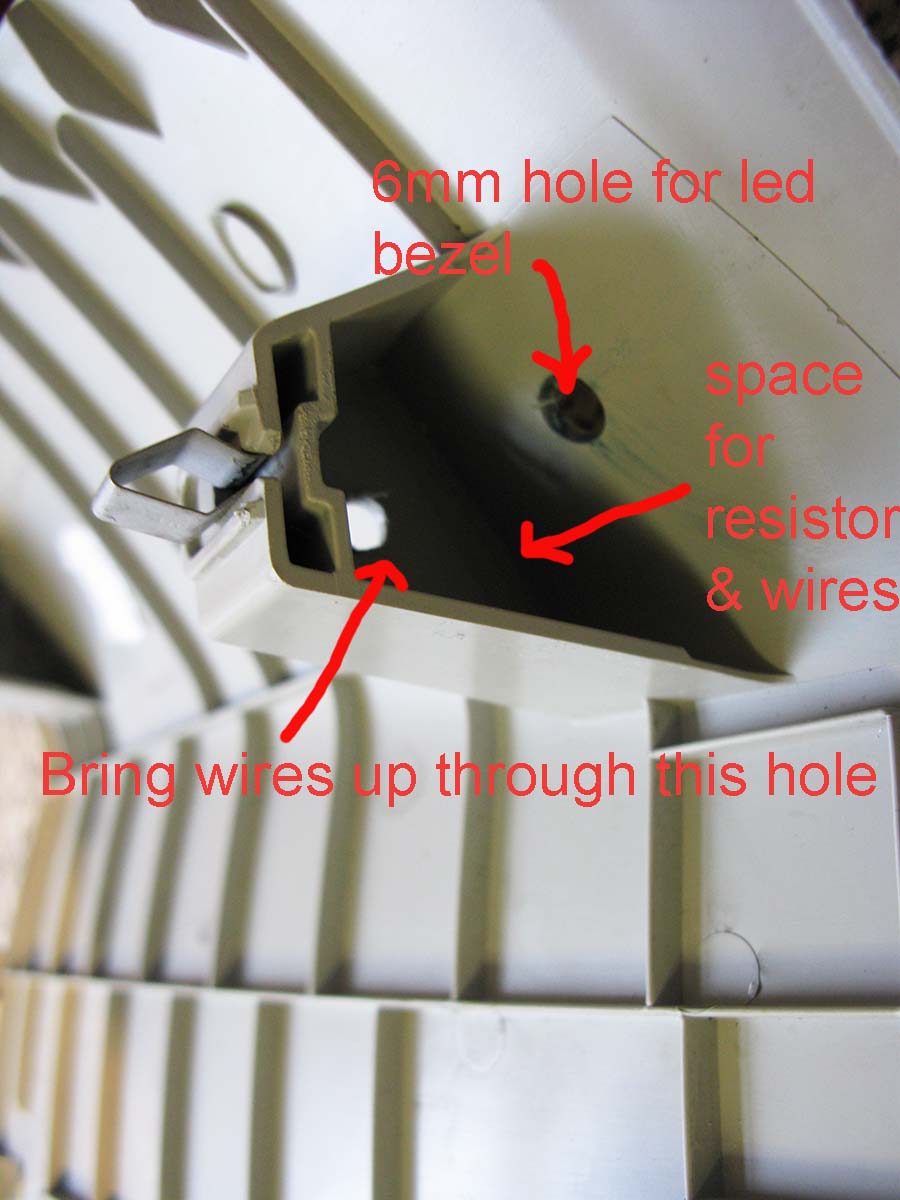
Photos uploaded. Sorry, Yeti off the ramps now so no wiring photo, but everything is neat and tidy, soldered splices with heatshrink sleeve over. resistor and solder junctions all fit inside the moulded space for the cover retaining clip.

-
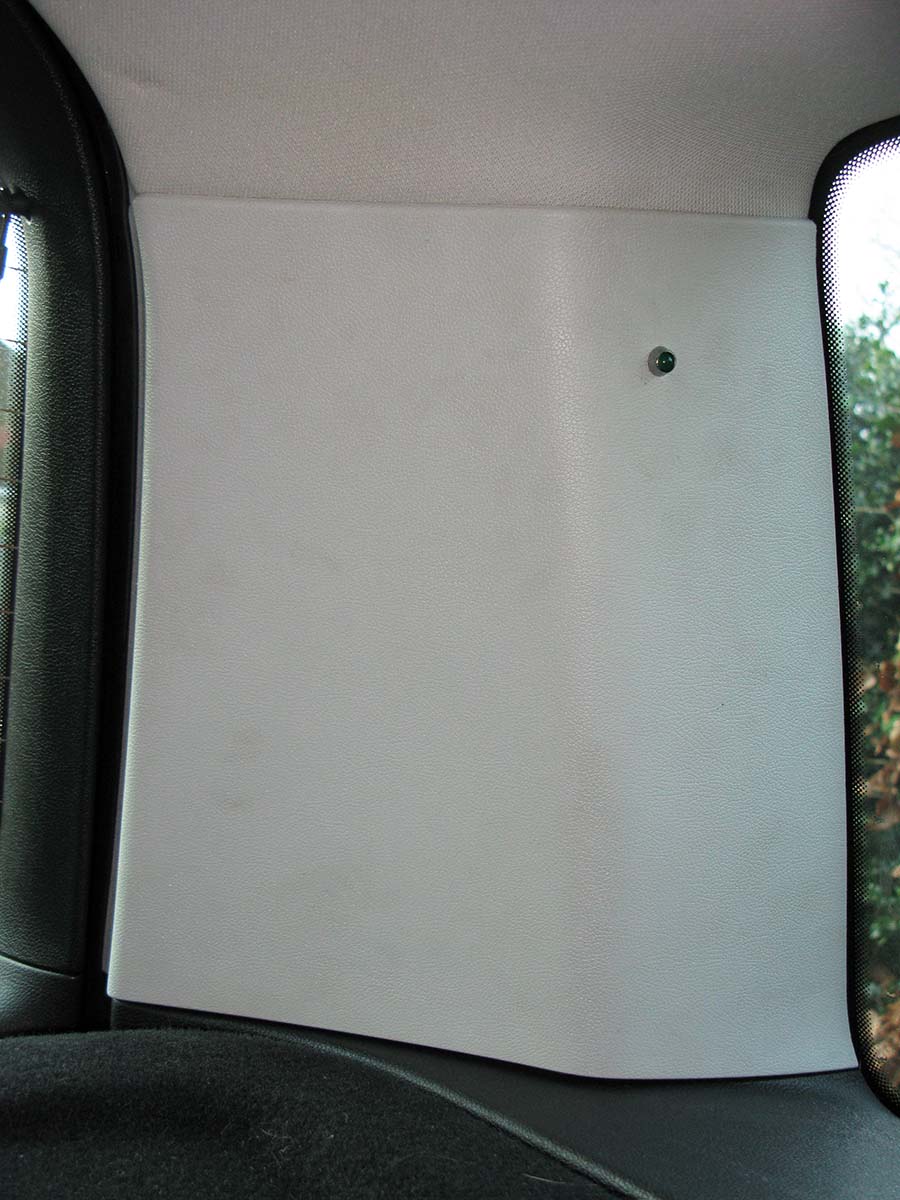
Ordinary leds (diodes) need a series resistor. I don't run green more than about 15mA otherwise you get short life. Therefore 5mm green led + 560 Ohm is about right and not too bright. If you want it in your face, or rather the rear mirror, go for high bright clear red and a 470 ohm resistor. Otherwise use a 12 volt led which has a resistor built in. If you don't want to drill a 6mm hole in the rear corner trim cover, you could just poke the led out from the edge of the cover. It comes off easy, unlike the long cover over the lock keep which is a pain in the but to get back without breaking the 5 spring clips along the top underside. To get this simple led up in the cockpit with wiring would need a lot of messing about. I could have used a cheap Fleabay wireless single channel garage door opener, but you need to do some work on the fob to permanently enable the button and provide a step down voltage from the pump. Then you mount the receiver 'module' up front under the console to activate your led. These things are only about £4 and I've used them before. Simplest was to remove the rear top plastic cover, run a wire down behind the left lining, down through a bung in the boot floor then across the back side of the heat shield to the Haldex unit. The back side of the heat shield shouldn't get too hot being cooled by the air space above, but I did use some silicone wire. Glass fibre sheathed cooker wire would be high temperature also. I'm sure 105 deg C would be o.k, but I already had the silicone wire. I fitted a 2 pin faston connector on the end and its female spliced to a a pair of wires soldered to the Haldex motor wire. I did extend the motor wire my about 100mm which makes it easier to remove the connectors on the controller. I'm not sure you can turn the motor around, the pump section has to stay aligned for its filter to align with the port in the body(?). Attaching my 2 pin faston connector to the pump wires now means I would have to cut and solder splice the connector and wires on to a new pump if it was replaced. The really smart mod. would be to identify the Skoda OE 2 pin connector and wire up a break out adaptor using a male and female plug/socket. Will post up a photo. Seeing the led come on, go off, or dim whilst driving gives some insight into what the 4WD is doing and when it is most active.
-
I just finished fitting a green 5mm led and bezel to the lift off interior panel nearside rear. With some patience you can remove the rear lock cover trim and get a wire down the side, without removing the lining. The led is not over conspicuous and annoying (at night) and can 'disappear' with a slight shift of the interior mirror to the offside. I used a green led and 560 ohm resistor. A 12V led would work fine, but you can't control the brightness if it is too bright. Anybody who tries this needs to know that +12V is on the yellow pump wire and 0V is on the black wire. I can see the pump come on for low speed acceleration, stay on longer when in off road mode, go out when on the flat cruise and come on when decelerating and when cornering which all sounds normal behaviour. It also goes off a couple of seconds after using the hand brake. What they got wrong is the wire entry point into the motor: The wire entry is high up on the end and as everybody knows, water runs downhill! If they had brought the wire into the bottom of the motor housing with a slight drip loop, it would have sealed better. If I need to get the pump out again I'll have a look at that. Apart from getting a good seal, if the motor lead was longer it could loop downwards a little before it goes up and locks in the first cable clip. But for off road running through streams etc the motor wire sealing needs a second look.
-
...it must calculate the pressure from the load on the pump..... I don't think so. Look at the graphs I posted showing motor current and pressure. The motor current is either near zero or 3.5 Amps and fairly constant. Pressure is controlled by the positioning motor V184 which is a stepper motor controlling the valve. It's connections are via the two contacts you have to be careful with when you lift the Haldex controller off the main body. One question is where does the feedback come from to control it? I think this is coming from torque sensors or other sensors elewhere. I would summarize replies to the problem of failed Haldex Gen 4 pumps as follows: 1. The Haldex motor has bad internal connections from the wires connected to terminal points inside the motor. 2. The Haldex motor has poor brush contact due to sticking brushes, brush wear or dirt. 3. The Haldex controller does a short motor burst 'current good' check at key on and permanently latches a motor fault if the test current is too low. Thereafter, there is no 4WD and you don't know until the car is scanned or you are in an off road situation with wheel spin. 4. A good motor should measure a resistance of around 2.5 ohms. I'm intrigued by the discussion on globby Haldex oil, but I think Haldex pump motor failures are down to the Haldex design. Fortunately most can be easily fixed saving a lot of money. Even brushes might be sourced. Somebody needs to confirm brush length on a low mileage pump - mine were 9mm.
-
Thinking about it some more....... The pump is a gear pump as far as I know? I posted that it runs at around 1 amp when not pumping. I didn't measure what it did with its fluid input blocked, but I suggest the pump would run just as though it was offload. It would be a different story if the output was blocked, then the blockage would push up the motor current. Since ithe motor is running normally at around 3 Amps and the 5 amp fuse also powers the cockpit display, an increase in pump current should take out the fuse. Whilst the sludge is very visible and if containing hard metal particles, could affect the pump mechanics, I put my bet on most pump failures being electrical caused by the motor, but aggravated by the momentary diagnostic self check not getting the correct current. Once the fault is latched your 4WD is no more and you won't know until you need it - Fit the led. How many dealerships are going to mess around taking pump motors apart? Realistically they will scan the car, get the fault code, call in a replacement pump and send the customer off with a repaired car and a big bill.
-
Put the glass in a freezer and see which layer freezes first. If either layer freezes above -10 deg C, it won't me much good inside the clutch.
-
I know Haldex fluid is supposed to be a special product at a special price, but what do we know about it? Is it actually a mineral oil or something else? One important characteristic must be its viscosity for their pumped system. Unlike a multigrade motor oil, I would expect its viscosity to be maintained constant over a wide temperature range. To prove if it's oil or not I might stick some in the freezer to see what happens. Is it hygroscopic and likely to absorb moisture when stored? If you know a helpful garage chap, they have a device for measuring water in brake fluid. I bought a fresh bottle from the Skoda stealer which was cheaper than some Fleabay sellers. At the moment mine is clear and a bit gloopy like chainsaw oil. Chainsaw oil is made thixotropic to help it stick to a rotating chain.
-
You will have to drain and refill again after refitting the pump. You will probably find more 'gloop' in the nylon pump strainer than on the filter you just took out. Read my post on the pump: Remove the cover, clean the commutator slip rings and brush holders with meths/ind. alcohol, check the motor brush lengths, clean the brush holders of any debris and lubricate them with switch cleaner. Splice/extend the motor connector wires about 100mm and consider fitting an inboard led to tell you when the 12 V pump is active (or locked out by the Haldex controller and no 4WD). The only gloopy stringy oil I've come across is chainsaw oil. .
-
I suspect the info display is getting the switch signal via the connection to the onboard supply unit control module and it would get the same good signal if the bulb was blown or there was a bad connection in the bulb holder. Try fault finding the wiring and diode as I suggested.
-
I'm approaching 70 and still riding my BMW K1200RS. The heavy 'brick' is reliable, starts first time and gets me from A to B, but with a bit of bum ache now. I see HDs on the motorways at 60 mph in the slow lane when I blink, but not for long. If it rains or there's frost and ice I use the VW cabriolet. A similar ' in the air' experience but less gear to wear and there's a heater. Motorcycles are all things to all people. You buy whats suits YOU. If you want comfy cruising bikes with built in weather protection go the big screen cruiser route, but don't expect high speed stability. If you want some fun and develop skills for the twisties, lean towards the sport or sport/tourer. Staying alive is most important - Ride Safe.
-
Lock switch contacts are usually pretty crude wiping contacts that can get grease or oil on them from the lock or over enthusiastic lock spraying with WD40. They might be cleanable. The only reason they might burn is if a lamp filament went short circuit?
-
MY12 Yeti is outside 24/7! After your suggestion I had an idea: You know the problem is usually getting any wires from rear to front neatly, but I will have a look see if they can go through a plug in the boot spare wheel panel. Then I thought of 2 options. Best is to put the led in a spare switch cover, but a simple option could be to have it up high on a rear corner so you can see it in the rear mirror. I think I'll go for green and set the brightness so it isn't too annoying.
-
I've now completed some vcds tests logging data from my repaired Haldex pump and I can share some of my findings: I have produced data and posted the results of scatter graphs showing two pairs of results measured against time (Seconds) for a short test run of about 10 minutes. During the tests run starting from a standstill I accelerated hard and soft and slowed several times. The first graph shows the pump motor current and oil pressure versus time, whilst the second graph shows oil pressure and estimated torque versus time. The Haldex unit and data is only generated when the car is moving with some torque, i.e during acceleration. There is no pump motor current when the car is at idle or running at constant speed without engine drive e.g coasting without torque. The first thing to notice is the huge peak oil pressure up to 27 Bar which is nearly 400 psi! The Haldex electric pump motor is only a 'pre-charge' pump with a maximum pressure of 4 bar (60 psi). It provides oil pressure to the internal piston pump which generates the high pressure required by the clutch. That is why it is a fairly small unit and isn't that over worked. The internal high oil pressure in the clutch varies considerably according to estimated torque. You can see the pressure peaks produced under hard acceleration on the graph. Second, the electric motor current during the test run varied from zero to nearly 3.5 amps, sitting mostly at an average of 3.5 amps. Remember I said I measured the off load current (no oil) at 1 amp. The last stage of my acceleration tests from 500-580 seconds were done with 'Off Road' engaged. You can see it makes no difference to the Haldex operation. As I said they just alter the throttle range and torque to give you more slow speed control. My conclusion in this thread post #42 is that I shall be fitting a wireless remote to monitor the voltage on the pump motor and switch a small led fitted in the spare switch blank next to the 'Off road' switch. It should be off when stationary and flashing 'on' according to applied torque during acceleration. If it stays 'off' during acceleration I shall know the pump motor is open circuit without having to do a diagnostics check and reset (which probably won't work anyway). VCDS is well worth the money. Now I have 'characterized' my Haldex clutch I can repeat tests in future and compare. If pressure versus torque is changing, I might suspect a blocked pre-charge pump filter. http://www.briskoda.net/forums/topic/403735-no-drive-to-rear-wheels-4x4-off-road/page-2 I tried the two sheets of polythene soaked in detergent under the front wheels. The car just moved straight over them with no hint of a front wheel spin. I thought my test was flawed but wasn't inclined to fault the pump to prove otherwise. Now I have the plots I can see that as soon as the car is moving and there is measured torque, power is transferred to the rear wheels, so why would I get front wheels spinning on my plastic sheets? In conclusion, people are making a lot of money replacing Haldex pump motors when the problems are in the motor and system design which can be fixed by careful cleaning if brushes are not worn down or the commutator slip rings are not badly pitted. I hope you can now save a lot of money! As an aside, you can see in my 'standard' Yeti how the rear drive clutch is applied according to torque. There are specialists selling modified Haldex controllers which alter the front to rear wheel power ratios to give something like constant 4 WD. If I look at the standard setup and eyeball out the acceleration peaks, the oil pressure is averaging about 4 Bar (60 psi). The Haldex controller tweak would push this average up a lot higher. The pre-charge pump would still be running about the same duty but the internal high pressure pump and clutch parts would be working harder. Personally, I don't want my Yeti to be true 4WD and I think Skoda have got the Haldex characteristics about right for road use and the occasional get you out of trouble situation. They just need to provide the fault warning, look at the diagnostics and motor design to eliminate the brush contact problem I found. pump current & oil pressure.pdf oil pressure & torque.pdf
-
O.K, I think I'll do it with a cheap wireless rf remote in a potted box operating a 12v switch and no wires. Hack the remote button to stay on permanently, remove coin battery in remote and power on from the 12v pump supply via a 3.3V regulator chip.
-
That will work once the controller is happy after testing for motor current. Once it faults, there will be no voltage until the fault code is cleared . In that respect a led would be a good idea and cheaper than having OBD diagnostics permanently plugged in, because it basically tells you if the pump motor is locked out or not by the software. If anybody can suggest an easy convenient neat wiring route from the Haldex unit to the center console, that would be helpful and I would add it to MY12. I have spare switch covers next to the 'off road' switch and one of those could take a 3mm led. I'd probably use a standard led and resistor so I can adjust the brightness. The loom between the pump motor and controller is short and a pain for removing the plug. Best to solder splice and heatshrink sleeve a couple of 100mm long wires to increase its length. I'm not sure what the polarity is on the pump wires? Best to put part of the led resistor value at the motor in each wire and heatshrink over, then any accidental short to the long led wire won't take out the controller or fuse.
-
I shall be using that App or OBDwiz App with my OBD Scantool. However, if you get a repeat of the pump motor open circuit fault, you will be able to clear it but it will come back if the system gets the slightest sniff of an open circuit motor the next time you switch on and the controller self checks. The Stealership is only doing the simple diagnostic check and clear and hoping for the best, or that you will not notice there is no AWD! My concern is I don't need AWD most of the time but when I do really need it I won't know if it will be there or not. Keeping diagnostics in the car won't help when it's stuck with the front wheels spinning. I hate to say this, but a whack on the pump motor, followed by a diagnostic scan and fault clear might be quicker than putting snow chains on the front wheels. If there was a cockpit warning (which they could provide with a software mod.) they might get a sudden rush of 4WD Yetis with intermittent open circuit pumps and would have to address that issue as well as the ECU fixes. Don't hold your breath, the number of 4WD Yetis sold may be too small for Skoda to address the issues. The issue to take up with Skoda is why there is no cockpit warning given of Haldex transmission failure. I would have thought failure of AWD to operate was a pretty serious fault on a supposed AWD vehicle? For now my cleaned up motor might soldier on for many uncertain miles and perhaps they think 50k is the motor service life? I might now think about adding my own electronics to monitor the pump motor current whilst I'm driving.
-
Thanks I'm going to try something in my driveway. I've cut 2 lengths of 1200gm builders polythene into strips 500mm x 2.5M long. I'll put those under the front wheels then brush over some washing up liquid, try to get the front wheels over and spinning to see if the car still moves forwards. Not sure if ABS will interfere though.