
GaffCelticViking
FREEDOM
-
Joined
-
Last visited
-
Hiya! I don't honestly know but found this, which might be helpful: https://www.dynamicsounds.co.uk/vehicles/Skoda/Octavia?product_type=4
-
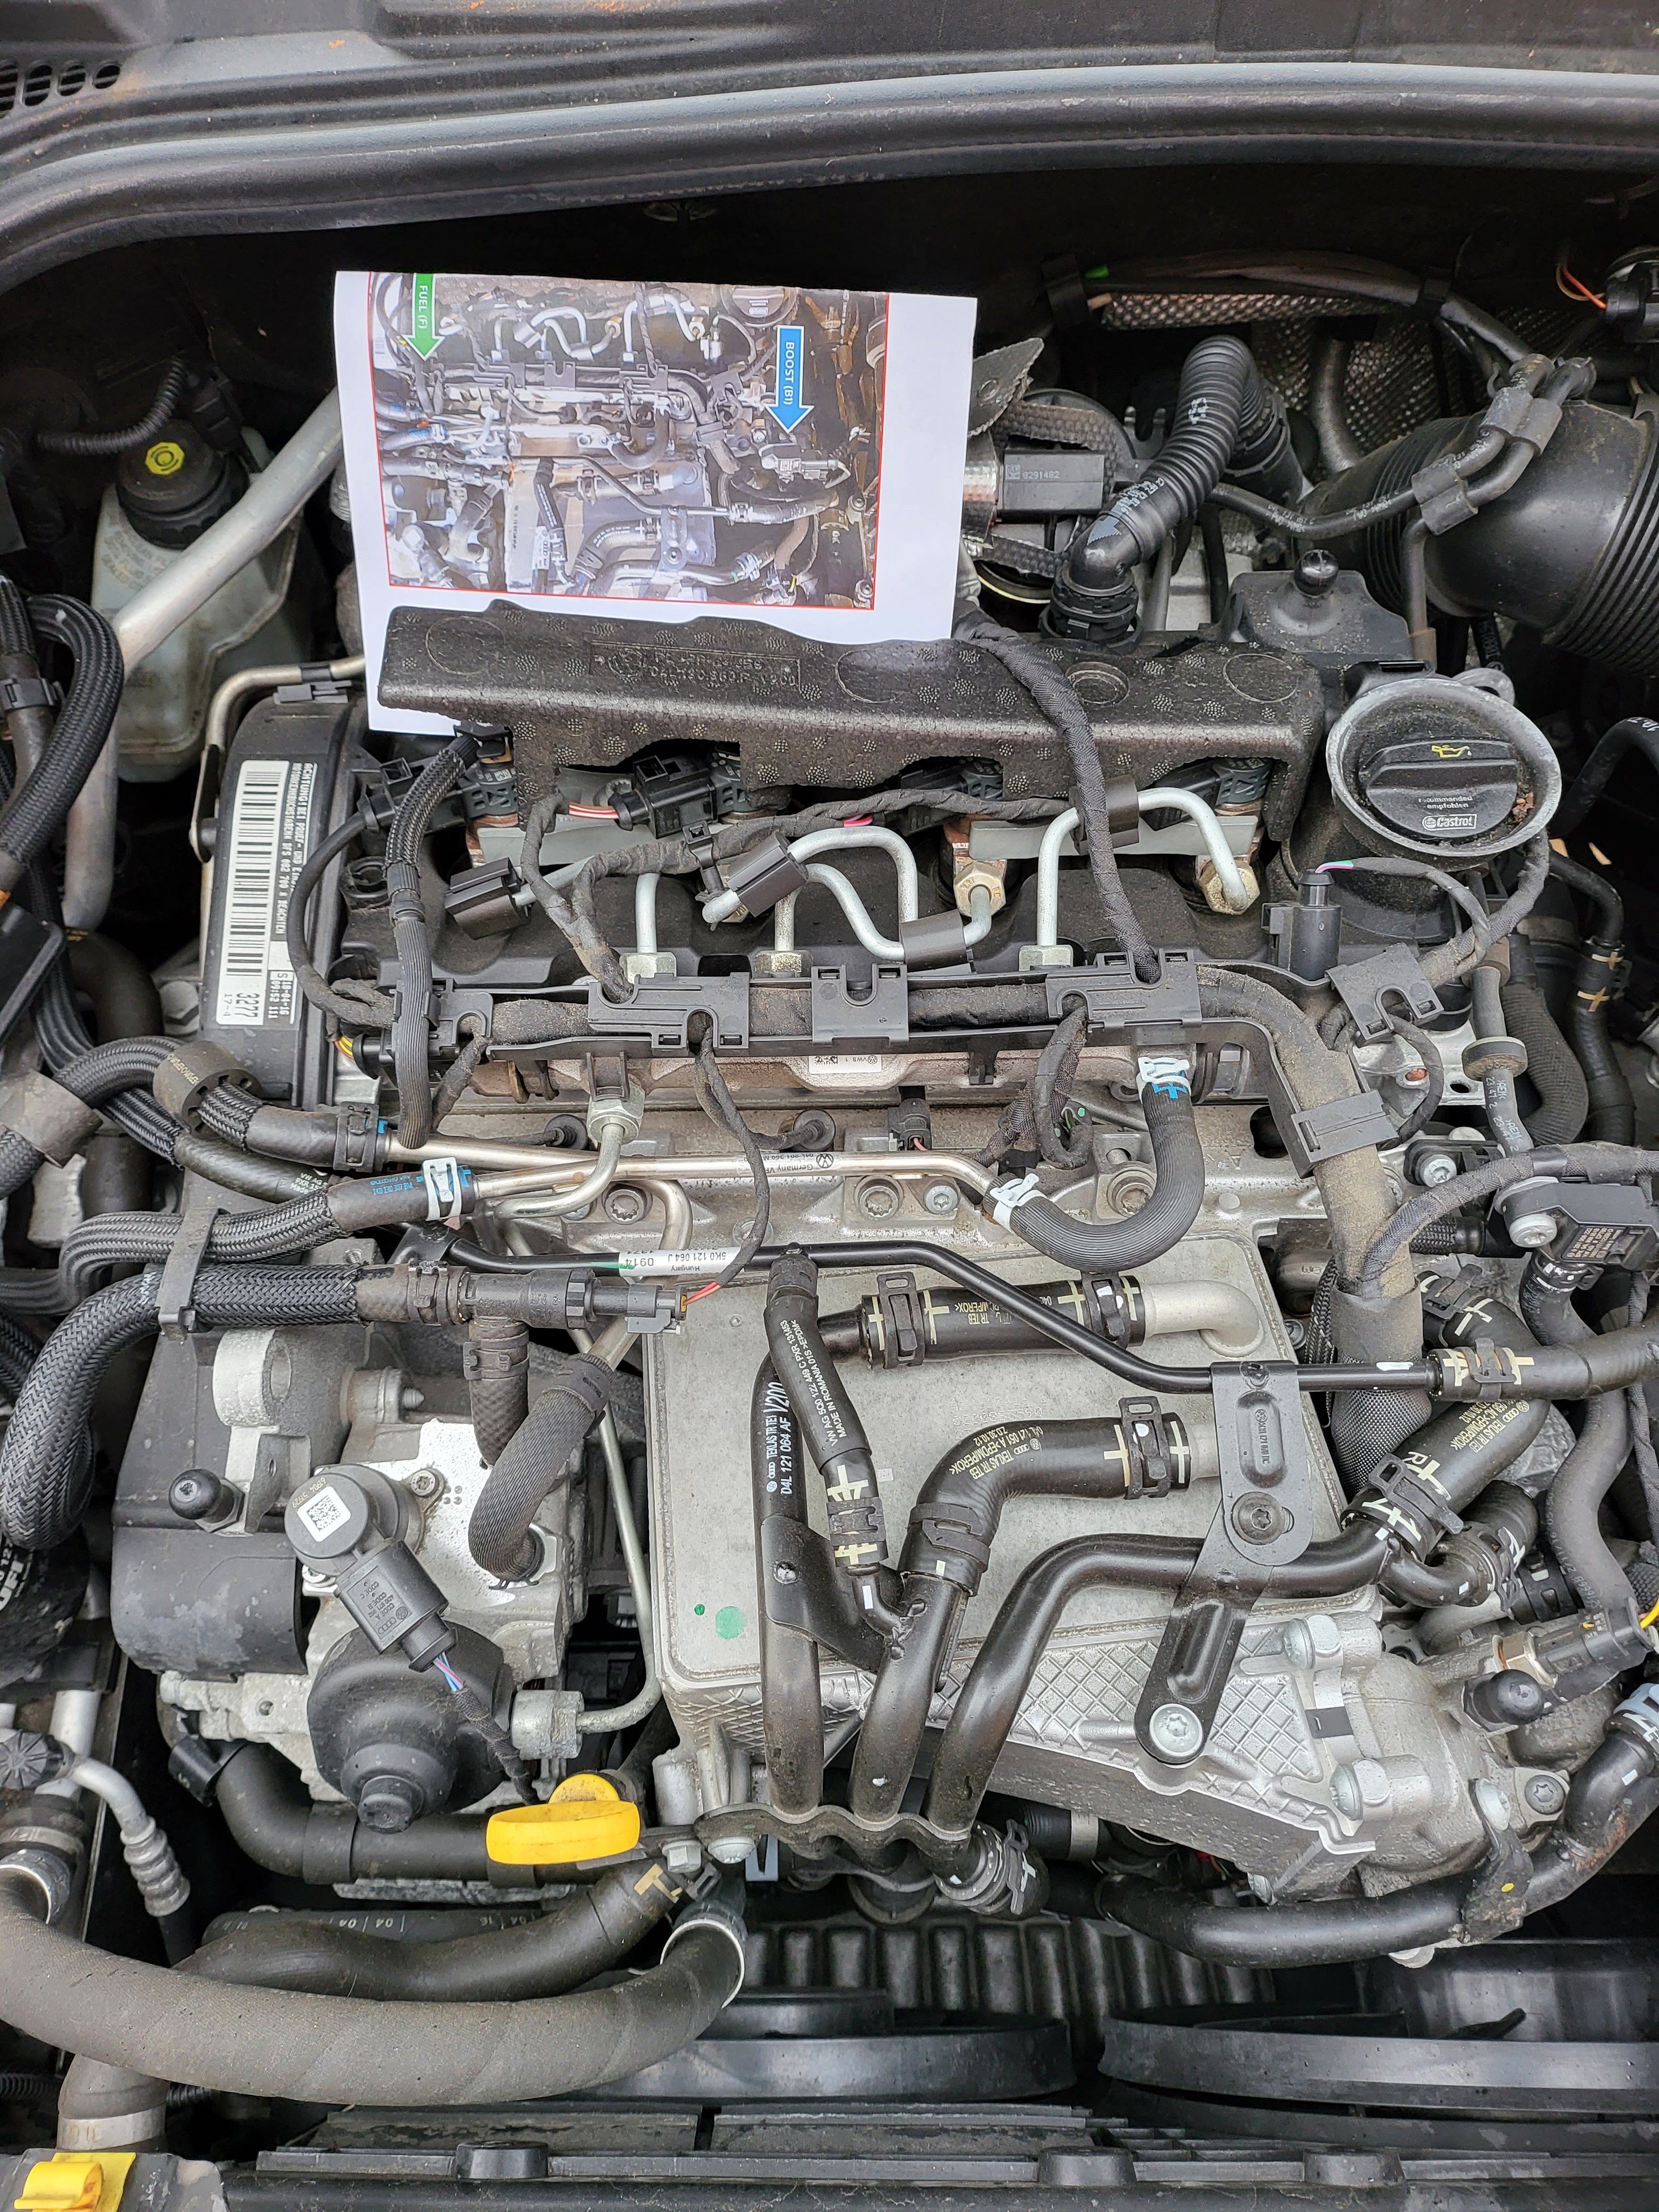
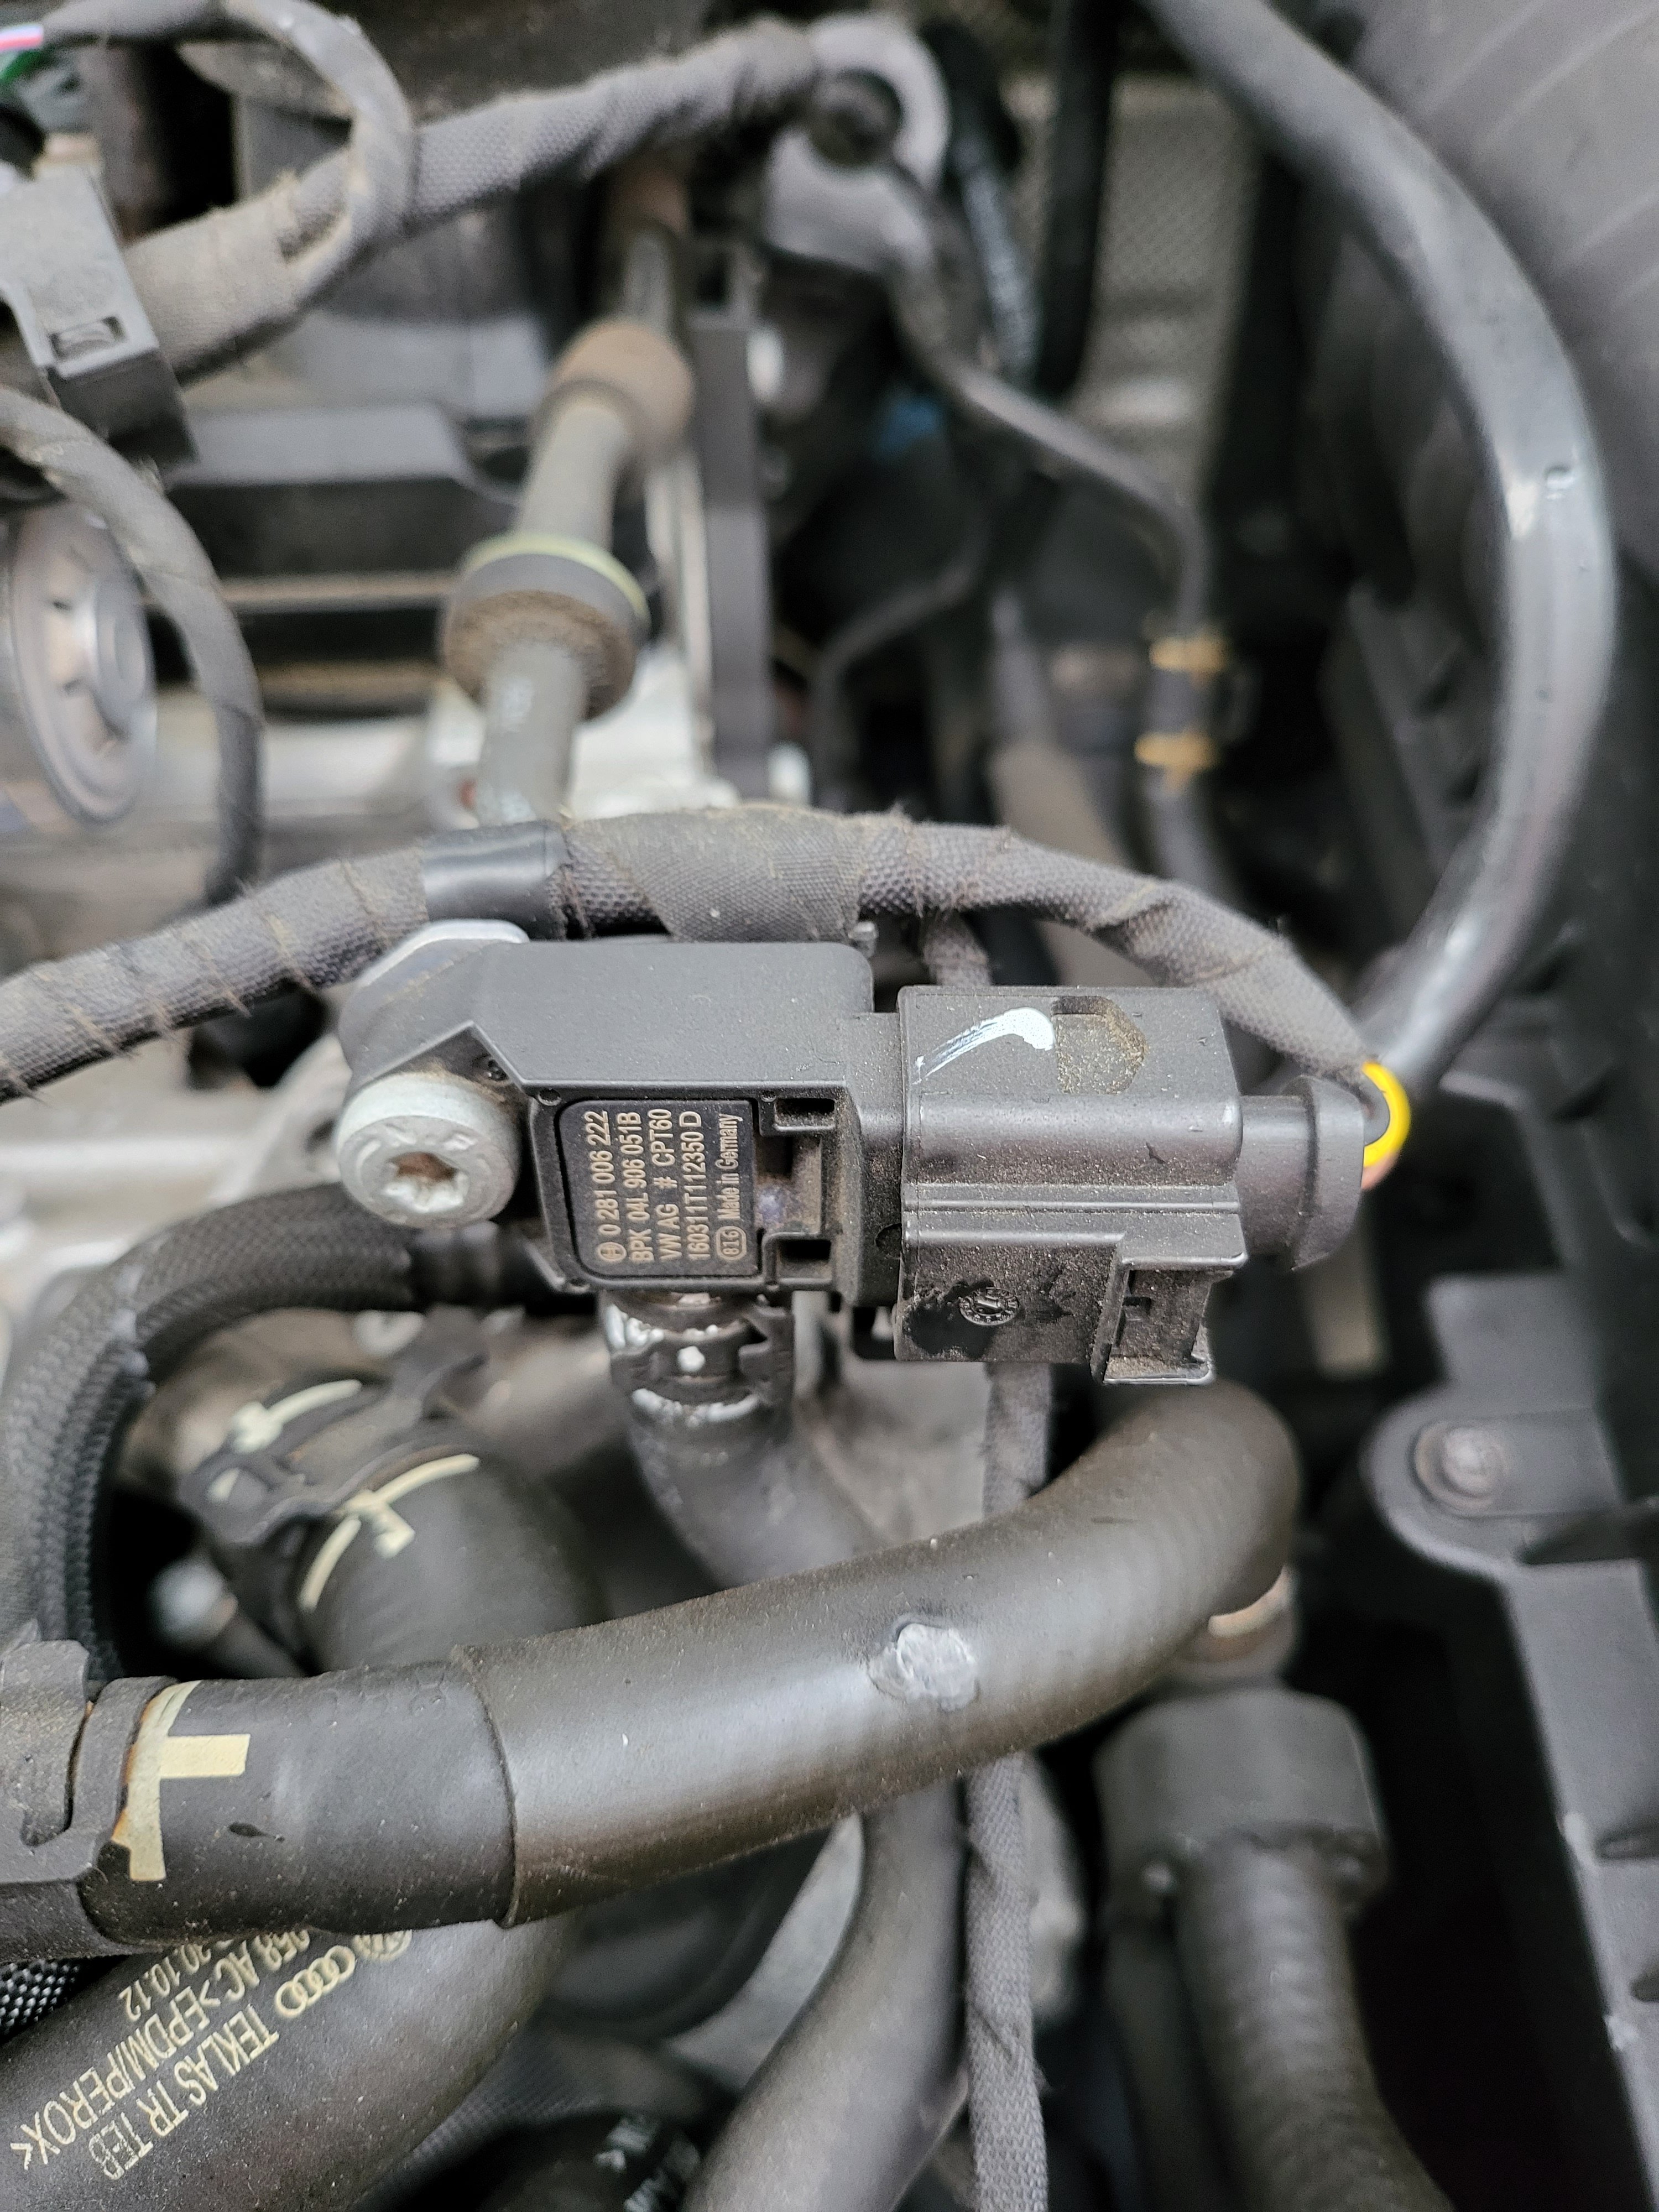
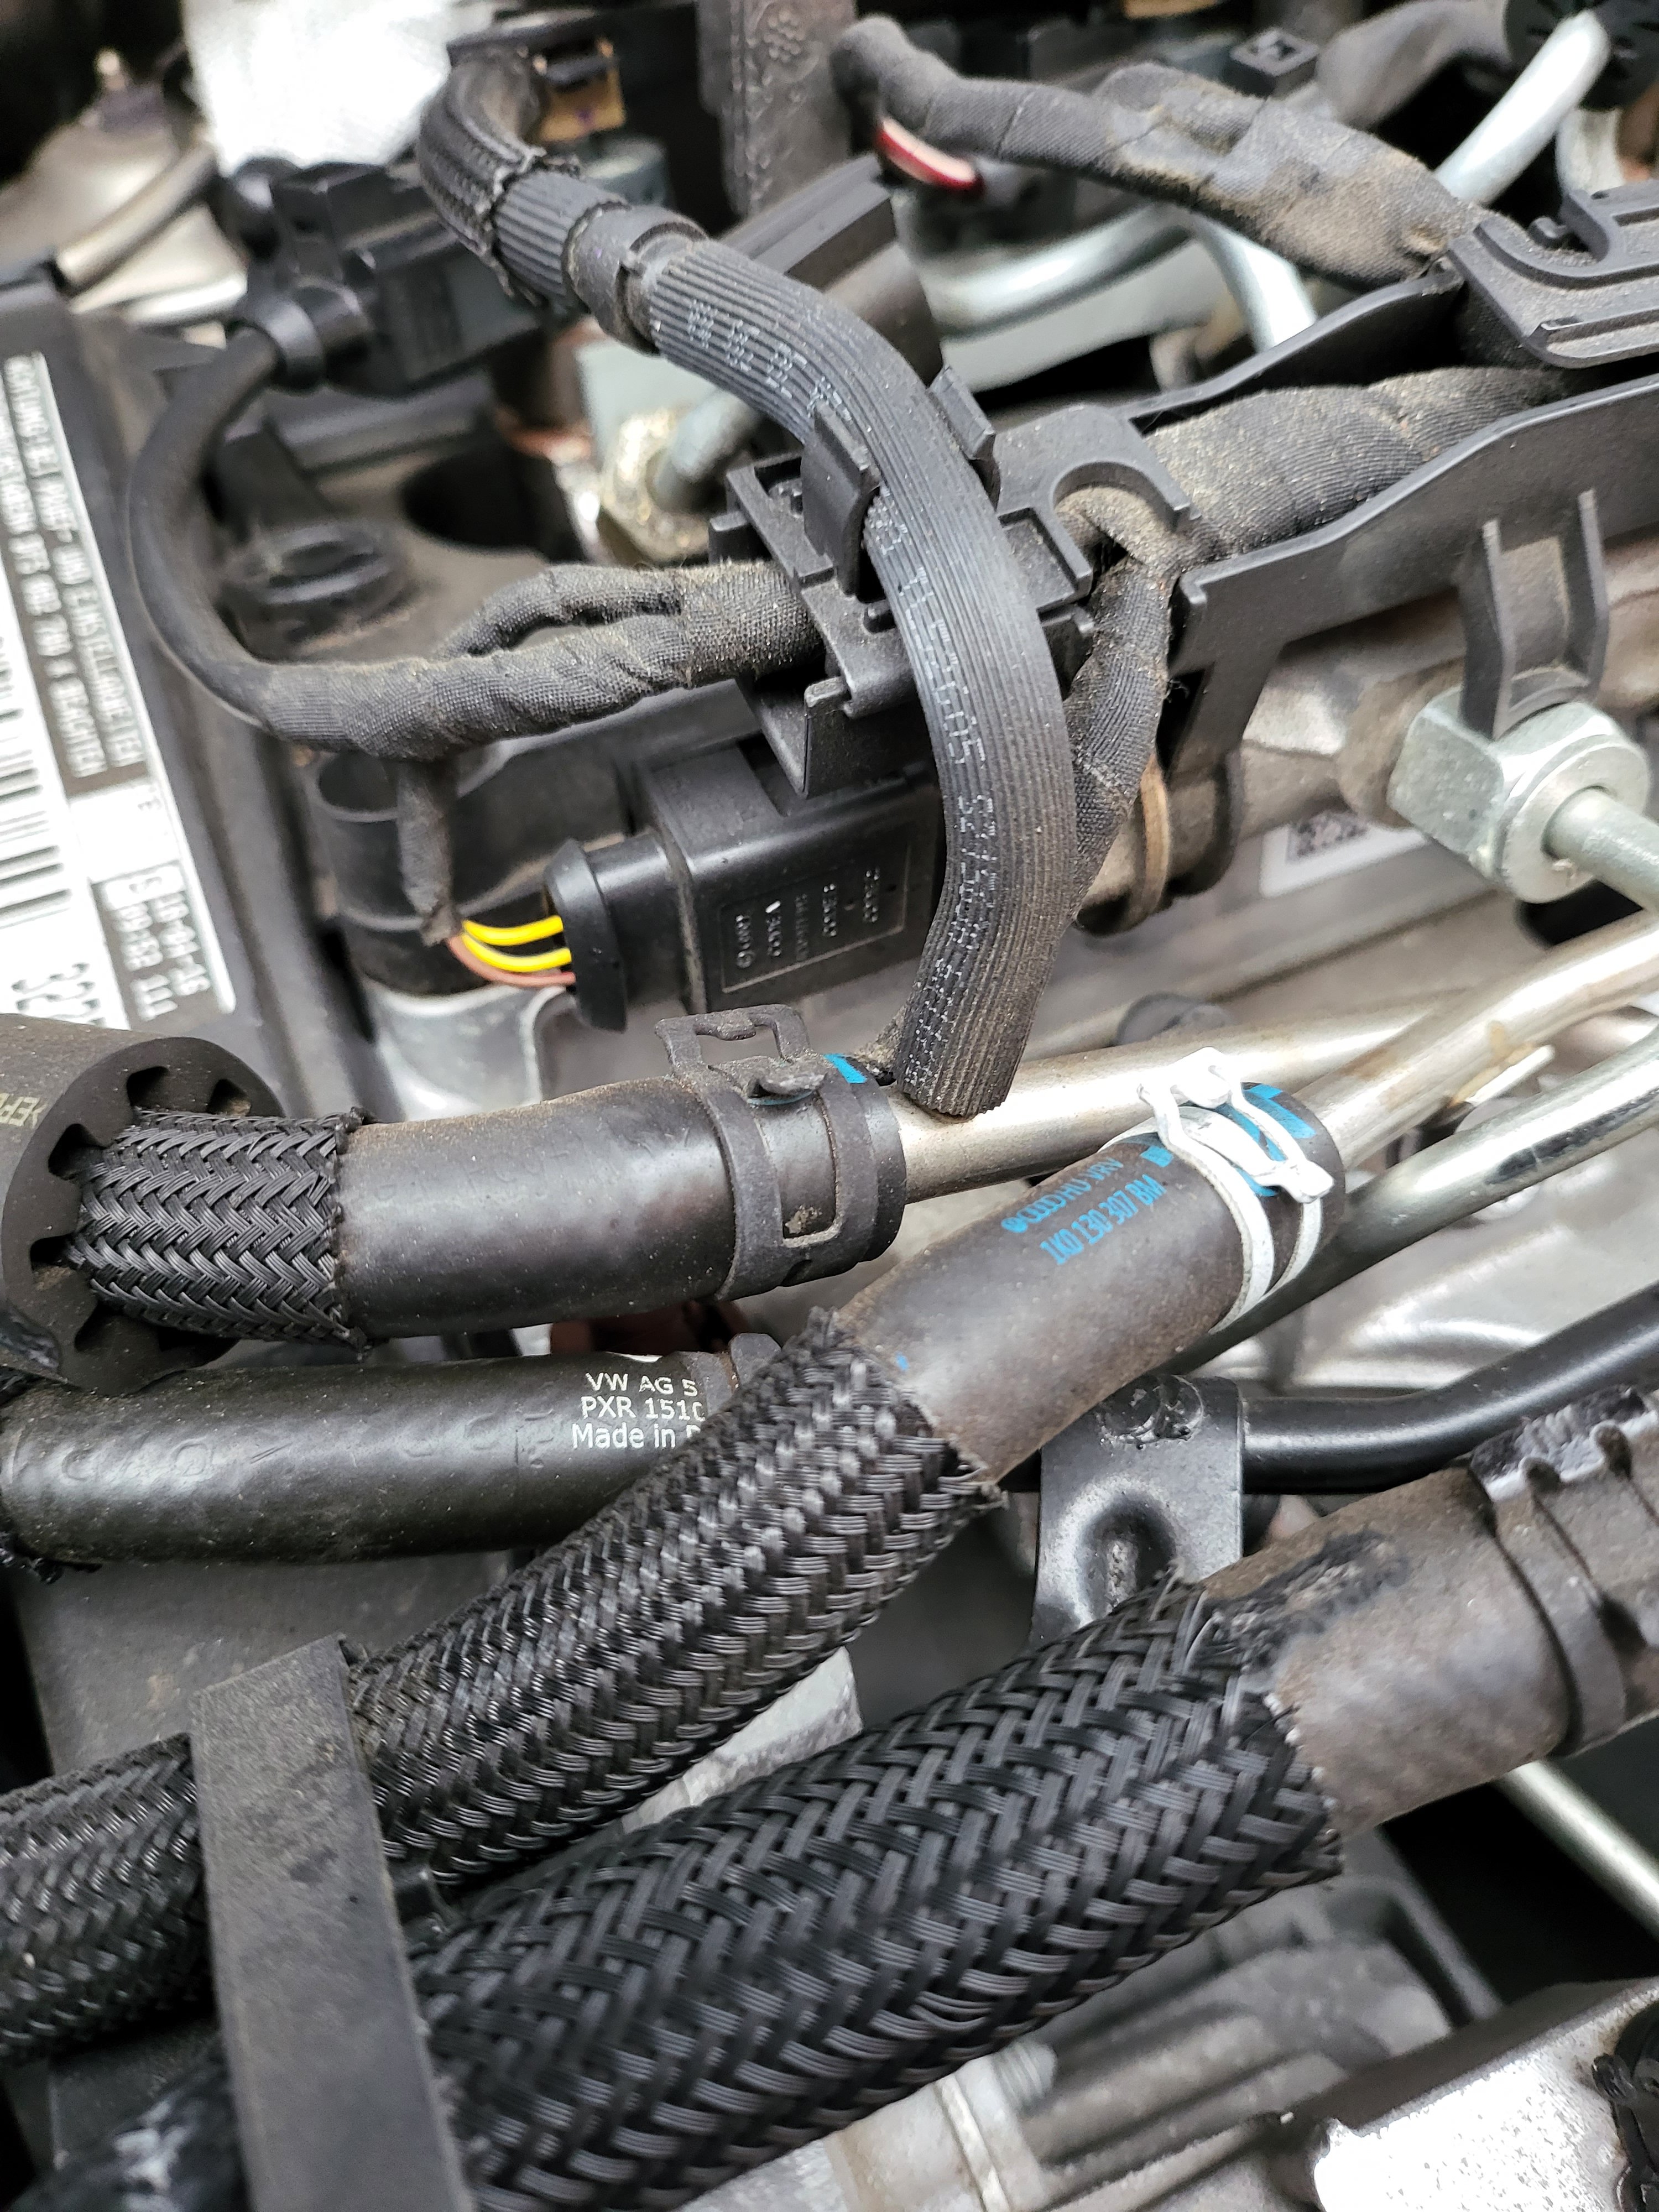
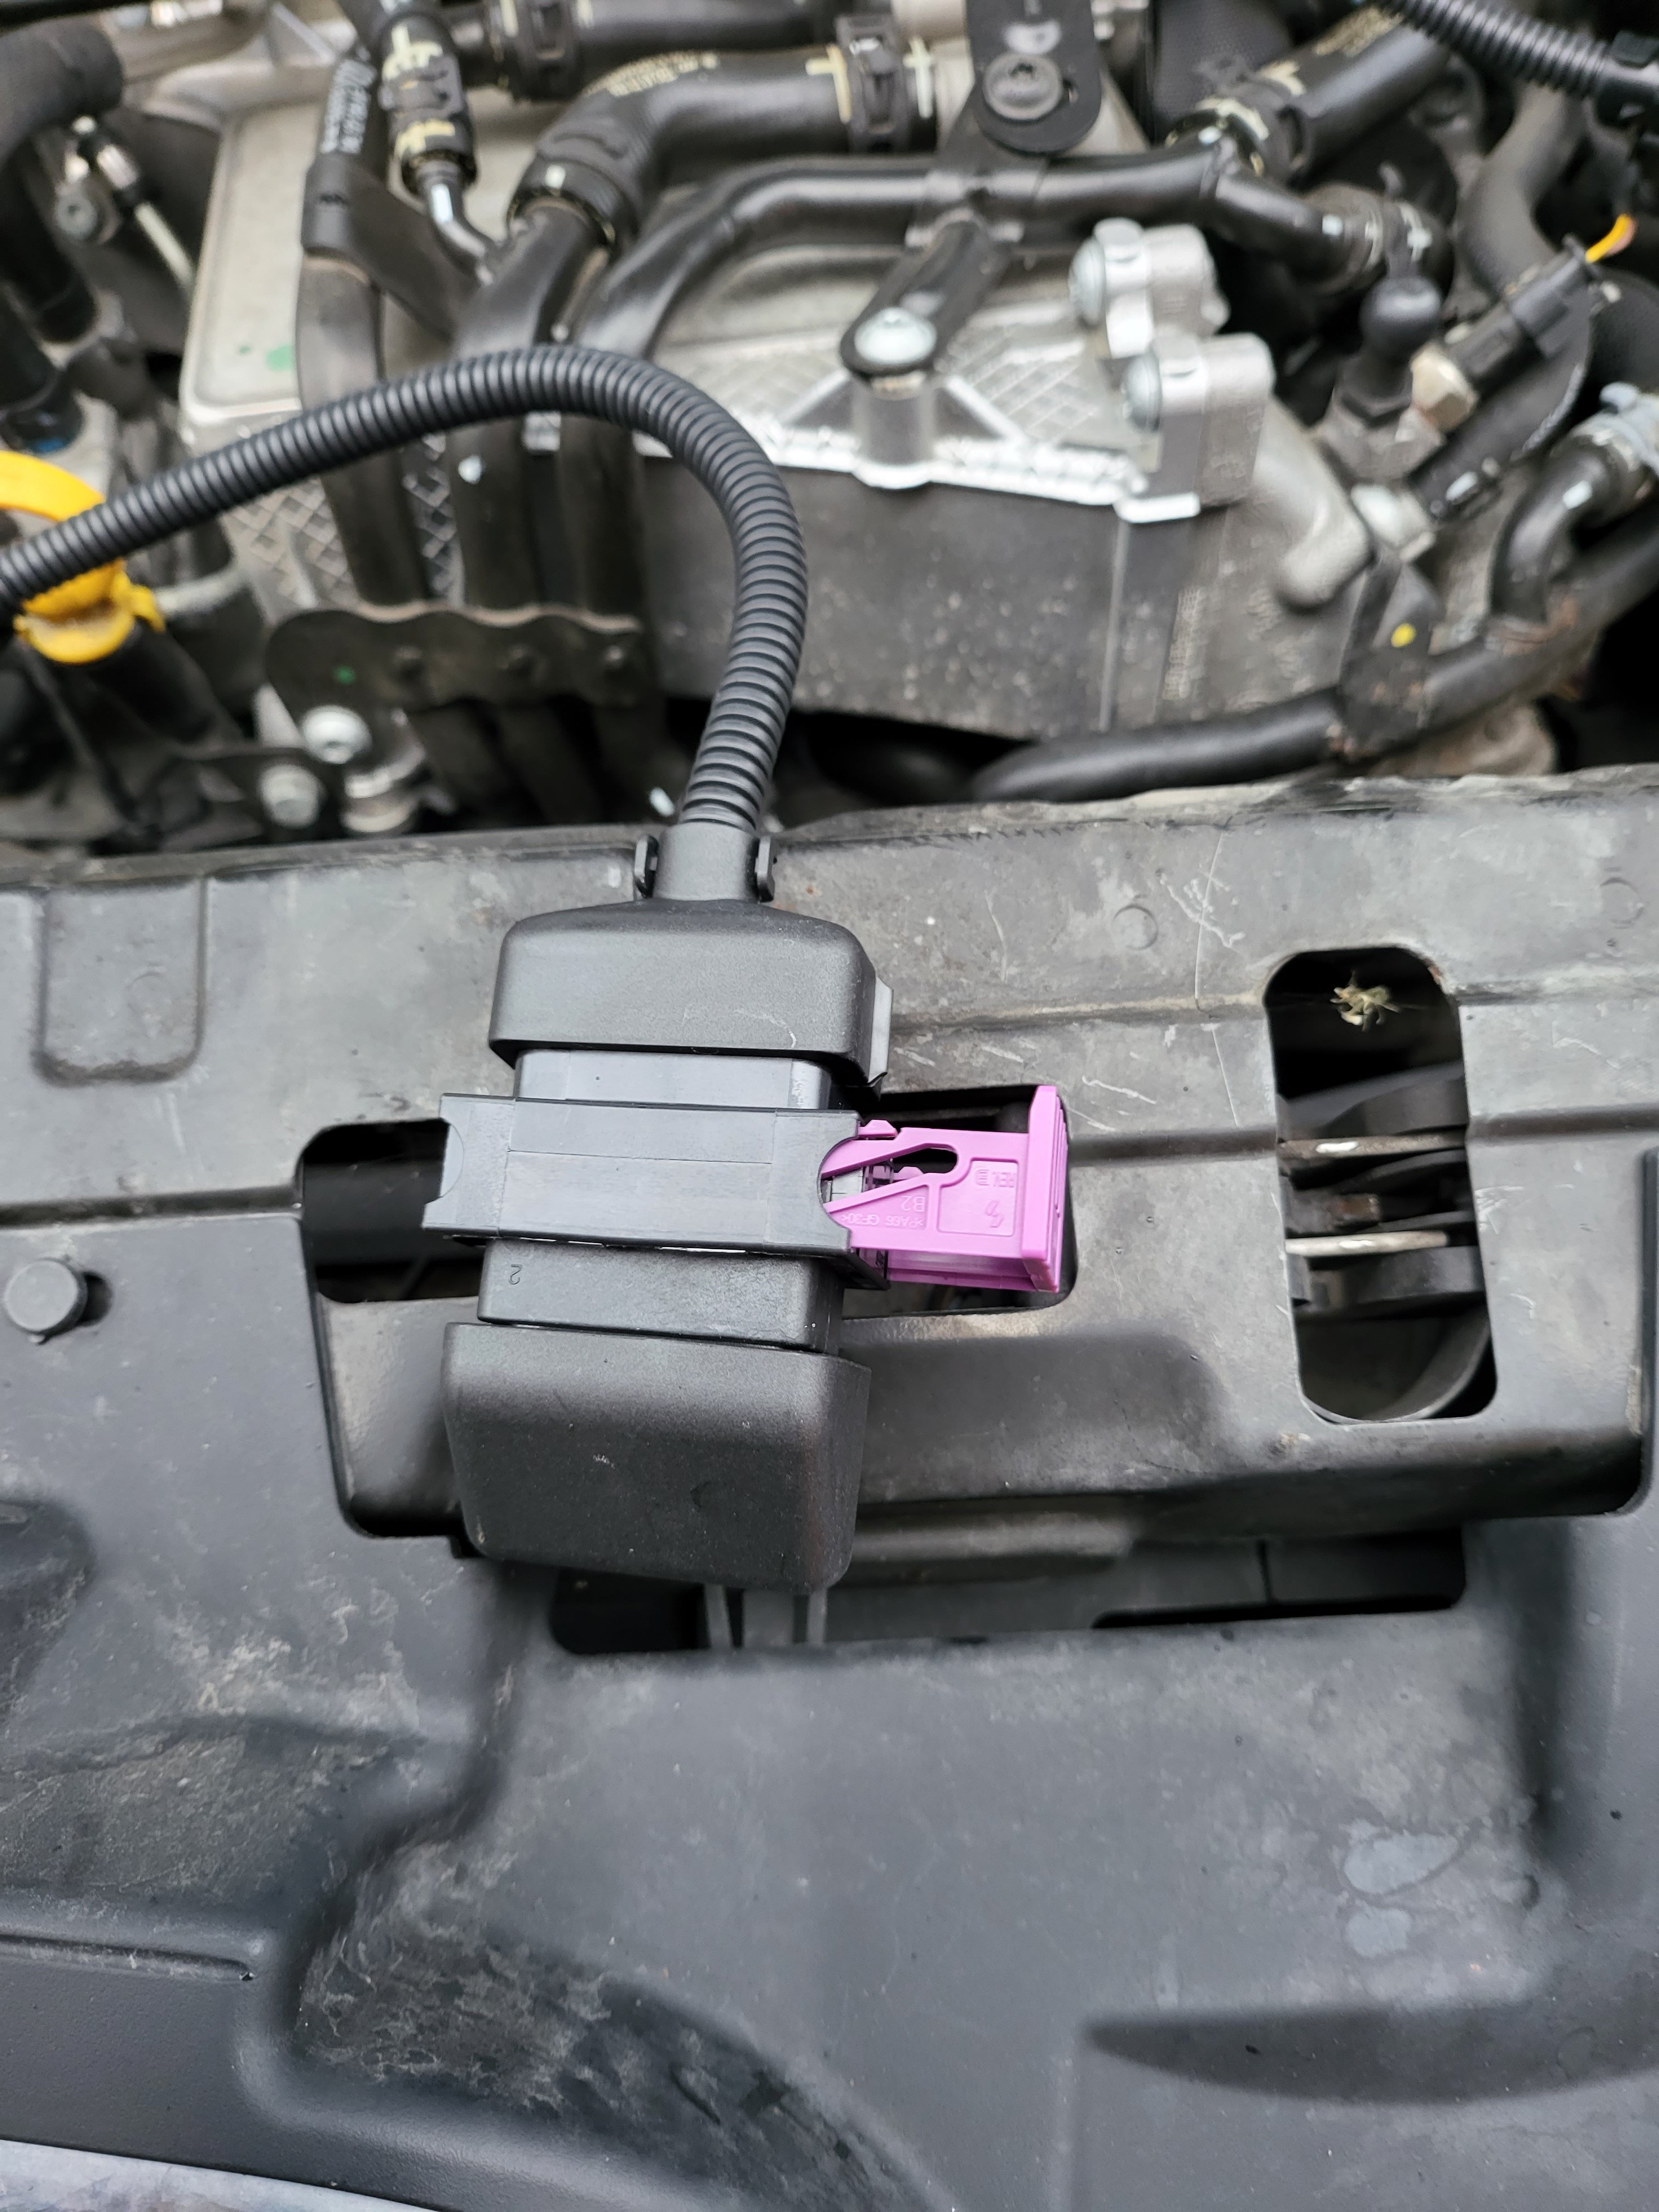
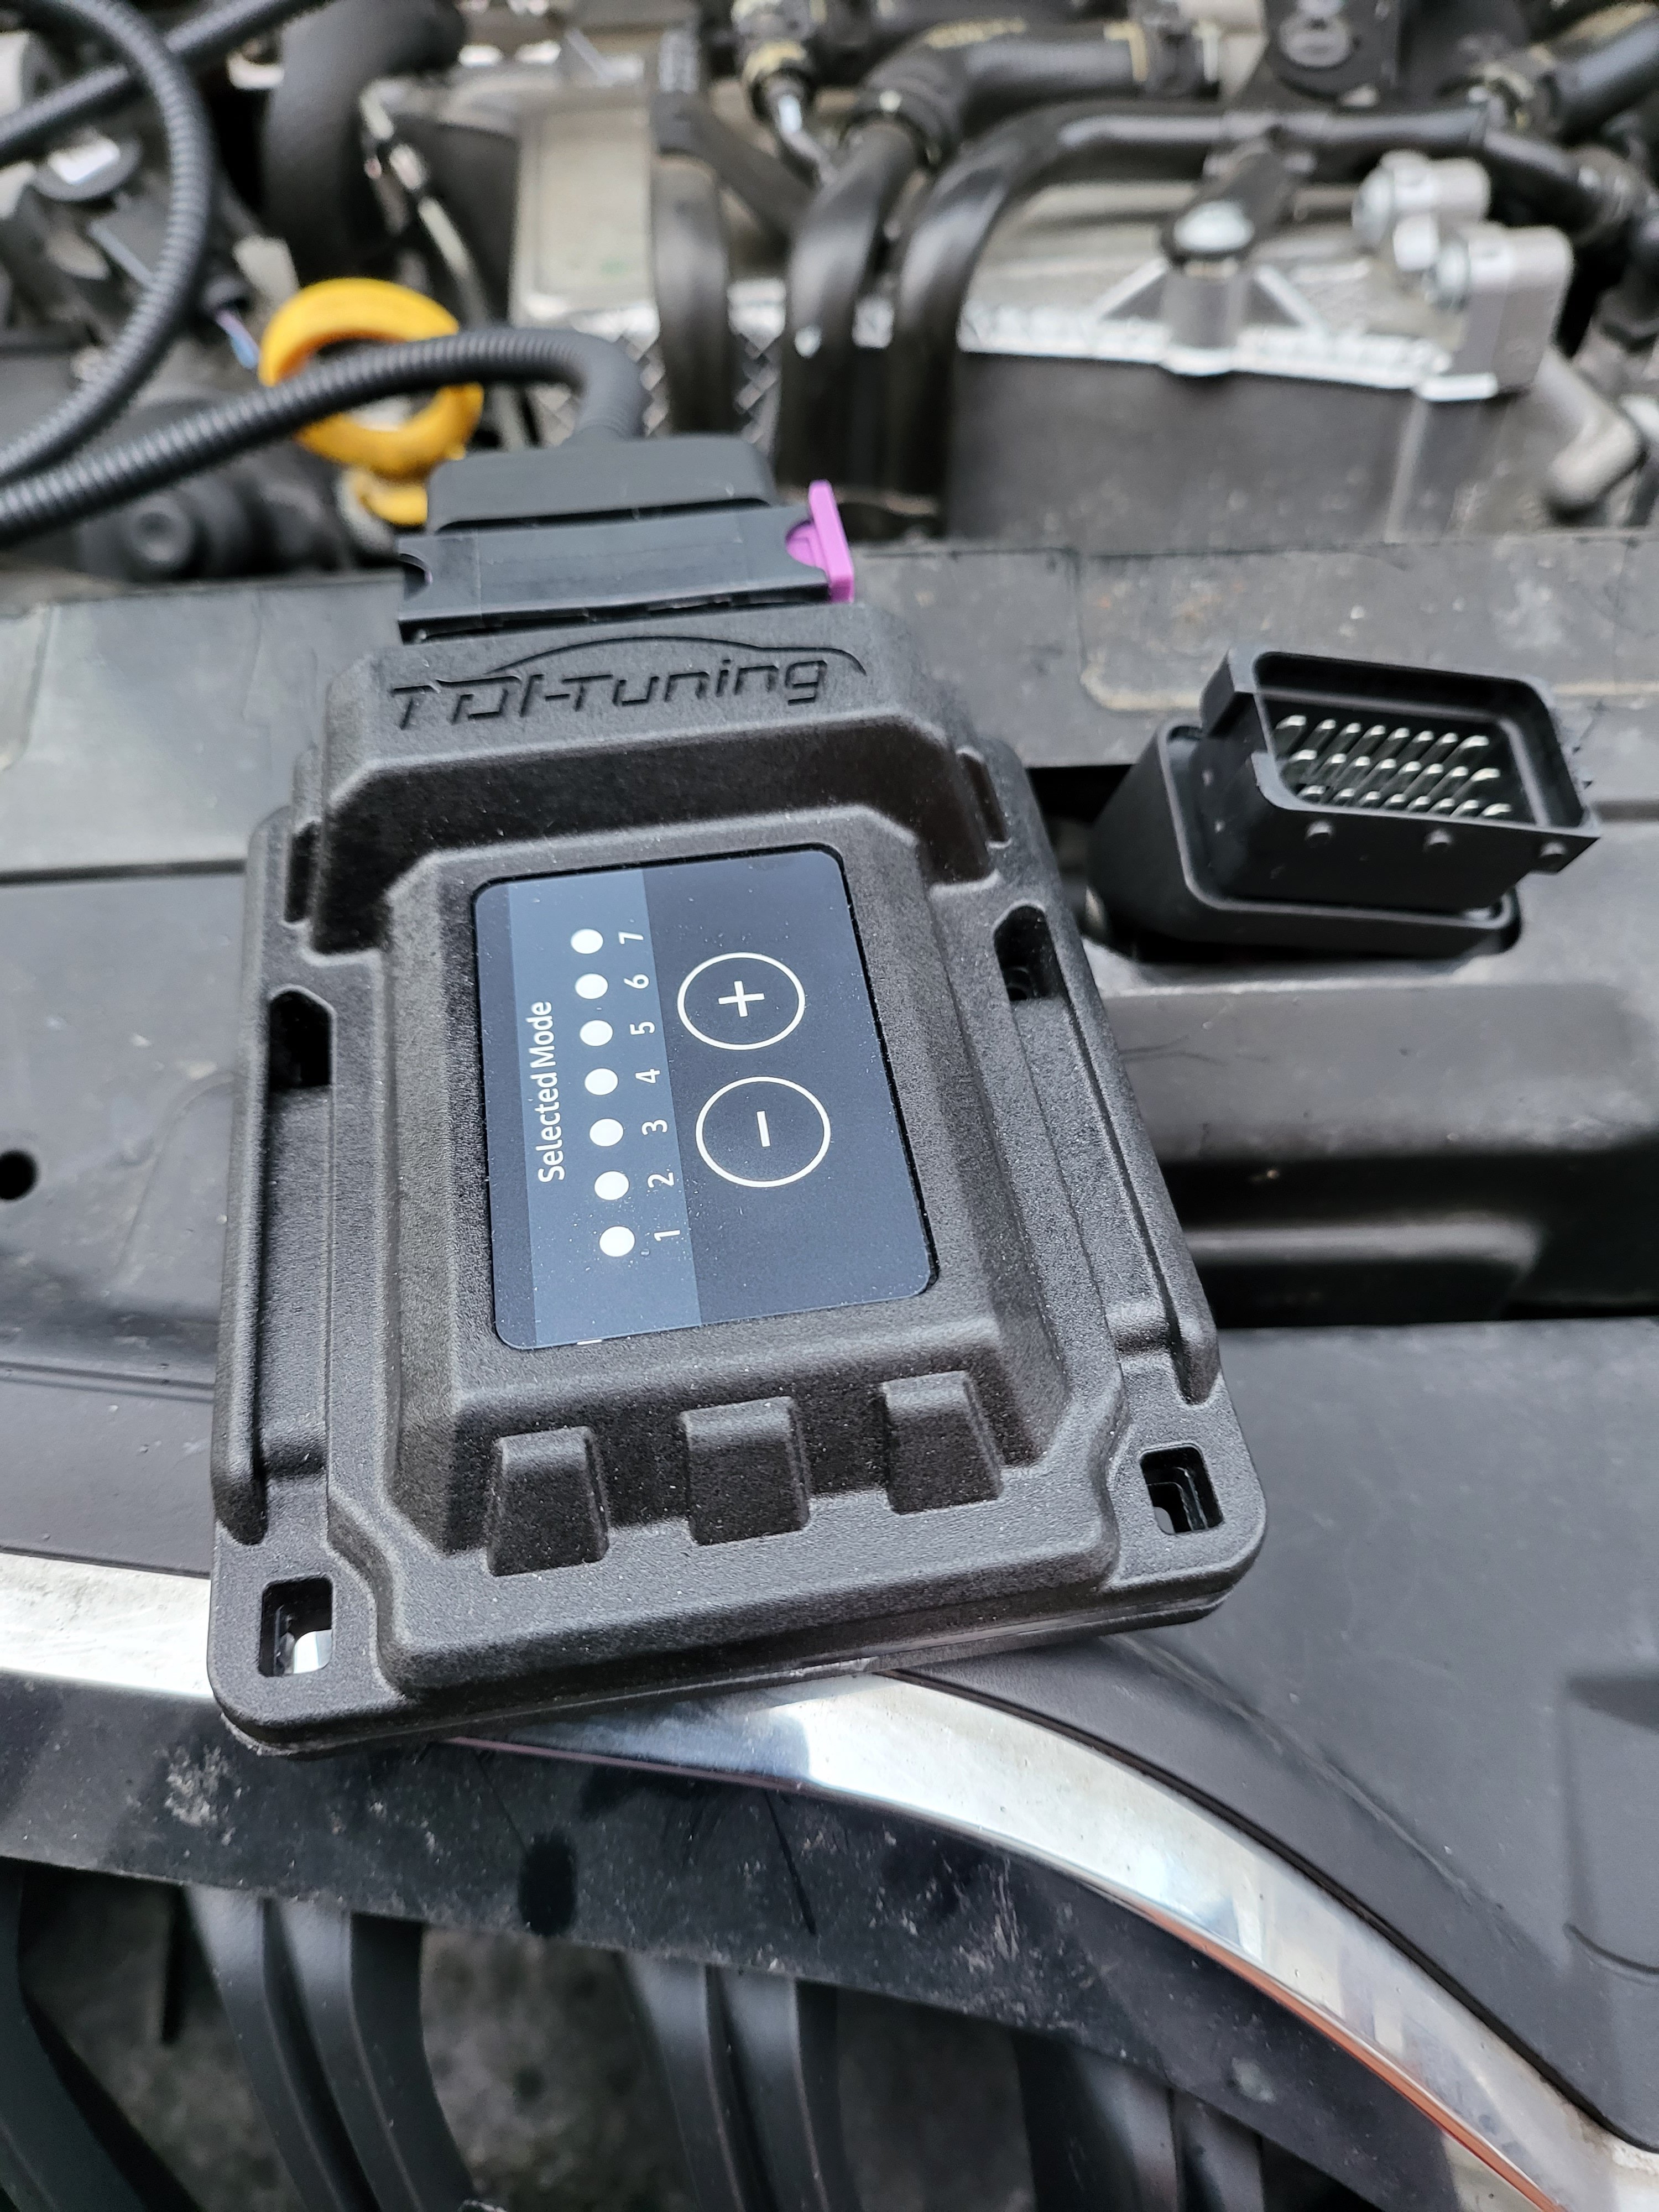
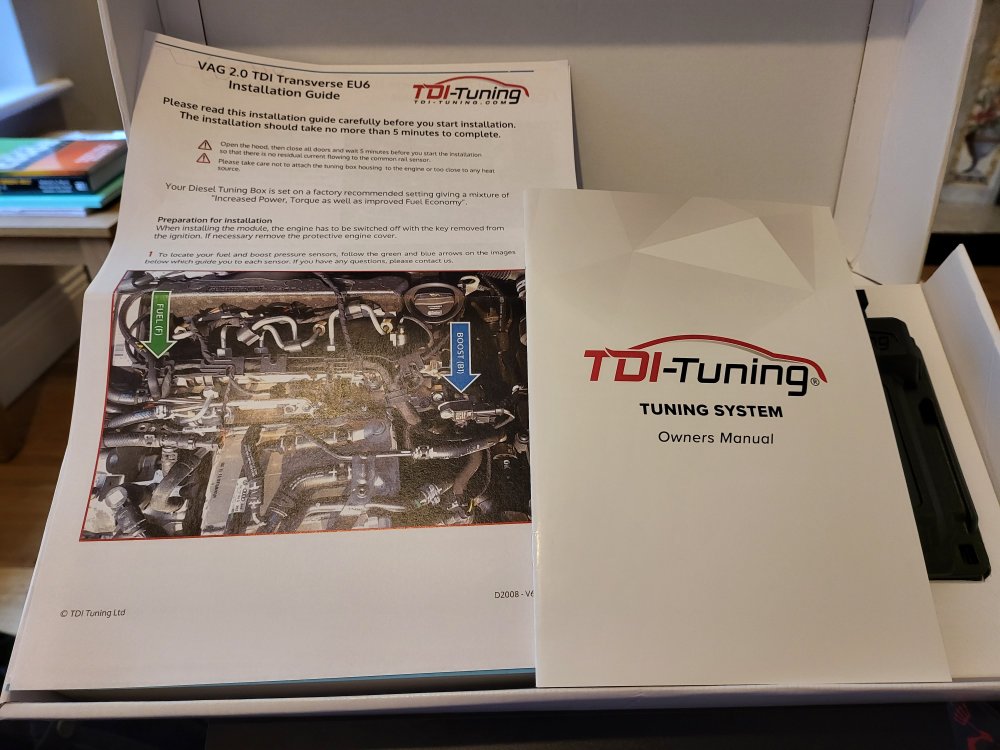
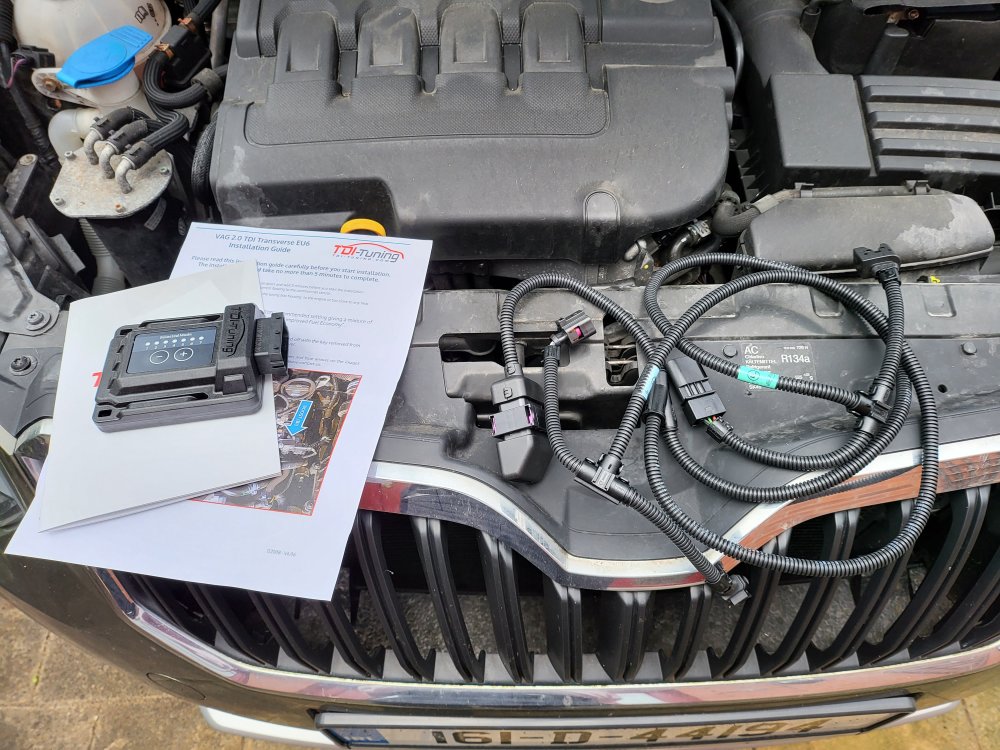
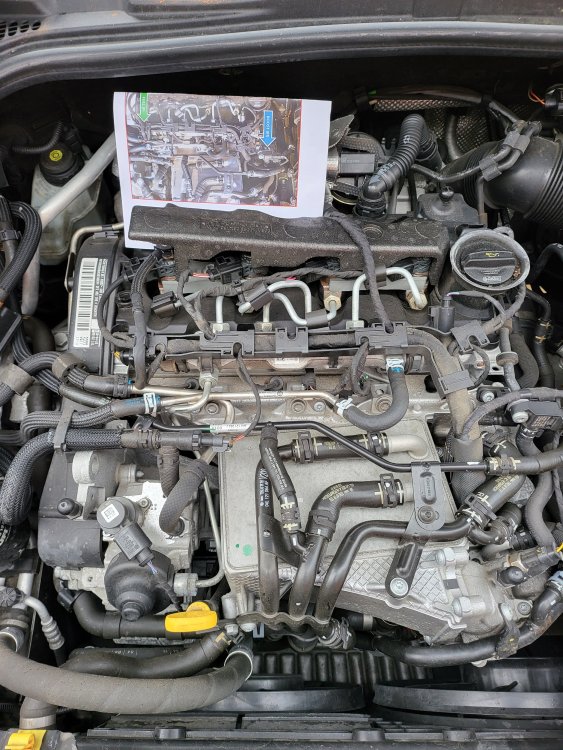
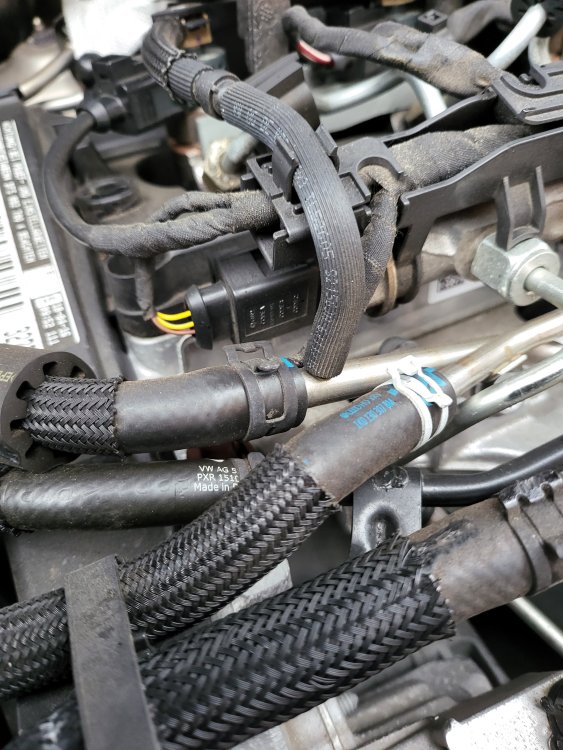
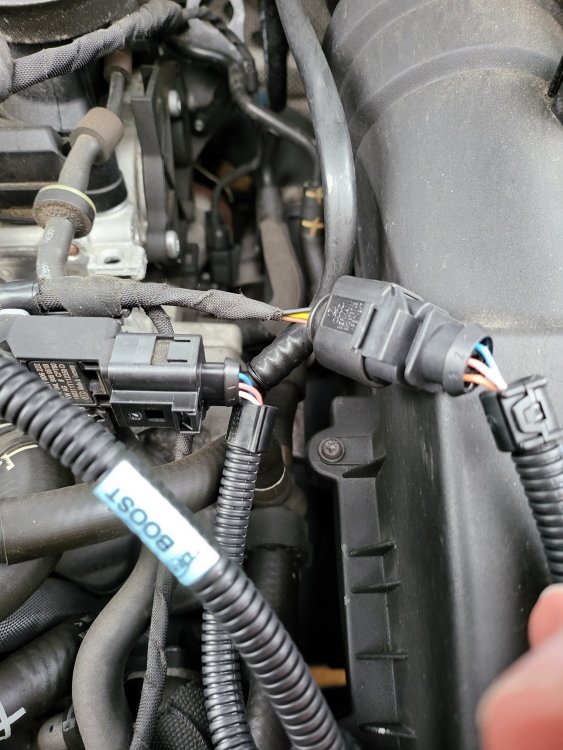
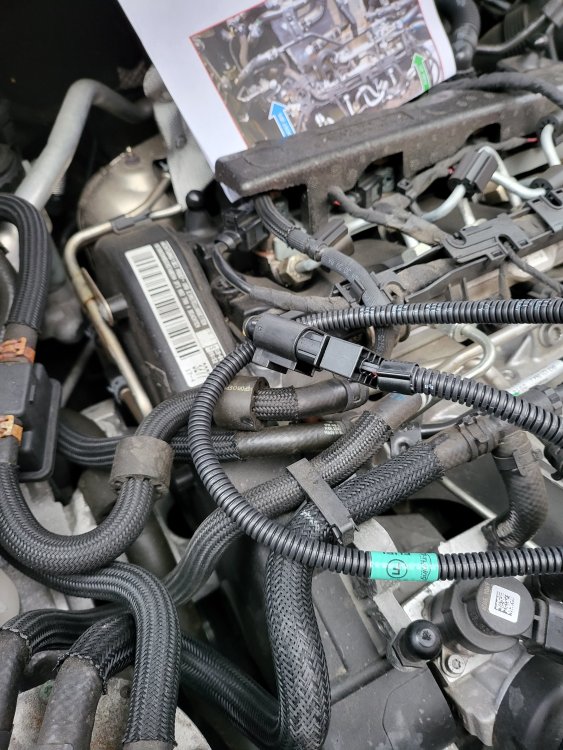
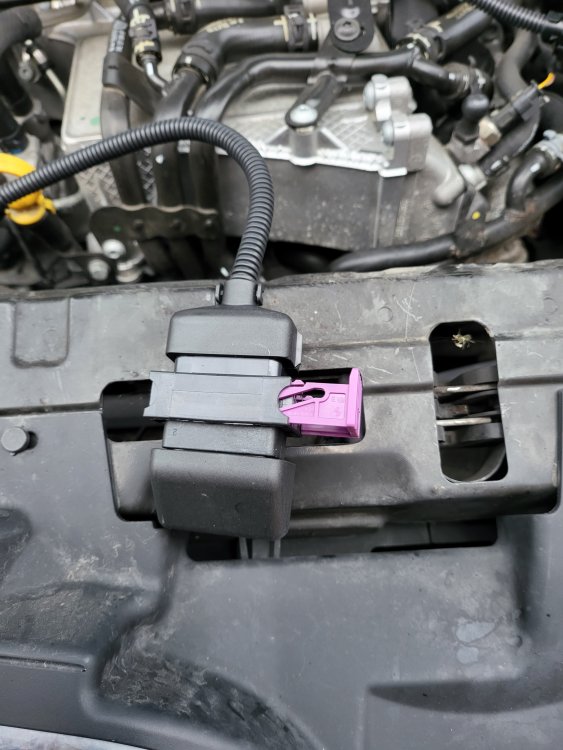
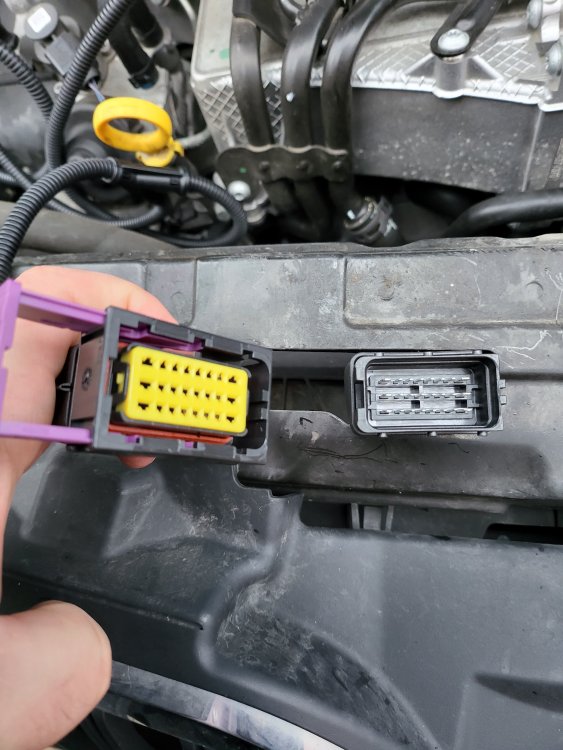
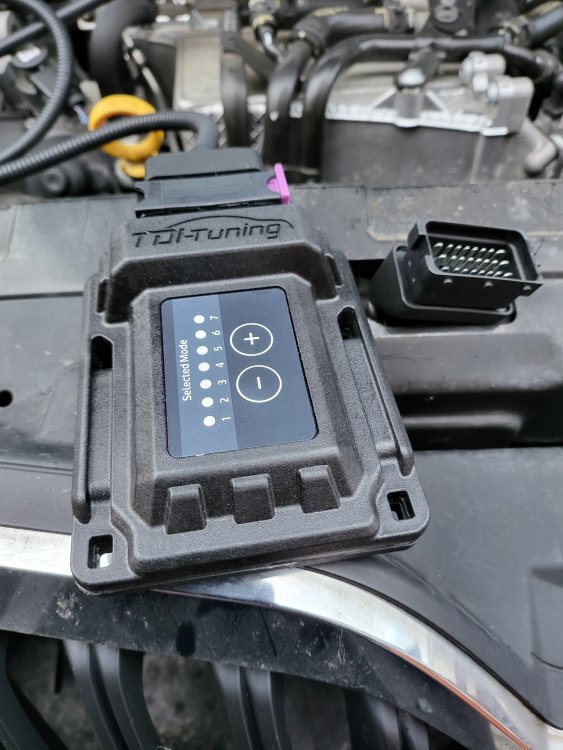
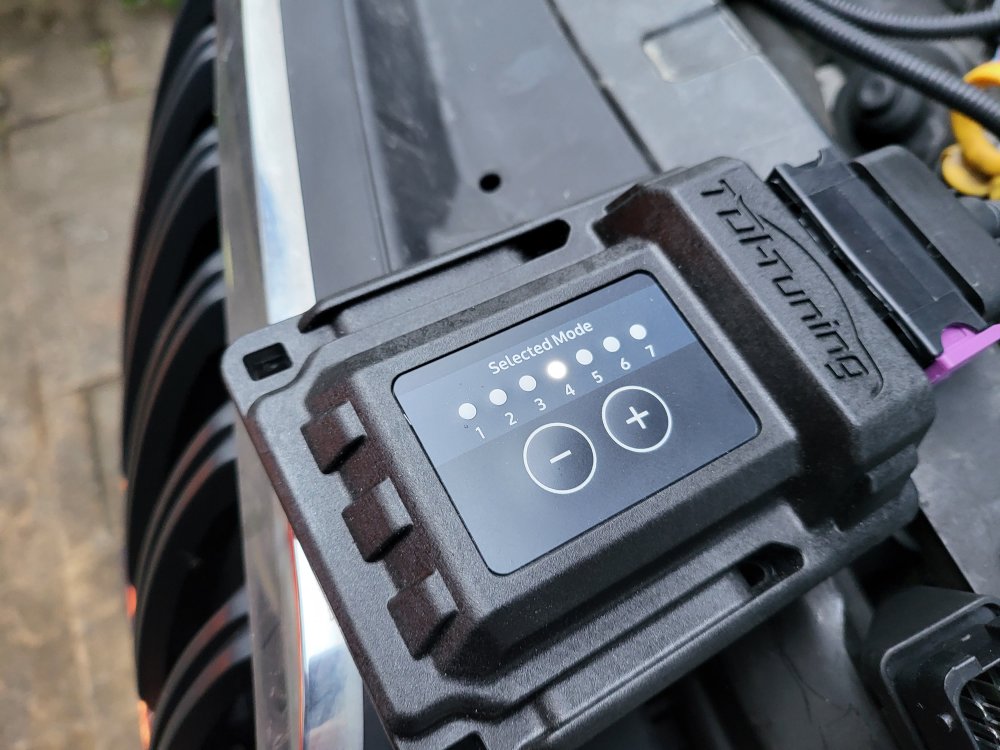
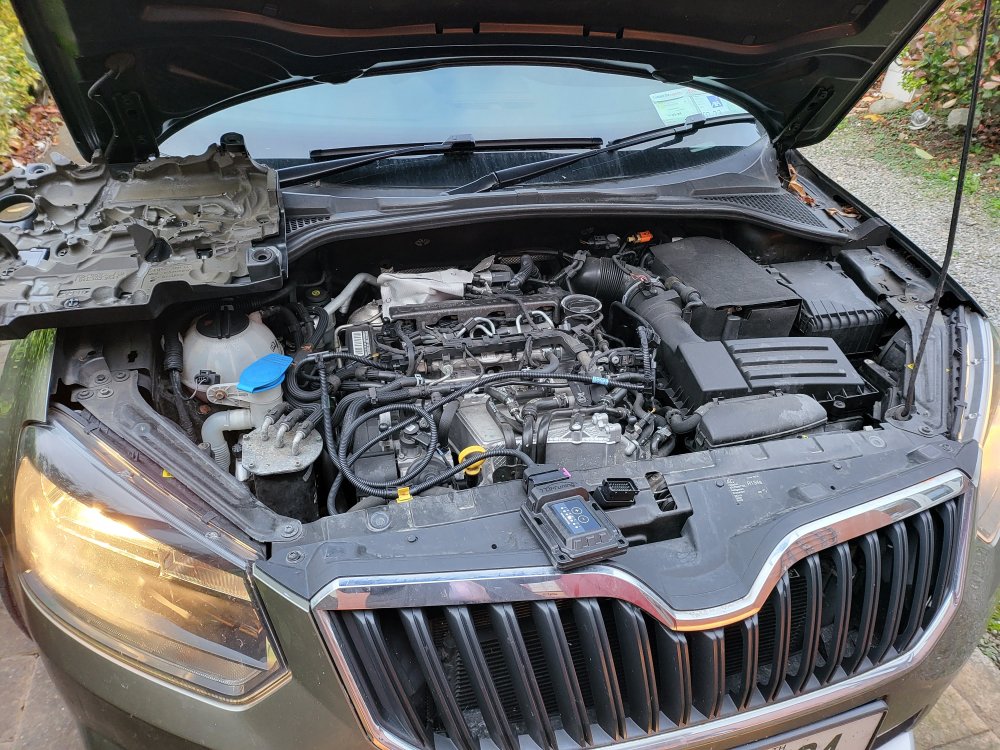
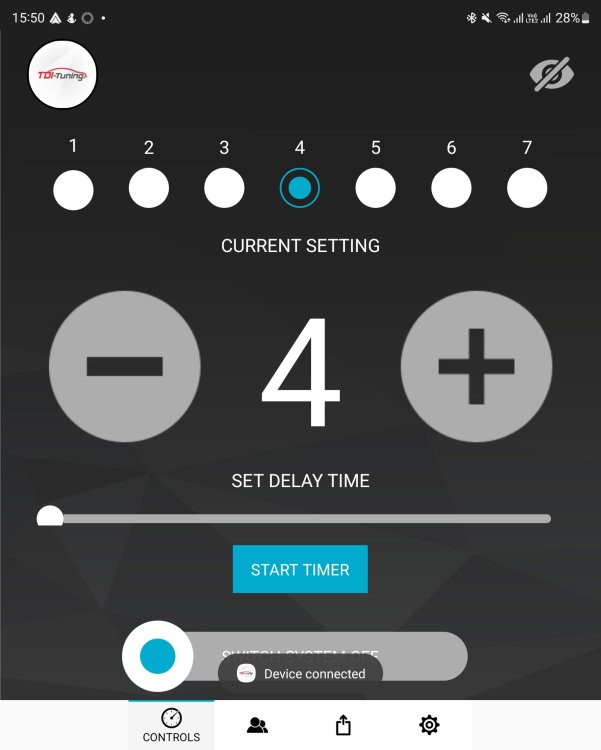
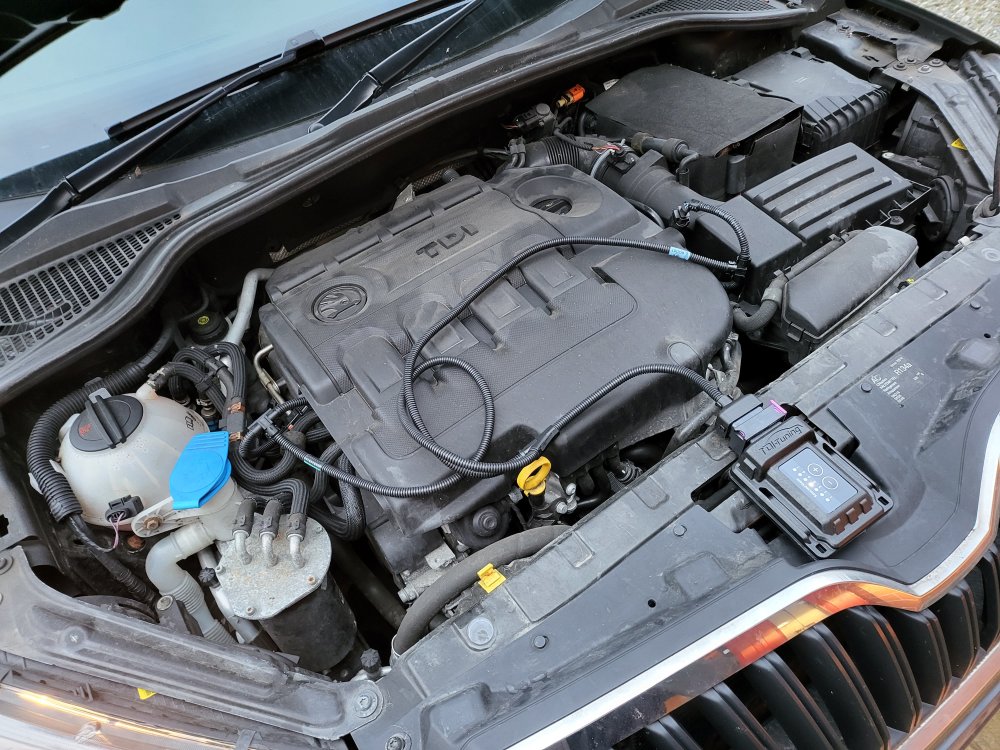
Dear Yeti Fans, I finally took the plunge and tuned my Yeti. I considered getting a proper rolling-road tuning in Ireland, however they're few and far between over here and some of the places I contacted for a basic remap didn't have the remap for a DFSB engine. I opted for a TDI Tuning box from the UK after watching far too many YouTube videos and asking on FB Yeti forums for advice as the engine code is DFSB and not a C*** variant. I paid €358.82 (€281.33 for the device (20% off) and €47.50 for BT Connectivity), and sadly due to Brexit I had to pay a duty with admin fees of €101 on top of that for a total of €459.82. It's a lot of money for a gamble, however, a gamble that paid off. The box arrived only a week later with instructions, and while they were clear they weren't for "Dummies" clear. I know the front end from the rear of my car and I that the steering-wheel is at the front... 🙂 Therefore I've added a few photos with instructions for those not mechanically inclined, like myself. Box with the device, the cables, and instructions: The cables, with two connectors: the fuel injector and the booster: Device and cable laid out on top of the engine compartment: Remove the engine cover, starting at the top left or right corner (snaps) then the lower corners (laid out the instructions to aid me): The Booster Connector (connects to the blue TDI Tuning connector), it has a locking mechanism that needs to be released before unplugging (on the top of the connector, pull up, lower right of this picture): The fuel injector connector (connects to the Green TDI Tuning connector), locking mechanism is on the other side, and must be released before unplugging: Connect the TDI Tuning connector to the Booster of the engine, and the Booster connector to the TDI Tuning cable: Connect the TDI Tuning connector to the Fuel Injector of the engine, and the Fuel Injector connector to the TDI Tuning cable: Disconnect the plug and connect your TDI Tuning device (it only fits one way, though take a look before trying to plug it in, and lock it): Start the engine, and check the dashboard for any warning lights, followed by checking the lights on the TDI Tuning device: Download, install, and connect your TDI Tuning app (only if you bought the BT connectivity) using the last 6 digits of the TDI Tuning's serial number (on the actual connector of the TDI Tuning device): Snap the engine cover back in place, being careful not to trap the TDI Tuning cables underneath. Route and fasten your TDI Tuning device and cables. I ran the cables around the front of the engine cover and placed the TDI Tuning device in front of the battery (not shown): Please don't hesitate to drop me a note or a question on installation or placement. What are the pros and cons? + It's easy to install and remove (NCT/MOT and at service). + It doesn't permanently modify the ECU. + Can lower fuel consumption, and definitely improves performance. + When I change car in future I can send the device to be reprogrammed by TDI Tuning for the new car. - Doesn't provide the same potential gains as a rolling-road update/remap, or a stock ECU update/remap. What's it like? I'm driving at the middle setting of 4 (190 BHP, 400 NM Torque) with a noticeable difference in power and performance. I've yet to drive far enough to gauge the change in fule consumption, and I've yet to try the other settings (7 = 195 BHP, 420 NM Torque). From a rather zippy 148 BHP and 340 NM Torque to 190 BHP and 400 NM Torque is good, and a clearly noticeable difference. Sláinte! 🥃 Gaff


-
Hiya Shooz, I bought the ISOMQB from here https://www.navi4all.com/en/ as my Yeti is the MQB platform (second generation). I suggest talking to Navi4All to make sure you get the right version for your car and ICE system. Best of luck and Sláinte! Gaff
-
Hiya Tom, Thanks for seeing the value of the guide. - Bluetooth works for Android and Apple devices, though Android Auto only works consistently when connected (should work wirelessly). I need to contact Xtrons support about this. - FM radio works well, and I don't use AM. - Yes, I didn't know how to connect the existing GPS connector, it ends in a USB connector that I think connects to one of the USB connectors (USB female to male). I've heard other people successfully connect it this way. The accompanying GPS puck works well. - Ireland stopped the DAB+ tests last Christmas so I've no way of testing it. One of these days when I'm abroad I'll give it a go. 🙂 Sláinte! Gaff
-
You'll find it cheaper here: https://www.navi4all.com/en/product/9-android-10-octacore-4gb-ram64gb-rom-car-gps-qualcomm-aptx-plugplay-vw-seat-skoda/ at €301. This is the IB90MTVLN, which has 4 GB RAM and 64 GB ROM, while the IQ90MTVL has 6 GB RAM and 128 GB ROM. The IQ90MTVL is €381: https://www.navi4all.com/en/product/9-android-10-octacore-snapdragon-665-6gb-ram128gb-rom-car-gps-4gcarplayandroid-autodsp-built-450w-volkswagen-seat-skoda/
-
Hiya! Android Auto via USB works extremely well on the Xtrons IQ90MTVL. It's responsive, beautiful big screen (9"), and just works well via the ZLink application. Occasionally, wireless Android Auto works too, though not frequently enough for me to trust it. The built-in navigation is dependent on having good connectivity and a SIM installed. Good connectivity is available either by using the pre-existing GPS contact connected to one of the new USB connectors (I now know this works) or using the GPS puck that comes with the unit, however, this requires a decent placement of the puck on the dashboard (attached photo of GPS satellites). If you're only installing the Xtrons IQ90MTVL without accessories such as the DVR camera, the reverse-parking camera, or the tyre pressure monitor, or the OBDII device then I think installing it is easy enough (if I managed to do it, then so can anyone else 🙂 ). Sláinte! Gaff

-
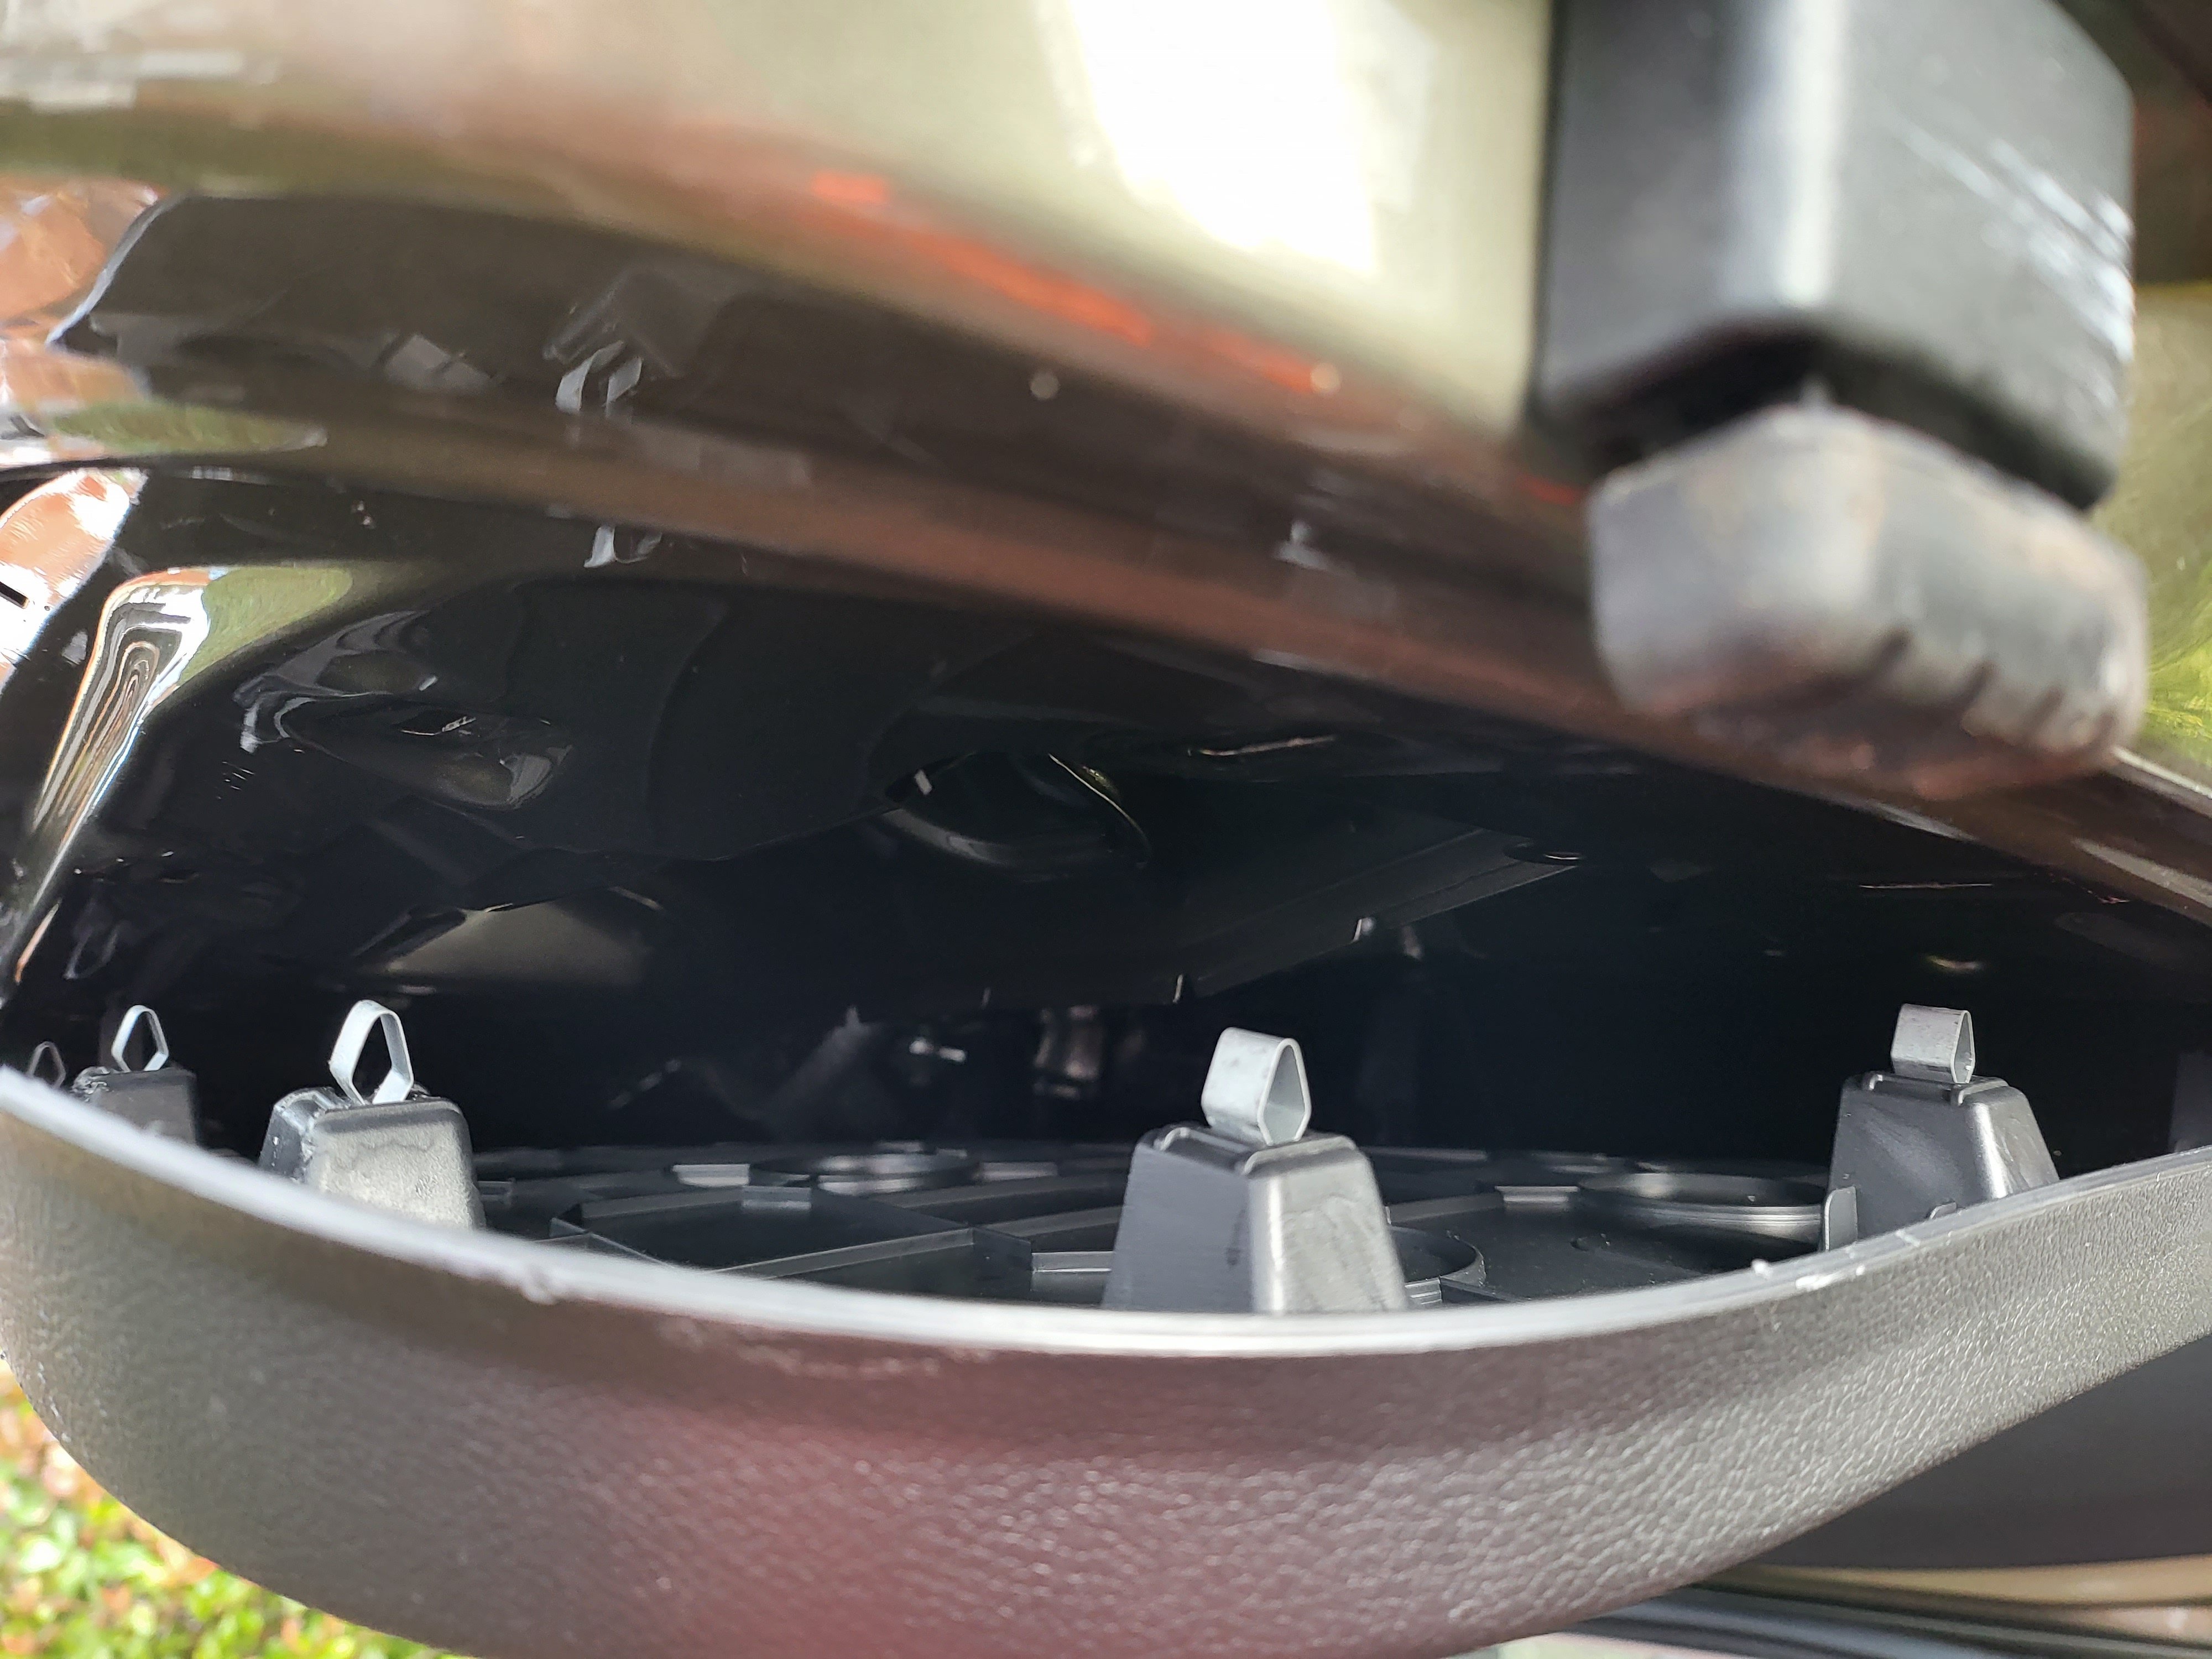
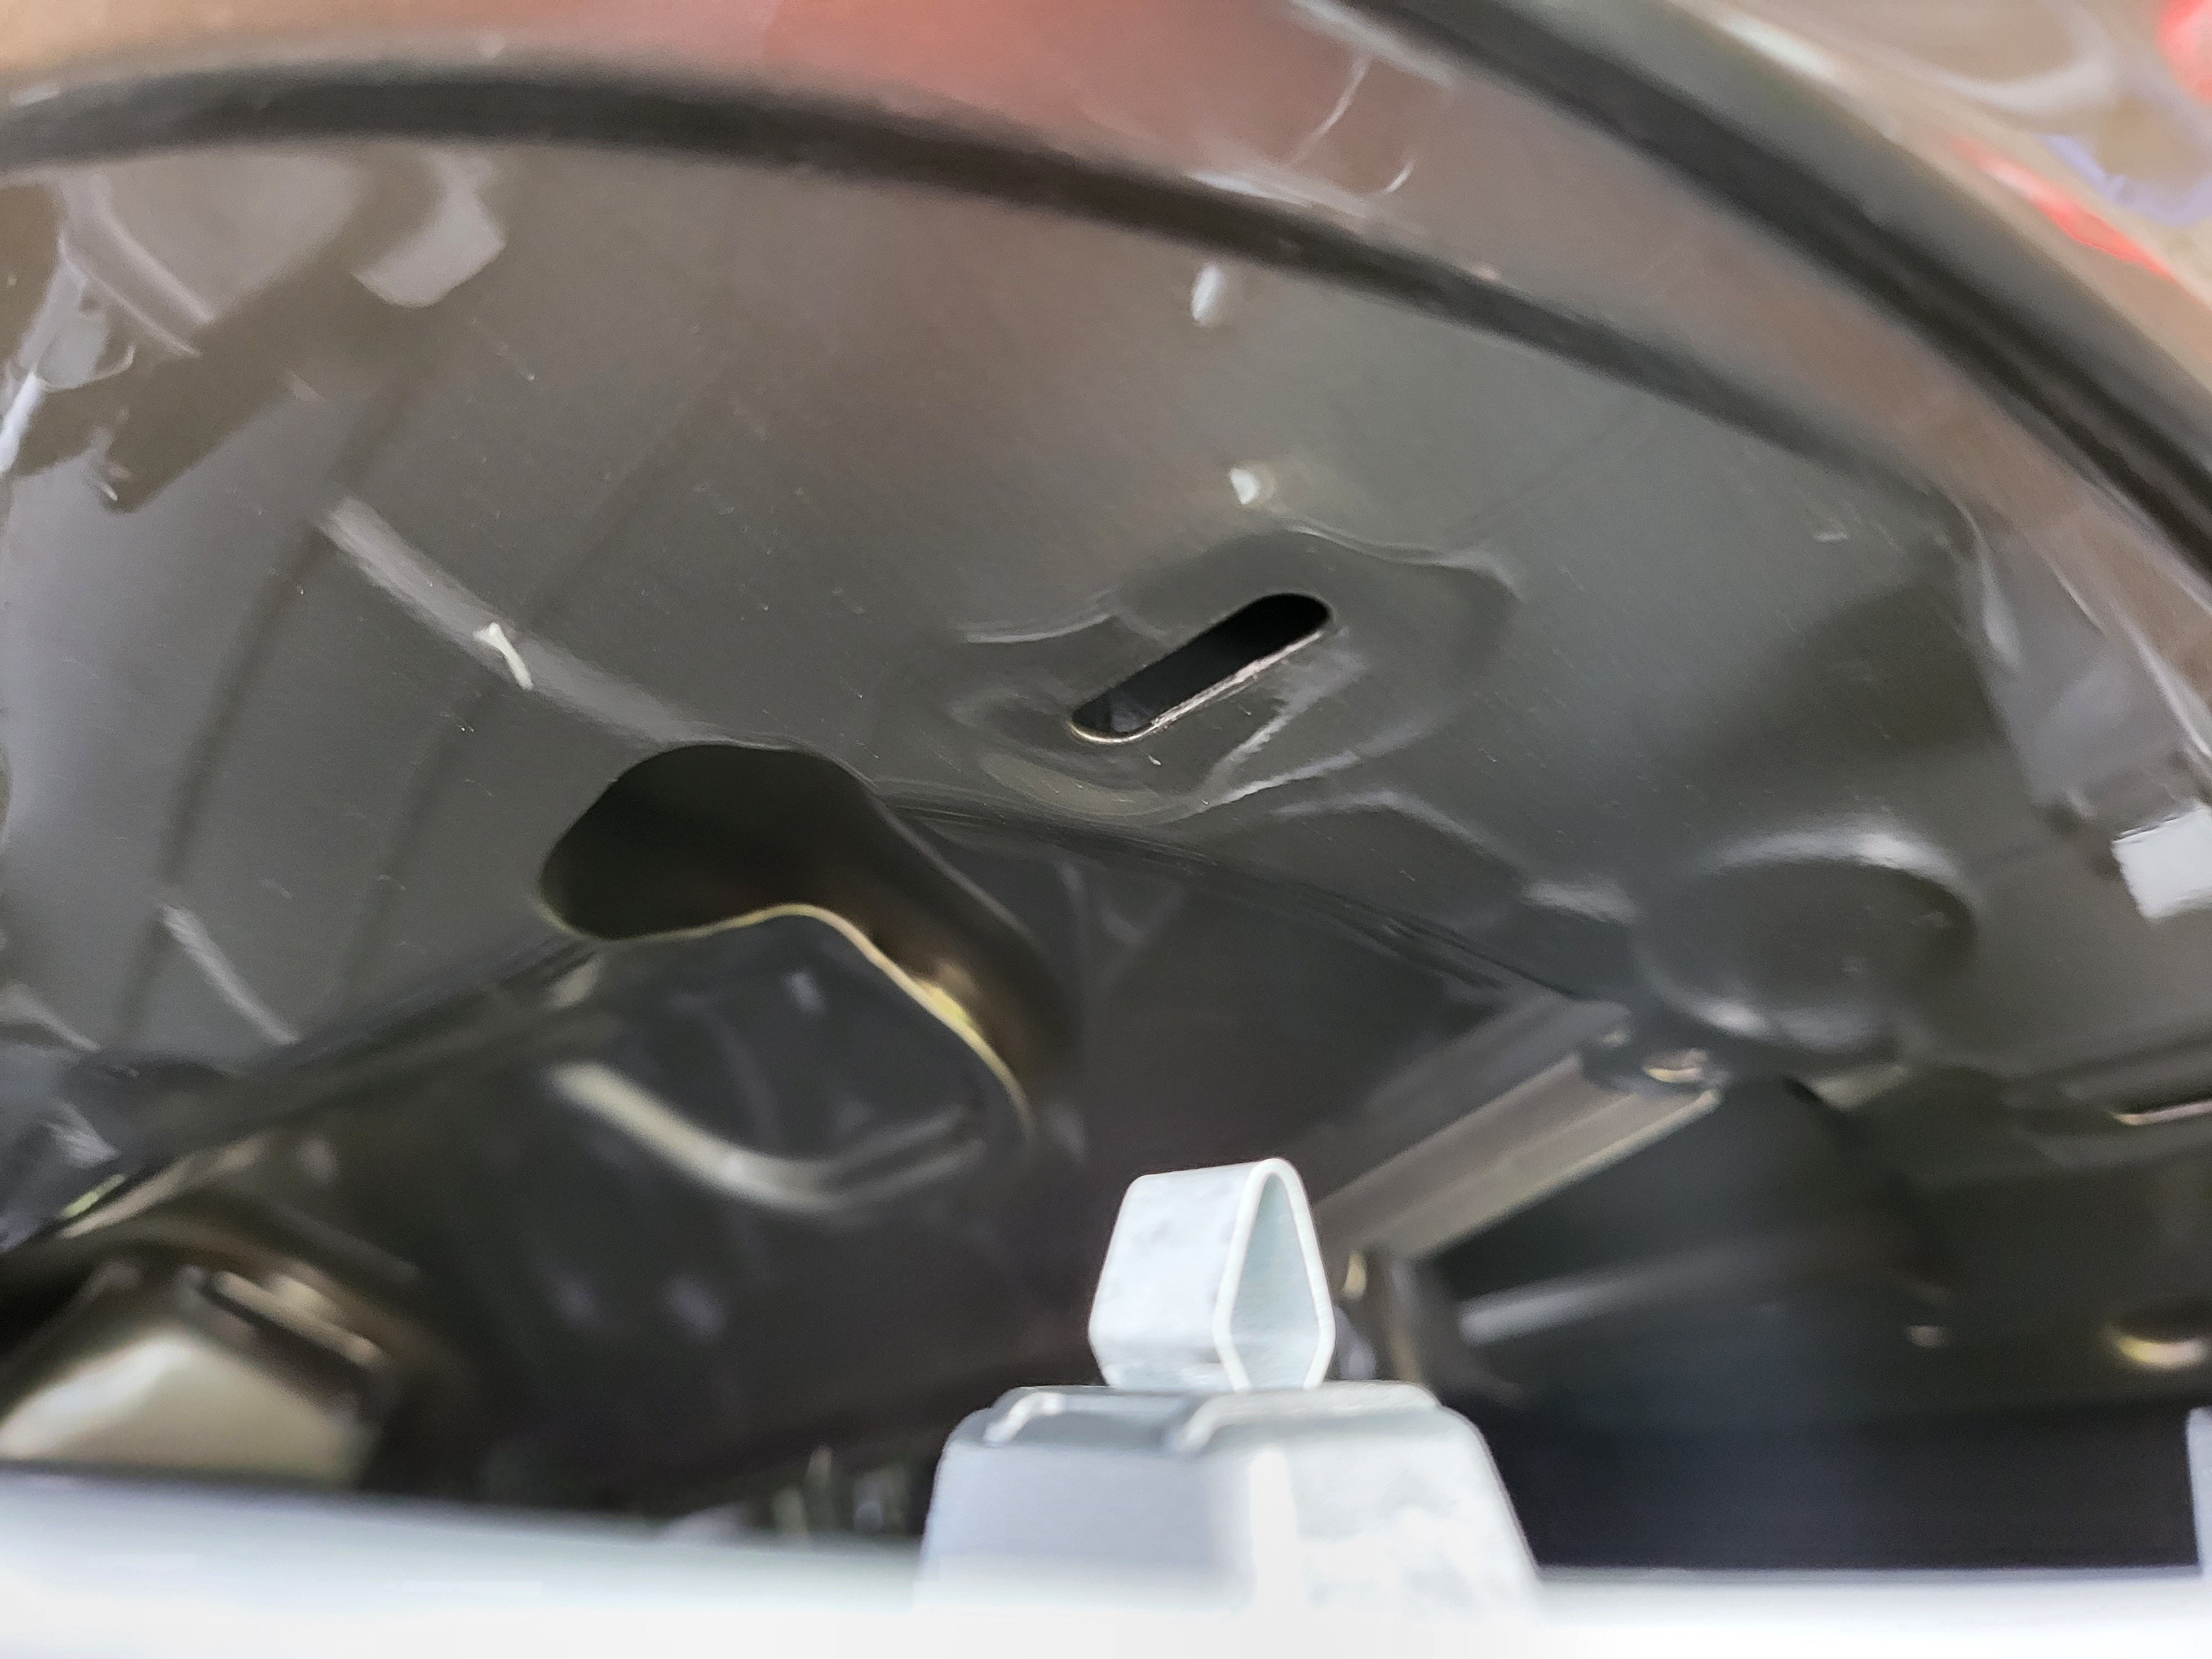
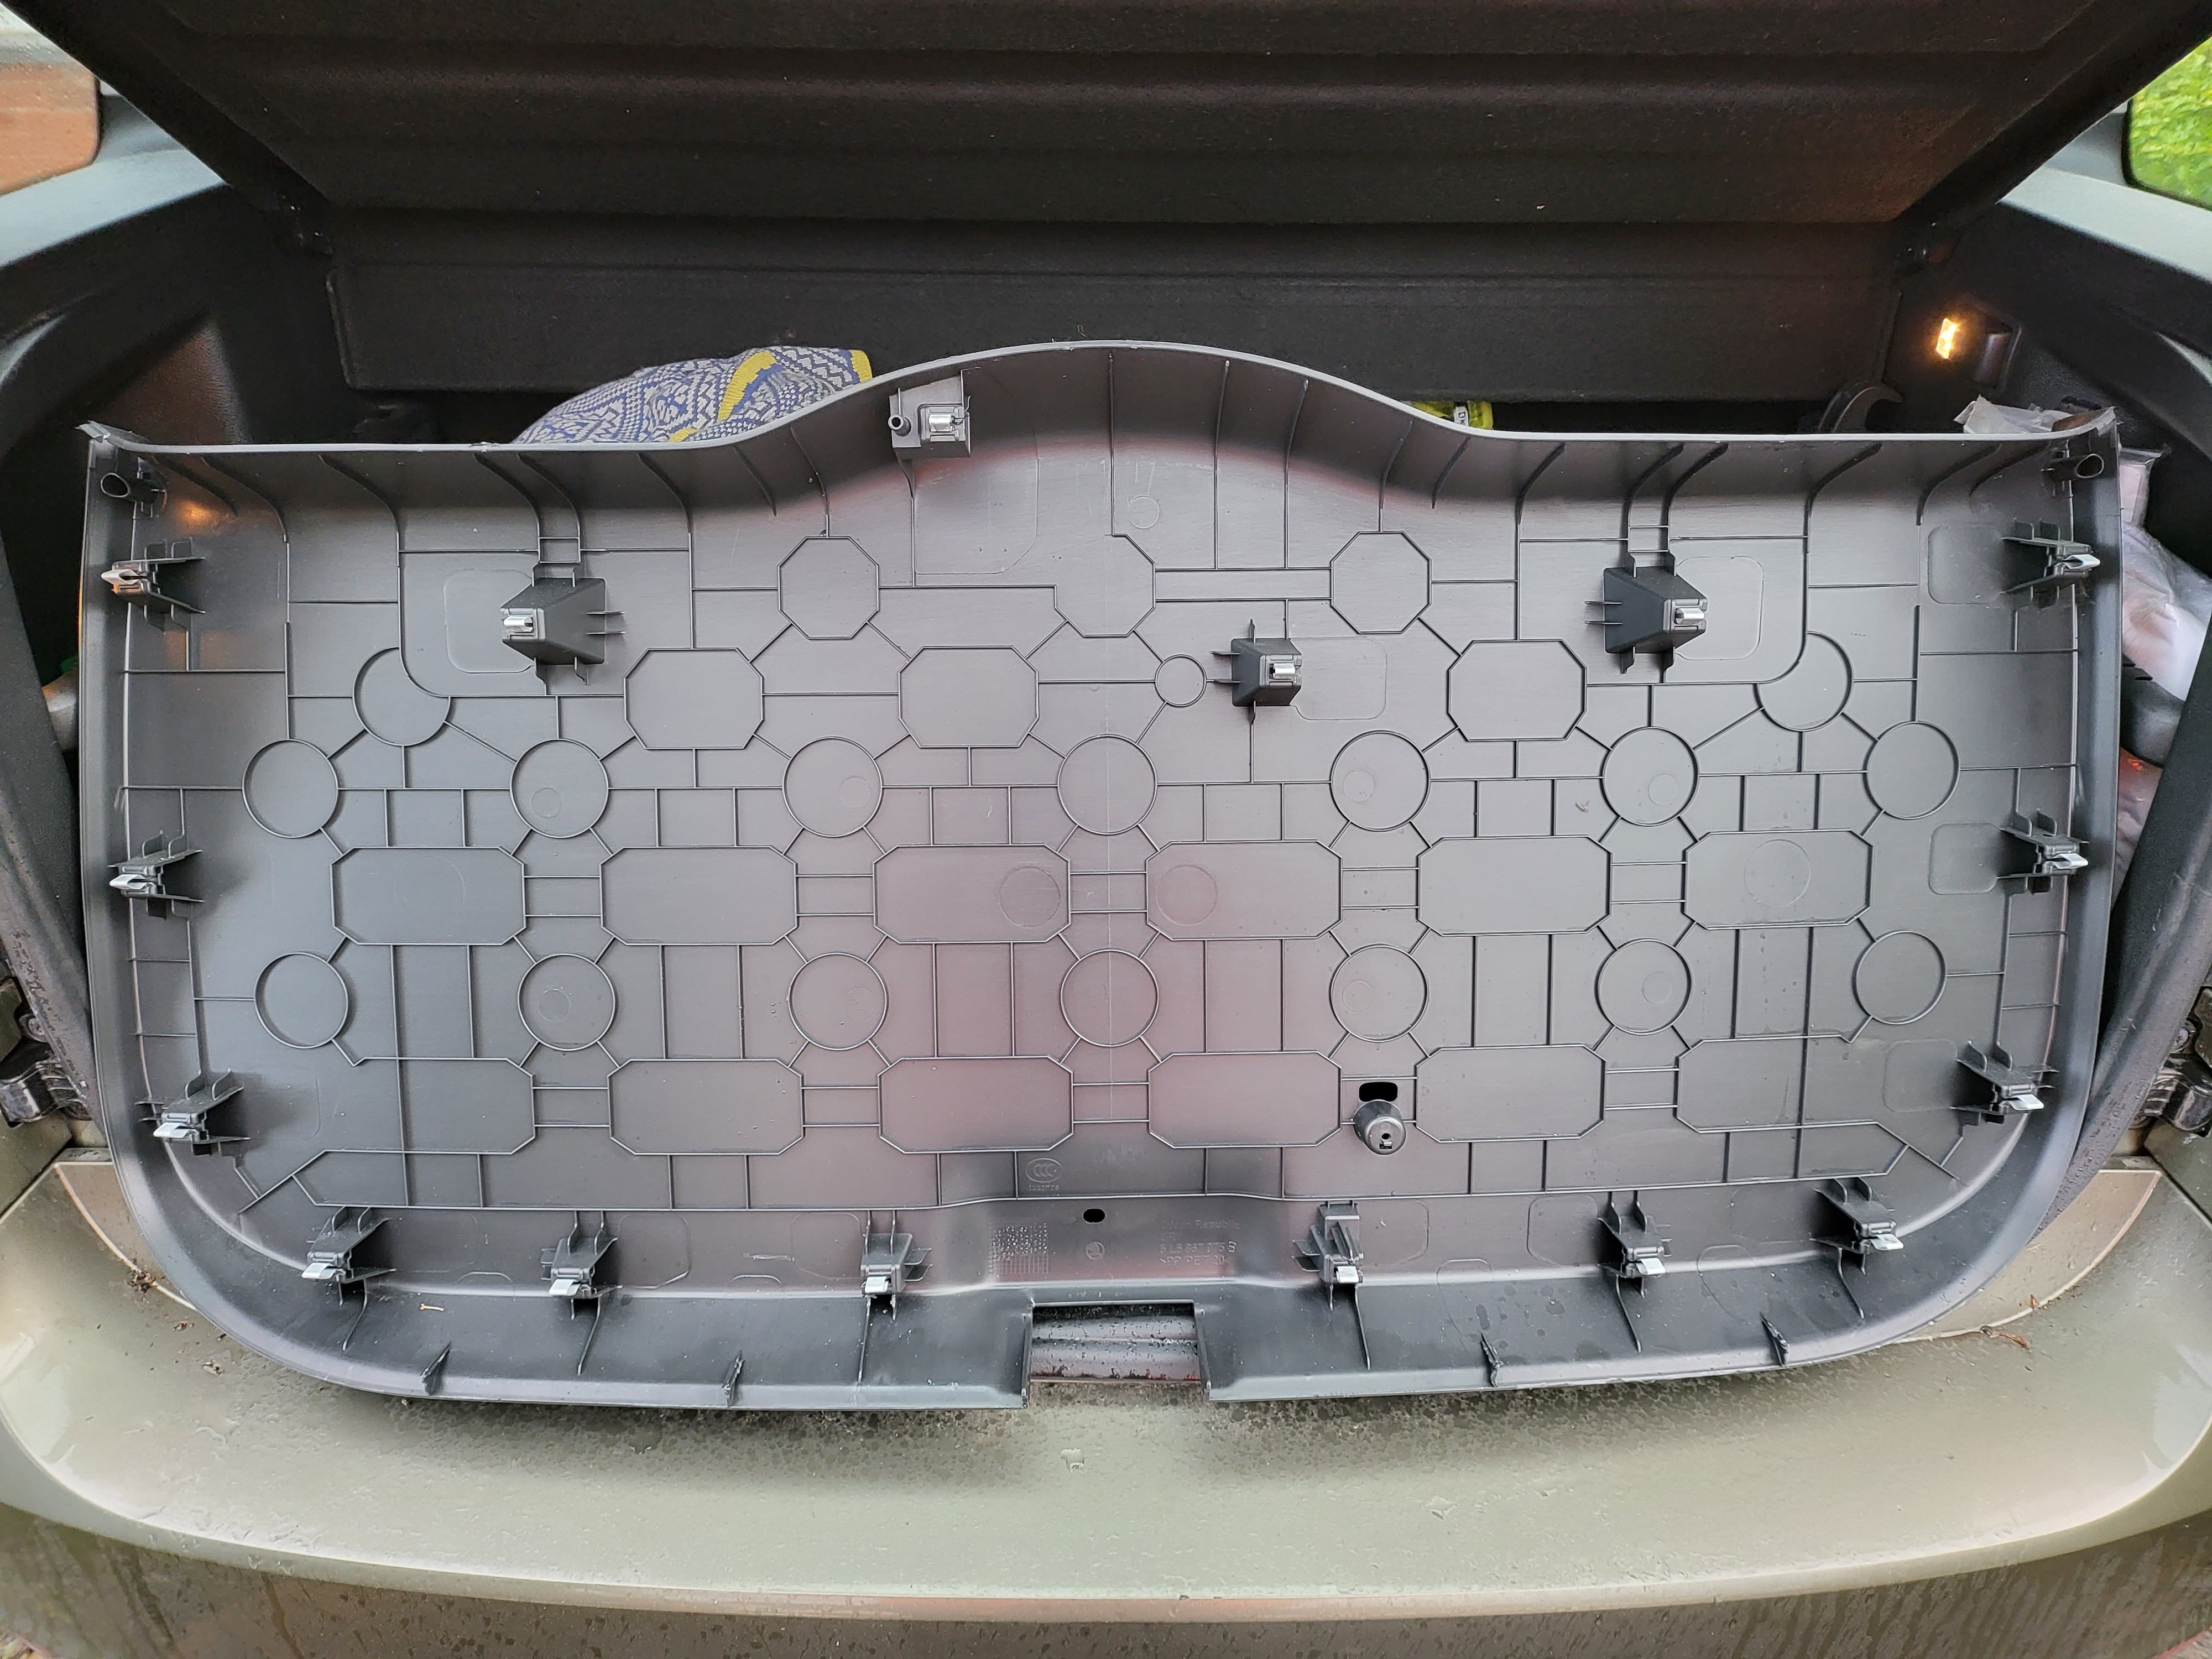
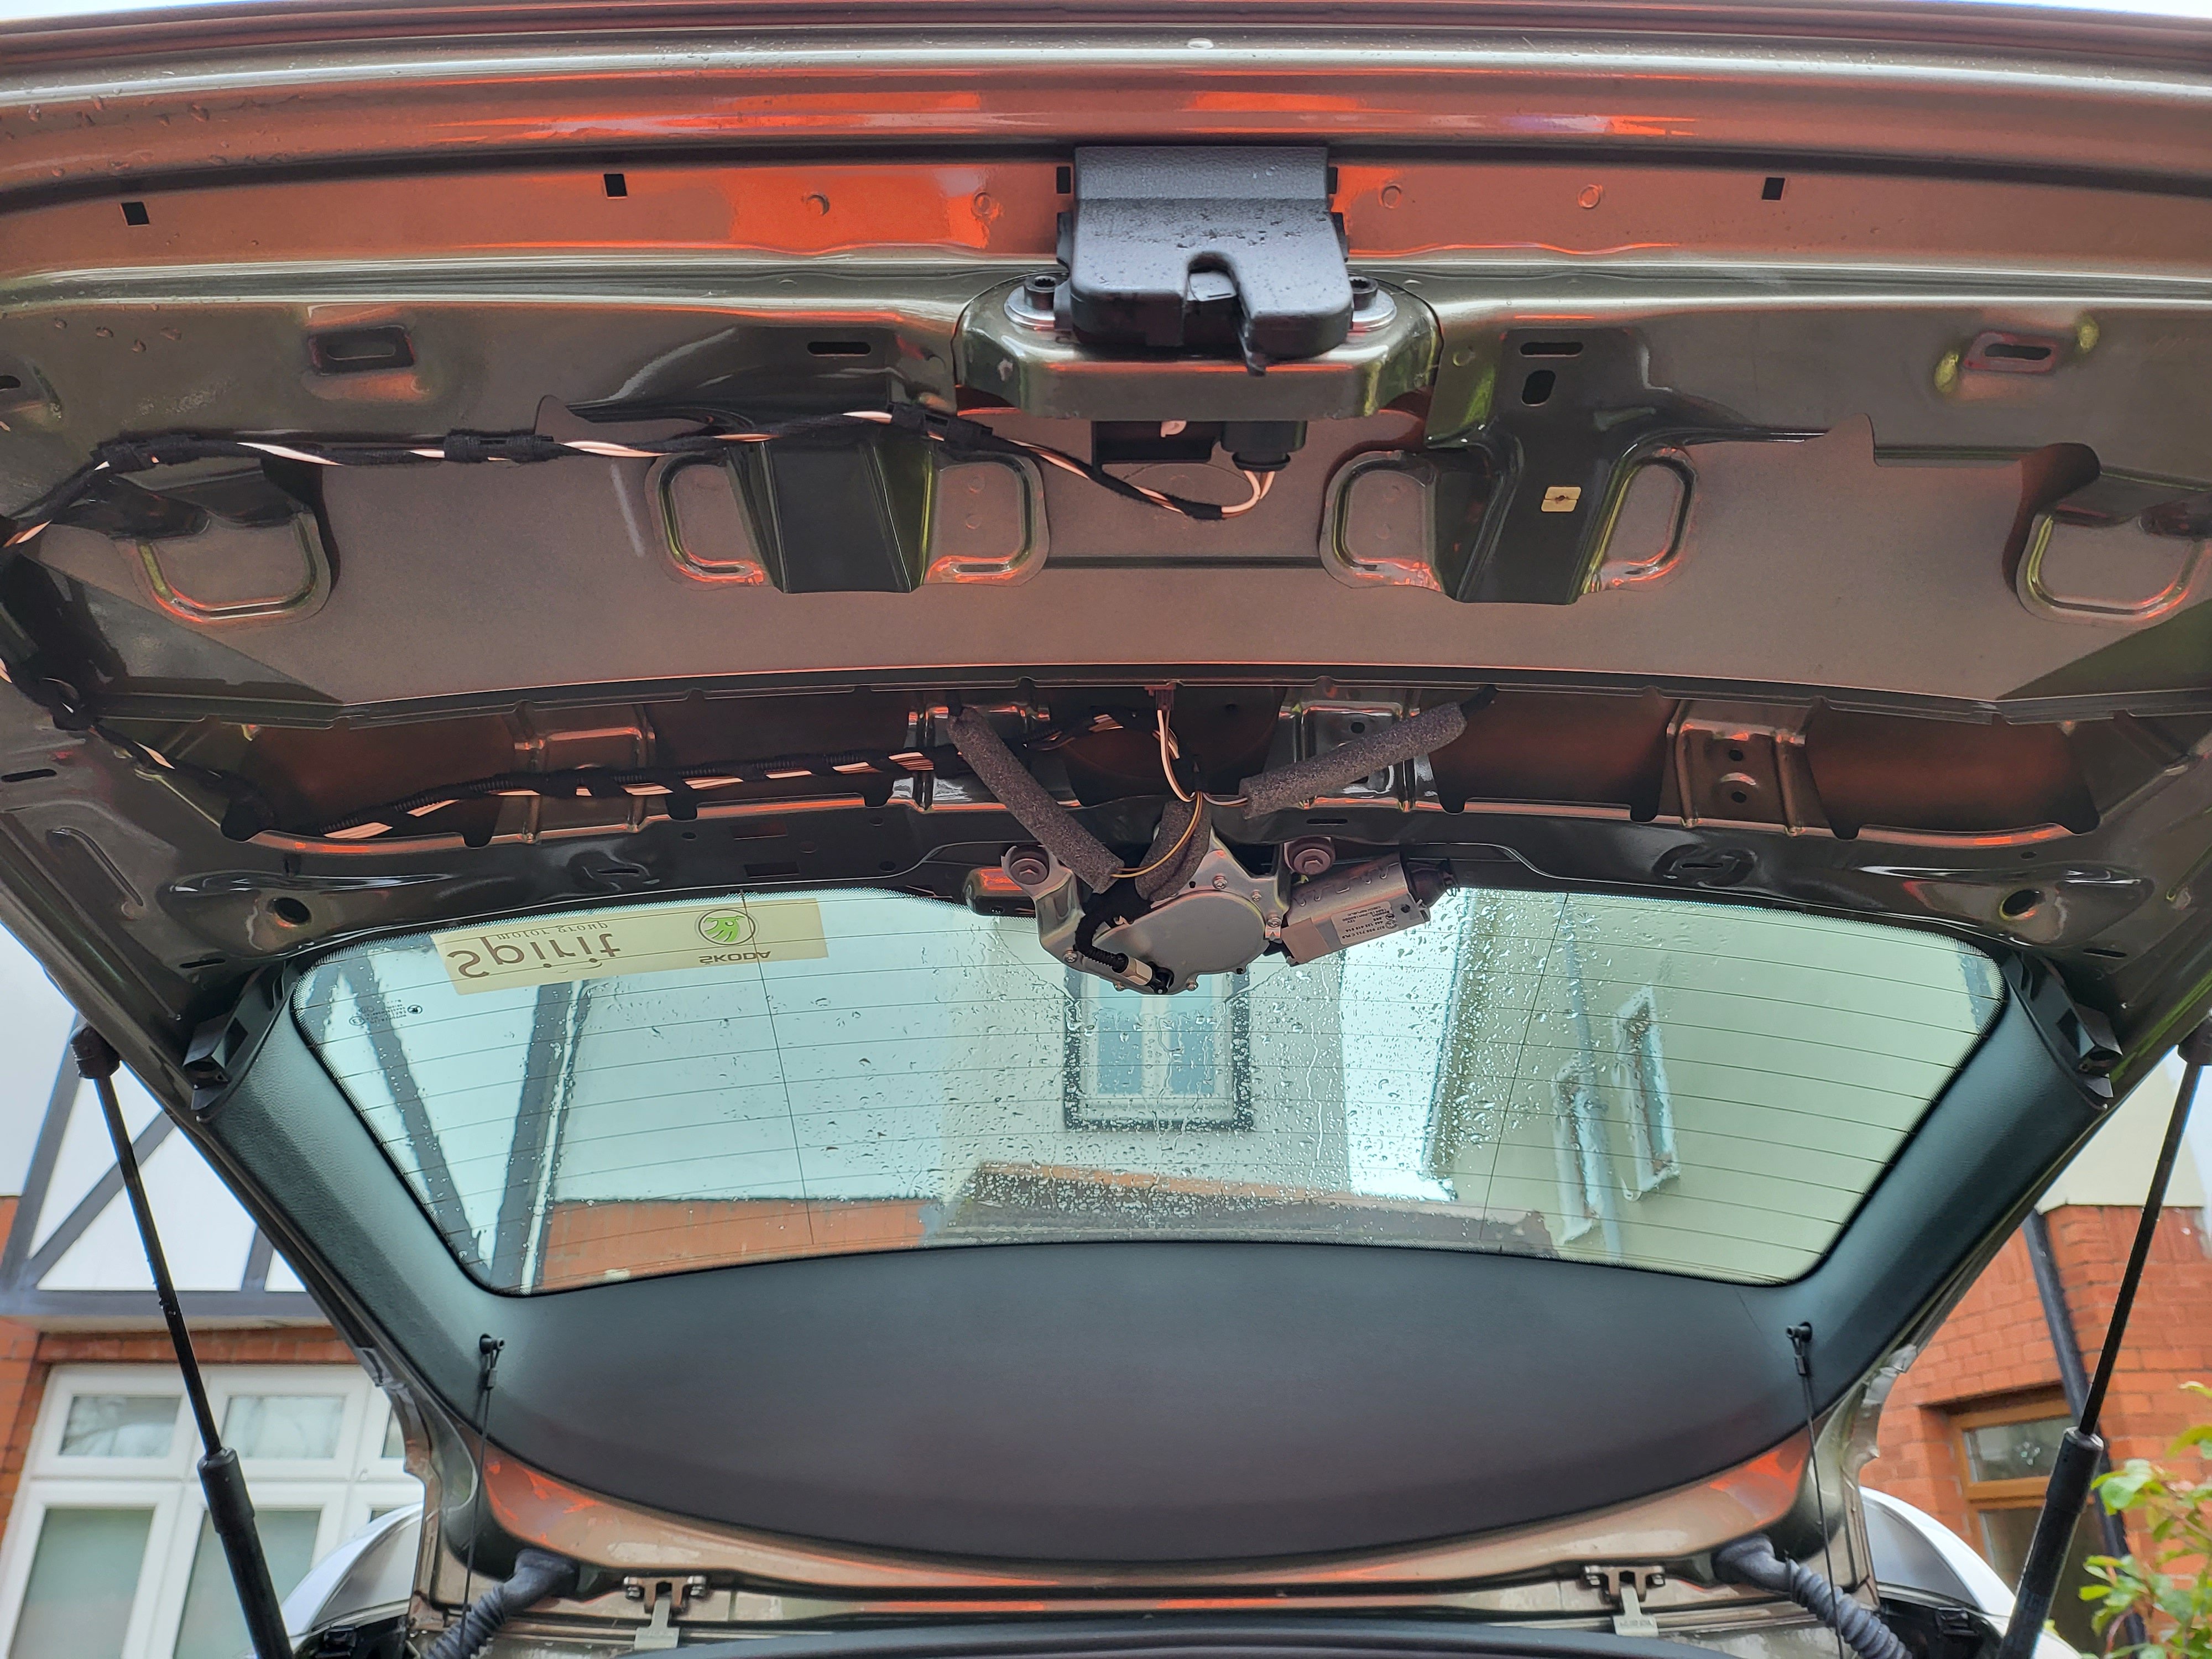
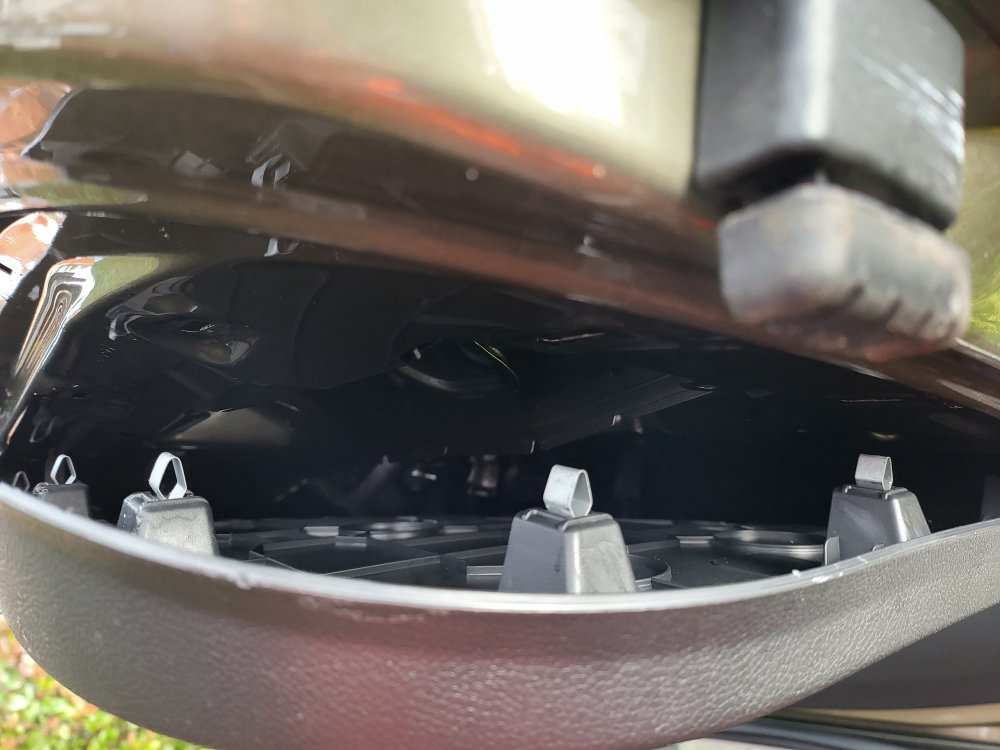
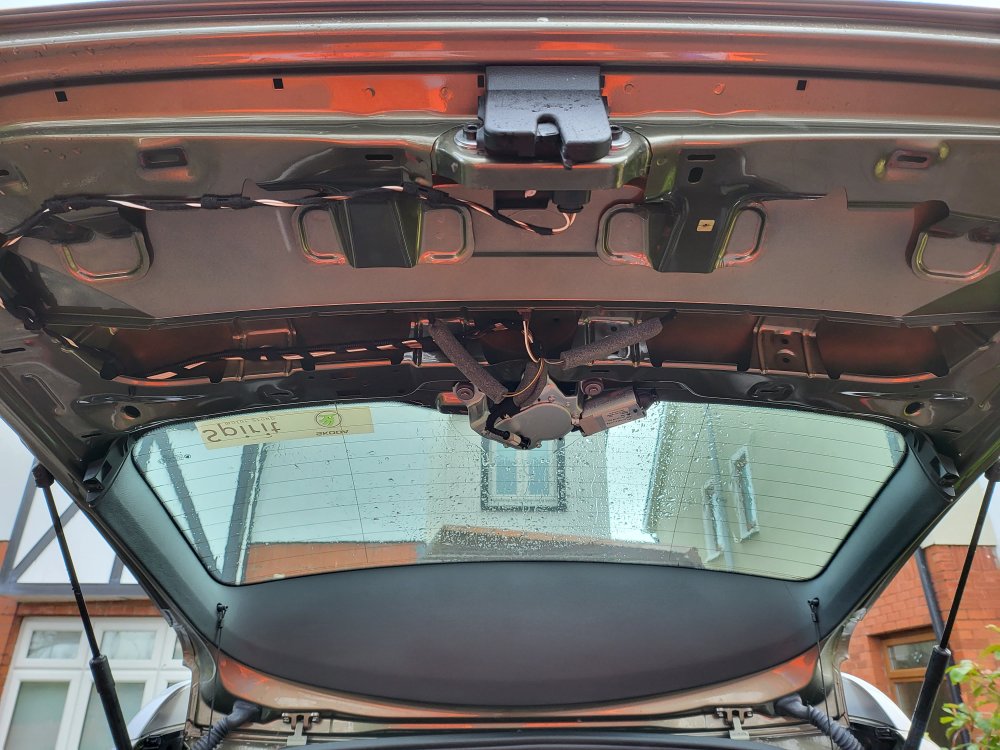
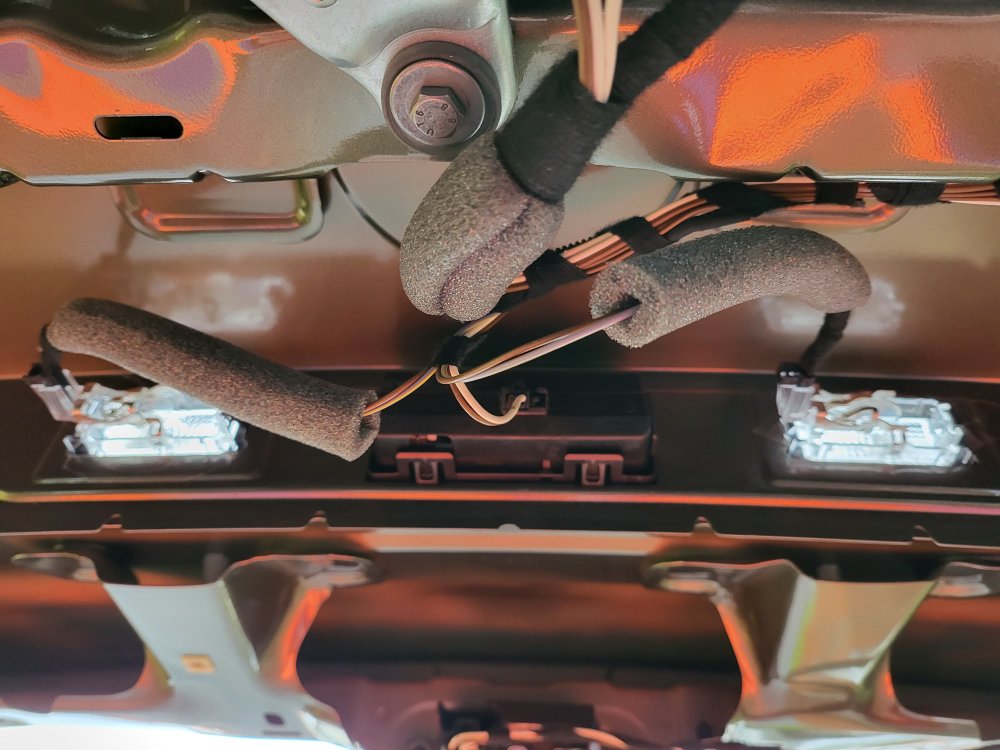
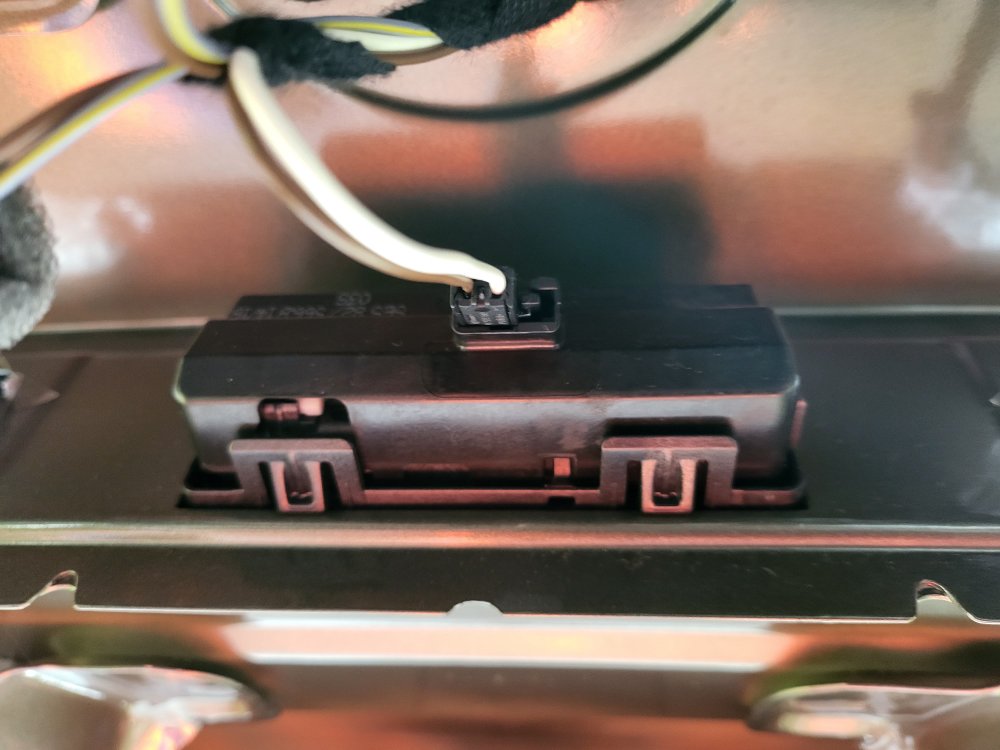
Hiya! Had a "rummage around" the Skoda Yeti boot panel to check which connector is used for my boot opener, as I've decided to purchase a new reversing camera that replaces the boot opener. I don't want to drill holes in my Yeti. It's the LS8012 connector for my face-lift Yeti. I think the pre-facelift Yeti has the other connector. A right pain in the backside to remove. Unscrewed the rubber boot strap and pulled it out. To remove the boot panel, the clips attached to the body requires getting a long strong plastic "spatula-like" implement or two and with fingers forcibly pull it off as the clips are on tight. I've left the panel off until I get my new reversing camera as I don't fancy removing it again. I began at the bottom, closest to the boot lock, as I had the best access and not like some where the panel meets the window. I'm buying this on Amazon UK (I have vouchers to use), Dynavsal 1280 x 780p night vision camera together with this in case I need it: 12 Volt Rectifier. At the moment I think I'll pull the reversing camera cable through the bottom of the car, as opposed to via the roof. Mind you, I might change my mind as I'm doing it... 🙂 Sláinte! Gaff


-
Hiya! I bought the following as accessories when I bought the IQ90MTVL: Front DVR -> XTRONS ICE/SS/DVR030 Rear Parking Camera -> XTRONS ICE/SS/CAM005 I should have bought this instead as it fits the Škoda Yeti better: https://www.automeedia.ee/en/a/skoda-fabia-yeti-reversing-camera-compatible-with-android-player-xtrons-camskfb01 I think it replaces one of the registration plate lights. I'll have to drill holes for the one I have. Sláinte! 🥃 Gaff
-
Hiya! Some updates on the use of the XTRONS IQ90MTVL. Antenna and GPS "Puck" Placement Installing the antennas (WiFi, 4G) the GPS "Puck" under the lid of the top dashboard container works well. GPS navigation works well with no issues in finding and accessing satellites. 4G connectivity (data only) is good and works well. I think the antenna placement is good, despite my initial concerns. USB Connectors USB Connectors are also placed under the top dashboard container (cables fed though a hole drilled in the bottom of the top dashboard container) and I connect my Android phone there for Android Auto. Bluetooth and Link Connectivity Issues Bluetooth on the IQ90MTVL does not show available bluetooth devices (for example mobile phones) though phones find and connect to the IQ90MTVL. OBDII connectivity is fine after multiple retries to connect. The TPMS application talks to the TPMS caps, though does not receive data such as tyre pressure and temperature. I've yet to install another application for this. I did find under the extended settings (access code: 126) that I can select different TPMS applications/settings, and I'll try some of these before installing another application. Display and Functionality The display is gorgeous, clear, and big for the space that is available. Touchscreen is responsive and accurate, though I occasionally engage the buttons below the screen (volume up/down) when swiping thorough the applications. Using my Google account I access the some of the same apps I have on my phone. Sound and Microphone Sound is superior to what I had with the Amundsen, clearer and louder, despite not having fiddled with the equaliser. Radio is good, with clear reception using the built-in antenna (same as the Amundsen). Phone calls are clear and people hear me clearly too with minimum peripheral noise. Issues I can't connect my wife's Apple iPhone 13 to Apple CarPlay over WiFi, and it's dodgy over bluetooth too. I think I need a firmware update as I suspect the bluetooth functionality has issues. All-in-all I'm over-the-moon with the IQ90MTVL. It's better, more responsive, has more and better features, and all at a lower cost than buying a like-for-like replacement. My next step is to install the front DVR and rear parking camera. I'll share updates on this too. Sláinte! Gaff
-
Hiya! Documented the installation of the XTRONS IQ90MTVL In-Car Entertainment system as a replacement for my ailing Amundsen unit in the hopes that somone else finds it useful. Please note that I'm not a mechanic, have never done anything like this before, and essentially haven't a clue what I'm doing, however, this was in the end possible to do with a high degree of success. 🙂 Enjoy! Installing the XTRONS IQ90MTVL in a Skoda Yeti-compressed.pdf
-
Installing the XTRONS IQ90MTVL in a Skoda Yeti-compressed.pdf Hiya! Attached the installation document created for the XTRONS IQ90MTVL in a Skoda Yeti (PQ Platform). Please note that I have yet to install the DAB+ (don't have DAB in Ireland any more) and the two cameras. I still have connectivity issues I *think* will be resolved through a firmware update, though none exists for this unit as of yet. Overall I'm pleased with the unit and recommend it to anyone wanting a good piece of kit. Please be aware of some of the concerns I have raised in the document though, as these may affect you to a greater extent than they do me. Sláinte! Gaff
-
Hiya! I bought and installed the same unit (IQ90MTVL) earlier today in my Skoda Yeti. I'll share word document with photos that I created as I employed the tried and tested "trial and error" method. Documentation could have been better. 🙂 I too bought a number of accessories (GPS, front-facing camera, rear-facing camera, TPMS, DAB+), some of which I wouldn't buy again (GPS, DAB+ (doesn't work in Ireland)). Please give me a day or two to finish the document and I'll share the link to the upload site on here. Sláinte! Gaff
-
GaffCelticViking changed their profile photo
-
http://spiritskoda.ie/ Sales: Rowan Avenue, Stillorgan Industrial Park, Sandyford, Co Dublin Service: 1-3 Blackthorn Close, Stillorgan Industrial Park, Stillorgan, Co. Dublin 01 2163666 (01) 294 2222 [email protected] [email protected] Monday 09.00 - 18.00 Tuesday 09.00 - 18.00 Wednesday 09.00 - 18.00 Thursday 09.00 - 18.00 Friday 09.00 - 18.00 Saturday 10.00 - 14.00 Sunday Closed Service Mon – Friday 8:00 – 5:30, Closed Saturday / Sunday Bought my second-hand Skoda Yeti here. Good post-sales service.