Mark-Surrey
Members
-
Joined
-
Last visited
Everything posted by Mark-Surrey
-
Thanks to everybody for their responses so far. I haven't yet received complete details of the new scheme at my wife's company. Here's what we have been told so far: Lease company is LeasePlan No deposit, just monthly upfront payment via the payroll Fully comprehensive insurance Maintenance Roadside assistance Extended end of contract damage waiver of £500 included Early termination cover included for life events eg. maternity, internal job change Optional EV charger can be ordered and installed My understanding is that HMRC have already confirmed that the BIK rate for Electric Vehicles will increase from 1% to 2% in the 2023-2024 tax year. So if I take out a 3-year lease, we should hopefully be OK until at least the end of the lease, so I can't really ask for any more than that. I agree with SurreyJohn above that this kind of benefit surely cannot be maintained at these levels in the long term, once there are huge numbers of people driving EV's. But even 3 years of such benefit sounds fantastic to me!
-
Does anybody have any experience with an Electric Vehicle Salary Sacrifice scheme here in the UK? The company where my wife works is planning to launch such a scheme soon. It sounds almost too good to be true. Basically, the employer leases an Electric Vehicle from one of the big car leasing companies, and the employee "rents" the car from the employer. The employer then deducts the cost of this lease from the employee's gross (ie. pre-tax) salary, and the employee has to pay the BIK (Benefit In Kind) on this benefit. But since the BIK rate on electric vehicles is only 1% currently (2% next year), compared to 20+ percent on petrol or diesel cars, it's still a big benefit for the employee. See the following LeasePlan website for more details: Salary Sacrifice | LeasePlan For anybody fortunate enough to be a higher rate tax payer, the employee is essentially saving about 40% on the cost of the lease (or 20% for a basic rate tax payer). The lease typically includes things like servicing, insurance etc. From everything which I've read, this seems to be totally legal and approved by HMRC as a way to get more people switched over from ICE cars to electric vehicles ; not some kind of tax dodge. As it seems almost too good to be true, maybe it is too good to be true, and I'm missing something?! I know that plenty of people will say that they won't ever lease a vehicle, because you're paying money for something that you will never actually own. But personally, I'm OK with both leasing and owning ; and if I can save a big chunk of money on an electric car, I would be very happy to lease it. I really like the look of the Skoda Enyaq, as a spacious family car. It does seem rather unfair to me that the people who stand to gain most (40%) from this scheme are those people who are already earning a good salary, whereas basic rate tax payers gain only 20%. But I guess that's a whole other discussion.....
-
I’ve never really understood why so many car manufacturers do a mid-cycle refresh after 3-4 years which often seems to involve very little more than a re-design of the headlights and brake lights, bumper etc. It must cost them tens of millions of pounds in Engineering costs, tooling costs, logistics costs etc., just for a slightly different rear light cluster design! It seems completely pointless to me, and a big waste of money. I’d prefer that they spend those tens of millions of pounds giving their customers some really useful extra options free of charge. BMW seem to do these pointless headlight / rear light redesigns whenever they do their mid-cycle “LCI” refreshes.
-
I’m not sure how the boot floor looks on your car. But if it’s similar to my (2-wheel drive) 2018 1.5 TSI SE-L DSG, which has VarioFlex seats, Skoda will tell you that you can’t have a full sized spare wheel, only a skinny wheel. But it is actually possible. It just requires you to cut away a couple of small sections of polystyrene from the piece which sits along the back of the rear seats. I posted a guide on how to do this in the “Skoda Karoq Guides” section in this forum, if you’re interested. I preferred the safety of having a full-sized spare wheel rather than a skinny wheel, for any long trips. The 50-mile @ 50 mph limit of a skinny tyre is fine if you’re not far from home, but no fun if you’re driving to France on holiday. I believe you’re only allowed to drive on as normal, with no limit on the distance driven, if your spare wheel is identical to your other wheels. So rather than getting a steel spare wheel, I bought a 2nd hand one on eBay which was the exact same model as my 4 other alloys. I think I paid about £90 including shipping. But like somebody else commented, you don’t see many of them on eBay. But to be fair, I think the brand new price from Skoda was fairly reasonable, about £180 if I remember correctly. I then bought an identical tyre to my 4 other tyres, and had it fitted on my spare alloy. You do lose some of the depth in your boot if you do this. But personally, I prefer to be on the safe side.
-
Yes, it works with the key fob
-
I find that even the driver’s side door handle behaves like that if the car has been standing in the garage for a few weeks. I assumed that this was a battery-saving measure.
-
I bought one of the ones from eBay at the link mentioned above. It’s working fine. I had no problem logging in, as my iPhone remembered my password from the other Skoda app. You can’t really go wrong for £4.75 including delivery. In these Covid lockdown times with cars standing on the driveway for weeks on end, it’s worth it just to be able to easily check the battery voltage.
-
You might want to consider buying a CTEK charger / battery conditioner. It allows you to recharge the battery without removing it from the car. There’s even an accessory which allows you to charge the battery through the cigarette lighter 12V socket. The cigarette lighter 12V socket solution only works with cars where the socket remains active when the car is locked, but that is indeed how the Karoq works (it doesn’t work on my BMW). I bought mine during lockdown, and I’m very happy with it. I know that there are cheaper options out there, but everybody speaks highly of the CTEK products. Some of the car manufacturers (eg. BMW) re-badge them as original manufacturer accessories. The one which I bought is the MXS 5.0 and it cost me £72. The cigarette lighter socket adapter was an extra £15. I read somewhere that another advantage of this CTEK product and its cigatette lighter socket accessory for the Karoq specifically, is that the bonnet release mechanism on the Karoq is on the passenger side and the handle is hidden by the door itself. So if your battery is completely flat, I understand that you can use the emergency key to open the driver’s door but then you can’t open the passenger door to get to the bonnet release mechanism, so you can’t charge the battery without bending the bonnet release handle. With the CTEK cigarette lighter adapter solution, once you’re in the car you can hook it up to the cigarette lighter socket and start to recharge your battery without even having to open the bonnet at all.
-
I like to use Waze on my smartphone screen for turn-by-turn directions with its map pointing in whichever direction I’m going, and use the built-in sat nav’s map in parallel, pointing north, so I can see where exactly I am, if I’m in an area I’m not familiar with. I find it useful to have the map on the main screen always pointing north. But if I plug my iPhone into the USB port, I can’t find any way to do that combination (I also have the virtual cockpit). So whenever I’ve been doing long journeys to areas I’m not familiar with, I just plug my iPhone into the cigarette lighter adapter to keep it charged, so it stays completely independent from the car.
-
Does anybody know whether any of the tyre manufacturers offer good All Season tyres in runflat version yet? I put Vredestein Quatrac Pro all season tyres on my wife’s Karoq. But my BMW 2-Series Gran Tourer has runflat tyres, and I couldn’t find any All Season tyres in runflat version, so I ended up having to get separate winter tyres and a 2nd hand set of alloys. But ideally, I’d like to not have to faff around changing the tyres on my BMW twice per year, and I’d also like to get some space back in my garage. Particularly as where I live in Surrey, we generally don’t get snow very often at all, so all season tyres are a good option here. I know that a lot of people hate runflat tyres for various very valid reasons. But personally, I like the safety aspect of knowing that a blow-out at high speed on a motorway likely isn’t going to be as dangerous, and that I’ll be able to carry on driving for up to another 50 miles to somewhere safer before having to get it replaced.
-
My wife’s car had only done a few hundred miles when we changed the tyres, and it was all local short distance drives rather than motorways. Neither of us had really paid any attention to the noise level of the original Turanza tyres, so I can’t comment on any difference in noise levels. I was only really concerned about having tyres which would provide good safety levels all year round, without having to faff around switching between summer and winter tyres like we did with her previous car.
-
I changed the factory-fitted Turanza 215/50/R18 tyres on my wife’s Karoq 1.5 petrol DSG to Vredestein Quatrac Pro all-season tyres last year. Unfortunately, we haven’t had any real snow since then in Surrey to really test their performance in snow and icy conditions. But I found the prices for this Quatrac Pro tyre in 215/50/R18 size to be fairly reasonable. I paid just over £100 per tyre. When I was looking last year, the CrossClimates weren’t available in that size at a reasonable price, I think Michelin had just released an XL version but the prices were exorbitant at that time. One advantage of the Quatrac Pro compared to the CrossClimate is that they are not directional, which means that you can put a spare wheel on either right or left side of the car, which isn’t possible with the CrossClimate tyre design.
-
How about something like this: https://www.ebay.co.uk/itm/Stud-Penny-Coin-Rubber-Flooring-Matting-for-Garage-Van-Car-Roll-Mat/332514264053?hash=item4d6b6503f5:g:KkwAAOSwYgFasaSH You can order it in a length which would cover the maximum width and length you need, then cut it to the exact shape of the Karoq boot with the seats folded down or removed, and just roll up the relevant end when the seats are up.
-
I’m also interested in switching to a fully electric vehicle. My wife has a 1-year old Karoq 1.5 SE-L DSG, and I have a 4-year old BMW 2-Series Gran Tourer 220d xDrive. I really like her Karoq, but want something electric. The new Skoda Enyaq is apparently due to be officially released on 1st September, and available early next year. The initial reviews of prototypes by various motoring press magazines look very positive. It’s apparently going to be smaller than a Kodiaq on the outside, but similar interior space to Kodiaq. It will apparently offer a battery option with up to 311 miles of range. There will be a 4WD option, with the added bonus of no transmission tunnel eating up the space of the centre rear passenger. It will be Skoda’s first electric vehicle based on the VW group’s “MEB” platform, which will also include VW’s ID.3 and ID.4 models. Lots to like about this new Skoda Enyaq, from what I can see so far.....
-
When I was looking for a cycle carrier for my BMW 2-Series Gran Tourer, I was advised to avoid those carriers which strap onto the rear tailgate. Most tailgates now apparently have plastic parts (eg. the spoiler at the top) which are made of plastic and which can break under the pressure from the very tight straps of the carrier with a bike strapped onto it. I was told that even if there are no plastic parts in the tailgate, when you pull the straps of a tailgate-mounted cycle carrier taught, you can end up bending the steel edges of the tailgate where the strap clips are attached.
-
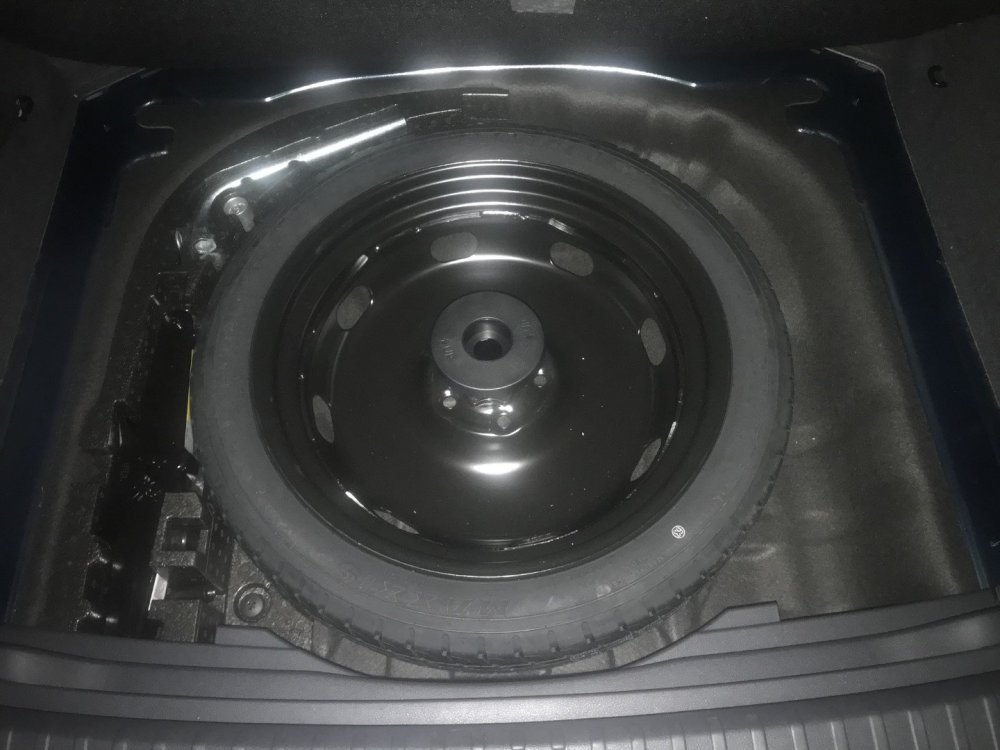
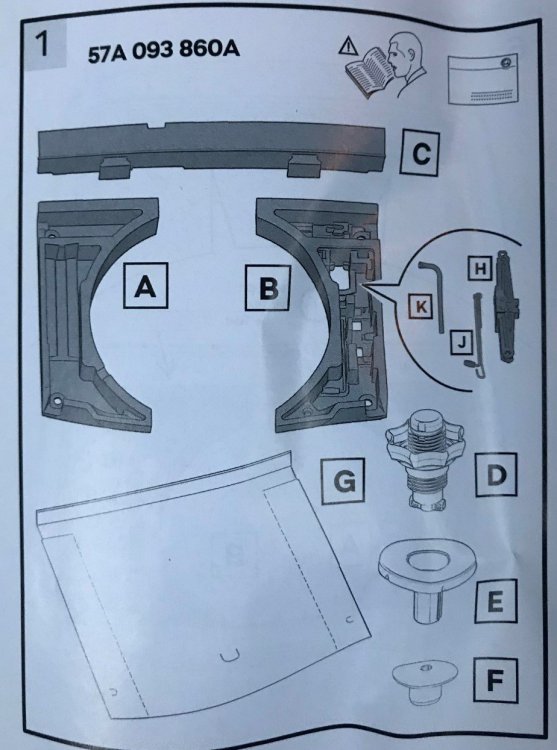
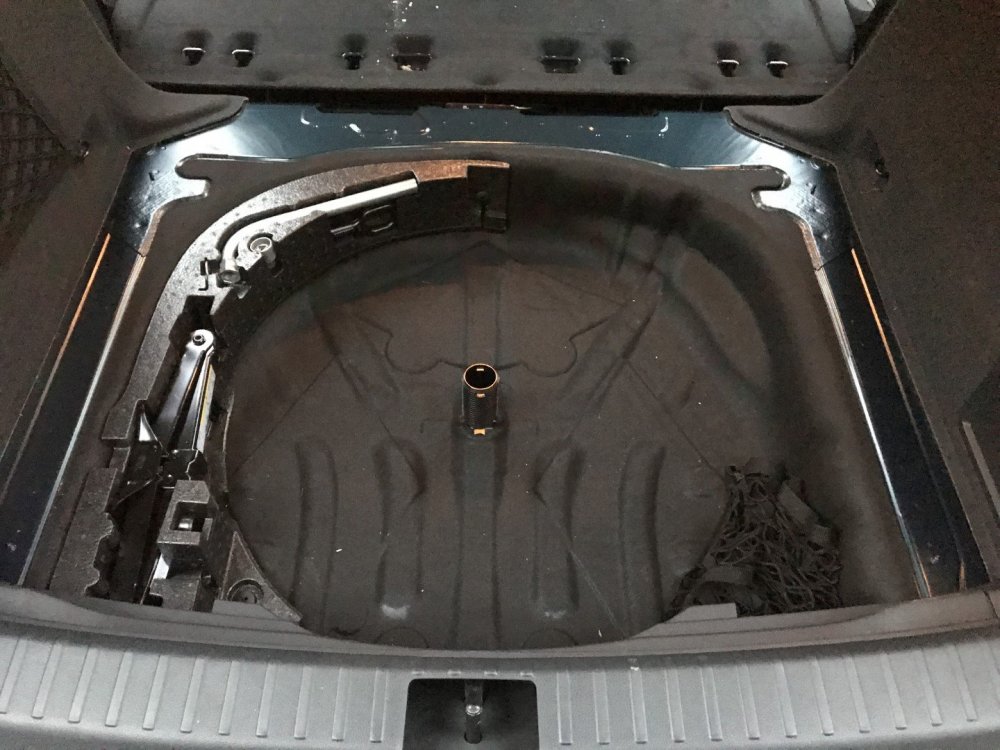
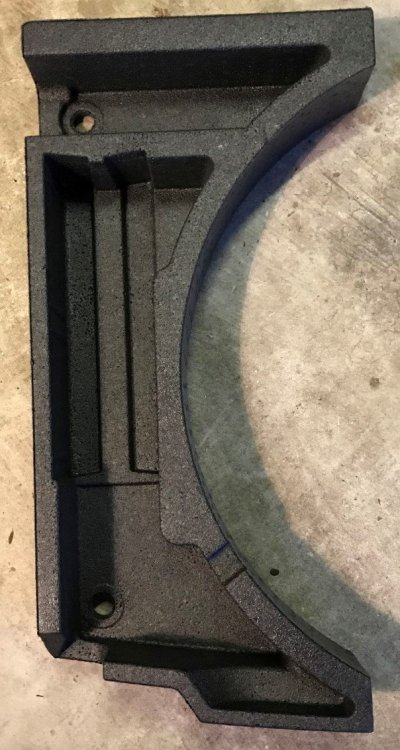
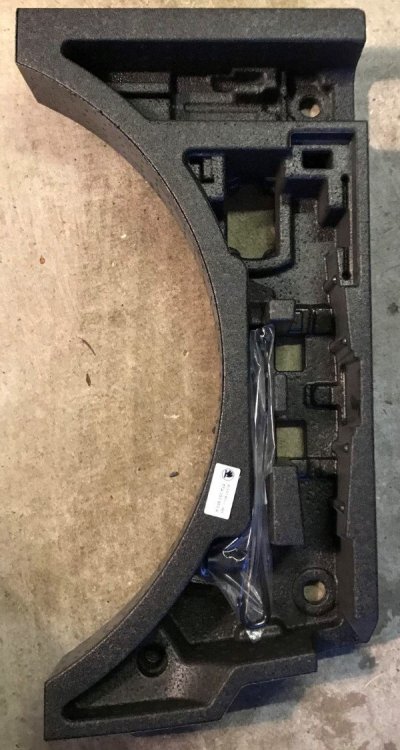
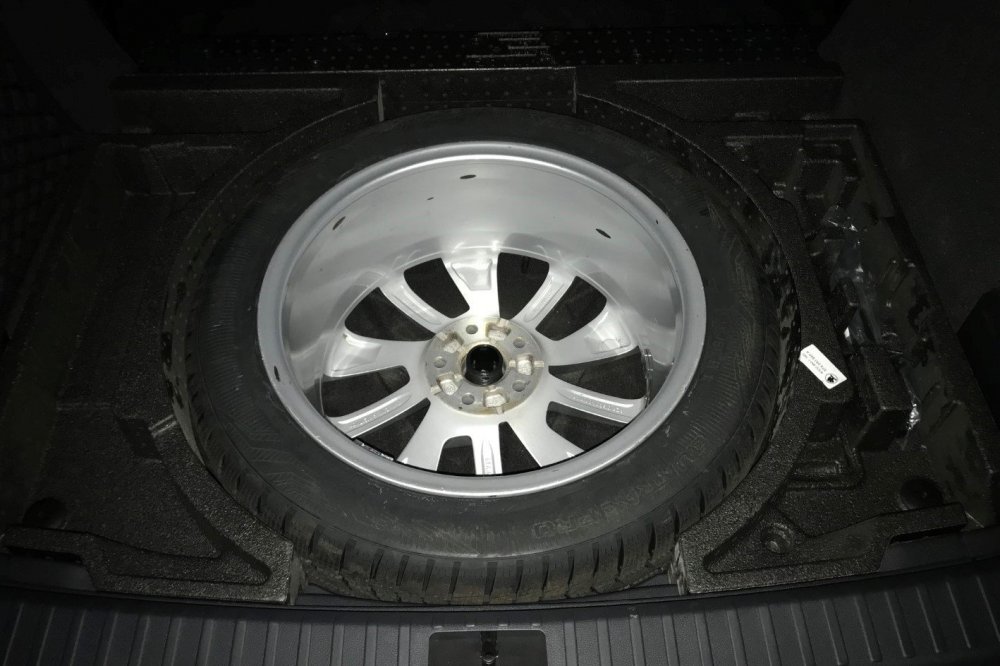
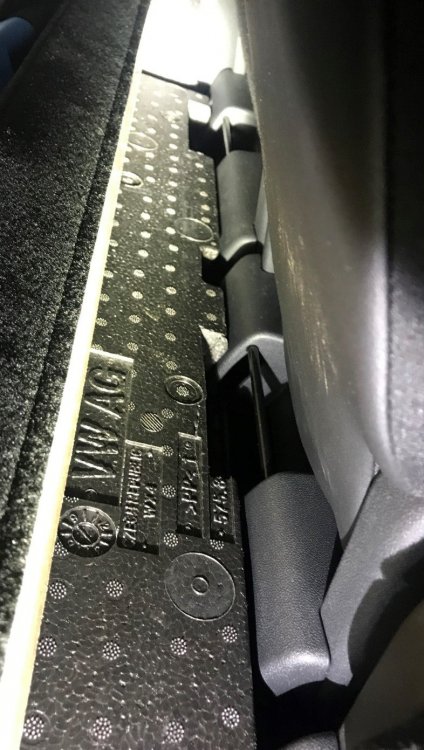
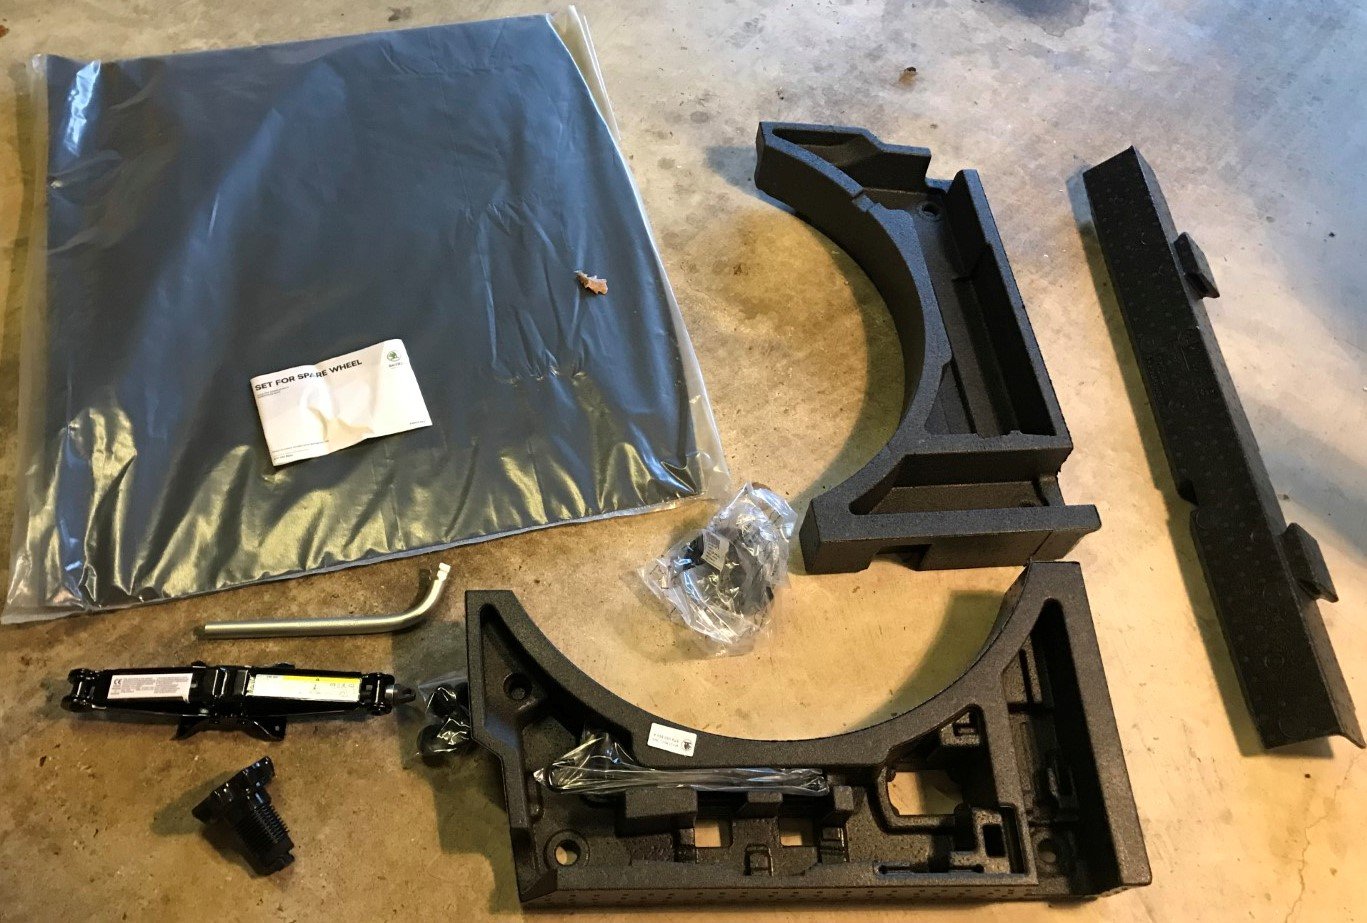
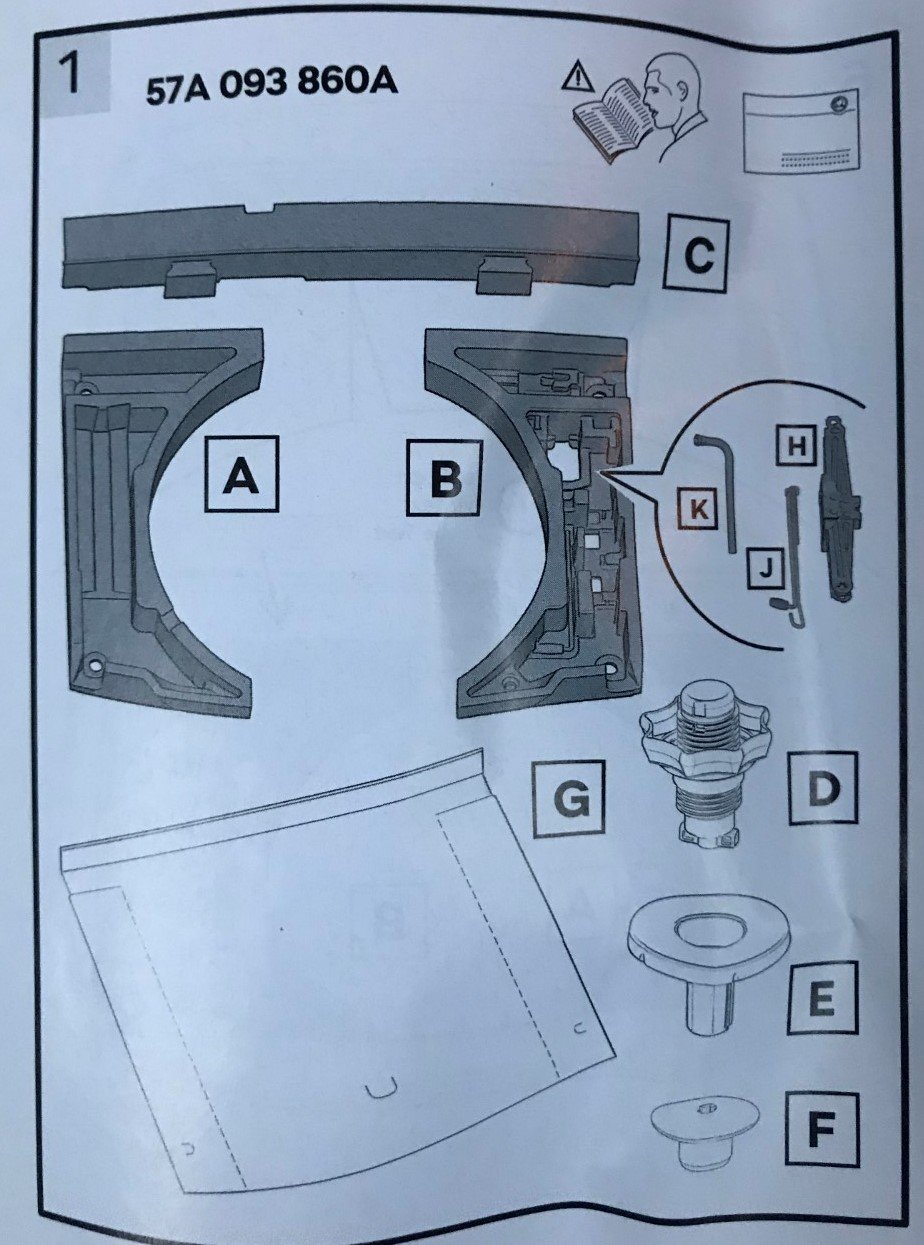
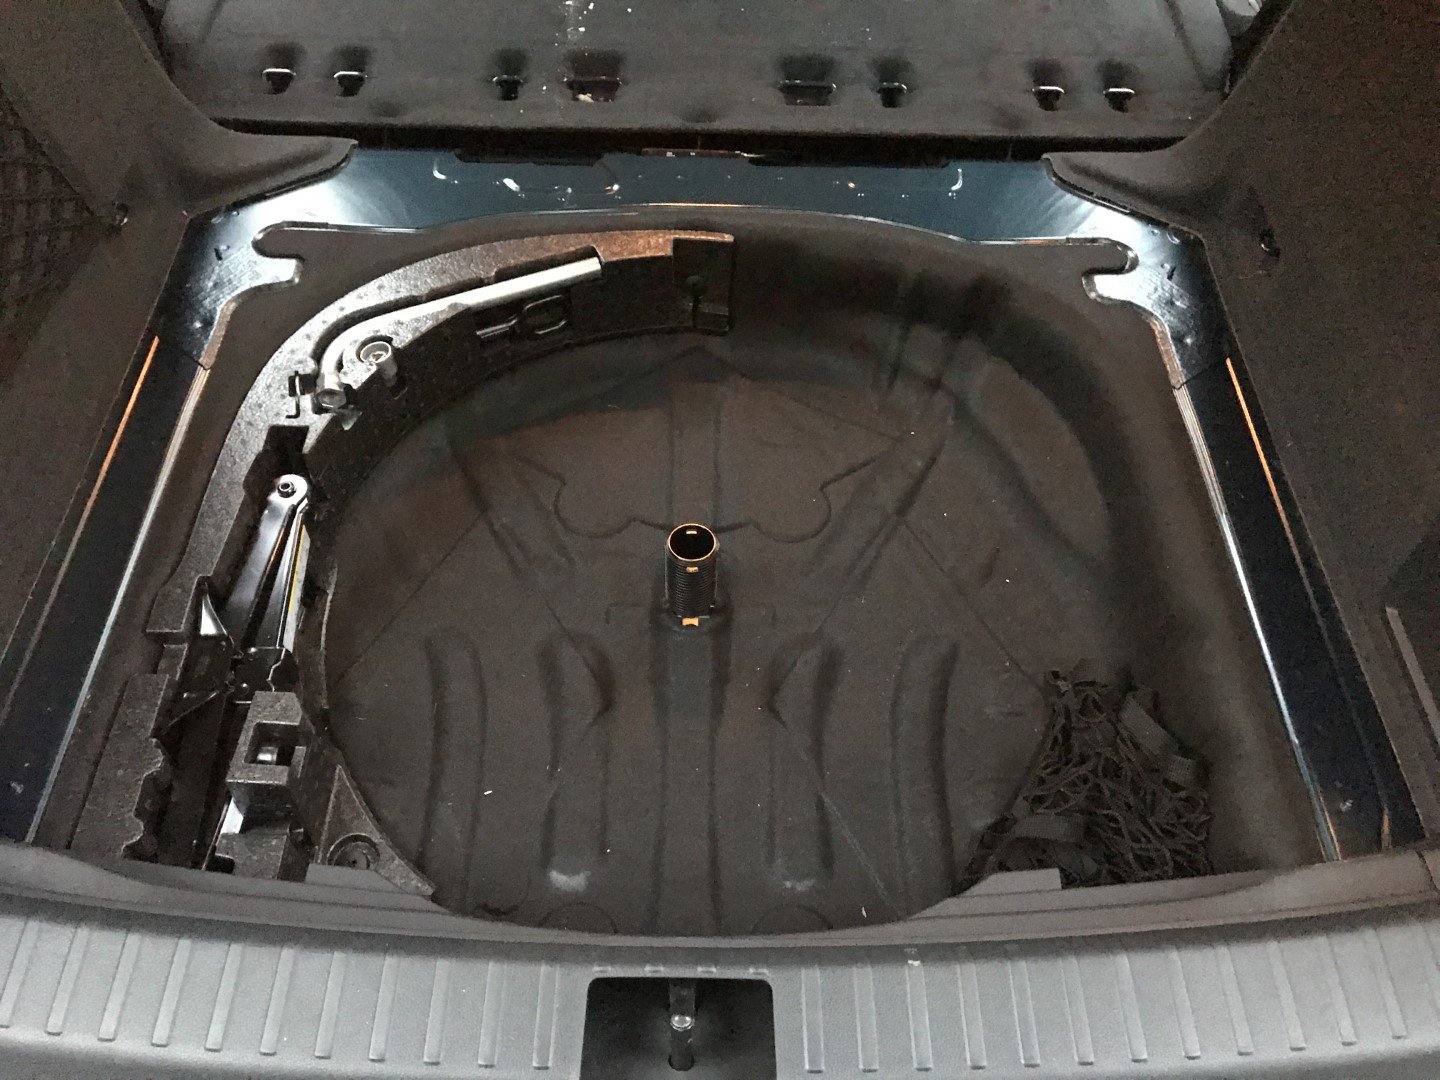
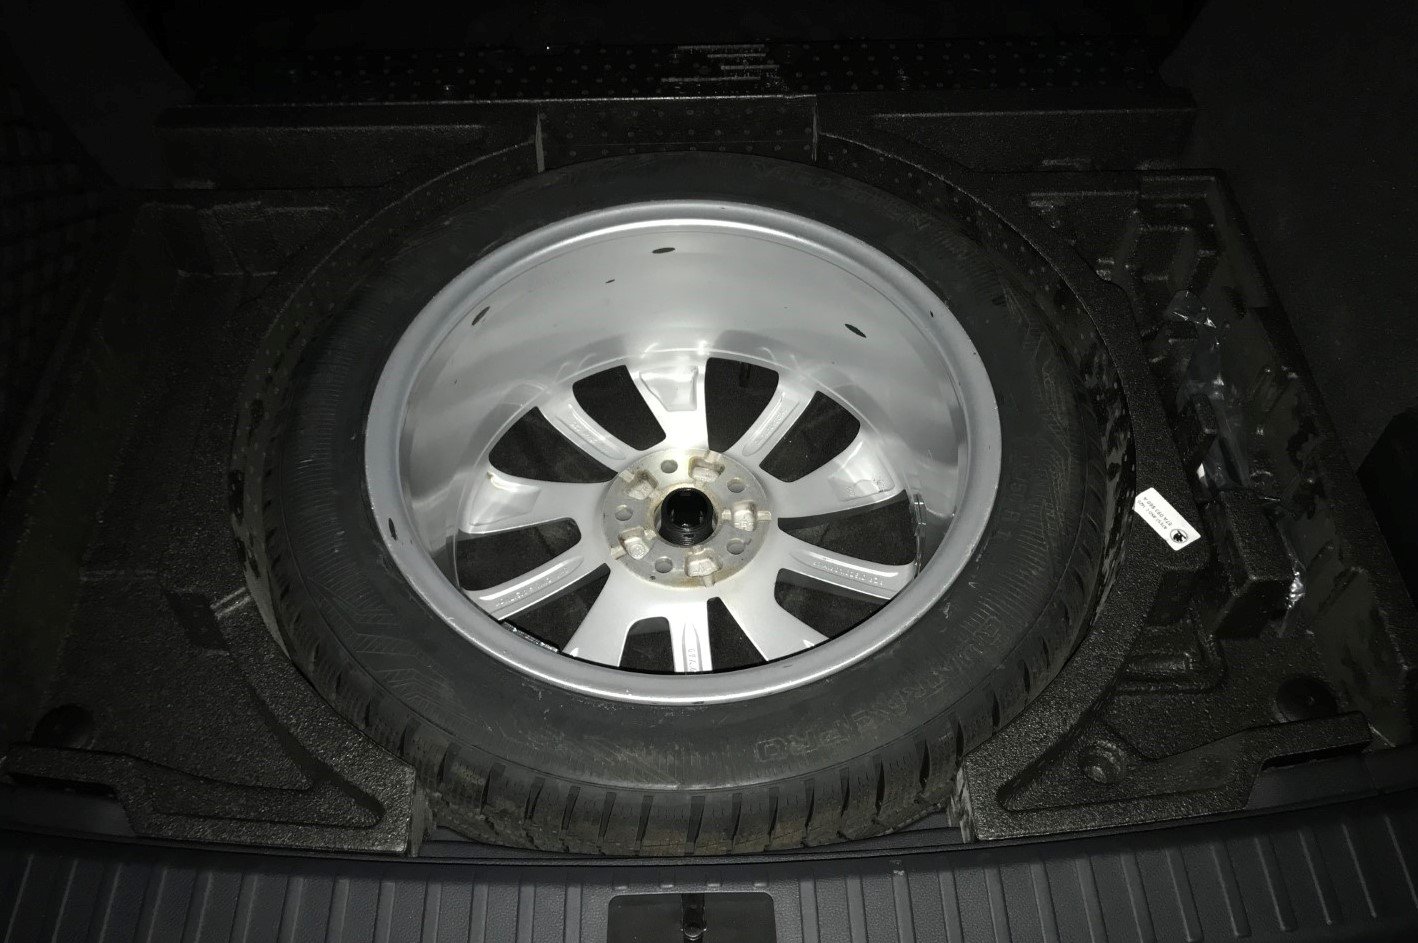
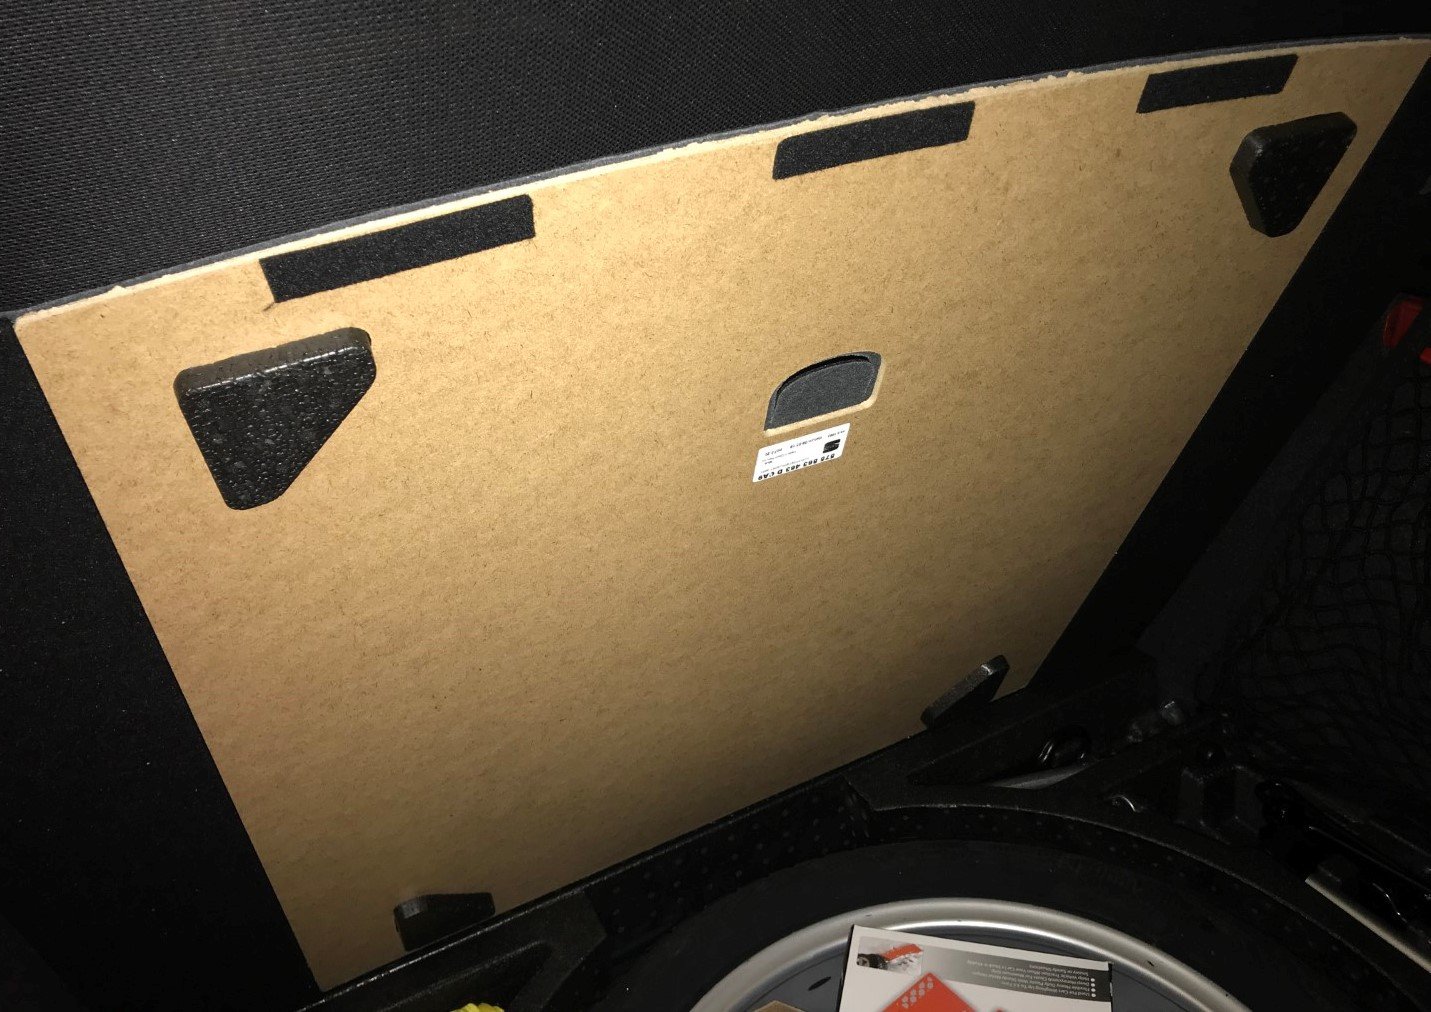
I've just finished converting the boot space of my UK-spec 2-wheel drive Karoq SE-L trim from a space saver spare wheel to a full-size share wheel. I thought I'd put some photos here, in case anybody else is thinking of doing something similar. When I bought our Karoq SE-L earlier this year, I wanted to order a full-size spare wheel, but it wasn't an option. The only option was a space-saver spare wheel. But I read on various forums that it's possible to fit the boot kit for a full-size spare, it just needs a bit of simple cutting of a polystyrene piece, which indeed turned out to be true. I think this is only a problem if your Karoq has the VarioFlex seats, because there is a handle on each seat which is inaccessible if you don't cut off some of this polystyrene. The UK model of SE-L trim comes with VarioFlex seats as standard, and 18" Braga style alloy wheels. The Skoda part number for this boot kit for full-sized spare wheel is 57A 093 860A. I paid £77.50 + VAT from my local Skoda dealer. It's a very big box! In photo number 01, you can see the original space-saver spare wheel in place. In photo number 02, you can see the contents of the kit, laid out on my garage floor. In photo number 03, you can see the main page of the instruction manual, showing all the different pieces . The original boot cover needs to be unclipped. You just need to lift up the VarioFlex seats to locate some plastic clips. Twist these plastic clips then pull them out. Then pull up the material which goes underneath the seats, so you can lift out the boot cover from off the pins. You can then put back the material which goes under the seats and put the clips back in place, because the new boot cover is not held down by these pins at all. In photo number 04, you can see the boot well with the old skinny wheel and the old boot floor removed. This photo was taken before I removed the old polystyrene insert. You can see that there is a plastic tubular piece in the centre, which stops the wheel from moving around. I thought that the kit for the full size wheel would have a taller plastic piece to support the boot floor at a higher level, due to the extra height from the full-size wheel, but it doesn't. The new kit came with exactly the same plastic part which was there already, so I just left the original one in place. In photo number 05, you can see the polystyrene piece which sits along the full width of the boot space, between the seat backs and the spare wheel. The two protrusions which you can see enable it to interlock with the two other polystyrene pieces. This polystyrene piece shows a VW part number of 575 863 496 A. In photo number 06, you can see the polystyrene piece which sits to the left of the spare wheel. It shows a VW part number of 575 863 495 E. In photo number 07, you can see the polystyrene piece which sits to the right of the spare wheel. It shows a VW part number of 575 863 496 J. This is the part which holds the jack, brace, and locking wheel nut etc. in place. There are some plastic clips which hold down the right and left polystyrene pieces ( 2 clips each). They attach to some protrusions in the metal underneath. You actually need a large Torx screwdriver to properly screw them on, but I didn't have one, so I just screwed them finger tight. From what I could see in the instruction manual, it looks like you get a tool to screw them down with the official spare wheel, but I didn't buy the official spare wheel. I bought a 2nd hand Braga alloy wheel from eBay, which is absolutely identical to the 4 other wheels. In photo number 08, you can see my full-size 18" Braga wheel sitting in the cavity, after the polystyrene pieces have all been put in place. After I took this photo, I still had to screw down the plastic cap which goes on top of the tubular part in the centre of the wheel, to hold the wheel firmly in place. The Skoda boot kit comes with a jack and a wheel brace, which go in the right-hand polystyrene piece. The brace looked identical to the one which I already had, but the jack was very slightly different (the base of it was a slightly different width). There is space to put other tools in the cavity in the left-hand polystyrene piece, and I also put loads of other tools etc. in the cavity in the centre of the spare wheel. In photo number 09, you can see along the rear of the VarioFlex seats , where I had to make a cutout in the polystyrene piece behind the handle of each seat. I also removed a thin slither of polystyrene along the fully length, just to stop it interfering with the seats when they are lifted up and put back down. In photo number 10, you can see the new boot floor which comes as part of the kit. It actually has a Seat part number on it, which is 575 863 463 D CA9. It has some triangular-shaped dense foam pieces in the corners, to hold it in place correctly. Overall, I think this Skoda boot kit for the full-size spare wheel is pretty good value. You get a lot of stuff for £77.50 + VAT. If you already have a space-saver spare wheel, you actually end up with some bits which you don't really need. For example, you'll get an additional wheel brace and jack, and an additional plastic part which screws the wheel down to the boot floor. If you're able to get the pieces individually, the ones which you really need, if you already have a space-saver spare wheel and jack etc., are the three VW polystyrene part numbers 575 863 496 A, 575 863 495 E, 575 863 496 J, plus the Seat boot floor part number 575 863 463 D CA9. I hope that this is helpful to some people out there.