
Steve8O
Members
-
Joined
-
Last visited
Everything posted by Steve8O
-
How is everyone getting on with their decisions? Any new Scala owners? Had mine 18months, and although its far from stock now it's a great car at it's base, and as everyone has mentioned, phenomenal value for money. The 1.0TSI 115PS is absolutely the way to go if buying new, you save around 2k compared to the 1.5TSI. For daily driving it is a brilliant little engine. Don't let 3 cylinders put you off, Ford Fiesta ST uses a 3 cylinder as does the Yaris GR and they both put out big power. If you want the extra punch and power. Then get the 1.0TSI and remap it to Stage1, there are plenty of good VAG garages around offering RacingLine OEM+ or APR ECU remaps. Mine is mapped with a RacingLine OEM+ Stage 1 at 150PS (Same power as the 1.5 at stock) and it pulls and picks up great. Still just as efficient as stock but has the extra power on tap if you need/want it. A remap will only set you back about 300GBP too so that's still a saving of approx. 1700 compared to the 1.5TSI. @VRS_White_Hatch I would agree that 'professionals don't believe options add much to used car prices' a quick scan of used car sites will show you this, even when they are advertised, with 1000+ optional extras, the listing price is very similar to that of a comparative model with no options. @Mdev would totally agree with your comment 'some plastics on the dash are a bit basic' I could not stand the grey lattice dash, it looked so cheap, I know it was there to with the seats, but when you are sitting in the driving position you don't see the seats, you see the cheap dash - I did an interior wrap on this panel with black brushed steel vinyl, looks way better, and I think Skoda now do a similar look on some models in Europe. @Ali748did you choose between the Scala and Puma yet? I came from a ford focus 1.6 125PS, and I wouldn't say I didn't like it, but the Scala has really made me fall in love with driving again. The options are pricey but they do complete the look of the car, especially the pan roof, extended glass tailgate, and full LEDs all round, without them the car looks a little bit unfinished like skoda have tried to cut costs, in my opinion of course. All the best
-
No issues at all. Yes I added spacers at same time as springs. Eibach black spacers, 20mm each side at the back and 15mm each side at the front and fitment is spot on. I had wheel alignment done at the same time just to be safe and protect the life of my tyres, but nothing needed to be recalibrated. The -30mm Eibach pro-kit is near perfect in my opinion, its a good height with the 18s, it rides and corners well but remains comfortable for daily driving.
-
Thanks @OGKhyamB, the Quartz Grey is a nice colour. You will have to put some pics up of the mods when you get them done. A couple of new pics I have added a sunstrip with VAG Society UK sticker. I kept it quite narrow, as I didn't want it to get in the way of rain sensor behind rear view mirror. Also added a white pinstripe to the Maxton Splitter and Side Skirts. Bought 6mm by 10meters off amazon for £4, as Maxton were charging £8 for 6mm x 2metres. Once the pinstripe was added I took the plunge and bought the Maxton Design rear side splitters - this was a huge gamble as on the website they are pictured with the stock textured grey bumper trim and they look really 'stuck on' rubbish. So I bought them with the hope they would go better with the custom gloss black bumper trim and if not would have returned them. I am quite pleased with how they look now with the pinstripe added. They definitely compliment the lines of the whole lip kit especially from side view of the car. The rear maybe feels like its missing something in the middle, but I really don't like the Maxton Valance and I am yet to find anything else that gains my interest even slightly. Next up for me is a rear wiper delete. Going to get the Racingline insert and do that at some point soon. Love the extended black glass tailgate, and removing the wiper will really clean it up. Other than that the only thing I have on my radar is to upgrade to EBC discs and pads, but at only 11k miles on the clock, I won't be doing that for a while. Anyway, enjoy the pics and happy modifying.
-
Cheers @WolfyWestythat means a lot as your Rapid is a fine example. Also forgot to add to the mod list that I used number1plates to get short 7 letter plates. They basically trim the 2.5cm of space at both sides of the plate, keeping the digits and spacing the same. It's a small mod but is actually really pleasing. I'm not into fancy plates, 3D, 4D or personal, don't have anything against them, just don't float my boat, so these simple short plates are great, plus was able to put my insta @ at the bottom of the plate which is a nice personal touch rather than advertising the dealer that registered the car.
-
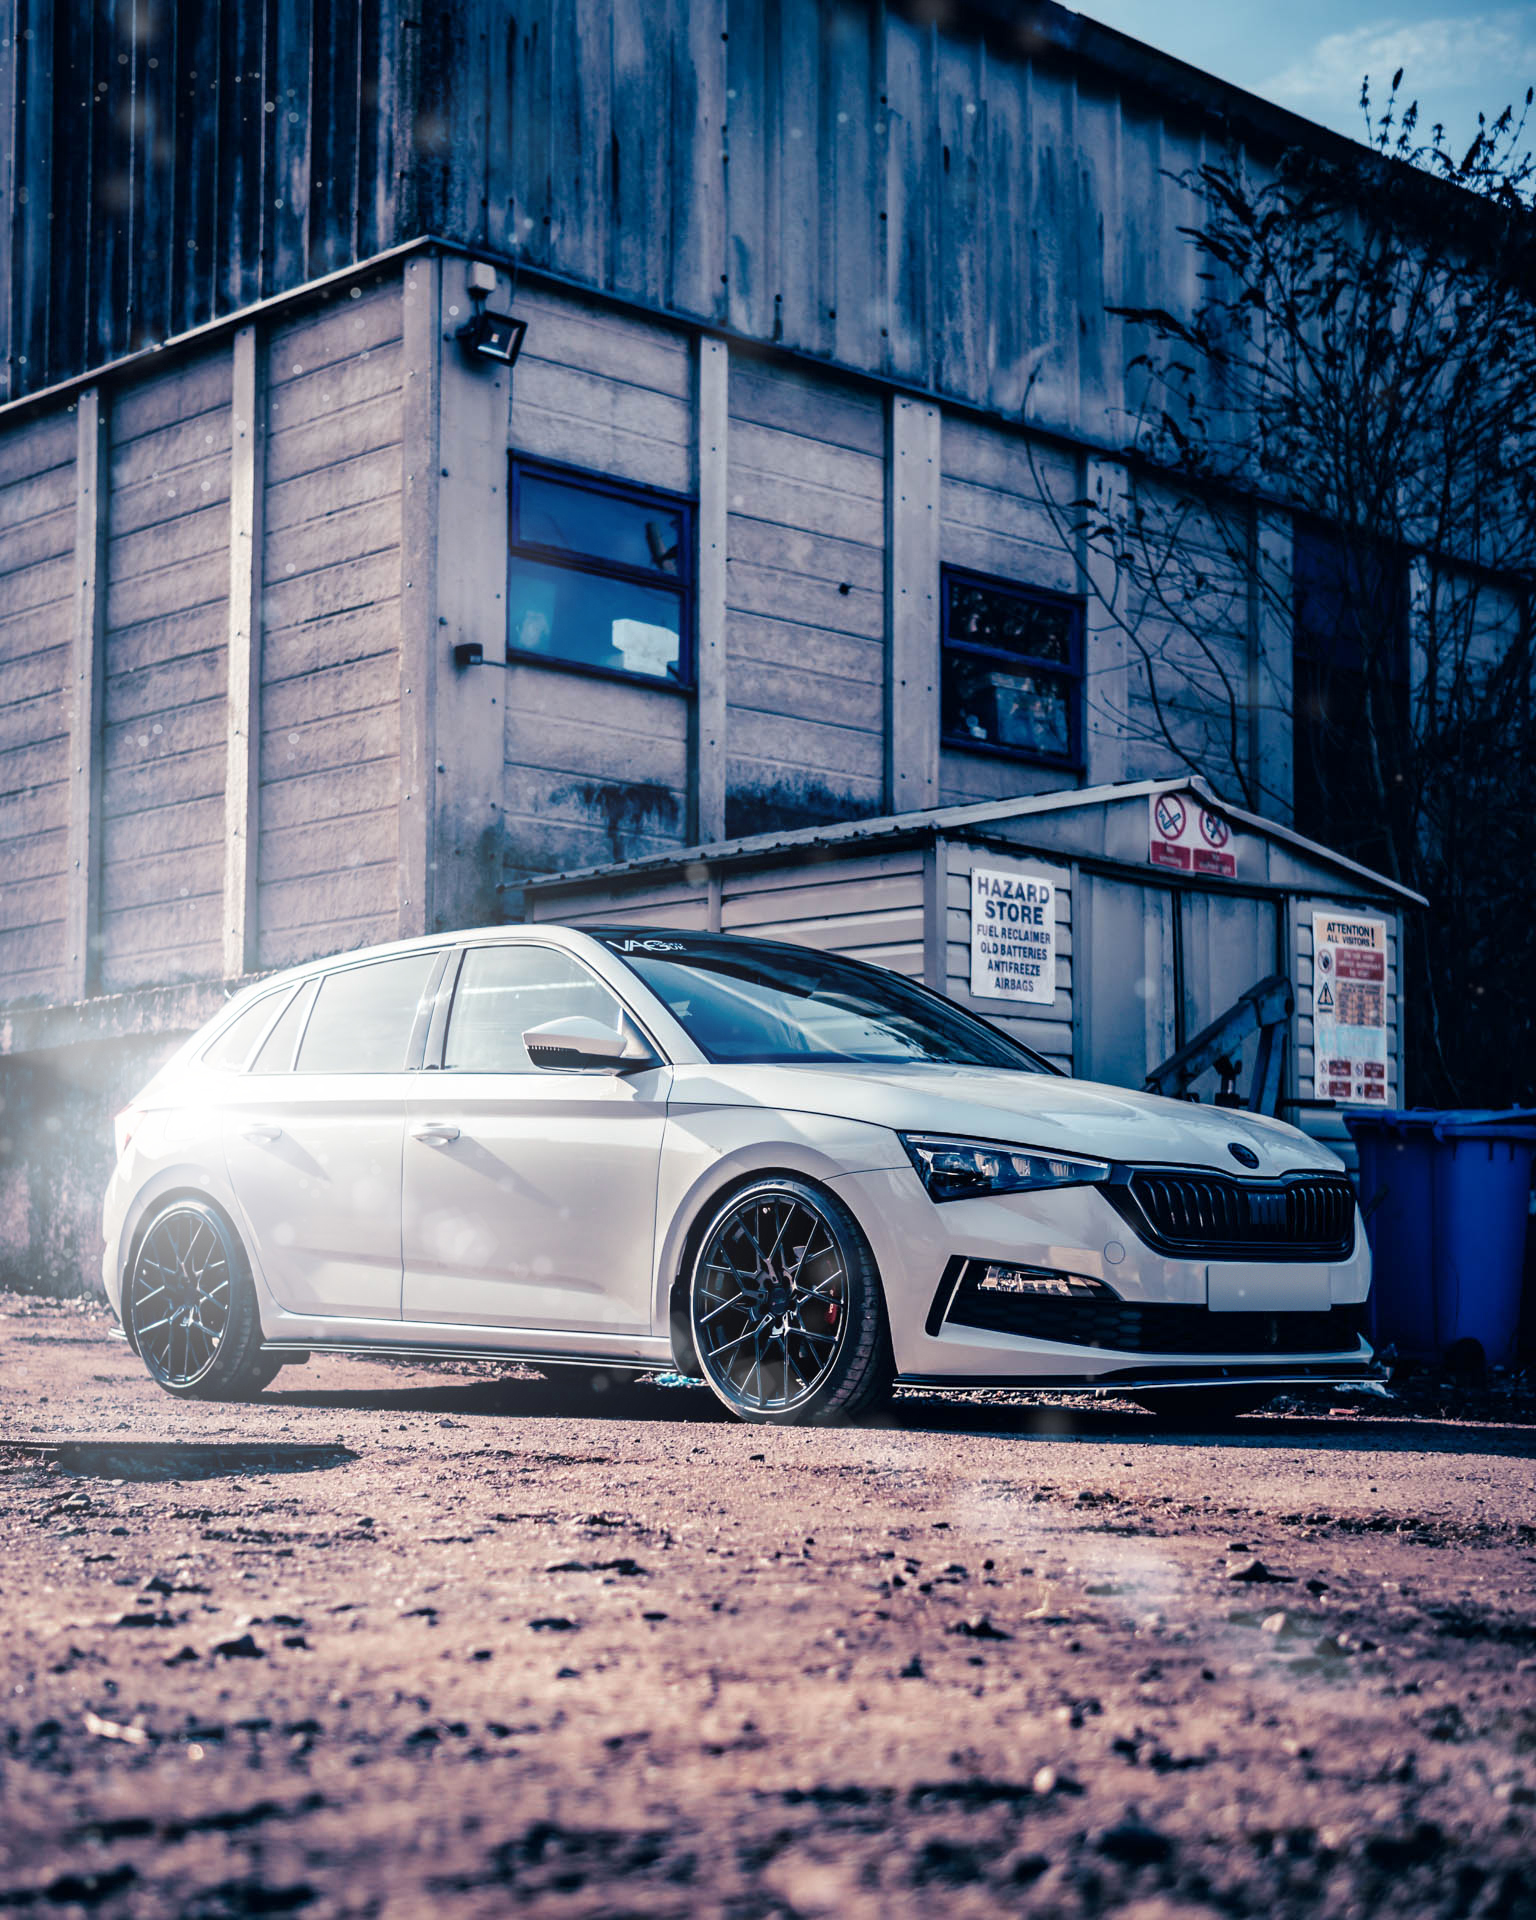
New Update, Longlife Cat-Back exhaust, Maxton Design Front Splitter V1, Side Skirts with custom mounting into front mud guards, rear bumper trim painted in Piano gloss black to get rid of that cheap textured plastic look. For more images see My Instagram
-
Hi Robert, I've owned my Scala SEL 1.0 TSI 115PS 6G Manual for nearly 18 months now and just done over 10,000 miles. I use the app Drivvo to calculate mpg per re-fuelling, as onboard readings are always a bit suspect. My average over the last 18 months is 44.698 mpg My best tank of fuel has been 51.2mpg and my worst 38.6mpg. Also worth noting that I am on 18" Vega Alloys, and 4 months ago I had the ECU remapped with Racingline OEM+ software, reportedly upping power to 150PS and 239NM, I have yet to get it on a Dyno for accurate readings but it definitely pulls better. According to Drivvo data this has had no impact at all on my mpg, although I am now using Shell V-Power 99RON so that probably explains that. Hope this helps. It is a great car, and I couldn't be happier with mine.
-
I was interested in purchasing some trim panels and got in touch with them recently regarding the Brexit situation, their response was; Hello, at this moment we deliver to UK only by Royal post - the packet must be up to 2kgs and max 50cm long. Only to Northern Ireland we deliver by GLS "without" limits. Regards Magdalena Kopacek.com team Superskoda.com is now Kopacek.com Rather unfortunate but it is what it is
-
Thanks for the tip re imgur @a7n
-
Thank you, I am really pleased with it. The black grill is the one thing that makes the most difference, it is a great improvement, especially when it is the only piece of chrome on the vehicle in the first place. Saying that it is such a hard change to do, I tried to do it myself but the full front bumper has to come off and disconnect all the sensors etc. I was unlucky and hit a Doh Dear 6 months after purchase, the Scala had to go into the bodyshop for a new bonnet, bumper and headlight, so when it went in I asked them to change the grille frame for me at the same time as they would be putting it into the new bumper, and the nice guys at Berkhamsted Bodyshop did it no questions and no fee. So a small win out of a bad situation, silver linings and all that. Otherwise you are looking at 2 hours labour at whatever rate your bodyshop charge.
-
Absolutely Unfortunately I have ran out of attachment space, so I need to look into how I can manage my attachments on the forum, however for now you can see some pics here https://photos.app.goo.gl/R5PDKdsYFHH3KUMg8 Mod List: Eibach ProKit lowering springs 30mm front and rear. Eibach Spacers 15mm front and 20mm rear, with black gloss extended wheel bolts. Stage1 Racingline OEM+ remap Racingline cold air intake Alloys painted in gloss black Callipers painted in Rosso Red with Skoda Decal at front Black magic front grille frame Black magic front badge Black skoda lettering on rear window De-badged - Scala Genuine skoda mud flaps added front and rear Genuine skoda scala alu door sills Autobeam LED 5500k white fog lights Audio upgrade; AudioControl LC7i MTX-TR450 4Ch Amp MTX-TR65s Component speakers front and rear MTX-RTP12 Active subwoofer on Vibe fast plug. Still to come; Longlife Cat-back exhaust Maxton Design front Splitter and Side diffusers, however I don't care for the rear valance from the kit so am waiting to see if maybe Rieger or TCS do a full rear diffuser as the ones for the new Octavia look great. How you getting on with your new Scala?
-
Had my Scala SEL for 1 year, and have been very pleased with the comfort and adjustability of the seats (all manual controls, didn't go for the electric adjustment options) recently did Central Bedfordshire to Durham and back in a day due to attending a relatives funeral. 4 hours each way with no stops and had no discomfort or fatigue in anyway from the seats. Very enjoyable drive, and 54mpg for the day with the 115 tsi 6g manual.
-
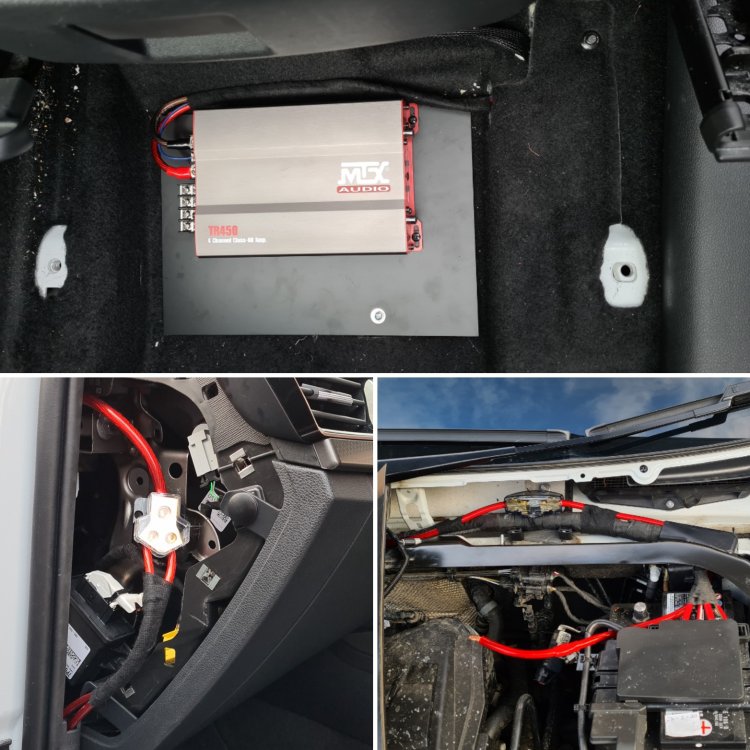
Managed to fully install the LC7i last Saturday in the freezing cold. No Buzz! No Alternator Whine! No Interference! Full Functionality! Brilliant piece of kit. Shouldn't have tried to be cheap and do without it in the beginning . Basically re-did the whole system, took a full 8 hours! Should have taken more photos but I was trying to just focus and crack on as best I could as I was aware my wife was getting less and less happy as the hours ticked past. So now the simplified harness works so much better behind the head unit. Only thing that could have been better still would be to solder the connections, I used bullet crimps, with heat shrink tubing and then tesa cloth tape to hold all individual connections and then group wires together too for that OEM look and feel to it. Speaker cables are now only about 60cm in length to the LC7i mounted behind the head unit. RCAs run from LC7i under center console to amp under passenger seat, then speaker cable of about 140cm runs back up to harness behind head unit connecting into factory speaker cables. Here is a photo of the LC7i and fuse distribution block installed behind the glove box without the glove box in. https://photos.app.goo.gl/3vArtsf3NG5Xw5ay5 And here it is with the glove box back in https://photos.app.goo.gl/RBXddo5NU6ainWvt8 I am going to take the glove box back out again and play with the mounting of the distribution block, currently its getting a bit of vibration when the sound is cracked up. So I will foam up some areas back there. As I was rewiring the amp I re-did the mount too, just to give it a more custom and finished look. https://photos.app.goo.gl/jn4eBYDAeAMhHL629 All holes in carpet, were factory cut. I didn't have to take a knife to anything so was really pleased about that. I used a M4 rivnut into the C bracket to really hold the mount board down. And used M3 rivnuts on the board with 3mm rubber spacers to mount the amp, so that it has airflow beneath it, avoiding risk of it getting hot on the ABS board. Sound is now great in my opinion! All levels set on LC7i, amp has about 10% gain on front speakers and about 20% on rears, sub needed no gain at all. Amp is set to high pass for fronts and rears, and the system does a pretty good job at delivering a full bodied set up. I think if I was being really critical, the high end treble is the strongest element now, then the base and then the midrange. A more powerful sub would of course be better, and a higher end set of components with a full x-over system would really deliver. I don't regret my choice on any elements though, it is a million times better than the stock setup and I really enjoy listening to my music through it. Full cost breakdown MTX TR65S 2way component speakers x2 = £119 MTX TR450 4Channel Amp = £96 MTX TRP8 Active 8" Sub = £140 Audio Control LC7i = £199 Rockford Fosgate RFI-6 2m RCA cable x2 = £20 Vibe 4AWG Slick wiring kit = £25 Vibe 8AWG Slick Wiring kit = £23 Connects2 CT10SK03 harness = £17 Stinger FastRings x2 = £40 Connects2 CT25SK01 speaker adapters x2 = £22 Noico 80mil(2mm) 1.7sqm butyl sound deadening = £37 Fused Distribution block = £14 On top of this I needed a heavy duty rivet nut setting tool and rivet nuts, crimping tool and crimp connections, heat shrink tubing and heat gun, tesa cloth tape, rotary tool with sanding and wire brush attachments, trim removal tools, and VAG radio removal tools, ferrules for 8awg and 4awg cable ends, a fuse tap for remote on wire, and a couple of spare interior trim fixings in case any brake, (some of these items I already had and some I didn't). So all told the full setup cost me the best part of £800 which, if I am being honest with myself, is about 300 more than I wanted to spend. However I did have good fun doing it all myself, learning different techniques, and how to take parts of my car to pieces and put it back together. The sound is sooo much better now, which of course it should be at the cost. The best bang for buck is most certainly the sound deadening, a lot of time this is completely overlooked (and I nearly cheeped out on it too) but my goodness me the difference it makes. I can have the volume at its max of 75% all doors closed, stand outside the vehicle and I can hear no panel vibration whatsoever, just clean low and high end sound waves eeking out the gaps. It also makes a hell of a difference to road noise too, with stereo off, the level of road noise is now at a much quieter and comfortable level to before the install. Audio Install done now, Eibach lowering springs and spacers on in March, then alloys painted in gloss black in April along with Callipers painted red too. Cheers
-
Ok so learn from mistakes, don't rush it, do things properly. New cable T-Harness CT10SK03 to replace the one I have butchered and smashed behind the headunit. https://photos.app.goo.gl/XJmJicK2gSsAueHYA I have removed unnecessary pins this time to really free up the space, and I have added a CT20UV01 speaker female to male ISO adapter in the middle. These are the cables I shall cut to run to Amp/Speakers. This way should I ever want to take out any of the system I can simply remove this section and it will be back to factory. I have also made the decision to invest in the Audio Control LC7i instead of a cheap passive LOC. Originally I didn't do this as I didn't want to spend a big load of cash, just wanted a nice upgrade to the stock audio, however it has become apparent to get the true signals out of the head unit to aftermarket equipment then this LC7i is really a necessity. And although it may now be the most expensive part of the system, at least it is in there as a base and should I wish to upgrade my 4ch amp and components to something higher end later on in life then I know I have the foundations already in play. Chosen location for the LC7i is behind the glove box. There is a nice solid plastic sloped mount, the perfect size for this just behind the glove box. https://photos.app.goo.gl/okvNWrUcsKk6sBwf6 Intention is to put closed cell foam between the LC7i and this plastic mount, then zip tie the unit in place. There is enough foam and other bits in there to stop it from bouncing and moving around. https://photos.app.goo.gl/sVSyCkFgQQfmteUQA I know ideally the top of the LC7i should be accessible to modify the dials should I wish but there just isn't the space. I had hoped I could mount it vertically behind the glove box so that it would be accessible by releasing the glove box catches but its just a bit too tight. https://photos.app.goo.gl/g5ZN41qgtGcF4Unr9 So I shall try my best to calibrate it properly off the bat, then should further tweaking be needed in the future, the glove box is a very simple 5 screw removal. Purchasing the LC7i also means that I need further power distribution so needed a new distributor block. I have gone with a fused block for both + & - like what Johnny went with. Currently my little power distributer block is in the way but I am hoping to mount this here - https://photos.app.goo.gl/tfxYjBnEJbAi2QwFA It will have 4AWG power in, 8awg to 4ch amp fused at 40amps, then 8awg to active sub also fused at 40amps, 16awg to LC7i fused at 10amps, I may also power the head unit via 16awg fused at 10amps too, just so everything is on the same block, not sure yet, Then of course everything will be ground through the same block, which will all need re-wiring as currently I ground in the boot. I also bought a VIBE FastPlug for wiring of the active sub. My Scala is our family car, and occasionally it is required that I need full use of the boots entire capacity. This handy little device from VIBE will give me the ability to quickly disconnect my active sub box and remove it from the boot without the risk of any exposed wires shorting out the system. Well worth the tenner. I think if I were to ever upgrade the system further I would look at building a custom enclosure for around the wheel arch. But this system doesn't warrant that. Not sure when I will get round to doing these re-wires and additions, busy month ahead, Valentines, Wifes Birthday, 2 funerals and pancake day, plus the weather is cold and wet, but the days are slowly starting to stretch out again so looking forward to spring. All the best everyone.
-
Ok @JohnnyType2 or anyone, I need some help/advice now. I have fully installed my aftermarket audio system in my Scala now but I am getting dreadful tweeter buzz whenever the headlights are switched on (LEDs in my trim). This happens with the engine both on or off. If headlights are off then audio sounds perfect. If headlights are on then a dreadful static buzz comes from the tweeters and can only be drowned out at about 40% volume. I would usually associate this kind of static with a ground loop, however if that were the case wouldn't it be constant rather than only when the headlights are on? Couple of other bits of info, if I am driving with the headlights on but then press the brakes - thus activating the brake light LEDs then the buzzing stops entirely, until I release the brake again. Also if I switch the amp high pass filter to low pass then the buzzing also stops but I also get no sound/treble from my tweeters. To me that definitely seems like some form of circuit interference from the lighting which is then getting amplified by the amp, and I guess that could be either through the body ground or through the CAN system in that when the headlights are activated it causes the headunit to switch to night mode, ie dimming and changing map colours. Is there anything else it could be? I think my next step is to completely ground the HU to the same location as the ground of the amp, that way the audio system has no loop possible, and thus if the buzzing continues then it must be through the CAN. If CAN is the problem is there a solution? Would investing in an Audio Control LC7i to fully filter and convert the signals before they get to the amp solve the problem do you think? Any help would be greatly appreciated, cheers.
-
Buzzing is back. Don't understand it. Only occurs when engine is on and dipped beams are turned on. If brakes are pressed, it stops the buzzing. If indicators are activated then the buzzing fluctuates. So it is obviously to do with the current running through the car. Buzzing is only through the tweeters and never changes in pitch or volume. Obviously if you turn music up loud enough then it drowns it out but that is not a solution. I have checked all connections, everything is solid. Has heat sink and insulation tape around all cable joints. All ground connections go through a power block to a single clean ground point that is not shared with anything else as I have moved it from the pics above. Just don't get it. Anyone have any ideas? Could it be that I need to ground my oem amundsen head-unit to the same point as the amp and active sub?
-
Yeah, if anything they are good for just pushing up against the interior trim panel to help vibration, but considering their low cost they are just brilliant. Fixed the buzzing, wahoo! WINNING. It was the high level input grounds, creating a loop. So the amp came with 2x high level input connectors as it is a 4ch amp. Each input has grey cable, grey/black cable, white cable, white/black cable, which are Left and Right positive and negative, but they also have a thin solid black cable for ground, its not very long, maybe 25cm. So I attached these to to the mounting bolts where I attached the amp originally, I have no simply run them around the amp and attached them to the ground terminal where the 8AWG cable is also attached. Meaning all grounds now go to a single point, and no buzz! Anyway next up was the tweeters in the rear doors, these came out surprisingly easily, they have a plastic back that is clipped and stuck on with some form of adhesive, but a flat head screwrdiver slides right in and pops them off. Then the housing is held on by 3 plastic weld points which I used the rotary tool on and they came clean off. Was able to use 2 out of 3 of these points to offer up the mtx tweeter housing and drill holes in. This combined with some adhesive and job was a gooden. I have ran out of attachment space and the 'insert image from URL' isn't liking my shared links, so please click links to view images, cheers. https://photos.app.goo.gl/SG556ksUdj9bjauH9 https://photos.app.goo.gl/TYuNi5LT7gQrVptn9 Hopefully I can get round to do doing the front door woofers and tweeters in the A-pillars at some point this week. Then will leave it alone until Easter time when its warmer and my Eibach pro kit springs can go on, the alloys get painted gloss black and the callipers in rosso red.
-
See this thread for what I have been up to with my project recently.
-
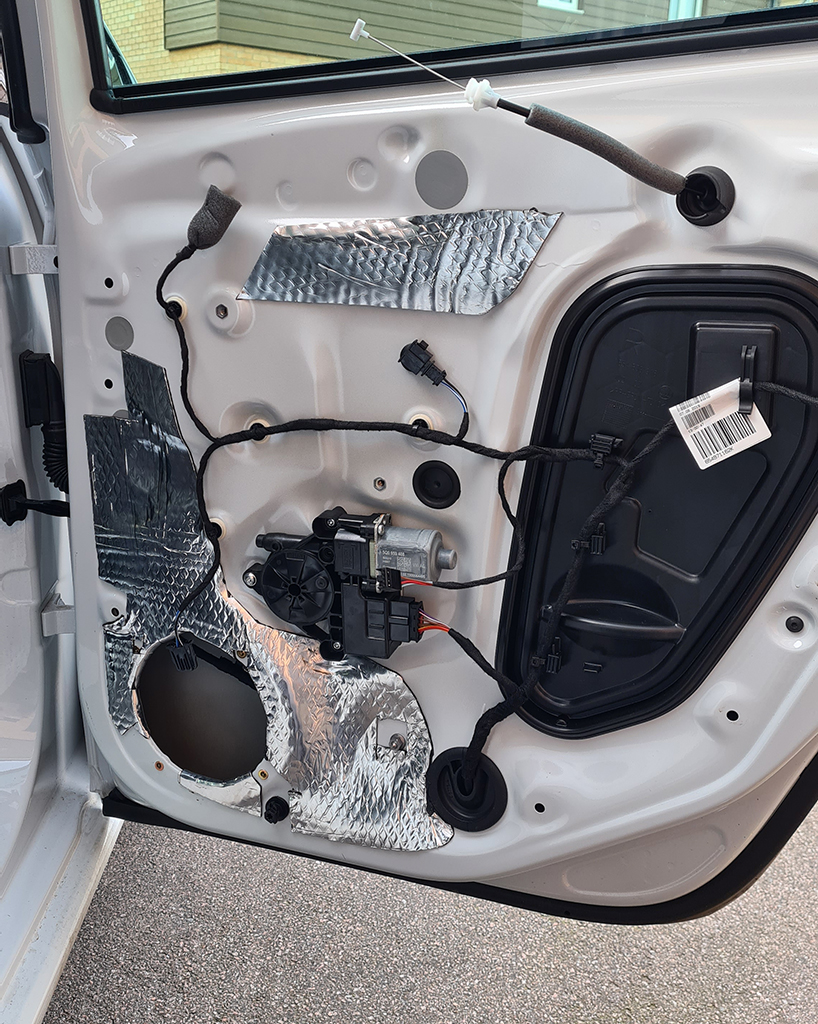
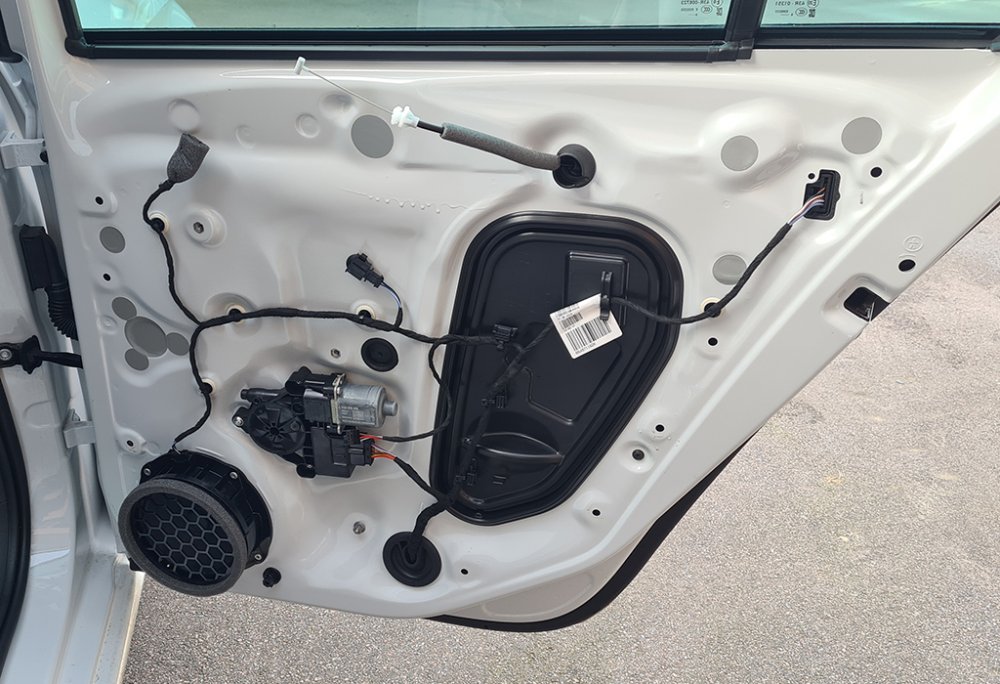
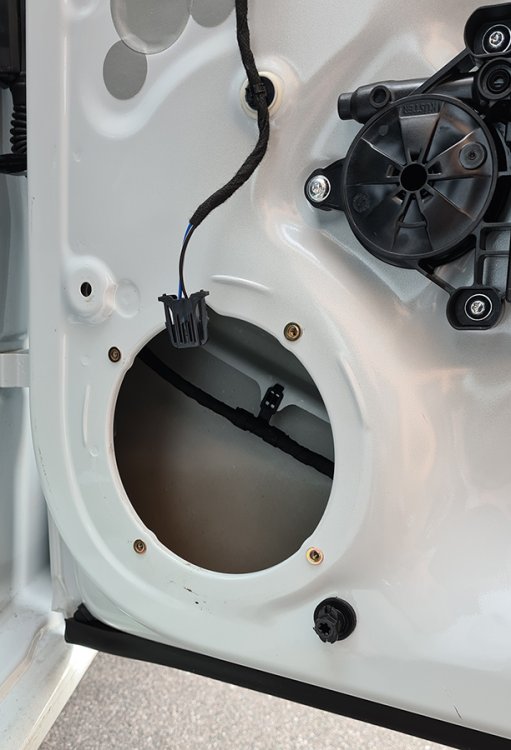
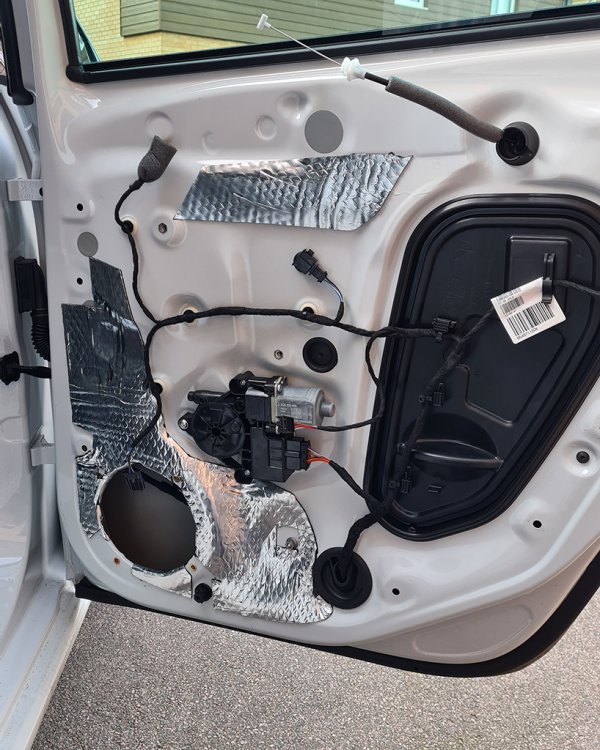
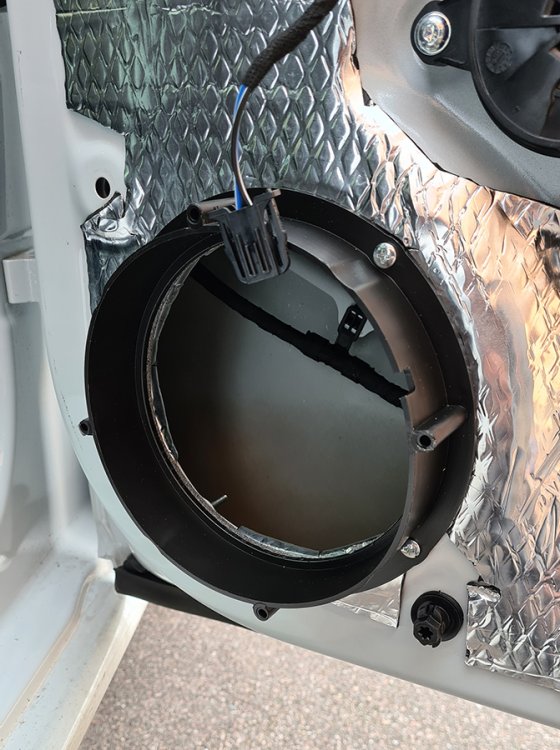
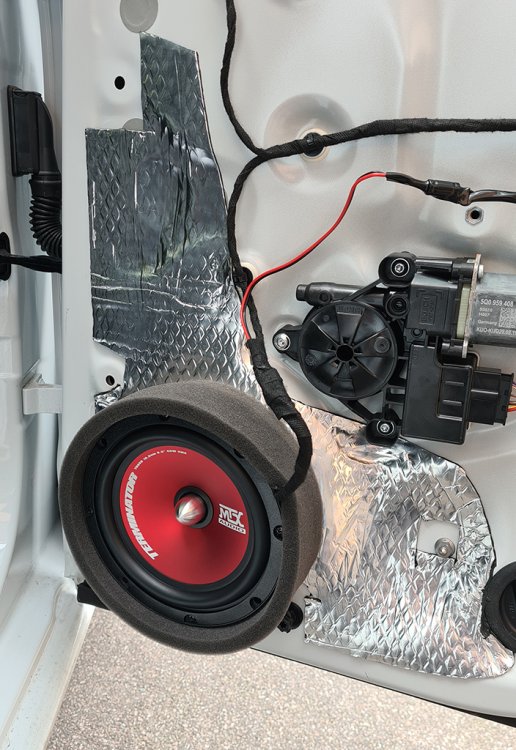
Door Speakers. Started with the rears, and followed pretty much the same procedure that is well documented on youtube and elsewhere. Use trim panel tools to get the door off, use forked tool to really get in behind each clip. As this car is less than a year old they were really really stiff but the tool did work, you do need to use force, but in a measured capacity, for instance don't go yanking anything but do get the tool in the right position and give it a good measured pull. Drill out the rivets for the stock speakers. Use a riv nut tool to put in M4 rivet nuts. Sound deadening added to flat panels of the door. I didn't want to go overkill with this stuff. So added it to the large flat surface around the speaker housing, on the flat panel inside the hole on the exterior of the door below the actuator, then did the knock test on other areas. Just use a knuckle to gently knock the panel, you can tell by the sound if it needs deadening or not. A good rule of thumb is flat areas are more likely to vibrate, bent mental as largely quite stiff and solid. The difference in the sound of the door closing with even just this little amount of deadening is incredible. Next on was the connects2 6.5 speaker adapter. Then I got some of those fast rings that @JohnnyType2 used. They are awesome! A solid disc gets stuck to exterior panel, 1 ring gets cut and stuck to the back of the speaker so as you mount it to the adapter there is a layer of foam between the plastic and the speaker, and the magnet nicely rests in to the foam disc. Then the largest ring goes around the speaker so that when the trim panel goes back it presses up against the plastic, fully directing the sound out the through the grille. Lovely, must buy product!
-
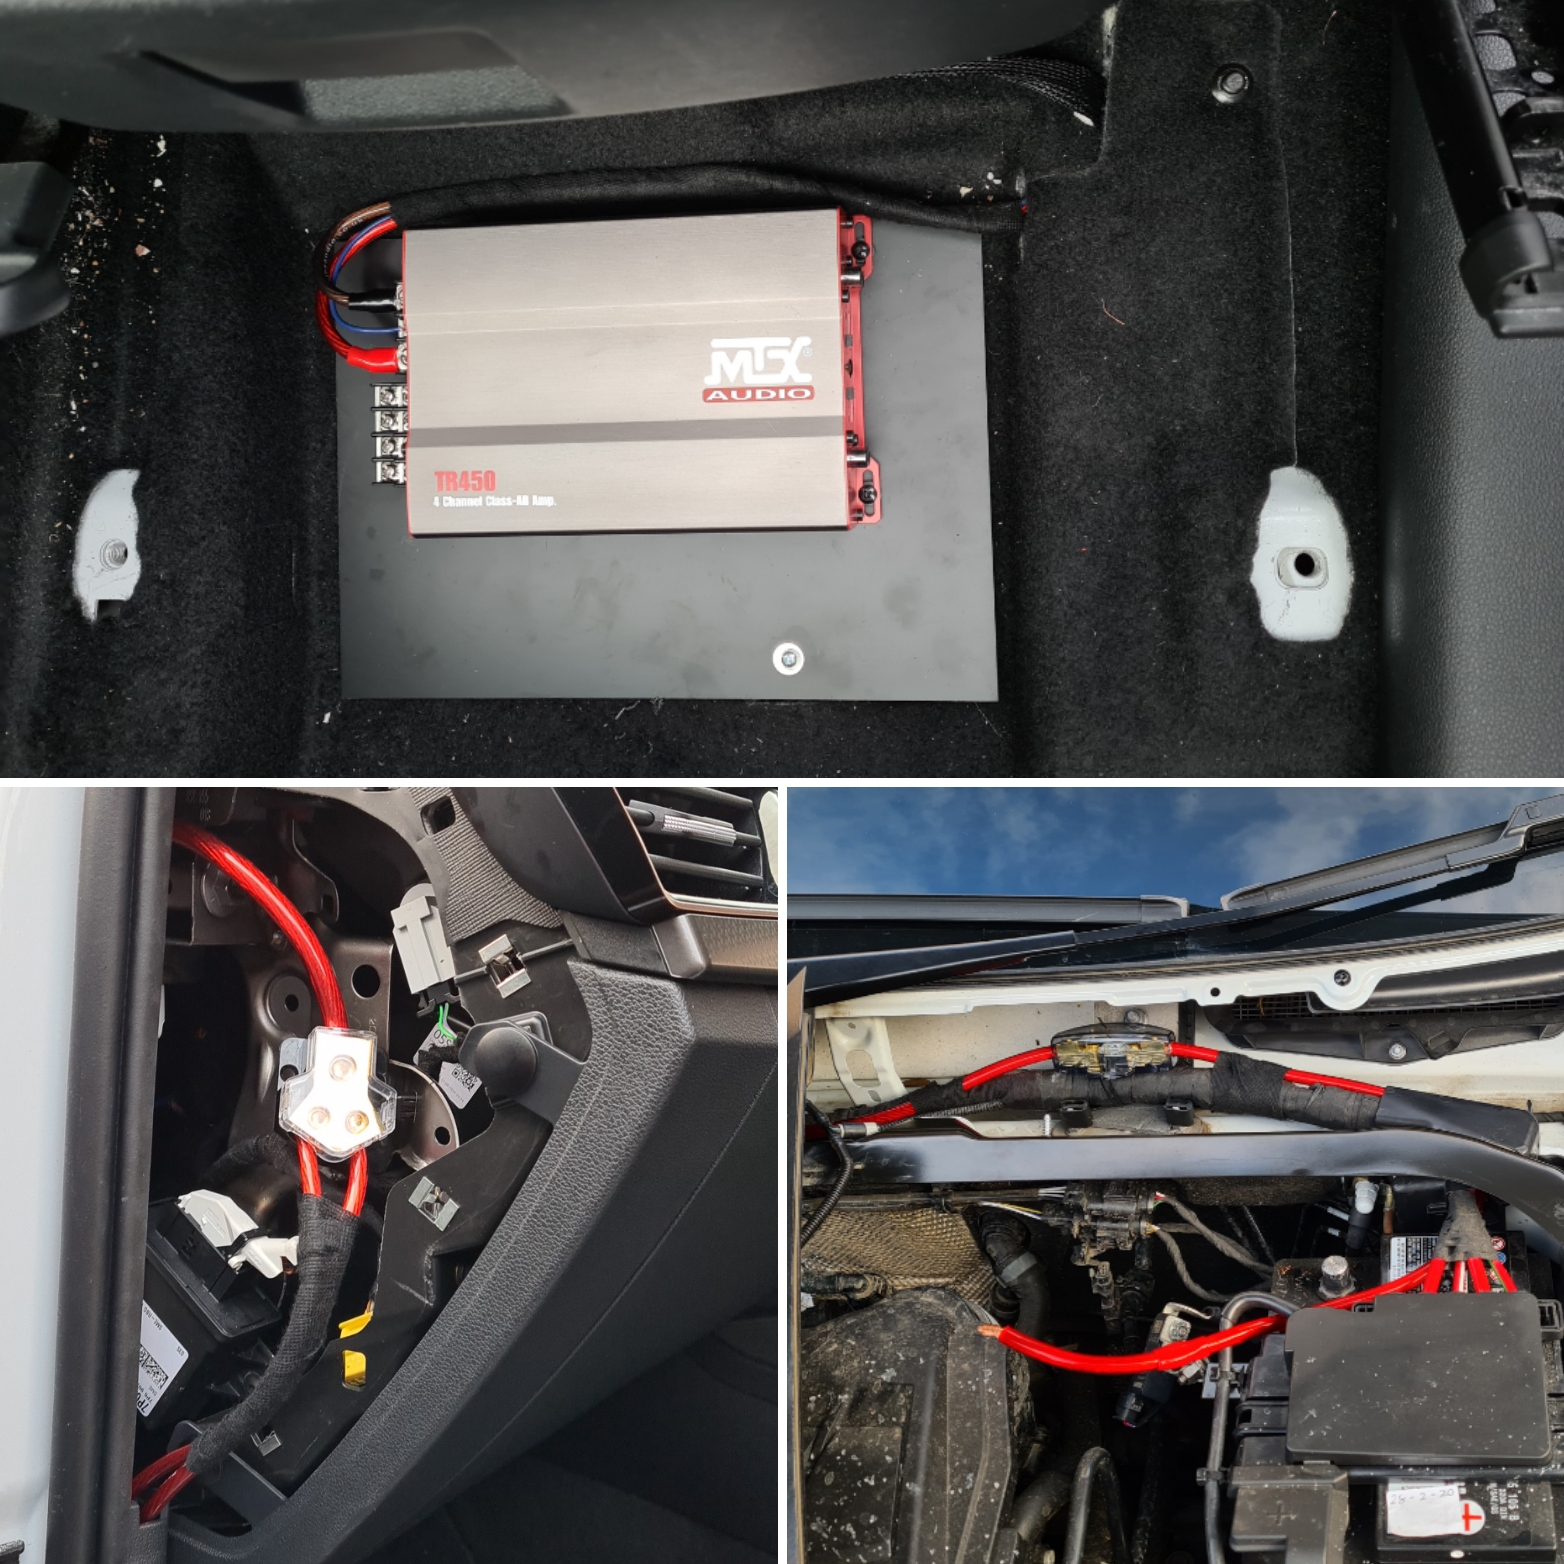
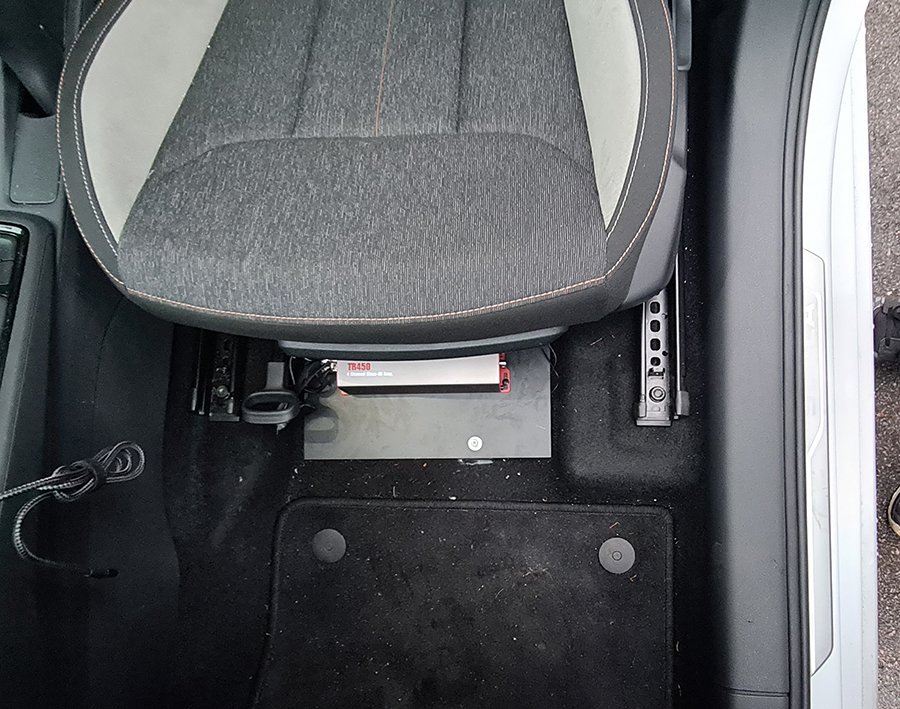
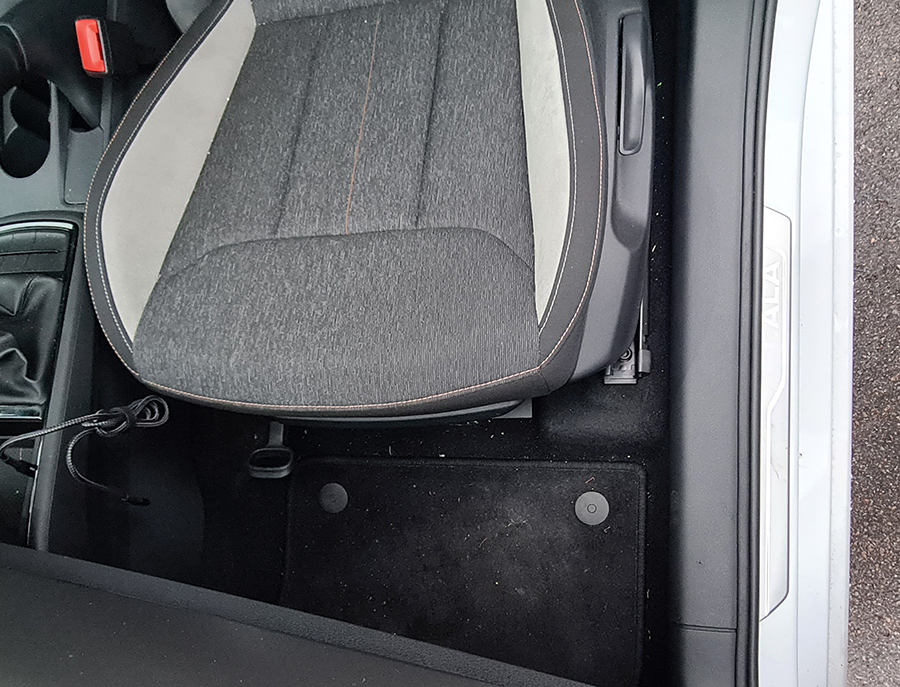
Wiring issues Once all wiring was in and I could test the system all was good, eq, balance and fading all were working correctly via the amundsen. Out on first drive was when I encountered some issues. All the wires in the harness had been using the CANBUS so wouldn't give a good ignition on 12v for the Remote on wires, I had found a wire in the loom under the sill plate on the passengers side which worked perfectly - or so I thought. Out driving in the rain and put the back wiper on, the amp and sub shut off until the wiper finished and then came back on. The wire 12v I had tapped into was obviously this back wiper and every time it was activated it was breaking the connection for the audio equipment, poop! Also on the same drive I found that by turning on my headlights, full LED option in my model, created a buzzing in all the stock speakers which are now running from the amp, double poop! Remote wire first, disconnect from back wiper. Tried cigar lighters, center console and boot are both permanent power not ignition on. Bought a fuse tap and went into a spare fuse in the box. Job fixed, wahoo. Speaker buzz, read online lots of posts about this being a ground loop. I had originally ground the amp under the passenger seat and the active sub in the boot, so I bought another power block and a high quality earth terminal. I now ground on passenger side above the rear wheel, with 4 AWG then split at the power block and run a 8AWG to the active sub and an 8AWG to the amp. This is much neater. This is my ground, using an existing location as the factory for something else. You can see I have wrapped this solid nickel terminal in foam and cloth tape as it is right up against the panel and I don't want any vibration. Buzzing is still occurring with lights on, poop. So this could be that I am sharing this ground location with whatever that factory ground is. Or maybe that the high level input speaker connectors that came with the amp also have a ground and they are creating a loop. Frustrating but options to try and fix. Also wanted to show that the active sub came with a bass control. I ran this down with the RCA cables and found a screw under footwell that I could mount it to very neatly. It's a very small little box with a dial to control the bass output of the sub. This is genius. It means that when the kids are in the back I can turn it right down, but when it's just me I can dial it up super easy. Nice little control that you would never know is even there.

-
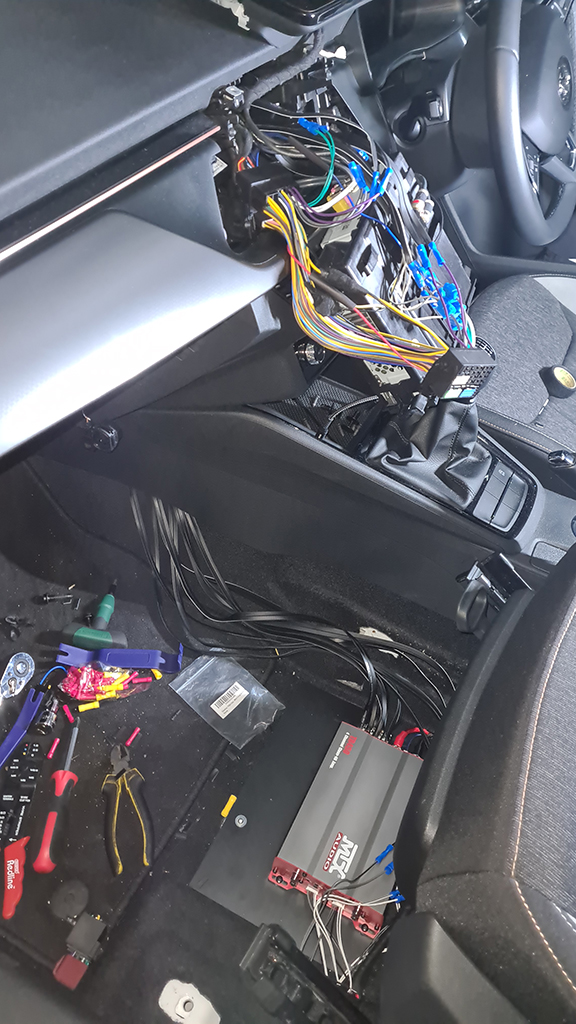
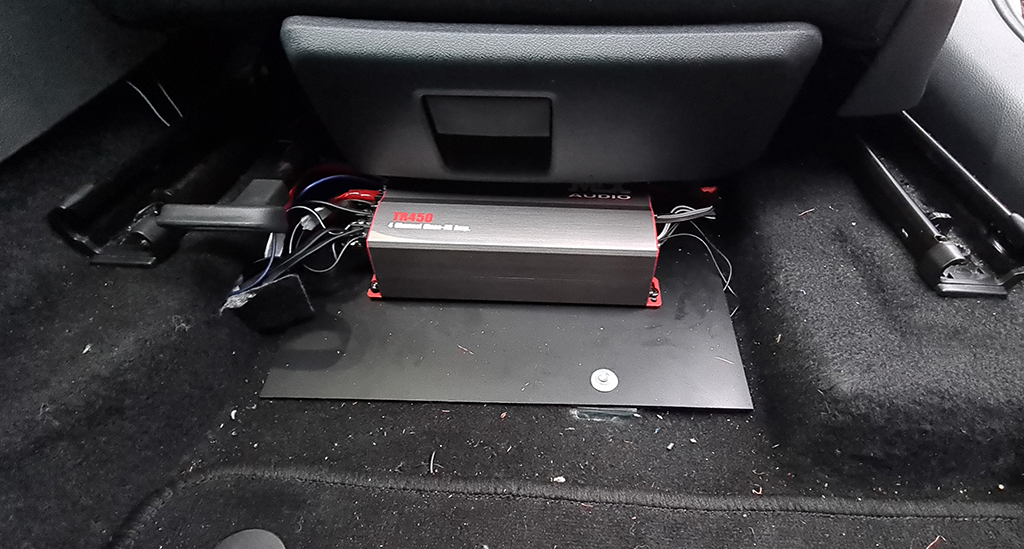
Wiring up. Done a fair amount since I last posted. So here are some updates, Doing this bit was definitely the scariest part of the whole install. I couldn't fully disconnect the screen so that had to rest on a piece of foam on the dash as it is sharp in places. Also worth adding a little tape on the dash for the hanging head unit, its rounded plastic but just better safe than sorry. I ended up buying a connects2 (CT10SK03) harness, which I had to get from car audio direct as Halfords didn't stock it, the original wiring loom just didn't have enough access to tap into everything that I needed. So I spliced into the front speaker cables as close to the Head Unit as possible to connect up the Vibe LOC to then run the RCA cables. these run down to drivers footwell, behind fuse box and along right hand side of car. Then 1 by 1 I cut each speaker cable from head unit and ran it down behind glove box and under center console to the amp, and then back up to reconnect into the wire. The space behind the head unit is actually quite big, so wiring down and up wasn't too bad at all. Once all the cables were connected up and run through properly, I used cloth tape to secure all connections and minimise any vibration that they might get behind the head unit. The addition of the harness, plus the LOC and all these new speaker cables and RCAs meant getting the head unit back in was a real challenge. Although there is a big space back there, in the Scala the HU slots in and then as it is pushed back it slides on runners up at about a 35 degree angle right up into the dash, and the opening behind it for cables is smaller than its profile. I spent a good 4 hours scratching my hands to pieces and wondering if I was ever going to get it back in. By pure accident I found that if I slid my flat hand as far back in the hole as possible I would touch the under side of the center dash speaker grille I was able to pop this out from underneath with the one hand. This meant I was then able to use a hand to reach down from over the dash through the empty speaker hole, as there was no center speaker in there, and grab the harness from the back of the head unit as I slid it into position. It took a good deal of patience and concentration as I was working totally blind, but being able to pull the cables from the back while pushing at the front got it all in. This is the amp fully wired in situ with the passenger chair pushed as far back as possible. And this is it with the passenger side chair in its regular position in line with drivers chair.

-
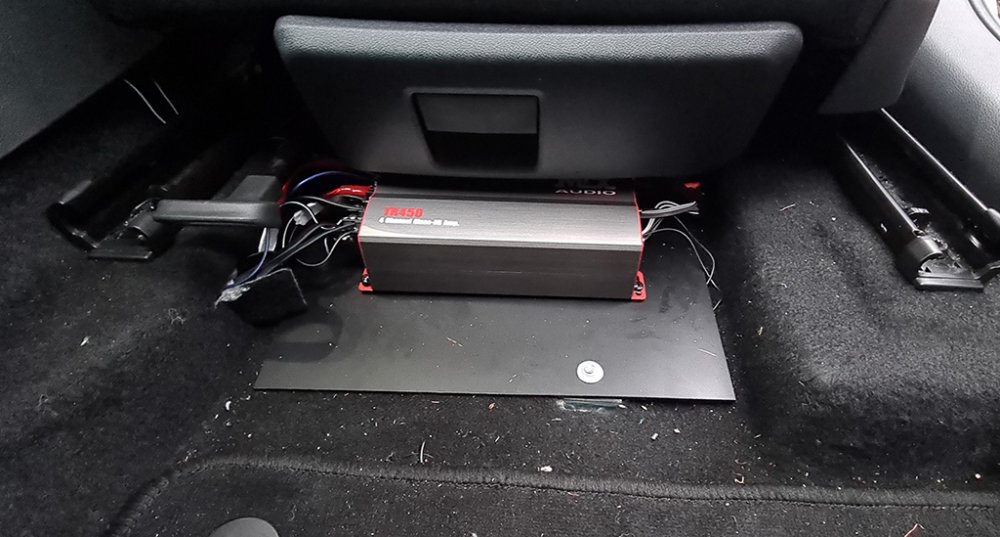
Busy busy day yesterday and today. 4 AWG kit arrived and immediately my first headache. There is no way for power to get through the firewall on passenger side of the car. The entire wiring loom goes neatly under the skuttle and wiper motor. So a lot of patience and care, and I got the skuttle and wipers off, then next to where the wiring loom goes through is a nice perfect grommet. I think this would be for the bonnet release cord on LHD models. So as the power cable had to go all the way accross the car and in behind the fuse box on drivers side, then behind stearing column, up behind head unit and glove box, the 5m length runs out before it gets to the passenger footwell. Used lots of 5mm closed cell foam and cloth tape to ensure this new cable doesn't rattle or vibrate on anything behind the dash. Made the decision to put the power block behind glove box. Terminate the 4 AWG cable into it and then buy a new 8 AWG cable that I could cut and run from power block to amp under passenger seat and sub in boot. So this is where I am, AMP mounted under seat, Sub in boot, all 12v power cables, REM cables and ground cables in and tidy. Next I will splice into speaker cables to get sound to sub, then running speaker cables to and from amp, to test the system with the stock speakers before I start switching out the components in the doors.
-
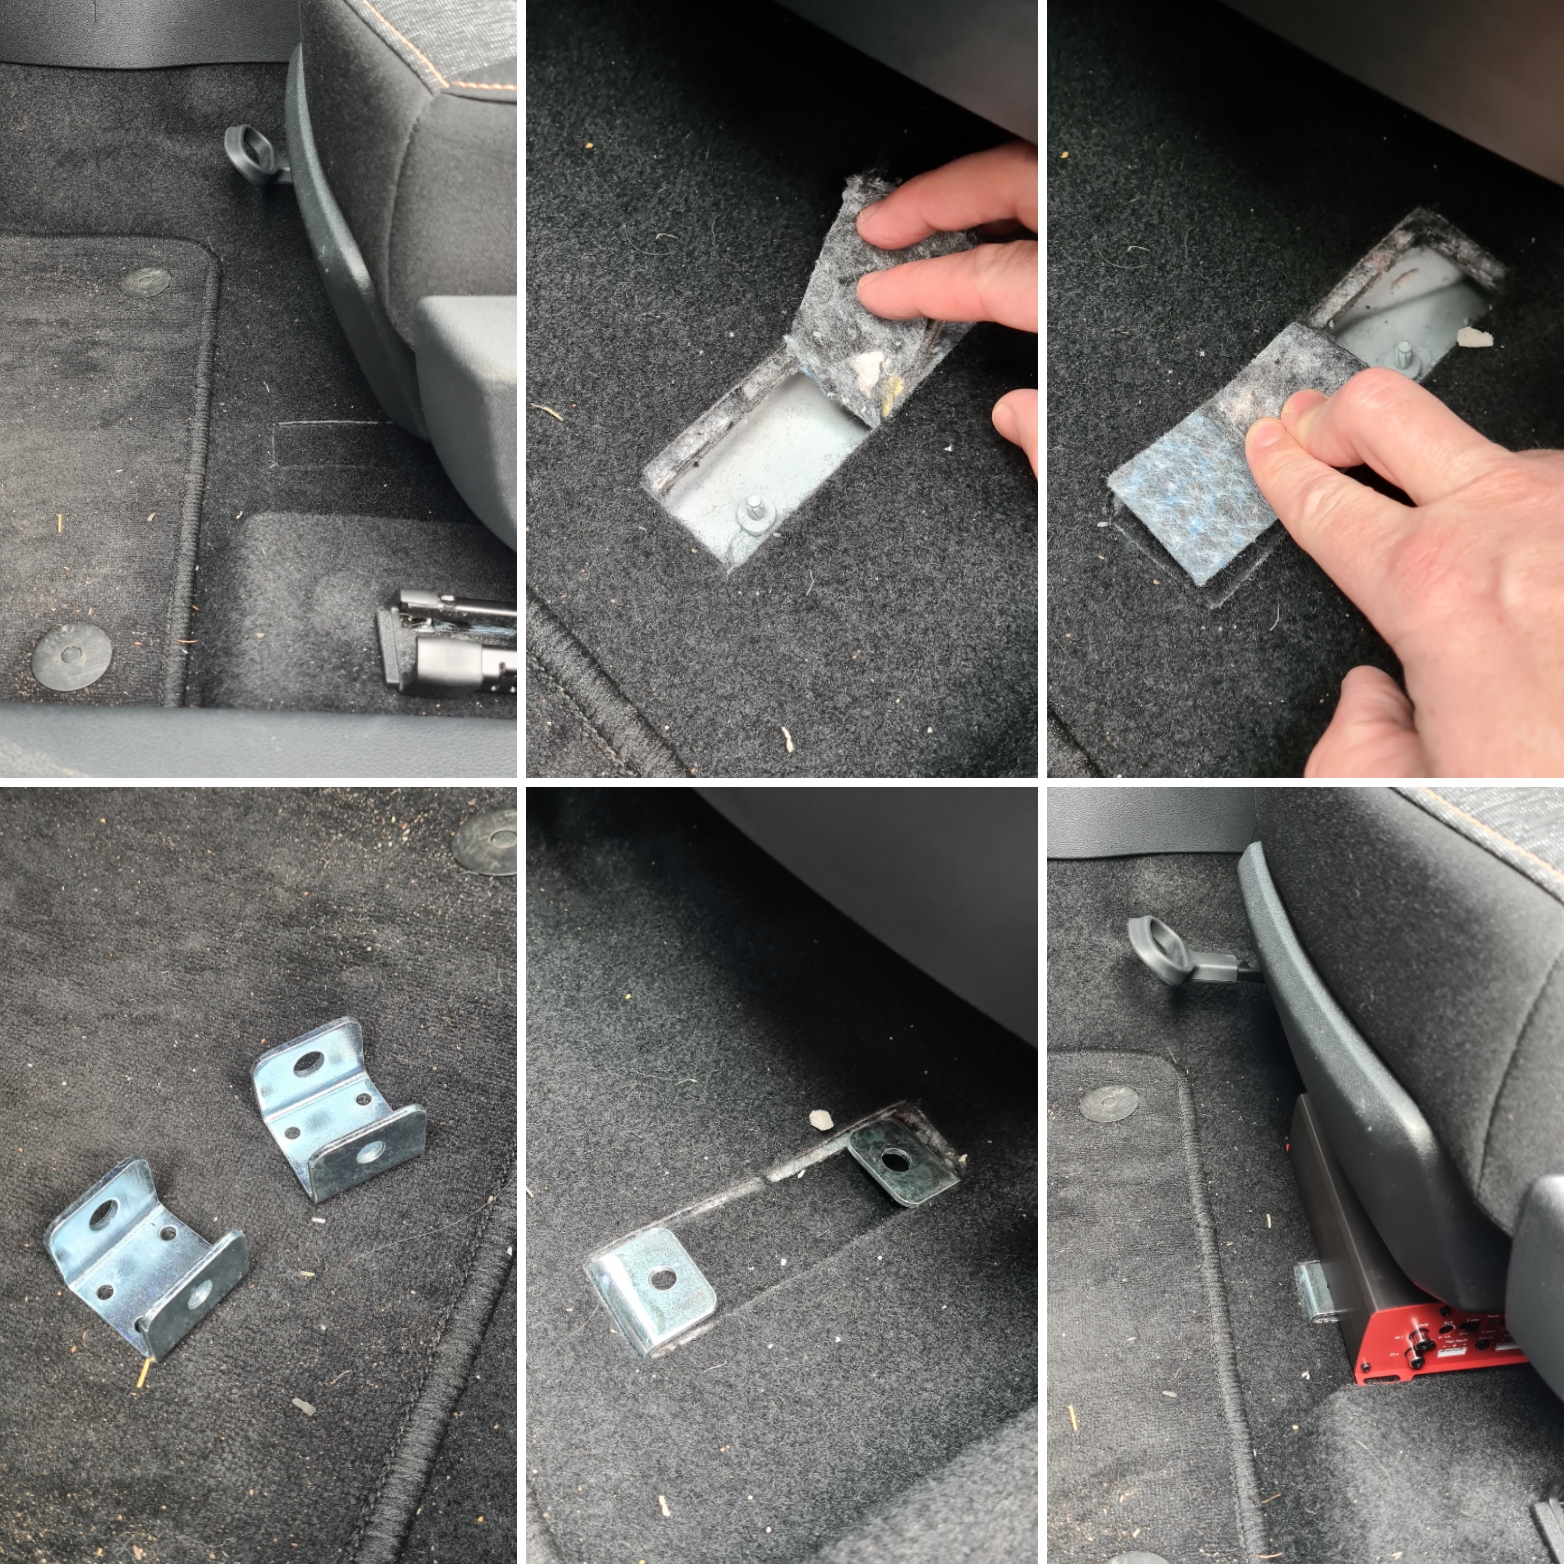
Unfortunately still waiting on the wiring kit. Did a bit of research before doing a detail today. Found that under both driver and passenger seat are these cut rectangles of carpet which fold forward and backward to reveal mounting points. A rumage around the bits and bobs draw I found some C brackets which will be perfect. Aim is to attach these brackets to mounting points, then attach a nice sheet of ABS plastic to the brackets as a platform to mount the amp onto. As the brackets sit flush with the carpet there is good clearance over the amp even with the chair at its lowest. Will likely mount the amp further back than shown (pic was for clearance ref) with an area of plastic to function as almost a kick plate to protect the amp from passengers feet or rolling objects. I dont think it should be an issue but luck favours the prepared.

-
I agree. it's understandable. From what I have read I think it may be a VAG heating/fan issue, my brother-in-laws golf mk7.5 R takes forever to clear the inside windscreen from fog every time he starts that, my dads Toureg suffers too, and they are both considerably more expensive than the Scala. They also both turn their stop-start off on their DSG boxes, for a similar reason to you are suggesting. Think I would be just as frustrated in all your shoes, the golf r has 300BHP and the Toureg is a V6 monster, seems bonkers that if the driver wants to put his foot down that there is such a delayed response due to the stop start. Like I said previously, on the manual it works really nice, I guess this is because the driver is making an active decision to stop the car, ie foot off clutch, handbrake on, neutral. A case with the DSG of the AI auto bits not communicating with the other auto bits, each trying to effectively do their job but contradicting each other at times. Have you taken your Scala back to dealer for the OCU recall? It could well be that the problem isn't the camera, may well be its the technology in the Amundsen head unit. I have had my own issues with the Amundsen unit - see 'Loud Beep' thread in scala section. Since the recall I have had one further update on the unit and it is much quicker in functionality and response now. Although if I haven't used the car in a few days, as lets face it we can't go anywhere, then it can take a while to load user profile. My main problem with the unit is that Android Auto (Google) doesn't communicate well with Amazon Music in anyway, but that is nothing to do with Skoda. I can ask google to play George Ezra for example, and she nicely replies, asking amazon music to play George Ezra, only for it to choose a random playlist that contains George Ezra 8 songs in! Proper first world problem there.
-
Totally agree with @Mdev here, I think the onboard tech in the Scala SEL is well above par. Lane assist comes on above 35 in mine, and only mildly tugs at the steering if it senses I am not positioned correctly, at no point would it ever make me end up in a ditch. If you don't like it coming on for 40+ B-roads then just turn it off while you are driving, it's 3 clicks with right thumb on the wheel, not imperative you do it at start-up. For A-roads and motorways personally I think it would be silly not to use it, if anything it at least encourages you to indicate properly when switching lanes. Share my position is there for the SOS and Nav, your phone is doing the same thing with god knows who, apple, google, or worse facebook. Stop start is useful for efficiency although I see you have the DSG so don't know how friendly this is to the driver. In my manual I have to be in neutral with handbrake on and foot off the clutch for it to kick, making it very useful for when you are at slow traffic lights. When lights go orange, stick foot on the clutch, into gear and off it goes, can't fault it. And guess what - because I share my position it knows when I am home, so when I pull up in front of the garage it doesn't auto stop because it knows I am going to get out to open garage door and pull into garage before shutting it off. As for the reversing camera, I have never understood these, use your mirrors, look over your shoulder, listen to the sensors. Again climate control in Auto does a great job. As an example if I didn't want to spend time getting my car in and out of the garage I wouldn't put it in there, so to me it begs the question - if you didn't want all these features, why did you buy it?
-
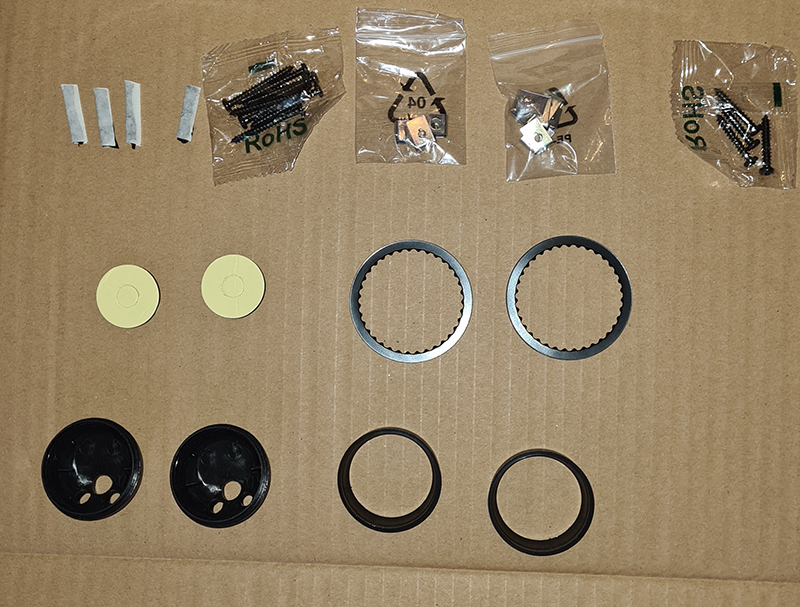
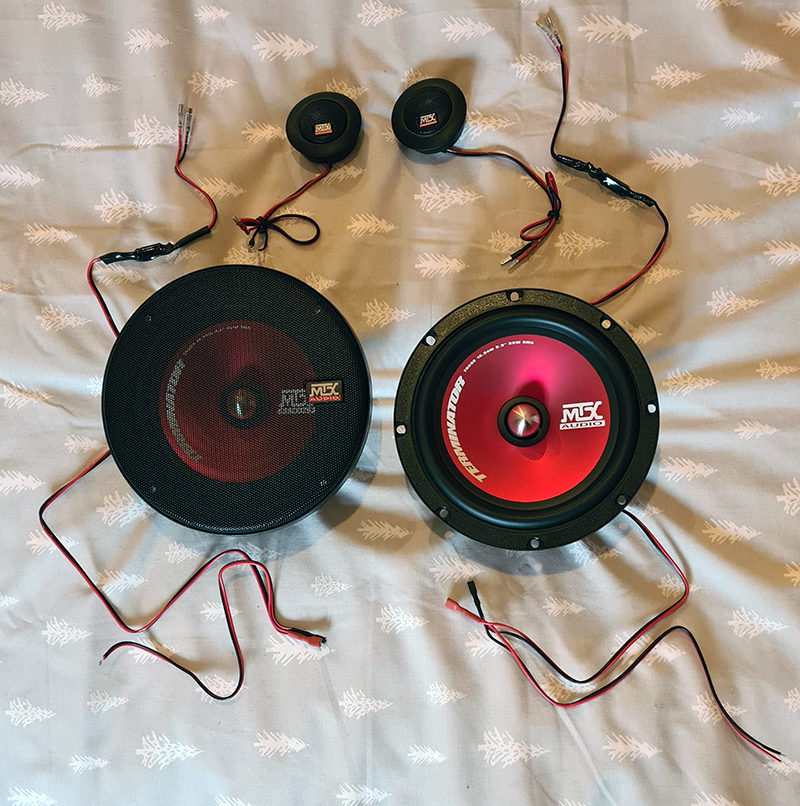
Speakers and Amp arrived this morning. Speakers have inline capacitor to protect tweeters and product sheet mentions using with the TR450 amp with High Pass filter on (which Johnny mentioned earlier) so this way the amp wont be sending out harmful low frequencies and the capacitor will do the job of protecting the tweeters from the mid-ranges that the woofers can handle. Will obviously have to cut these wires for the front as using stock wires in the A-Pillar for tweeter, so will need to add the capacitor in there. But in the back where both tweeter and woofer are in door I am hoping that these cables will be able to be used as they are. Box also comes with a good deal of attachments. For the tweeters there is dash mounting sockets, mounting rings, and double sided adhesive rings, so good options available. There is also 4x butyl adhesive strips. As well as clips and screws for the woofers, although I am looking to use the riv-nut method that others have used. These clips are sharp metal and I would be concerned that with vibrations they could scratch the metal work on the door panels. I have seen that VAG use M3 rivets for mounting speakers, I know some up the size to M5, but these MTX aren't crazy heavy so sticking with M3 so that I don't have to drill the door panel. Project isn't going to advance as I would have liked as my son has got chicken pox so can't be at nursery and my wife is a key worker so means I am dad duty in the day and work (from home) in the eve, therefore some of the hol I had booked will be eaten into with actually catching up on work rather than getting stuck in with this. Amp wiring kit on the way and sub due Weds. Still need to source - power block to split power to front amp and boot active sub, sound deadening, mounting plate/mechanism for amp to go under passenger seat. Likely wont be any further updates til the new year now, so Merry Christmas and good health to all.