rbhelle
Members
-
Joined
-
Last visited
Everything posted by rbhelle
-
Only heat working when set to "HI" and not on any other temp settings=likely one or more sensors are faulty. If blowing heat on either left or right side and temp adjustments are working fine, well, its more likely heat registry or flaps that are faulty. If nothing works....well, good luck 😊
-
-
Thank you, that is one way to do it. Unfortunately it will not be correct and you risk damage to your dsg in the long run. This is like drain engine oil, measure and put back same amount. This will give less oil than recommended... It is more a nice way to determine minimum amount of how many liters you should buy, but not a procedure to set levels right. Even if DSG is working good after doing this fill method, it doesn't mean that it would doesn't take any damage in the long term. I would at least get levels checked, mate. Driving with too little oil will lead to premature tear and wear and likely hamper cooling abilities. I am always a bit surprised when DIY conclusions tend to be like: "I've done it like this and no problems shown". Just because problems doesn't show after some use, it doesn't mean it won't in the future. Especially with lubrication fluids in a car. I would not concur with this method to anybody doing this DIY yourself. Follow the VW manufacture procedure to get lubrication fluids correct for this DSG.
-
Hello there! Long time since I have posted anything here now. Anyway, I am about to replace the camshaft oil seal on a 2.0tdi EA288 engine (DFSE, but applies to any EA288 diesel engine). It is leaking and that means one have to replace timing belt kit as well in order to avoid any issues from the oil leak. Well, the service manual states that one should use VW special tool that costs a fortune in order to safely remove the camshaft oil seal without risking damage to the camshaft. Several you tube videoes also shows the use of specialized tools. Often one can use picks, flat head screwdriver etc. Well, the risk of damaging the camshaft by implementing some youtube methods wasn't very tempting, since it is someone elses car. I found that a tool from KS Tools is perfect. It is actually a radial shaft seal removal/installation tool and it only costs about 38 GBP from autodoc. In Tool has this number: KS Tools 700.1280 the ad below it is priced a lot more, but as many of you know, Autodoc has good prices. I paid 38 GBP for mine just now. Perfect to use on any radial oil seal on VAG cars (camshaft, crankshaft, bevelbox seals and rear differential oil seals etc) Just a tool tip for those who are in need of doing this repair replacement
-
Or di it as I have commented in the DIY guide for DSG change :-) Use the fill hose system from ebay you found and fill from bottom drain plug. That will give best result and is also as stated in VW/Skoda repair manual for a DQ250 DSG. After initial 6ltr fill (car not running), keep hose connected. Start engine and run through all gears for 10 sec each until DSG oil temp is approx close to 40 degrees celsius. Unscrew hose from drain plug and let it flow steady until it starts to pulsate fluid out. Thats when correct level is reached, so plug immediately. If dsg oil at correct temp does not have a steady flow first time you remove hose from drain hole), it means there is to low amount of fluid inside dsg, so just connect a new bottle and overfill while engine running and then remove hose and wait for the dsg oil stops flowing at a steady rate and pulsate fluid out, thats when you have correct amount :-)
-
Just remember to measure oil temp when you control measure the level. Meaning: Fill up dsg box with approx 6 ltrs. Start engine, circle through gears, 10 sec each gear until oil temp is at 35-40 degrees if I remeber correct. Disconnect hose and watch when level is set correct. It is correct when oil is not constant flow, but as soon as it starts to pump out in "waves" if you understand 🙂 Immediately plug drain plug when that happens.
-
That is the correct one, and with this you will fill from drain plug as well and not from the dsg oil filter hole
-
What below? 🙂
-
Yes, you can do that. Will take a bit more time, but doable yes.
-
Well, its a time for everything. This forum has given a lot, and thats why I will stay here iot help or learn from all of you. Yes, I sold our Superb MK 2 and bought a new Tesla Model Y AWD LR juniper instead. Still have our Audi Q7 Etron diesel hybrid, so not given up on diesel at all yet. Since I also work as a part time private mechanic, I will still focus on VW, Skoda, Audi repairs. Well, thanks for now and my next post will probably be as a respond to someone or tips from my work on other peoples cars 🙂
-
Hello there! Well, happy to help. I have had a lot of help from other members contribution in here, so it is nice to return the favour. Regards, Roar
-
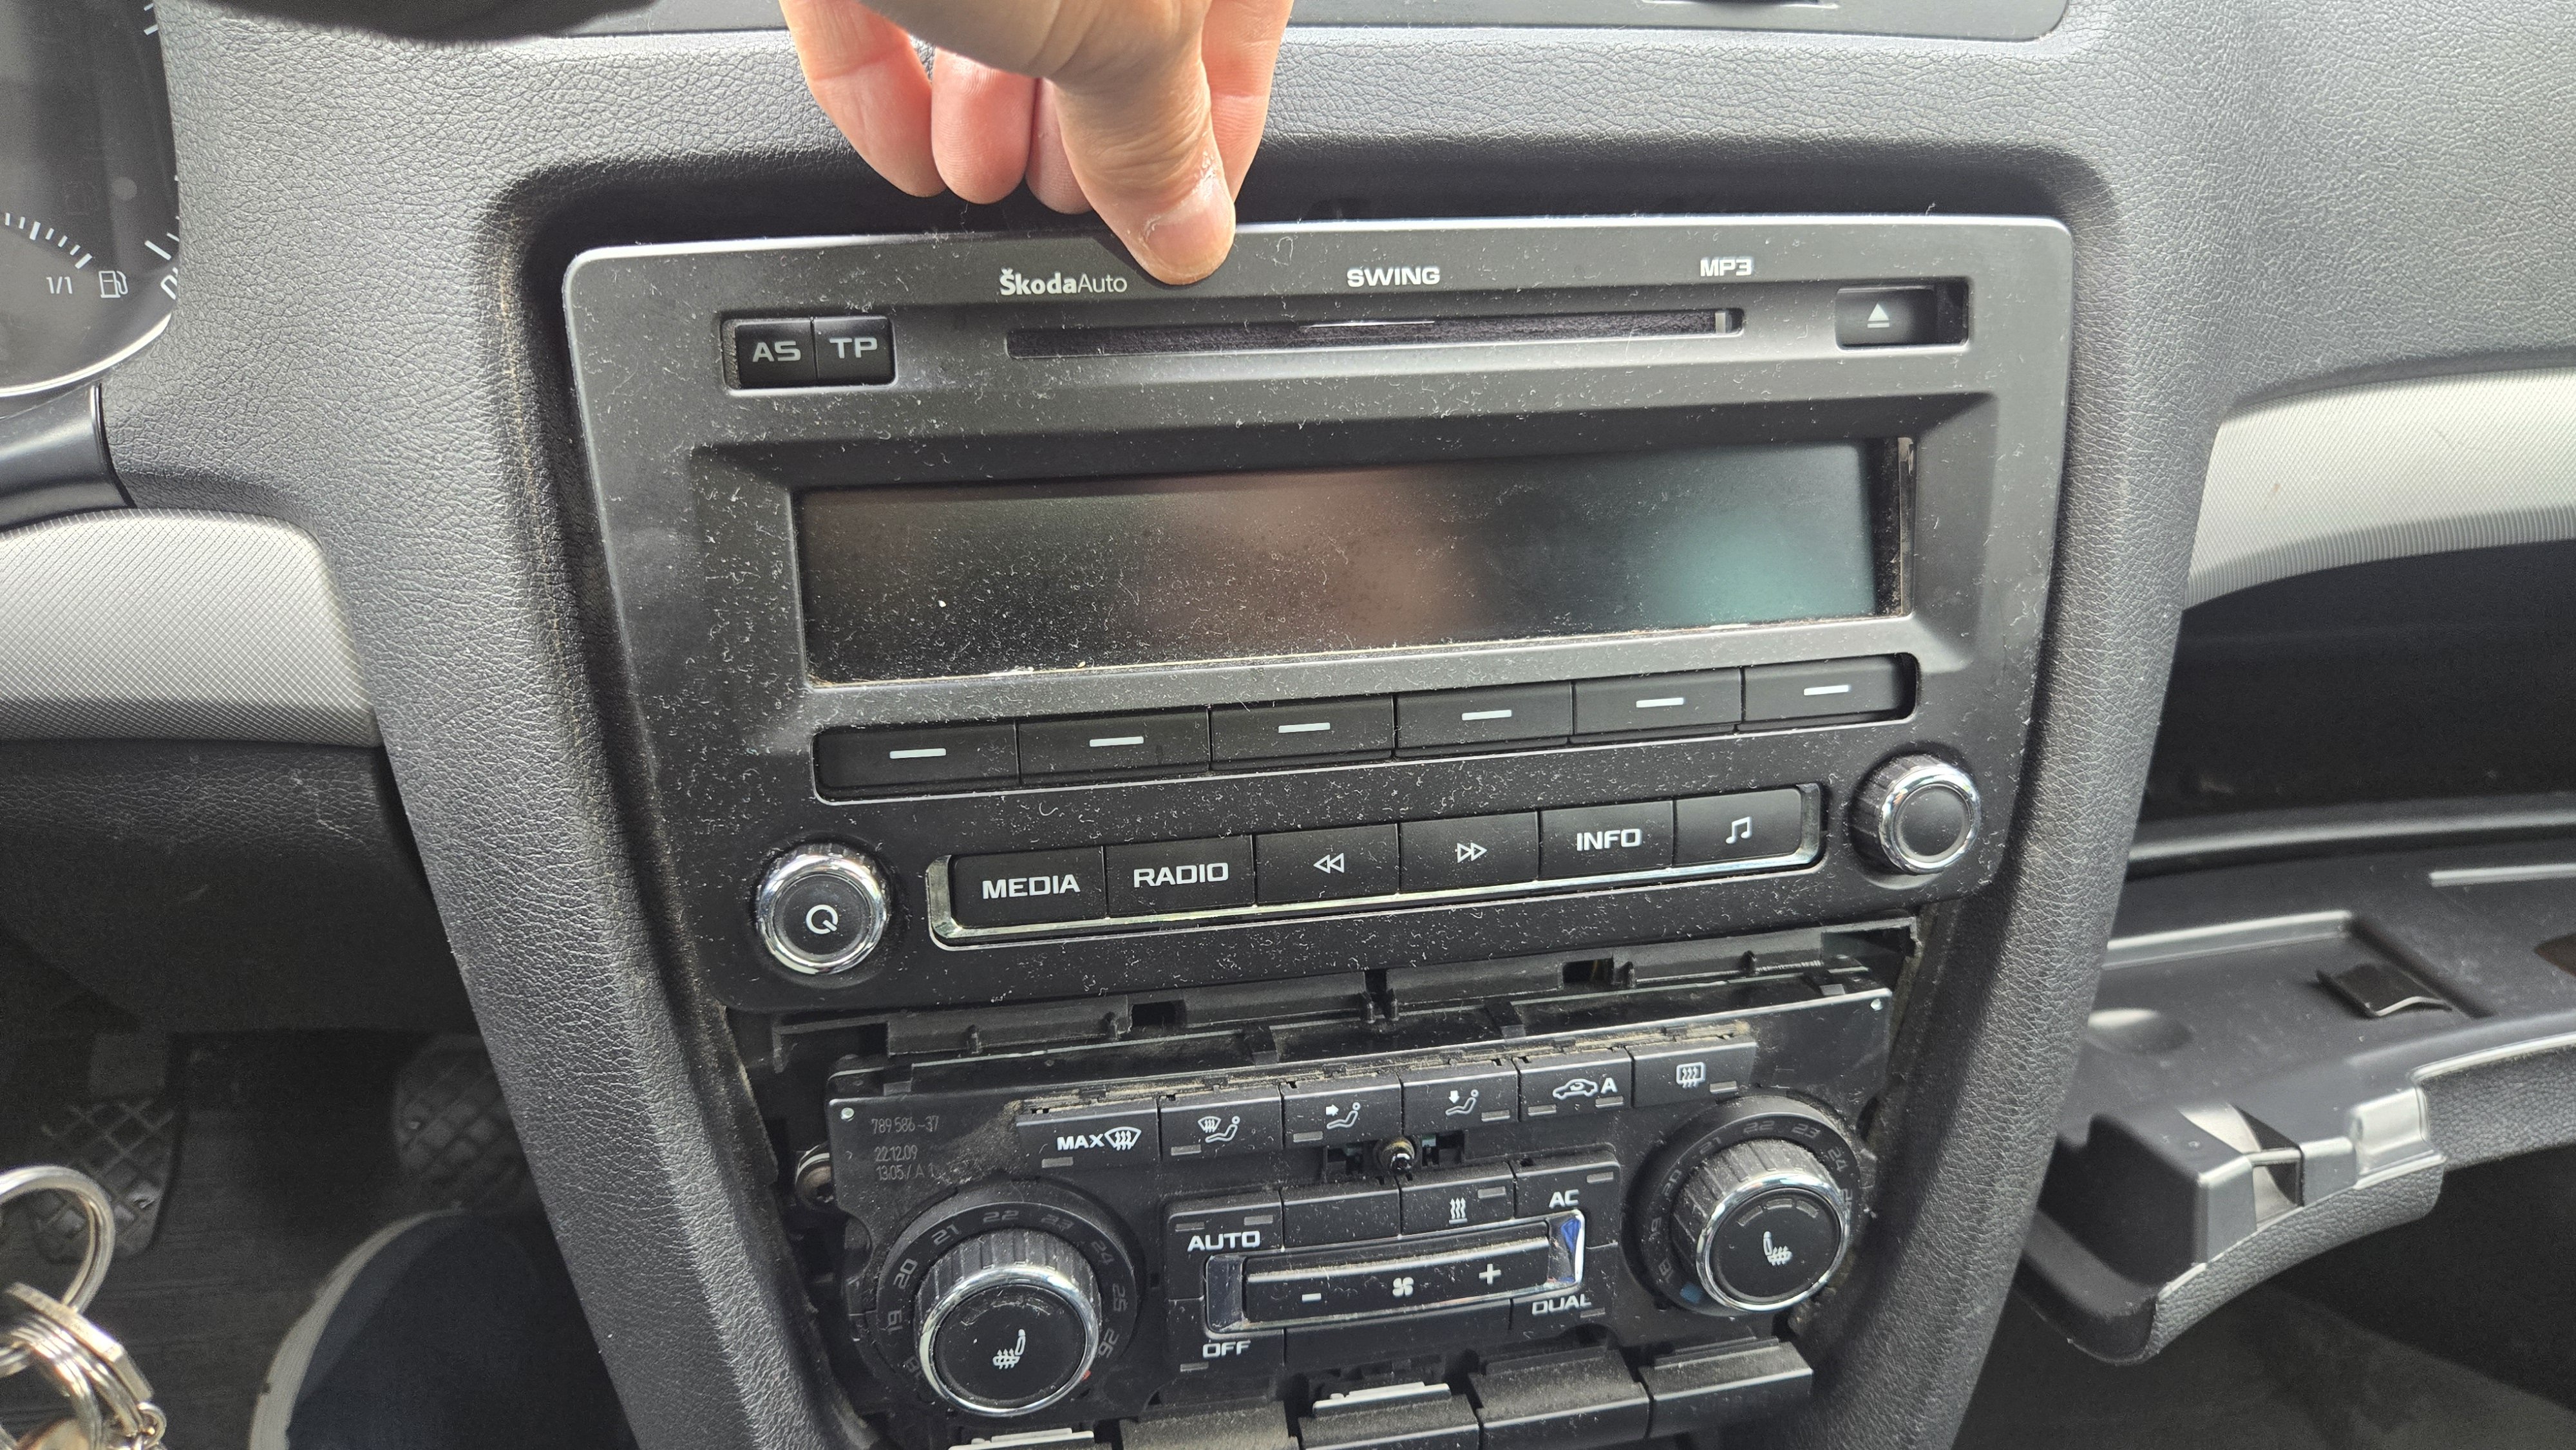
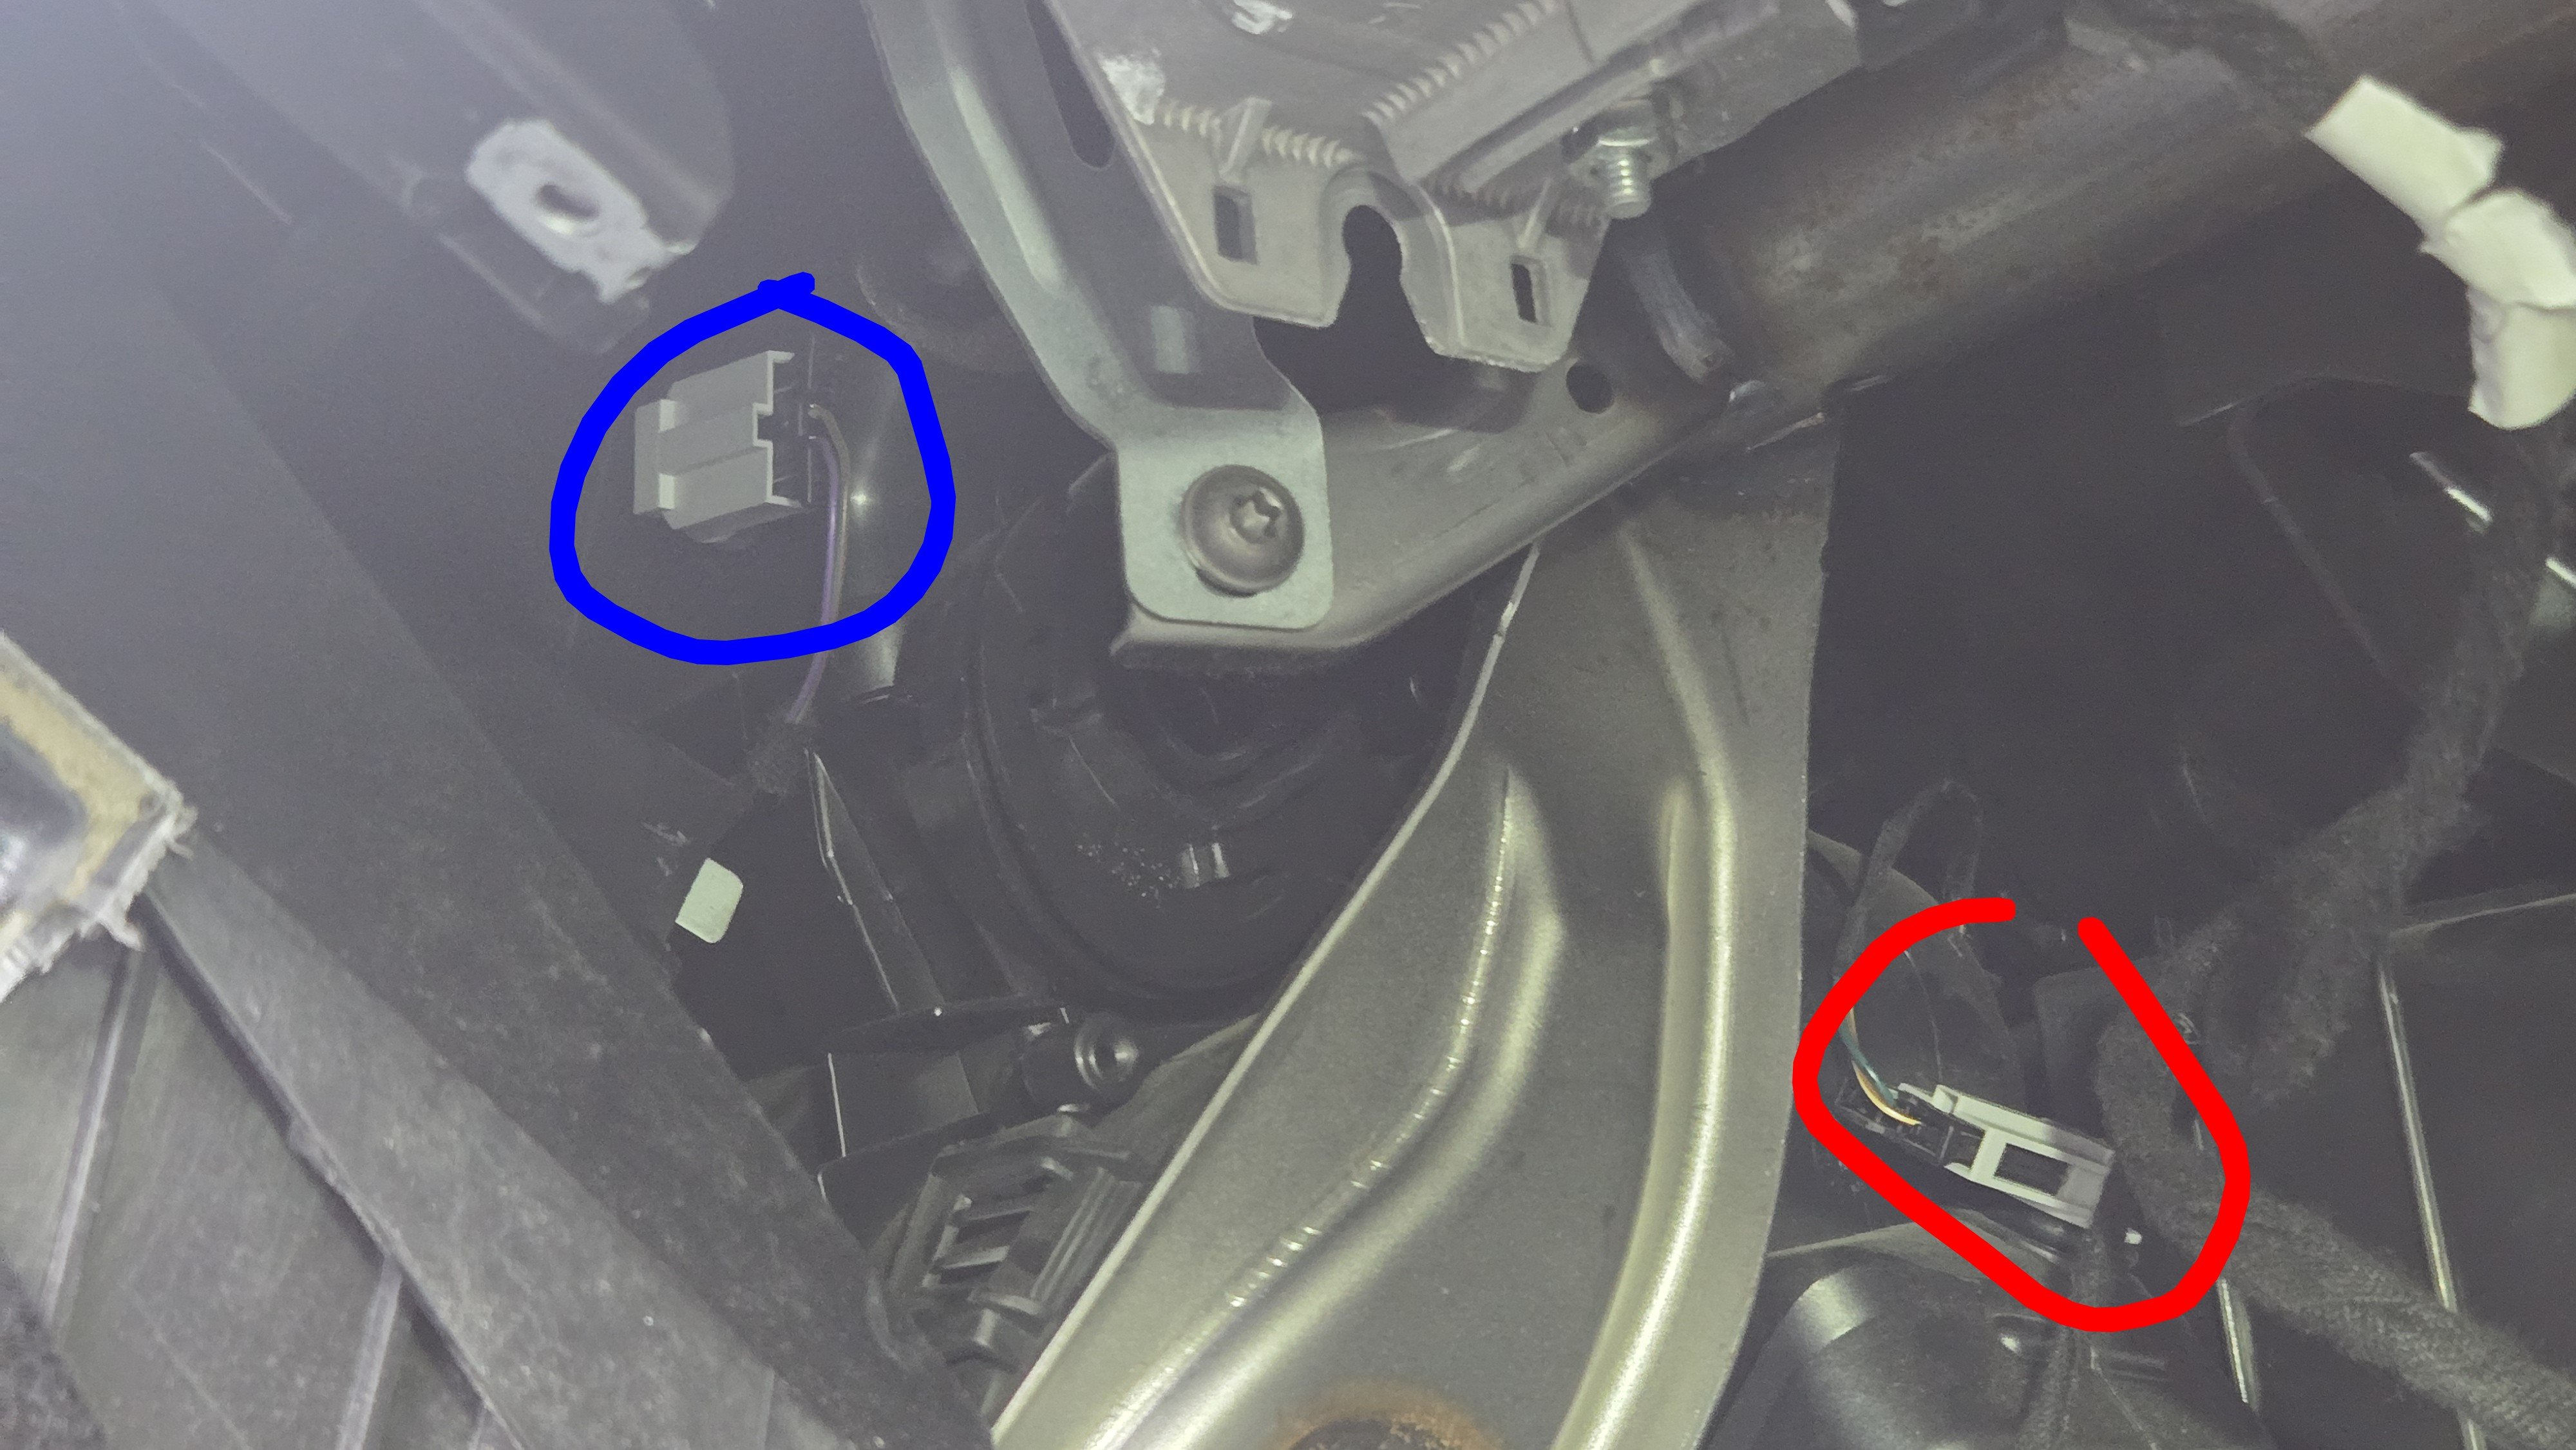
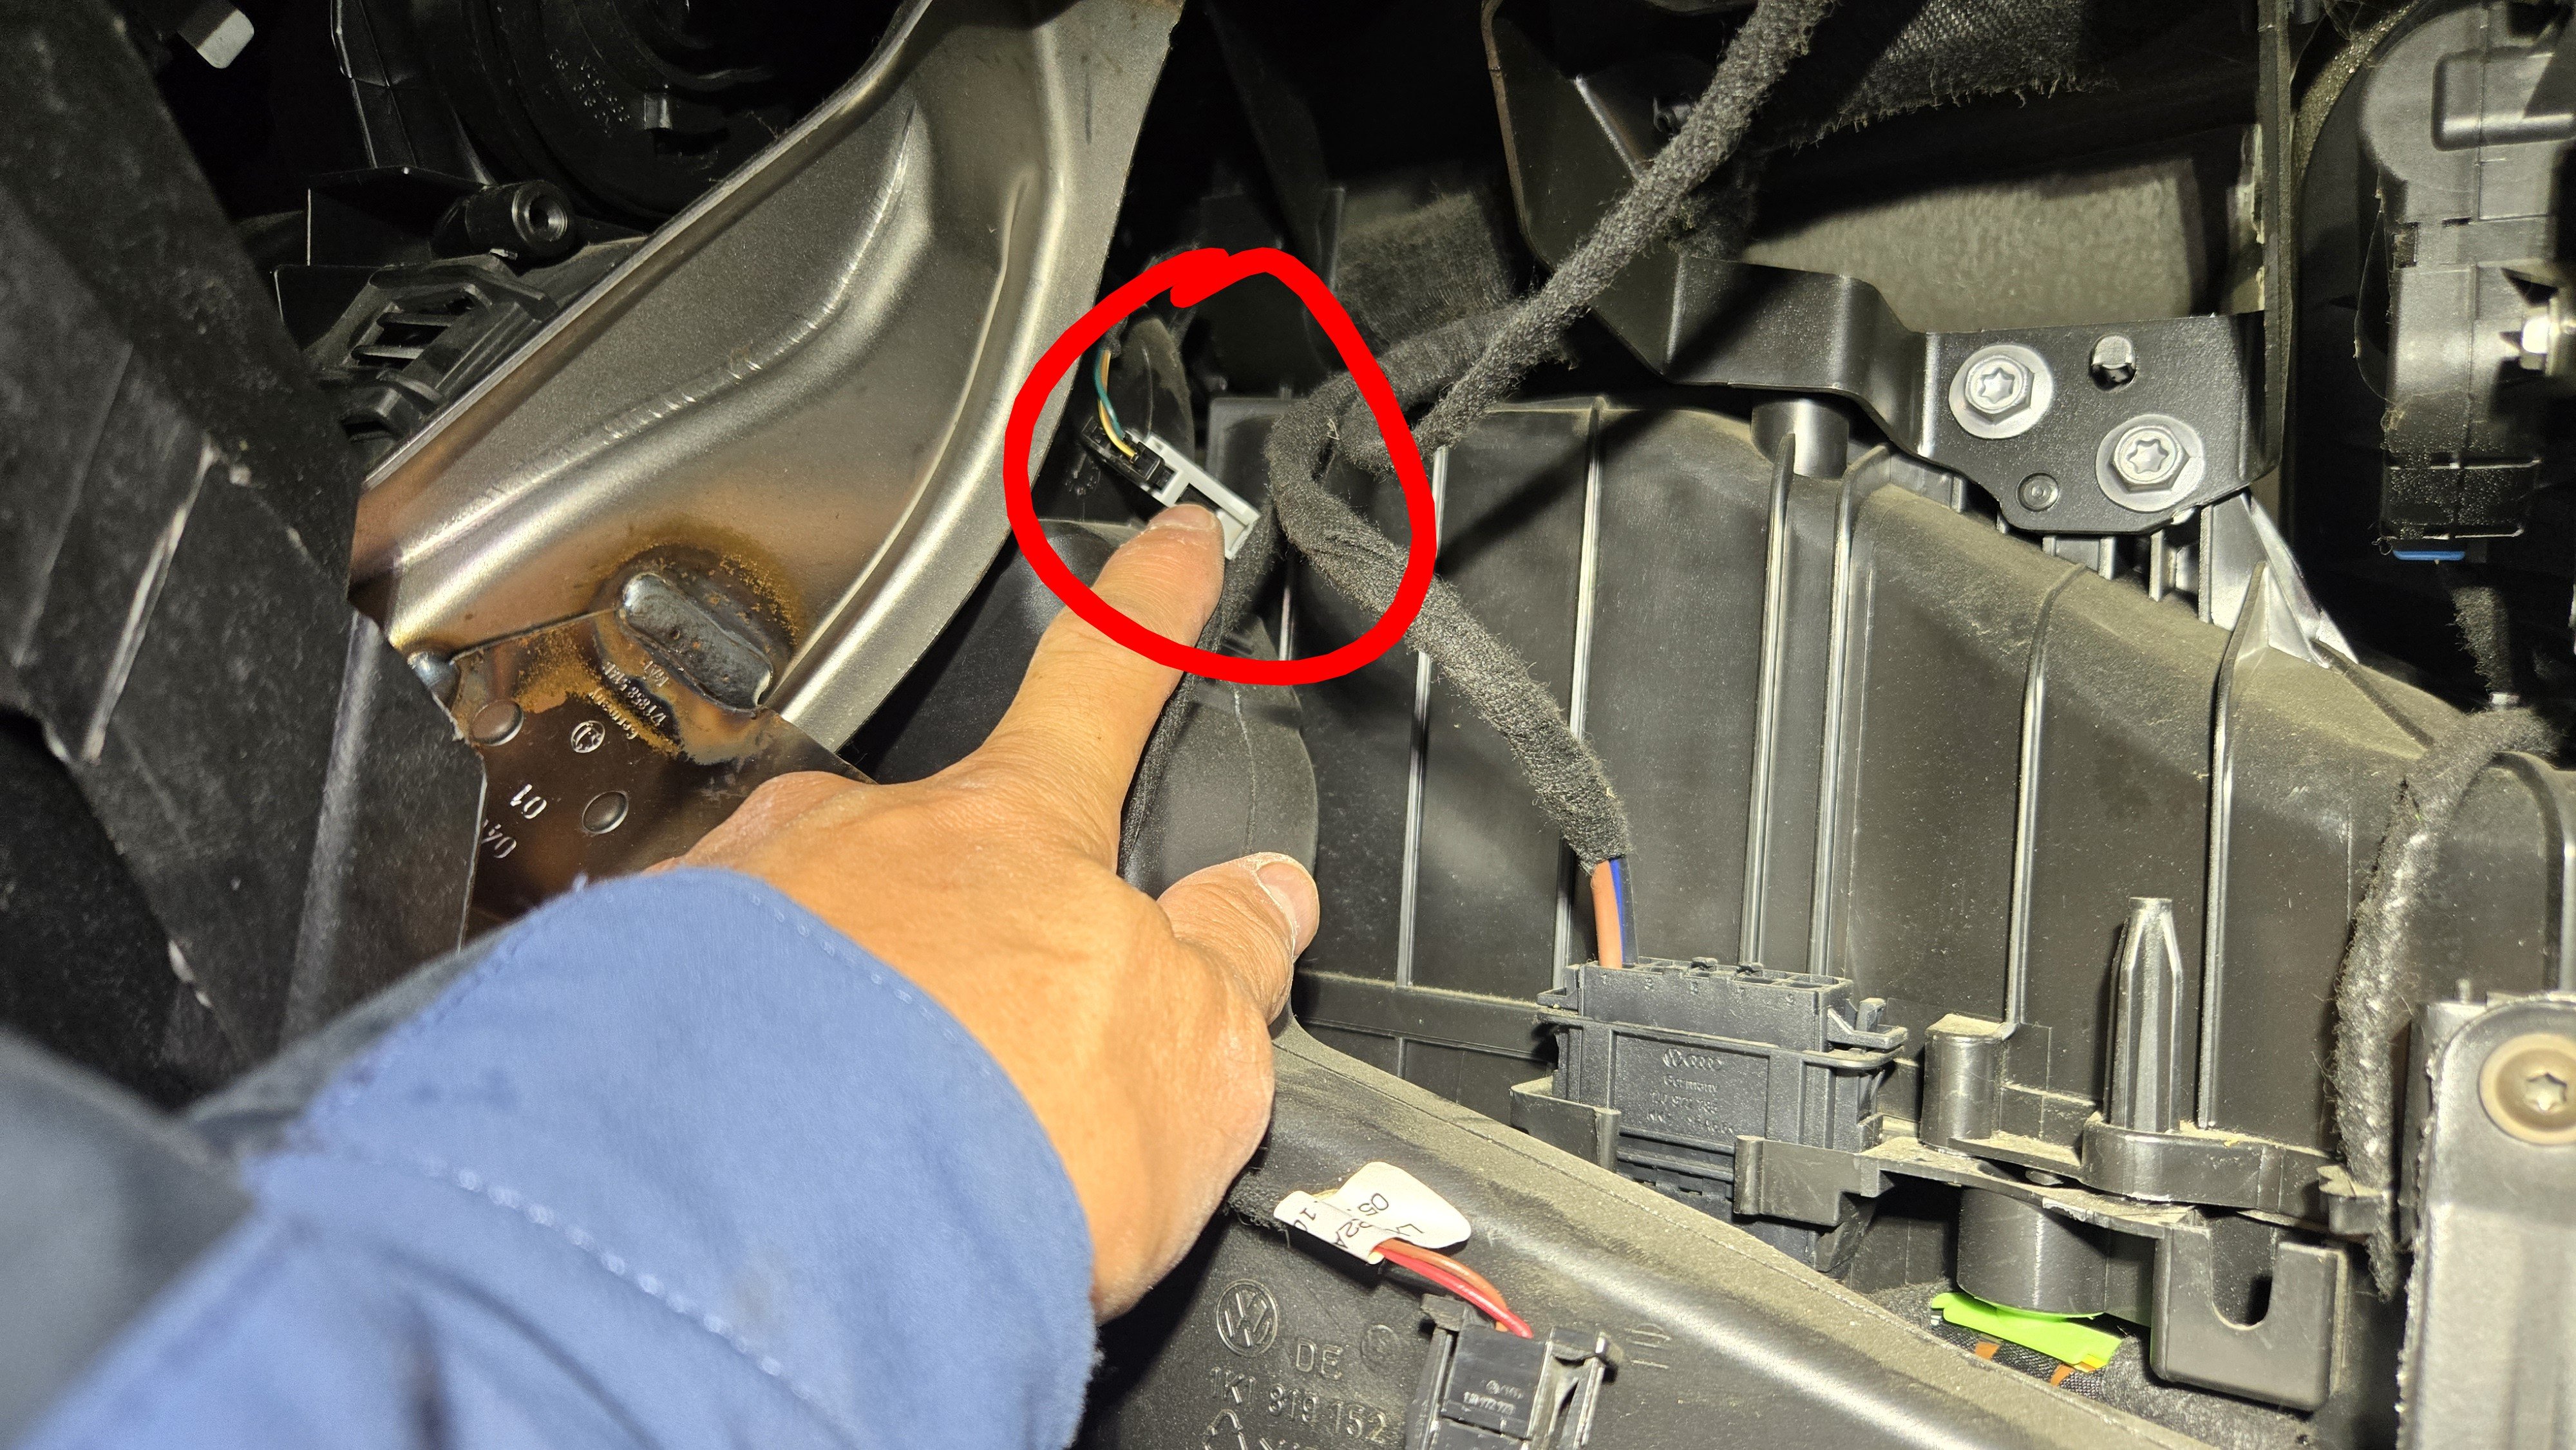
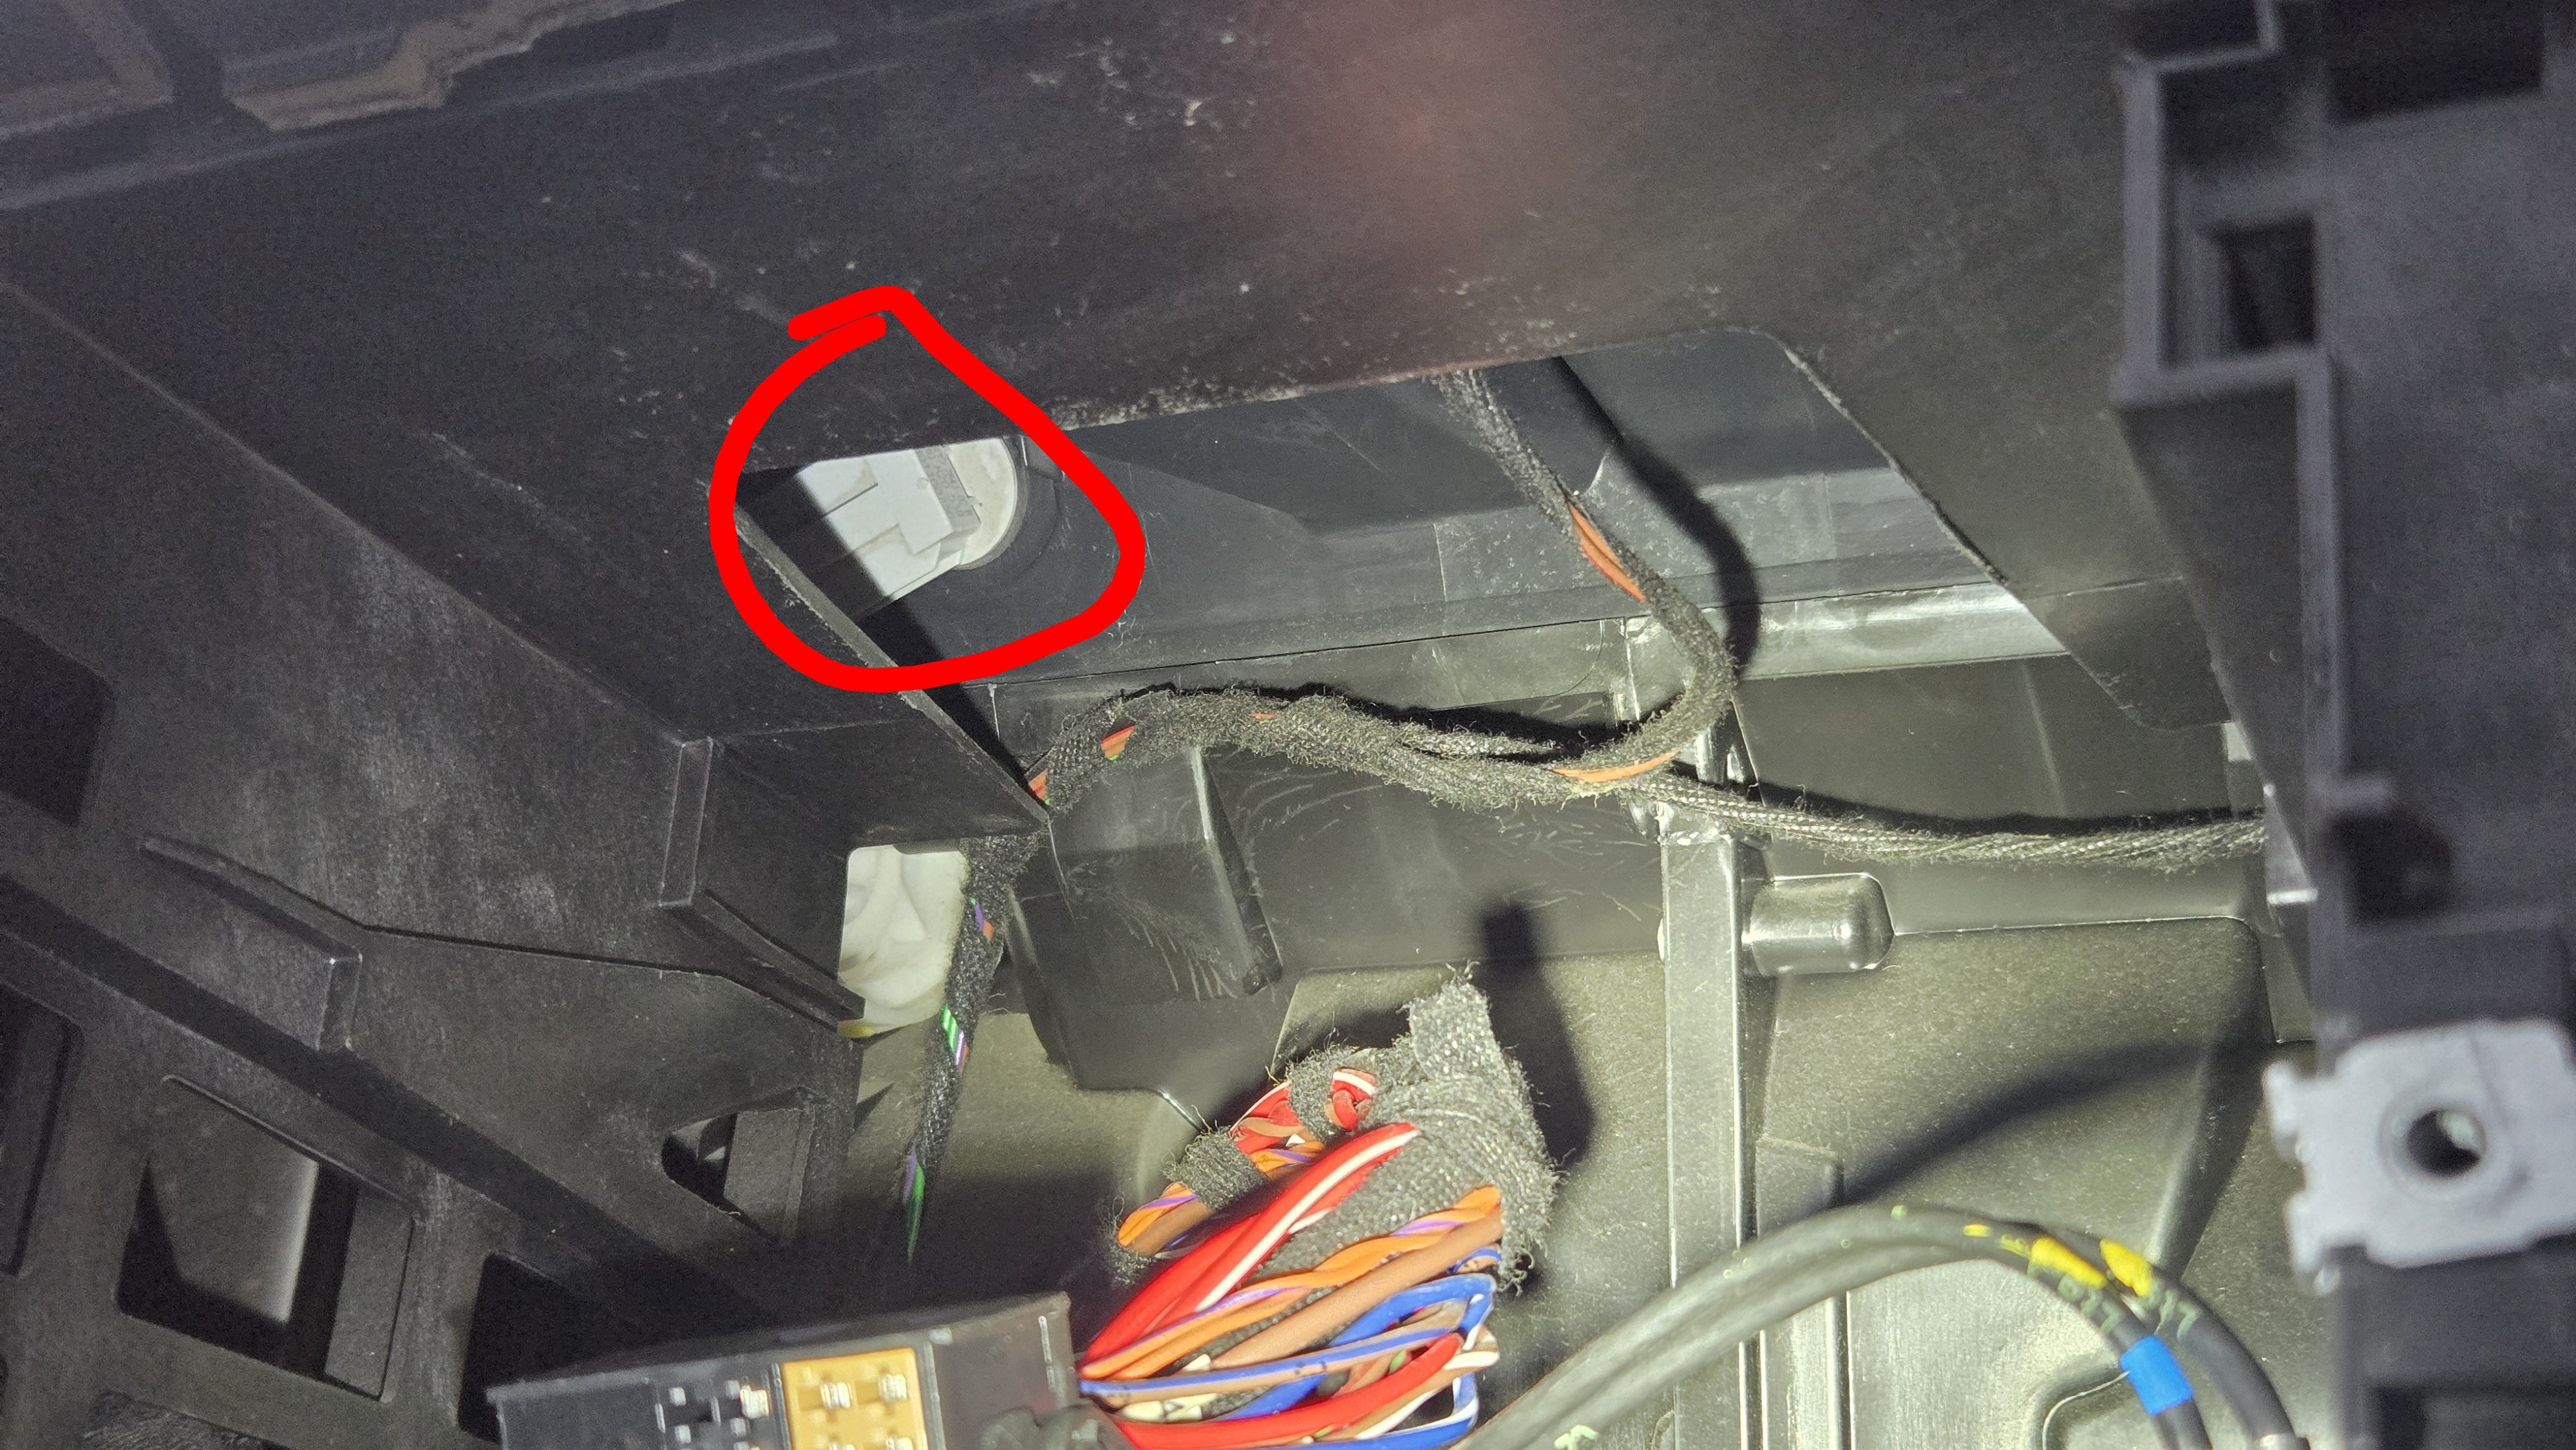
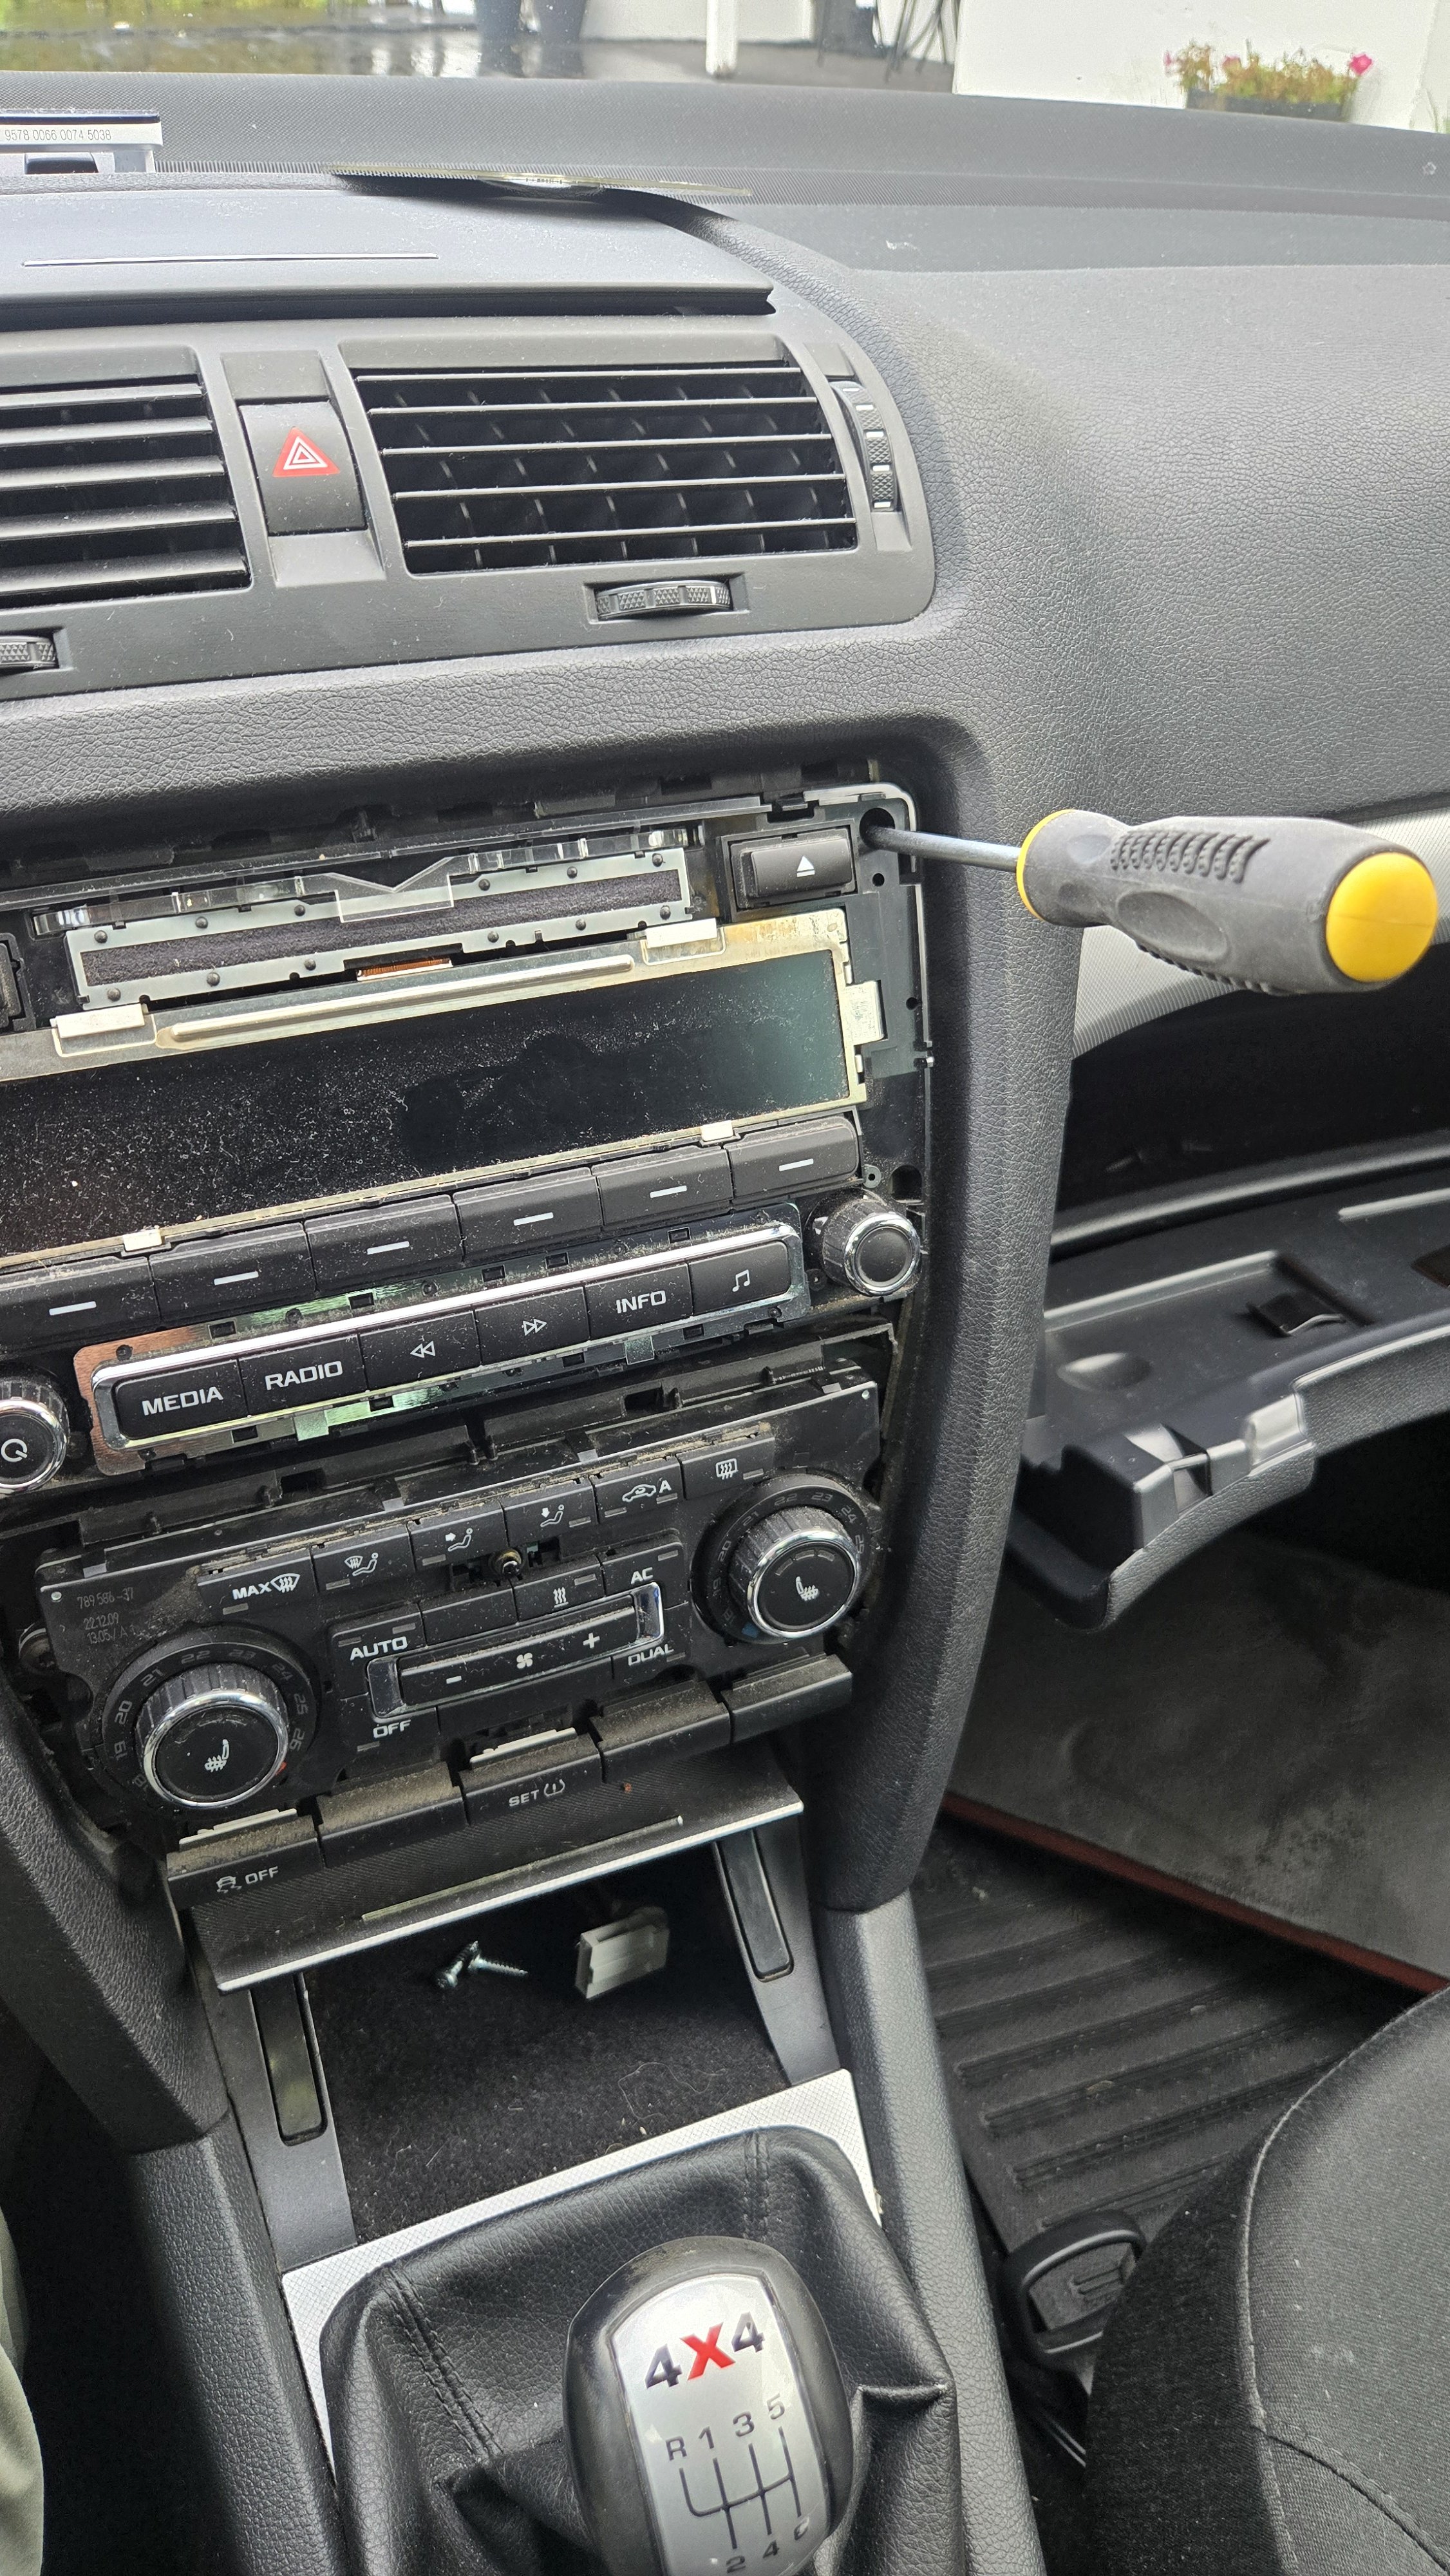
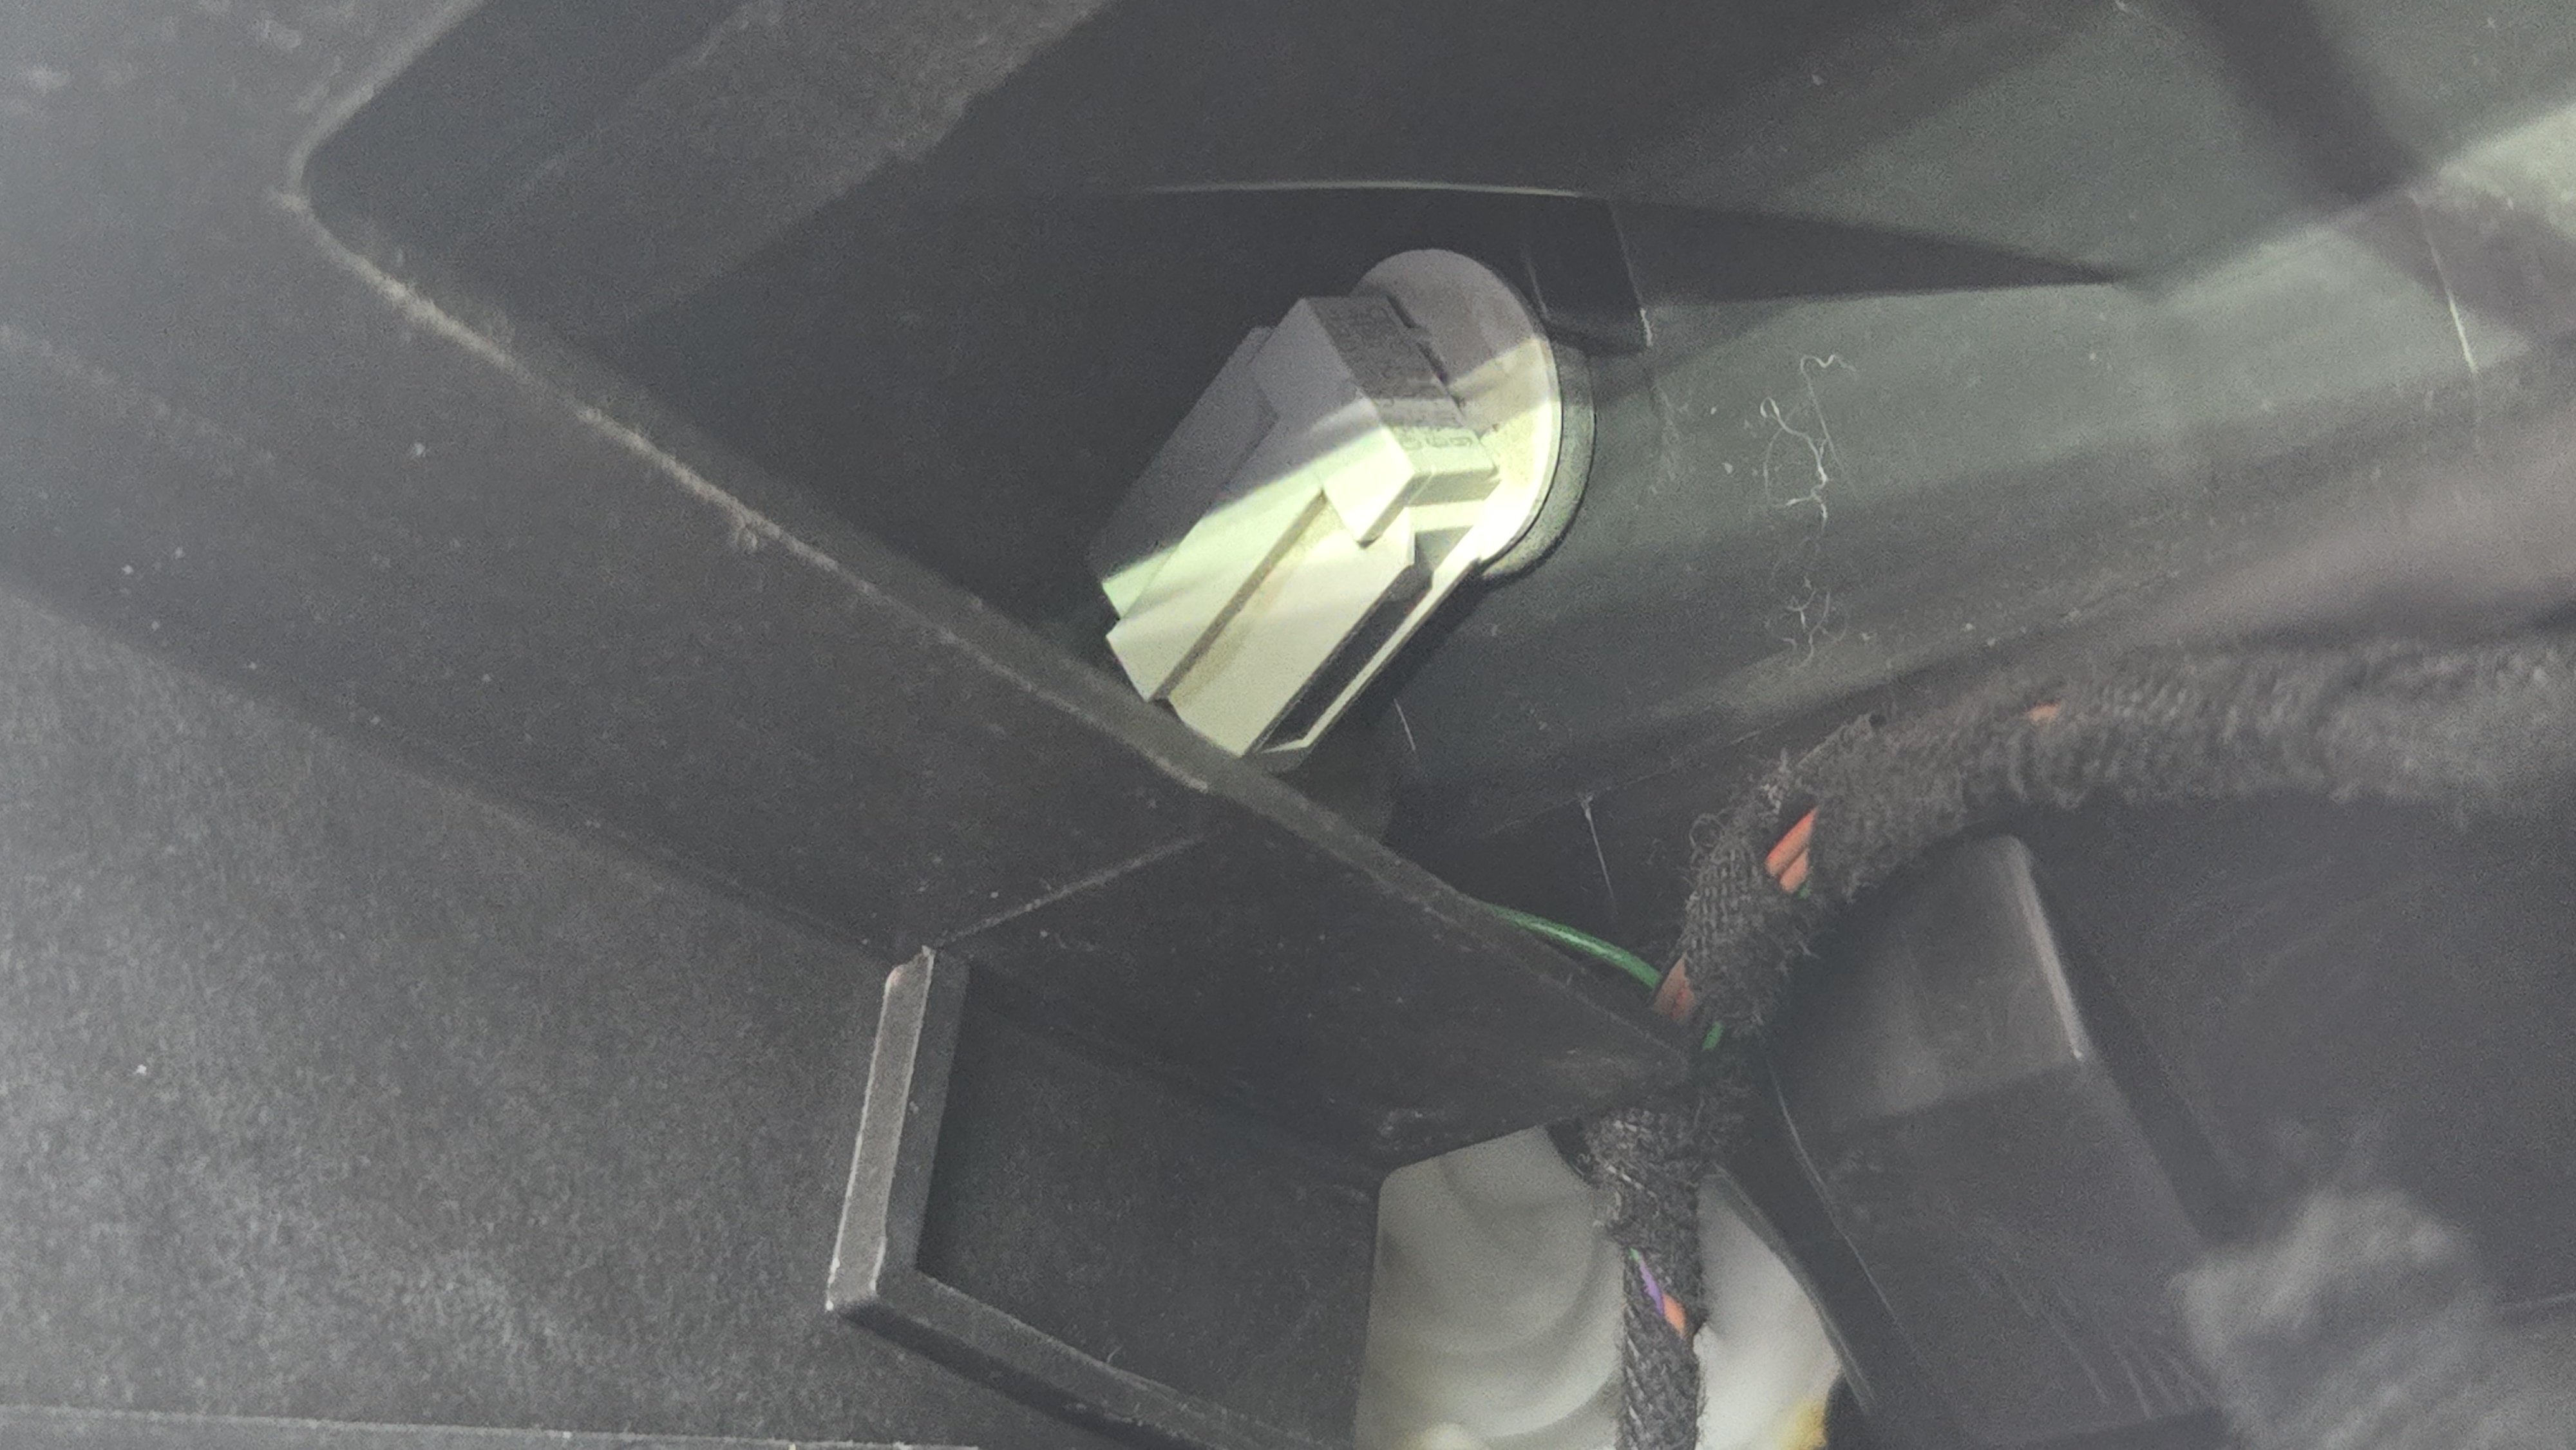
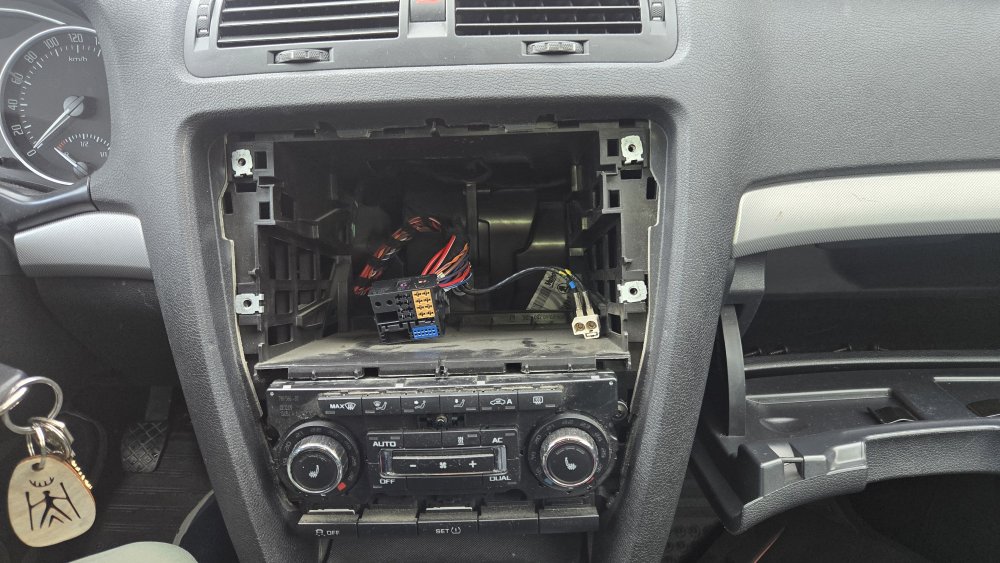
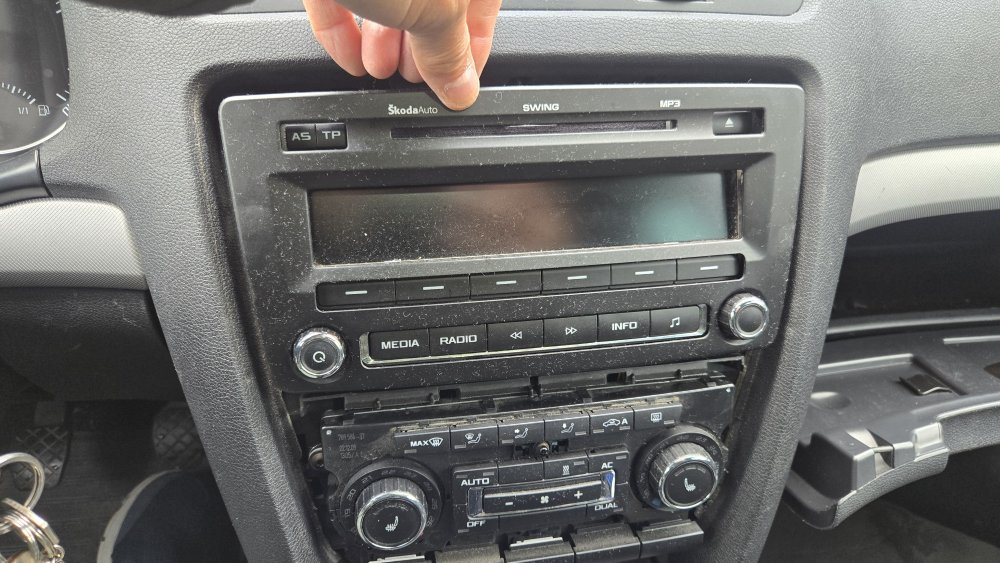
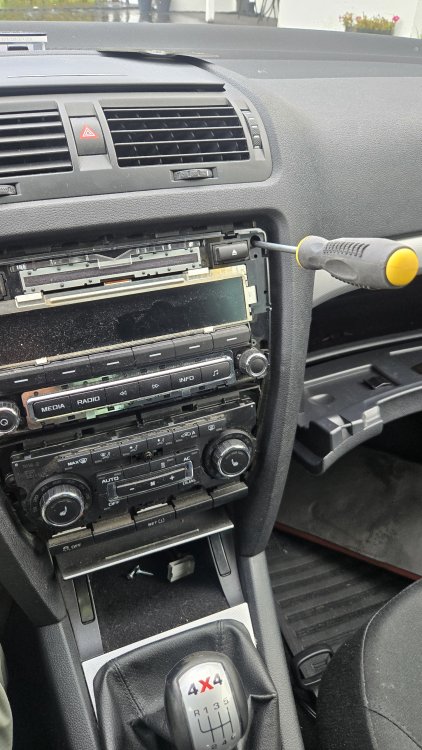
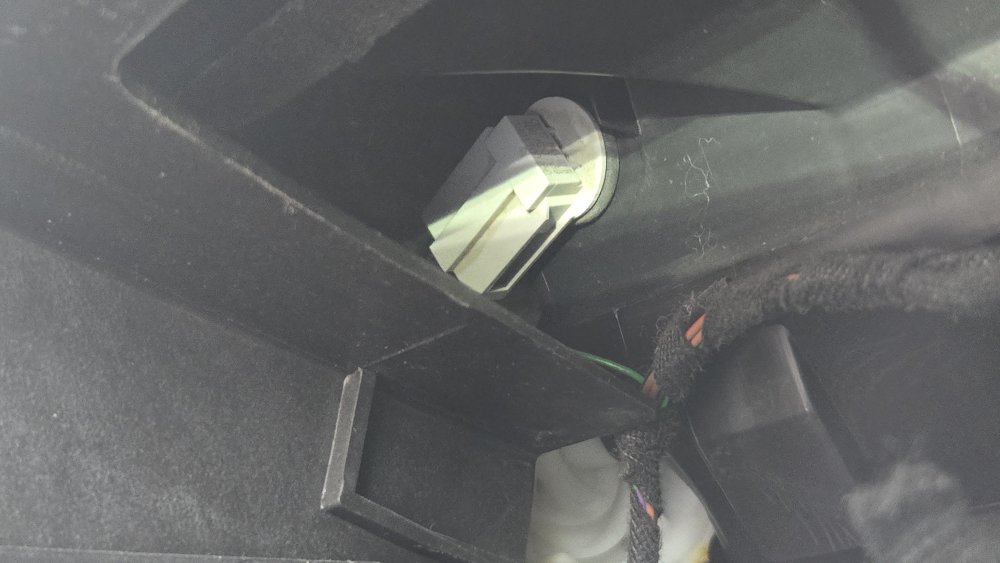
Here is a quick write up on how to access and replace all 4 temp sensors on a octavia 2010 tdi estate 4x4. I live in Norway so this is for a car with wheel on the left side. But I guess it is much the same for you english as well. So, my fault is as follows, climatronic only gives hot air when knob is set to high. If set to 26, 25, 24 etc degrees, it immediately blows cold air. Both from upper and lower vents. And yes, flap motors are ok and calibrated and yes the aircon if filled and served and yes, the heater core is not the problem. Vcds/obd shows no fault codes at all. So I did a live scan to log the aircon measures. And there I saw the fron left and front right temp sensor read a temp about 78-84 degrees celsius. Np wonder the climatronic pushed cold air out... I replaced all 4 sensors when at it. Both the footwell ones and the front upper ones. How to acces: Well on left side, pry out the fuse cover on side, pry out the small storage compartment on driver side. Pry out the silver cover around the light switch and also the silver cover on the other side of the steering wheel. Now you will see all T20 torx screws you need to remove. You will now see the airduct for the floor. This is fastened with one t20 torx screw. Remove it and now remove the airduct itself. It is self explanatory this one. And you can now remove the connector from the sensor. Now twist the sensor counter clockwise and take out. That was the lower left temp sensor done. The lower right sensor access: Have to remove the glove compartment box. First remove the side cover for the dashboard (facing the door). Use a plastic prytool and just rip it straight off. Then remove all t20 torx screws holding the glove compartment box. There is one on the side, 3 on top (open the compartment box) and 2 on the bottom. When these are out, the whole box will be loose and can be removed. Disconnect the airbag "on-off switch" and also the connector for the light. If you have a hose supplying the box with cooled air, no need to remove this. Just lay the box down on the floor. No need to undo the lower airduct on this side to remove the lower temp sensor. Again, disconnect wire and turn sensor counter clockwise to loosen and remove. In pics this sensor is marked with red circle. Now just do the same also for the front right temp sensor. Marked in blue. So when this is done you have done 3 out of 4 tempsensors. Just one left and that is the front left sensor. This bugger is located behind the radio. Need to take radio out and this is done without special tools. Remove silver plastic cover around the radio and also the black remaining frame. Use a plastic prytool. Flat screwdriver will do, but be careful, easy to get scratches etc. Now you will have access to all 4 t25 torx screws. Remove these and just pull radio straight out. Remove the cables and radio can be placed wherever you like. And there you will see the temp sensor high up to the left. Use same procedure on this as well and voila, you have now replaced all 4 sensors likely causing issues like mine. Best of luck. The front temp sensor have oem nr 3D0 907 543A. The lower footwell sensors called G261 and G262 have oe nr 4B0 820 539. I replaced all 4 in under 1 hour. Sensors should no more than 40-50 GBP at dealership and maybe 15-20 GBP at autodoc (Vemo, Hella brand)


-
Just pry out the frame with appropriate tool
-
Reply to my own answer. On my LH steering wheel car (scandinavian) octavia 2010 MK2, 1.6tdi, the front left upper temp sensor is behind the radio. Need to pry off the silver plastic frame with plastic tool. Next use same tool on the black inner frame and now you will see 4 torx screws T25. Take them out and just grab the radio and pull out. Disconnect 2 connectors on back. You will see the left front tempsensor to the left upper side. Pretty easy access. That is 3D0 907 543A. The right temp sensor is located behind the passenger compartment box. Take this down and you will see it high up to the left towards the centre console. High up is the left front sensor behind the radio
-
This is listed as the cabin temp sensor. Guess it is not the left, right front temp s3nsor. I have same issue as you so very interested in finding the right sensors (right, left front vent temp sensors)
-
Have this issue as well. I replaced both sensors named G262 and G263. These are the ones measuring the temp on the air footwell. So, where exactly are the left and right front ones then? I found also same as poster, but to me that looks like the indoor room temp sensor. Not the left and right front vent sensors. So anybody care to elaborate?
-
No need for special tool. Just need a spring compressor tool.
-
Yup, good call! Did mine last year. I used a Dremel like 12v Milwaukee tool.
-
No, not directly related. Earlier versions had a construction fault that was corrected in later versions. I believe this was fixed from 2013. The exhaust points towards the air inlet instead of towards the engine manifold side. So 180 degrees wrong. Many people have fixed this by modifying the connecting pipe adapter into the throttle body. It is a thread about this in the guides section.
-
Might be your oil pump driven helt. Need to take down oilsump and also timing belt crank pulley if I remember correctly. Oil pump belt is an easy job to do, but takes time since one has to get access.
-
At least 2, left and right. Might be one in center also. Don't remember, but yes both left and right are known to fail eventually.
-
Good job well done. Yes it is quite a bit fiddly...and you description is quite spot on 😆
-
It could be that your friends ea189 engine was part of the emission scandal that hit VW. In those days VW manipulated the ea 189 engines to be ulez compliant, but it was not true.
-
First things first: Well, this is pretty normal when it comes to VW, Skoda, Audi releases. They start production of new models the year before release and simultaneously they sell the old models also. Thats why you can buy a new 2015 model superb MK 3 with the new engine in 2014, but you can also buy a old MK 2 in 2014 with a production date probably mid 2014. Both cars will be registered with plates in 2014 (well, thats the case here in Norway). When it comes to ea 189 vs ea288 engines, MK 2 was never released with the ea 288 engine, but the MK 2 had a facelift in 2013 and got new engines, but still based on the same ea189 cr engine. So, are your friend sure that he got a MK 2? Because MK 2 facelift is not too unlike the MK 3 in front. And the MK 3 had the new engines ea288...
-
I have worked on both and there are some differences, but all in all they are alike 🙂 Timing belt tool kit for the ea 189 engine is a bit different from the ea288. But replacing process is the same.