commievid
Members
-
Joined
-
Last visited
Everything posted by commievid
-
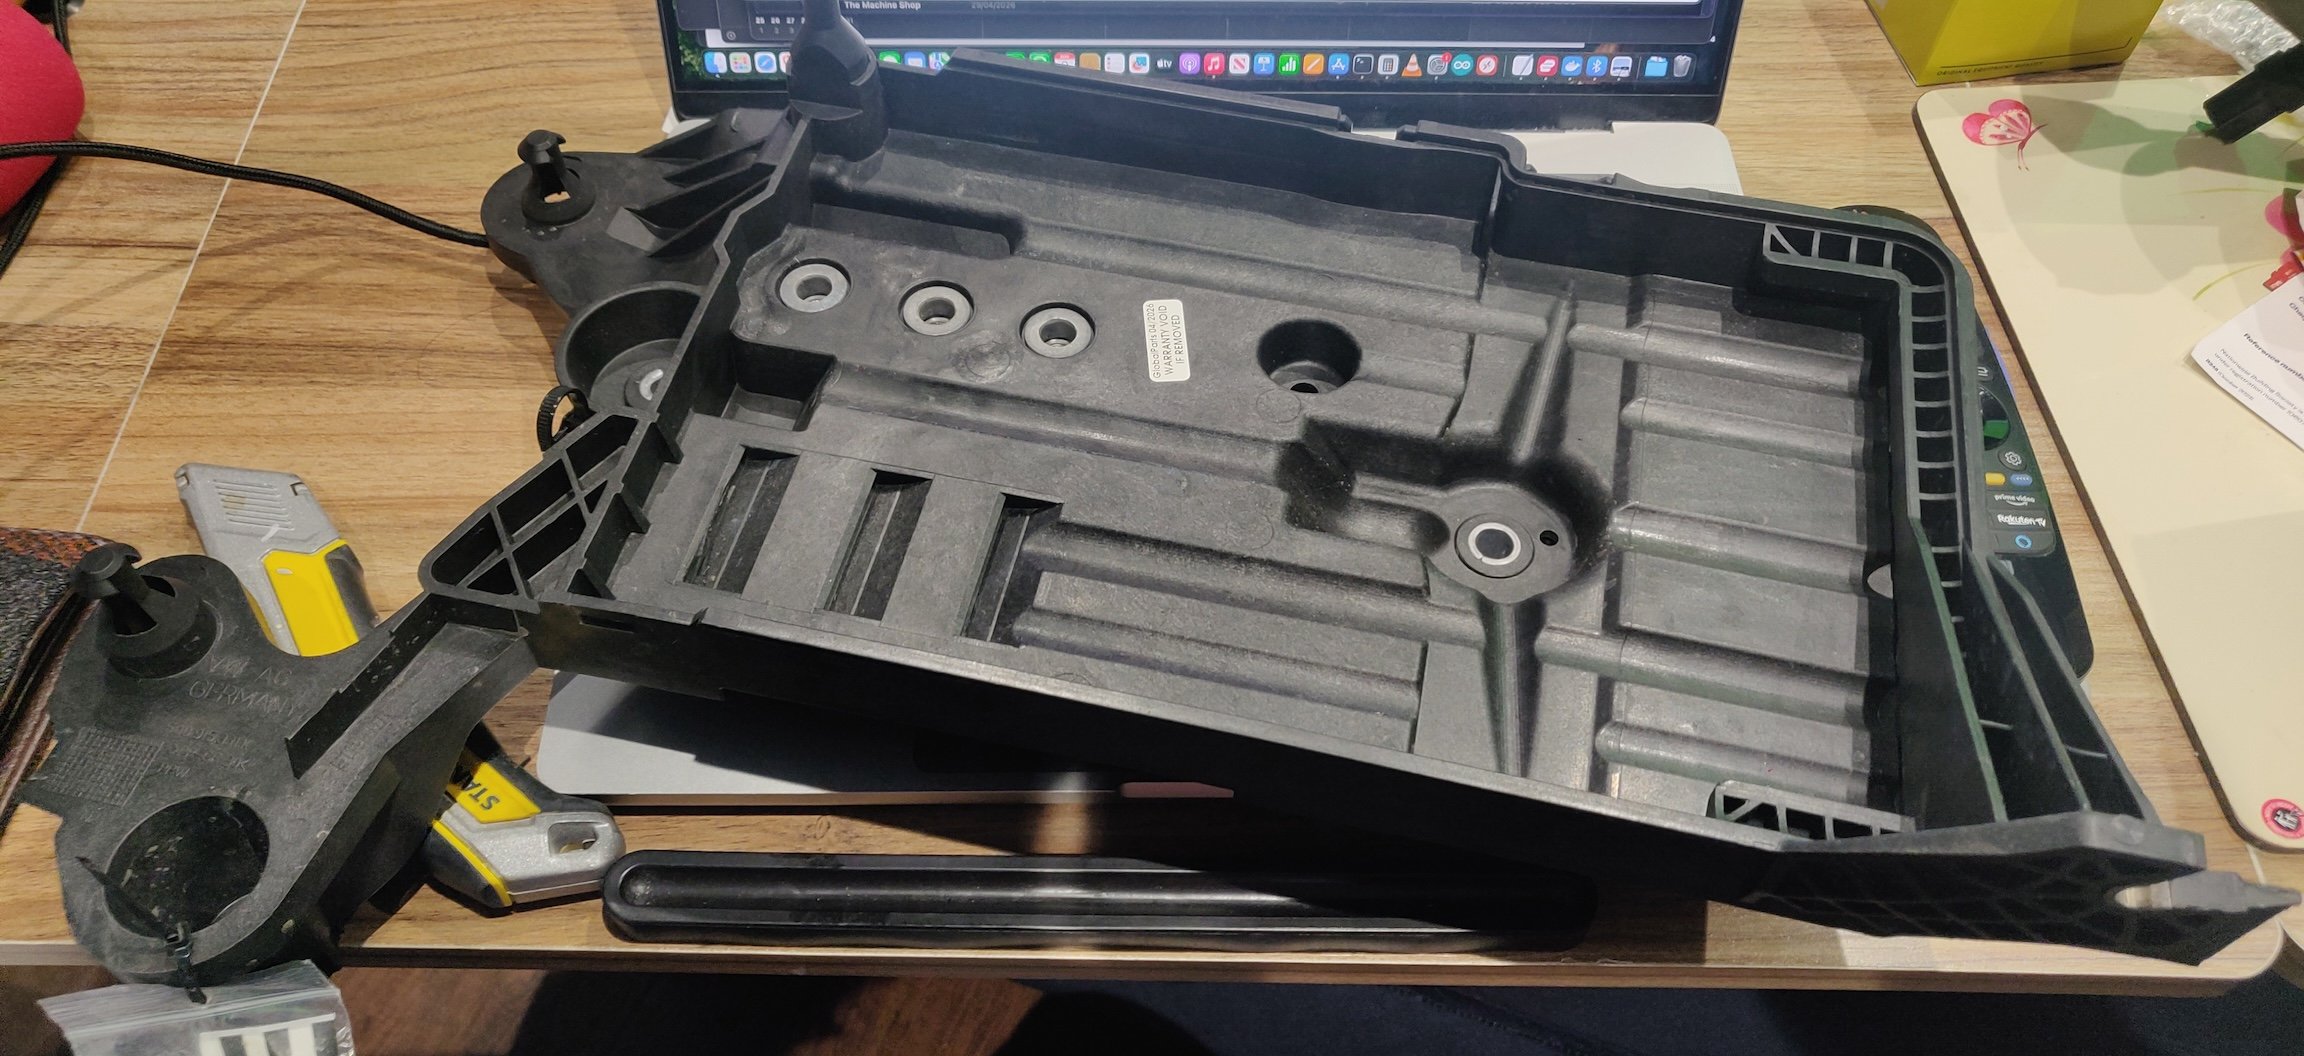
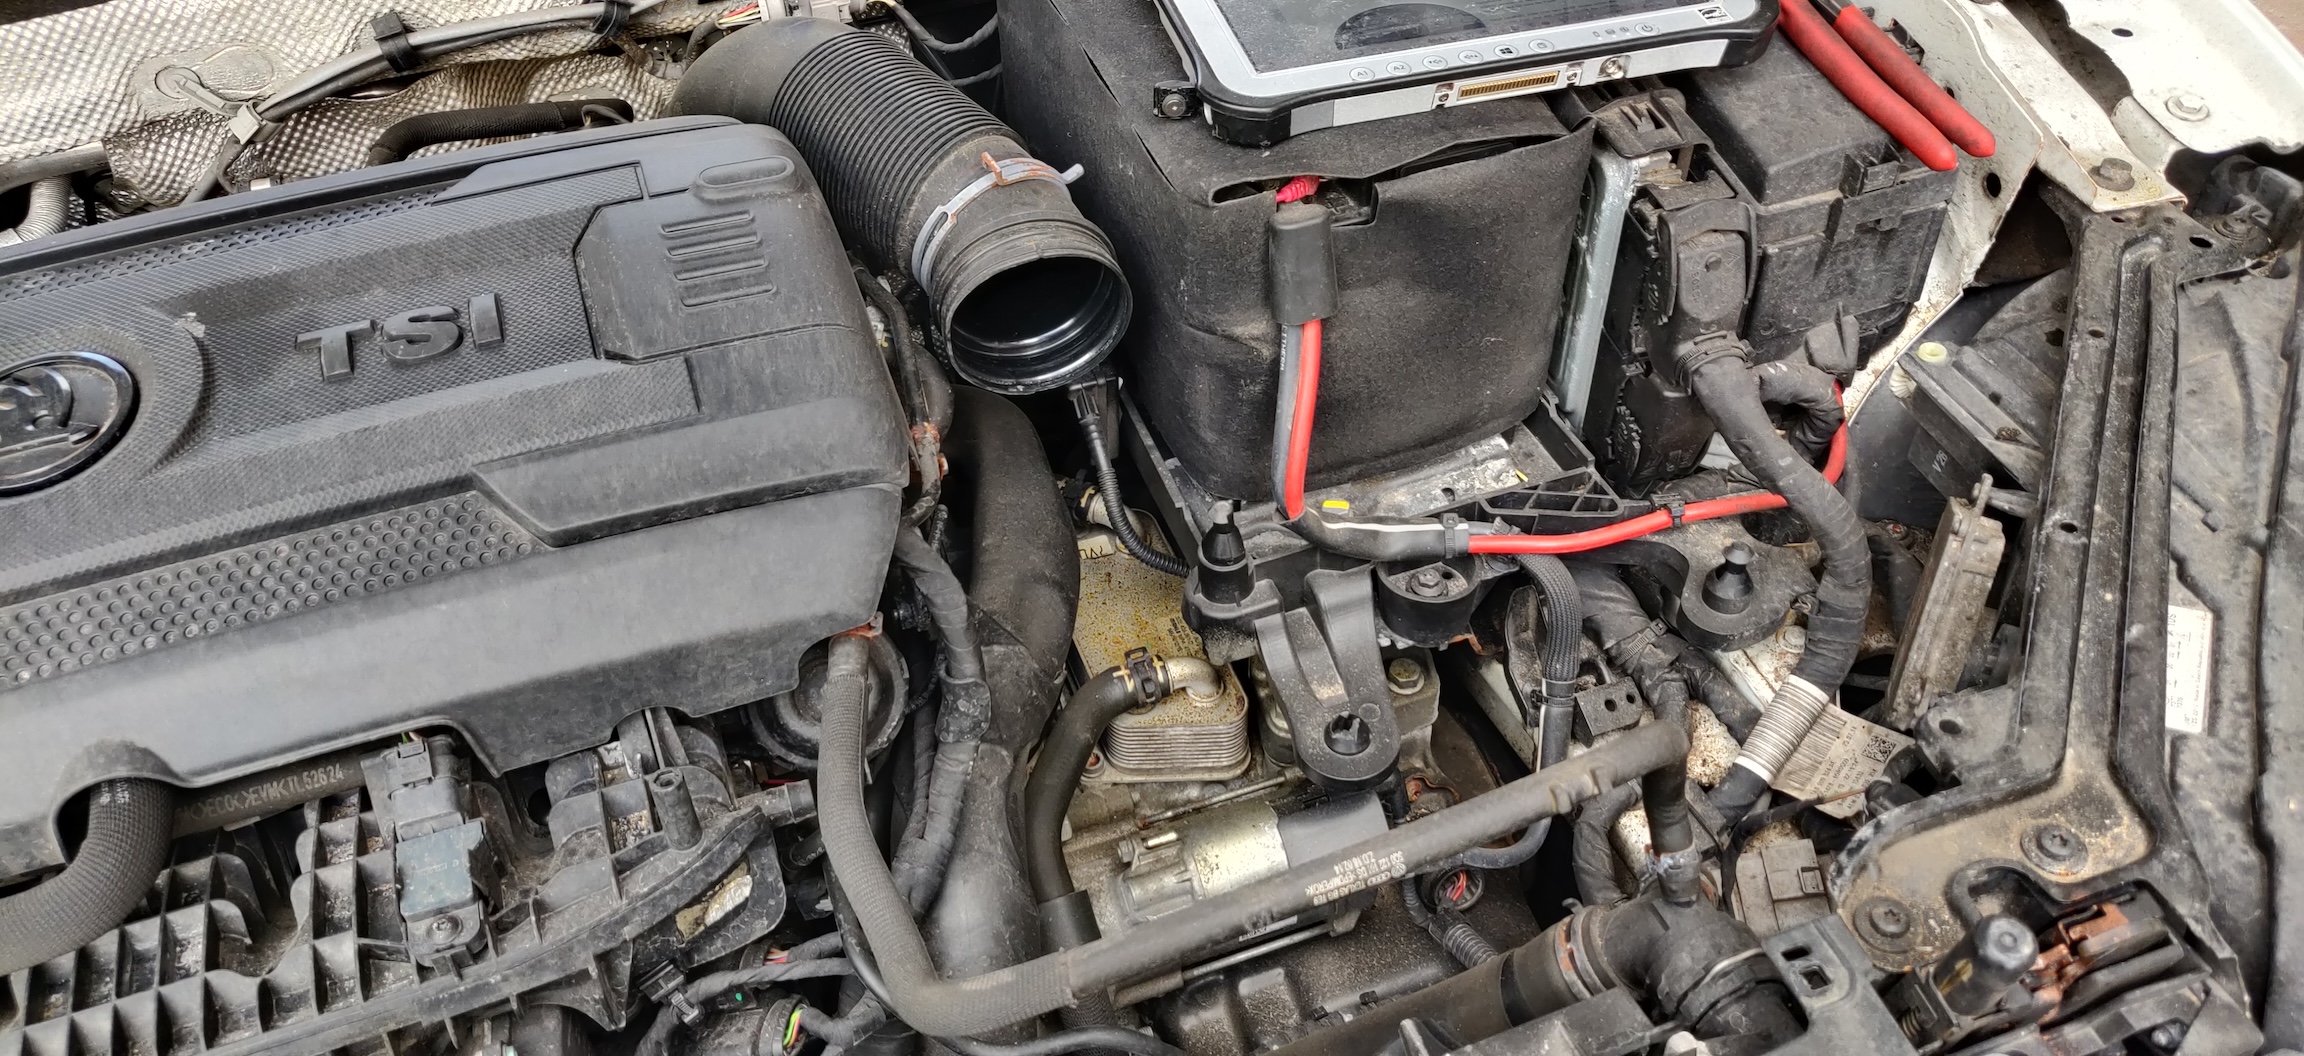
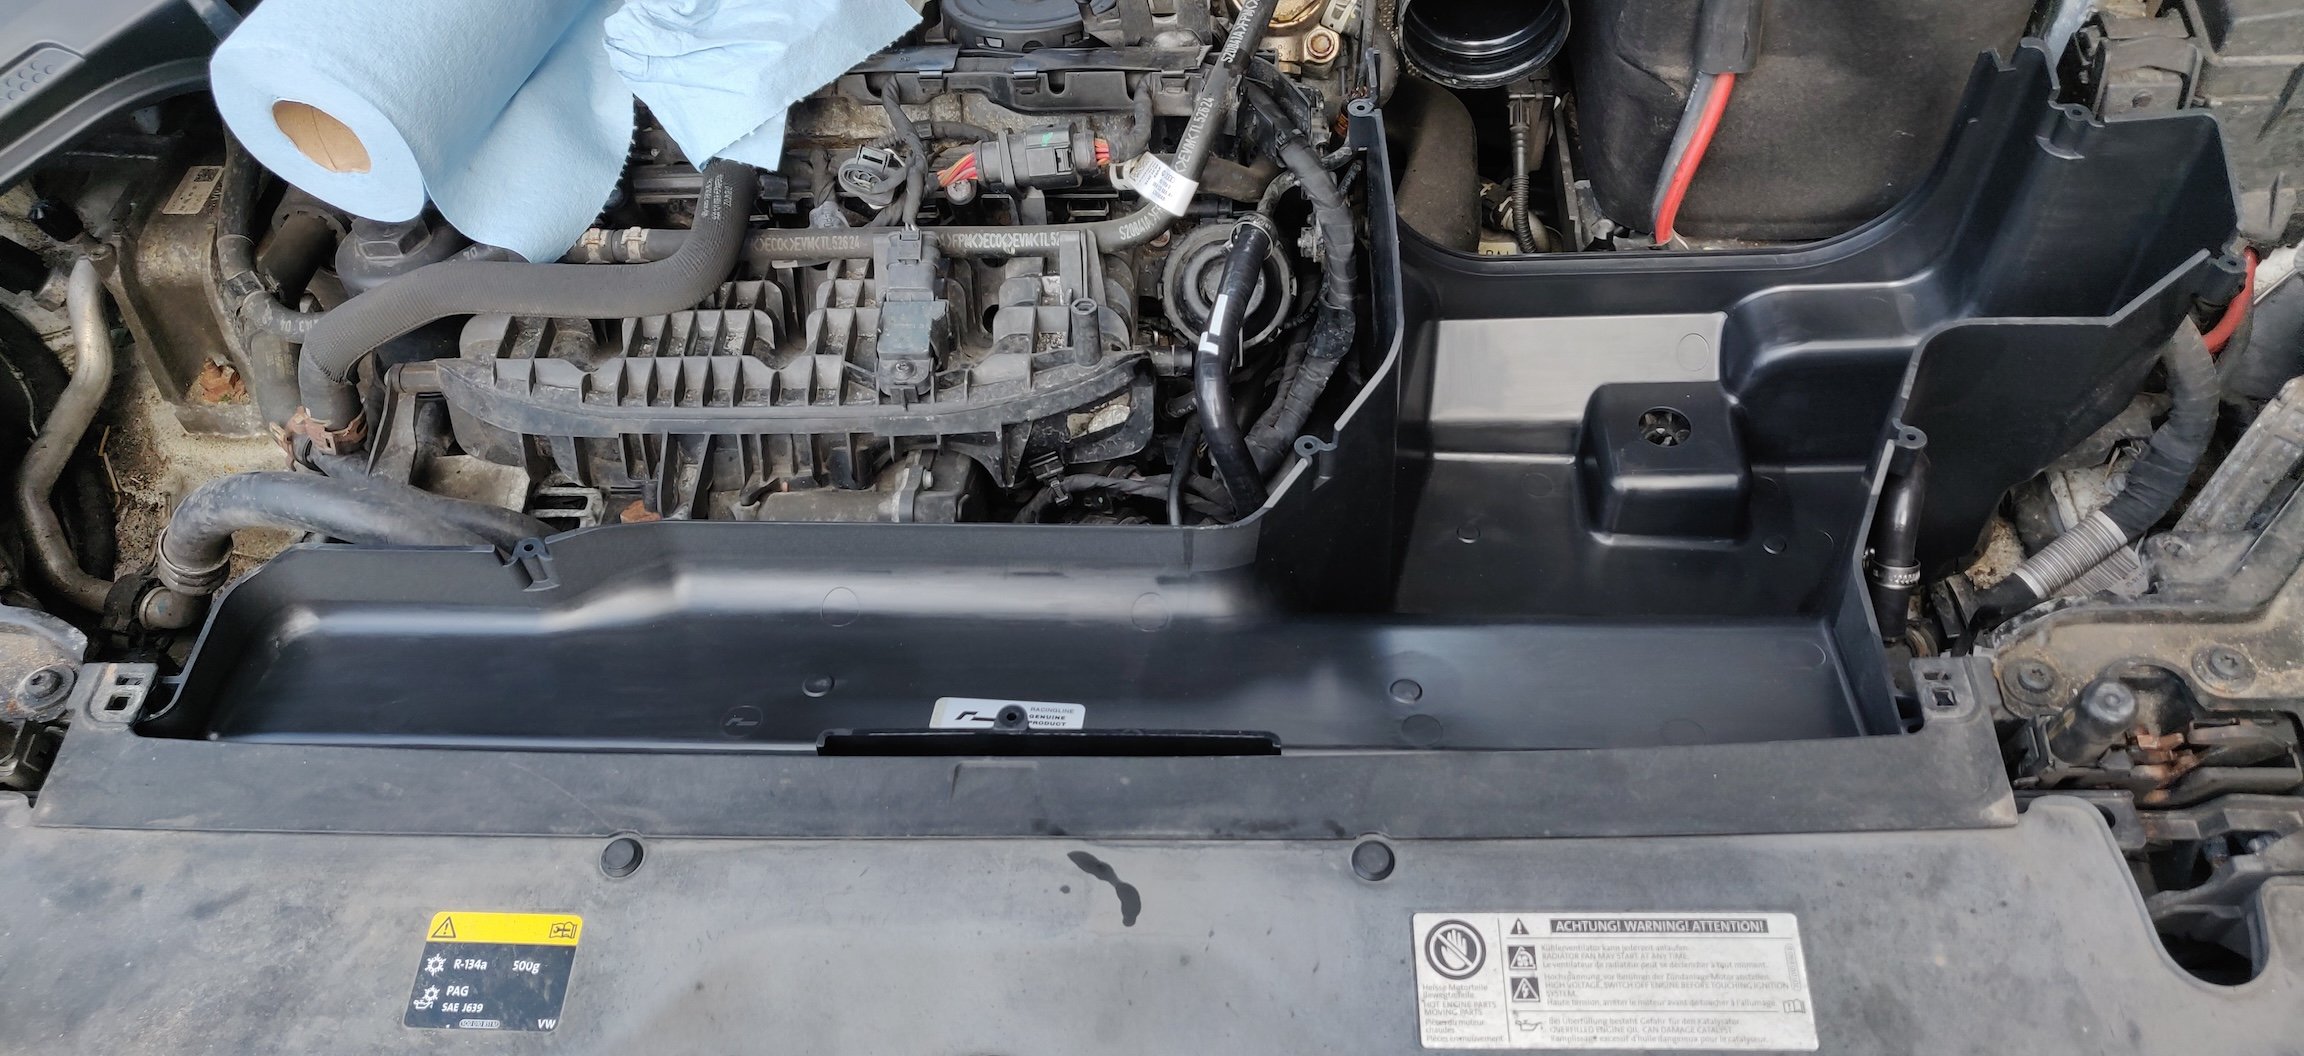
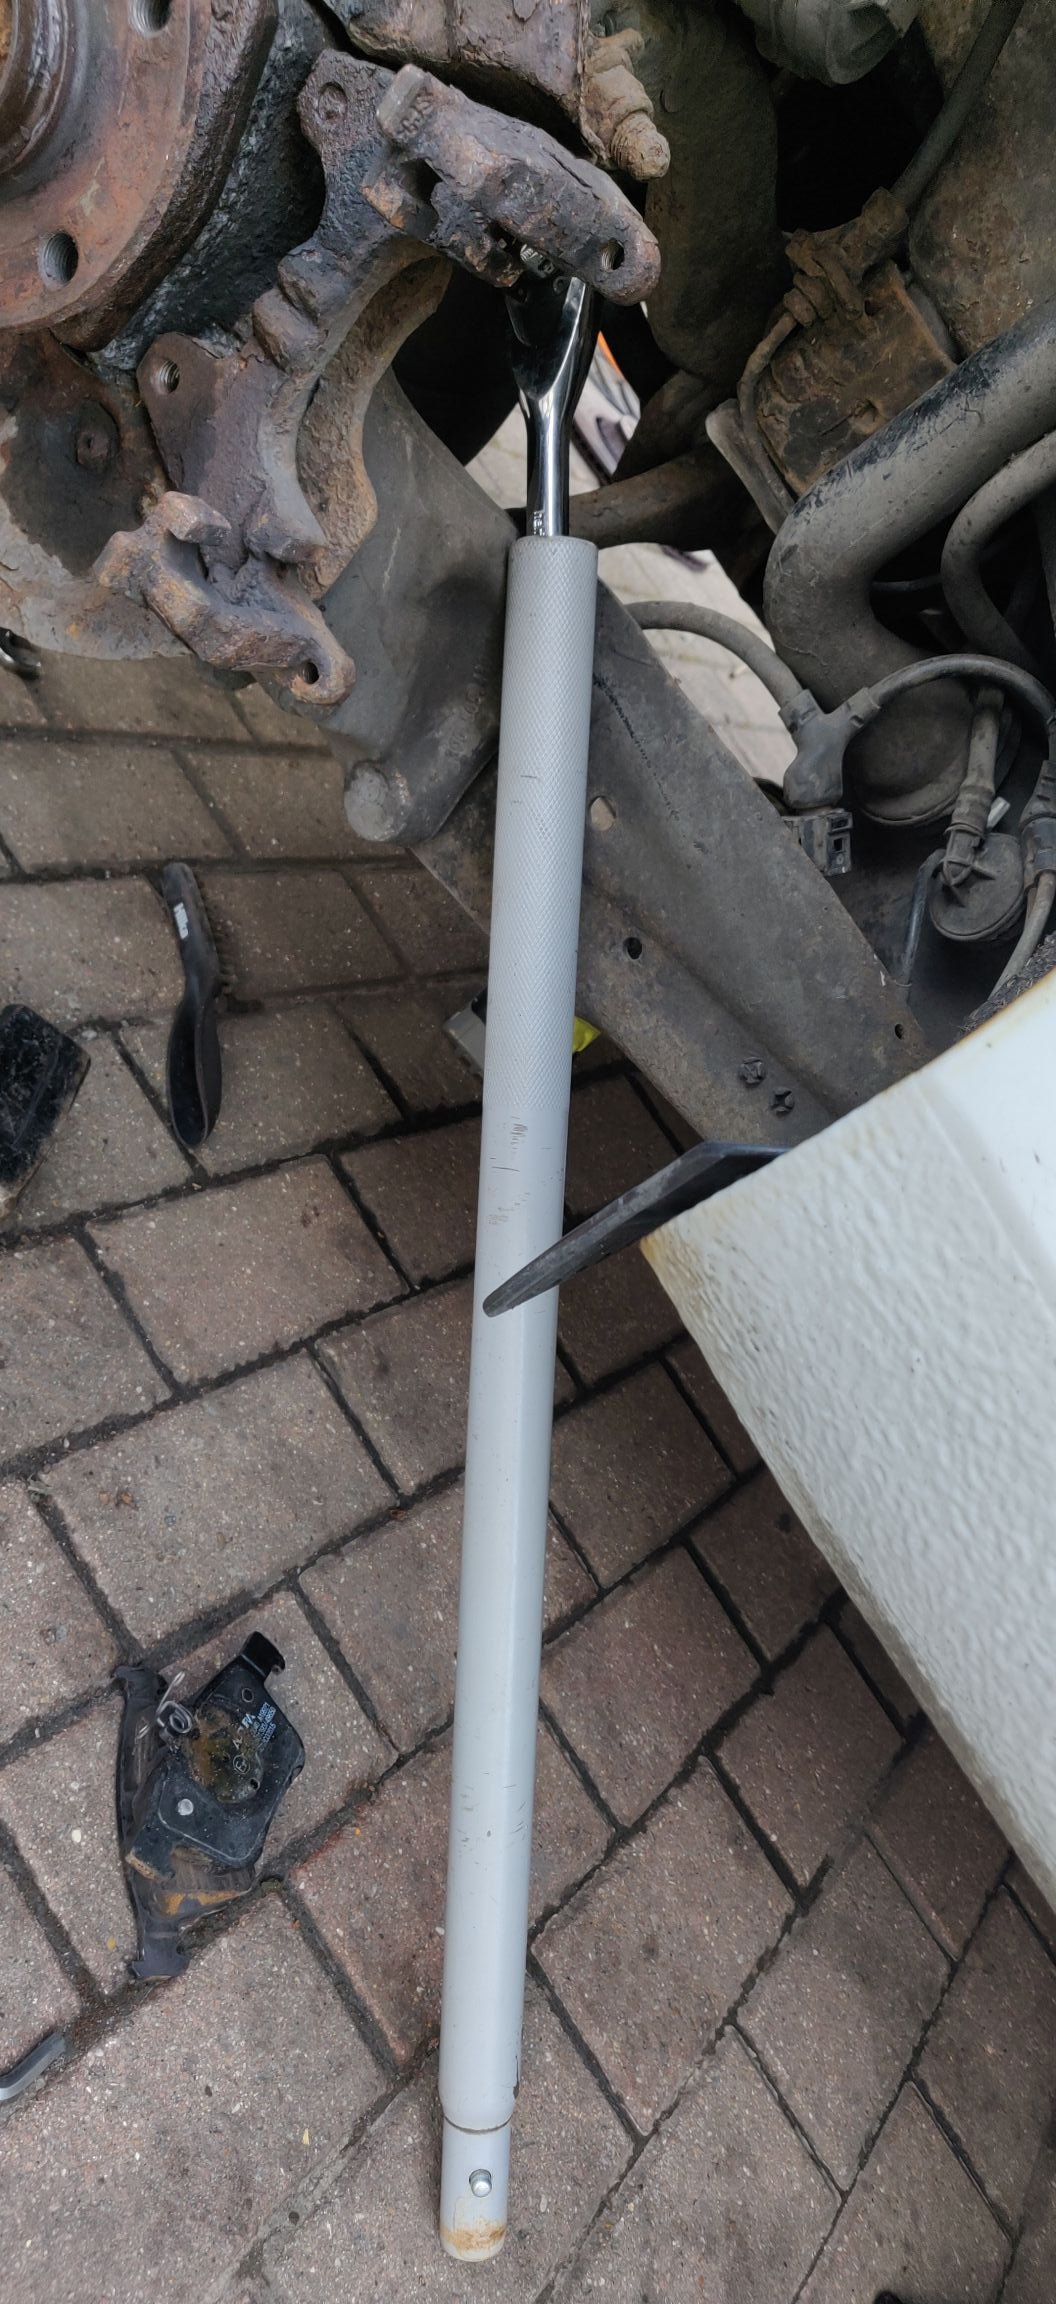
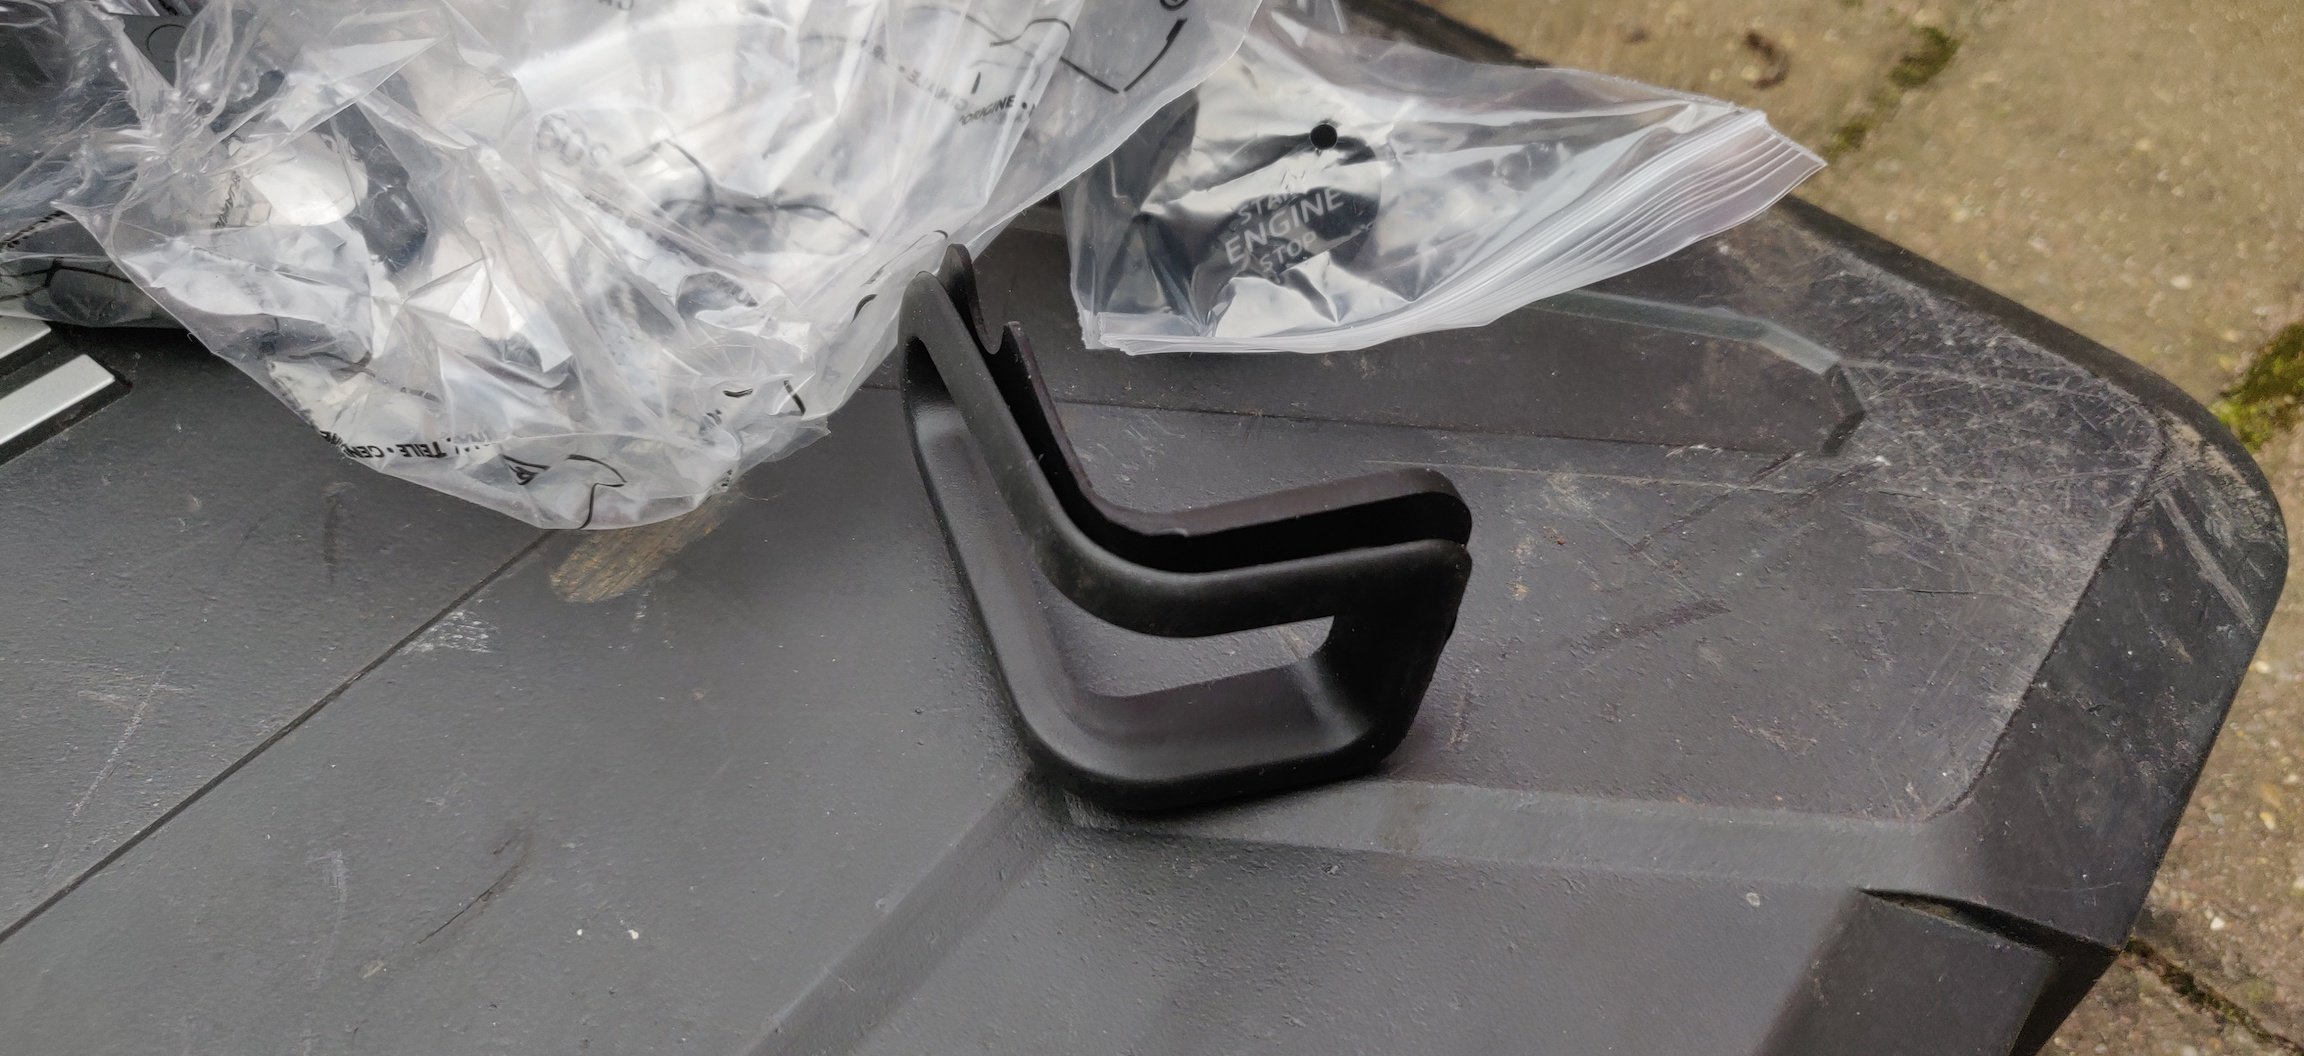
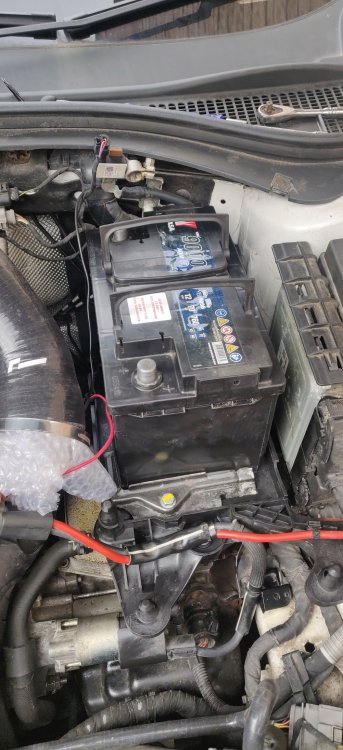
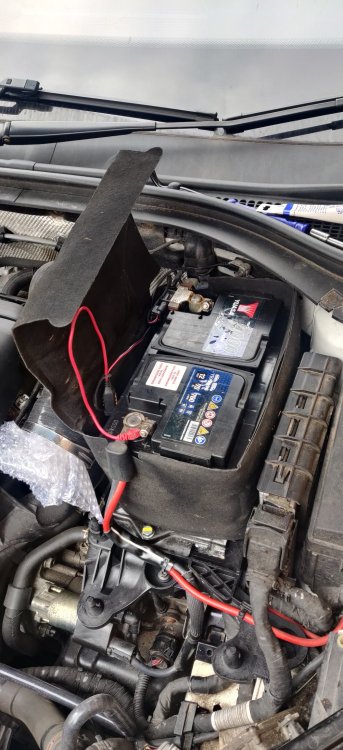
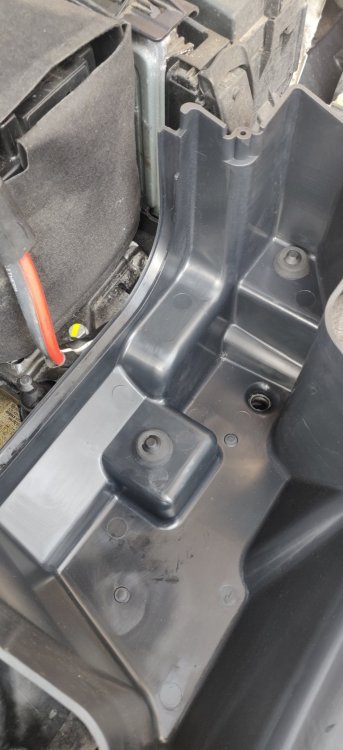
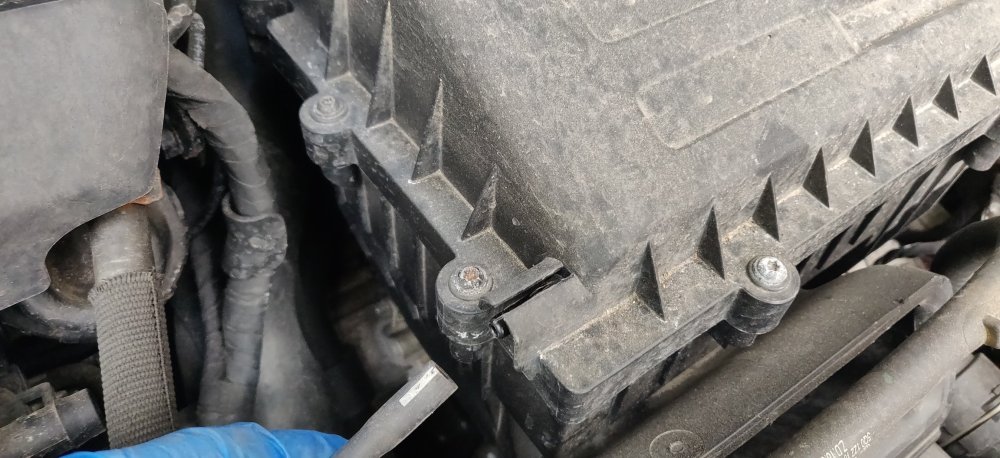
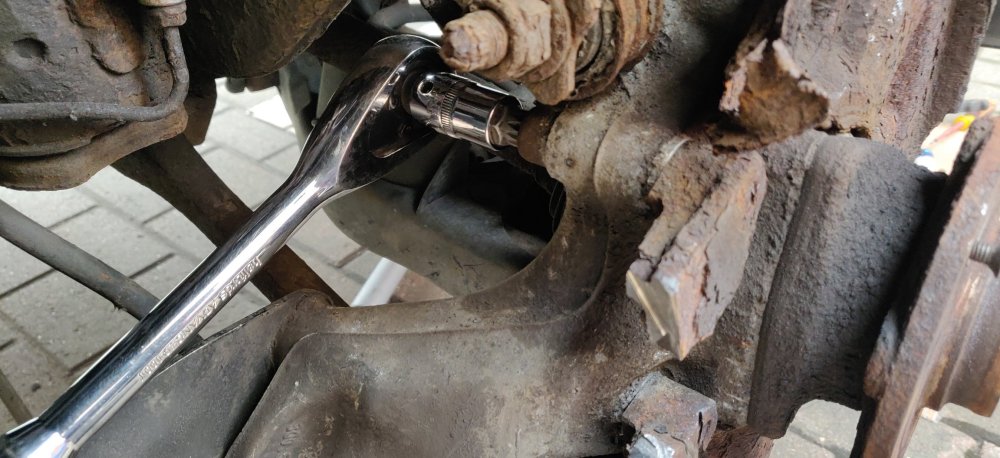
Woke up early (mainly because I'm getting old) and given the weather wasn't too bad, got cracking on: So removed the R600 pretty much, in order to get the rubber grommets installed: Didn't know the orientation but some thinking and a double check on a Youtube video confirmed it. The video also mentioned that hole in the middle might be related to the OEM's drain tube bit, so decided to also transfer that over. Then it was the battery tray. None of it turned out to be as much of a faff as I thought it would be. So negative then positive terminals off, then wiggled the cover off, and then the 13mm bolt for the strap keeping the battery down. Then pull the battery to the front and hoist it off: Then got a metal trim clip tool to pry the harness off of the tray, two bits along the front: Then it's a 10mm nut at the rear: Then three 10mm bolts, two in the tray, and one off to the front right, which needs a tiny bit more dexterity or longer extensions due to the wiring in the way: Once all out, the old tray can be wiggled and eventually come free: The nut on the rear has a weird rubber bit that sticks out, I guess some random additional vibration dampening, nothing more wiggling wouldn't sort out. Took the opportunity to give the area a wipe and spray of XCP, whilst the area was easy to get to. Then it's the reverse to wiggle the new tray in: Had to use some force and wiggling to get the bolt holes to align up, but got there eventually. The three bolts and nuts were tightened to 9Nm as per the workshop manual. Hoisted the battery in, pushed it back so it slides under a lip on the rear of the battery tray, before putting the bracket and bolt in, to 15Nm: Slide the battery cover over and on, then greased the battery terminals, and tightened to 6Nm: That's that, the whirring and buzzing of the car coming back to life should be audible. So now its the R600 intake again: Like last time, some wiggling to get it into place, but this time, pushing it into the plastic bits on the replacement battery tray. Should go in without much bother and won't be going anywhere. The filter is then on, clamp tightened up, and the new screws that came with the replacement grommets are used to tighten the top cover down: Gave it a spritz of rubber and vinyl care and wiped down. I'll probably do an oil change in the next couple of weeks, but that's not really post worthy. Fingers crossed, the front subframe is the next big job and that'll be nearer the end of summer. Maintenance: £3372.49 Upgrades: £5358.48 Miscellaneous: £827.47


-
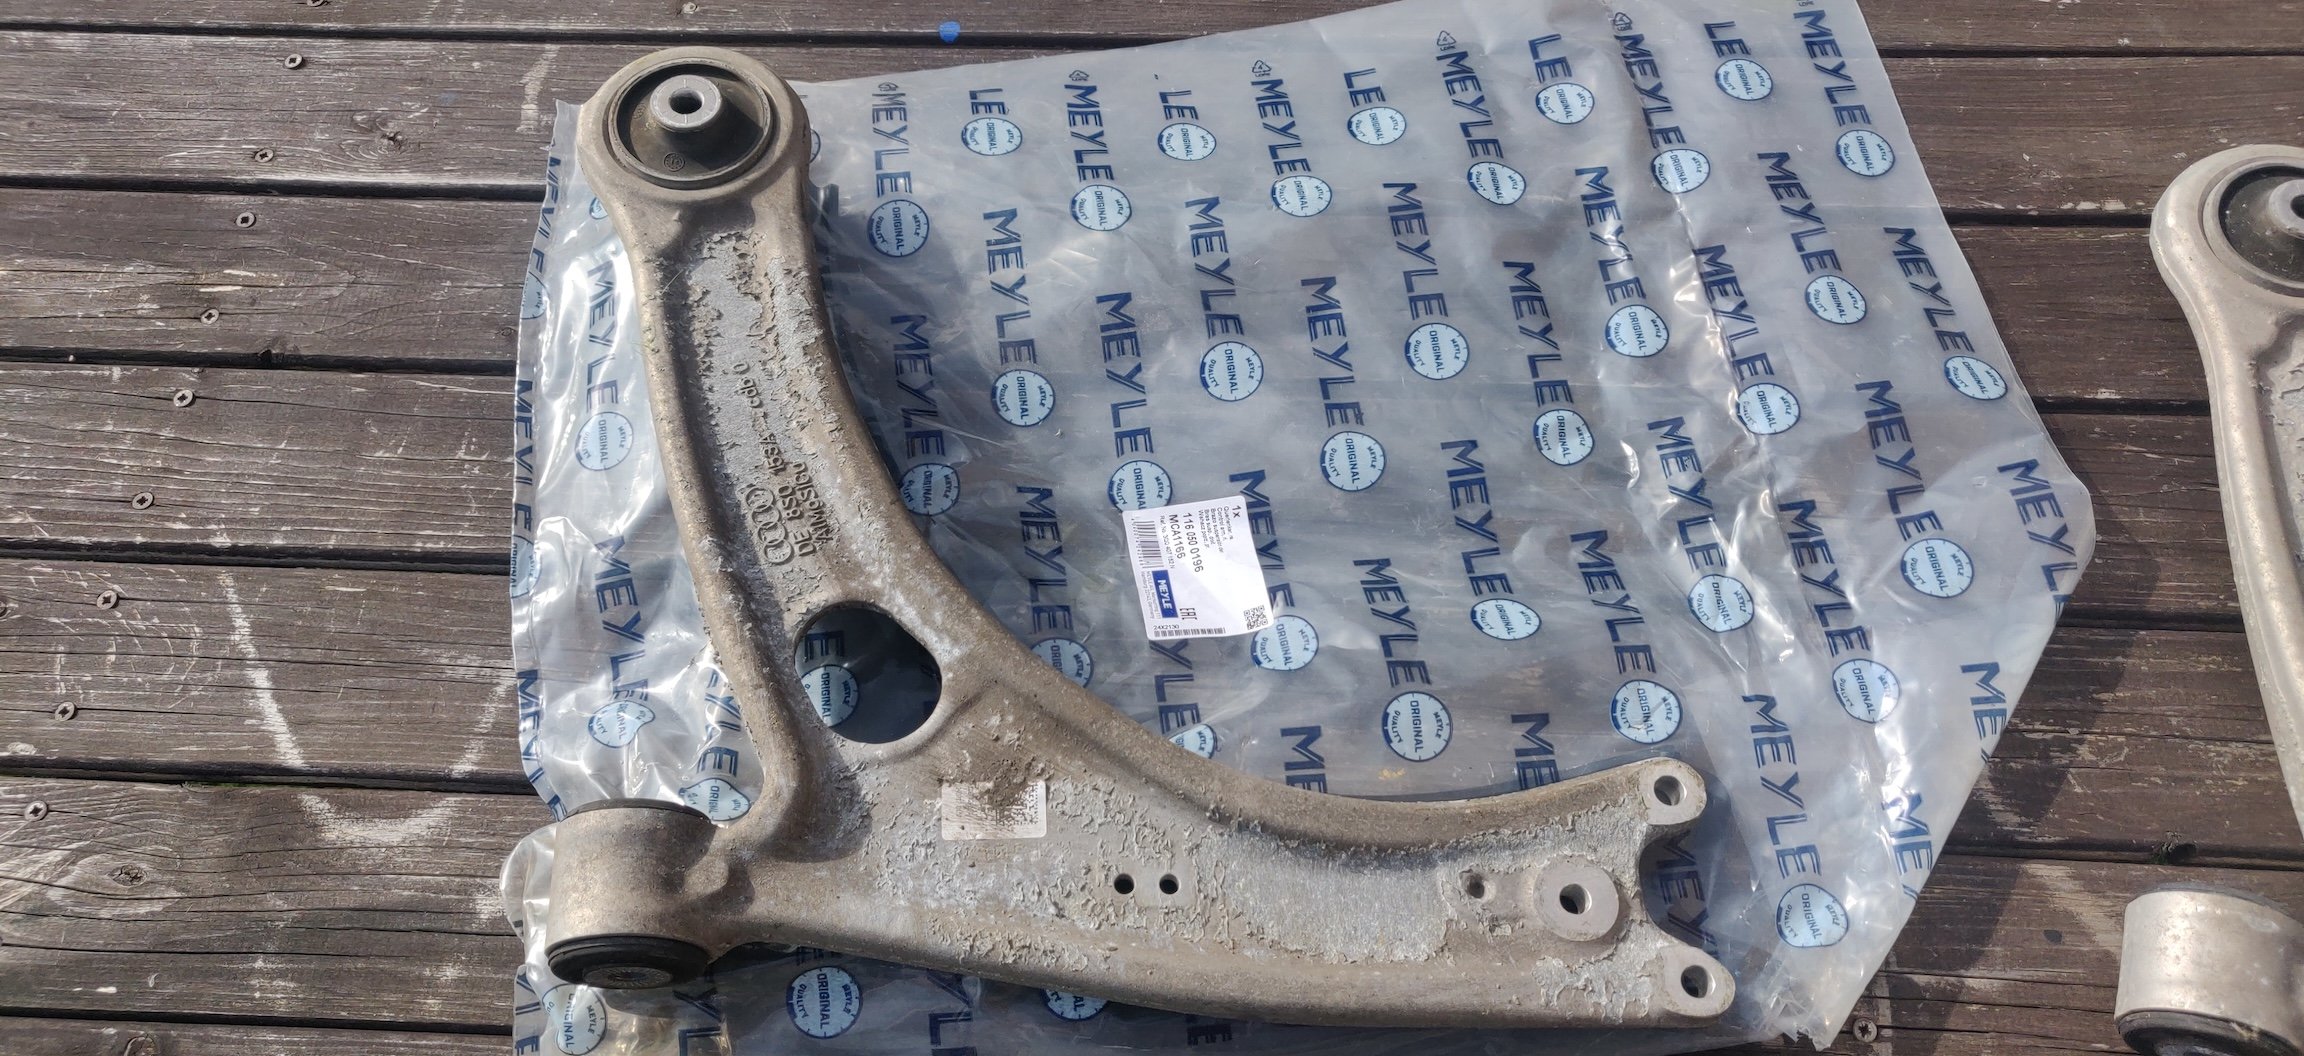
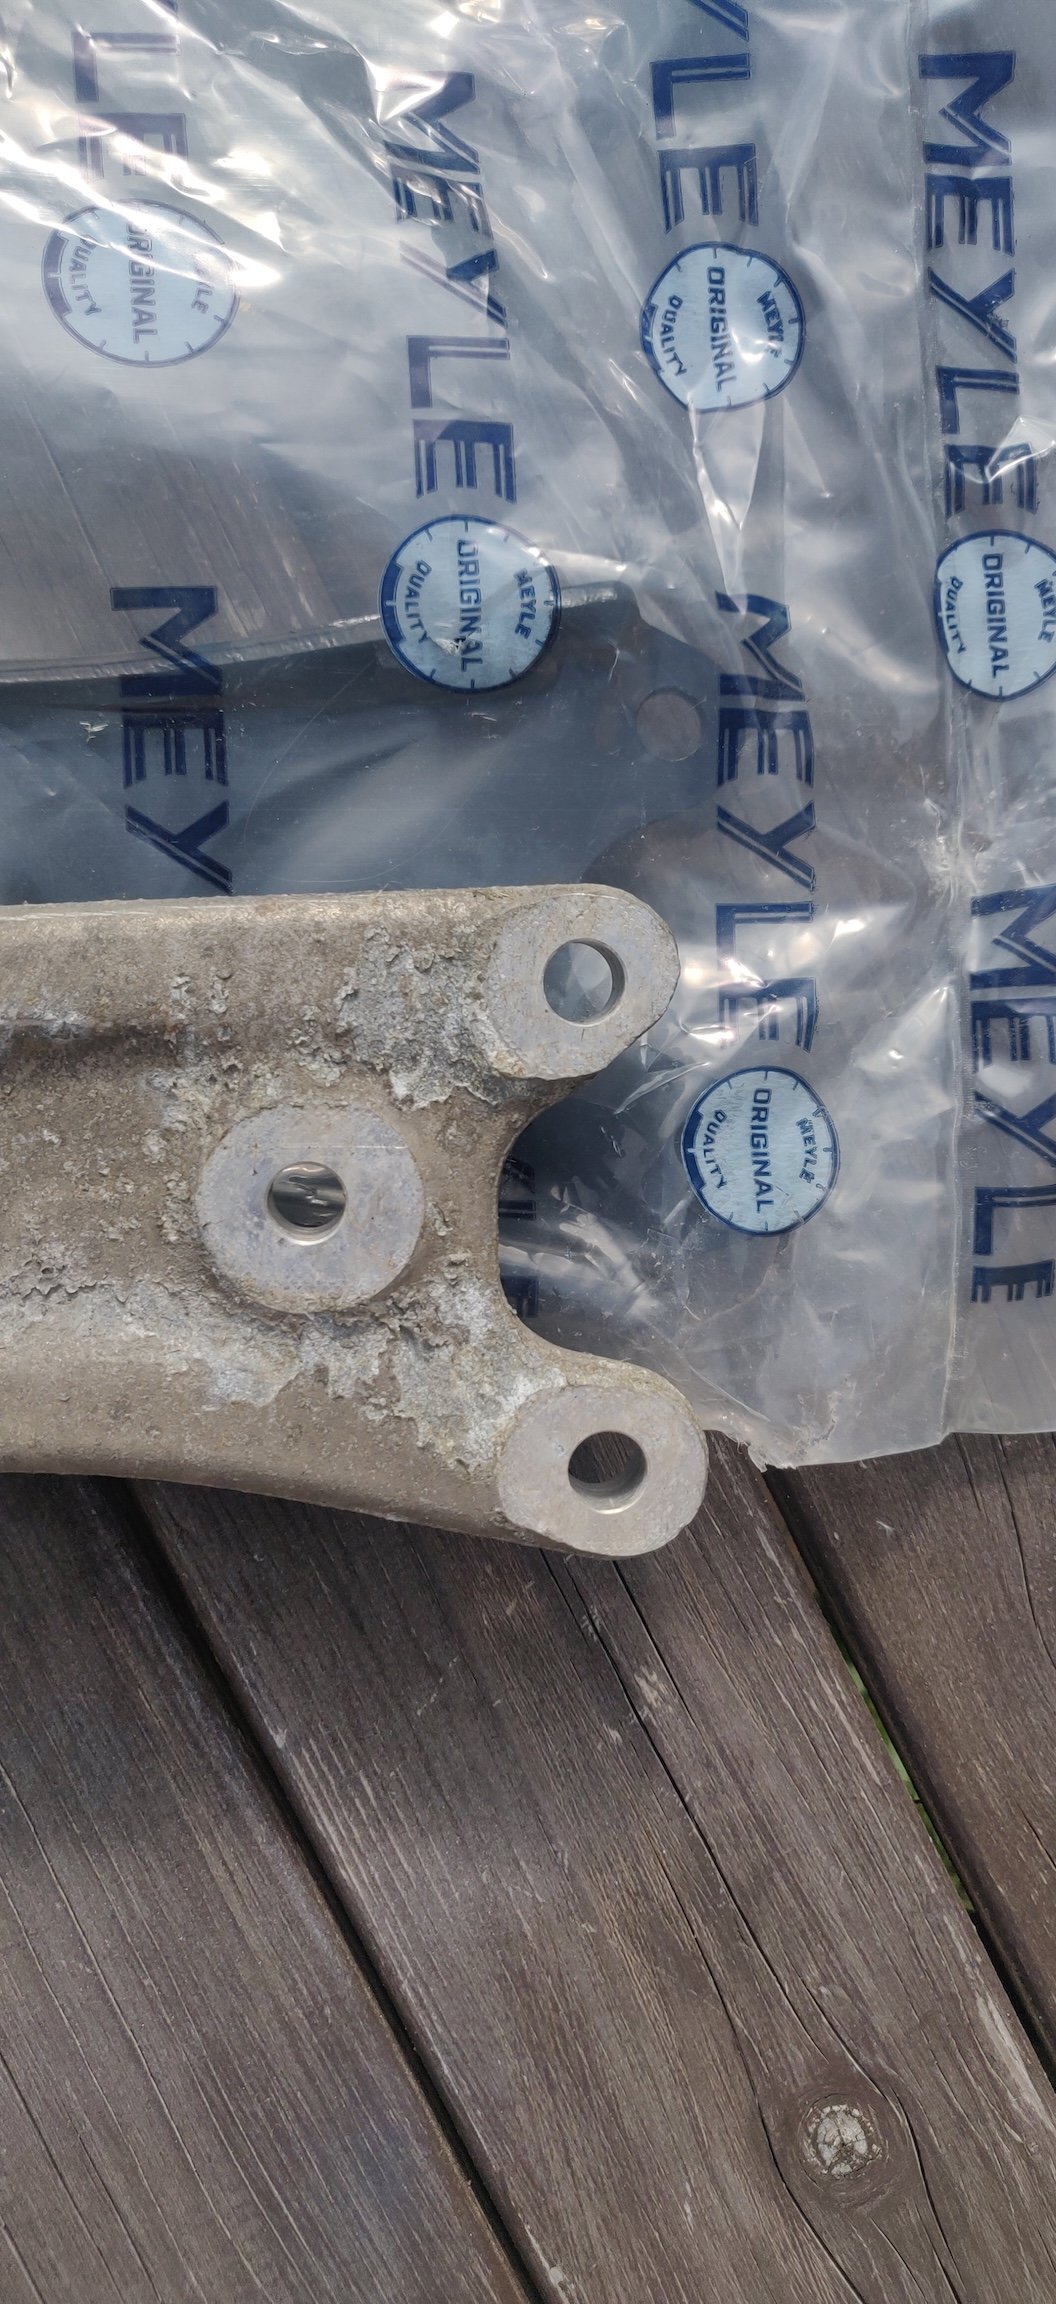
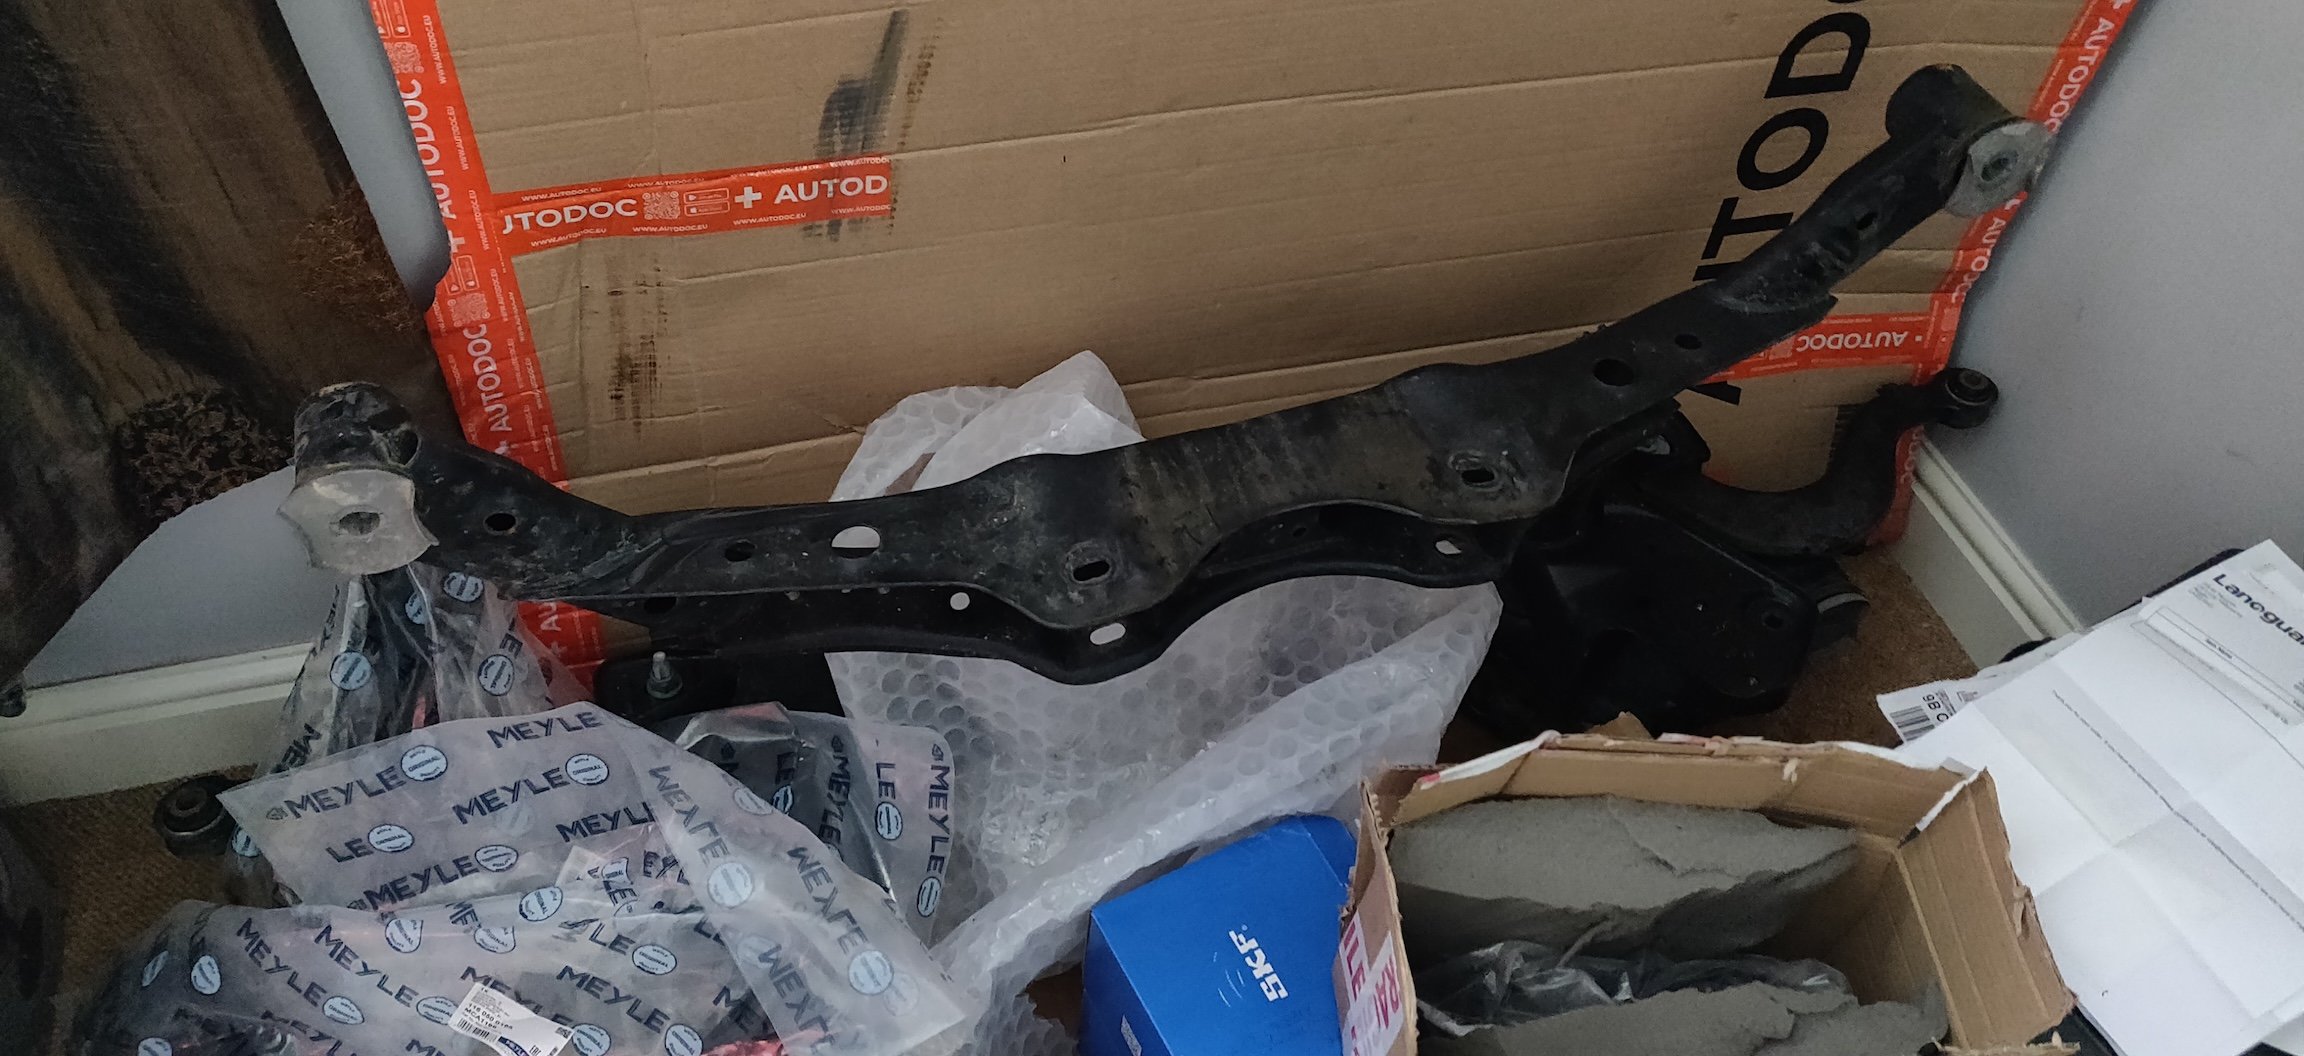
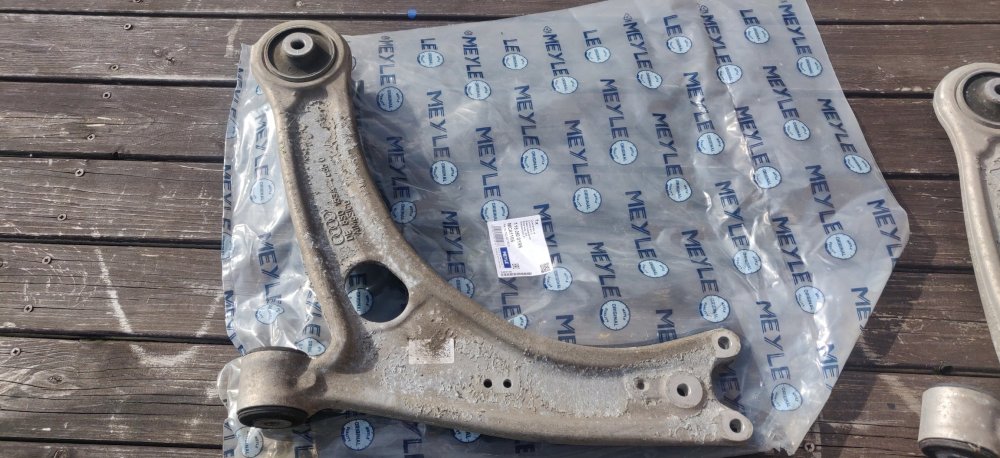
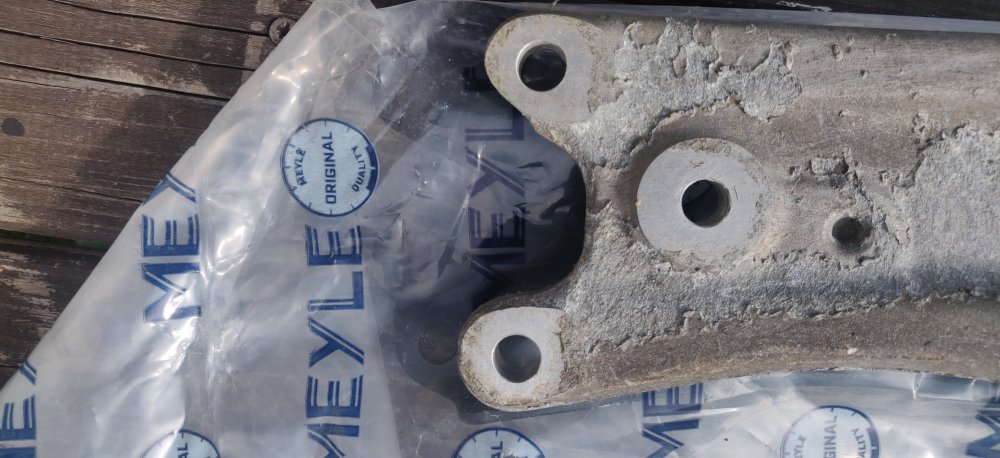
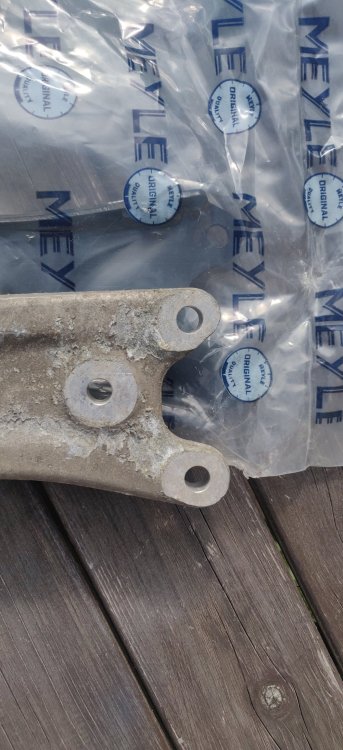
Reason I've been reluctant with aluminium lower arms: Above is a pic of the aluminium arms that came with the subframe, and some Meyle replacement arms: They essentially look about a centimetre short? Hence not wanting to bother, as almost all aluminium arms of some sort are for the S3 or Golf and such, so probably a narrower track? Happy to be corrected if Passat/Arteon/Superb variants exist. Regardless, the Meyle arms were from eBay, bought about a year ago for £69.54. Now for something different. From the R600 install, went online to look for replacement missing bits, and found them: The part number turns out to be VWR120004, and was from Progressive Parts for £20.35 with delivery. If I knew the part number, could have probably shopped around I guess. However, this was ordered on Thursday evening, so for it to arrive Saturday morning isn't too bad to be honest! What was a real surprise was: The battery tray! This was ordered from eBay in the same Thursday evening, with some shopping around and a discount coupon getting it to £16.96. Arrived around mid afternoon, very impressed all round! Technically not the cheapest on eBay, but honestly, it looks brand new, or is certainly VERY clean! Wife actually has the car for the weekend, so can't do anything until she's back. I suspect a fiddly job of disconnecting and wiggling wiring harnesses and whatnot to replace this tray and the subsequent fettling of the R600 bits to get the rubber grommets on and all sorted. Maintenance: £3372.49 (+£86.50) Upgrades: £5358.48 (+£20.35) Miscellaneous: £827.47


-
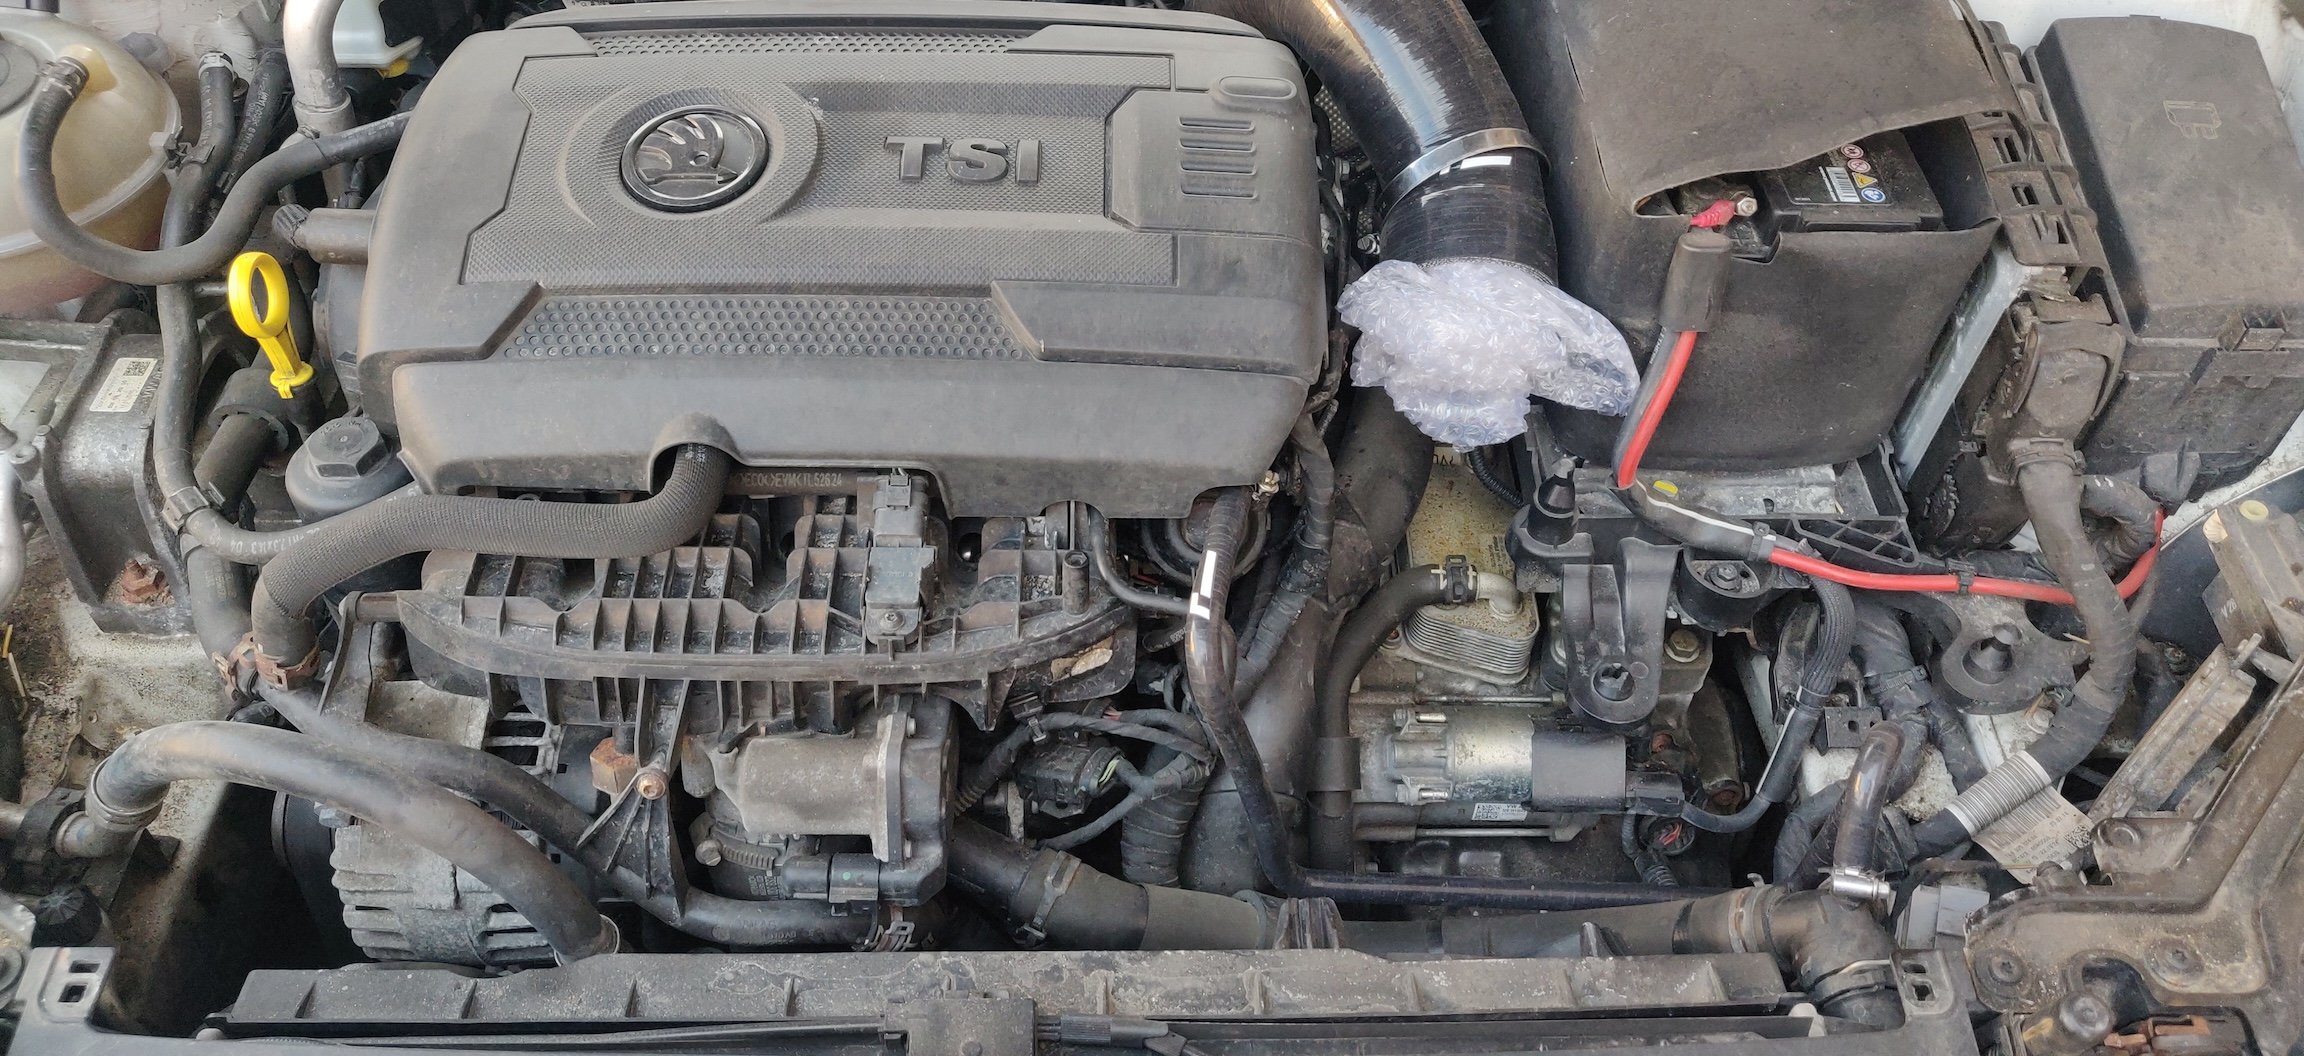
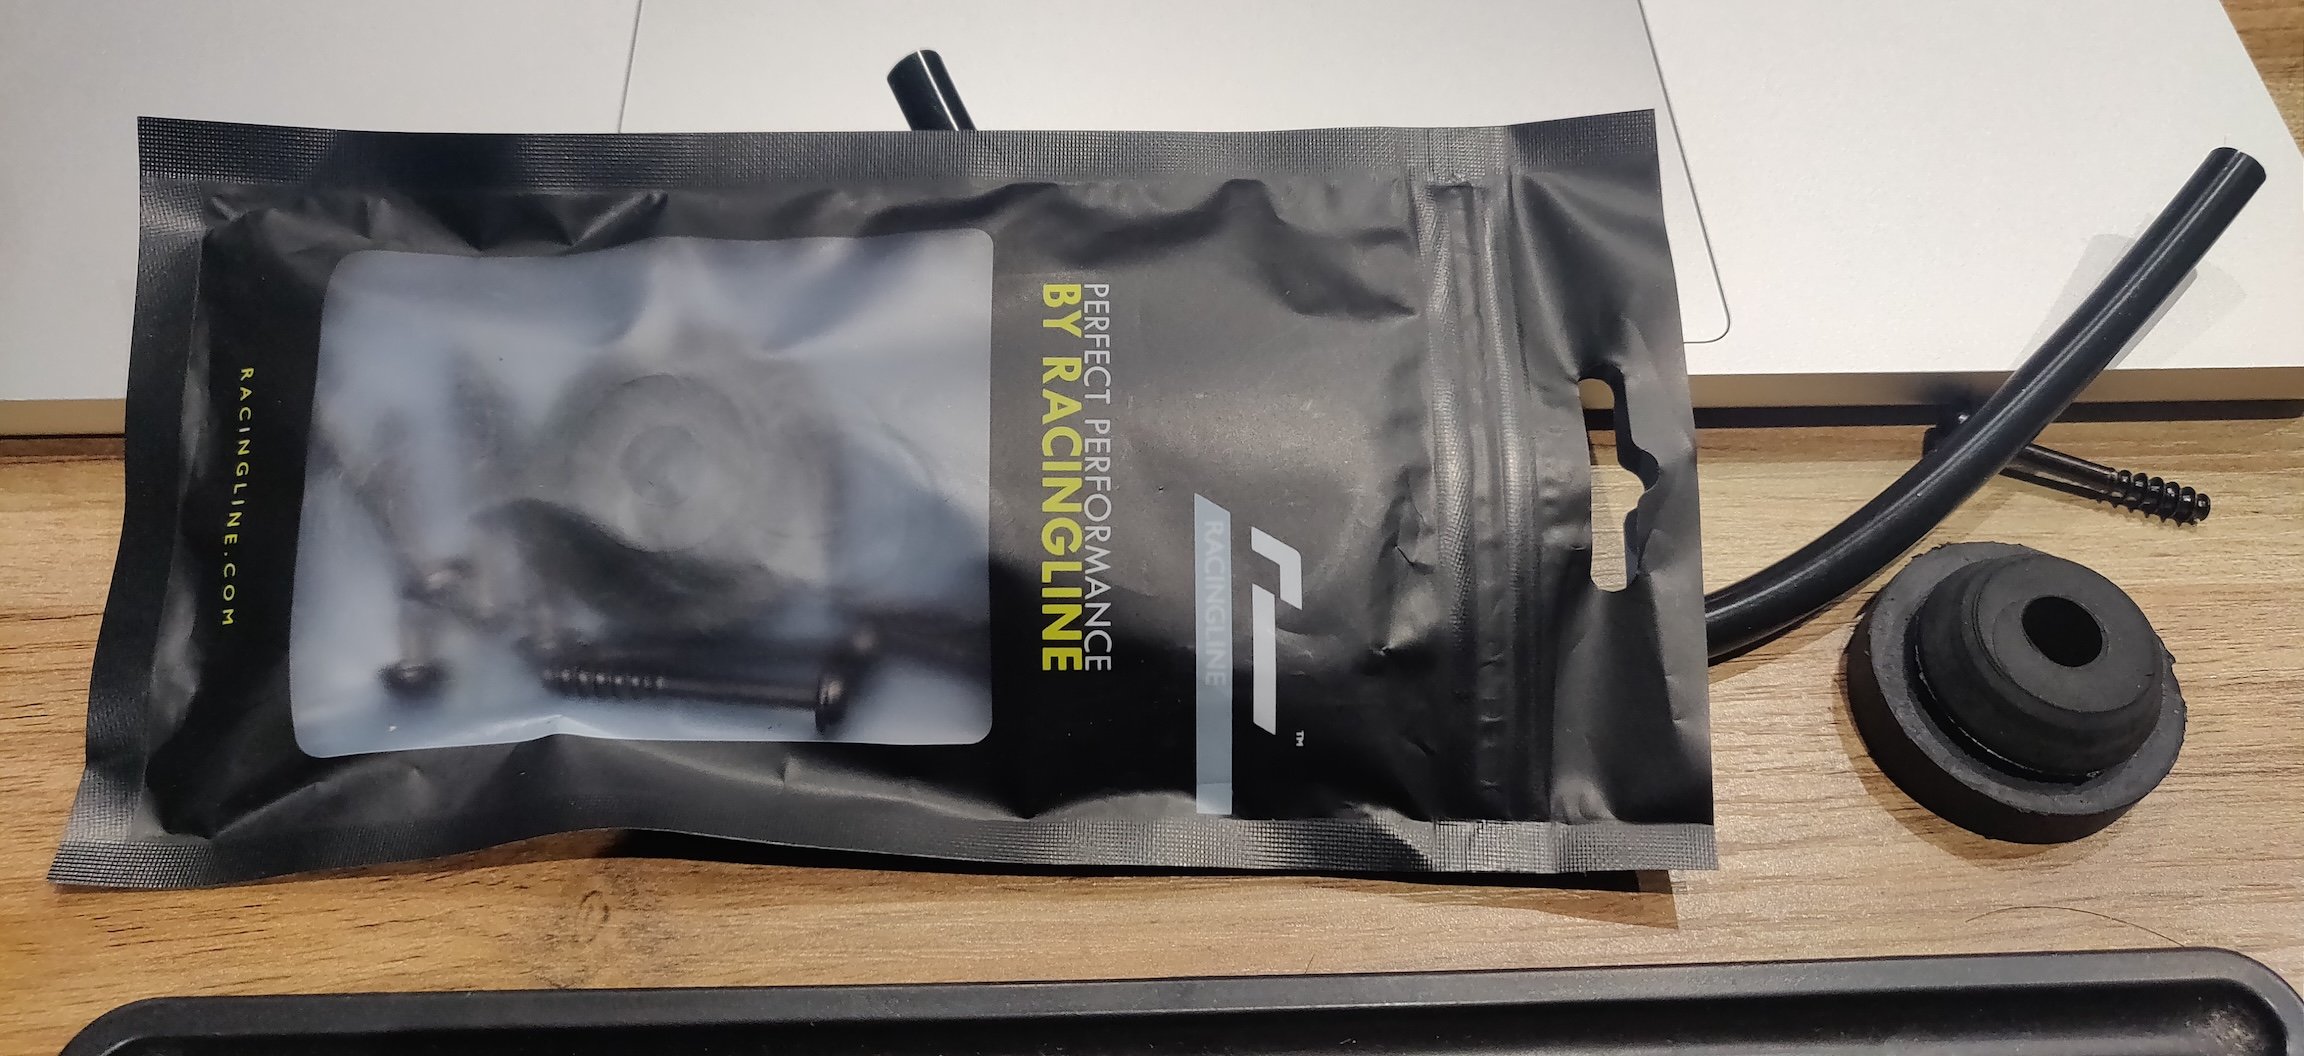
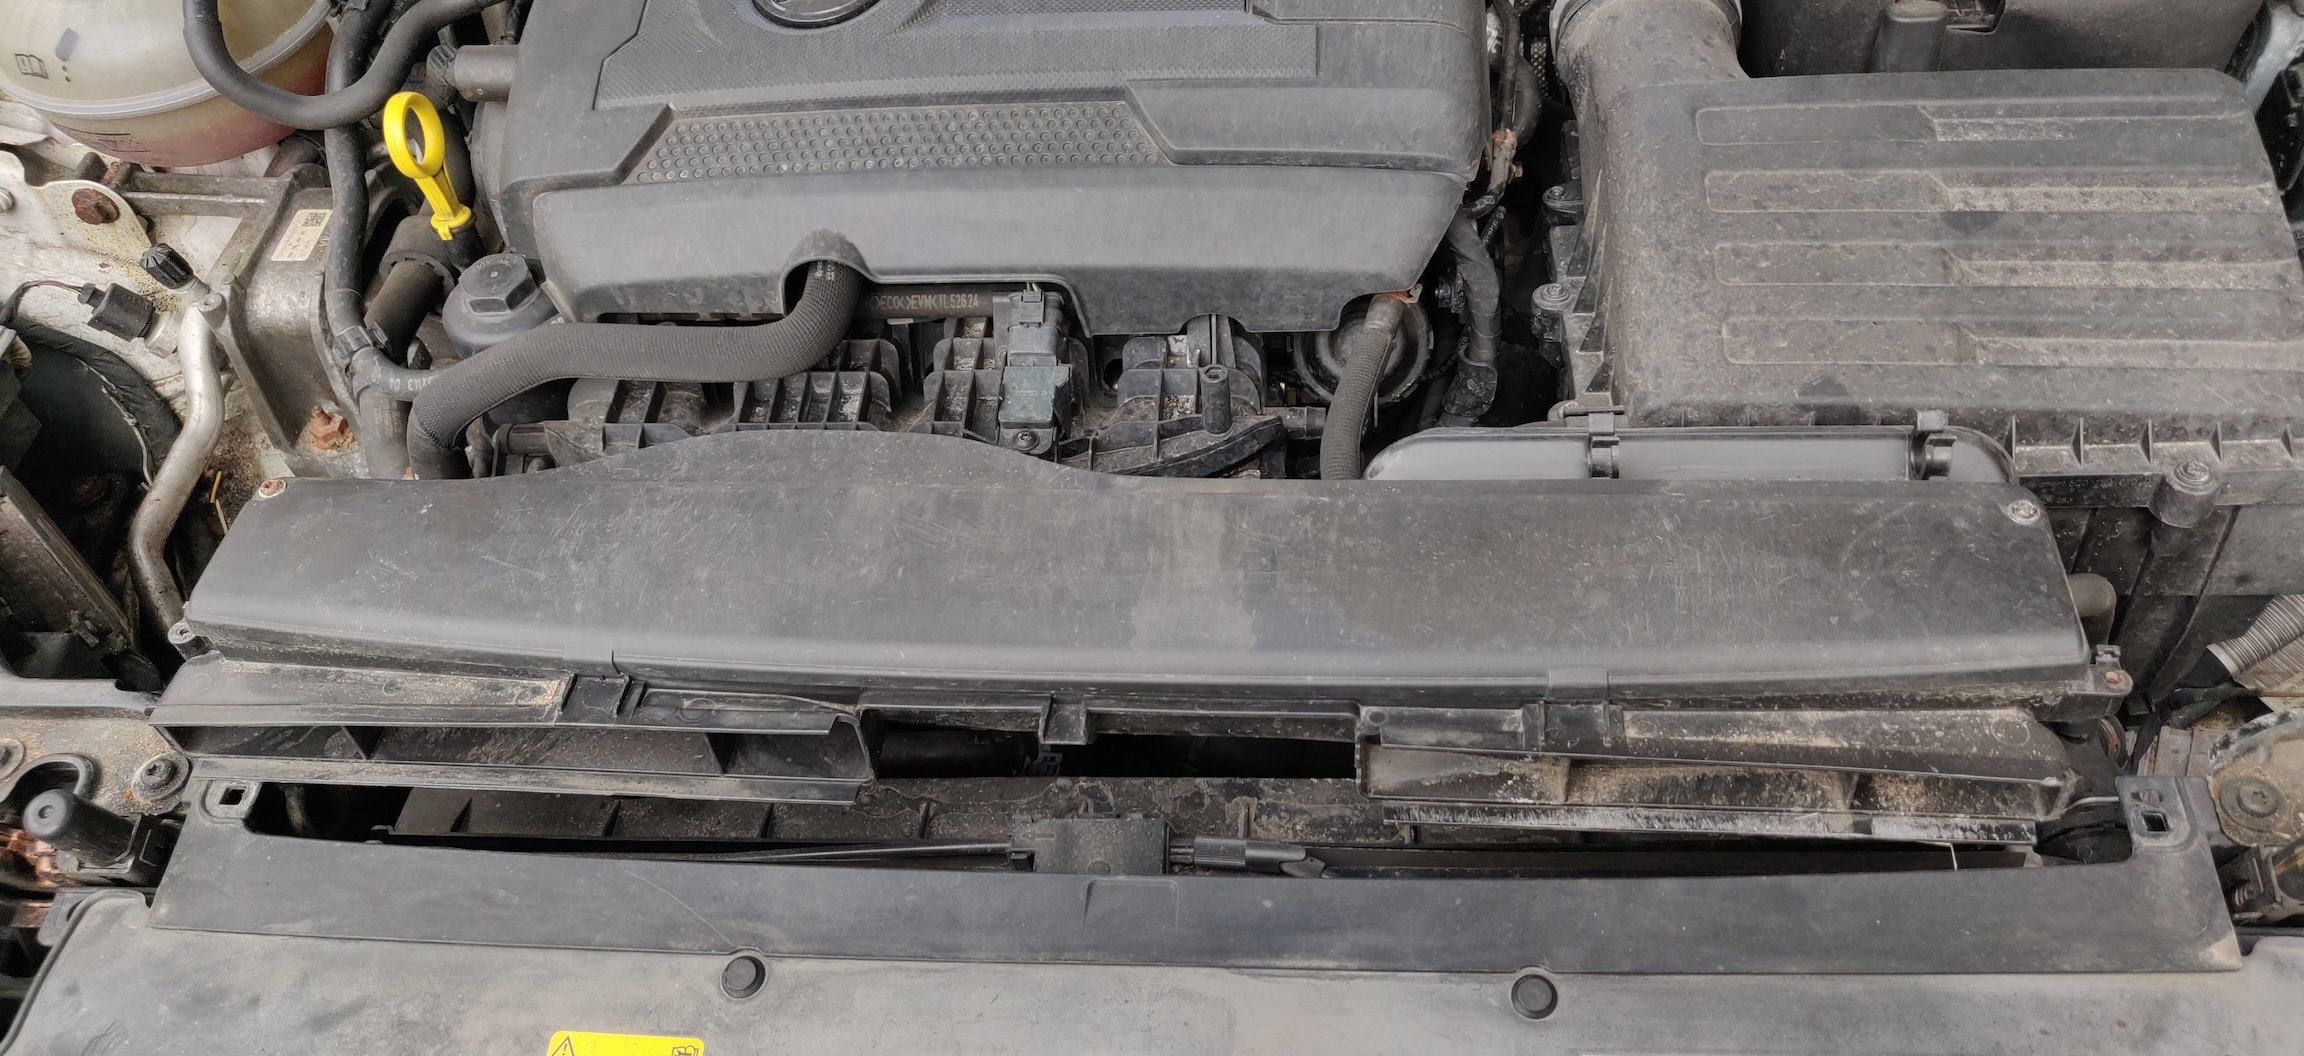
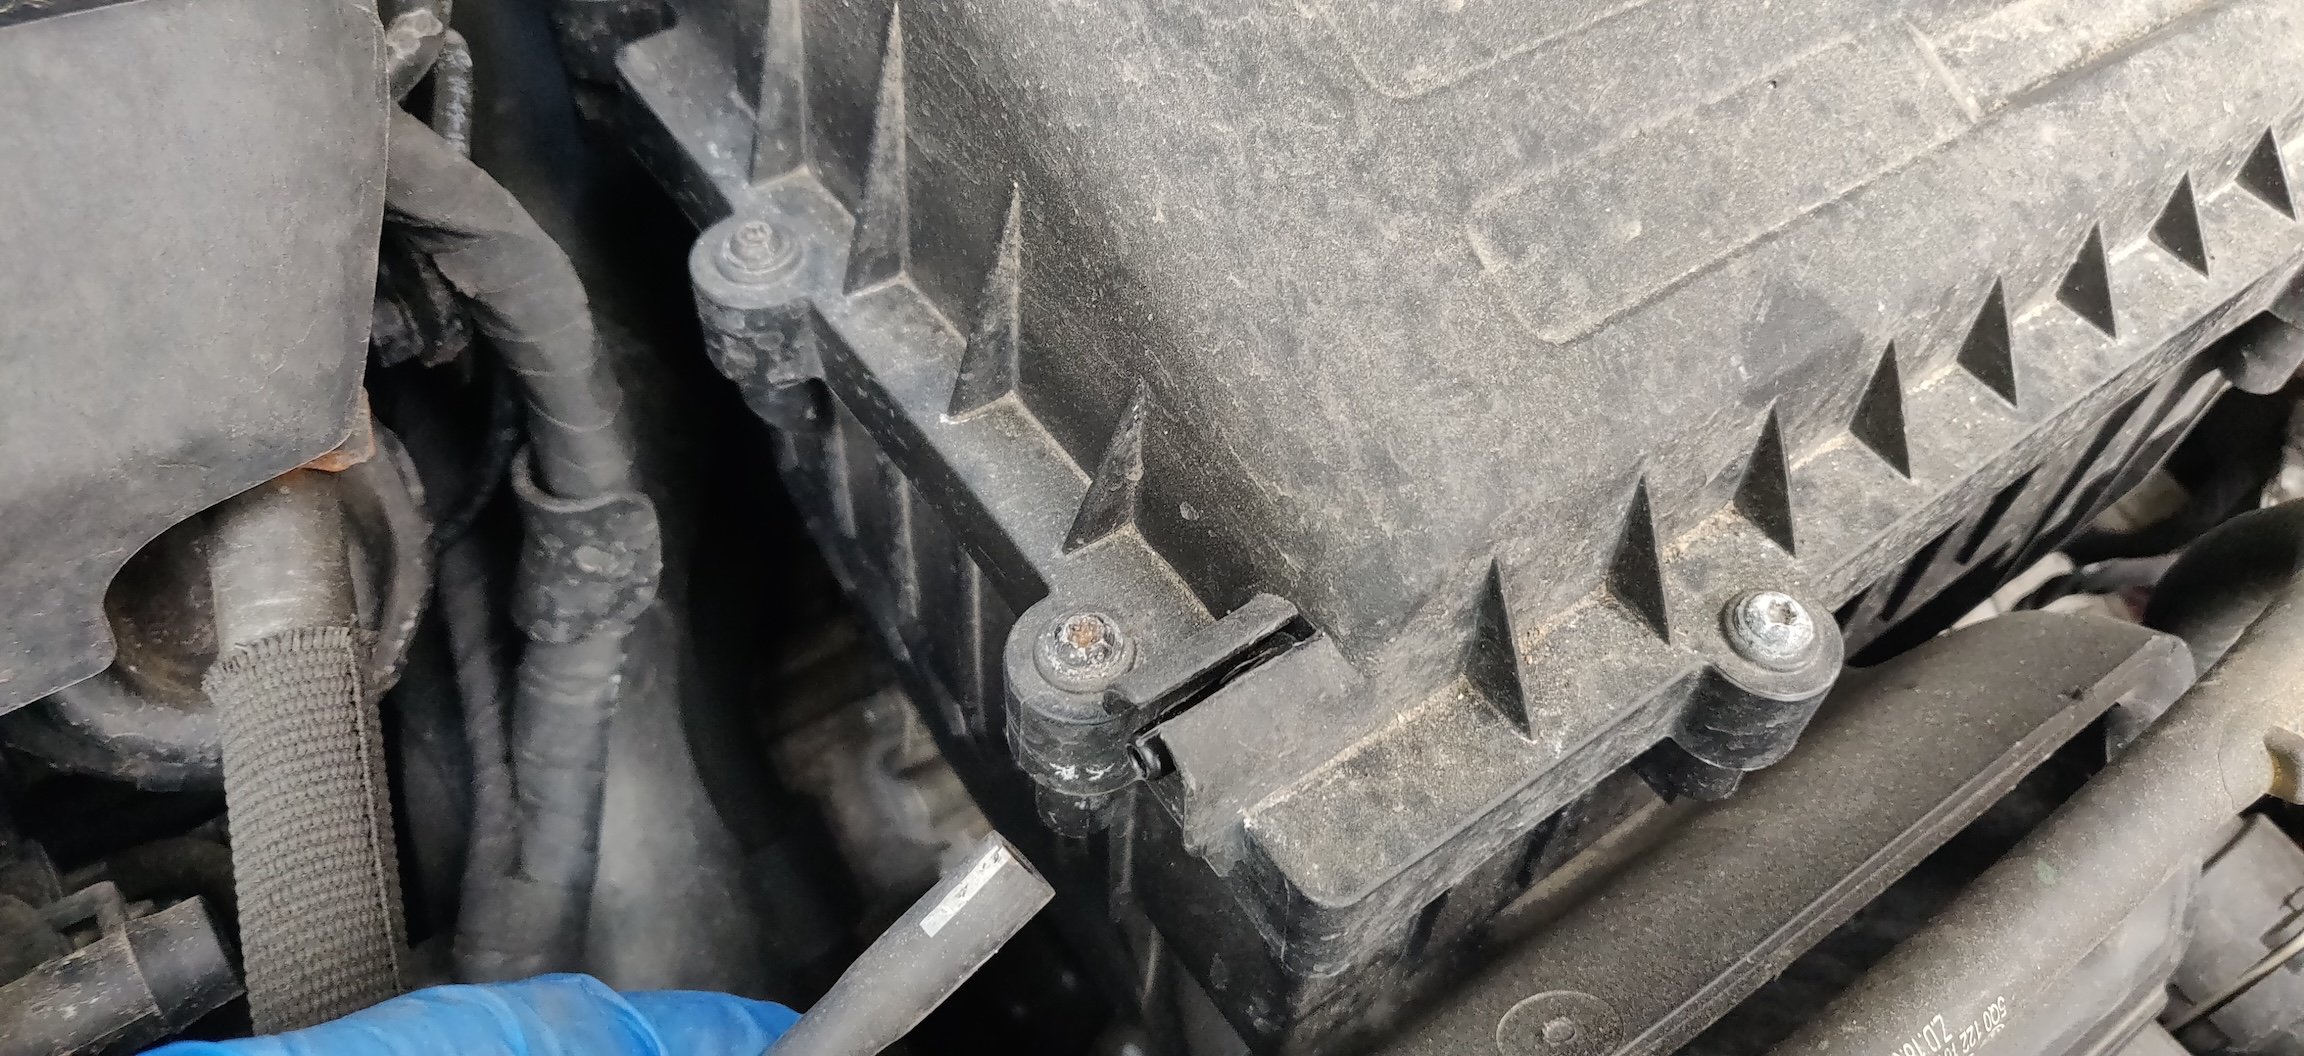
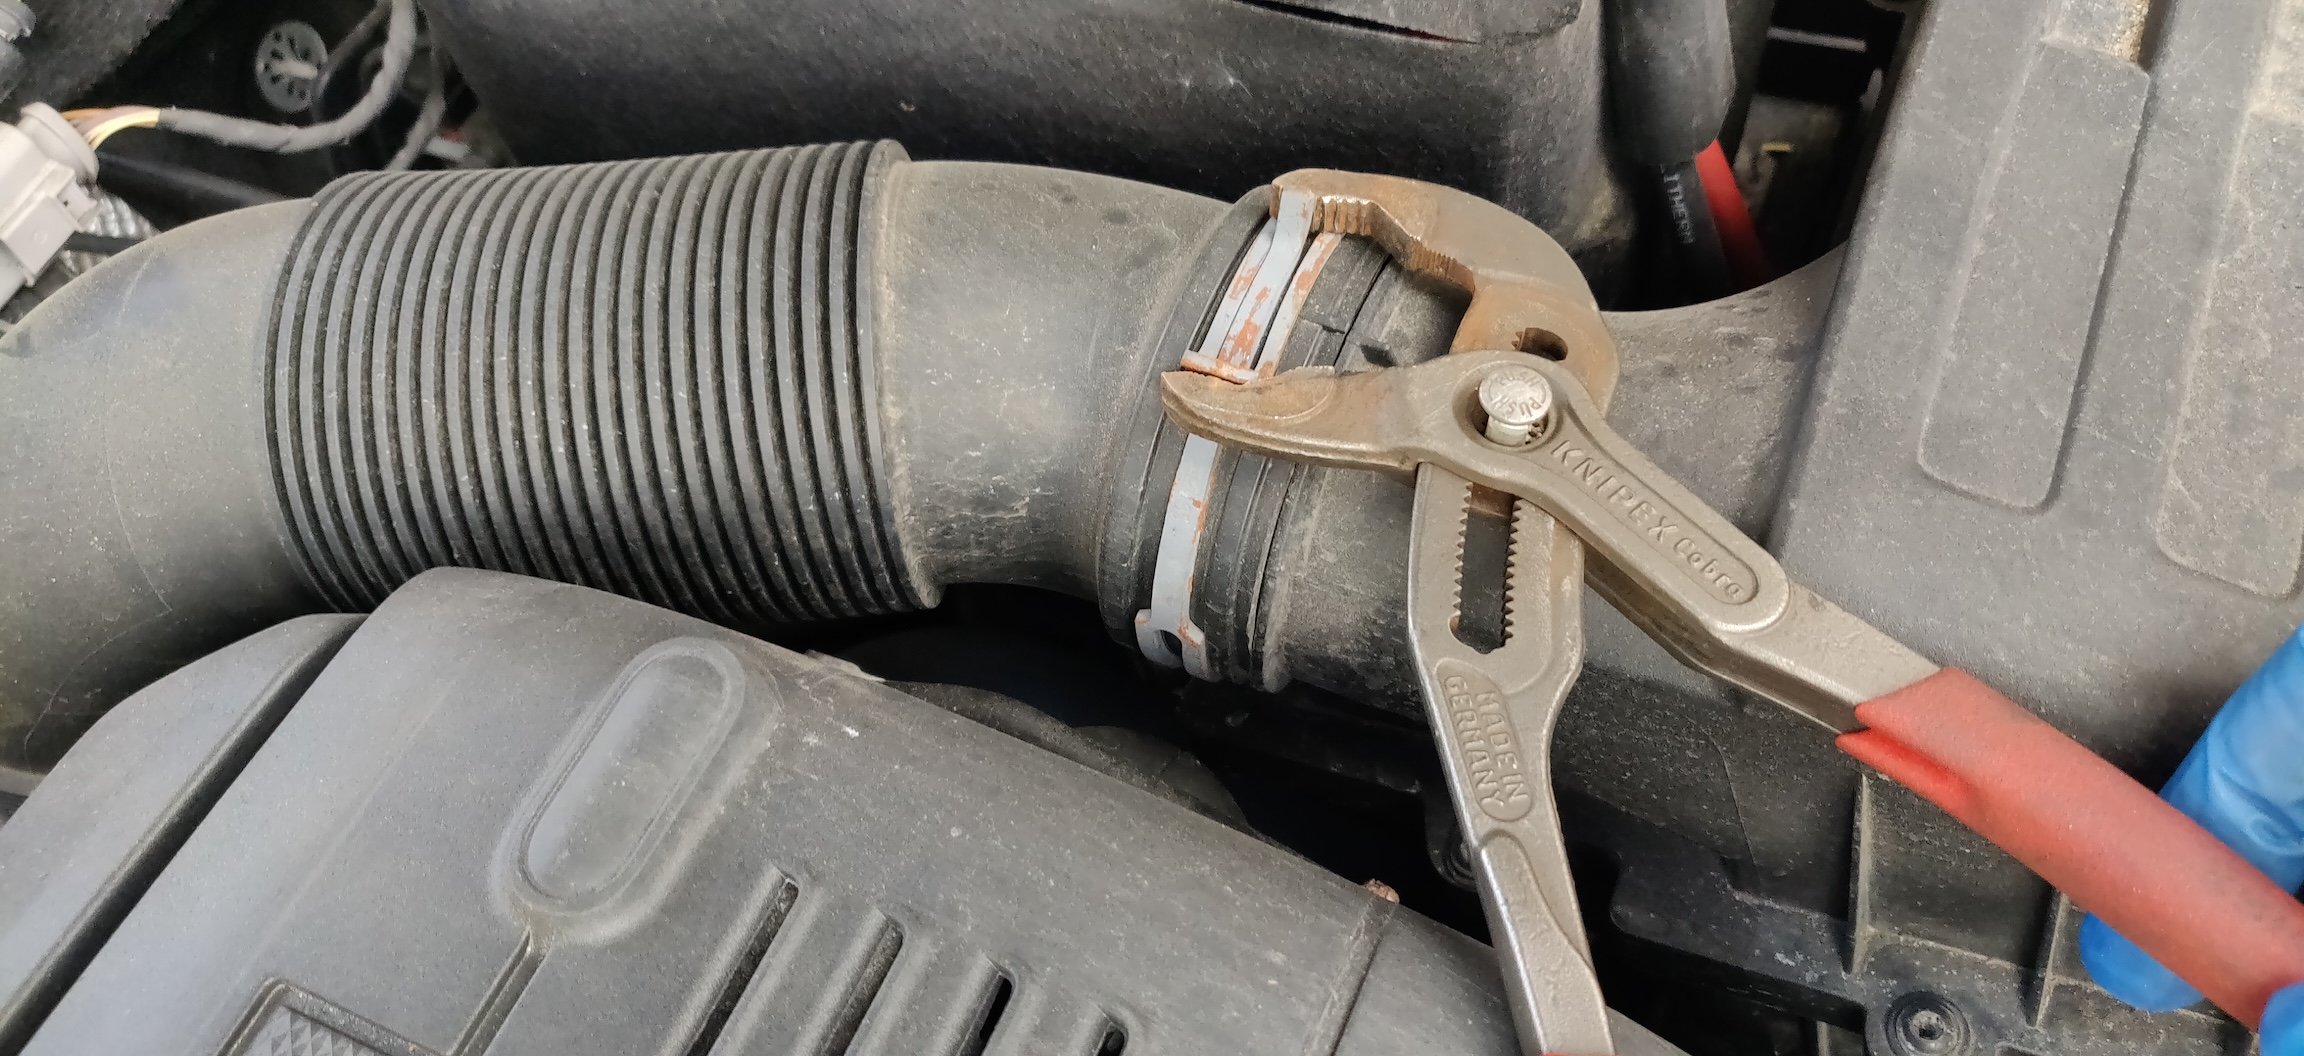
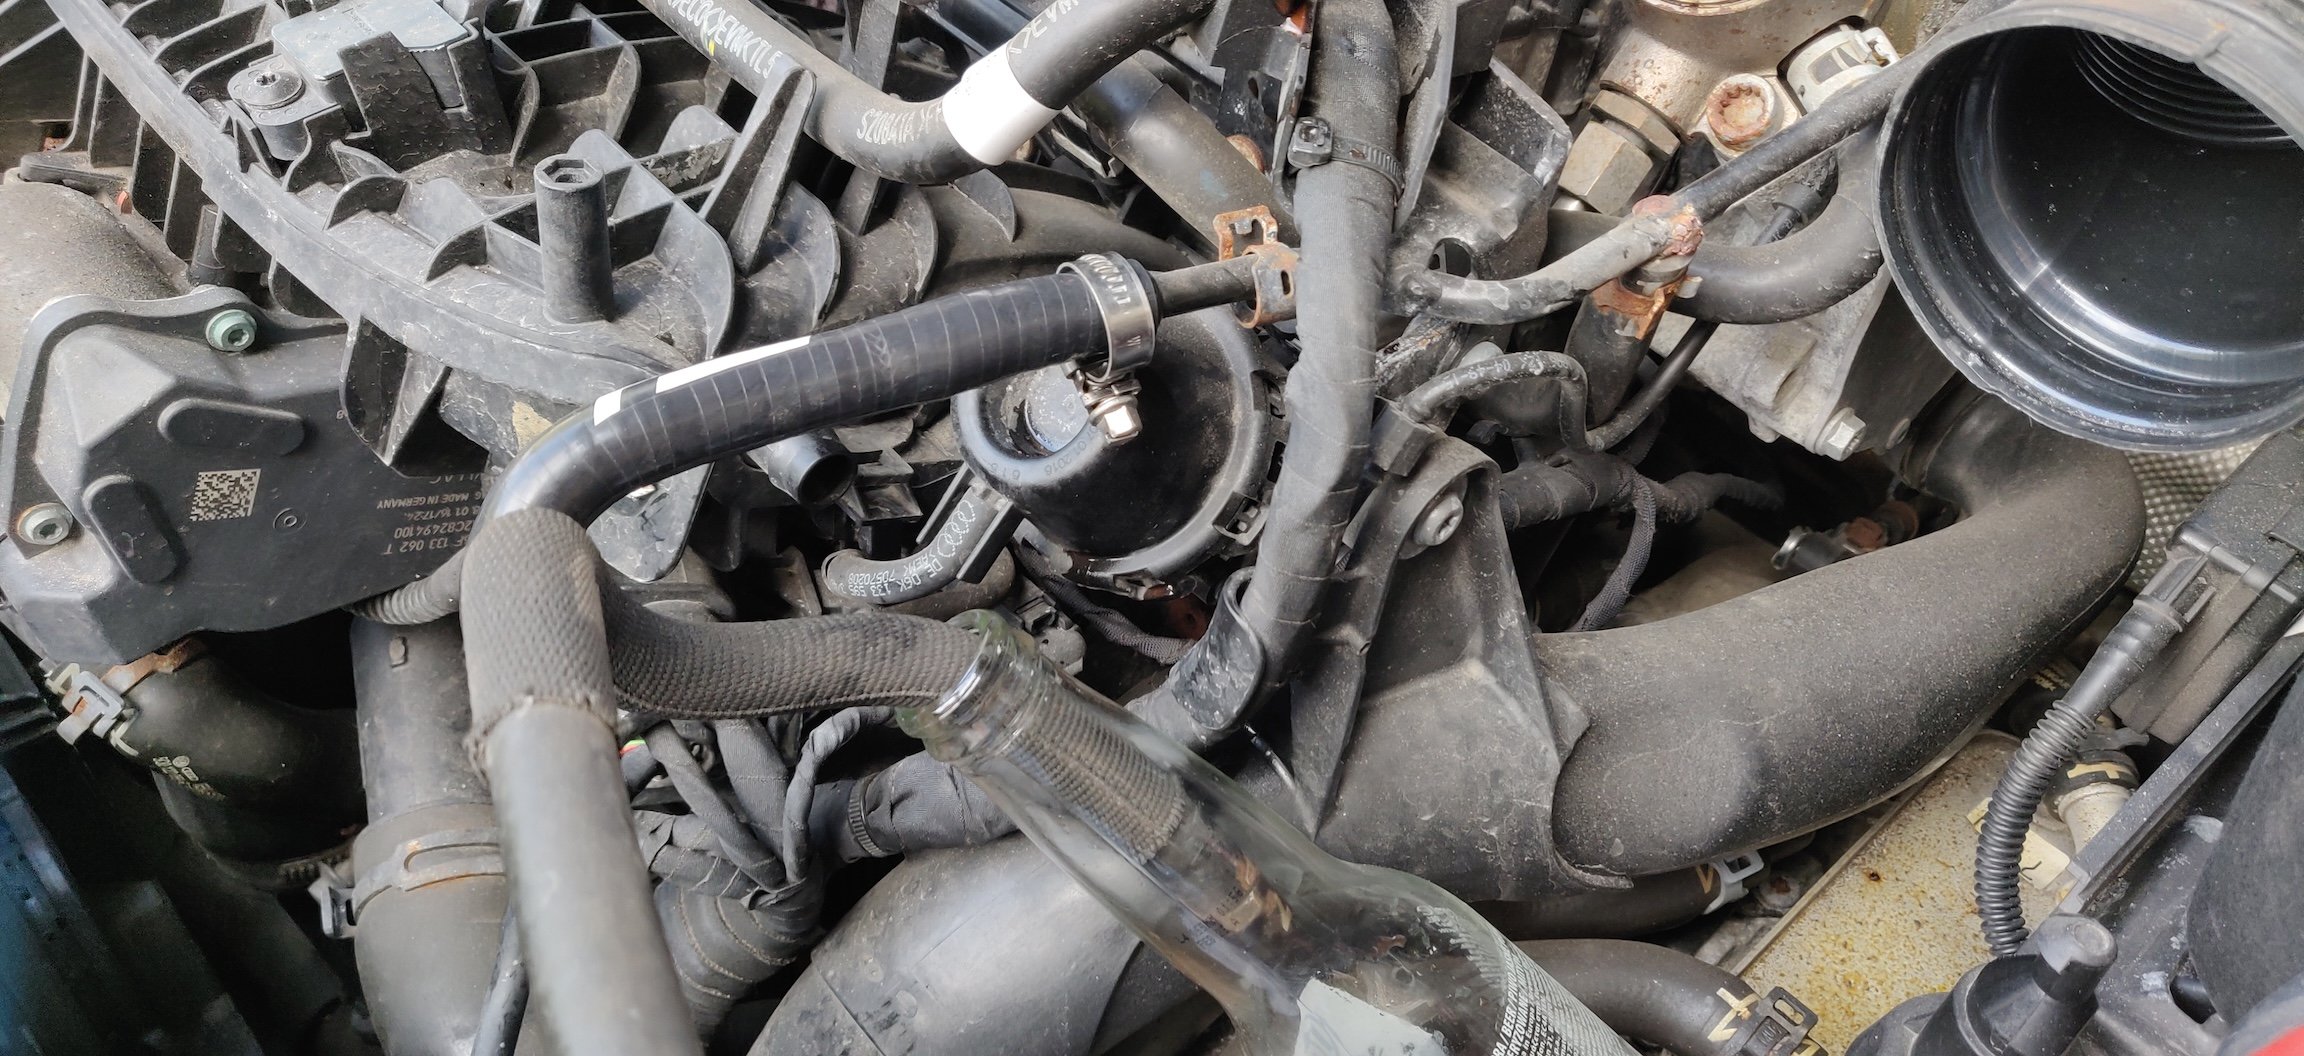
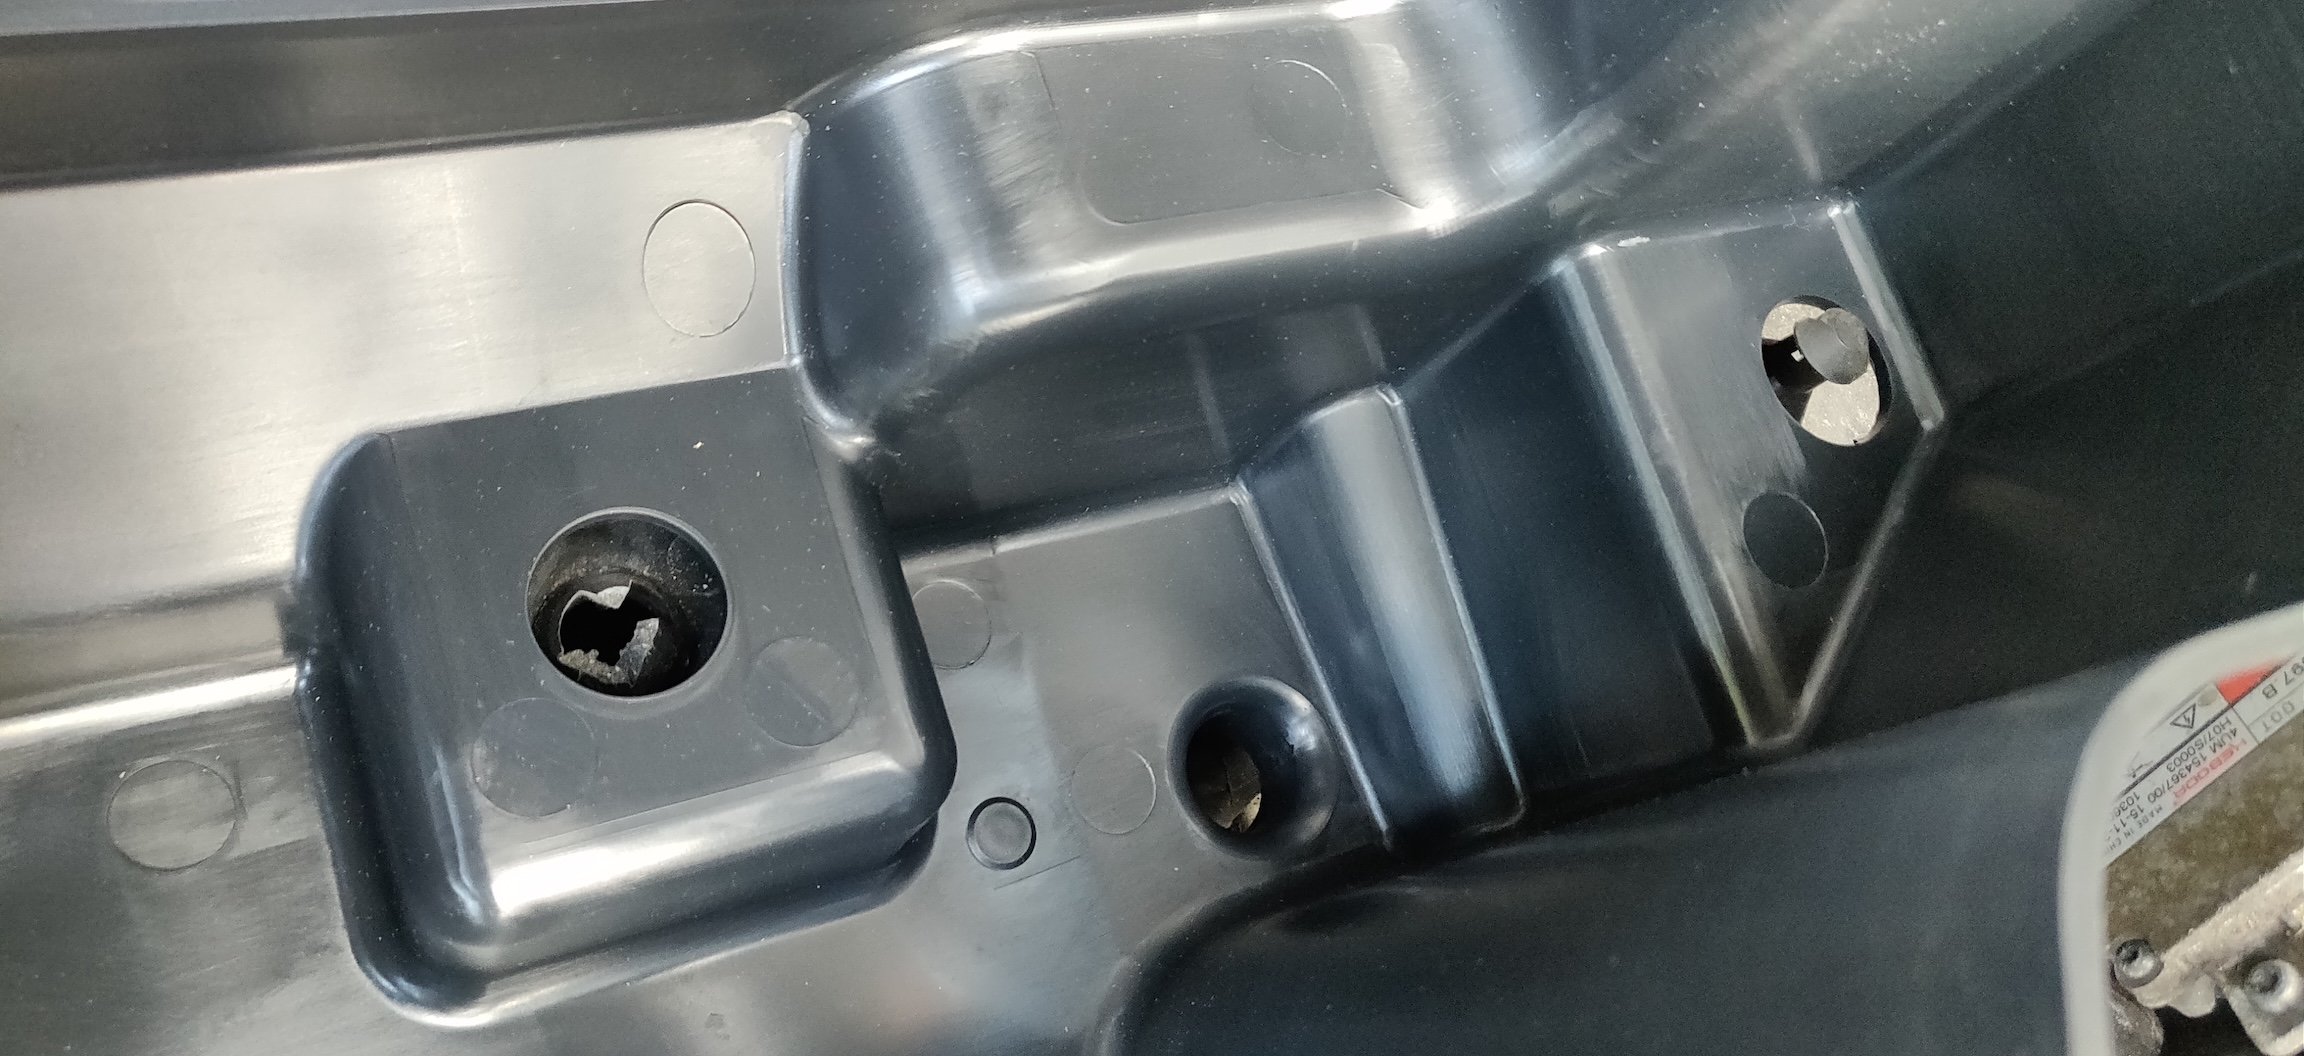
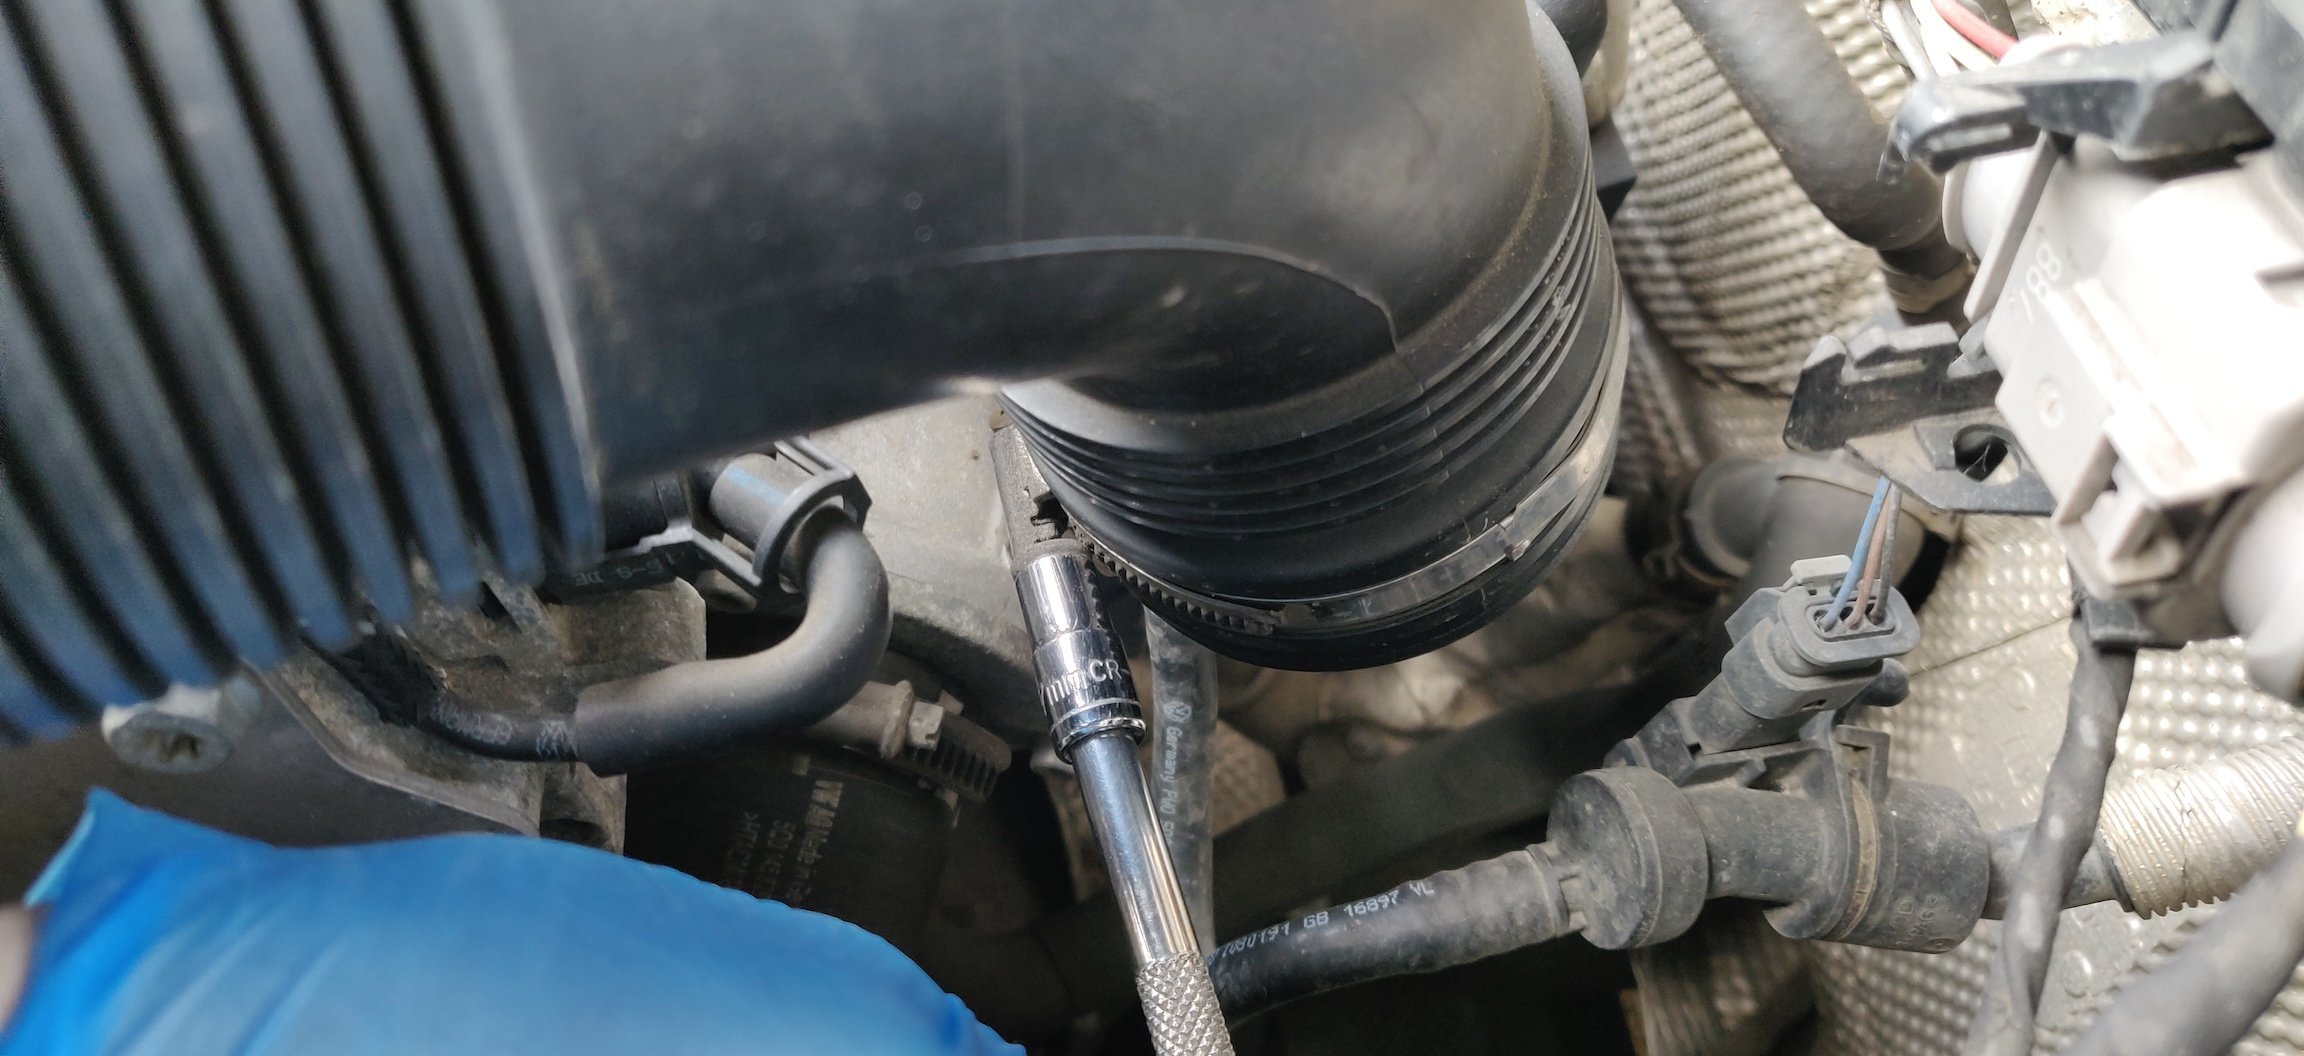
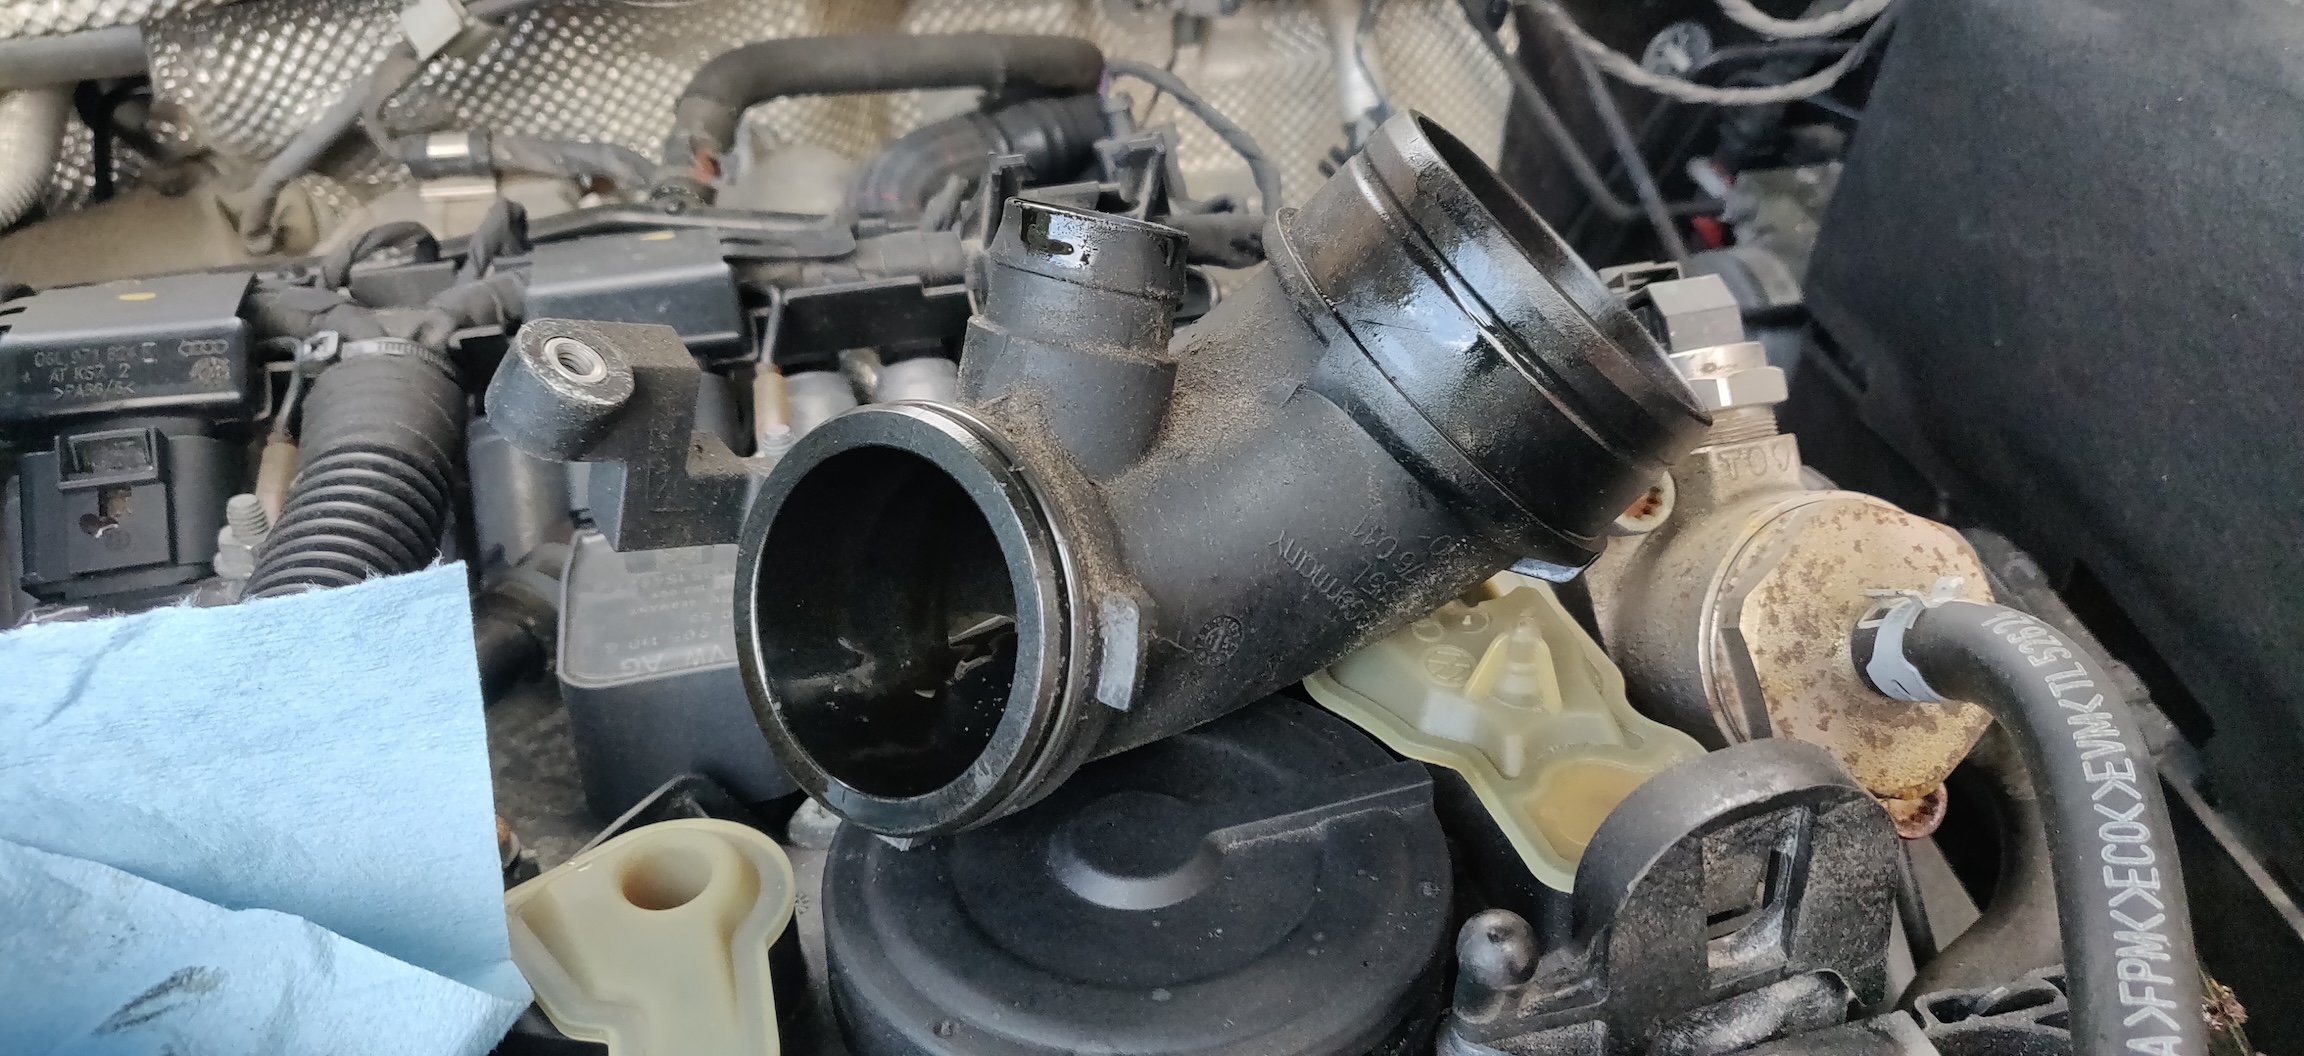
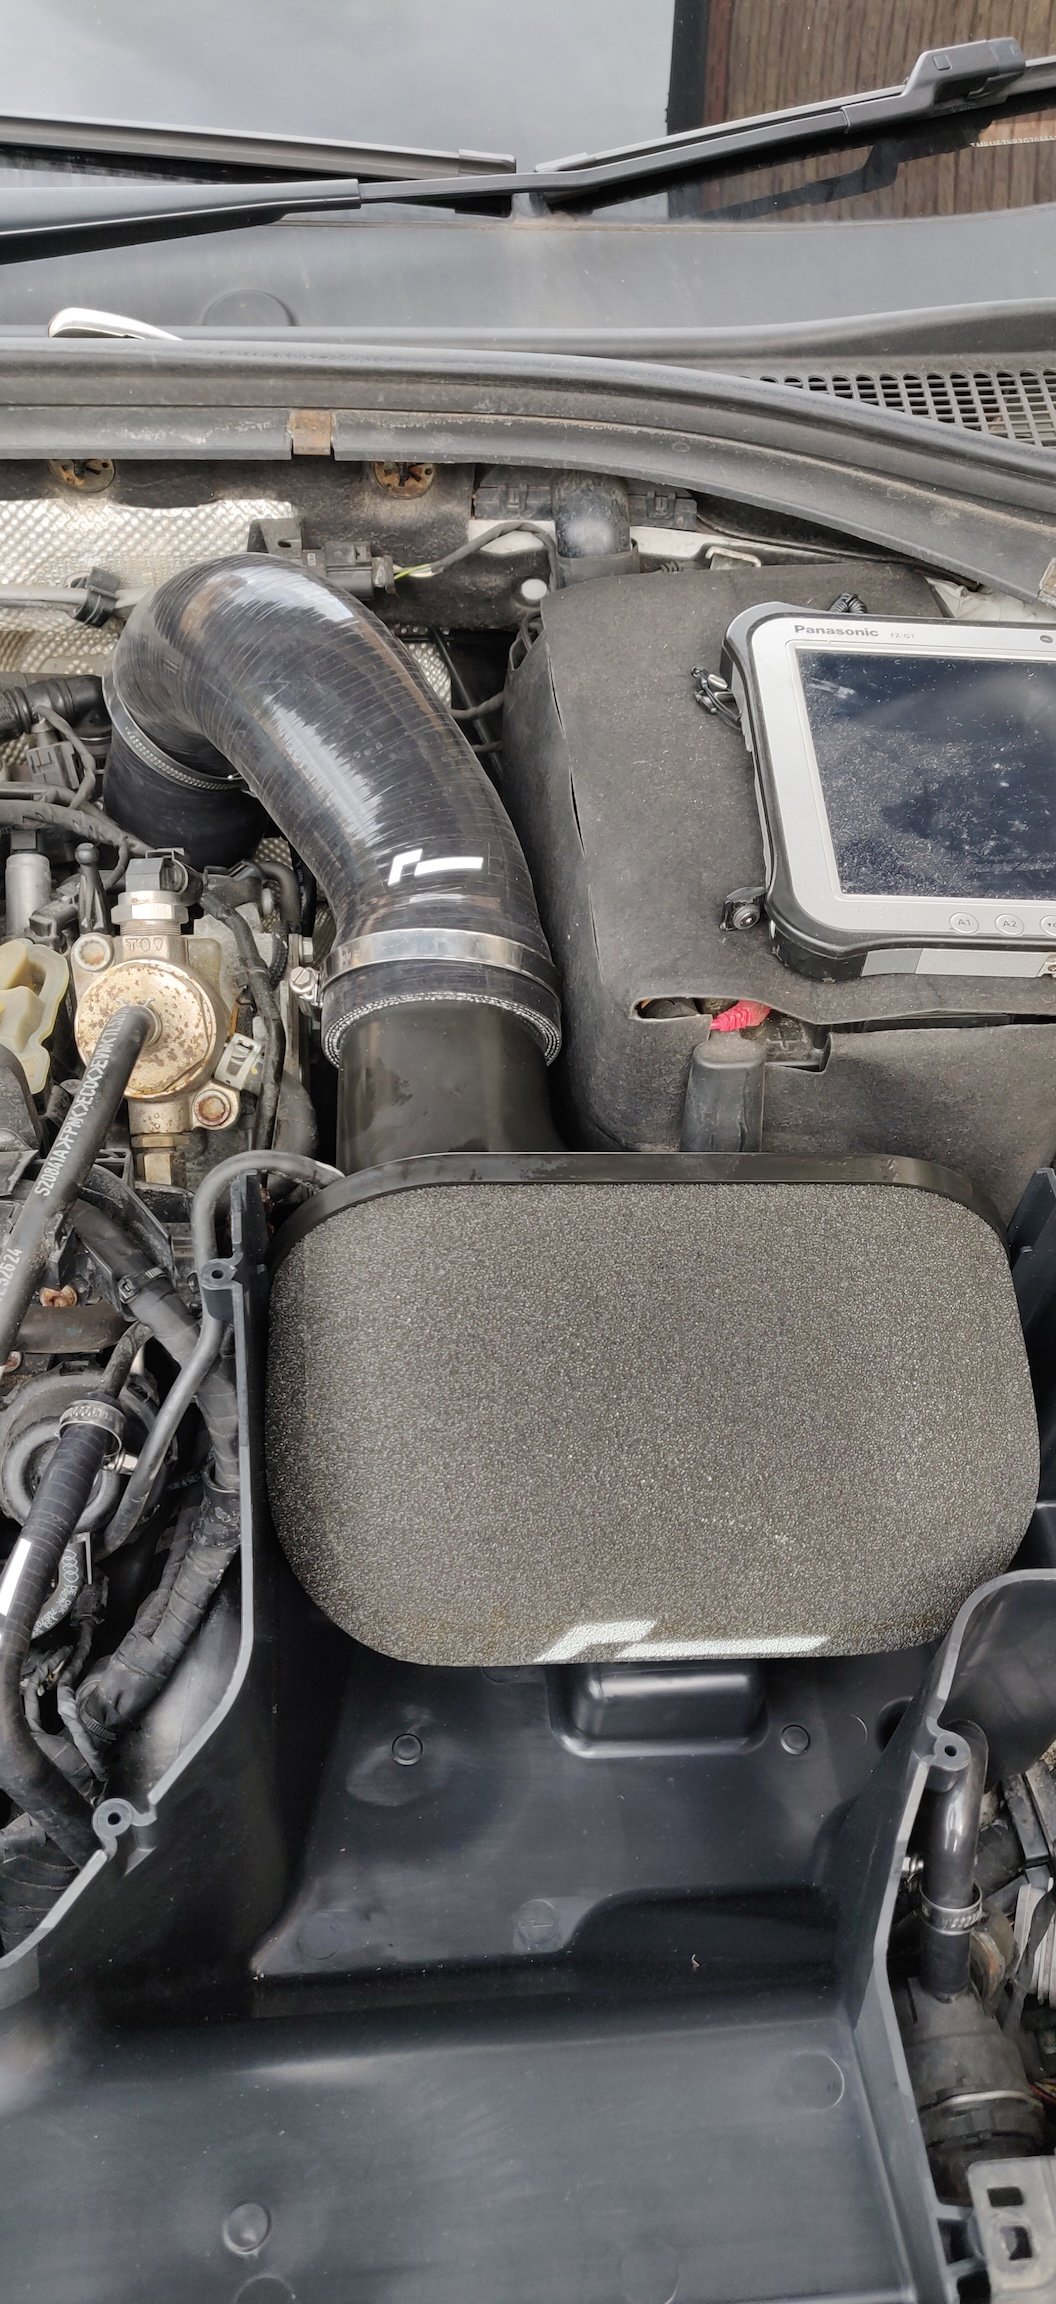
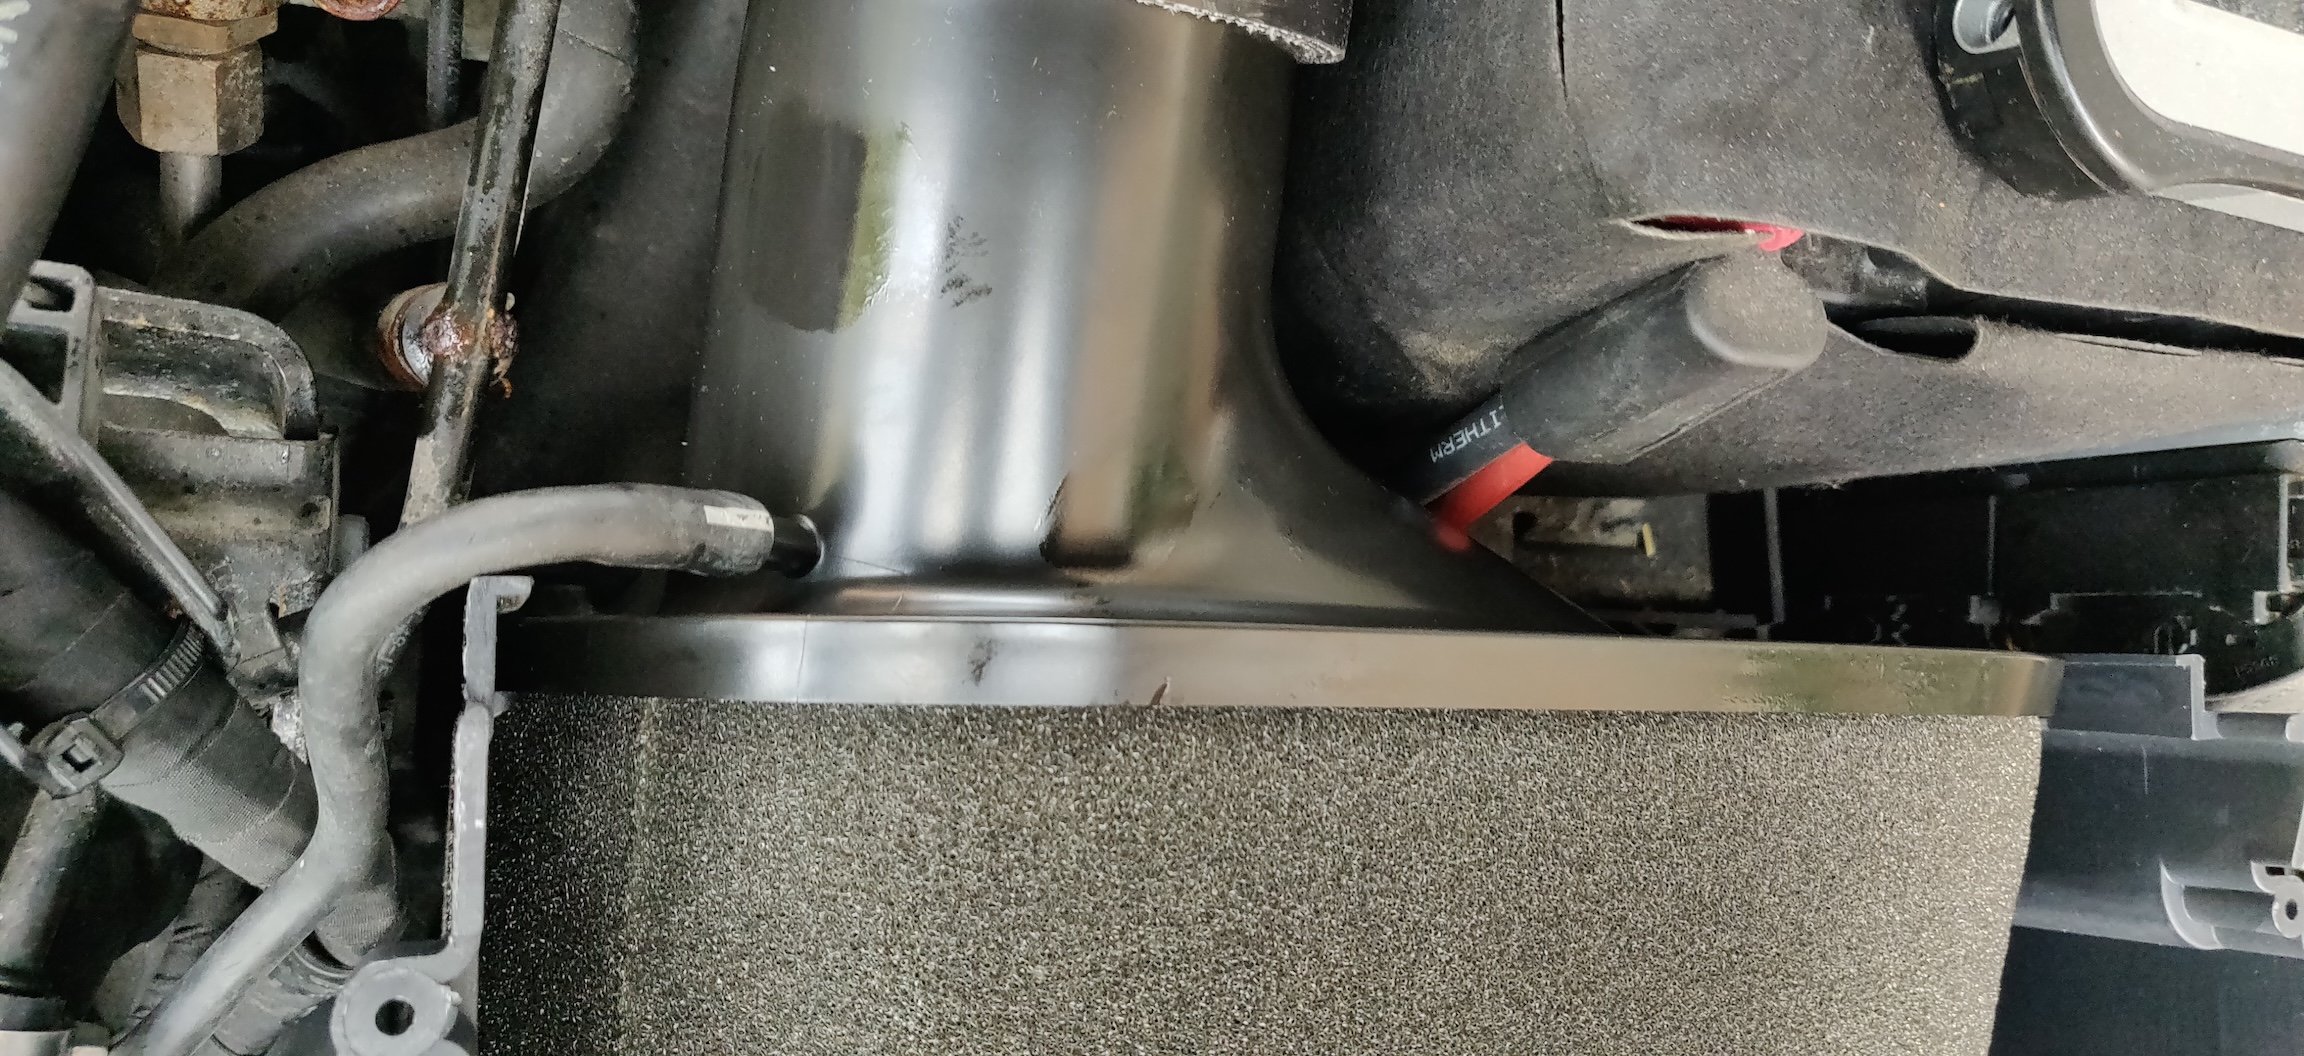
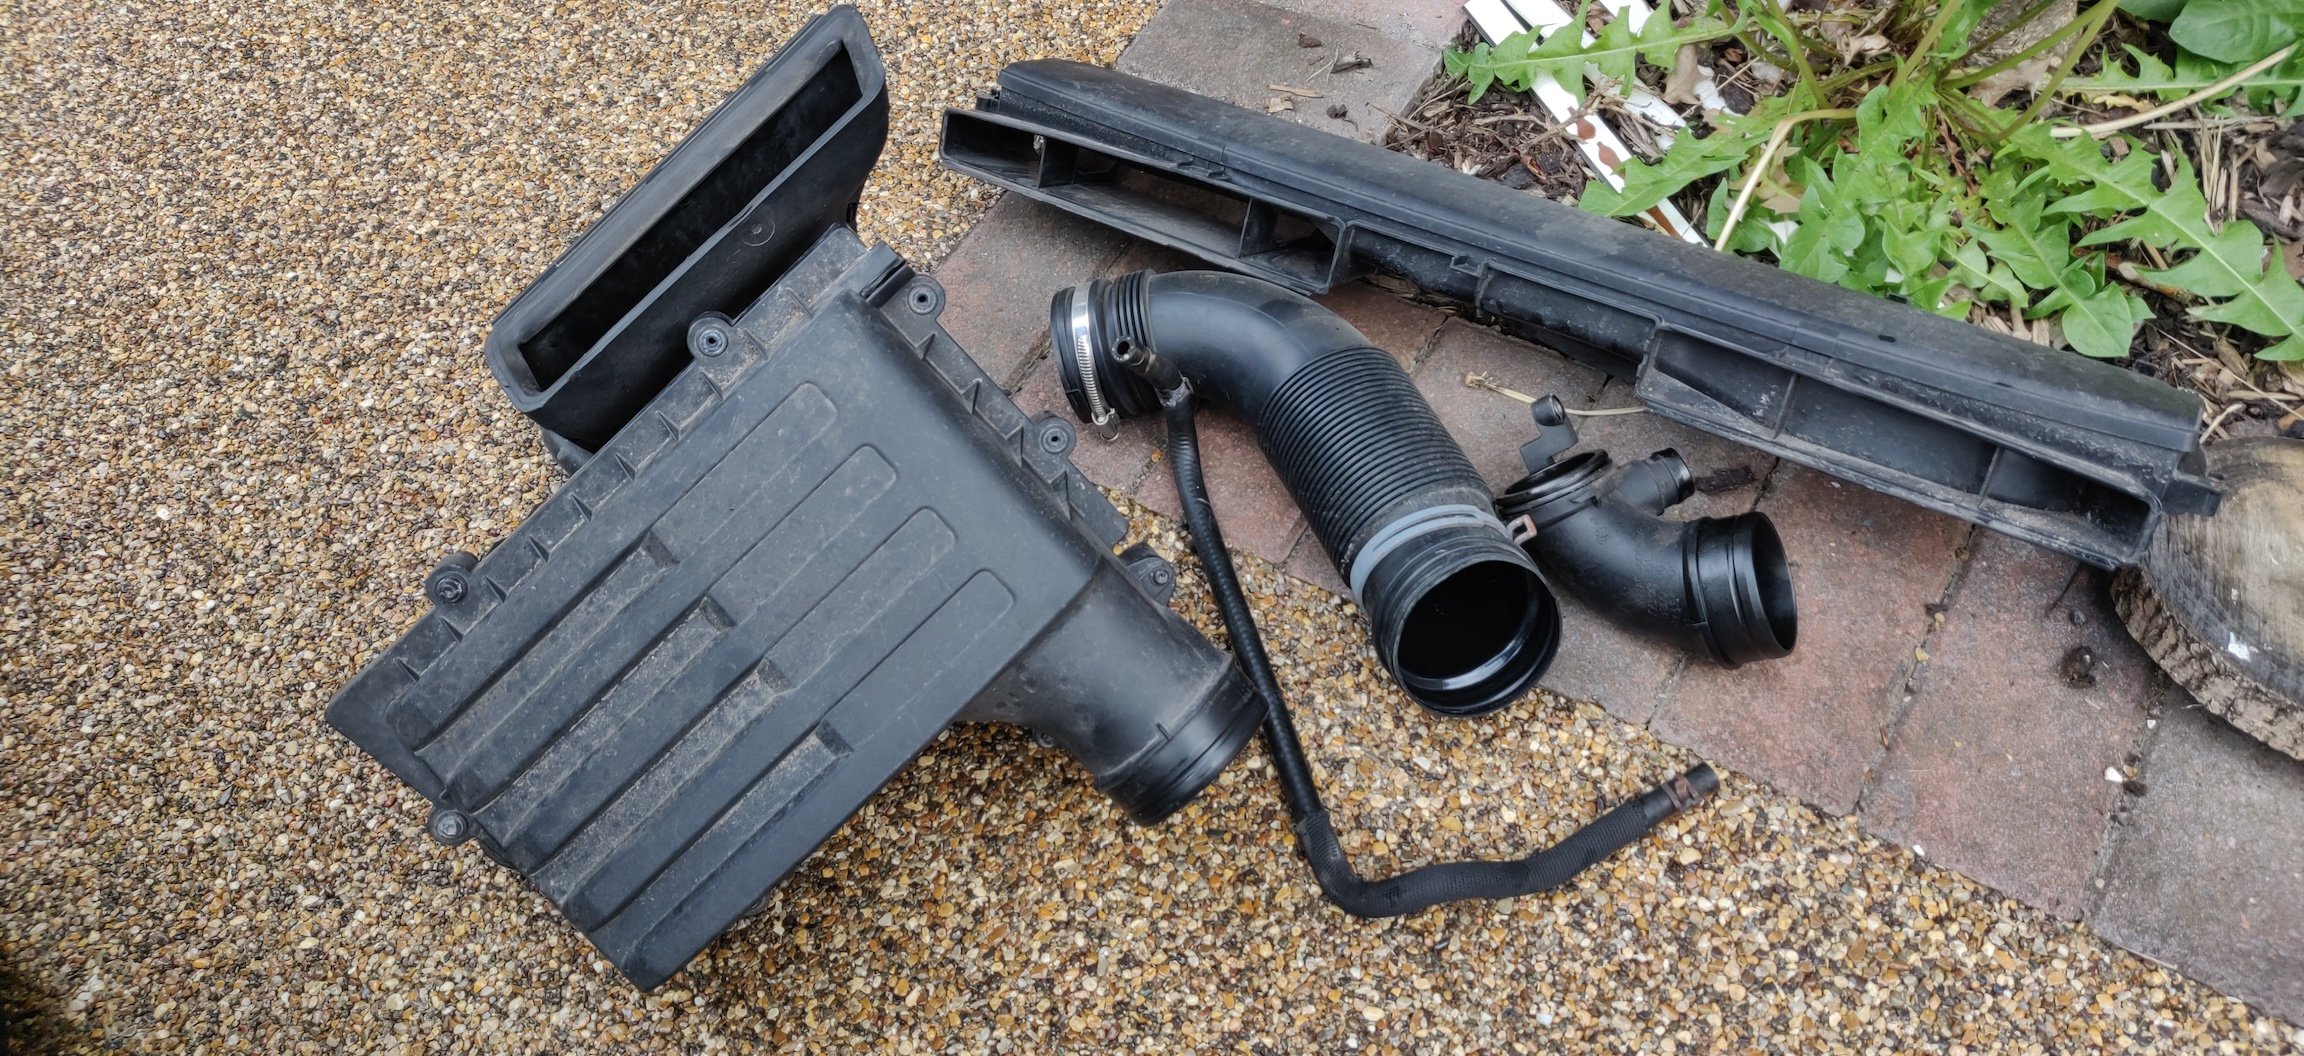
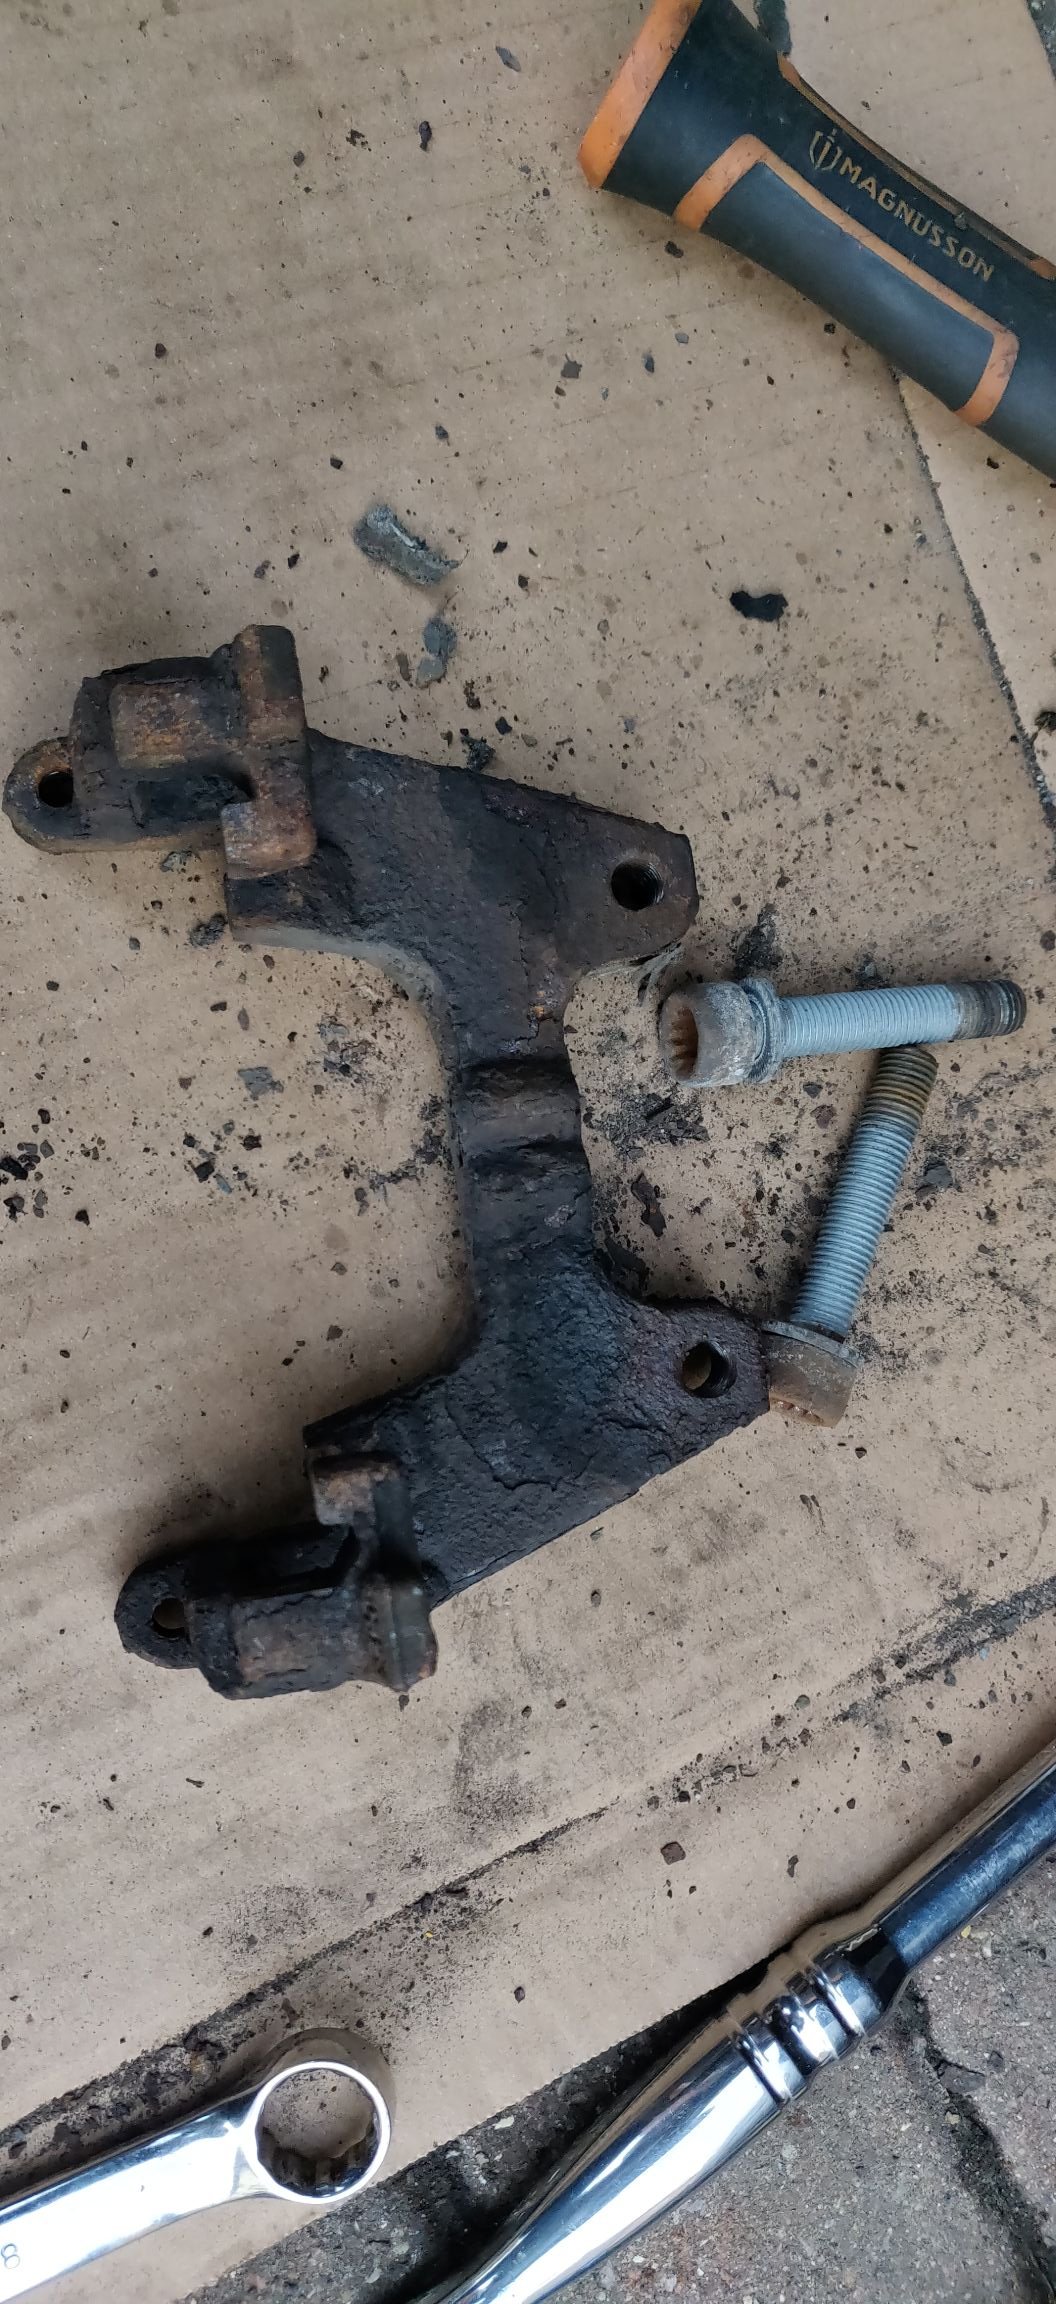
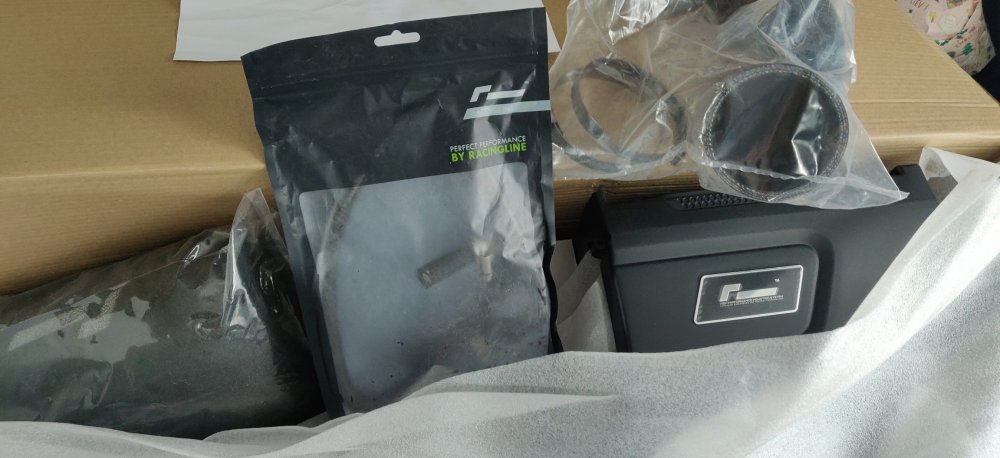
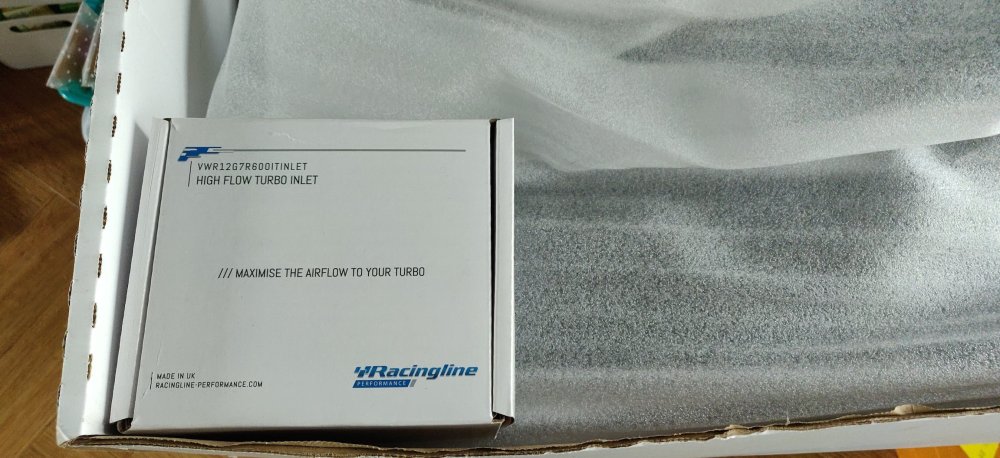
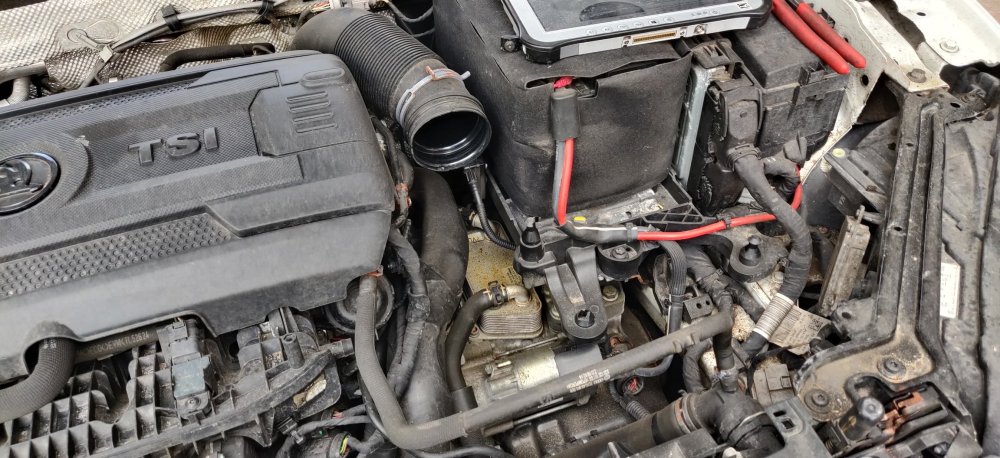
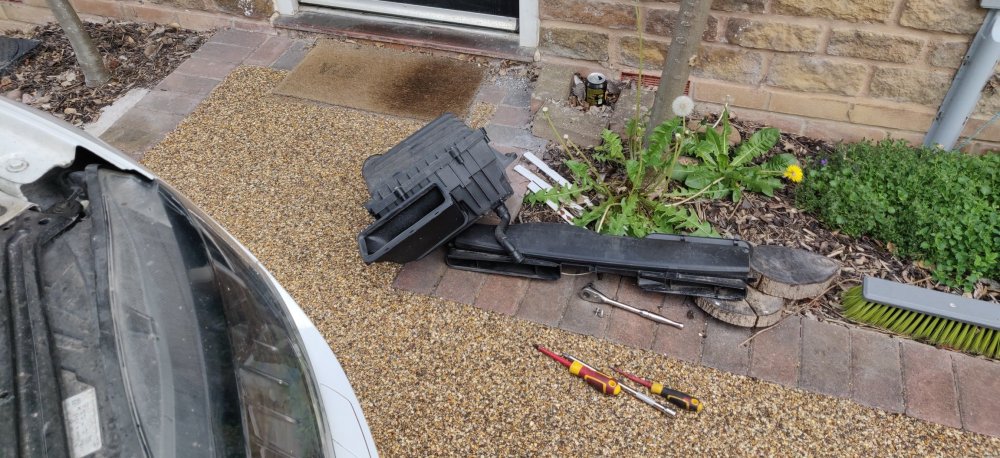
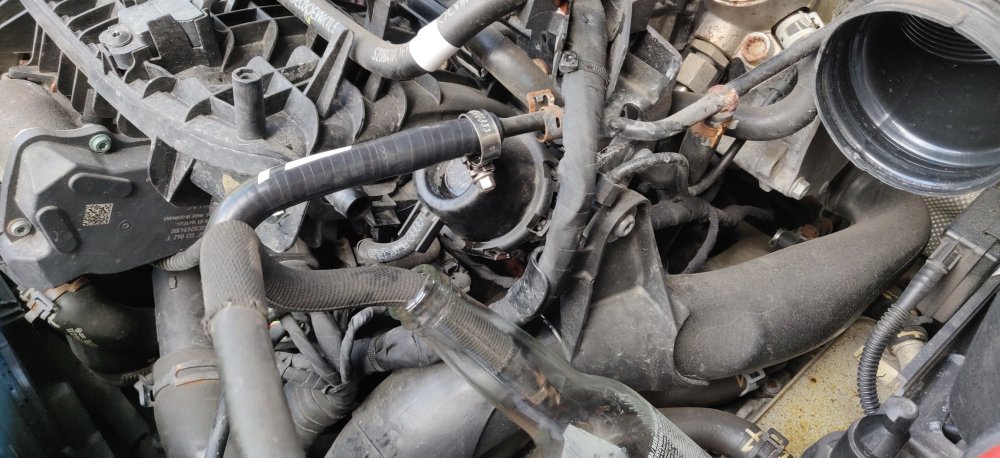
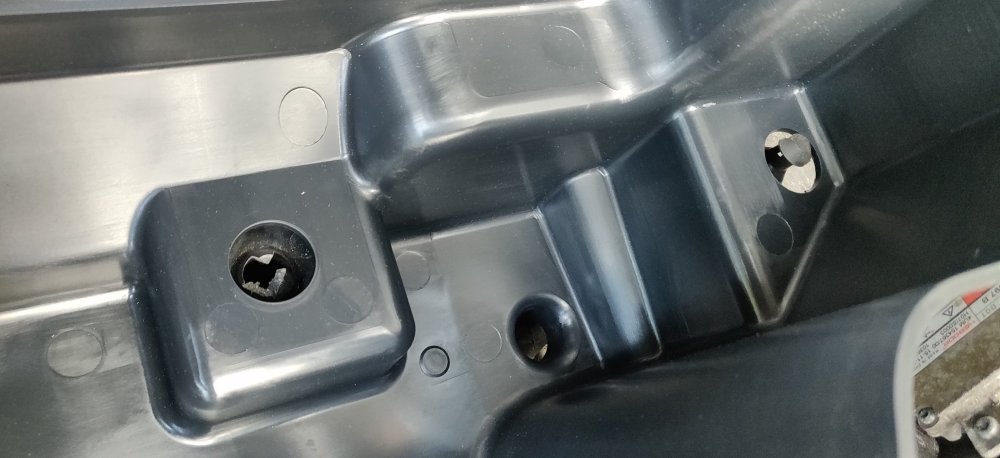
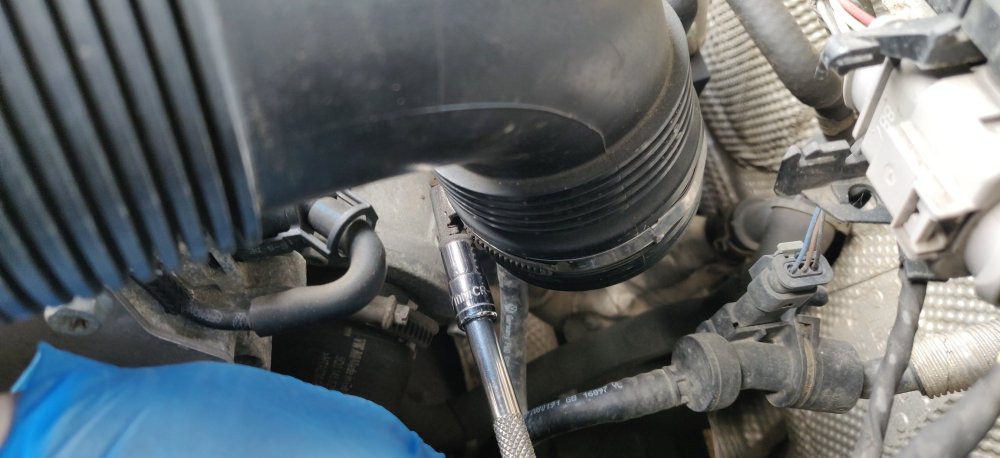
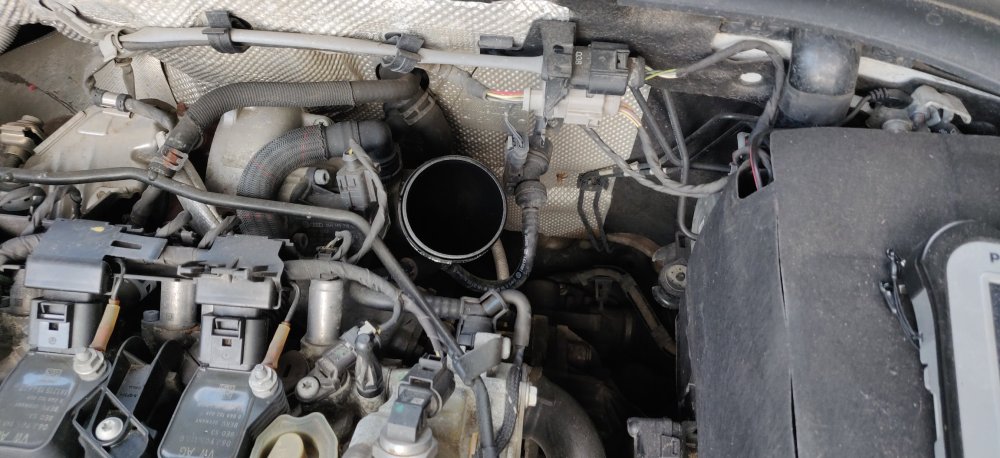
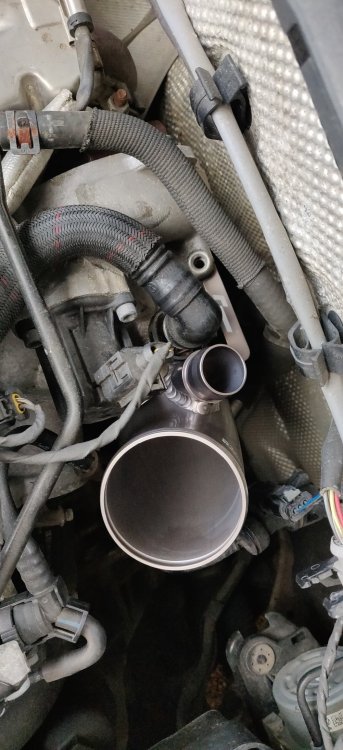
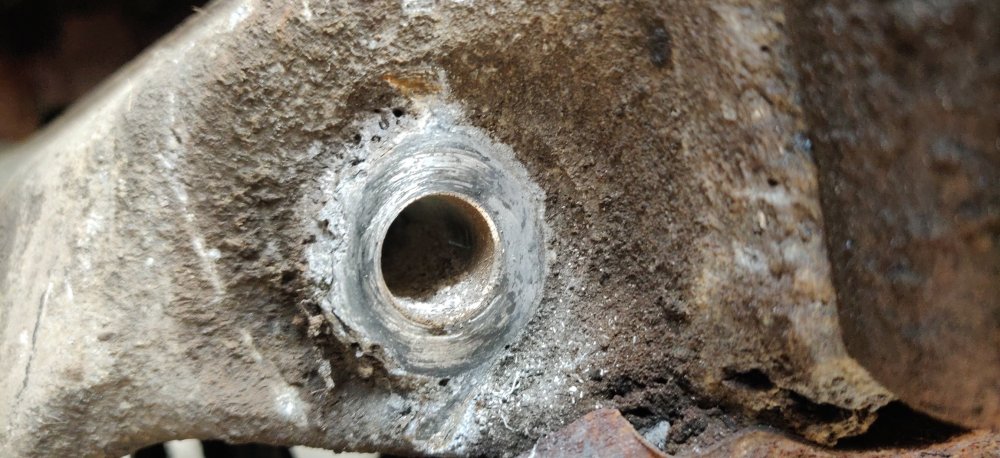
So, after work, took the opportunity to do something that's been on the back burner for ages: I think it's the first engine performance mod! A RacingLine R600 air intake! Alongside other bits such as: Turbo inlet pipe, and additional bits like a replacement pipe to go underneath the new air box bit. These bits were bought absolutely ages ago, circa March 2024, and have been lying around since. The R600 main bits were £502.93. The turbo inlet pipe was £74.99 and the coolant pipe was £42.94. So the first step is to start removing the original air filter box and inlet. Two screws, and the front should wiggle away: Then used a flat head screwdriver to loosen and pop out the vacuum line from the air box: Then my Knipex pliers to get the clamp off of the air intake pipe: Once the pipe is loosed from the air intake box, the air filter box itself can be removed, as its some rubber grommets over plastic bits: Popped out with effort, and unfortunately: Looks like I got too hamfisted and ripped out one of the plastic bits with the rubber! Guess a new battery tray required... So those bits out so far: Next is to replace the coolant hose with the replacement designed to go under the R600 box. Lots of Youtube videos show coolant going everywhere, and to be honest, I did the same. Got towels and whatnot underneath and just removed and replaced as quick as possible: Got messy so no pics for the other side. Wiped excess and some parts cleaner before the next bit. So dry fitted the bottom part of the R600 box: Just some wiggling really, but noticed the instructions mention attaching rubber grommets to the box before installing them: Sadly, the packaging didn't have any! Plus with the broken plastic bit in the battery tray, kinda stuck for now. I expect rattling until this is sorted I guess. So carrying on, time to remove the air intake from the filter to the turbo inlet pipe: Standard hose clamp, so a 7mm to loosen, and then wiggling to free that pipe: So next is the turbo inlet pipe. There's a hose that needs to be removed, via squeezing and popping it off. Then also a T30 torx bit keeping the pipe in place. Once removed (carefully lest that torx bolt drops into the abyss!), initial attempts to pull the pipe off wasn't fruitful. Turns out it needs some rotating before it pops out: The new one is the reverse. I put a light smear of engine oil on the o-rings that the new RacingLine pipe had, then pushed in and rotated into place: Then carefully put that torx bolt back into place. I tightened it to 12Nm as its an M6 bolt, not sure what the actual figure needed is. On the home straight now. The R600 kit came with a new pipe, so slotted that in alongside the filter itself: Just some wiggling but it eventually all aligns up. Orientation of the pipes and stuff was probably made simple by just looking for the RacingLine logo and making sure that points upwards! Not forgetting the vacuum line: That's pretty much it, on with the top cover: Tighten up all the hoses and bits and that's that: Noticed also that the R600 box didn't have any screws, so decided for now to just take a few from the OEM air filter box and attached them to the R600 box. Will need to source rubber grommets for the R600 box and screws if available. The spoils: So will need to find somewhere for these OEM bits to go, but that's that! Haven't really driven it in anger yet, I'd imagine there probably won't be any major difference really. Am hoping this becomes useful once a remap is involved! Bit annoying that some of the bits were missing, but some Googling has shown replacements are available, so I'll order those, and probably a battery tray as well, so technically some of this will need disassembling once those have arrived. Maintenance: £3285.99 Upgrades: £5338.13 (+£620.86) Miscellaneous: £827.47


-
A valid question, and unfortunately, could be the case! I'll be doing an oil change on the thing in the near future, and I think whilst I'm down there, I'll try and see if it looks like it'll fit. It had the original lower control arms on there, and they didn't look wonky. Aluminium ones as well, but they're a bit shorter than the ones for the Superb, so will have to use steel ones. Worse case scenario would be the current subframe goes back on I guess...
-
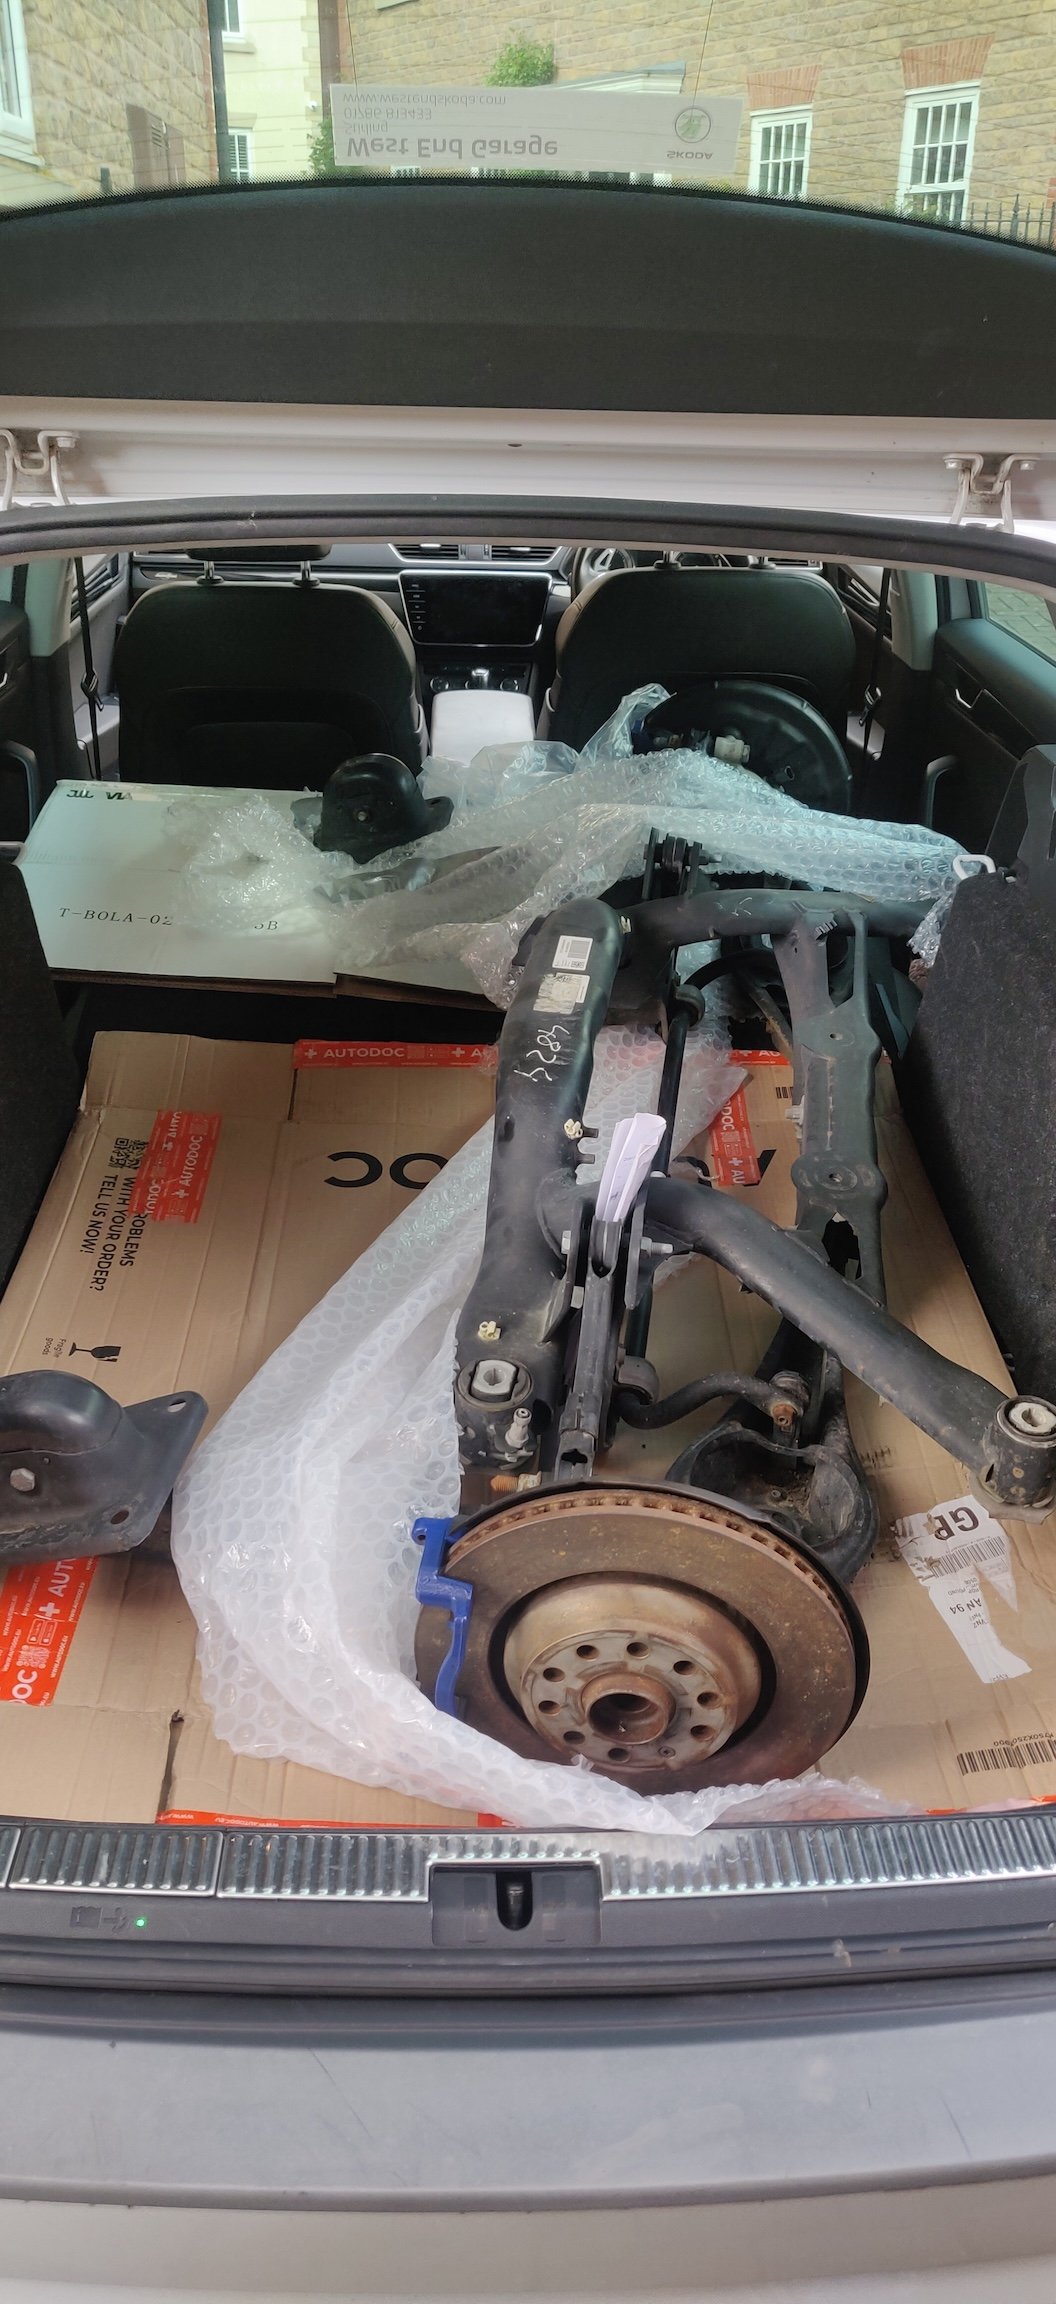
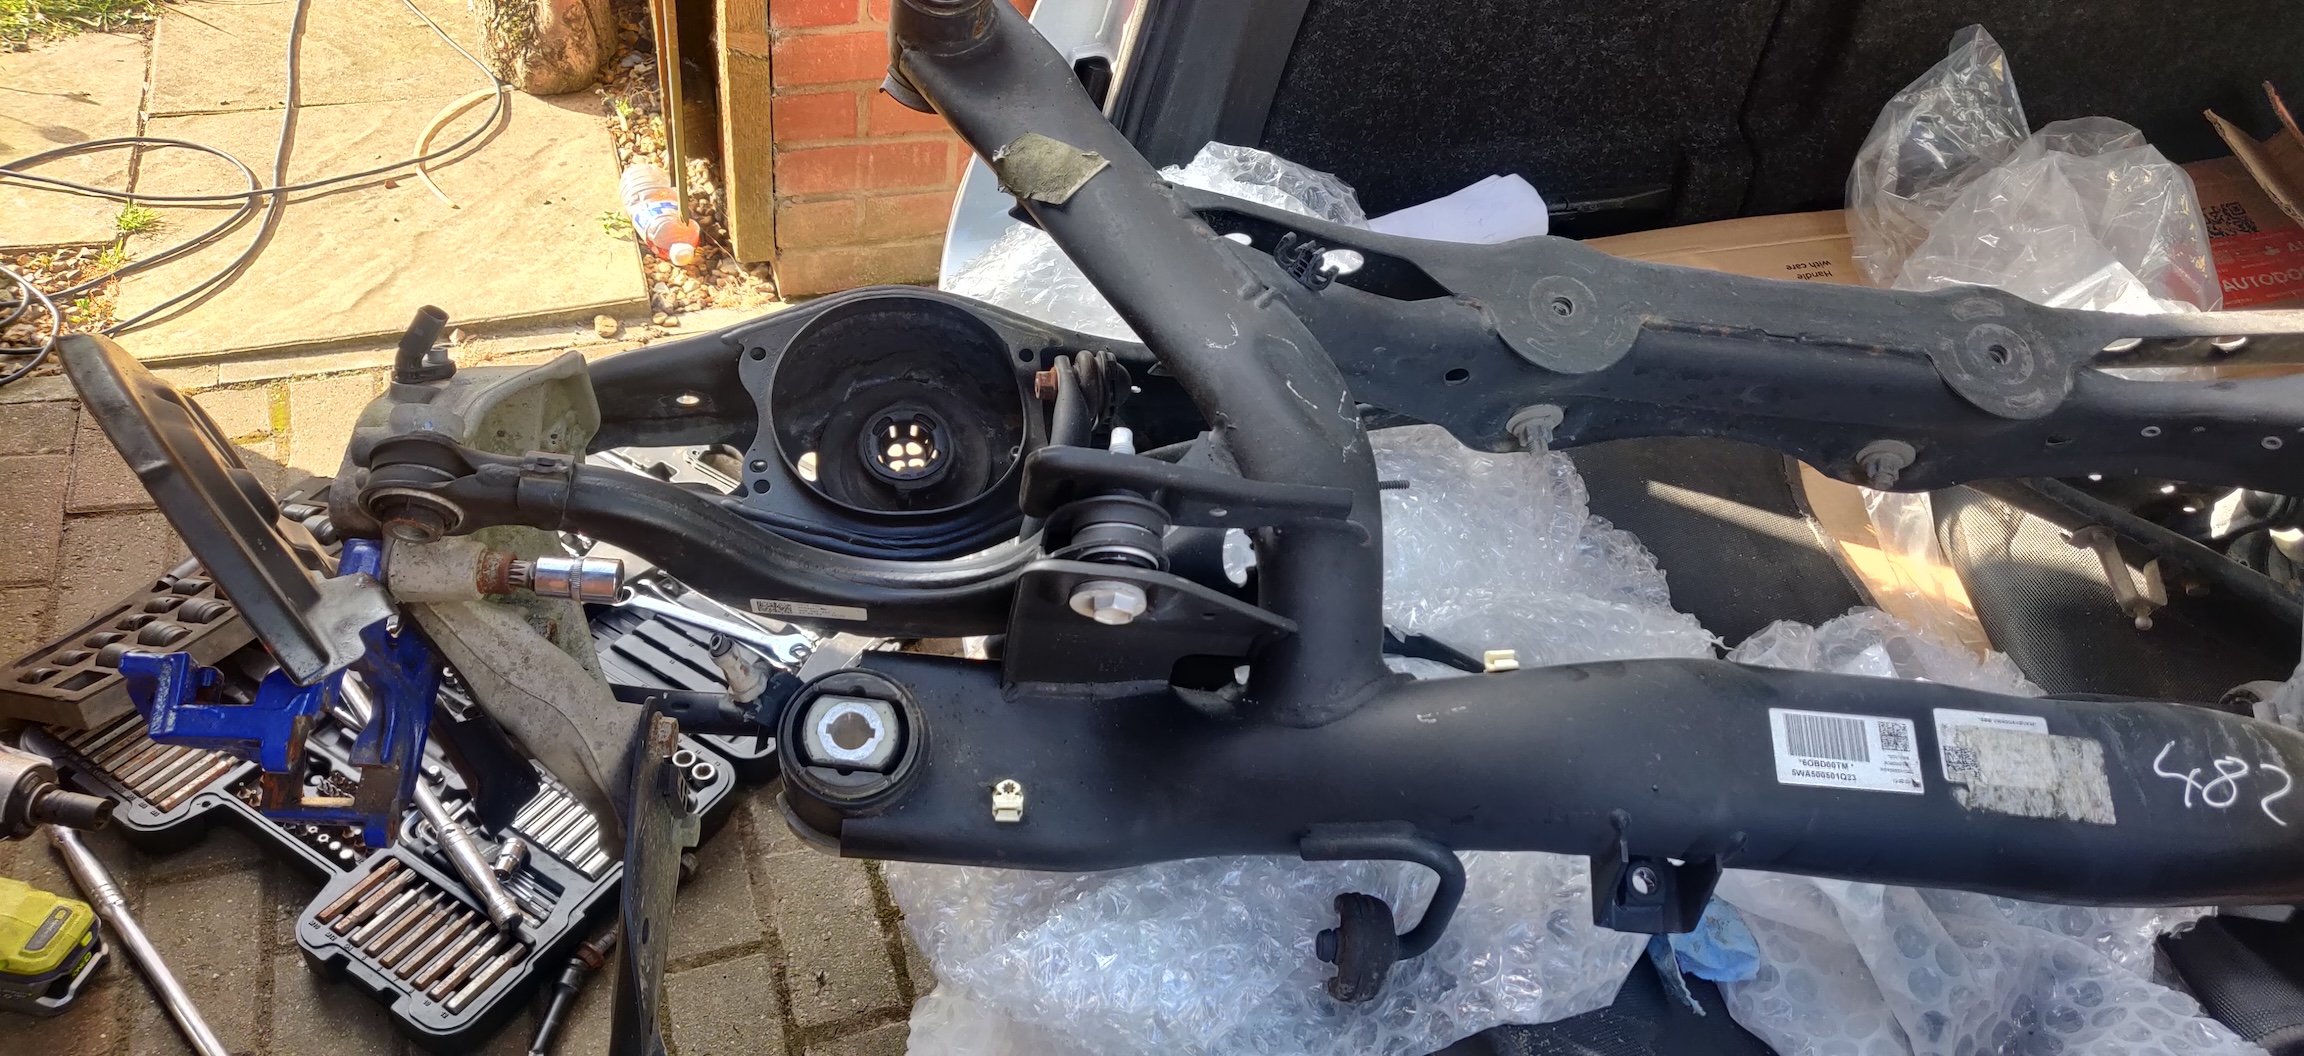
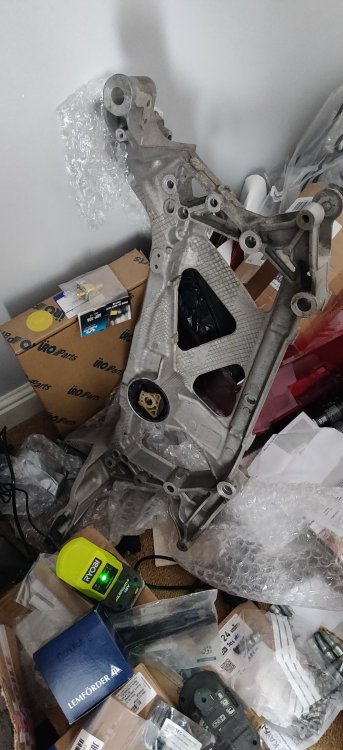
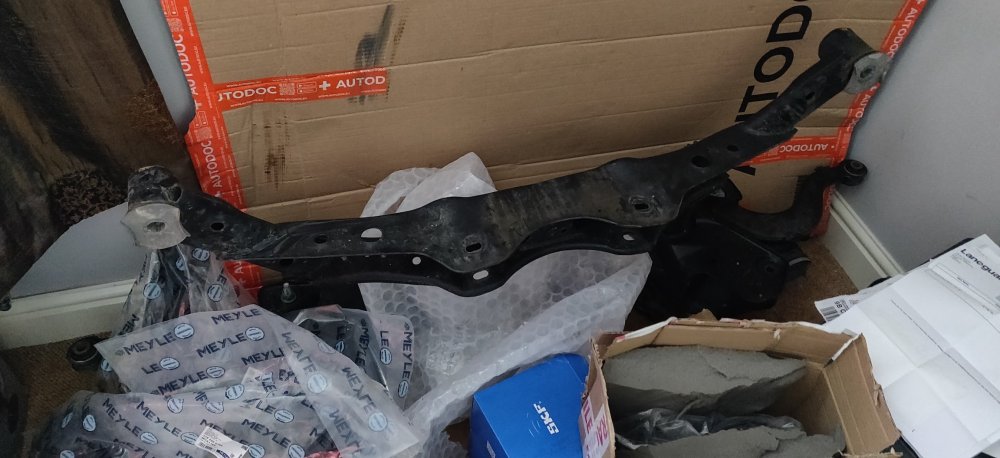
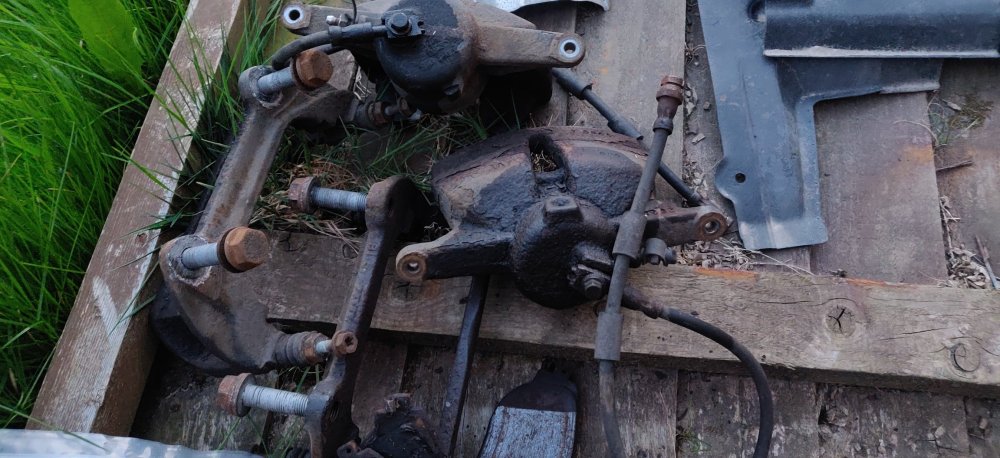
MoT all passed, so all good on that front! Gonna post some stuff I've collected randomly as part of long term planning and hoarding. That way, I can add them to the cost tally before I totally forget! So I've had this tucked away for a while now: An aluminium subframe. Got it for £100 from eBay more than a year ago! The ad said its from an Audi RS3, but to be honest, but be from anything from Golf R to anything related. Because it's aluminium, I've pretty much left it out in the garden come rain or shine, but I've given it a quick rinse and wipe over, as I'm planning for this probably end of summer or early autumn. I should probably price up the other related bits, but I'll leave that for when I start tackling this in earnest, as essentially every bolt is replaced, let alone other bits like wishbones and ball joints, etc. I also found this on eBay that I couldn't resist: Virtually an entire rear axle. This was £165.75, and as you can see, even has the rear pad carriers and discs attached. The ad said it was from a Golf R, and given the colour of the rear pad carriers, didn't have much reason to argue against this. It's not immaculate, but only has a few bits of rust around the subframe and arms, nothing that a slathering of hammerite or somesuch would help with. Took three of us to hoist this into the rear boot, and with just myself at home once back, didn't have much choice but to start disassembling it to make it less bulky: Was a case of slowly attacking the bolts with impacts and whatnot until arms, hubs and other bits were all separated out. It's a lot easier with a free floating subframe and parts that haven't rusted to buggery! Once it was virtually the subframe after a hour or so, plonked it into the house: Wife isn't particularly chuffed with this arrangement, so I'll probably have to consider giving it a quick clean and then probably buy some shrink wrap or something and wrap it up so it can be left outside or something. Complete madness on my part, but given replacement arms are a few hundred pounds, let alone a subframe in good condition, I couldn't resist. Whether I genuinely brave disassembling the rear of the car, and the all the inevitable chassis/body clean up as a result of that, I don't know, but having this around hopefully simplifies the reassembly stage, and if not, I can probably sell it on. Got some other bits I could probably start doing this evening, mainly as this looks like the last nice sunny day before the weather turns for the weekend. Maintenance: £3285.99 (+£165.75) Upgrades: £4717.27 (+£100) Miscellaneous: £827.47


-
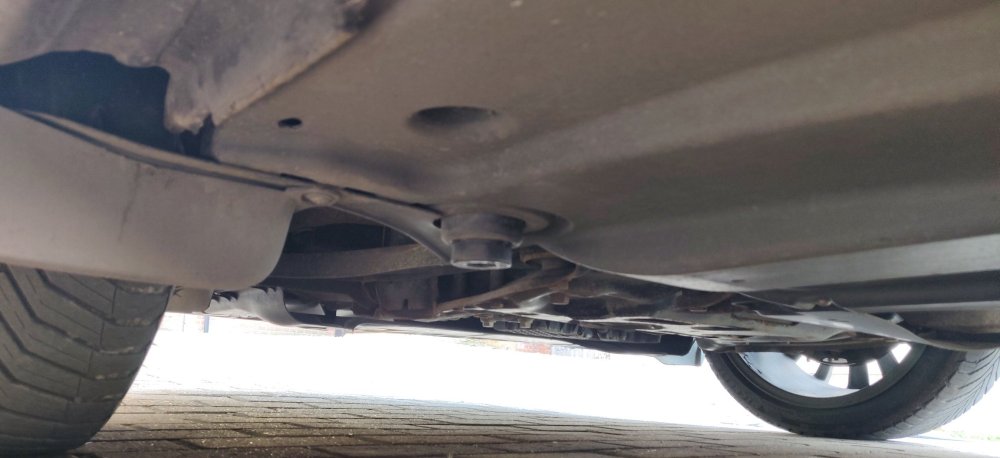
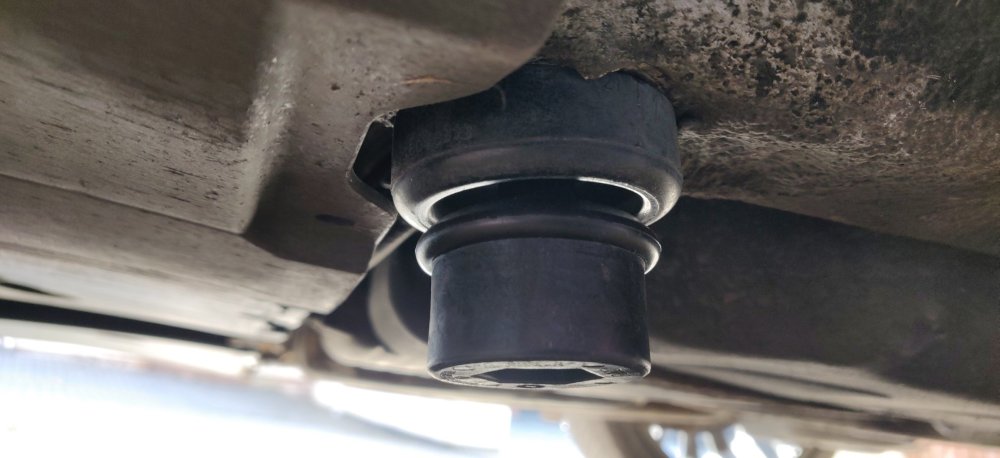
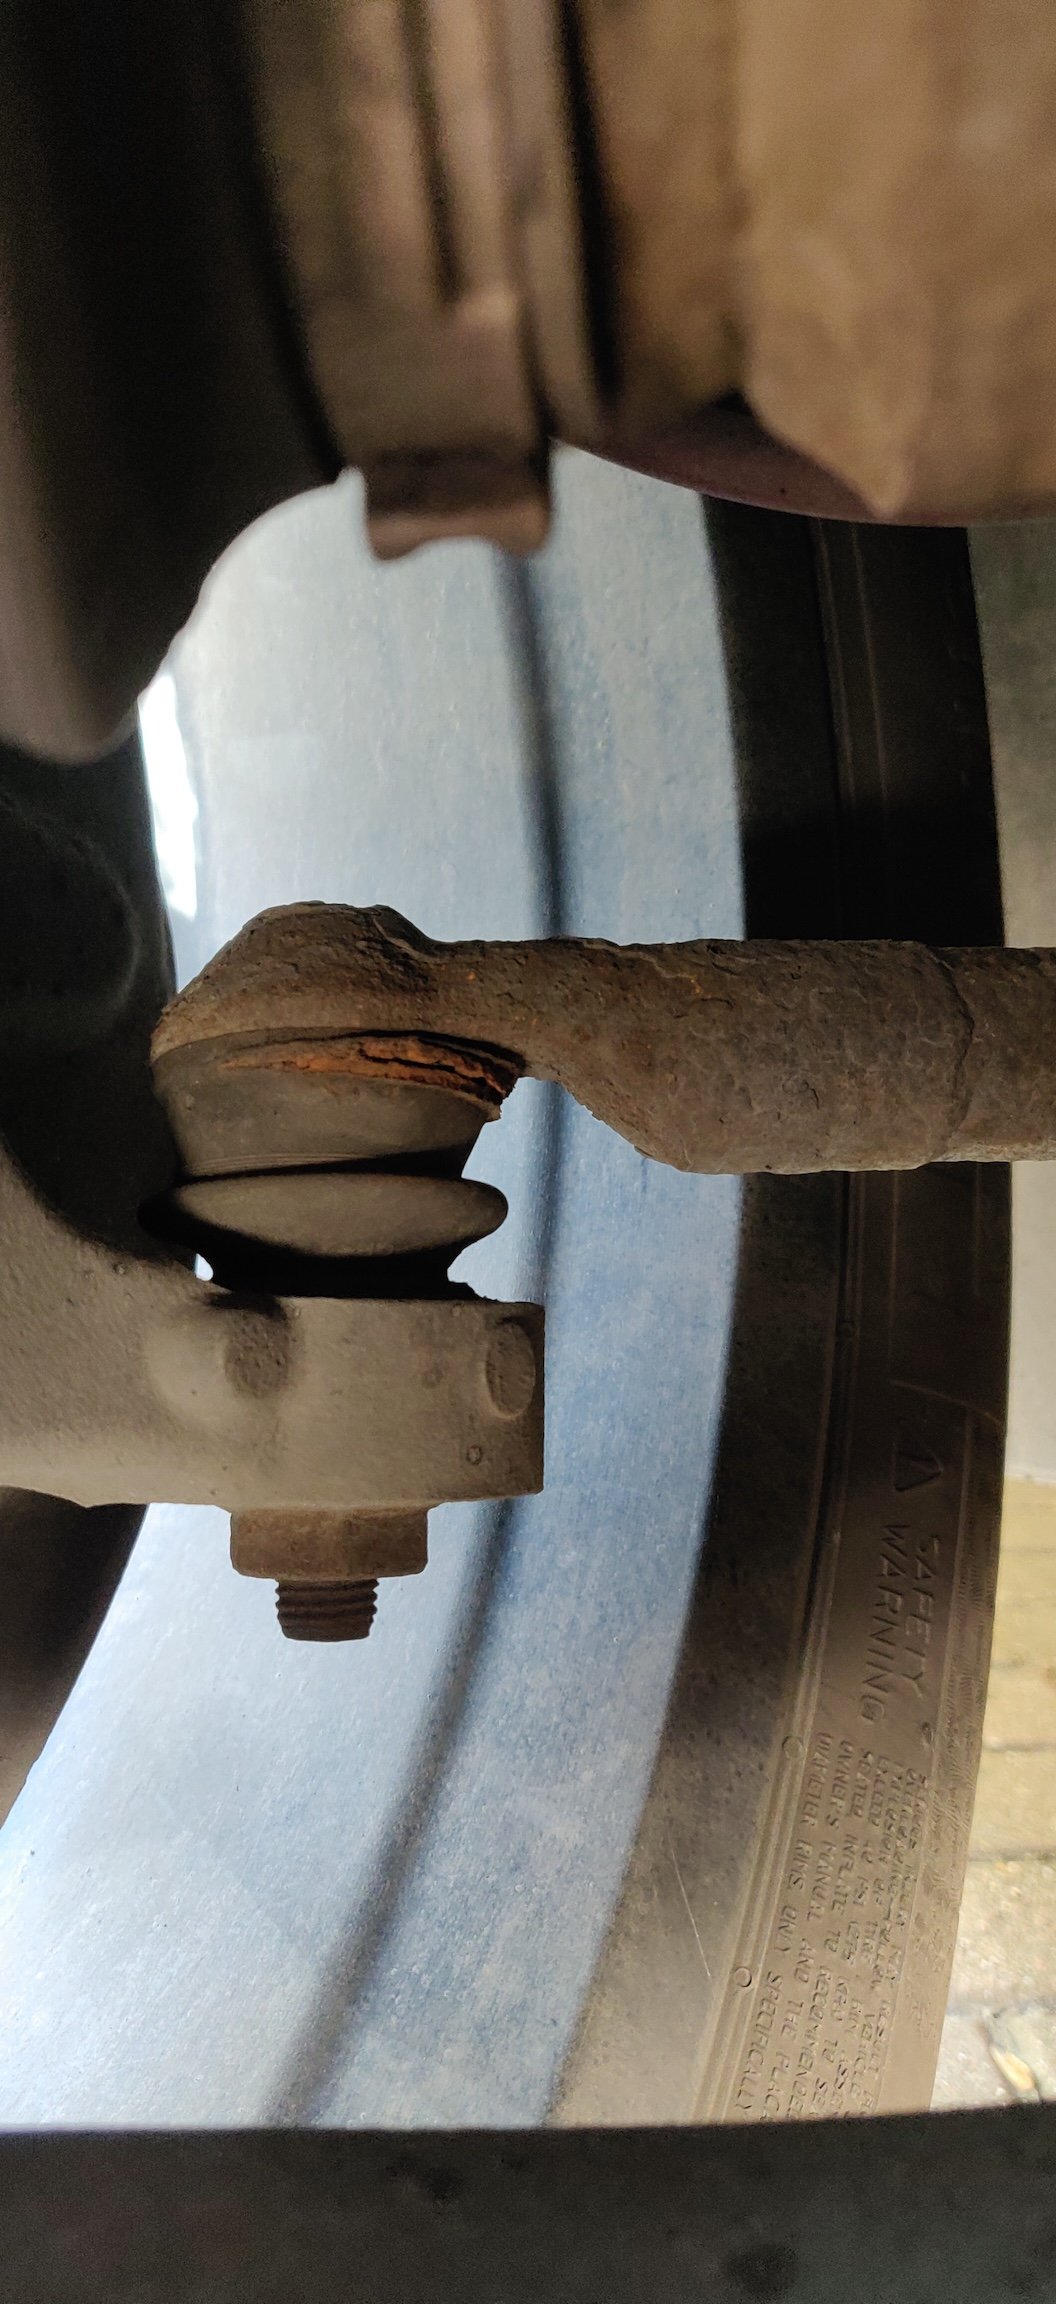
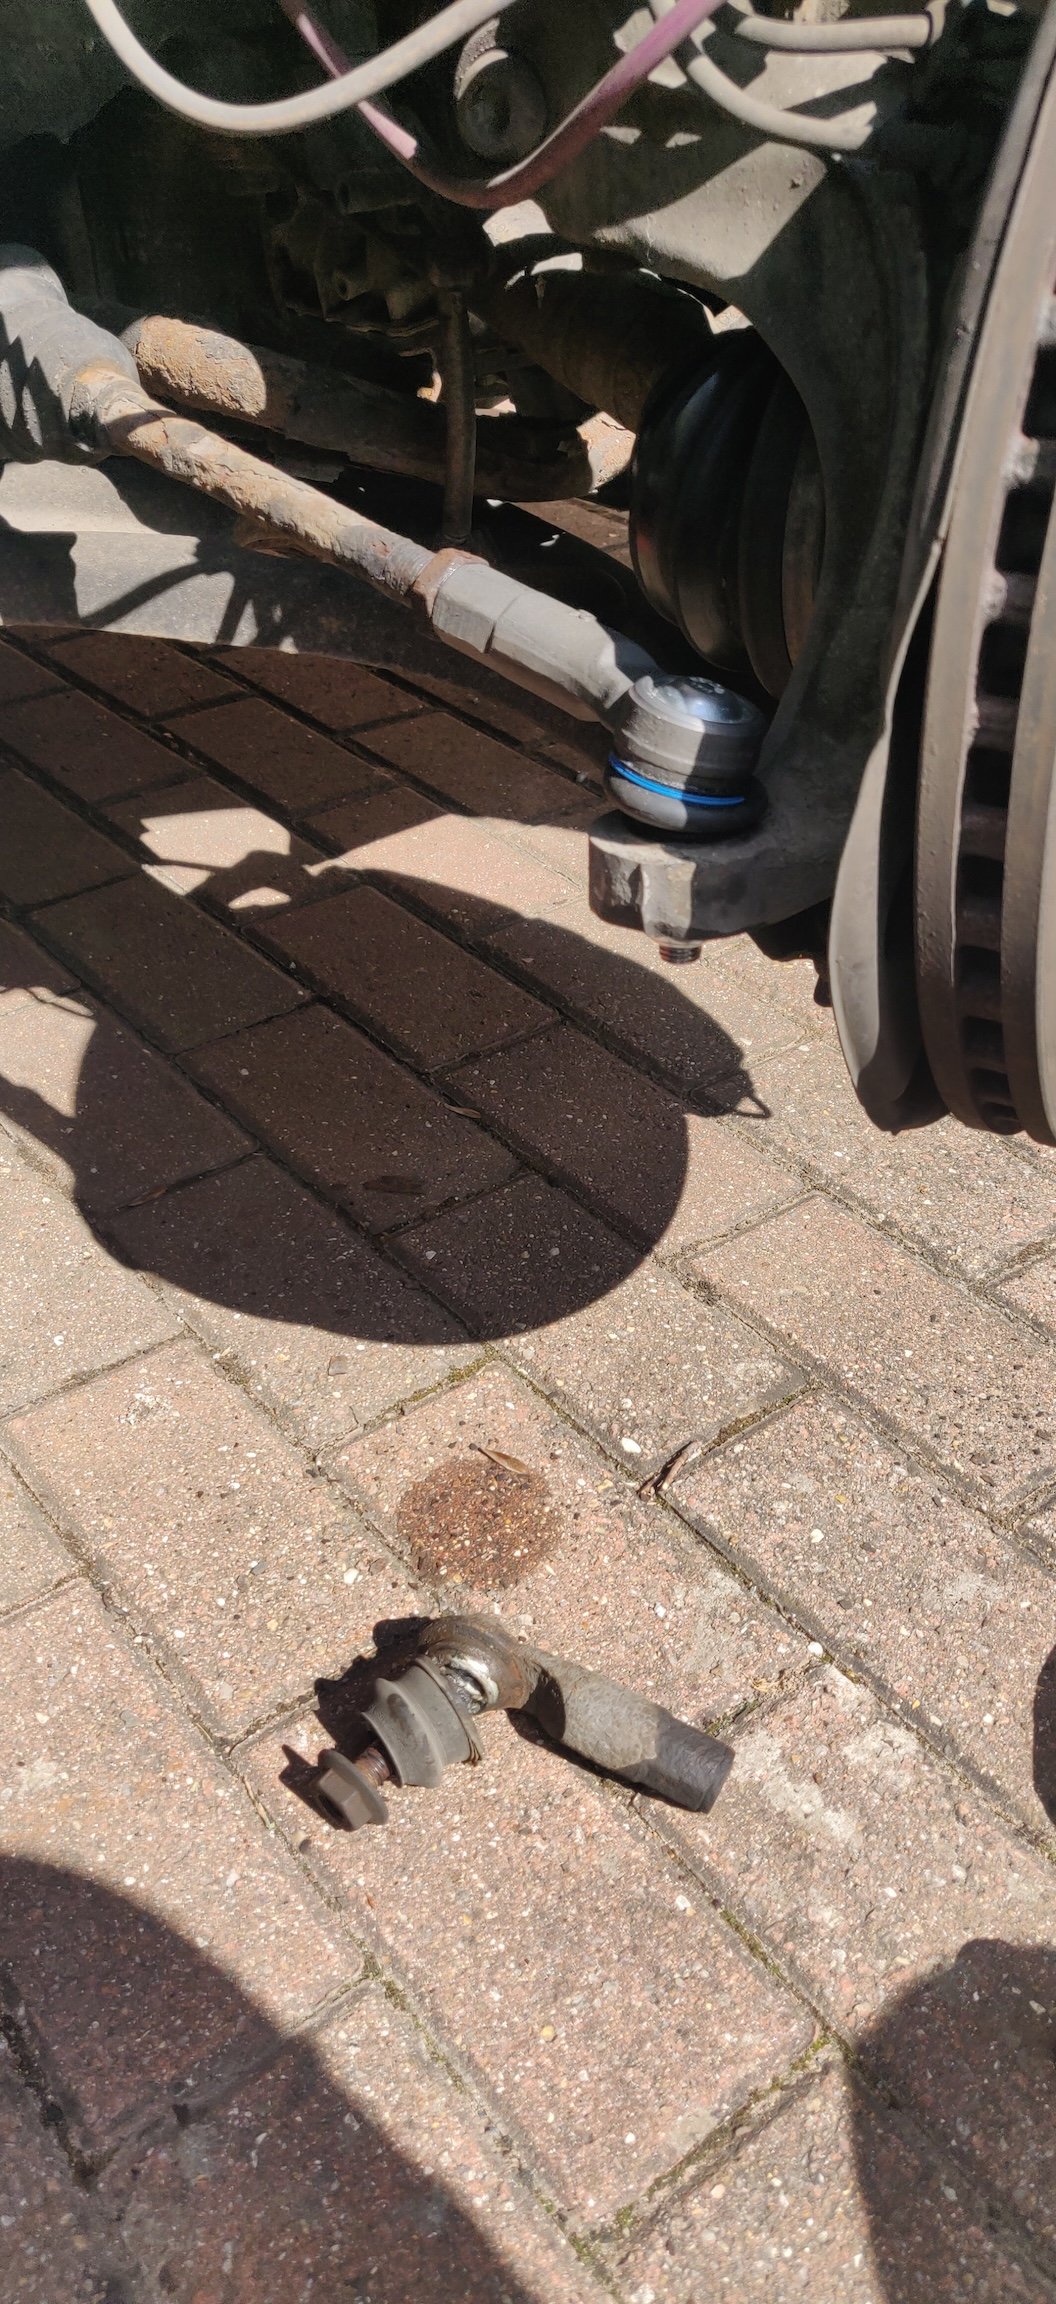
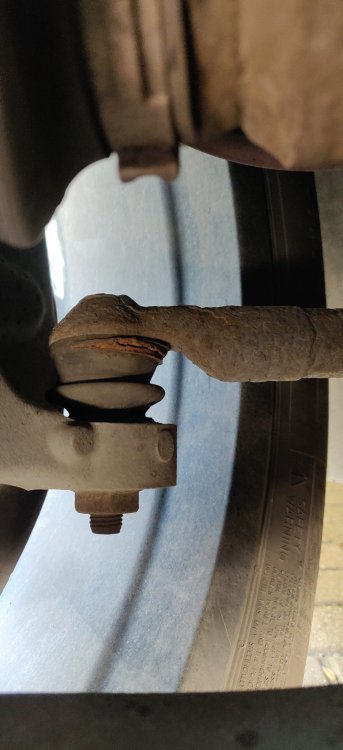
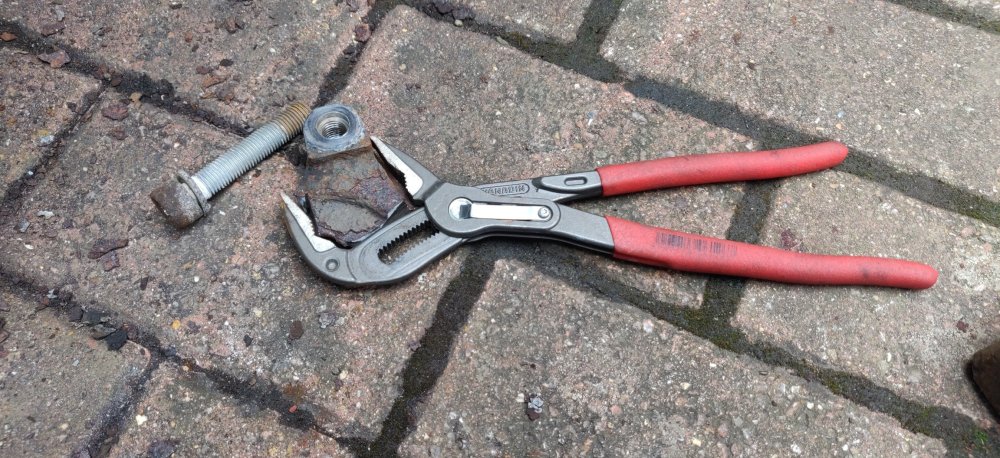
Hi all! Been a while! So the car failed its MoT: Driver's side tie rod end, no idea what's happened, but looks like rusty remains of whatever was trying to keep the rubber boot in place has long gone, leaving the boot unable to do its job. So off to scour the interwebs for replacements. Got a pair of Meyle HD's from eBay for £33.81. Parts 116 020 0025/HD and 116 020 0026/HD. As is typical, this was all on the Thursday on the run up to the Bank Holiday weekend, so essentially had to wait until yesterday before they arrived. Decided to sneak out of work for a bit to try and tackle this. Original intent was to at least get the wheel off to see if the locknut would come free. Kinda lucked out: Gave it a quick wirebrush and PlusGas, then got a 24mm spanner and gave it a grunt. Magically, it came loose! Only a tiny amount, sure, but that's all that's needed. Buzzed off the nut on the other end, gave the hub a few whacks with the lump hammer which resulted in the old tie rod end popping out, and then just replaced with the new one. Was 22 turns off, and 22 turns back on, so probably straight enough! Be ready for a retest tomorrow. Annoyingly, I was intending to replace bits of the front suspension over the next few months, as I've been stockpiling some random bits as and when I saw a good deal on them, in addition to a few upgrades I might do if I can feel I can them done quicker. Not much drama otherwise, other than perhaps some rear wheel arch rust starting to come through. That might put a scupper on long term plans unless I say start to learn welding or something. Regardless, very happy the tie rod end swap took about 45 minutes, rather than the potential drama when that locknut doesn't want to budge. Maintenance: £3120.24 (+£33.81) Upgrades: £4617.27 Miscellaneous: £827.47

-
Already have shelving in the back of the garage! I suppose the question is whether I start adding extras to the side!
-
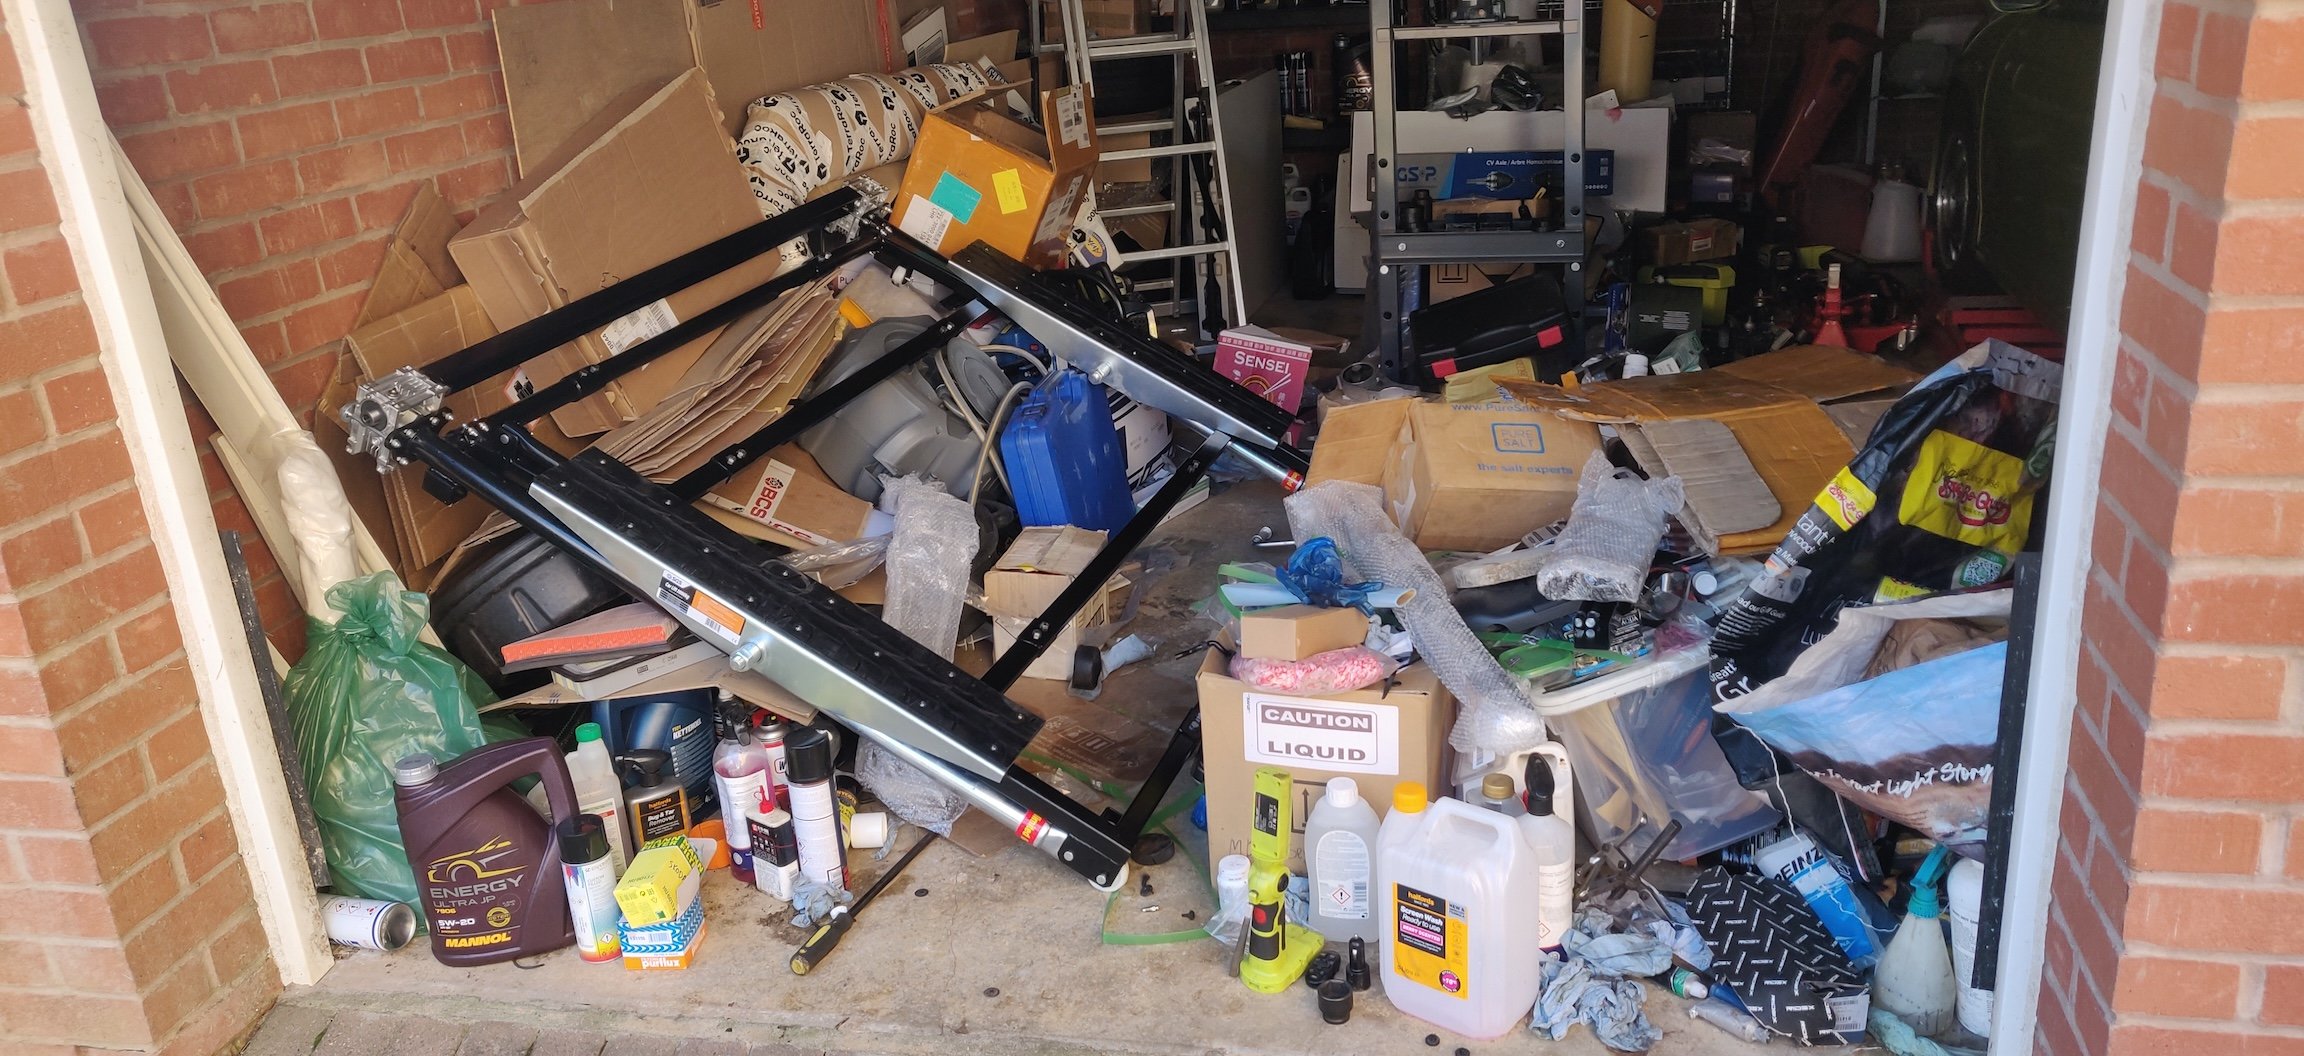
I'm off work for the rest of year starting from...now! So I'll definitely get a crack on with tidying up the garage. There are bits for cars that are LONG gone!
-
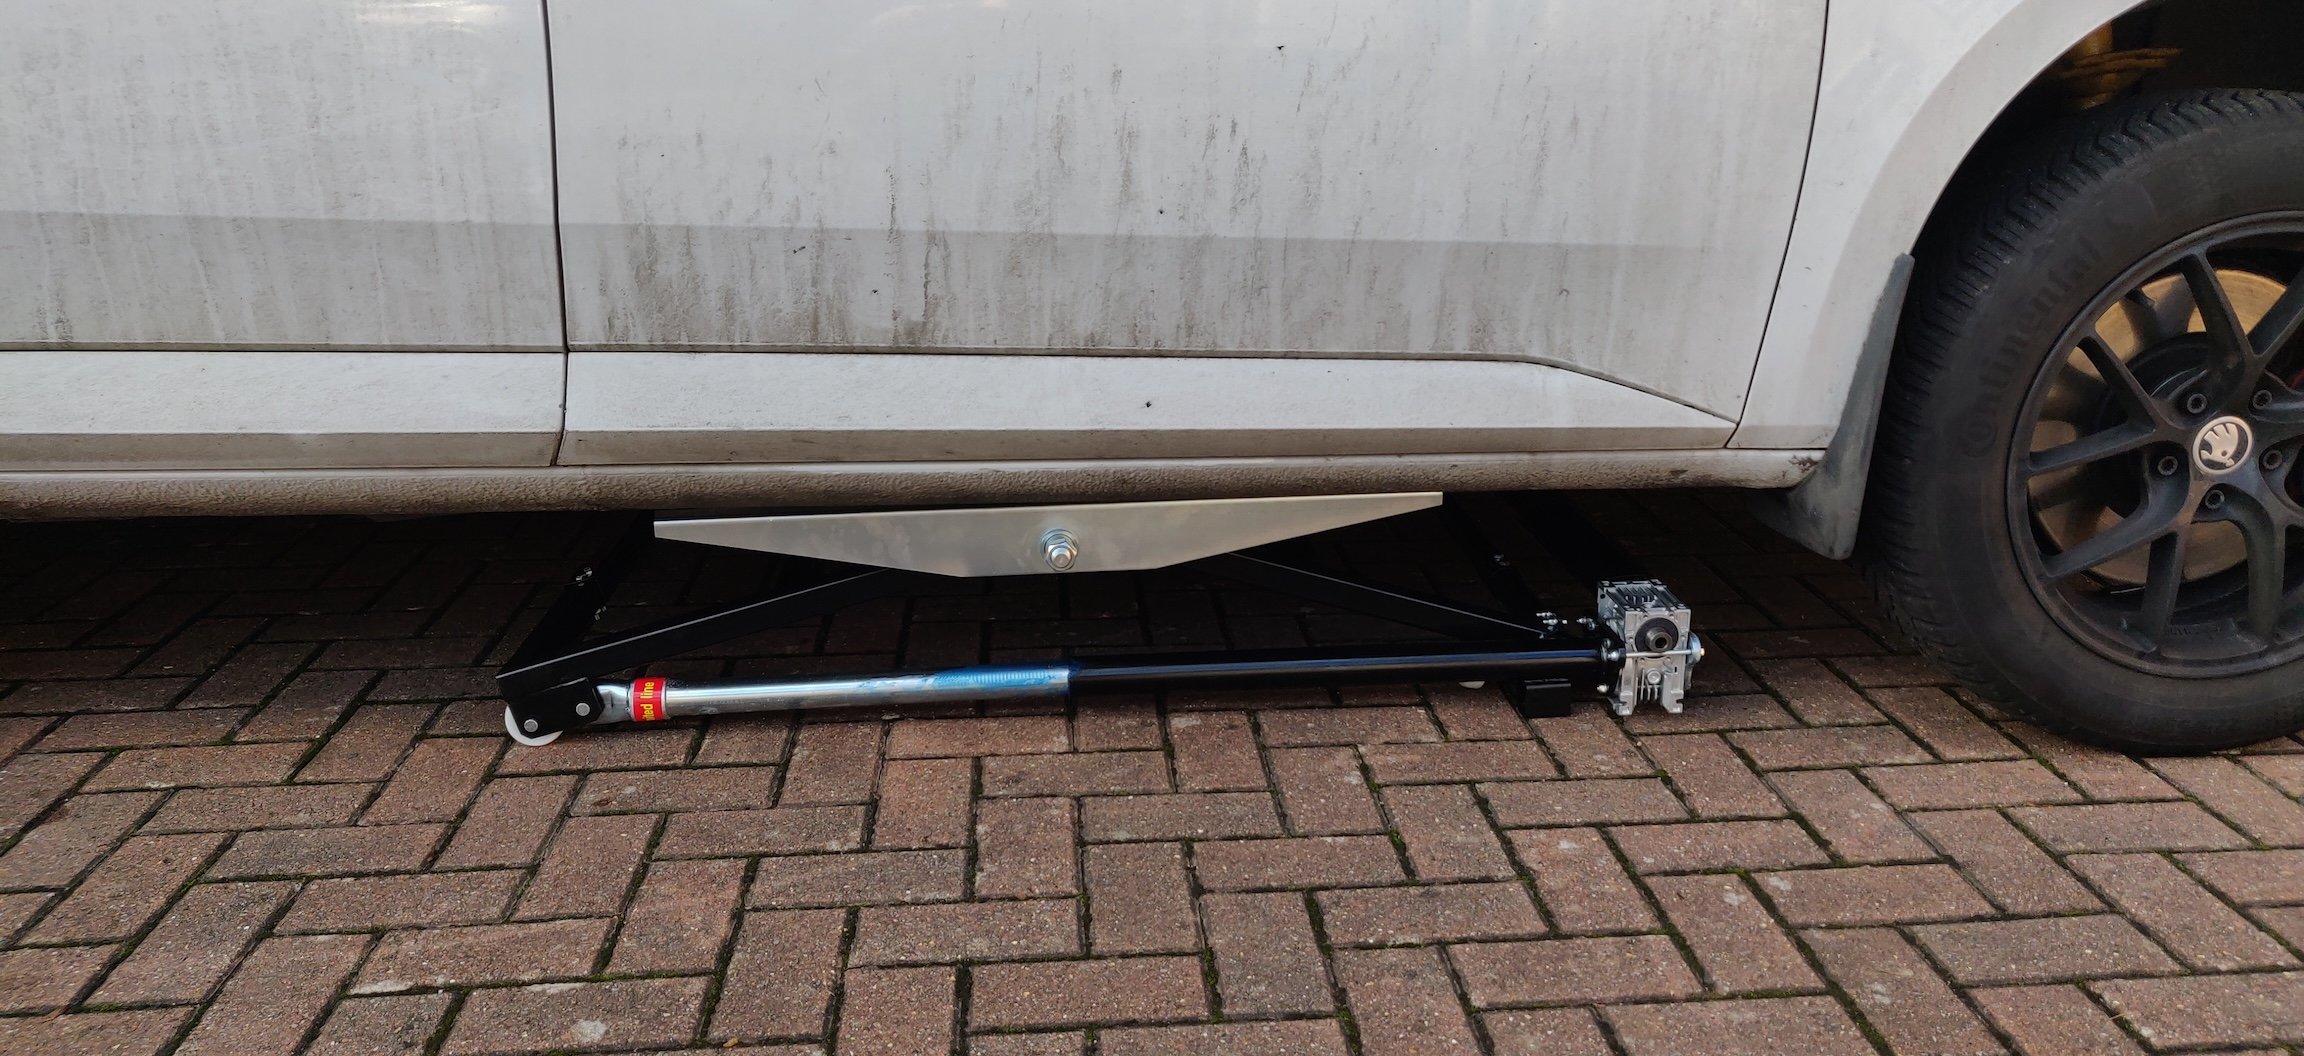
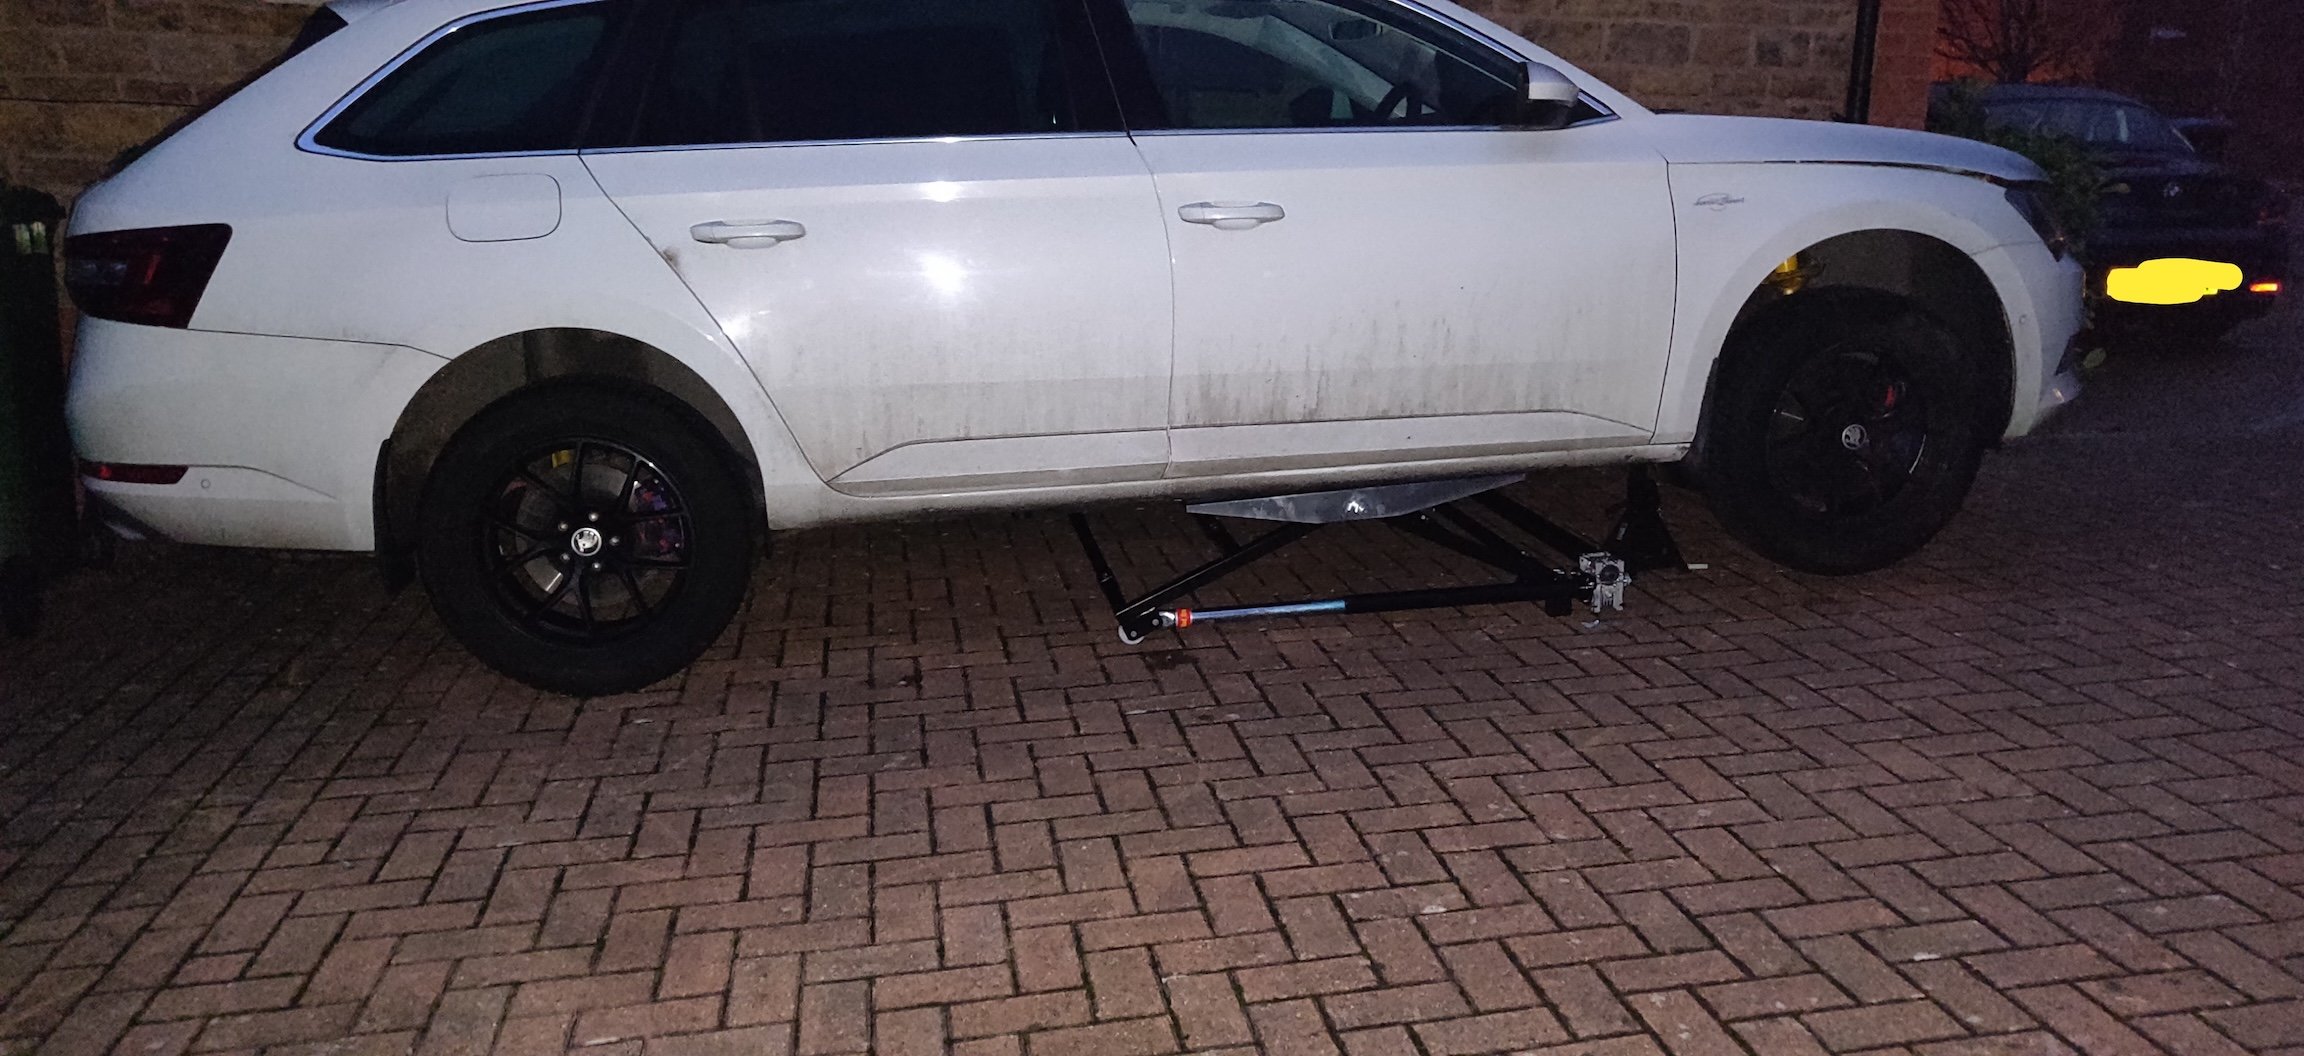
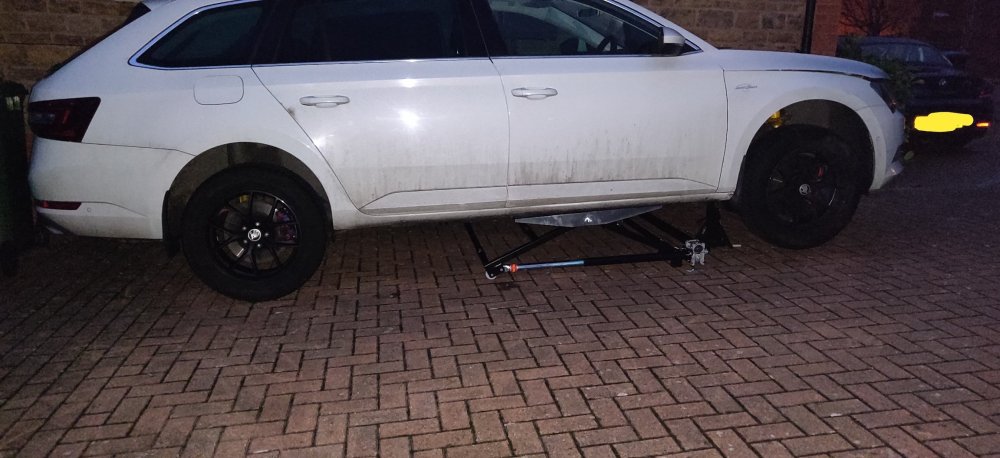
Apologies for the thread revival! The car started to nag with a "Inspection now!" message, so decided given its about half a year since the last oil change to just do so. As it was Black Friday last week, the usual barrage of emails arrived of discounts of various sorts, and one stood out enough that I decided why not: A 2000kg capacity tilting car lift. From SGS, although CJ Autos is the other one who normally sells this sort of thing. At £450, I thought it was worth a punt. Not going to add it to the running costs as its a more general use tool. I've had my eye on one of these for a while, although ironically the cars I would want to use them on, like the Elise, don't really work with it. Also turns out that even though its about 15cm lowered, it's still not able to clear some of the cars we have. Once the wider extensions were fitted as per the pic above, slid the thing under Skoda to see if it lines up to the sills: Normally, I'd be worried about this sort of thing for the sills, but for whatever reason decided the hell with it, and got one of my cordless drills and started: It kinda worked, and I basically lifted it up enough to get under (with a jack under some area of the subframe in case!) and start an oil change. I bought 20l (4x5l) of Mannol 504 507 oil for £78.85 so should be good for maybe 3 oil changes, maybe 4. With a couple more oil filters, my usual Mann branded ones, for £21.83 for the pair. Turns out the VCDS doesn't reset that inspection one amusingly, and it looks like you can just use the dashboard trip meter button to reset it. Looks like I've committed to twice yearly oil changes, which is probably no bad thing. As for the lift: It's a little on the large side, so I really need to tidy up the garage before I find out whether it may or may not make my life easier, but I imagine once I lift up the Skoda and tilted it forwards, it would potentially provide amazing arounds of room to work on the rear, which would be fantastic should I brave renewing all the rear suspension and bodywork area. I'm hoping with fashioning some sort of ramps or whatnot that it can lift some of the other cars and with all four wheels off the ground, would make wheel changes and brake jobs a whole lot simpler. Probably nowt more until the Spring, so Merry Christmas everyone! Maintenance: £3086.43 (+£100.68) Upgrades: £4617.27 Miscellaneous: £827.47


-
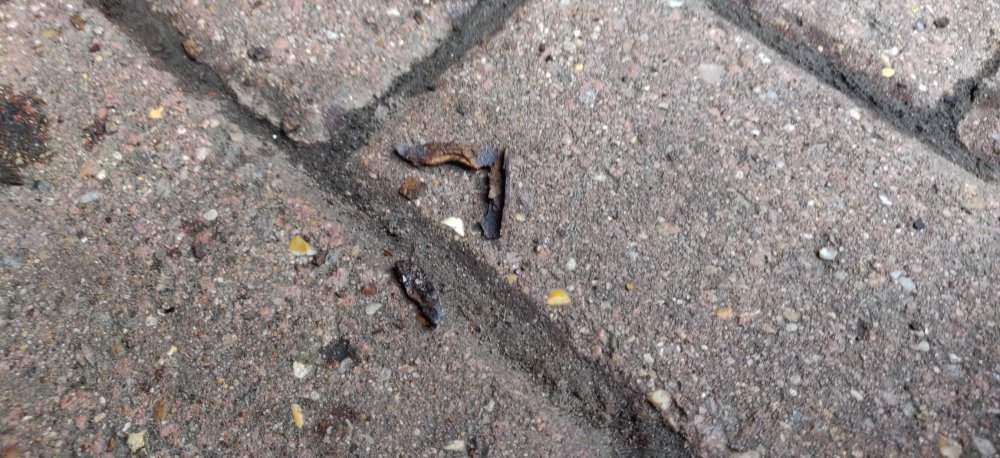
Hey all, So earlier in the week, after the wife drove off for work, noticed a couple of bits on the driveway. Didn't take any pics, but a couple of strips of wheel weights, somehow just decided to give up. I'm presuming the tyre fitters looked at the new wheels and didn't bother with giving the wheel a quick clean before they attached the wheel weights. Could also have been my use of some wheel sealant which might have prevent proper adhesion. Either way, something for a garage to sort out. Alongside the whooshing sound of the air con expansion valve, a regas was also on the cards (yes, it's getting warmer hence now caring about it). So booked it all up alongside an MoT. With the previous MoT only being about the brakes, the presumption would be a nice pass. Which it did. Advisories were for some bush wear on the front suspension arms, and a loose rear heatshield. Neither to be fussed about, and can easily sort those out throughout the year when I can be bothered. The arms are slightly grotty/rusty anyway, and alongside bearing replacements, probably isn't too much out of the way once I start on the fronts. The air con regas (cheapo R134a fortunately) was at £54.50 and 4 wheels rebalancing was £39, plus VAT came to £112.20. One day I'll scrounge up enough money to get my own air con machine, but until then, not the end of the world, especially with the warm weather we've been having. Maintenance: £2985.75 (+£112.20) Upgrades: £4617.27 Miscellaneous: £827.47
-
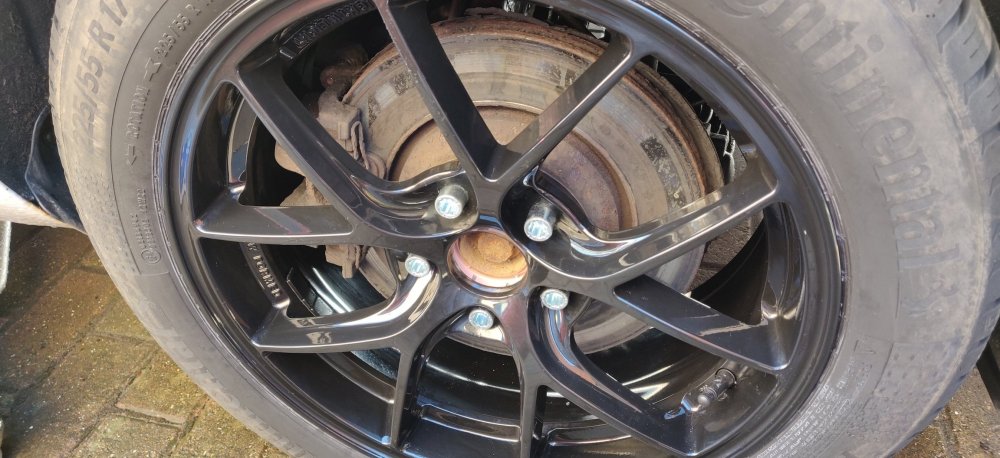
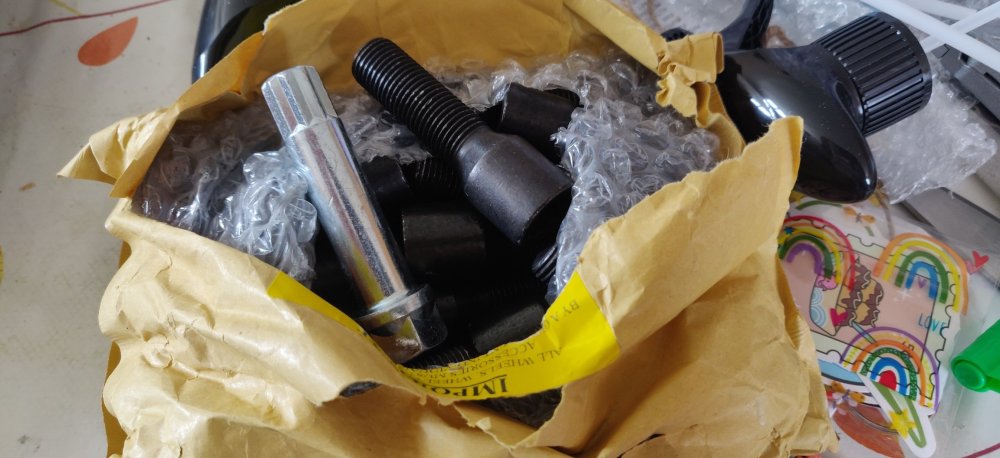
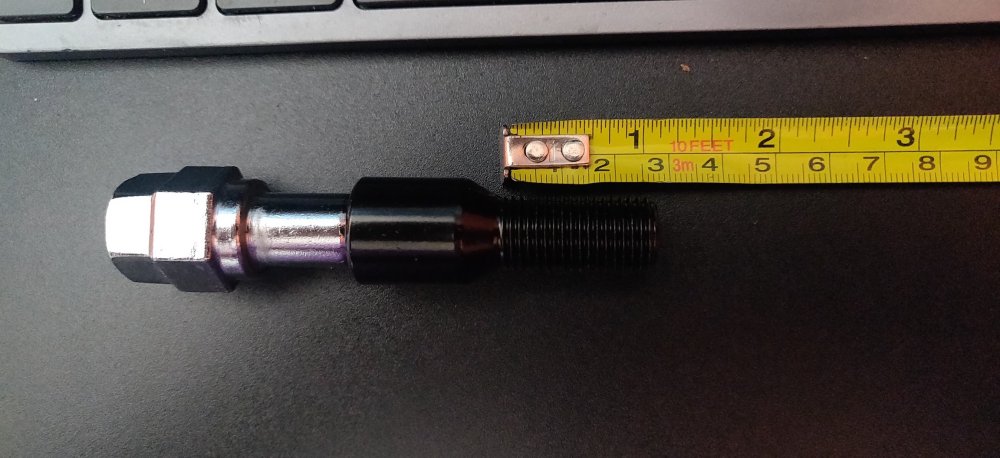
So they luckily arrived next day: Some longer tuner bolts, 40mm these ones. I guess technically, the ones I got with the allows were 30mm, so 36mm would have been the exact correct ones. I think I saw 35mm being the closest, but only 40mm ones were in black. Wanted the black ones so as to not stand out against the black alloys. These were £37.99 from eBay. No more pics, because removing a wheel bolt and replacing it with these ones isn't really worth it. Torqued up all the wheel bolts to 140Nm and gave it a short test drive. The brake pedal is super spongey and inconsistent. The wife will need to be careful. The new discs and pads still need bedding in, but it does feel like there's air in the system, the usual annoying of case "I've bled it through twice and still spongey". For now, we'll drive carefully until a 100 miles or so, once the discs have their initial black coating removed and presumably the EBC red stuff bedding in stuff removed. I'll probably have to bleed the brakes again, so I'll rummage another litre of brake fluid. I could probably involve the VCDS and perform some ABS bleeding just to be sure. Worse case scenario would be my overzealous use of the brake pedal holding tool could have pushed the seals in the master cylinder too much. I've done that before on another car, and meant replacing the master cylinder, which is mainly a messy job rather than perhaps difficult. I'll remain hopeful it doesn't come to that. Maintenance: £2873.55 Upgrades: £4617.27 (+£37.99) Miscellaneous: £827.47
-
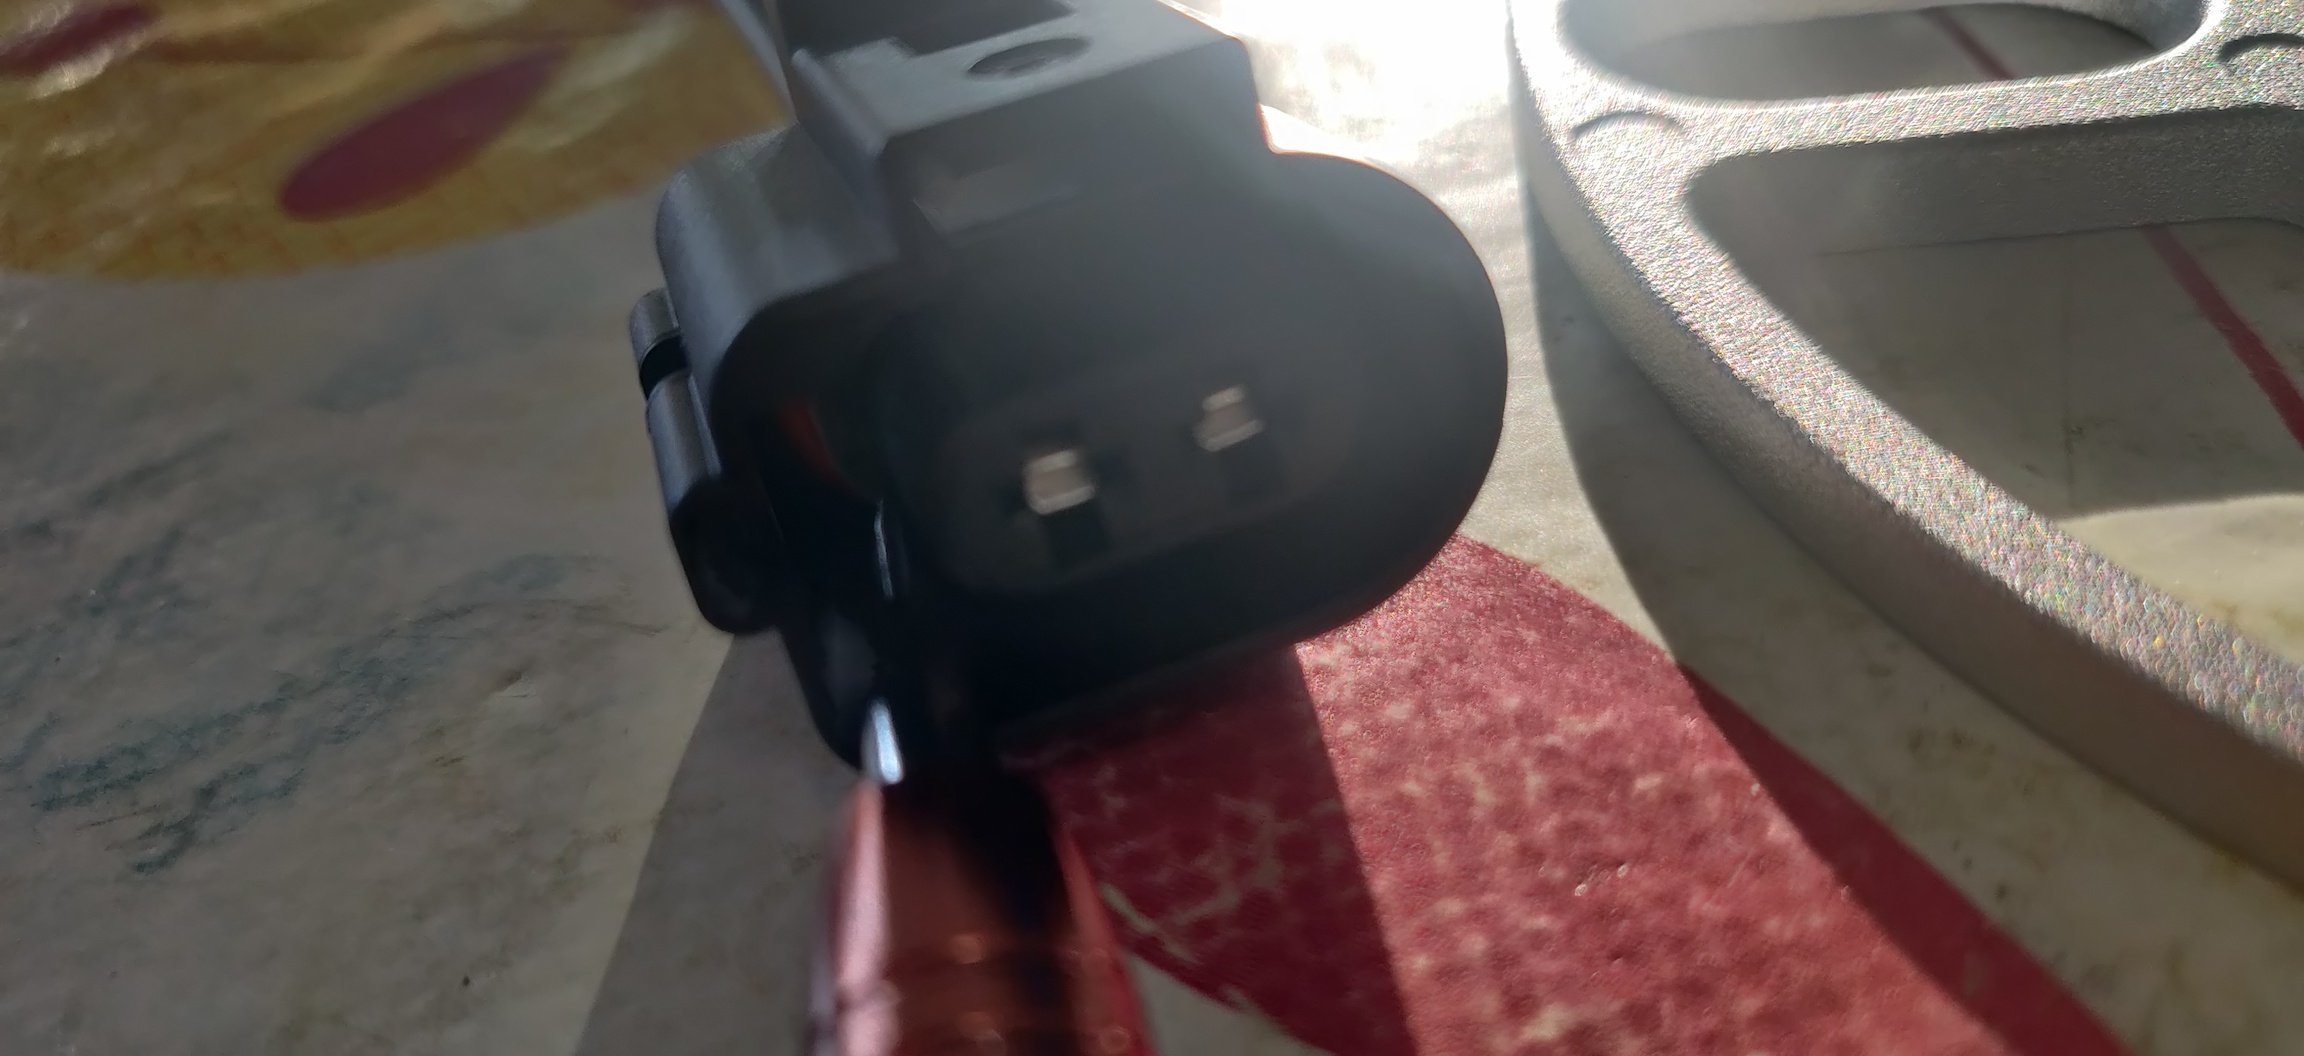
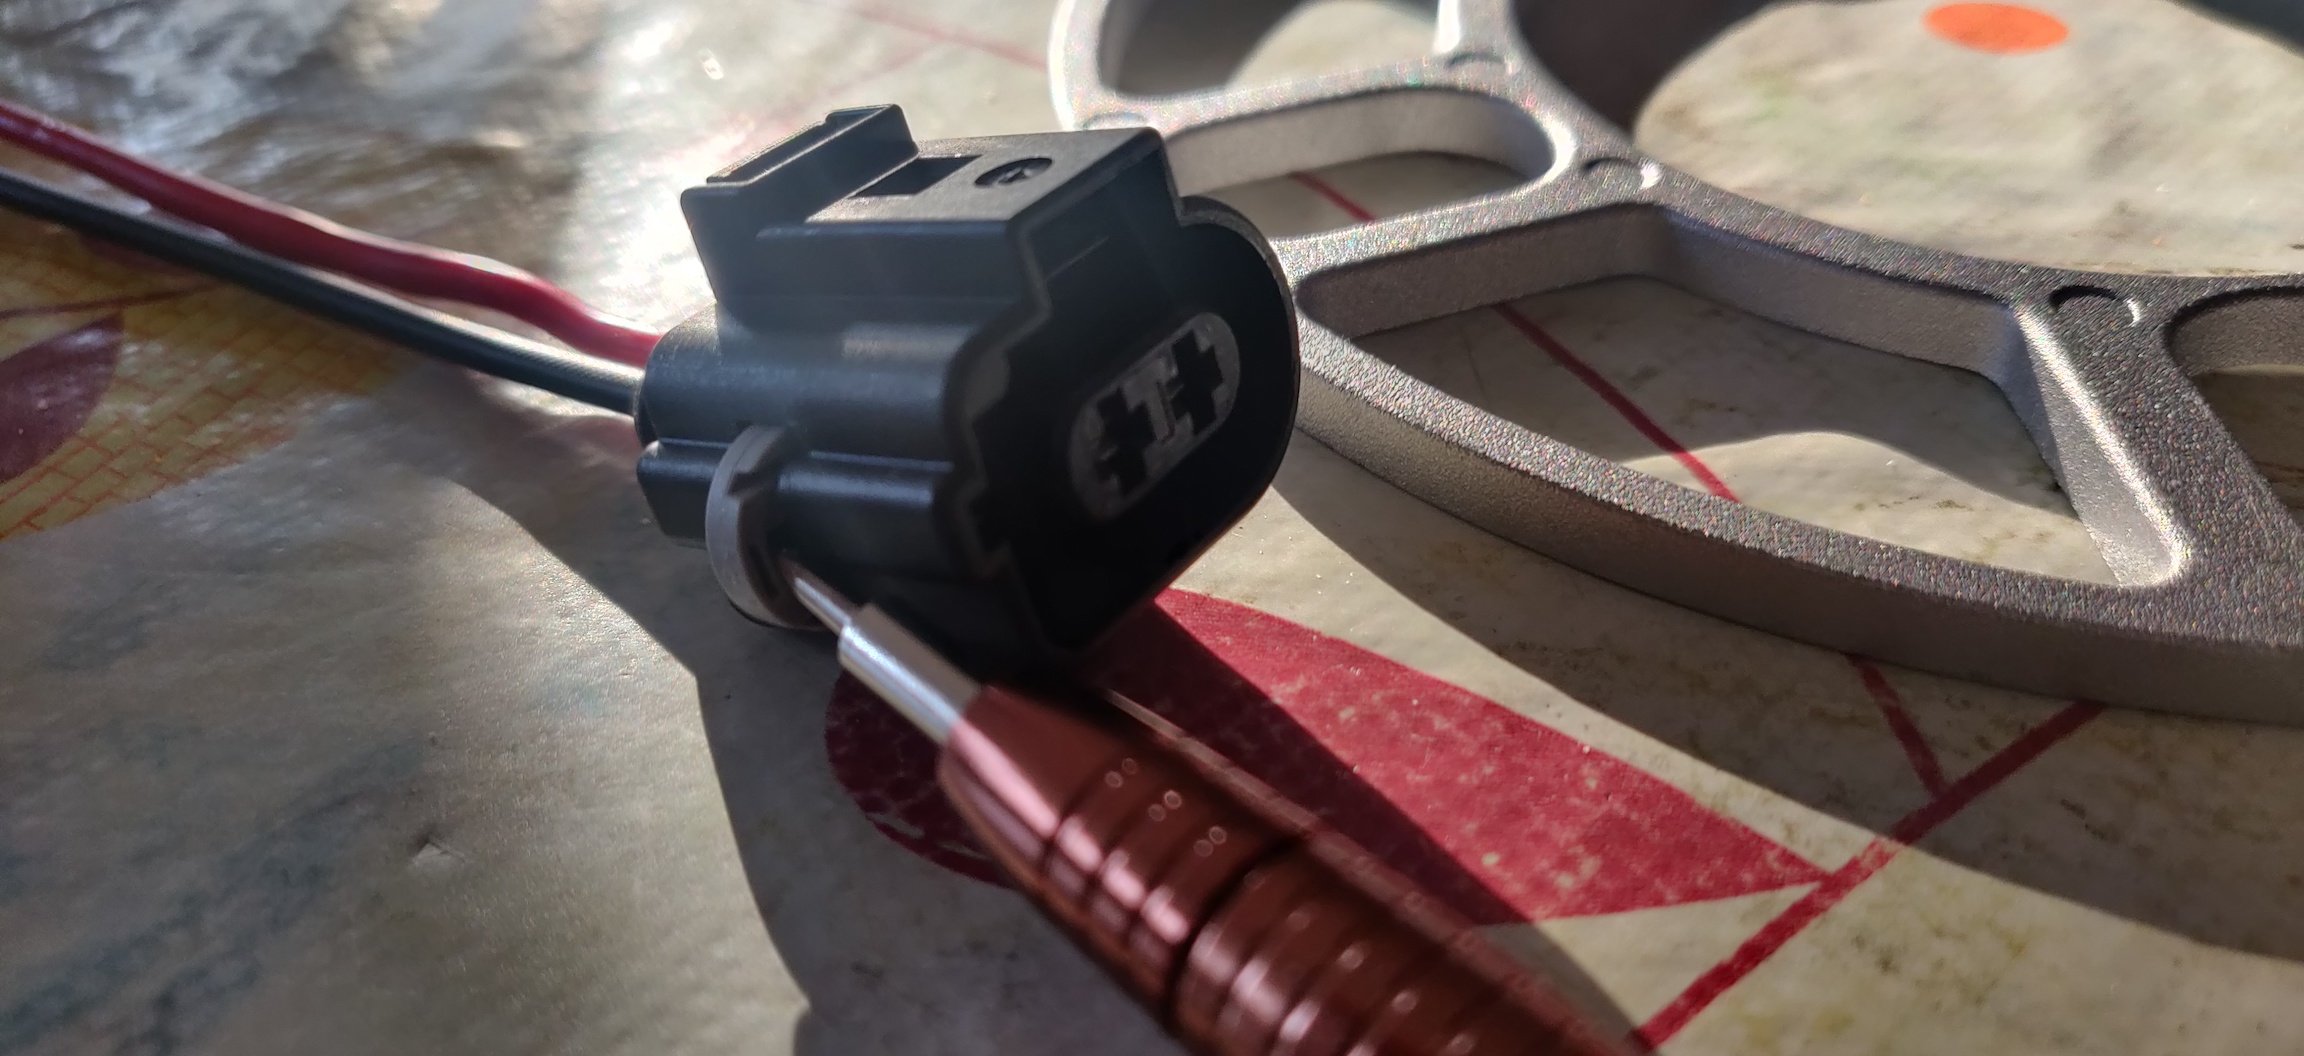
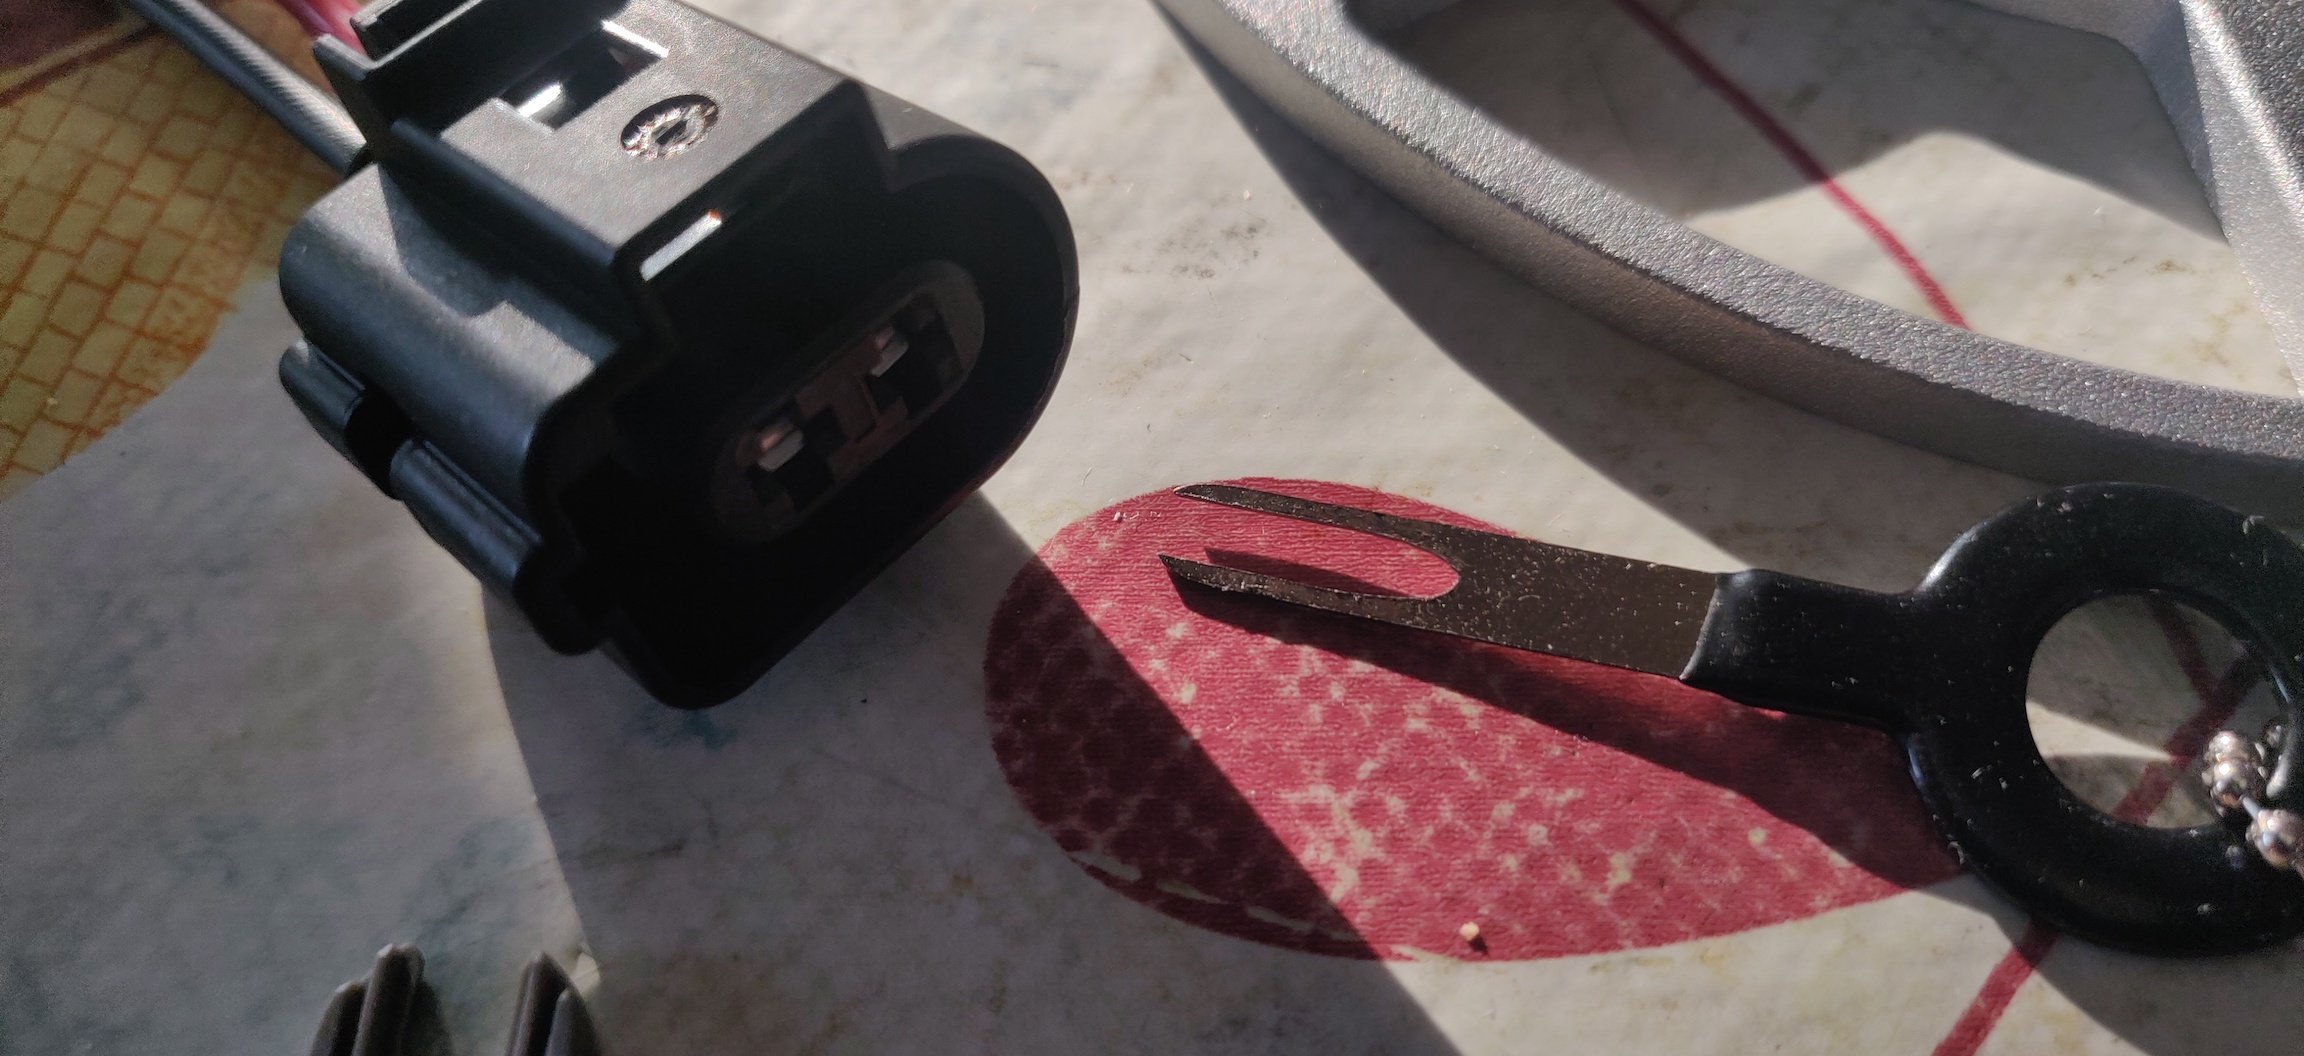
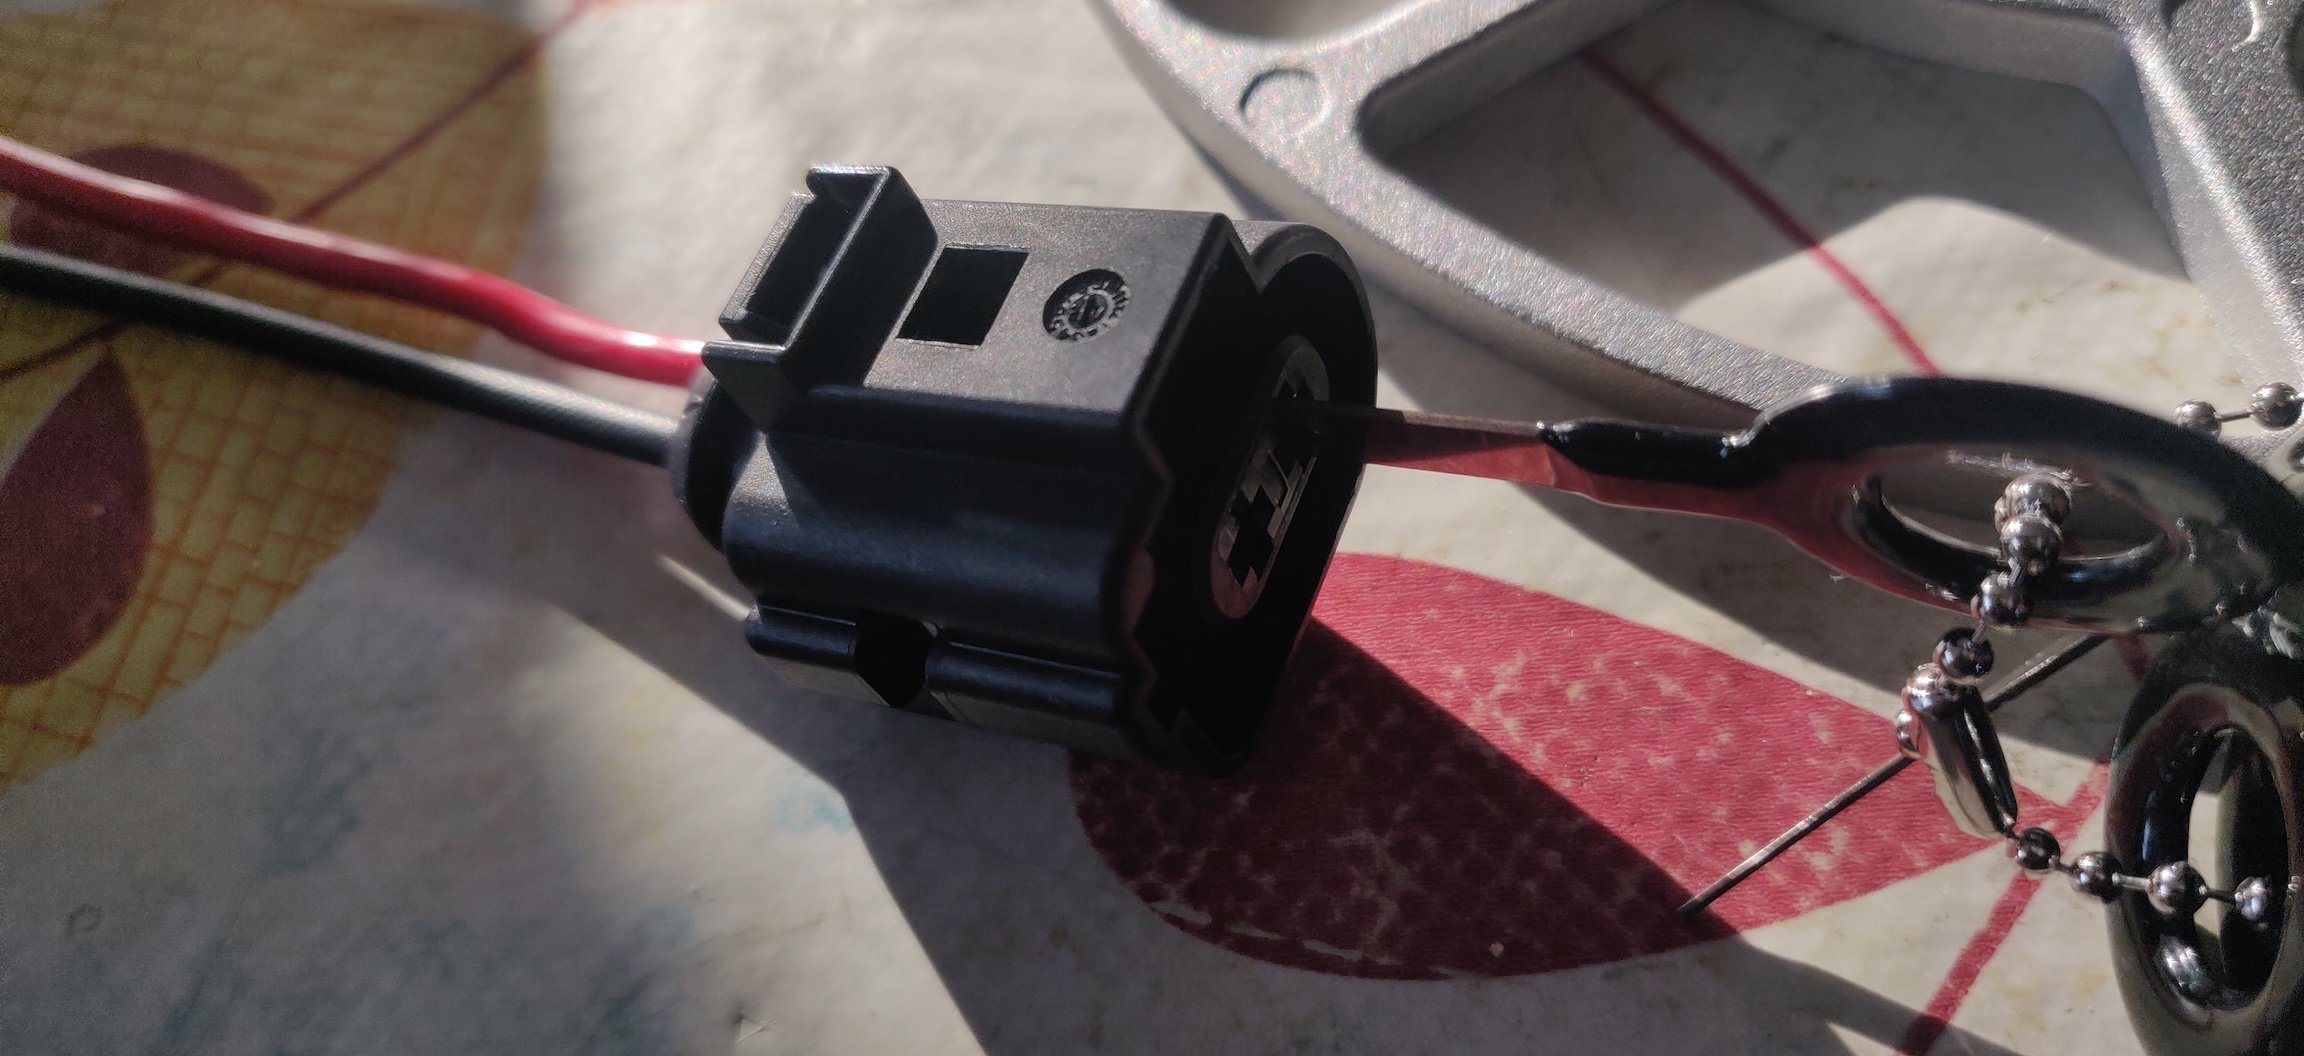
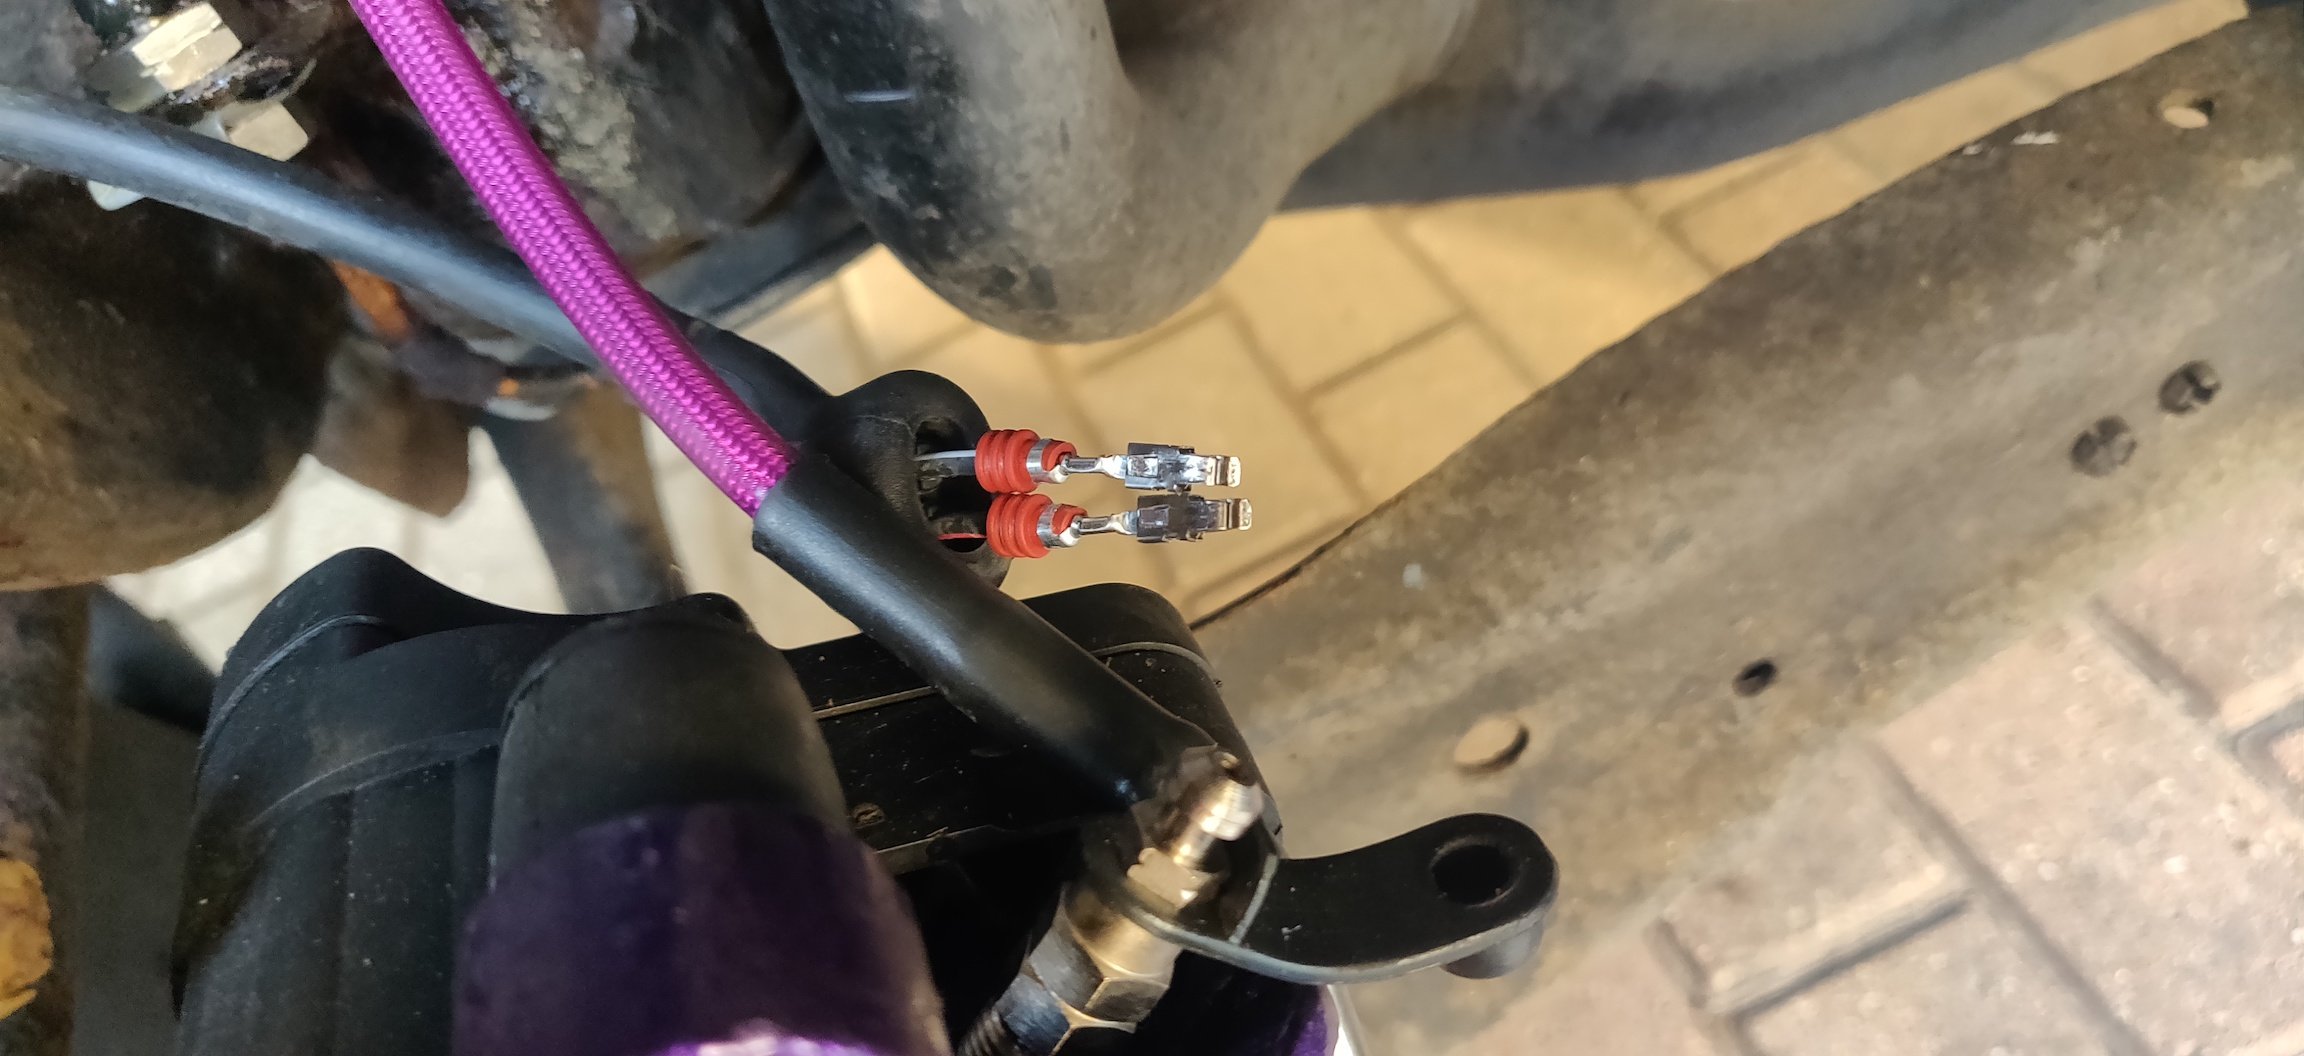
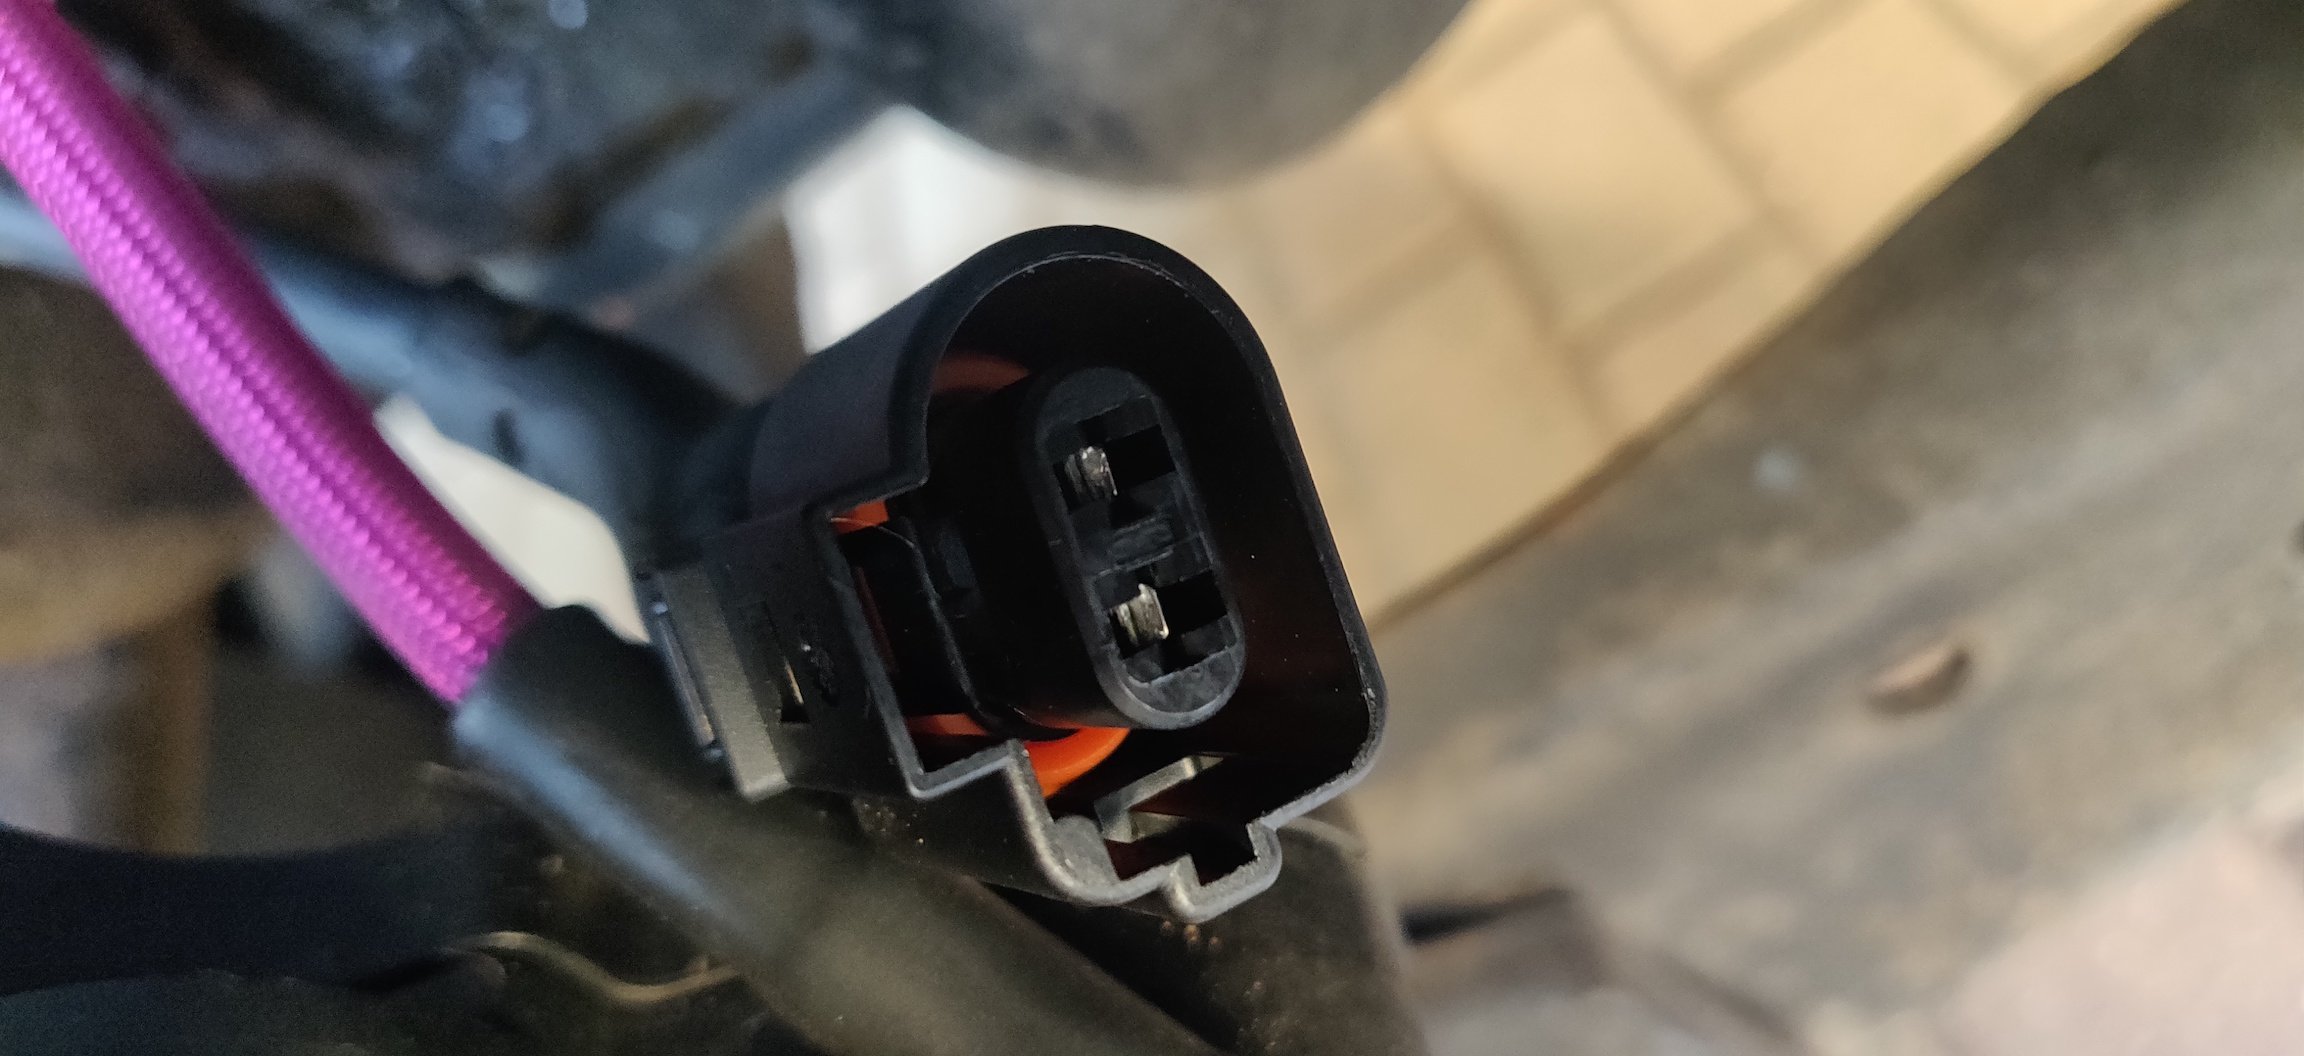
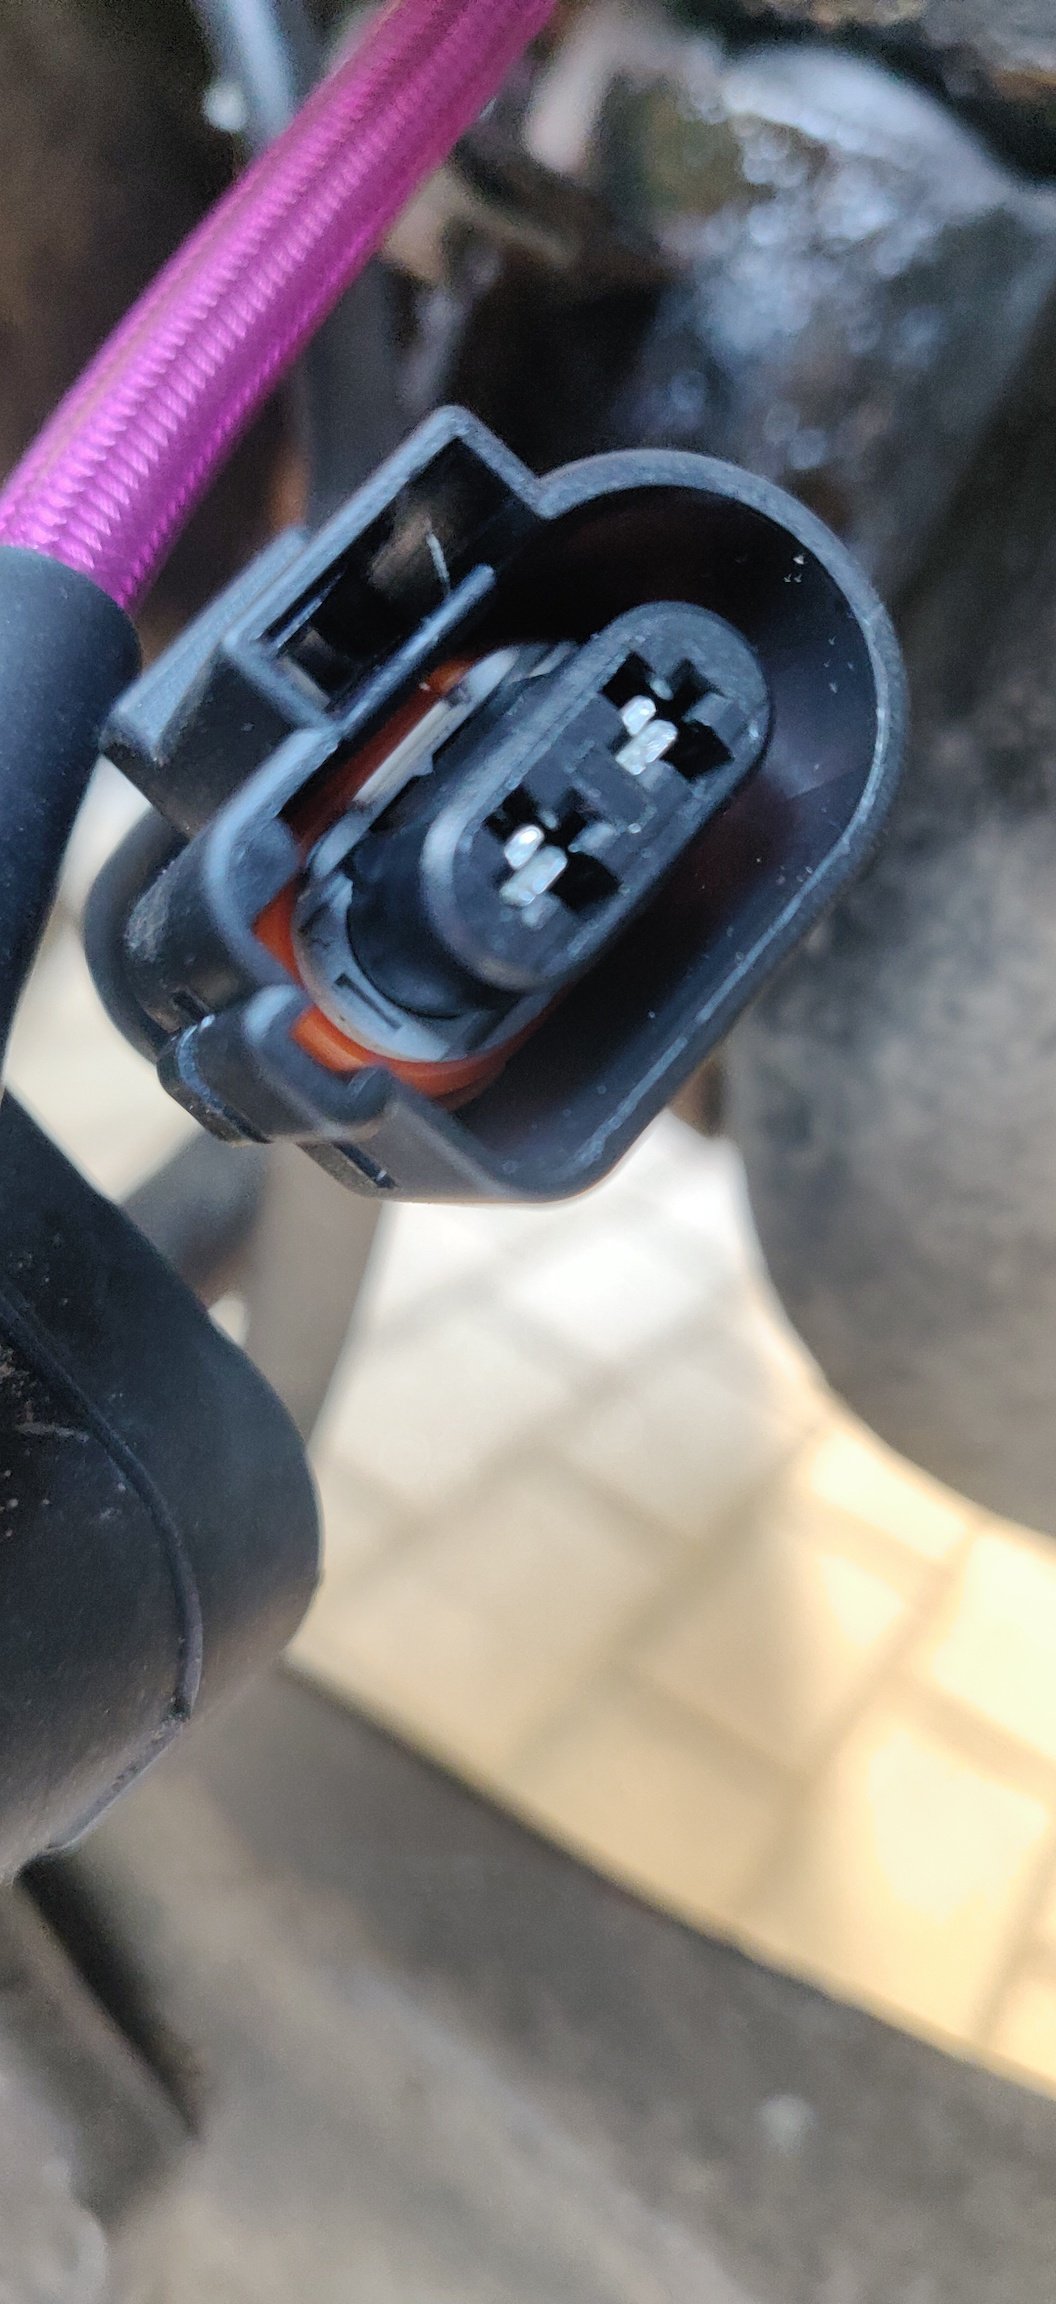
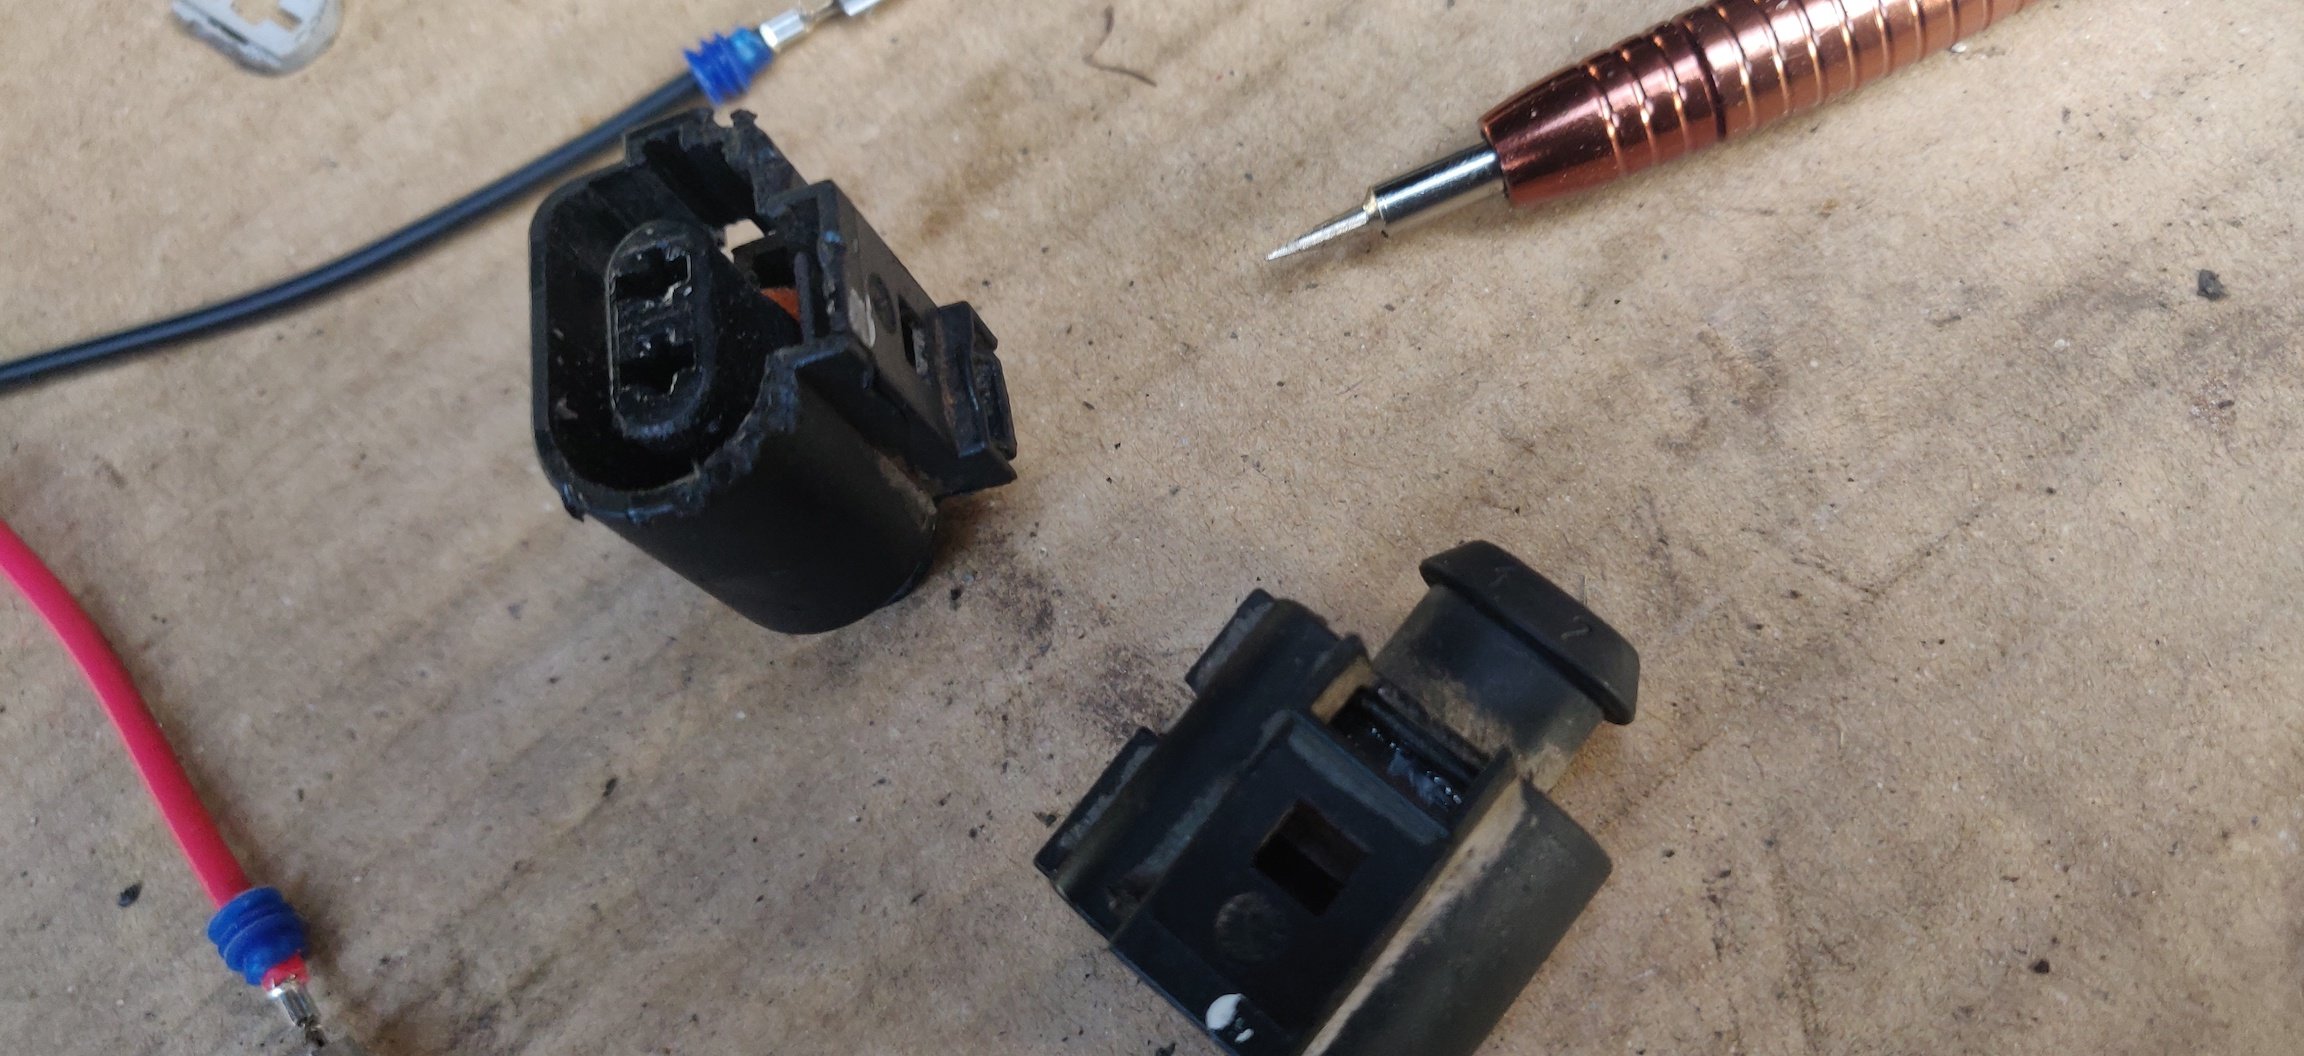
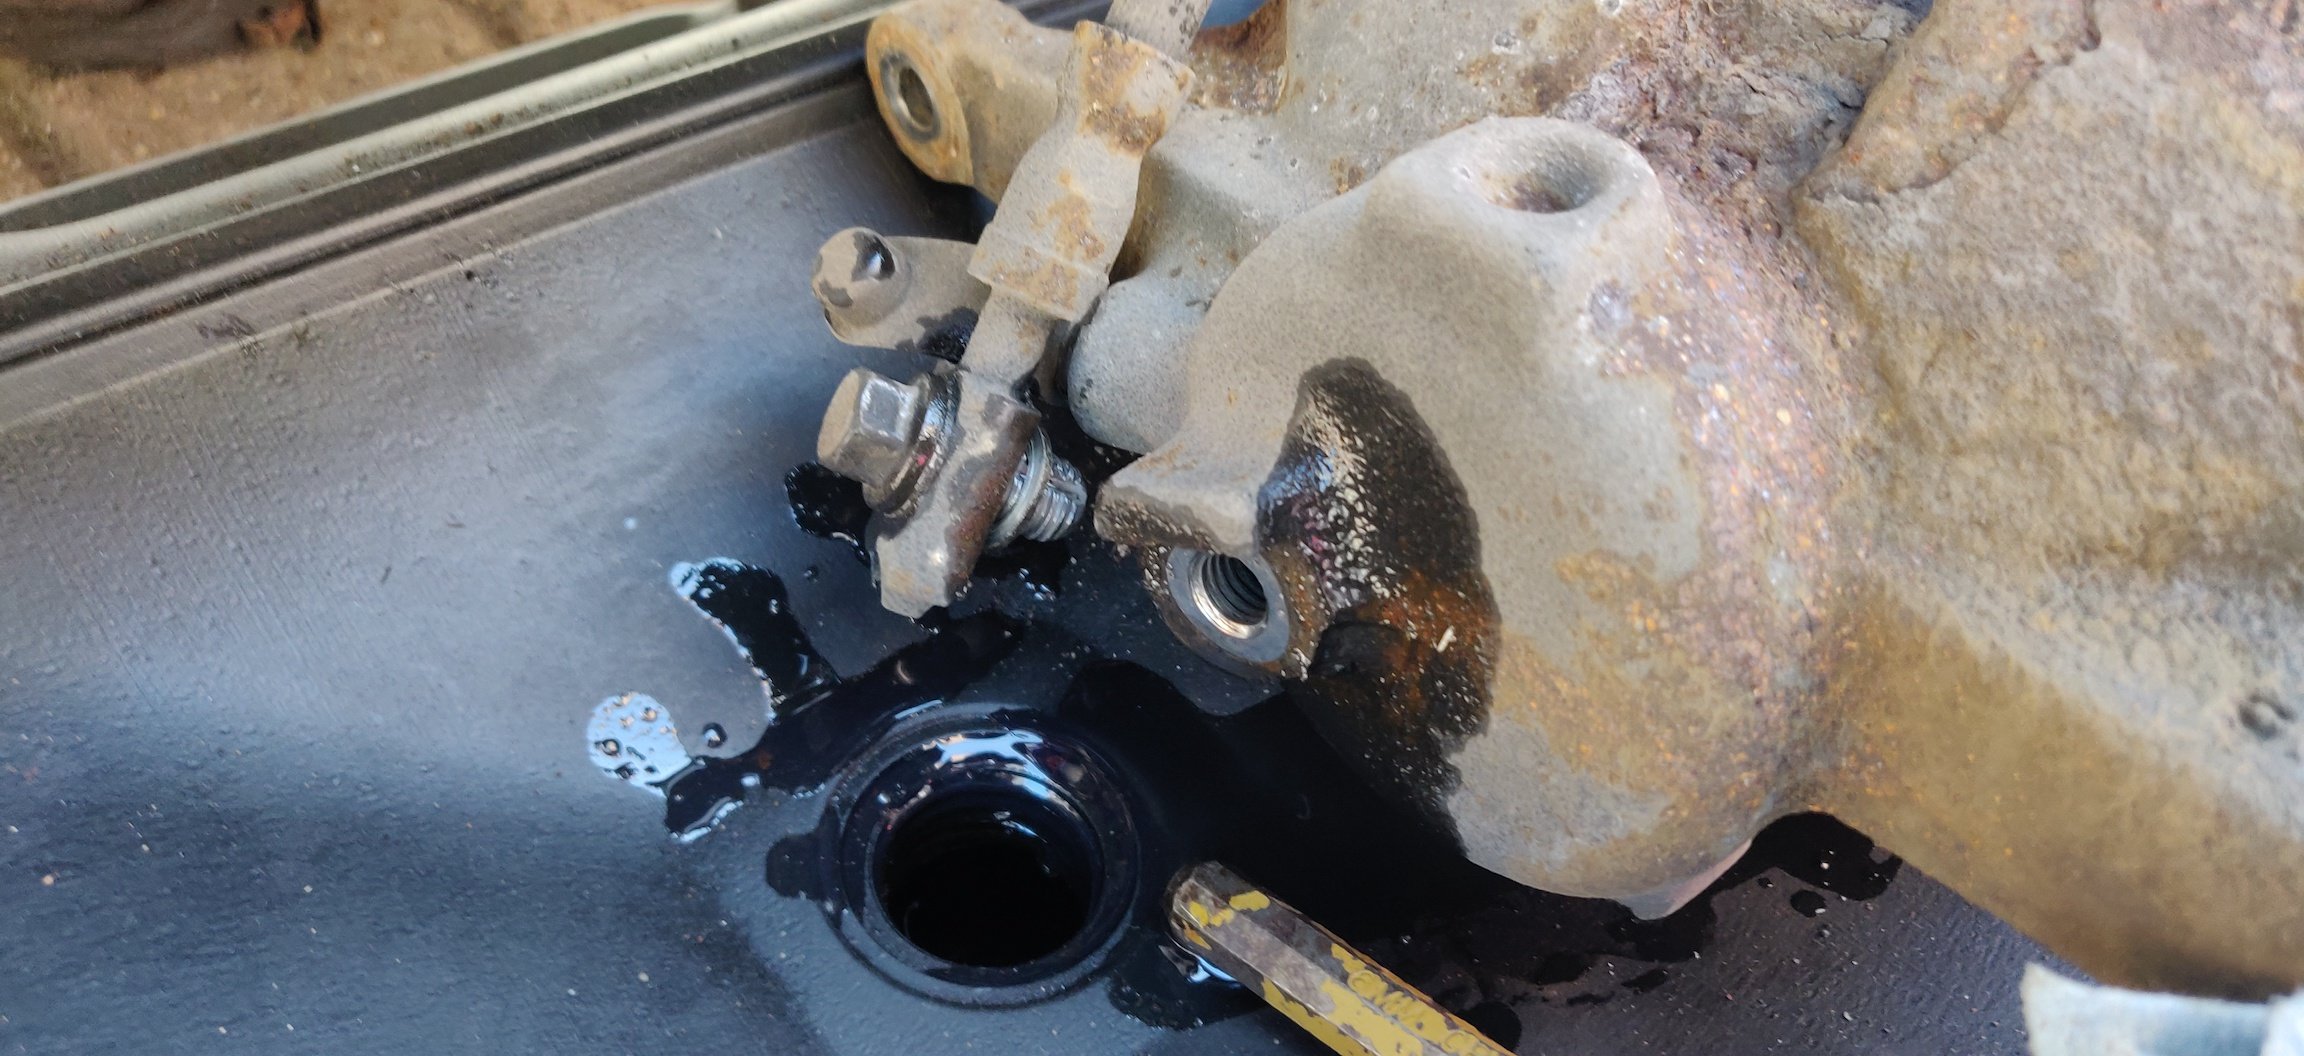
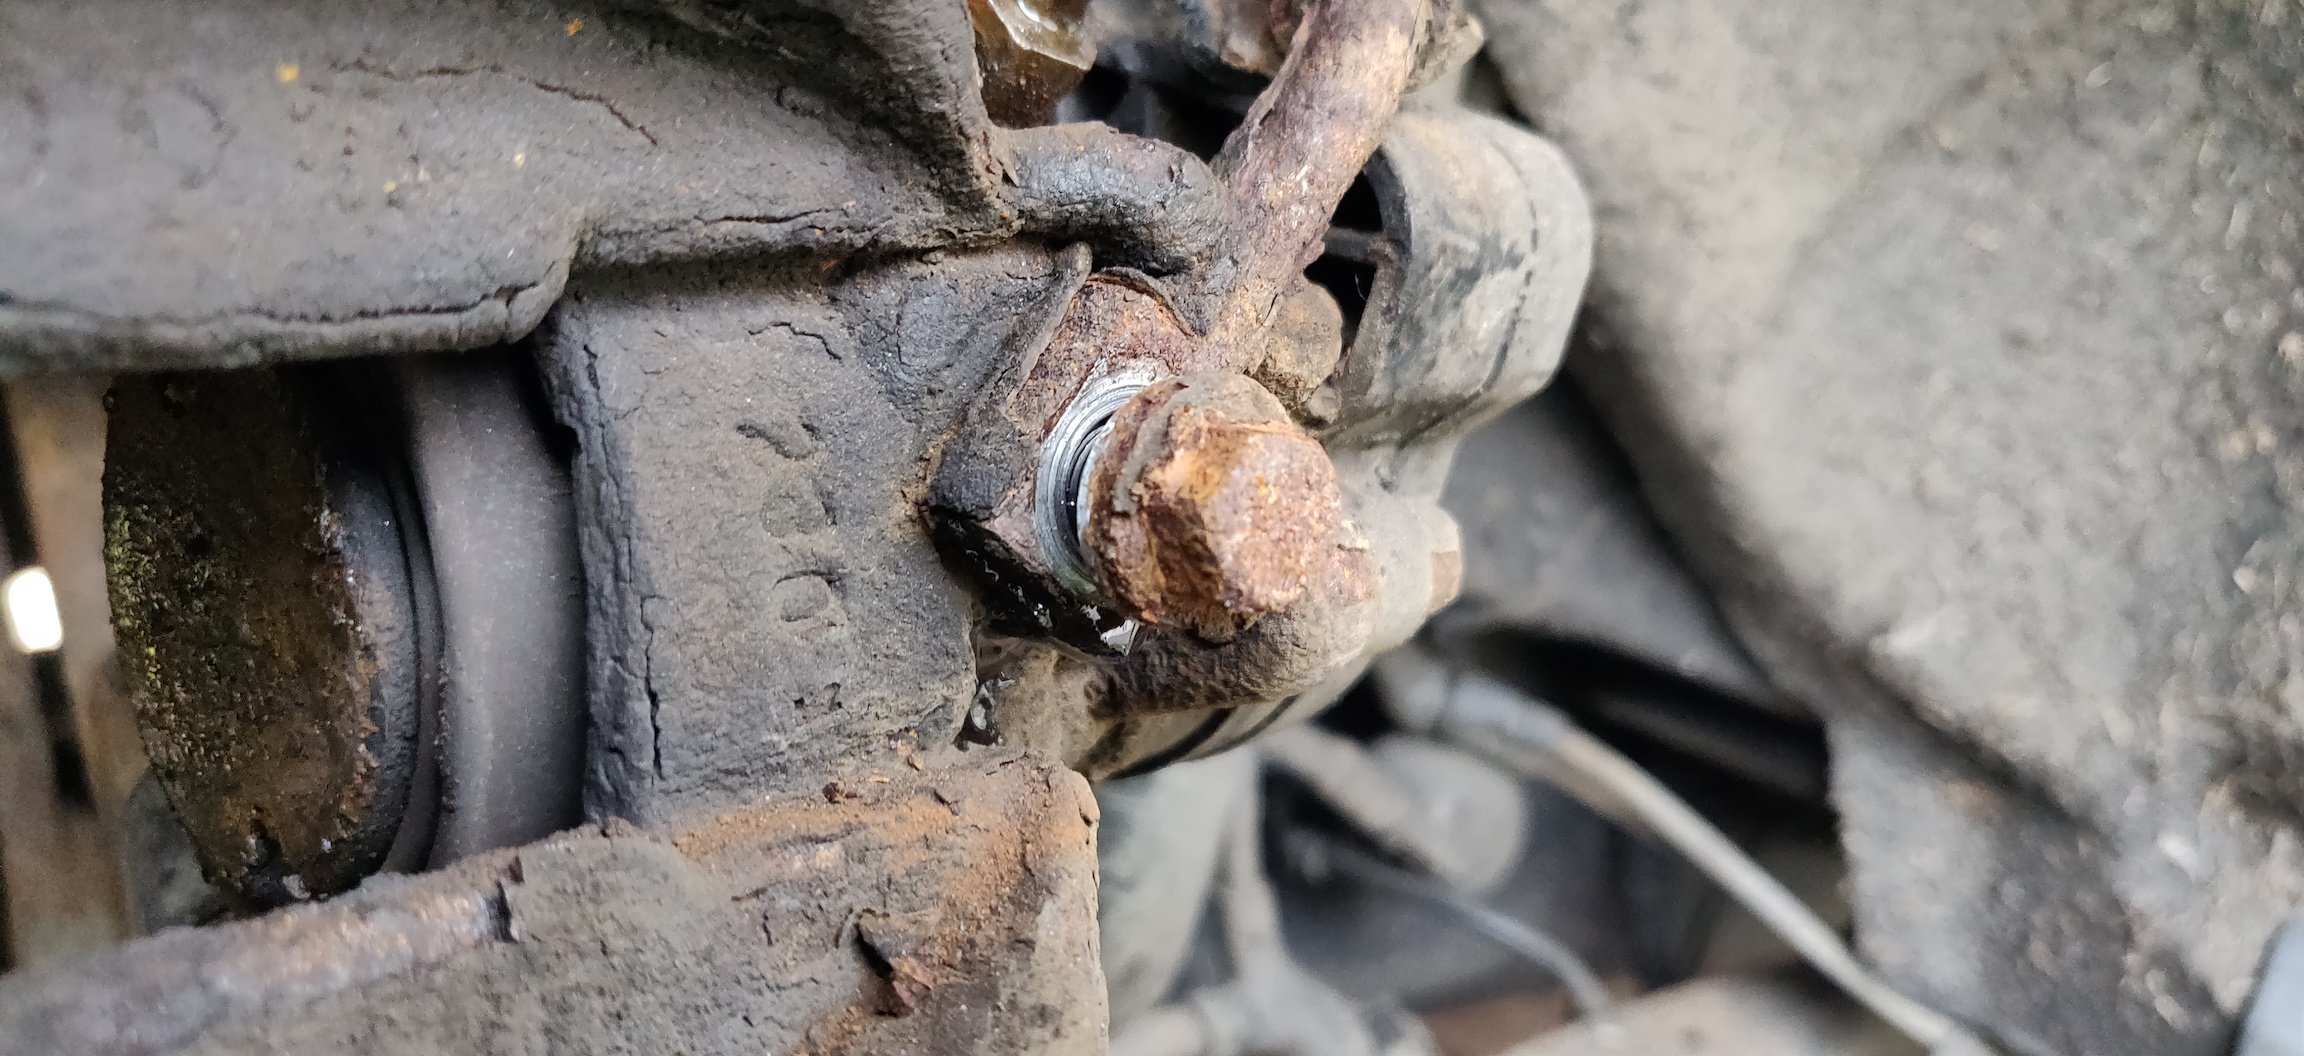
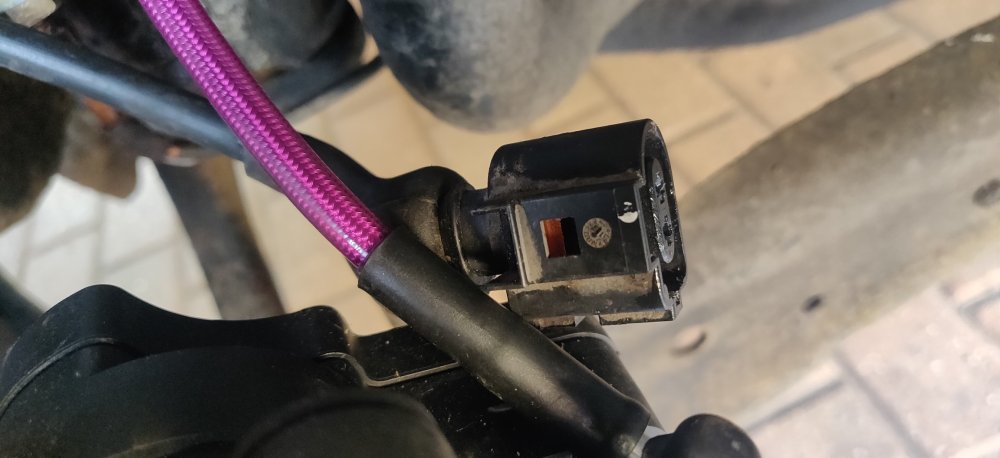
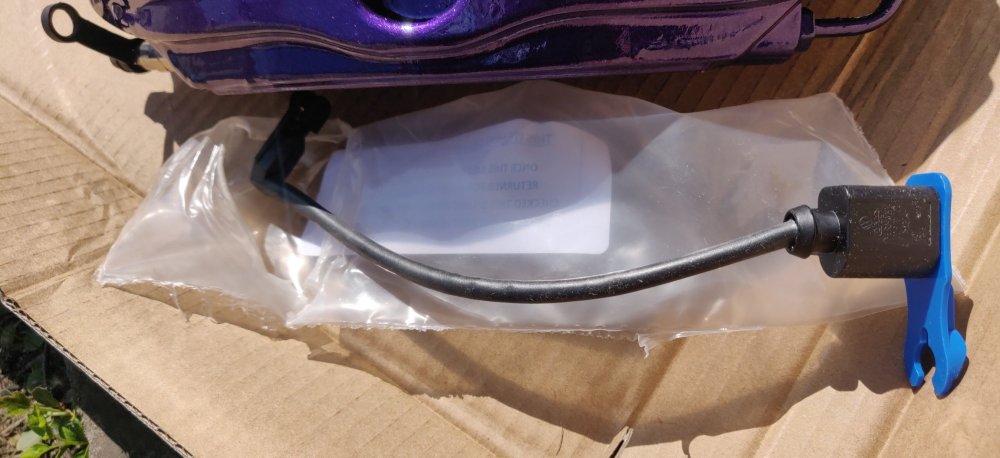
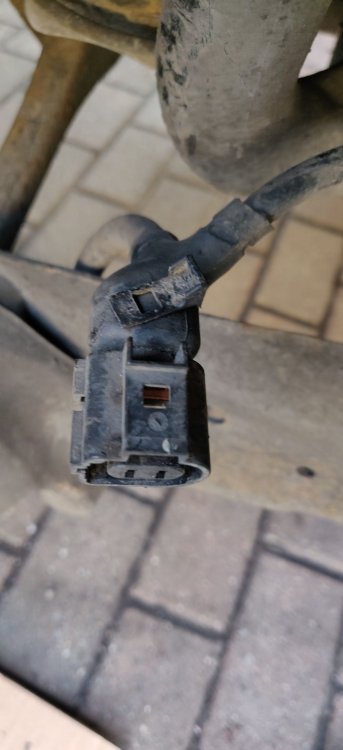
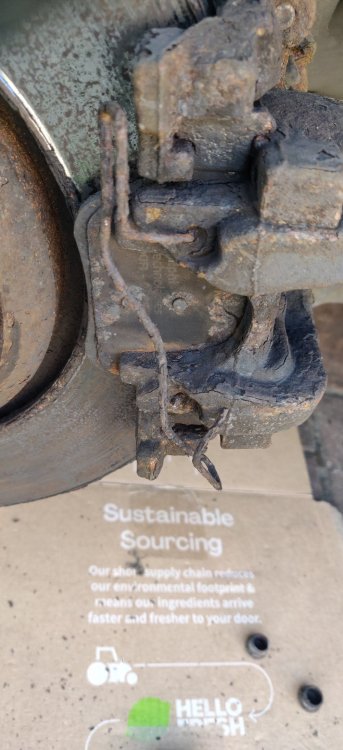
So some potential replacement wheel bolts for the fronts arrived this morning, but unfortunately: They're only 28mm in length thread wise. The ones I got with the alloys are 30mm, so these were very much the wrong ones. A typo on their eBay ad unfortunately, so being sent back and another order made. Only other thing left to do was the electronic parking brake connectors and replacing the damaged ones. So after some Googling eventually found https://www.youtube.com/watch?v=oDWKcAiLJ_Y which pretty much summed it up nicely. So essentially, there's a locking tab, grey in colour: Got a precision screwdriver with a flat head and just needs a small tug to get it accessible from the gap in the side: Once free, the terminals are in a position to be removed. So went through the extractors to find a possible suitable one: I actually found it just as effective to use two thin flat ones, which go into the "top" and "bottom" of the connectors per se: With two flat ones across, it catches onto the tabs better, and once in, you just tug at the wires and it should come out of the connector. Forgot to take pictures of the removed terminals, not that important! So essentially a case of doing the same steps on the car: This is the damaged driver side, needed to disconnect the ABS sensor to get enough leeway and space to get at it. Probably another case of being much easier without a caliper in the way! This was a bit fiddly and dirty, so didn't take pictures along the way. First obstacle was to see if that rubber boot bit was going to be an obstacle. It was tight, but ultimately looks like the connector is just forced into the rubber boot. So once the locking tab was removed, the terminal extractors were used, and one at a time, some wiggling of the connector then frees one terminal, and then do the other: Then with the new connector, placed it in line with the terminals, and pushed it into the connector simultaneously, waiting for a click for both: That's pretty much it. Almost forgot to insert the locking tab: Put a dab of silicone grease, reconnect to the electronic hand brake, and then repeat for the other side. So the remains of the old ones: The passenger side was mangled with my pry bar as part of removing it, so both were in need of replacing. You can see the dirt in the connectors, and I presume that's a factor making disconnecting difficult, in addition to just years of exposure making the plastic more brittle. I'd probably factor coil pack connectors as part of service items. Don't think there's much to remediate it, and I guess in the grand scheme of things, disconnecting the parking brake isn't something that happens often enough to make an effort to sort out. So with that, put the car back onto terra firma. I guess once the longer wheel bolts arrive, I can essentially remove one bolt at a time replacing them with the longer ones, so no need to do any more lifting. I'll need to remember to use VCDS to reset the parking brake, but that should be it, fingers crossed! Car should be MoT ready now. Maintenance: £2873.55 Upgrades: £4579.28 Miscellaneous: £827.47


-
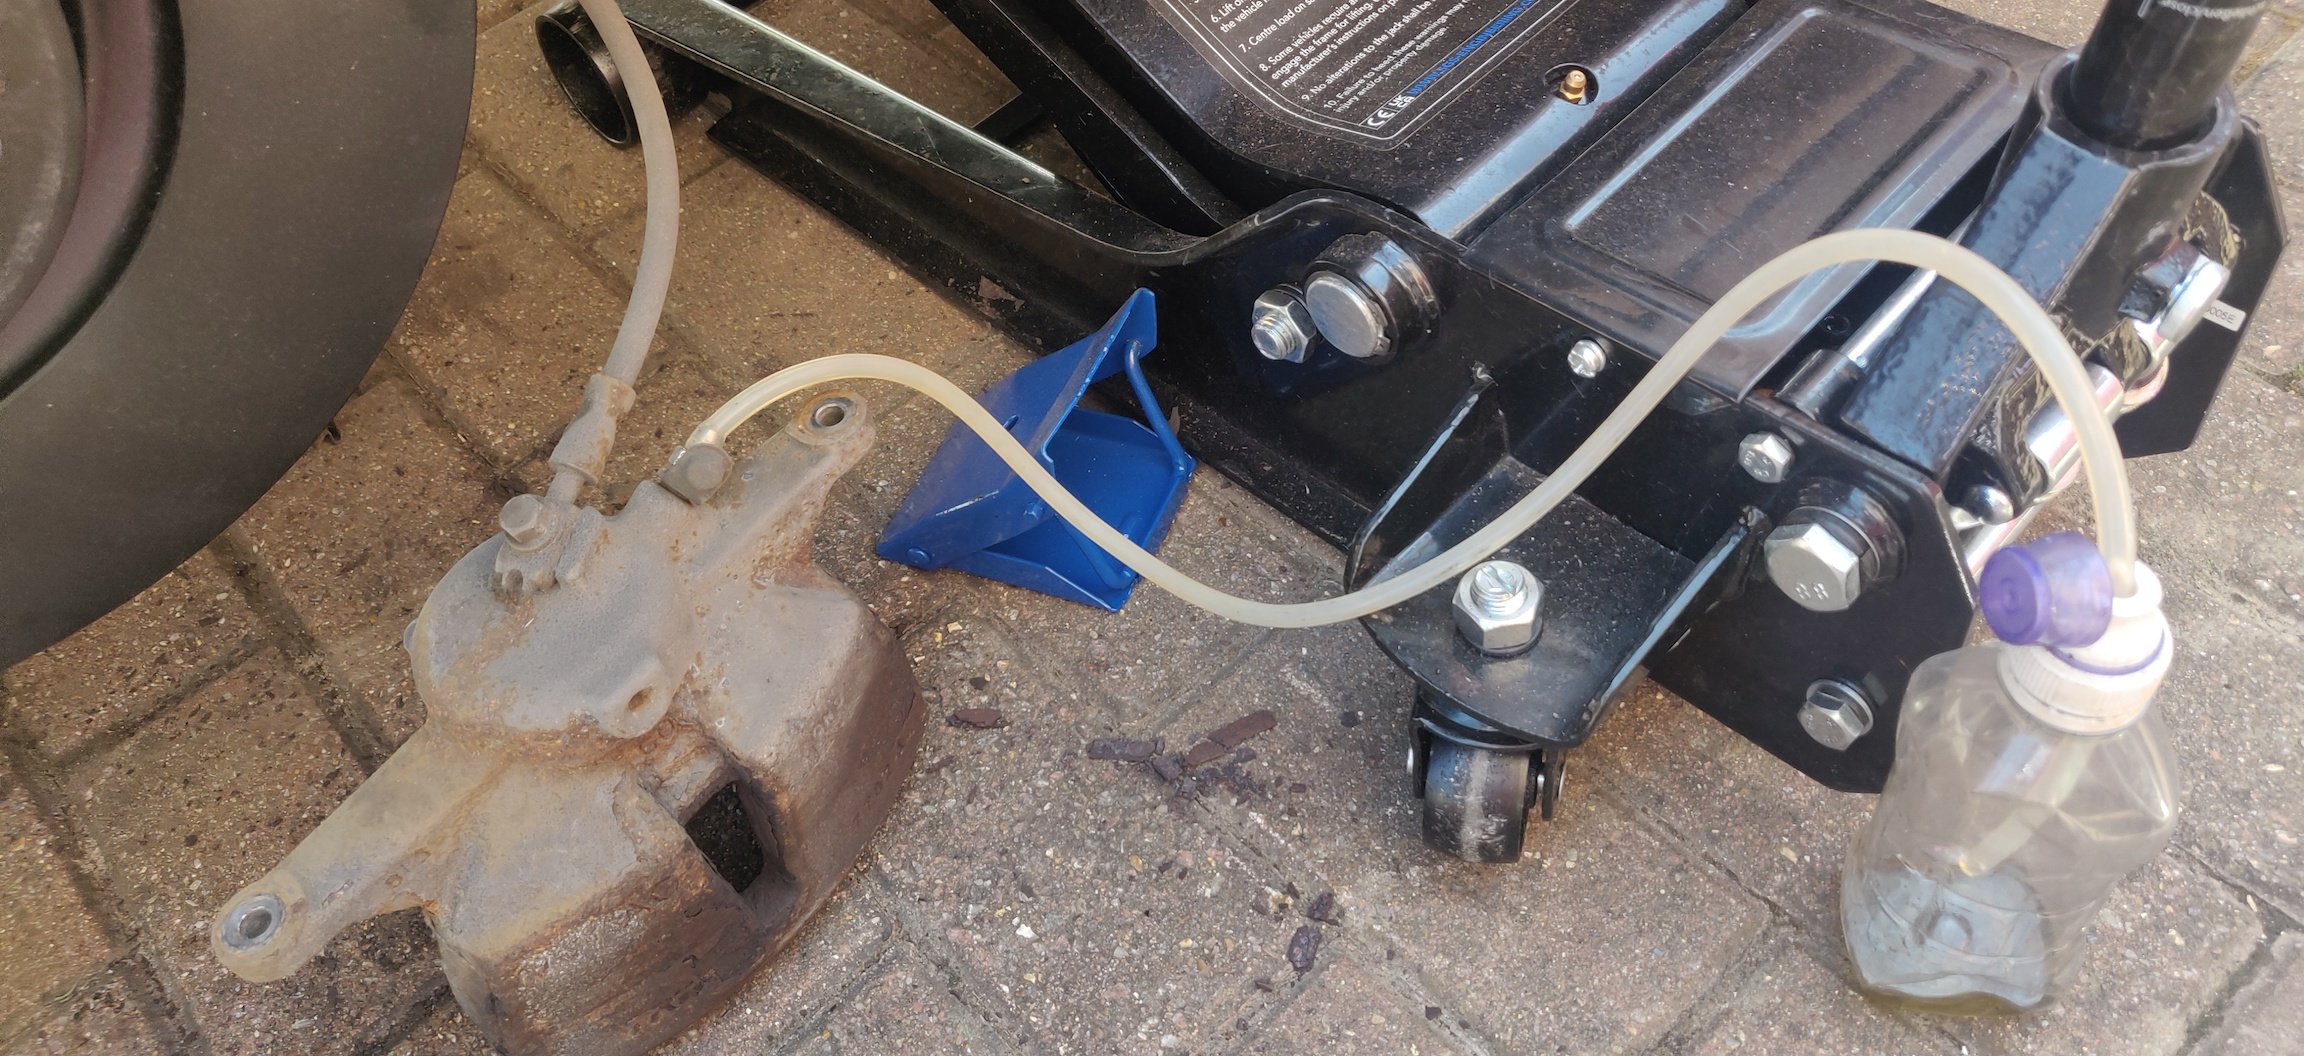
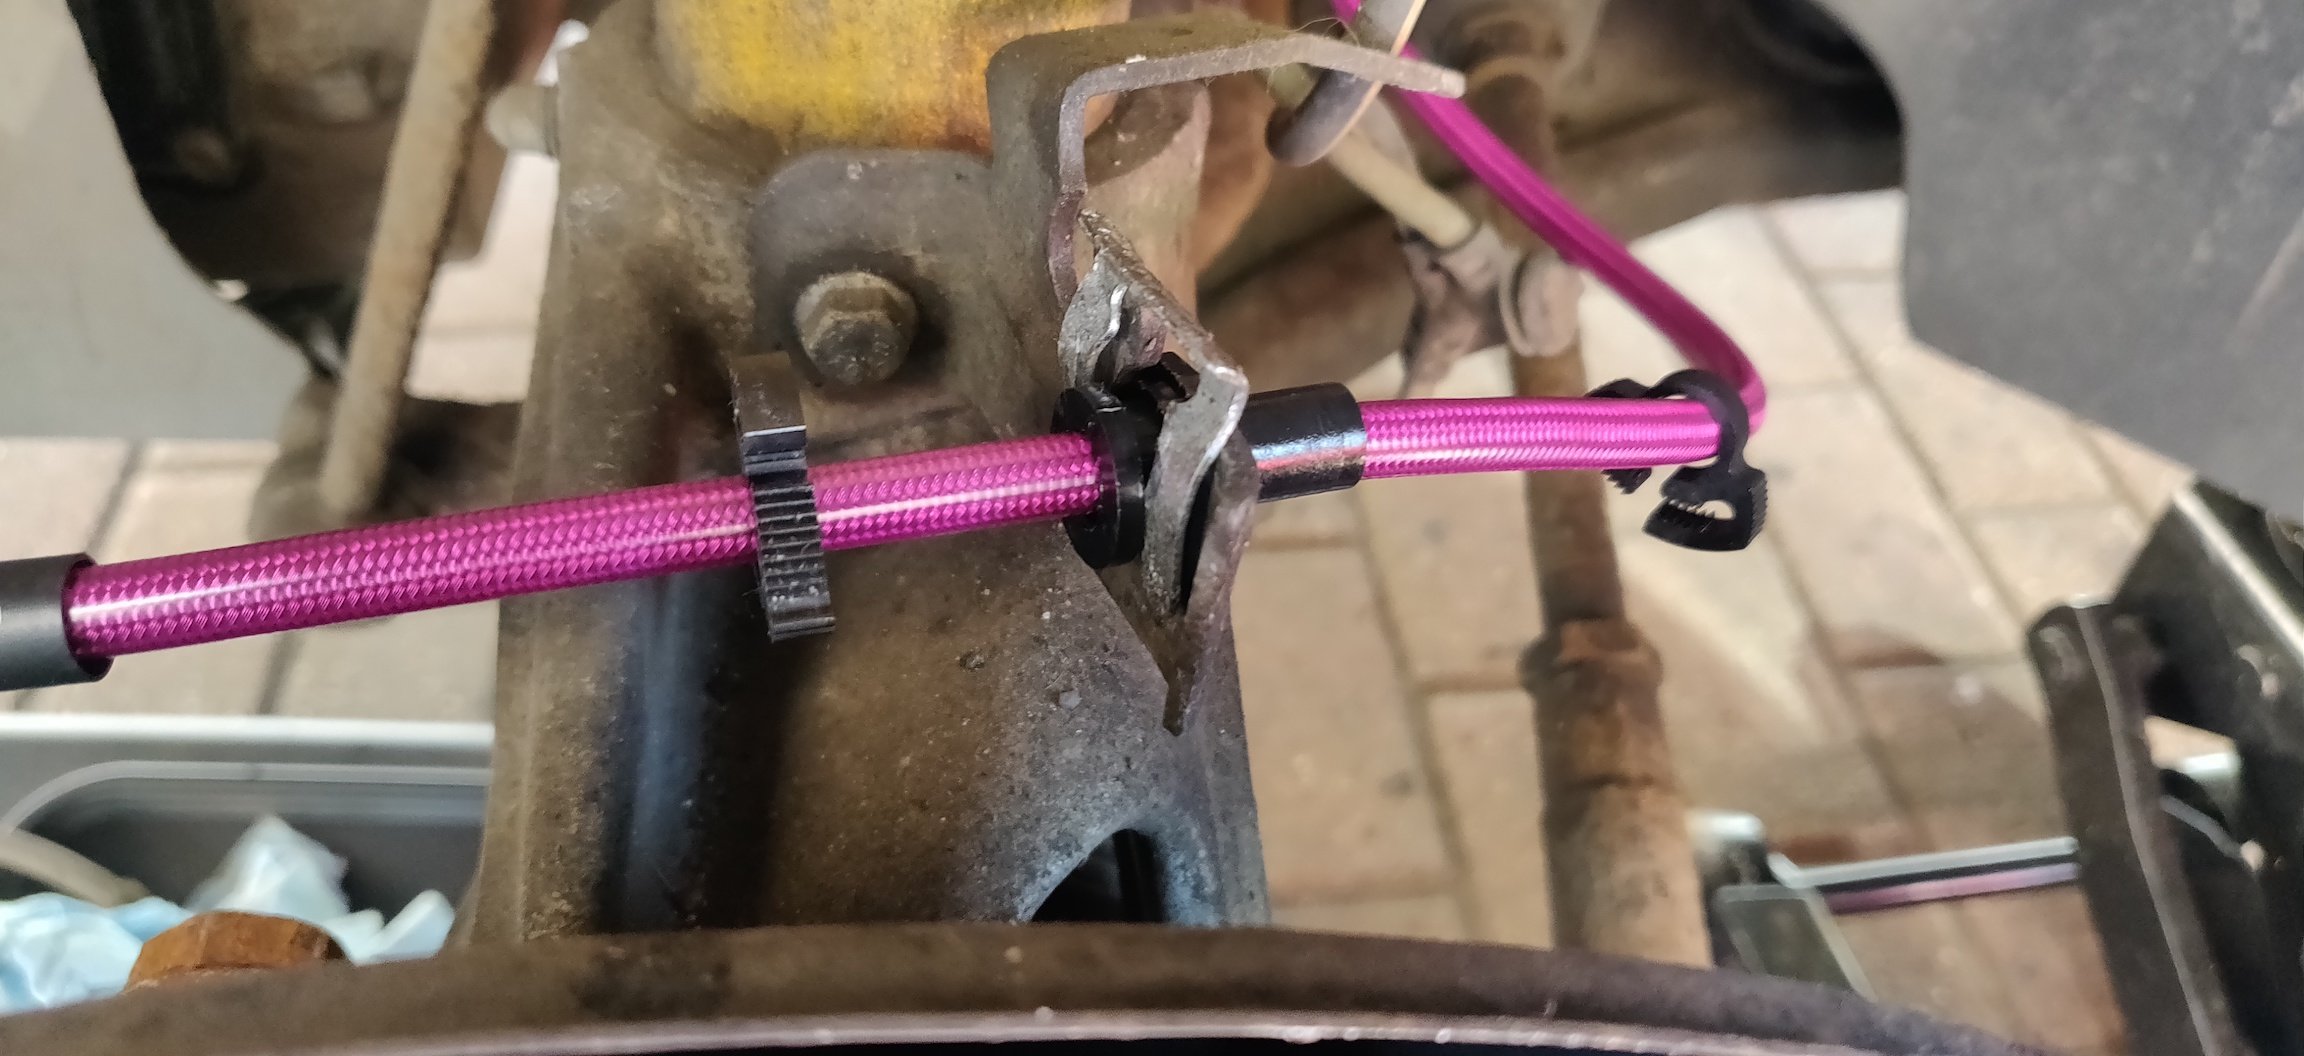
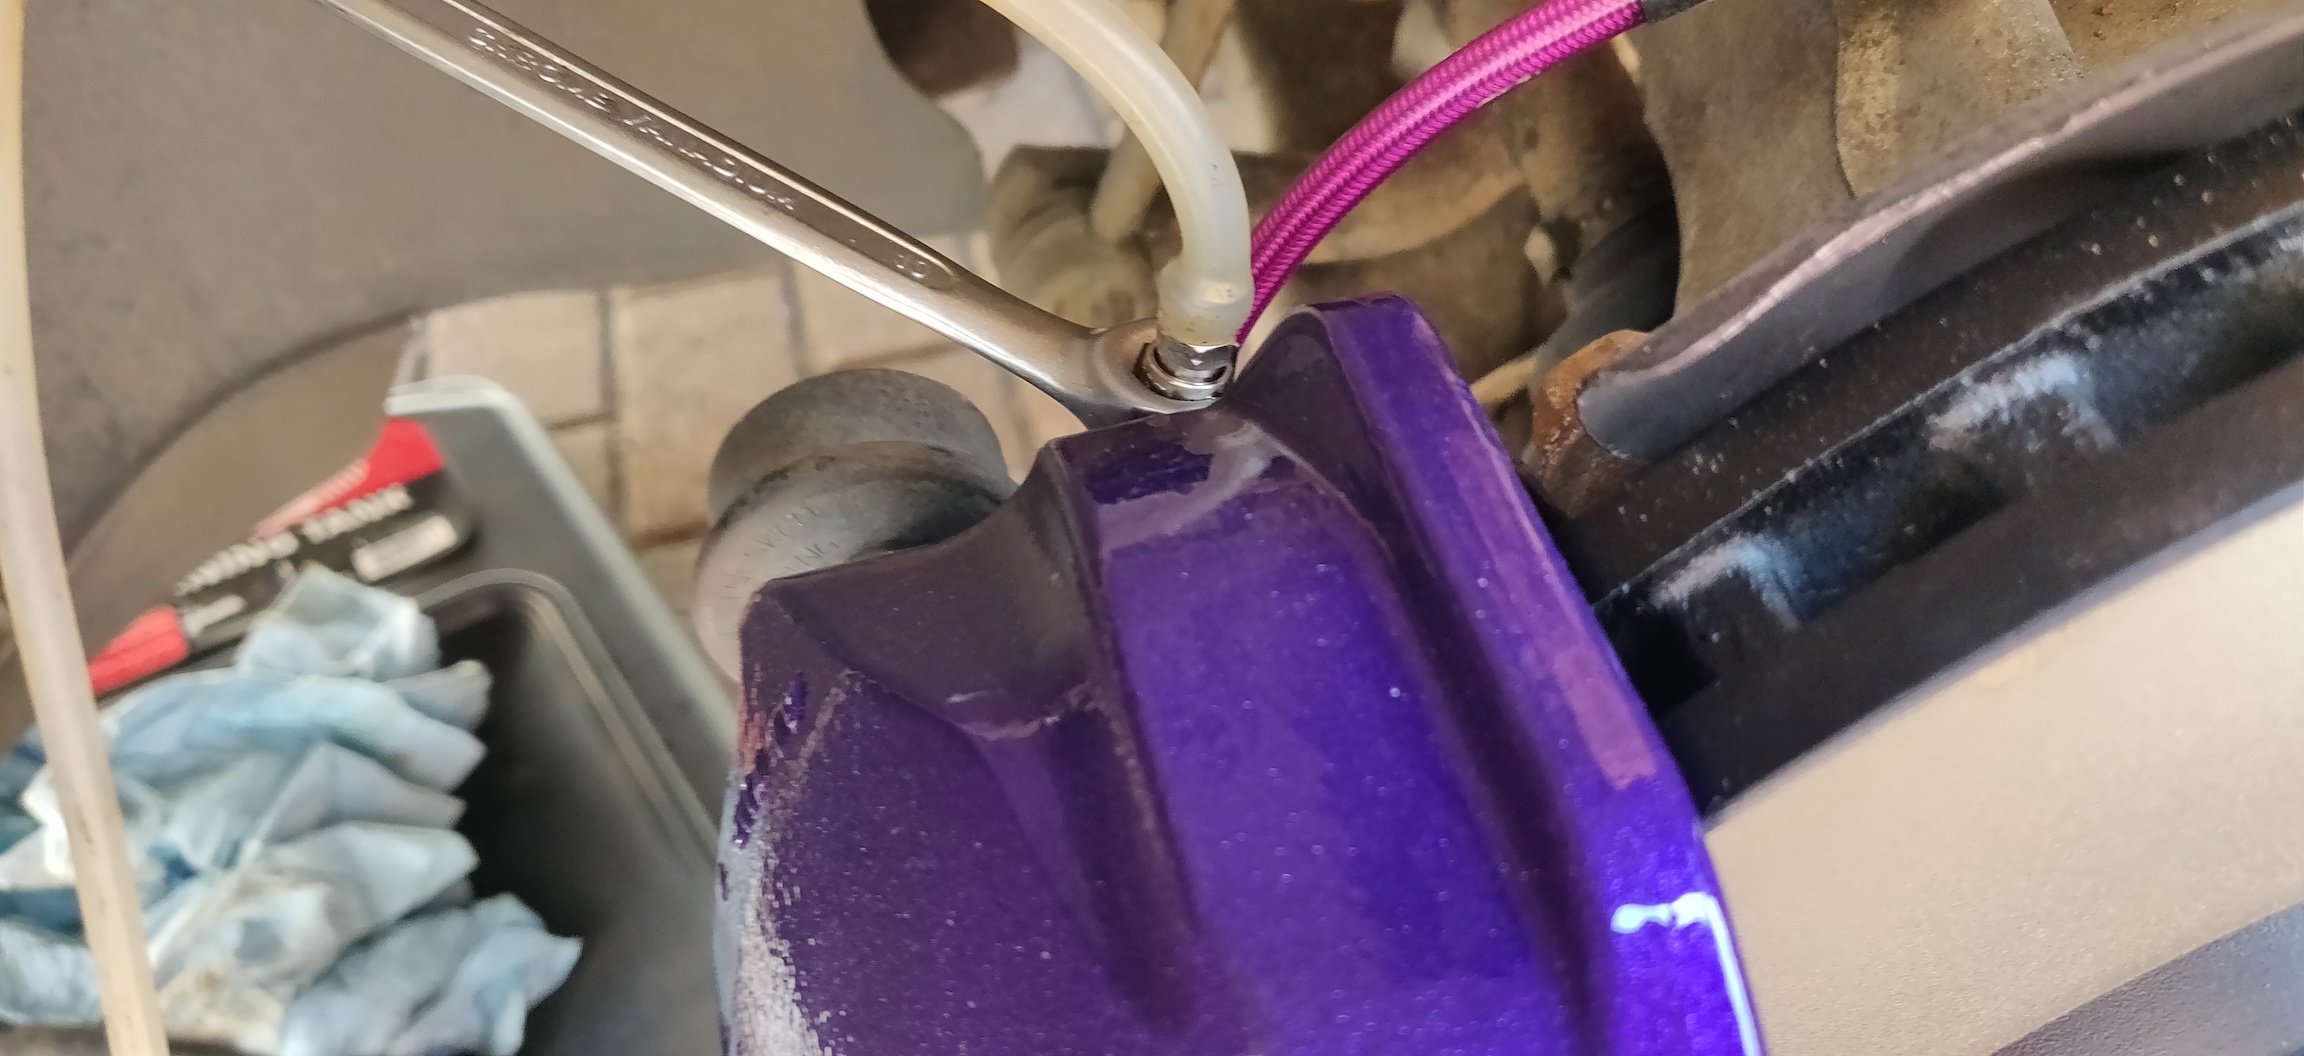
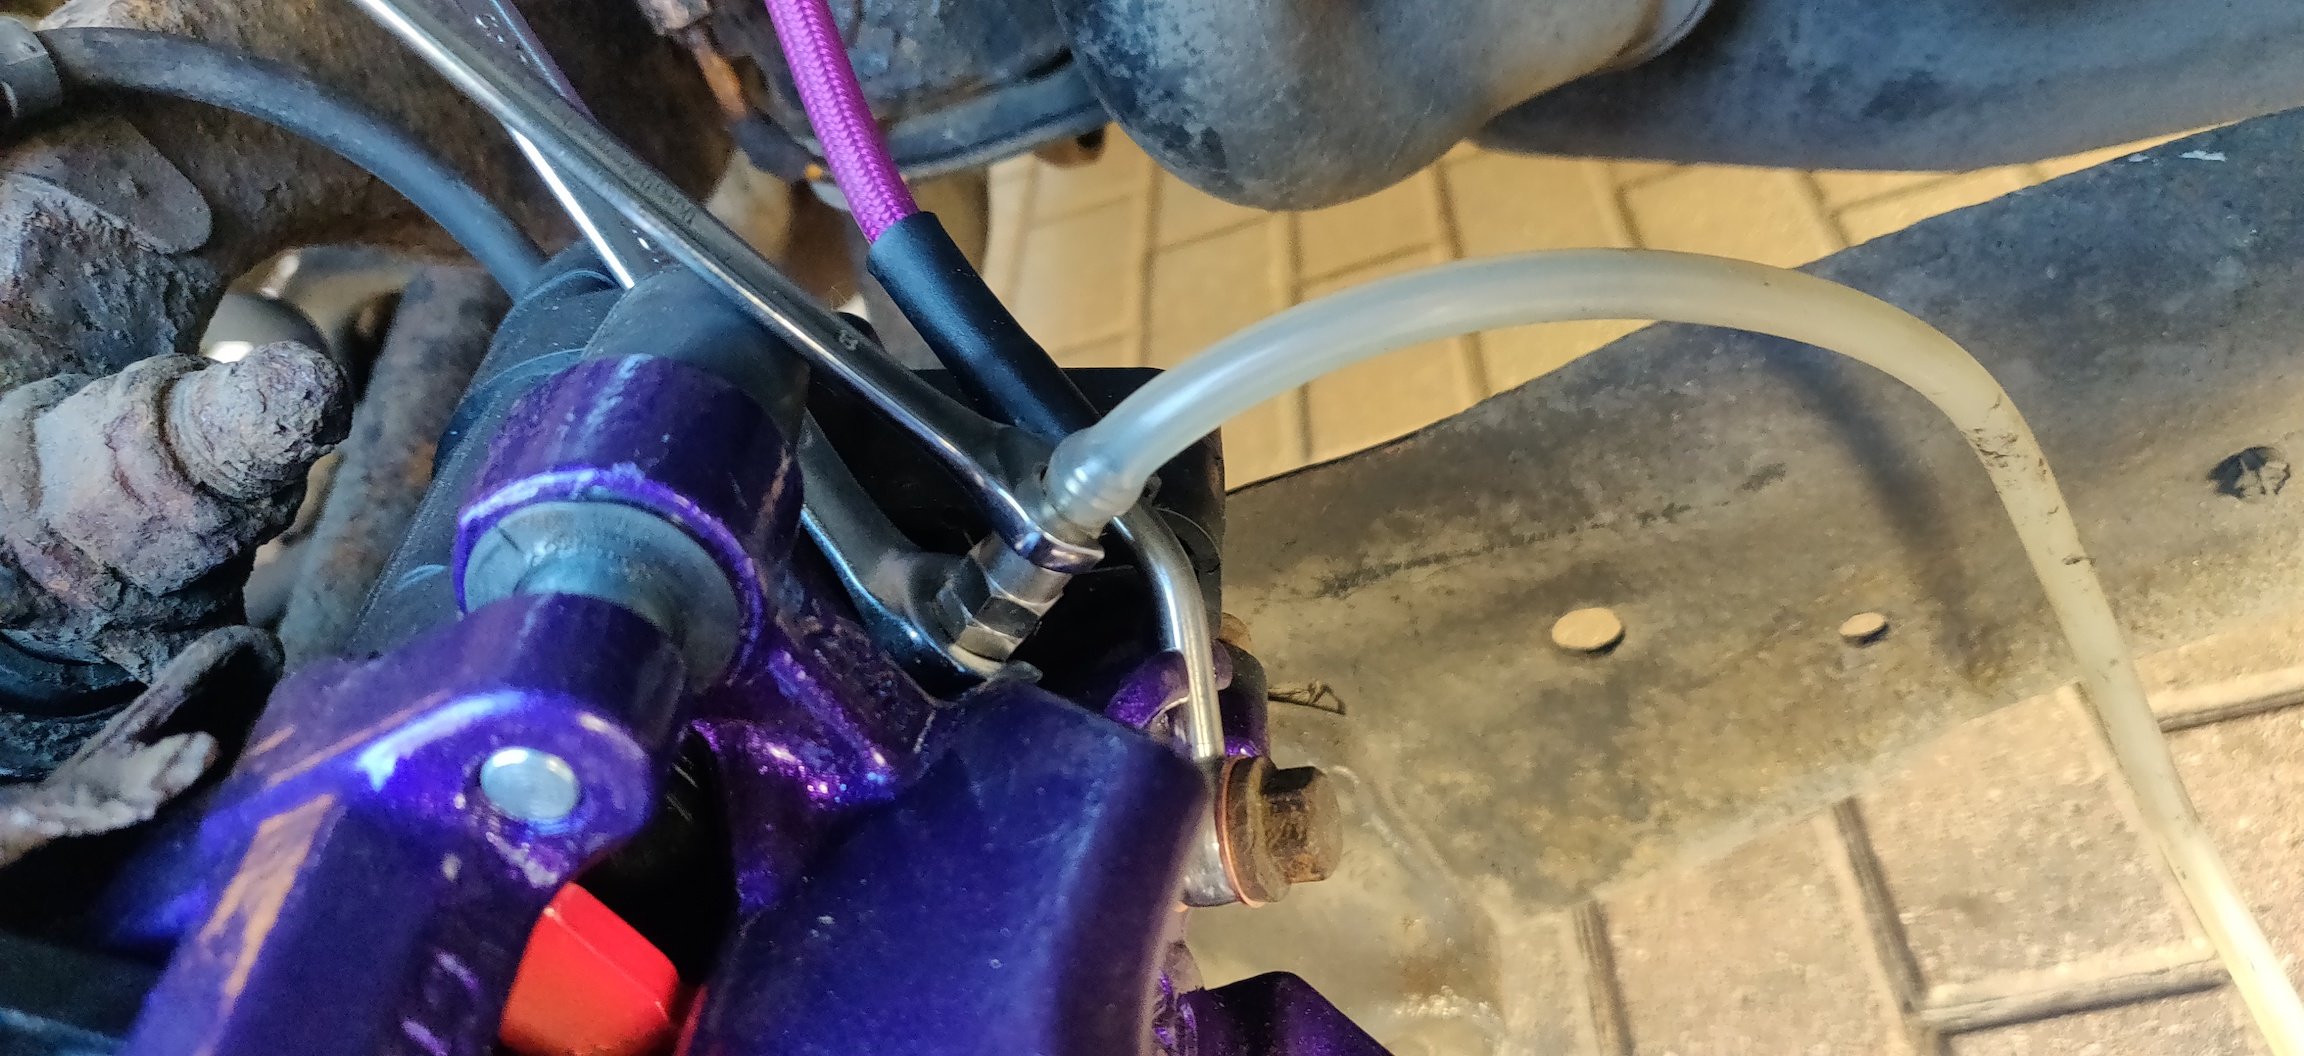
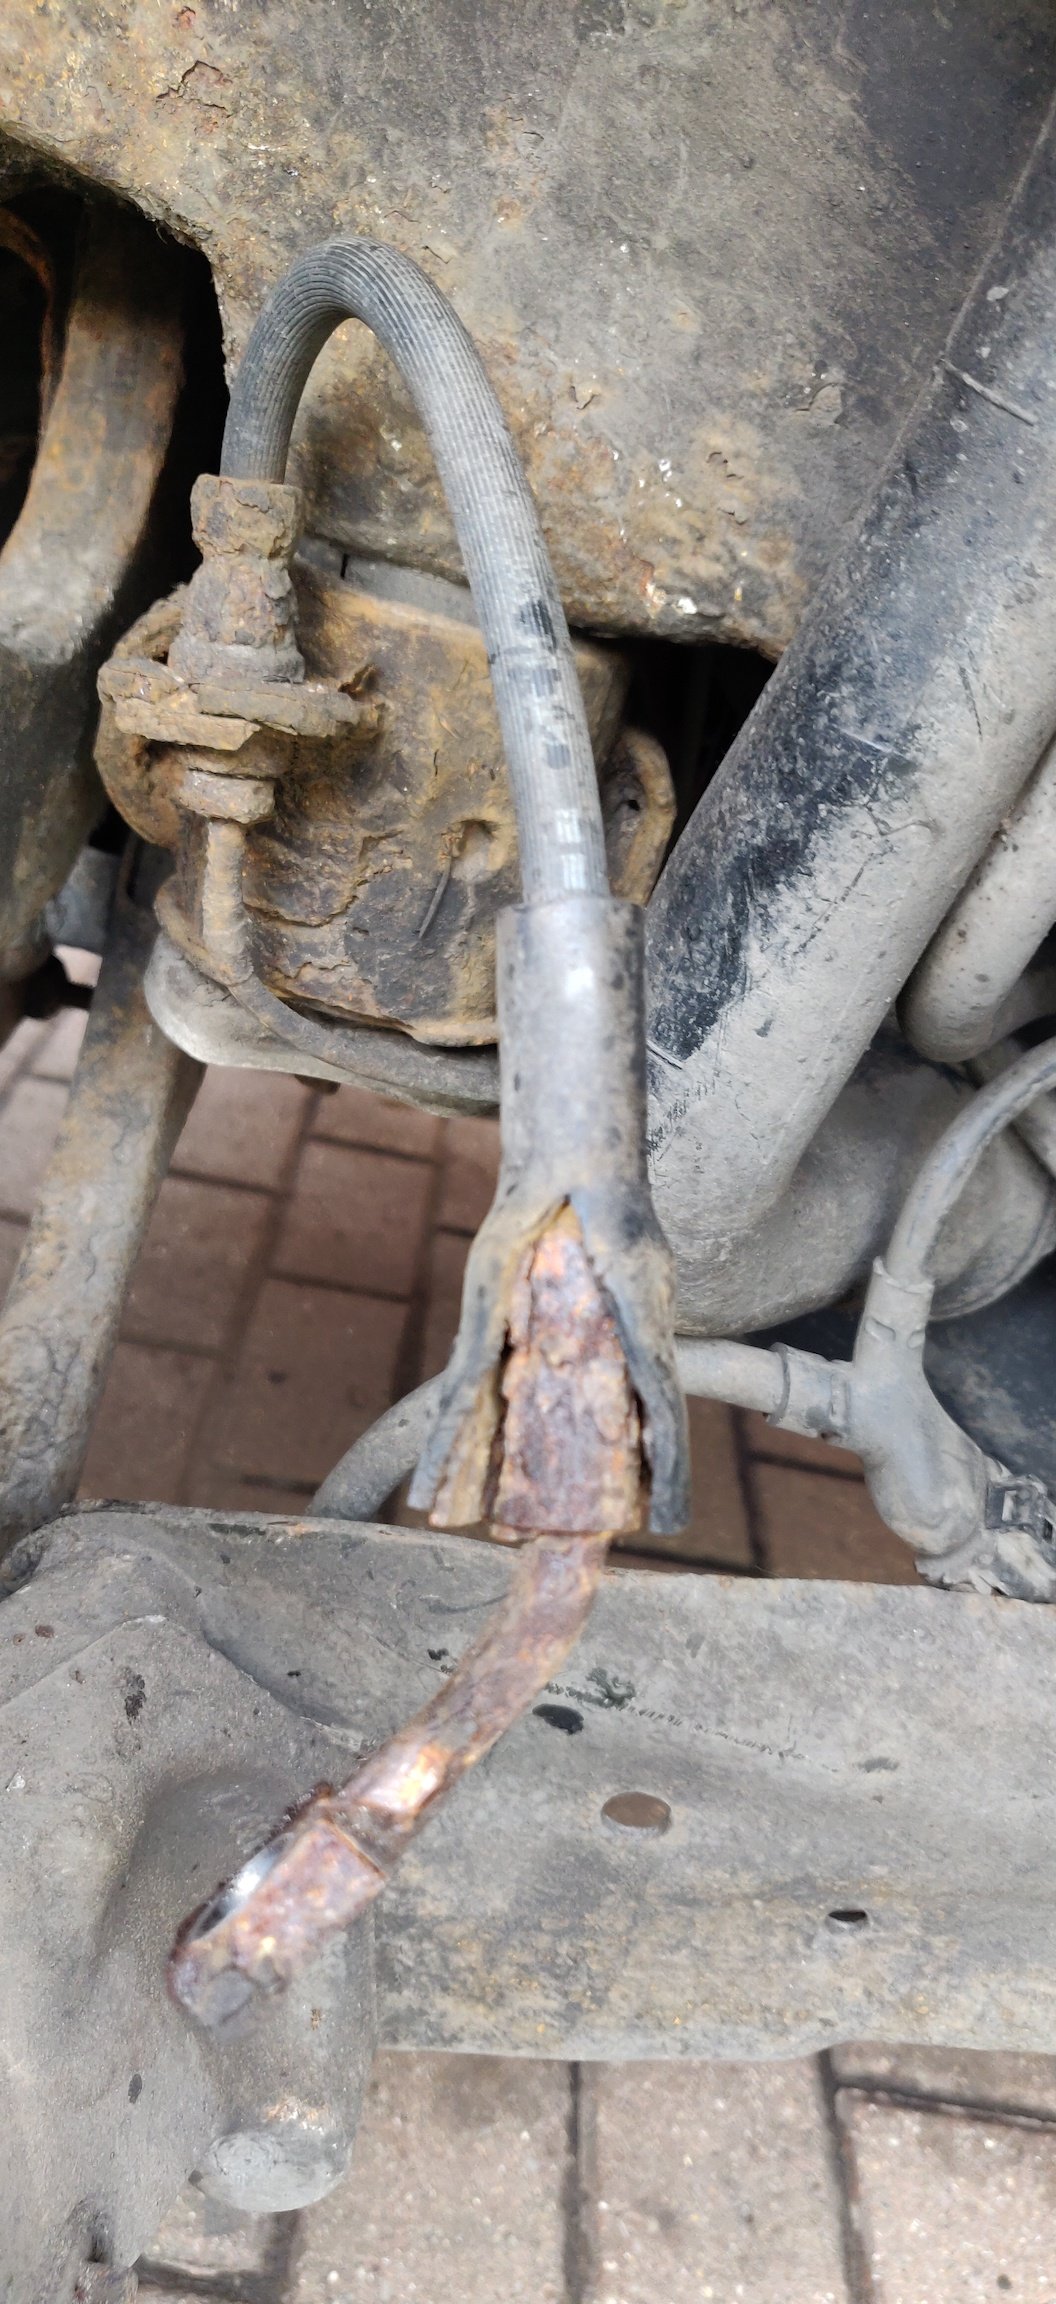
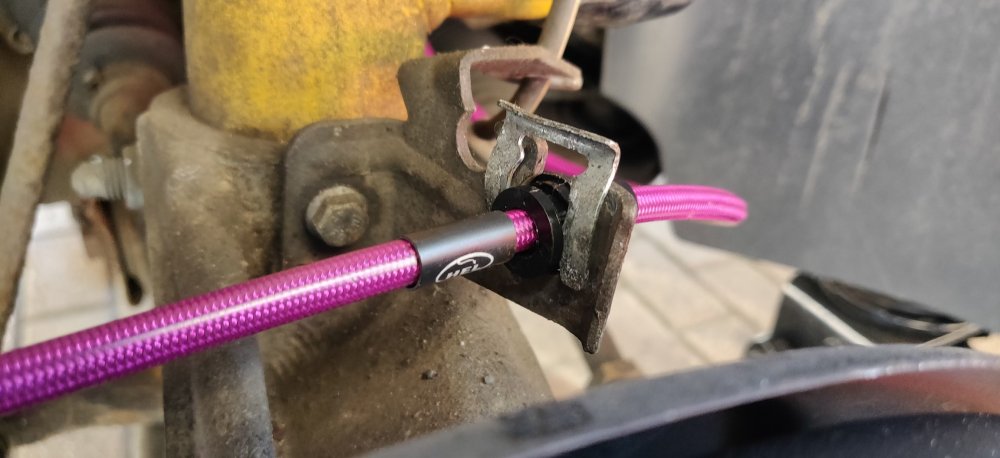
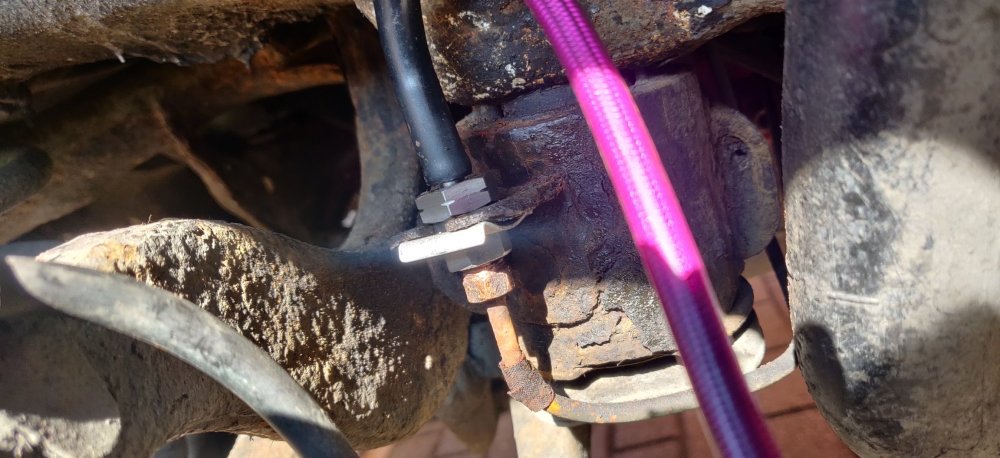
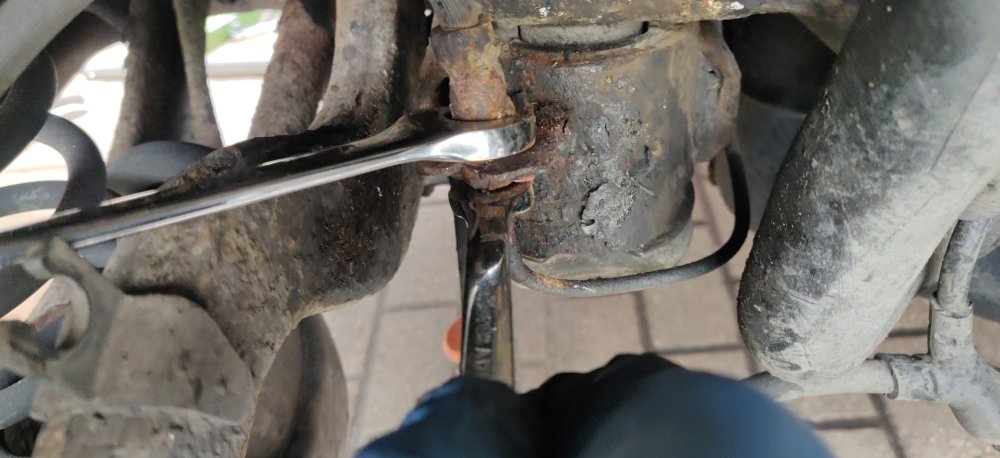
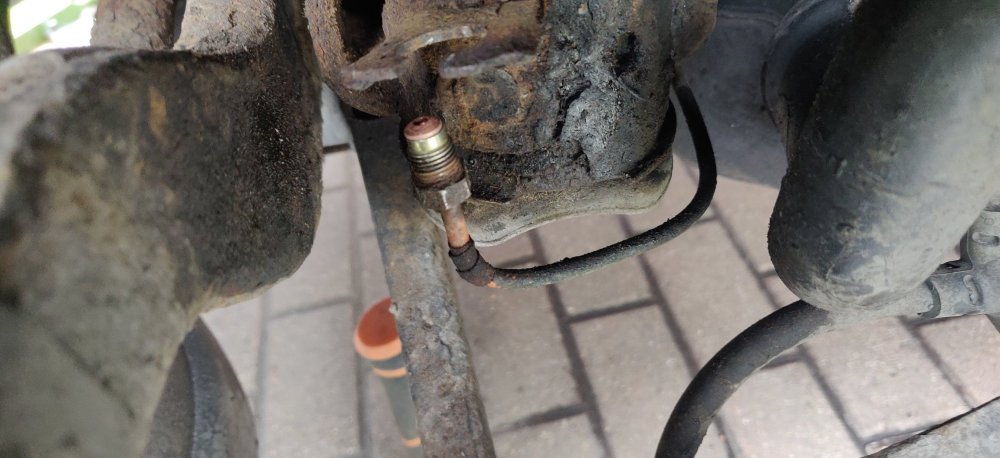
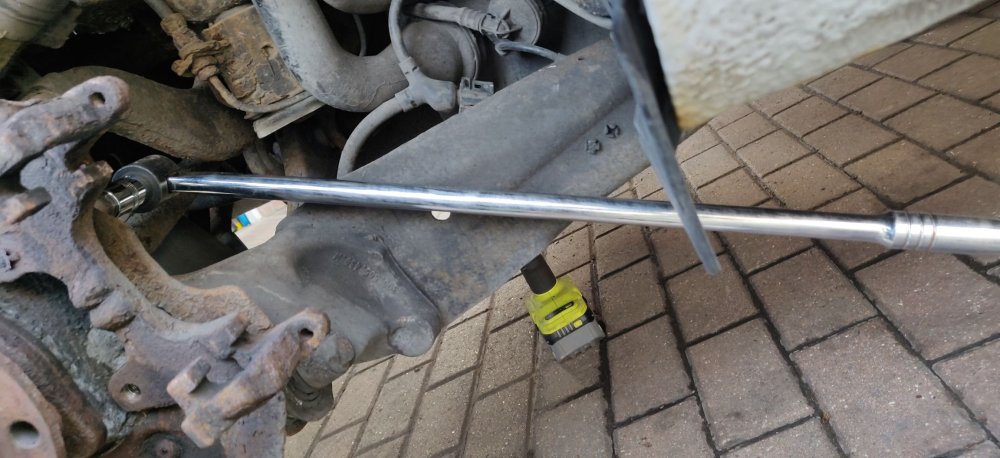
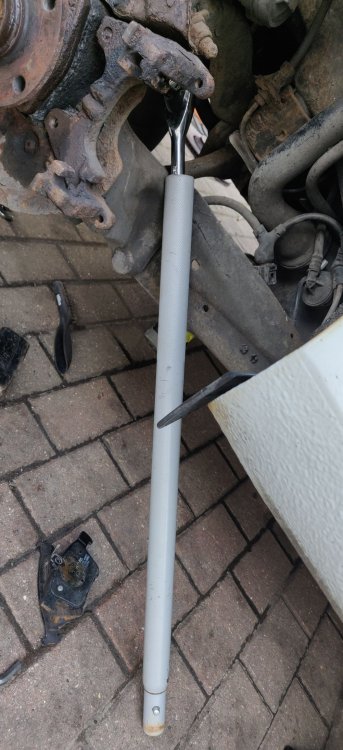
So yesterday was time to tackle those brake hoses. Got the brake bleeding bottle onto one of the calipers: Loosened the bleed screw and reinstalled the brake pedal hold tool, 60mm. Tried to move the wiring alongside out of the bracket and out of the way: Primarily because some fire is involved to see if that loosens the union. Had some fire proof material which I tried to use around where I would be hitting: Sorta a cheapy soldering mat I guess. Just something lying around the garage. Then just got on with it, about 30 seconds, then like the rears, 17mm spanner over the union and 11mm over the flare: Then it started to loosen. So again like the rears, a case of keeping the flare still and turning the hose instead. Before that, buzzed the banjo bolt off the caliper: So the brake hose can turn without a lump of metal attached to the end: So then reverse of removal. The HEL brake hoses have the bit to attach it to the bracket on the hub, with a couple of clamps as it were, to essentially go on the hose to restrict movement, as the bit on the bracket is free moving, presumably to allow for quicker construction of the brake hose. Anyways, added a dab of copper grease on the brake flare, then twisted the hose onto the flare: Small nip with the 17mm spanner and then to double check the route to the caliper: Seems to be ok, again, lucked out with the orientation possibly. So the workshop manual for the TTS calipers state 45Nm for the banjo bolt, but the HEL booklet states a range between 20-33Nm. I’m presuming this is due to them being stainless, and not wanting to repeat what I did with the Haldex bolts, I’ve nipped them up to 32Nm. Didn't want to wiggle down there to get behind the caliper for a pic. Then just wiggled the hose a bit and checked for kinks alongside steering lock to lock, then used the Knipex pliers to tighten up the clamps: So that’s that. The driver side also contains the wiring for the pad wear, so installed that: I don’t think I tallied up the replacement pad wear sensor, it was part 8S0 615 121 A and cost £19.49. Just a case of clipping that onto the inner pad and then to the connector. Although initially I tried putting it in the wrong way. It looks like the way the sensor works is essentially sacrificial: there's a wire that sits a little proud of the mark on the pads that suggest replacement time, so it looks like once the brake pads wear through that wire completely, the warning light(s) come on. Anyways, installed the brake hose and bits for the other side, and all done! Now, normally I’d stamp on the brake pedal a few times to push the fluid through and normally will push retracted pistons out to mate with the pads. But given all the hoses have been replaced and for the calibers themselves are newly refurbed, I guess pushing the pedal might not be enough, so for now: Just put the brake bleed bottle onto one of the random bleeders on the front and will let gravity do its thing. Then left it few a moments, and repeated on the other side. For the Stahlbus bleeders, they needed a bit more turning than normal bleeders, a full turn, before it looked like a tiny bit more before fluid started coming out. Once the initial rough job was done, pumped the pedals, then randomly tightened up the caliper bolts: Like last time, because they're beastly 200Nm jobbies, had to put the calipers on lock for clearance for the big torque wrench. So time to bleed the caliper propers. Got the pressure bleeder out, filled it with 1l of Dot 4 fluid, then attached it to the reservoir and pumped to about 16 PSI. Then gently gave it a turn and a half: Pic of the rear for reference, note that the Stahlbus now makes it easier as the spanner doesn't foul the rest of the caliper and whatnot. The TTS workshop manual states the order to bleed was: Front Left, Front Right, Rear Left, Rear Right. Within the front calipers too, the manual states outer before inner. So went through two goes running around the corners of the car, going through almost the whole 1l just to be sure. Some tiny bubbles were evidence especially for the rears. The rears also initially had a reddish hue to it, presumably from the overheating on the left and the use of fire on the unions probably also heated up the fluid. Once done, gave the area around them a good spray through with brake cleaner, we'll see how shiny these bits stay shiny. So with that done, and a couple more presses of the brake pedal, that was pretty much it, so started reassembling the fronts: Yup, got the alignment tool so might as well. Was £7.40. It does add a tiny bit of time to the proceedings, but I'd imagine if you had a fancy car, these are very useful to stop alloys from getting damaged on the way of fitting or removing (because German car buyers love their massive and heavy alloys). Was going to do the rears, but left it as the light was starting to evade me: That, plus the handbrake electric connectors need to be looked at and I'd definitely do so before bringing the car back to terra firma. So almost there. Se err: If anyone wants some 110k+ miles, 9 year old calipers, get in touch! They're still usable I reckon, certainly too good for scrap, but also probably not worth much in the grand scheme of things as they need a cleanup (to say the least). Maintenance: £2873.55 Upgrades: £4579.28 (+£19.49) Miscellaneous: £827.47 (+£7.40)


-
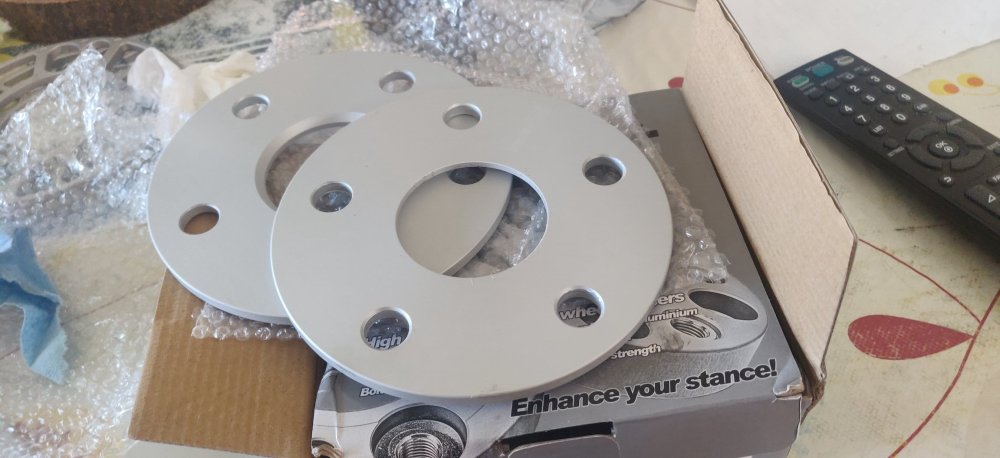
Hi all, So on Monday, got these back from the coaters: Replacement brake shields as per the earlier posts, where presumably they blasted off the original coating and applied Cerakote Blackout. I'll probably still give them a spray of something (especially the rears). One could argue that the fronts being aluminium means this is overkill, but the rest of the bits in the pic above is for a Honda Insight, which also used aluminium brake shields, which now don't exist, mine being corroded to buggery and one side completely missing before I got to it. Honda don't make those parts anymore so want to see if get these shields to just last a tiny bit longer. So those are ready for when I do the bearings, probably some time in the summer/autumn assuming nothing untoward happens. This arrived yesterday: Some proper 6mm spacers, with correct PCD and centre bore. In my rush to buy these at £22.99 I neglected to check that they're just a pair. I guess for now I'll just run with a wider front track, and sort out the rears whenever. Don't think we'd even notice. These also arrived: Hopefully replacement connectors for the electric parking brake. Cheapest I could find them was £13.28 and from, well, the pic plugs the site. The connectors having wire tails already inserted probably means I can then find the appropriate terminal extractor to remove them and then do the same on the actual connectors. Hopefully. So off to double check the spacer is ok: Because they're not universal, they can be plonked straight onto the hub, I guess eventually I'll get one of those alignment pins. Then the wheel on: Skin of the teeth. Reminds me of the E55 AMG we were SO close to getting instead of this, with its paper thin clearance of caliper to wheel, which to me is the correct wheel size. So I guess it's onto the brake lines before this is all sorted, but back to work... Maintenance: £2873.55 (+£13.28) Upgrades: £4559.79 (+£22.99) Miscellaneous: £820.07


-
I actually had a couple of these from my time with the wife's Ibiza, I'll need to see if I can find them!
-
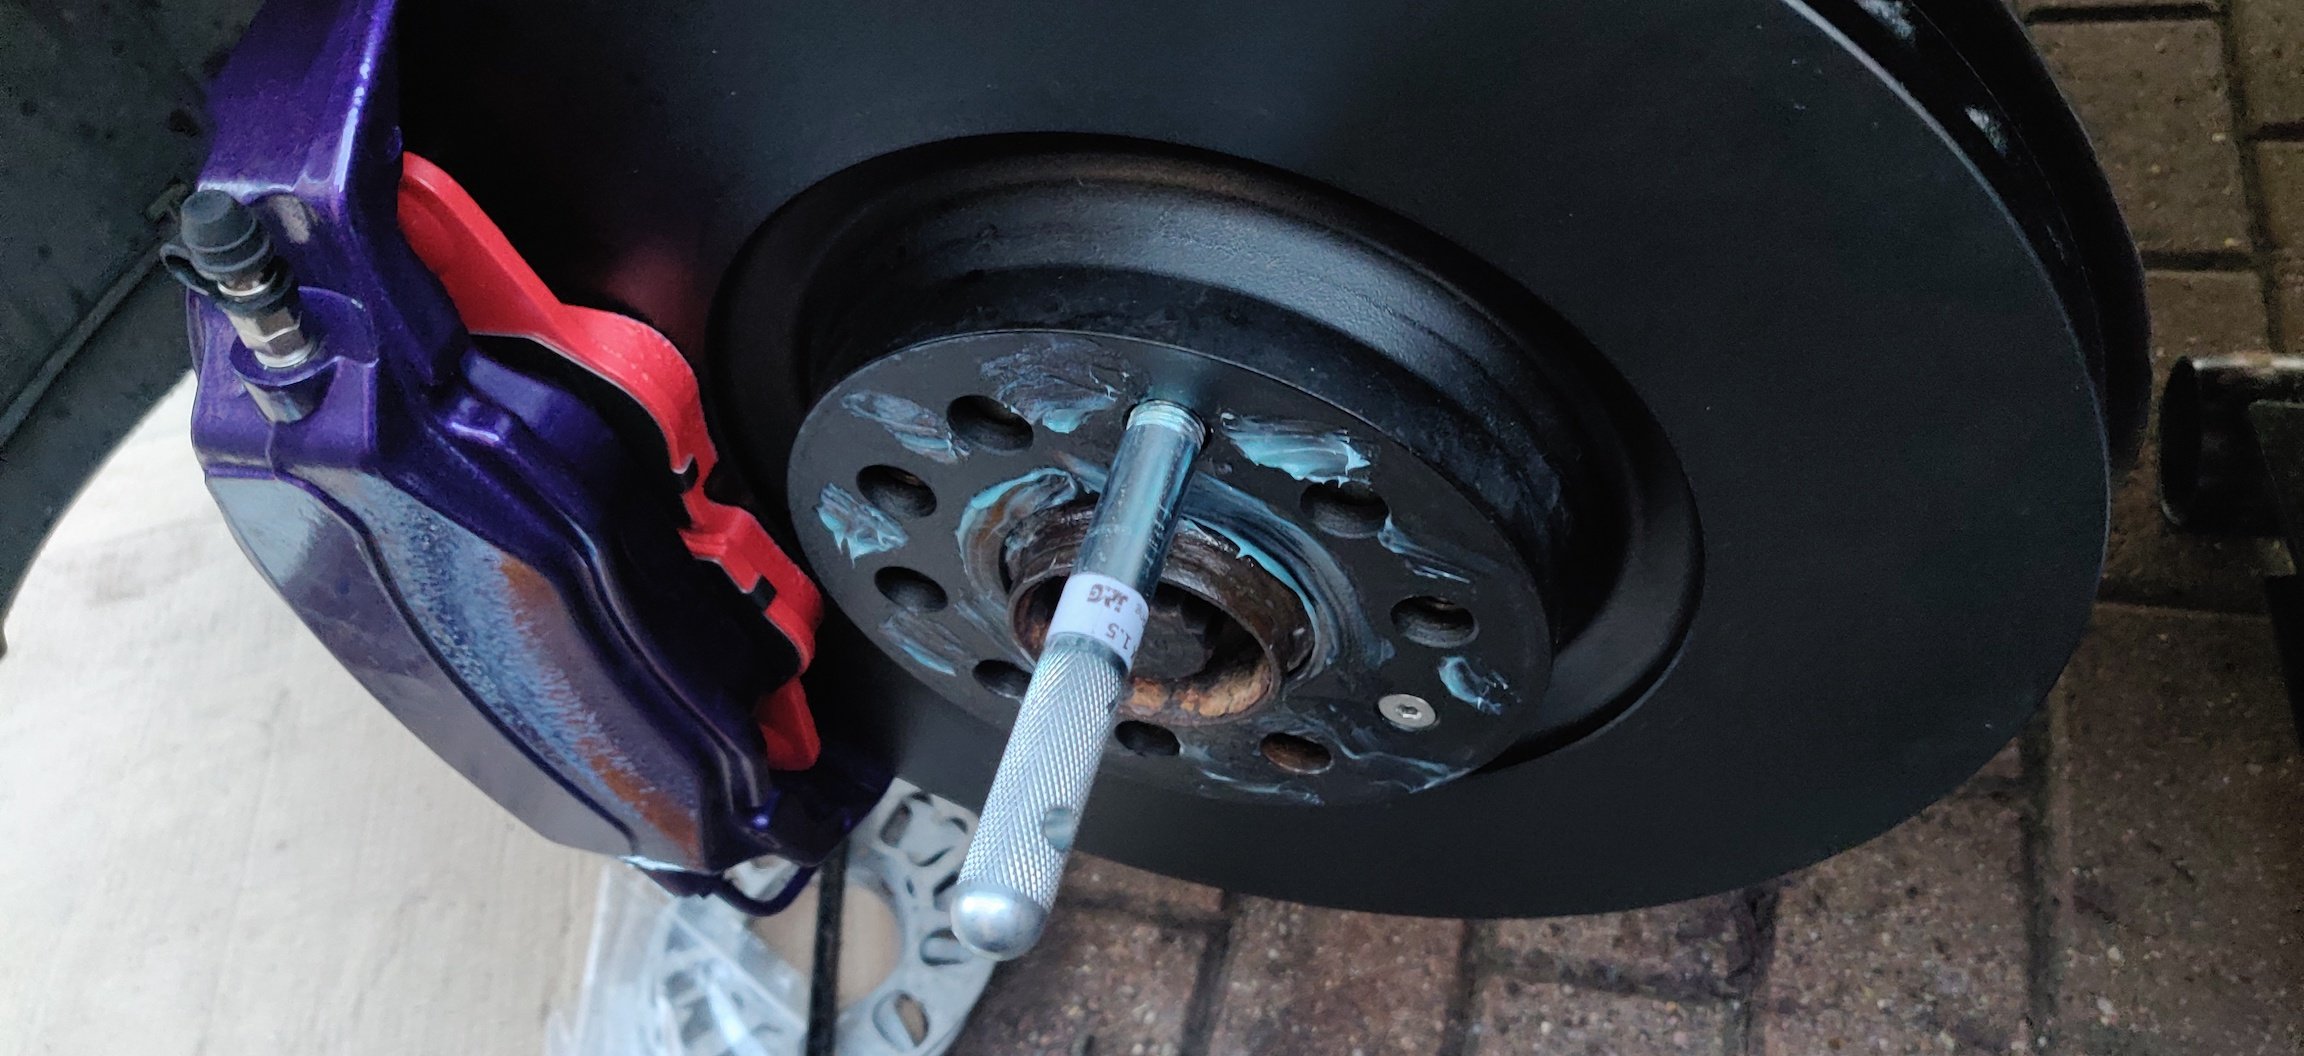
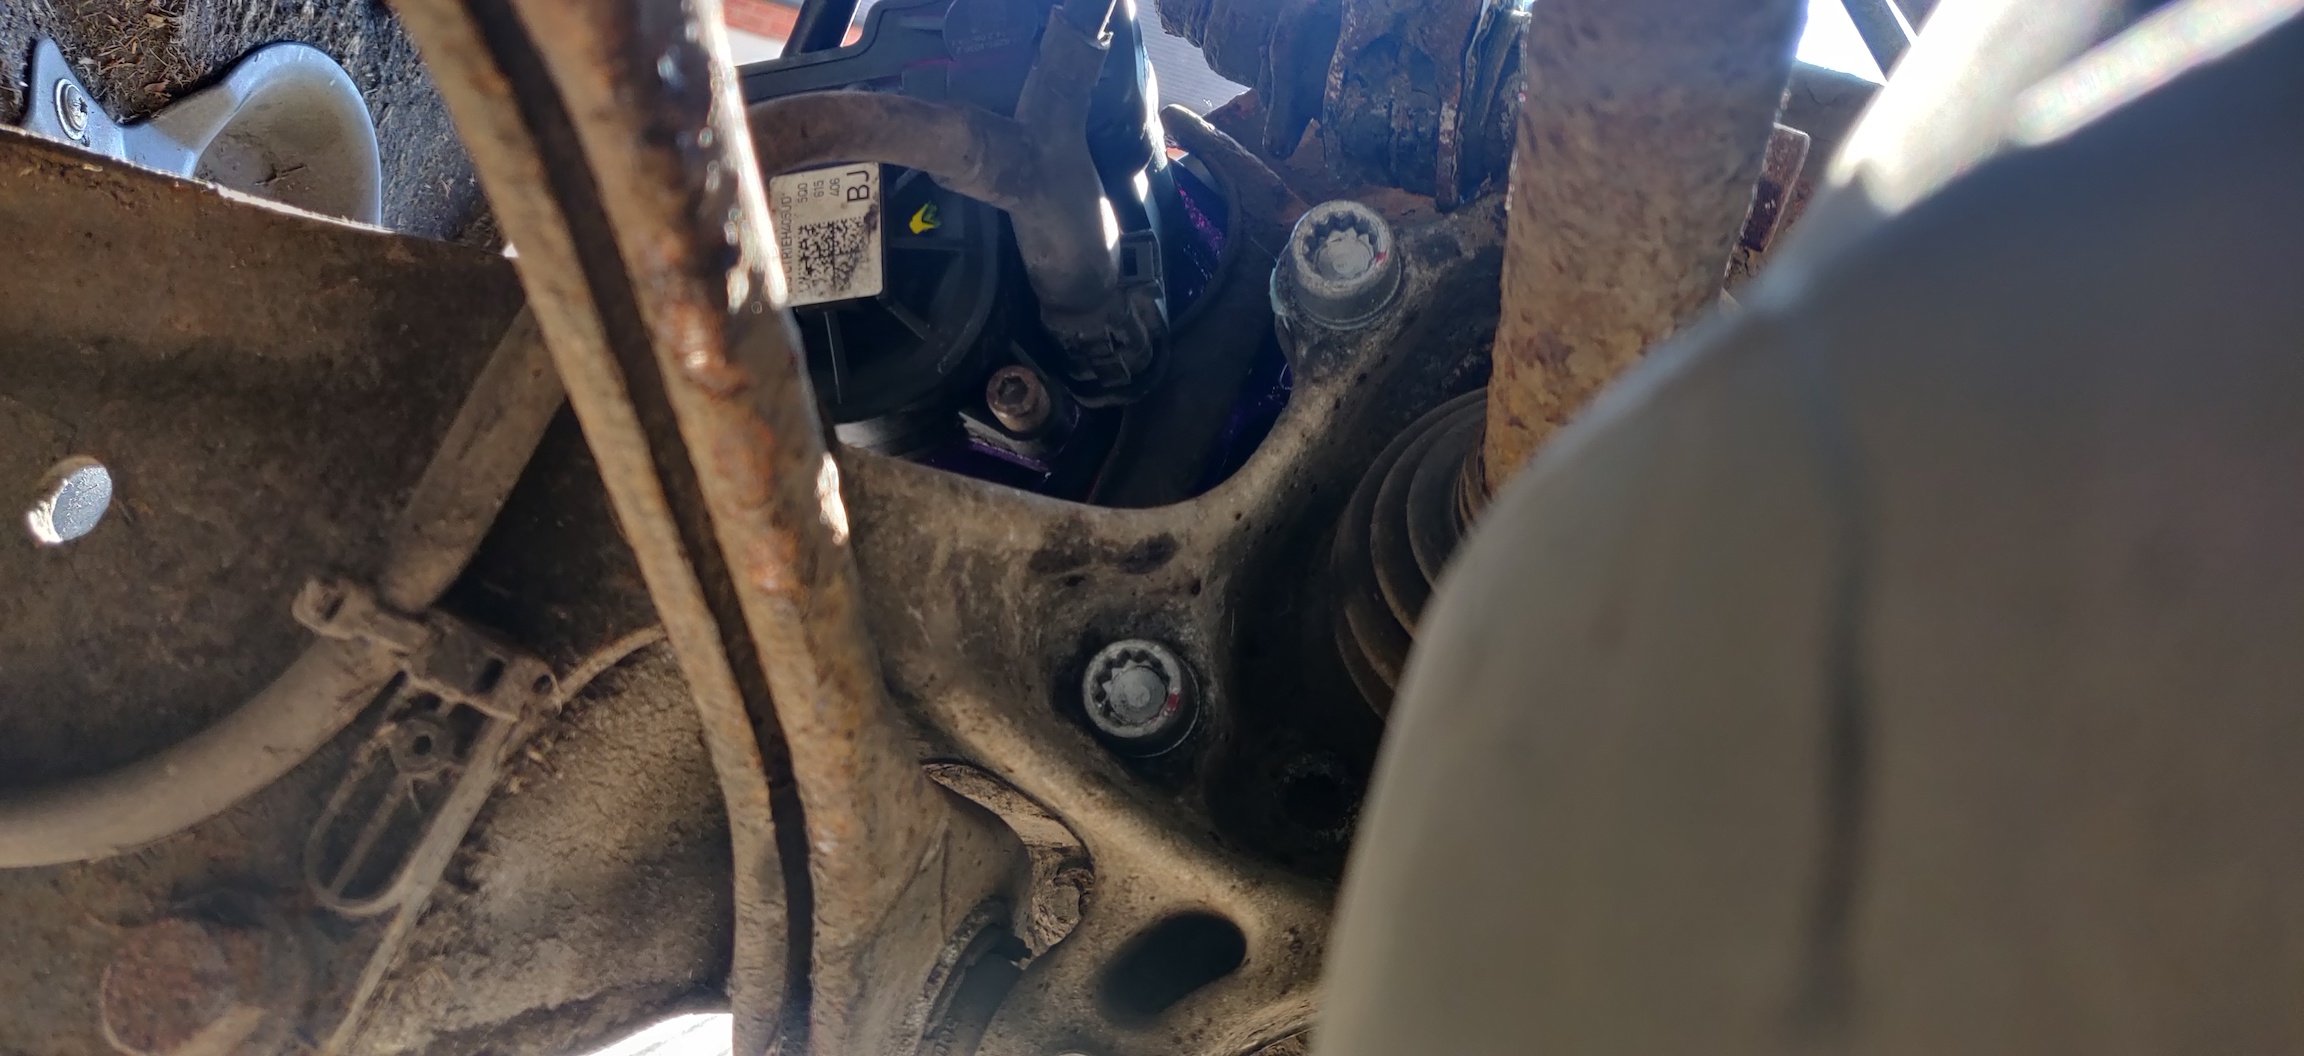
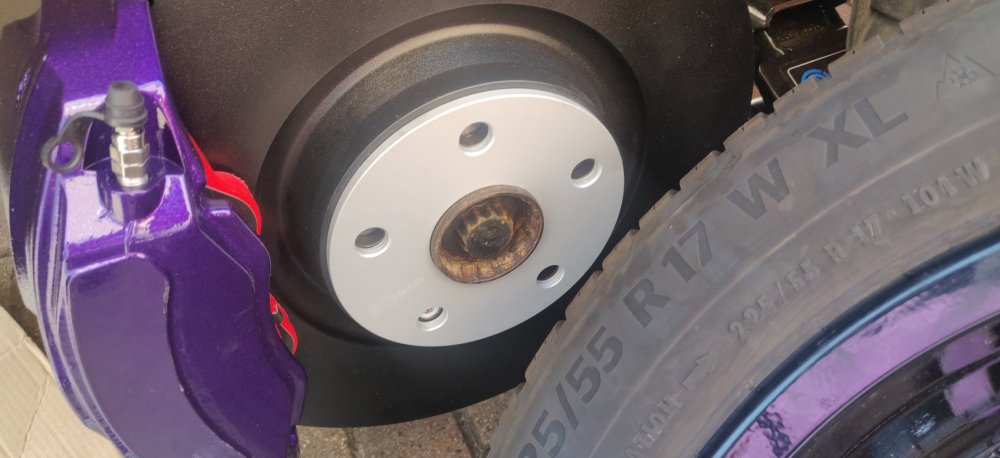
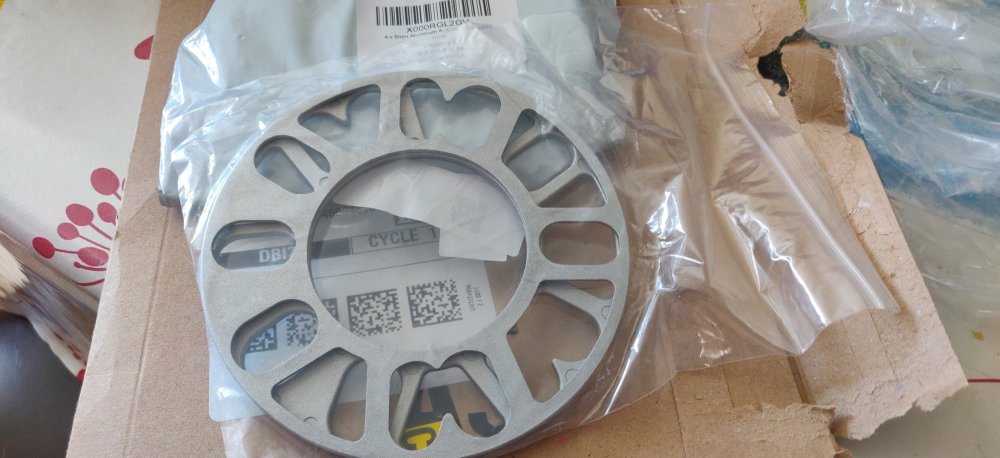
So conveniently: Spacers arrived, what a time to be alive! Pair of 3mm and I think it's 4 of the 5mm. Don't really care, after the correct size before committing to better ones, as these look a little too generic/universal. So back out, and gave the wheel bearing face a quick cleanup like the rears: Then coated the face with a thin layer of corrosion block grease, before lugging this thing on: Before this, got the retaining screw, gave it loads of copper grease and then blasted it through the hub with the impact wrench in and out to clean out the threads, before reapplying more copper grease and then using it to hold the brake disc on. Not bothering with torque until we're actually finished. So got the left side caliper out and dry fitted it with the old bolts for now: Ready for trying out whether the spacers are correct. Because the car's not Japanese, I can't just slap the wheel spacer onto the brake and then the wheel (until I git wheel bolts, of course), so had to use a couple of bolts and just...hold onto it: Then try and plonk onto the hub. Wheel wasn't going on, so at 3mm, was still fouling: So off with the wheel, and on with the 5mm: Sadly still fouls, and worse: Left a few scuffs whilst turning. Not the end of the world, but a bit annoying as they're freshly painted. I suppose If I was reckless, I could just get the wheel to scrape off what paint it needed to. So sod's law, it implies 6mm is probably the required spacer. With both spacers in place: It's fine. So I guess I'll try with a 6mm spacer, and I guess if I'm super unlucky and it needs to be 6.5mm or something, then I guess a 7mm! Taking a break from this for the day, I've plus gassed the brake union and hoses for both sides, hoping that'll make the process of undoing those easier, but don't want to sort out that final part until I've got the right spacers. Looking at the fronts, in order to change the wheel bearings, it looks like the driveshaft will need to be clear of the hub, as there's no way the top can be accessed from just looking at it. I'm hoping that means just the ball joint can be undone and that would be enough, but I'll need to mentally prepare for the possibility of the strut bolts being involved too, which'll mean new bolts... Maintenance: £2860.27 Upgrades: £4536.80 Miscellaneous: £820.07


-
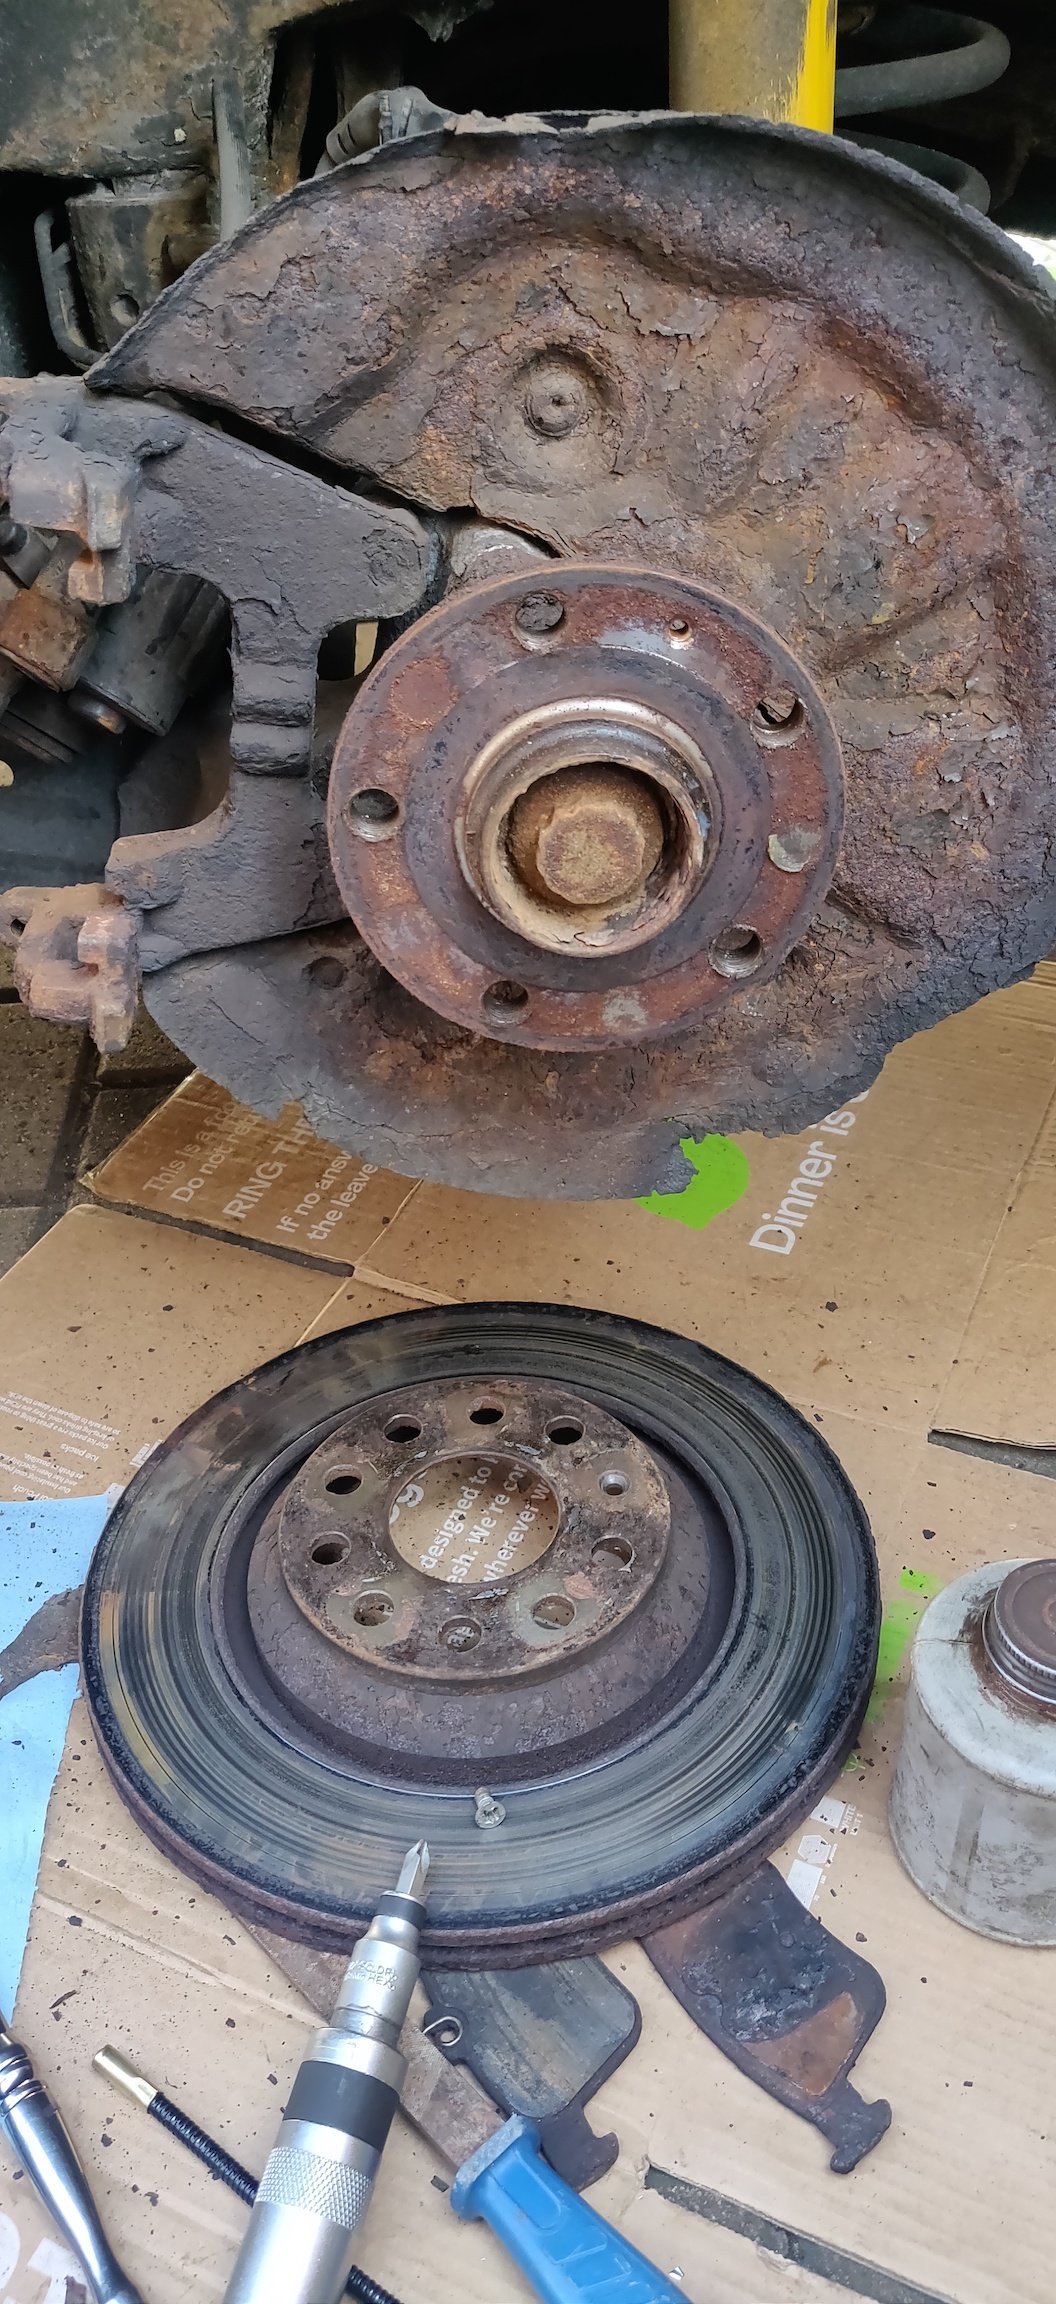
So time to finish the rears, which meant: The dreaded TTY bolts. Even getting them to 90Nm was a hassle because of access and just generally being in uncomfortable positions. Used a sharpie to mark at the 12 o clock position, so the target is 3 o clock. The following is more for my future reference, because I'll need to do this again sadly when I decide to tackle the wheel bearings and shields (as the pad carrier will need removing and refitting again. The right driver side was easier, where the bottom had the M14 bolt, with an extension, then the breaker bar. It then goes from the floor and essentially bench pressed upwards until no more space and repeat. The top doesn't need the extension: With it being to be done next to the suspension bit (Ford called it the blade when it came up with it, I think for the original Focus). The left passenger side was a bit more difficult: Ultimately still the same extension and breaker bar, but with it going downwards, it wasn't exactly graceful to do. Probably looked daft if someone was to look on. The top was done but with a ratchet and pipe on, but this time on the other side of the blade suspension arm, as otherwise the fuel tank was blocking the range of movement. More fiddly bit had enough purchase in the valley between tank and sill. More not-so-graceful grunting and groaning: Probably all 85-95 degrees probably, not the most pleasant of experiences. I do hate when car manufacturers put their rear calipers towards the front of the car instead of the back, as you're at the mercy of the gap between wheel arch and suspension with not enough free space to do stuff like this. Anyways, a mental checklist and almost forgot: Clips for the brake pipe and braided hoses. This was more of a faff than I suspected, more because the caliper and brake discs being installed made access too difficult for a hammer and chisel to thwack it in. I ended up using the Knipex pliers to close it into place, with the rear of the braided hose connector as leverage. The clip clicks into place and can then be twisted into the appropriate orientation (until rust then solidifies it into place). Gave it all a spray of ACF then went to look at cleaning the rear wheels: There was visible rust flecks on the left wheel, no doubt from the actual metal grinding of disc and inner pad. I've a bottle of Iron Fallout Cleaner, from Valet-Chem, which does a smashing job of dealing with it, I'd highly recommend it. Spray it sparingly over what you're cleaning, and if it starts going purple, then its reacting with iron bits straight away. Then a brush and a jet wash rinse. Took about 4-5 times on both wheels to get it running clear. Then dry fitted the wheels: I feel the reason the left wheel was stuck was because the brake pedal was applied before the wheels were attached. The brake discs on the rear can be removed without the pad carrier, but it appears that the brake disc retaining screw isn't enough to keep the brake disc flat on the hub. So I reckon when I pressed the brake pedal to get the pistons out, the brakes then pushed the disc at a slightly weird angle, then we proceeded to drive to ages. That's the hope anyway, so the plan is to have all the wheels fitted before pushing that pedal. I guess once all the braided hoses are in though, there's probably too much air in the system, so probably should do an initial bleed. I'll sort that out once the fronts are sorted. Speaking of the fronts: Did the same as yesterday for the front right brakes, so disassembled the caliper, carrier and removed the brake disc. I noticed on this side that the brake disc retaining screw still had remains that were slightly proud, so went at it with fire for about 30 seconds: Then got the Knipex pliers out: Minor victory: So that means this side will be easier to use when dry fitting the new brakes as the new retaining screw can be used to keep the disc in place. So hopefully the spacers should arrive today at a not too silly time so I can give that a go. Otherwise, time for lunch and a break. Maintenance: £2860.27 Upgrades: £4536.80 Miscellaneous: £820.07


-
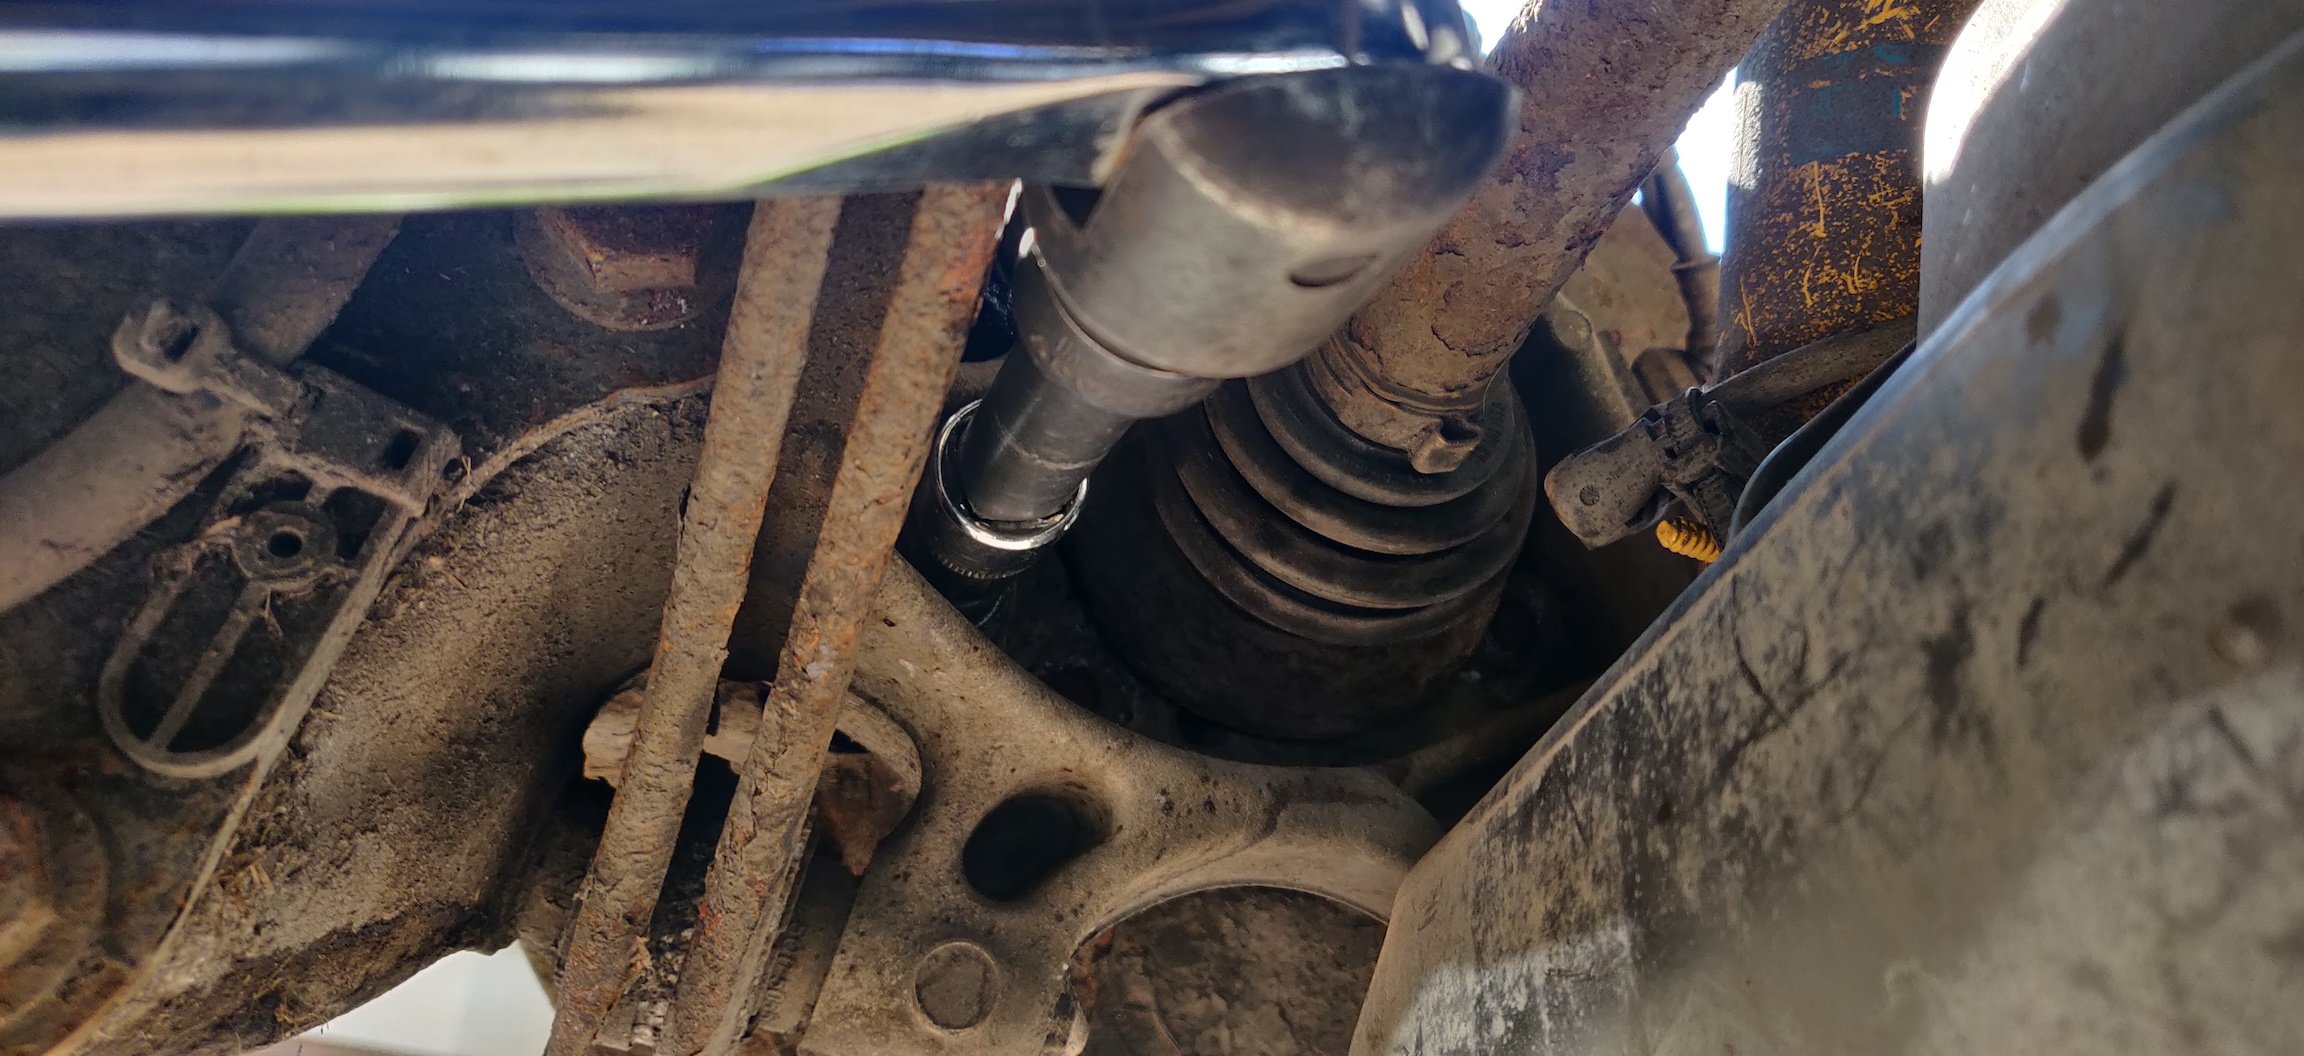
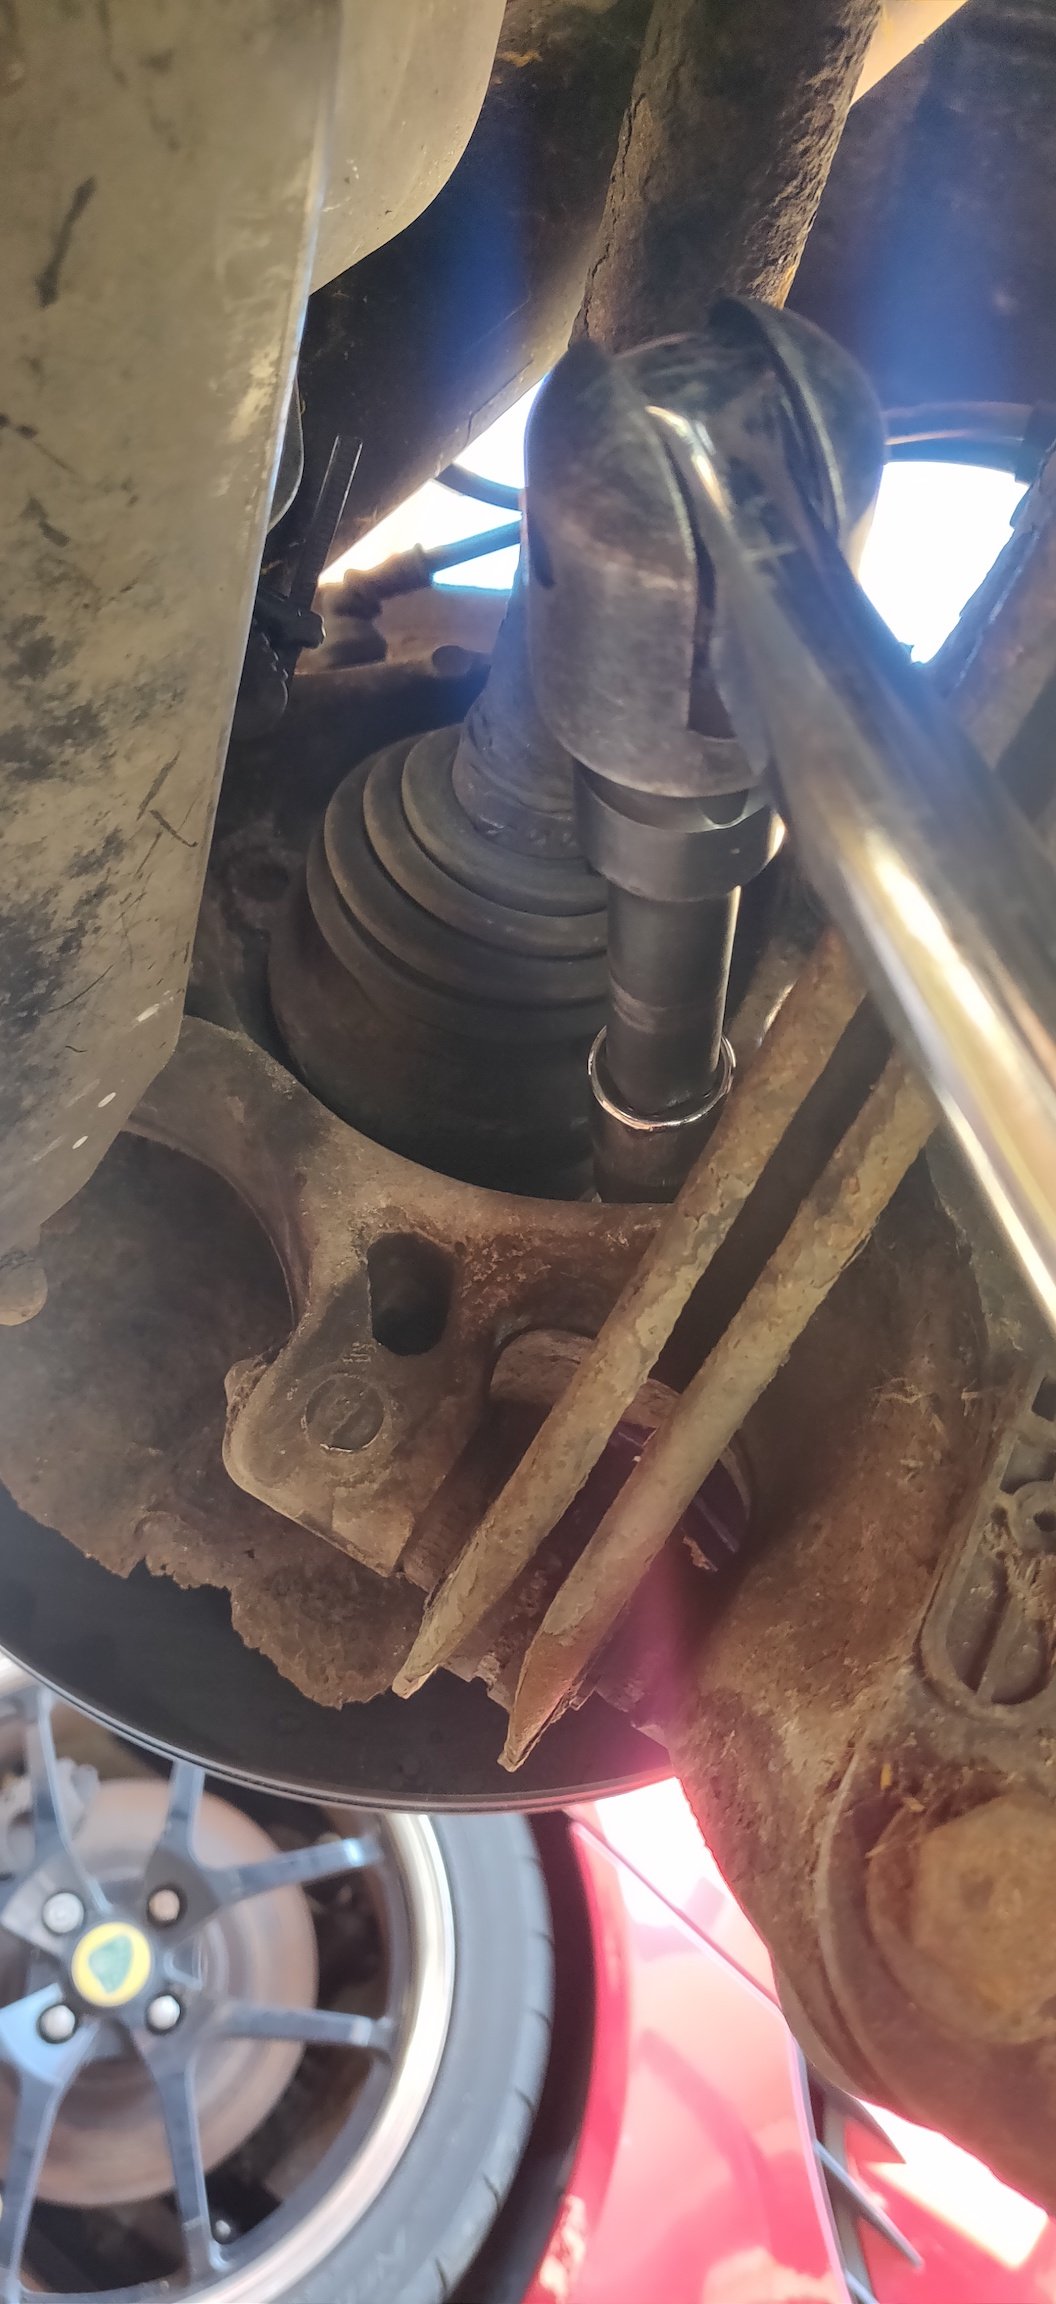
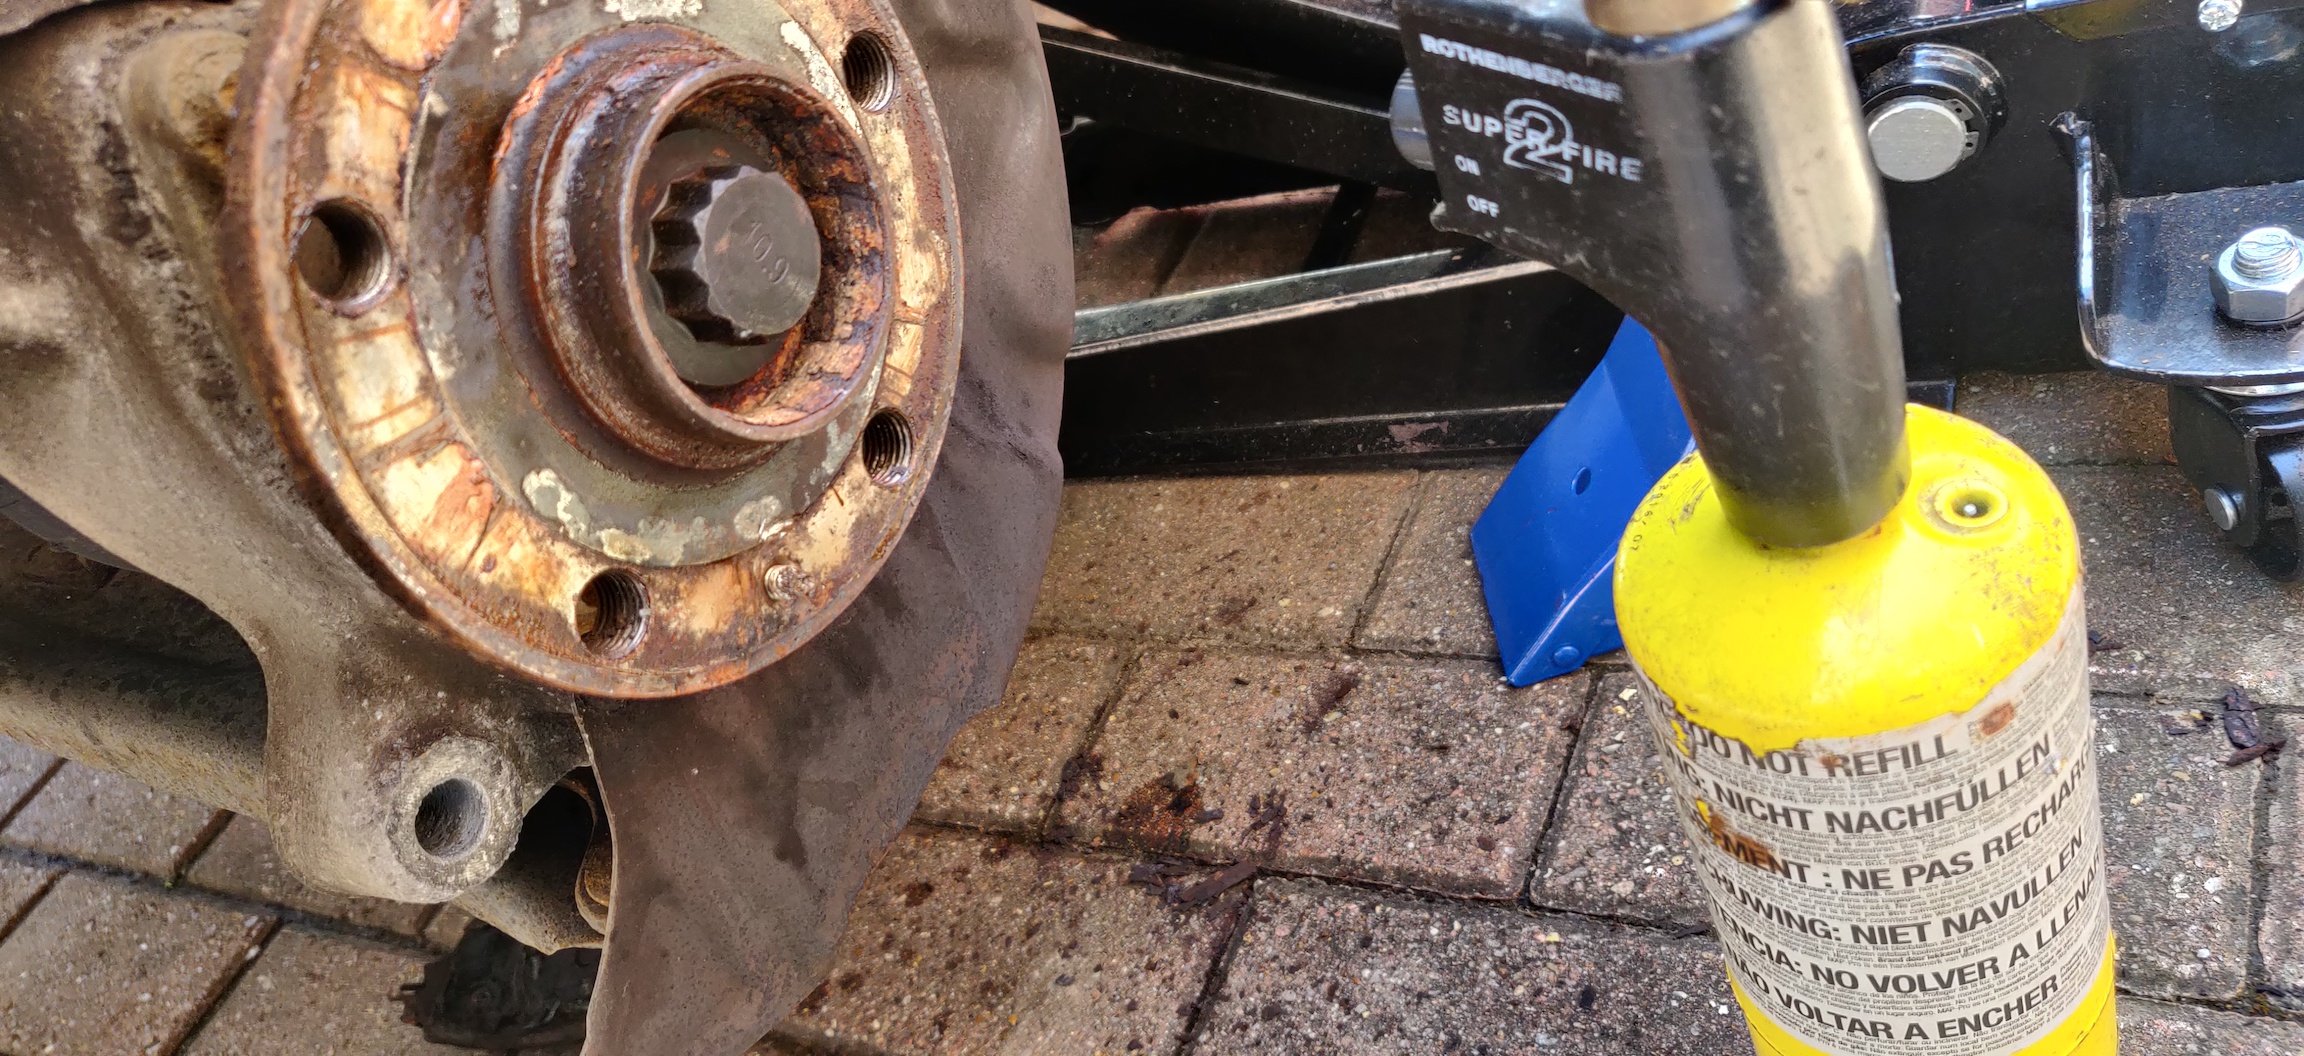
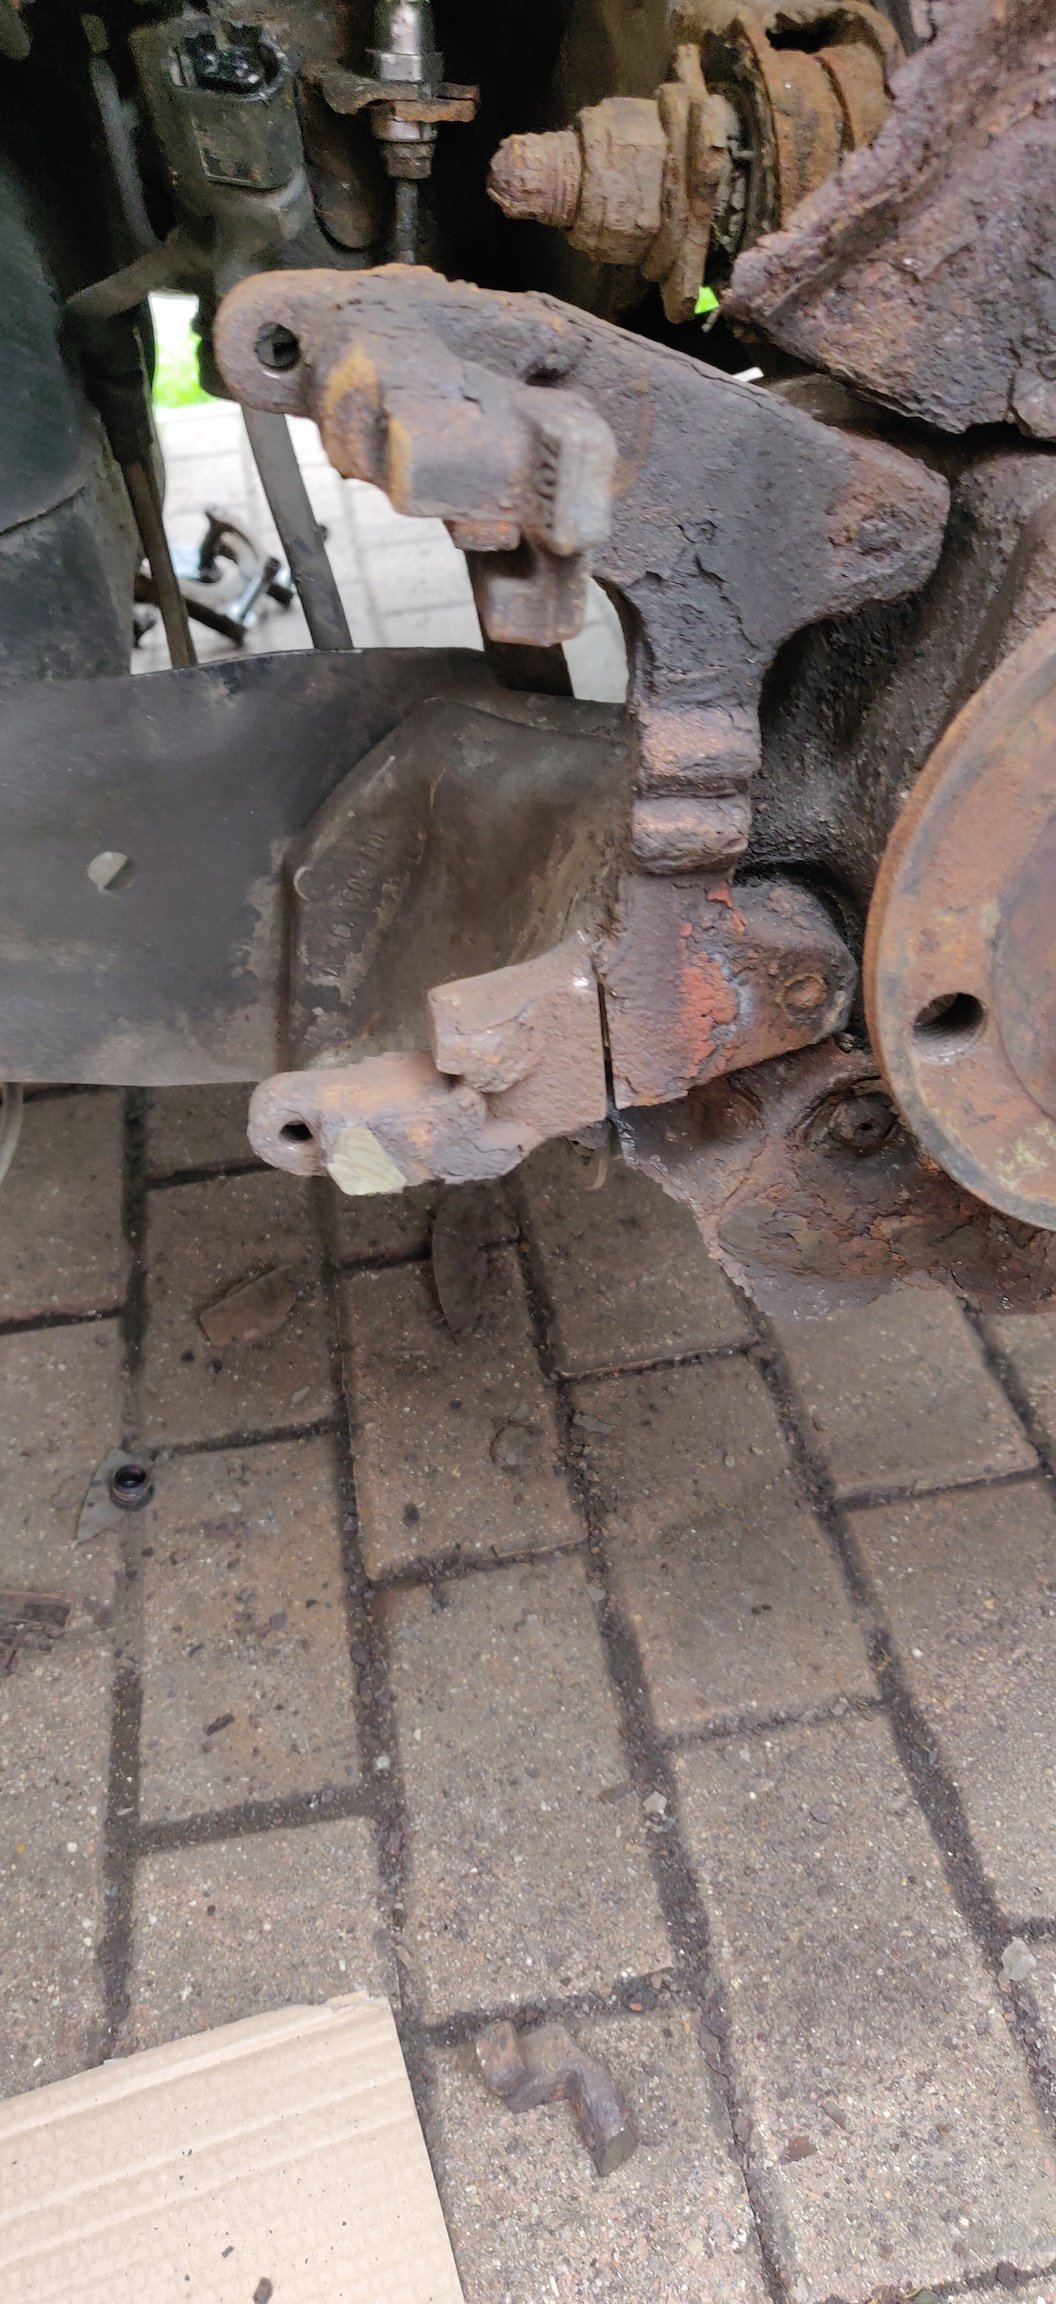
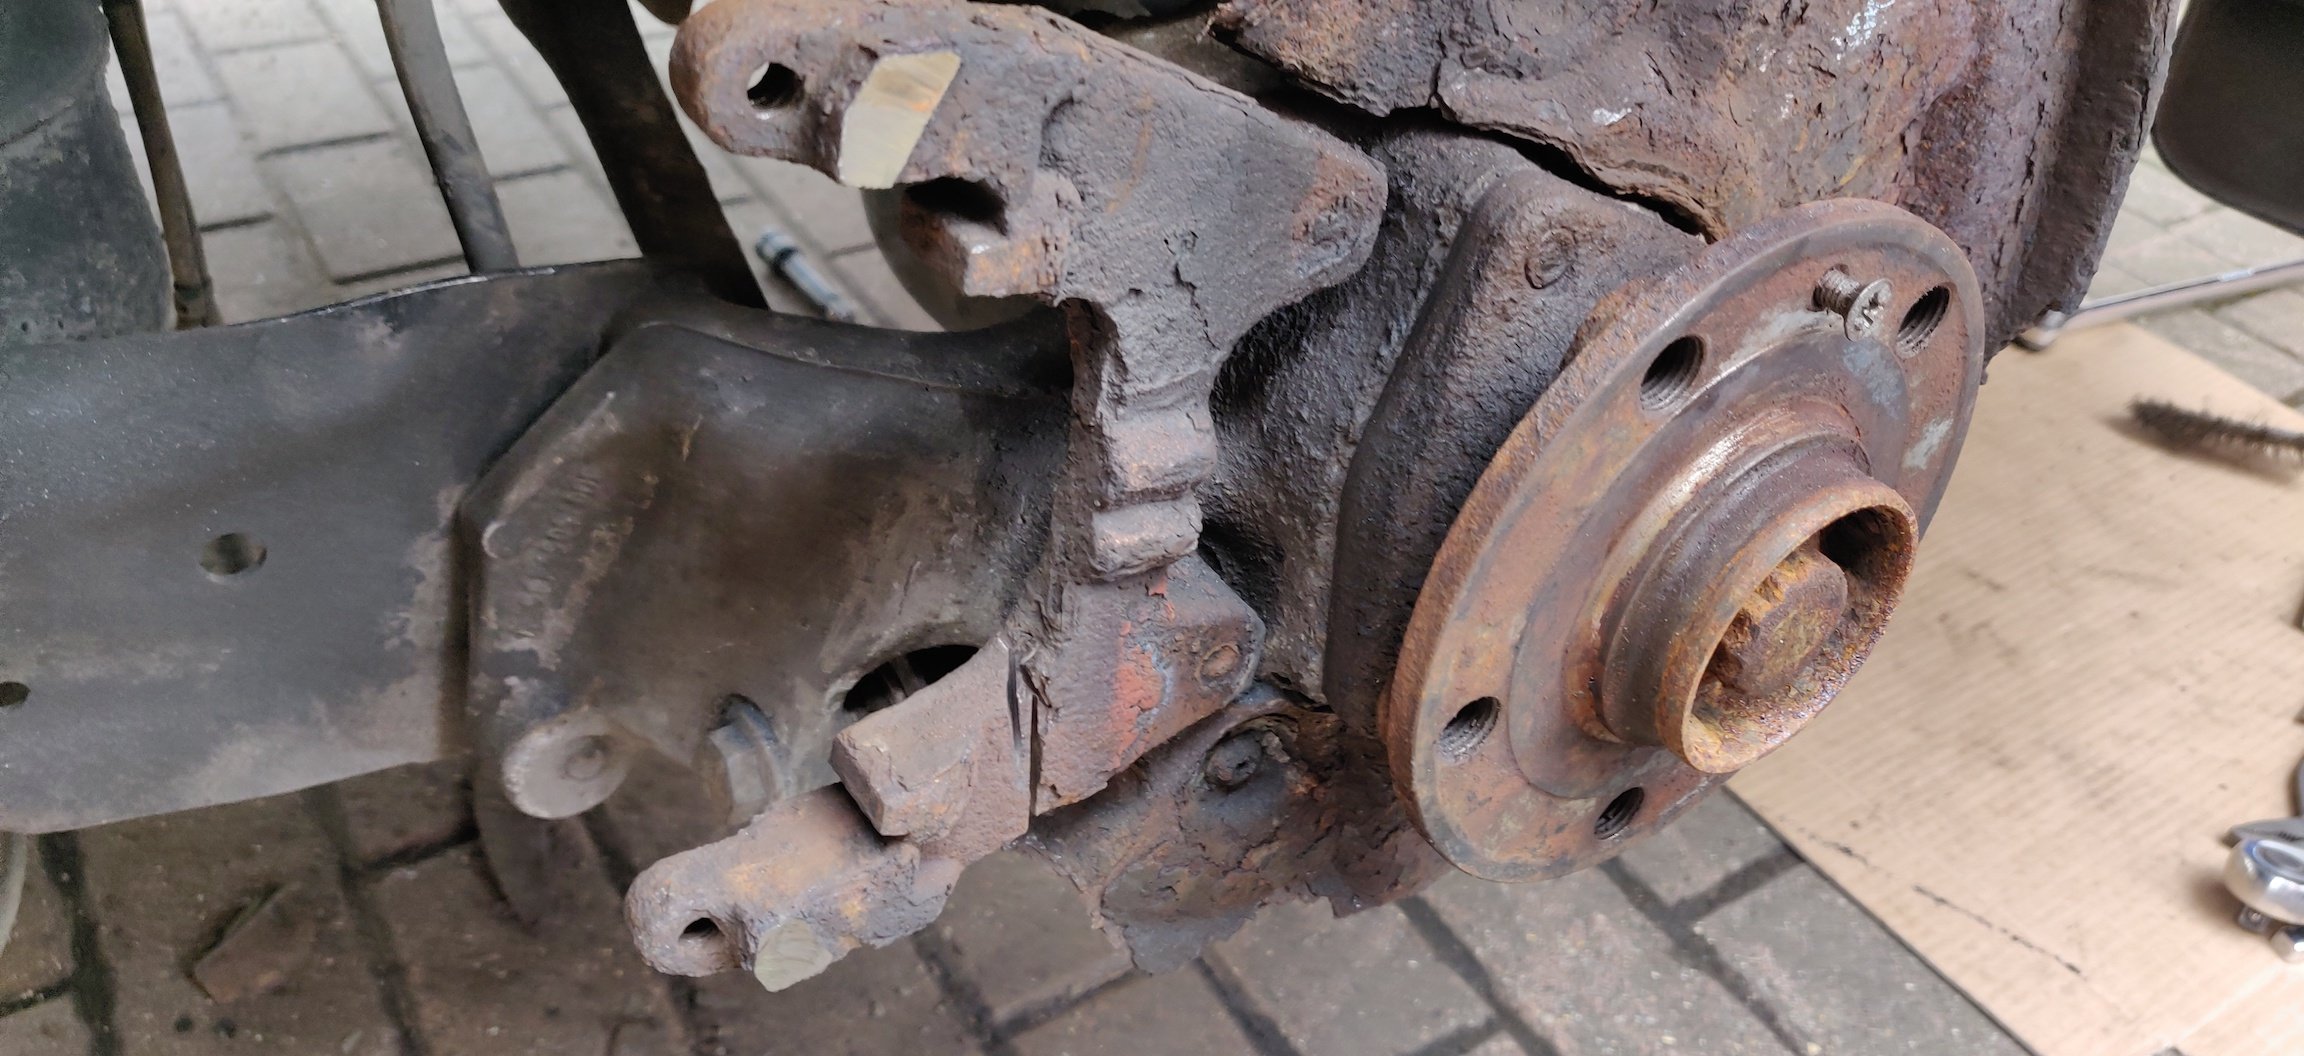
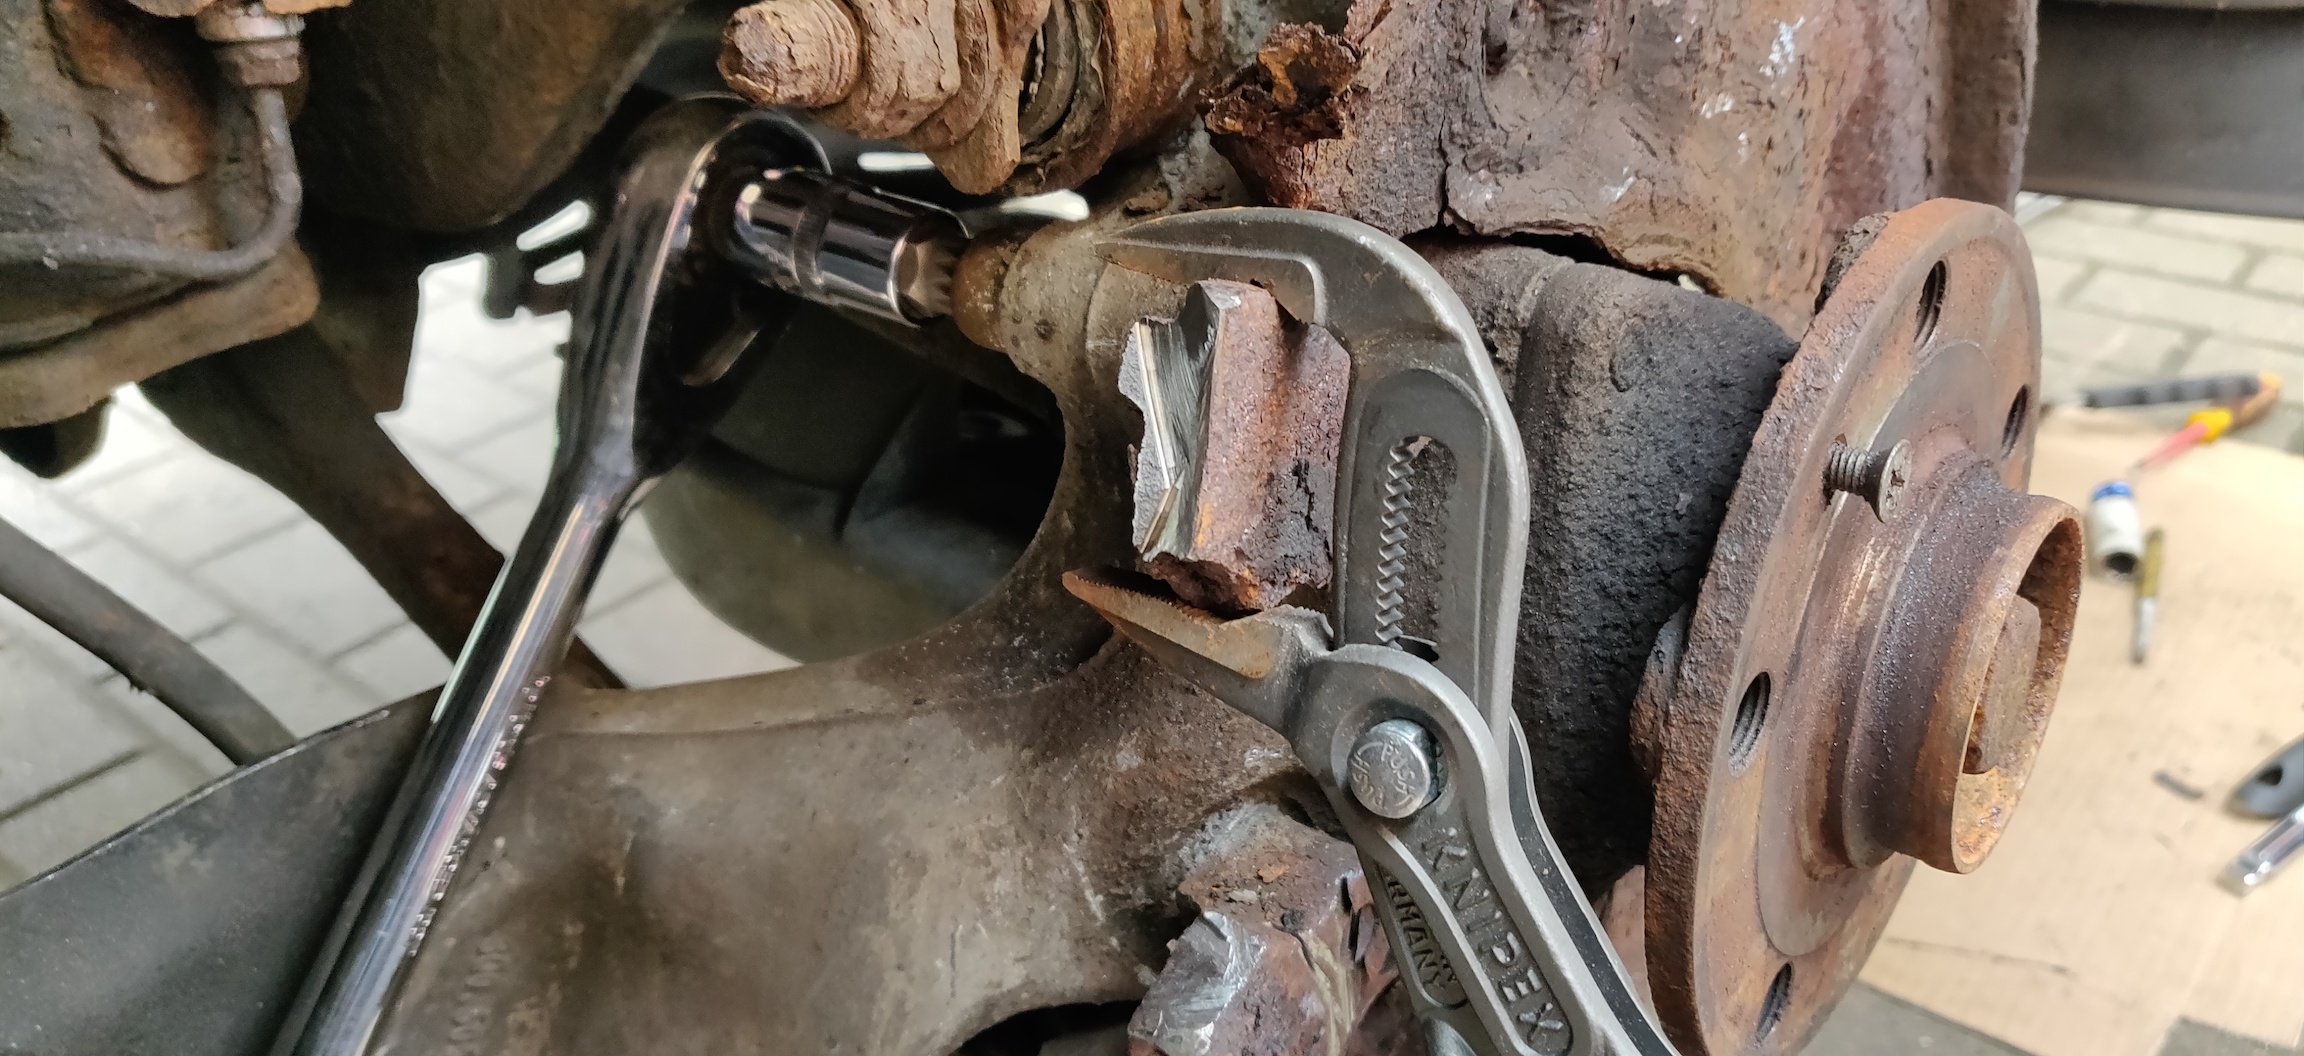
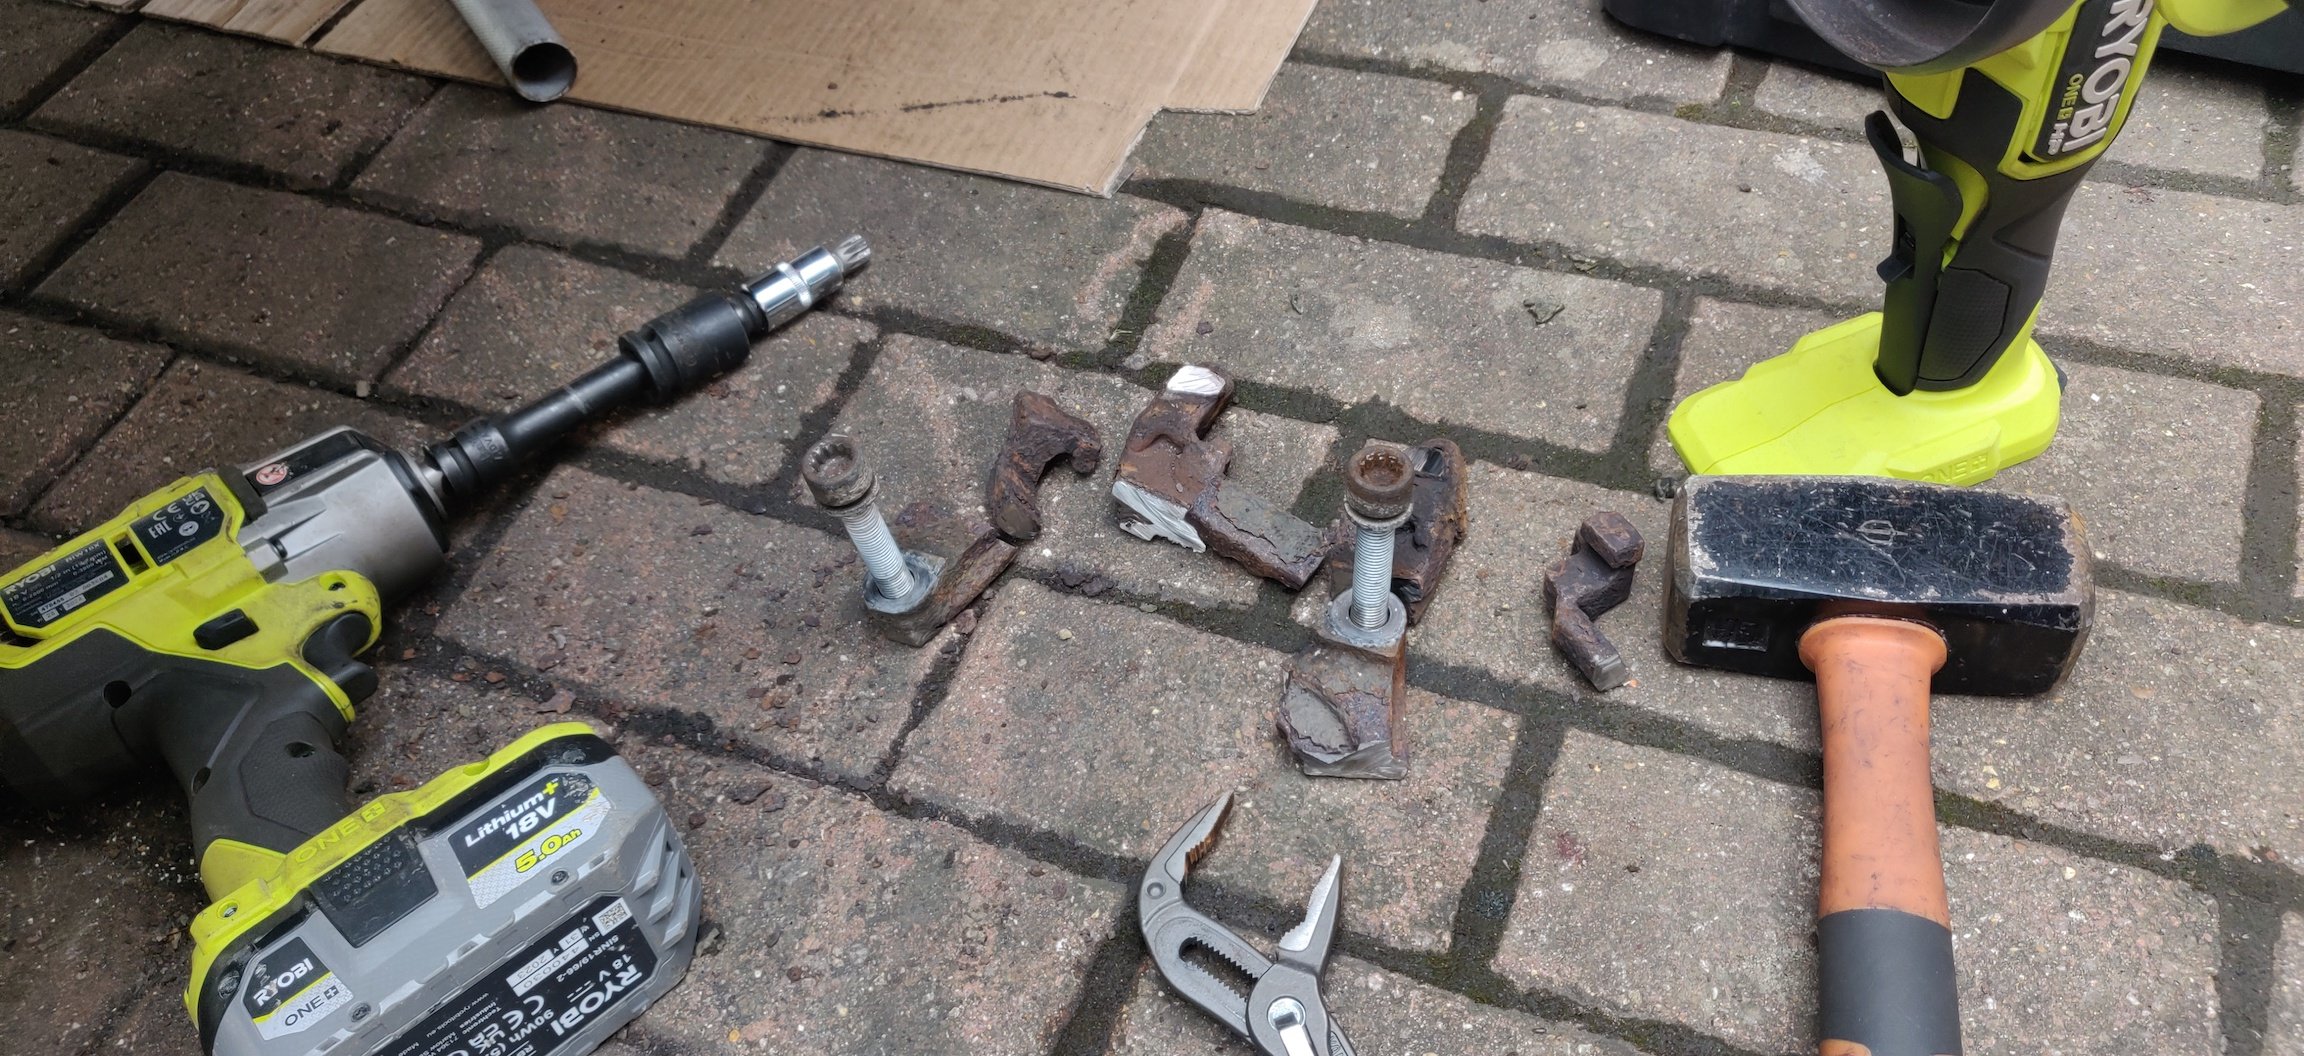
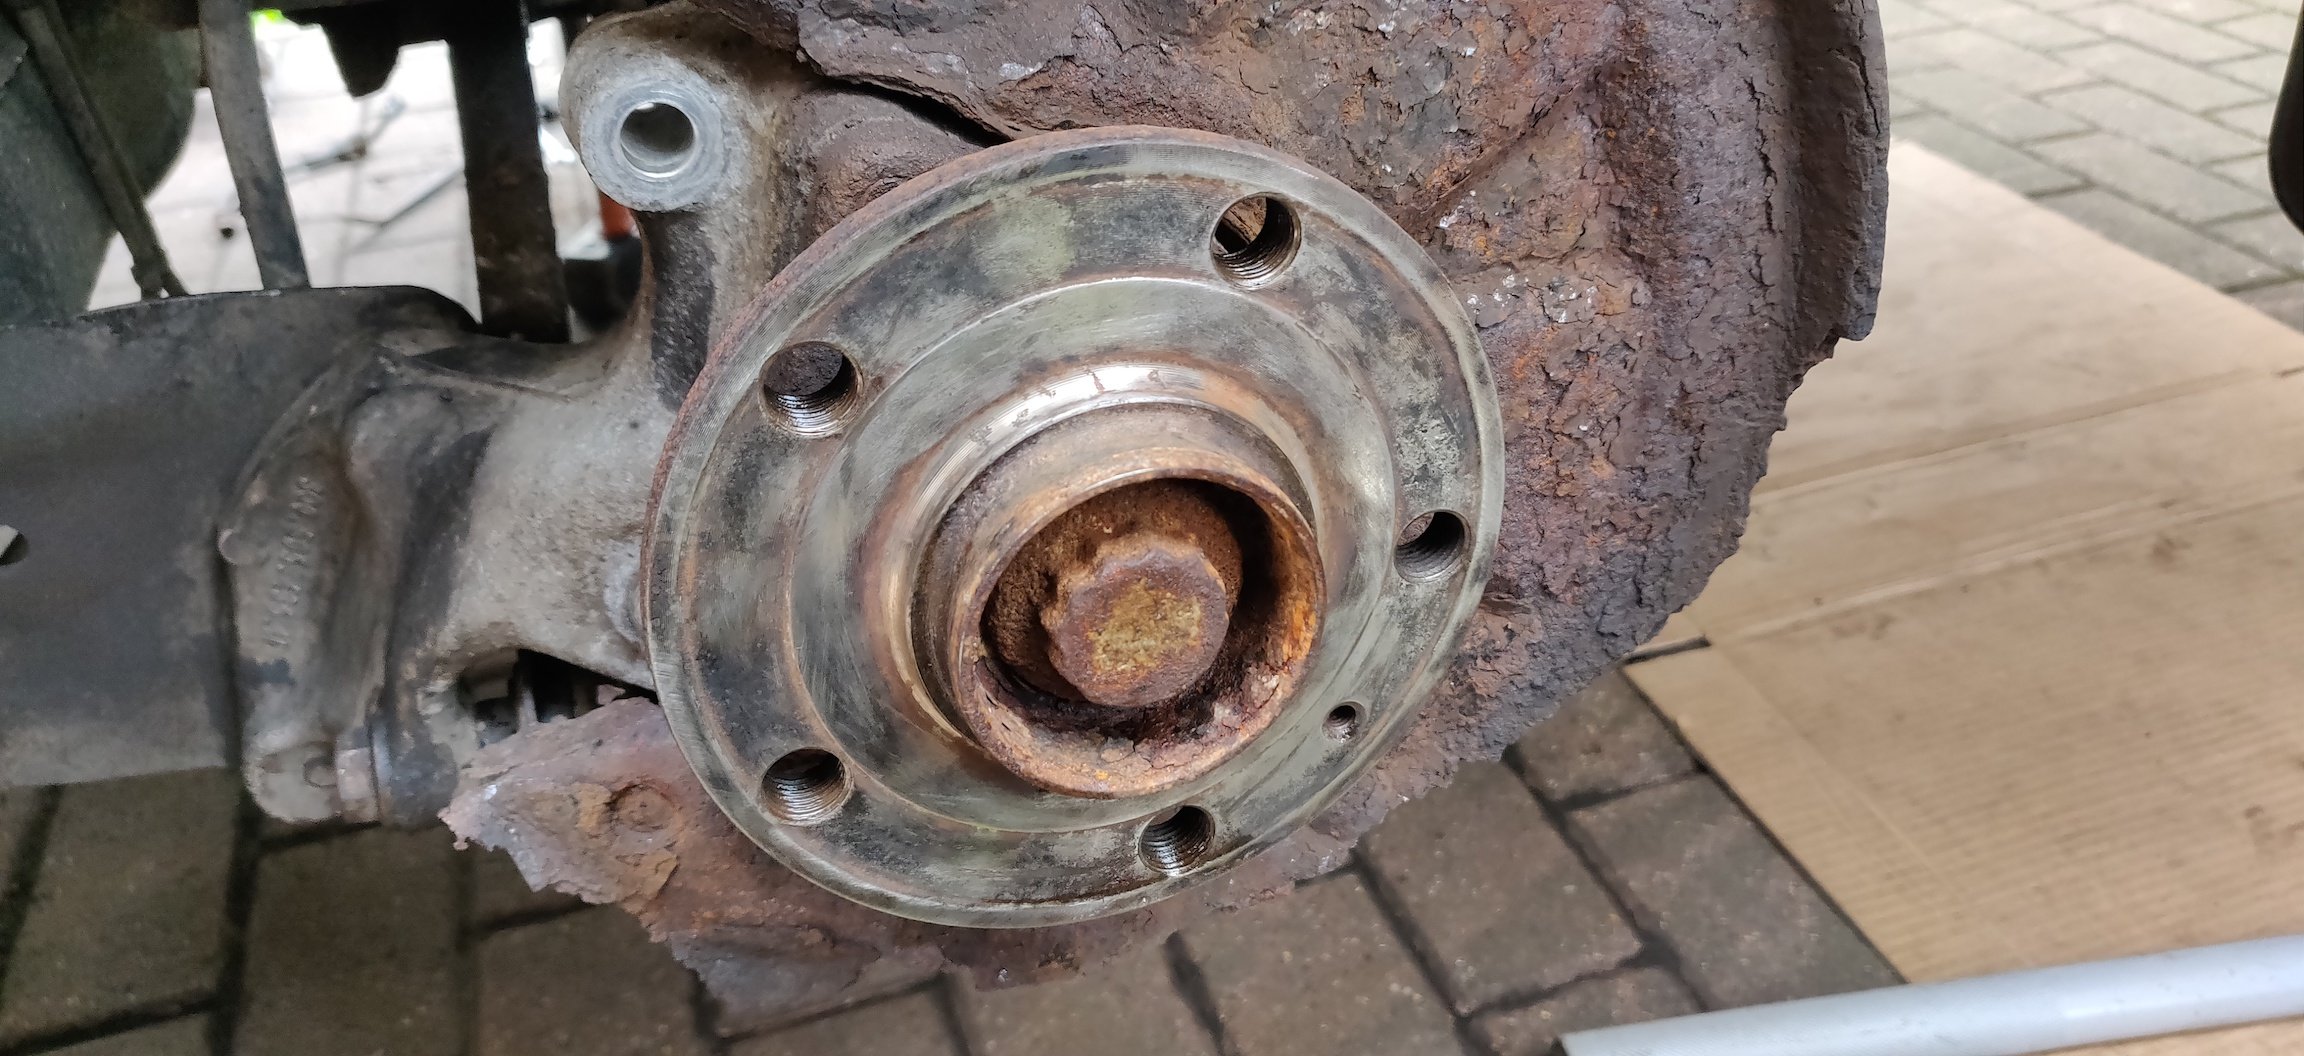
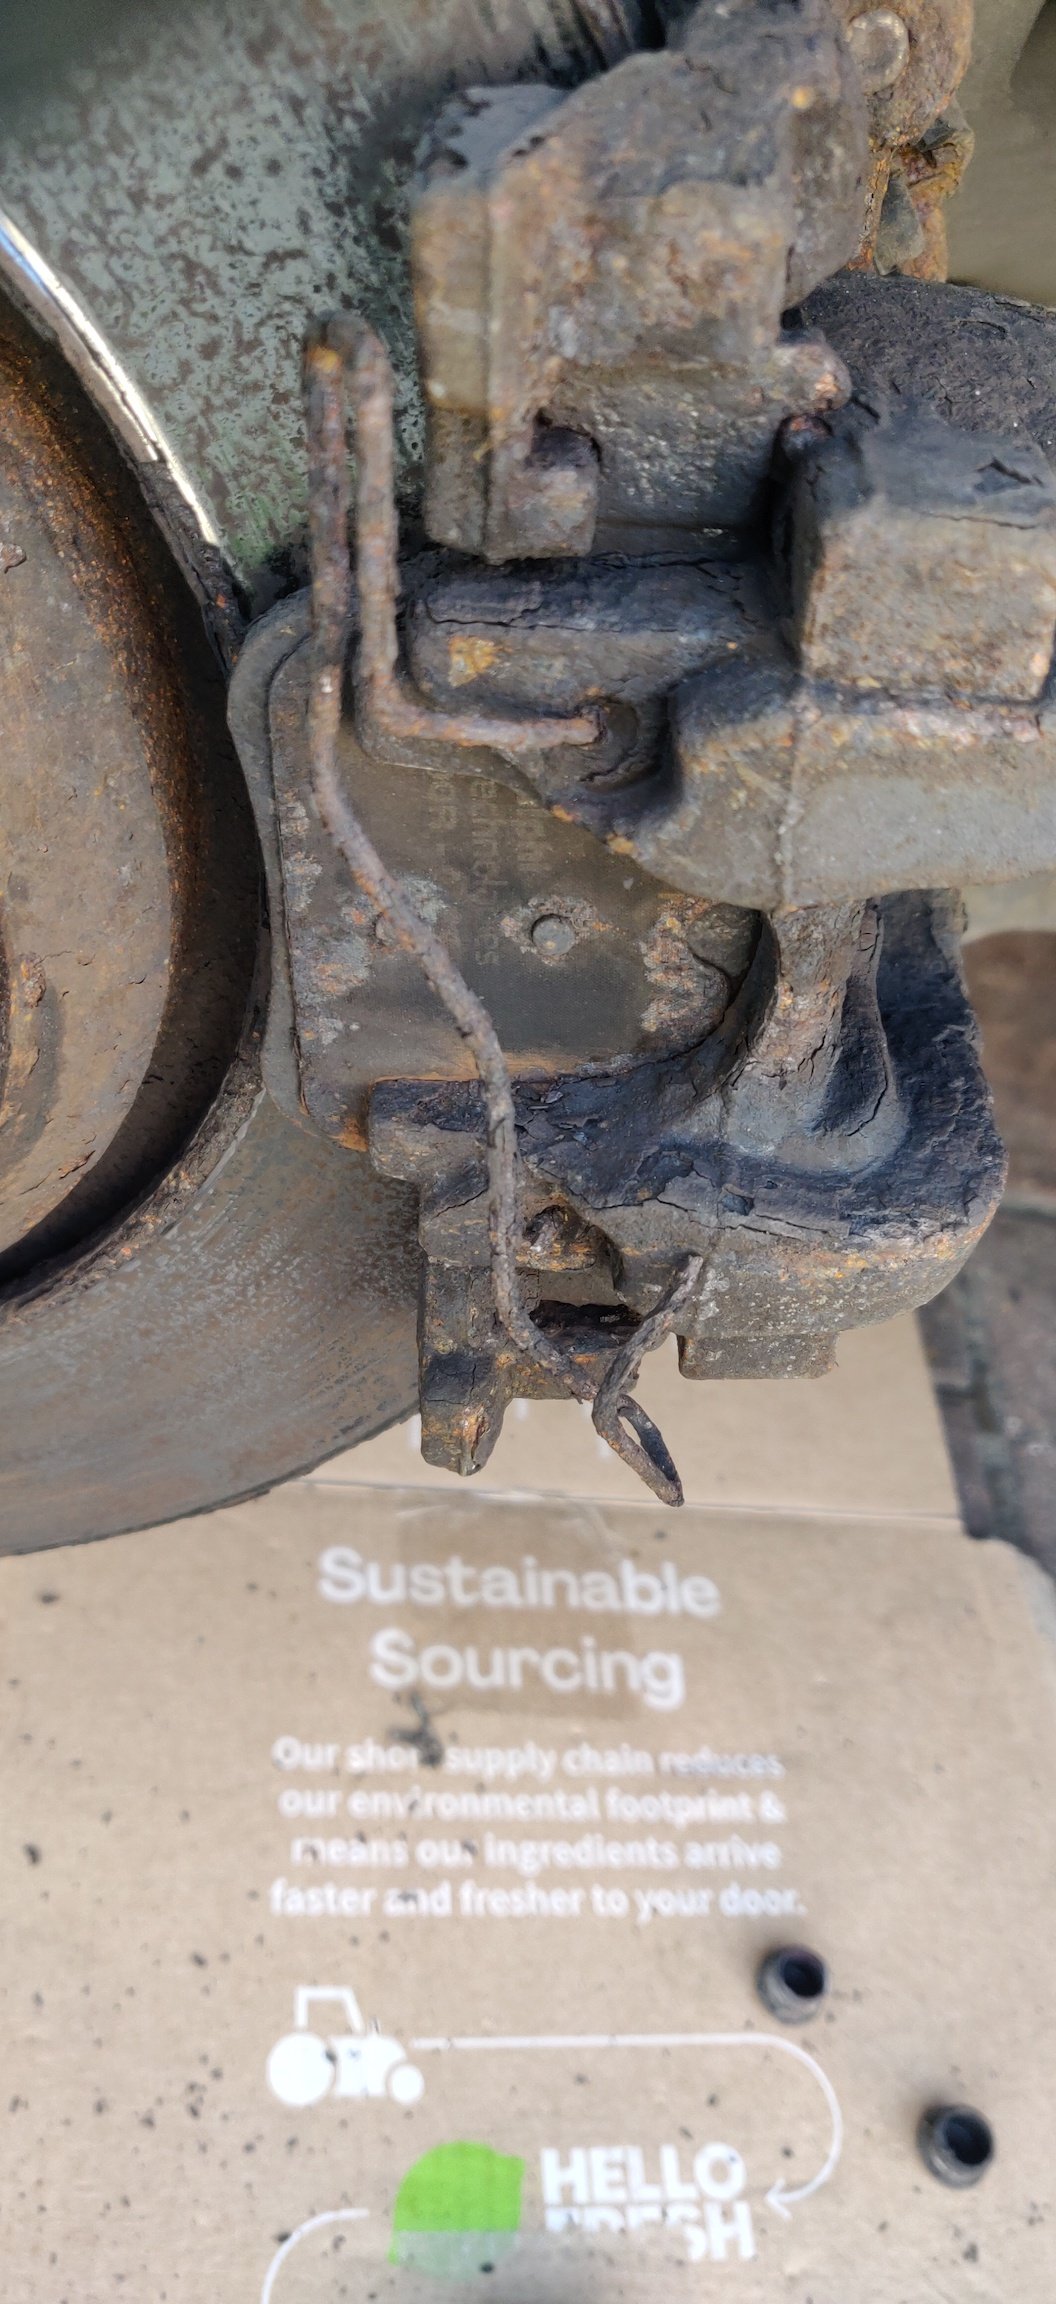
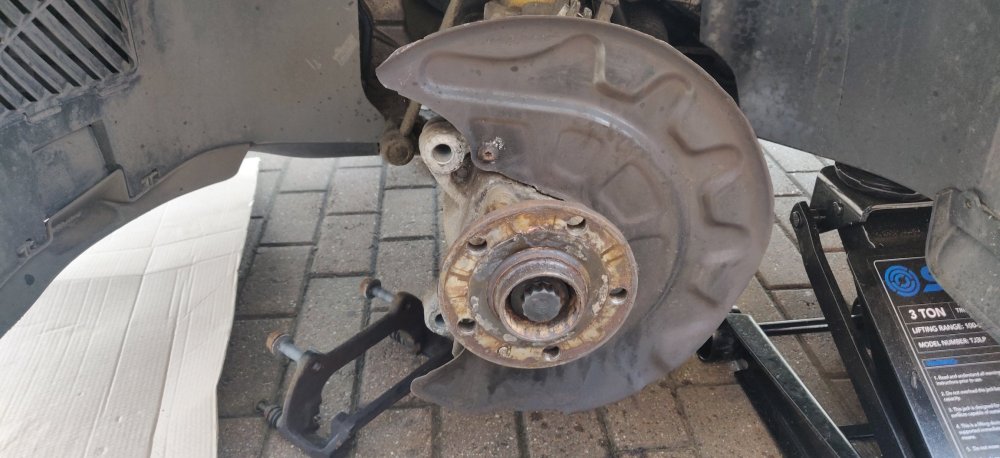
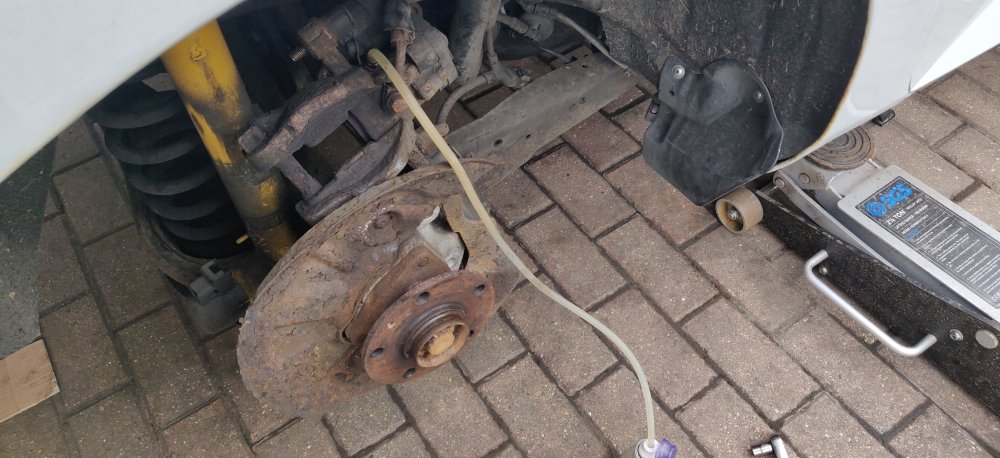
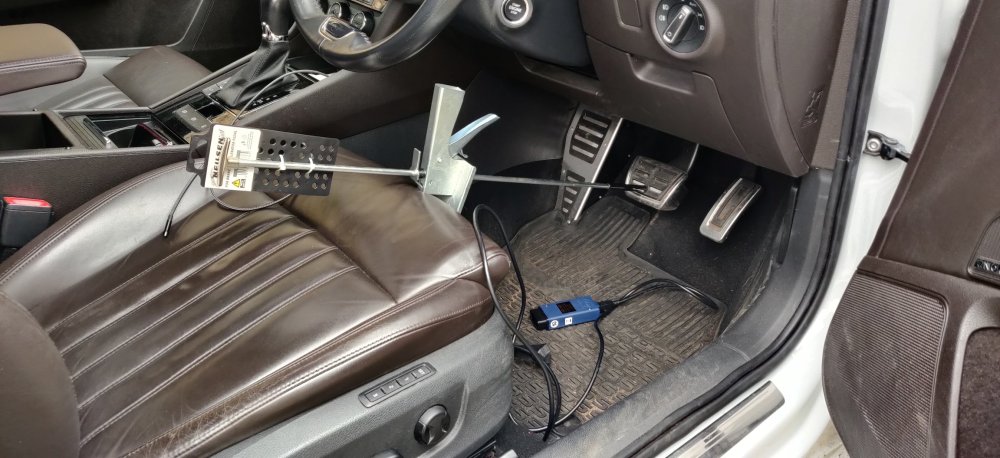
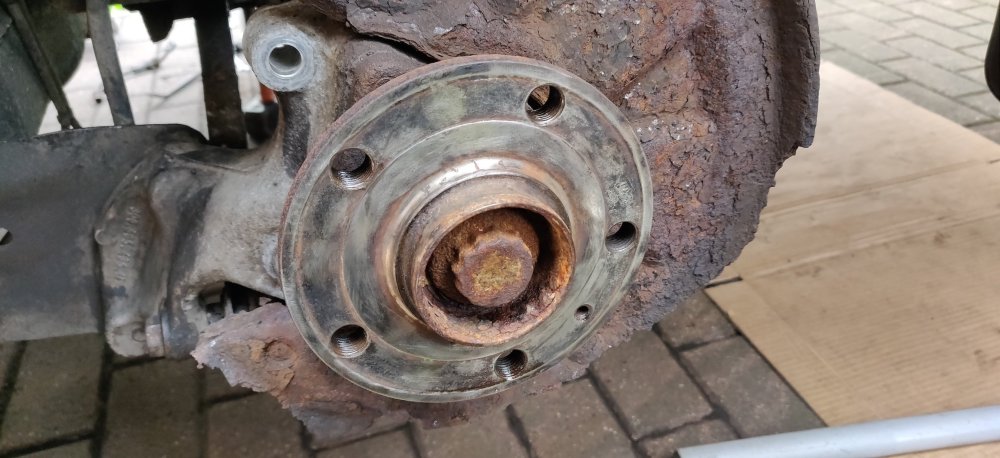
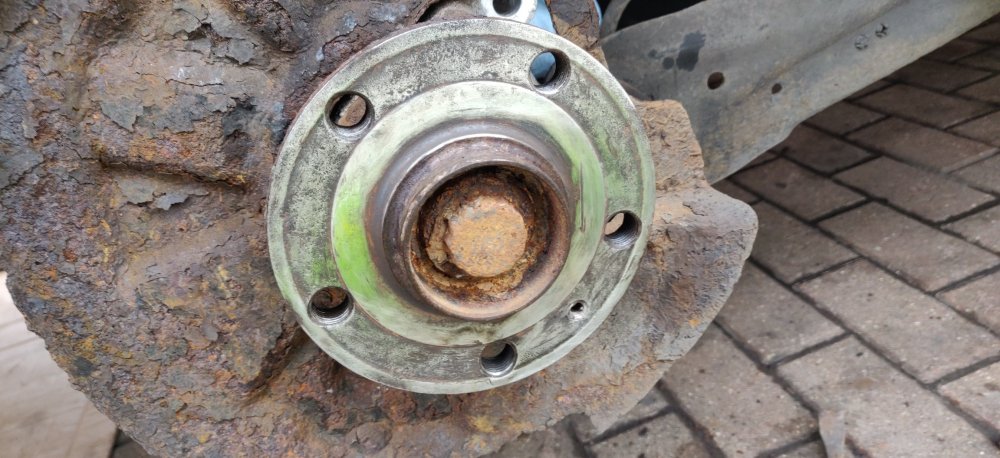
So, on with what I did today. Yesterday, the left pad carrier bolts were tight as buggery. I think it might have been possible if the car was lifted off the ground sufficiently enough to get maybe a couple of pipes on a wrench to get enough leverage. Another attempt early in the morning was no better, so went absolutely mad. Do not try this at home: Started having at it with the angle grinder. Original plan was to go straight at the bit with the bolts, but the angle grinder was bumping into things like the pad carrier ears and the bearing hub. So just starting taking it out in chunks, as seen above, the bottom ear has already been chopped off. Just basically went at it slow and steady: So ears cut off, bit more on each bit and then the central bit, to leave two separate bits: Started to cut at the bolt, but at an angle as the wheel bearing was in the way. Wasn't actually really necessary, as I decided instead to get a lump hammer out and went at them. They actually started to turn, so then got the socket and wrench on the top: Then some additional thwacks and the bolt started to come free, so with some pliers: Was a case of twisting and hammer thwacks until: So nearly there. The bottom was a little stubborn, but also had enough space for an impact socket with a UJ and extension: That, and additional hammering then saw the bolt start coming free: Then just impacting for about 15 seconds and it comes away: So yeah, very drastic measures, but luckily nothing else was hurt in the process. Would not have been this destructive if another replacement wasn't at hand for sure! I imagine the reason the bolts were stuck was similar to the front struts: Bits of aluminium corrosion, which presumably held the bolts in tighter than normal. So next step is to remove the old calipers. So in goes my trusty bleed hose into a water bottle, and the bleeder loosened: Then to get into the car: Using a brake pedal presser tool to keep the brake pedal pressed in. The workshop manual says at least 60mm, so just pressed it in until about there. This acts as a means of stopping brake fluid going all over the place once the brakes are disconnected. The bleeder being loosened allows the excess fluid to leave, rather than push the pistons on the two calipers out (which would be a potential disaster). My poor Honda Insight in the garage has its own tool with the pedal pressed for about 3 months now! So with that done, got an impact wrench on the banjo bolts to get them loose, would have probably been awkward otherwise as the calipers are just dangling freely: Then just unscrew the bolts and have something underneath to catch excess brake fluid: This is the unchanged right side brake hose, you'll have seen this before. The left side hose has already been replaced before, so I know it's been greased up and should be easy to undo. The right was an unknown. So first step was to remove the hose clip: Which probably if anything went exactly how I thought it would: Not the end of the world, but just a tiny bit fiddly with a hammer and chisel to get that stubborn bit out. With that out, and applying some fire around the union as part of mentally preparing for this, went at it, 11mm union at the bottom and a 17mm spanner around the top: In a non-salty world, the brake hose at the top would be held whilst the brake union at the bottom would be loosened, and that turned until it came free. Over in the UK though, it's the opposite, as there's no way the union would not have seized to the pipe, which this one has. It's a case of doing both until it started to loosen, then holding the bottom union in place whilst the hose at the top is undone. I was then met with: Looks like a copper pipe. So this tells me a repair around here was done before. I'd be very interested to see how that was done, as the pipe run disappears around the fuel tanks and subframe. Shame they didn't put a dab of grease between the union and pipe though, as that would have prevented the seizing. Anyways, repeated this on the other side so the old hoses are now out. Next step was give the wheel bearings a quick clean: Used the angle grinder again, with an abrasive disc, which seems to do a fairly decent job without looking like its ruining things. The right wheel bearing face looked a lot rougher than the left: So took a little longer to clean up: Not sure what the green tint is there, camera must be on the blink. So then its time to start assembling things. I went with the approach of the pad carrier first: With new bolts, slathering corrosion block grease around the middle of the bolt, leaving the ends clean. Then for the left side, slid the brake disc on: With the new stainless retaining bolt, lots of grease. Did it the other way around on the right side, brake disc first. That was probably a tiny bit easier as no need to wiggle the brake disc and whatnot. The brake hoses for now are just twisted onto the unions, with a dab of copper grease on the union threads: Did them hand tight then snugged a little with the 17mm spanner. It looks like I've lucked out in terms of the orientation of the hoses, as they are almost dead on to where they would need to be for the caliper. That's usually why the union is the one that turns, as the hoses should be put in place (with clips) first. Onto the pads: The workshop manual references a grease, which after some searching, looks to be lithium grease, which seemed off. So went with a dab of ceramic brake grease on the ears of the pads before putting them on. I'm hoping that as the carriers are all cleaned up and painted, then rust won't be a factor. Could still be dirt and stuff being a factor though. Then it's the caliper: So greased up the new slider pins with the grease that's supplied, slid them through the rubber boots a few times to make sure its all lubricated, and onto the carrier. I've actually used the old banjo bolt to connect to the caliper, with the requisite new copper washers. Both this banjo bolt and the slider pins were tightened to 35Nm. I've left the tightening of the pad carriers for now, because to be honest, I'm not looking forward to it. Just the clips to do, decided to fill the holes they go in with some corrosion block grease, in an attempt to prevent the nightmares encounted on the old calipers. But essentially, that's the rears done. I'll spend a bit of time tomorrow double checking things and bleeding them through. Decided to then jack up the front right and go about looking at the front calipers. To do so I wanted to turn the wheel to the right to get better access to the pad carrier bolts. Now, with the steering lock on, I nonchalantly pressed the starter assuming it would go into ignition and unlock the steering. Instead the car turned on, as the brake pedal was pressed! Quite surprised but quickly turned off the car and scrambled around. Looks like nothing affected. Small drama over, it was wheel off, and then a 17mm spanner and 13mm to remove the bolts for the caliper: The brake hose is quite long, and help by a clip on the wheel hub, so removed that clip and the hose is long enough to leave the caliper on the floor. Perfect for leaving room to try out the new caliper: Unfortunately the front retaining screw for the brake is buggered on this side, so had to be careful with the brake disc whilst trying to get the wheel on, to see if there's any clearance issues. So it looks like the 17" wheels fit: But unfortunately: The caliper fouls on the face of the wheel. Amusingly these wheels are ET40, the most I could get. With some checking on willtheyfit.com when I was researching wheels, the site says: Which looks to almost be what I appear to be missing to clear the brakes. I wondered if the 19" wheels would have been, then realised I've sold those. So a bit of a bust, took the caliper off and back in the house for now. I don't anticipate the car needing to be used in the immediate future, so for now, just scrambled to get a set of 3mm and 5mm spacers to see whether I can get away with the thinner ones. Amazon for £20.98. Hopefully they'll arrive soonish and I can check all this again. Assuming the spacers are ok, the main obstacle for the front brake replacement is probably the brake hoses. But we'll see how we get on. Maintenance: £2860.27 Upgrades: £4536.80 (+£20.98) Miscellaneous: £820.07


-
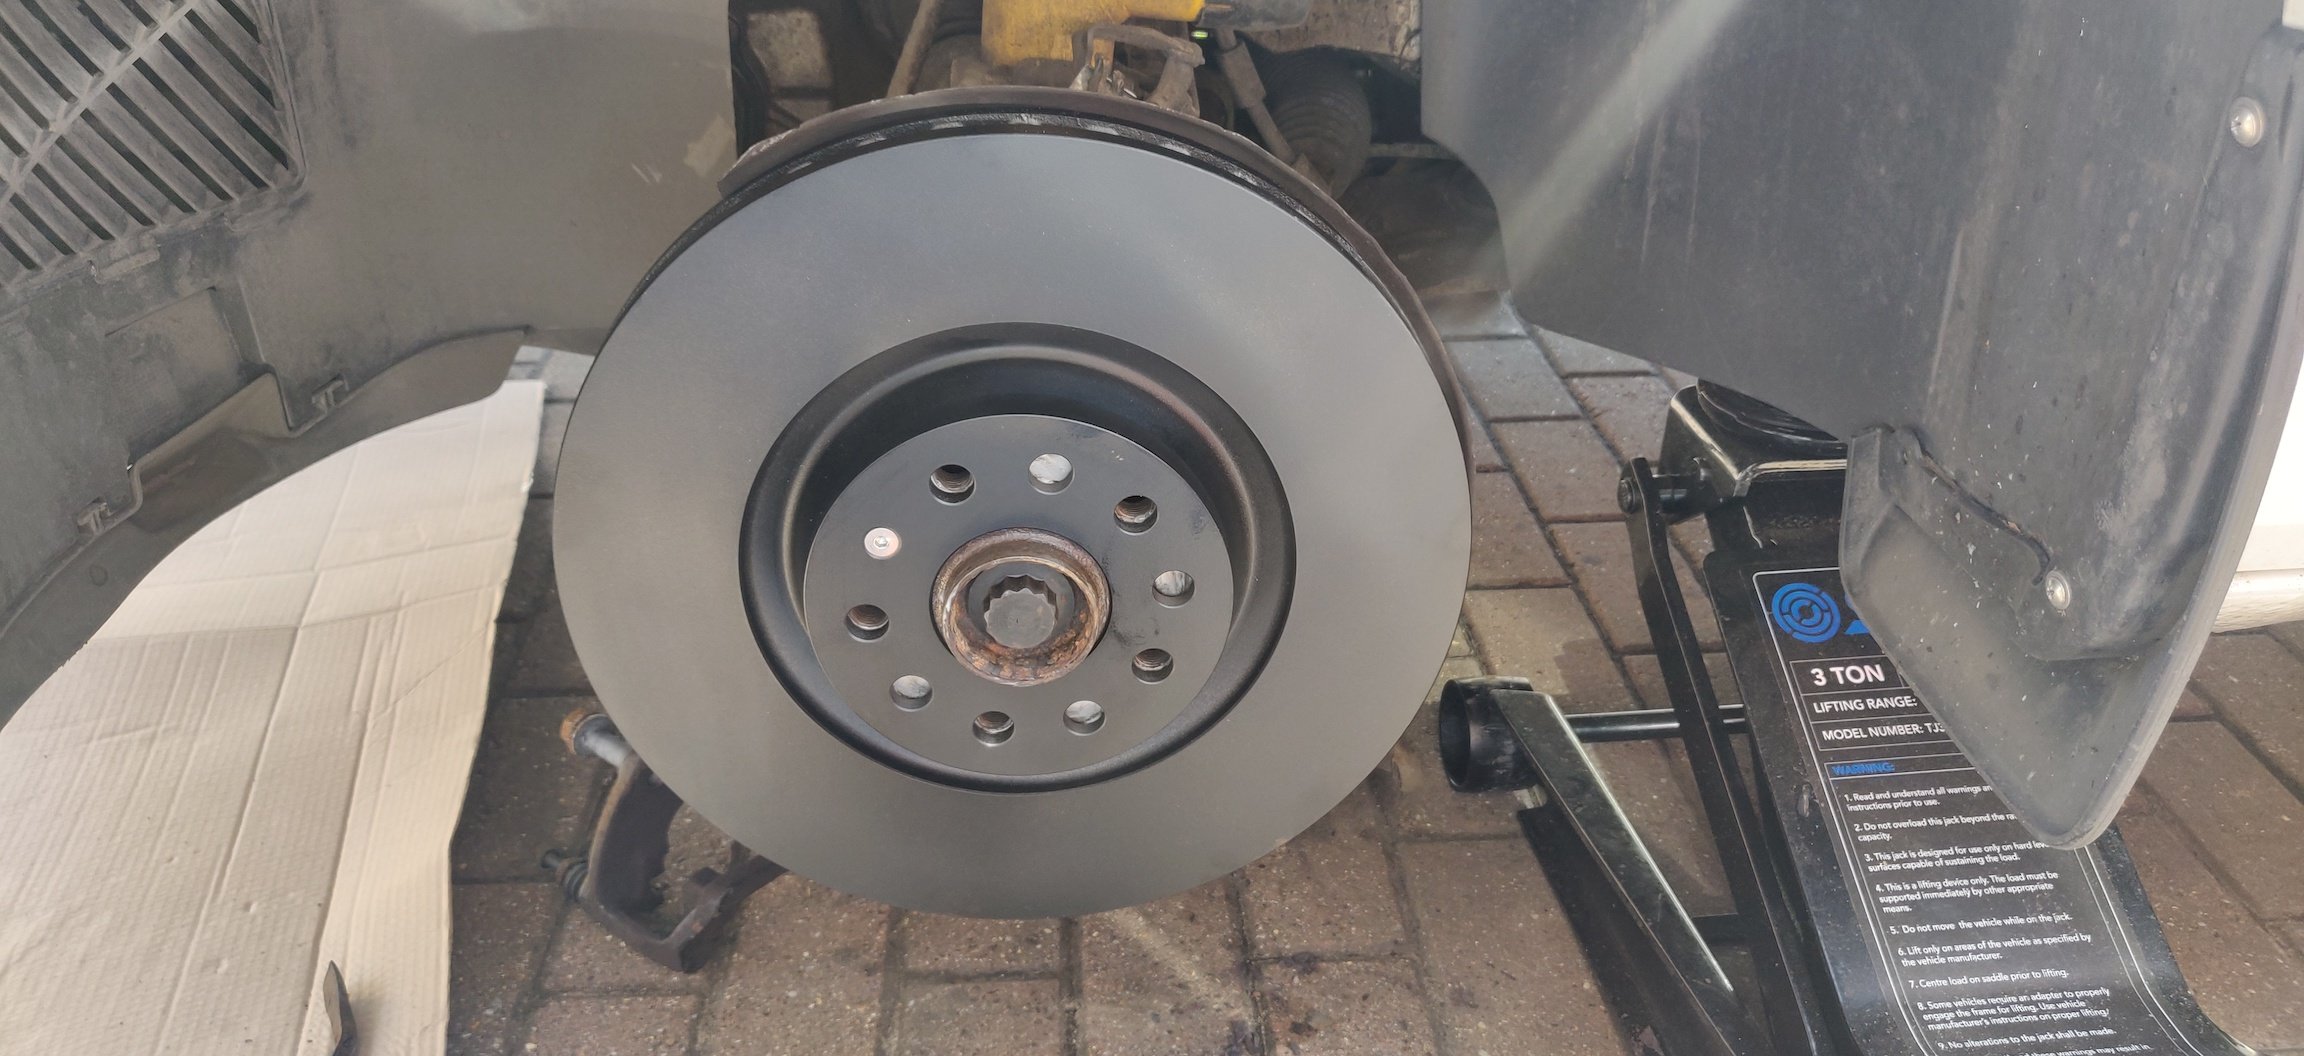
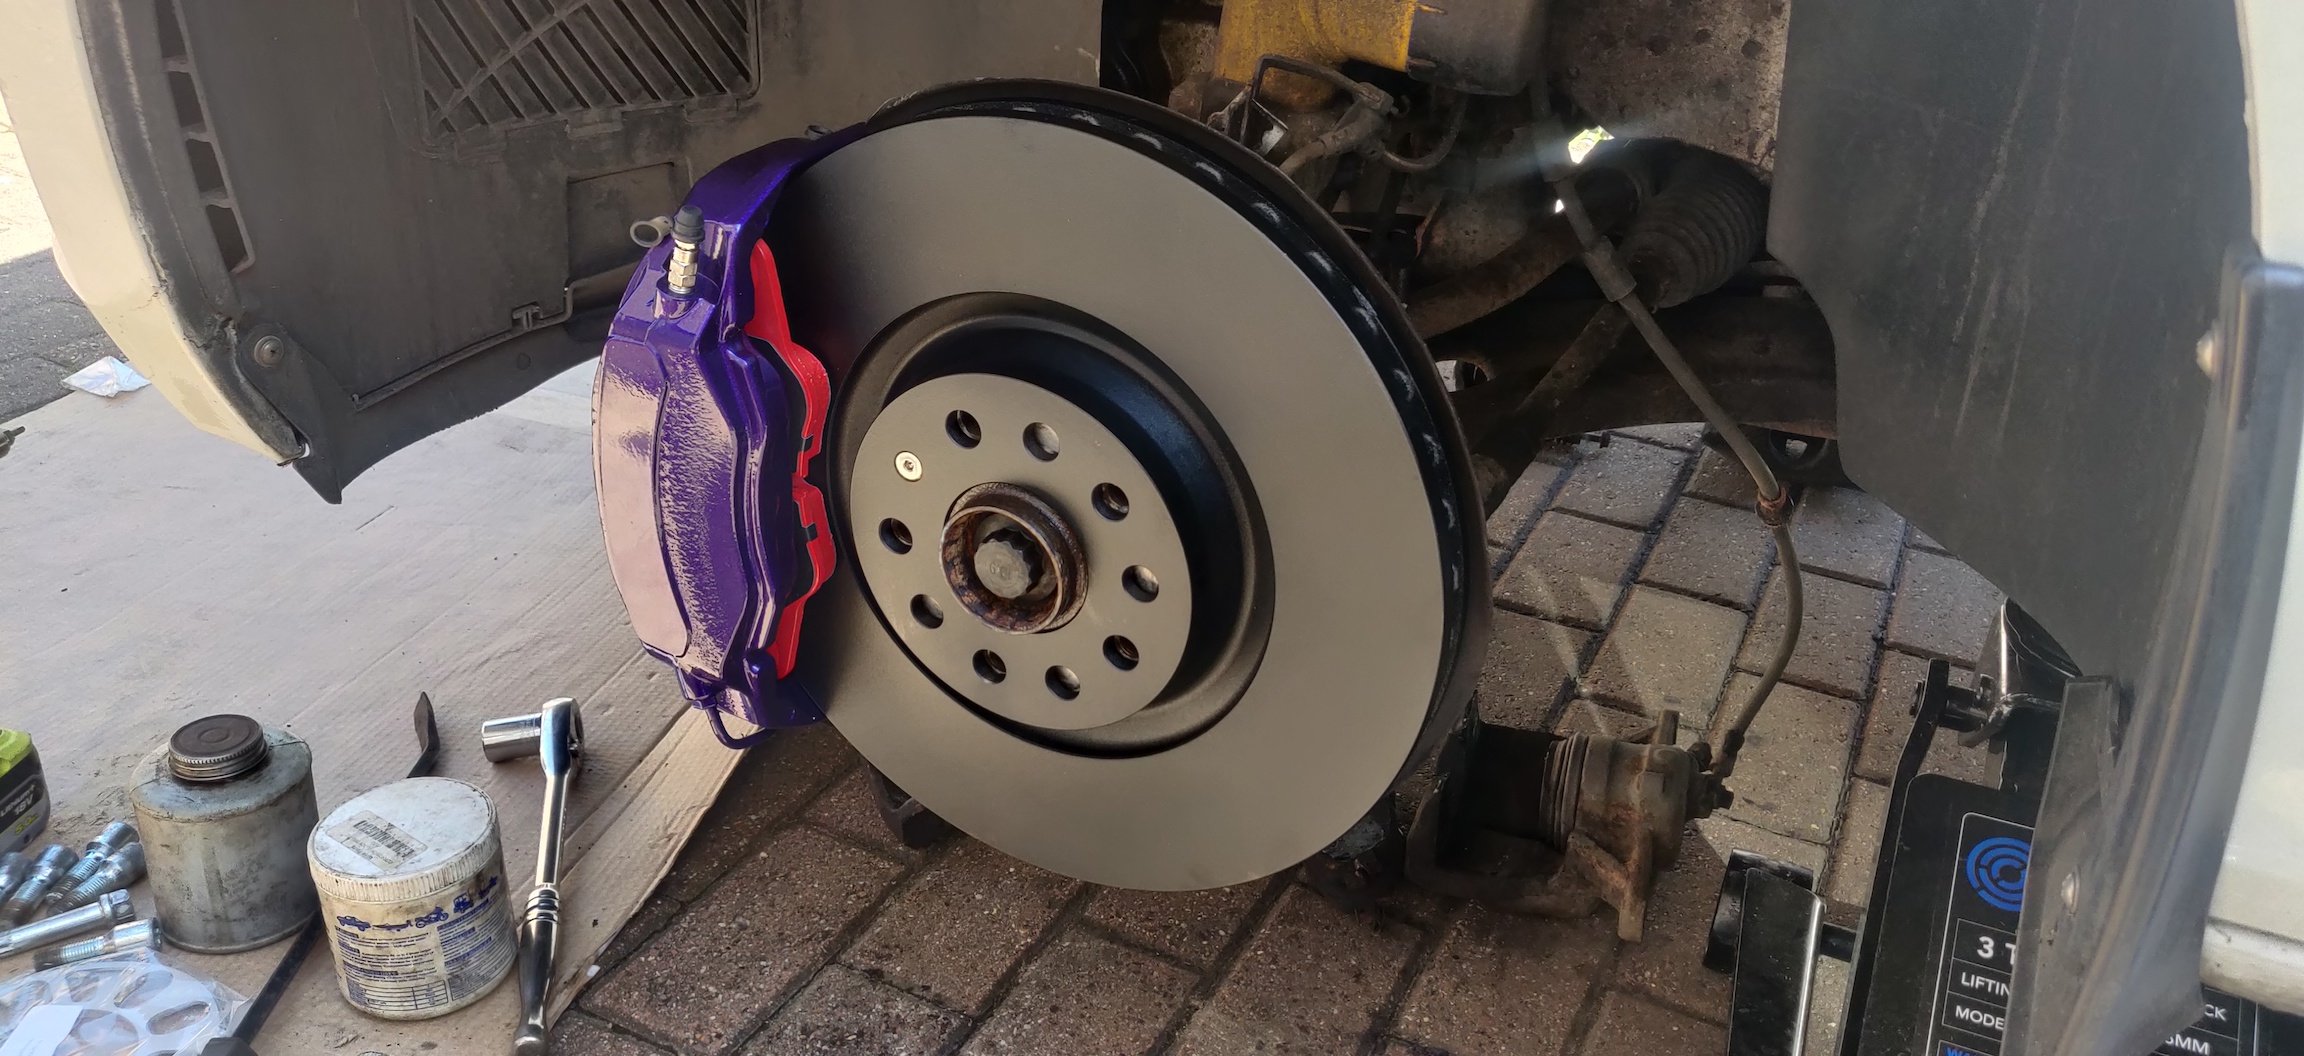
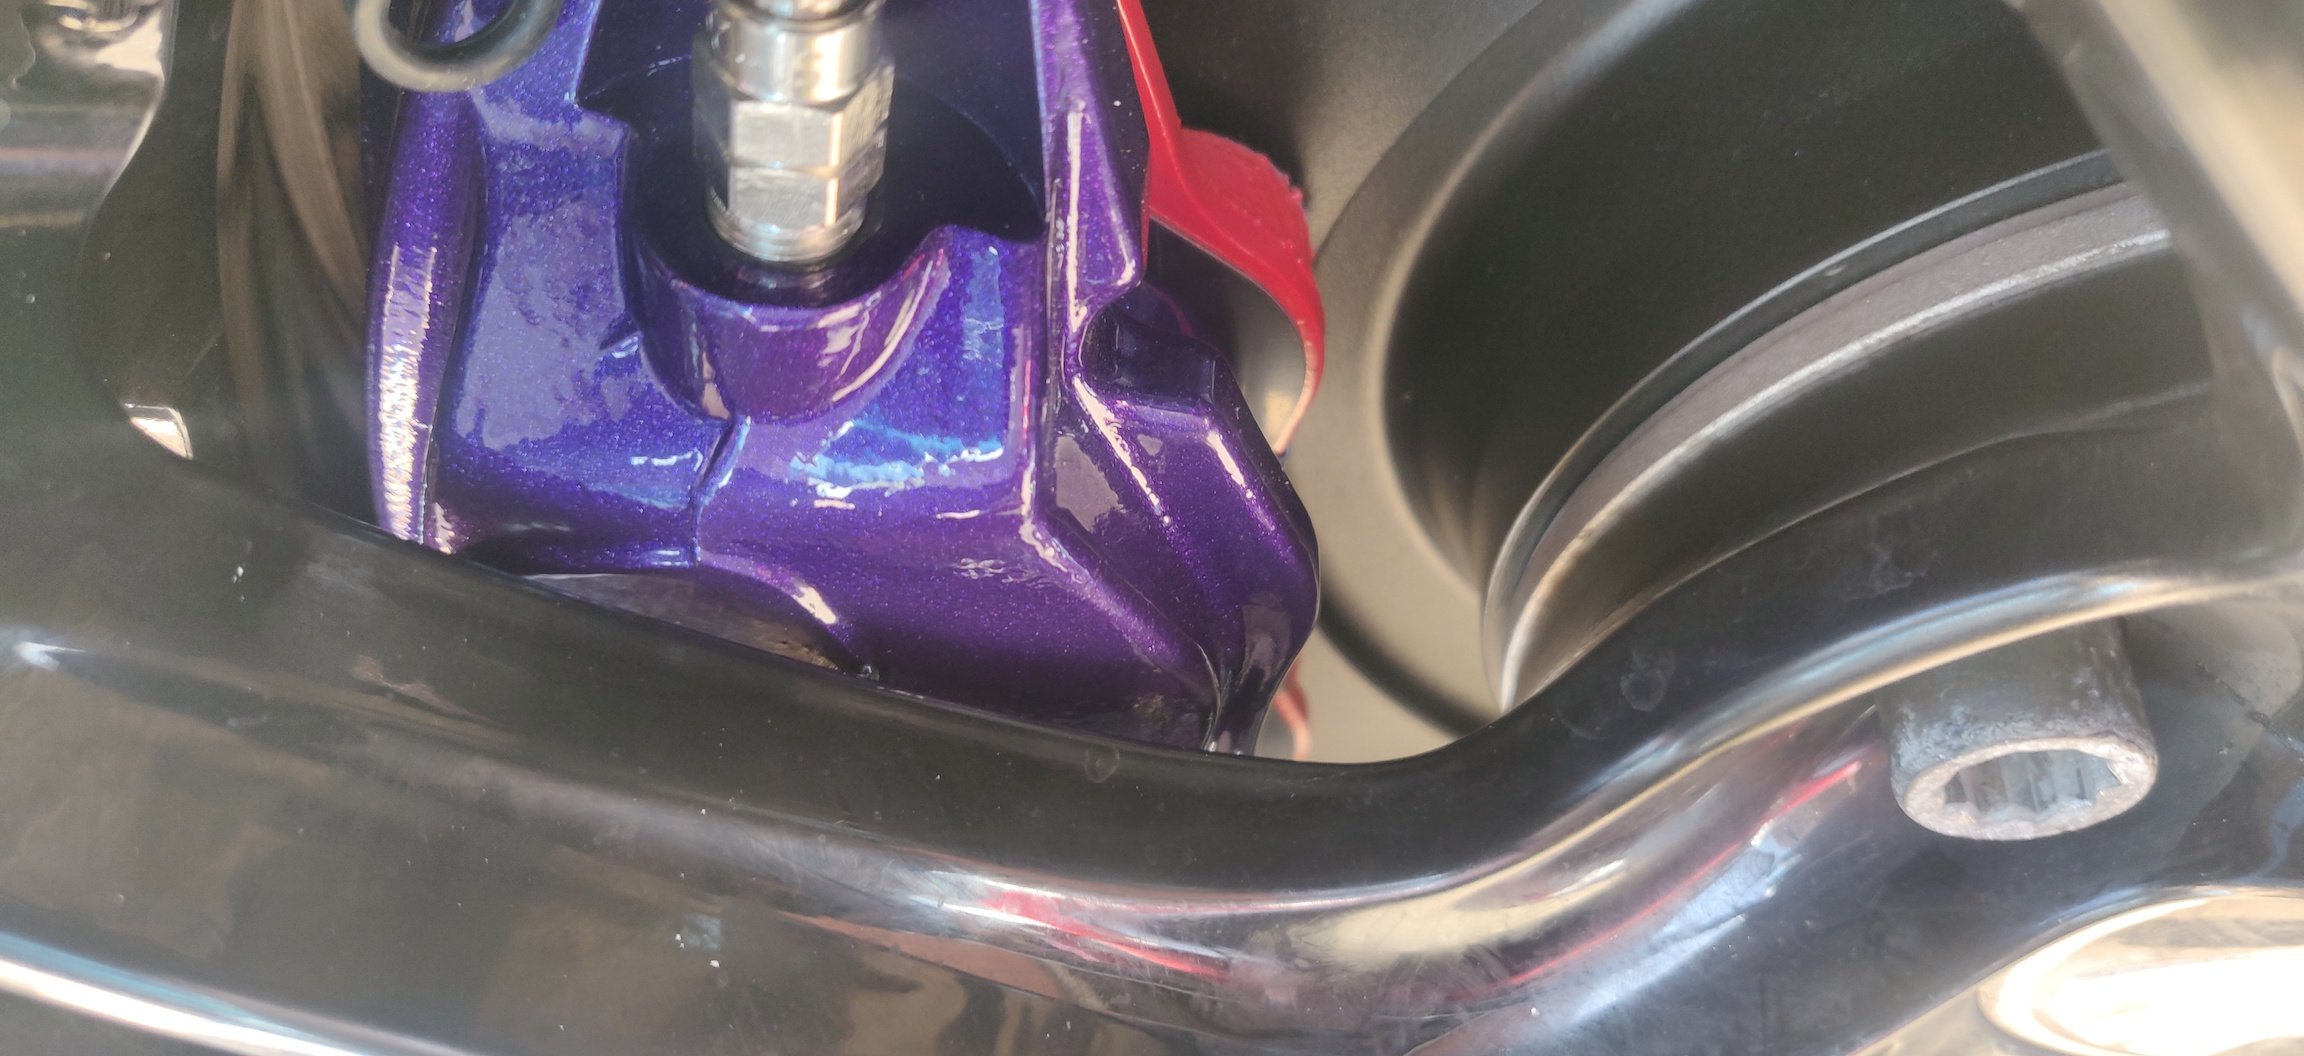
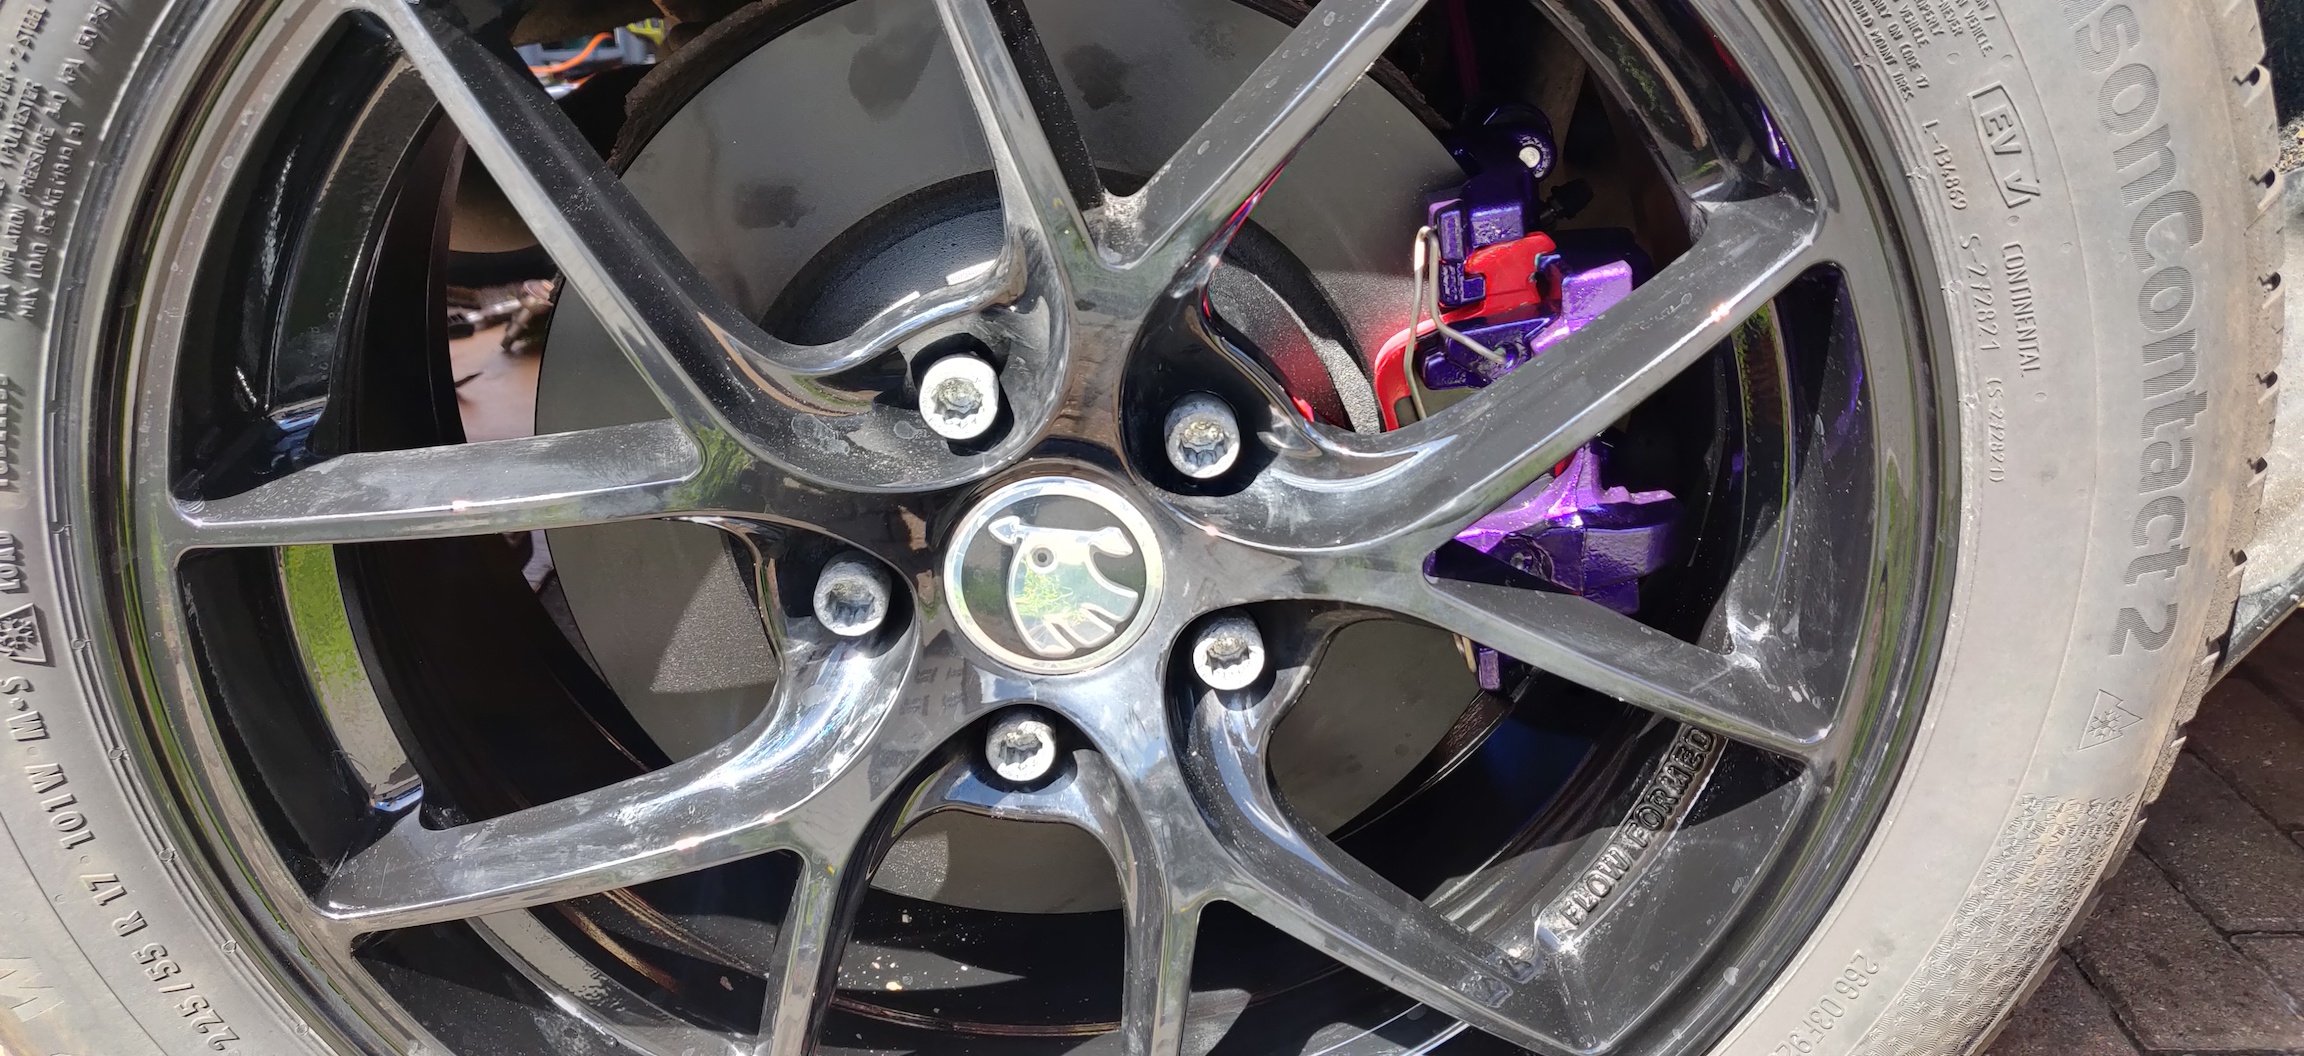
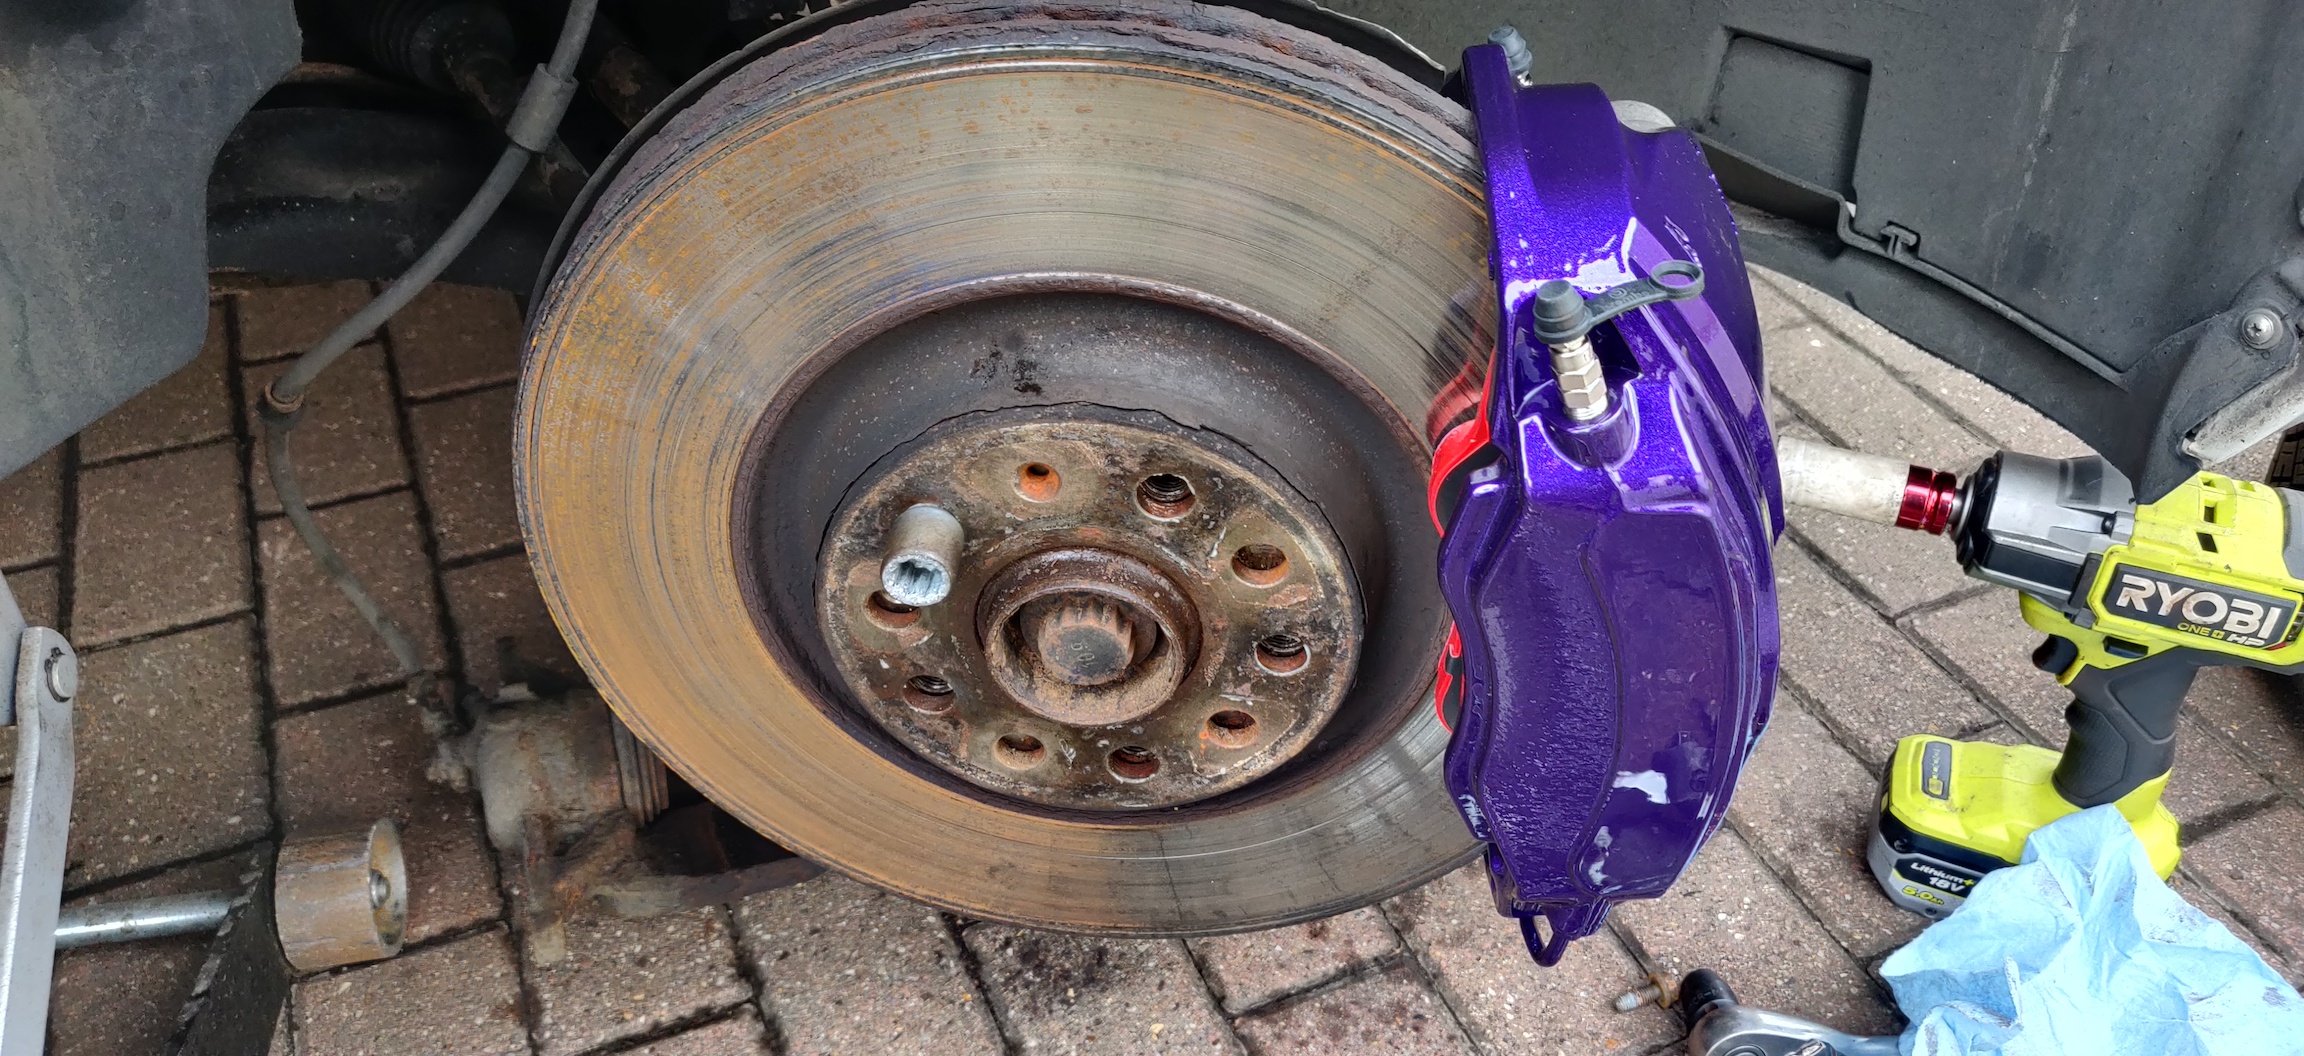
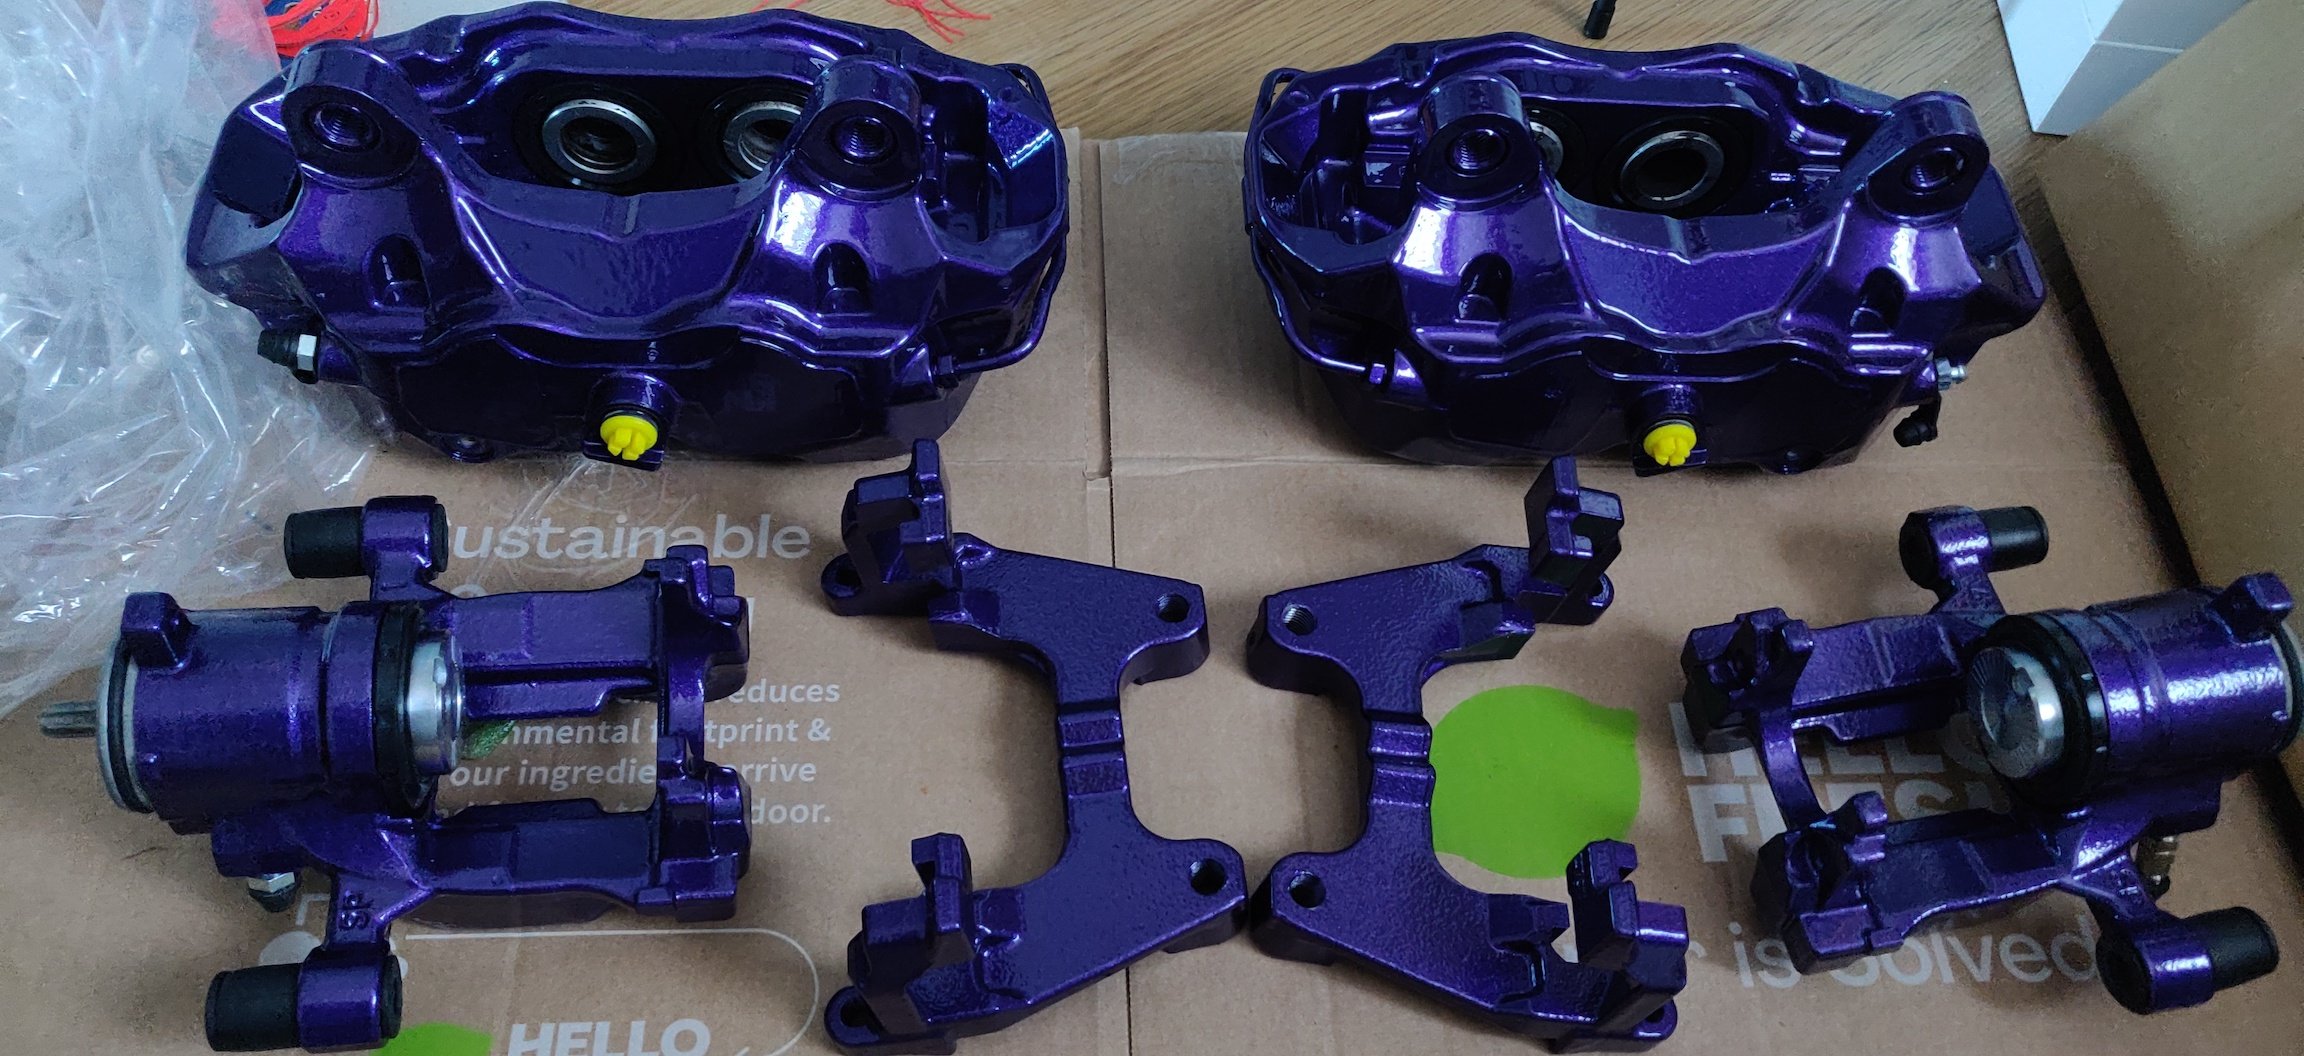
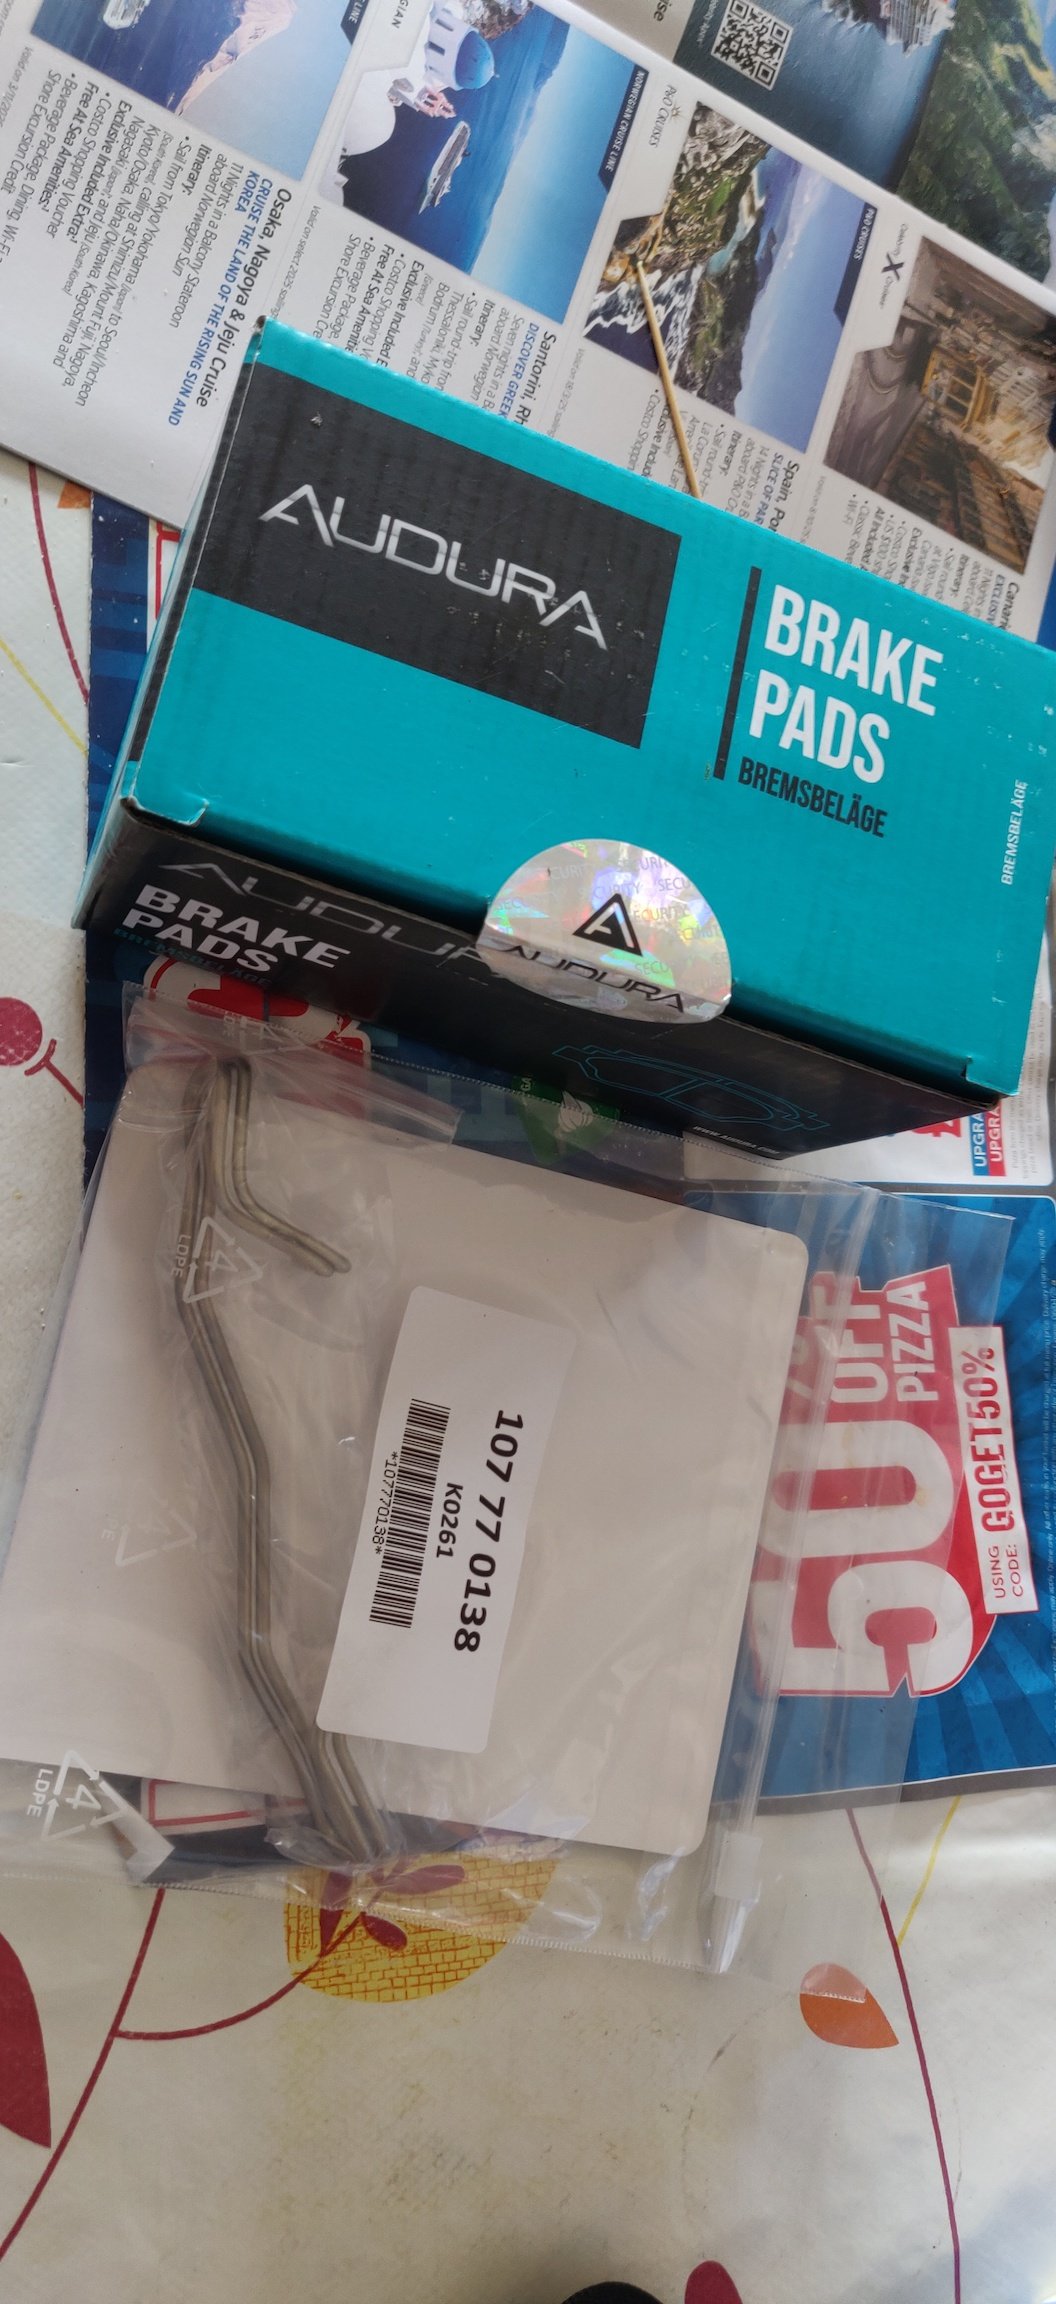
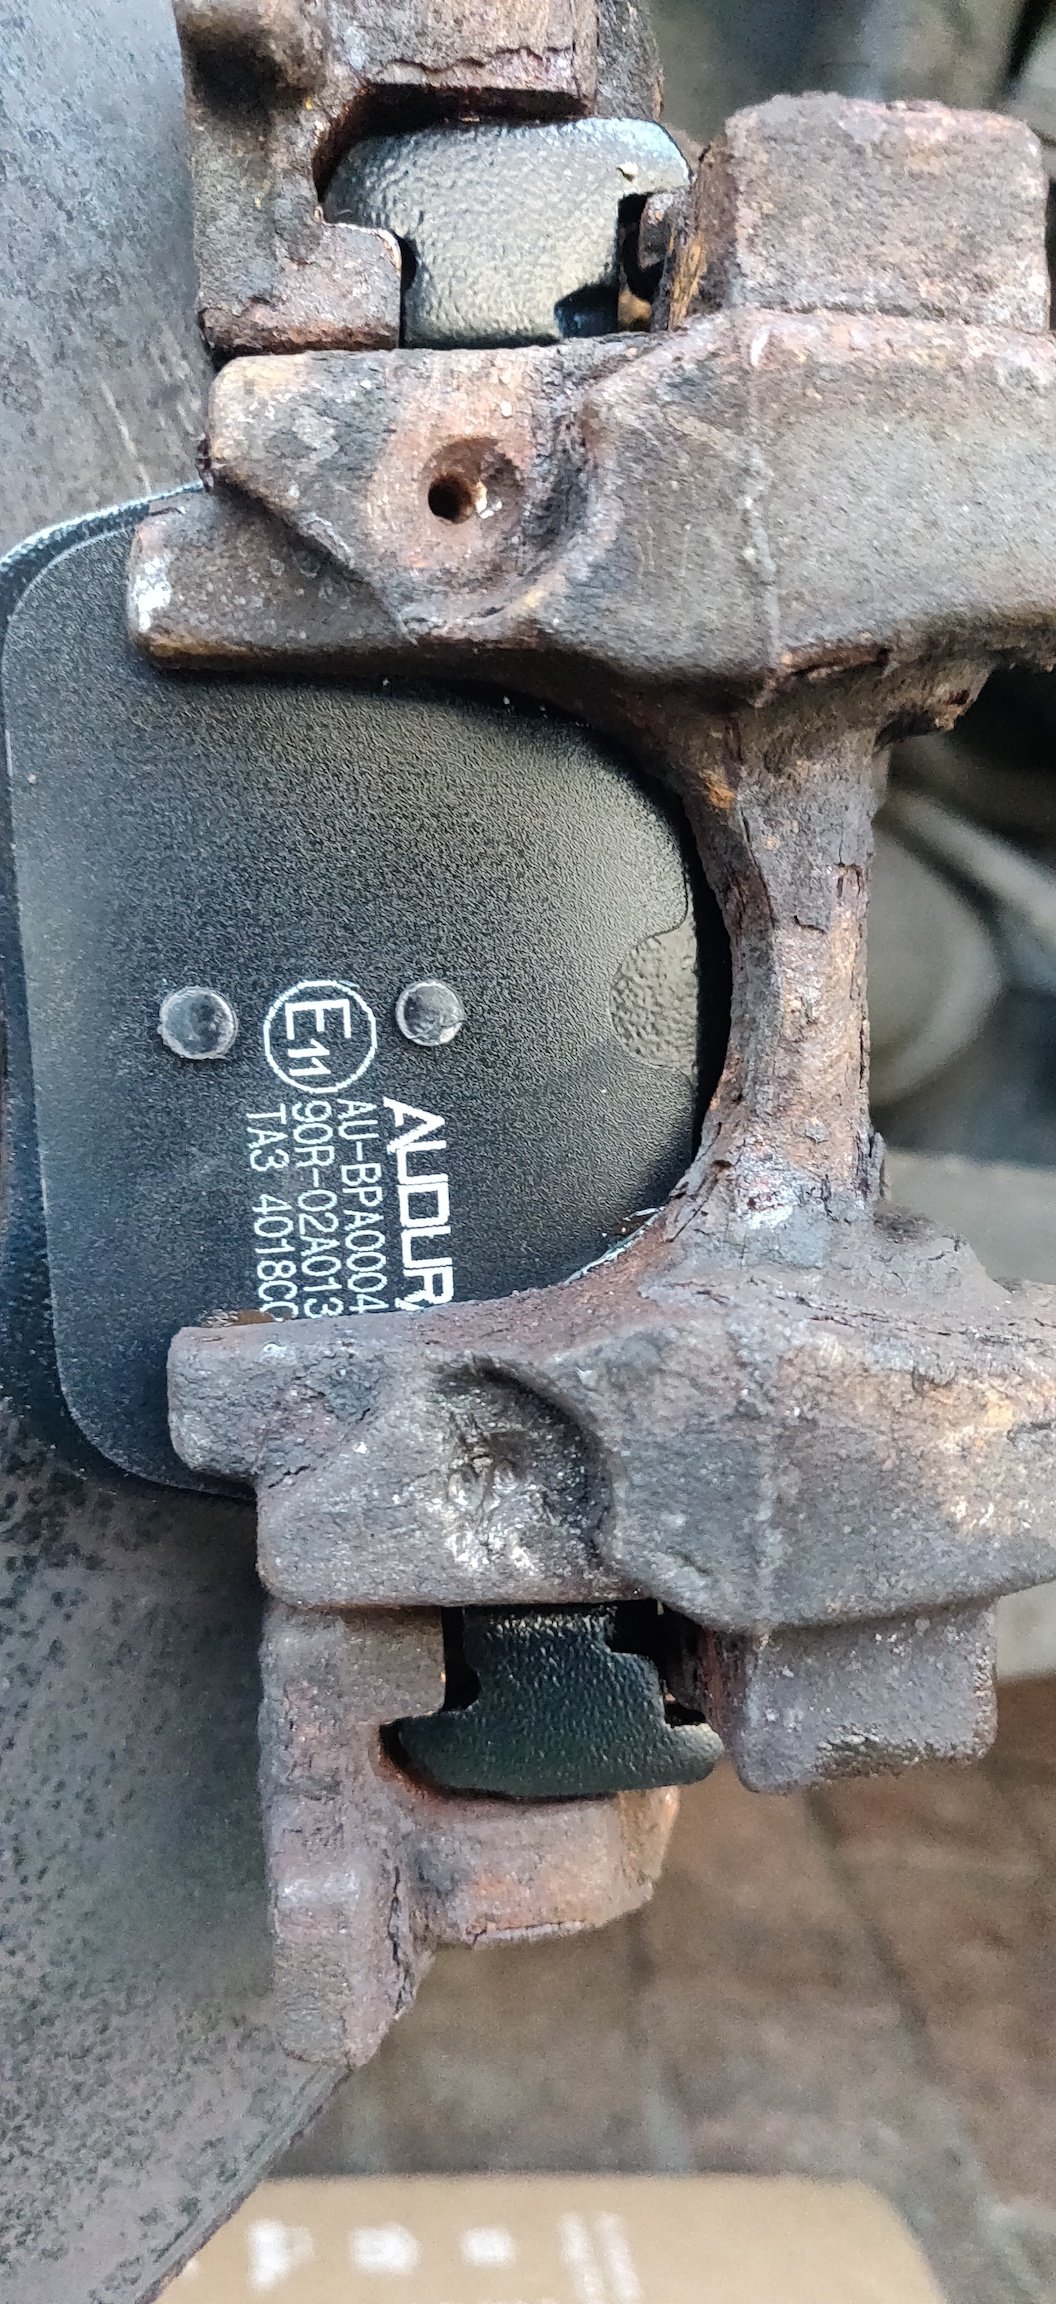
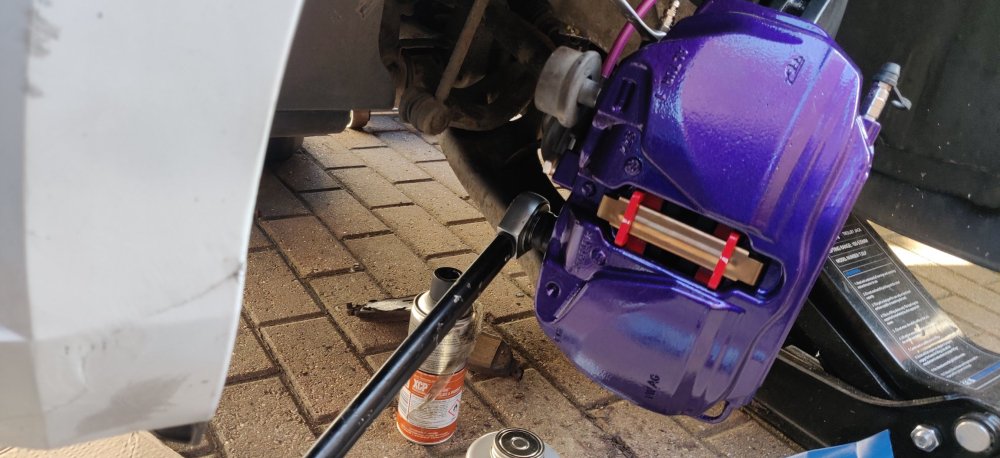
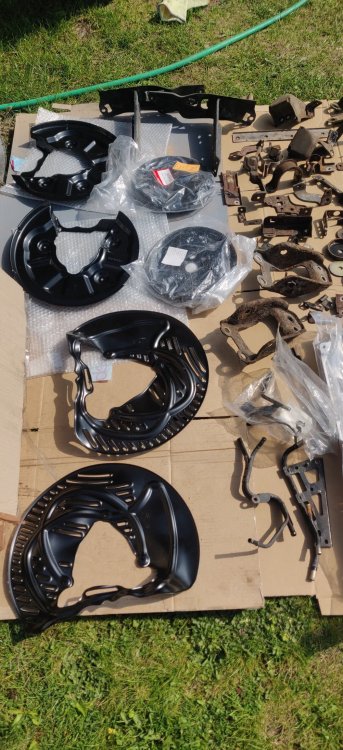
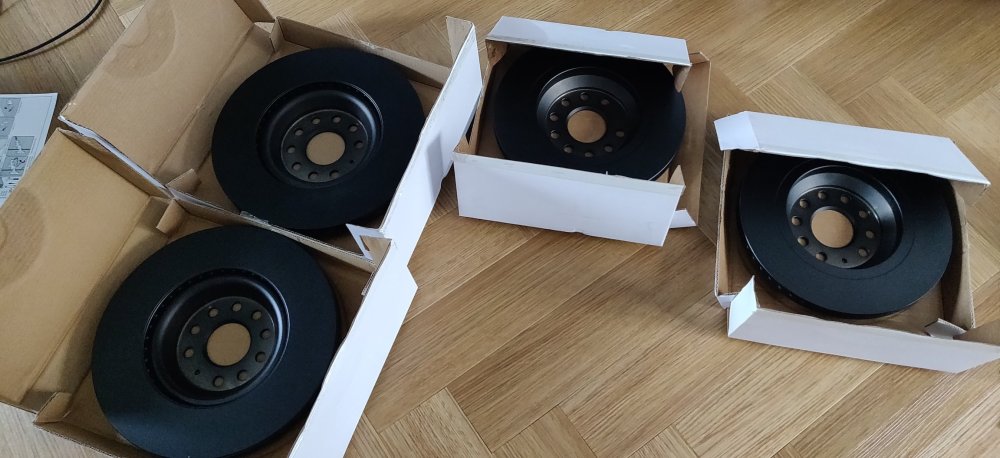
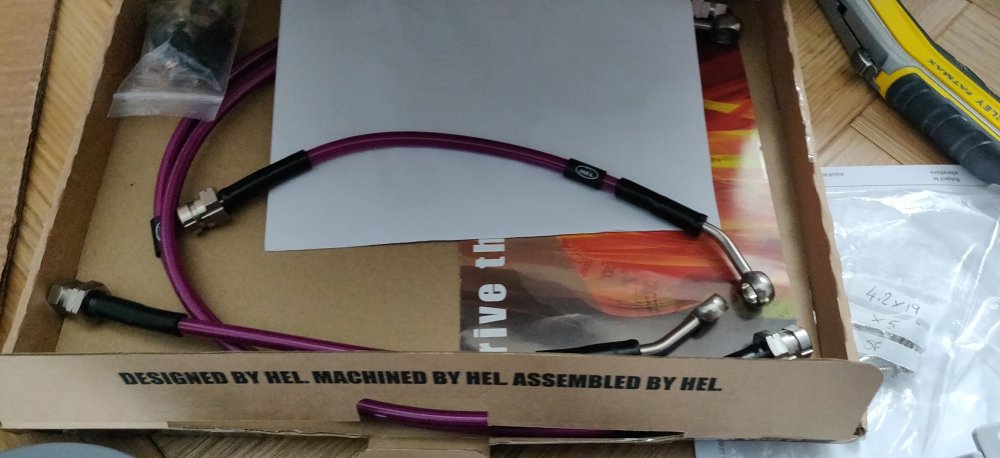
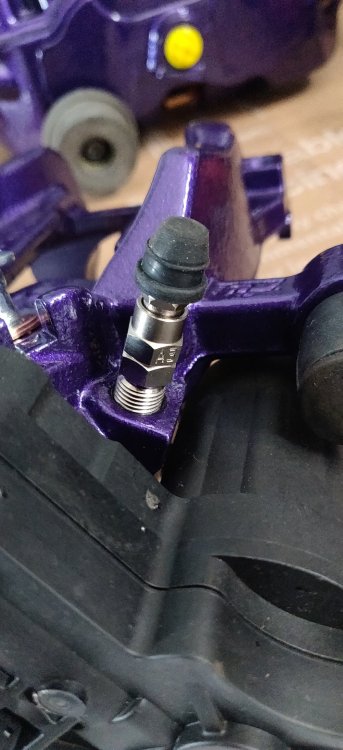
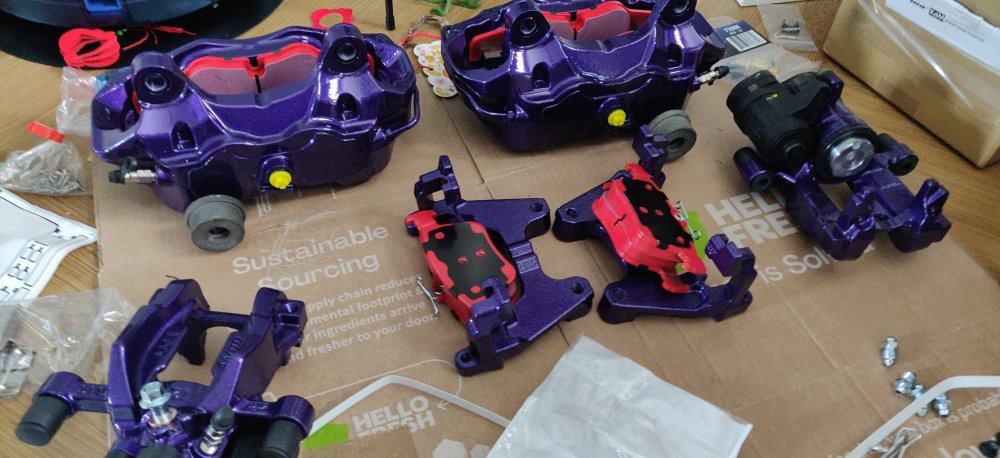
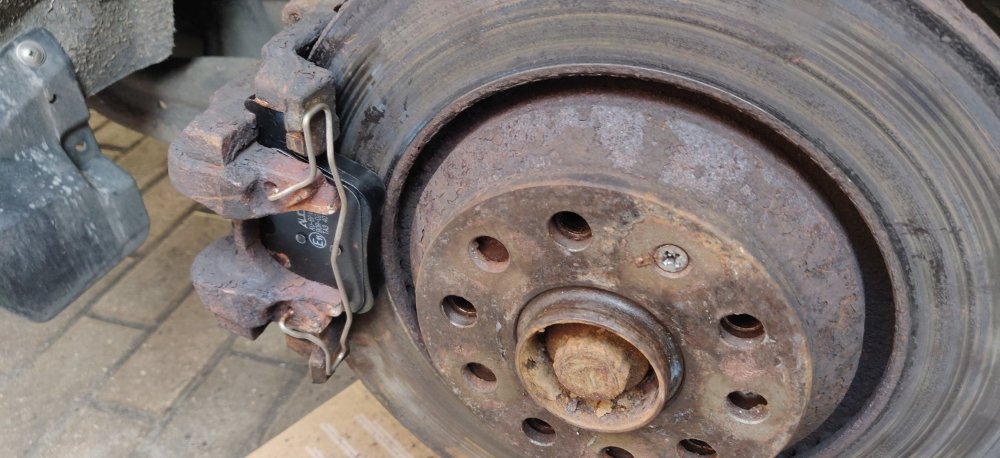
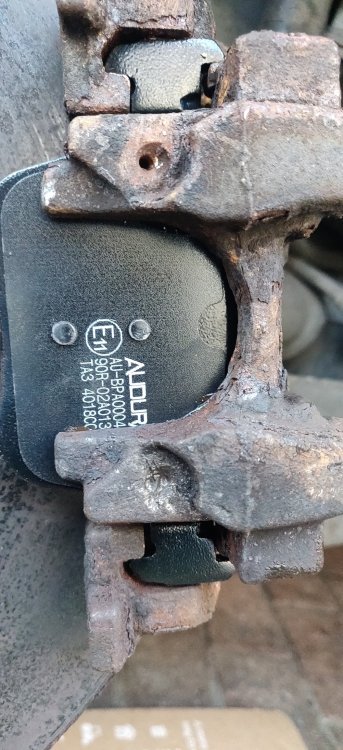
Busy day today on the rear brakes, but first, a post that will probably infuriate a certain someone. So something that has been on the list of things for this car: Some Audi TTS calipers to replace the fronts. The aim was to scour for these until they were at a price I couldn't refuse. This was the case, as not only was it a good price, it was also all 4 calipers, front and rear. Came to £409 with a discount. I did reduce the delivery cost by picking them up myself, so a 3 hour round trip if I remember correctly. This was mid February, and from there, was a case of sourcing the other bits. So things like: Caliper bolts front and rear, and the rear caliper gubbins, like slide pins and those clips that were buggered. Front bolts probably don't need replacing as they're not TTY, and I'm sure they would fit the Audi TTS calipers, but got them anyway, N 910 84 901 at £10.87. The rears are TTY, got Febi Bilstein 48817 from eBay, £12.78. Not pictured are bits for the front calipers, 8W0 698 231 are some clips to keep the pads in place and for the pad contact area to the caliper, £28.87. A pad wear sensor for the Audi TTS caliper, 8S0 615 121 A from eBay at £19.49. The slide pins for the rear (£10.83) and the clips (£6.89) were from eBay, just aftermarket bits, notable that the 7mm socket is now a T40 torx on these pins. I'll have to make a note of that somewhere for future work (probably scribble it on the brake disc or something). Some other random bits like brake hose clips (£3.23) and brake retaining bolts (£3.25), stainless ones, and probably really for the new wheel bearings once those are ever in place. Just random bits from eBay, as it'd be mad to use genuine retaining bolts and risk them seizing. Also a set of brake shields front and rear: Obviously the bits on the left side. The rears need replacing as seen on previous posts, and the Audi TTS ones have these air vent bits, which I suppose is for cooling, yet, feels like it defeats the purpose of shields. Fronts are 8S0 615 311 D and 8S0 615 312 D at £57.20 for the two from lllparts, and the rears are from eBay apparently parts 5Q0 615 611 K and 5Q0 615 612 K at £40.70. All the other bits are for my Honda Insight, basically in a state of disassembly, with a huge amount of rust, in such a way that means I'm not worried about the Skoda. All the bits are being sent to be coated, to something hopefully more corrosion and scratch resistant. Lest the rear shields disintegrate away again. The grand irony being the Insight is aluminium, so it's the rest of the bits that have really rotted away. Anyways, brake discs: I've used MTec for brake discs for a lot of my cars, mainly because they do coatings which seem to help keep the unbraked surfaces hold up reasonably well. Sometimes not perfect though, but the price of the discs make it hard to argue. Set of 4 large discs for £228.48 seems hard to beat. One has to start chasing big money for lighter discs or "better", whatever that may mean. Whilst the wallet was being emptied: Set of HEL brake hoses. Picked purple for reasons to be revealed later. Given the state of the rear hoses, and the fact the Audi TTS ones need to be a tiny bit longer than the standard ones, meant this was a decent chance for fancy braided ones. These were from Progressive Parts at £108. So whilst the calipers were sat there, with these shiny bits alongside, the general grottiness of the calipers meant this was probably the best time to get them refurbed and rebuilt, and I guess be repainted before they were fitted. So dropped them off the Brake Caliper Specialists at Long Eaton, and a week later: So all in purple. Bit much perhaps, but all looking nice and fresh. If the calipers were to stick after this, I'll put the car into a ditch or something. Divert your eyes: this cost £697, where £50 was added because the pistons in the rear calipers were buggered and needed replacing. The TTS calipers are using the same pistons originally, shame they weren't spruced up, but hey ho. They'll probably get dirty quickish once actually used. In spare moments, the calipers were all fitted up, electronic parking brake and stuff like that, in addition to: EBC RedStuffs. I don't anticipate tracking this car, so no YellowStuffs. The Reds spit out less brake dust, so hopefully good news for the shiny calipers and wheels. The fronts are DP32256C and were £116.87 and the rears are DP32173C at £53.84. The rears were ordered circa a year ago, just sitting happily waiting for disaster. Continue to divert eyes: Stahlbus bleeders have been fitted throughout. The rears have the bleed screw in frankly a stupid place, difficult to get any spanners in there. So the idea is that the Stahlbus bleeders stick out a bit more due to it being two separate pieces, so an even longer one means it sticks out even prouder. Hopefully this makes future bleeding even easier. Annoyingly, the TTS caliper does 2 bleeders each, and these bleeders are not cheap! The rears are M10 x 20mm lengths at £52.31 and the fronts are M10 x 16mm lengths at £96.19! Those and the painting of the calipers were certainly not necessary, so a moment of madness. This looks like madness, almost two grand, but is essentially a full brake refresh, and the procurement of parts was pretty much over the course of a year and a bit rather than all purchased in one lump. One can easily spend more once things like big brake kits or more exotic friction materials are involved, so it could have been worse. Been a long post, I'll need a break before I post what I actually did today! I guess the maintenance bits really boil down to the brake disc, pads, and I suppose the rear brake shields. Maintenance: £2860.27 (+£439.89) Upgrades: £4515.82 (+£1515.91) Miscellaneous: £820.07

-
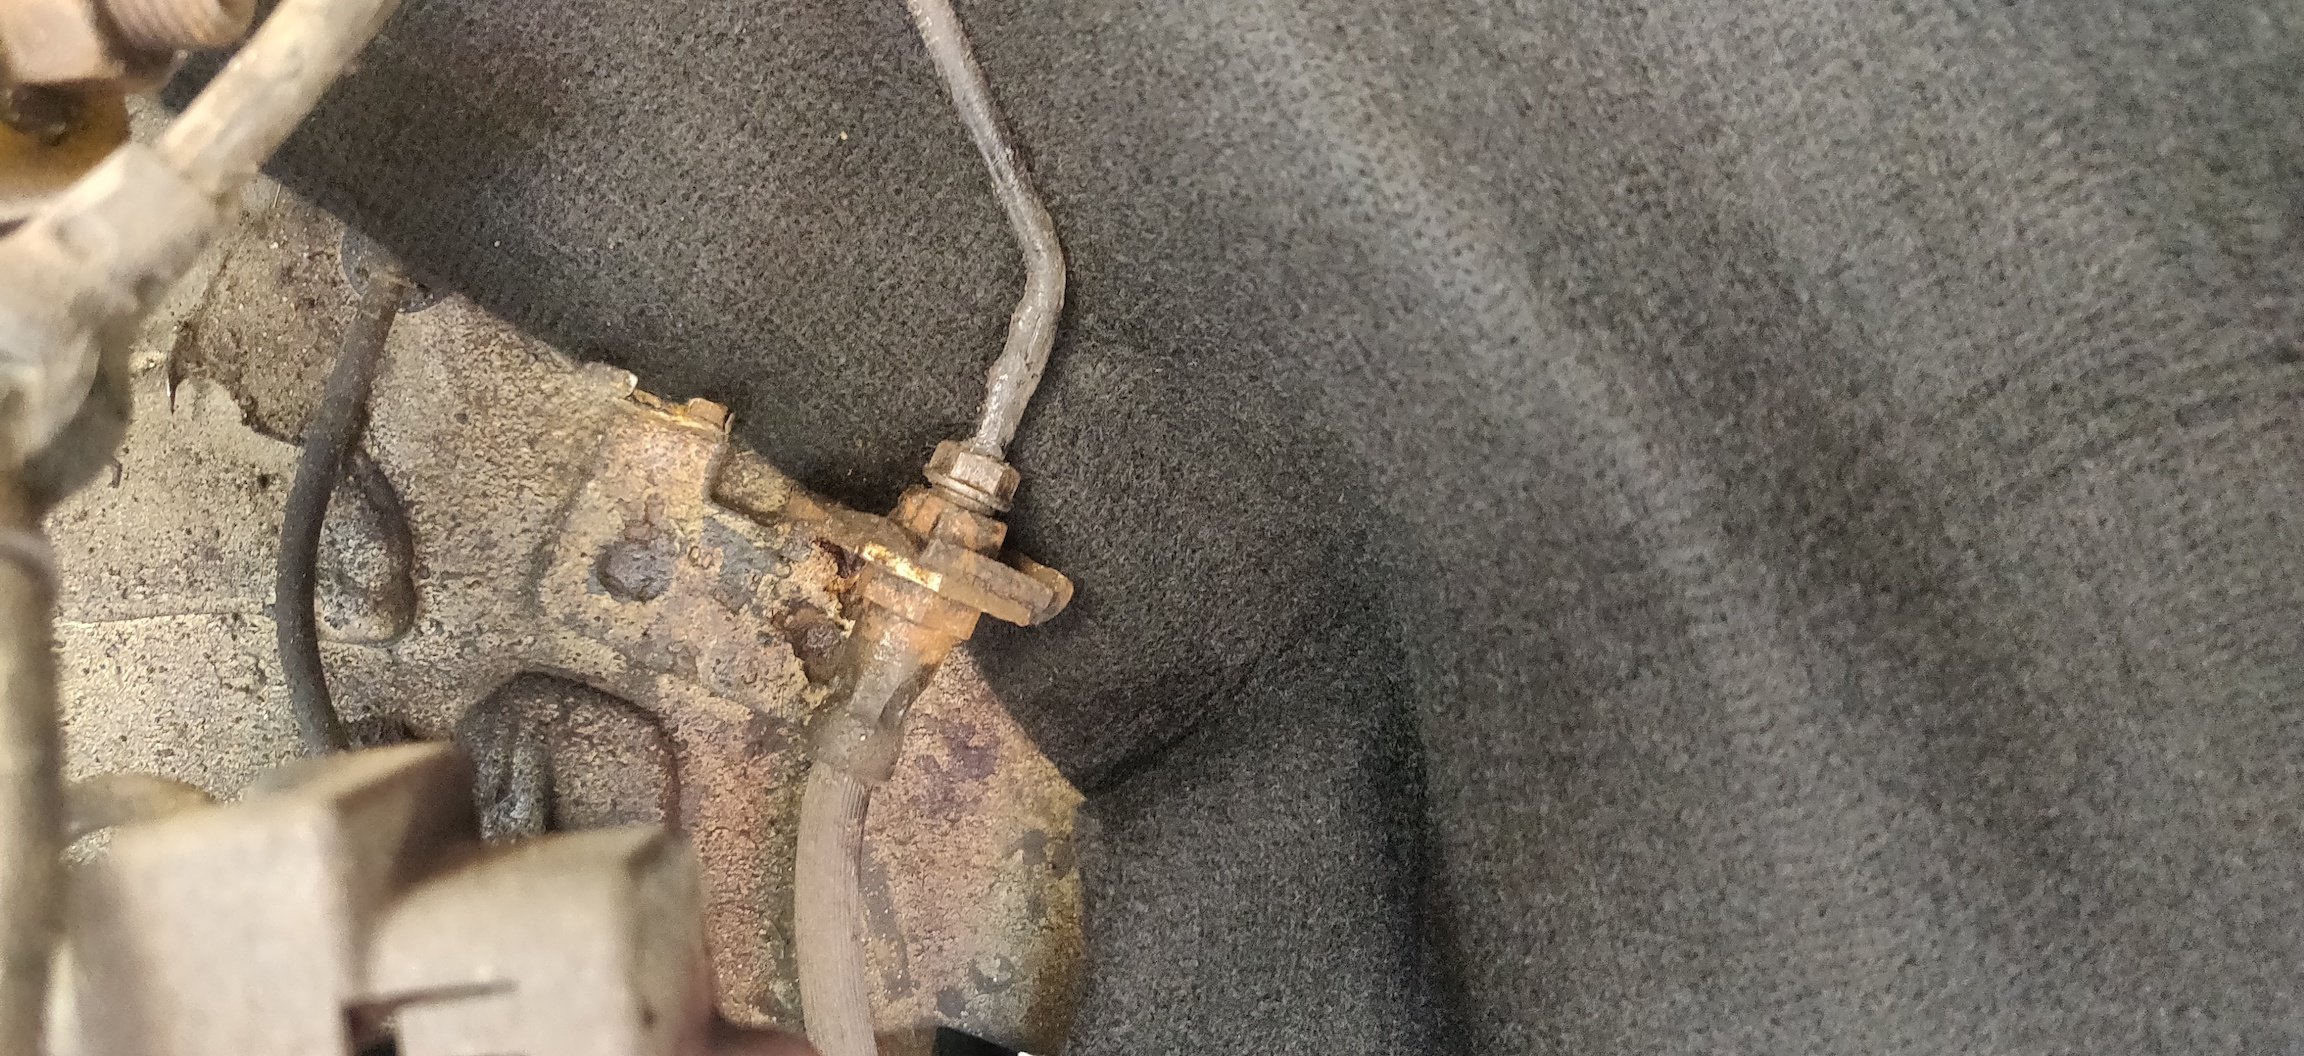
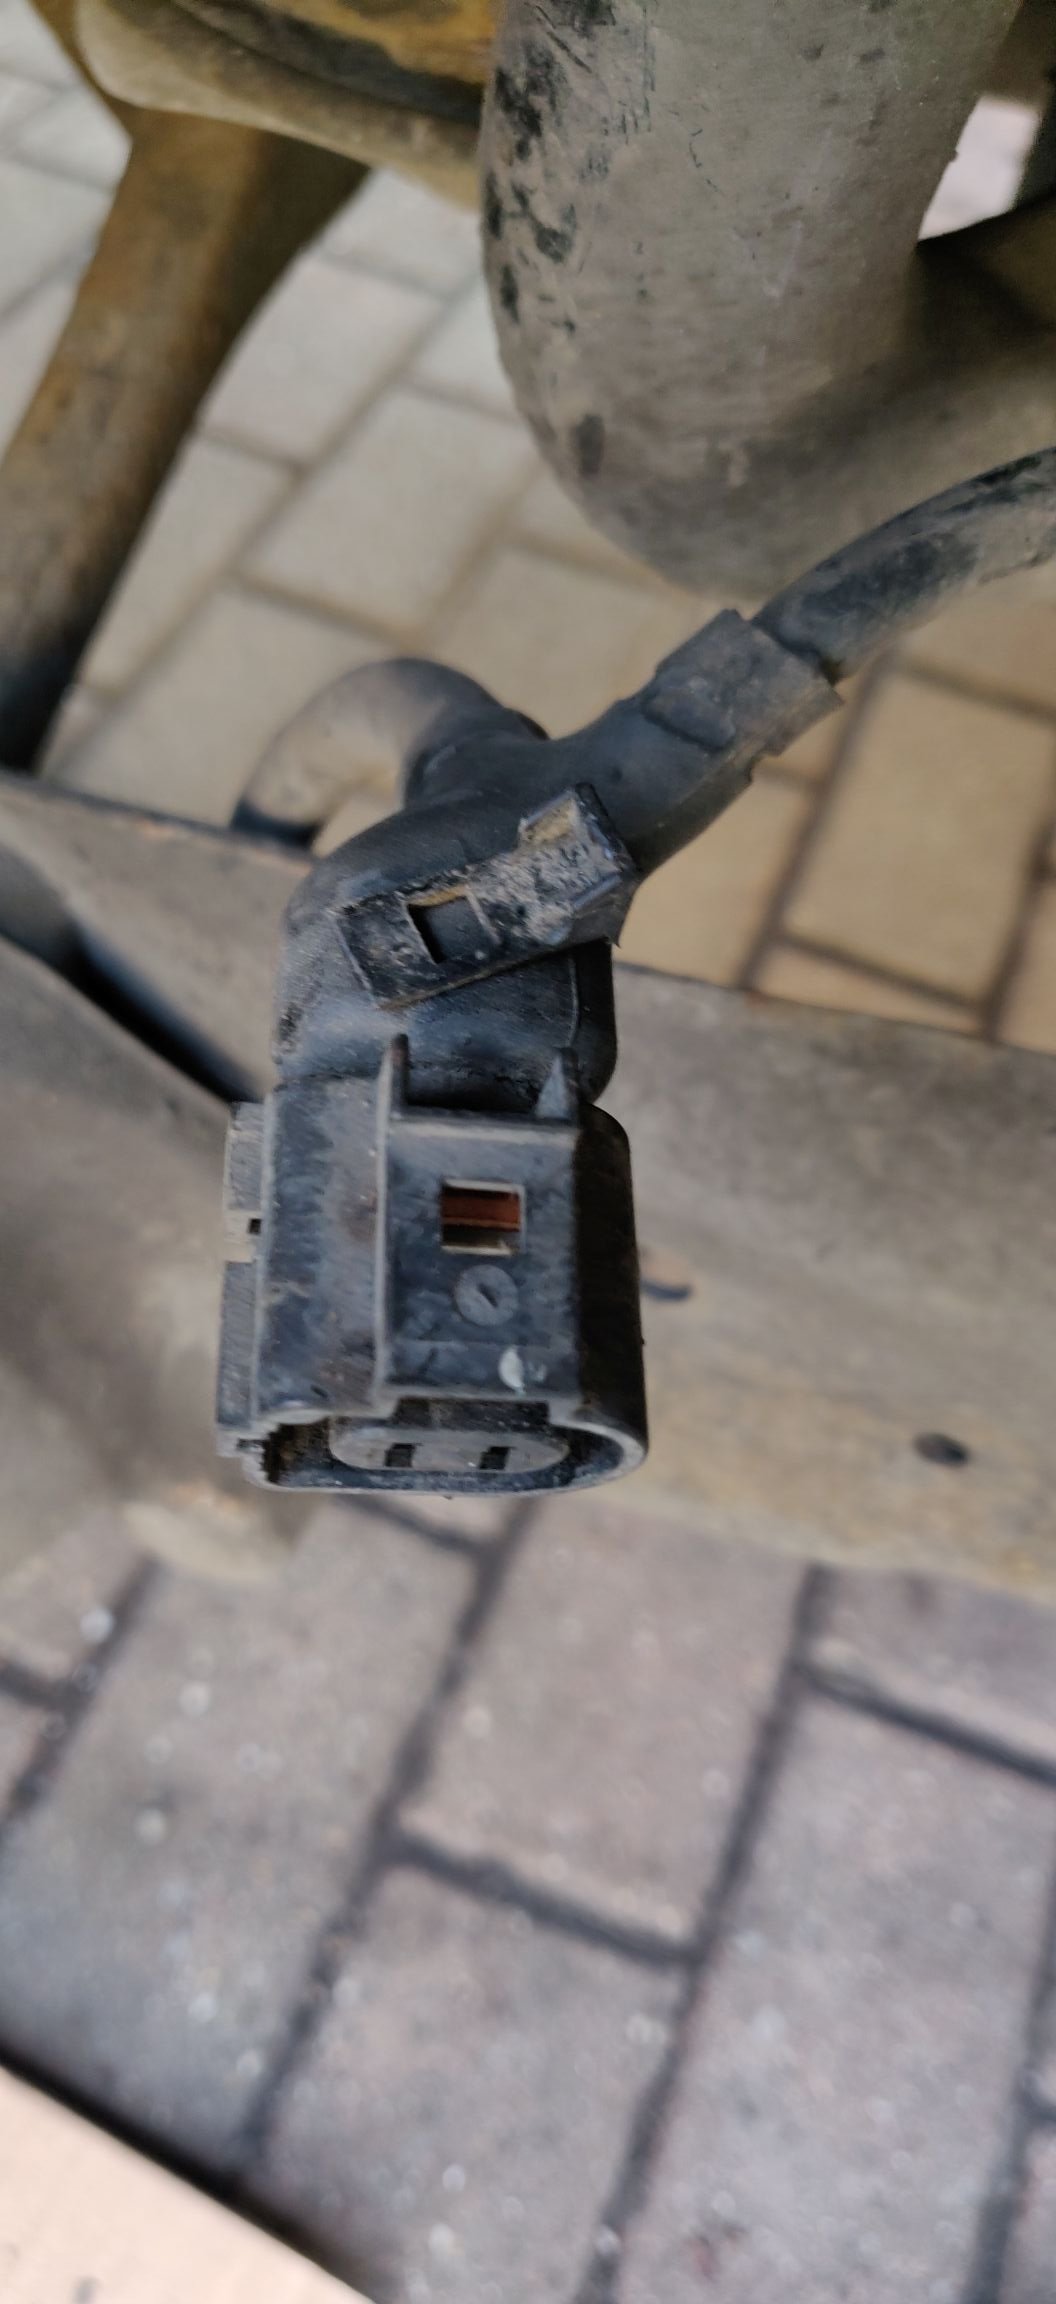
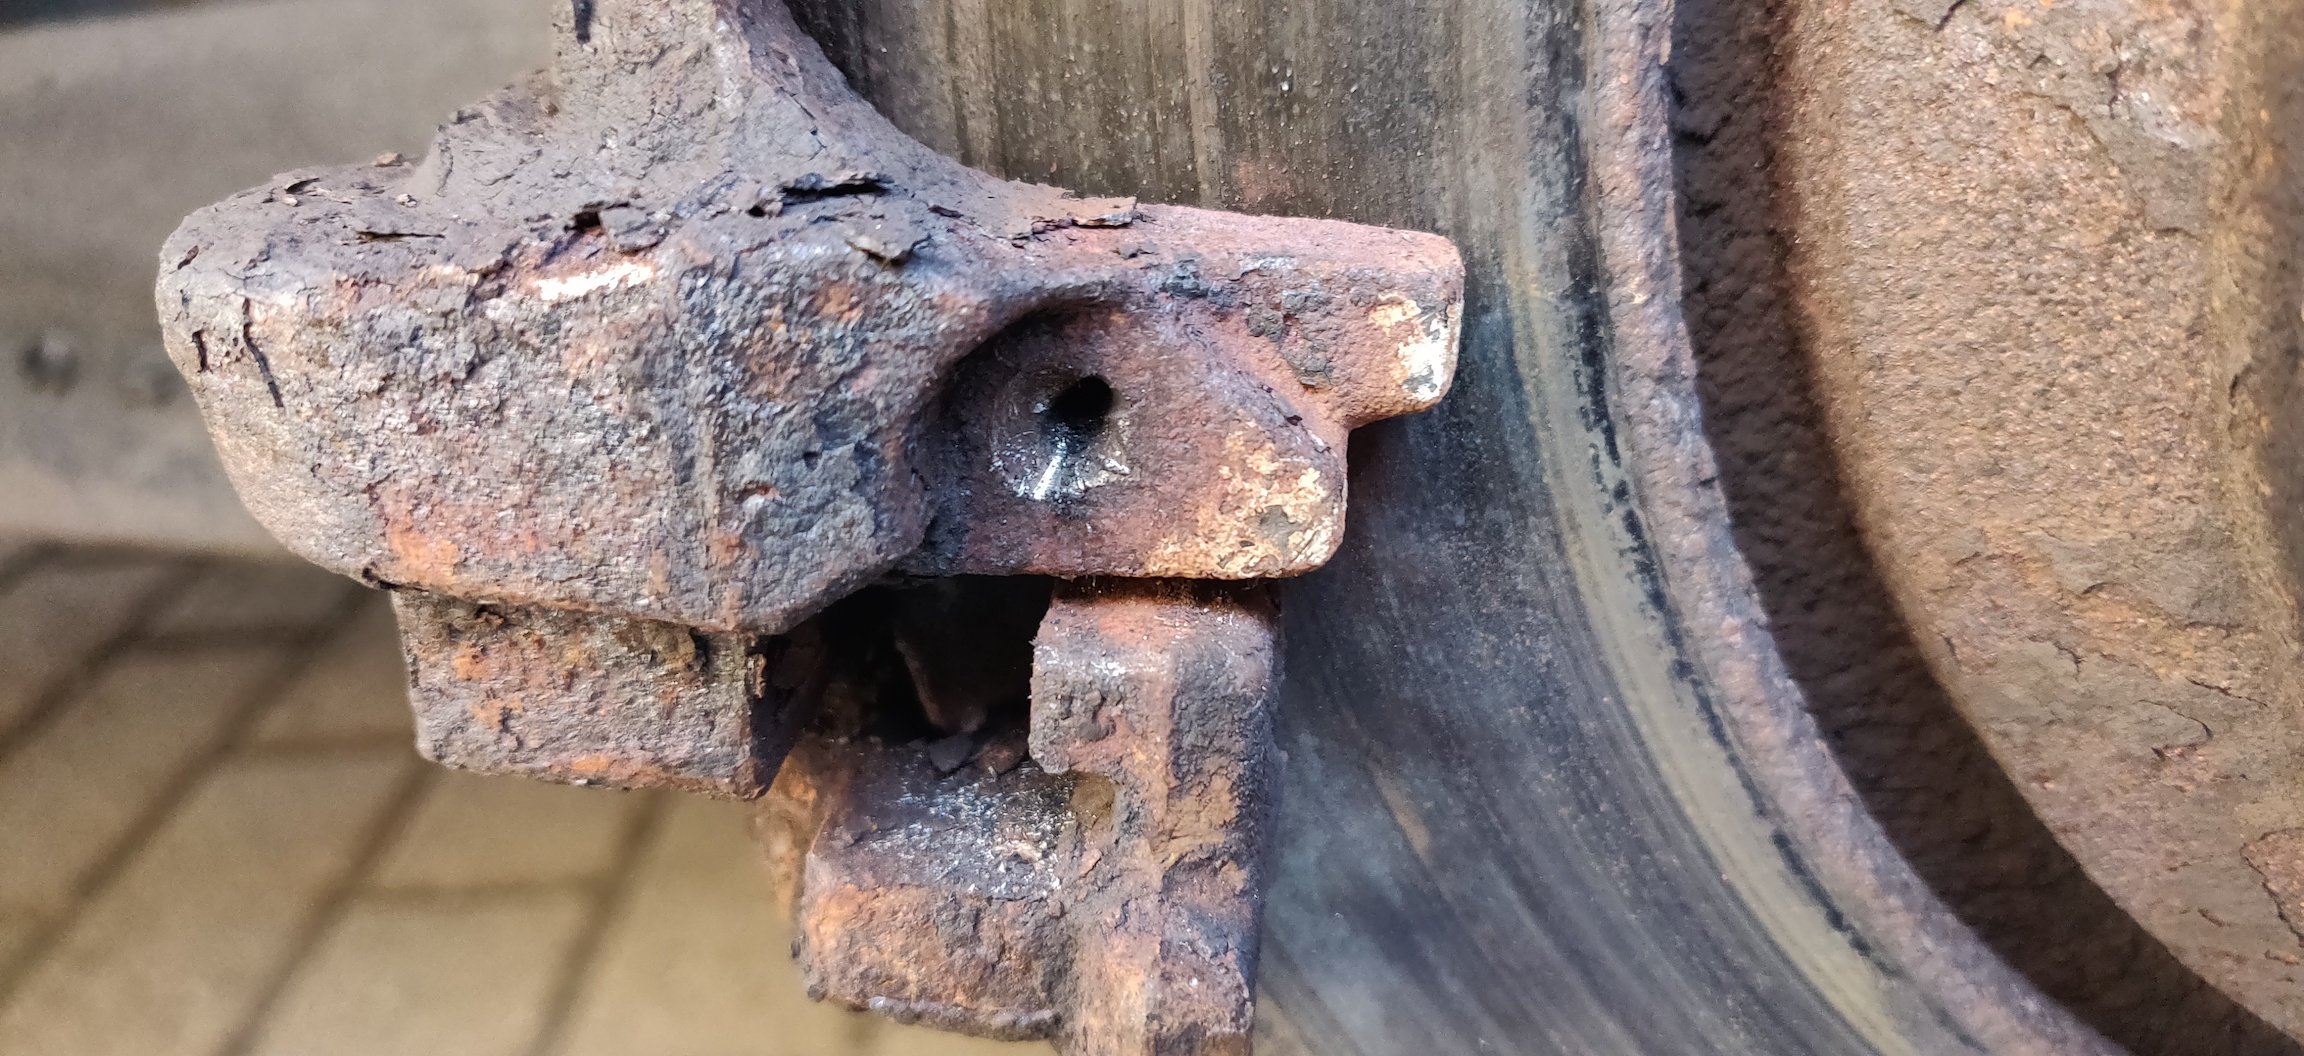
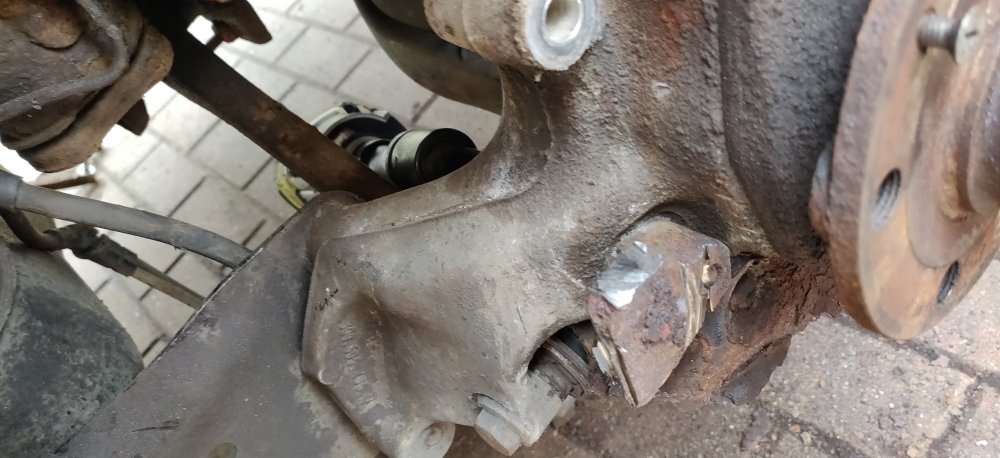
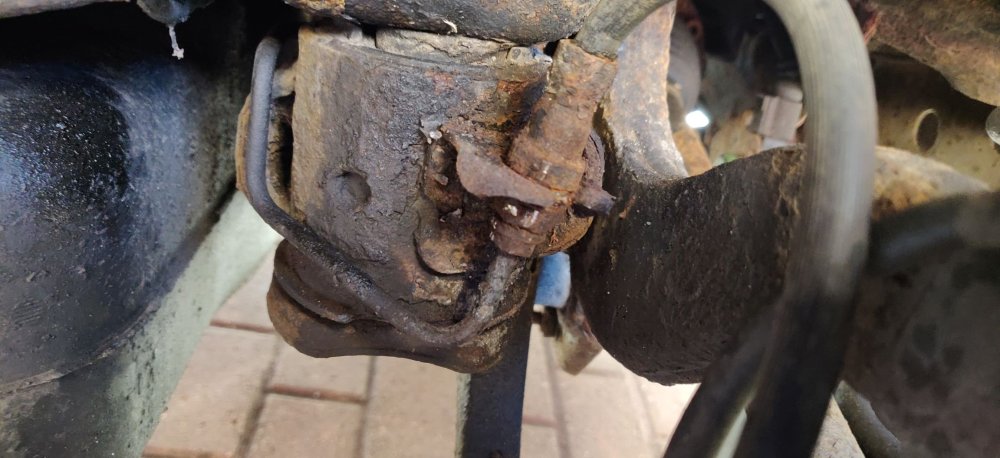
Hi again, So given the last post was a while, and I believe 9 March when I replaced the rear pads, I've been forced to add an update, luck not on my side. The hope was that changing the rear pads would be enough, but the rear left caliper unfortunately looks like it was still sticking. It appears I didn't do a post about replacing the rear hose to the caliper, which I saw as another possible cause for the sticking. I was probably not in the best of moods at the time so didn't take many pictures. The main concern was undoing the brake union: A case of hitting it with some heat and deep breathes until the union started to turn. You guys know the state of the rear of this car, so the brake union was never going to turn without the pipe. So had to undo the rest via the hose, otherwise the pipe would twist and that would be a very bad day. In a few years time and some luck, I'll probably attempt a subframe drop, which seems the only way also to address these brake lines in a proper manner. Anyways, replacing the actual hose is just reverse, really hoping that screwing the new brake hose in would result in being the right orientation for the caliper. I think it ended up near enough. The hose was £12.99, nothing fancy, as it was all to try and buy me some time... Less than 1000 miles later, and after lots of evidence of the caliper still sticking (super hot), we were hearing metallic scraping sounds. I was hoping it wasn't going to be the rear pads. The reason I wanted to buy time was because I have replacements ready to go and ideally wanted to do it in the late summer or autumn as part of changing other things like the brake shields and wheel bearings, which could be a terrible time and so wanted a decent uninterrupted block of time to tackle it steadily. However, it was now looking like the front right caliper is also starting to get hot compared to the left, so my hand is forced, and all the brakes will need to be changed. So undoing the rear calipers and removing the pads for the right hand side: Absolutely fine, barely run in. The same can't be said for the troublesome left side: So the metallic scraping sound was the caliper being stuck enough that the inner one has worn to buggery. I've only seen this one other time where it started to grind away the actual pad backing. So my hopes that the rear pad change would tide over the MoT coming next month are somewhat dashed. We literally can't drive this any more at risk of doing all sorts of damage, which may already have happened to that poor caliper. I suppose another set of cheap pads might tide it over for another month, but I imagine the MoT would fail on the state of the brake discs. Was always blasé about these calipers and brakes due to intending to replacing it all though. So for now, the plan is to just do the brakes and leave the shields and bearing for a later time. Of course, attempting to undo stuff has led to: Broken electronic hand brake connector. I seem to have this happen too often with VW stuff (coil pack connectors usual suspects). I'm hoping the moulding to that connector is just rubber and so the connector itself could be replaced by extracting the original pins. If not, then I need to plan some sort of bodge. I guess a lot of time exposed to dirt gets into the nooks just enough to make undoing things awkward, and then slightly too much force. Other than that, the main obstacle is the removal of the pad carriers. This has meant various attempts at breaker bars, extensions and ratchets with a pipe over: The bolts are an unorthodox M14 bolt. Or at least that's the name of the socket used. Given the wife used to have a Seat Ibiza, I've had a set of these sockets available for a while. Fortunate as the Halfords tool set I have only goes up to M12. For the right hand side, I was somehow able to start the lower bolt with just the ratchet, and the lower bolt has just enough space for a wobble UJ, extension and impact driver to get out. It's all super fiddly with the driveshafts, rear damper, rear spring and suspension arms all conspiring to basically get in the way. The top involved an attempt with the breaker bar as seen above which wasn't successful, so the ratchet with the trolley jack handle as a pipe was used: Almighty cracking noises ensued, but the bolt was starting to loosen: So that's that side sorted. Absolutely no luck with the left side. I imagine the heat cycles from the sticking caliper has not done any favours. I'm just about able to use my feet against my garage wall for leverage (essentially horizontally shoulder pressing the damn ratchet and pipe) but still no luck. Put some plus gas on it for now and will try tomorrow morning. If heat doesn't suffice, then I will happily get violent and cut the pad carrier out, given I have a replacement. I'm still not sure why on earth they decided these bolts were the ones to go for, especially considering the front ones are just normal (albeit chunky 21mm socket I think) bolts. Bolts that aren't TTY either. I will probably post up a bill of materials and pricing of the replacements tomorrow evening depending on how things go. Those of a nervous financial disposition will need to look away! Maintenance: £2420.38 (+£12.99) Upgrades: £2999.91 Miscellaneous: £820.07


-
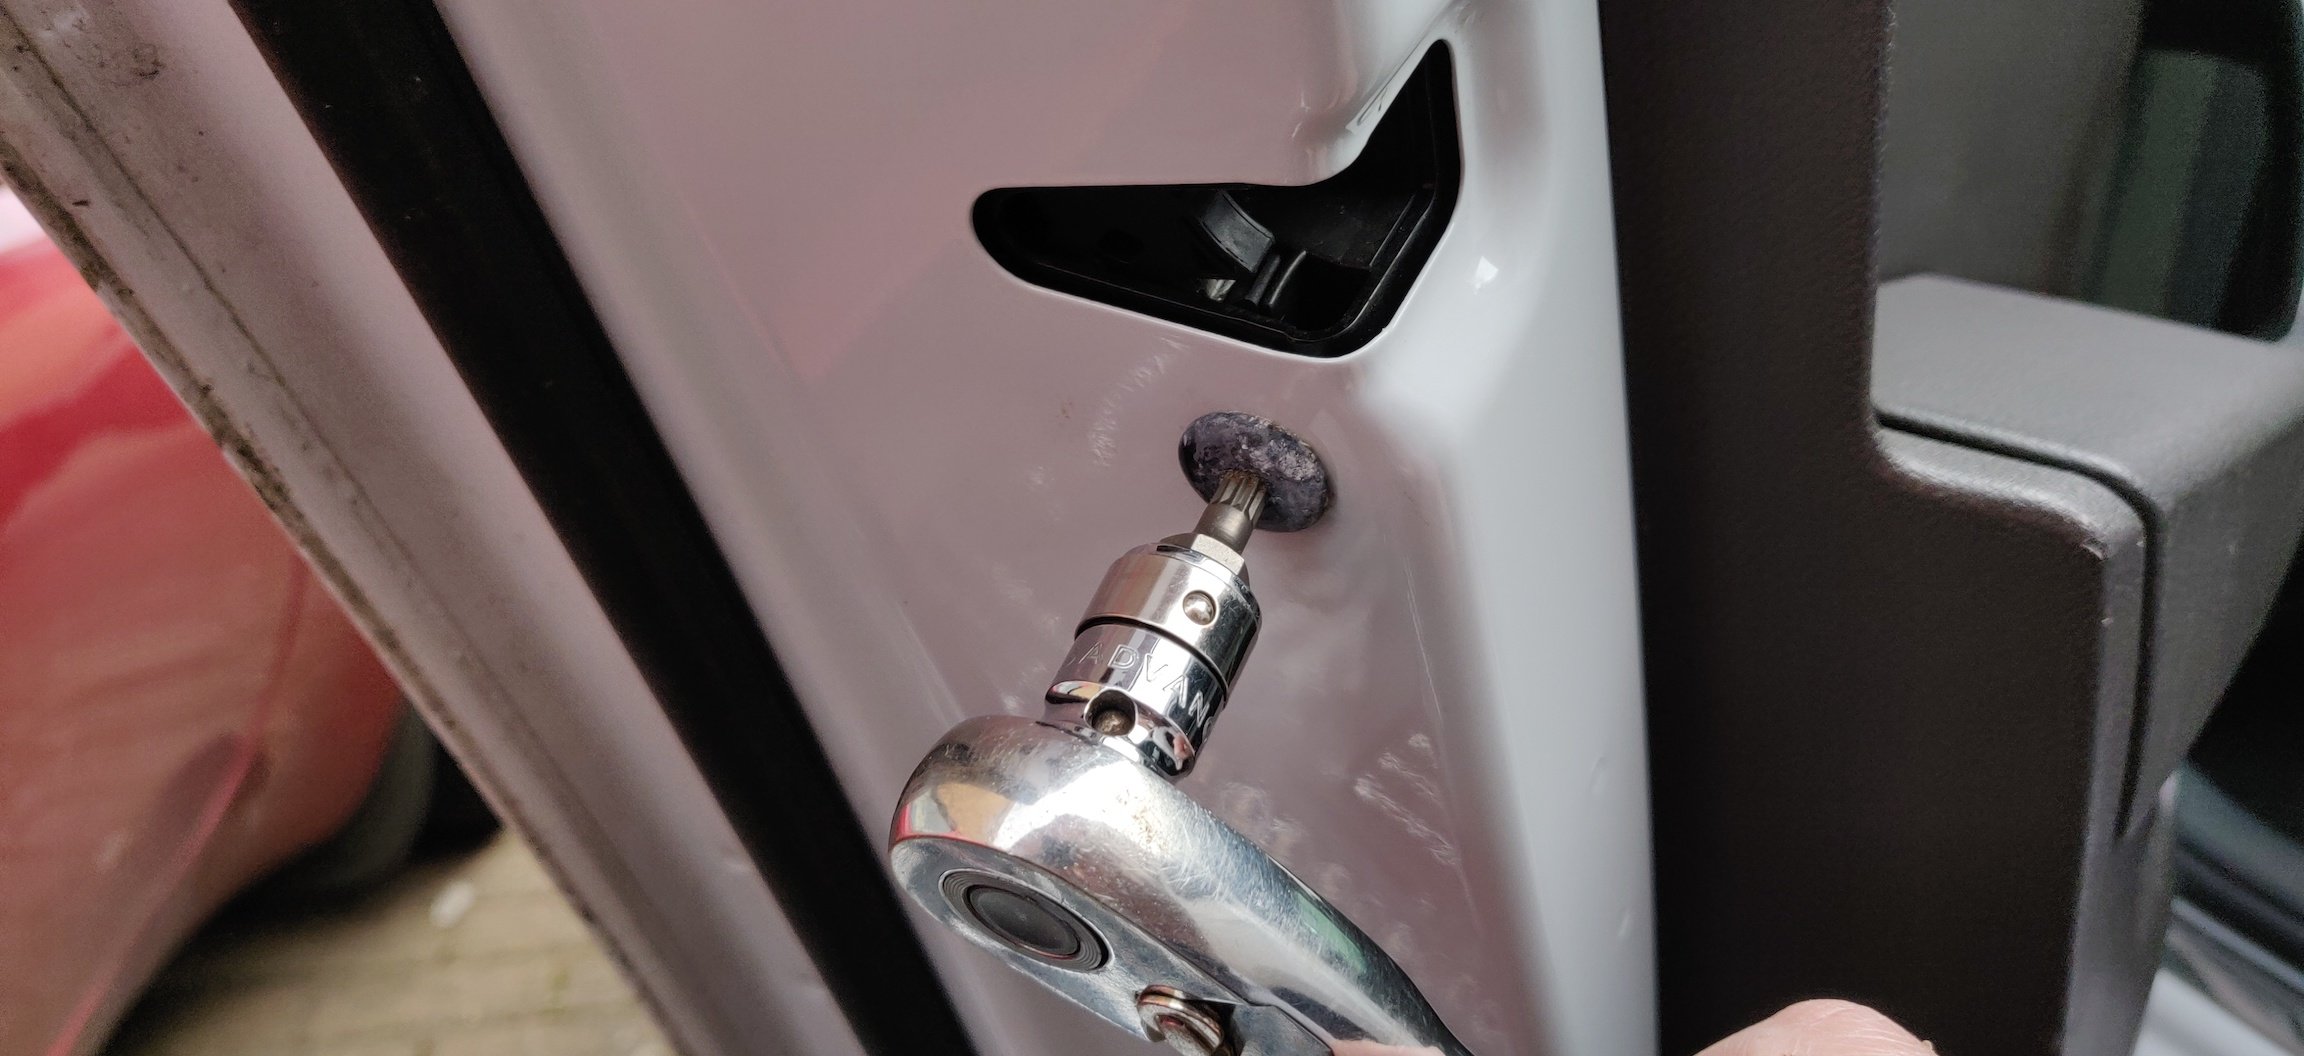
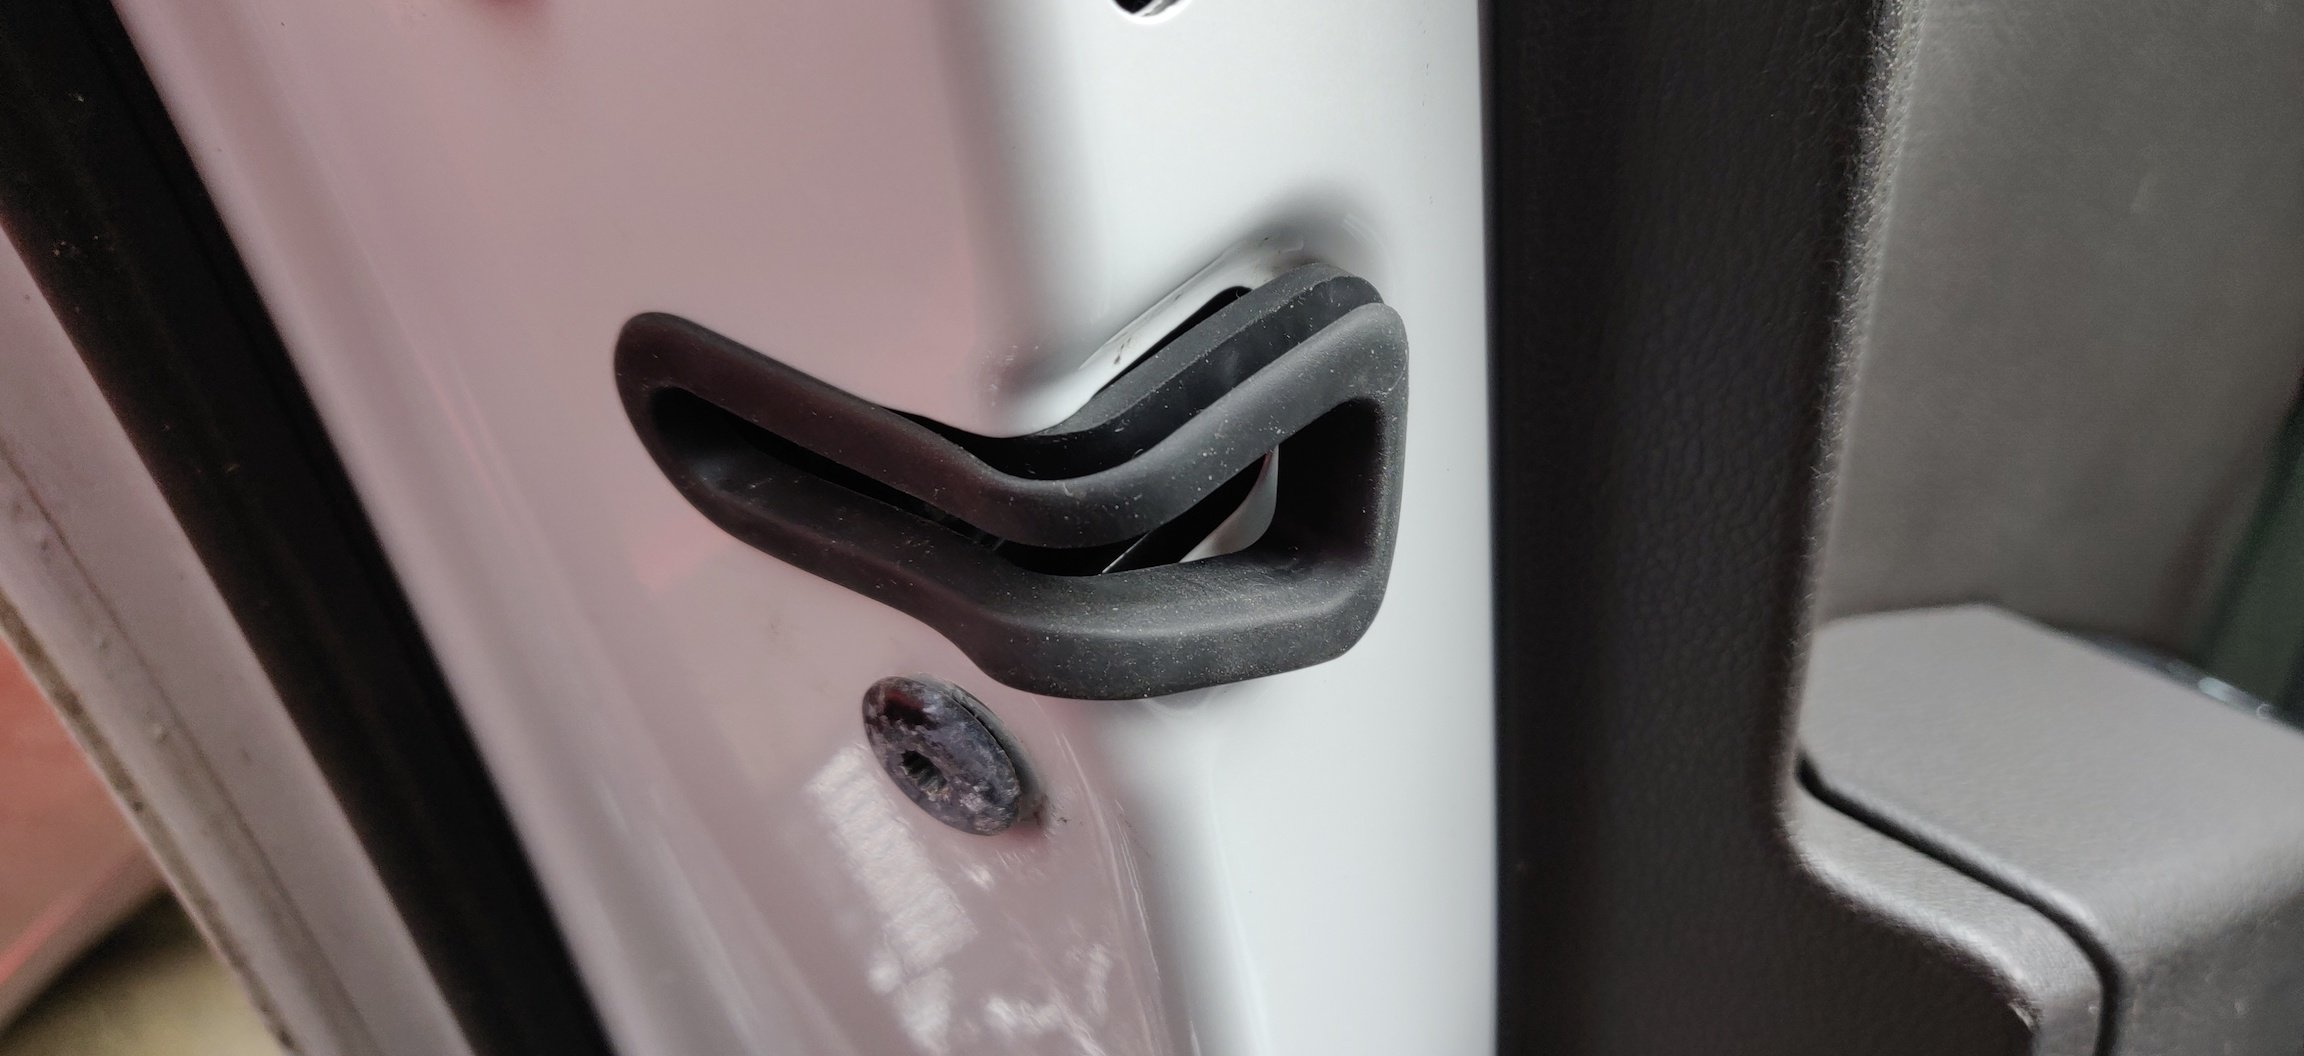
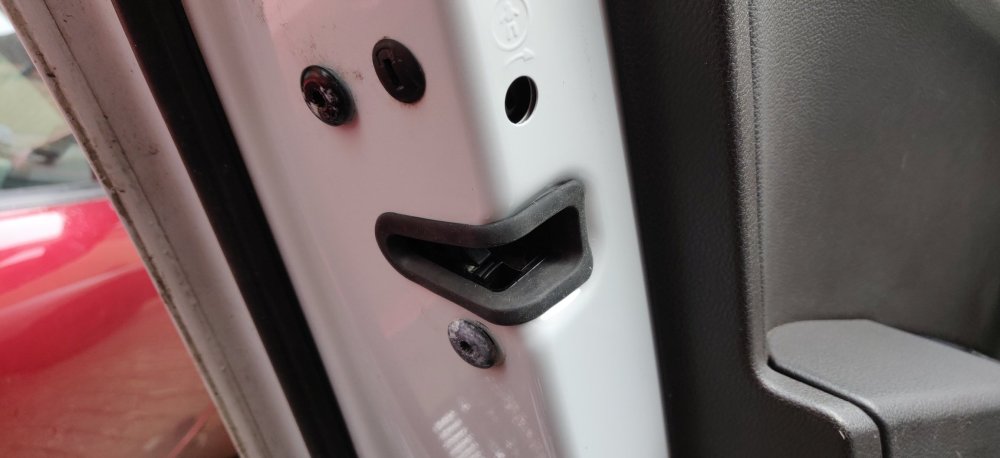
Hi all, so wife has found the starter button being a bit of nuisance sometimes, and now she mentions it, it does feel a little less responsive. There's a few threads about this, where people have given the circuitry a clean to improve things, but I didn't bother: Got an aftermarket one as seen above. I figure a genuine one about £50 or this one for £9.59 from eBay, so buy cheap, buy 5 times sort of situation. Also, something that's been on the back burner. I think @MartinB might be to blame, random rubber bits that go in the door latches! I got these at the same time as some other bits for the future, and were £5.66 for 4, I'll tally shipping in the future. They didn't go straight in, as the rubber bits are a little thick on one side, so went to loosen the bolts holding the latches to the door frame: It's one of those weird bolts, which I think is called a spline? My Halfords tools had one and I think M6 was the one needed. Once loosened a few turns the latches can be wiggled about a tiny bit, just enough to force these things in: Just a bit of persistence really, but they get in. Then retightened the bolts to 18Nm. The workshop manual mentioned 20Nm on certain pages to add to the confusion, but most references were 18Nm. The starter button was straightforward, dropping the lower steering cowl and then using some thin flathead screwdrivers to loosen the tabs. There's loads of threads describing the process, so didn't bother taking pictures. Certainly feels more responsive now, I'll debate whether to clean the old one (probably not). Most of my spare time is being preoccupied with another car, and despite it being aluminium, still has steel bits with rust significantly worse than this! So it'll be luck more than anything if I get time to do more with this one. Maintenance: £2407.39 (+£9.59) Upgrades: £2999.91 (+£5.66) Miscellaneous: £820.07


-
Oh, best to not look at this thread over the next year then! If it just an anti-rattle clip, then I'll leave it for now. The pads are sacrificial, as all the brakes need overhauling in general, and I'll probably just ditch all the calipers once I've done what I have planned in mind.
-
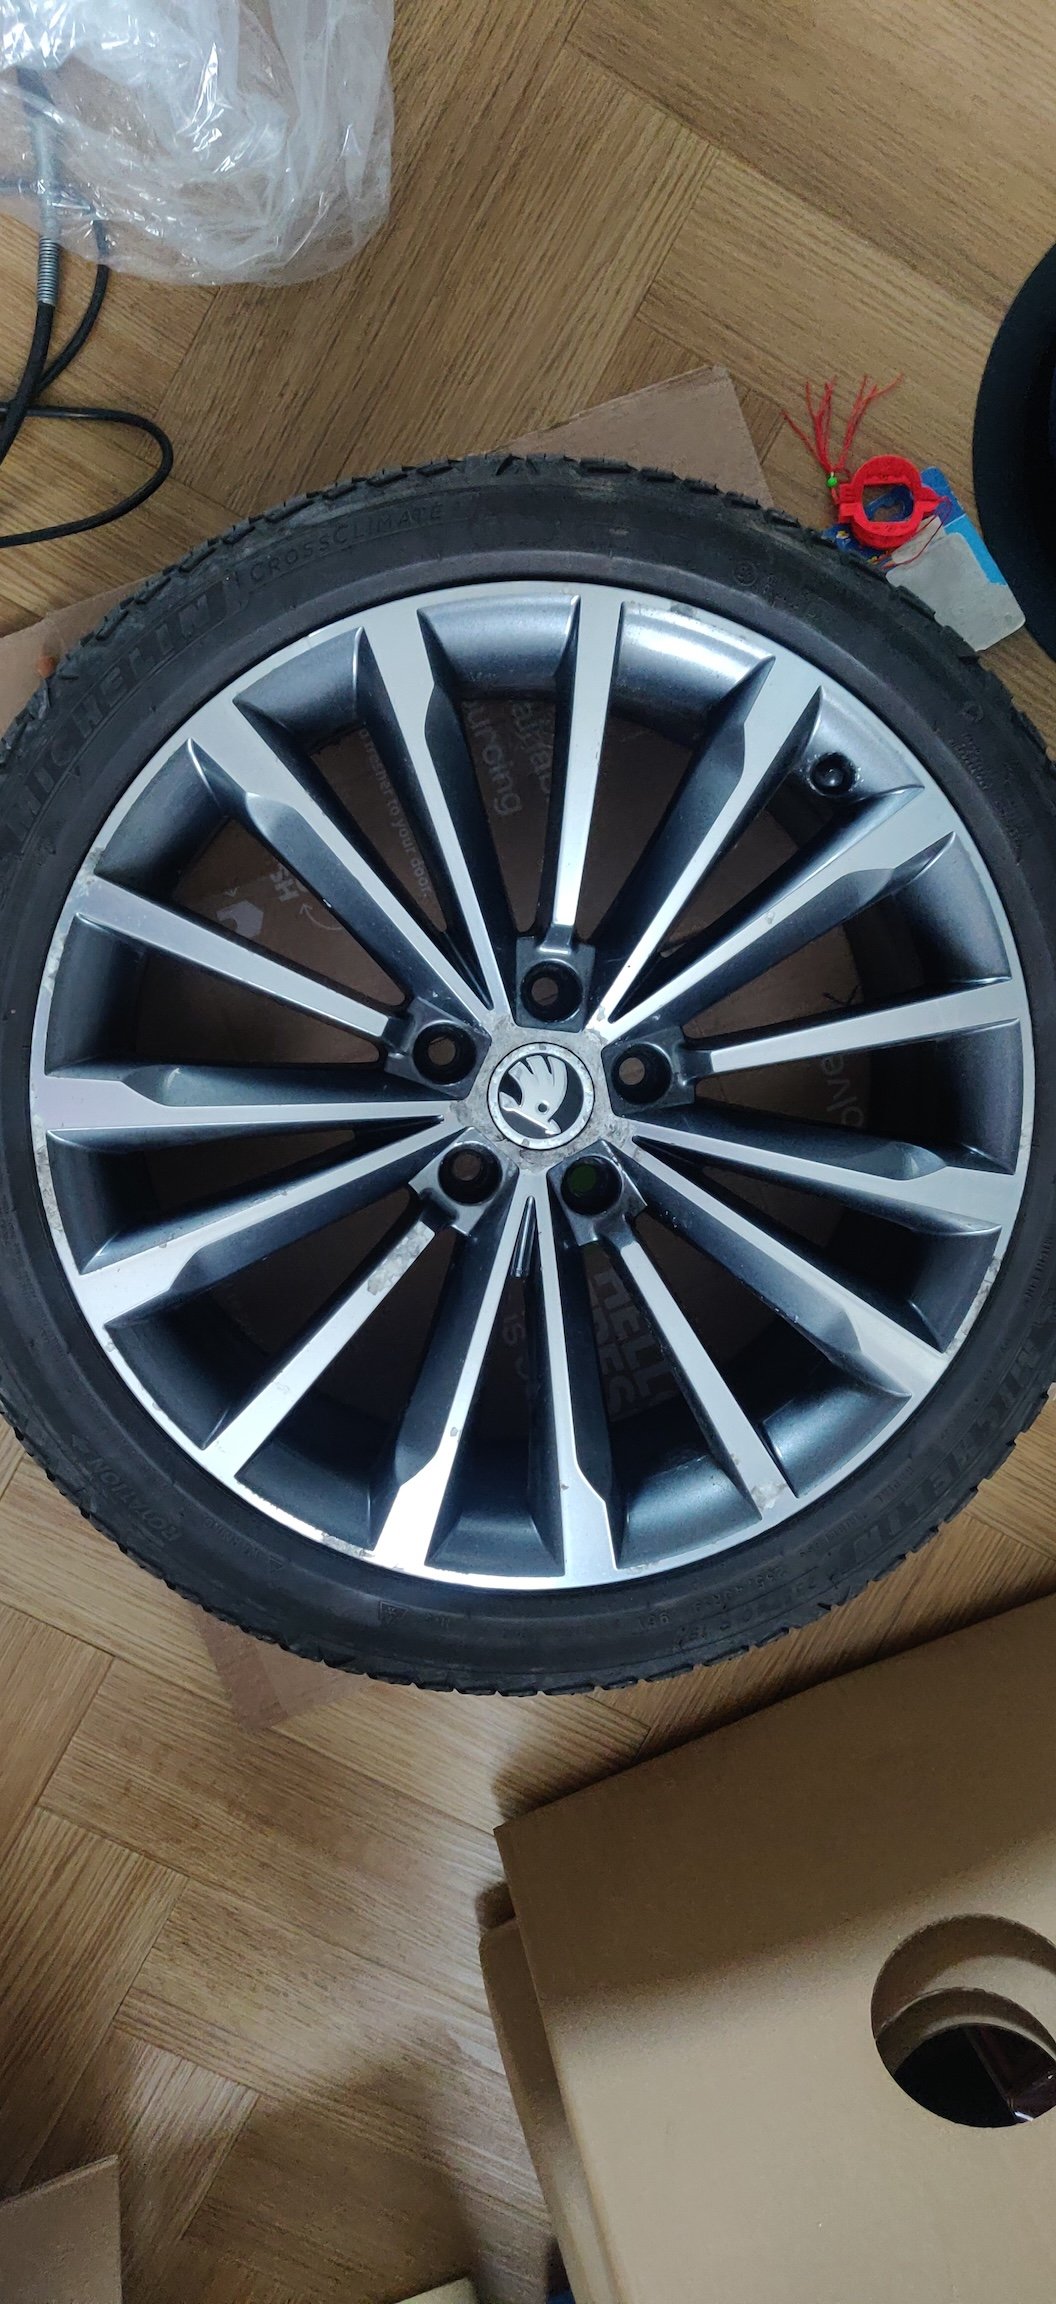
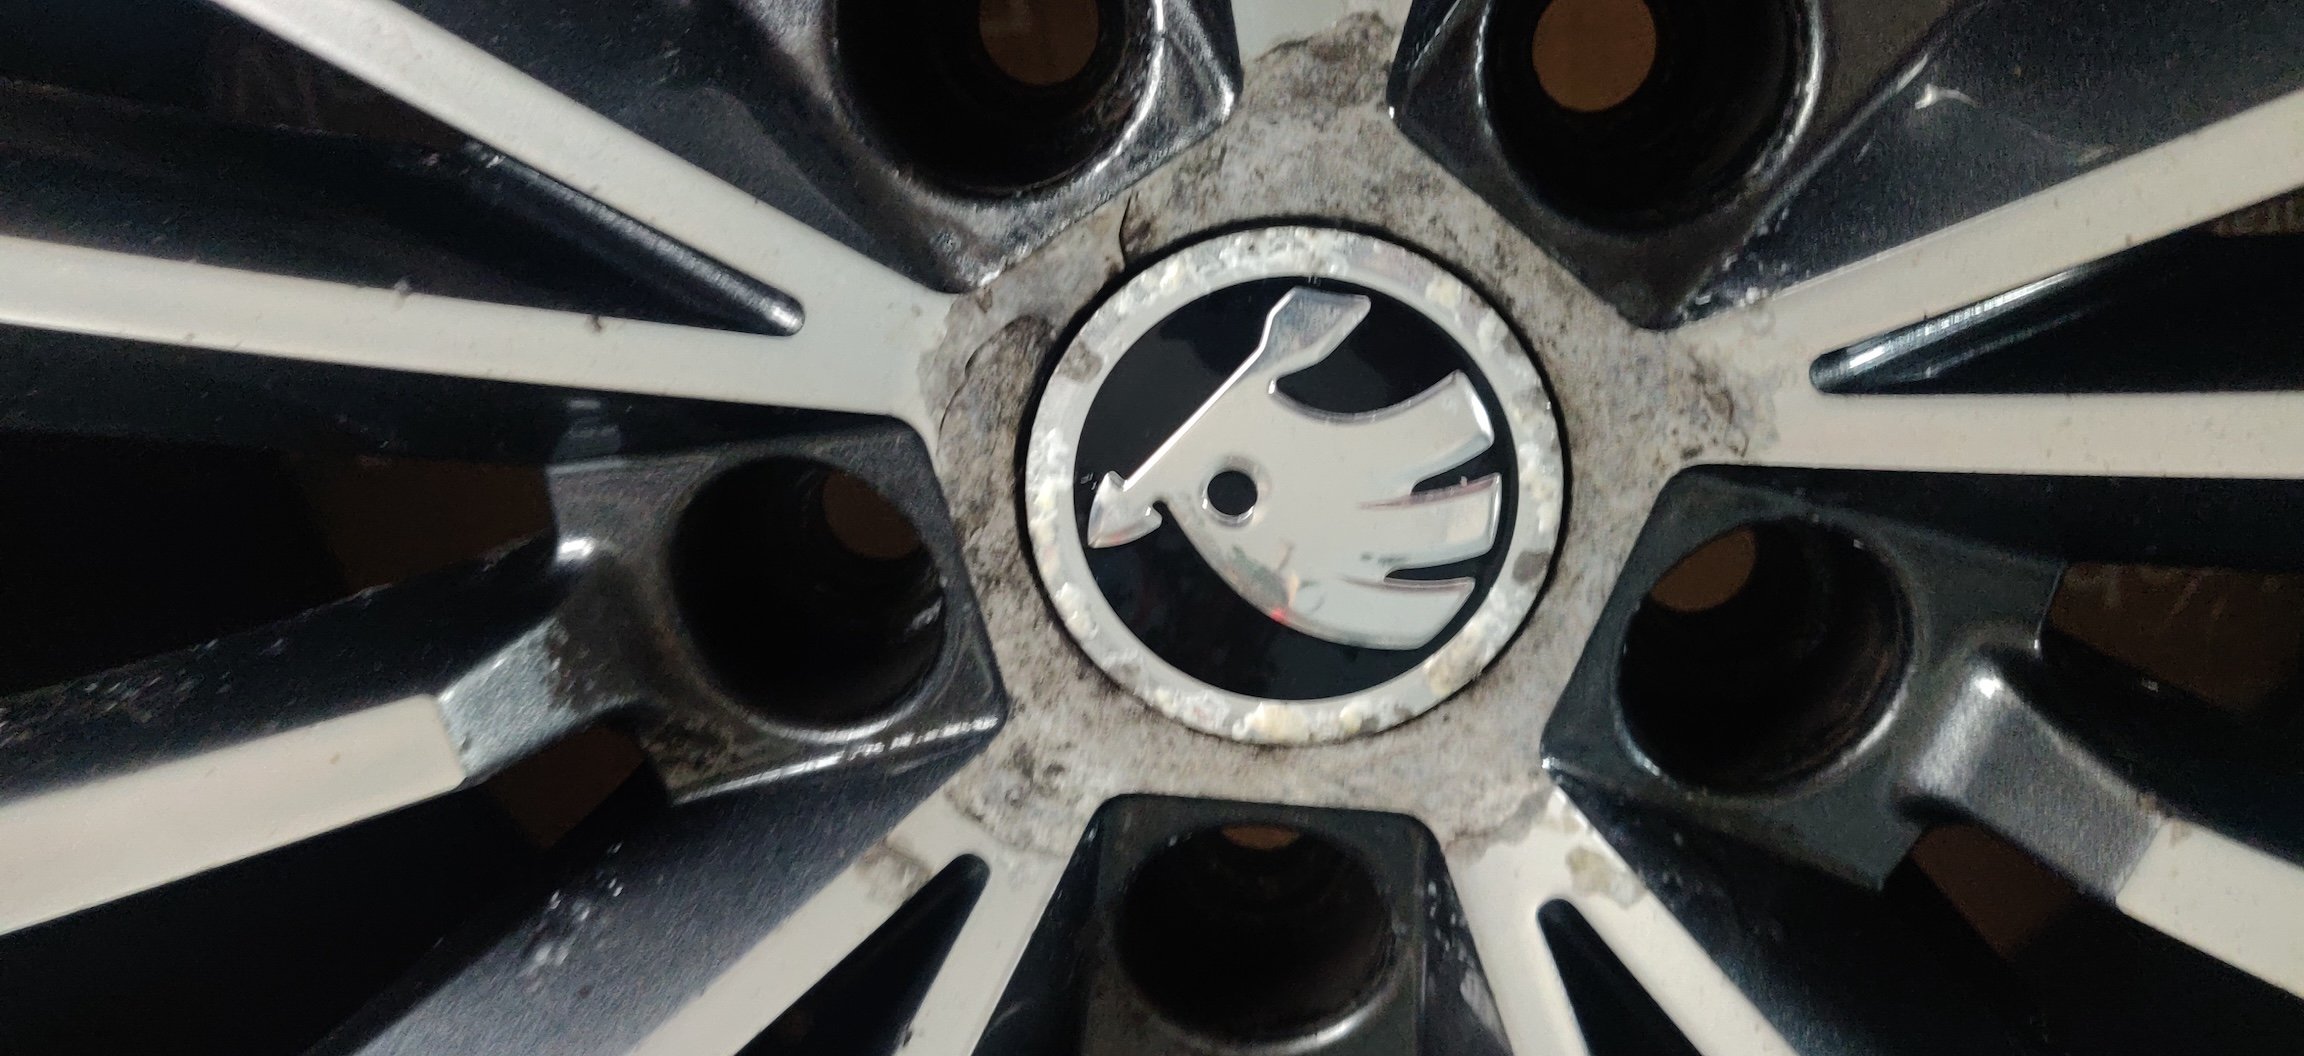
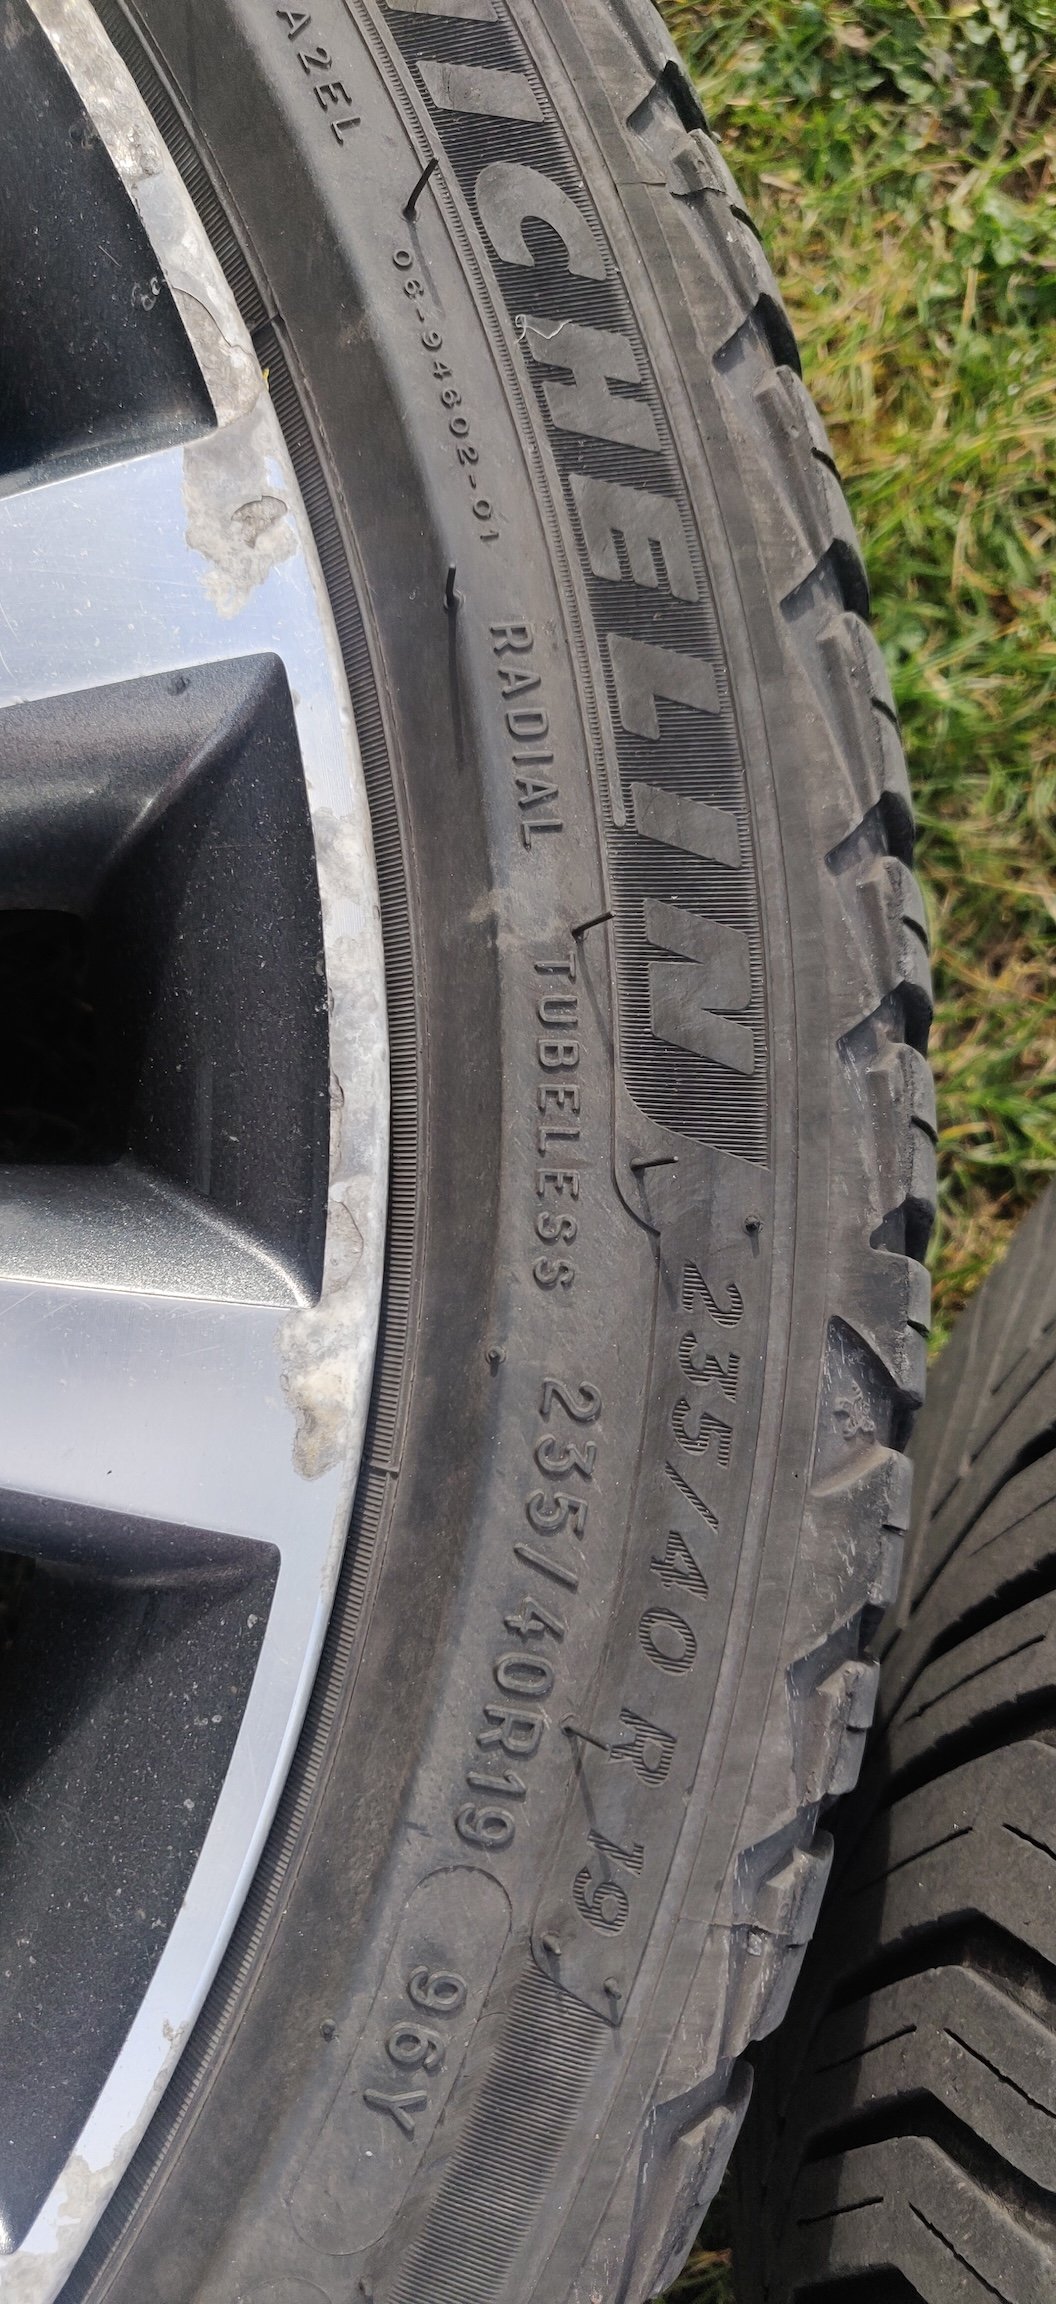
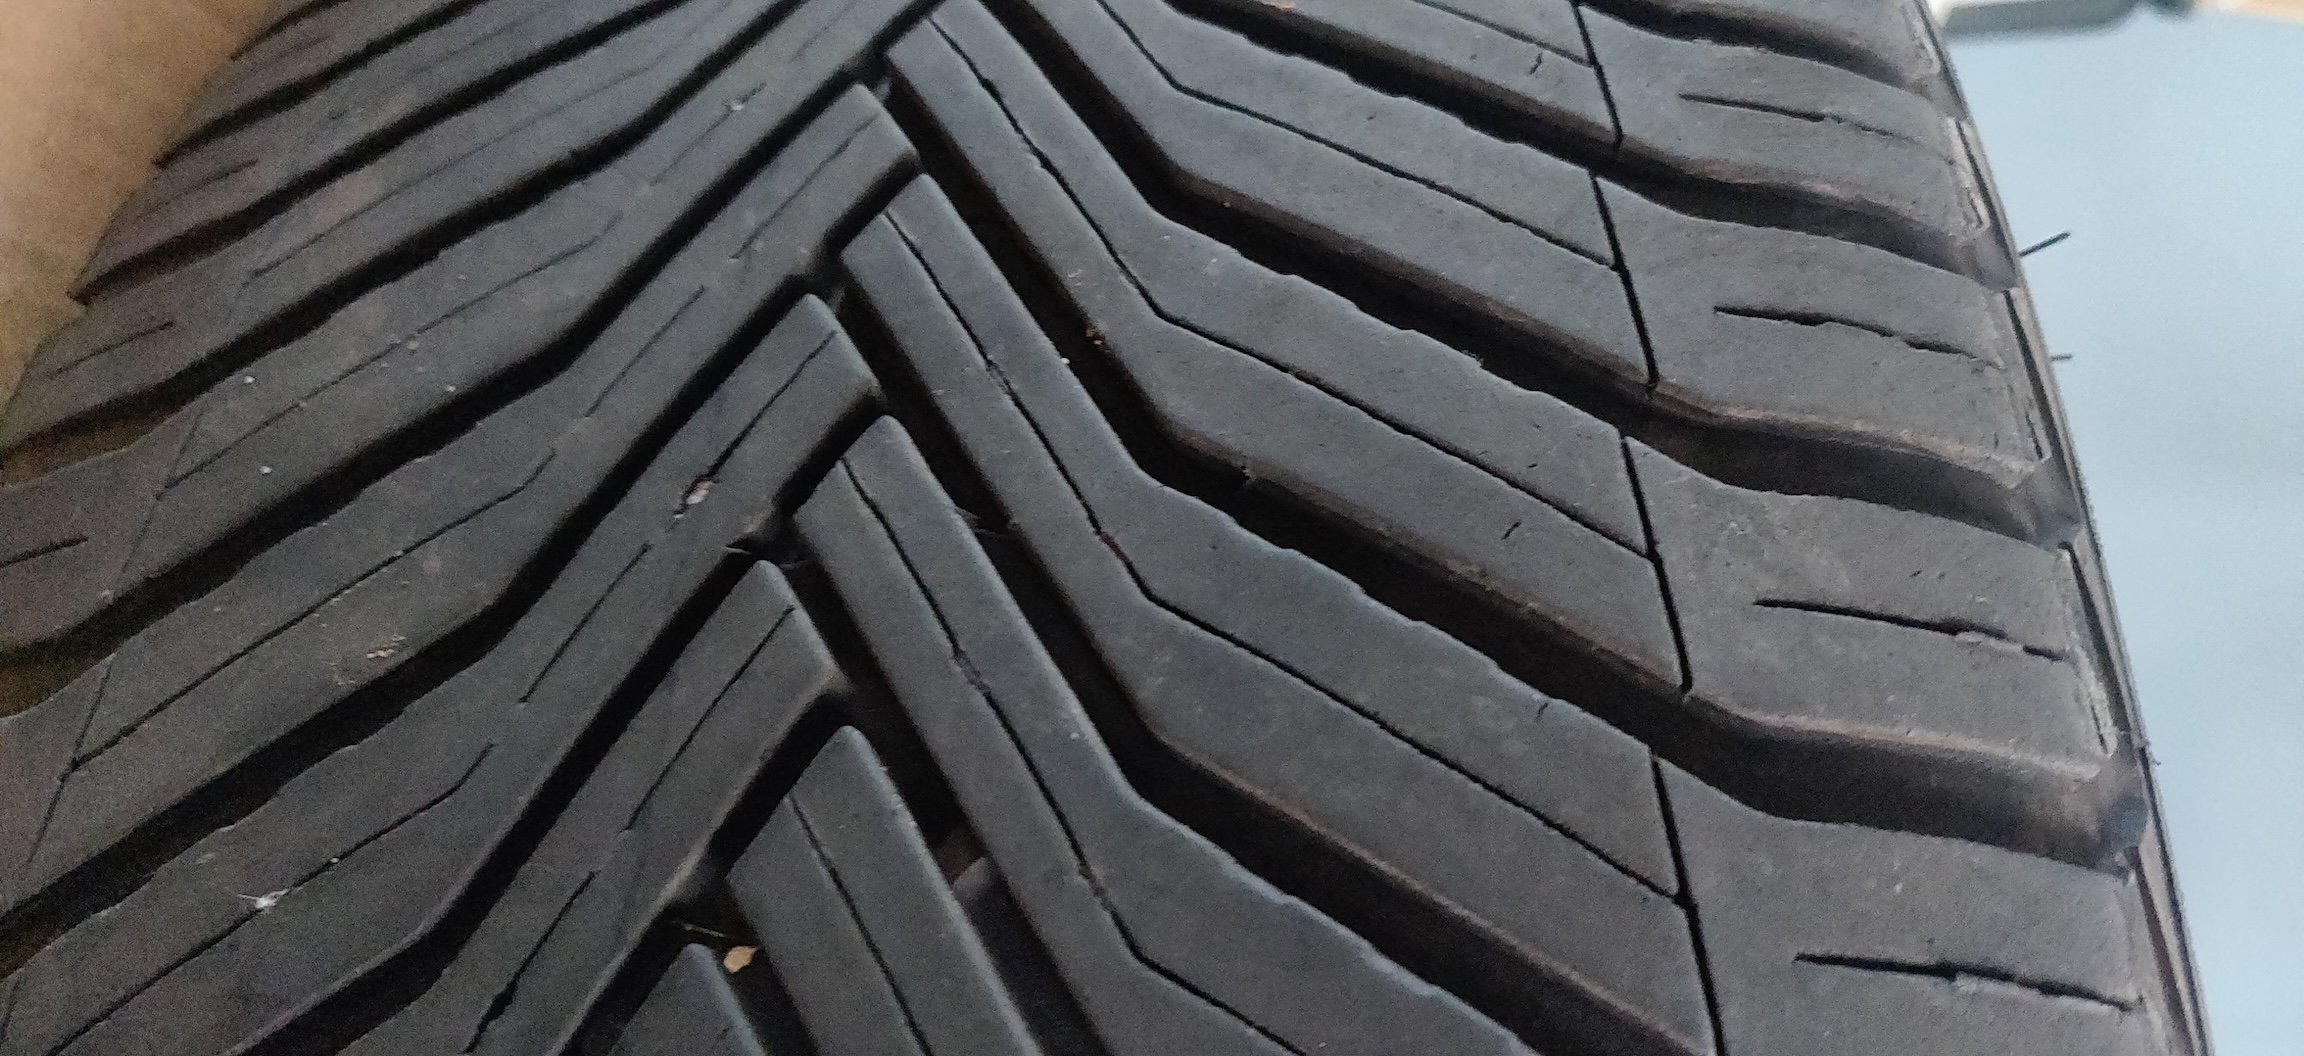
19" Trinity wheels with Michelin CrossClimate 2's Price: £200 Description: If anyone has been following my diary thread, these are the original wheels that have been replaced with 17" aftermarket ones. A set of 19" Trinity alloys from a Skoda Superb 2016 that has done 110k miles, with Michelin CrossClimate 2's that are over half worn. Condition: They almost certainly are original given the state of them. If I was to attempt to sell these up, the wheels don't seem out of round, and the tyres seem ok. The two biggest issues are that one wheel has a slow air leak, needing to be pumped up again every week or two. A tyre place attempted to find a leak in the tyre but couldn't, so remounted it which worked for a few months. This probably means its due to the corrosion around the rim of the wheel. The second is one of the bolt holes has damage marks. I genuinely can't remember if this was me, as it could be, I distinctly remember being in a situation where I needed two breaker bars and fire to get one of the wheel bolts loose. All the wheels have kerbing and corrosion around the rim, with some having bubbling deeper within the wheel. There's corrosion all around the centre caps, and general mankiness rear side and behind the cap. I've tried my best to clean them up, but there's only so much I can do. Tyres are Michelin CrossClimates, at the OEM 235/40/19 size. In general, it looks like most have inner wear, which probably tells me I should get the car's geometry looked at long term. Perhaps a couple more worn in the inner side than others, but I reckon they're good for 9-12 months. So the wheels could be used as is, but that would be a bit mad, they should be refurbished, hence what I think is a low asking price. The wheels are anthracite with a diamond cut finish, so I reckon that would probably be expensive if refurbed to original finish (assuming it can, depends how deep the cutting would be). This site https://fawheels.co.uk/prices suggests diamond cut set of 19" wheels would be £480, so that would be the ball park I guess. Collection from Rugby (CV23) massively preferred. I could probably deliver them if the distance is reasonable. I'm extremely loathed to want to ship almost 100kg of wheels with tyres!


-
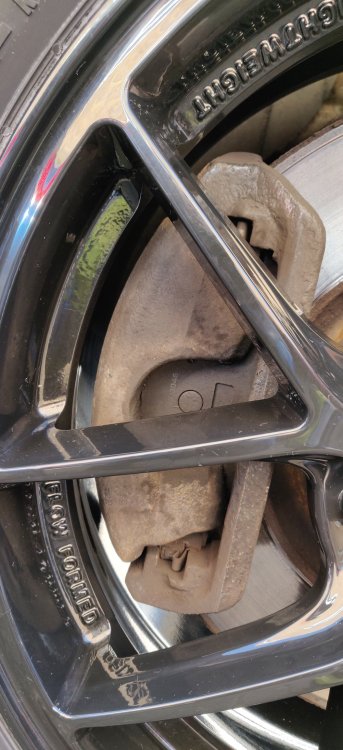
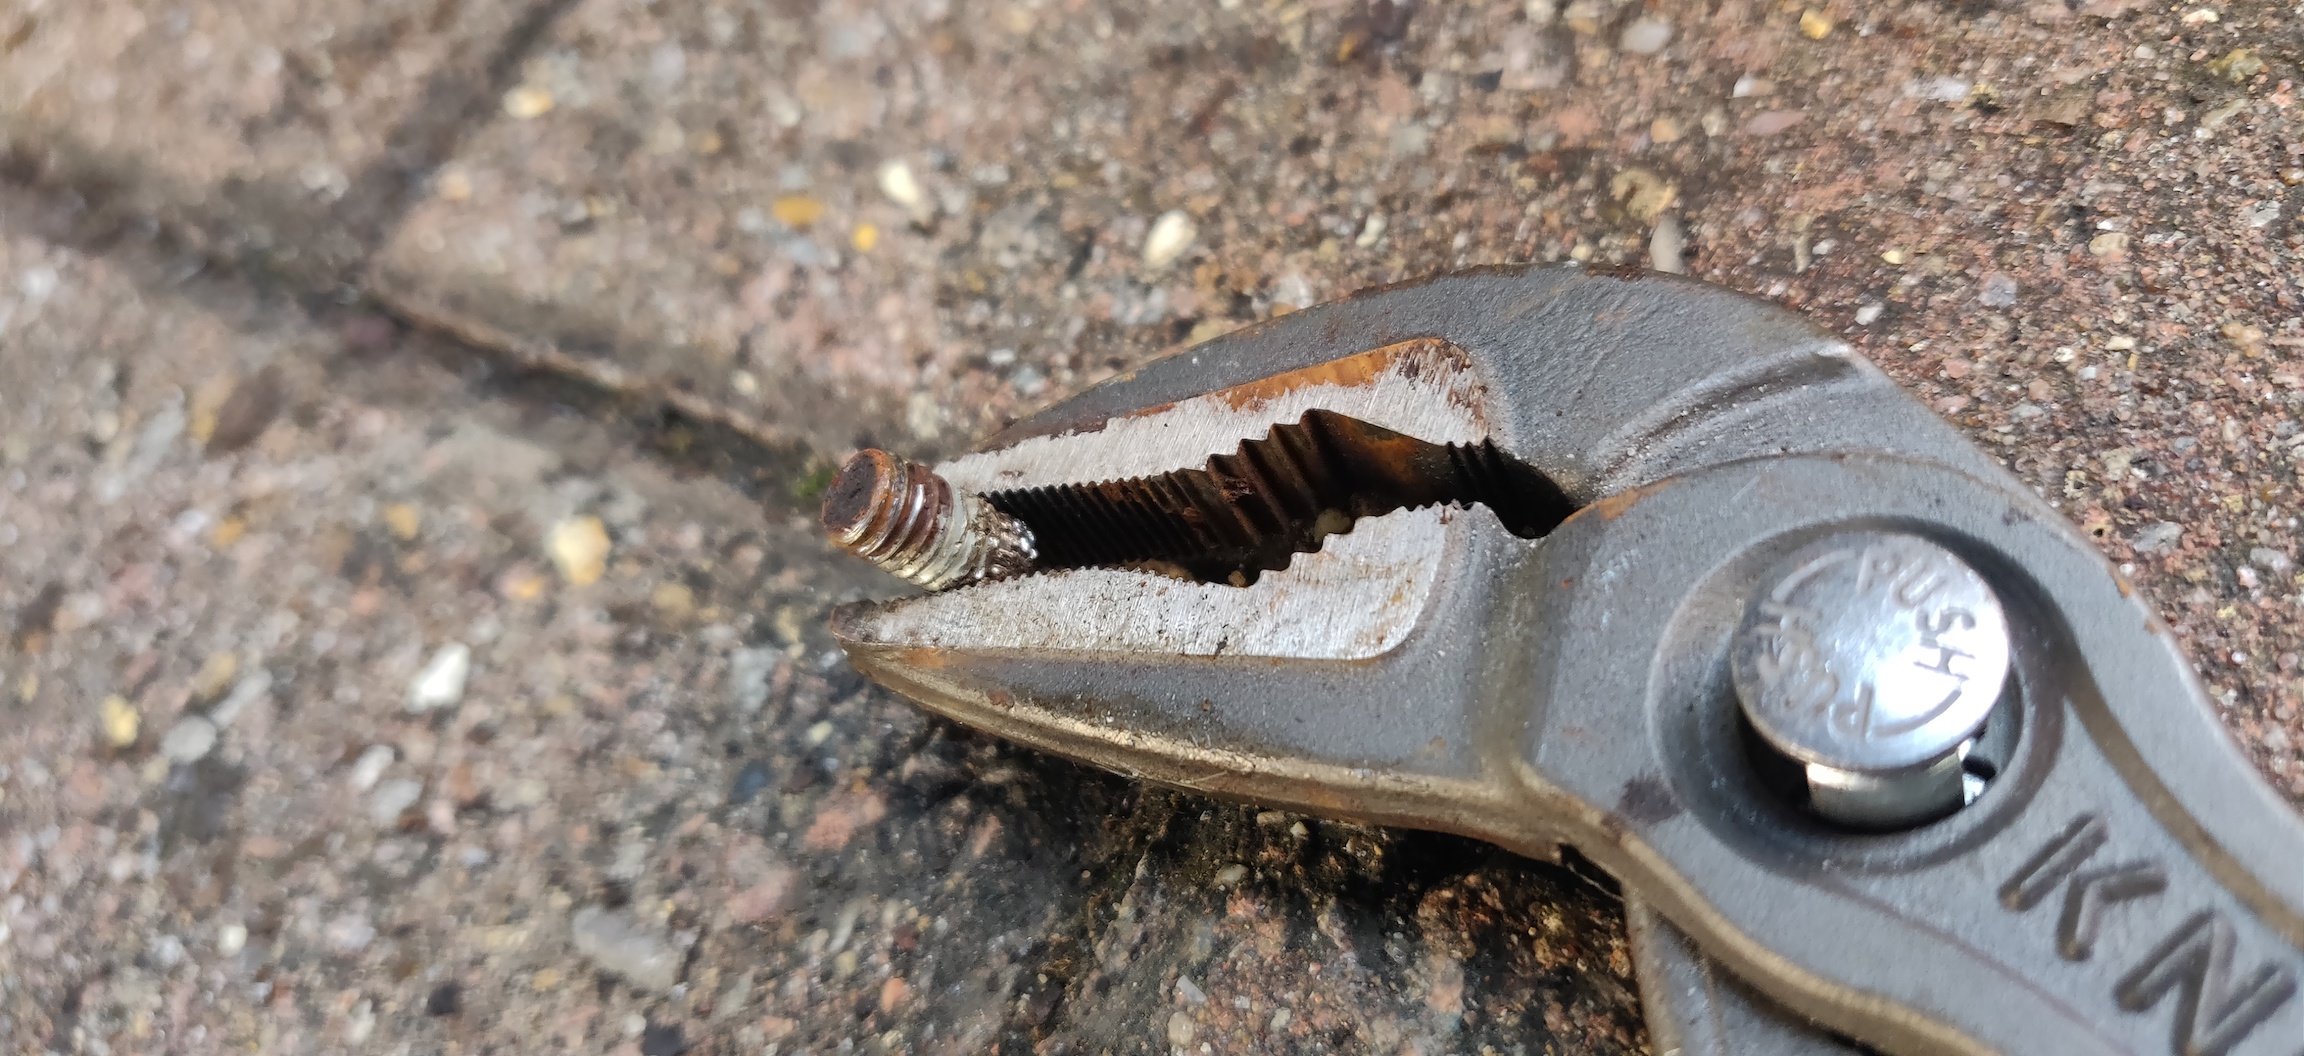
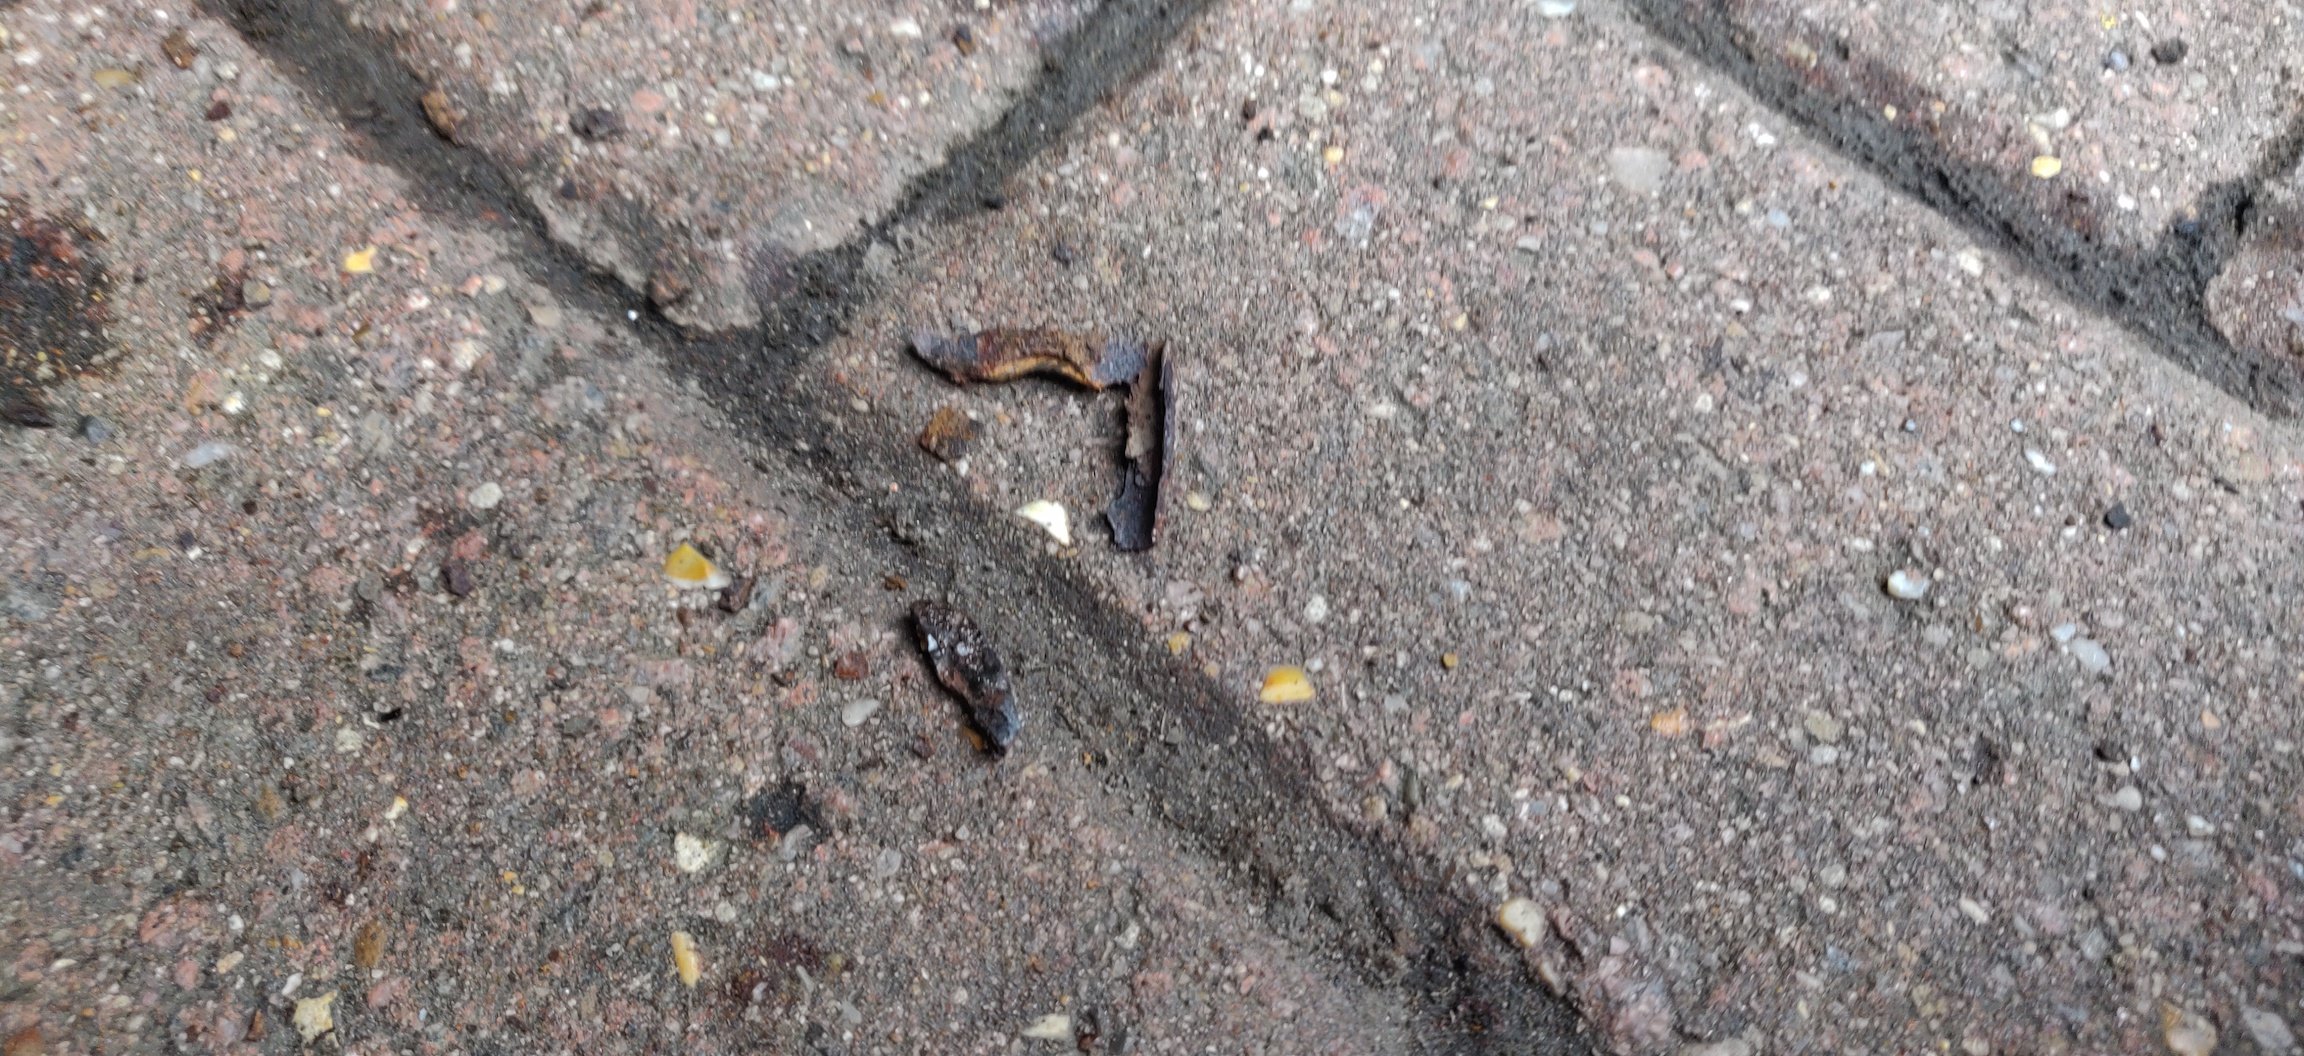
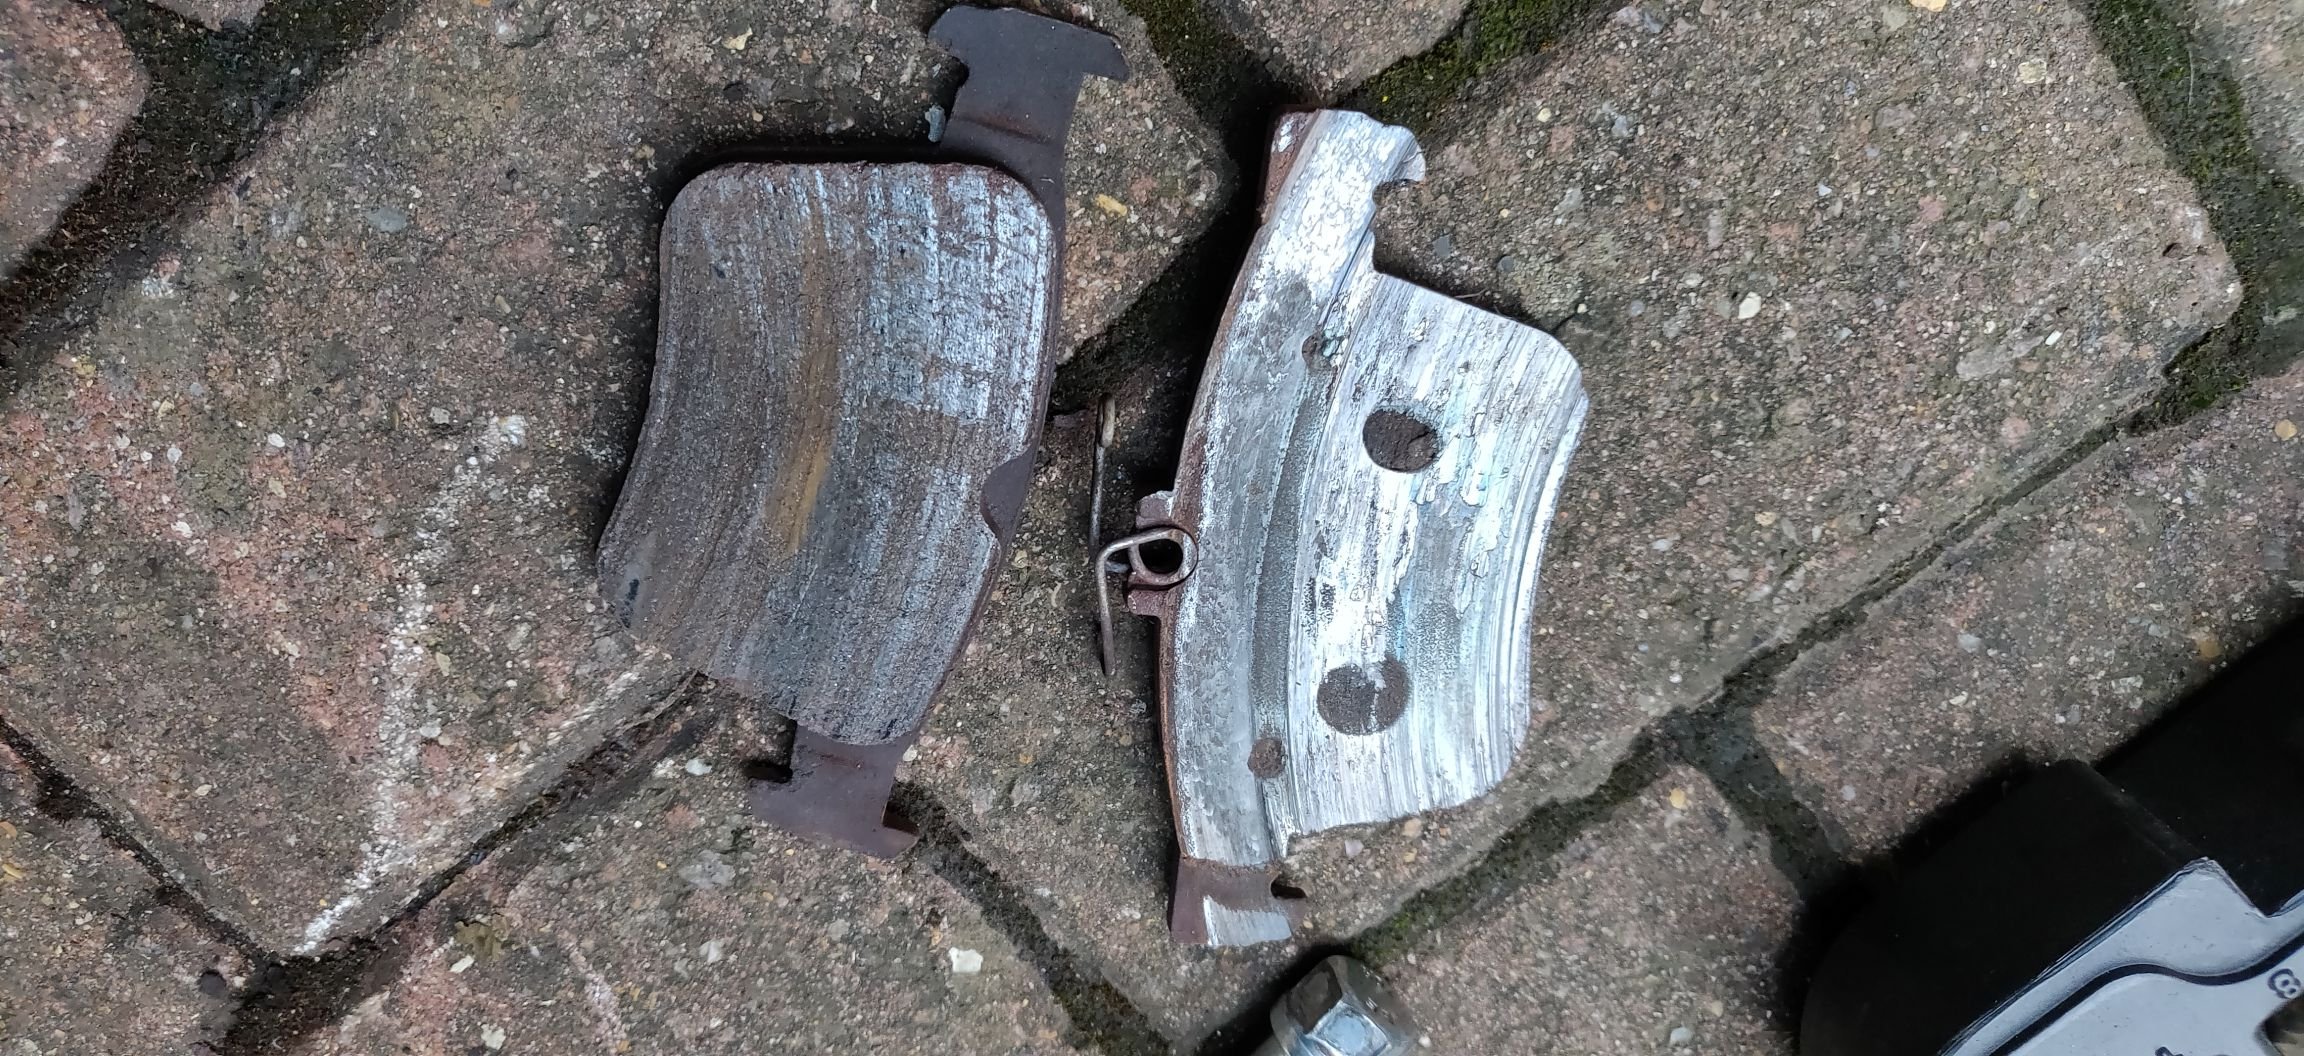
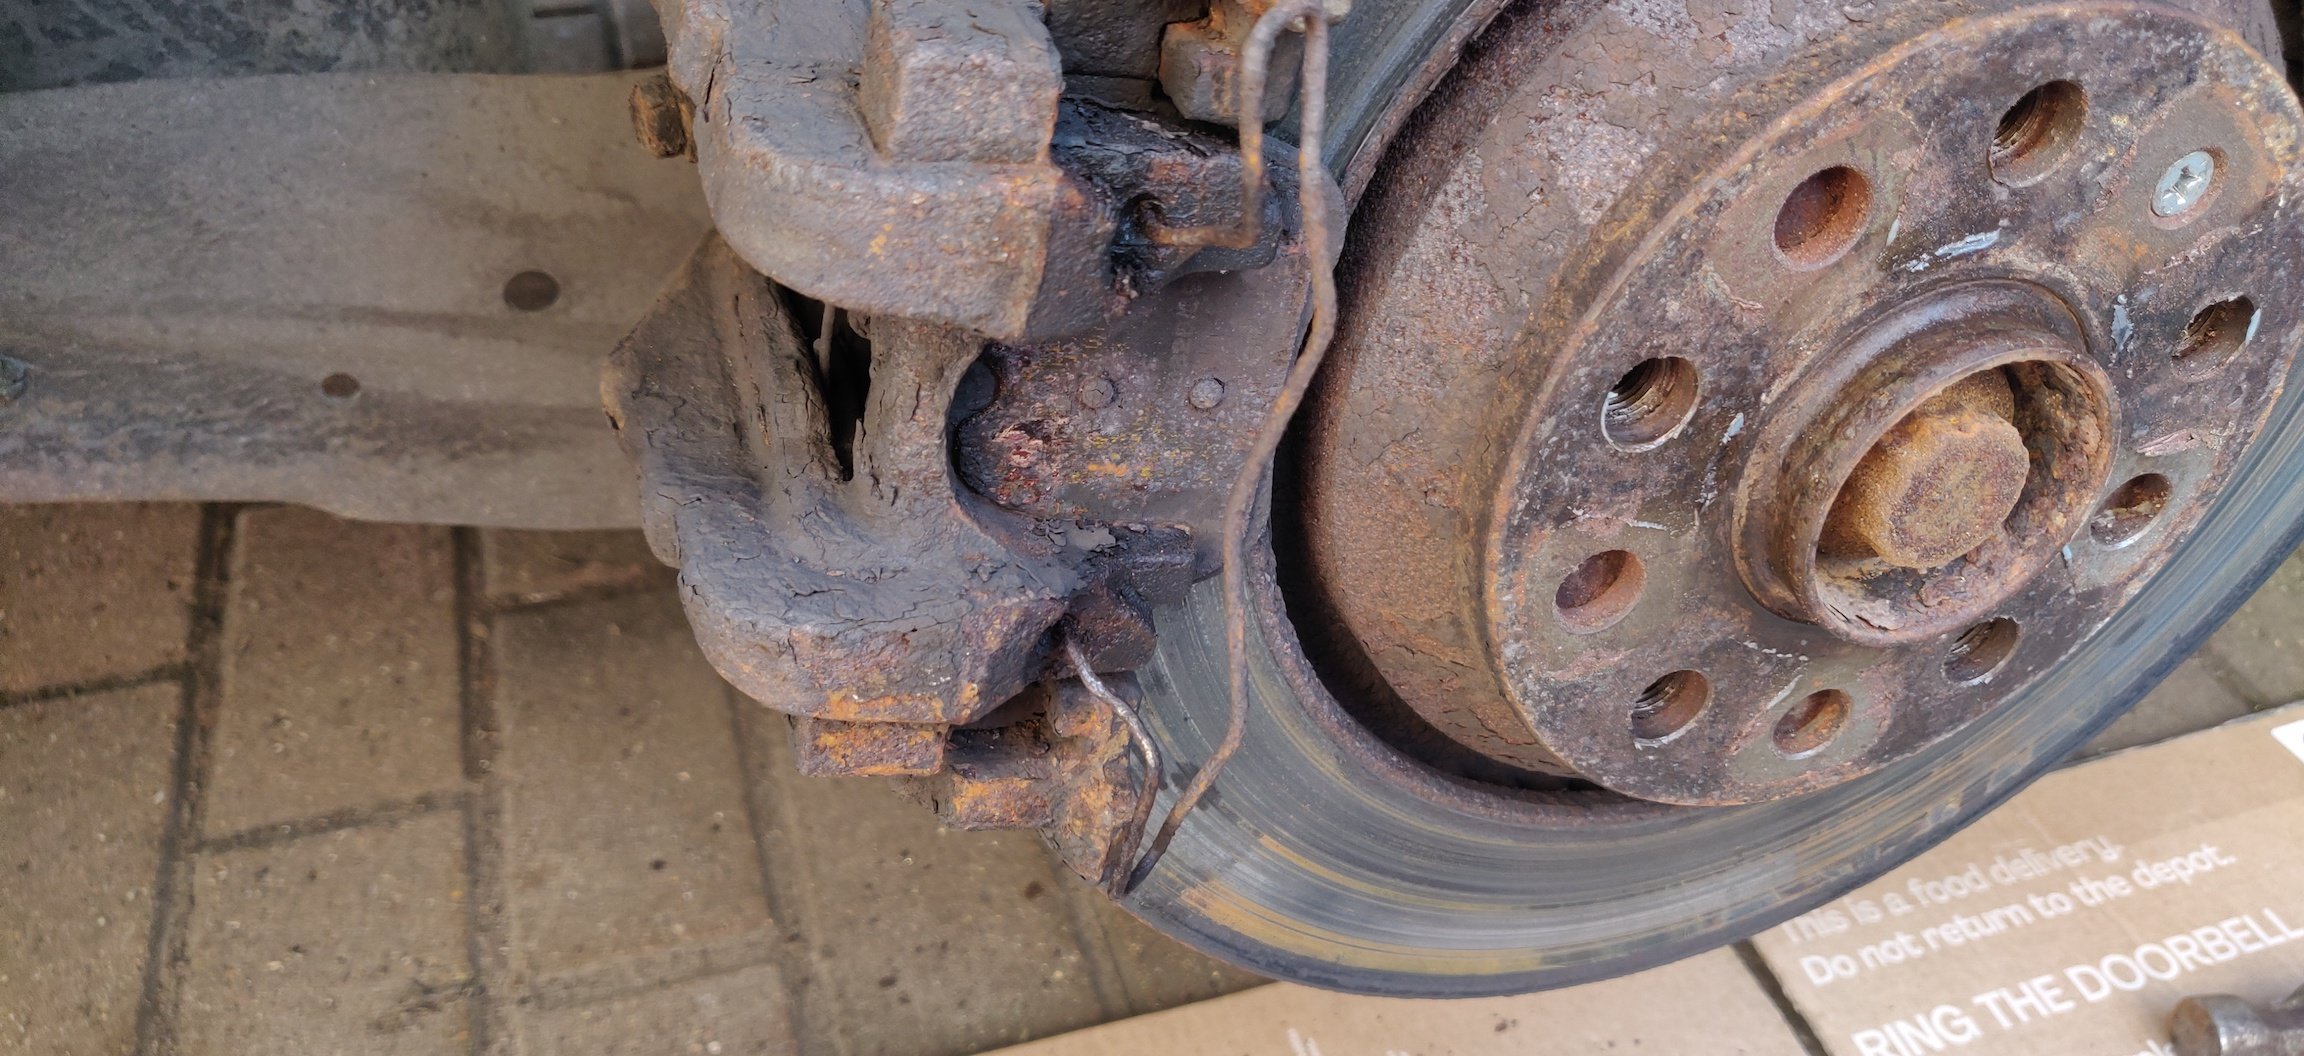
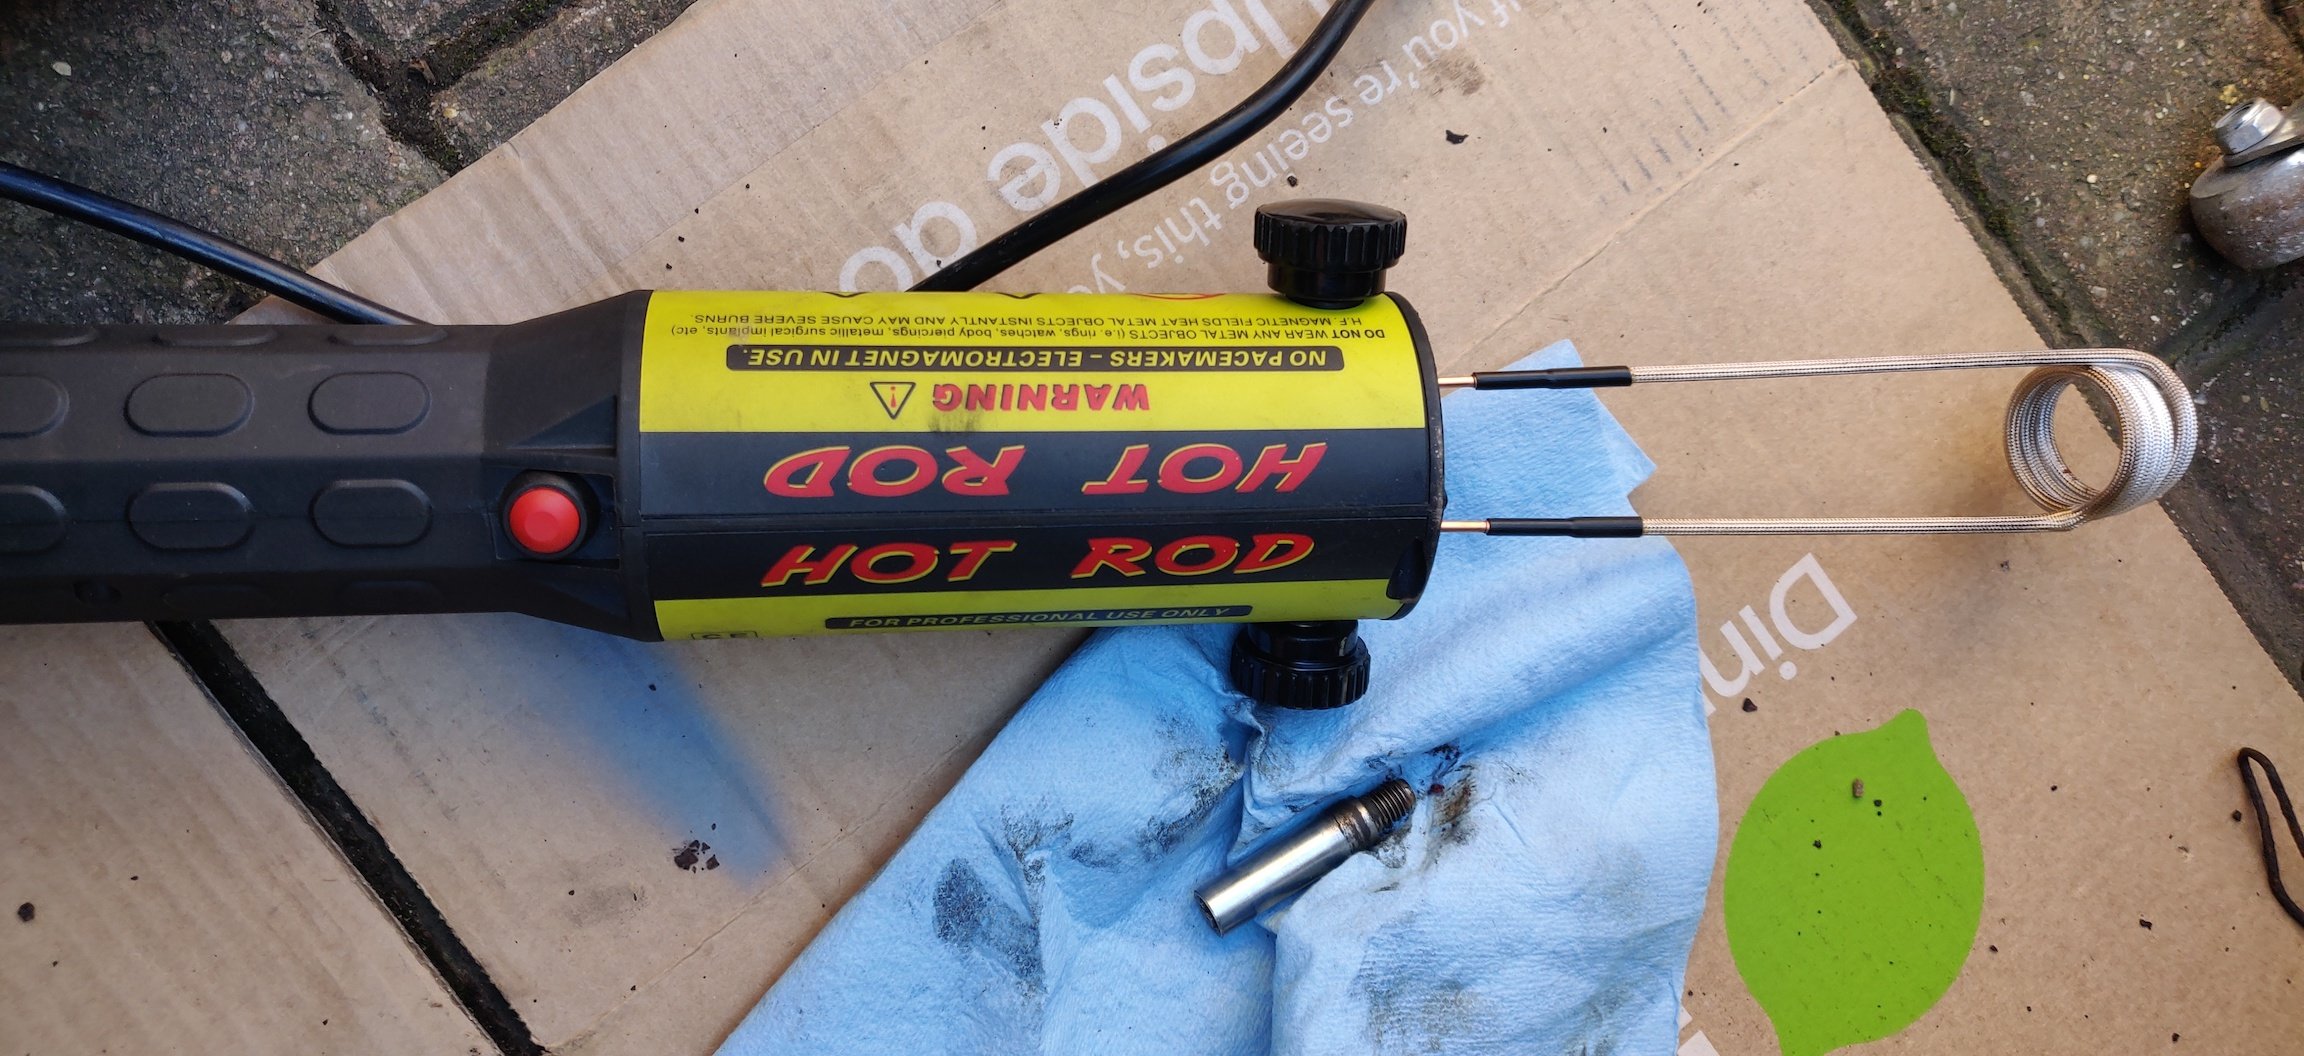
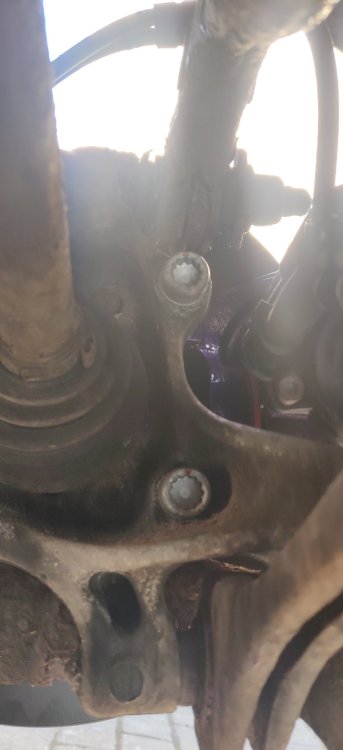
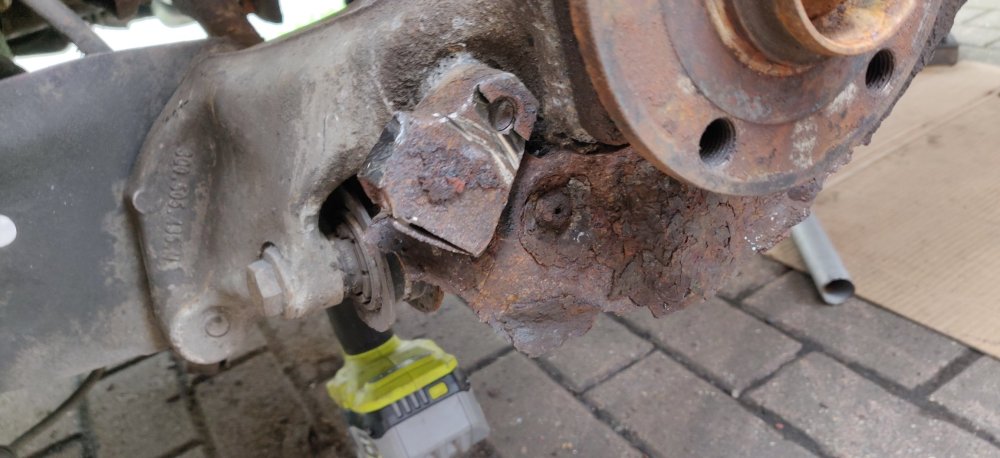
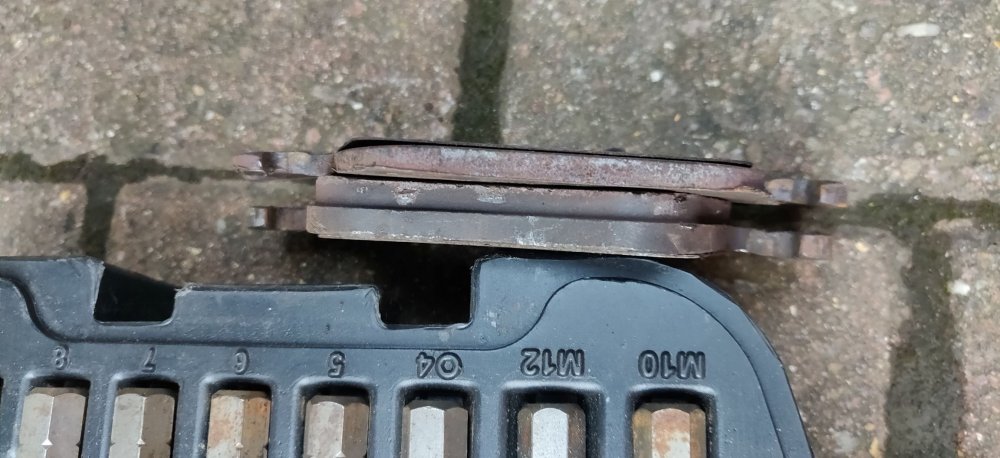
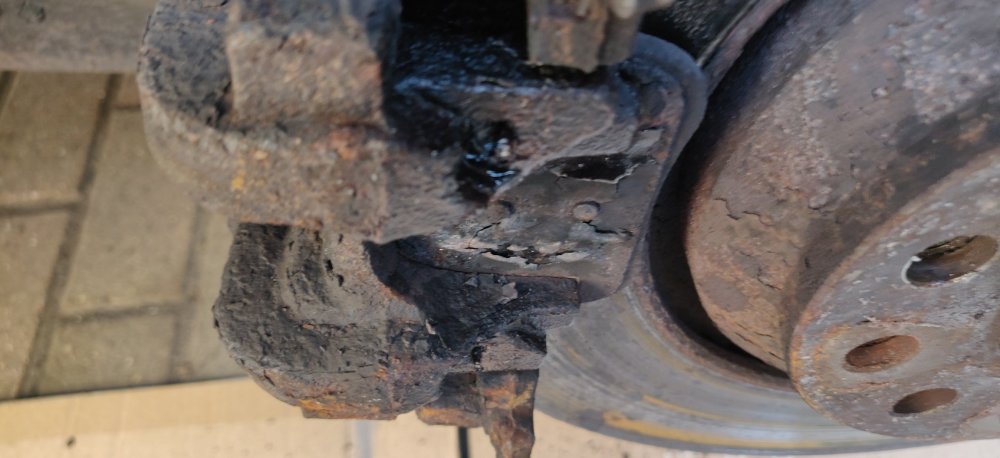
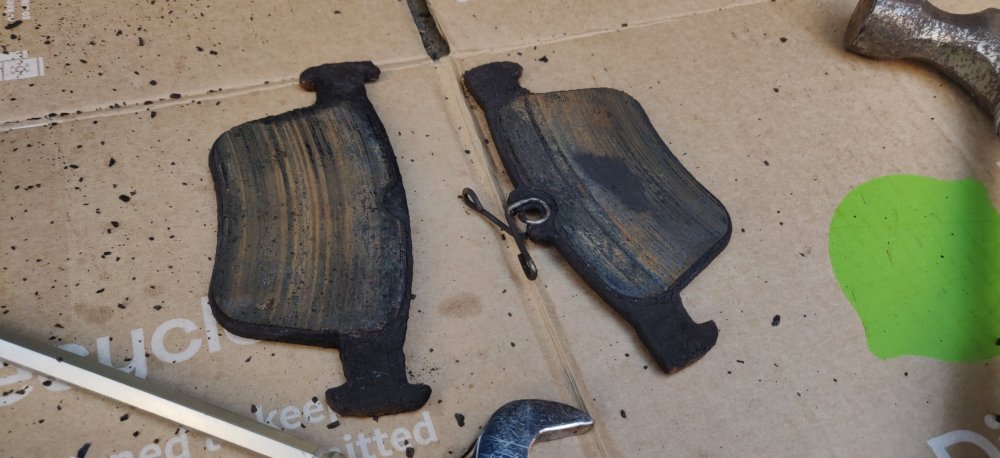
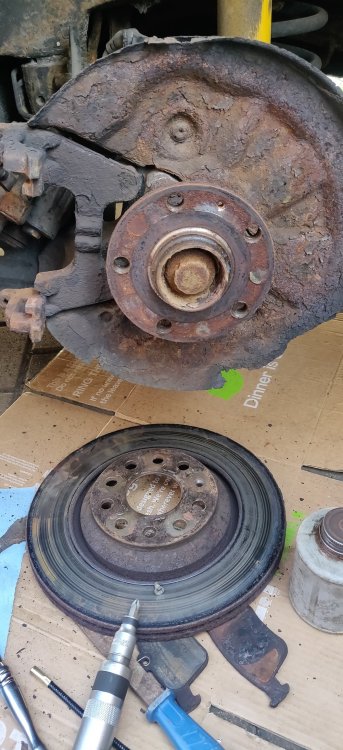
Hope everyone enjoyed the weekend sunny weather! My Sunday did not go as smoothly sadly... As mentioned in the previous post, the rear left caliper was sticking, so the task today was to disassemble bits to clean up and regrease, with the hope that would be sufficient. Of course, with this car, it was anything but. So after reminding myself how to use VCDS, got some wheel chocks on the front and disengaged the parking brakes. I think it was in the ABS module, and something like "start brake lining replacement" or somesuch. Then some whirring of the handbrake mechanisms and ready to start. After jacking the car up and removing the wheel, the first step involves removing the retaining clip holding the outer pads: So of course, something I've never seen before happens, where the clip is seized into the caliper: Thus snaps off leaving some remains in the caliper after attempts to persuade it out with pry bars and pliers and whatnot. This was probably the sign to stop and just leave it. Tackle them a bit later. For now, just remove the slide pins (a 7mm hex behind the plastic covers), then a pry bar and light hammner taps to free the caliper. Set the caliper aside hanging off the suspension arm, then removed pads: Or rather, what remains of it. I suppose there's about 0.5mm of friction material left, so no big surprise that the caliper was probably at its end and years of crud keeping things stuck. At this stage I put the caliper back on with the pins, to try and tackle the remains of the clips in the caliper. Wife was in China a few weeks back, and I asked her very nicely to procure me one of these: It's essentially some funky induction heater which allows a concentrated heat to be applied to whatever is within the coils. The particular coil attachment was large enough to slide on the end of the caliper, where the clip remains are. So got them glowing red, then some plus gas, then some Knipex pliers on the remains with some twisting, swearing and praying. The top came free, but the bottom needed some additional convicing with a hammer and chisel, and then eventually just went at it with a drill: Not ideal, but I was starting to get extremely miffed. This did mean that at the least, if I wanted to replace the pads, I could do so. It being a Sunday, the only local source for car bits I was aware of was Euro Car Parts, which fortunately had a cheap enough set of pads plus the retaining clips, so spent the 25 minutes drive there and back to get them: Did not want any fancy pads for reasons I will explain in a later post! Parts came to £27.58, I guess via eBay might have squeezed a fiver saving, but wanted to get this done today. At this stage, didn't take any more detailed pics, because there must be loads of pad replacement guides online. The new pads were stiff along the pad carriers, so attacked the carrier with a file. However, with the brake disc in the way, made tackling the inside a bit of a faff. So decided to attempt to tackle removal of the brake disc: Which amusingly decided to not be anywhere near the drama I anticipated. I have an impact driver tool from Halfords from years ago which was specifically for those retaining screws for the brake disc. The rear left had a cross head, so firstly, got some fire on the screw for about 30 seconds, then hammered at it with the impact driver. A relief once I saw the screw rotate slightly. The brake disc itself can be wiggled to free it from the pad carrier, which is a huge relief. This allowed for easy access to the carrier to continue filing away the years of crud. So once cleaned up, copper grease on the contact areas and then checks to ensure the pads slide nice and smoothly. Then the caliper guide pins were given a quick clean and dabs of silicone grease, sliding them through the caliper with grease a few times to loosen them. The caliper piston can then be retracted. I suppose one benefit of the electronic handbrake is that the piston can be wound back with a standard retracting tool. The tool itself pushed the caliper back in nice and smoothly, so the caliper itself doesn't seem seized. Then some anti squeal paste on the piston and the contact points on the outer pad: Then just finish it up. The new clip needed some persuasion to get fitted, and to be honest, the bottom appears to not be snugly in, which I can't help but feel it means it's going to fly off. Anyways, I'll revisit it later. So decided with that done, to do the other side, which is generally good practice: So of course, the clip on this side suffers the same seizing as the other. Unfortunately, whilst the top seized part was removed without drama, the bottom was resolute, and this time, bits came off the remains in such a way that there was no more leverage. Attempted at this point to drill out the remains, which basically left 3 drill bits in pieces. Fuming, I decided to just carry on with the pad replacement: So there's the new pads and the shot of the bottom supposed hole where the clip would go. Genuinely amazing. So at this stage, I either: a) Leave it, don't care, it should be an anti rattle clip, so this just means rattles. b) Persist with drilling somewhere around there with new bits. I'll order some new bits as I have other cars which need broken bolt remains drilling out. Went back into the car, pressed the brake pedal a few times to push out the caliper pistons, then used VCDS to reinstate the hand brake mechanism. Frustrating for what should have been a simple task, but I guess the car at least is usable for now. It's actually really frustrating for other reasons, which I'll reveal at a later date. Trying to look at the positives, at least the calipers themselves weren't seized, and hopefully, now with dollops of copper grease on the brake disc retaining screw, means future rear brake disc replacements won't be a drama. Maintenance: £2397.80 (+£27.58) Upgrades: £2994.25 Miscellaneous: £820.07


-
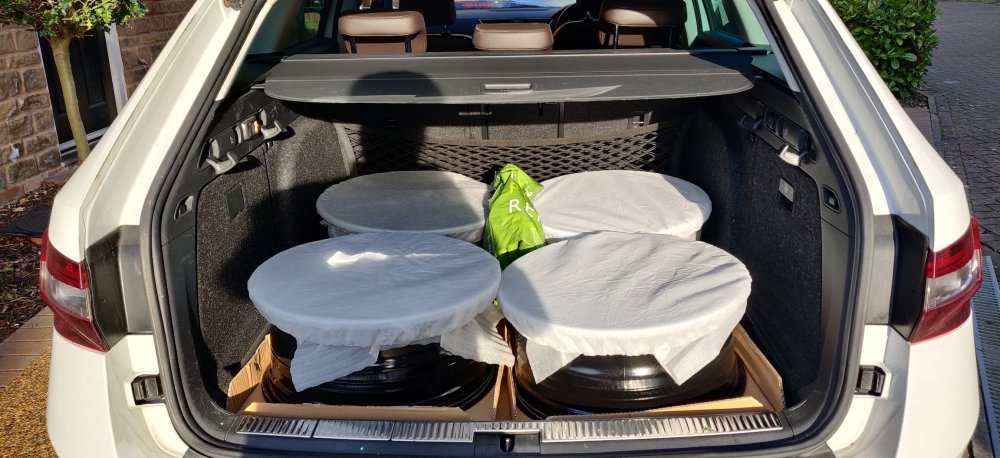
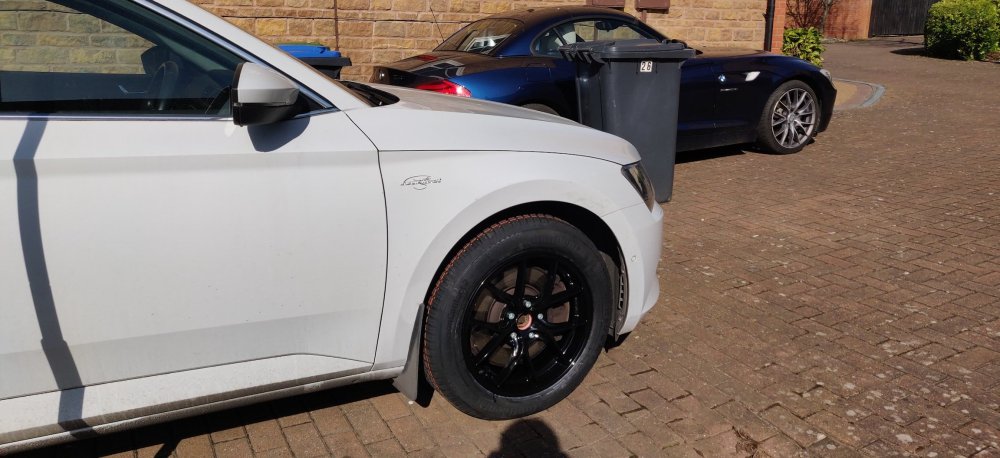
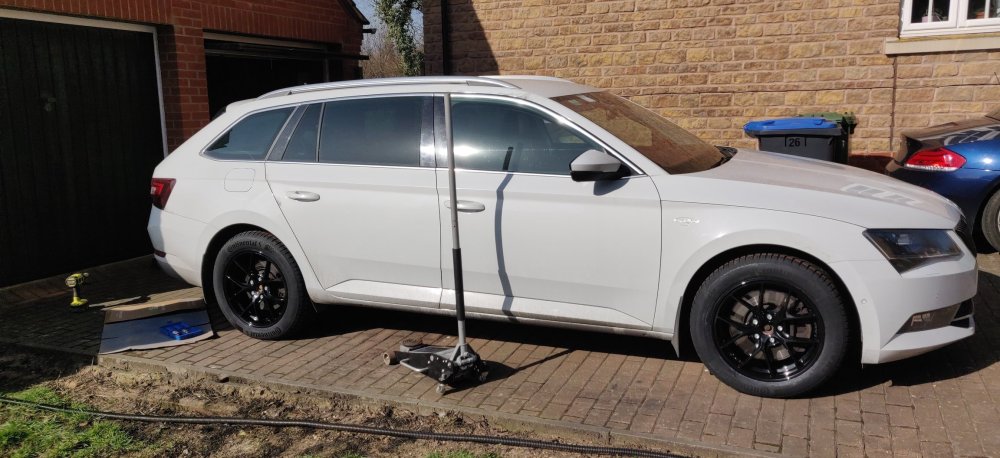
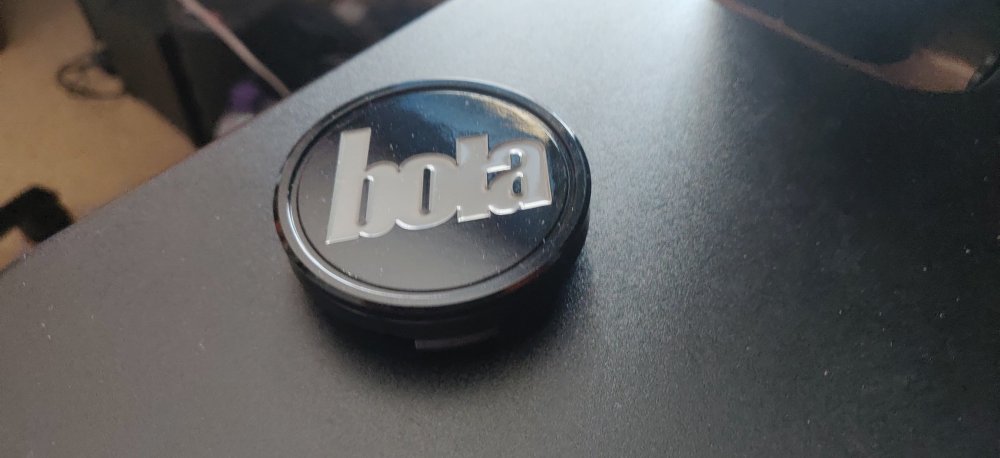
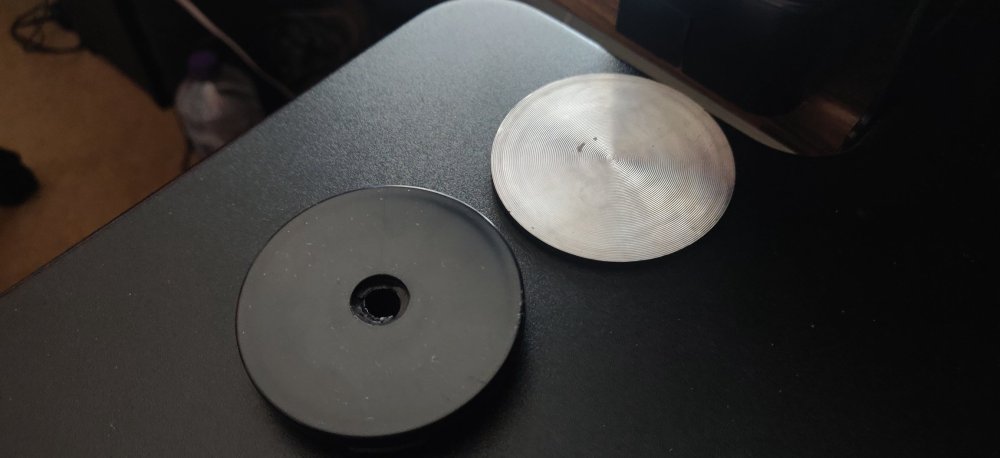
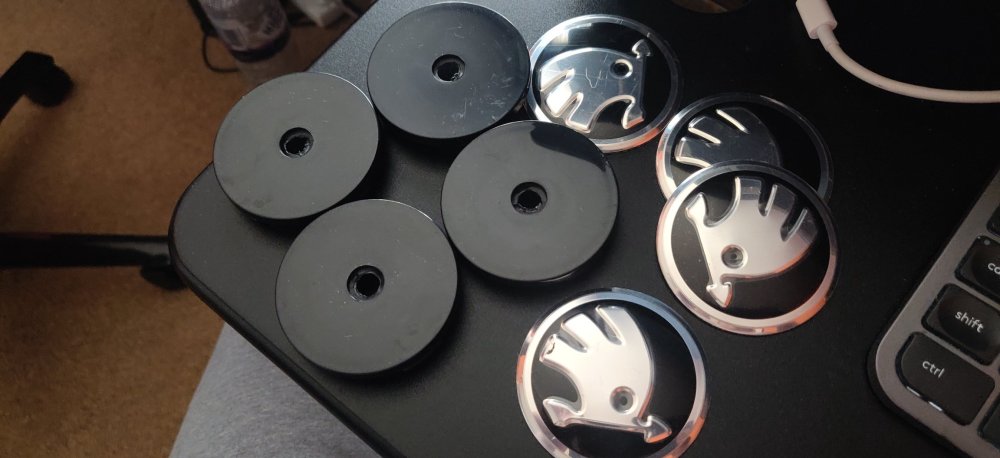
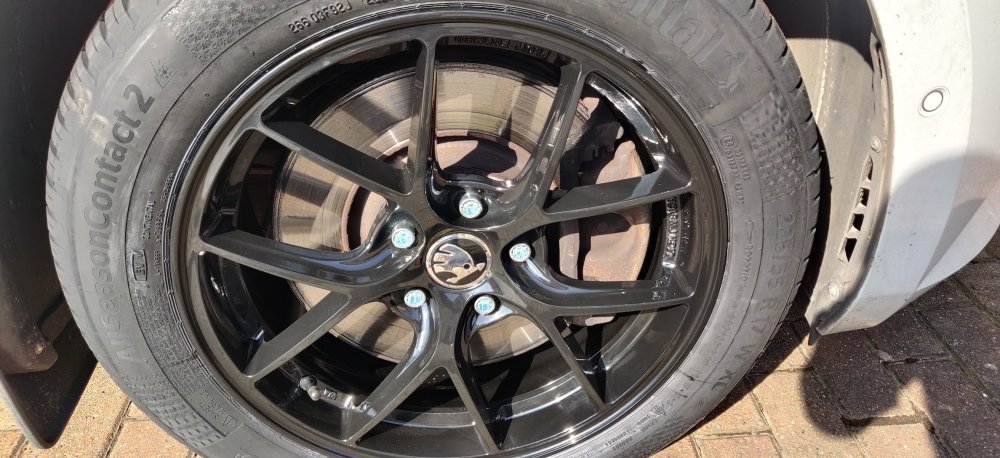
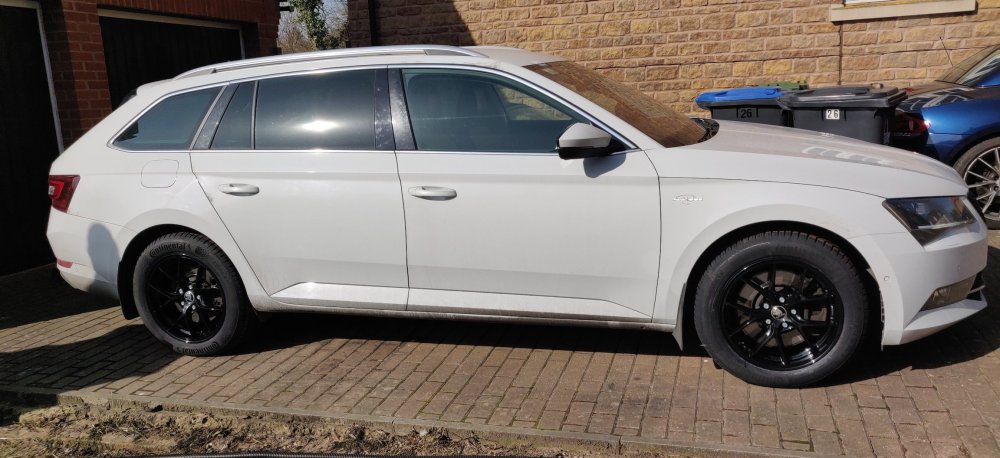
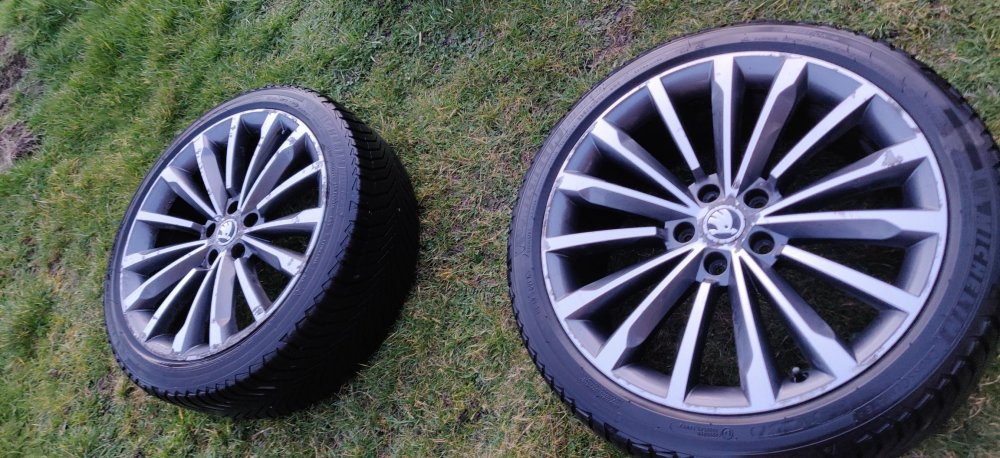
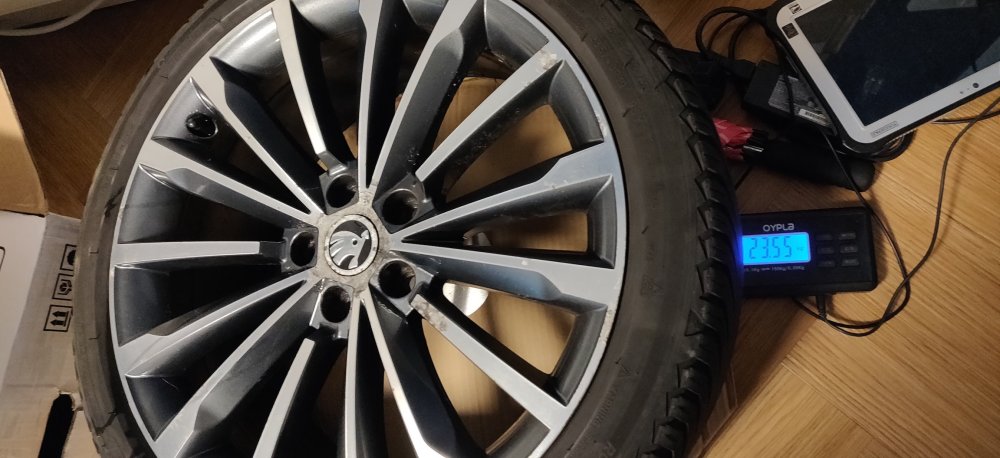
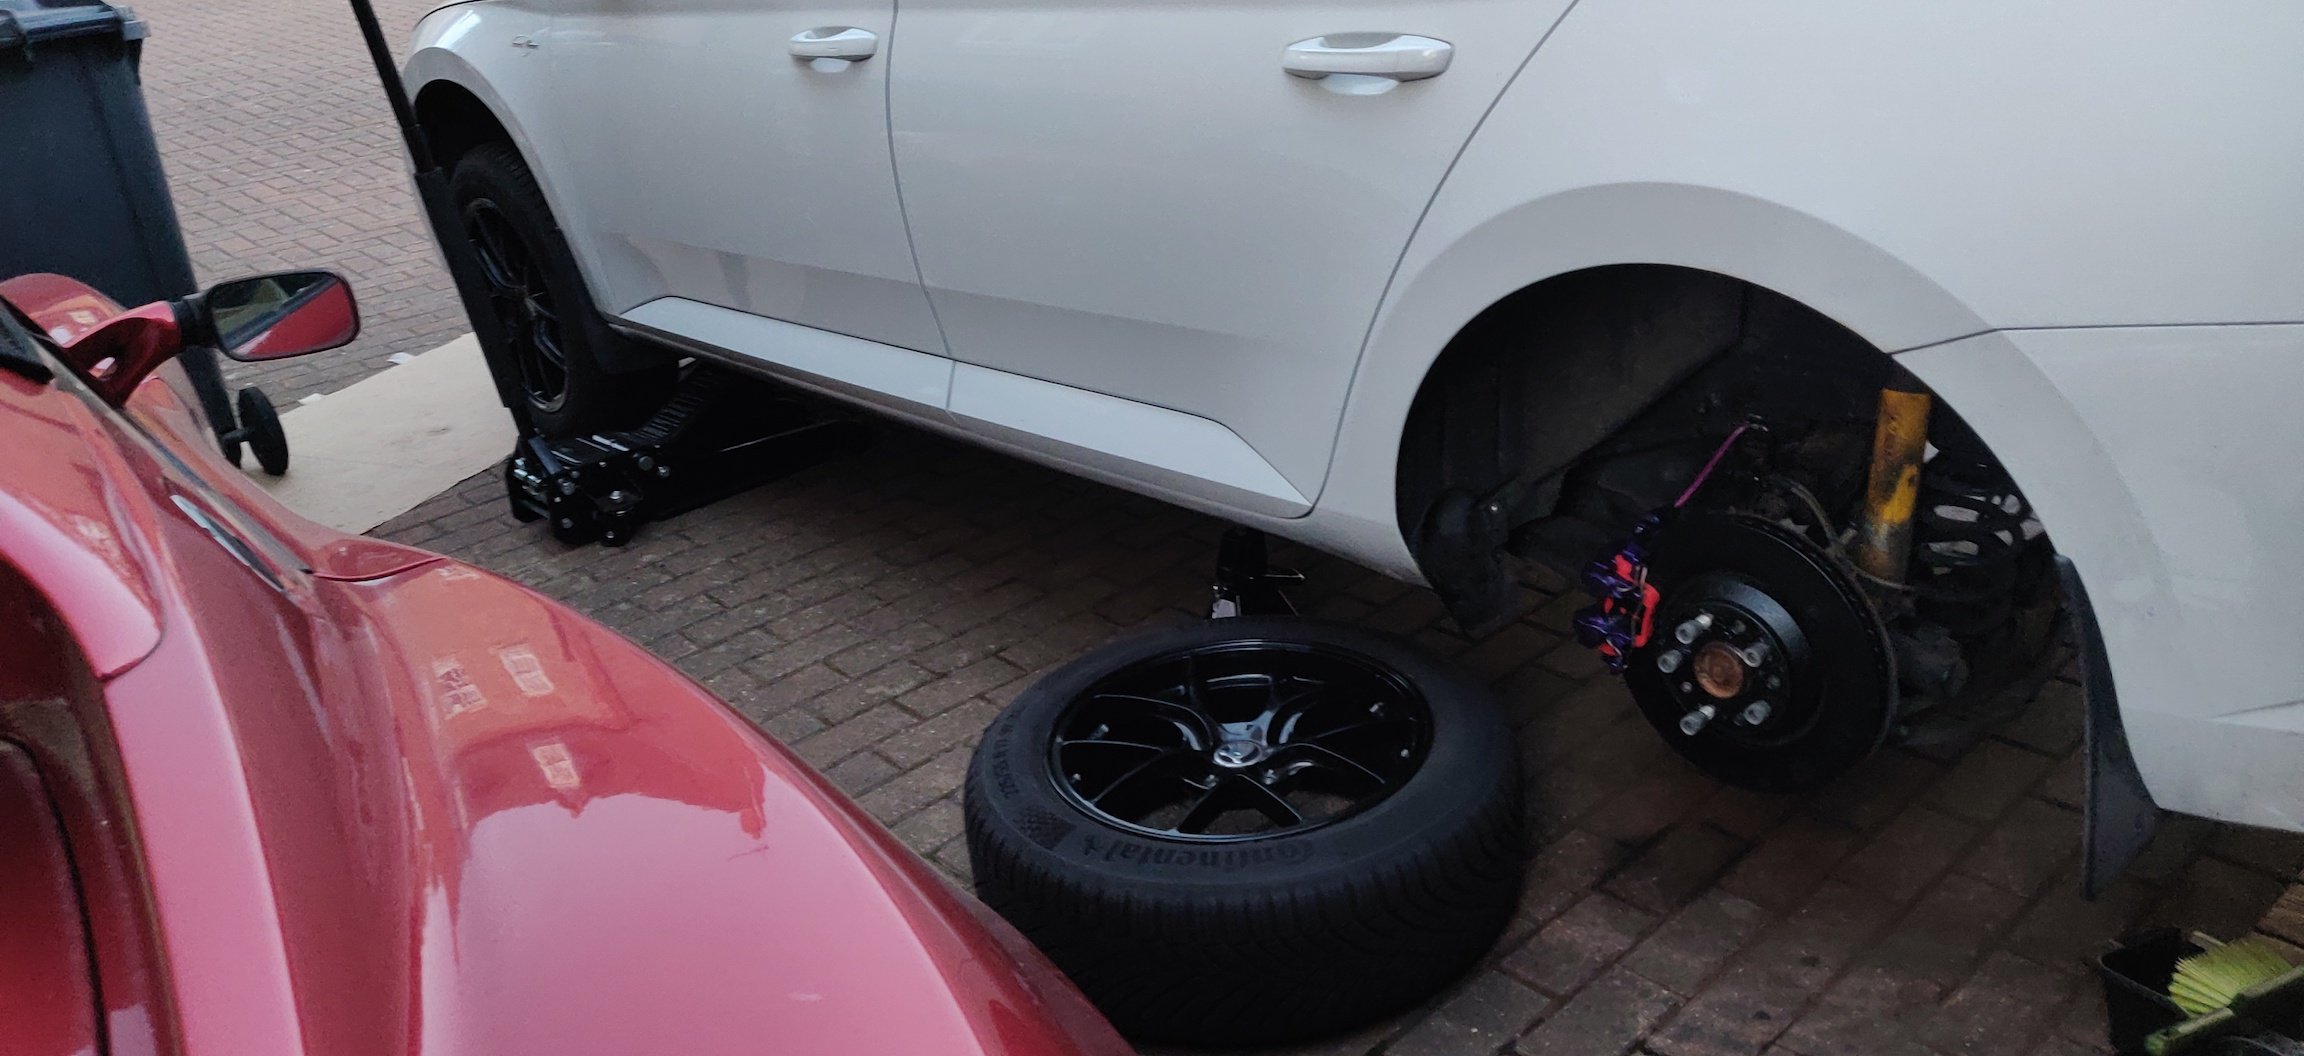
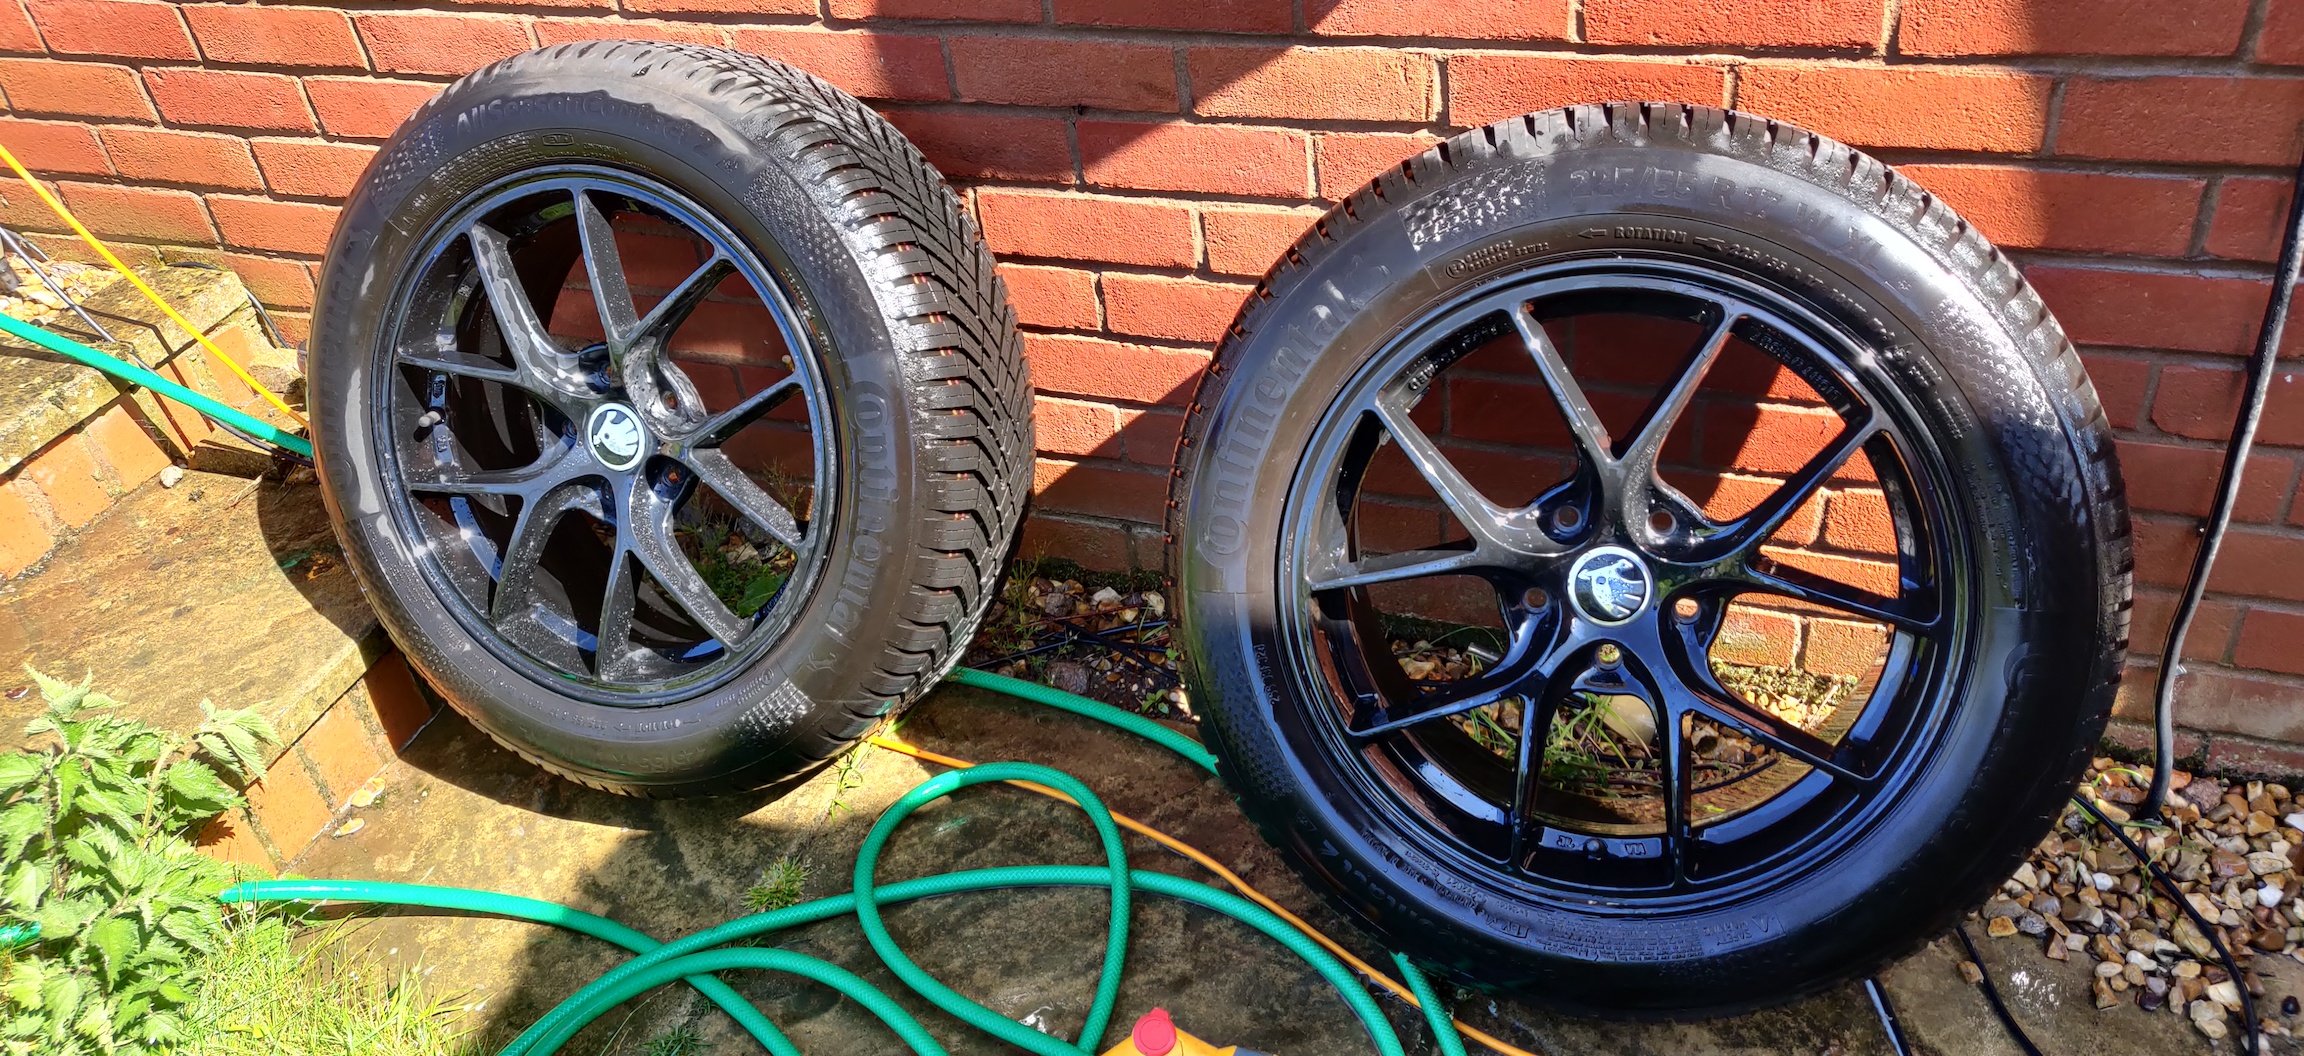
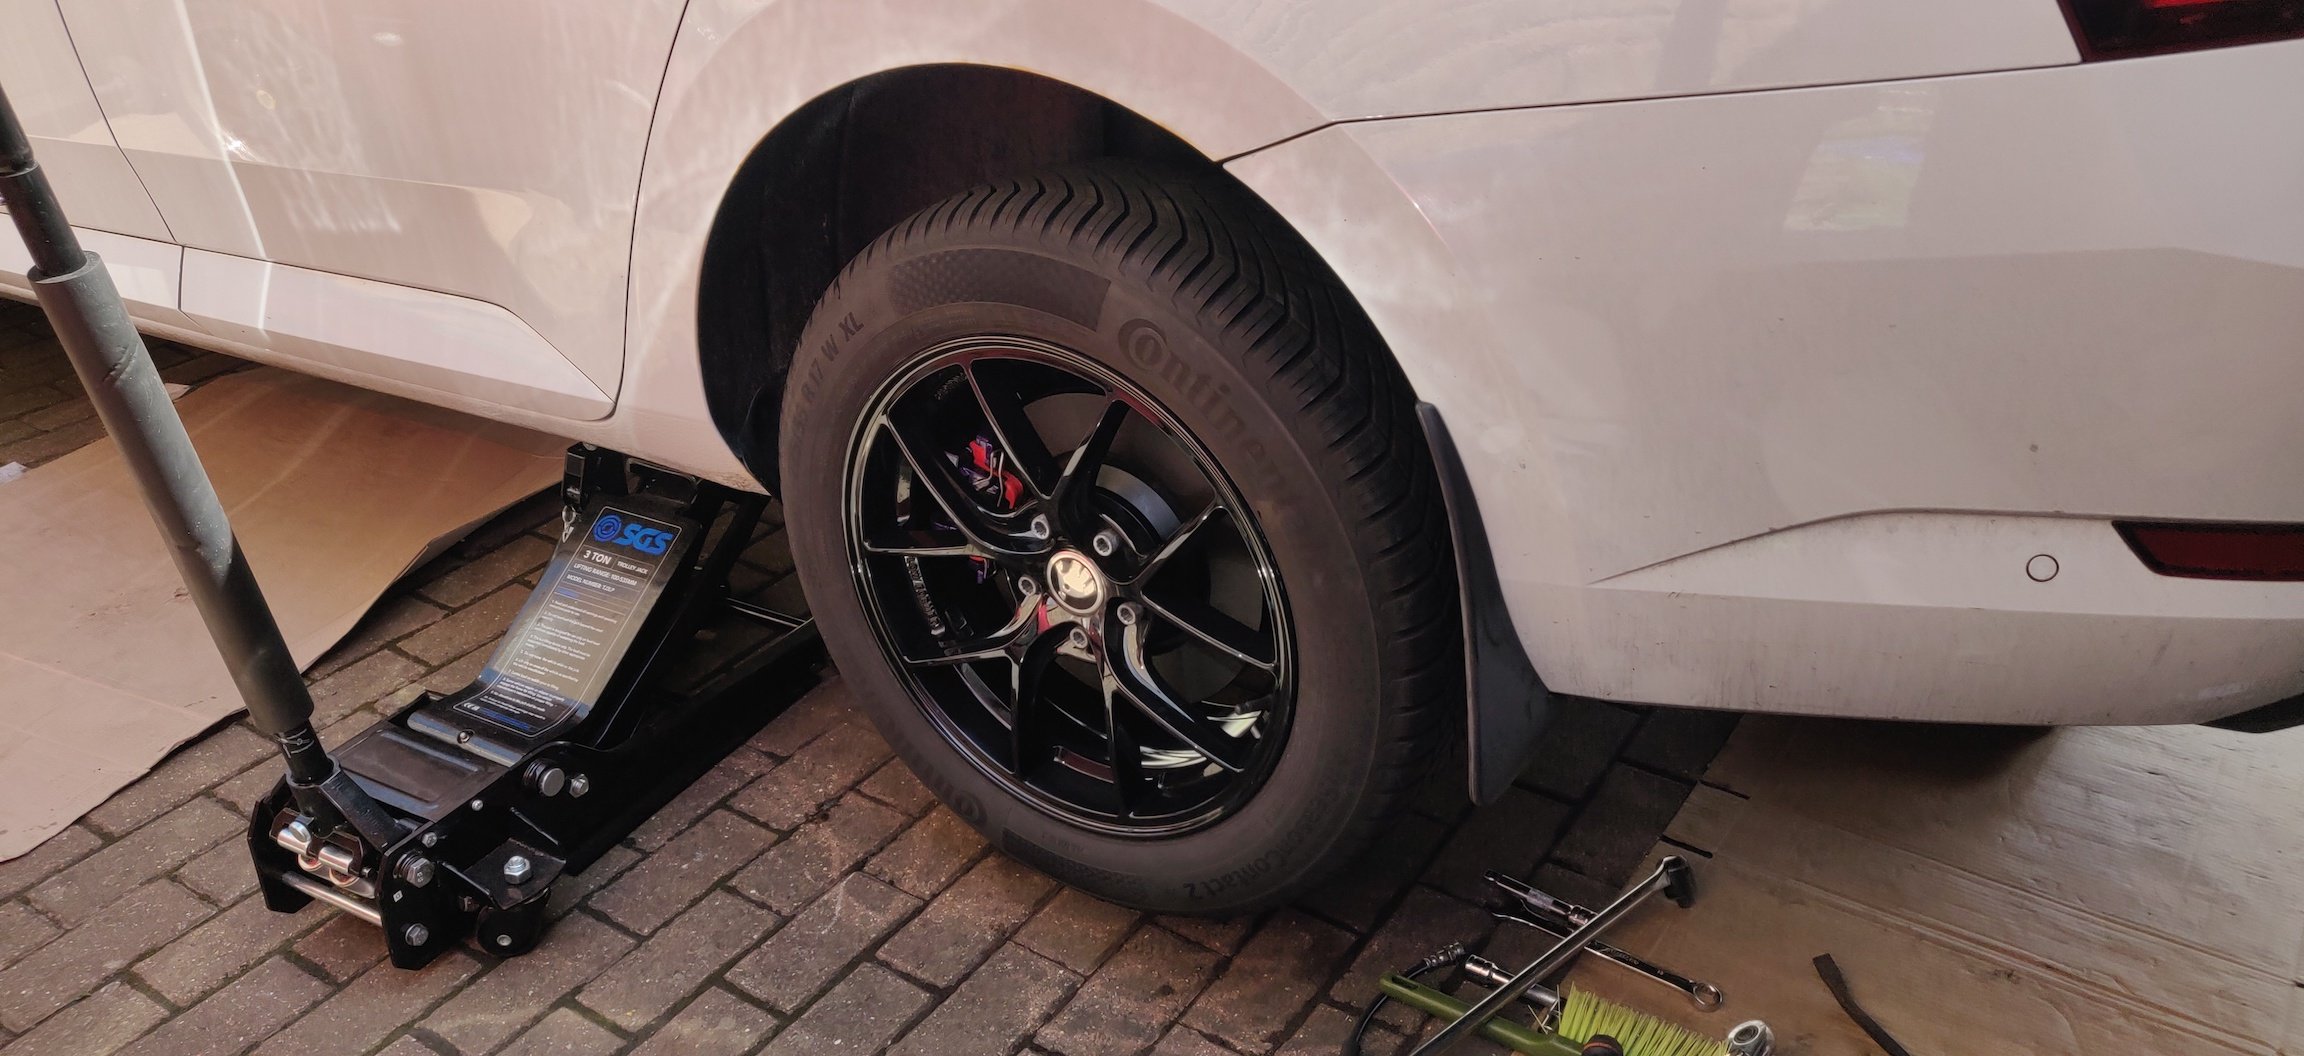
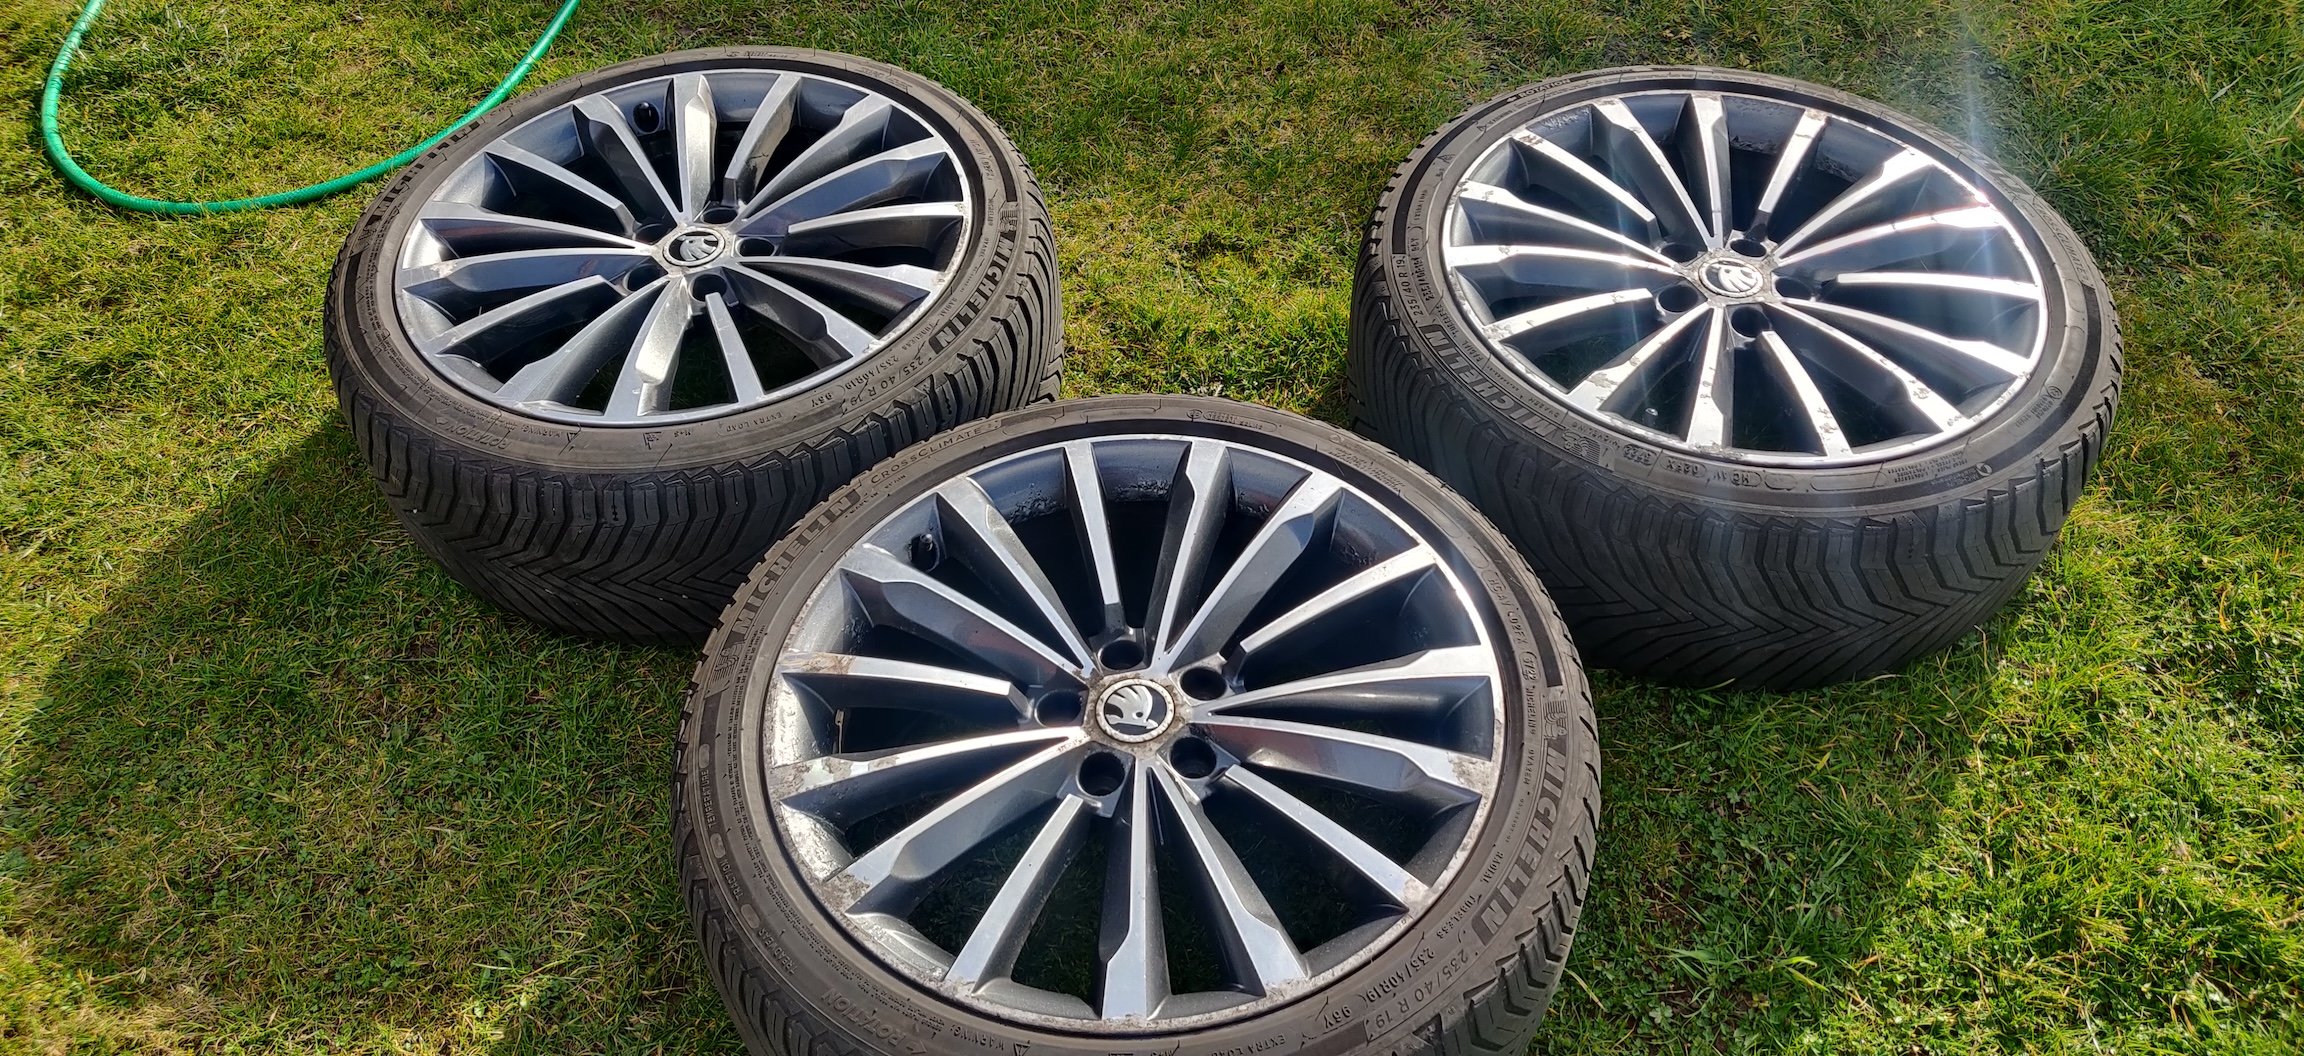
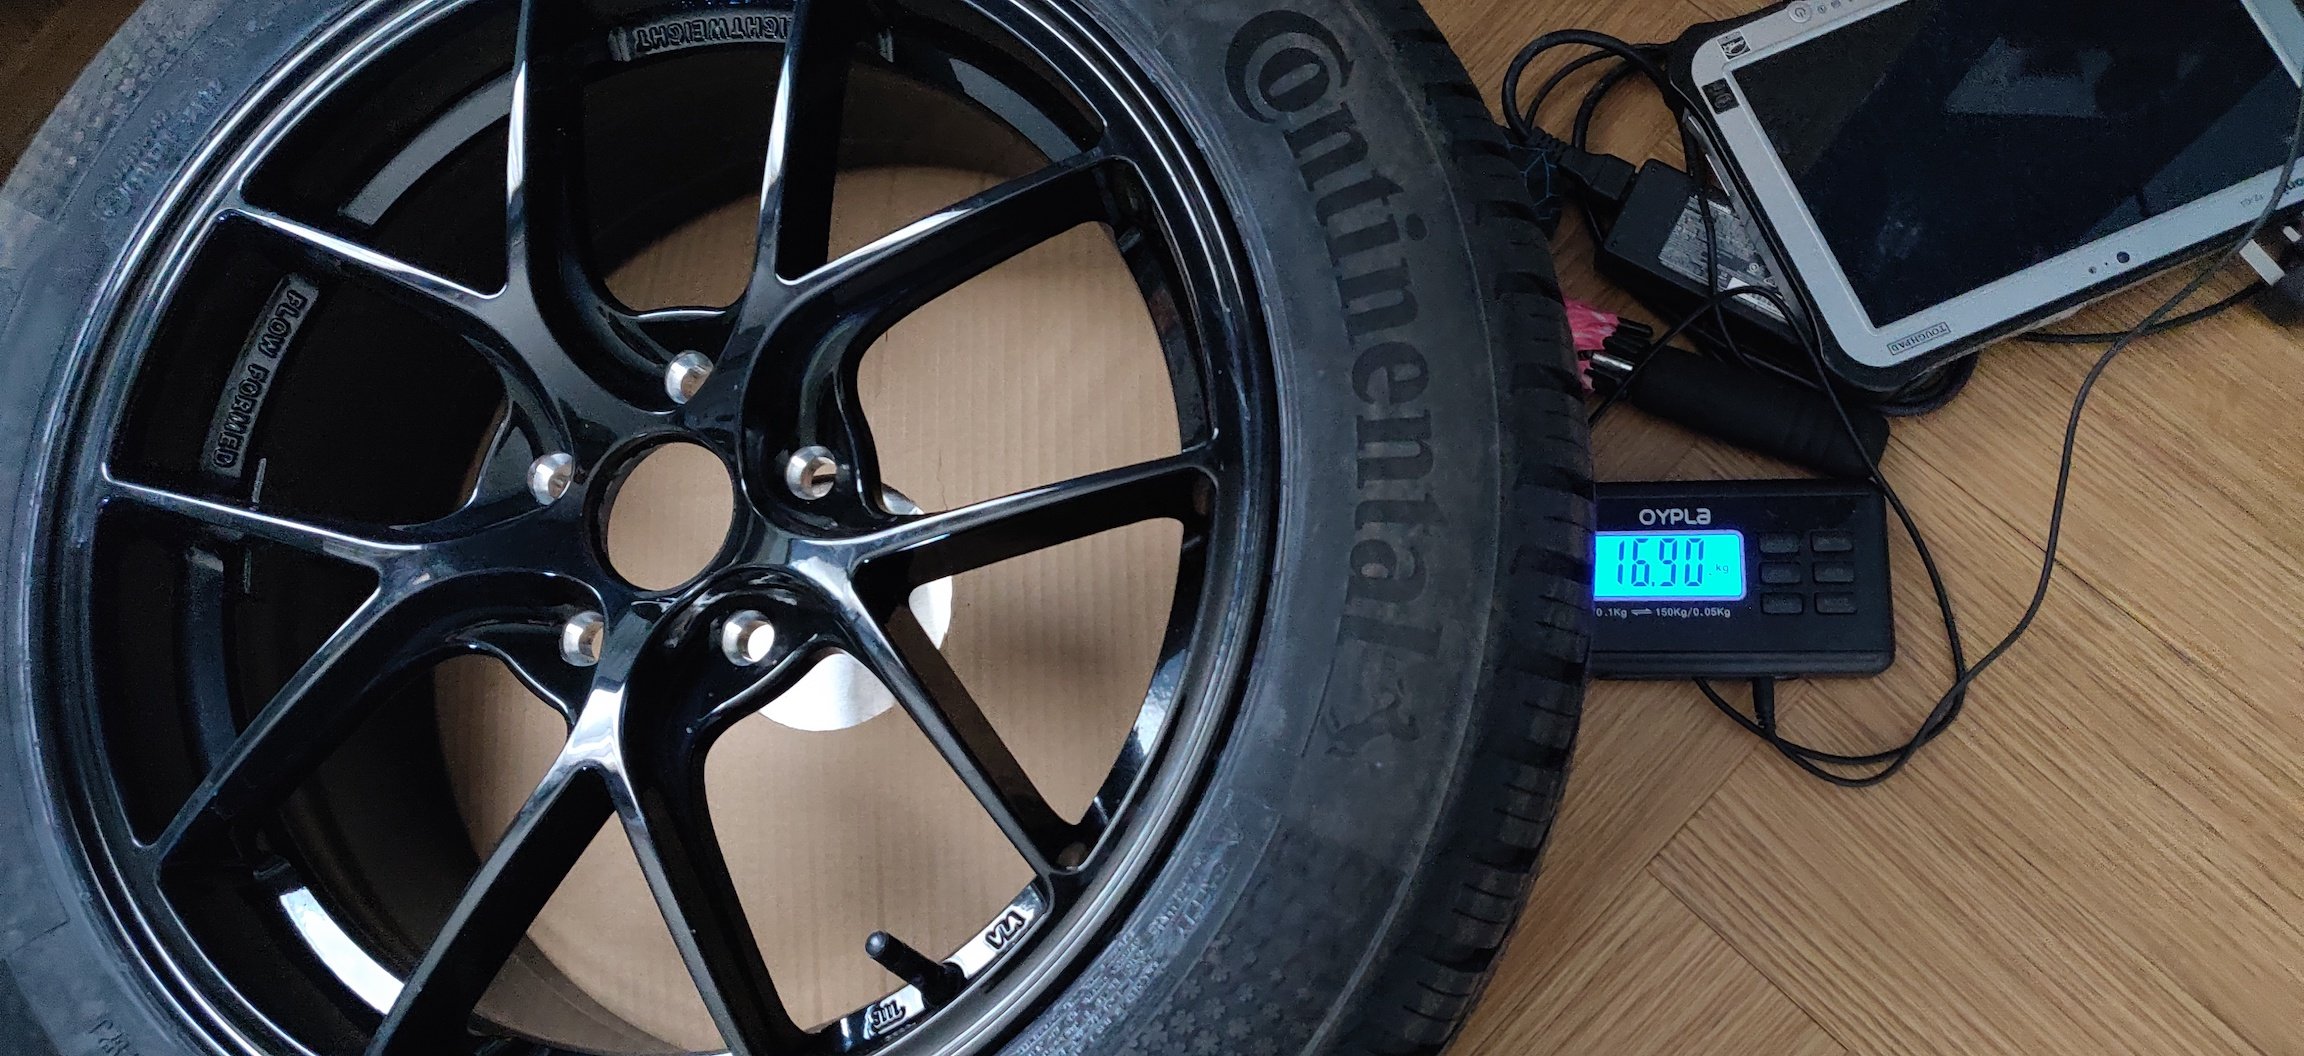
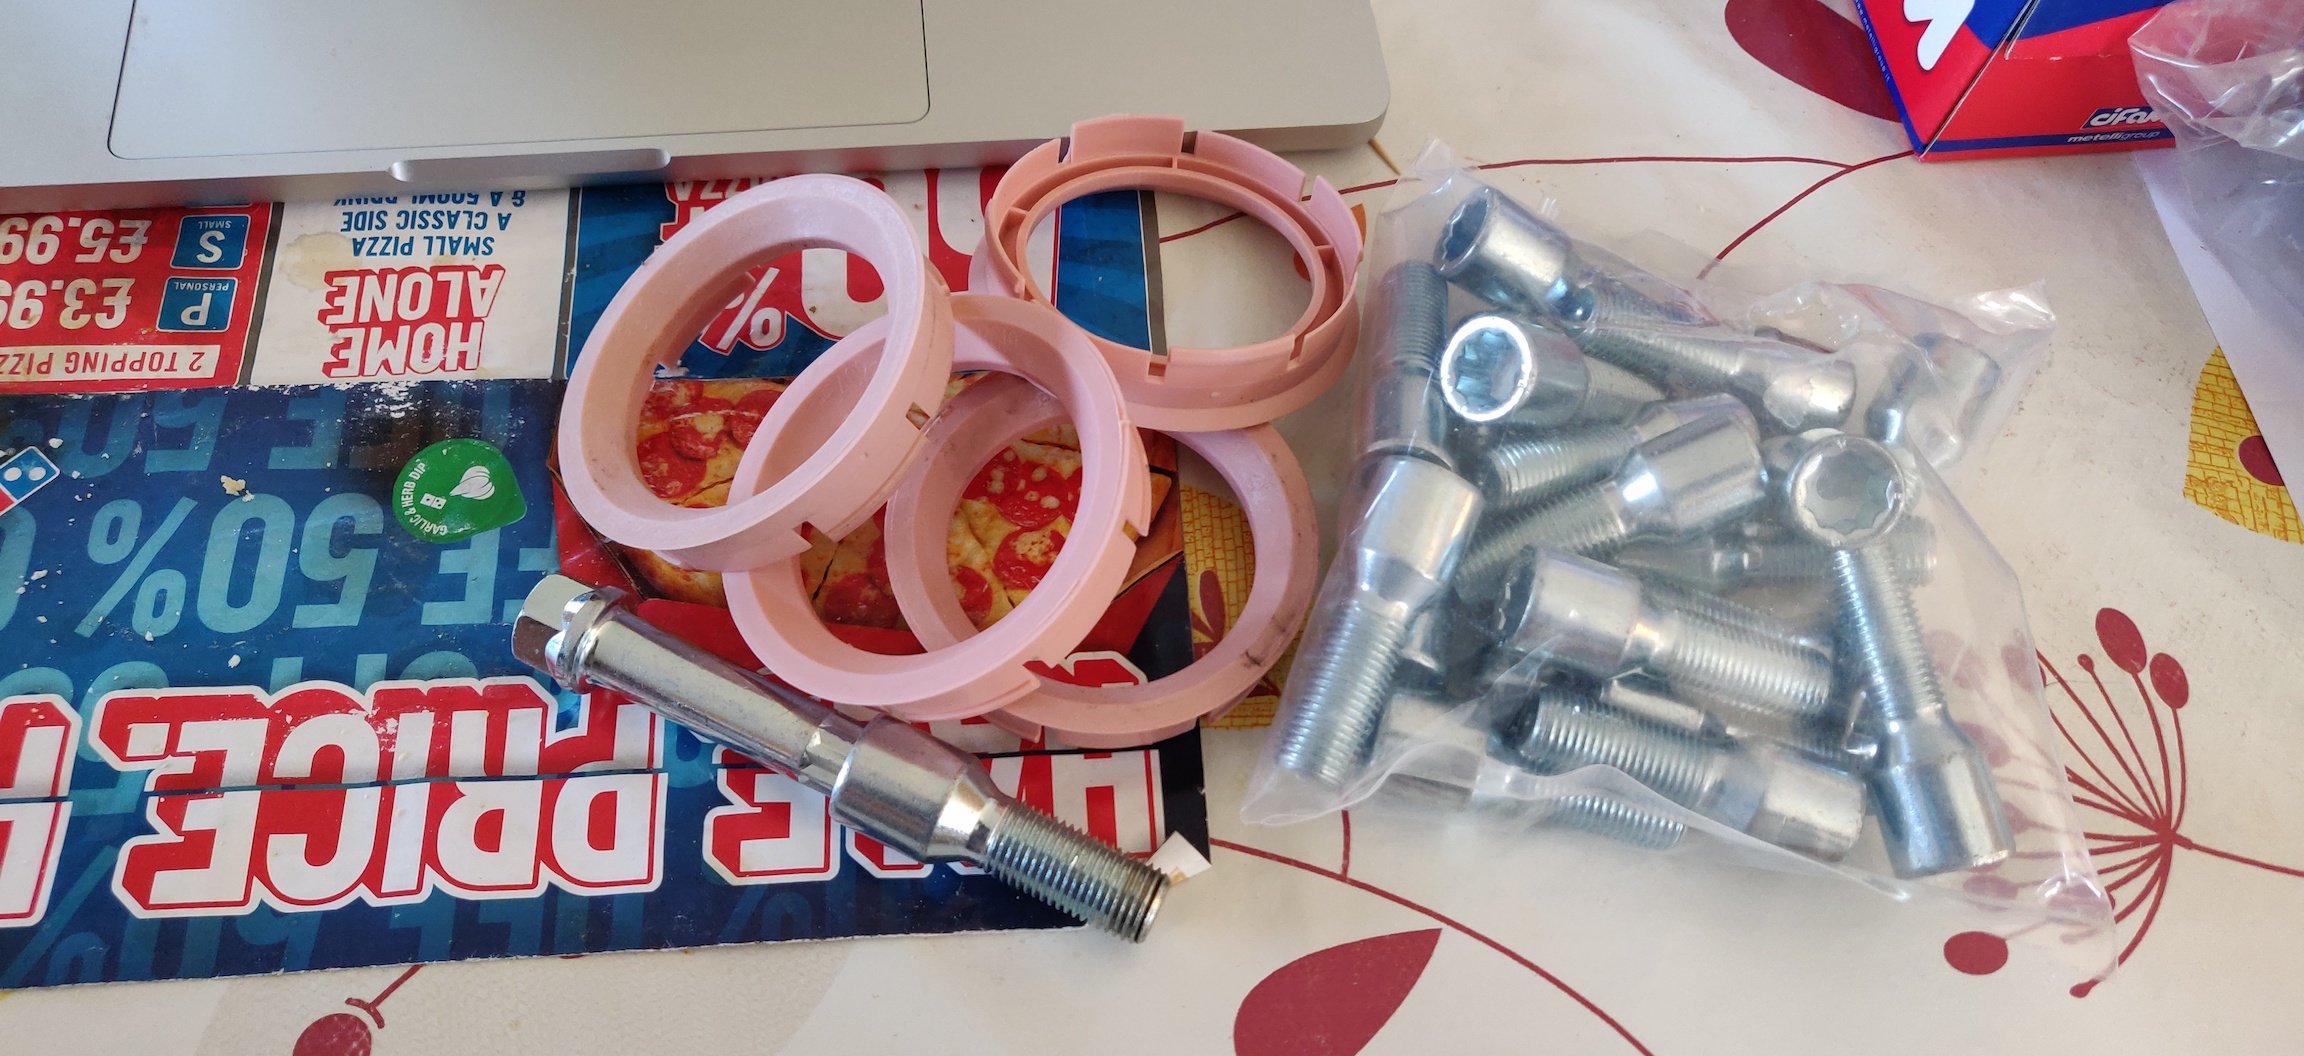
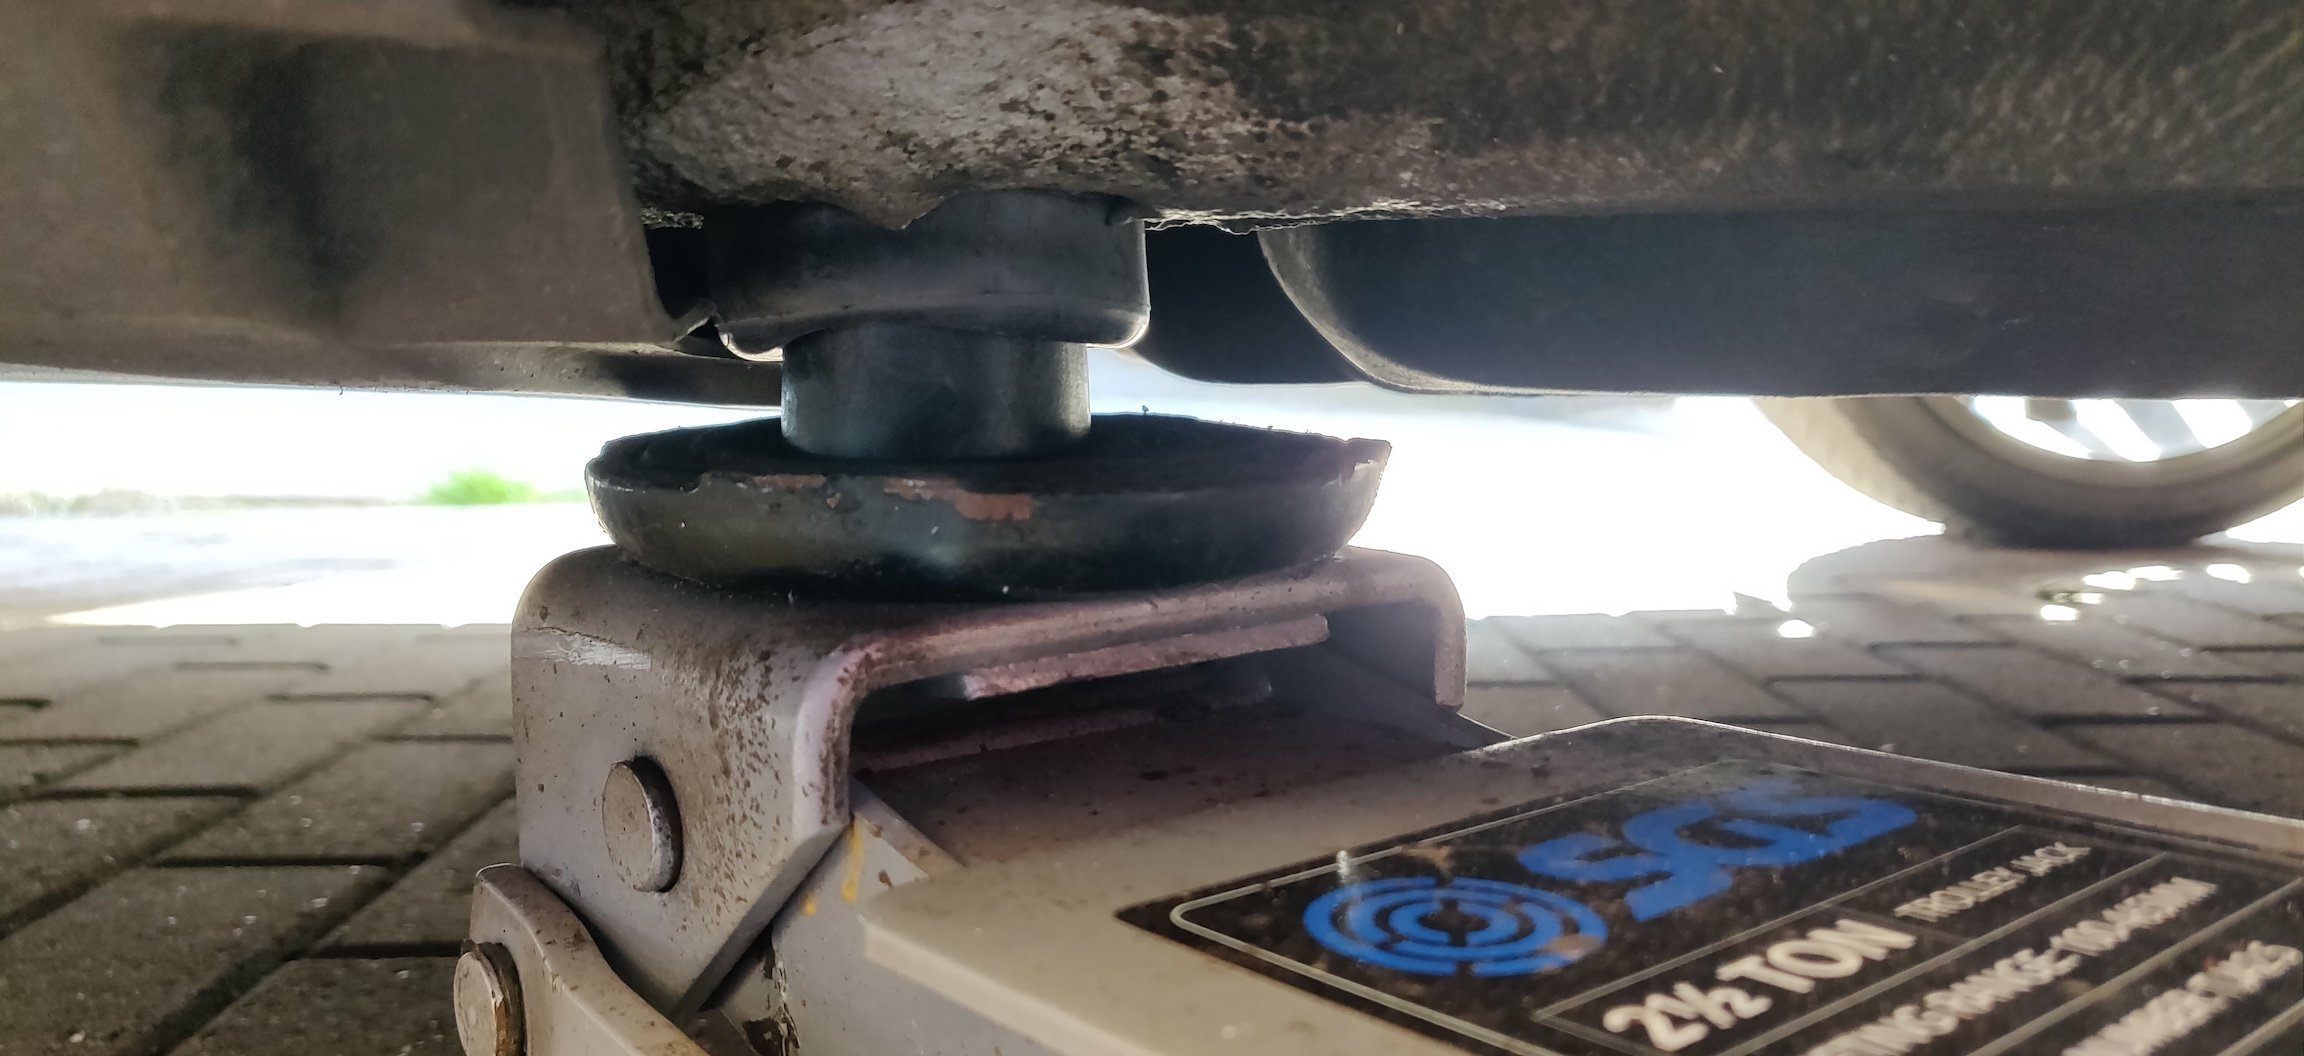
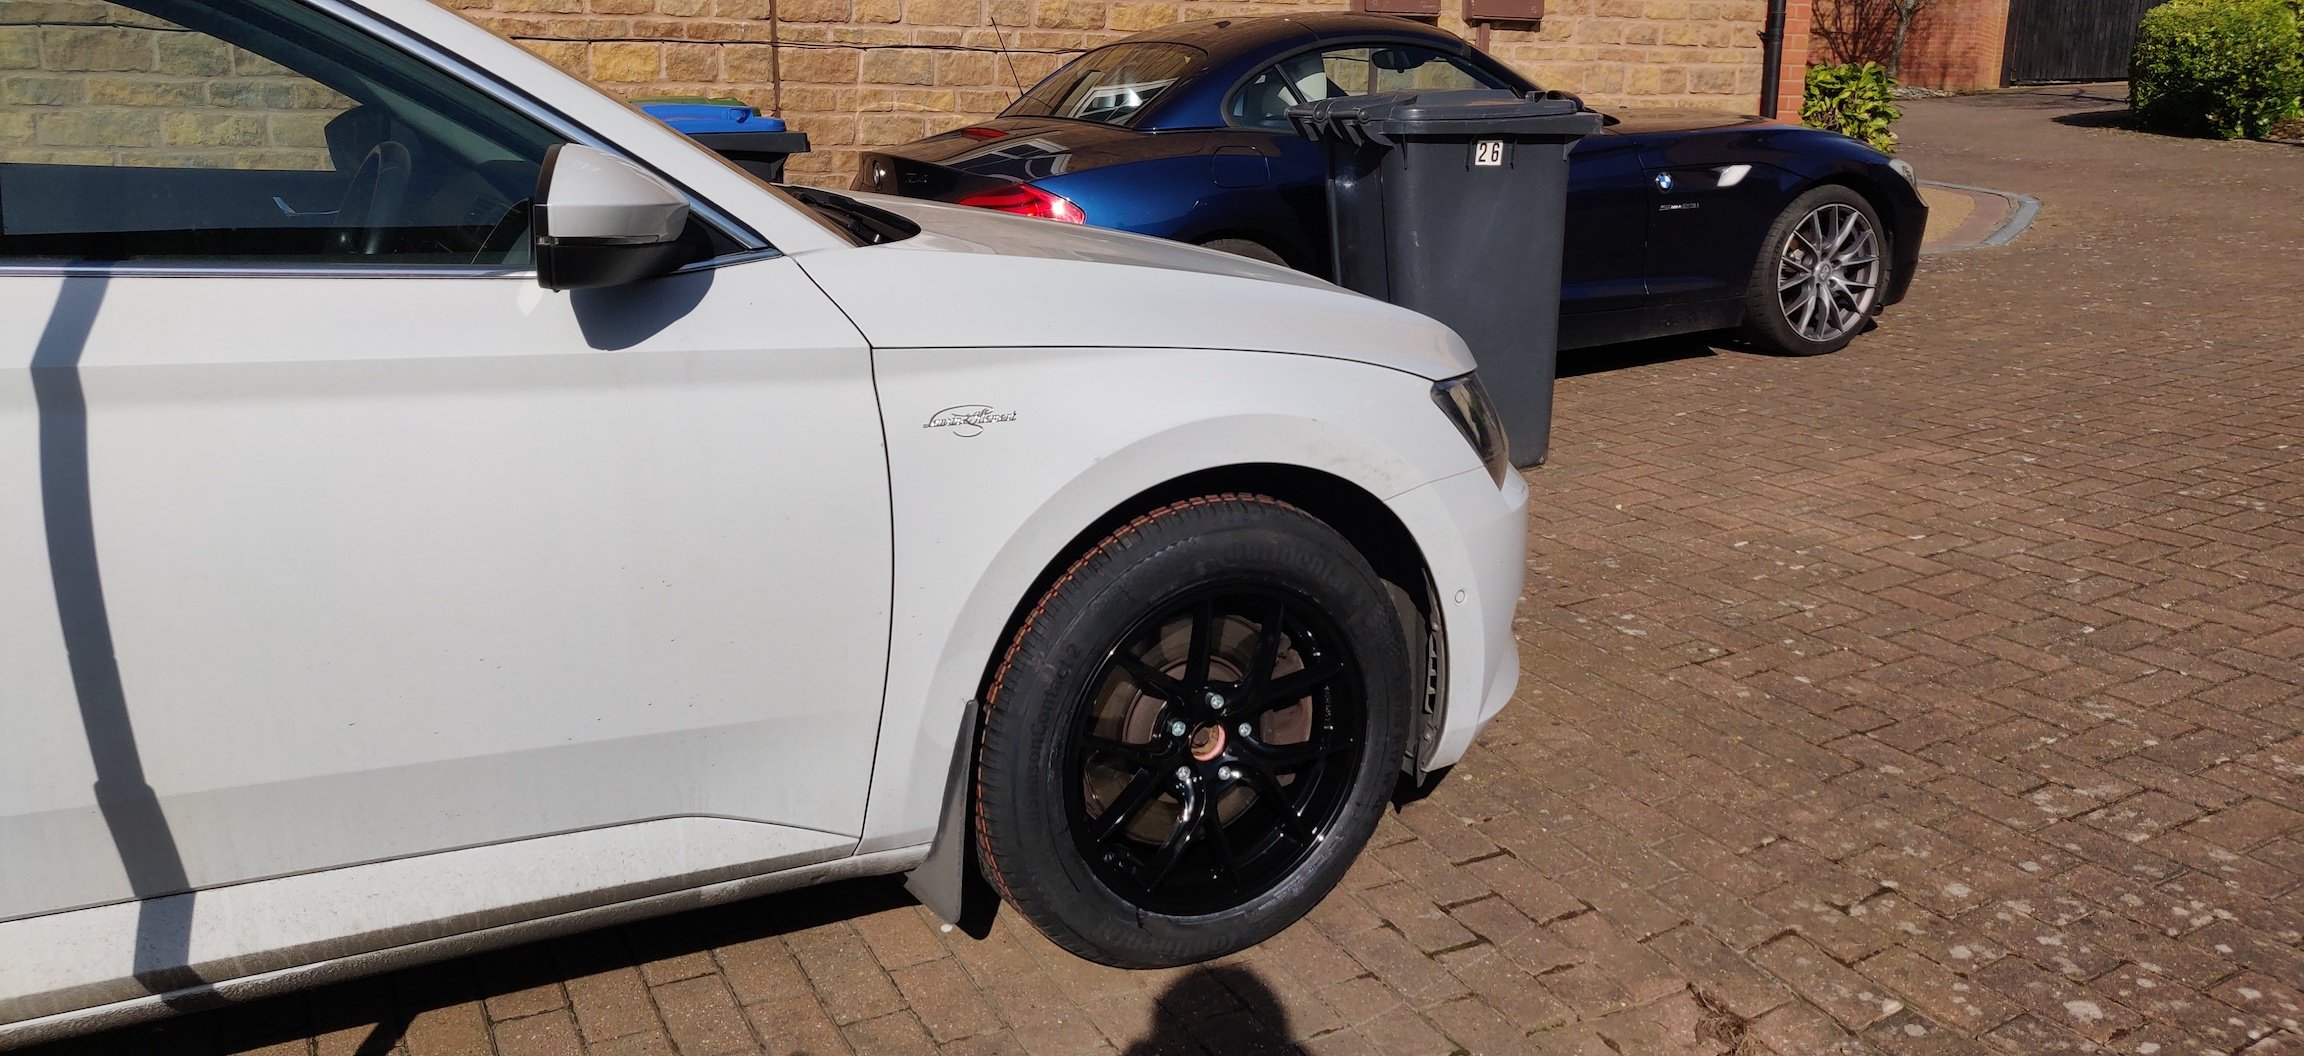
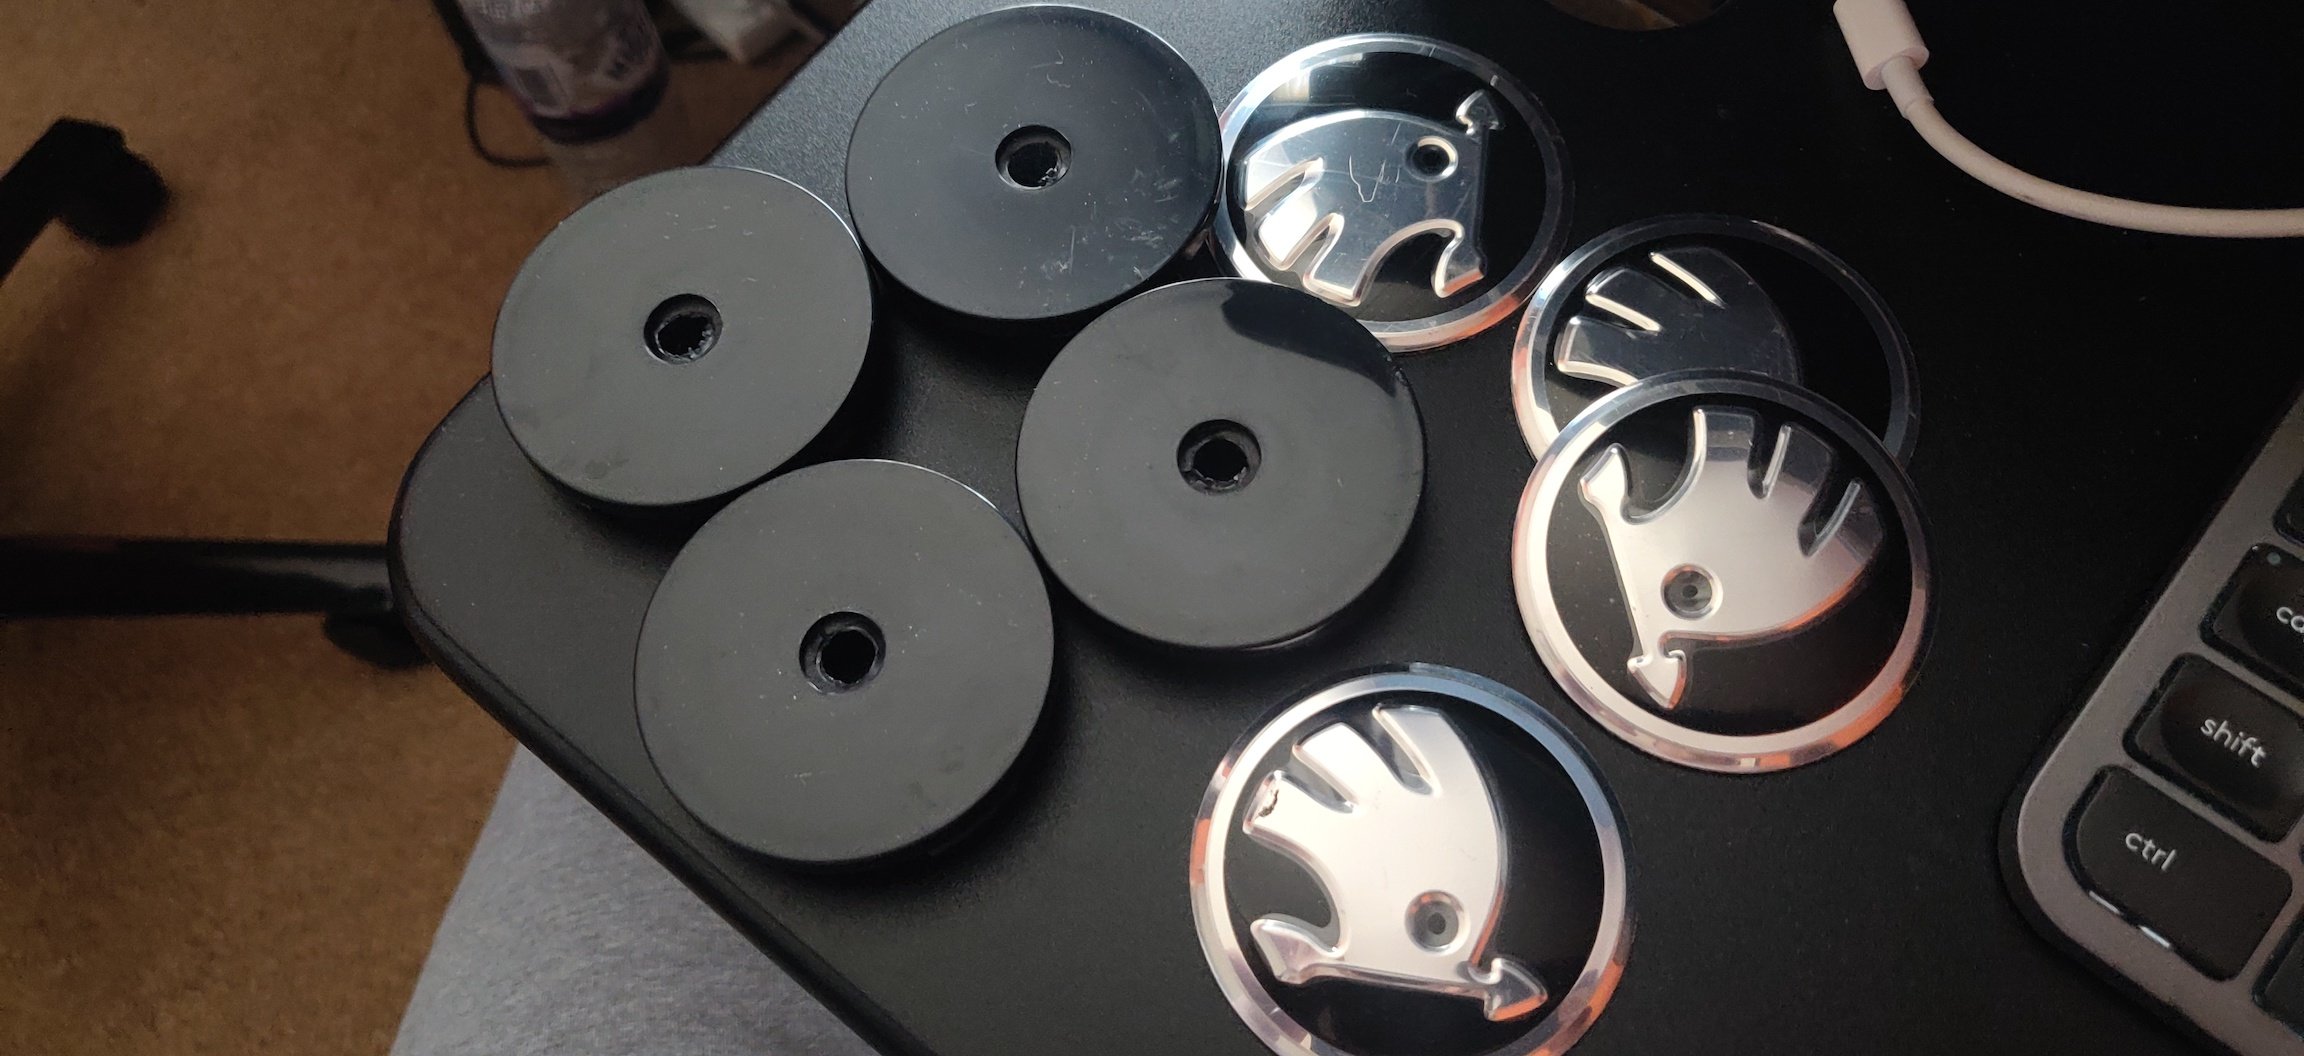
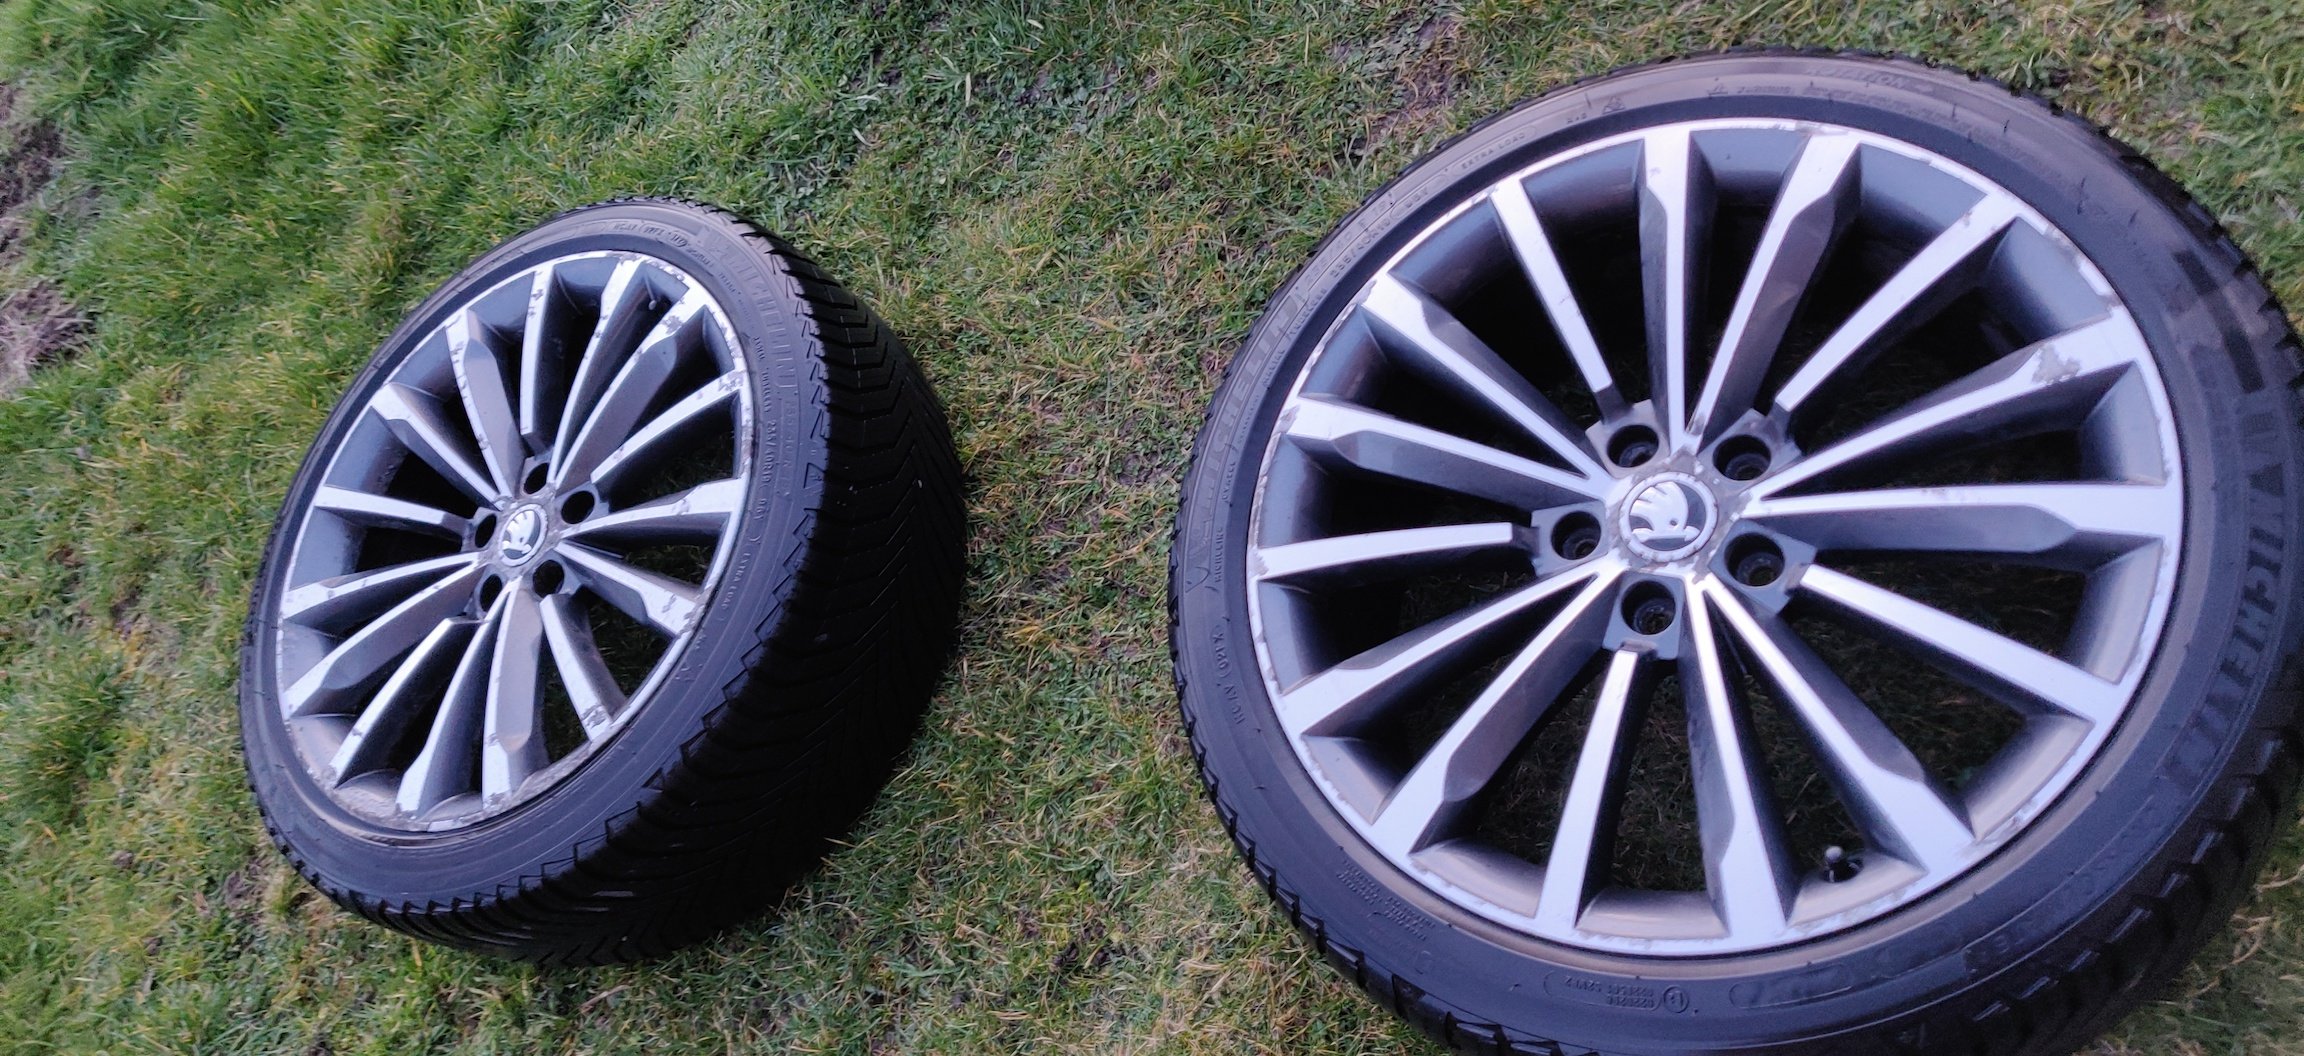
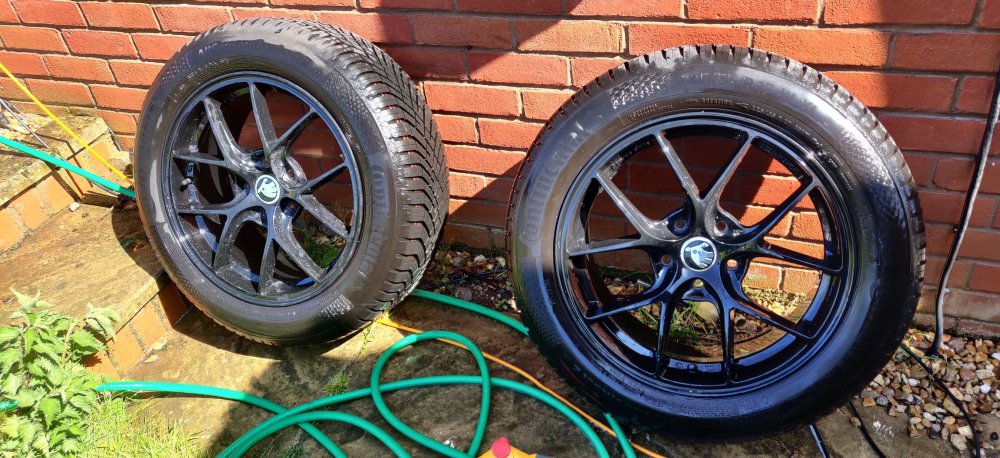
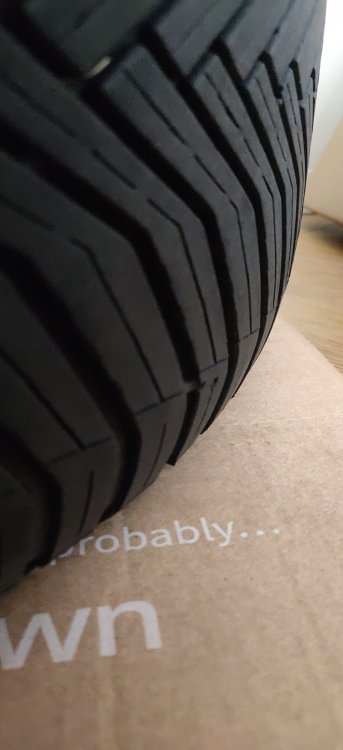
Early this Saturday morning: Packed the wheels into the boot ready to head to a local tyre place. Booked an early slot to attempt to beat the rabble of traffic that wakes up and slows things down mid morning on weekends. 15 minutes later and a quick drive home: Tyres all fitted! Decided on a set of Continentals, AllSeasonContact 2 specifically, 225/55/17 for those interested, W speed 101 XL for the boffins. Normally, I would have got some Michelin CrossClimates (the same as currently on the 19s), but for all intents an purposes, the internet pretty much stated "they're newer, so they're better" and I pretty much just went for them based on that. Presumably, once Michelin release a CrossClimate 3, they'll be immediately top dog again. WIth a 15% discount from BlackCircles, the tyres came to £546.44. Whilst offloading, took the opportunity to weigh one up: So 16.9kg, so the tyre is a smidge over 10kg, I suppose as light as they're gonna get. Weights of actual tyres are actually never ever mentioned or considered in the scheme of things, which does seem amiss, I would be curious about whether there's a correlation between performance, profiles and other factors. Originally, the plan was to fit these at a later time, as I would need to source different wheel bolts, to transition from the ball seat to taper seat that aftermarket wheels would have. Fortunately though, the kind people at Driftworks where I purchased the wheels from threw in these alongside spigot rings: A set of tuner wheel bolts, which pretty much mean there's no obstacles. It's pretty much a standard wheel swap. I took the opportunity whilst jacking up the car to also fit these: These were purchased from lllparts ages ago, I think they're meant for things like Audi's or whatnot, and were mentioned in a few previous posts. Specifically that the intended part doesn't exist anymore, and previous posts suggest to trim these down, given they stick out a bit as per the pic above. I'm probably just going to leave them as is for now, as they actually help highlight where to jack at a glance. I believe I've tallied the rubber parts in an earlier post, so the other bits here came to £77.34 with shipping, so a bit on the expensive side. Just a case of pushing the rubber part into the holes on the underside, then slide the other part into the rubber: Then a jack is used to push the other part until it clicks into place in the rubber: So pretty much jack up a corner, take existing wheel off, set up the new wheel with the spigot ring, grease and whatnot and fit the new ones on. So new wheel on (much easier as much lighter!): Clearance of the caliper for the front: Then the other side: Torqued the bolts up to 140Nm, and then off to look at the wheel caps. The Bola wheel centre caps supplied with the wheels have a metal Bola branded disc of sorts attached to the cap with a sort of adhesive: So with some hacking with a craft knife, allowed some leverage to get the discs off: Then, stuck some random Skoda wheel stickers. These were 56mm stickers from AliExpress, £4.37: The stickers are a tiny bit larger than the caps, so 54mm would be the more appropriate size, but I reckon they'll be fine as is. If they don't and fly off, well, I'll just source smaller ones. Those just push fit: Done: Day trip out showed enough differences over bumps and ramps, and effectively Sport mode being as comfy as Comfort was with the 19s. Wife also found it much easier to keep going too fast on the motorway, so maybe the weight reduction has done something. Time will tell in regards MPG, hopeful of an improvement. Once home though, noticed a grinding when slowing down, and a whine when reversing. The rear left wheel was warm, and sure enough, some water over the brakes and they were steaming. So looks like the caliper is stuck, so I'll see if I can address that tomorrow. I'm loathed to spend any more money on the existing brakes as some other things are on the cards... Gave the old wheels a quick clean: Then lugged one of them into the house to weigh: So 23.55kg on the scales, so over 6.5kg a corner! So more than 26kg of unsprung weight saved, which I'm sure will mean all sorts of benefits. The 19s are in a horrid state, and with one slowly leaking air, all would need refurbishing, which would be a tiny bit more cost wise if there was a desire to keep them diamond cut. The tyres are probably usable for a few more months, though some have more wear on the inside of the tyres, which does suggest I should probably get the geometry checked. I'll stick them up for sale, hopefully for what is considered a bargain price... For now, the rear left caliper would be the current urgent thing to look at. Maintenance: £2370.22 Upgrades: £2994.25 (+£628.15) Miscellaneous: £820.07