


KevinSt
Members
-
Joined
-
Last visited
-
My water pump just failed 😞. The dashboard showed low coolant and the reservoir was empty. Managed to get the car home after topping it up with water. I suspected that it was the pump straightaway and so started stripping the front end until I could see the pump. I added some water to the reservoir and it immediately leaked out of the centre of the pump. In fact there was a small piece of gasket or seal hanging out from the behind the pump pulley. Upon removing the pump there was something rattling behind the pulley, the collar was stuck covering the impeller and the plunger on the solenoid valve snapped off in the housing as the plastic seemed brittle. I think that it was not far away from catastrophic bearing failure. Needless to say I'll be replacing it with a non-collared version since I don't want the overheating problem and I'll look to change it again in about 60k miles, which at the current rate will take me another 20 years. Here are my details: Year of registration 2013 Engine 2.0 TDi CKFC Mileage when fault occurred 69900 Dealer name & response (i.e. "don't want to know"/"yep, they all do that"/other) Didn't bother asking Warranty or goodwill contribution? I am the warranty 😉 Any other info. (Full Skoda service history/independent?) Car has been regularly serviced, pump was original but has now been replaced with a Gates pump that doesn't have the sliding collar. Belt and idlers all looked in good order but they were replaced too.
-
The manual says: The windscreen washer nozzles for the windscreen are heated when the engine is running and the outside temperature is less than approx. +10 °C So if they are not working then that might be an indication that there is something strange going on with A11 or the temp sensor.
-
Could there be a short to ground on one of the temp sensor wires that is making the controller behave in a strange way? Also, do the windscreen washer nozzle heaters come on when the weather is cold?
-
If the front screen heating works then that would suggest that VAN bus between A63 and A11 is working correctly. What if there is an internal fault with A63 where it doesn't actually send a message on the bus? It is interesting how the front works but not the rear. Both are controlled from A11. Either it is not receiving the command to operate the relay or it is seeing or being told something to stop it from operating the relay even if it is receiving the message from A63. You should be able to measure the resistance of the temperature sensor from the connector of A11, if there is a sensible value then it would eliminate that as a potential cause.
-
I suspect that the temperature sensor is required to determine when to turn on the screen washer nozzle heaters (R37 & R38). There is unlikely to be any temperature override on the rear window heater since it could need demisting no matter what the external temperature. Without knowing the full heater control logic it is difficult to target the fault-finding.
-
The only words in the owners manual about the rear window heater are: The windscreen and rear window heater only operates when the engine is running. The windscreen and rear window heater automatically switches off after approximately 10 minutes. There is no mention of only operating when the ambient temperature is below a particular limit. Looking at the schematic the rear heater selection button (S218) is shown as sending a digital message on the VAN bus. Could there be a problem with the bus connections from terminals 5 & 6? Maybe this results in the warning light coming on until no message is fed back to the AC Control Module (A63) by the Multifunction Control Module (A11) to keep the warning light lit. This might explain why the relay can be controlled by the diagnostic control since it might communicate with A11 via a different pair of cables on the VAN bus. I would be tempted to resistively check the continuity of the VAN bus wires from A63 pins 5 & 6 to A11 pins 16 & 17.
-
I was hoping to find a wiring diagram for a VW or Audi that would have a similar circuit to the Octavia, but I can't find one. If there is a control module then it is quite possible that it monitors the current flow to determine if there is a fault. The connection terminals on the window glass are not soldered, I believe they use a silver-loaded epoxy to make the connection. Unless the epoxy is broken then it should still be making good connection to the heater element. If these connections are intact then there must be breaks in all of the heating elements. Maybe you can make connection to the individual elements to check the resistance along their length?
-
You should be able to measure the resistance across the 2 connection points to the heating element. If that is where you have measured then you have a bad connection to all of the paths in the demister so the problem lies at the point where the terminal is connected. Loss of one or more of the individual elements would only increase the resistance slightly, certainly not into megohms.
-
Well, that's your problem then. Your heating element it virtually open circuit at 1 Mohm. Assuming a maximum 30A fuse for the circuit then the resistance is of the order of 1 ohm or less. This would result in about 150 watts whereas your 1 Mohm would only produce less than a milli-watt.
-
Perhaps PetrolDave is correct in that the heater element is showing the wrong resistance. If I get a moment I’ll measure the resistance of mine for comparison.
-
When I had the switch fail on my old Mk 2 I had no symptoms other than the non-working rear wiper and the fact that if you used the centre button on the remote to open the boot, the central locking would not automatically lock the boot when the tailgate was closed. The problem with my switch was corrosion, water had got into the connector and the terminal was virtually gone. Without a wiring diagram you might be able to get at the switch by unbolting the lock or you'll have to remove the inner tailgate trim to get at it.
-
I don't have a copy of the Mk 3 schematics but I seem to recall that the Mk 2 had a switch contact inside the lock mechanism in the tailgate that only enabled the rear wiper & demister if the tailgate was closed. Assuming that the Mk3 works in the same way, could there be a problem with your tailgate switch or wiring?
-
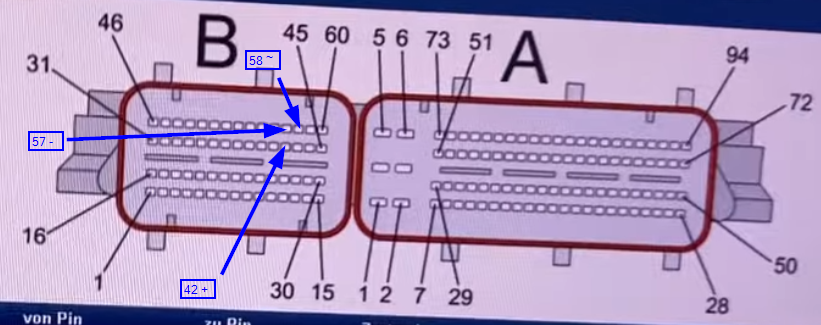
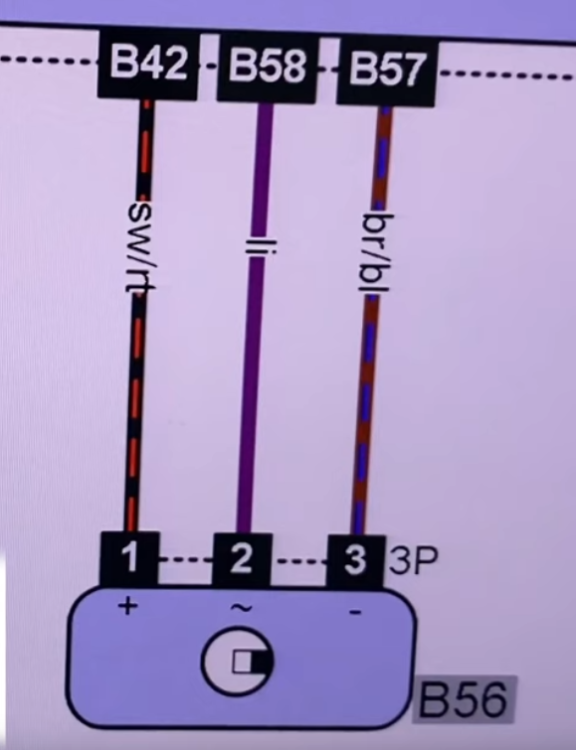
Crank, no start, P0322 No Signal - Cause: Broken wire from sensor to ECU The following may be useful to other Octavia owners. Here are the details of my problem and what I found: Car: Octavia 2.0 TDi 2005 DSG (BKD engine). Symptom: Cranks but doesn't start. DTC: Code reader shows P0322 crankshaft speed sensor: no signal. Changing the speed sensor on the DSG is not as easy as the manual gearbox version so I did some research first. I discovered that it was not uncommon for there to be wire breaks between the ECU and the sensor, so I decided to investigate this first. Just accessing the plug on the sensor is not easy and the ECU isn't much better. The ECU is held in place with an anti-tamper cover and there are a number of videos online showing how best to remove the dome headed screws using a Dremel. You may not even need to remove the ECU itself, you only need to remove the smaller of the 2 connectors at the front. This can be done by sliding the locking lever out so that the plug can be removed. The diagram that I have attached shows the connections and the wire colours. I've highlighted the pins of interest on the ECU plug, look at the connector labelled 'B'. The back cover on the ECU plug can be slid off revealing the wire colours. Use a multimeter to check for continuity to the sensor plug. On mine, I had a 2 Mohm resistance on the lilac signal wire. Pulling on the loom just in front of the battery cause the resistance to change and one occasion I actually managed to get it to read 0 ohms. Rather than untape the loom and search for the break I just ran a replacement wire from the close to the sensor to close to the ECU. I just stripped back a small amount of the insulation and soldered the end of the replacement wire in place and taped it up. This fixed the fault and the engine started as normal. I see that this fault affects many of the VW/Audi/Skoda TDi engines of this era. I guess that age, temperature cycling and tension in the loom causes the break.
-
Crank, no start, P0322 No Signal - Cause: Broken wire from sensor to ECU The following may be useful to other Octavia owners. Here are the details of my problem and what I found: Car: Octavia 2.0 TDi 2005 DSG (BKD engine). Symptom: Cranks but doesn't start. DTC: Code reader shows P0322 crankshaft speed sensor: no signal. Changing the speed sensor on the DSG is not as easy as the manual gearbox version so I did some research first. I discovered that it was not uncommon for there to be wire breaks between the ECU and the sensor, so I decided to investigate this first. Just accessing the plug on the sensor is not easy and the ECU isn't much better. The ECU is held in place with an anti-tamper cover and there are a number of videos online showing how best to remove the dome headed screws using a Dremel. You may not even need to remove the ECU itself, you only need to remove the smaller of the 2 connectors at the front. This can be done by sliding the locking lever out so that the plug can be removed. The diagram that I have attached shows the connections and the wire colours. The diagram provided by nige8021 above shows the pin connections on the ECU plug. Look at the connector labelled 'C'. The back cover on the ECU plug can be slid off revealing the wire colours. Use a multimeter to check for continuity to the sensor plug. On mine, I had a 2 Mohm resistance on the lilac signal wire. Pulling on the loom just in front of the battery cause the resistance to change and one occasion I actually managed to get it to read 0 ohms. Rather than untape the loom and search for the break I just ran a replacement wire from the close to the sensor to close to the ECU. I just stripped back a small amount of the insulation and soldered the end of the replacement wire in place and taped it up. This fixed the fault and the engine started as normal. I see that this fault affects many of the VW/Audi/Skoda TDi engines of this era. I guess that age, temperature cycling and tension in the loom causes the break.

-
I had a similar problem on my Mk2 Octavia and the problem turned out to be a corroded terminal in the tailgate latch mechanism. I think that the purpose is to prevent the wiper from being operated when the tailgate is open. I suspect that this contact switches the ground circuit rather than the 12V. You need to make a continuity measurement from a good chassis ground point to the various terminals on the motor. You can use a screwdriver to close the tailgate latch with the tailgate open. On mine, water had leaked into the lock mechanism and caused the corrosion. You could bypass this switch since I really cannot see the point of it.


