Leaderboard


.jpg.1006585dfe4e2977315b67c3d642e37b.jpg)

Popular Content
Showing content with the highest reputation on 18/04/19 in Posts
-
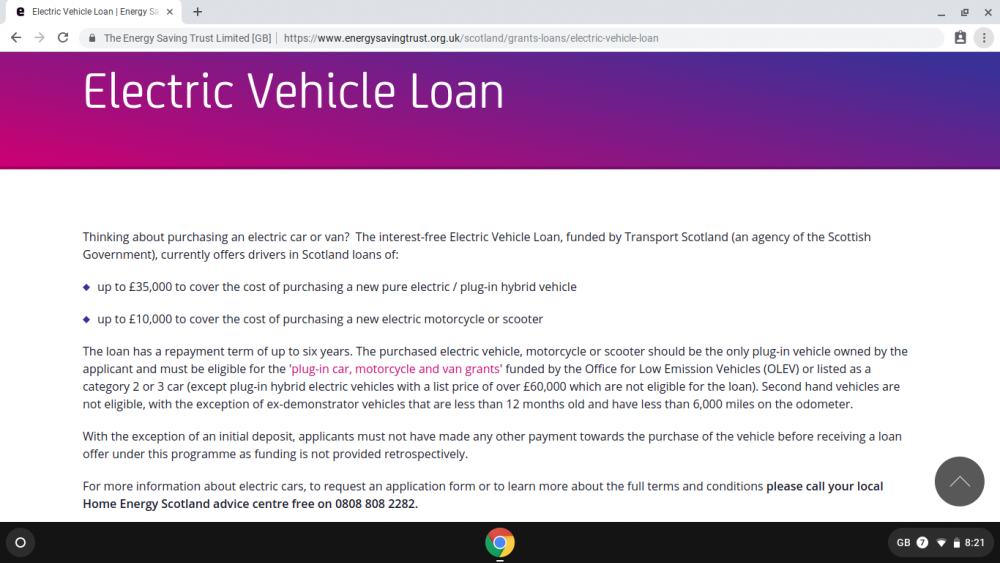
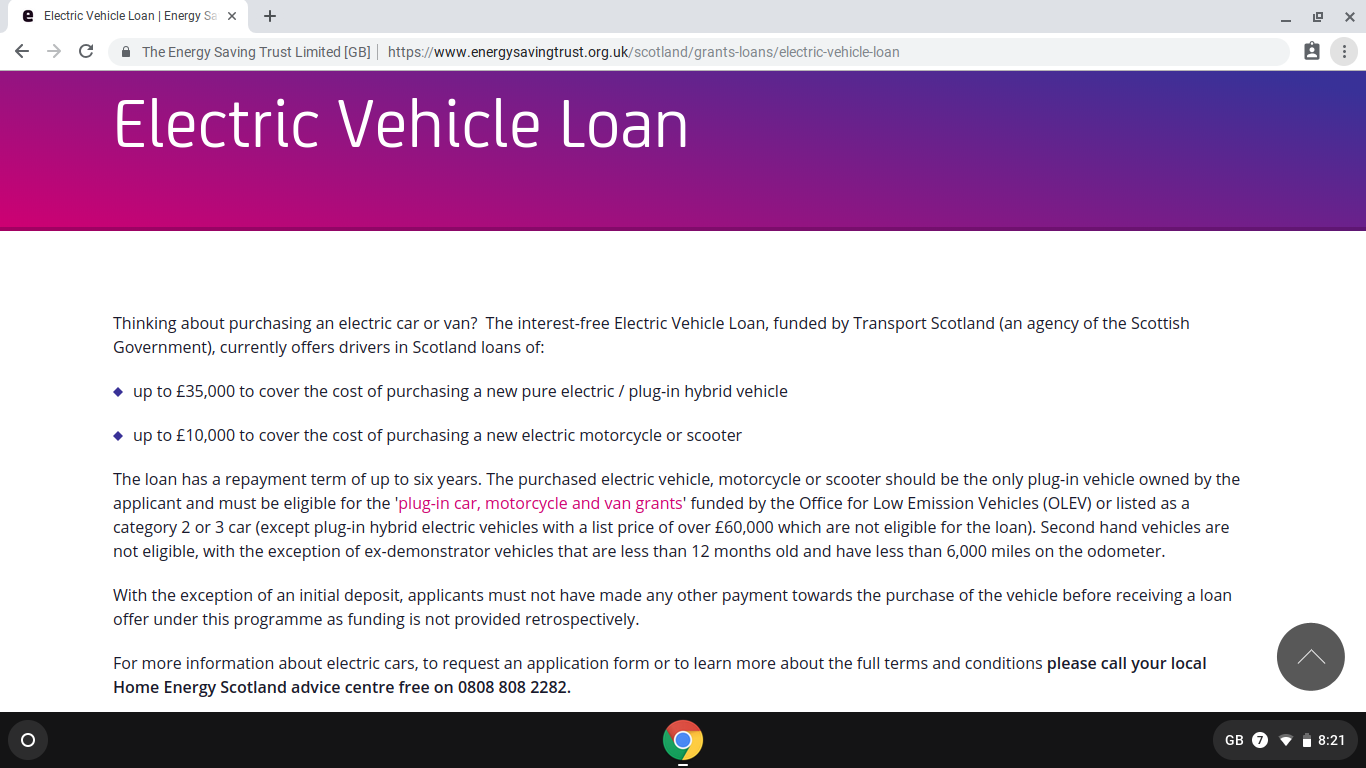
http://energysavingtrust.org.uk/scotland/grants-loans/electric-vehicle-loan
 1 point
 -
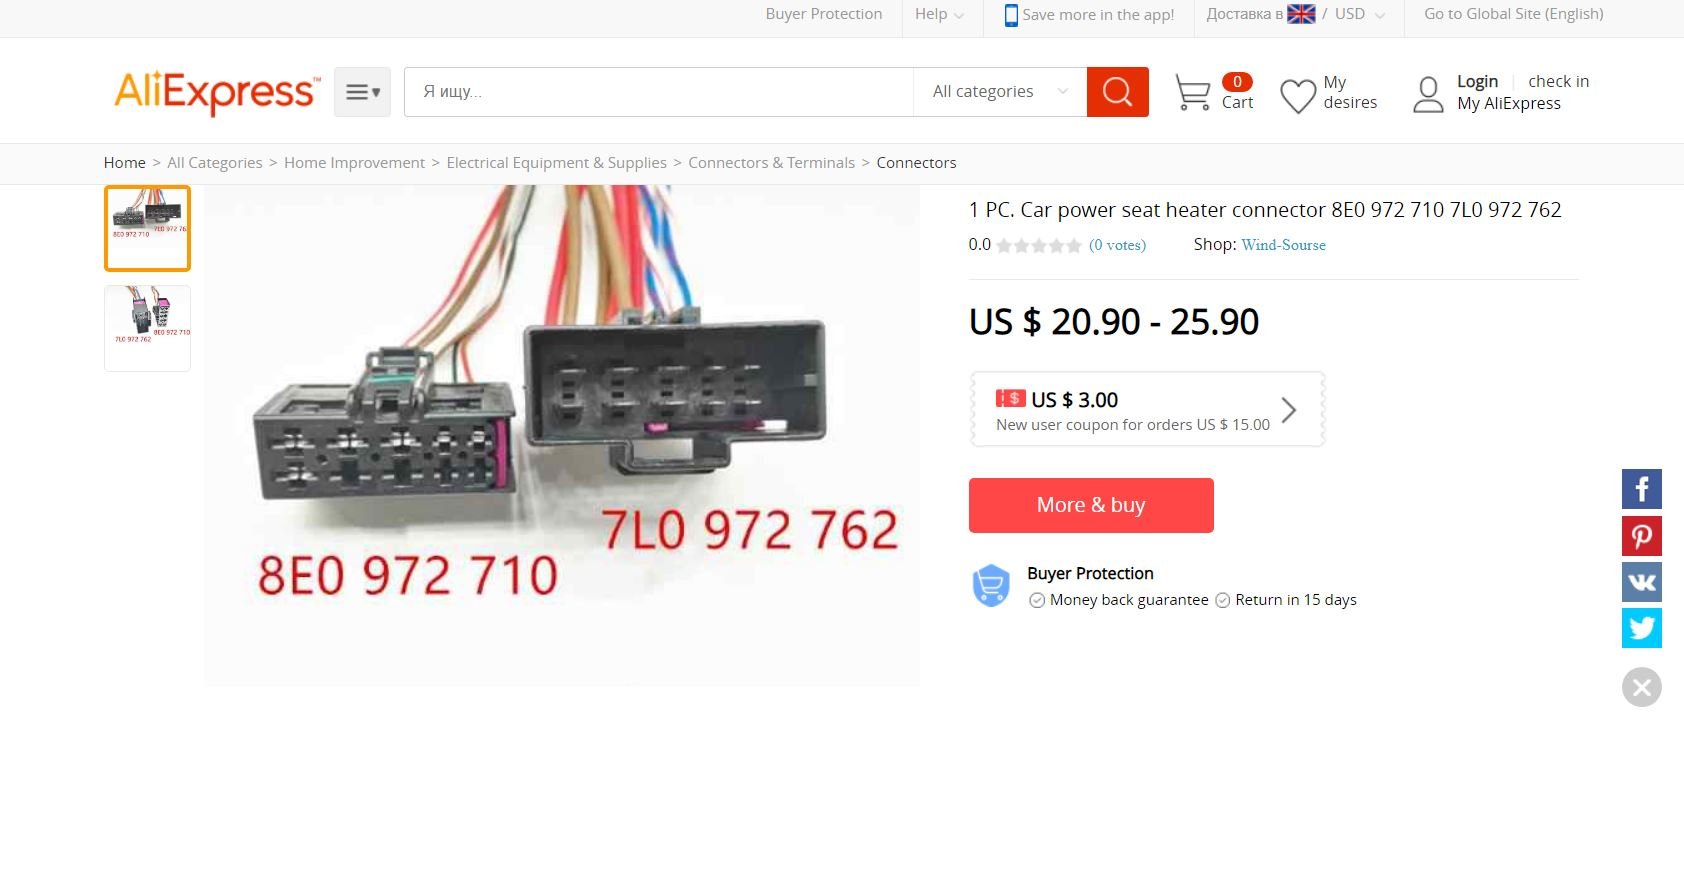
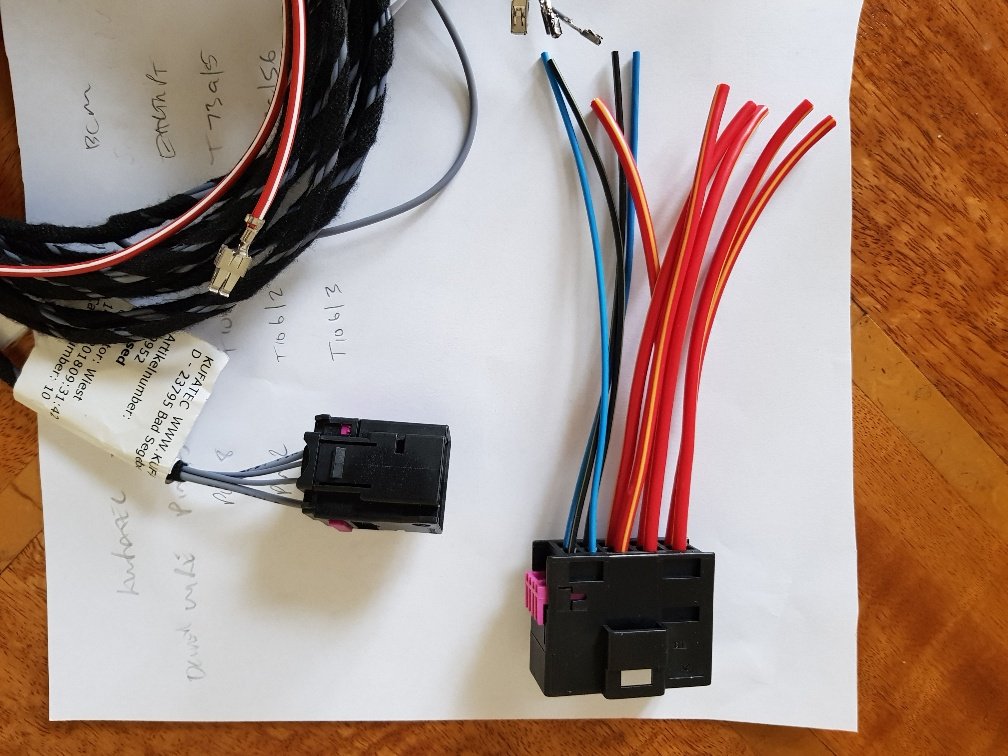
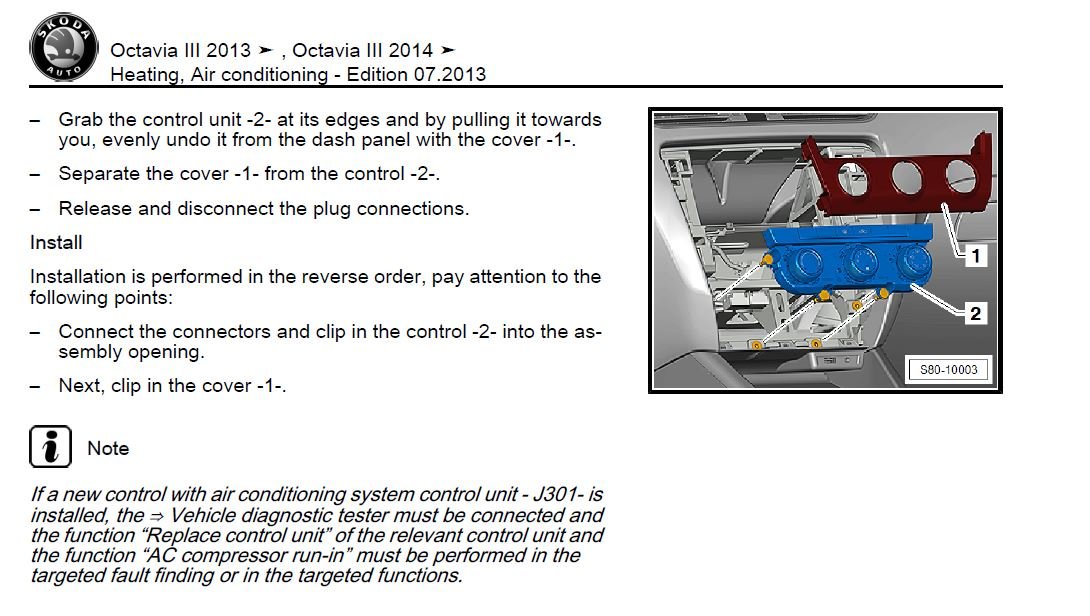
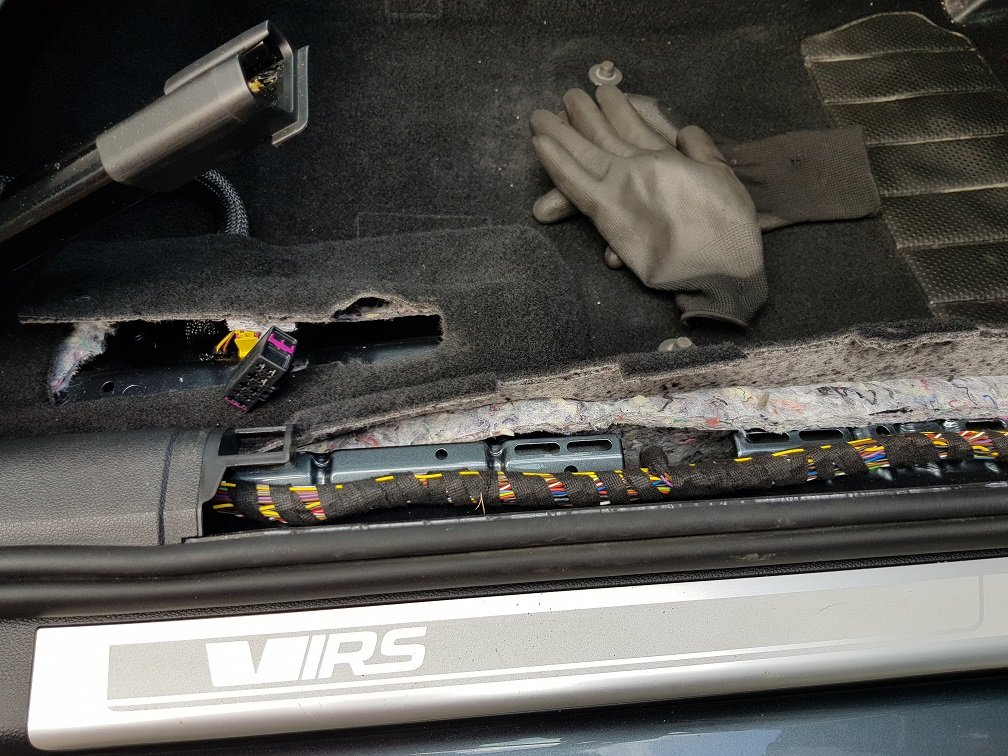
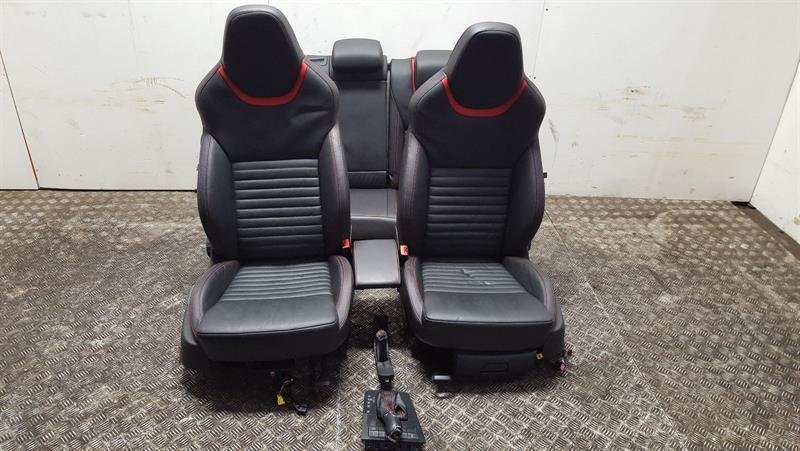
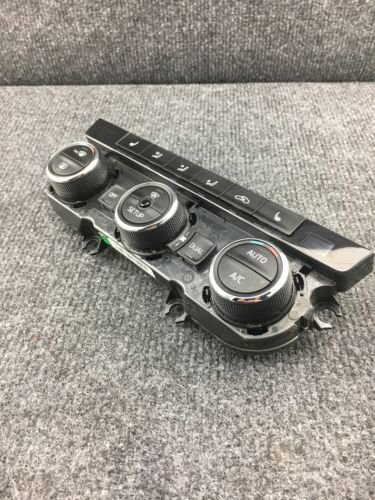
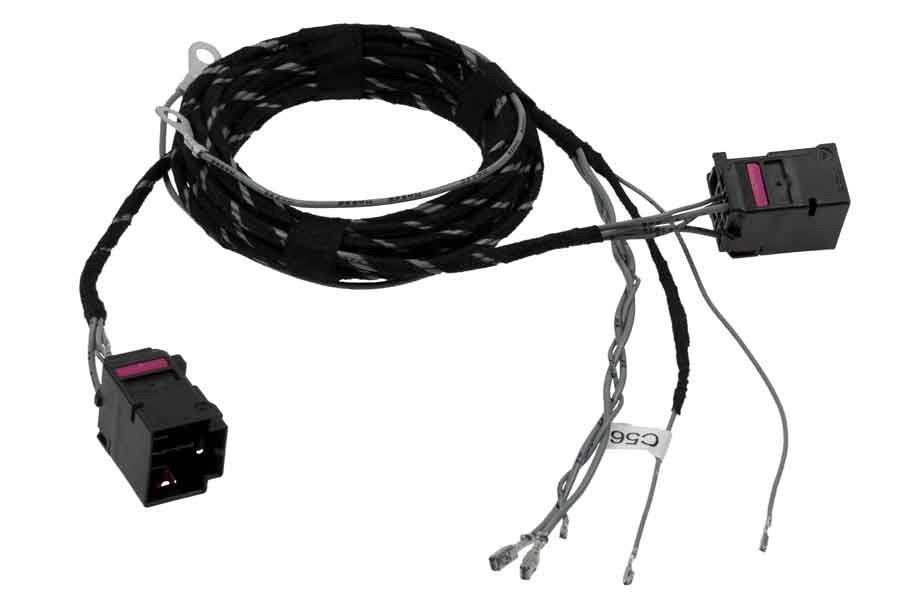
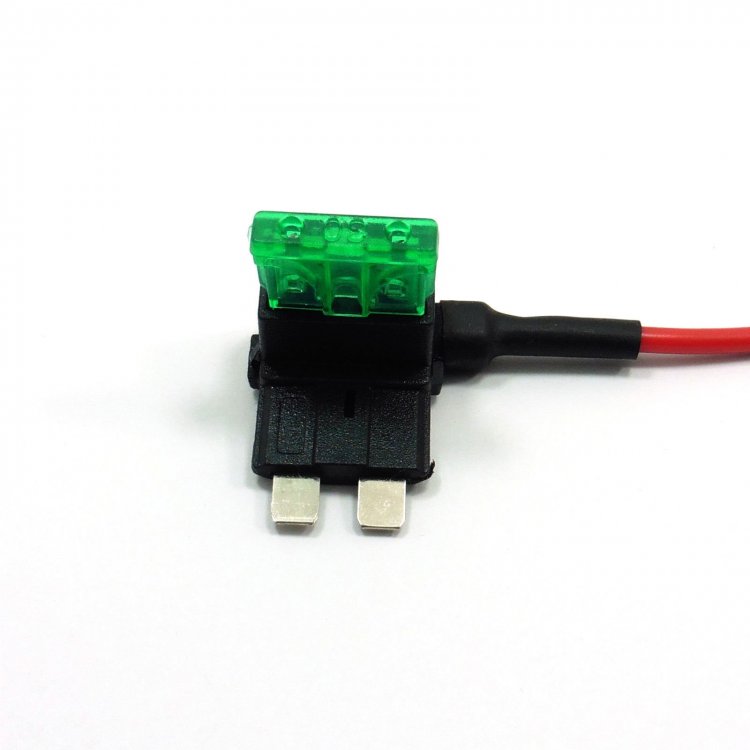
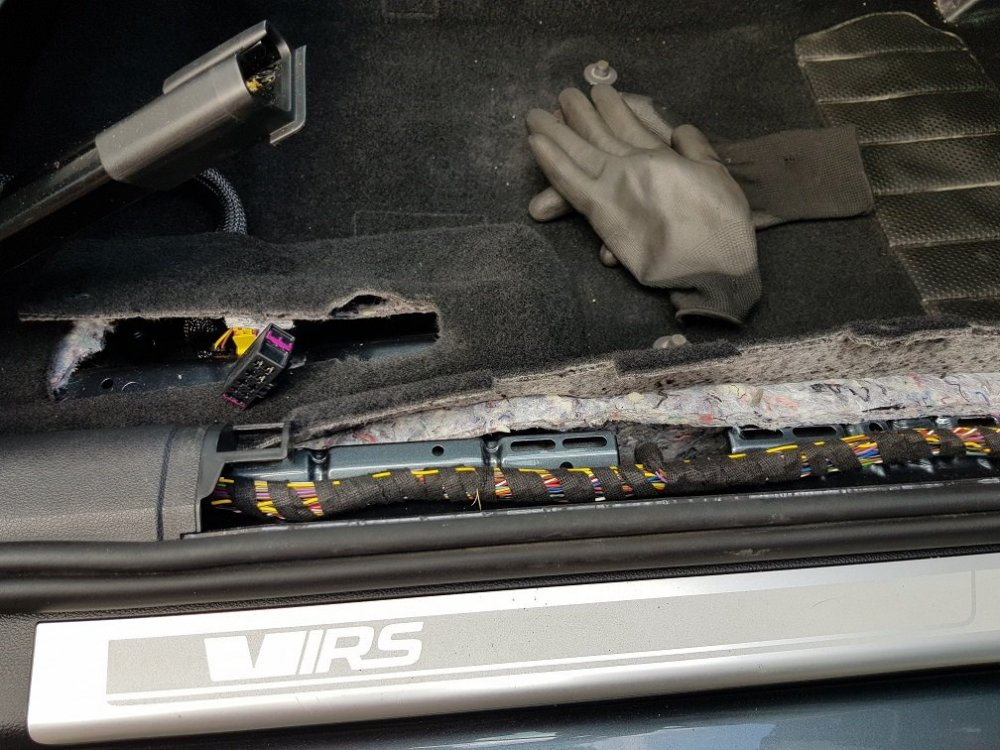
1 pointHaving finally wired up my retrofitted heated leather seats I thought I’d put some info on the forum so it may help others. I’d like to sincerely thank jackfrost & JohnnyType2 who offered great advice, helping a complete electrical novice to figure this out. To do the retrofit you will need: 1. Leather seat interior (eBay £300-£500). If like me you are changing a half leather vRS interior make sure you get all the trims if changing colour (I went from silver to red), i.e. hand break gaitor, leather armrest, gearstick and gaitor and steering wheel (although I’ve kept my silver stitched one). The front seats are heated and come with the wiring and 12-pin (female) plug. 2. Climatronic panel with heated seat switches (5E0907044N, eBay, £40-£50) 3. Wiring harness – Kufatec make a heated seat wiring harness for the Mk7 Golf (MQB platform, the same as the Mk3 Octavia), this is what I’ve used (£66.50 including postage from Richter Sport). The Kufatec harness comes with installation instructions of where to wire into the BCM/fuse box/earth. I cross checked with the Skoda wiring schematics having downloaded these from Erwin. 4. Male 12-pin connector plug (part number 7L0 972 762, AliExpress, about £18 for two). You could do this without the connector and just solder the wires together and heat shrink with plastic tubing. I wanted the option of easy disconnection of the seat wiring if needed in the future. 5. Standard piggyback fuse (eBay, approx £2.00) and 25a fuses (I used two). 6. OBDeleven or VCDS to code the seats to the car. You will also need some tools such as a wire stripper/crimping tool, snips, plastic trim removal tools, kneeler (if your knees are hammered, like mine), plasti-ties (to re-tie the wiring around the BCM plugs), de-pinning tools, multi-meter to check continuity of the wires in the harness once pins are changed over (see below). Procedure: Swap out the interior and give it a good clean. vRSAnt has a cracking guide on how to remove the seats: On the Golf Mk7 wiring harness, change the 8-pin VW plug over to the 12-pin Skoda so that the harness will connect to the seats. I managed to reuse the crimps from the AliExpress male socket and attach these to the Golf Mk7 harness. There’s a video on YouTube that explains how to do this (https://www.youtube.com/watch?v=OK7M4voWYOo) although I used small watchmaker flat head screwdrivers to prise out the neck of the crimps. Once the crimps were changed over, I checked continuity of each wire in the harness using a multi-meter. De-pin the redundant pins/wires on the AliExpress plug. There is an extra wire in the Golf Mk7 harness that connects from BCM plug A to the (SC) fuse box behind the glovebox. You need to cut the female connector off and join the cable to the piggyback fuse (crimp or crimp and solder) and use 2 x 25A fuses in the piggyback. Next you need to swap out the climatronic panel. Remove the radio fascia using removal keys (about £2 from eBay) and disconnect the radio, then remove the trim in front of the cimatronic panel and then the climatronic itself. Remove the wired connections, swap over and put the trim and radio back. Now you’re ready to connect up the wiring harness. Before starting I disconnected the negative of the battery. Remove both front seats, unscrew (10mm torx) four screws per seat, so that you can access the void under the carpet where the seat connections go. On the passenger side remove the trim along the door base, having first removed the bonnet release lever, and then remove the side panel on end of the dash (to the left of the glove box) and the glovebox. Doing so will allow you to get your hands in to the BCM plugs to remove them. See JohnnyType2’s comments in this thread: Remove all three plugs (A, B & C) from the BCM. You will need to connect wires & spades (male connector) to Plug A and C. The “extra” wire is connected from the BCM plug A to the fuse box (SC26 with 25a fuses). Once wired up, replace the plasti-ties around the neck of the BCM plugs and reinsert them into the BCM. Connect the earth to the earth point beneath the insulation at the door sill and run the cable along the existing harness and feed the male heated seat connector into the void beneath the seat and connect the male/female plugs. On the driver side; I initially just ran the wire over the centre console and connected the male & female heated seat plugs together to check all was ok. Now you can reconnect the battery and start the car. Clear all fault codes with OBDeleven or VCDS. Then go to 09 Central Electrics and under long coding look for the byte that mentions heated seats, select it and change to heated front seats and code/save. Unfortunately, I can’t recall the exact wording but it’s more or less as described; you are only changing one setting. The seats should now be working The wiring harness from the BCM to the driver’s side can be routed up behind the glovebox and the radio fascia (remove to access the void to the rear) and then run down behind the carpet at the pedals and along the door sill where the existing wiring is. Then earth to the earth point on the sill and connect the male/female heated seat plugs in the void beneath the seat. Replace all trim, glovebox and side panel and bask in the warmth of heated seats. Just in time for spring


 1 point
 -
Hi all, After much procrastinating I collected a Superb 280 Sportline Estate at the end of January. I was toying with getting a new Skoda Superb and found the posts on this forum really valuable. I've been on here quite regularly as a guest, reading your experiences, hints and tips and am very thankful for all the useful info. I've only just registered an account so by way of giving something back here are some details of a 2-channel dashcam I've just fitted to my Superb. Hope this helps anyone considering a similar install. I decided I wanted a good quality but discrete 2-channel dashcam system recording front and rear simultaneously and ideally one which would do a little stealth recording whilst parked and switched off. I wasn't worried about a built-in screen as I'd take videos off with a smartphone or simply pull the memory card out when necessary. I've tinkered with car audio in the past and am not afraid of a little wiring if required, but I wouldn't call myself an expert by any means. Enthusiastic amateur if you will... I first looked at the Nextbase Duo (https://www.nextbase.co.uk/dashcams/in-car-cam-duo/) which has a screen, but decided against it due to the fact the Superb estate is such a long beastie, I doubt it would see much out of the rear window. In addition the front and rear cameras do not pivot up and down so once you've set the front angle best to see the road ahead, some people had found the rear camera recording more of the headlining or interior. It was quite a sizable thing and the inclusion of screen made me think I'd feel nervous about leaving it in the car. I decided against. Blackvue models looked good, in particular the DR650S (http://blackvuehd.co.uk/product/blackvue-dr650gw-hd-2ch-2) however for "parking-mode" recording it needed an additional "Power magic" adaptor thing, or a very expensive battery pack which added additional cost and complexity. Definitely looked the best in terms of aftersales support though. After much research I settled on one from Lukas/Qvia. A relatively unknown company I found initally, with very few reviews on the web, but with most of these things being made in China, Taiwan, South Korea etc, being from the latter didn't particularly concern me if there was a knowledgeable UK distributor. TTW were the guys and I found the one I wanted here: https://lukashd.co.uk/product/qvia-ar790-wd-2ch-dash-camera/ I chose the snappily named Qvia AR790-WD. It looked very similar to the Blackvue above, being quite small and with no screen included. It came with a very small front and rear camera and the inclusion of a super-capacitor (rather than a battery) meant it would last better in hot sun / cold weather and because all the power "smarts" were built in, no additional battery packs or adaptors were required. Once fitted, the super-cap charges up and holds some current and the camera has a built-in fail-safe setting to shut down if it detects the car's battery voltage drops below a certain level. The cameras can then be set to record when motion is detected front or rear, or to continually record on a kind of timelapse mode. So far I've opted for the former and it's worked well. Fortunately the only thing it's picked up so far are cars coming and going and the odd late-night wheelie bin deployment by myself and the neighbours. Anyway, on to the install. You can see enough pics of the camera itself at the lukashd link above, so here's how it went for me: First of all, the installation instructions provided are not that great. Enough to give you an idea, but given the breadth of cars out there, clearly not enough for your average novice in a specific vehicle. Proceed with caution and if you're not comfortable pulling bits of trim off your shiny car, get a friend to help or professional to do it for you. The instructions said to mount the front camera first and run the wires behind the headlining. This dashcam has two wires - one to supply power and one to connect the rear dashcam. Both cables would be run across the headlining to the passenger side of the car. The power cable would run down the A-pillar to the fuse box behind the glove compartment and the rear-camera cable would stay at the headlining level, running to the rear of the car. Fortunately the front lip of the Superb's headlining had a nice recess into which cables can be easily tucked (it's like the expect them all to be used as taxis...) What you see behind the rear view mirror - i.e. not very much: (and the eagle-eyed of you will see I took this picture after I'd finished as you can see the rear camera in the mirror) Next task was the remove the front left A-pillar trim. Not complicated, I had some cheap trim removal tools but this one was easy enough to prise away with fingers. Pull outwards away from the pillar at the top edge and continue pulling away from the pillar down the windscreen side. Eventually you can pull upwards slightly away from the dash and it should come free. Behind you can see the airbag and some other wiring. I chose to run the power cable above all this keeping well away from the airbag: Power cable secured with some cable-ties: (I wanted to avoid anything rattling around after all the trim was back in place.) Cable tucked down through the same hole through the foam insulation. Next, open the passenger door and remove the side dashboard trim. No screws, just find a leading edge you can get a trim removal tool under and prise outwards. Note: the trailing cable is still laying ready to be tucked down through the foam insulation at this point (previous pic). Close up of the side panel removed. Get your hand in there and fish out that power cable poking through the foam insulation: Again, once fished through I decided to cable tie to something solid in order to prevent rattles: At this point I removed the glove box, which the manual explains fairly well and I see others have covered in other articles. What comes next depends upon your specific vehicle and the fuse you have. This dashcam requires a permanent 12v supply and a ignition or "accessory" fed supply, along with an earth connection. The dashcam came ready for hardwiring, but I understand a cigarette lighter kit was an option. I opted to use 19x19mm piggy back fuses: https://lukashd.co.uk/product/fuse-holder-adapter-ato-19-x19-mm/ but you might prefer using the mini 11x16mm fuses https://lukashd.co.uk/product/fuse-holder-adapter-mini-111-x16-mm/ The idea with these is that they're a simple way to extend an existing circuit. They come with two slots for fuses - one for the original circuit and one for your new added dashcam circuit. You remove an existing fuse, place the removed fuse into the unoccupied piggy-back holder fuse slot, ensure your 10A dashcam fuse is seated in the other slot and then press the adaptor into the position you removed your vehicle fuse from. I used a tester to find the 12v and accessory feeds, with a little trial and error turning the ignition on and off. Fuse 38 (Trailer electrical socket) was live with the ignition on and Fuse 48 (Blind Spot detection) was a permanent 12v. This is what I ended up with: (Fuse 38 is the top piggy back and Fuse 48 the bottom one) In my case both fuse positions were empty - no fuses present as I have neither of those options on my car. So I had to buy another couple of 10A fuses to complete the circuits. The ground wire was easy to attach, but I didn't take a picture of it. There's a convenient earth screw position just under the glove box to the left hand side. Easy to find. With wires in place it was on to running the cable to the rear camera; by far the most time consuming part of the job. I didn't bother taking pictures of tucking the cable into the headlining across the front left passenger door and rear left passenger door, as it was fairly trivial to feed the cable behind. Just remove a little of the headlining tuck the cable behind and replace. It's very tight around the b-pillar, but again with a bit of help from the trim removal tool, it wasn't too hard. Once you get the cable to the C-pillar that's where the fun starts. In a saloon I guess you have it easy and run straight across the rear headlining. However in the estate (and hatchbacks as well I guess) you get the quandary of how to get the cable through to the rear window properly. Ideally you don't want a loose cable spanning the gap between the headlining and the boot, especially when the hatch opens and closes. This is the cable tucked just into the headlining, optimistically thinking there'd be some easy way to go from here to the boot lid. Nope. The only way to go is through the c-pillar, out through the connecting boot grommets and up into the tailgate. So C-pillar trim needs to come off and cable threaded through into where that top grommet meets the left side of the car. Here's the C-pillar with the trim removed (comes off much like the A-pillar one). The cable needs to come down from the headlining into here: Enter stubby oaf-like finger to tell you where to run the cable. I chose the C-pillar to hold all the surplus cable. Don't do what I did and thread it all through to the tailgate, only to find you there's no room for all the surplus up there. Don't pull it all through to the tailgate like I did, only to have to pull most of it back through again... This was not fun. With one hand poking the cable up through the c-pillar, somehow you have to feed it to the hole where that rubber grommet was. I opted for cable ties and insulating tape. If you can get the cable ties through to your cable, tape the insulating tape to the cable (carefully protecting the metal plug on the end) and pull it carefully through the hole: Now we're on one side of the grommet ducting thing. The cable needs to go through that and there isn't much room in there. Enter the cable-ties again to pull the wire through: Note: those grey plastic bits hold the rubber grommet ends tight to the body panels. They are easy to get off and a right pain to get back on again - especially if you have chubby fingers like me. Deploy the missus or someone with small fingers to help. Now the cable's ready to be threaded into the boot lid. My worst fears - the whole boot interior trim has to come off. Lower section has to come off first, then the upper section around the glass. First of all, pop out the electric boot release button (if you have one) and the two interior lights. Remove the plugs from all three of them and poke the wiring back into the holes inside the boot lid. The lower interior trim section just pulls free now - again like before pop out one section (I started near the very bottom of the boot lid) and work your way carefully around, popping out the trim panel with a trim removal tool. The clips are much harder than the interior trim and I was quite worried about damaging the panels. Everything went OK for me, but go careful! Bottom panel removed: One the lower panel is removed, you can start on the upper panel around the glass. This time I started around the sides near the gas struts. Again, level and pop them out carefully working your way up each side first, then across the top. Once free the whole lot pulls downwards away from the raised boot lid. The upper panel removed and laying in the boot: (just so you can see all the clips) With both trim panels removed, the top edge of the boot lid looked like this: You can see the cable hanging out from the rubber grommet. Use the cable-ties again, threading one through from the left hole in the boot lid above to the grommet hole. Tape the camera cable to the cable tie again and pull through. This whole part took me a couple of hours to do tidily and safely but it was worth it. The camera can then be mounted where you choose on the rear window and the cables will be tucked safely out of harm's way. I wrapped the cable in a little extra insulating tape to protect it where it passes under the rear trim. Up to you. Test the camera, make sure everything works OK then refit all your trim panels. Here's the rear cam. There's a little raising of the interior boot lid panel, which I guess could be solved by cutting a small notch into it. However it doesn't bother me that much. The rear camera cable would've been better with a right-angle plug in my opinion, but again, not the end of the world. Hope this helps. Any questions, feel free! Roy.1 point
-
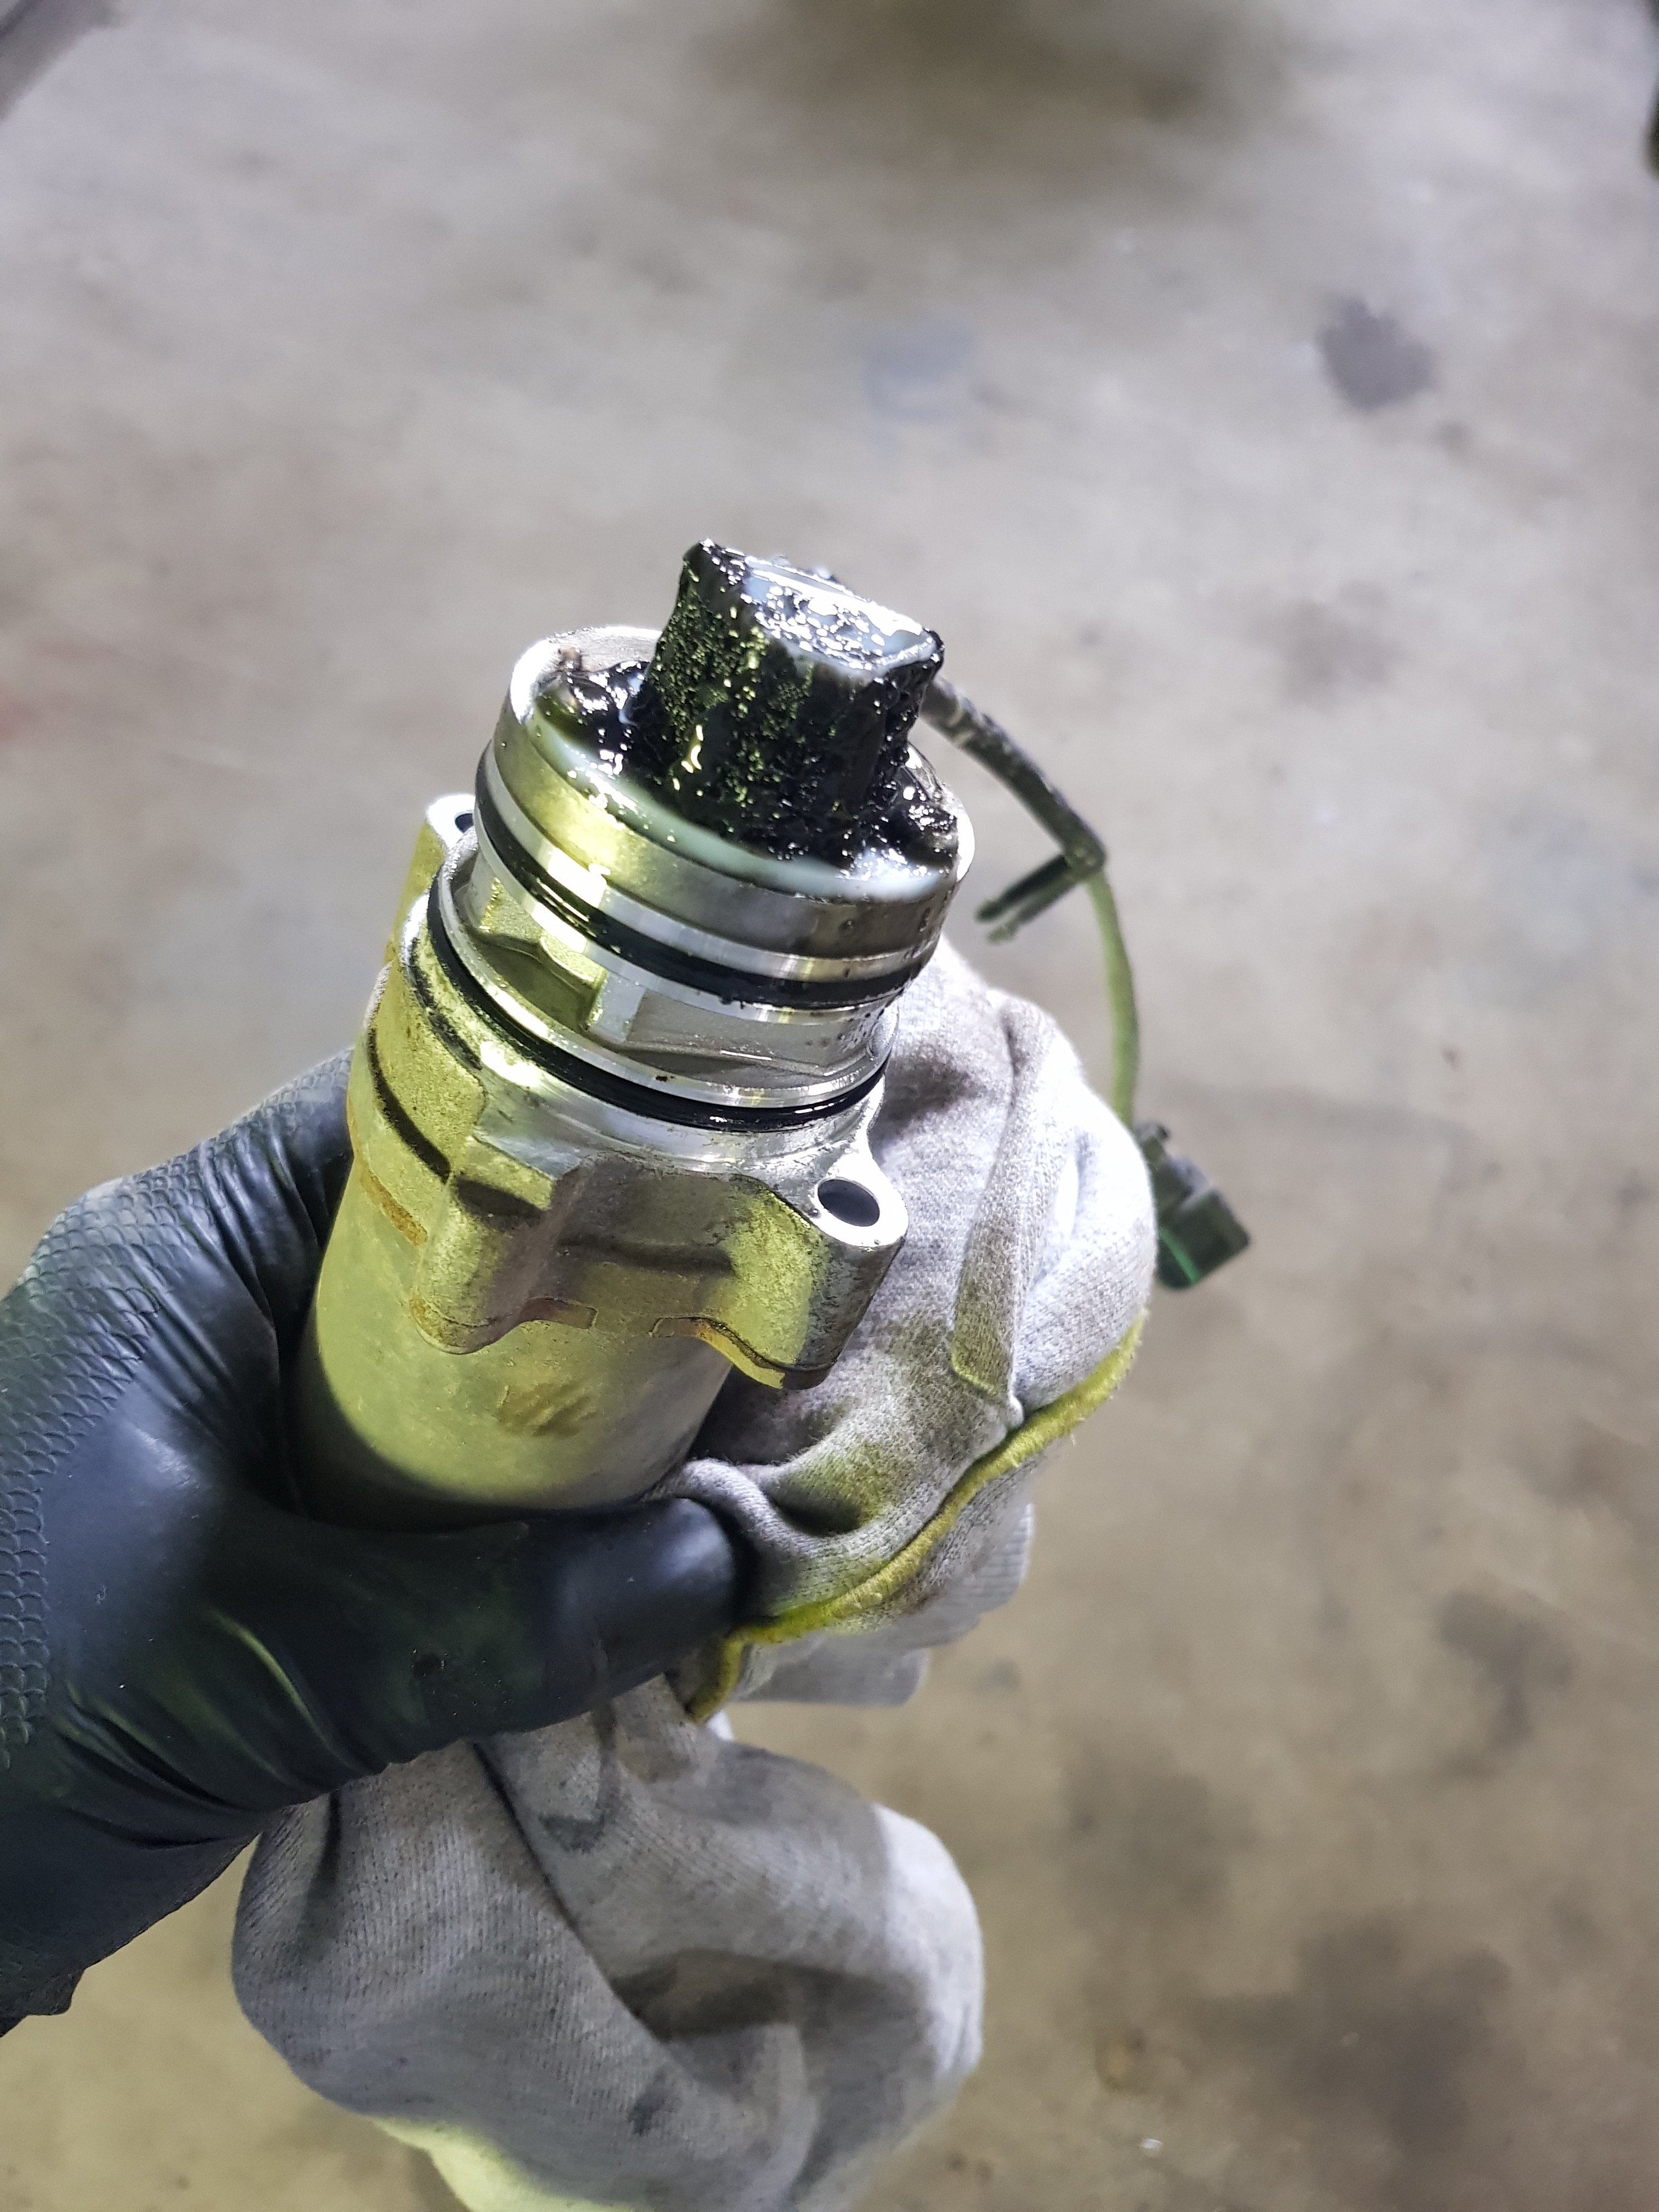
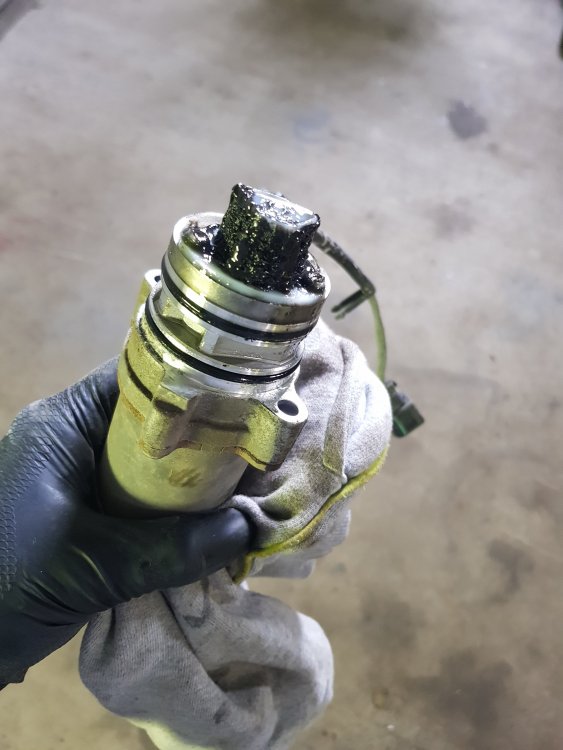
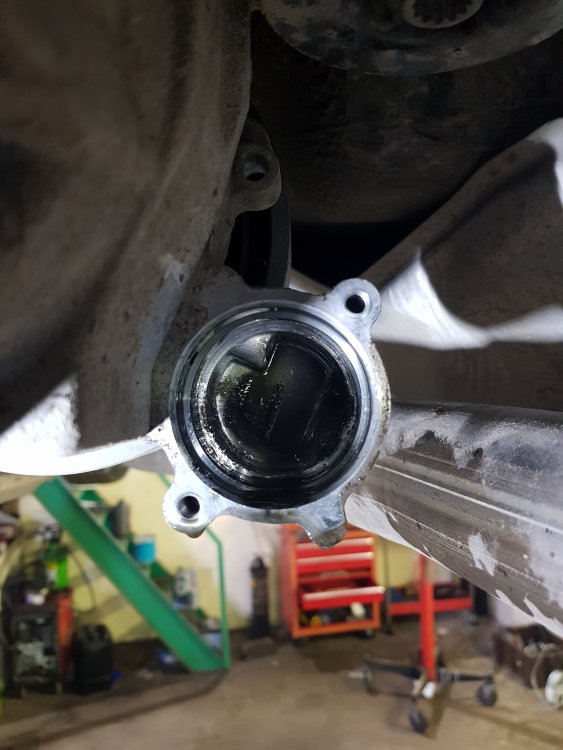
Hi guys, this is my first post but I've been a follower for a while. I changed the haldex oil in MY16 Octavia VRS 4x4 DSG today. The car is under 3 years old and has covered 16k miles. The oil change itself is easy and should be well within a home mechanics capabilities. I was lucky to have the use of a lift in a mates garage but ramps would do the same thing. There's alot of uncertainty out there about the intervals of when it should be changed etc. My advice to anyone is get this oil changed every 15k. From now on mine will be done anually. With the Gen5 haldex there is no filter and the gauze on the pump is very small. It gets completely gunked up and my guess is it will starve the pump of oil. I've included pics below of my pump when I removed it today. I sourced my parts online. The oil, G 055 175 A2, was bought from a Skoda dealer (Dennis Horton) for £24. Replacement o-rings and bolts for the pump were sourced through eBay, link below. https://rover.ebay.com/rover/0/0/0?mpre=https%3A%2F%2Fwww.ebay.com%2Fulk%2Fitm%2F323497629796 Dealers charge up to £80 for this kit! Below is the evidence this oil needs to be changed more frequently than the manufacturer recommends. With the oil changed I already notice a difference, my driveway requires reversing up an incline. Before the oil change I had to rev excessively to get the car to move up it as if I were riding the clutch. With the gauze cleaned and new oil it's zooming up the drive with hardly any extra revs and much more responsive!
 1 point
-Copy.thumb.jpg.e016c3f25ba1ae7b7e476821bb7c61fd.jpg)