


Leaderboard
-
Phil-E
Resident Member7Points12,217Posts -
Lady Elanore
FREEDOM6Points24,875Posts -
MikeTheThinker
FREEDOM5Points8,484Posts -
varaderoguy
Resident Member5Points2,848Posts


Popular Content
Showing content with the highest reputation on 30/06/20 in Posts
-
Here in Germany they actually have tiny little number plates and they're registered with the same state department as cars (registered as a vehicle). It's a legal requirement to have insurance. But they're exempt from TÜV (MOT). So the UK needs to try and do something similar.4 points
-
3 points
-
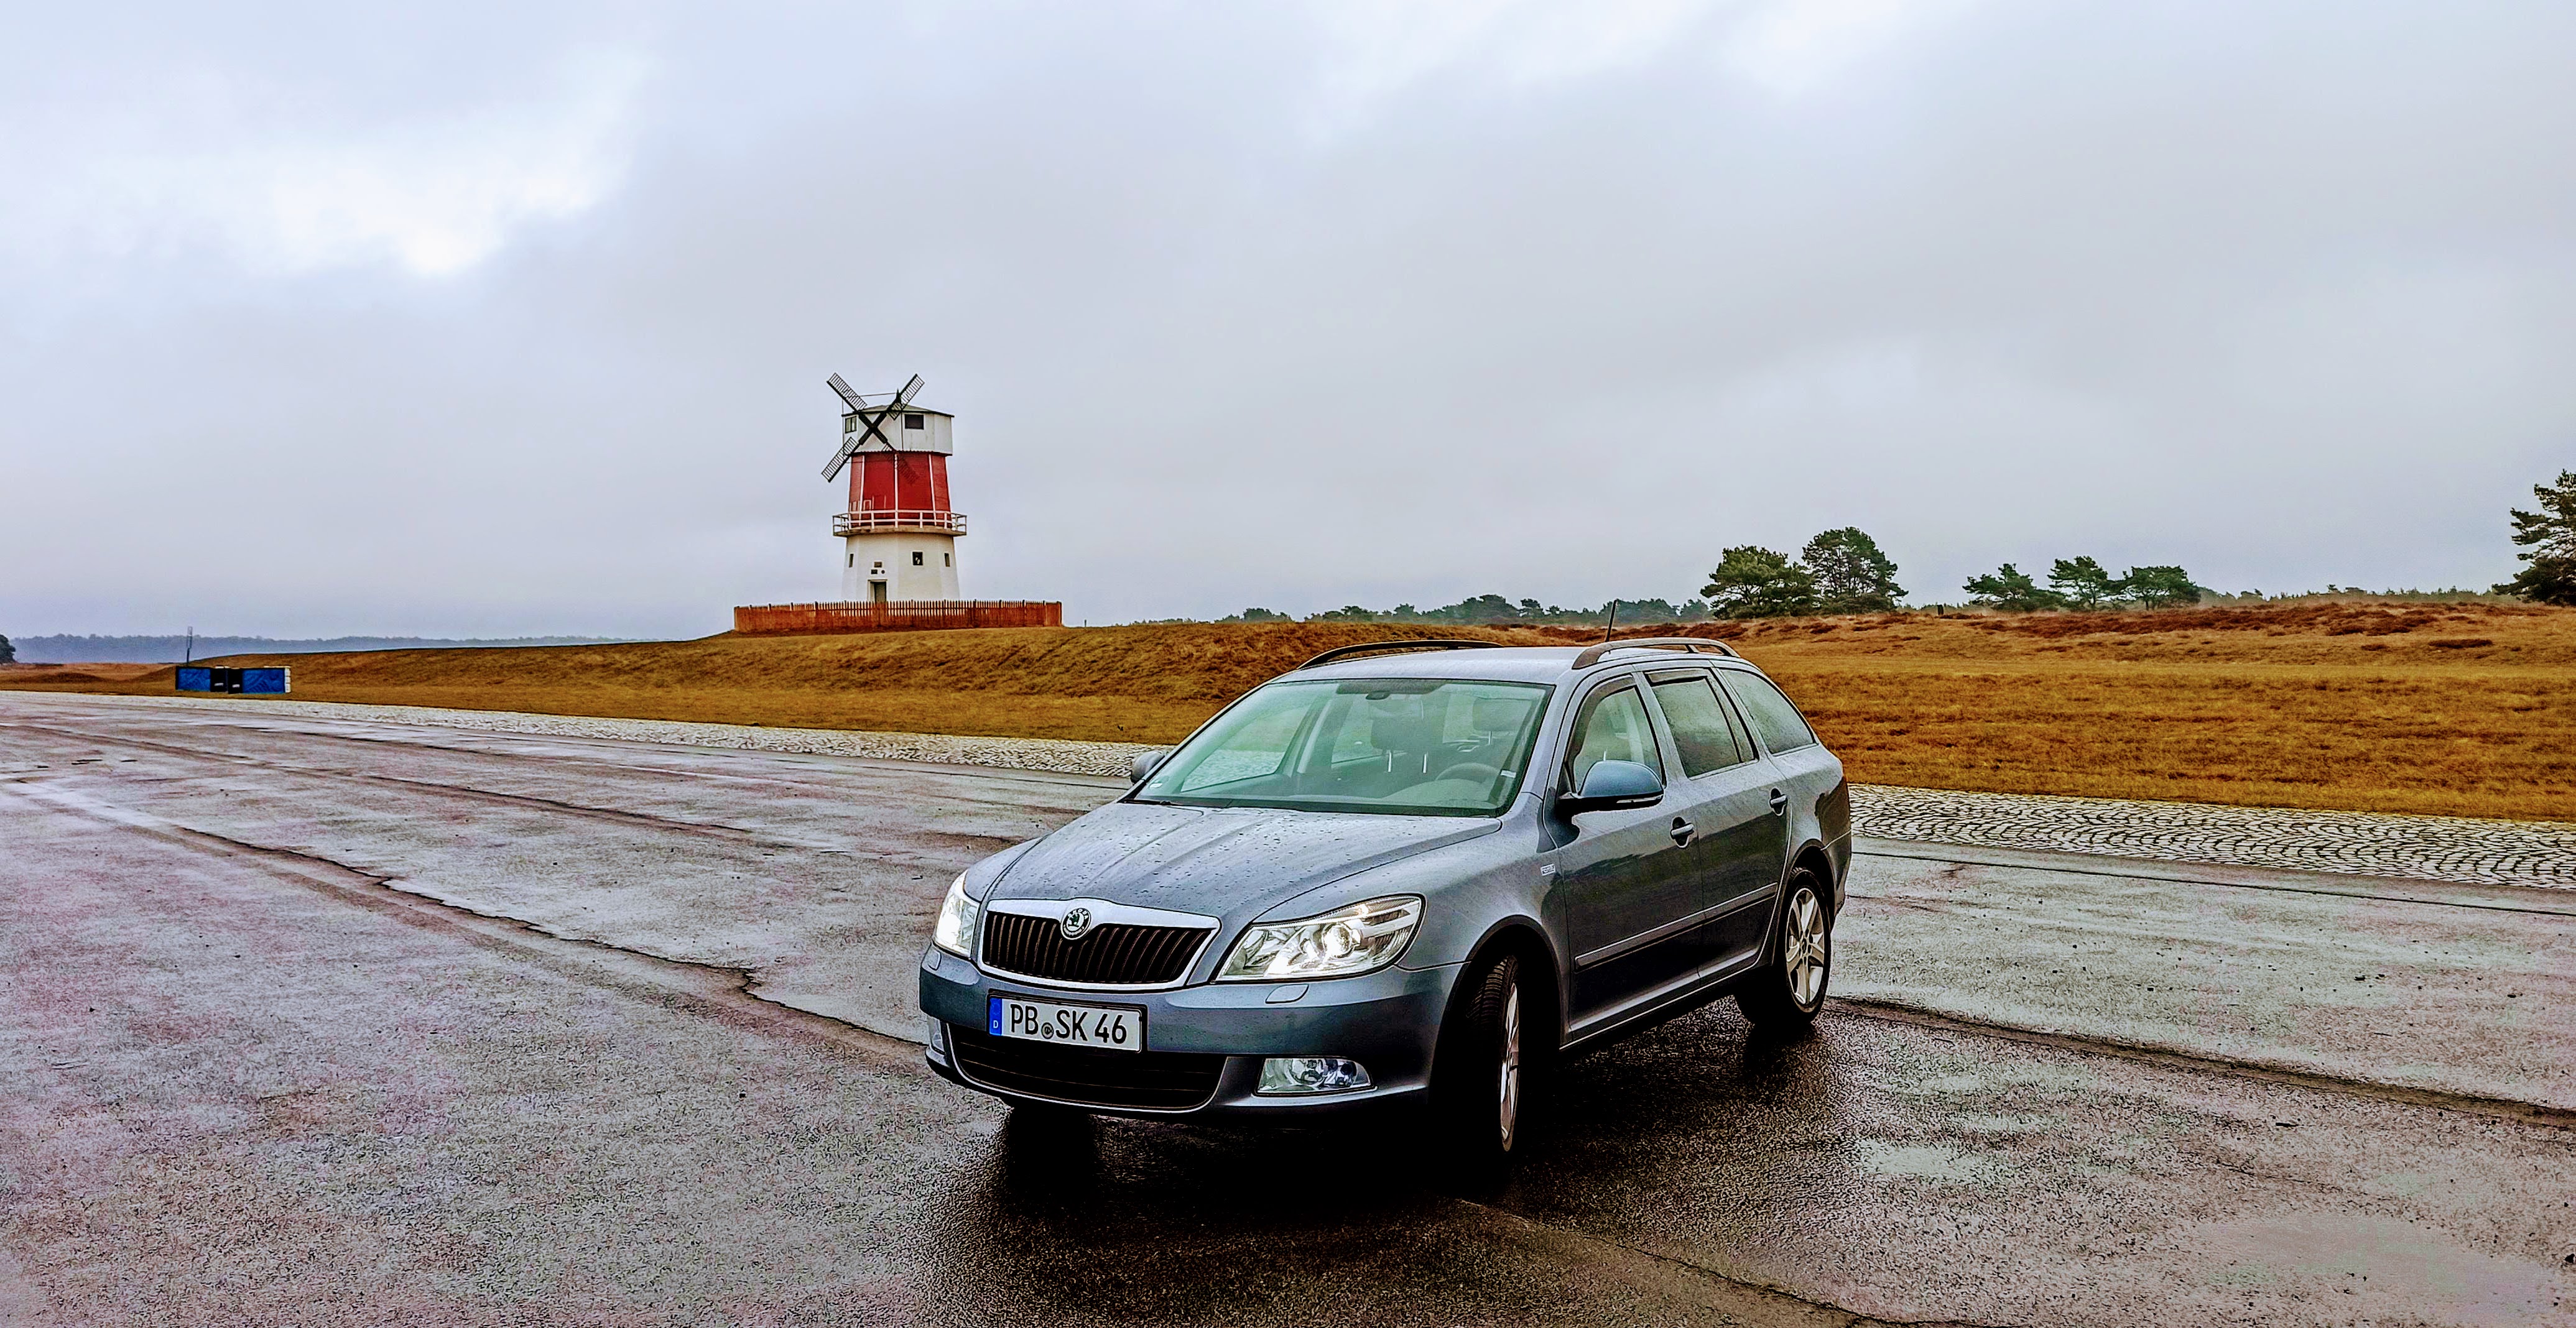
2 pointsSo I'm back in a Skoda finally. 1.4 TSI 122 DSG Family. 1 owner from new with full Skoda service history (apart from the last service done at the dealer we bought from). Specs are: AFS II Xenons Dual zone climate with heated seats Rain sensor Auto lights Cruise control Maxidot Factory tinted rear windows 4 electric windows Variable load surface in boot (not sure what it's called in English) Swing radio (ugh) Factory fitted removebale tow bar Stuff I've done: Rear LED number plate lights (the full replacement housing with built in LEDs) LED sidelight bulbs (although don't think they're canbus as the warning is on- they're Osram) Cheap bluetooth kit plugged into the Aux socket for now VCDS: AFS II enabled (yeah, it appears this isn't actually enabled fully from factory) Refuel quantity CH/LH via fogs XDS Differential enabled Cruise display (didn't work 😔) To-do: Full set of interior LEDs ordered from ebay LEDs for the DRL ordered Canbus sidelights Rear boot trim protector in silver ordered Heko wind deflectors ordered A few scratches to touch up (touch up pen set ordered) Android stereo/sat-nav at some point Gave her a wash and polish today (washed, washed again with clay mitt, autoglym paint restorer, poorboys black hole, meguires tech wax 2.0) Had a maiden voyage down to the Mosel region last week. 3 adults, dog, boot full and 3 bikes on the tow bar. Performed well. Did just over 40mpg which wasn't too bad especially considering the higher (or no) speed limit here. IMG_20200627_110400 by Philip Embleton, auf Flickr IMG_20200627_104056 by Philip Embleton, auf Flickr IMG_20200627_104129 by Philip Embleton, auf Flickr IMG_20200627_104117 by Philip Embleton, auf Flickr IMG_20200627_104159 by Philip Embleton, auf Flickr2 points
-
2 pointsThree Yetis over 10 years, last one for 6 years. All three with pano ceilings and none have leaked. Only issue was TIBET II that was prone to creaking occasionally but Allams sorted it on a service and it was fine after that. Any minor creaks caused by ambient temperature changes are cured by opening (tilt) and closing (untilt!) the roof and letting it reseat on the seals. The light into the cabin is fantastic. The blind shuts itself when it gets cold or wet when parked. The view through the roof is second to none - especially for the back seaters as I found out when a couple of friends and I took TIBET III for a jaunt down to Dubrovnik (threrad elsewhere) and you could sit back and watch the Austrian mountains pass by (when off shift from driving!). I wouldn't have an issue buying a Yeti with a pano roof. Mind you, I don't have an issue with brown leather seats (TIBET III being an L&K) or Tibetan Bronze paint whilst others, who have never lived with such niceties will look the other way. The L&K had a great spec for standard 'extras', what's not to like. As others have said - the naysayers tend to outvote the happy folk - human nature.2 points
-
2 pointsDefinitely get the cambelt and water pump changed at 5 years unless you like to gamble on £5k for a new engine! Brake fluid recommend change every 2-3 years and it's an age thing not related to mileage. Fluid is hygroscopic and absorbs water from atmosphere to the detriment of braking components and performance of the fluid. Not an expensive job so worth doing for peace of mind.2 points
-
So as I mentioned earlier, my car went in for a Racingline OEM stage one remap today. Bloody hell is it now fast! The guy said he started with an extremely healthy engine according to the first run on the dyno. As usual with these engines they usually show better bhp and torque than Skoda quote as standard, as was the case with mine. With the stage one map put in, it then showed 329bhp with 499nm of torque. It was running on Tesco 99ron at the time. It still has the rubbish Pirelli Zero tyres on from new, so I have booked it into another garage for 2 new Michelin PS4S this Thursday. No good having the power if you can't put it down. Very very impressed with the end result after my 30mile drive home. I did say to the guy, have you got a very kind dyno, as the power and torque were above Racingline quoted figures. He said the one they use cost £120k and is very accurate. One day perhaps I will get it on a dyno somewhere else to see what comes up. Never mind the figures though, I LOVE IT. Now I just have to remember the classic line from the film Spiderman, "with power comes responsibility".2 points
-
2 pointsI would definitely recommend getting the cambelt AND waterpump changed at exactly the same time. The 1.4 litre engine (from the Yeti era) is also prone to impeller breakup on the waterpump; the newer replacement waterpumps fix that problem. Cambelt - as has already been mentioned is also important. Its not so much usage as age on these things. I know it is an expensive service, but it is well worth getting it done if you want to keep your Yeti in good shape.2 points
-
2 pointsI was the guinea pig for the MIB1 Amundsen several months ago on here - of the 3 Skoda SD cards I have 2 are the smaller 5E0 version plus one of the larger 5L0 version, and I reported on here earlier this year that all 3 work fine in my MIB1 Amundsen.2 points
-
2 pointsNot true, I use three different genuine Skoda SD cards (all purchased second hand on eBay) for maps in my Amundsen - any genuine Skoda SD card can be used with any Amundsen. I'd love to know where this rumour started that Skoda SD cards are locked to one unit - I've seen it posted twice in the last two days but never before, someone somewhere is spreading incorrect information2 points
-
2 pointsHonestly, i think most of the comments are missing the point, OP *seems* to be asking if we think it's an issue with his tyres or the car itself. OPs Issues: 1. They're struggling for grip in the wet. 2. They have miss-matching less known tyres on the front. My comments on these issues; 1. Unless the alignment is out (which i'd assume they'd have had done after the pothole), it's most likely down to the tyres. 2. The front is the important axle, most of the load goes through the front tyres, braking, steering, accelerating, almost all of that is through the fronts, you want the better tyres at the front. Continuing on that; The 16" wheels OP has already, are a good compromise between good handling and good ride quality/comfort, going down to a 15" with 185 width tyres is less rubber contact, less grip, that's not going to help OPs issue. The Dunlops (i'm assuming SP Sport Maxx) are among the better ones in terms of grip and handling, so there's no need to change them really. Ideally, you want the same tyres on all 4 wheels, failing that, you want a good matching pair on the front. So that leaves two main options; Swap the fronts and rears over, so the grippier dunlops are on the front, where they matter. Replace the existing fronts with new dunlops, so OP has matching tyres on all corners. OP can sell on the part-worn ones to make a little money back. Final consideration; Roads *can* *sometimes* be quite slippery when first wet after a long dry spell. I don't know what the weather's been like leading up to OPs incident, but that could play a role. New tyres don't necessarily grip well "straight out of the box", the tyre may be coated in something to preserve it in storage (like some brake discs are) or just to look pretty, the very first time I had my front tyres changed, i almost went into the middle of a roundabout from spinning the wheels up trying to pull away quickly and understeering badly.2 points
-
2 pointsThe main thing imo is having matching tyres on front and back, to have overall balanced grip and improved handling and feel. The other thing i'd suggest is having your steering alignment checked. If the toe is off, that won't help steering. Make sure it's a place with a laser machine though. I ran my tyres at 33psi with the 16", and 35psi with the 17" (to try to protect the alloys a bit more). Since you have missmatching tyres, you want the better pair of tyres on the front, they're what does the steering, puts the power down, and most of the braking. If you start to lose the rear end, you can accelerate (or countersteer in extreme cases) out of it relatively easy. If you're understeering, you have to let off the loud pedal, that itself can upset the balance of the car and can make the rear end swing out, then you need to press the loud pedal, and if you're still cornering too hard you might lose the front again, it's not too pretty, done it myself on a roundabout, ended up in a different lane.2 points
-
2 points
-
2 points
-
2 pointsThanks for the replies, it is indeed for an Octavia.However I have found another video on YouTube that shows the process from start to finish, Superb 11 wymiana mechanizmu podnoszenia szyby Michal Czerwinski Hopefully this will help someone else out too 👍2 points
-
2 pointsJust realised that I hadn't posted the photos after the obligatory lockdown detailing session! Enjoy 😎2 points
-
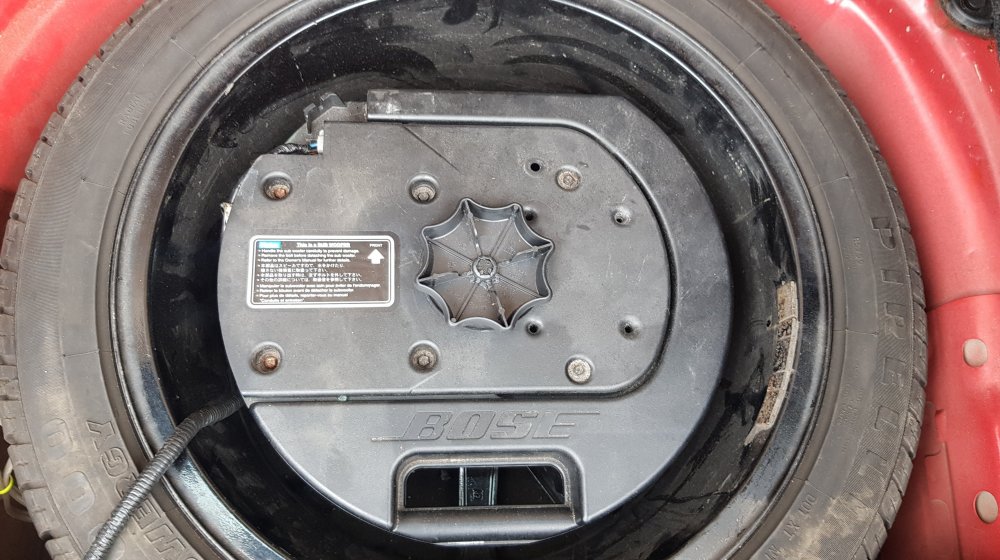
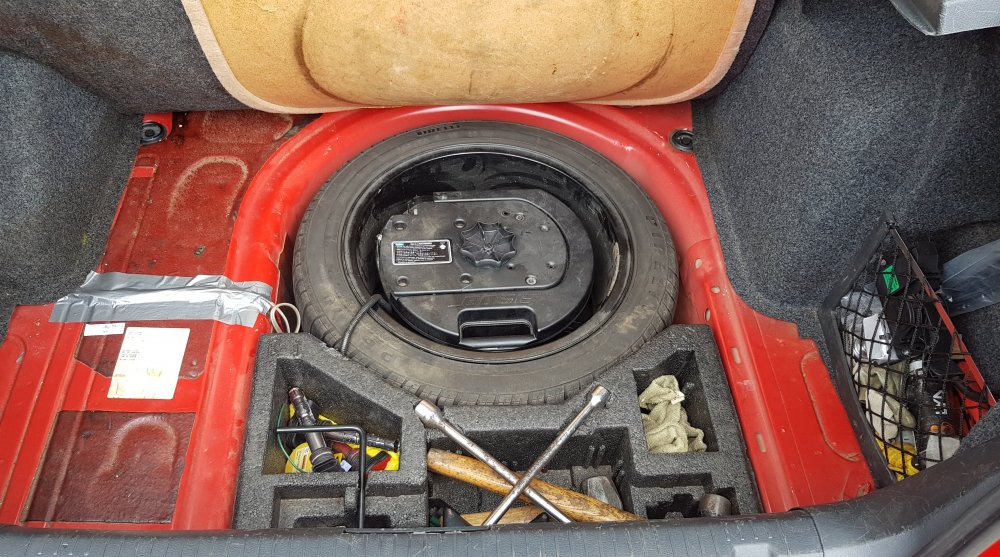
2 pointsCouple of nice subtle upgrades this week. A friend of mine comissioned me to break his car for him and I found a couple of things that I thought would be ideal to enhance mine. First thing was a set of red illuminated switch gear. Looks so much better than the standard green illumination that's hard to see at the best of times. As you can see, the heated screen, asr and fuel flap switches, light switch, all window switches and the climatronic unit now all light up red. Certainly fits my colour scheme much better. The instrument cluster still lights up green but it is possible to change the LEDs if you're careful with a soldering iron. I've ordered the different coloured bulbs and I've got a spare cluster to have a practice on. I've also recently been considering options for fitting a subwoofer, I've got 6x9s on the rear shelf but at the age of 36 I'm long past the days of massive boom boxes filling the boot so wanted something a little more discreet and practical. I came across a little Bose spare wheel subwoofer. It's absolutely ideal as it sits within the spare wheel and was really easy to wire up. It's more powerful than I expected it to be, but certainly not anti social in any way, just adds a nice bit of depth to my old school beats I just cut a little bit of the foam out of the polystyrene boot tidy jobby to move the jack into there so I can still carry the stuff to change a wheel without impacting on boot space. I also wanted the sub and spare wheel to be secure so I simply extended the original wheel holding down thingy with a length of M8 threaded rod and an M8 sleeve nut so it still all screws down into the existing hold down point. Pretty pleased with this little mod
 2 points
 -
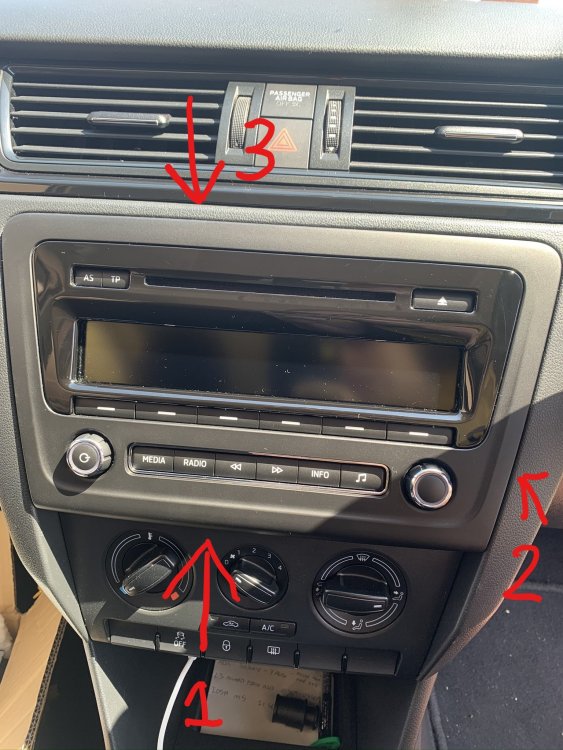
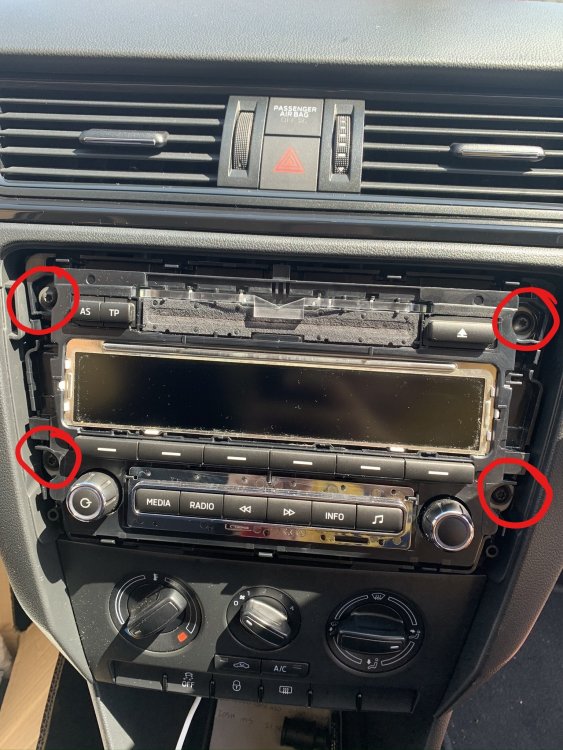
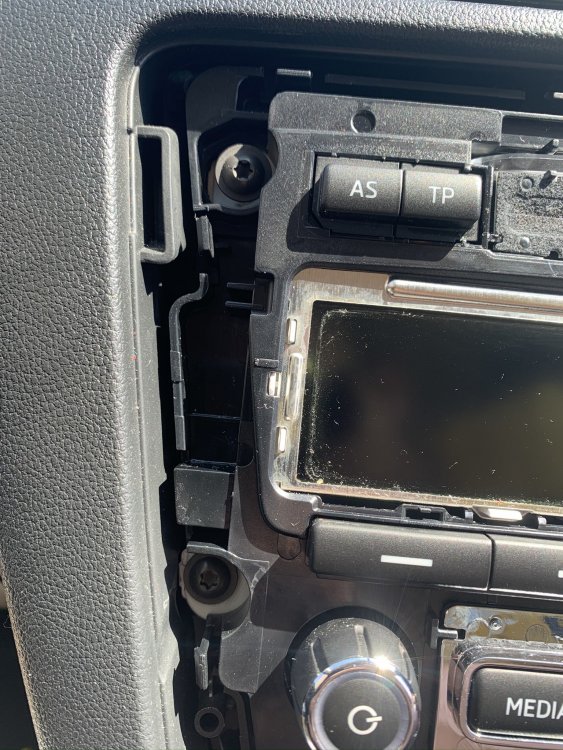
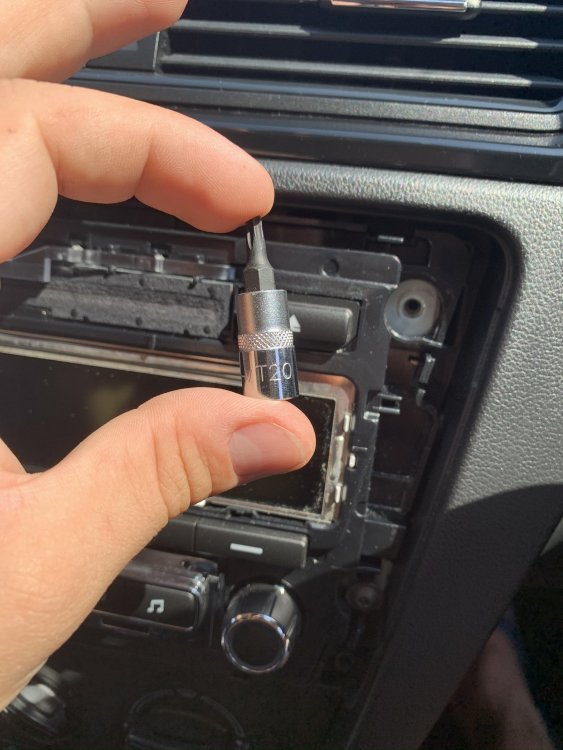
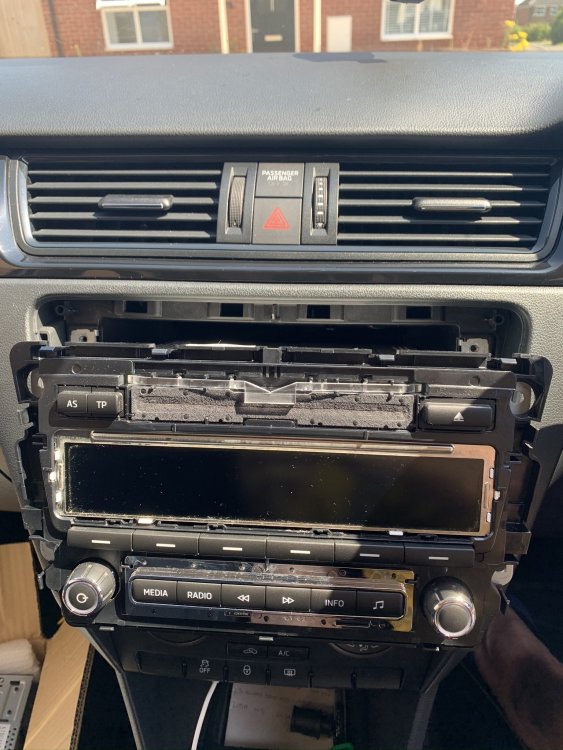
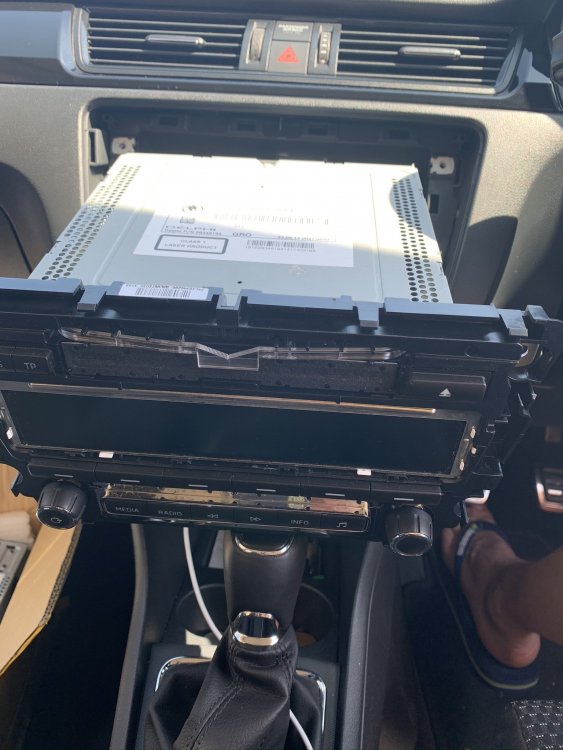
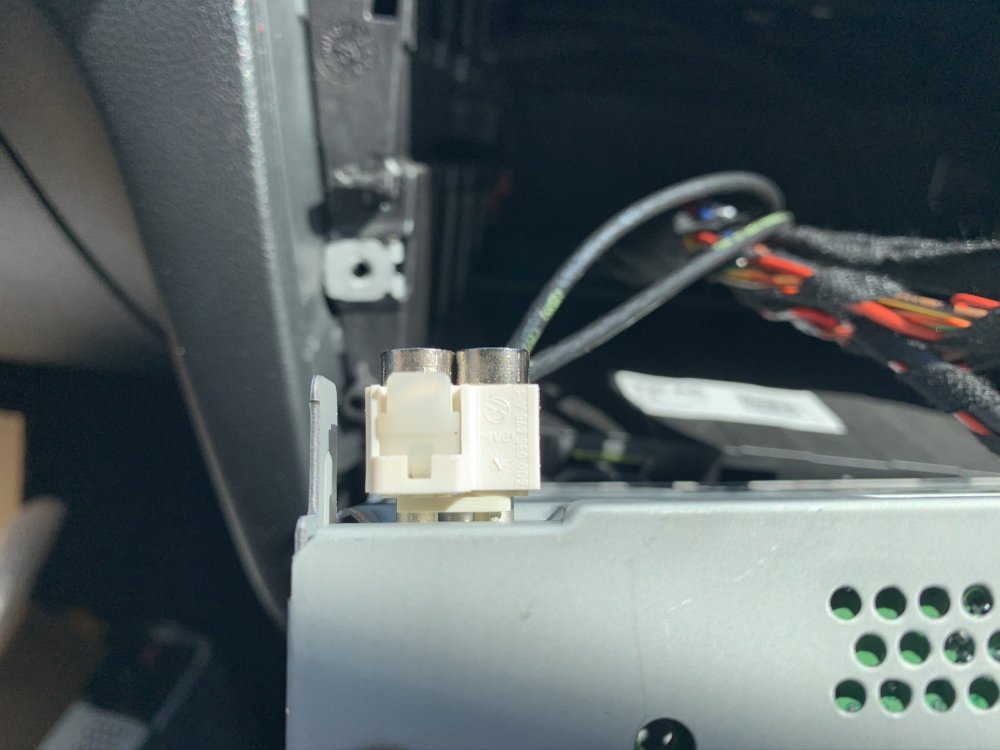
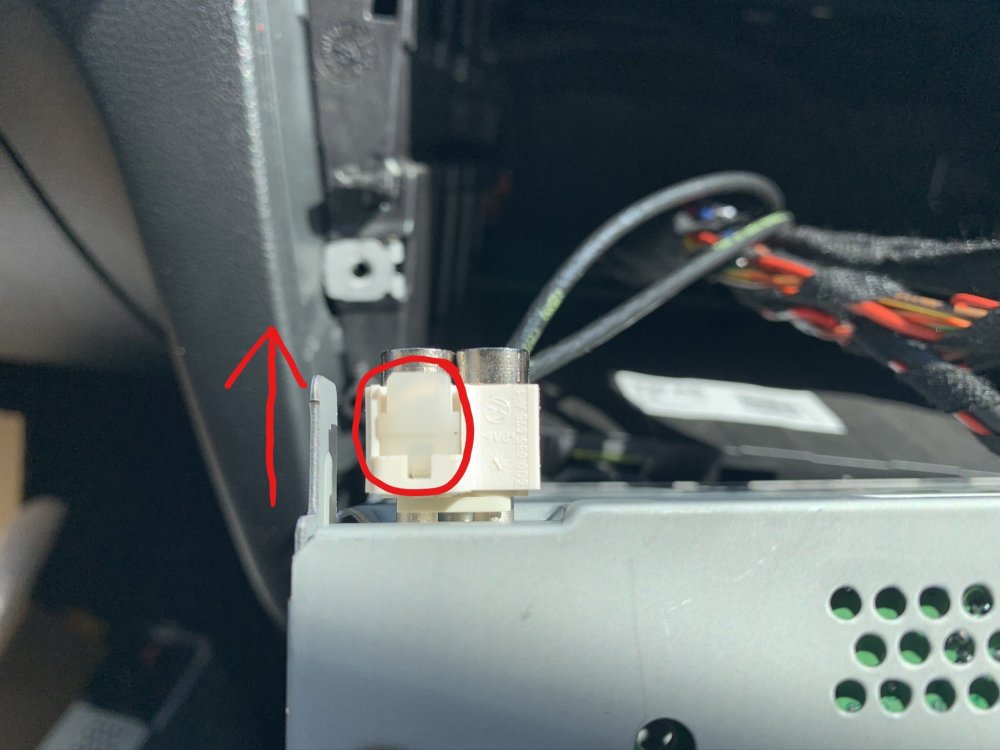
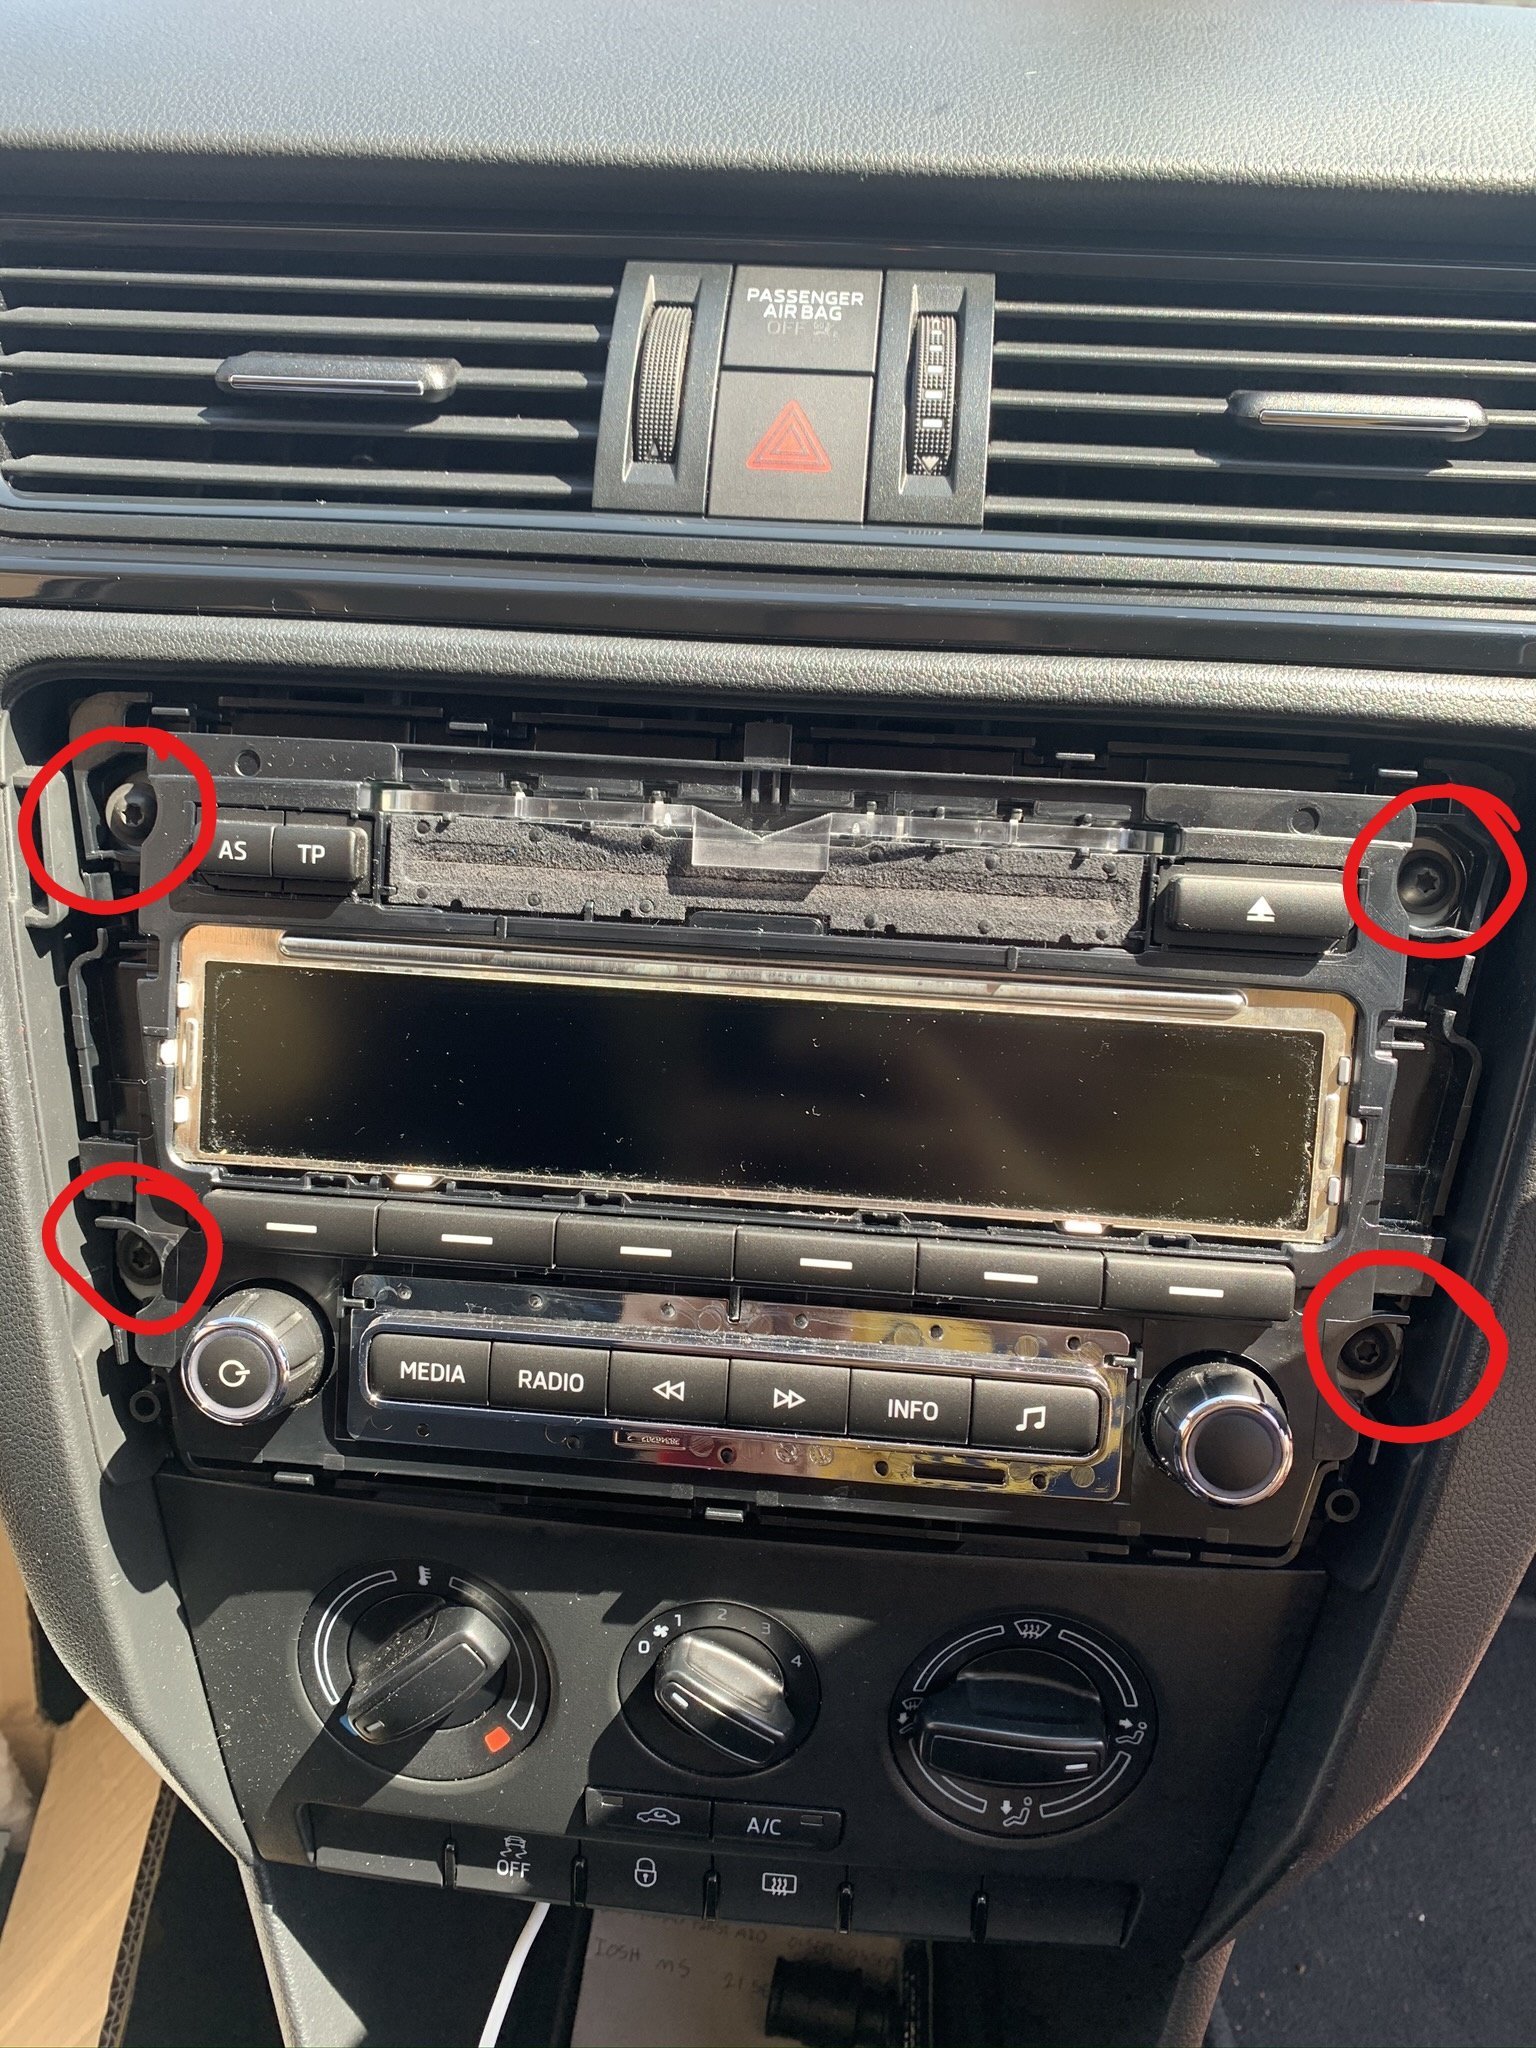
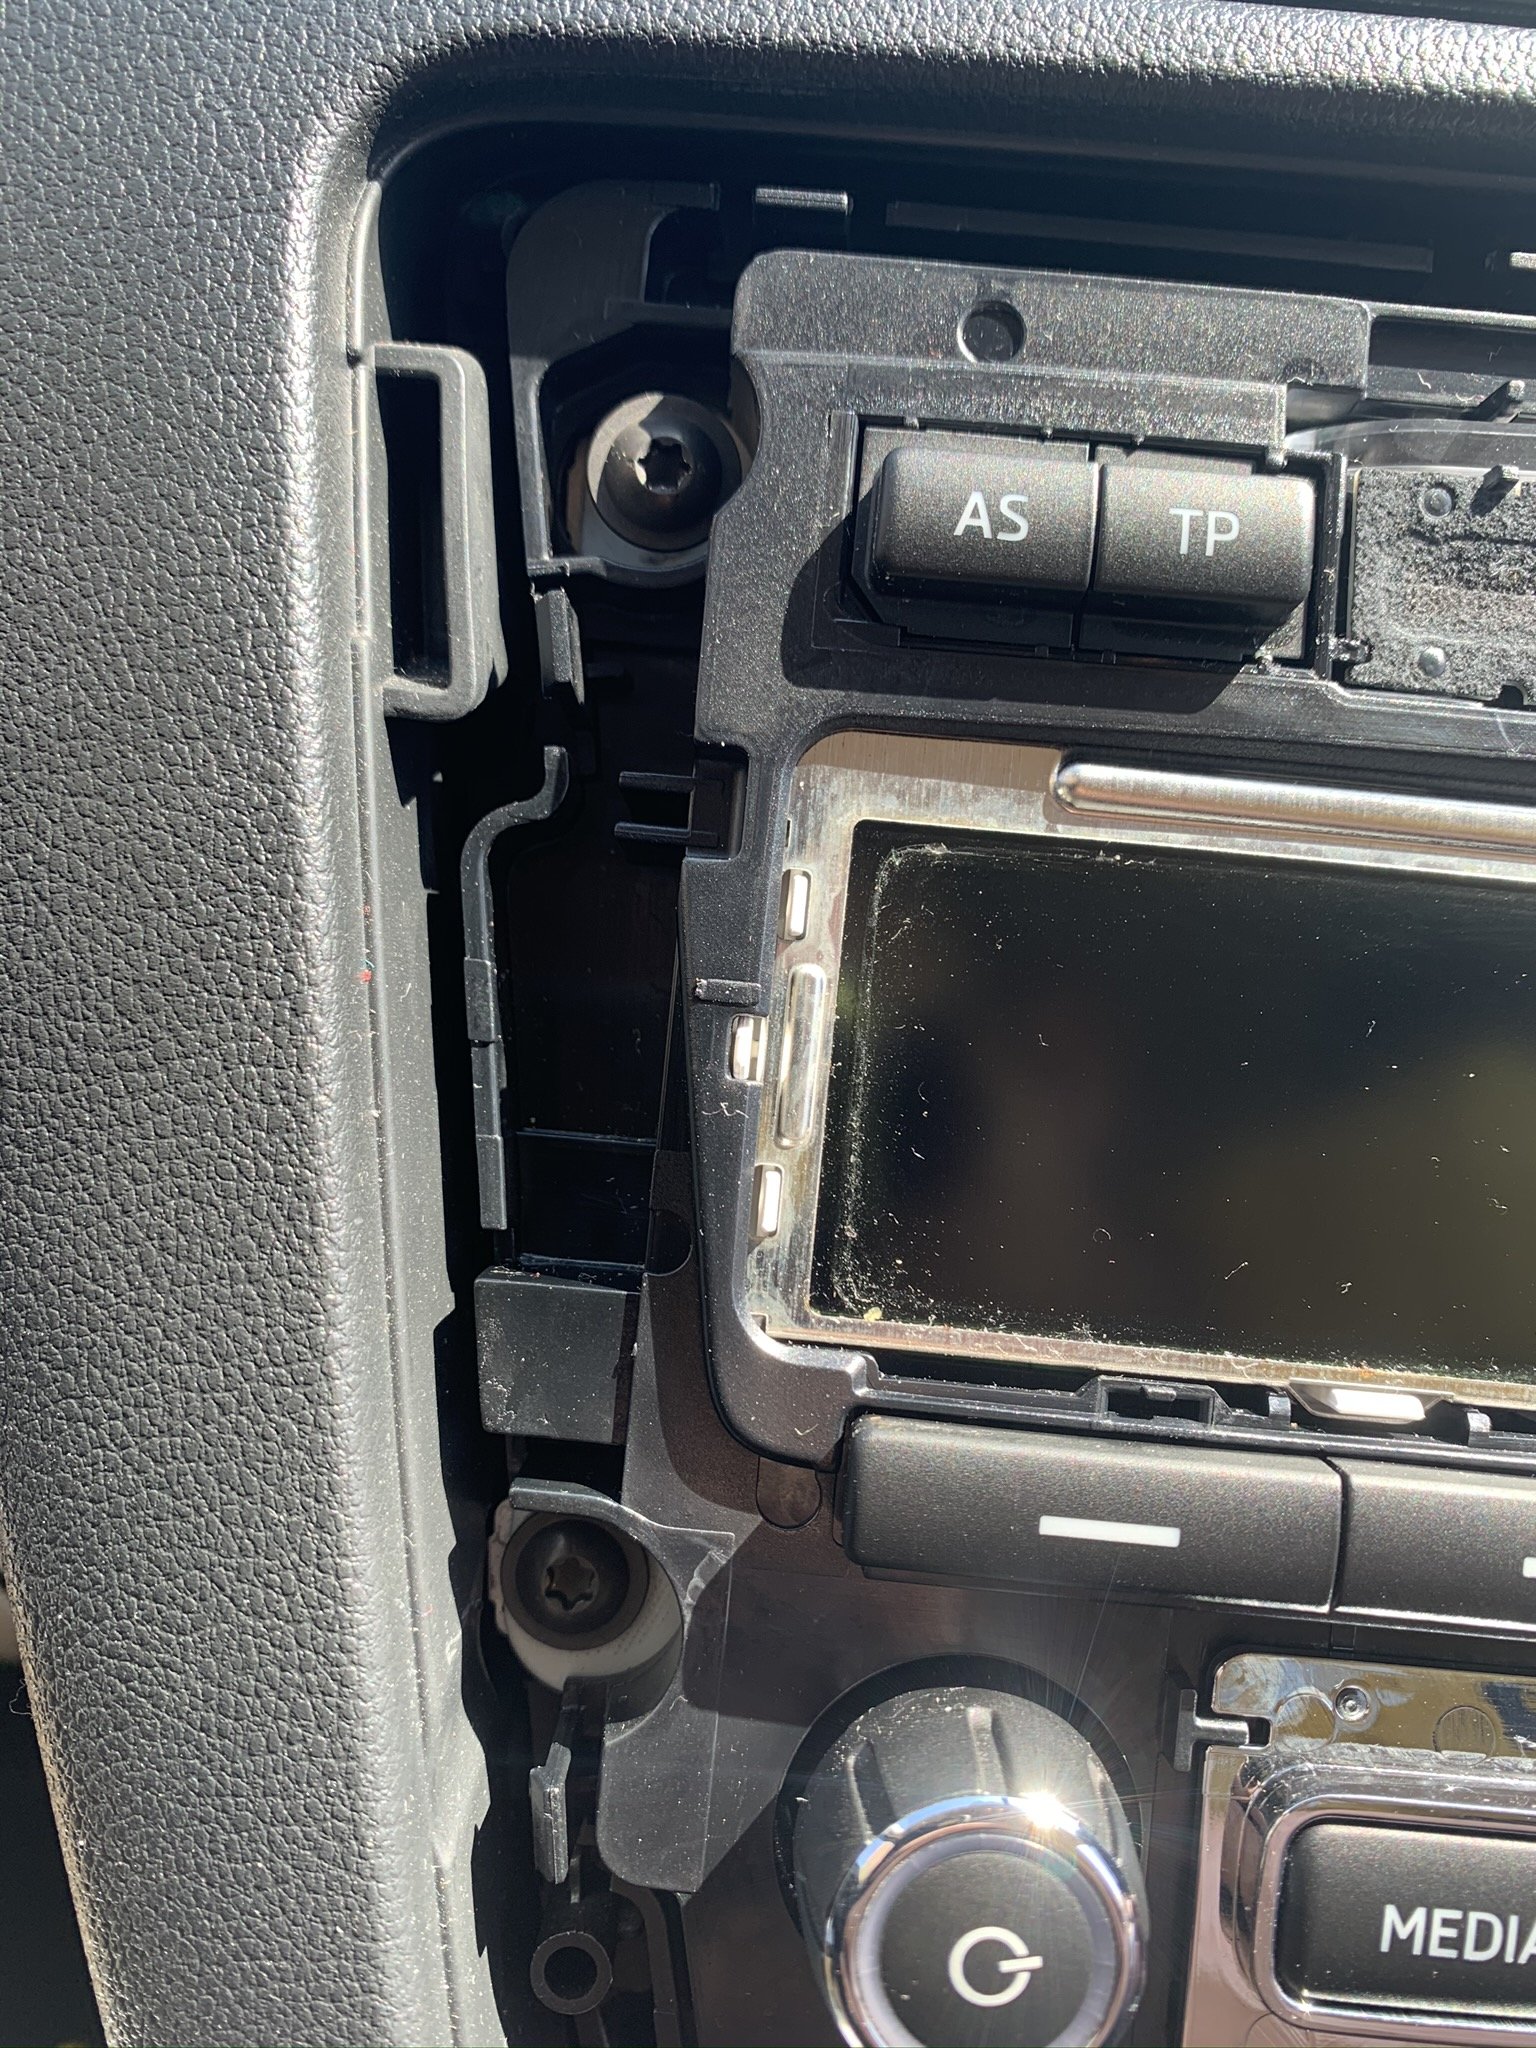
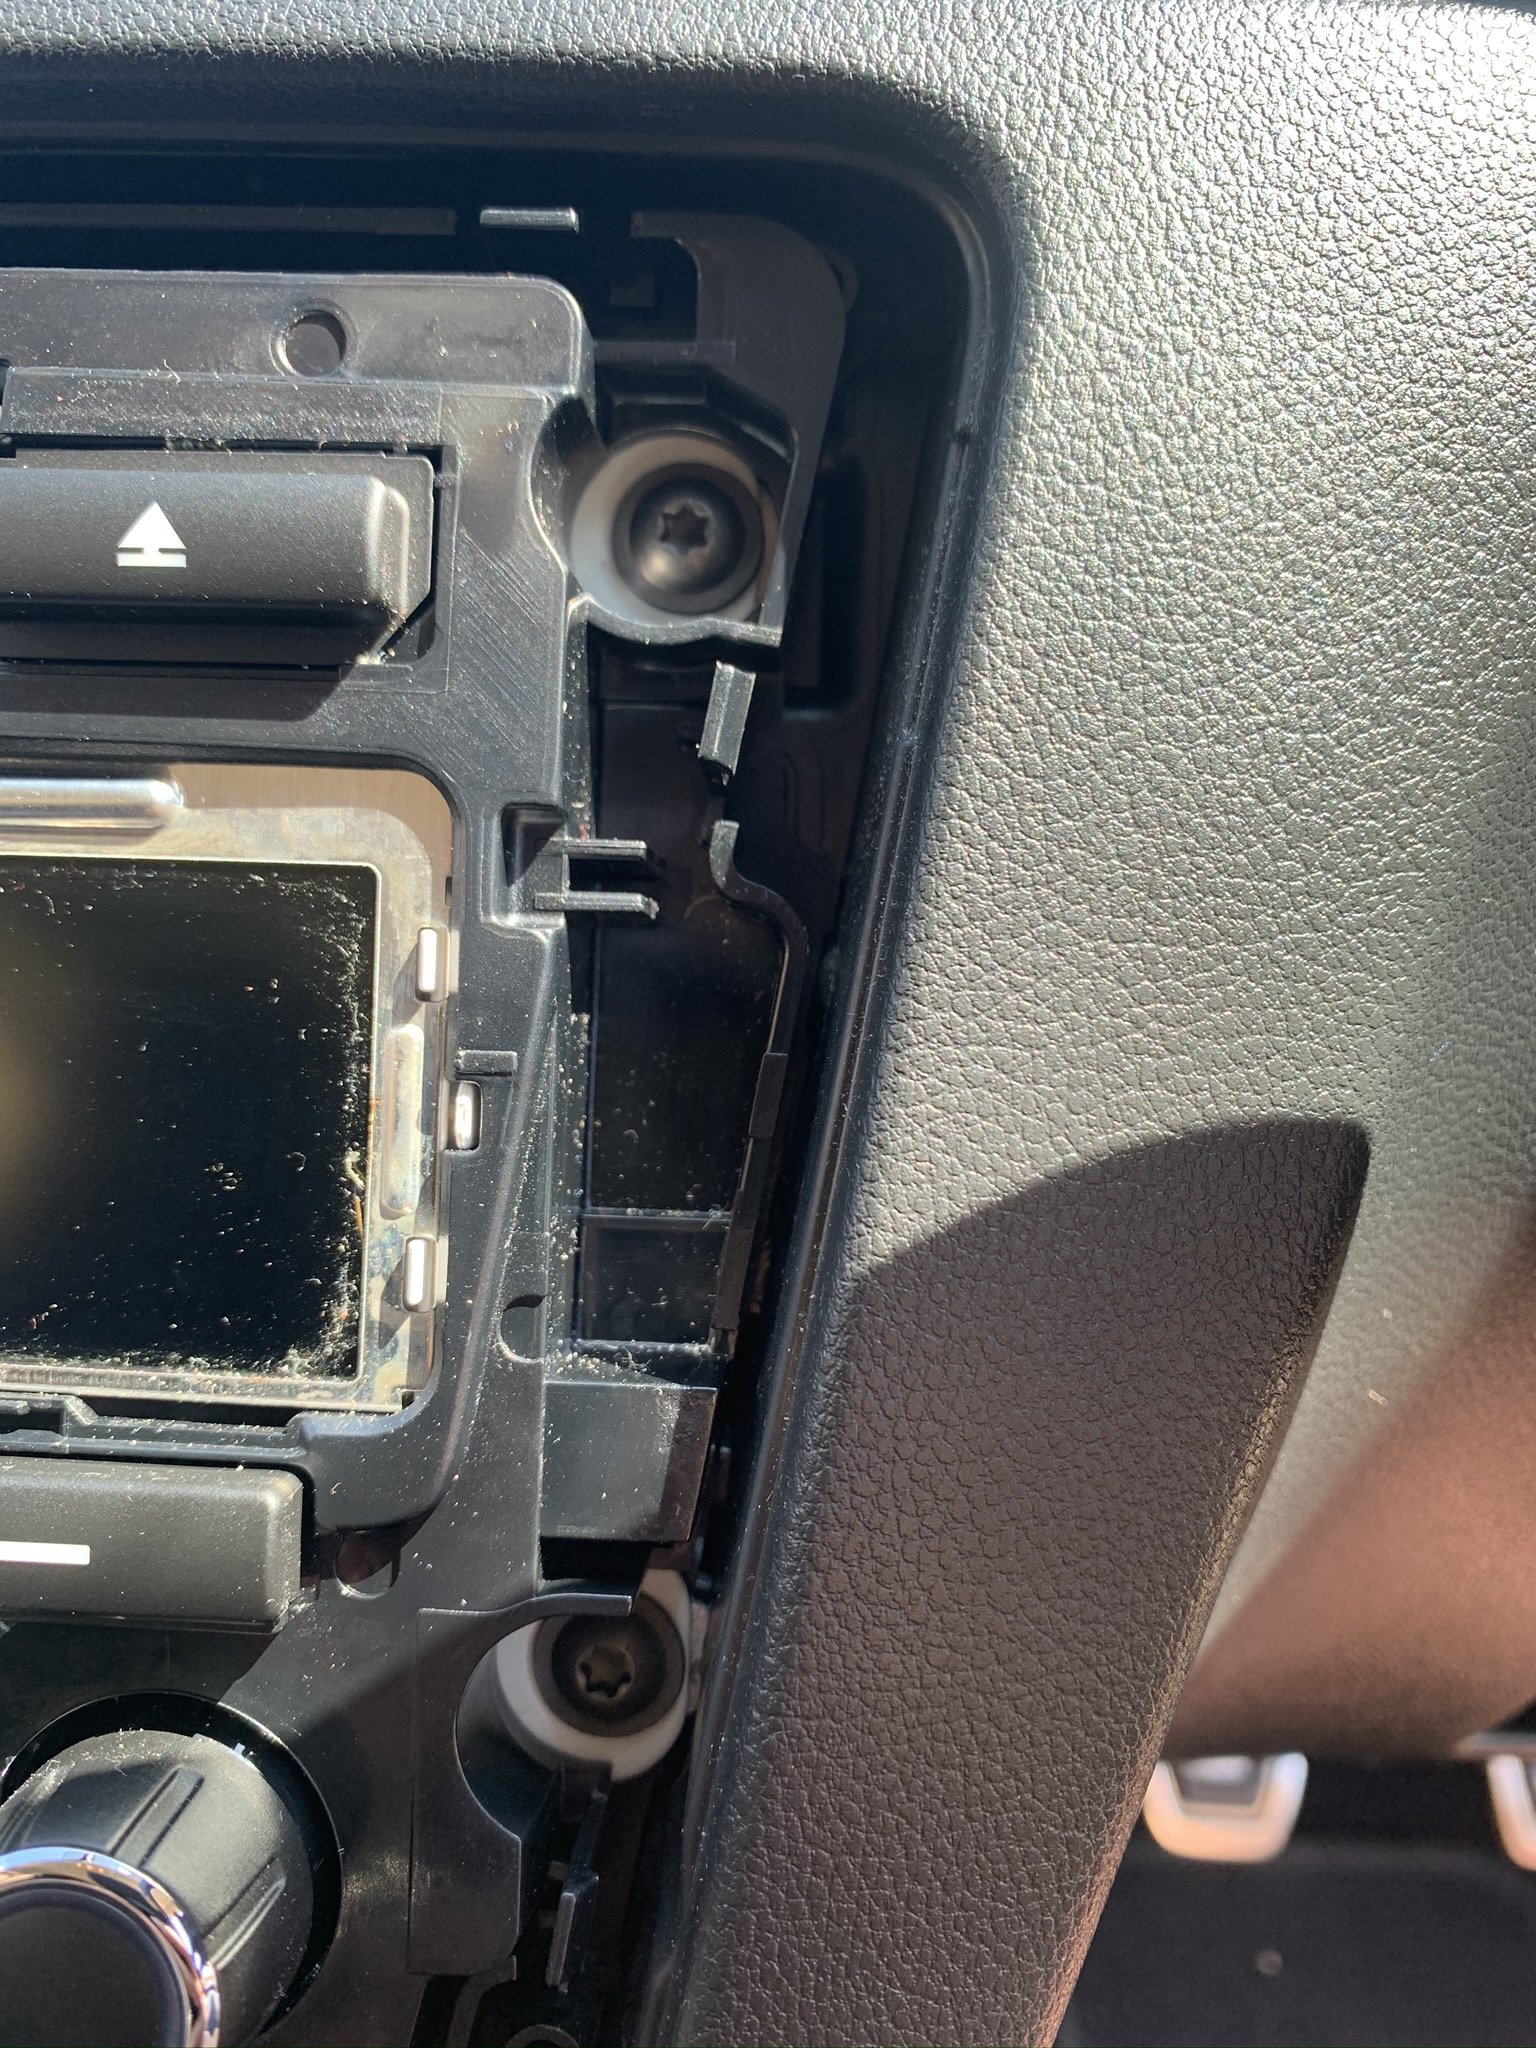
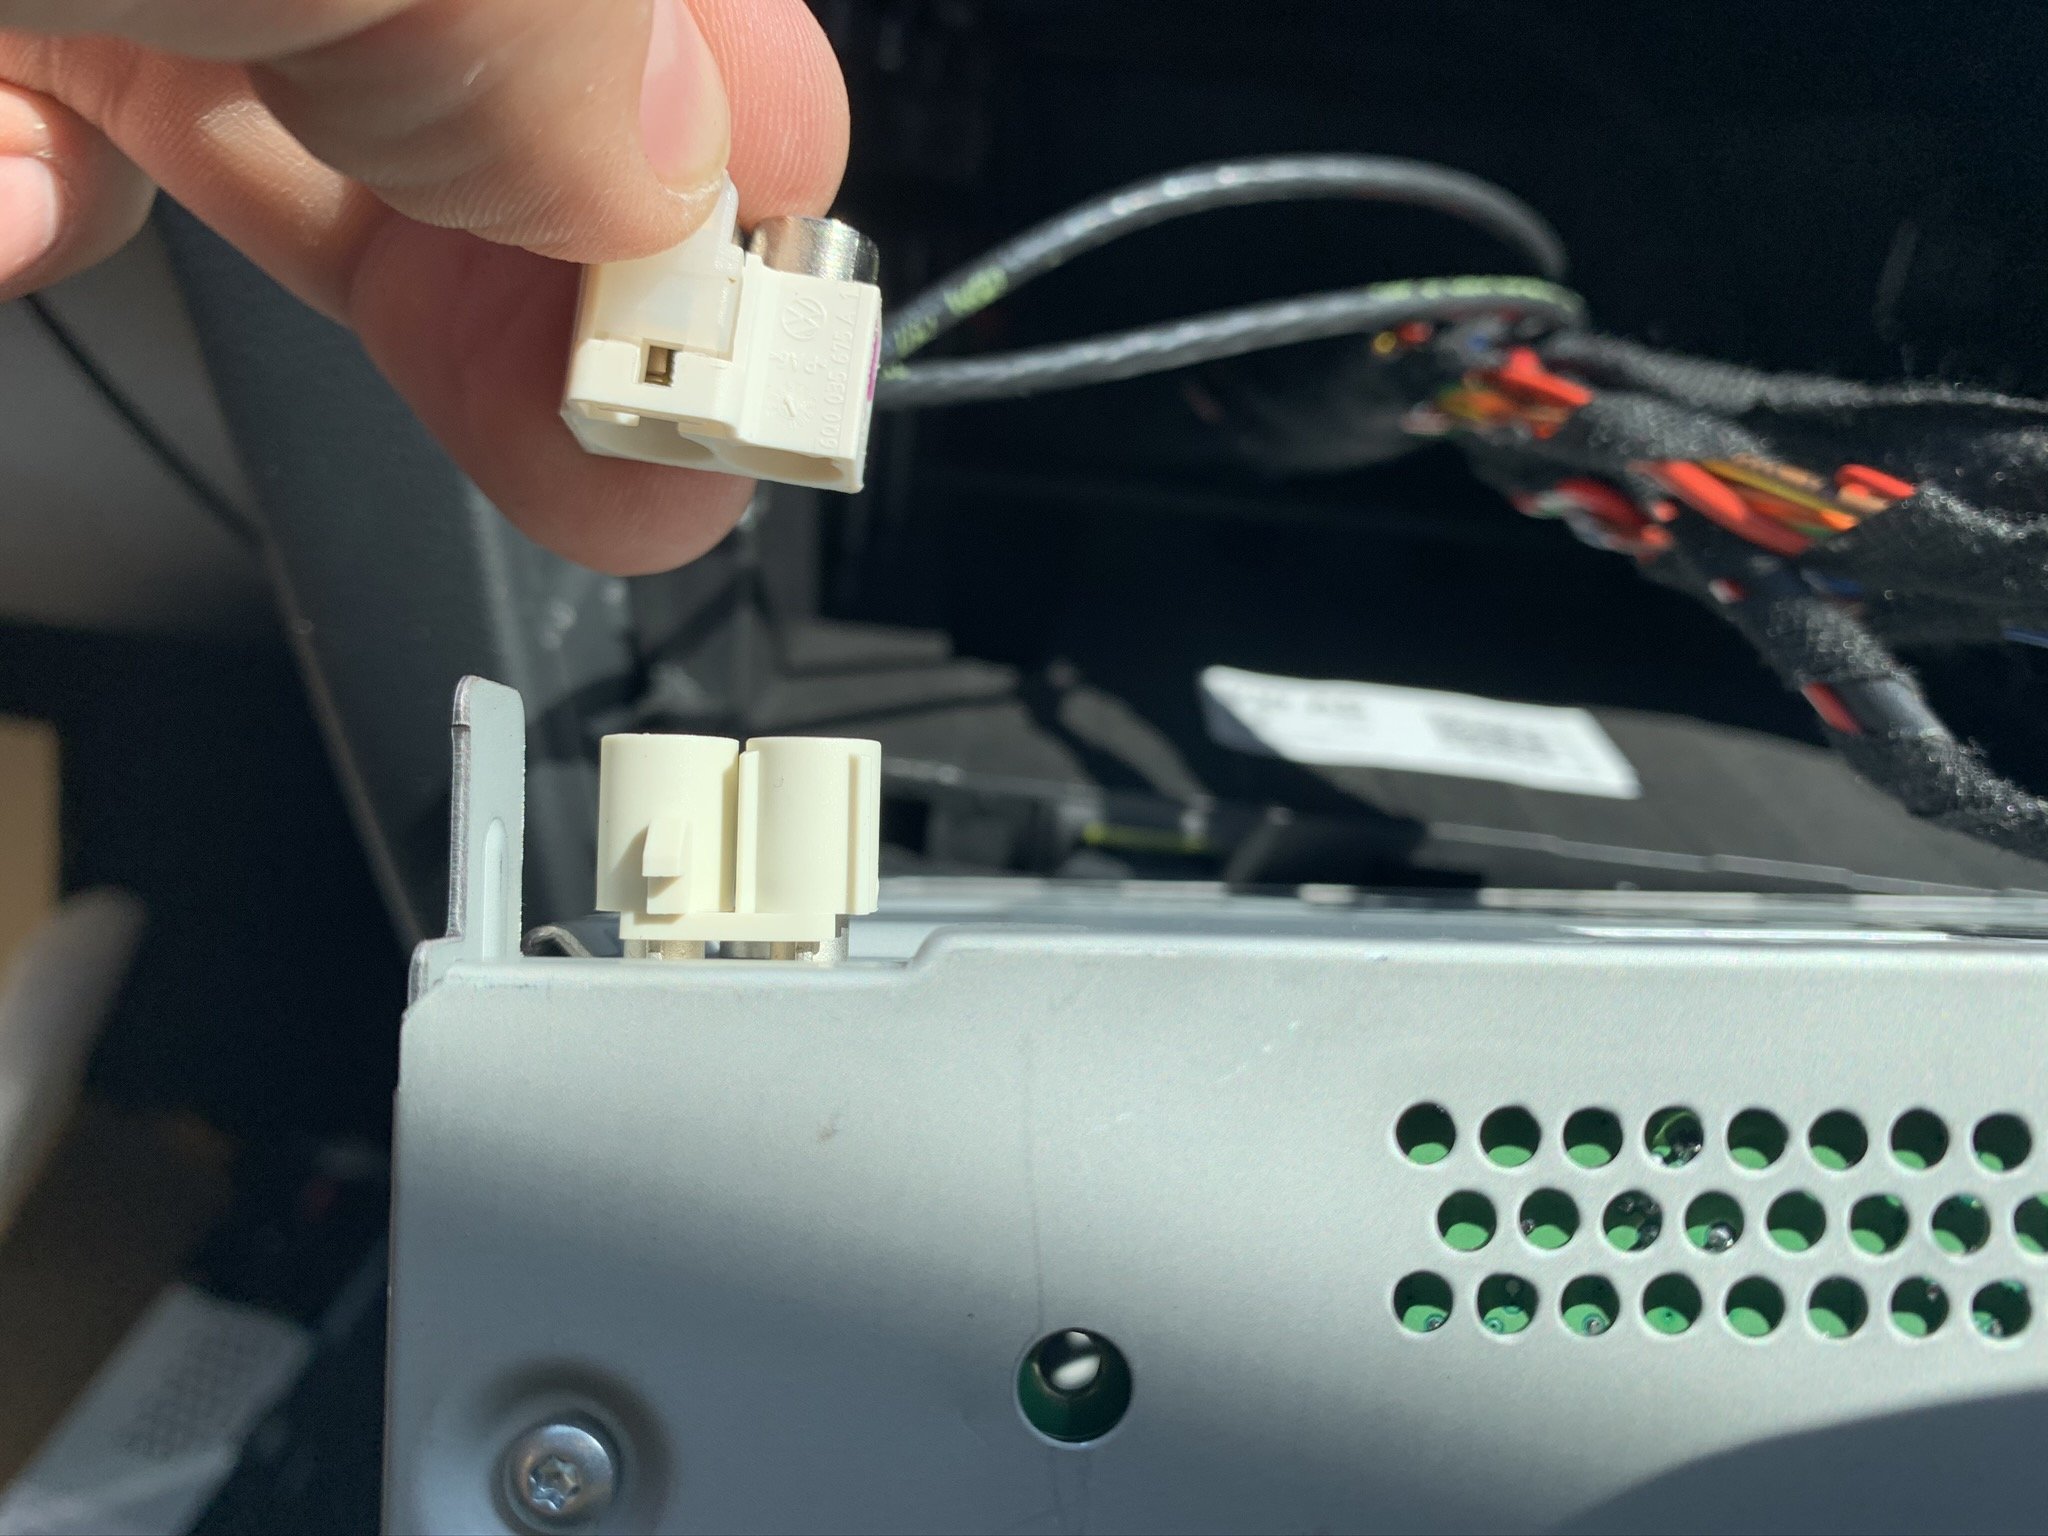
This is a guide on how to change the Skoda Rapid Swing headunit with the RCD 330 +, including links and pictures. This is a very simple and straight forward plug and play process but will hopefully help those make up their minds about making the swap/change. And help those who are not as technically astute. Purchasing a RCD 330 or RCD 330 + Before I go into the how to guide, here are a few details to consider before purchasing the RCD 330 + and where you can purchase them from. So I bought mine from Aliexpress and used a seller called Aidu Auto Technology Co., LTD (RCD 330 + Green Backlight LINK) Total cost including shipping - £201.29 (May 2020) There are others available on the store for less but these are the early models and don't include the green backlight to match in with the rest of the Skoda interior. Beware of customs duty! If your item is sent via Exped delivery such as TNT or DHL, then they will likely hand the item over to customs and will request proof of purchase value for tax purposes. Luckily i didn't have to pay anything but its just something to be aware of. However if you use the standard delivery method this is less likely to be intercepted by the customs team. (I'm not telling your to avoid paying any tax or customs that is rightfully owed by you) You will also need a Fascias for the new unit. Here are a few links depending on how much you want to spend but they range from £9.60 to £40.00. https://audiotechdirect.com/carav-11-455-rns-shape-2-din-fascia-for-skoda-rapid-2013-on/ Ebay Aliexpress Things to consider DAB - The RCD 330(+) are not DAB ready but you can get around this by downloading an app on your phone called "RadioPlayer". However clearly this will only work in areas with good signal and will depend on your phone contracts mobile data limit. You will also need to have your phone plugged in for AppleCarplay or mirrorlink to work. Navigation - This will only work whilst your phone is plugged in via either the iPhone lightening cable or android equivalent. Again this will use your mobile data initially and to provide you with real time traffic reports via maps. This will only be a problem if you end your journey in an area with no signal and require a new route to be planned. RCD 330 or 330 + - There isn't much difference in performance but if you want the full OEM look then paying a little bit extra to have the green backlight is something to consider. Plug & Play - If you're swapping the standard swing radio with ISO harness connector then you will have no trouble fitting this item. It literally plugs in and is ready to go, much less hassle then having to pay various amounts for different manufactures harness and adapters. This unit may fit other models which use the standard ISO harness but functionality maybe affected so please do your research first. (If you don't know what the ISO connector looks like, scroll down and look at the images and see if they match up) Size Comparison - How to Guide What you need: T20 Torx bit/socket/screwdriver Trim Pry Kit or just your hands (Use a screwdriver at your own risk and carefully) Step One Remove the fascia trim. Do this by prying the trim from the bottom first (1) and then both sides (2), finishing at the top(3). Step Two With the fascia now removed, you should be able to see the four torx screws holding the unit in, in each corner. You need to remove these, remember lefty loosey, righty tighty. Step Three Keep all the screws in a safe place as you'll need them to refit the new unit. With all the screws removed, you will now be able to pull the unit out of the dashboard. It may take a little bit of force and the trim pry tools are especially handy here if you have sausage fingers like me. I put the gear stick into 3rd gear and this allowed me to rest the unit before disconnecting the connections at the rear. Be careful to ensure the unit does not drop as this may damaged the connectors at the rear and/ or damage the unit if you wish to keep it or sell it. Step Four Look to the back of the unit and you will now see the ISO connector and aerial connection. These both need to be removed, so first the aerial: On the white aerial connector you'll see there is a opaque tab that is also circled in red. This needs to be pushed up, and then pressed inwards to release it from the unit. Step Five Remove the ISO Connector. Simply lift the locking lever and this will draw the connector out. Step Six Remove the original headunit out from the dashboard and place to one side. You should now have something like this. Step Seven Fit the Aerial adapter to the original aerial cable. Ensure the clip circled in red is lined up with the side with the tab. Push together and then push the tab down to lock together. Step Eight Fit the new Aerial cable to the RCD 330 or RCD 330+ unit by pushing it firmly onto the connector until it clicks in place. Step Nine Fit the ISO Connector to the RCD 330 or RCD 330+ unit The connector will only fit on one way but have a look to make sure all the pins on the plug line up with the pins on the unit. Press into place and use the locking lever to help the connector into place, ensuring the locking lever is fully down. Step 10 Fit the RCD 330 (+) into the hole in the dashboard, ensuring the four screw holes all line up. Fit the four screws a few turns each at first. This will give you some wiggle room to allow all four screws to be fitted easily. Once all in place, they can then be tightened just enough so they secure the unit in place. Don't over tighten them! Step Eleven With the unit now in place, turn the unit ON and check all the functions work as they should. If you find any problems with the unit, now is the time to rectify this with the seller. Step Twelve If you're happy the the unit is 100% working the final step is to fit the fascia which i've included links to. Put the fascia in place and gently push home all round until you hear all the clips click into place and the fascia is secure.


 1 point
 -
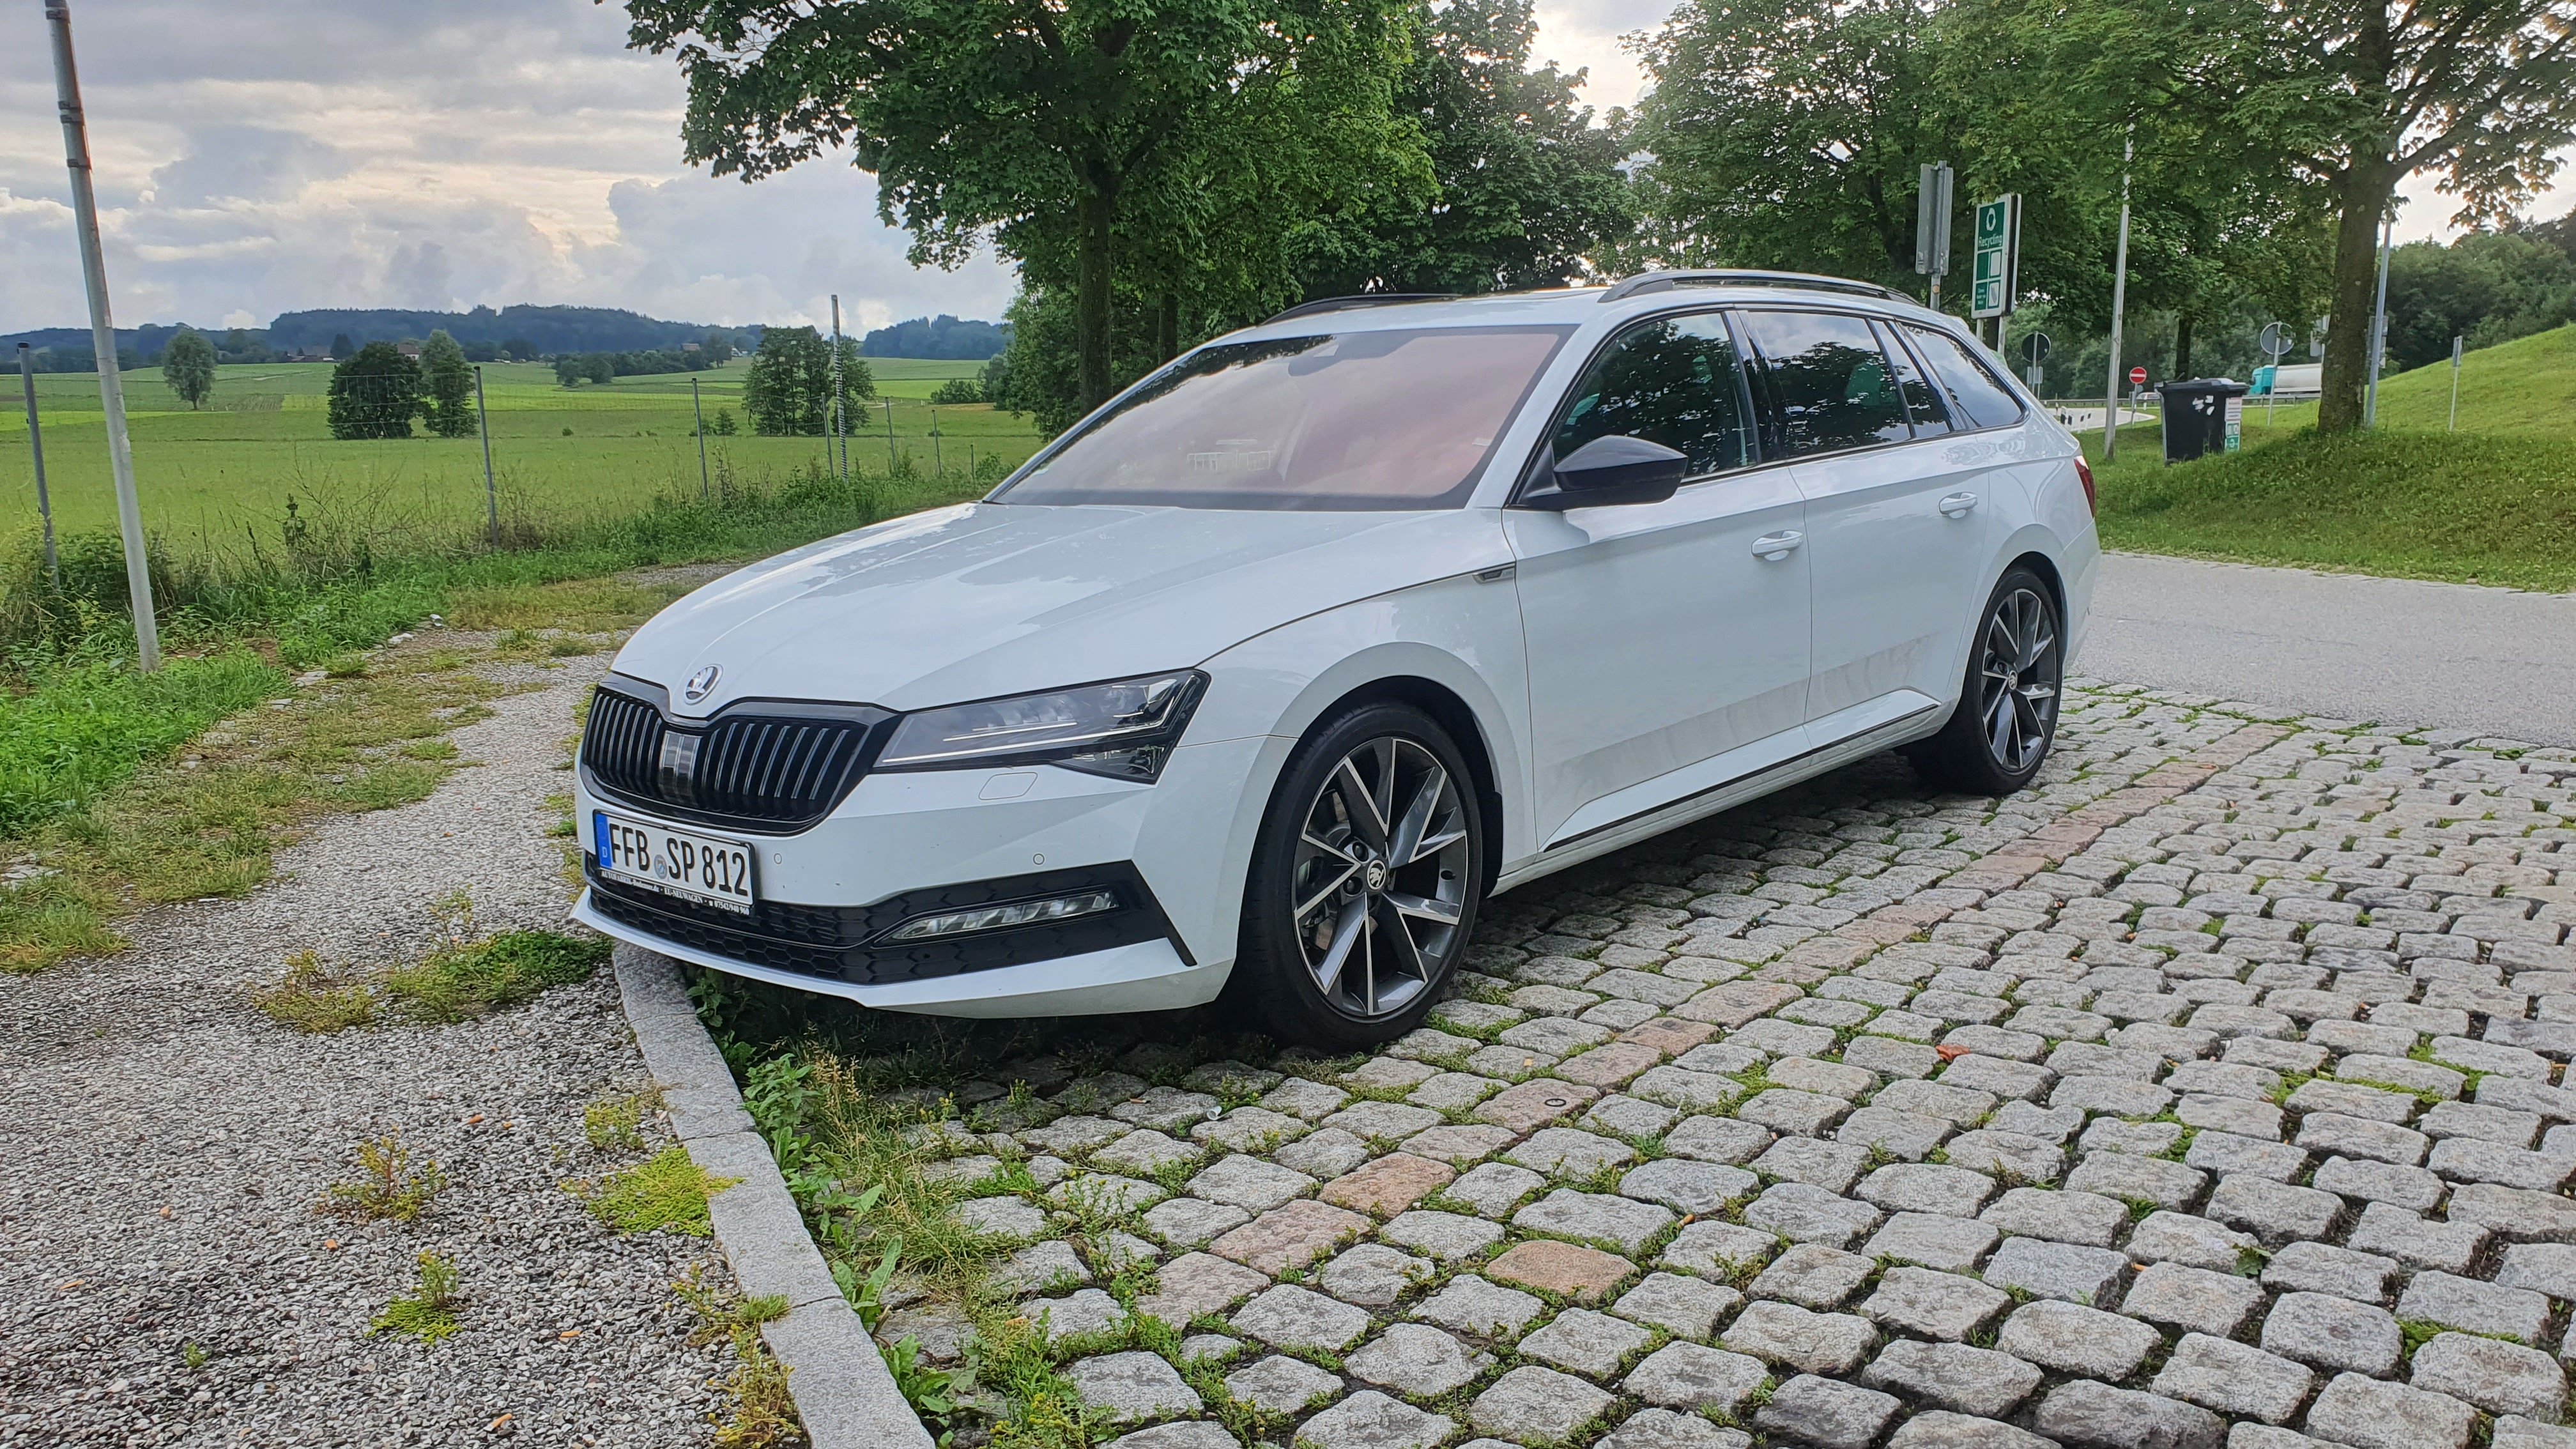
Afternoon all Been trying to find the time to write this post for a few months. In early October I made the final payment on my Rapid Spaceback, marking five years of ownership and the point at which the car is finally all mine My Spaceback is a January 2014 model, one of the very first in the UK, and it pulled about six months service as a demonstrator before I rescued it from a terrible main dealer (one which subsequetly had its franchise pulled). Over five years of use (initially as a daily driver for commuting for work, for the last four years its been a weekend and evening car for personal use only), I've concluded the following: The good bits: Fairly economical to drive (averaging about 42.5 mpg) Cheap to service (if you steer clear of main dealers) Decent size boot Amazing rear legroom Handles well Plenty of power from the 105TSI petrol engine Amundsen Nav is good (retrofitted to replace a Swing) and integrates well with dash and steering controls The bad bits: Uncomfortable front seats Trim rattles Rear doors filling with water (this was eventually fixed) Takes too long to warm up and produce hot air from the heater matrix (nothing wrong with the car or the thermostat - which has been replaced - it's just a quirk) Noisy factory fitted tyres (replaced them with better/quieter ones) MDI interface is very fiddly to use Big issues with moisture in the cabin (I have to use dehumidifier bags most of the year) Top of centre armrest broke twice (latch once, hinges once - both replaced with stronger and cheaper non-OEM parts) Like others here, I've taken the opportunity to mod and upgrade my car with OEM features as well as accessories and my own custom mods. In the last year I was able to take advantage of a lot of price cuts on previously expensive genuine accessory items as dealers were clearing out stock ahead of the launch of the Scala: The mods: Genuine Skoda raised boot floor Genuine Skoda under-seat umbrella holders fitted to both front seats (used for water bottles) Amundsen Sat Nav retrofit Genuine Skoda Boot luggage hooks Genuine Skoda Boot nets Genuine Skoda Boot storage cubby inserts Genuine Skoda Boot divider tray Genuine Skoda passenger door rubbish bin Genuine Skoda 2019 cup holder phone holder (which can hold an iPhone 11 Pro Max) Genuine Skoda washer bottle cover with integrated funnel Genuine Skoda parcel shelf net retrofit Hidden 12v power socket fitted behind the dashboard 4G Wi-Fi hotspot fitted behind the dashboard Amazon Echo Dot fitted (powered via MDI) Dashcam with hidden power cable Audi boot parcel holders Audi back seat storage box (bought becase it matches the fabric of the car seats) Wireless phone charger fitted in centre armrest All in all, the Spaceback has been extremely reliable and economical. While some parts have been built down to a very low price, the core stuff appears to be put together to a high standard and it has been robust (even surviving being rear-ended twice by an idiot in an Audi in a McDonalds car park with no damage whatsoever). Some of the aspects I have flagged as bad I know were addressed in the facelift (like the uncomfortable seats, the lack of a seat valance on the front seats), but a fair few were not, which likely led to the introduction of the Scala as a chance to learn and improve. Would I buy another Skoda - absolutely! But for now I have no plans to get rid of the Spaceback. At the time of writing it's only done 42,000 miles, so it's got plenty of life left in it. Happy to answer any questions about mods, upgrades, retrofits and general ownership. Thanks Chris1 point
-
Not private ones, and by Saturday. Helmets not even mandatory. Scary stuff...1 point
-
1 point
-
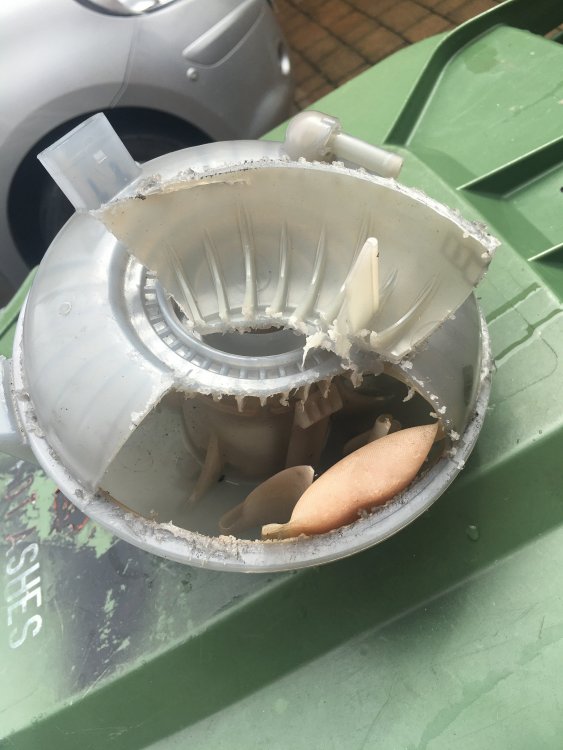
1 pointThats your crankcase breather. - https://www.ebay.co.uk/itm/BREATHER-HOSE-ONE-WAY-VALVE-FOR-SKODA-FABIA-OCTAVIA-RAPID-ROOMSTER-SUPERB-YETI/324064323803?epid=19021917382&hash=item4b73bd28db:g:s00AAOSwv9JeOrOp Part number. - OEN 030 103 175B1 point
-
I now understand - with the automatic you start the engine with the car in “park” and the footbrake depressed.1 point
-
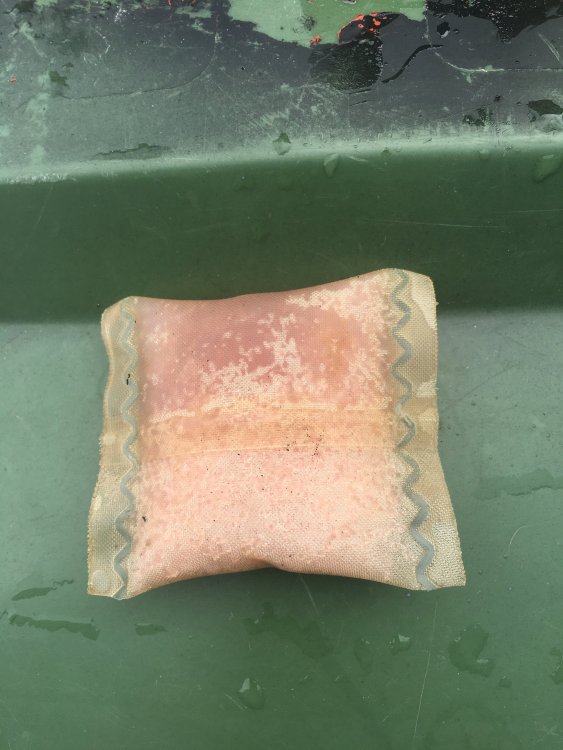
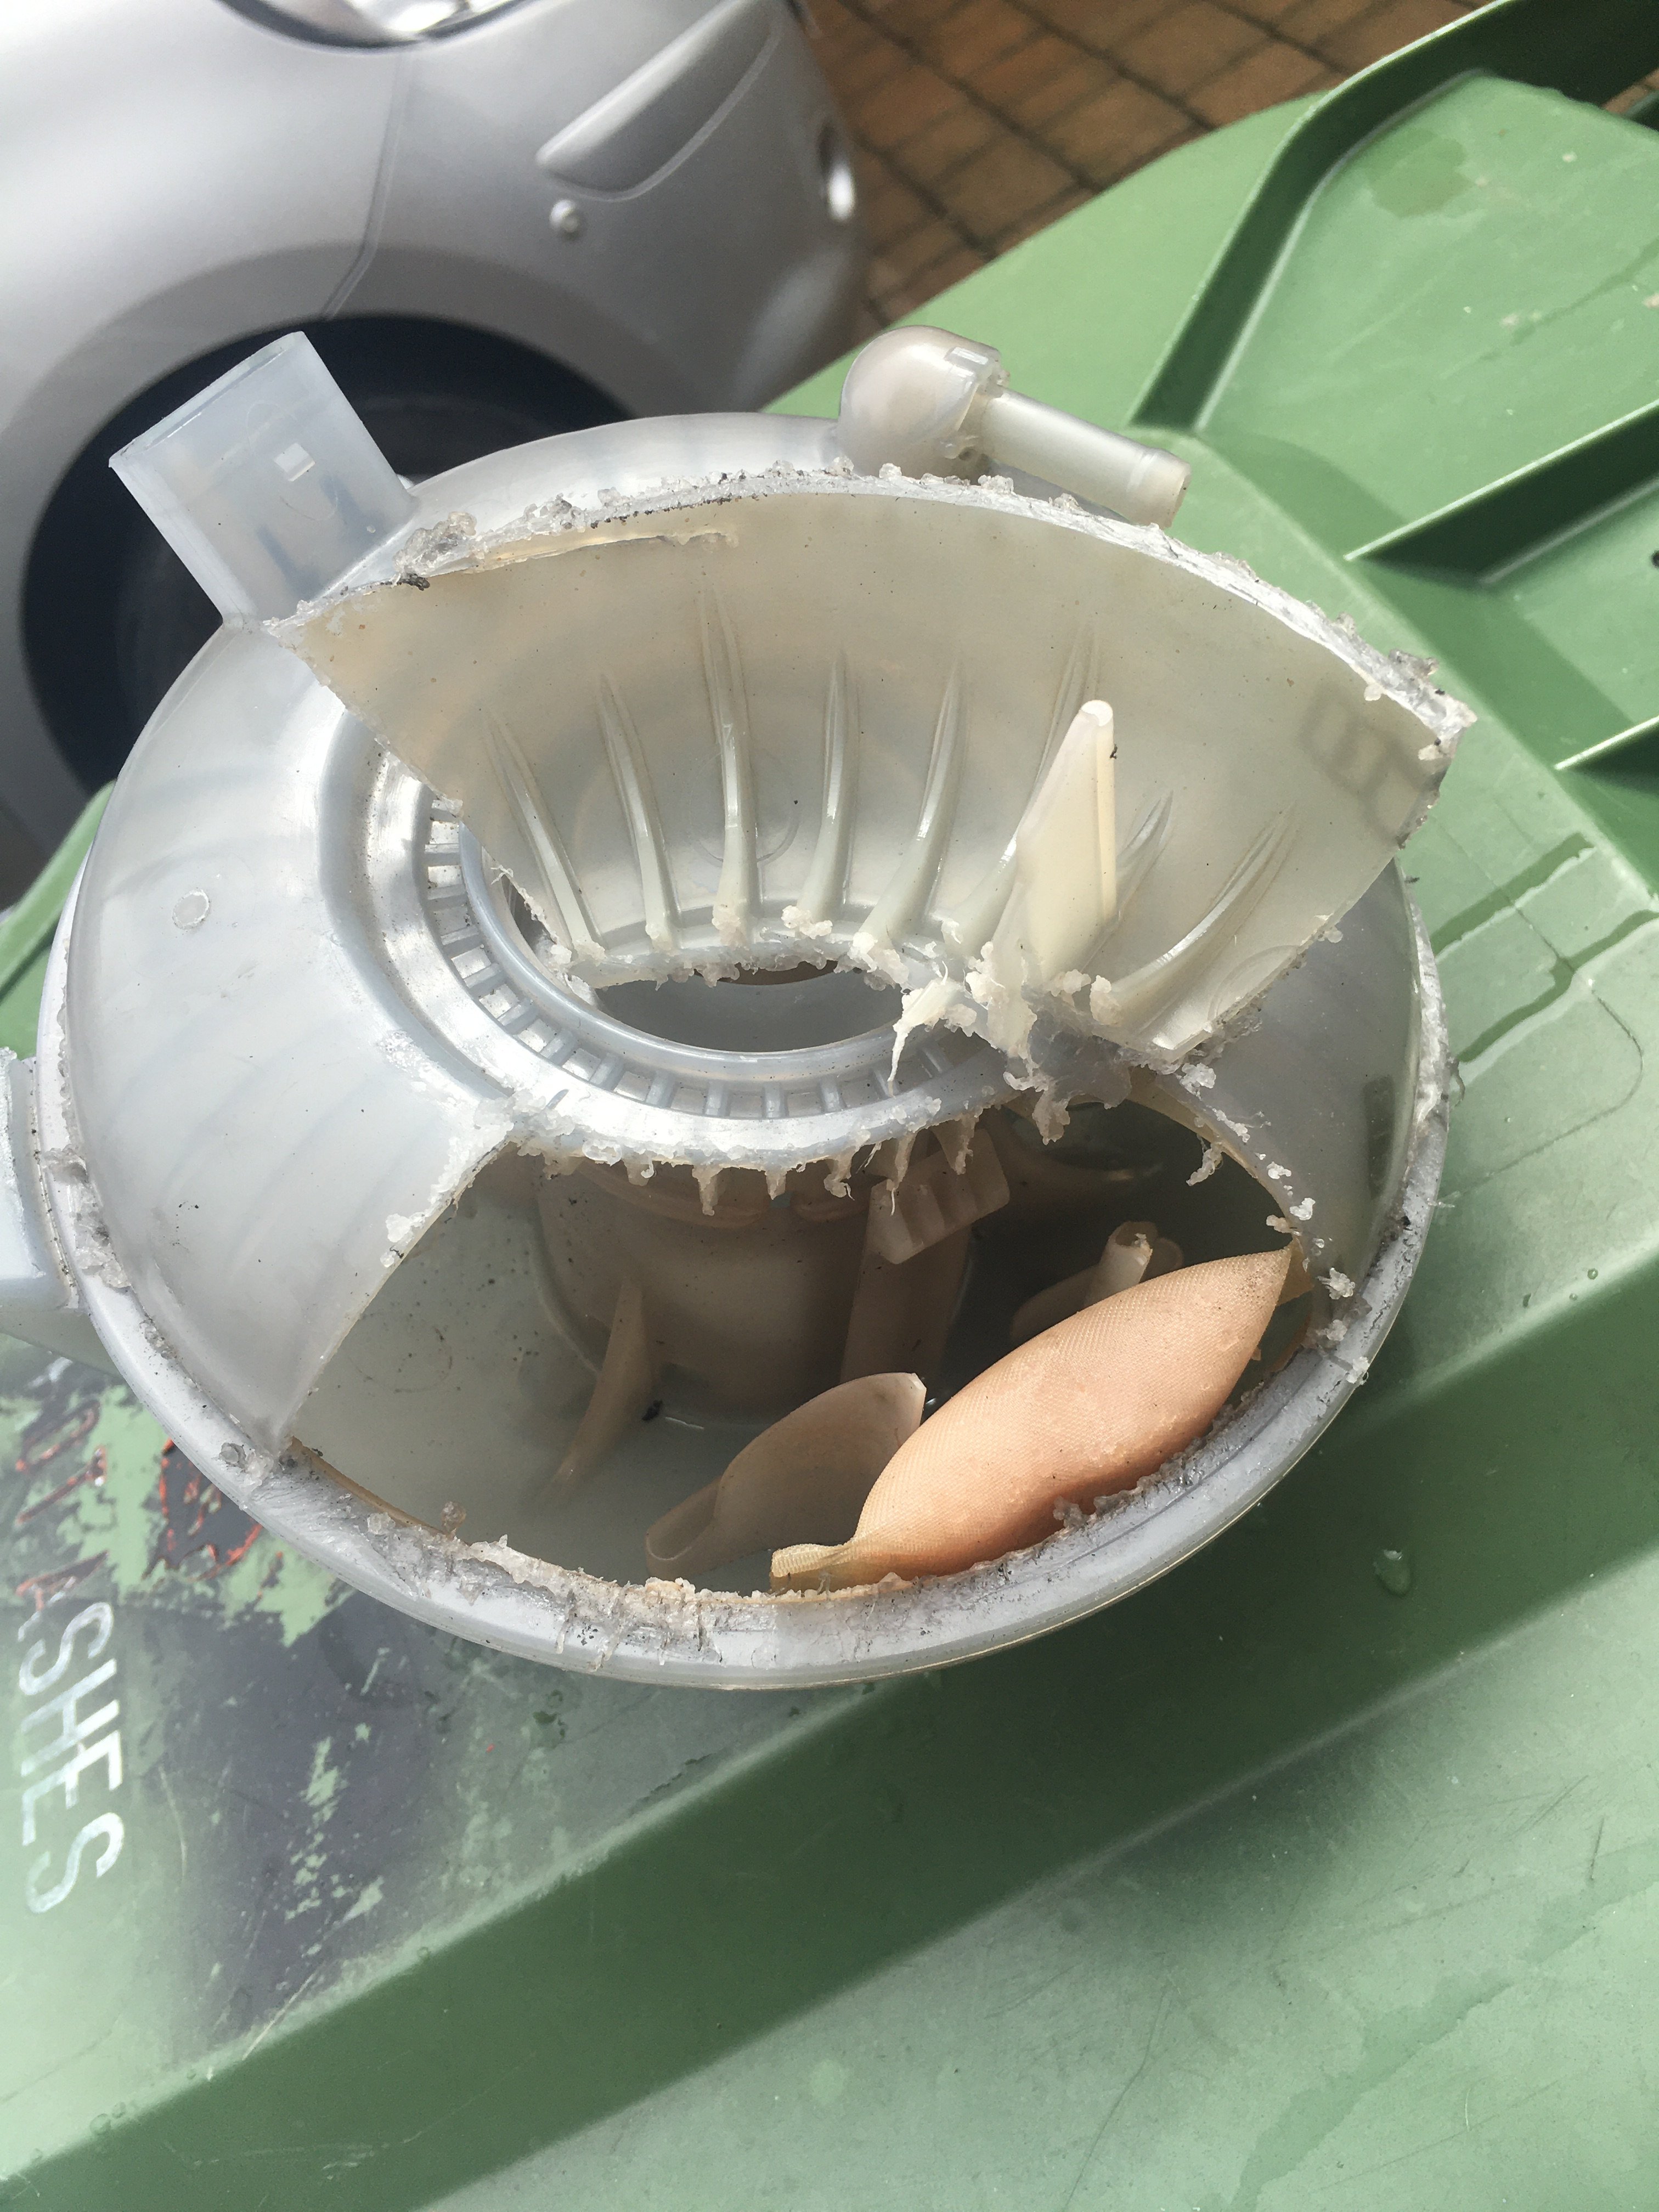
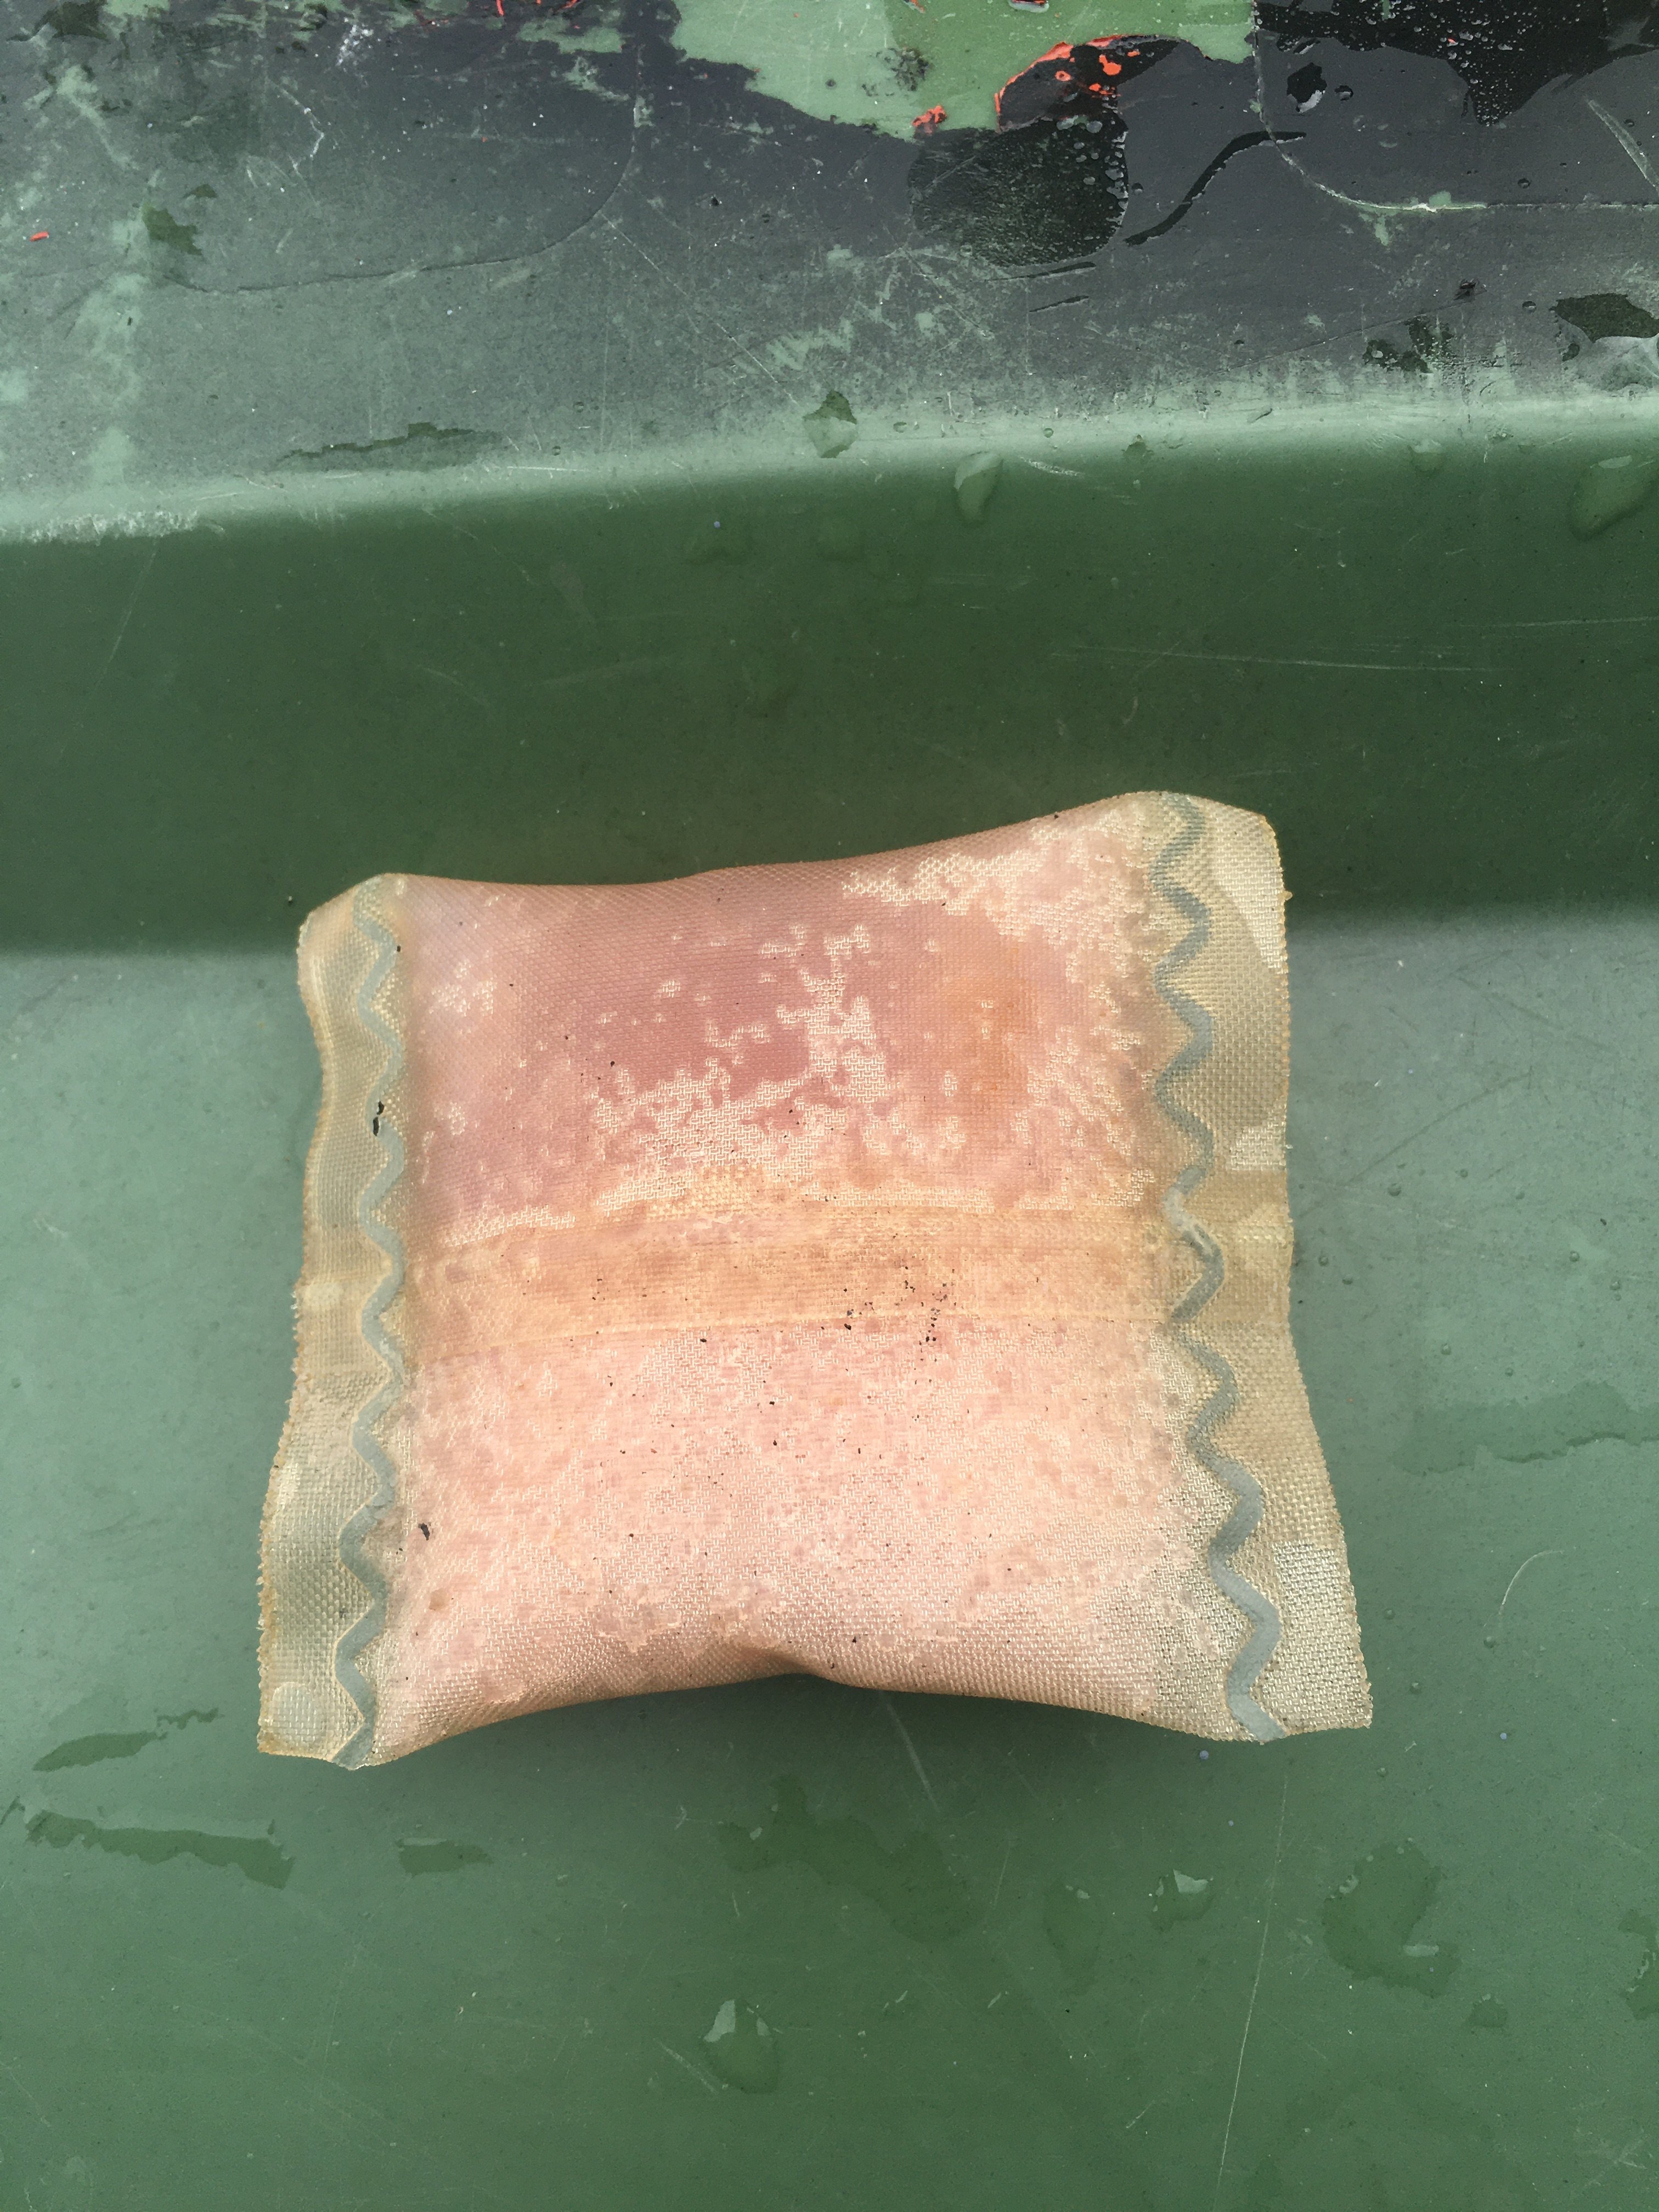
1 point1 pointOk after a good read of this thread and seeming as my 17 plate 2.0L Diesel SEL Octavia has now come out of warranty I've decided to go " teabagless ". My original expansion bottle has the part no. 5Q0121407G and is the version that has an inner and outer chamber with the " teabag " situated in the outer chamber and therefore no way of removing it. Interestingly, my mate's 16 plate 1.6L Diesel Estate has the single chamber expansion bottle which he fished the " teabag " out, yet it had the exact same part no. So the same part no. covers single and double chamber expansion bottles. For peace of mind I've now fitted the 5Q0121407M single chamber bottle as referenced in this thread at a cost of approx. £29 sourced from my local VW dealer. I couldn't be bothered to wait 2 days for TPS to order one in for me. It was roughly a ten minute job to do and I even managed to keep the fluid from flowing out of the old expansion bottle and then transfer it to the new one saving me the need of topping it up. I've cut out a section of my old two chamber bottle and posted a picture of it for those who are curious to see what it looks like. I'm a bit unsure though whether the teabag was behind or in front of the two plastic ridges. Also, but not really sure, it looks as if the corner of my " teabag " might be starting to become loose so thankfully I might have done this mod just in time.
 1 pointFolks - please ~please~ do not download cheap chinese knock-offs for the Ross-tech system. Especially if you have a newish car - you can brick you car unintentionally and a lot of the early versions of the "knocked-off" or pirated Ross-tech software won't work with modern cars. I know that folk think that Skoda's are cheap and some people have that mentality still, but you will cause damage - your 'purchaser' of the 'knocked-off' VCDS system will disappear when hard-questions are asked and you will be left with expensive repair bills. Please....just don't.1 point1 pointConsidering the age of the car, you might also have a faulty physical horn. You can try this (electrically) by applying an independent power source to the horn (+ve and -ve) and see if it works.1 pointRivets are 6.4X10.0mm. Part number N91078801. 10 rivets in each front door. Bolts were only used up until about 2003.1 pointSeems to get cheaper the more powerful it gets not sure how that works though.1 point1 pointPersonally I think there will be a massive take up of these one they are legalised - clearly there will be huge issues as well in terms of safety / impact on other road users / NMU's and the like but my experience of them in Prague last year was pretty positive1 point1 point1 pointIst job, or equal first. Check what pressure the fitter sent the car out of McConacheys with. Fronts and rears. & maybe see if you can loosen the wheel nuts / bolts with the tools in the car. PS Weather in the Sunny South West of Scotland and points further east west north and south has been terrible after high temperatures and junctions and roundabouts are letting out grease / diesel etc etc. Treacherous conditions even with the best of tyres and AWD if not driving with care.1 point1 pointThat is the correct part number for a MIB2 Amundsen card. BTW anyone with a MIB1 Amundsen can use either the 5E0 051 236 or the later 5L0 051 236 SD card.1 pointPrices are going up! I'm asking £2100 for mine as I think the car is well worth the money...😬 then again I would!1 point1 pointI replaced the paper filter on my Alfa 146 with a K & N one. Didn't notice any difference in performance and in a couple of weeks the air mass sensor needed replacing. Coincidence? or does the oil on the K & N damage the sensor? I would stick to a paper filter.1 point1 pointLooking on a well known auction site it seems that the 32gb card for the Amundsen MIB2 unit is 5L0051236BG but I would check with the seller first.1 pointBeen driving a bit quicker than my normal average (Long Term 40mph) over the last couple of days with an average speed indicated at 46mph which reflects the 35mpg average since refuelling which has seen a range of 23 to 44mpg. What is surprising is that the expected range on this tank is still 580 miles. Just passed 4,000 miles since the remap in early February and it really is the best mod you can do on most turbo petrol cars IMHO. Lots of benefits yet hardly any downside as economy has proven not just in this car but the 40+mpg my previous 300+bhp Octavia achieved over 29,000 miles. If you have a heavy right foot then yes you will spend more on fuel but as I am currently paying £1.30 per litre for 99 octane fuel one tank every 4 weeks is not too bad (£83 last tank for 551 miles).1 point1 point1 pointI totally get how you feel, we once had a Renault Clio with the electric tilt n slide sunroof (ok different mechanism but) ... it leaked from the day it was delivered, it was replaced twice under warranty then eventually removed by a non manufacturers bodyshop and filled with sealant and refitted ... it still operated as normal, but after that it never leaked again, 18 years later we said goodbye to the Clio (it was 21 years old by then) ... dry as a bone ... I get it I really do, and fully understand your fear ... but with the number of this specific unit in circulation, honest they dont all leak ... Why do Skoda behave like a PIA ... 🤷♂️1 point1 pointNice to see another Aussie on this forum, got my manual Karoq April 2019, was a demonstrator with 2 packs, opted out of Tech pack , prefer full size spare.. 🚙 still loving the drive everyday.. cute photobomb 😂1 point1 pointPeople who've had a leaking sunroof will invariably be on the side of the fence which is reserved for people who don't want another sunroof. The other side of the fence will be populated by people who haven't had a leaking sunroof, or indeed haven't had a sunroof to leak but still have an opinion on the subject. Personally, I won't have another car with a sunroof so I won't have to suffer the massive condensation problems, the smell, the staining of the headlining, the pools of water in the passenger footwell after it rains etc.1 point1 pointAt a predetermined opening of the throttle valve angle, the vacuum in the intake manifold decreases to such an extent that spring opens the enrichment valve. Because of this, additional fuel from the float chamber can be fed directly into the primary system (1st stage) via channels. In other words, the fuel enrichment valve helps with more fuel for the 1st stage of the carburetor. The 2nd stage of the carburetor helps developing maximum power/speed. If something prevents 2nd stage opening fully, then you can't achieve maximum power.1 point1 pointso old that my yeti was replaced by an Octavia which was replaced by a Nissan Leaf which was replaced by a renault zoe which has been replaced by a Tesla Model 3 😄1 point1 pointCheers @kentdale 👍 I'm super OCD about a straight steering wheel too. Took mine back to the local alignment shop to get it adjusted twice after having the Eibach springs fitted. Gotta be right though!1 pointI agree with you, the Golf R's are a decent compromise re. handling versus long-distance cruising, the 4WD does help, especially on greasy roads but my ancient Superb is still my choice as a daily driver. In the last 12 months it's done more miles than both Golf's combined, & it's more economical too. Problem is (?), it's 8 years old with 37k miles. Not dead yet though, yes it's a little outdated, but it's much more fun than it should be, 252 ps & 361 Nm does make a difference...1 point1 pointComing from an Octavia vRS you're likely to be disappointed if being sporty is a high priority. An extra 40bhp over a regular Kodiaq and being almost identical in all other aspects aside from bigger wheels and some nice visual modifications means it's still a heavy bluff fronted 7-seater SUV. Unfortunate but mostly unavoidable trade-offs needed to be able to seat 7 and the tick the latest 'must have' ride height box. On the bright side you can get it in Race Blue, on the down side Skoda no longer reserve this colour for their vRS models.1 pointThe remote control works via the BCM and the master door control module in the driver's door. Most of functionality is controlled via CANBUS rather than direct wiring so to achieve what you want to do I think you'll need a GSM module that can talk to the BCM via CANBUS. Otherwise you'll have to splice across either the door switches or the window motors, and I'm inclined to think that either of those options will play hell with the BCM.1 point1 pointThe early 150's are not Adblue only the 190's. Mine's a June 2016 registered car and doesn't have it. I think they changed mid-late 2017 on the 150's.1 point1 pointSo the update was pretty simple, format an SD card as FAT32 and extract the 7z file to the card. I used a 32GB Sandisk Extreme Pro 95MB/s. Insert the card into the car, switch on the power but don't start the car, then hold the Menu button and choose Update. It took about 25 minutes to install and to my suprise gives you a really detailed progress screen whilst it's doing it. Unfortunatly I don't notice any difference to my previous software (I had version 0353 and it upgraded to 0367). My partner has a 2017 Fabia and that has a cleaner UI design and Stop / Start notifications though I haven't checked her SW version. Nethertheless thank you for the update file!
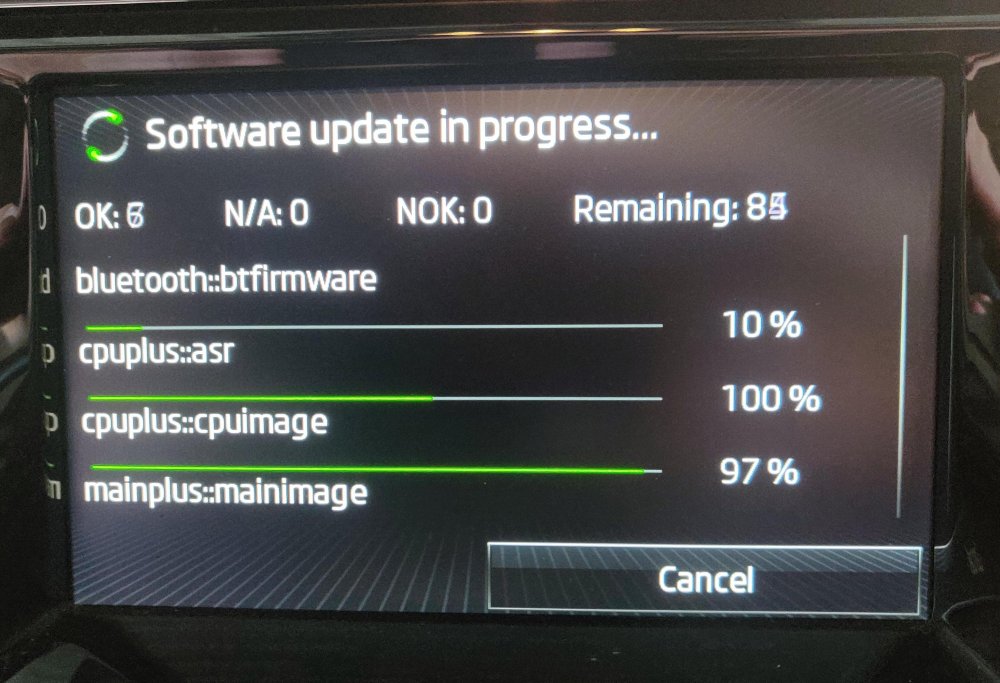 1 point


.thumb.jpg.f83a46b9b3c0d976b9dbffbb523c9874.jpg)


Important Information
Welcome to BRISKODA. Please note the following important links Terms of Use. We have a comprehensive Privacy Policy. We have placed cookies on your device to help make this website better. You can adjust your cookie settings, otherwise we'll assume you're okay to continue.