commievid
Members
-
Joined
-
Last visited
Everything posted by commievid
-
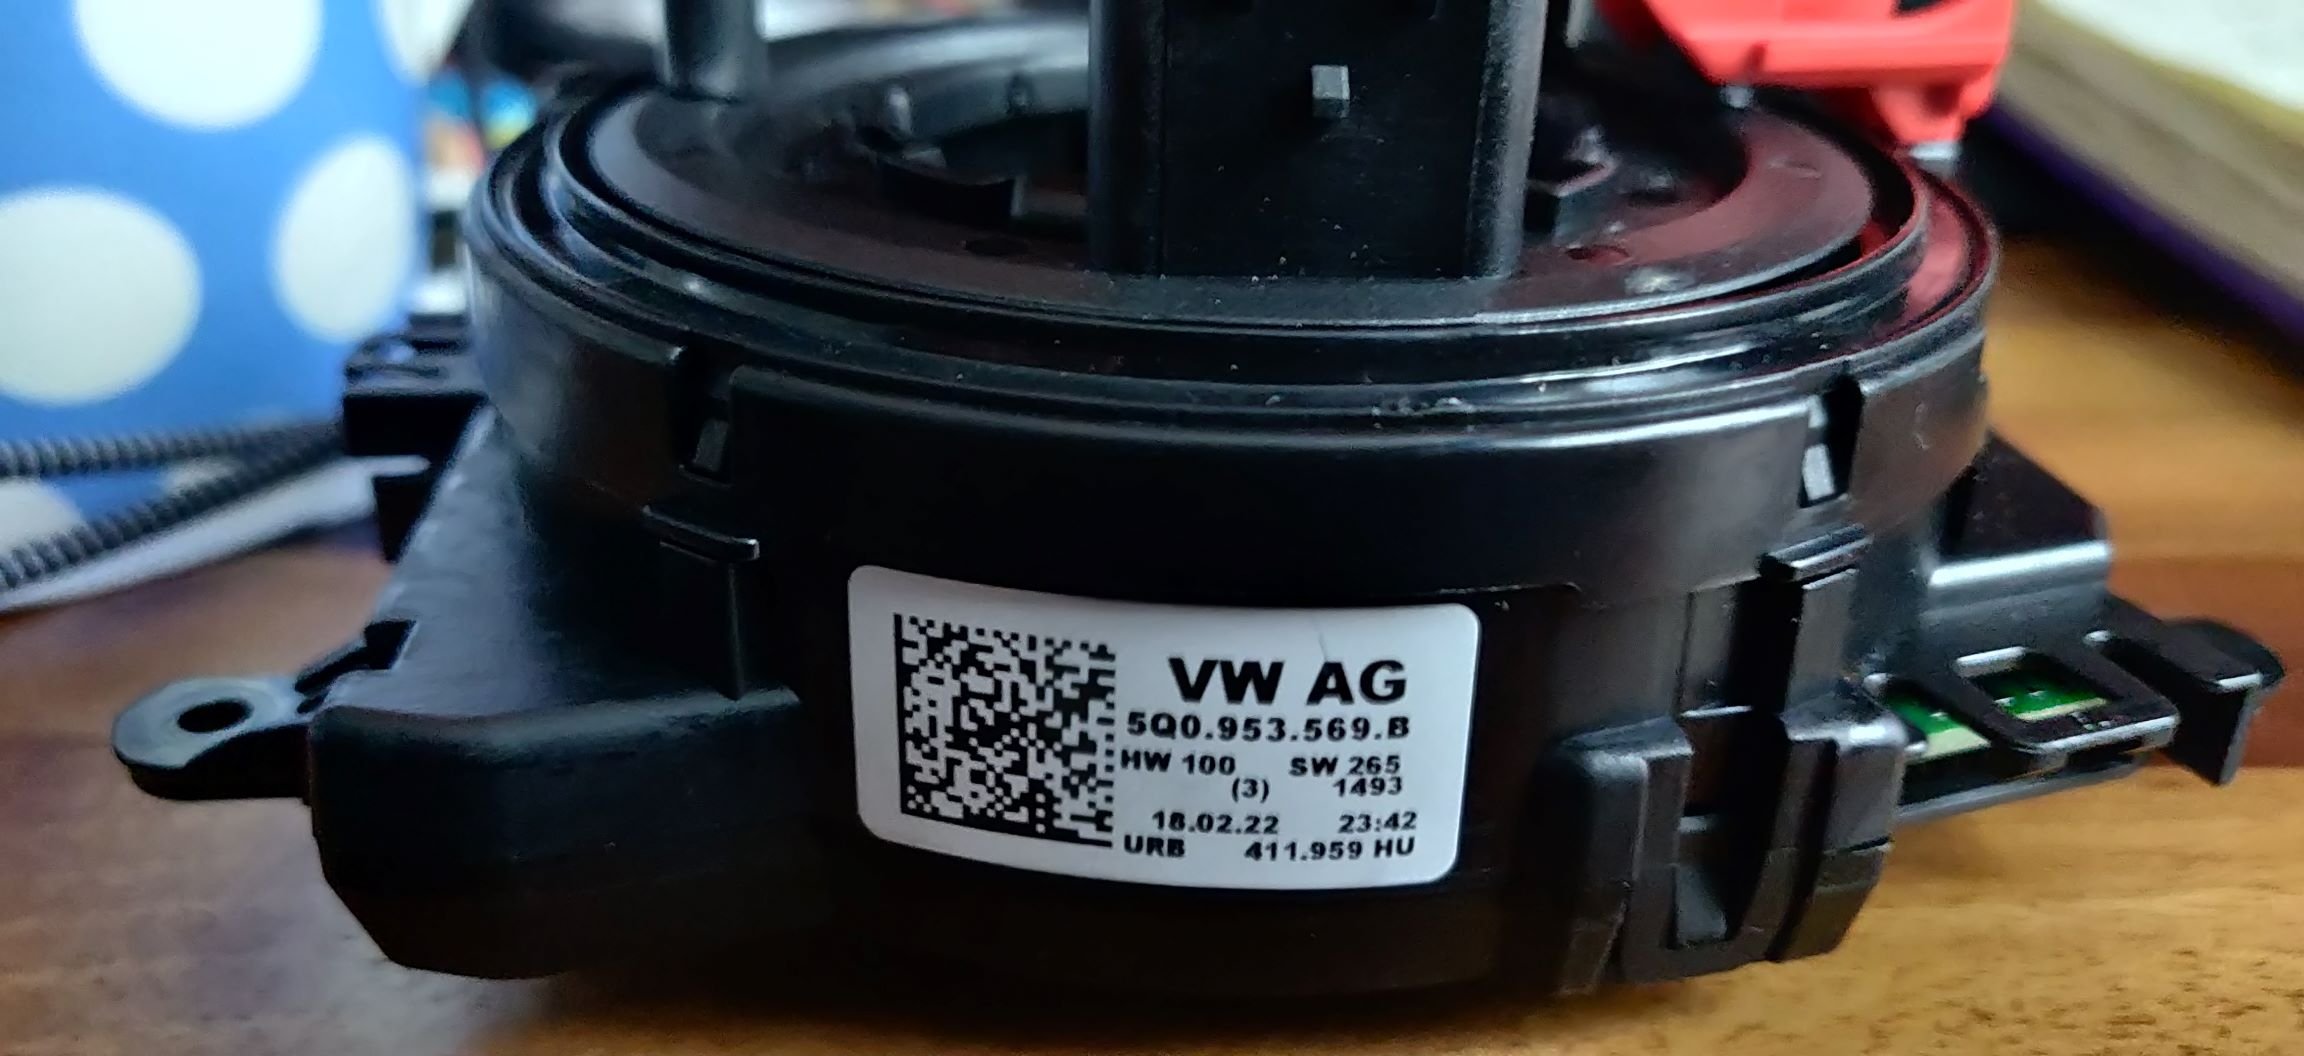
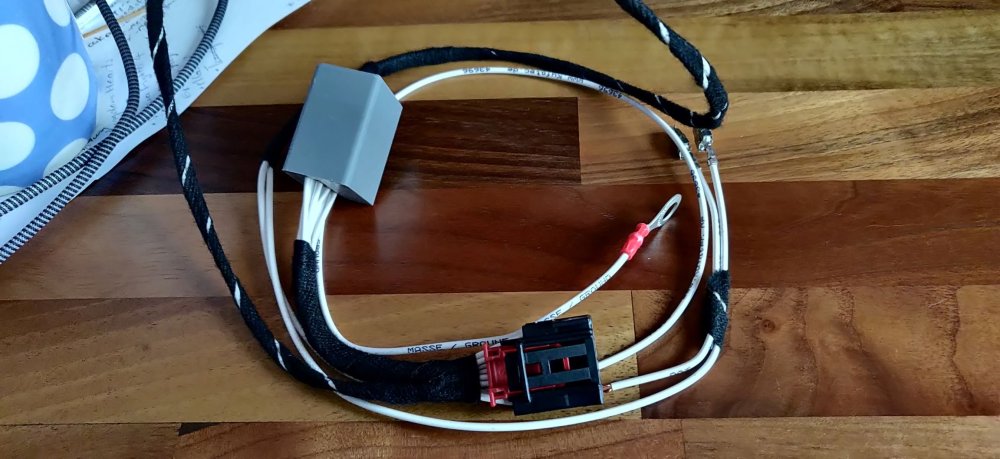
One more: The replacement clock spring to replace the replacement clock spring: Part number 5Q0 953 569 B which aligns more to others retrofitting experiences. I could probably swap that into the existing replacement stalks, so I could probably do that. Now, this is from https://www.cars-equipment.com/en/shop/steering-wheel-modules-11/oem-5q0953569b-airbag-spiral-cable-steering/ which was priced at £140, so went with it. They have a strange approach to sorting out the shipping, giving you several options. It looked like DHL was at £21 and made most sense because air mail for something this pricy might not be wise. A few days prior, I also ordered https://www.cars-equipment.com/en/shop/golf-3/43696-heated-steering-wheel-cable-set/ the Kufatec heated steering wheel adapter loom thingy: This was £35.49, and for this one I chose the air mail option, adding £4.00. After sending the first order through, they noted that UK customers probably shouldn't use air mail as it could take 6 weeks to arrive compared to Fedex or DHL. The picture above suggests otherwise. The bag says 43696, I was sure it's supposed to be 43696-1 for right hand drive. worse case scenario, I guess I will need to splice an additional length of wire for the power and ground. They both arrived on the same day, with the loom ordered on 29 February, and the clock spring ordered 3 March (sent on 4 March). as mentioned, both arrived 8 March. Now here's the rub. DHL decided to charge me an additional £50.92 to handle import duty and tax. This kinda annoyed me as I basically could have it sourced it closer to home at a similar price. Or sod's law, paying £3 more for Fedex might have avoided it (or maybe not). I'll jot it down to some bad luck. It does mean that this heated steering wheel retrofit is spiralling cost wise. I still haven't got an adapter for it due to being a facelift wheel... Maintenance: £1468.47 Upgrades: £681.11 (+£251.41) Miscellaneous: £584.95


-
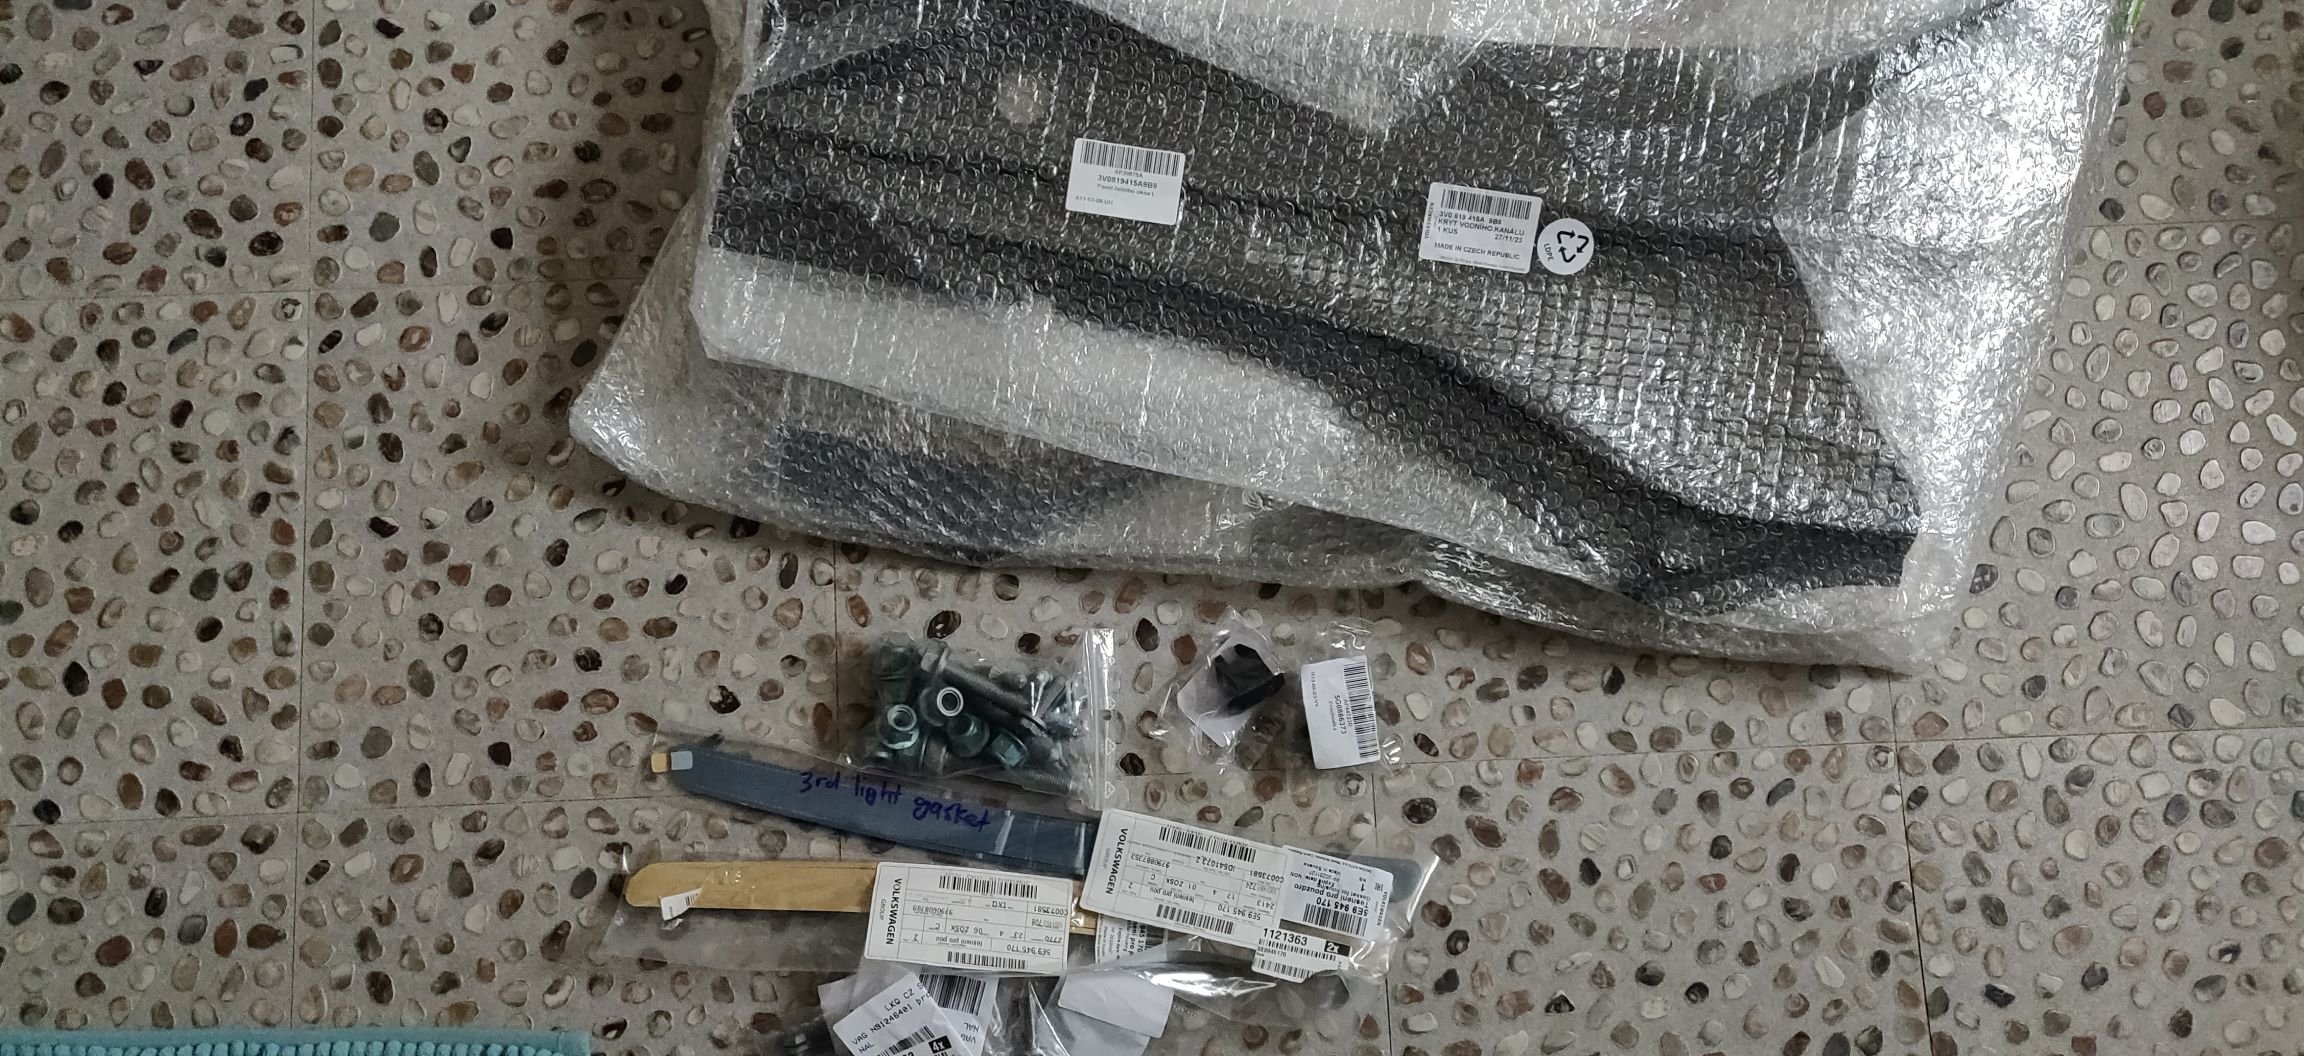
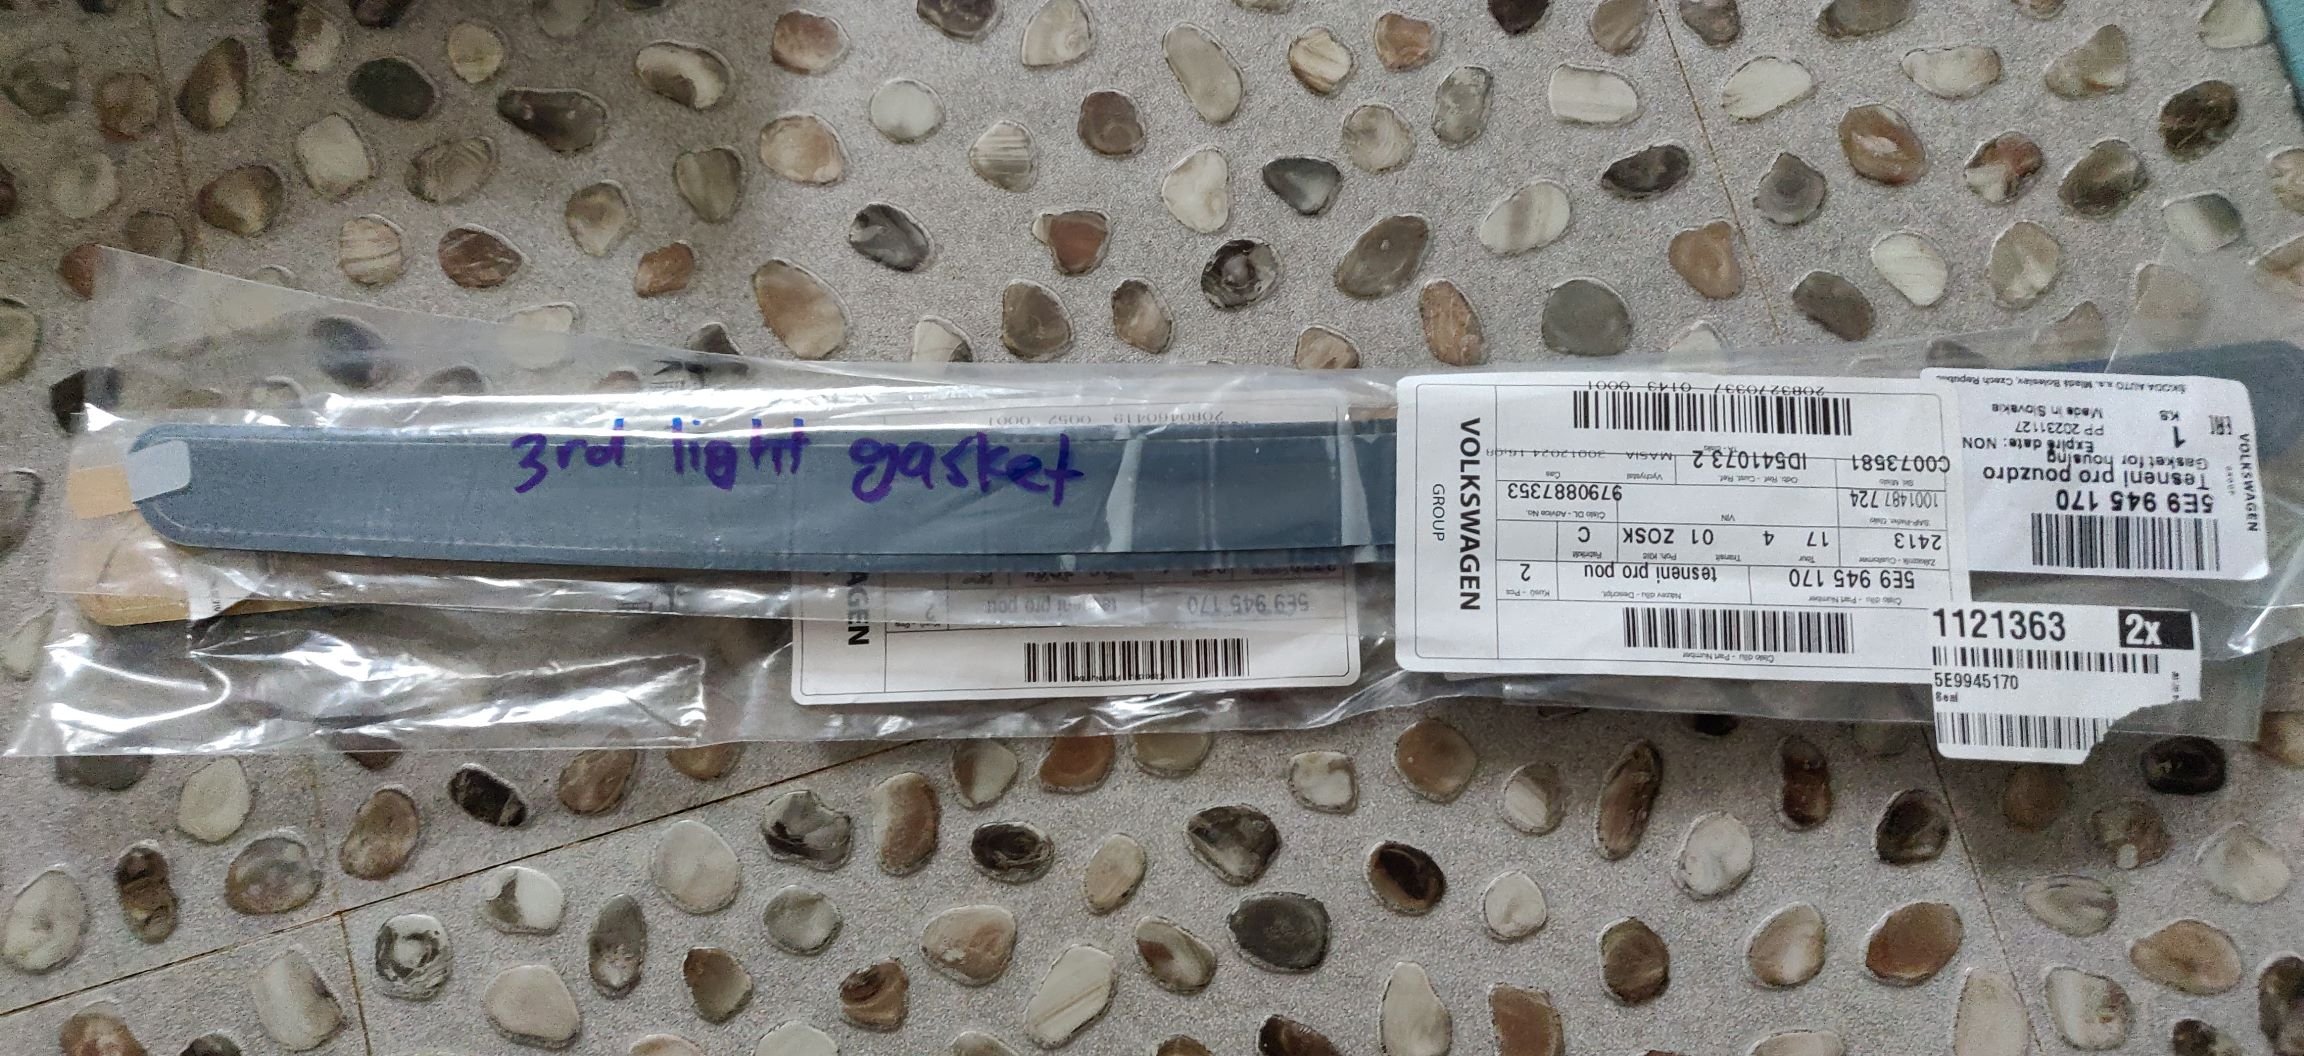
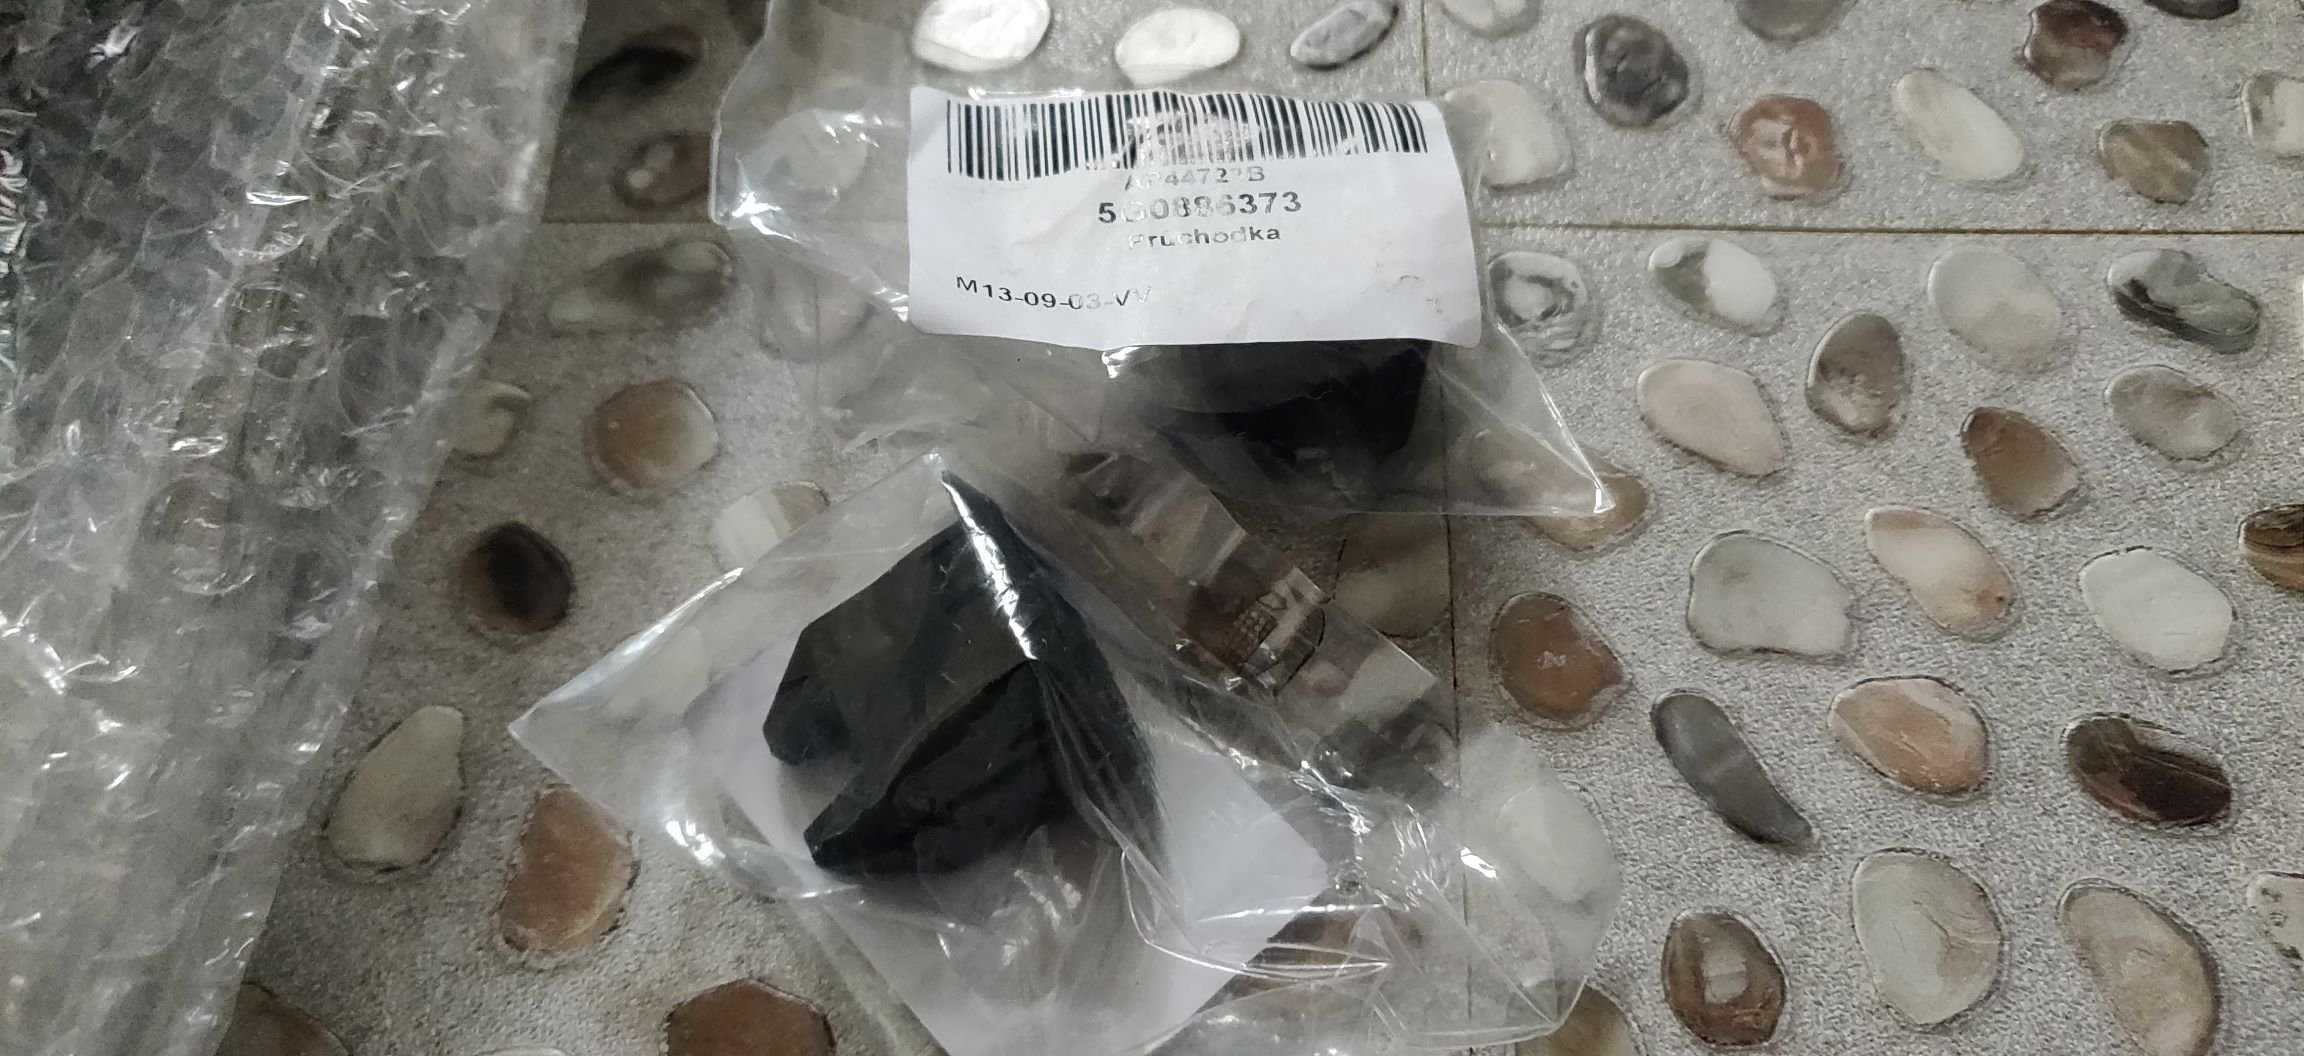
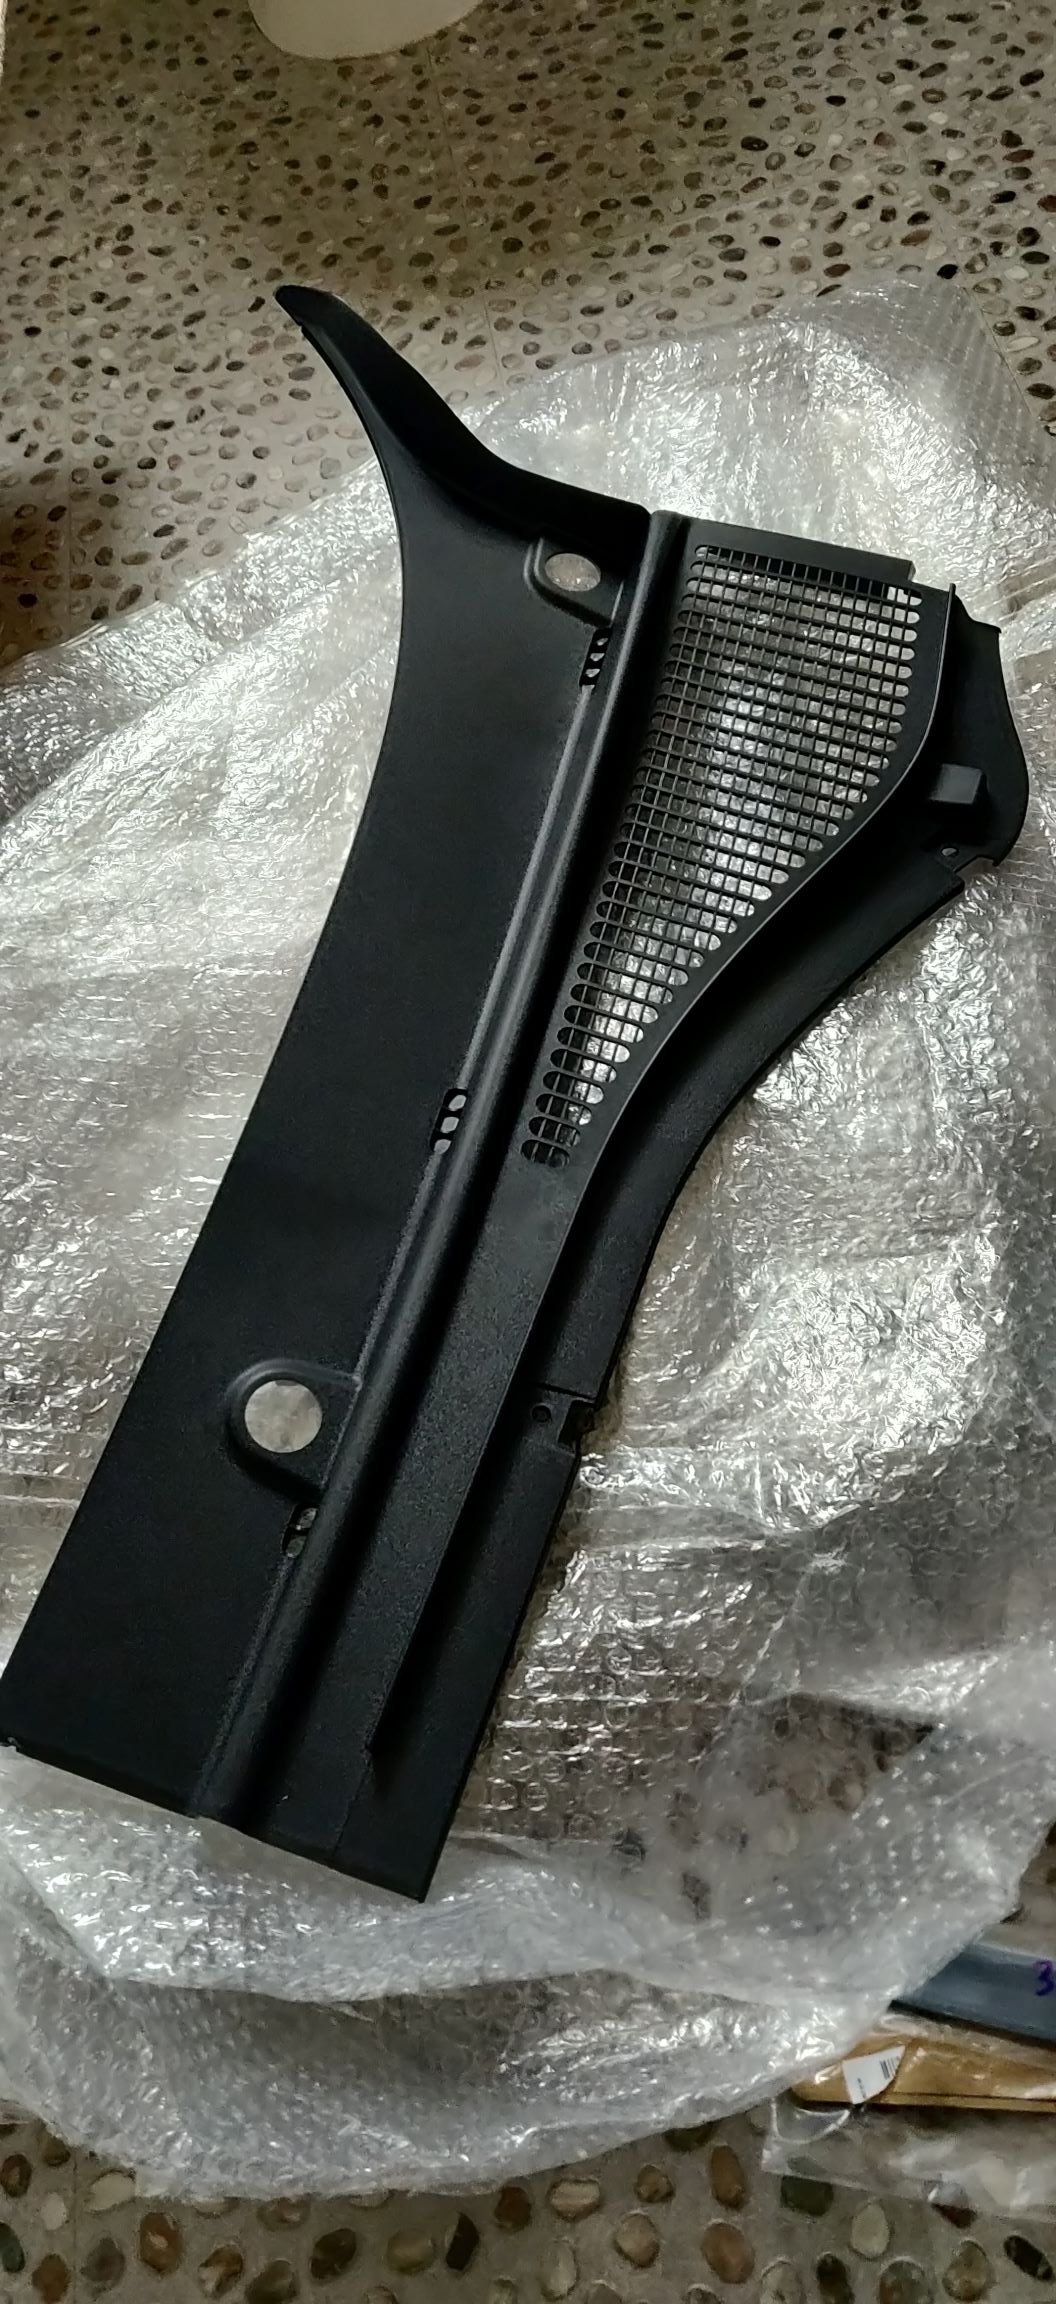
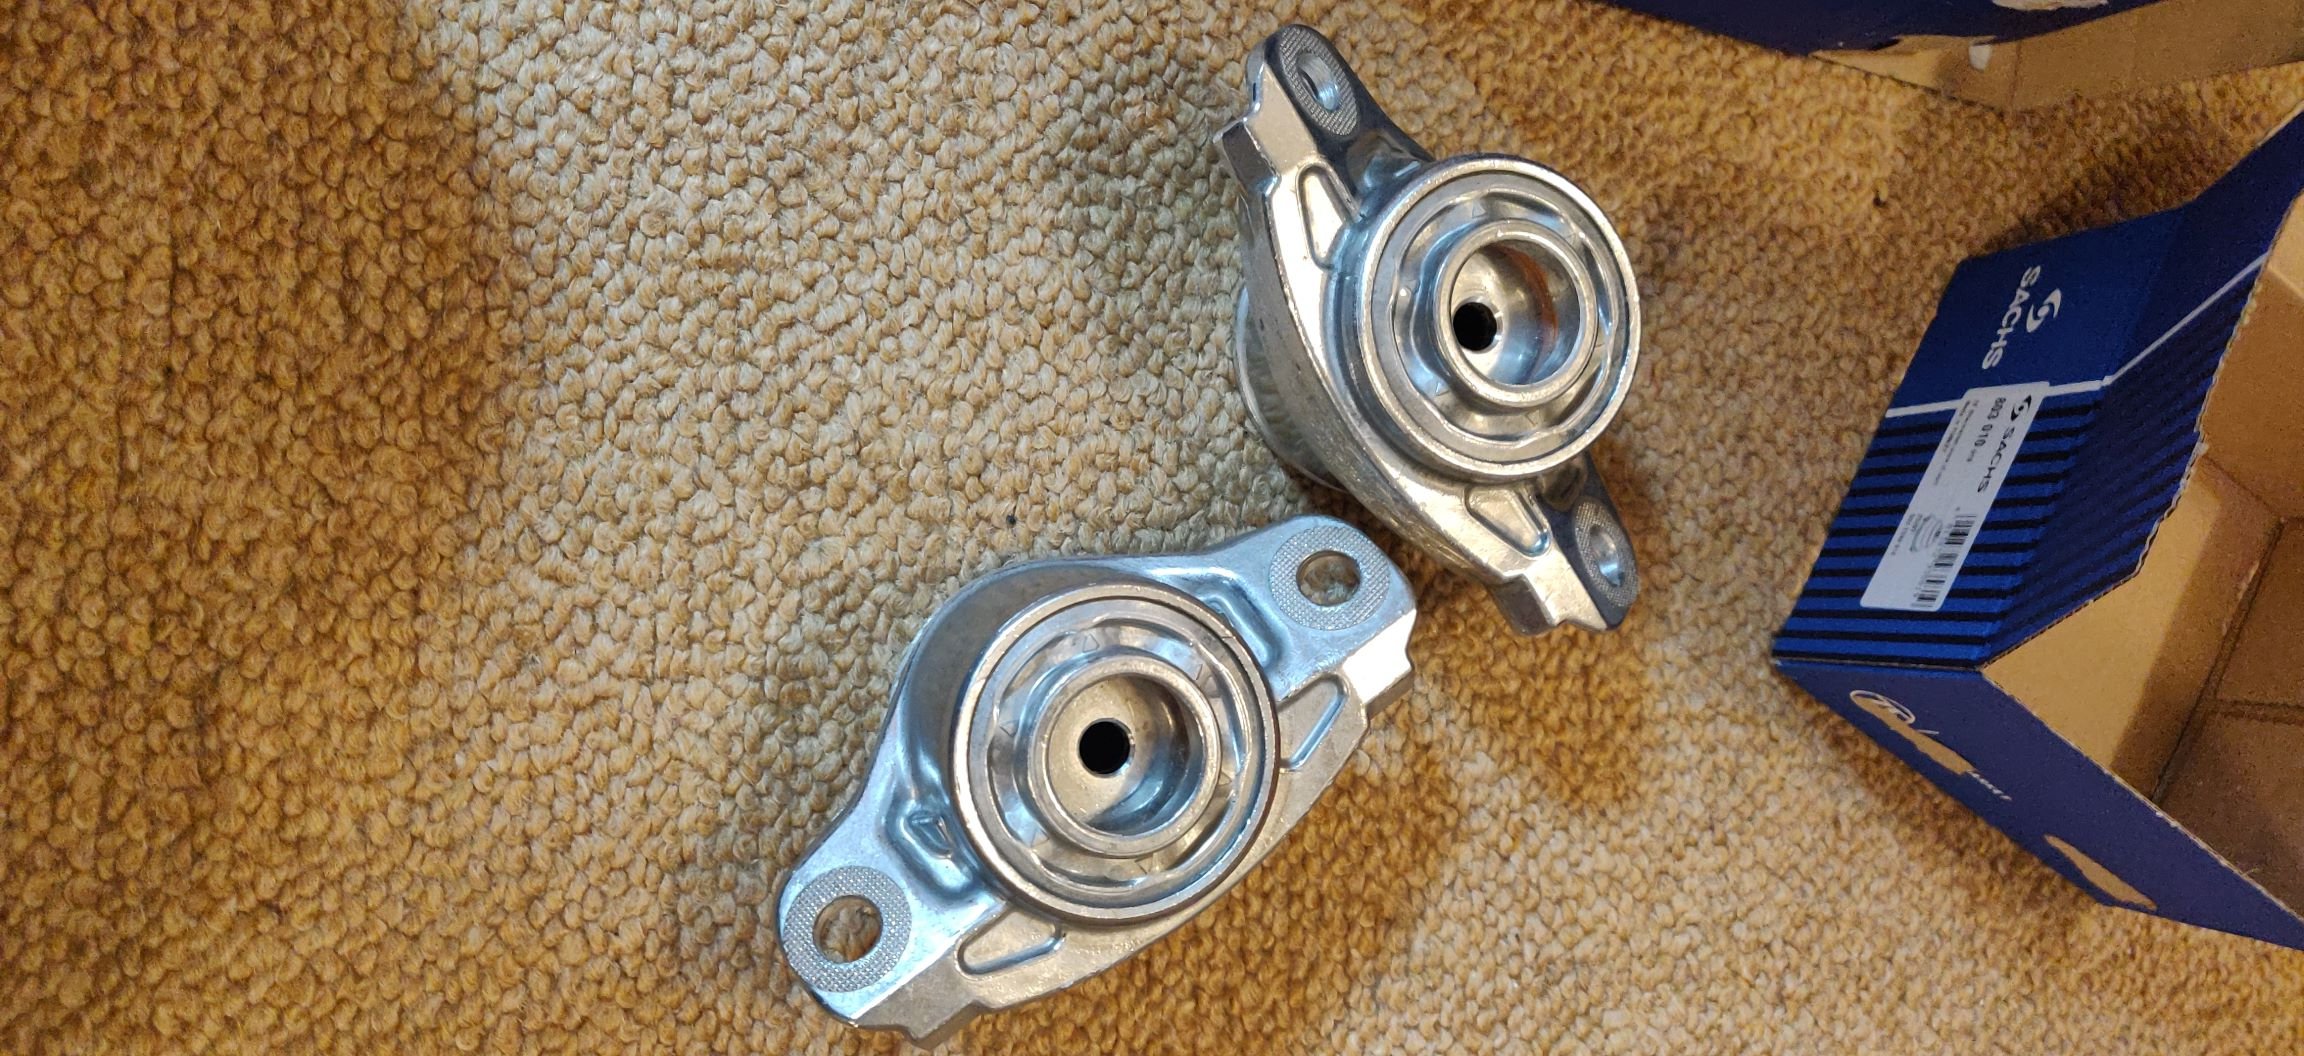
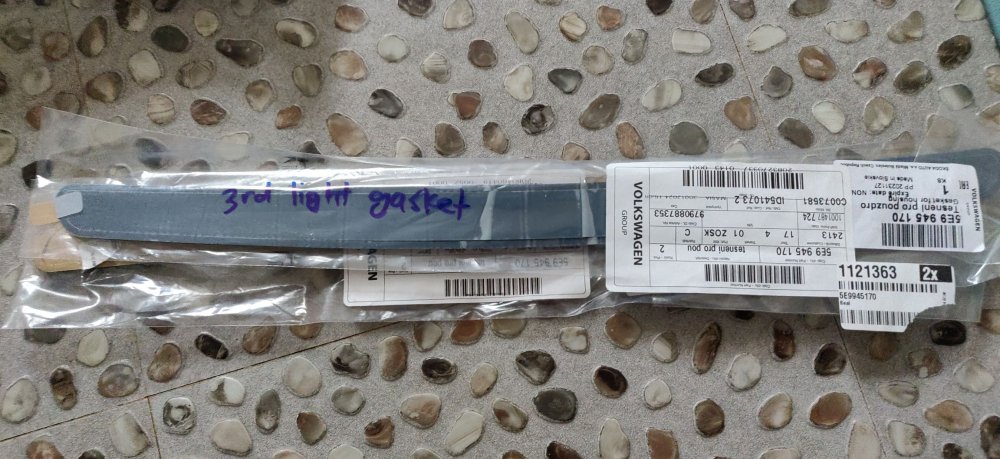
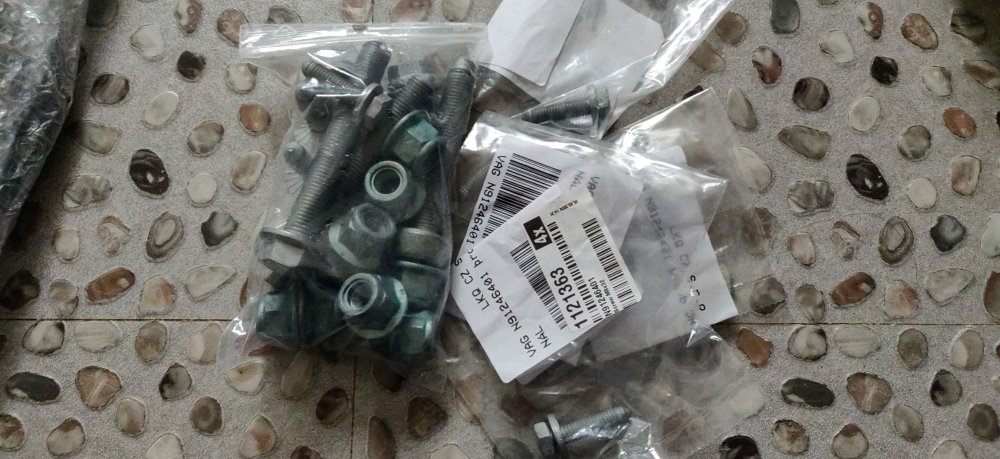
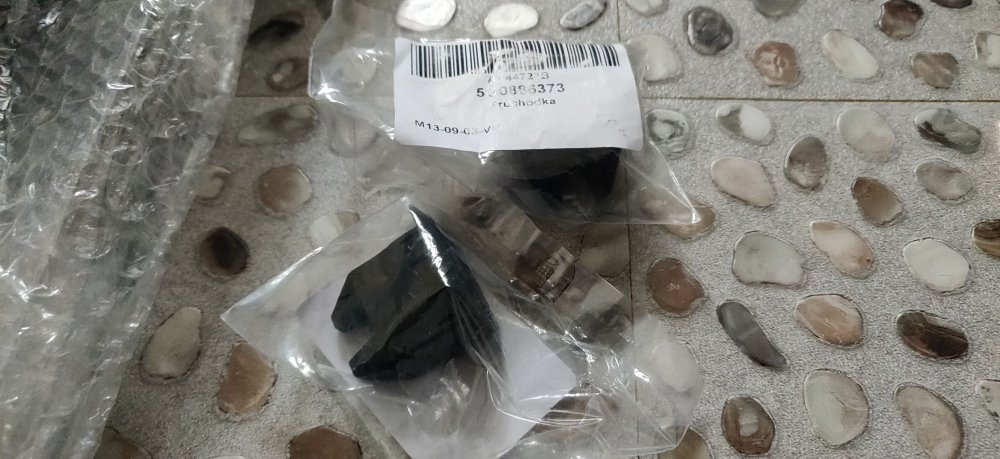
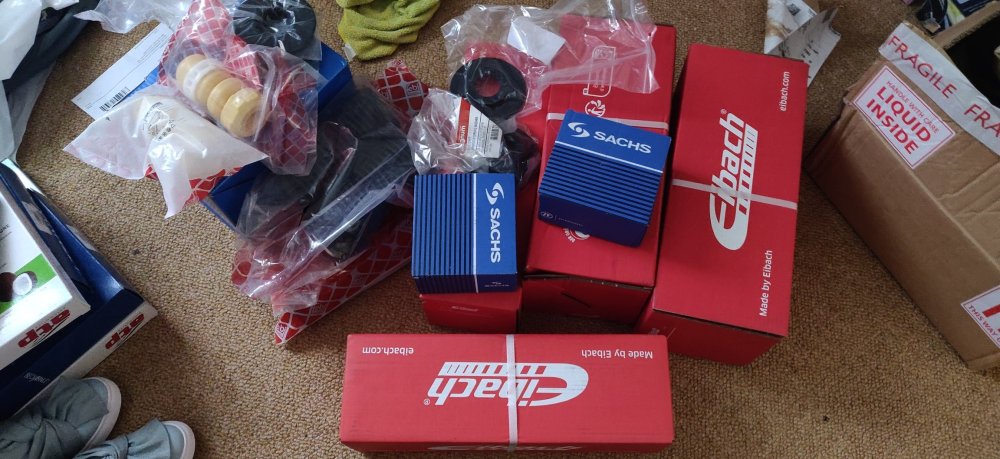
Whilst Googling around for prices and things, I stumbled upon https://www.skoda-parts.com/, so decided to give this a go, actually using LLL parts to obtain parts number and then searching through: I will recommend these guys. I made an initial order, and their site had the ability to keep adding to orders not shipped yet, so ended up doing that twice. Despite this, they still ended up sending it all with only a slight delay. The original order was placed on a Saturday 2 March, and additions added twice on the Tuesday, and via Fedex, the thing arrived on a Friday. Top notch! So firstly: These are the gasket for the third brake light (as you can see with my labelling), mainly should I need to remove the third light to diagnose that rear washer (which I may not need to). This is part 5E9 945 170 as per the upside down label and was €7.20 each (I bought two in case). Perhaps more importantly: Replacement suspension nuts and bolts. I'll forever bemoan the VW group for essentially requiring sacrificial suspension bolts. I suppose the argument is that these aren't replaced on the regular, and whilst in isolation they're reasonably priced, they do add up. I decided to get several nuts just in case. The list is: 6 x N 912 464 01 - M8 x 32 bolts for the front struts to the body (3 per side). €10.23 2 x N 106 283 01 - M12x1.5 x 90 bolts for the rear struts to the lower arm (1 per side). €8.60 2 x N 909 548 02 - M12x1.5 x 80 bolts for the front struts to the steering knuckle (1 per side). €3.20 4 x N 906 484 02 - M10 x 35 bolts for the rear struts to the body (2 per side). €10.42 10 x N 101 064 02 - M12x1.5 nuts for the above M12 bolts, bought 10, just to keep some spare. €11.52 I also added: I may have mentioned it in an earlier post, but these should be the grommets that the rear seat bench clip into, and are apparently sacrificial? They start losing their initial grip after removal. Pretty wild to be honest. Part 5G0 886 373 and came to €12.20 for 4 (again, some spares just in case). So the initial order came to €80.04, with €9.51 shipping. By the Tuesday, I also decided to add these: The workshop manual calls them "plenum covers", I'd call them windscreen cowls, and Skoda Parts themselves call it scuttle panel trims. These were €25.46 per side, so decided why not. It looks like whoever took off the driver side did it in a rather ham firsted manner, and damaged it. I'll take pictures once I near that part of the car. Buying spares also allows me to be ham fisted whilst I remove these the first time, and the price of them new was pretty much similar to used ones from eBay. Parts 3V0 819 415 A 9B9 and 3V0 819 416 C 9B9 for left and right respectively (I think). I wonder if the 9B9 code (which looking at other things I've ordered, suggests satin black) means there are other colours for these panels available? I think this added €8.48 to the order, fair enough as the packaging now needs to be larger. This then also coincided earlier in the week with noticing the lack of lower spring isolators. The black bit that the front springs sat on within the dampers, pictures in previous posts. This was part 5Q0 412 545 D and I decided to get aftermarket ones at €8.12 for a pair, as opposed to closer to €20 for genuine ones. For those, they only wanted an extra €4.16 to the order, I'm guessing because it doesn't affect postage, or they were being very nice about it. So the entire order from the invoice came to €144.05 which added up to £123.56 looking at my transactions. I'm leaning towards these as my go to parts people. Maintenance: £1468.47 (+£123.56) Upgrades: £429.70 Miscellaneous: £584.95


-
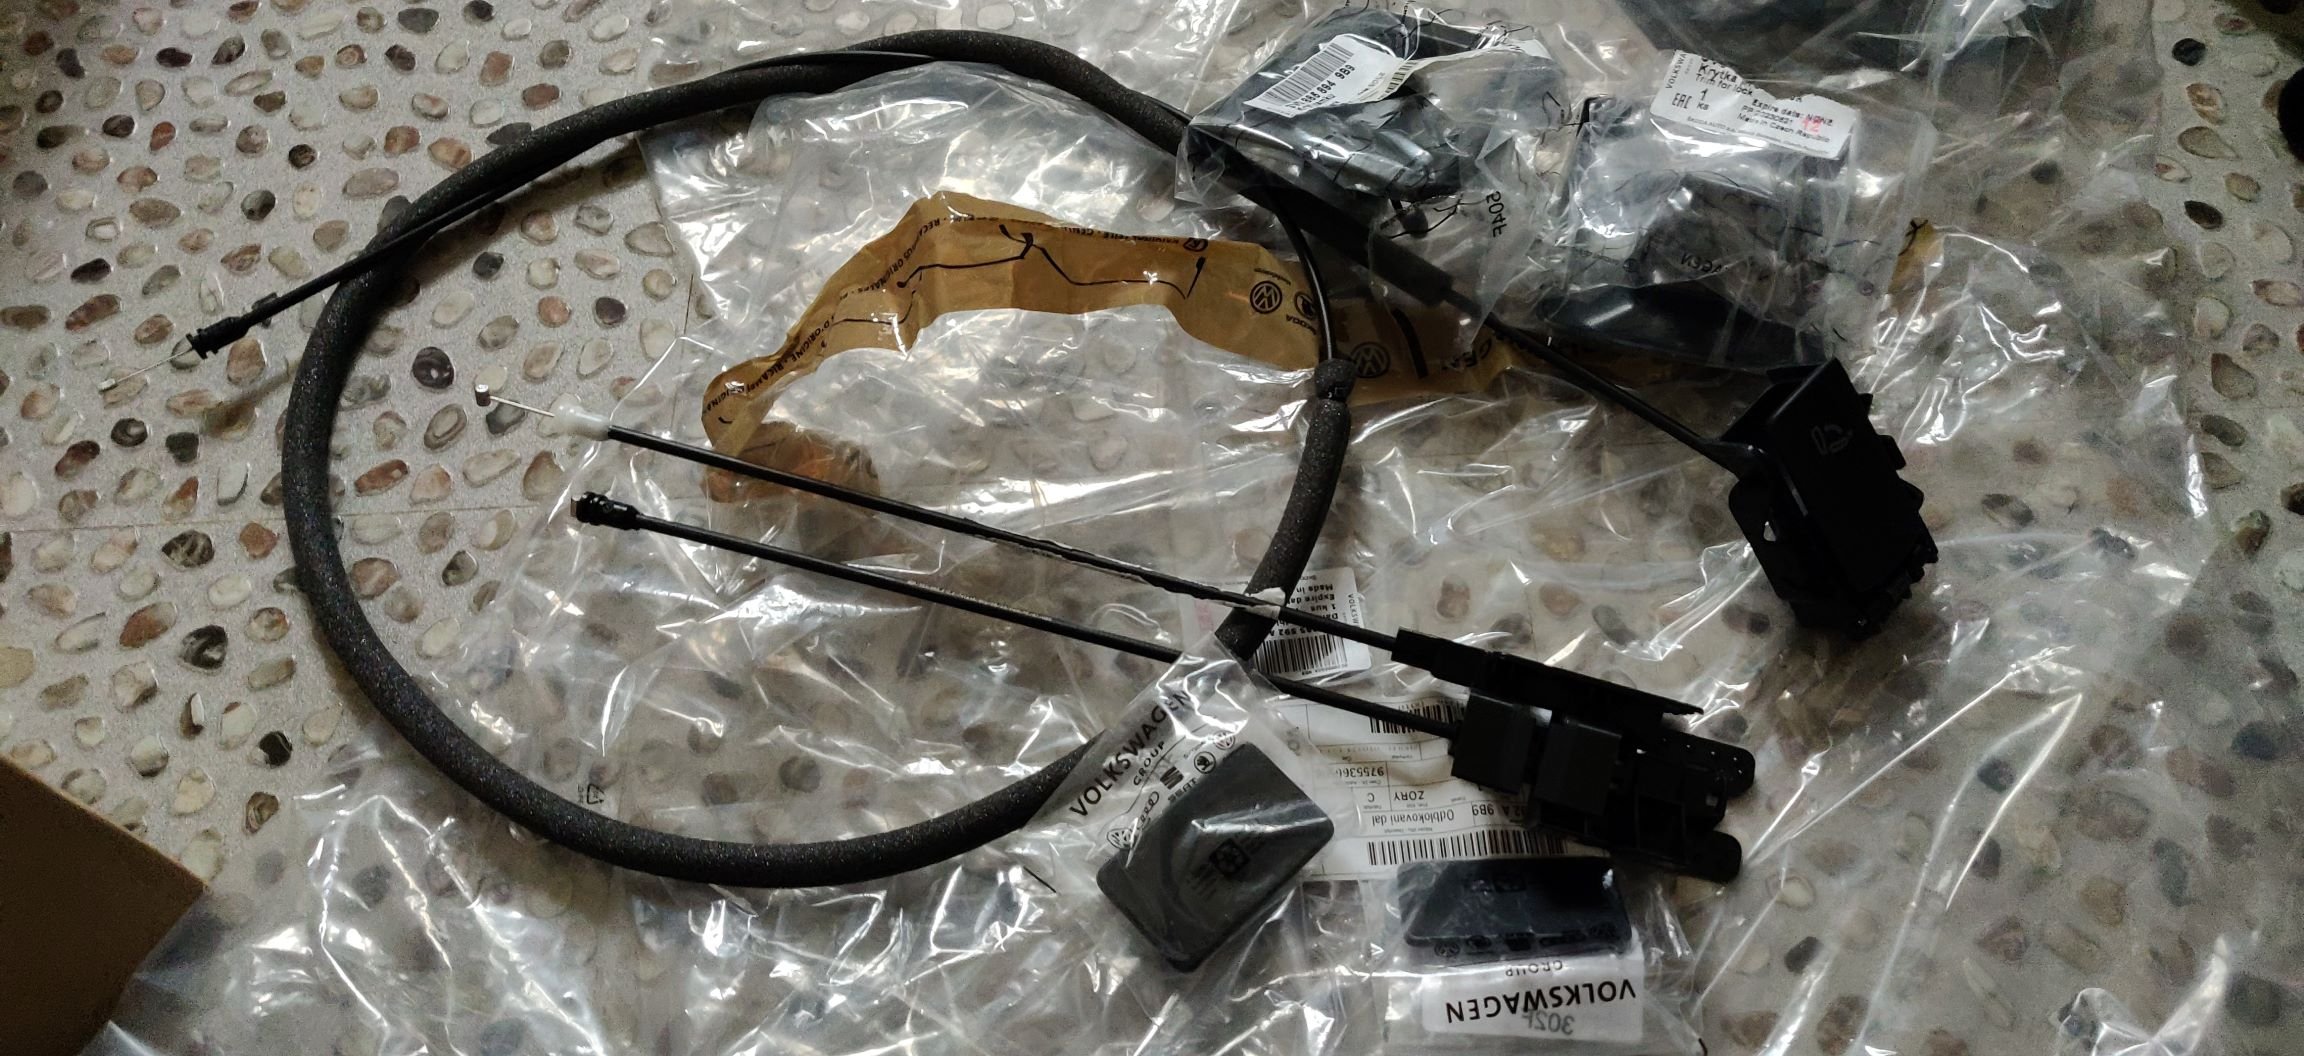
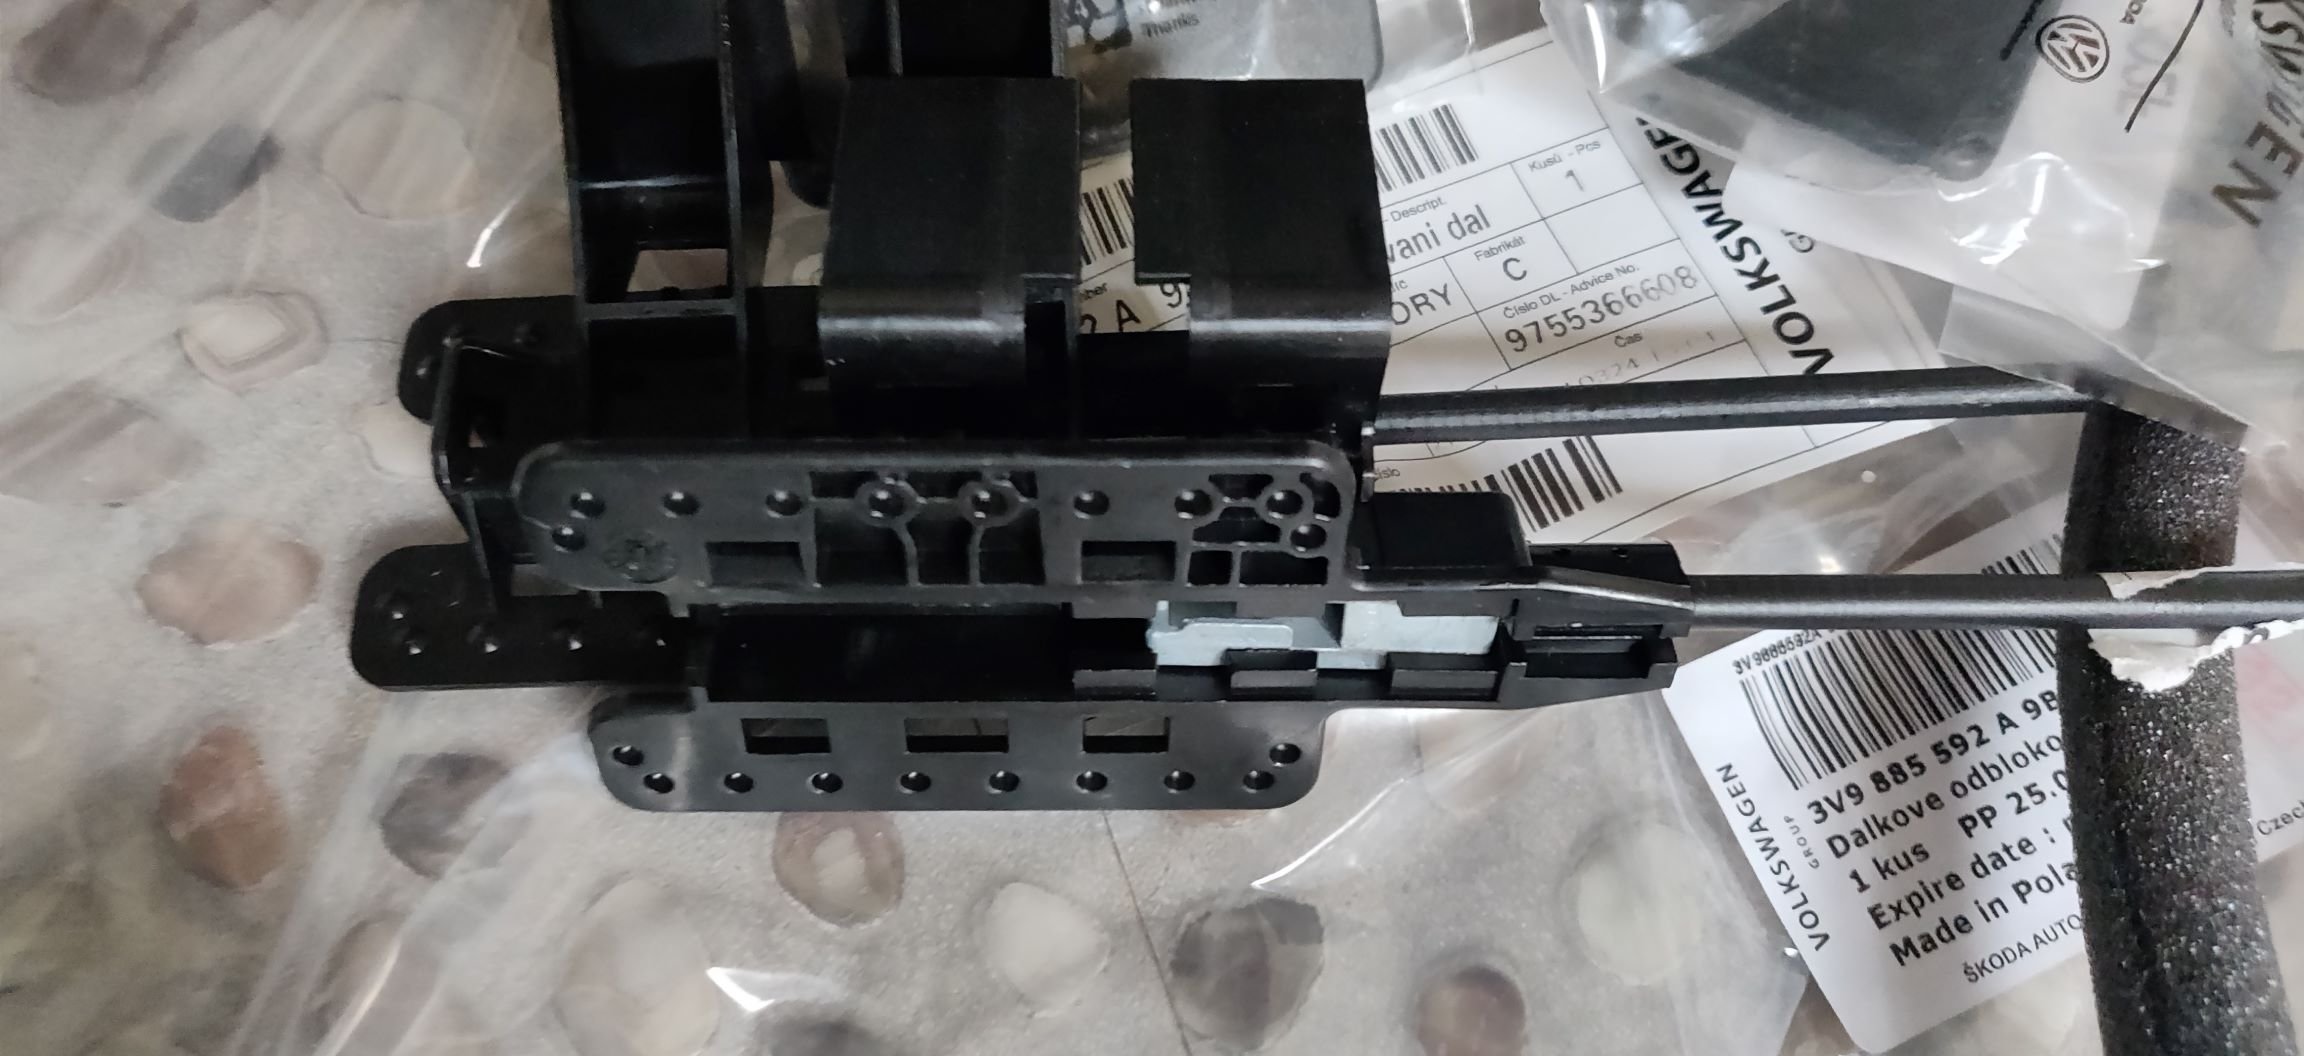
Looks like rain will stop play today. So I'll catalog up some more boxes of stuff that have arrived the last week, and also to help me keep track. I've found https://www.lllparts.co.uk/catalogs/skoda/CZ/SUP/851 a fountain of knowledge as the part catalog is pretty comprehensive, So on 28 February, I placed an order. They then do some sort of delivery calculation and within 30 minutes an updated price is sent to cover delivery. This then arrived yesterday, so smidgen over a week and a half: One thing I felt was strange that it was missing on this Superb is the levers in the boot that drop the rear seats. It was something we found on the Octavia VRS Estate when we was shopping around and is something I can see myself using when logging longer than anticipated loads. So it's what I'm hoping is enough components to retrofit this feature. I could find it to be terribly stupid an idea, but we'll see. So the bits involve: The rear levers (3V9 885 591 A 9B9 and 3V9 885 592 A 9B9) which came to £21.29 each. Then the parts that presumably go into the seat frame itself: These were 5G0 885 915 B and 5G0 885 915 C for the left and right, interestingly the former being £14.86 and the latter £10.36. I added some caps as well (5G0 886 296), which I think are for the above, 82p each. I also ordered the trims for the top of the rear seats (3V0 885 893 9B9 and 3V0 885 894 9B9) just in case, at £2.89 each. I also ordered two of 5E9885344A which are the bowden cables, which unfortunately also came with the levers, so they're kind of a waste, but came to £6.55 each. So all in all came to £92.64. So the original plan of removing the seats is still necessary for this in order to fit some of the gubbins into the rear seat back rest, but I could be being naïve about it being a relatively straightforward process. Maintenance: £1344.91 Upgrades: £429.70 (+£92.64) Miscellaneous: £584.95


-
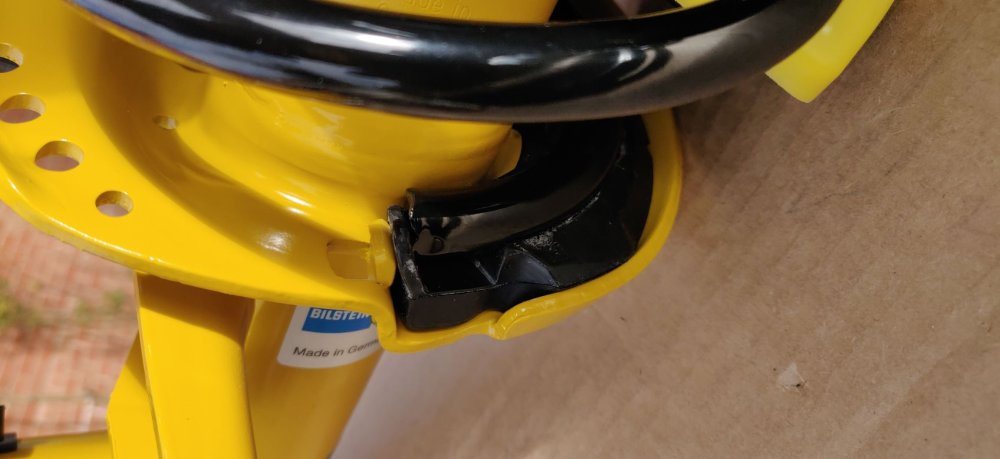
Whilst I'm here, this is the poorly Bilstein connector cover thing: So the inside reveals E4-XK1-Z034A03 which Google actually returns a response for. Unfortunately it's a website https://www.ecstuning.com/b-bilstein-parts/replacement-cap/e4-xk1-z034a03~b/ where it's apparently no longer available, so that's interesting. If anyone has a spare one possibly lying around, do get in touch! Maintenance: £1344.91 Upgrades: £337.06 Miscellaneous: £584.95

-
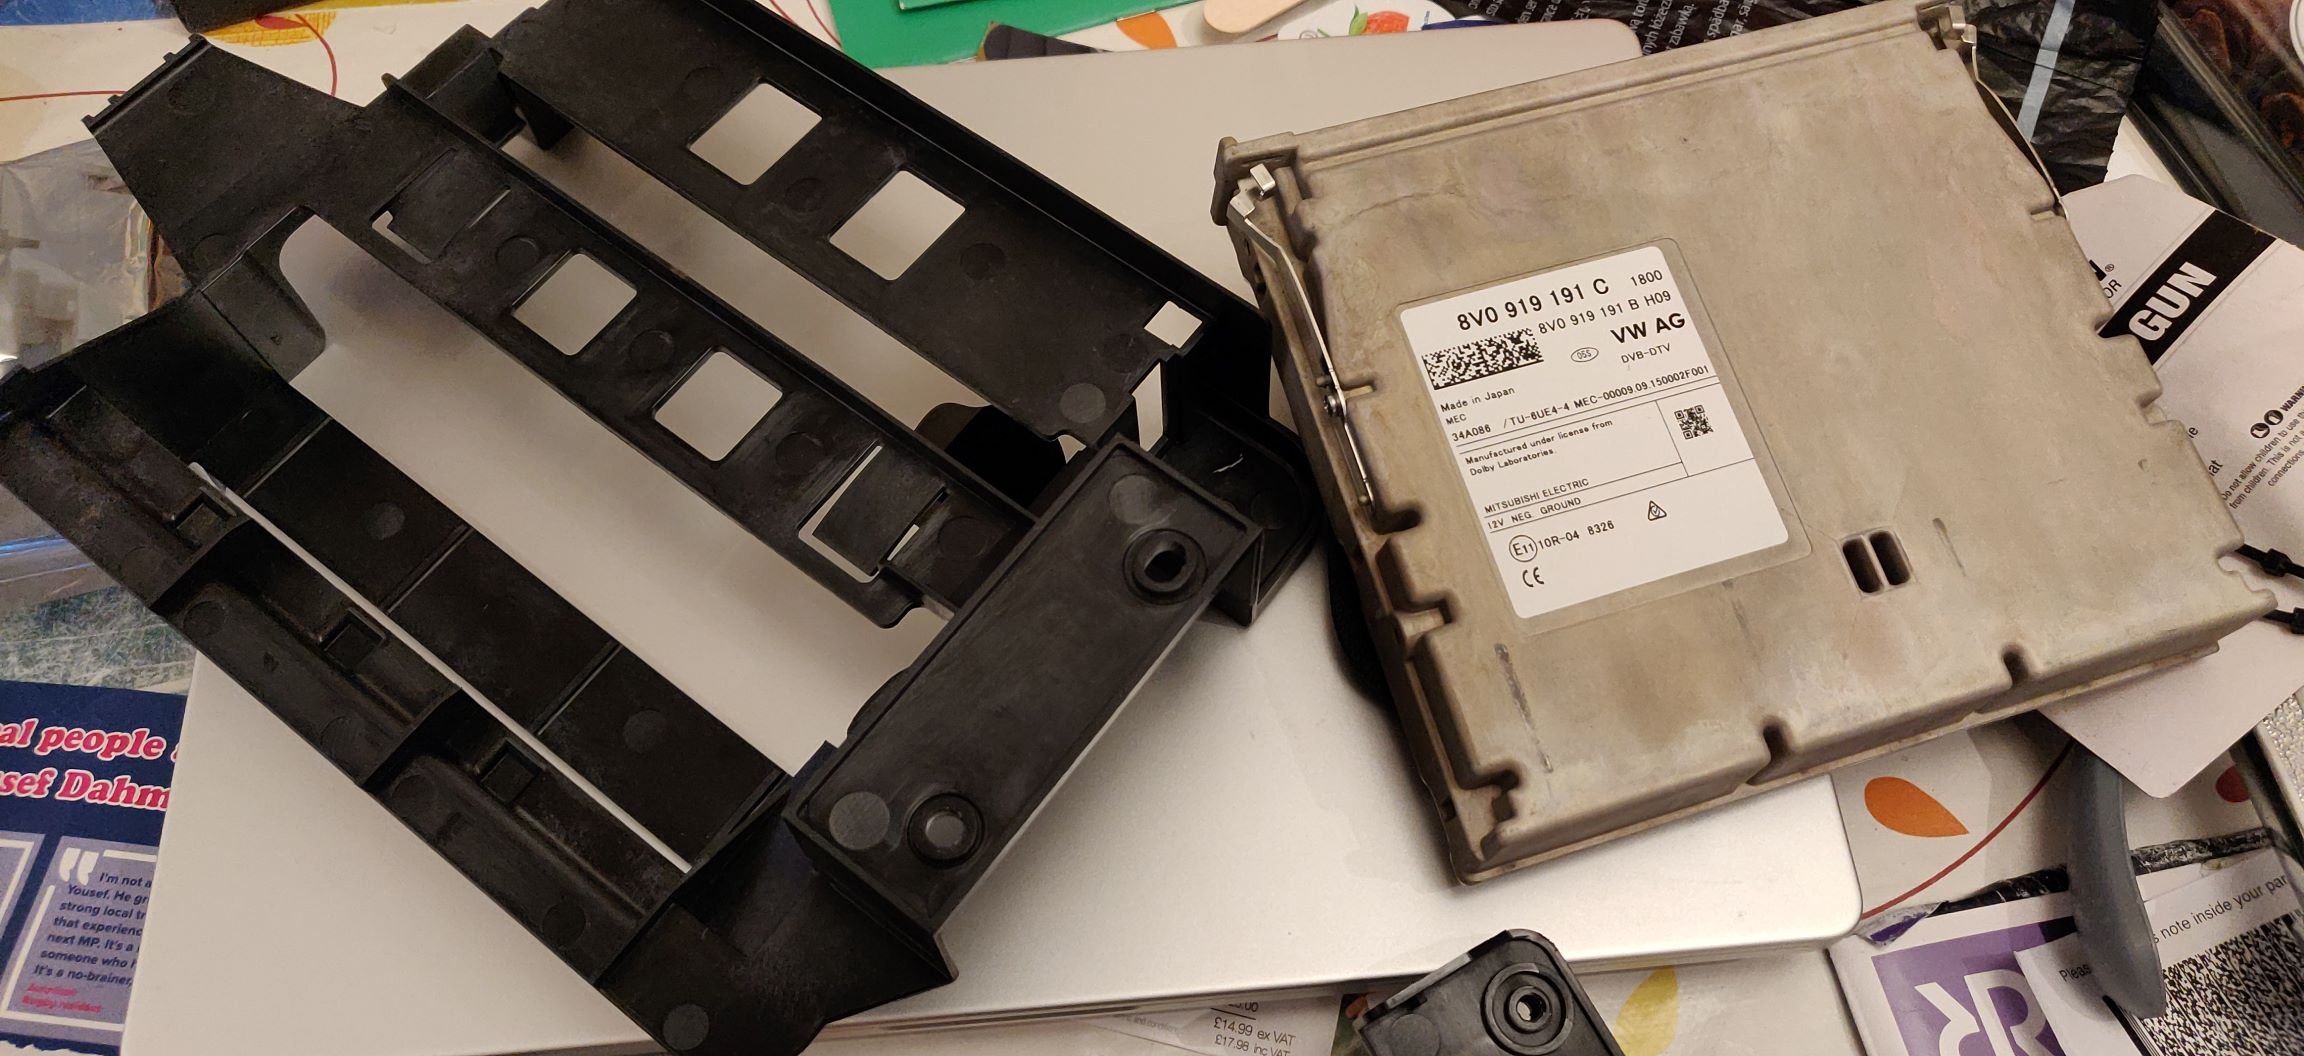
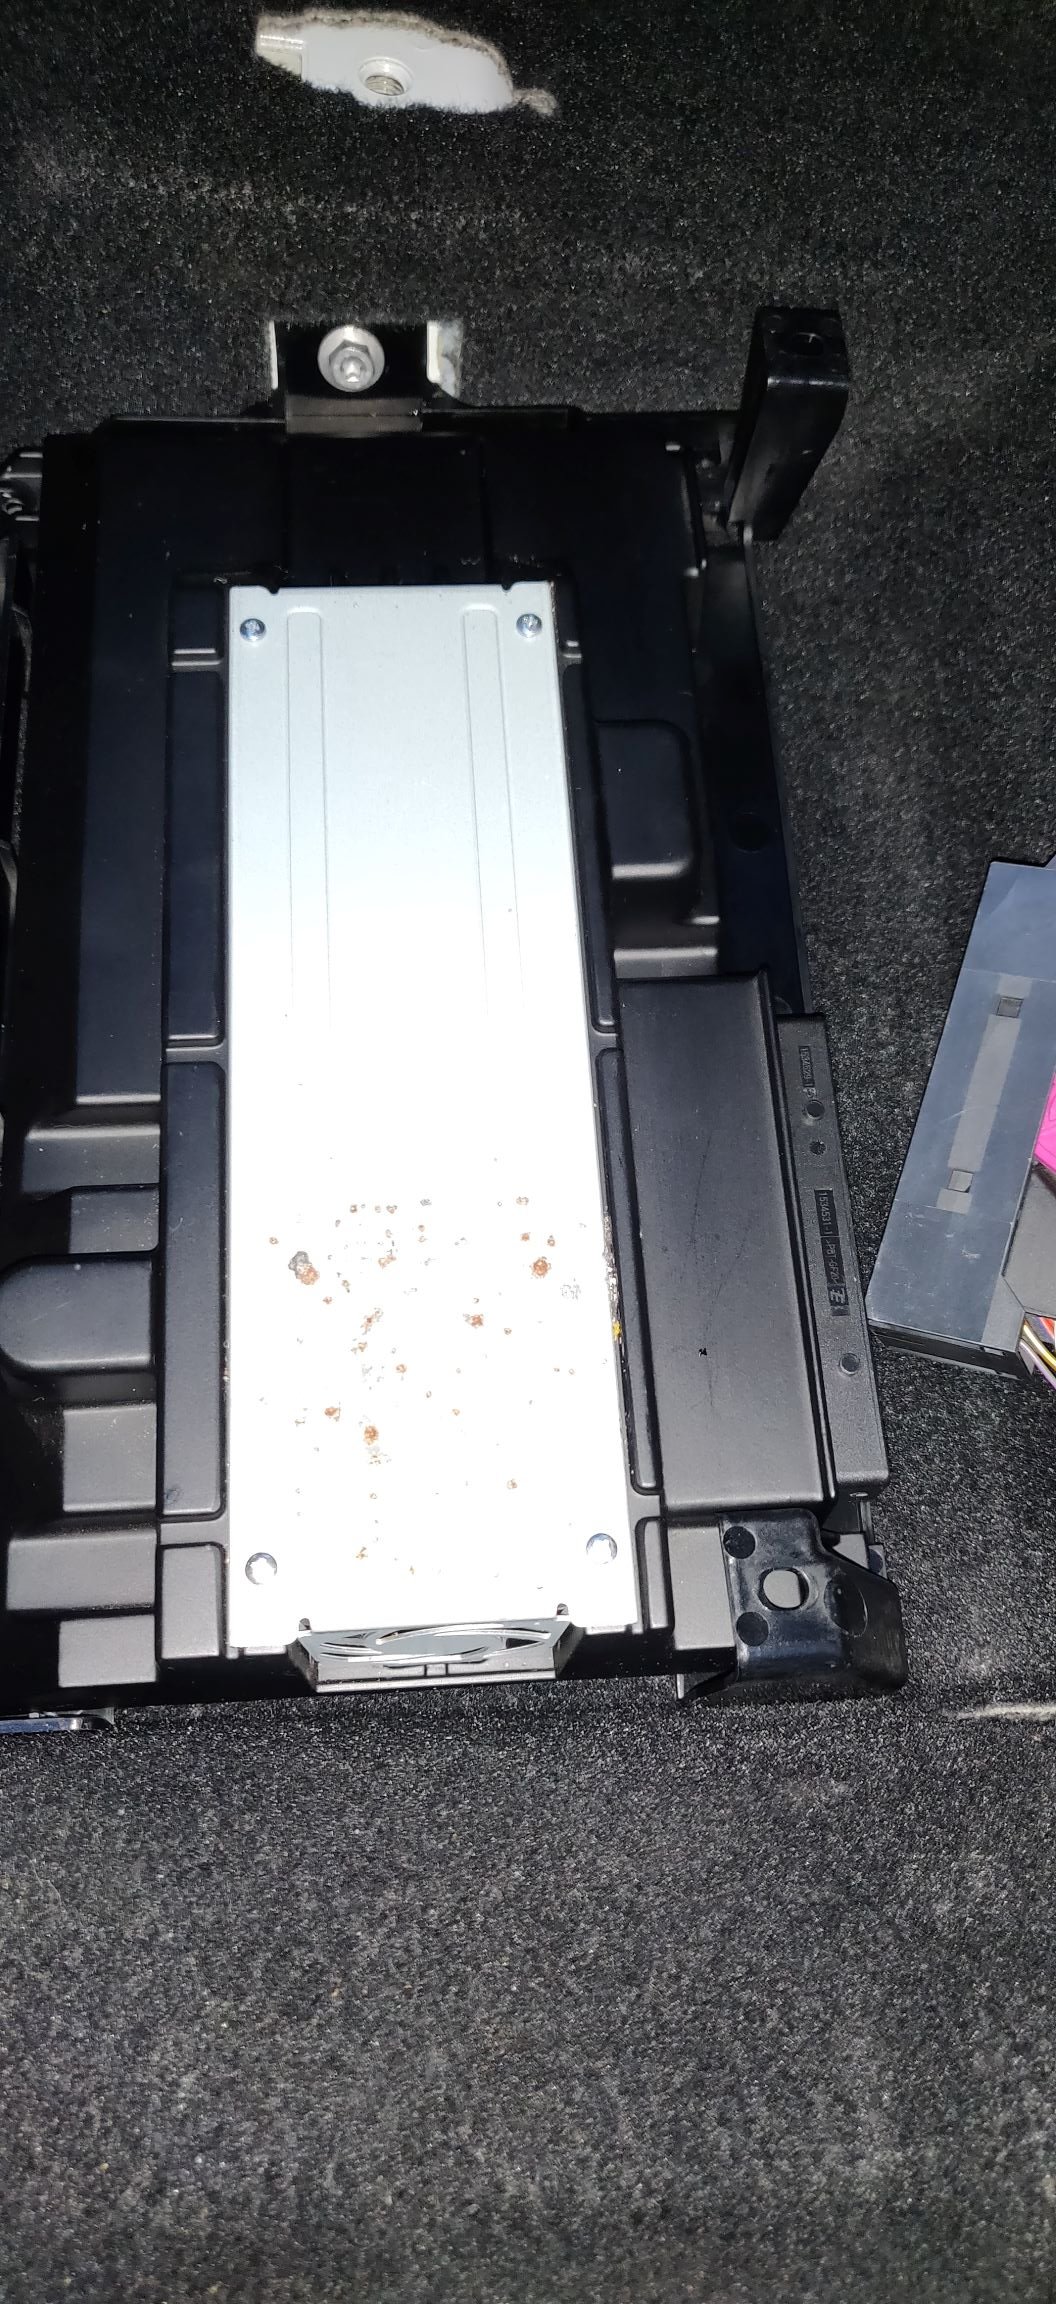
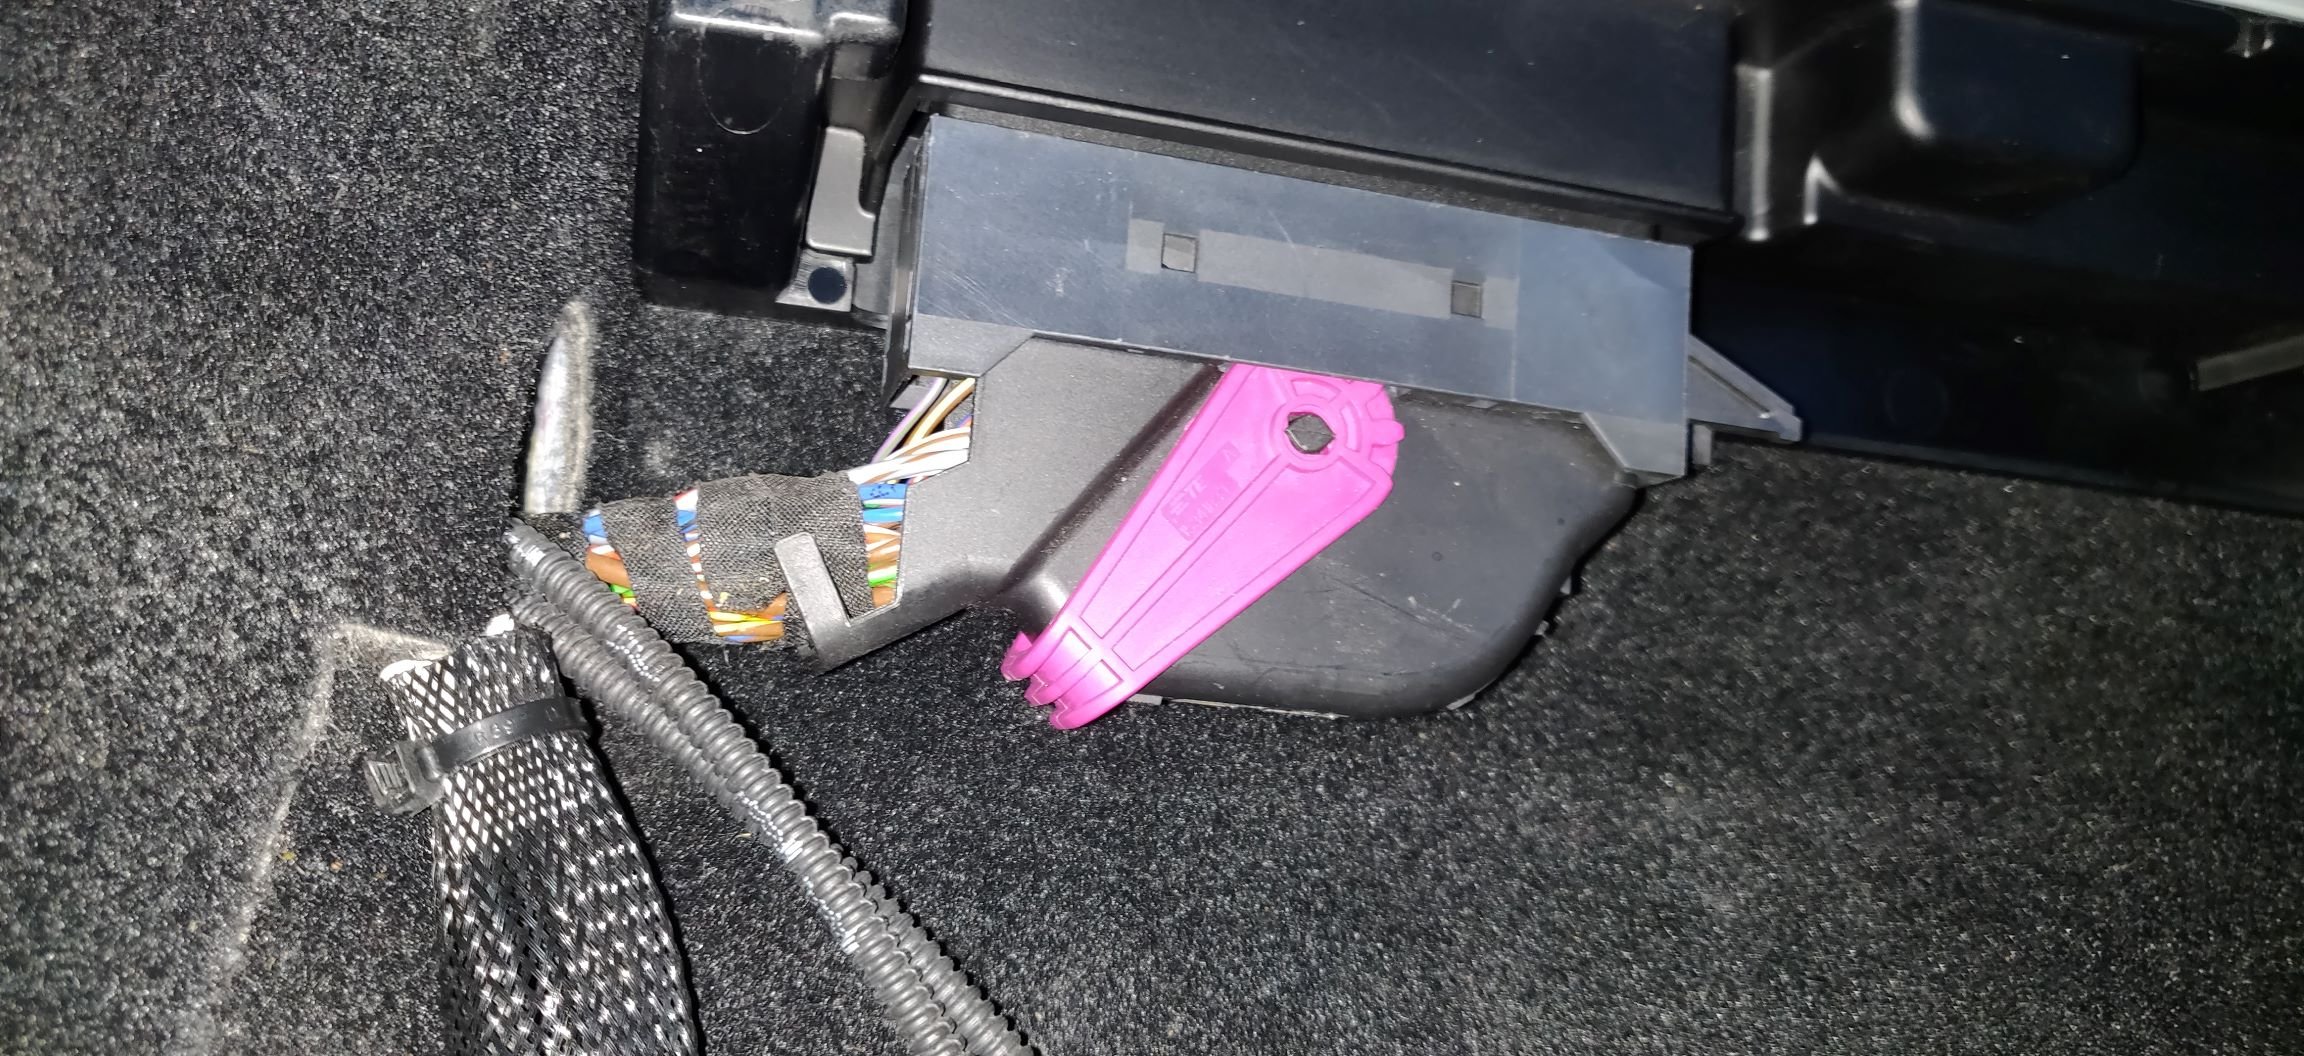
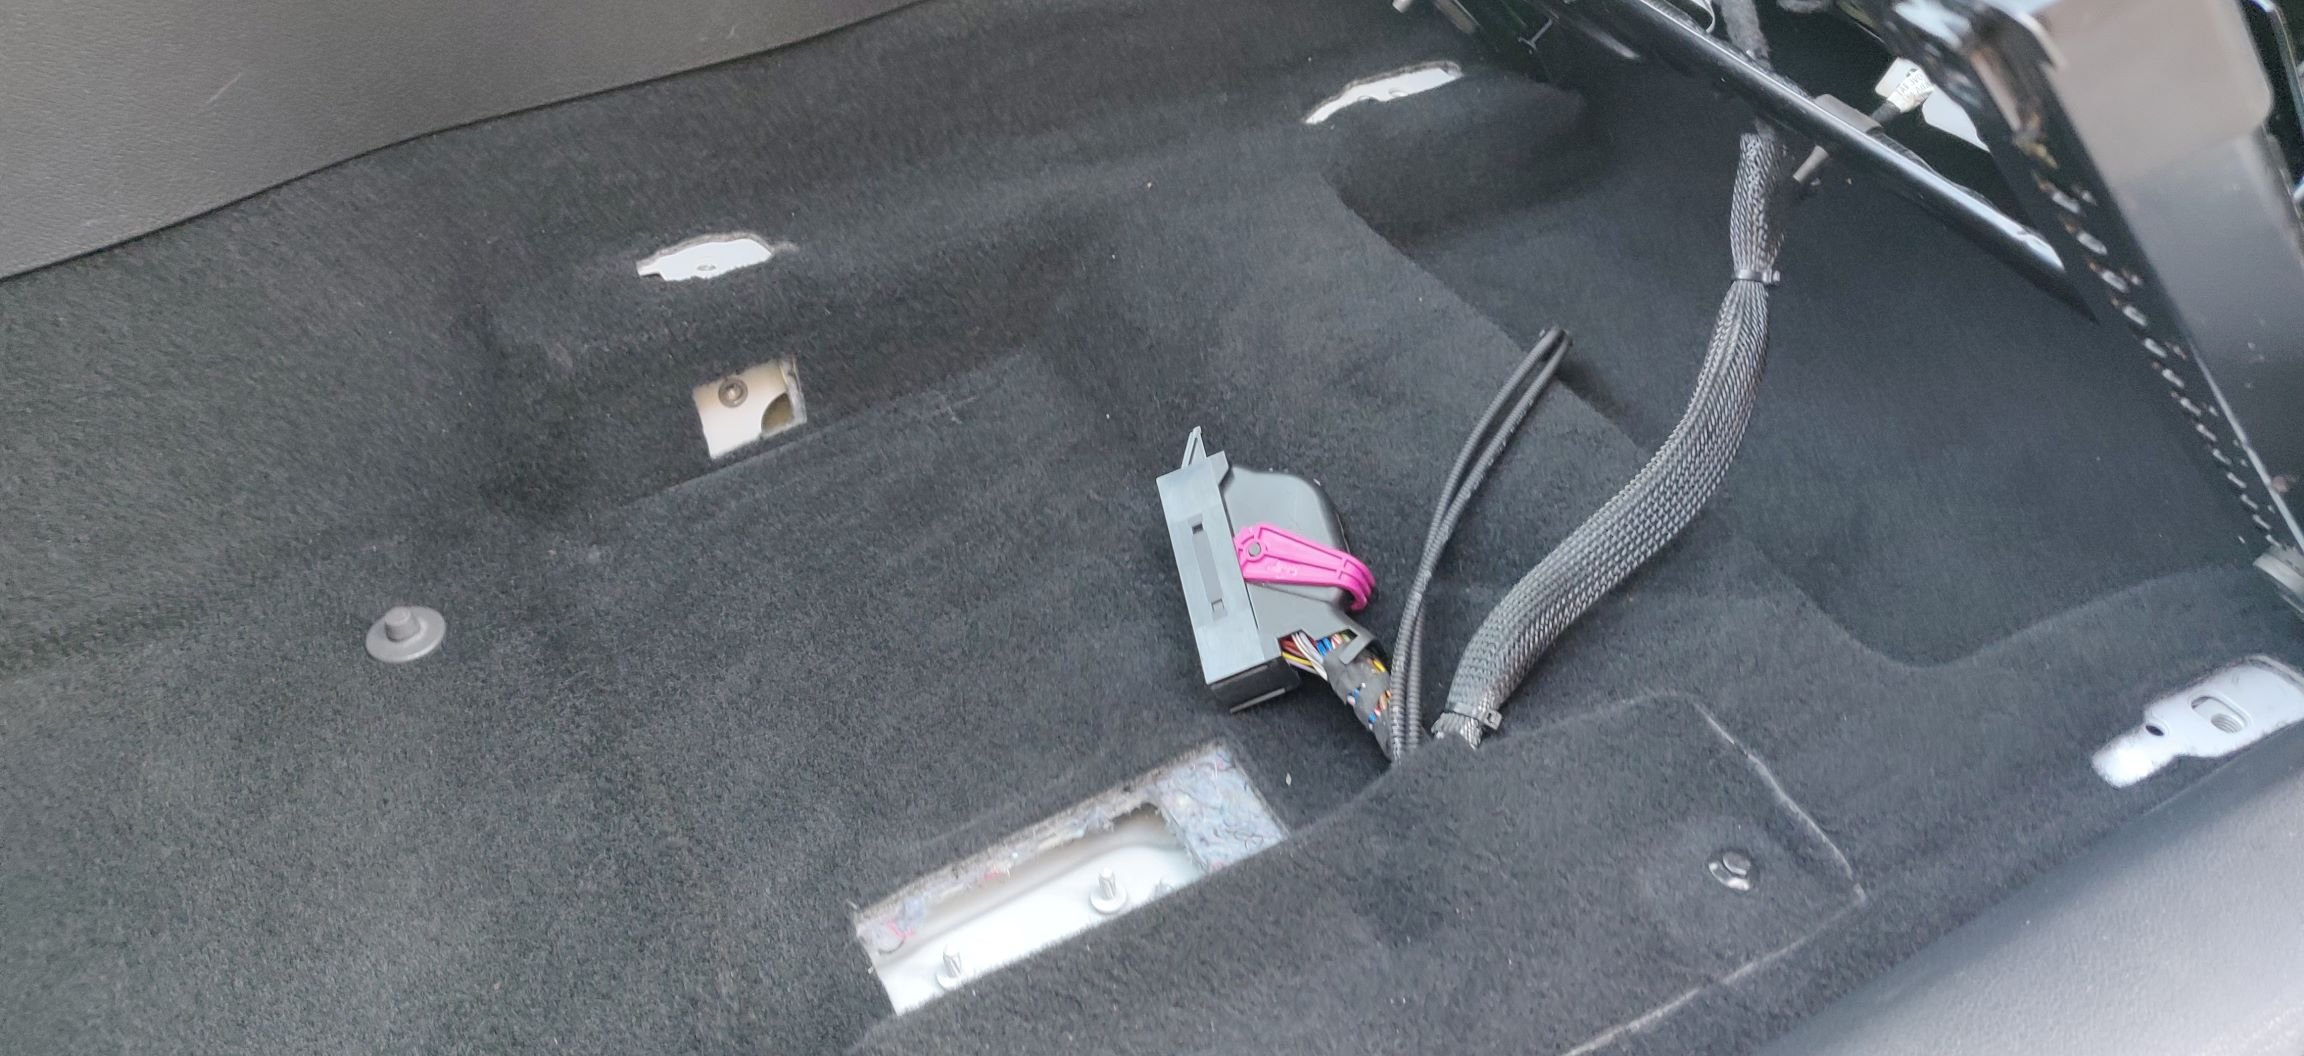
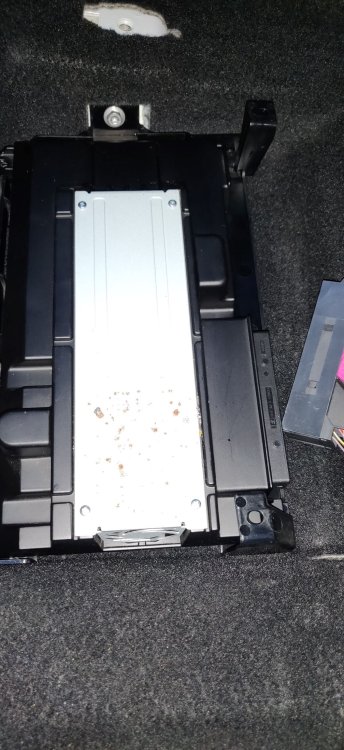
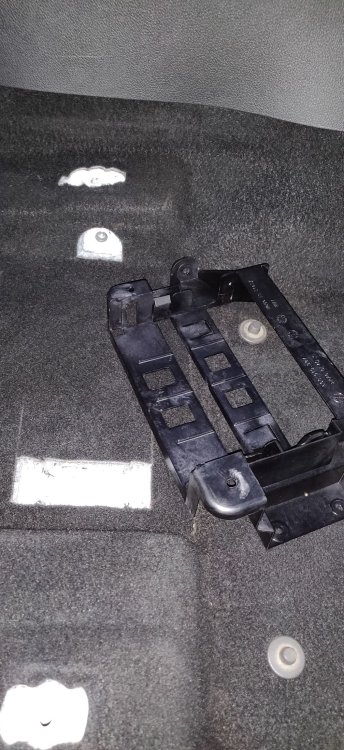
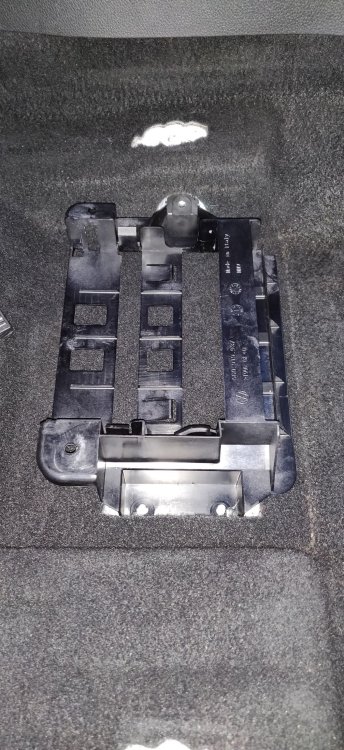
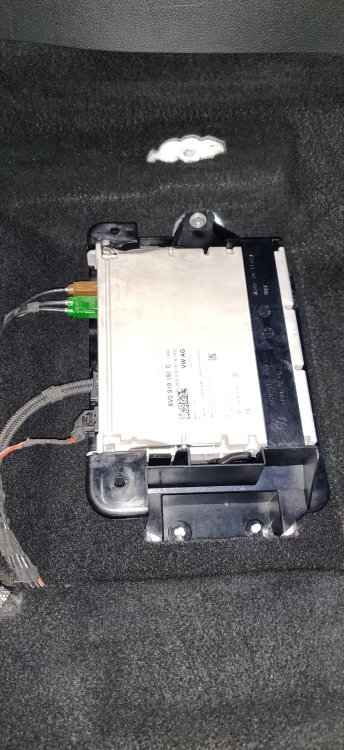
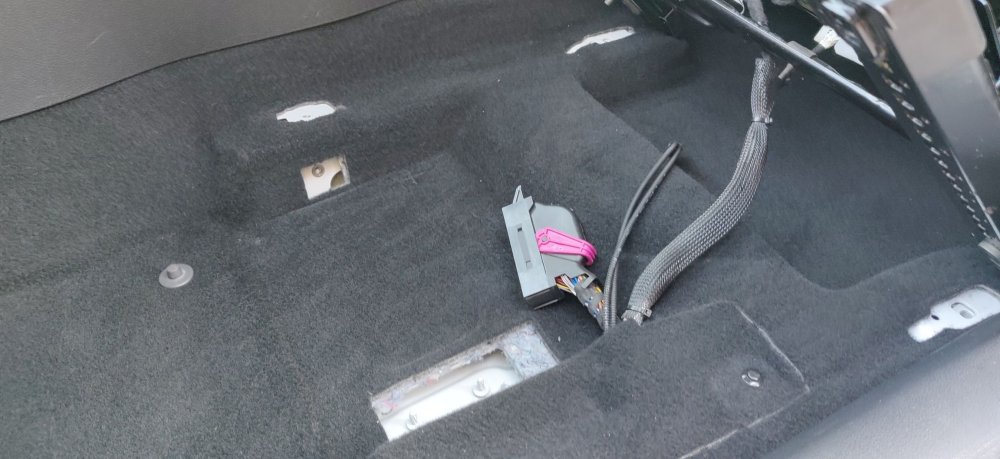
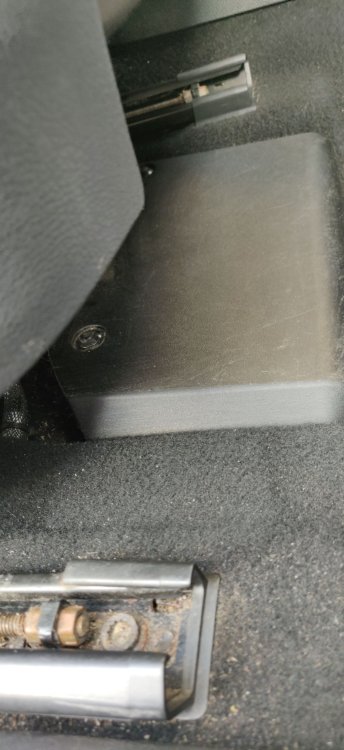
So here's some pics of reassembling the modules under the seats. Here's the amplifier and its frame: I've wiped them down a bit, but the amplifier just has what I can only assume is corrosion on that metal bit, quite wild given its inside the car. Here's the TV Tuner: It's really the reverse of disassembly, so for the passenger side with the amplifier: There is a bolt, and two nuts, with the former on the side and the latter two with captive threads on the car floor, so it slots into those: The amplifier then sorta slides into place, with a bit of jiggling: This actually should be done after sorting out the connectors, as one of them is one of them super secure ones, similar to ECU connectors: So you have to slide the purple (fuschia?) locking tab thingy into place: So that's that. The other side is pretty much the same: With the same bolt and two nut securing arrangement: There's a few more connectors for the TV tuner but its relatively idiot proof: The TV tuner has some metal tabs on the side, which are used to keep it in place in the frame, so the unit essentially slides in from the rear towards the front of the car where it will then click into place: Eagle eyed readers will not I haven't put the nuts in place. This is because in my vacuuming of the carpet, I may have also sucked one of the nuts. So its pretty much gone. I'll need to rummage around the garage or order replacement ones, but they look to be a standard M6 flange nut really, not the end of the world. I think that'll be it for this weekend. I could probably hook up the power back now that everything is reconnected (or in the case of the seats, not disconnected at all). I may still take the rear seats yet, and maybe they might have some wiring. So I guess for next week, I'll probably embark on the actual process of installing the suspension. I managed to squeeze my phone into the wheel well behind the wheel and aimed upwards: This could be interesting! I sense I should source some drop links. Maintenance: £1344.91 Upgrades: £337.06 Miscellaneous: £584.95


-
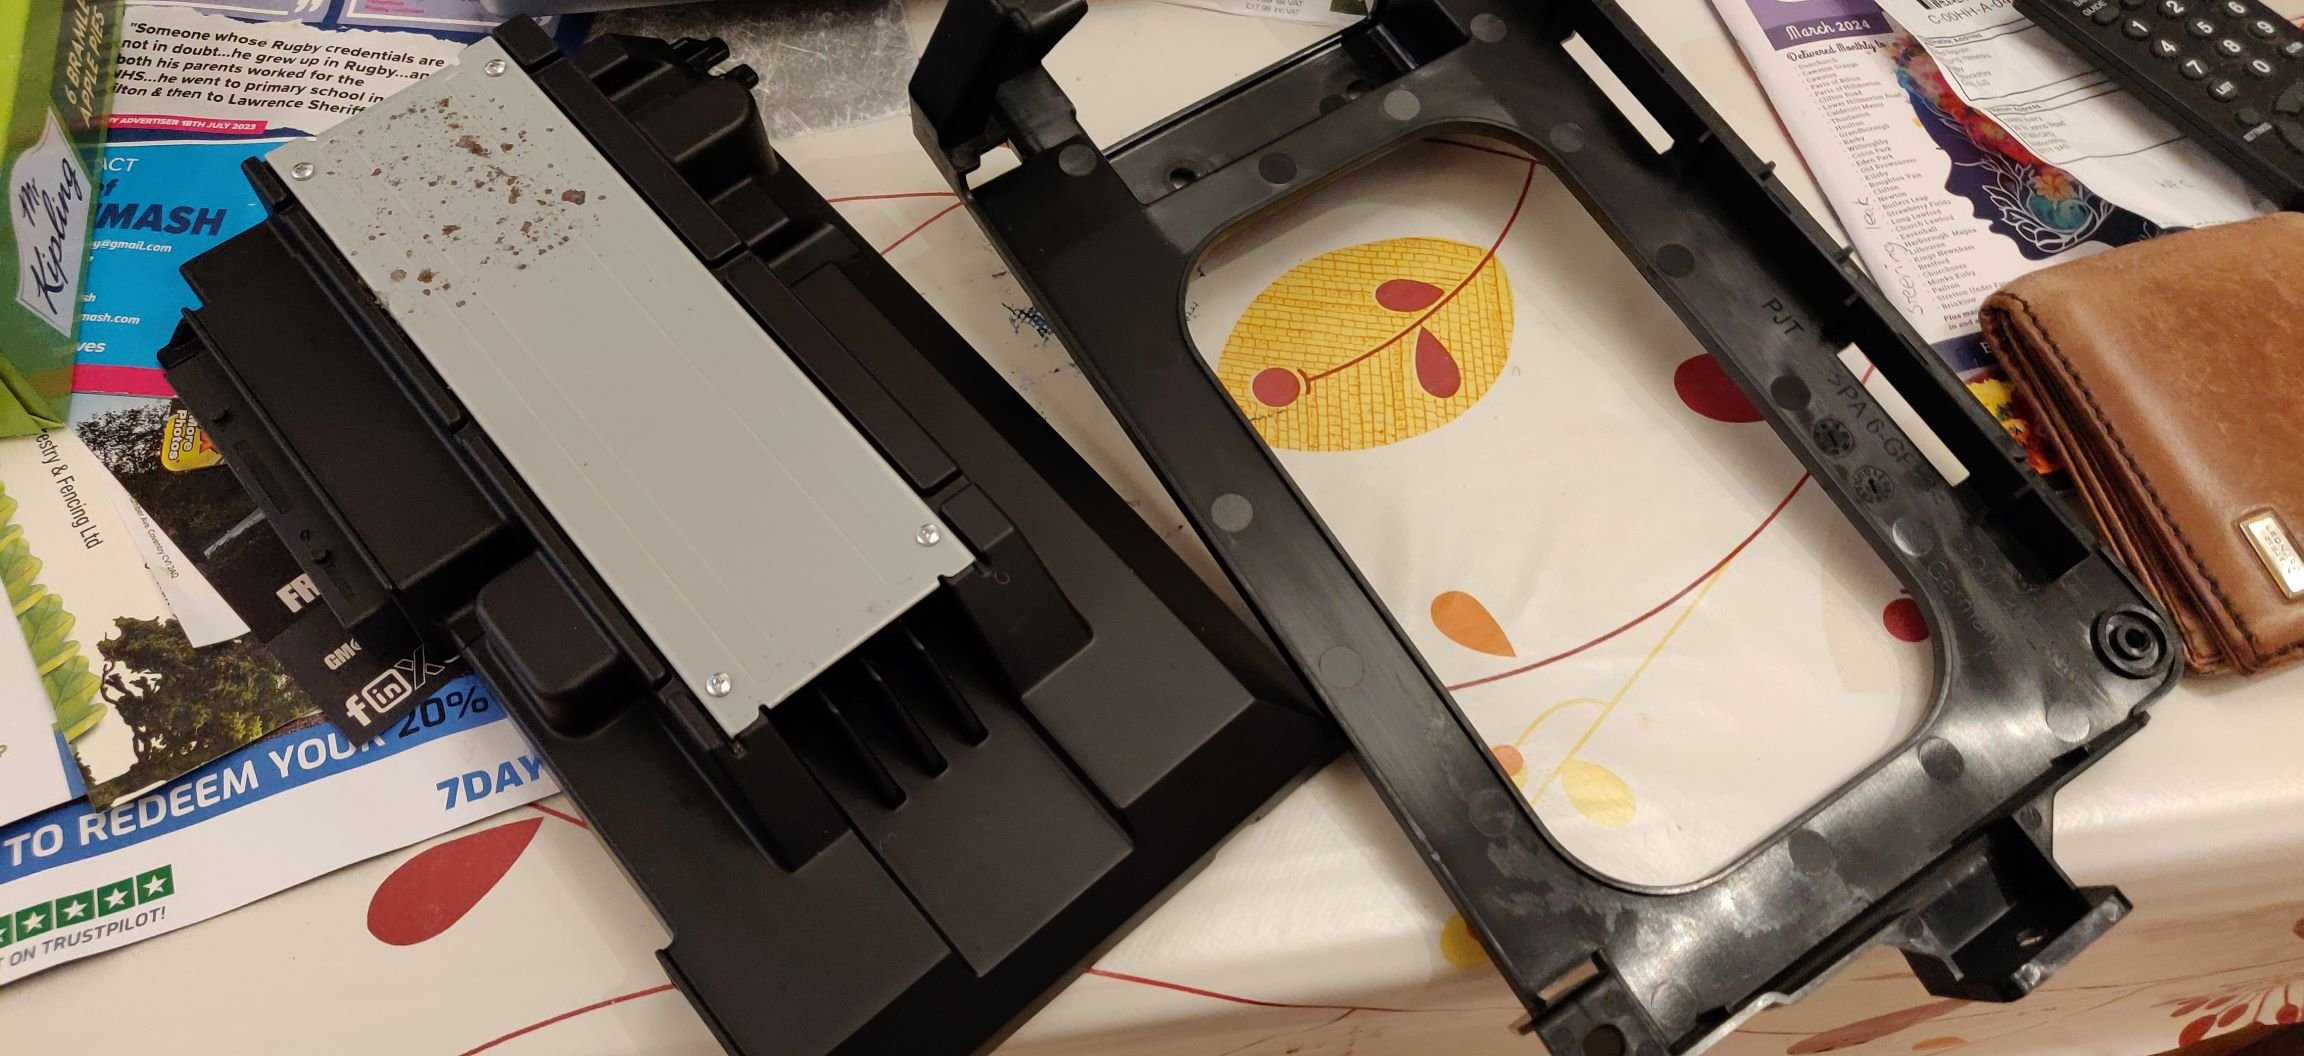
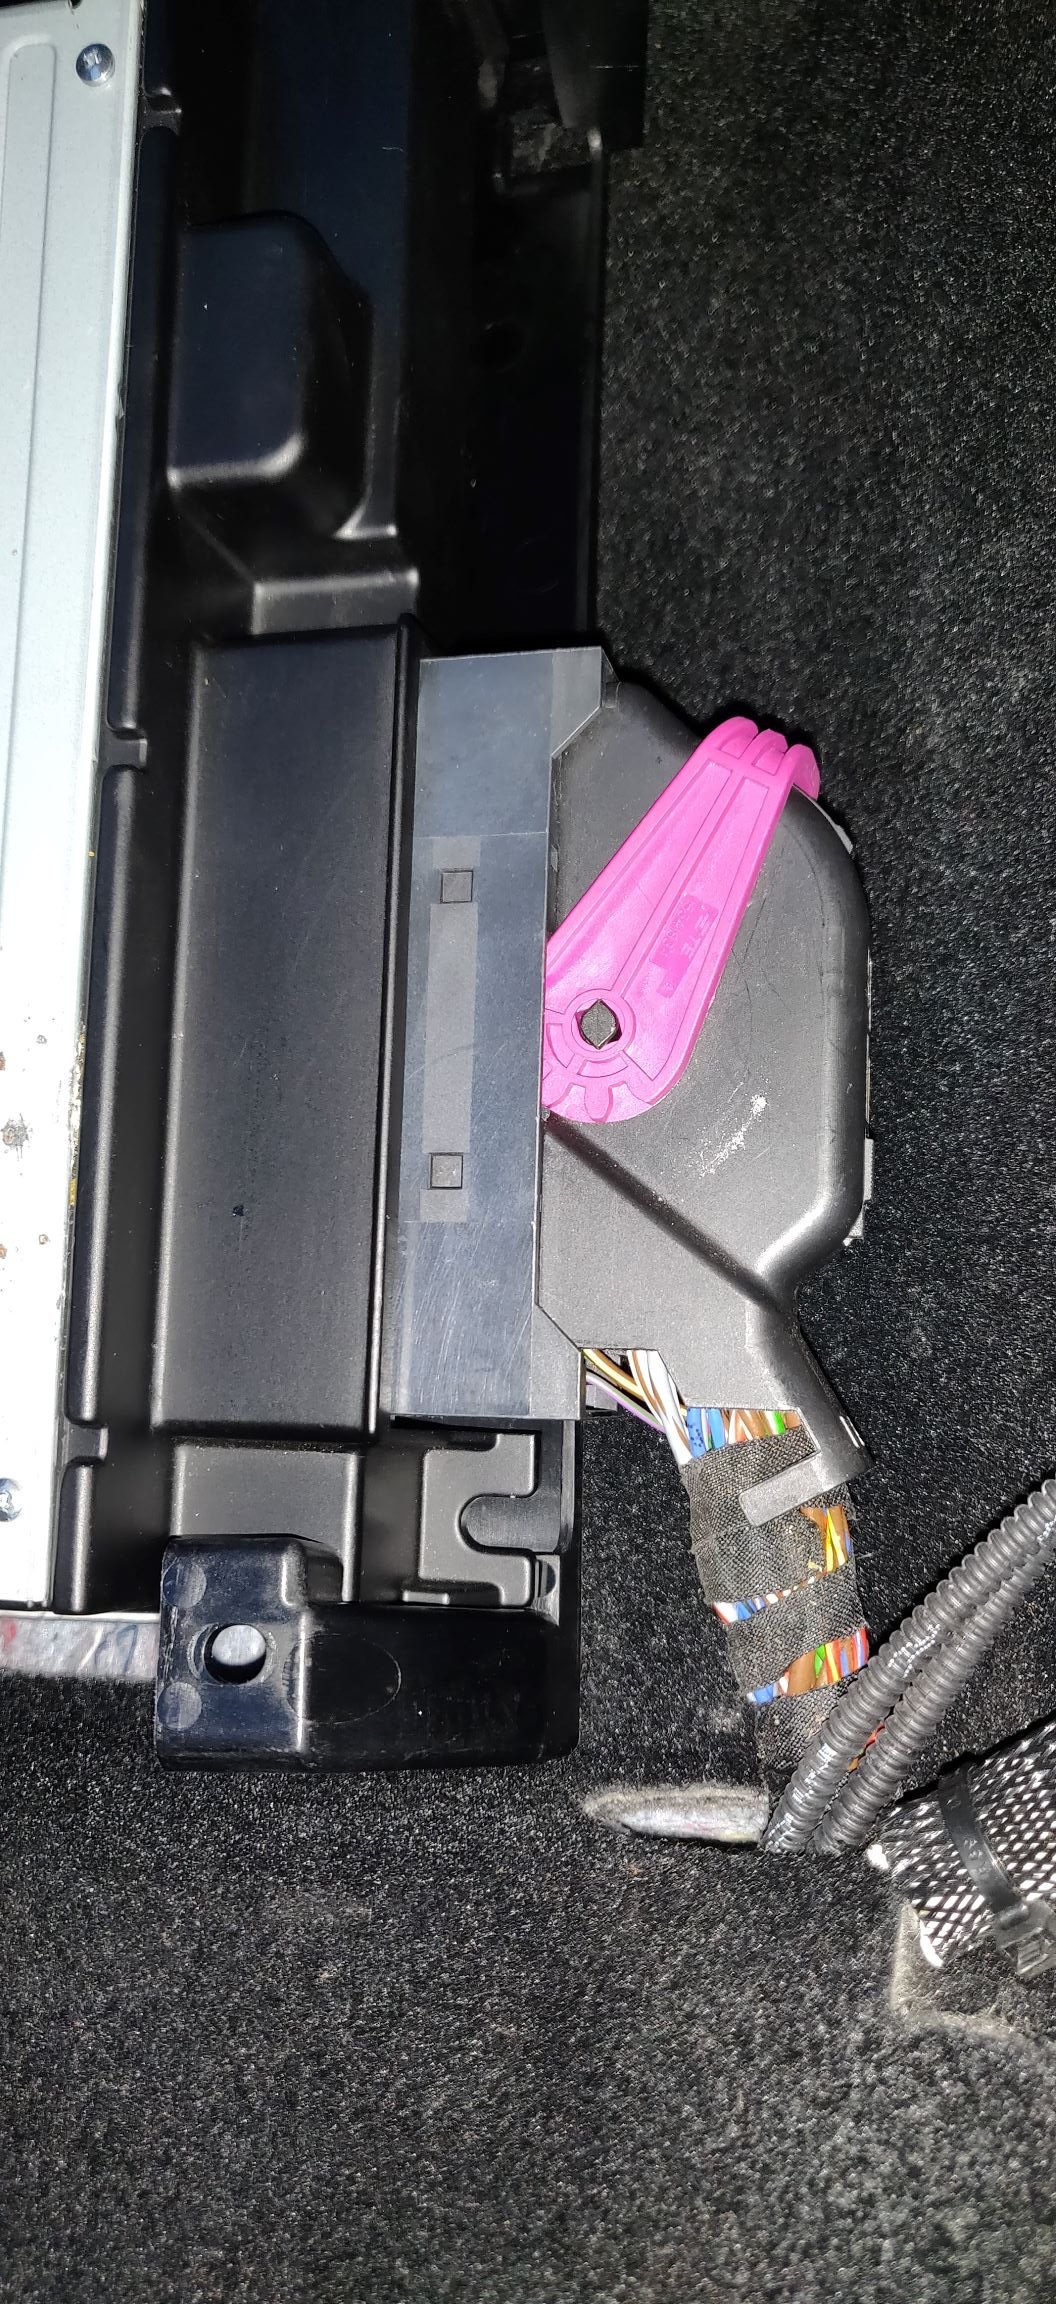
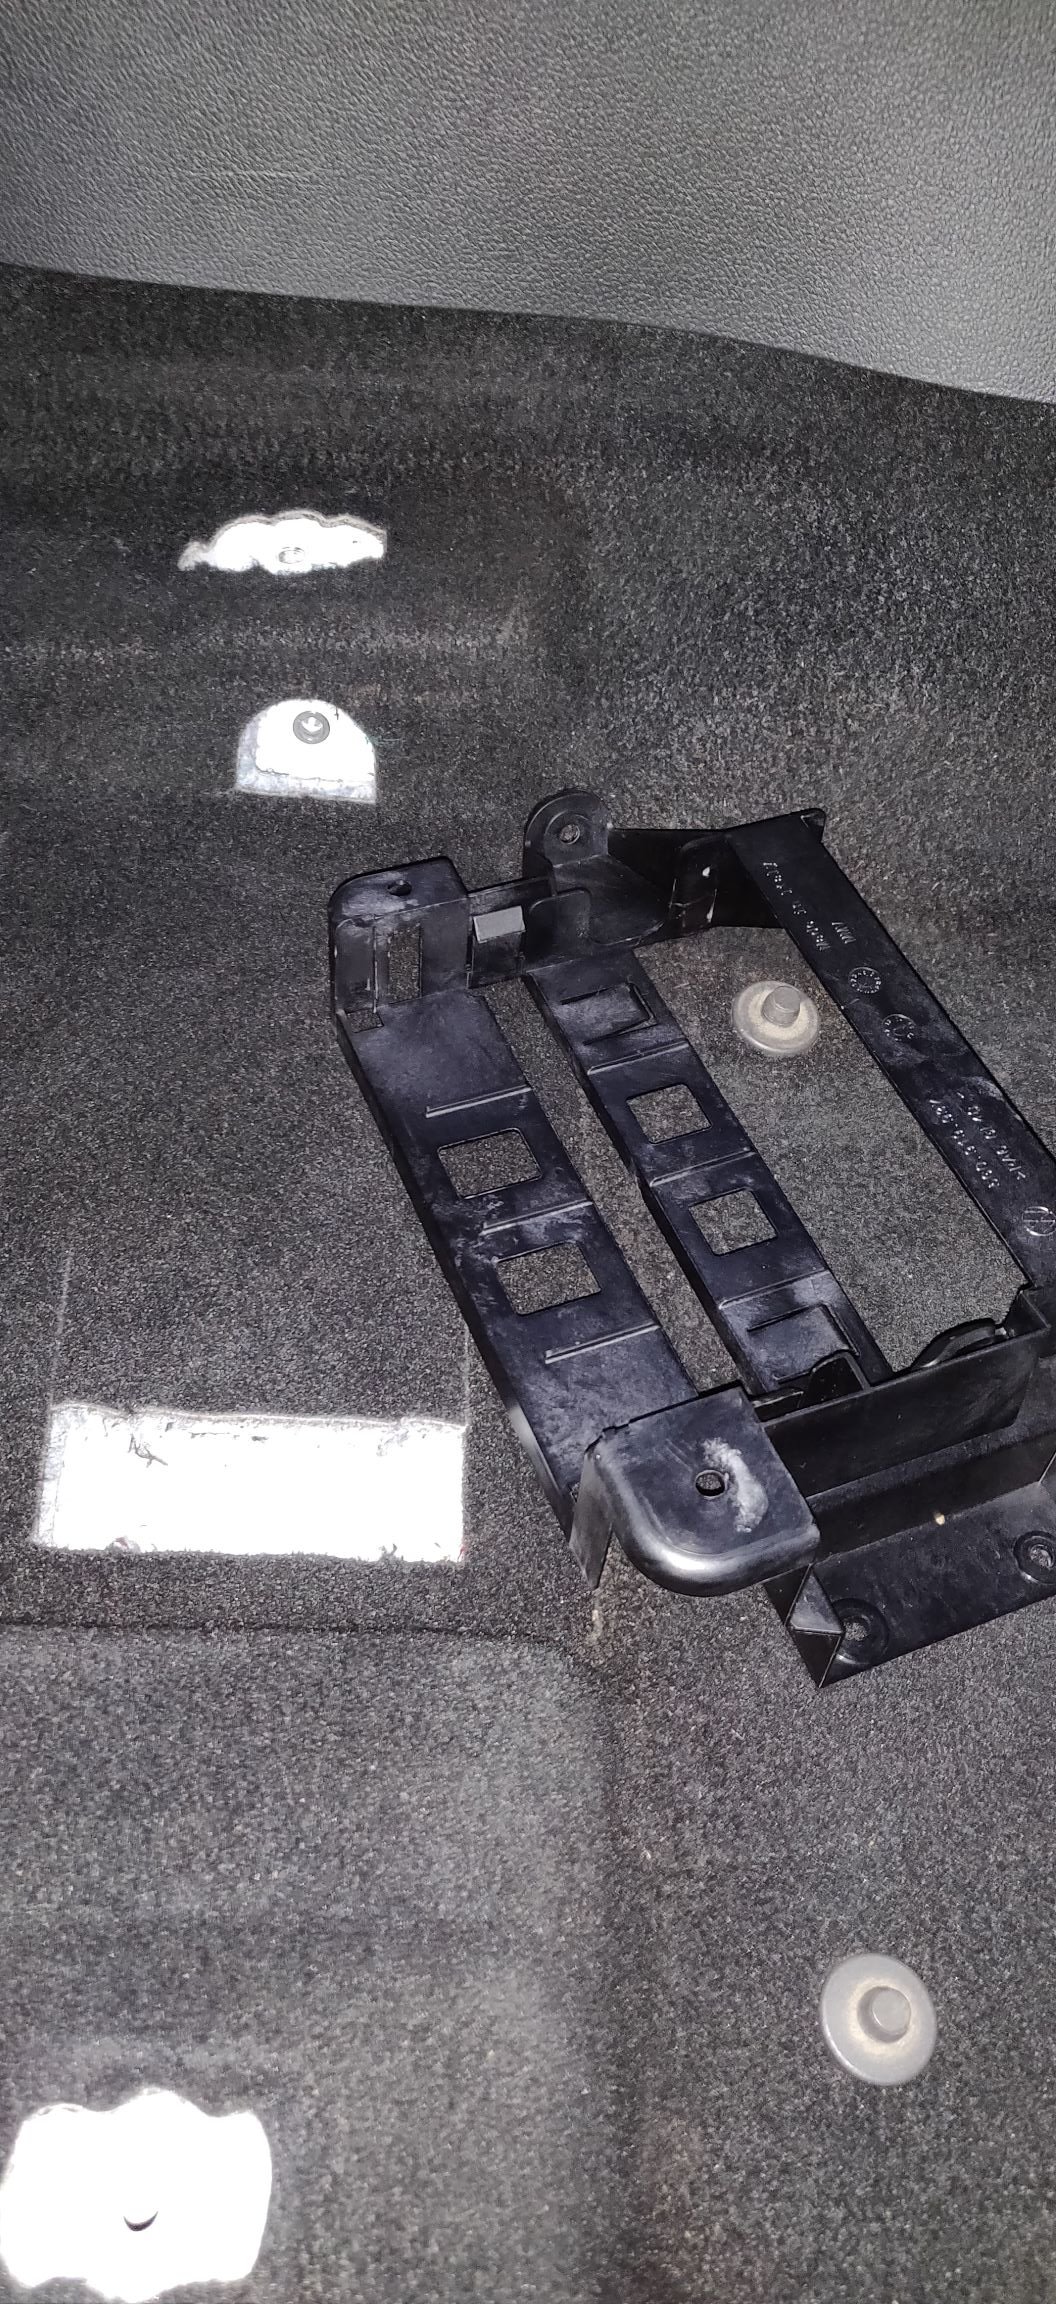
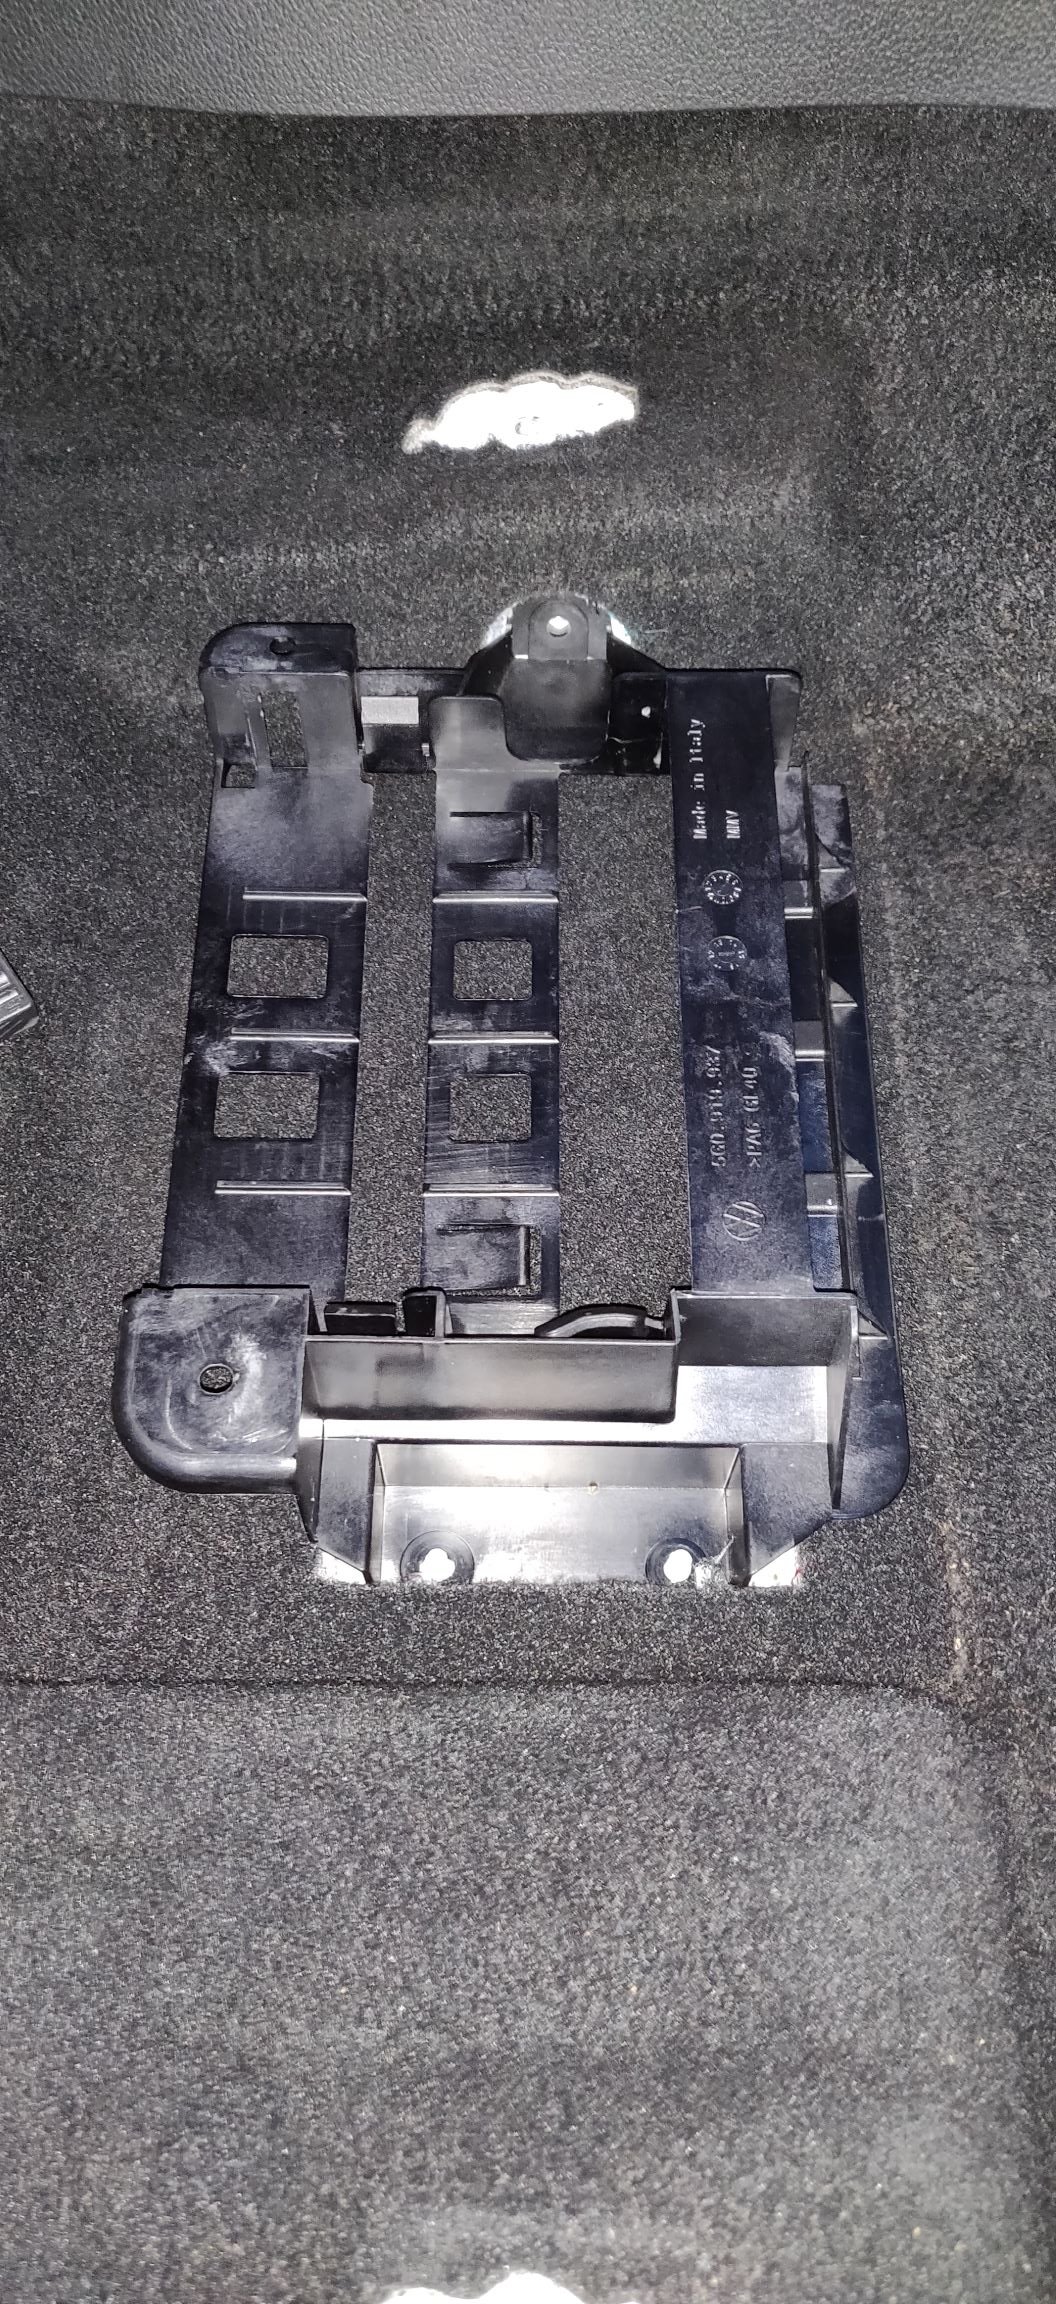
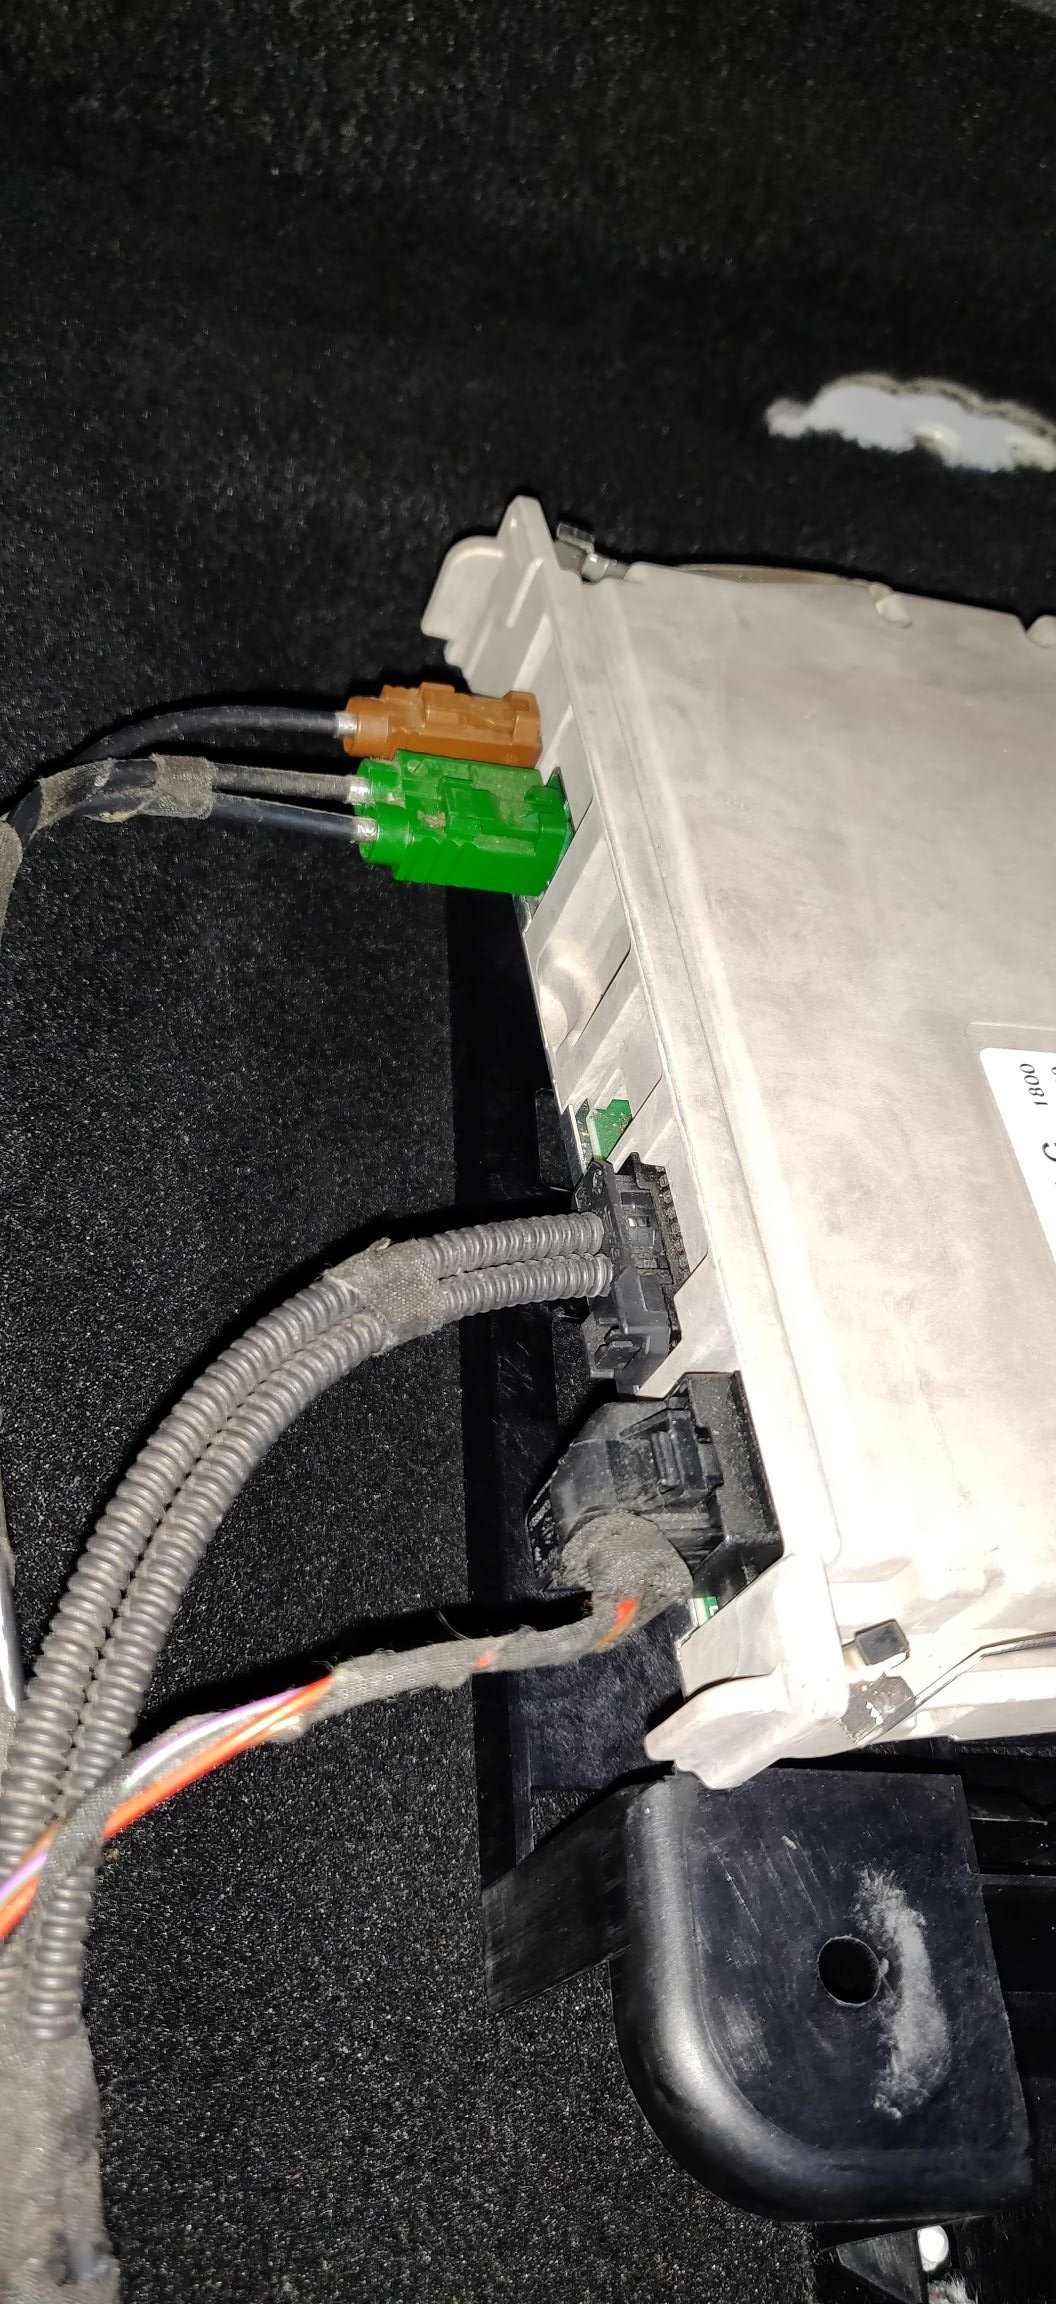
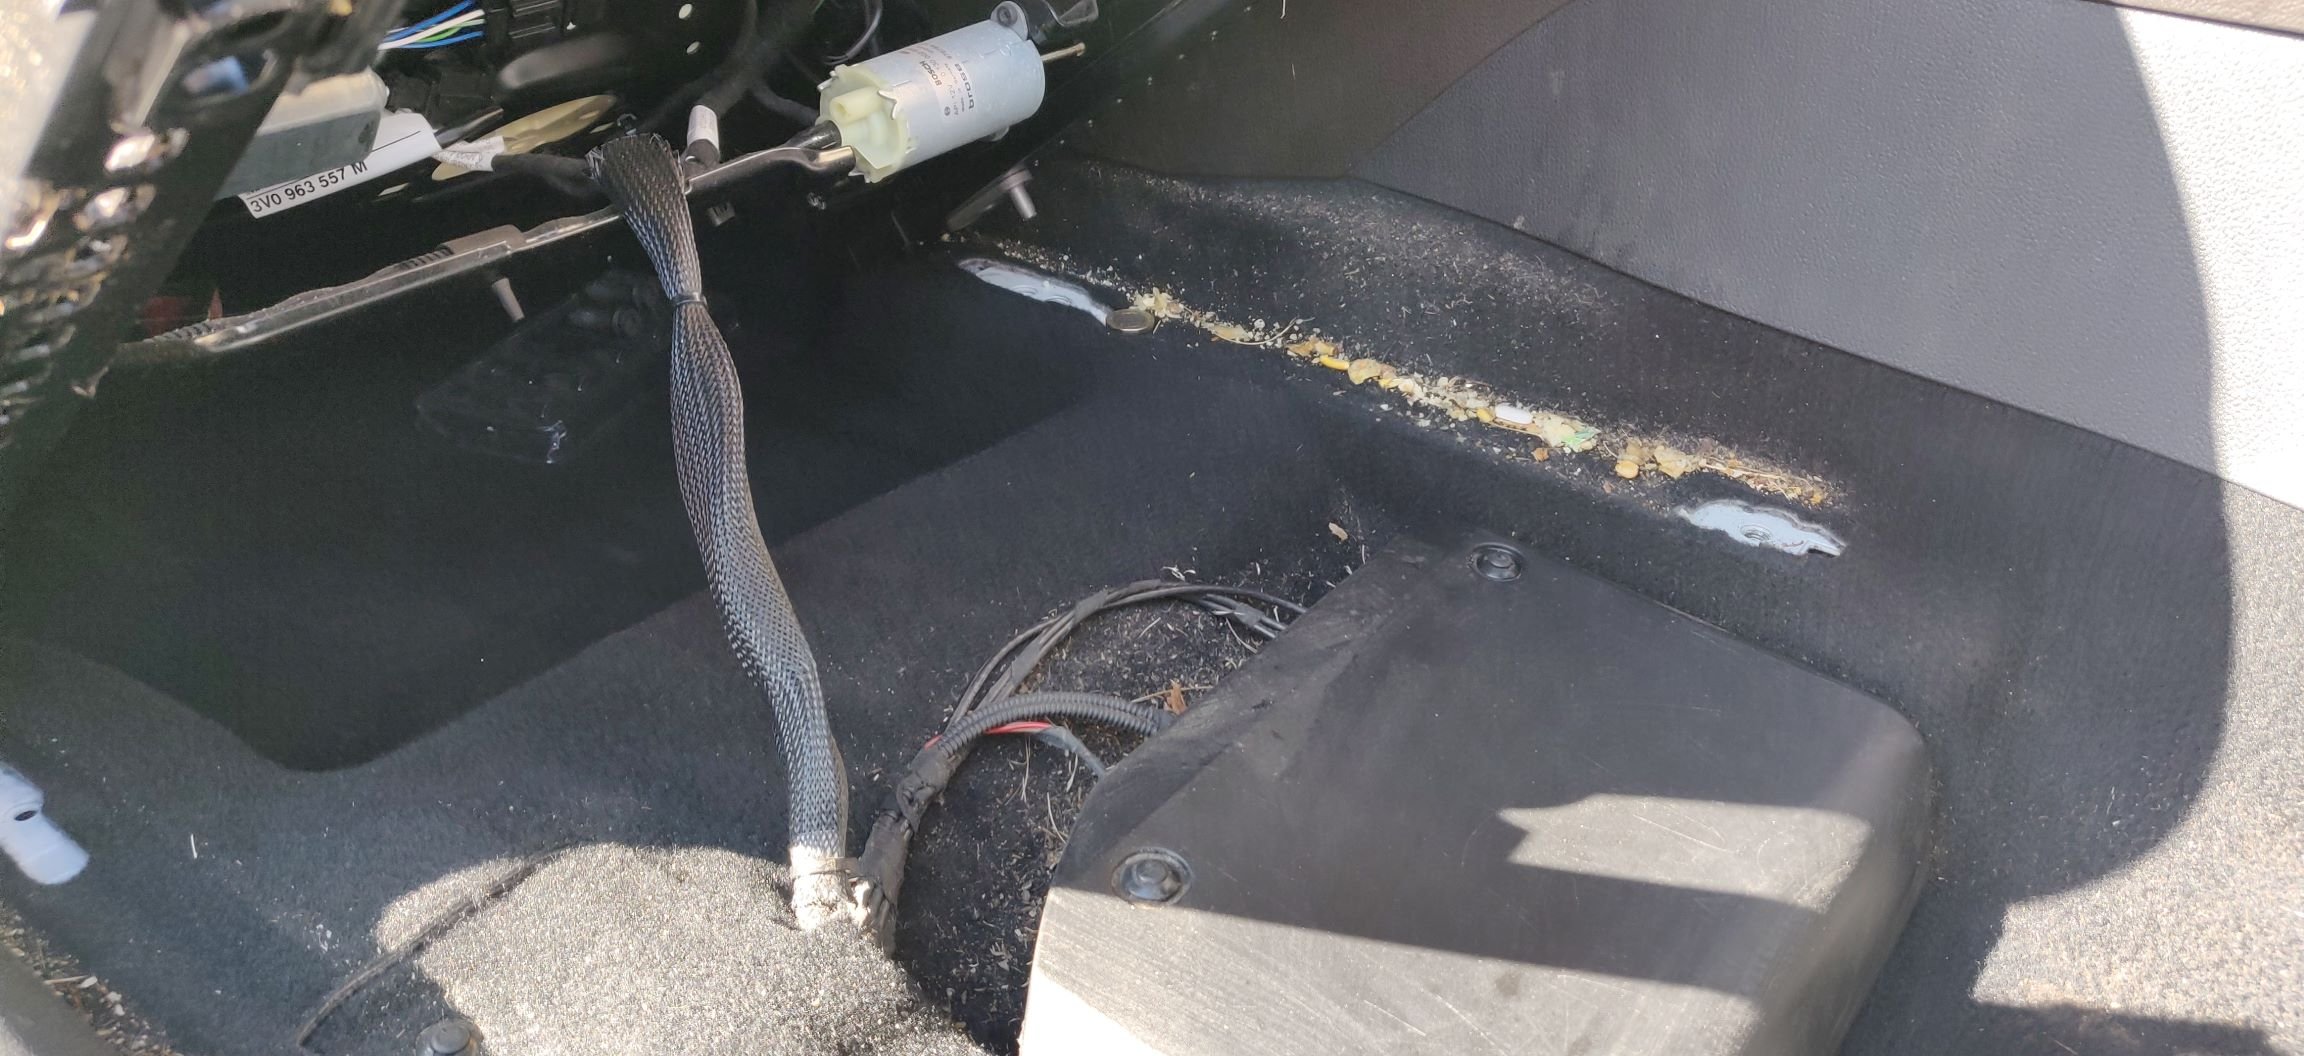
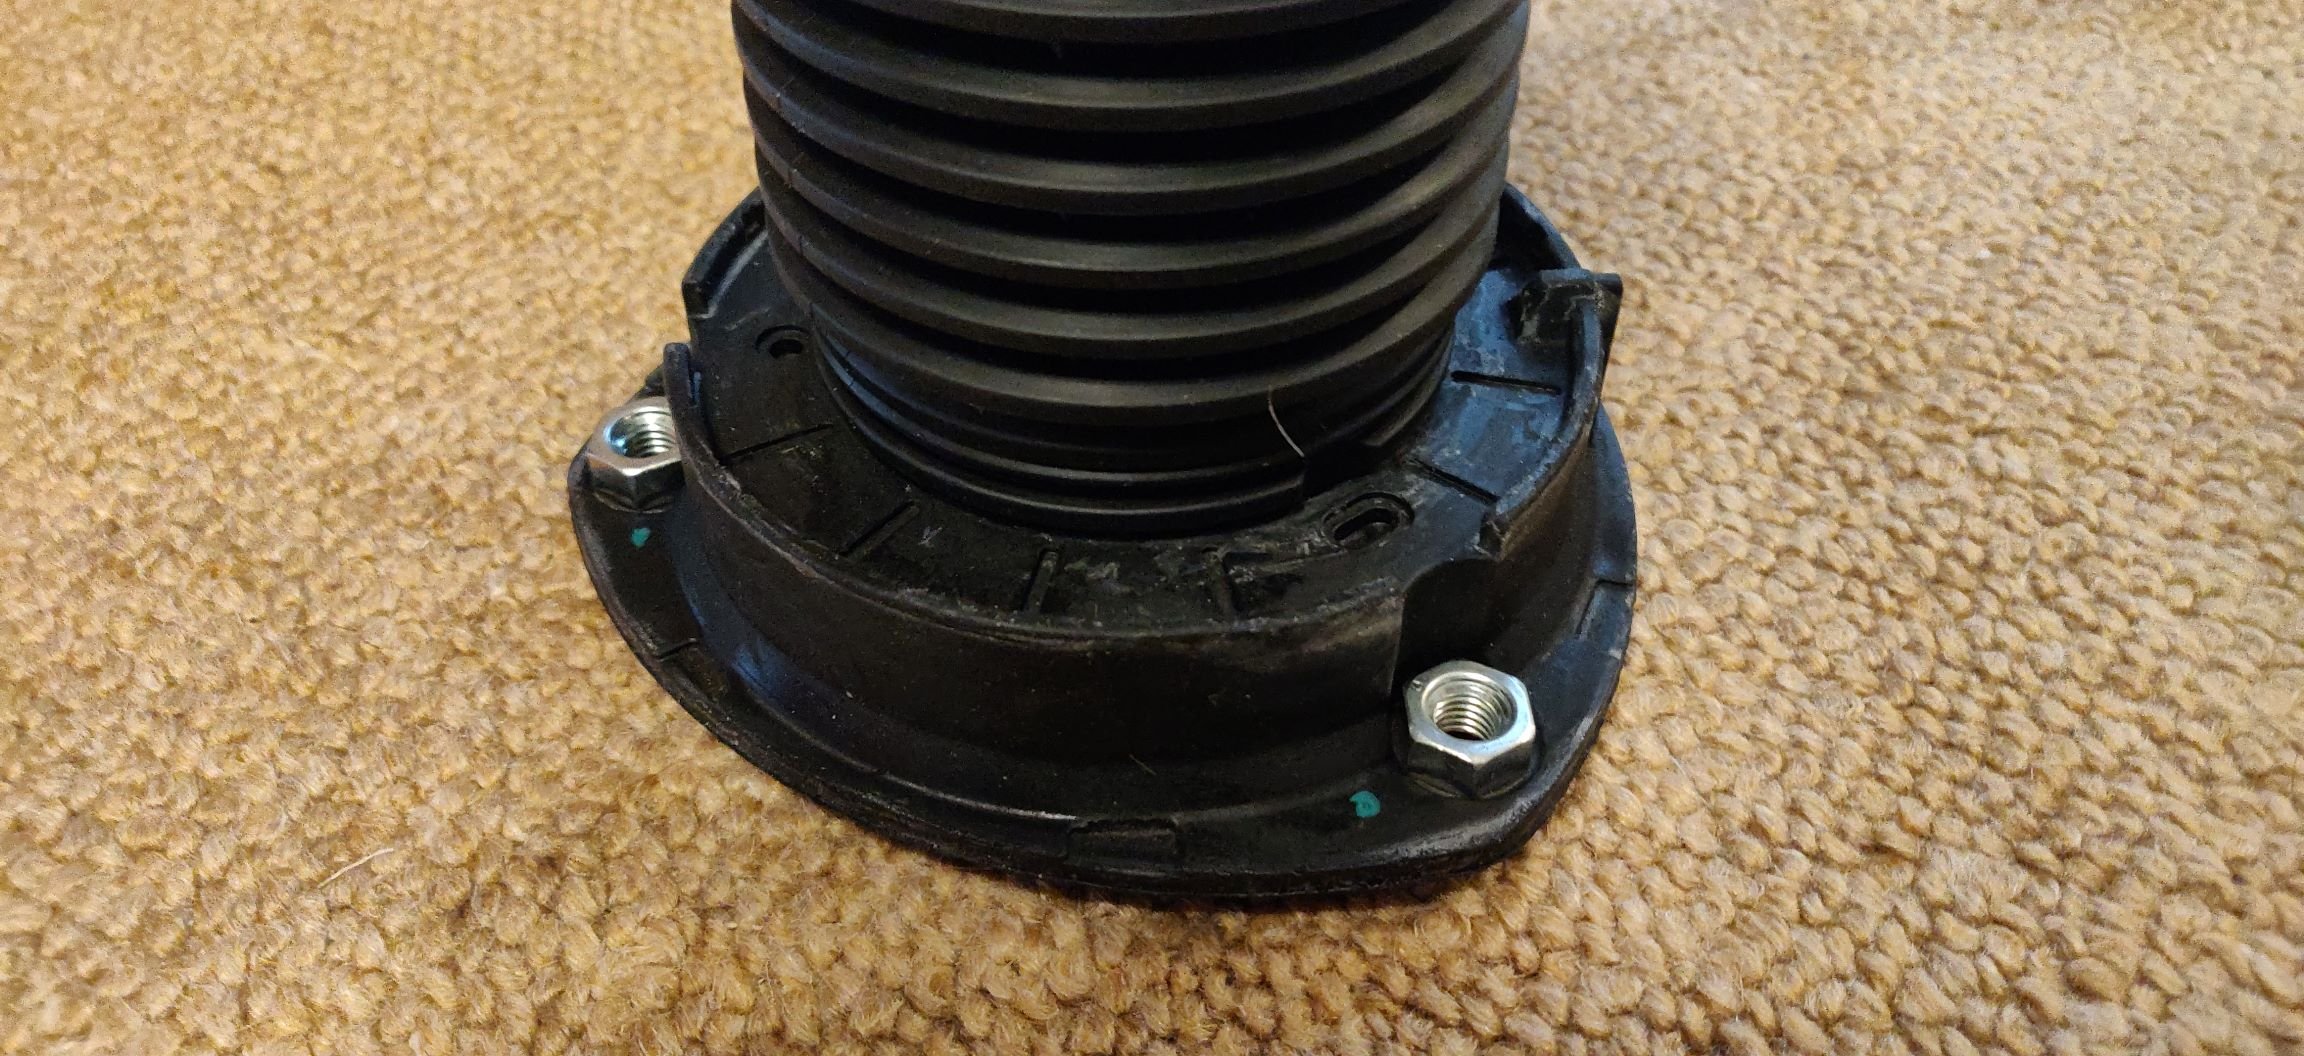
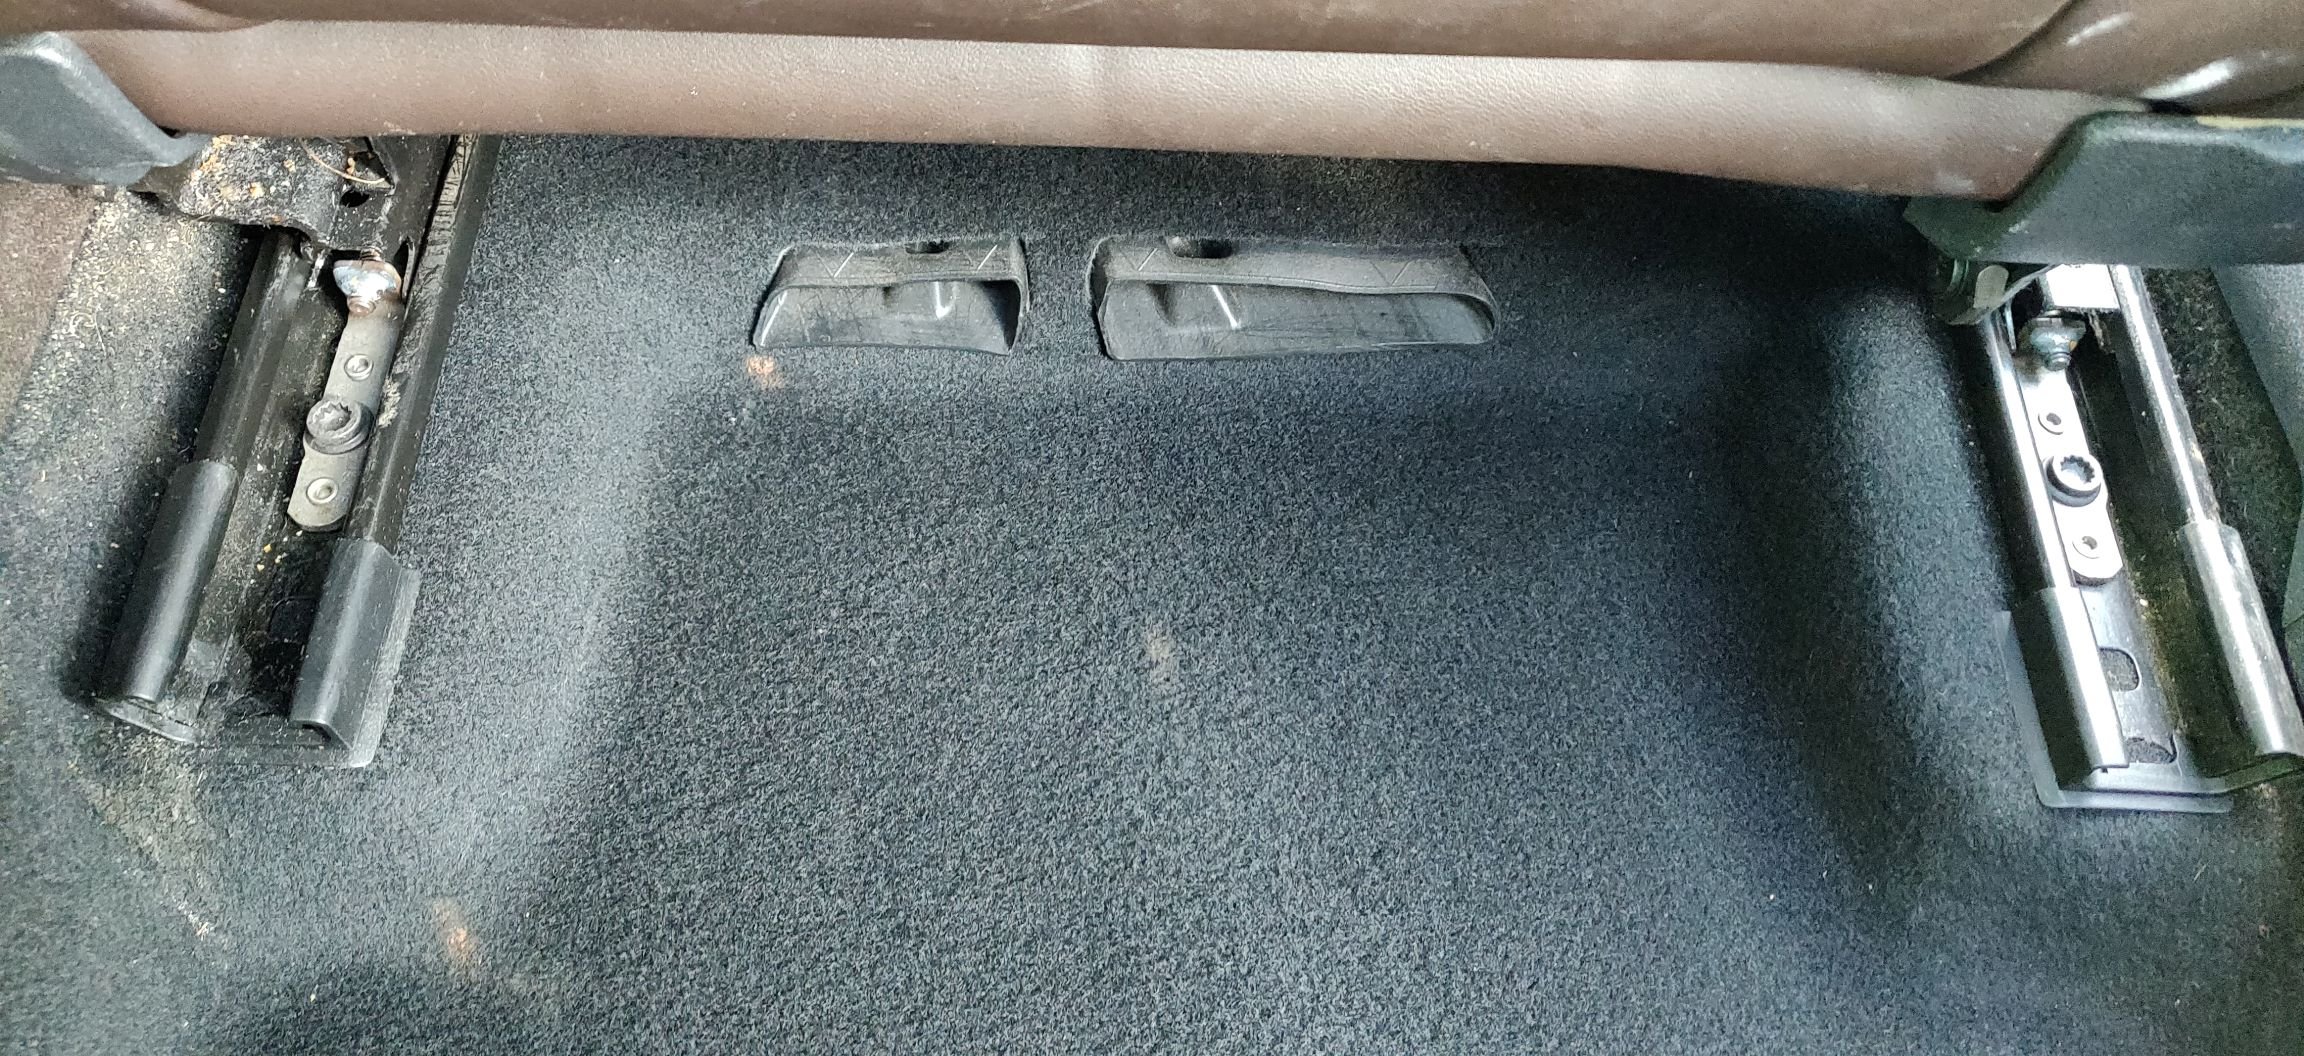
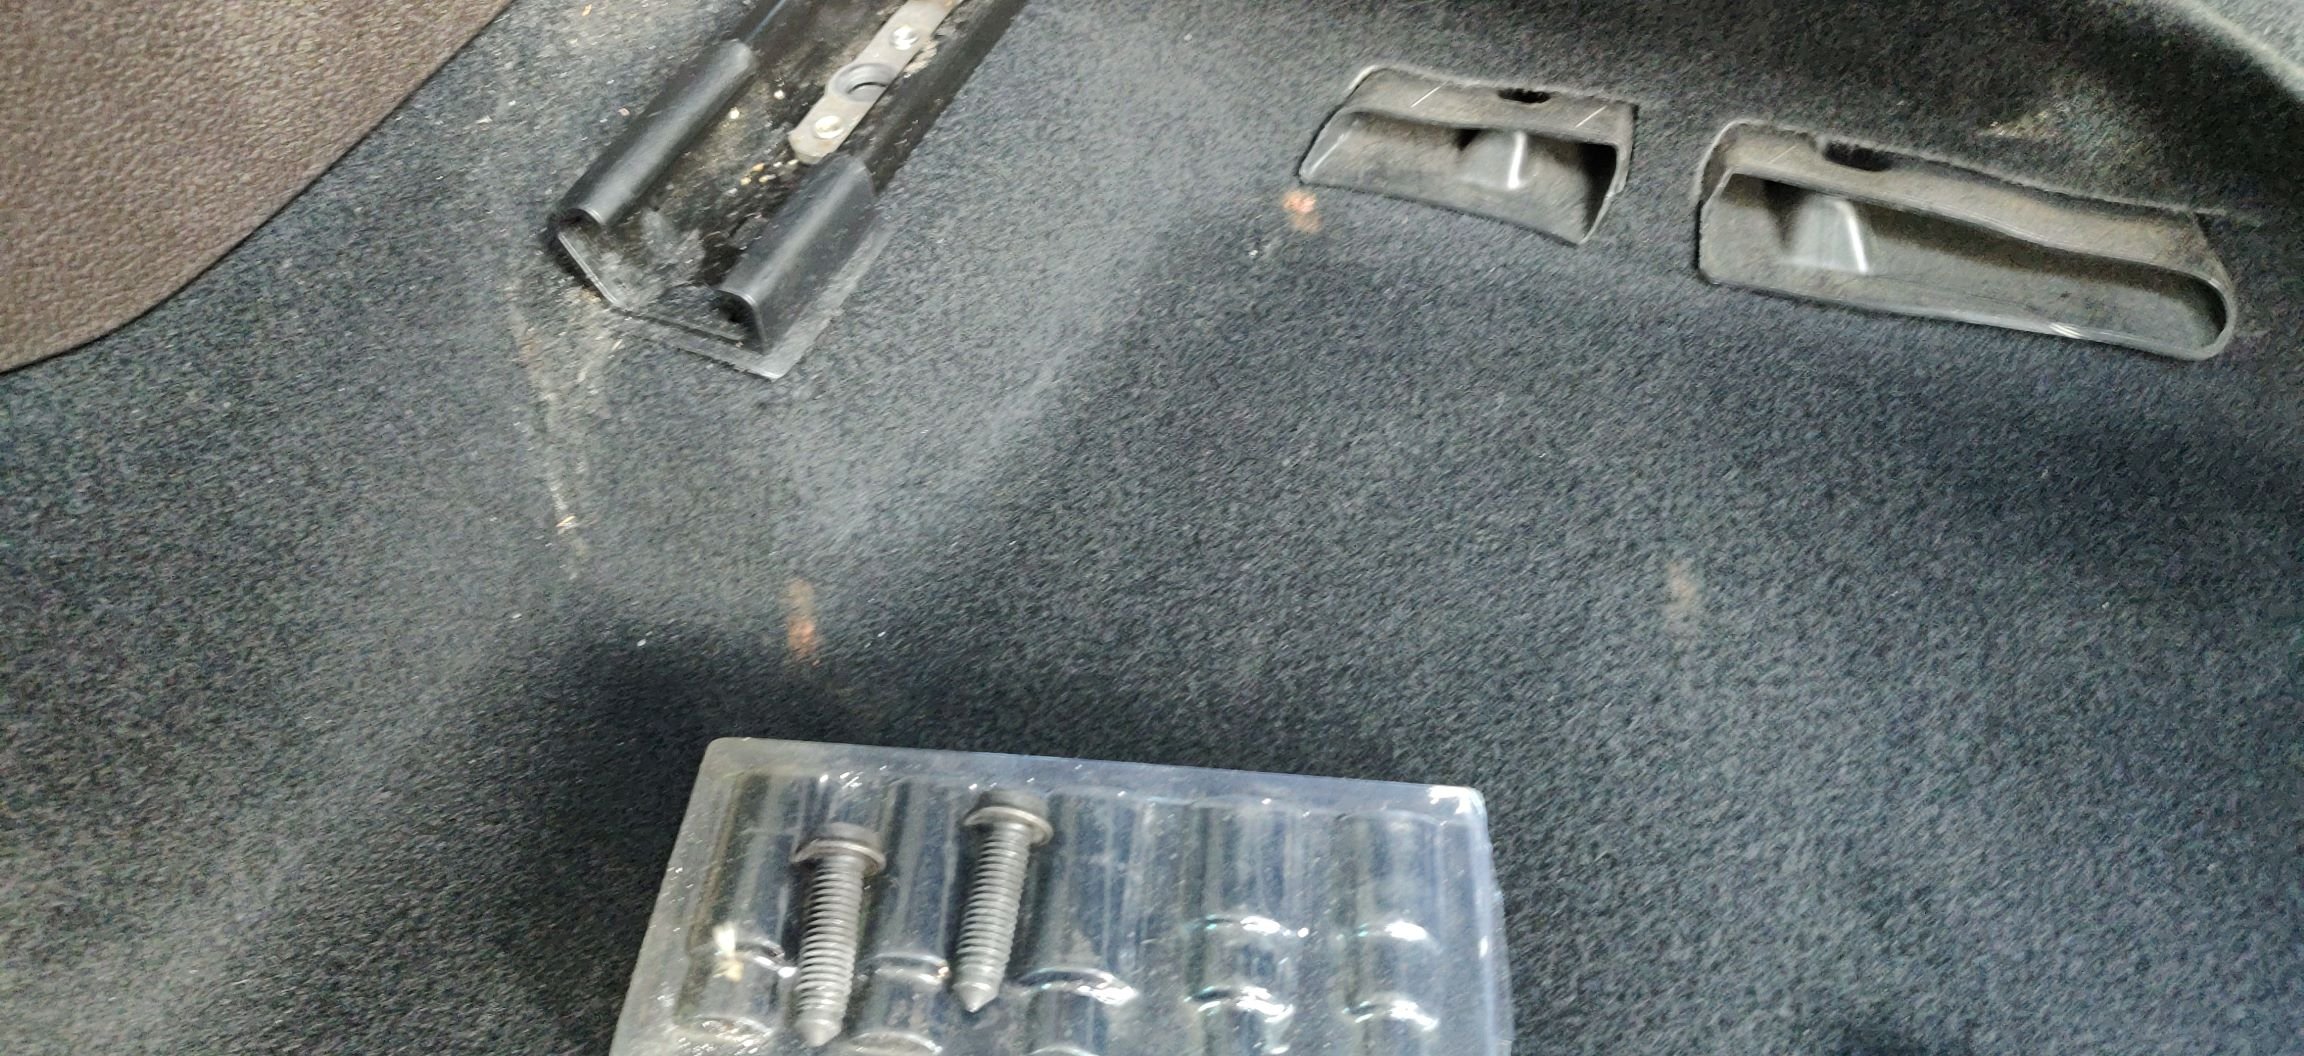
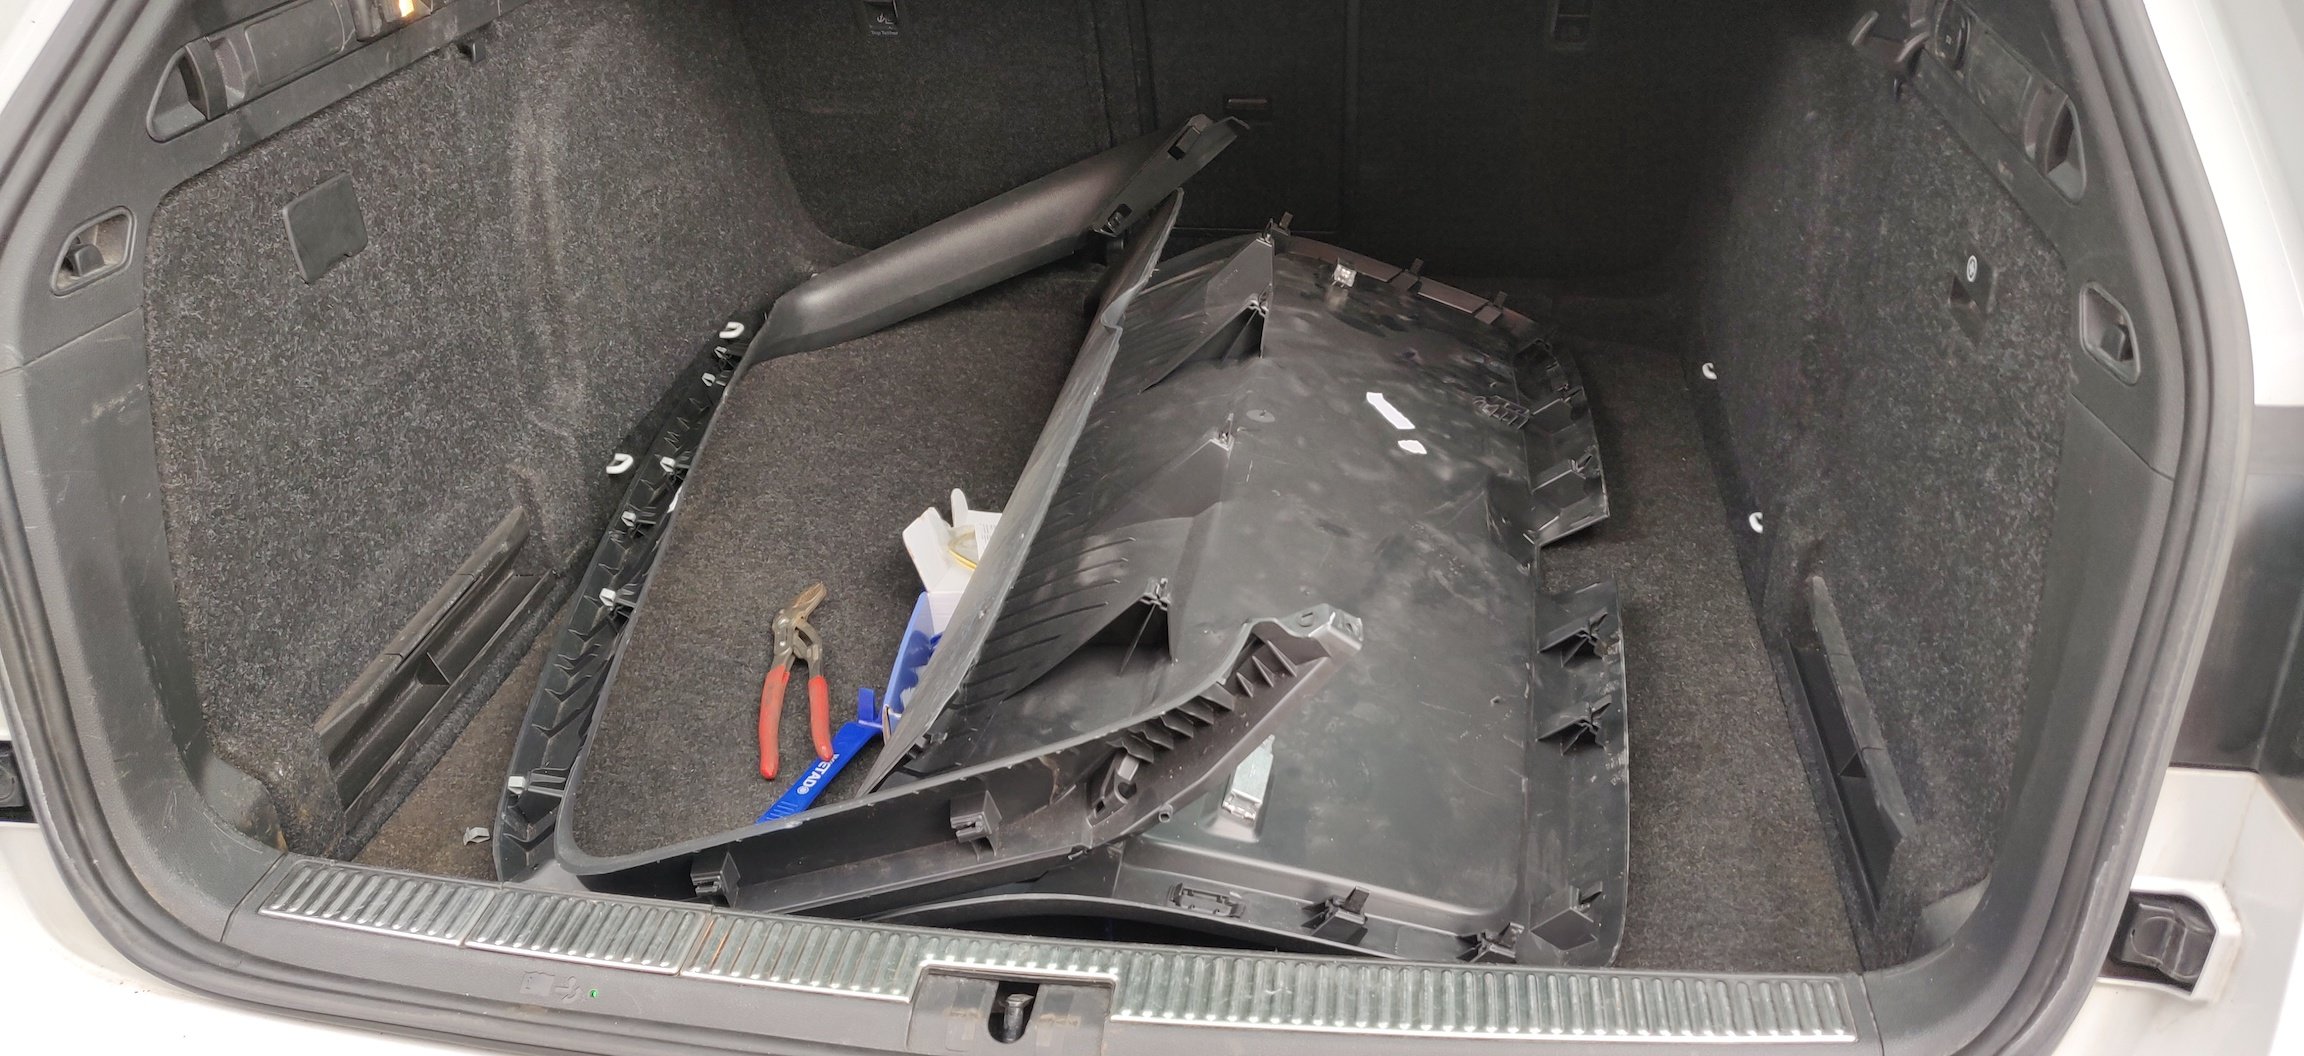
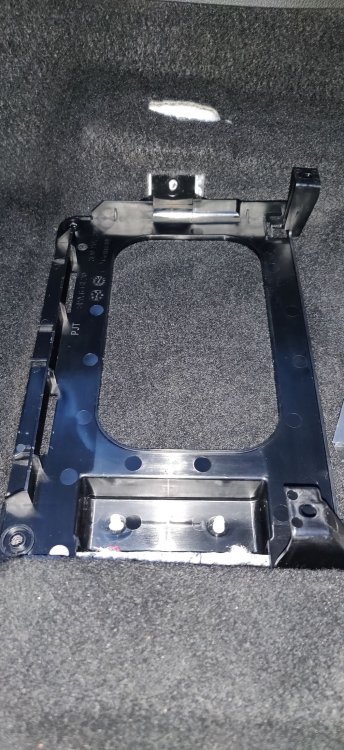
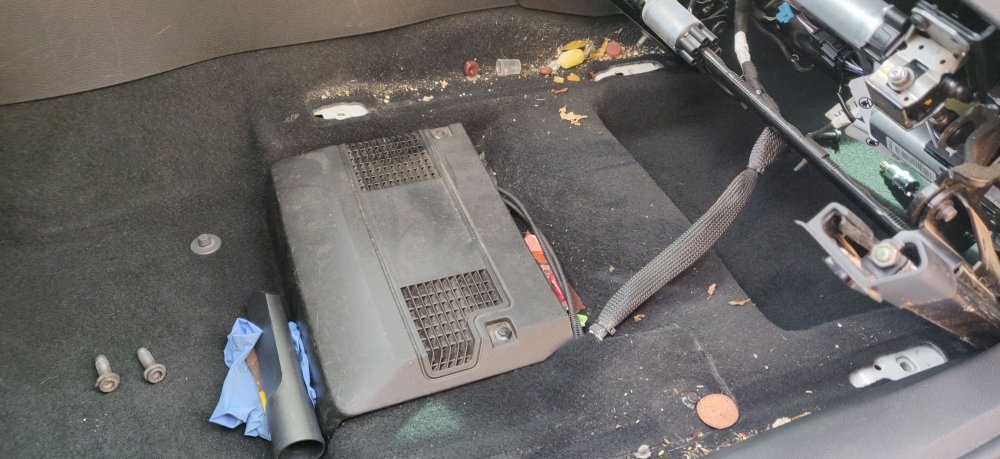
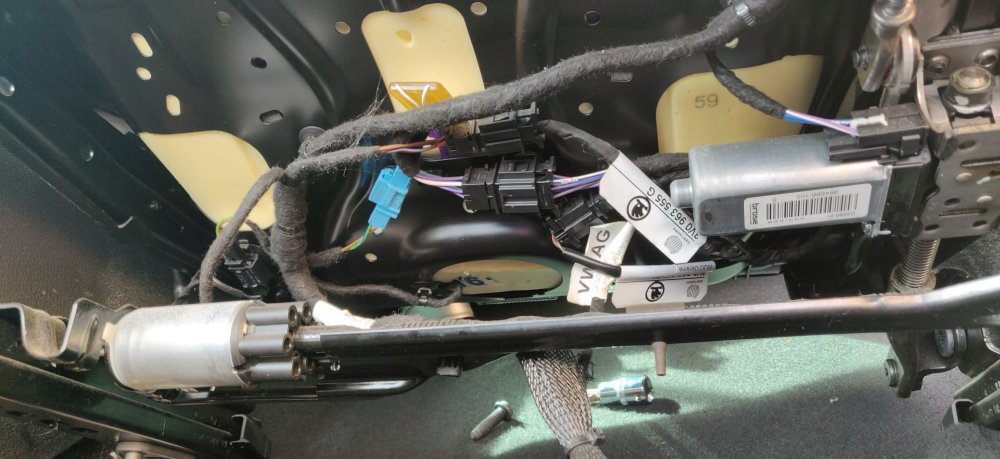
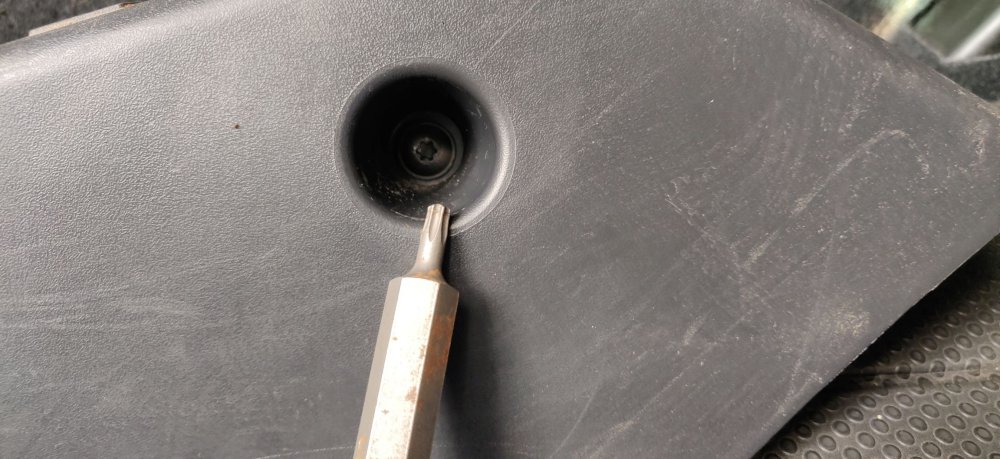
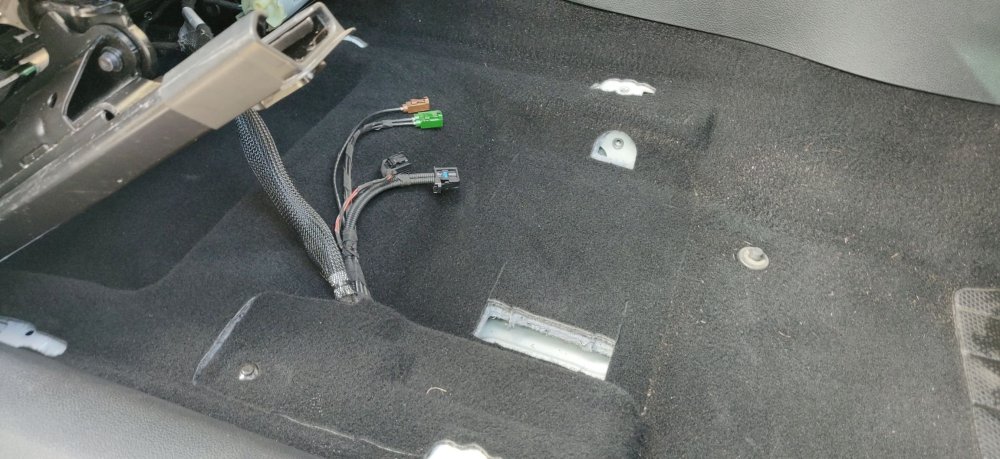
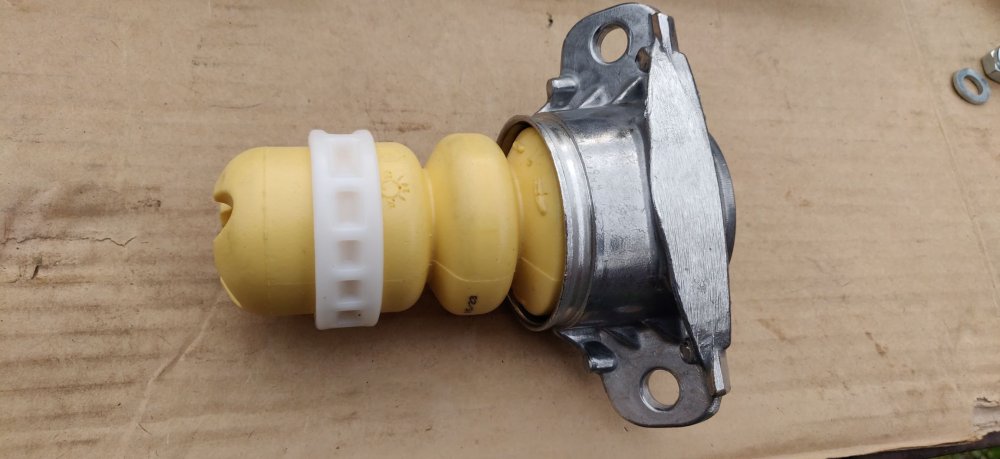
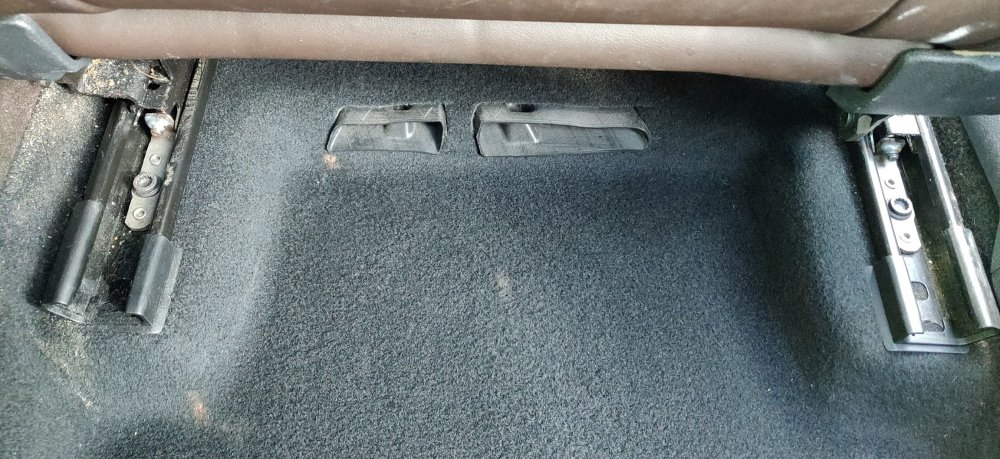
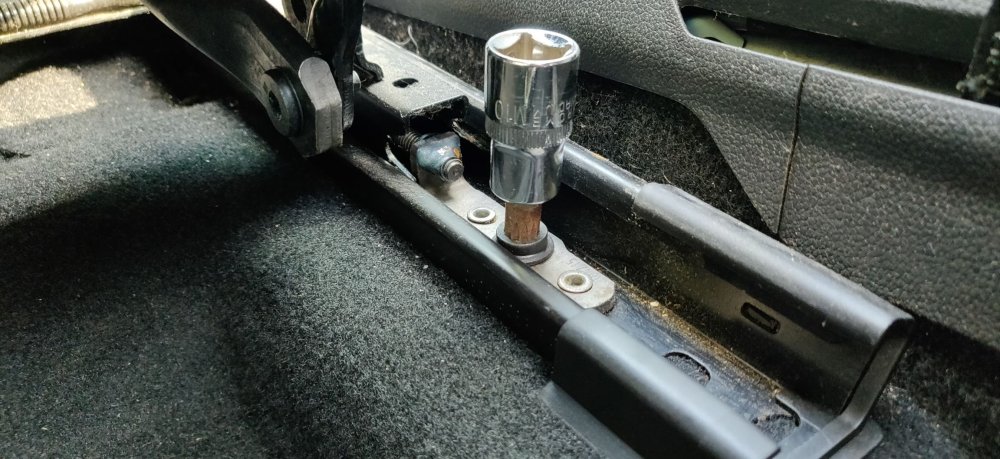
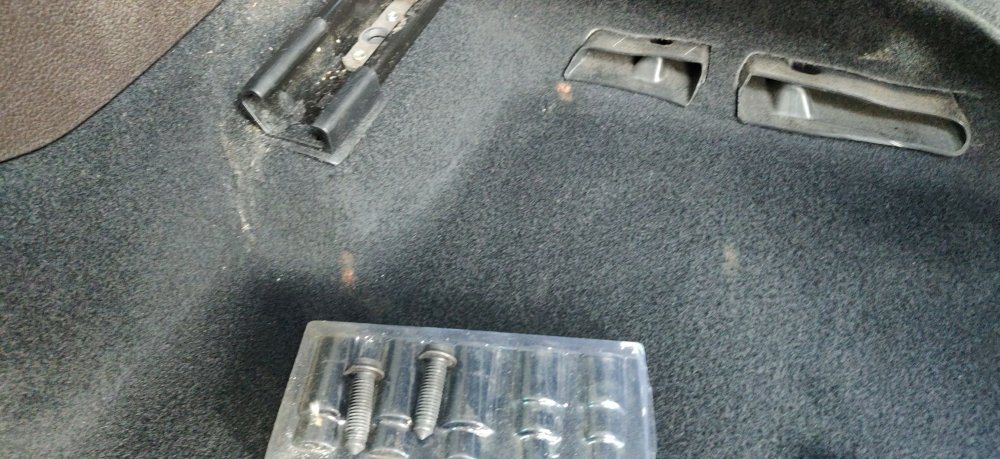
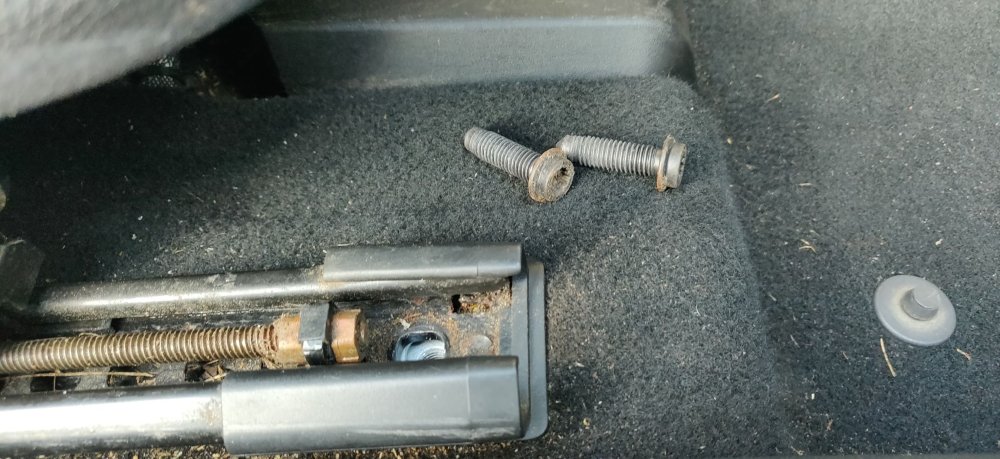
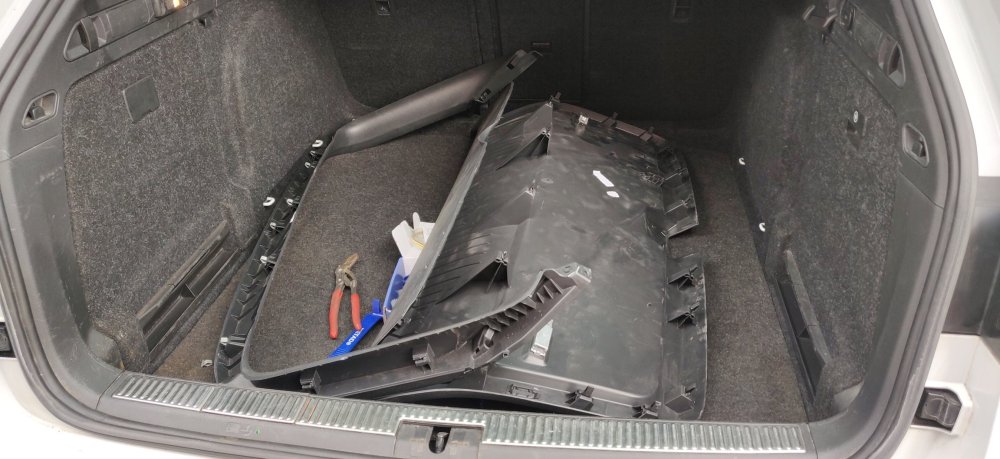
The original job this weekend was to take out the interior seats, primarily to get a good opportunity to clean out the carpet. So with the front struts assembled, that should have been ample time for the airbag gubbins to be safely disconnected. I probably shouldn't have bothered: Just your usual mankiness. Basically, the seats look like they tilt backwards once the screws are undone relatively easily. However, once I started to look at the wiring: Basically, my head started to hurt. I was able to make a start, getting a trim removal tool to disconnect some of the parts attached with clips, but once I'd cleared about 3 or 4 of the connectors, I then saw further parts of the loom weave themselves further into the seat, I presume going to bits like the rear footwell light and the buttons for the seat motors. At that stage, I decided to give up. The photos above show the extent of the required carpet cleaning, and tilting back was more than sufficient to get a decent chunk of the carpet sorted. Whilst having the seats out could have allowed for a good wipe and clean of the frame and the runners, I think that would be something for the long distant future. So decided to crack on with the carpet cleaning. The two modules under the seats, were removed by undoing the two plastic rivets (using the trim removal tool), then a couple of nuts and a bolt, to undo the frames that keep the modules in place. The passenger side I believe is the amplifier for the Canton sound system, and the driver side is the TV tuner. I also removed the foot rest in the drivers side foot well. I believe it was a T20 torx bit: Then with a bit of sliding and wiggling, it'll come free: With those removed, proceeded to attack the carpet as best as I could: The driver side still needs a few more goes, but under the seats is probably fine now, and the seats are technically ready to go back in. The modules under the seat and their frames are back in the house and they'll be given a wash and wipe down before reassembly. I was exhausted by then, a good few hours on this. Decided as the sun was still sorta there but coming down, to assemble the rear suspension, so back to the "workbench": Slot the bump stop into the top mount bit: The dust cover needs to be slotted into the top mount: It needs a tiny bit of persuasion, but once it's in, it should be quite firmly in place: This can then all slide into the rear strut: The workshop manual specifies 25nm for the top bolt, but again, just did it as tight as possible: Eagle eyed readers can see the 17mm spanner used, and this time decided to use a 5mm allen key. So this is much more straightforward, pretty much 15 minutes for both: So that's it. The suspension is all ready to be fitted pretty much (depends on the rear springs and whether the compressor is needed though. Been alright with the exception of the broken connector cover really, and I guess the general exhaustive work when cleaning a car. I note that I haven't even began to look at the rear seats. I'll need to swot up on that, as I recall there being some one use only plastic clips or some such, which seems a bit strange. I'll probably take a few more pics of when I put back those modules into the car. Maintenance: £1344.91 Upgrades: £337.06 Miscellaneous: £584.95


-
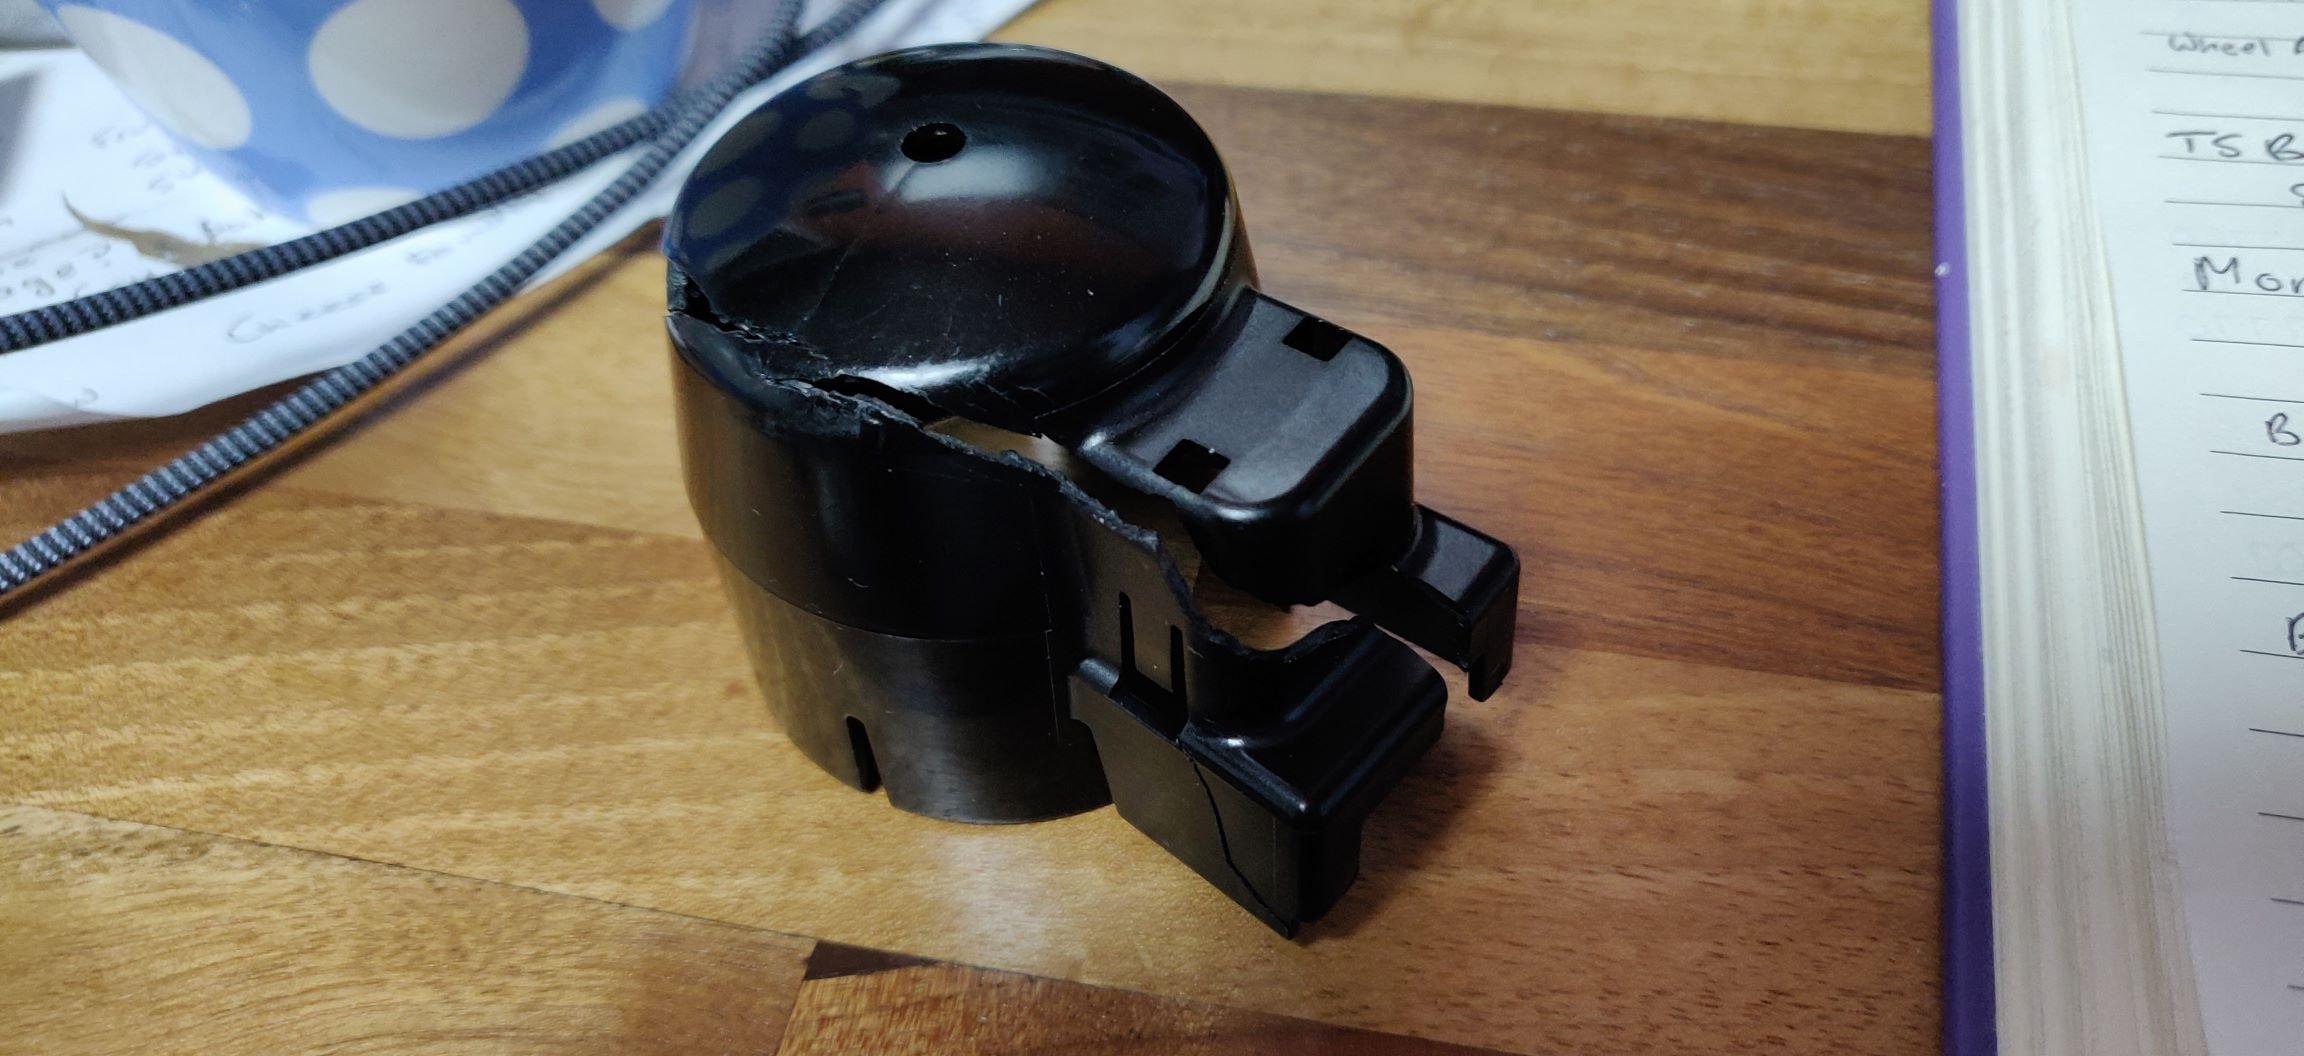
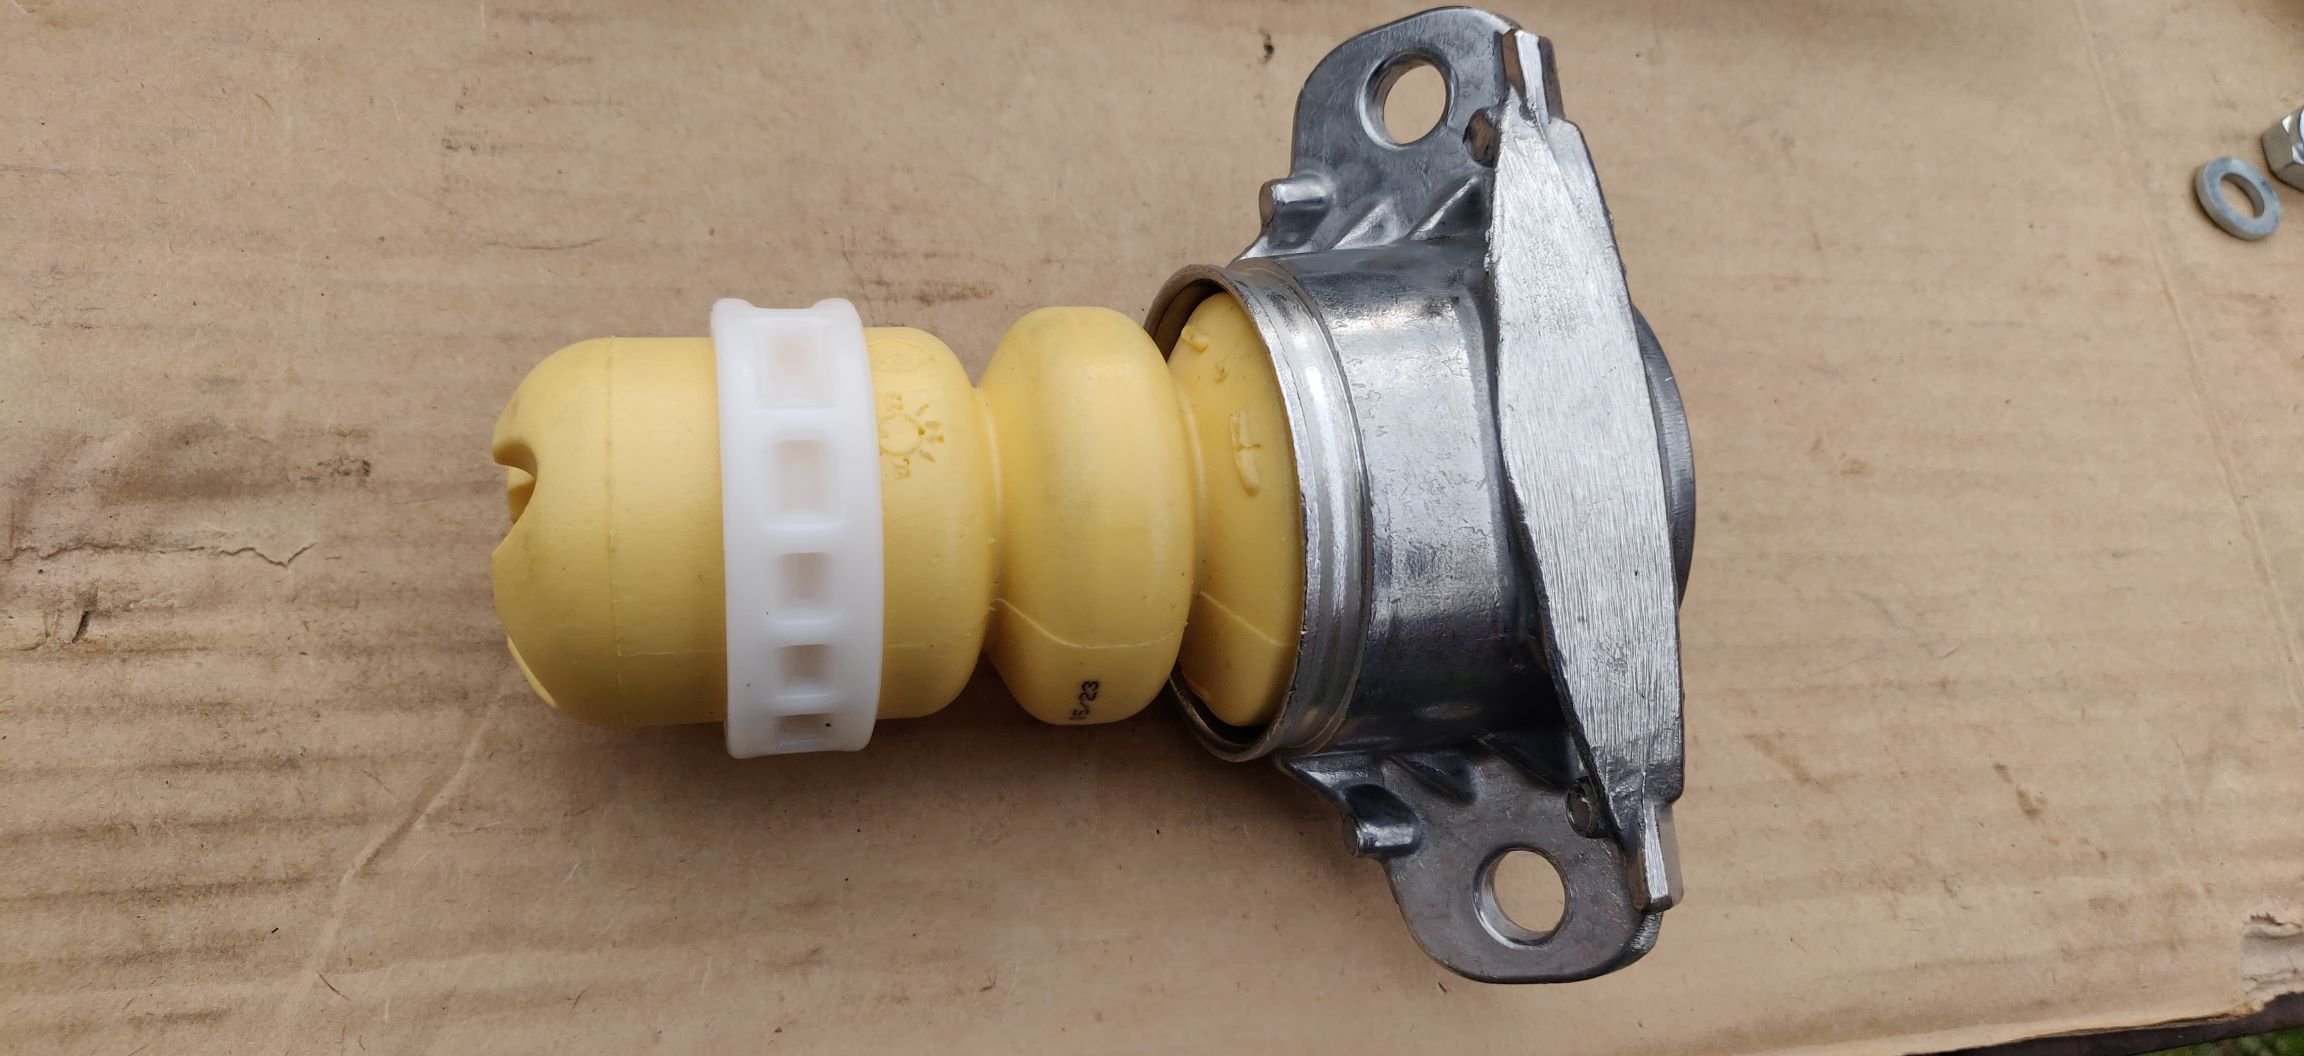
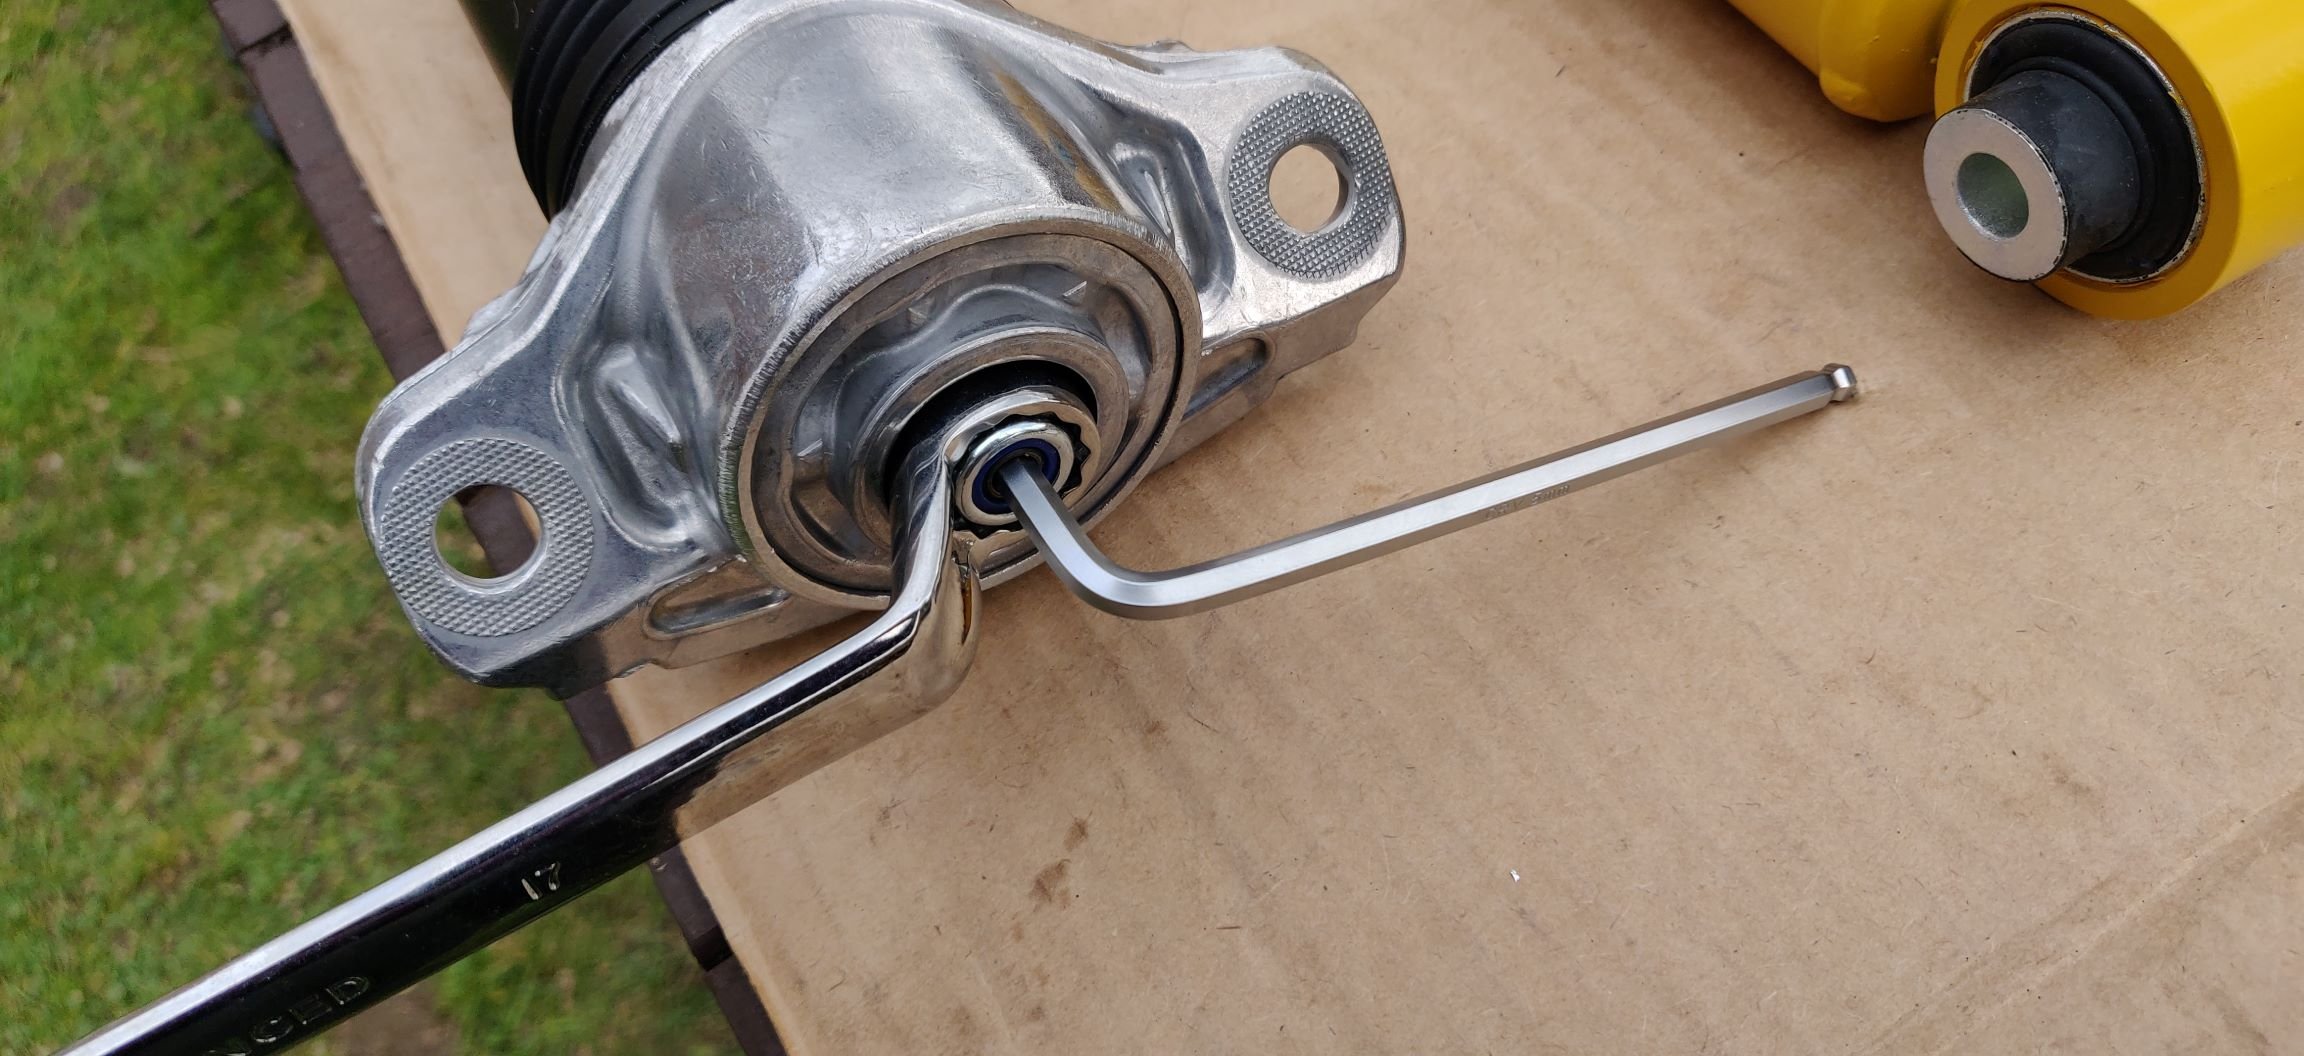
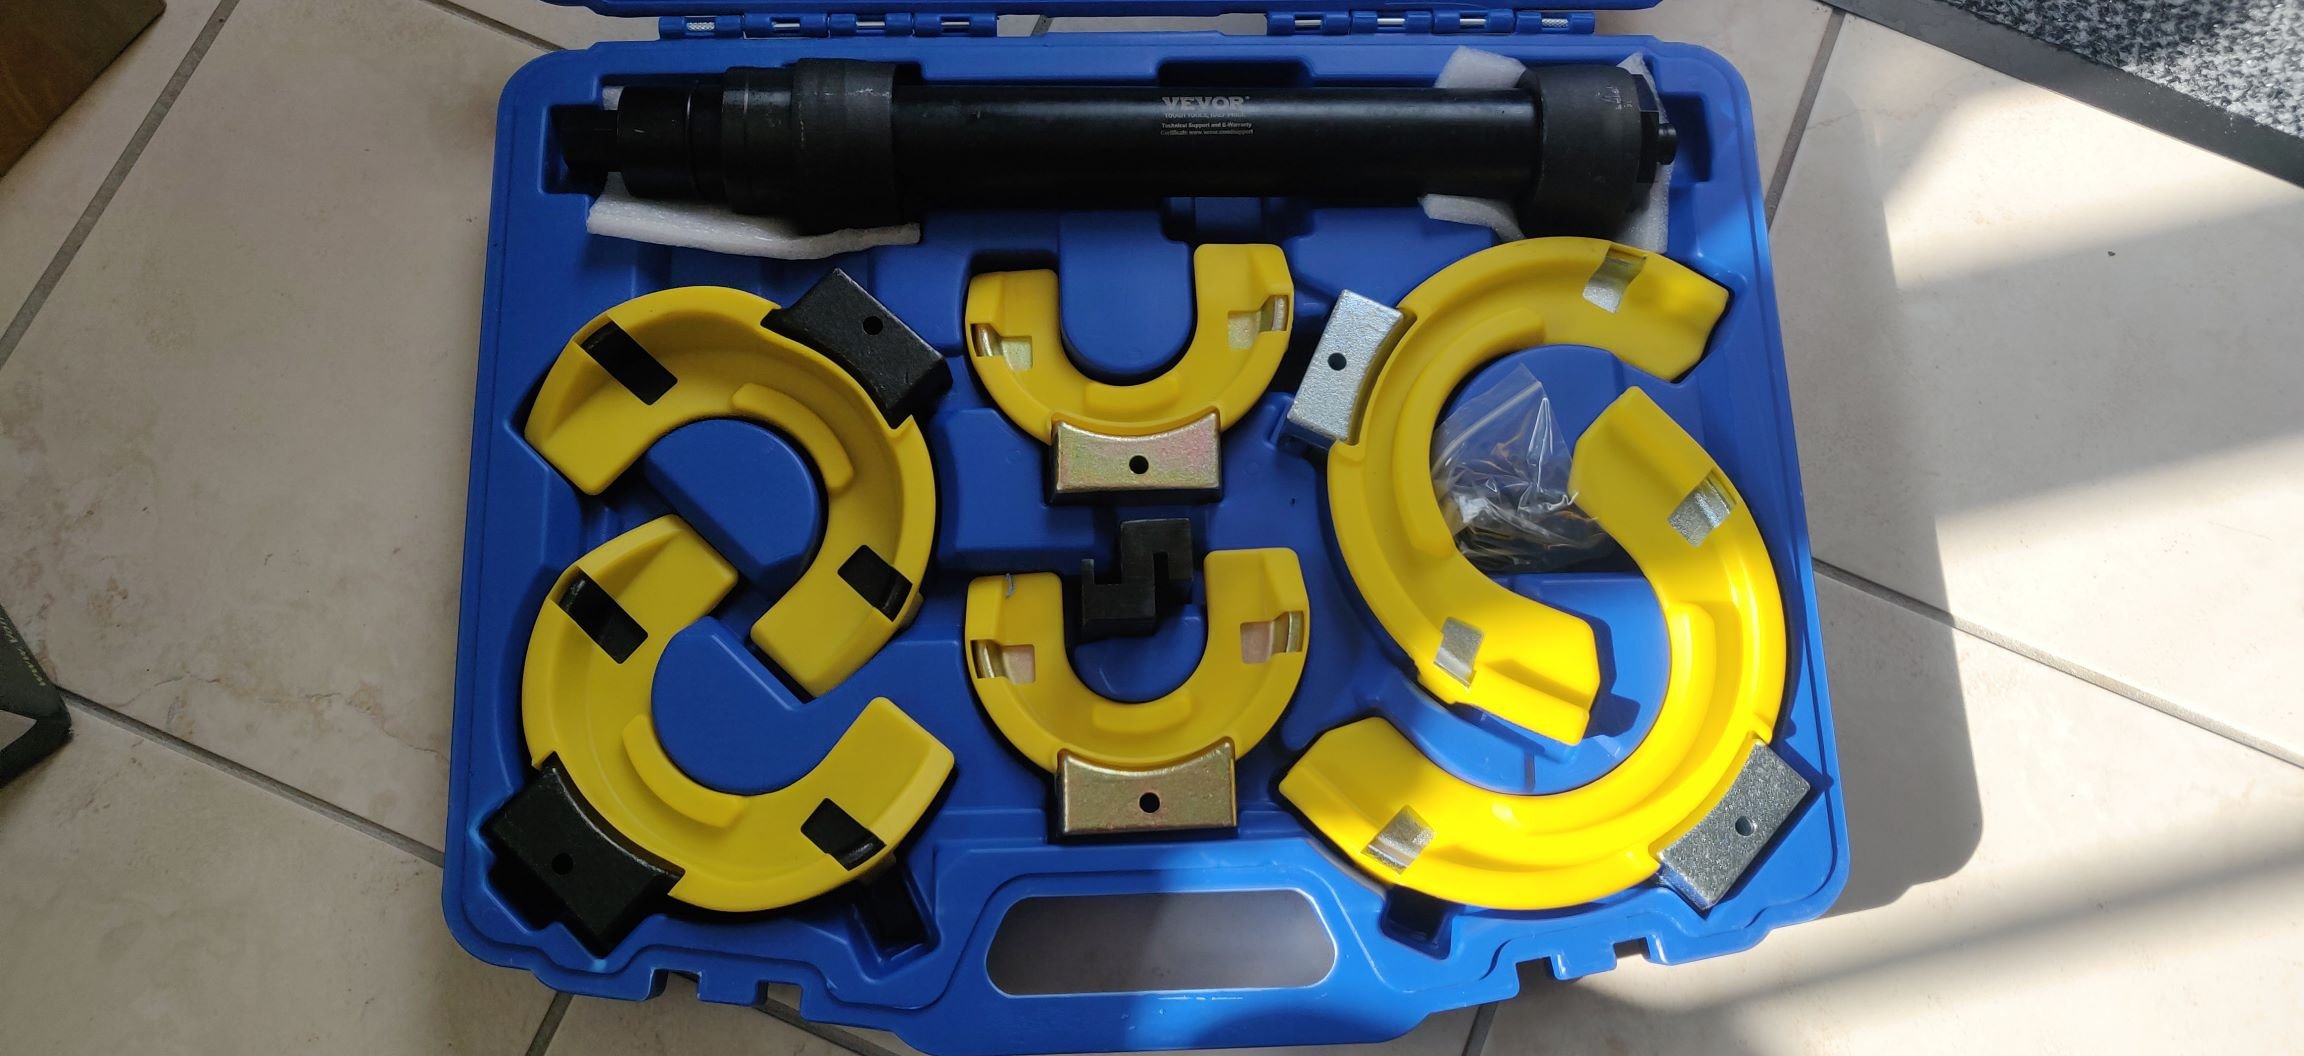
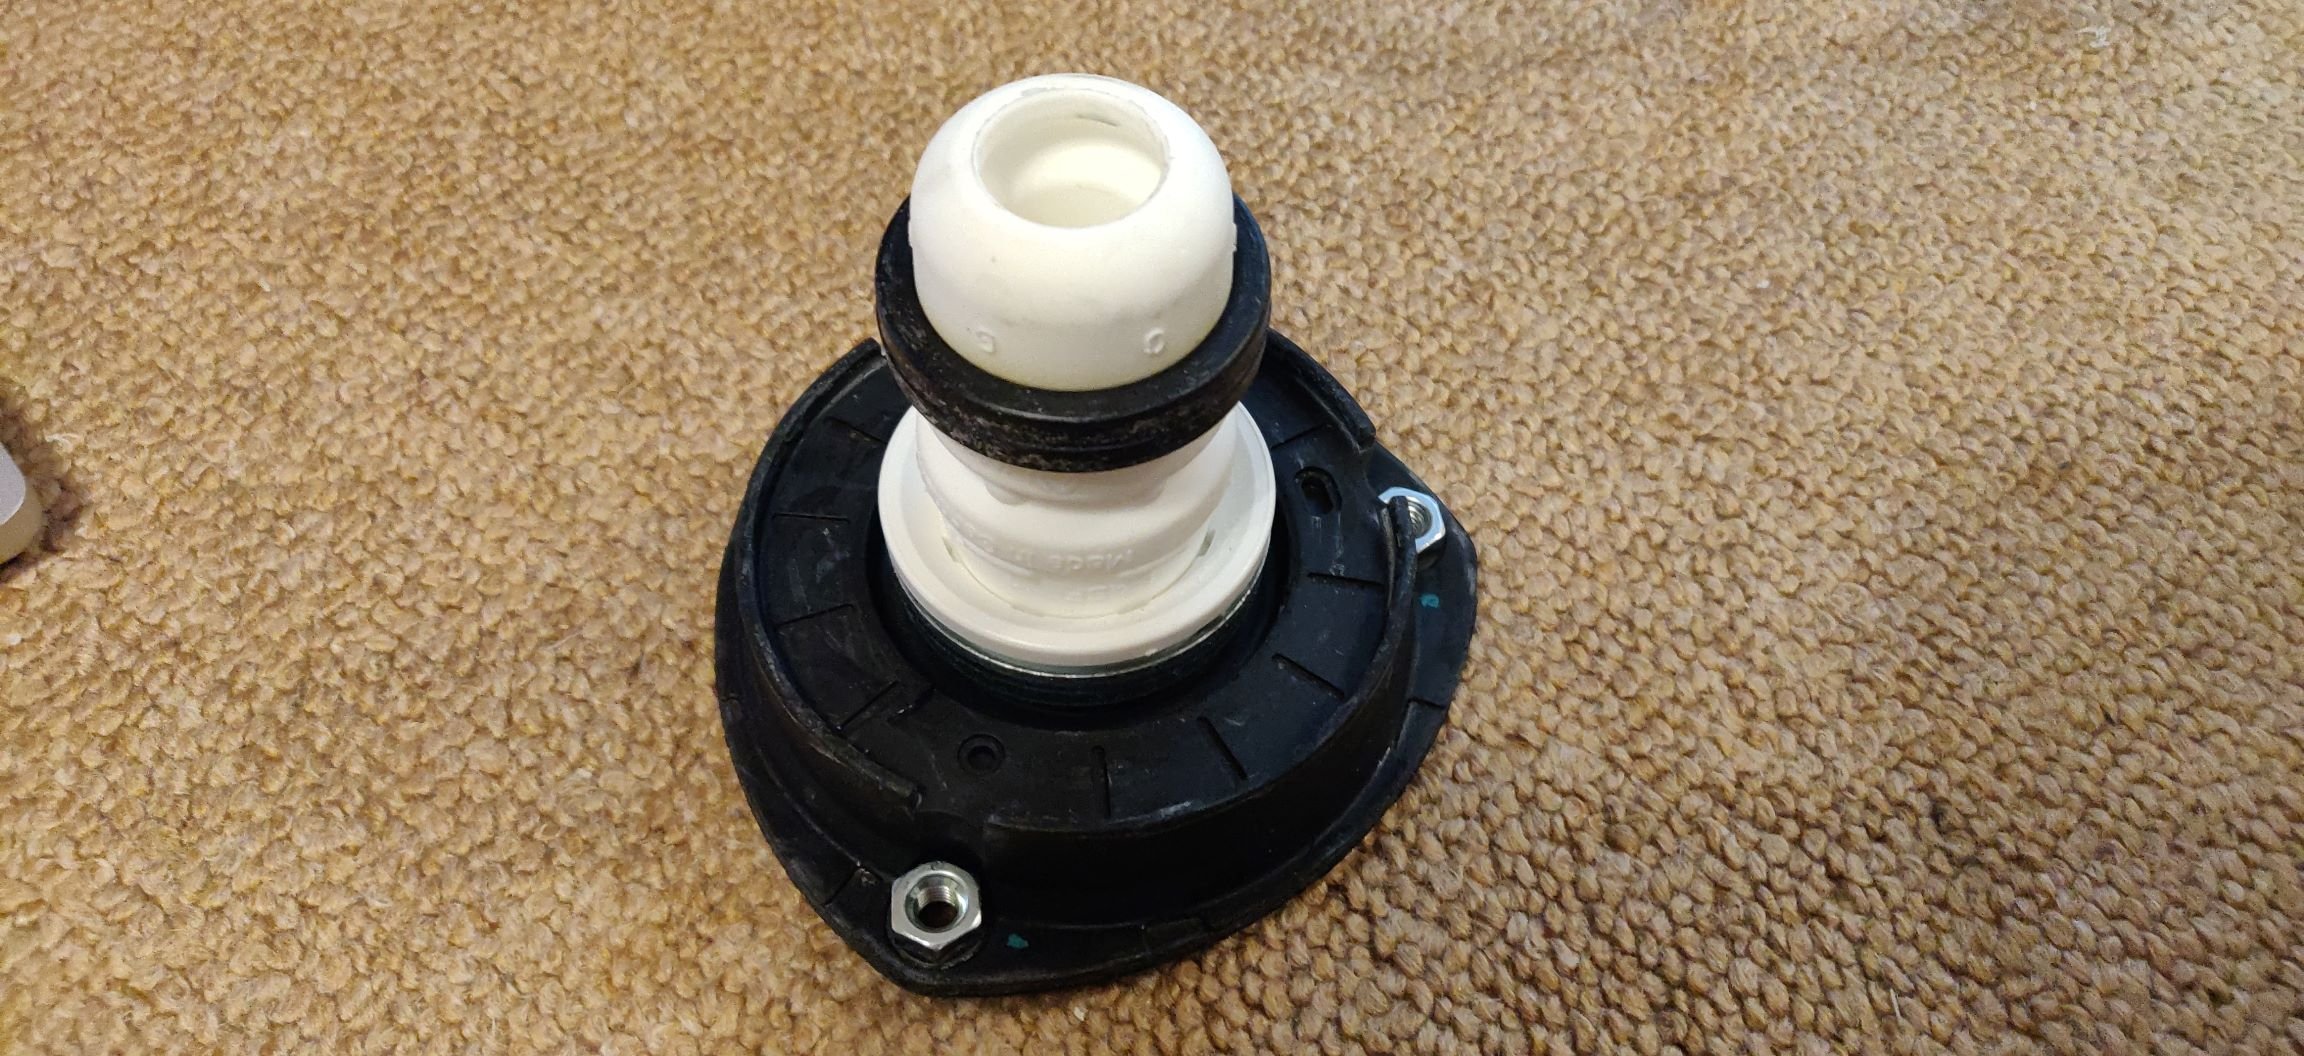
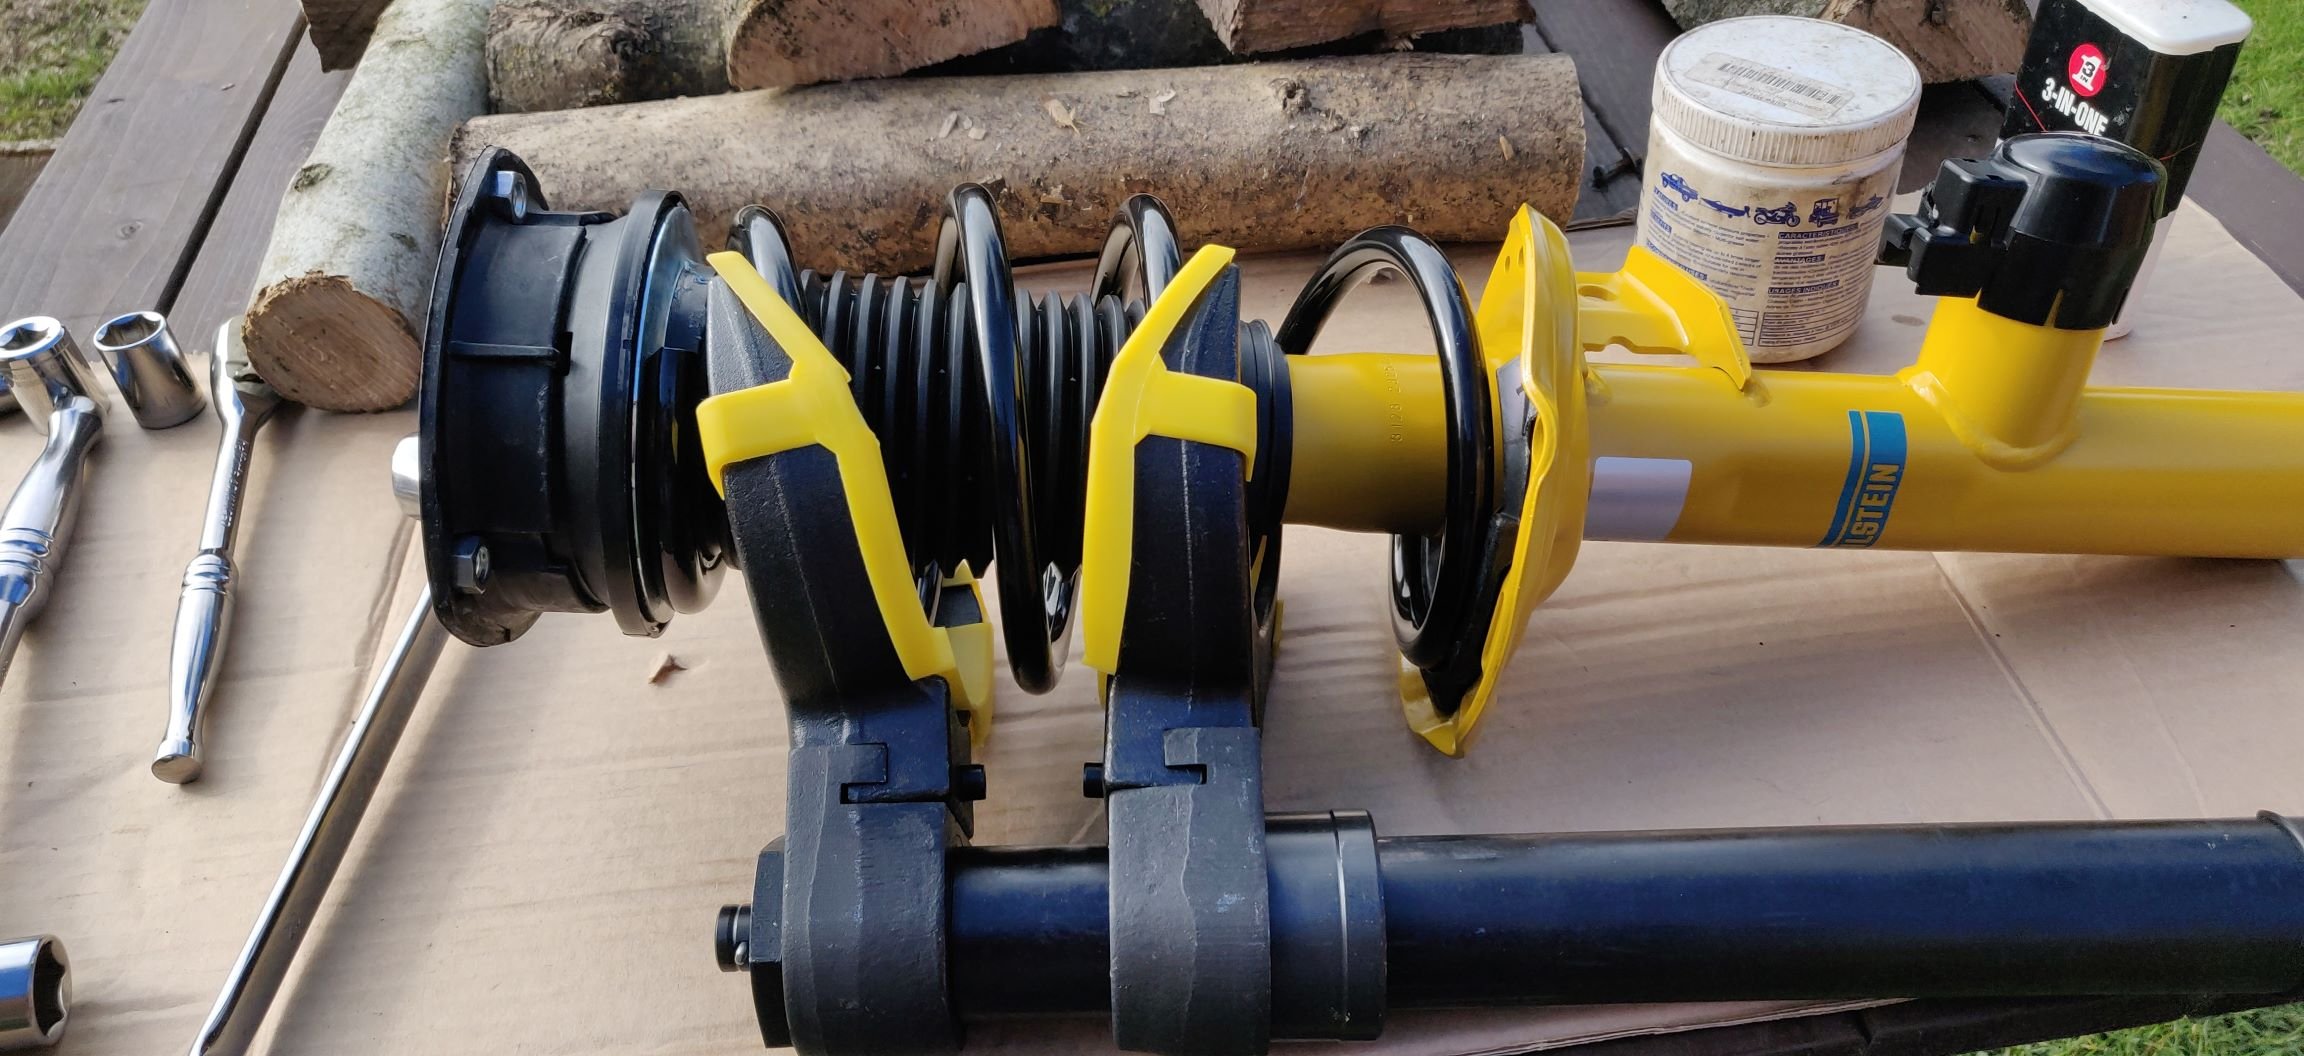
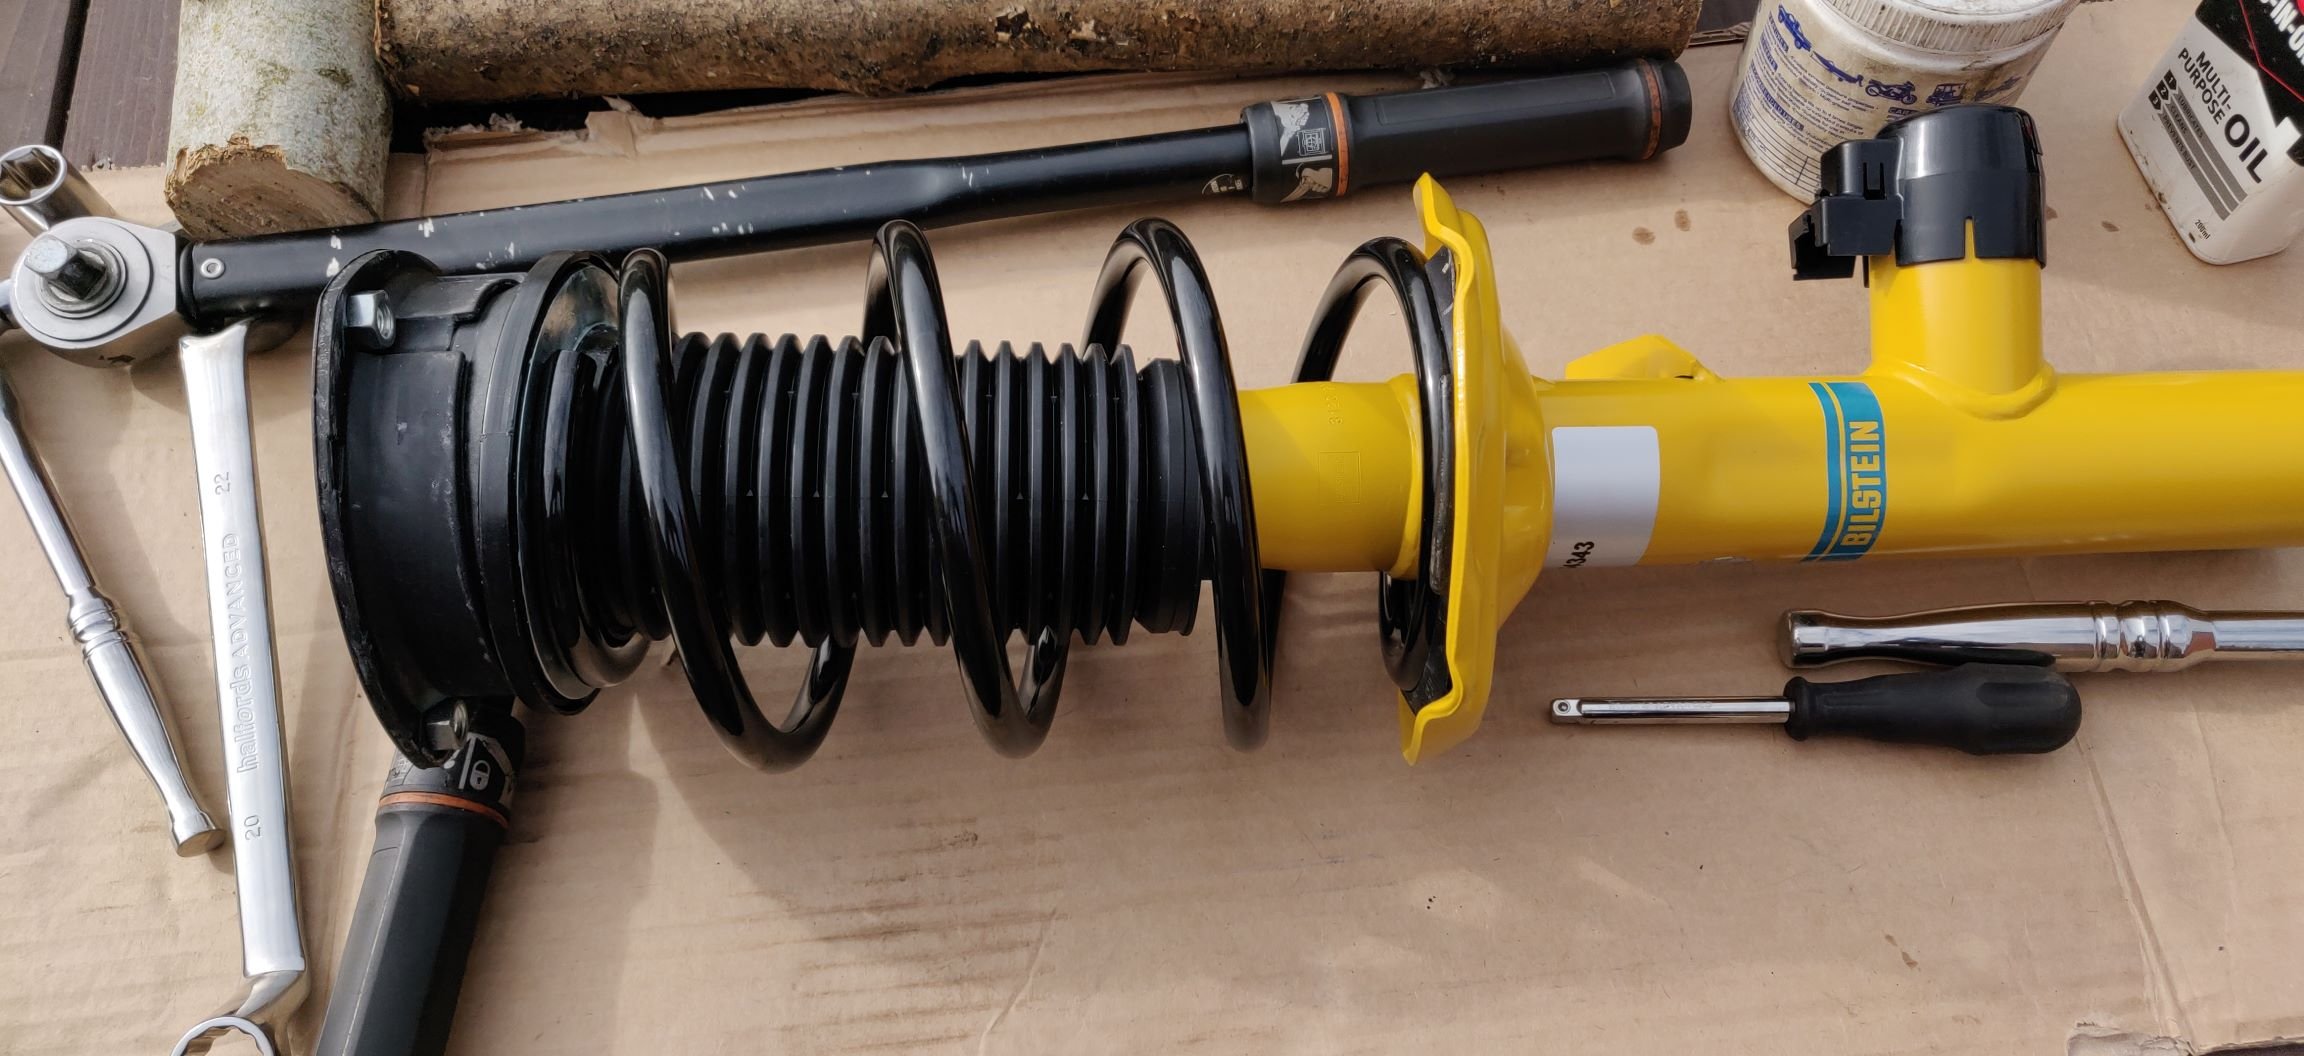
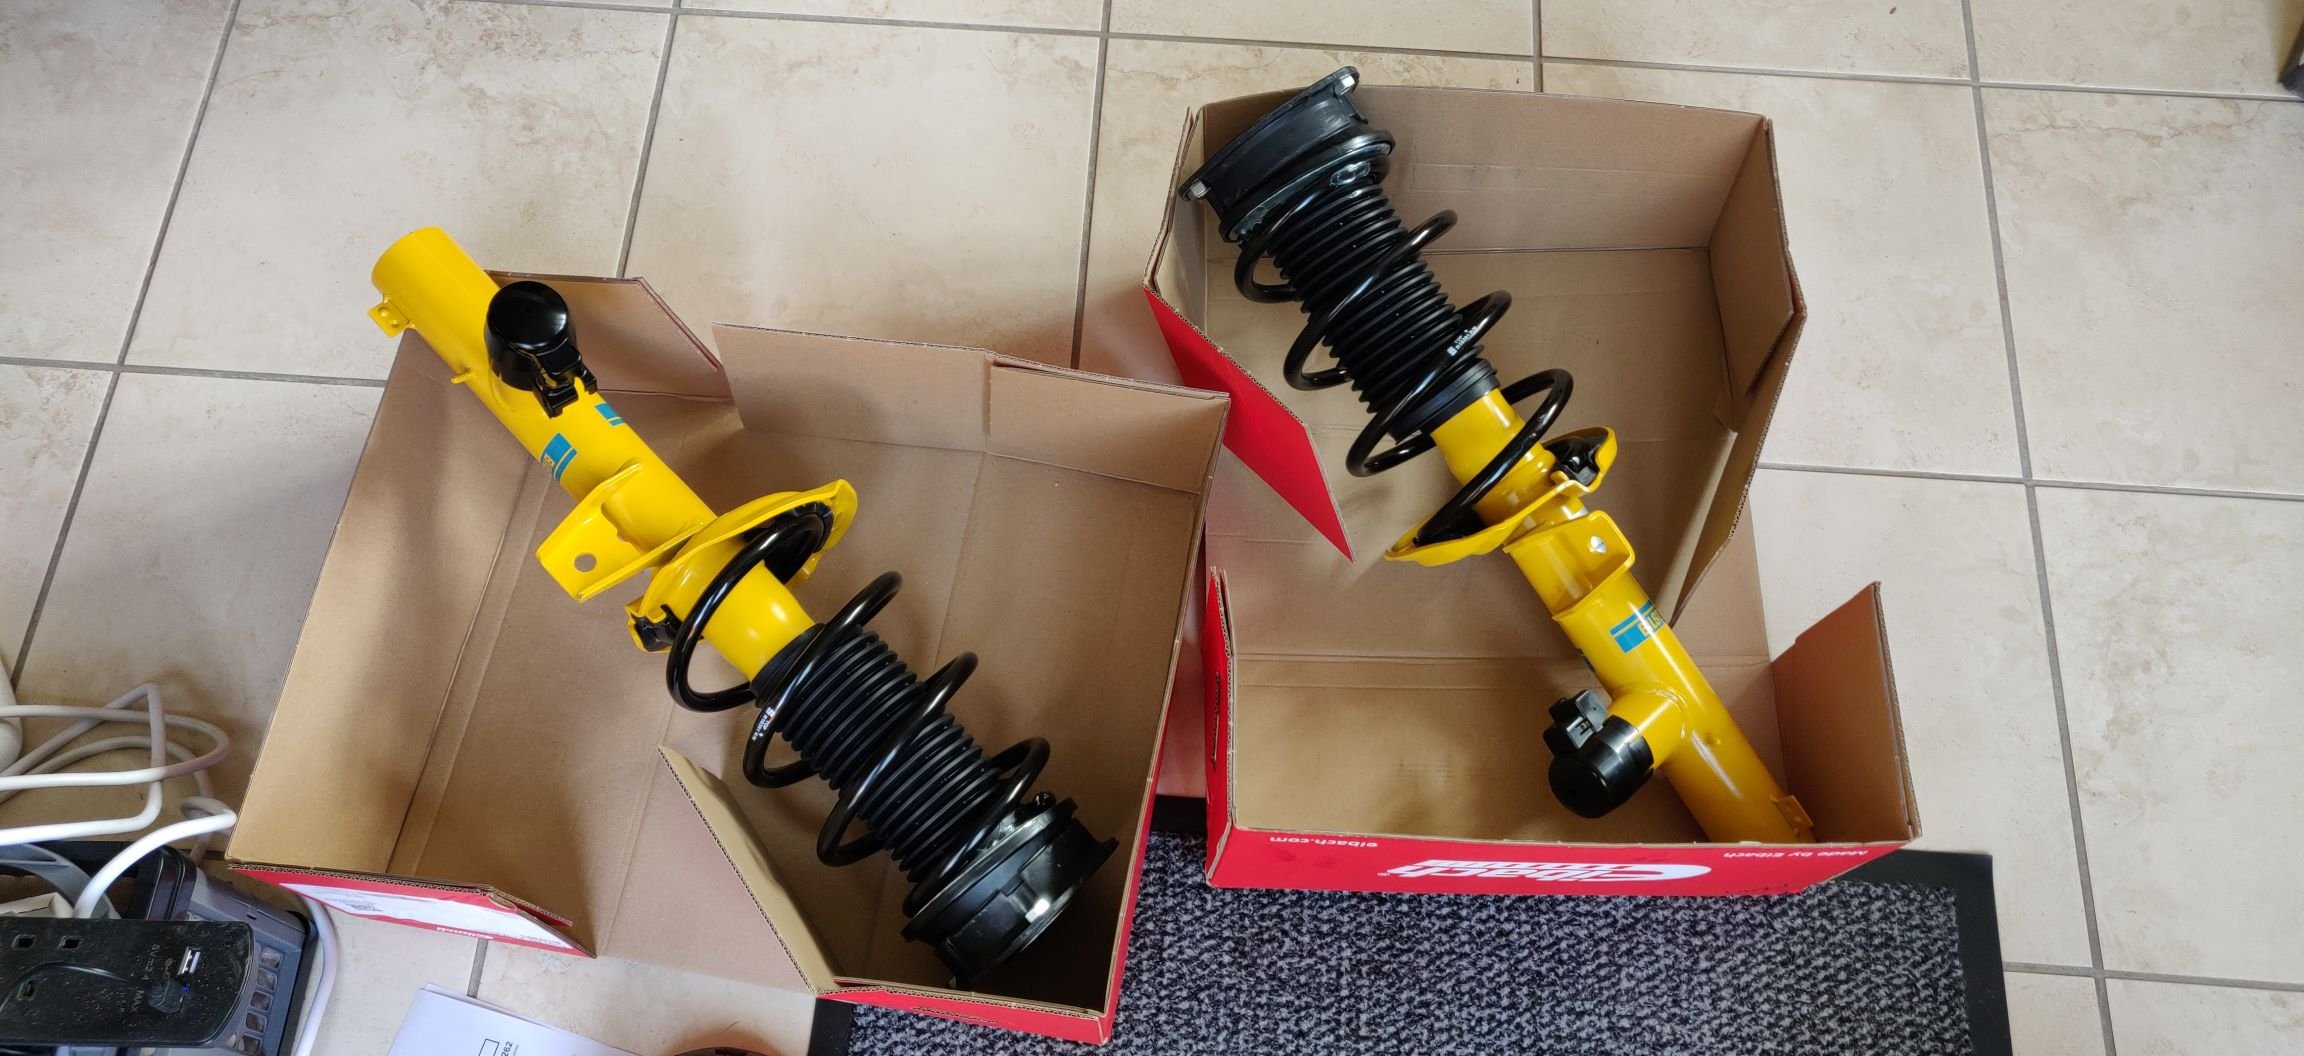
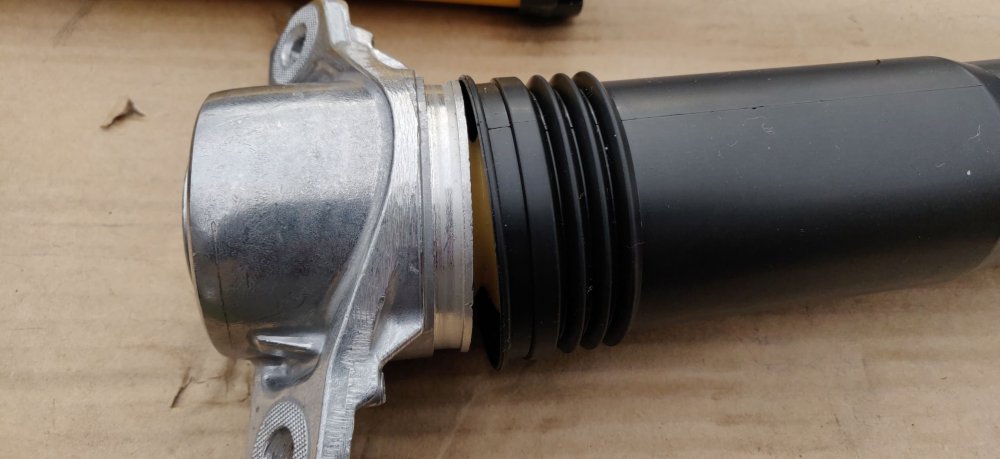
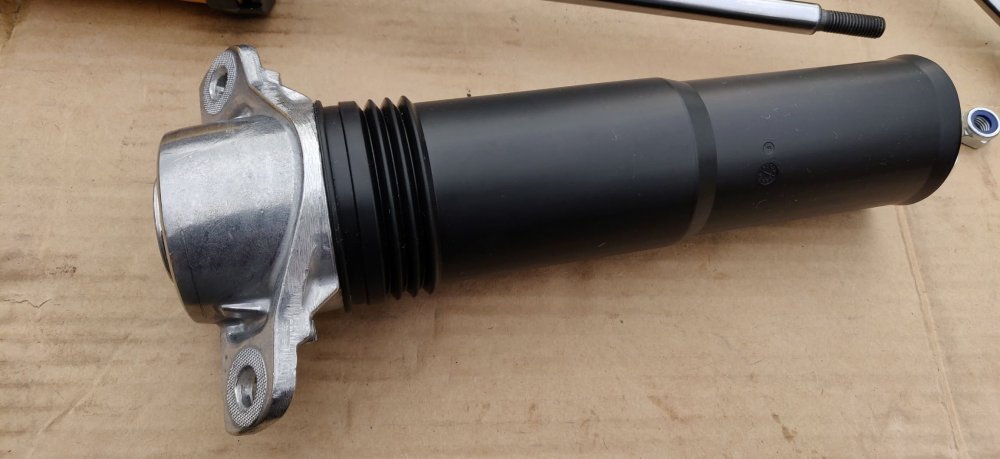
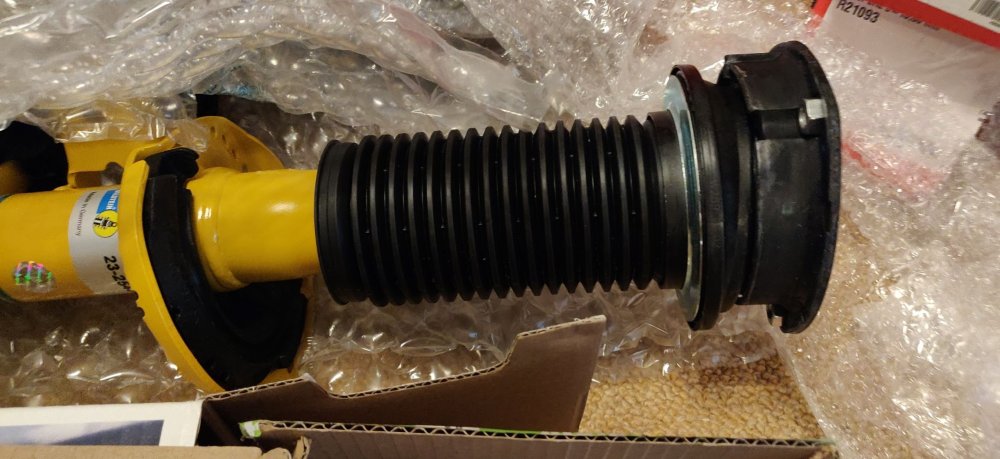
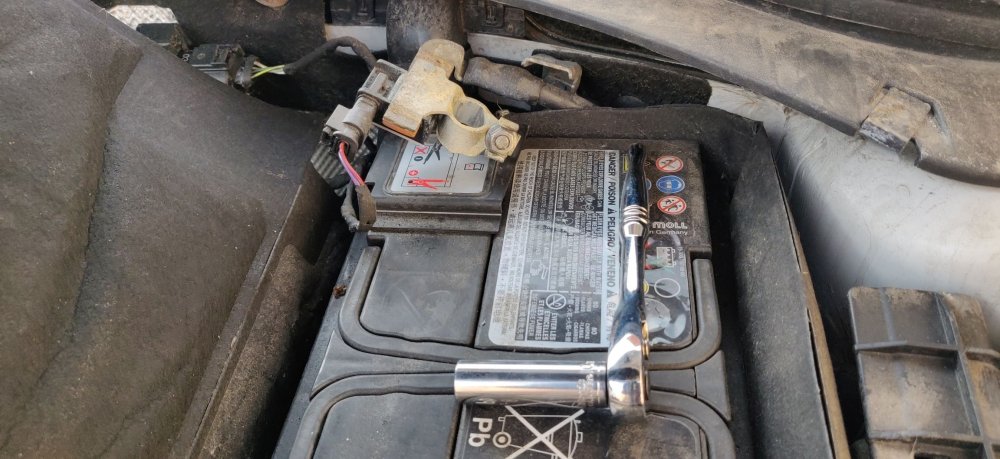
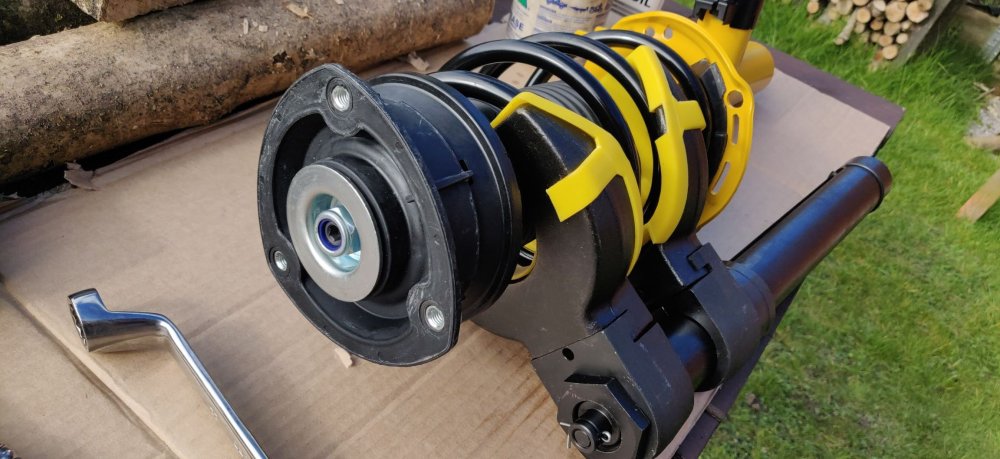
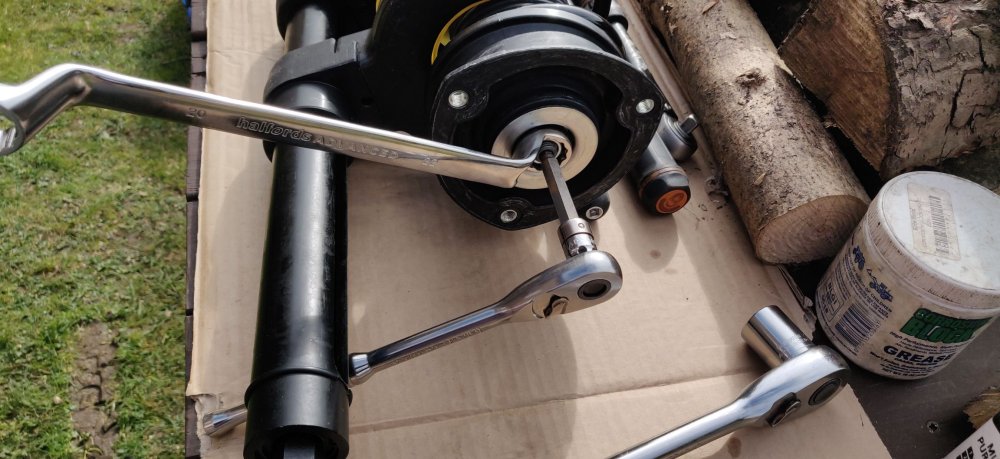
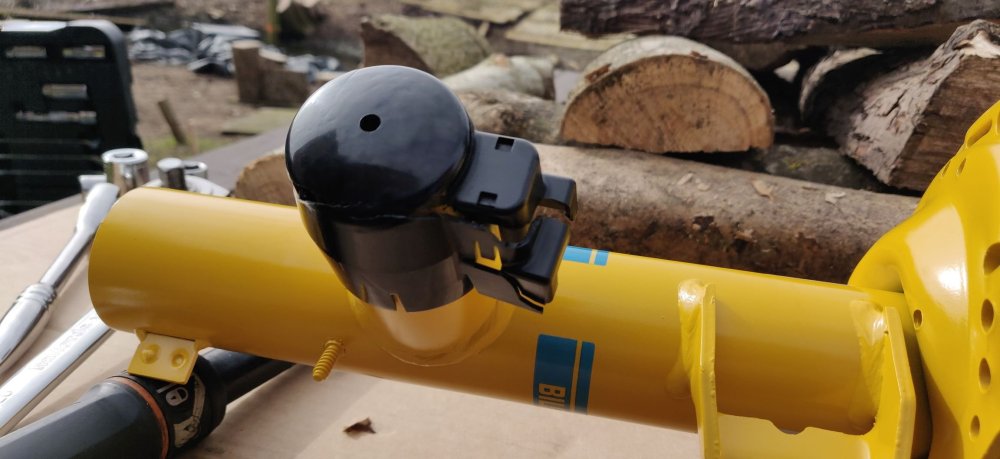
Last night, I did some dry runs of the suspension assembly. As I also received this: Although I have a pair of spring compressors which have served me well over the last decade, the workshop manual implies the rear springs could well require compressing to get free, and I suspect I won't have enough ground clearance off the driveway to get the lower arm down enough to free them without one. This particular compressor also has plastic covers which would help in reducing scratches, and also, only one tool is required to tighten or loosen the spring rather than going from one side to the other, and then finding out it fouls the strut or something. This thing was £86.44 from eBay, but given its a very generic spring compressor tool, I won't tally it up in the miscellaneous section, as it isn't really Skoda/VW group specific. Anyways, had to play around with the components just to keep in mind the right ordering, so the upperpart of the strut bearing has a slot that the bump stop plonks into: The dust cover also slots into the centre, with a bit of fettling: The lower part then slides on, the above shows a notch on the right side, which slots into a cut out in the lower part: The result can then slide over the strut: So it would be a case of the spring goes on, then the strut bearing with the attached bits, then the bolt on the top tightened up. So this morning, back to the original task of removing the seats. In every other car where I've removed the seats, its been a case of 4 bolts, slide forward for the rear, slide backwards from the front. The steps are the same, but with the notable difference of being electric. So slowly slide the seats forward: So the bolts are revealed, which are M10 spline bits, akin to the type attaching the steering wheel onto the column: So remove those: Then proceed to move the seat backwards, I did it just enough to get access to the front screws: So undo those: So the seat is now able to be freed: Repeat for the other side. Before I proceeded, I then disconnected the battery: I would suspect this car is modern enough to have airbags in the seat, so this is to remove power and to make sure any remaining current and what not is drained (I don't actually know if capacitors are involved in airbags, probably). So instead of waiting around, decided to assemble the front suspension, as it was quite a sunny day. So here's my makeshift workbench: Just a garden table (with some seasoning wood moved aside). I then assembled the spring compressor, took some deep breaths, and began the process of mounting the spring onto the compressor: The compressor has a 21mm socket on the end, so got my ratchet spanner onto it and began tightening. It goes without saying, please WEAR EYE PROTECTION, and also be absolutely sure that whatever is to the left and to the right of the spring is something you don't mind putting a potential hole in if things go awry. As per yesterday, I assembled the remaining bits ready for quick putting together: One thing I also did was to apply corrosion block grease on the shiny part of the lower strut bearing. The spring appears to sit on this part, but in general seems exposed to the elements, so a thing layer of the grease hopefully keeps it from rusting too badly. I also did the same for the spring, as the springs appear to have a tiny nick on the finish. The compressor needs to compress the spring it quite a bit, and it certainly gets tighter as you do so. The compressor is either then following the springs orientation, or its bending. To be honest, the compressor is a solid lump, a good 12kg of metal, so it was probably better than it looked. So once sufficiently compressed, I then try to dry fit it: Basically, once the thread of the strut goes through the strut bearing with what looks like enough thread for the nut, then you're nearly there. Basically, put the nut on and after a few turns, breath a sigh of relief. Just also make sure the spring is aligned appropriately to the bottom seat insulator and the strut seat: Here's the nut attached on, so the spring compressor is essentially ready to be removed: So undo the spring compressor, and eventually it'll loosen enough to free itself from the spring: So that's pretty much it. The workshop manual says to tighten the top bolt to 60nm. I don't really have a specialist tool to allow for torque tightening, maybe something I might invest in, but for now, just used a swan neck spanner and a hex bit. I believe it was a 22mm nut and a 7mm hex socket. I just did it until I couldn't really tighten it anymore. As I did a final inspection, I noticed a booboo: I guess as I was turning the strut around when aligning it to the spring and the seat and so on, I must have turned it and put weight on it in such a way that cracked the cover for the connector for the Damptronic/DCC bits. I'll remain optimistic that I can just use the ones on the existing struts, but if not, I'll either source a replacement, or just duct tape this back in shape. So I think the first strut took 45 minutes, and the other 30, primarily because I'm super scared of spring compressors when I'm using it, so I'm always checking and double checking every step of the way: So that's the front struts. I'll put a stop on this post and return back to the seats. Maintenance: £1344.91 Upgrades: £337.06 Miscellaneous: £584.95


-
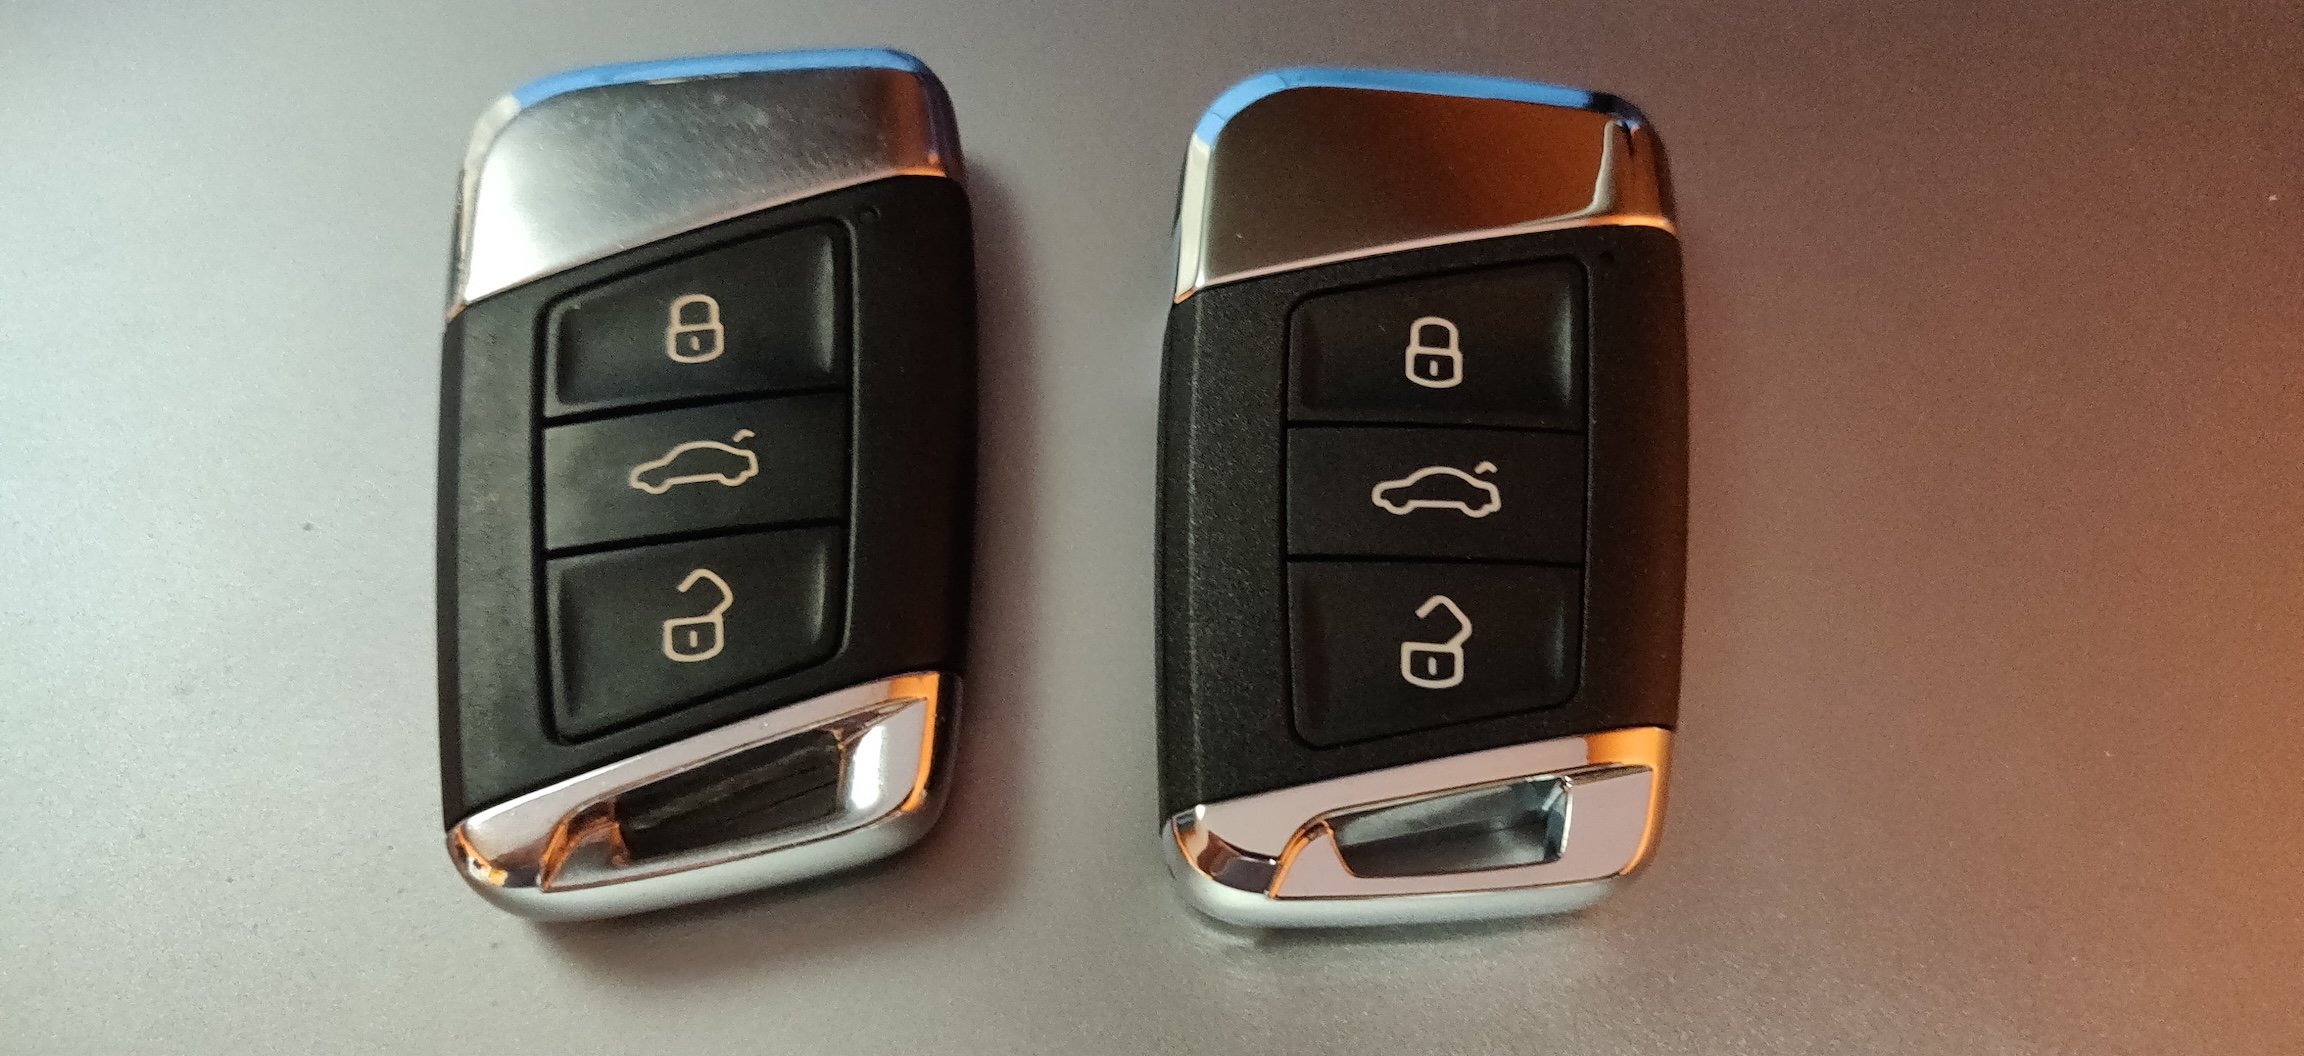
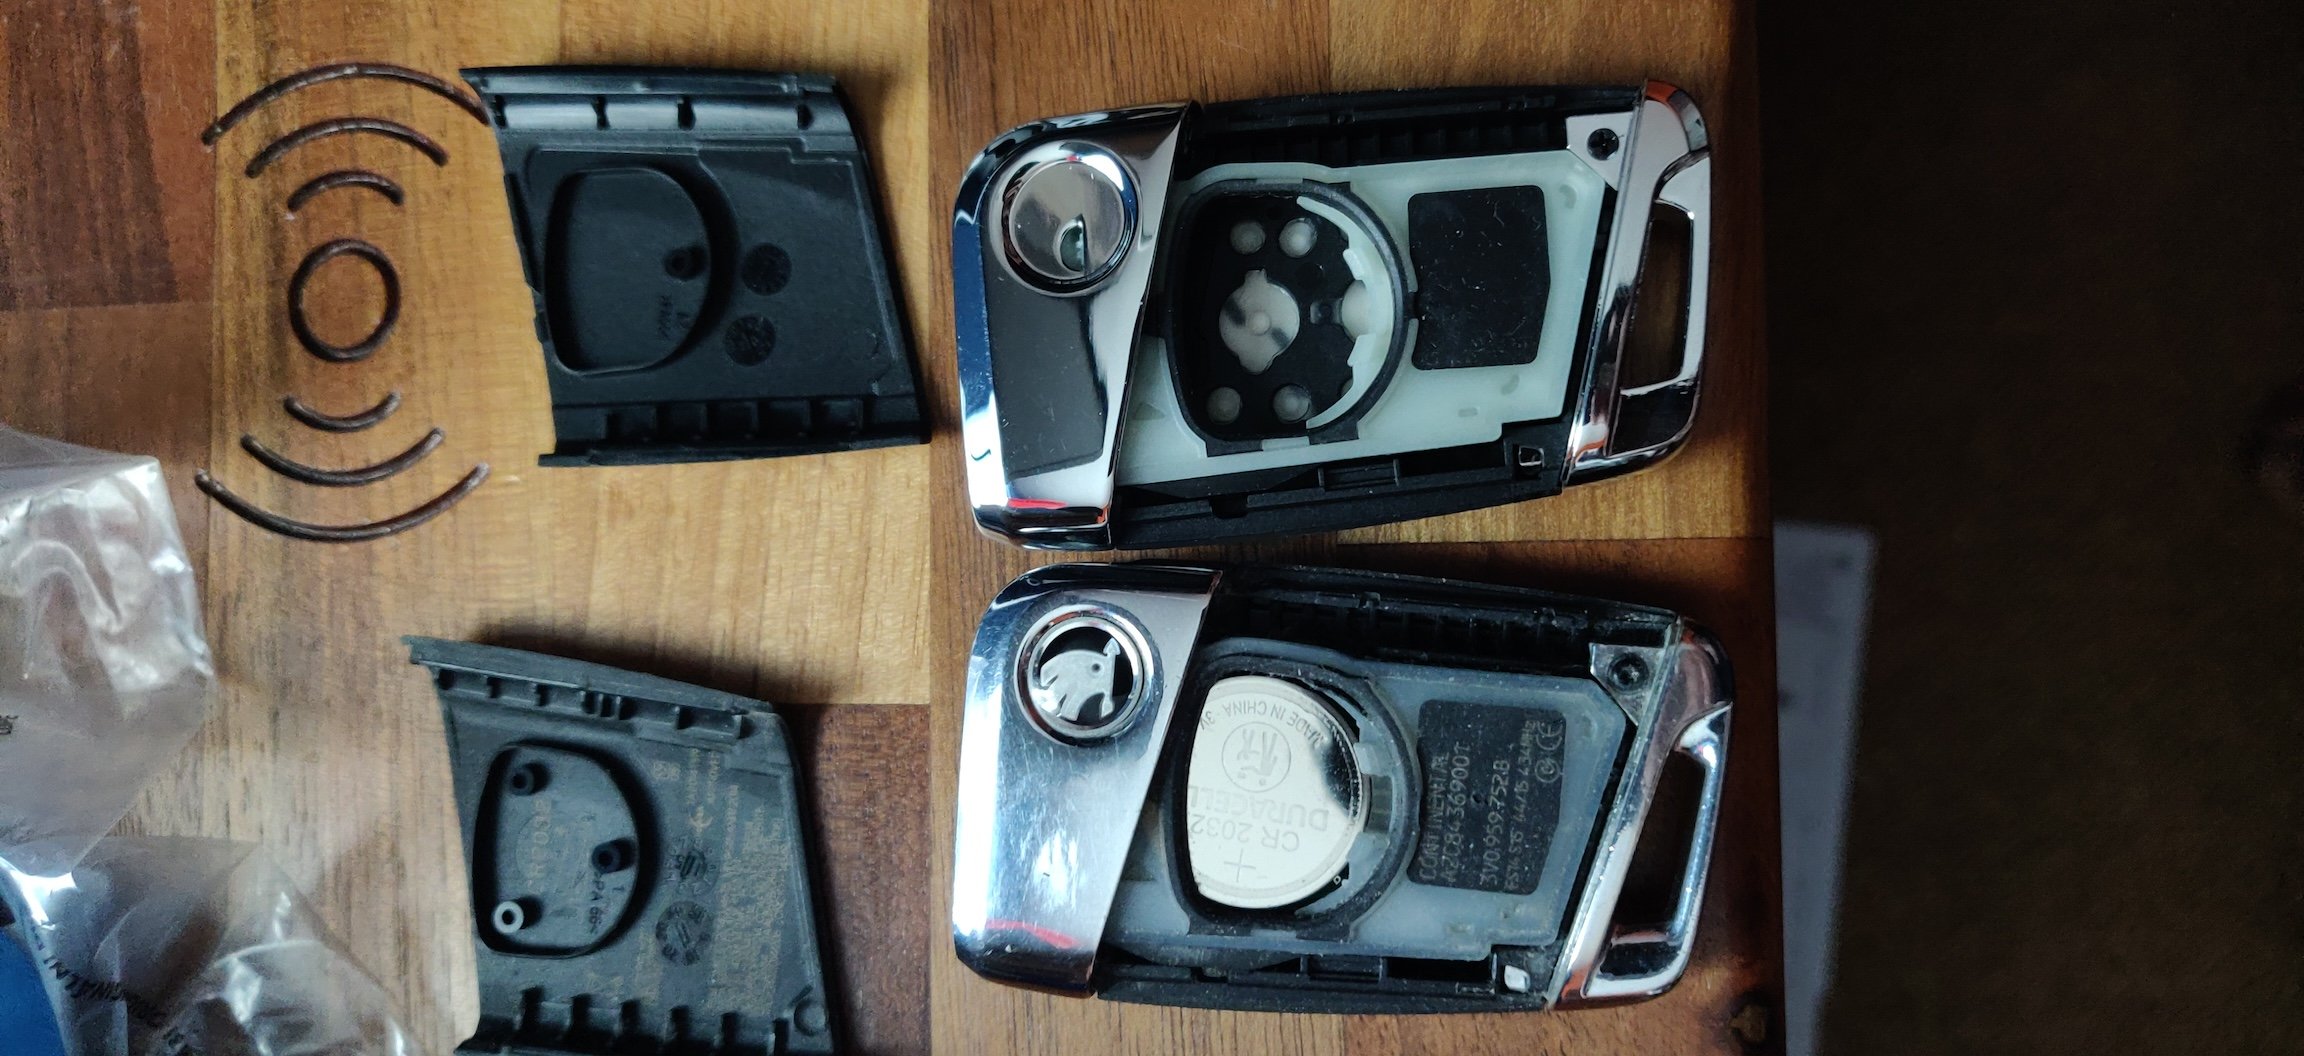
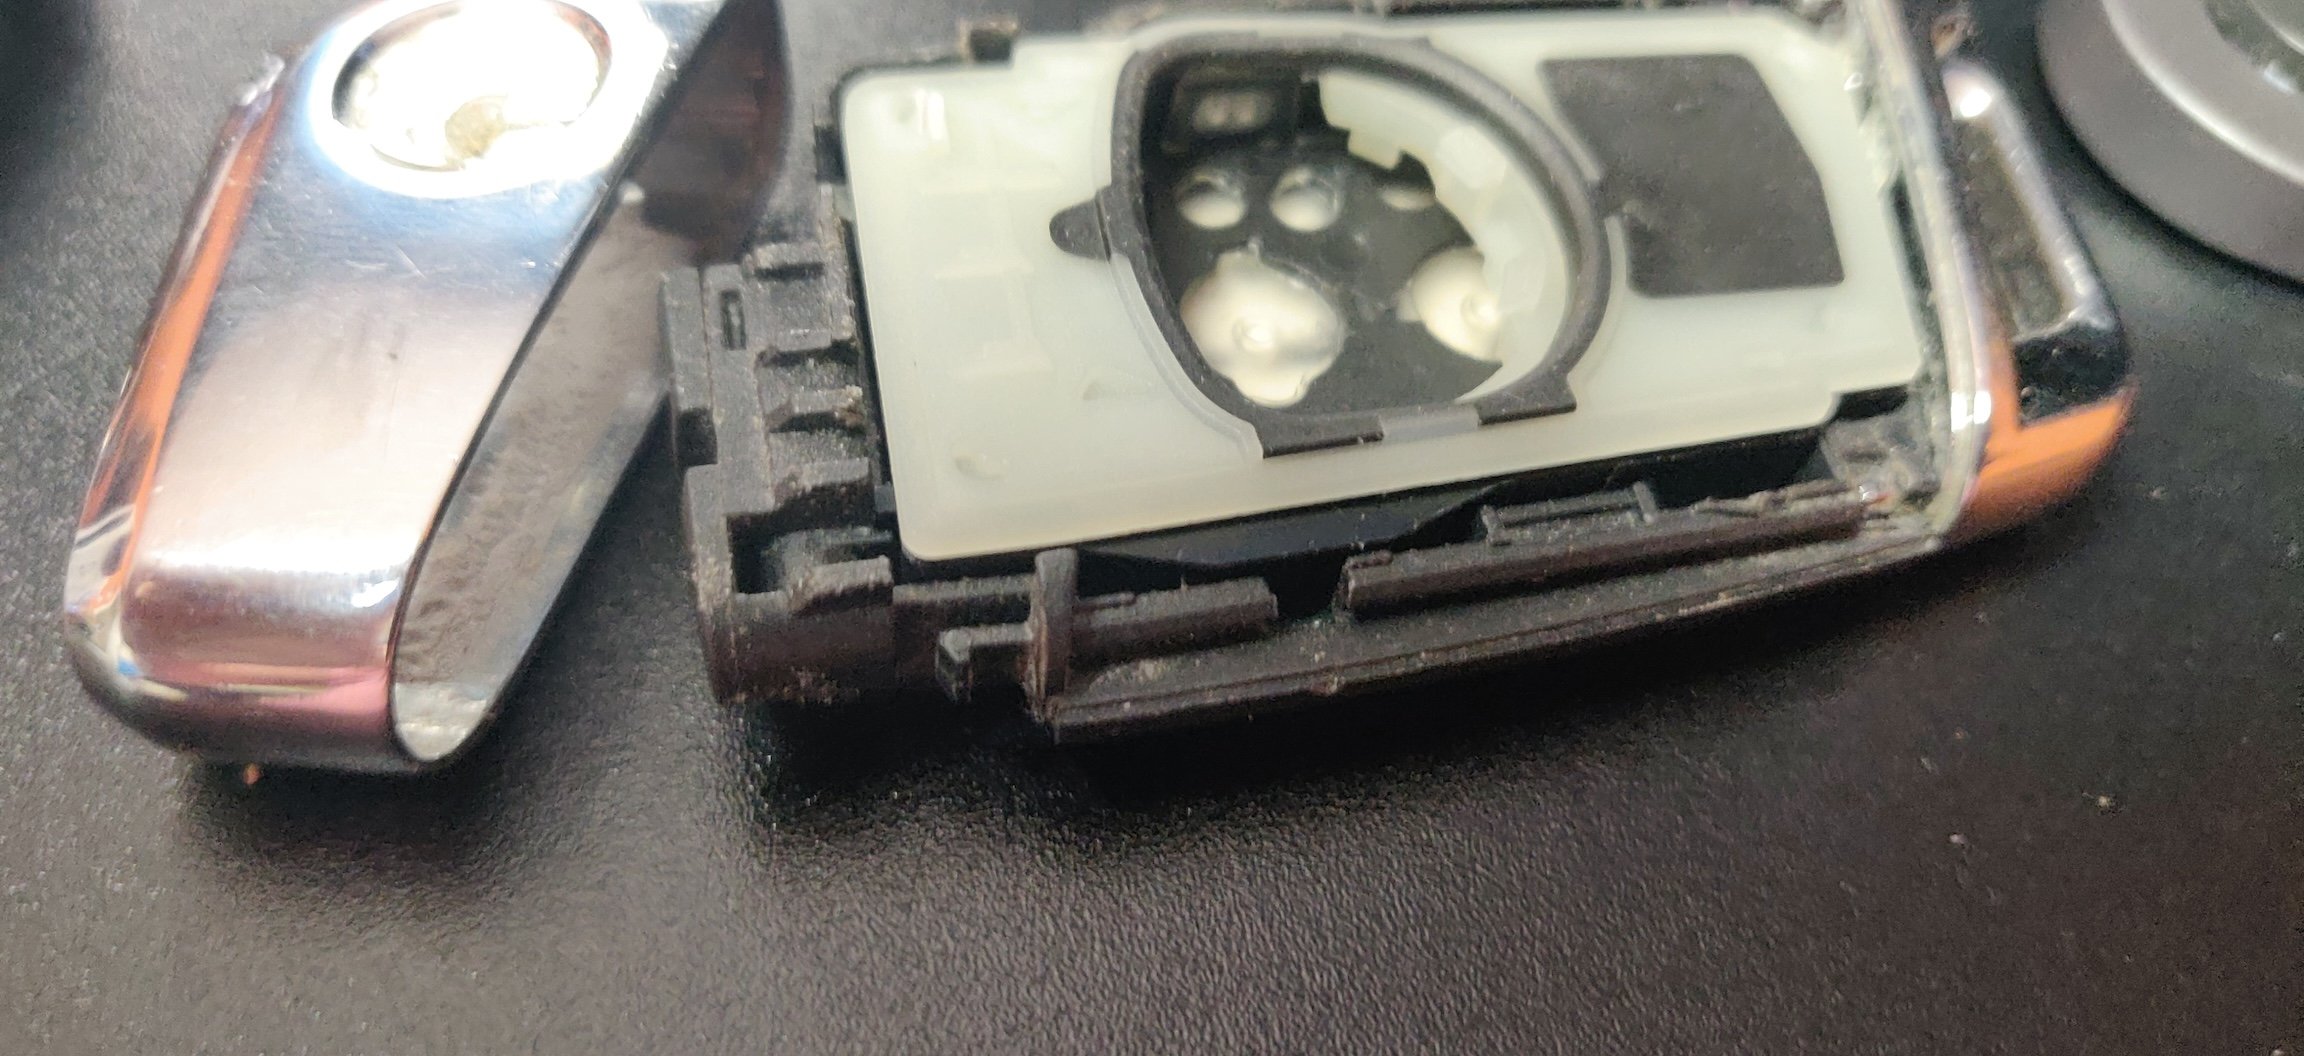
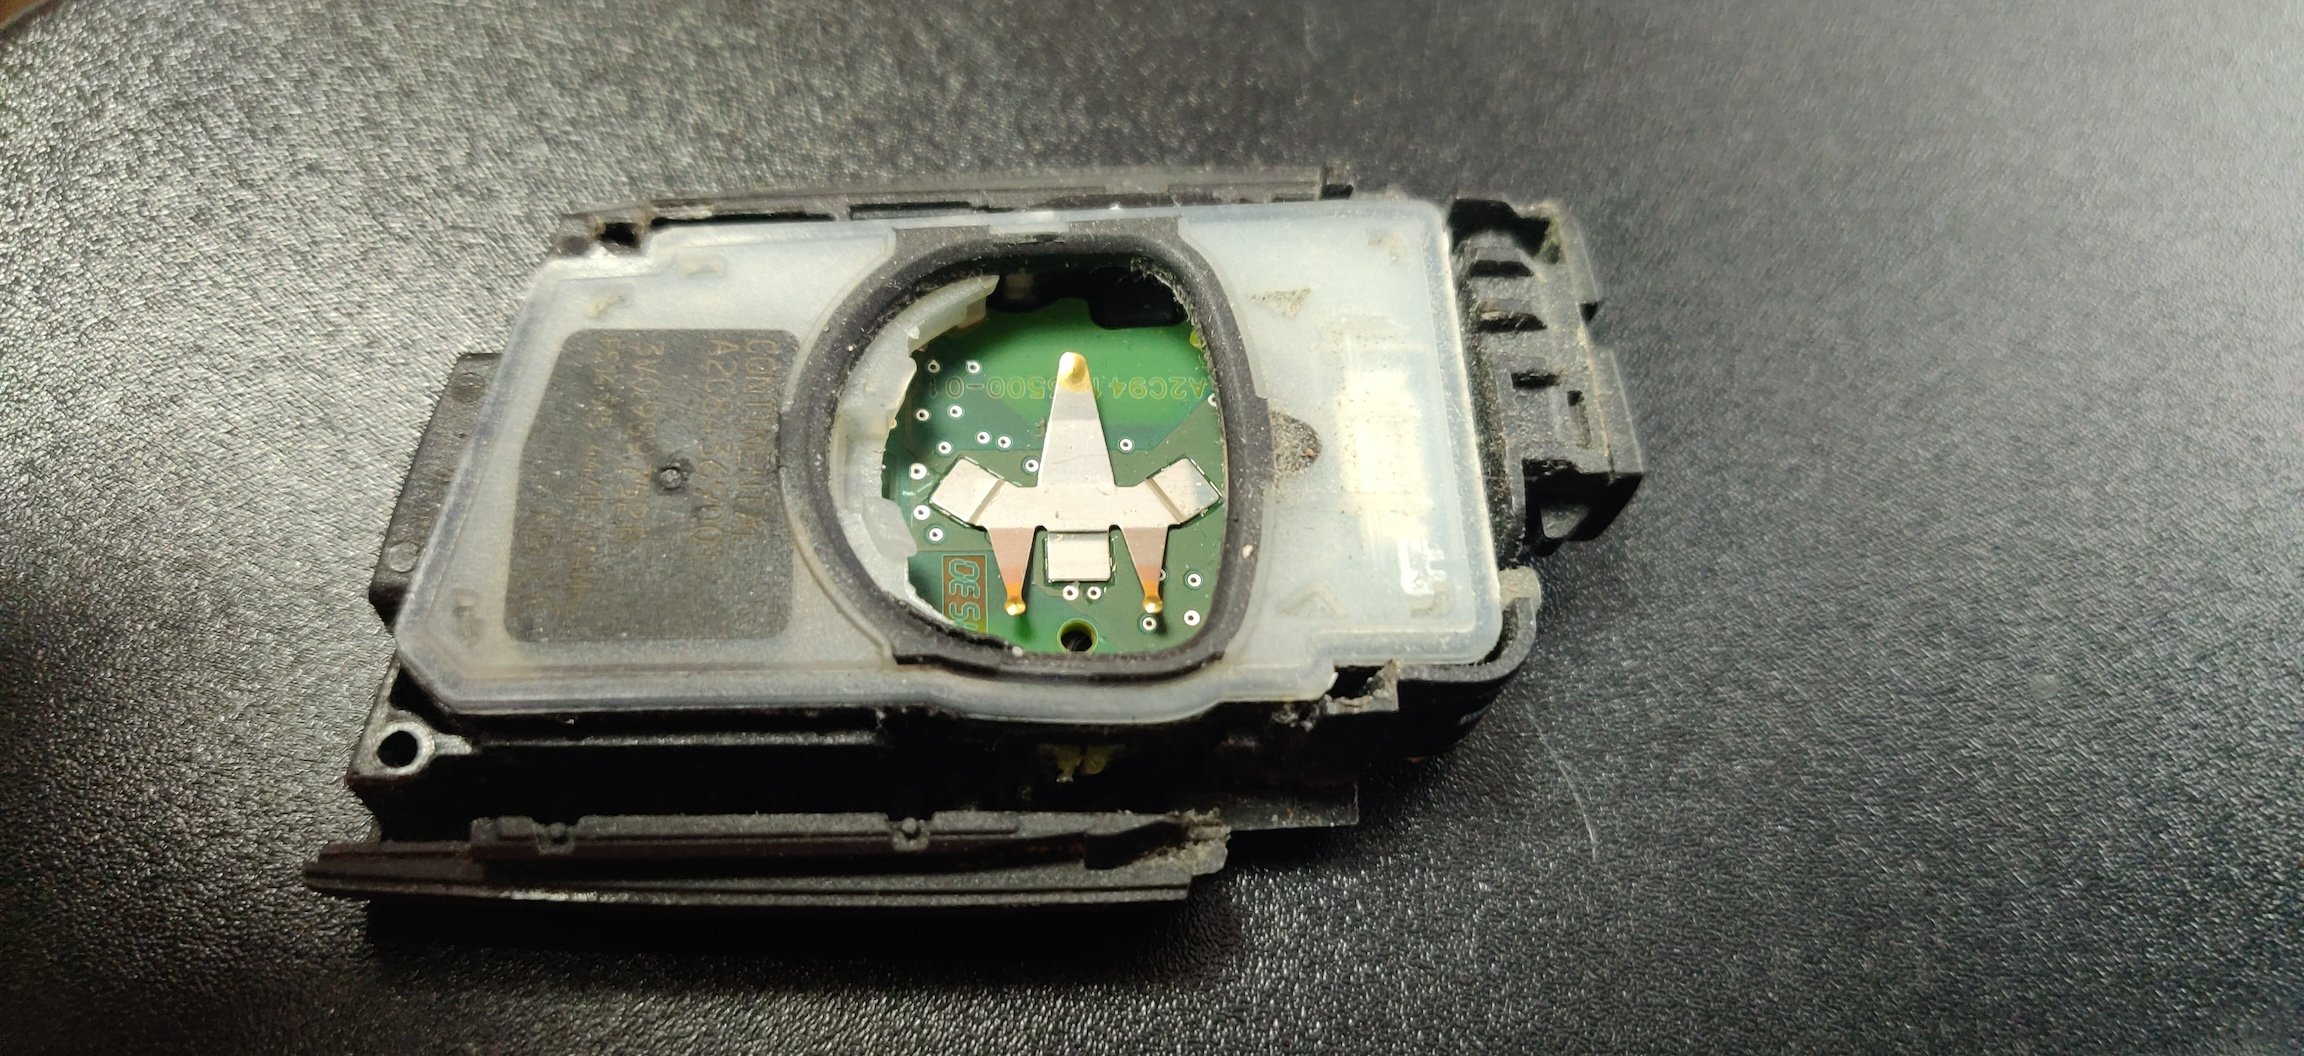
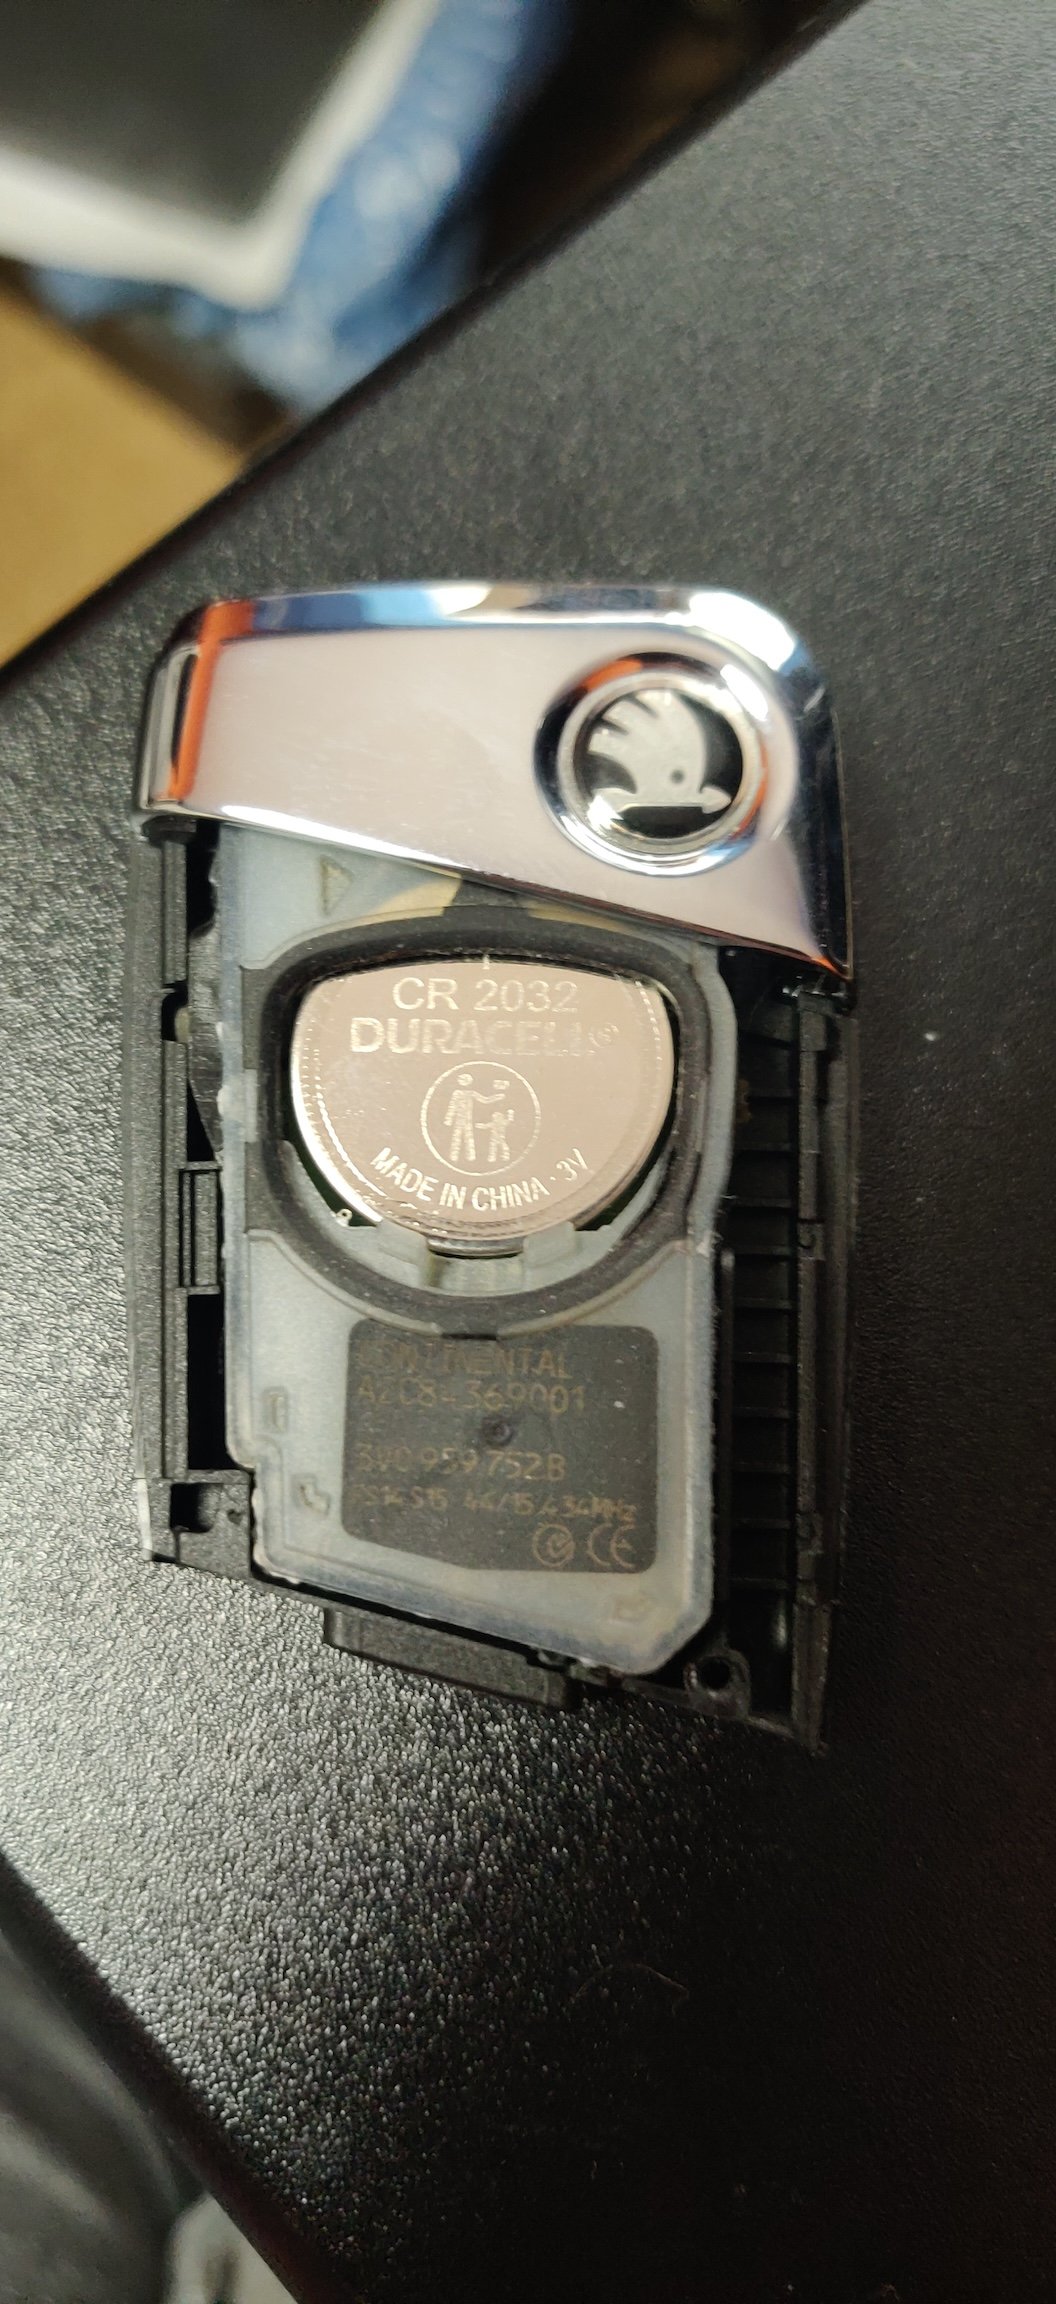
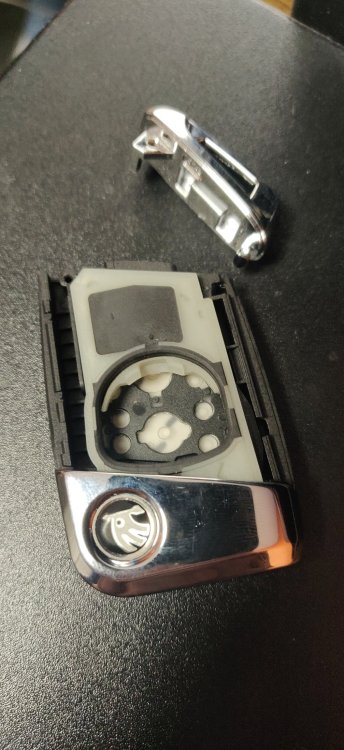
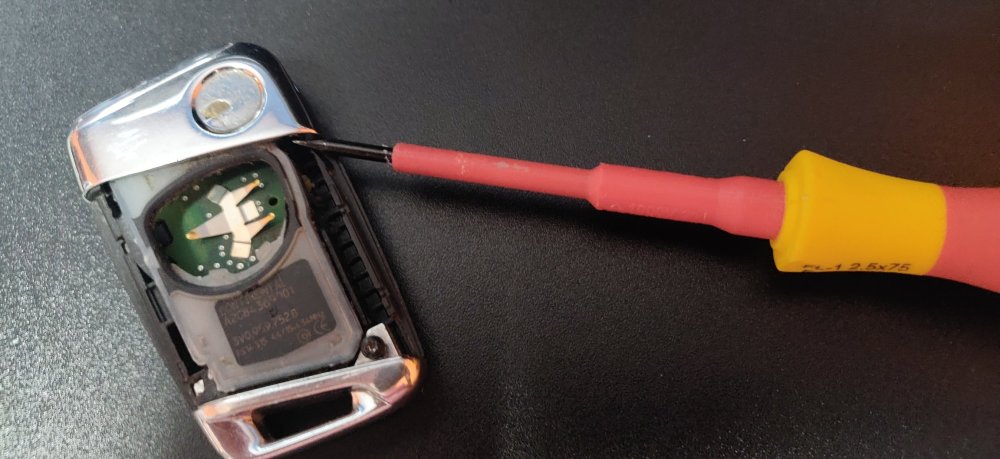
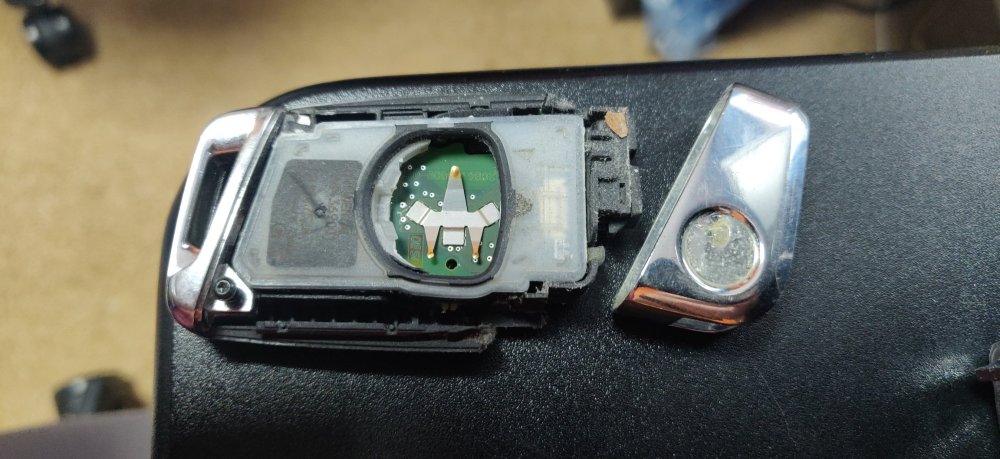
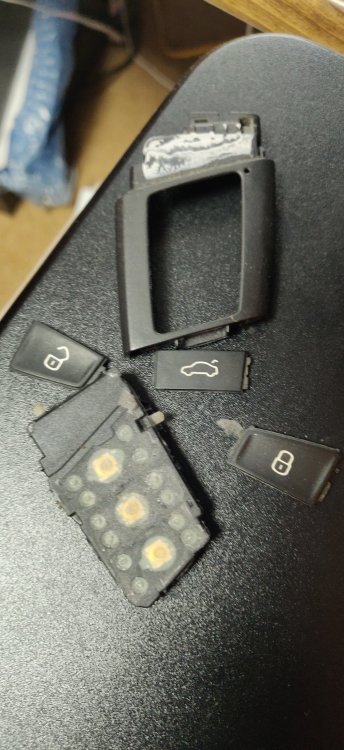
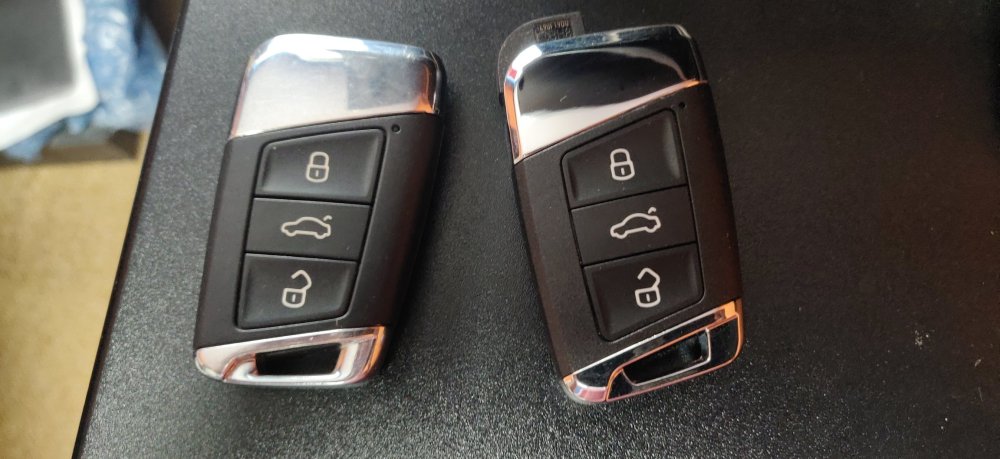
Something unimportant: Got a replacement shell from eBay for £7.99. Made the assumption it would be a case of transferring the brains over from the old to the new, but it wasn't as straightforward as I'd imagine. So most guides on the internet and Youtube etc. have steps for how to replace the battery, which is still perhaps a little more fiddly than one would expect. Standard advice appears to be to take out the emergency key blade bit, and put it back in but at an angle so you sort of wedge it side by side to loosen and free the rear cover: Then the battery is s standard CR2032 than can be flicked out with a flat screwdriver or fingers and slotted back in. This is pretty much where nothing else appears to exist that I'm aware of. So first thing that can be seen is a tiny screw in the bottom right corner, securing the bottom metal part of the fob. Unscrew that (aftermarket one is a small crosshead, and the OEM appears to be a tiny torx, I can't tell the size, one where if you have a micro spanner set for iPhone's etc. would probably has the appropriate size bit). Once you do that, it appears the bottom cover is slotted in at angle. What I did was use the emergency key and pushed it up along the groove it sits along which appeared to be enough to get it loose and free: The top cover is next. Took a while to figure it out, but with a flat head screwdriver here: Then a bit of force upwards, it'll eventually come free: There's a hook it seems on the opposite side: So the screwdriver lever attempts to lift it from the opposite side. This is made a bit more tougher because there's a sort of adhesive attached as well. Eagle eyed viewers will notice I've taken pictures from both of the fobs so they're both in different states of disassembly when I took pictures of the above. But you'll be presented with this: On the aftermarket one, the white plastic cover was able to be lifted. However I couldn't do the same with this one. After all sorts of attempts at levering (and cracking the original case as a consequence), it looks like the brains of the unit comes out as one whole piece: The keys are help in place by being sandwiched between the brains and the case, so the buttons all fell out. Did the same with the other case to remove its empty brain, as it were. Gave this a quick wipe and clean with some rubbing alcohol: Then it's pretty much a case of reverse of disassembly: I used my fingernails to remove the old Skoda sticker badge and it looks like there's enough adhesive left behind to keep it in place on the new one. Sod's law it'll fall out eventually, so I'll have to prepare to source a replacement. I also used a dab of superglue in the same place for the top cover, which is probably unwise long term, but I can't really tell what adhesive was used before, probably some PVA or contact adhesive maybe. Anyways, here's a picture of what is essentially the same as the first: Eagle eyed viewers should be able to spot the crack I introduced on the lower right of the old one. Bin fodder now. It looks like some more parts have arrived as well from Czechia (I think that's what they call themselves now), so I'll collate and take more pics this evening! Maintenance: £1344.91 (+£7.99) Upgrades: £337.06 Miscellaneous: £584.95


-
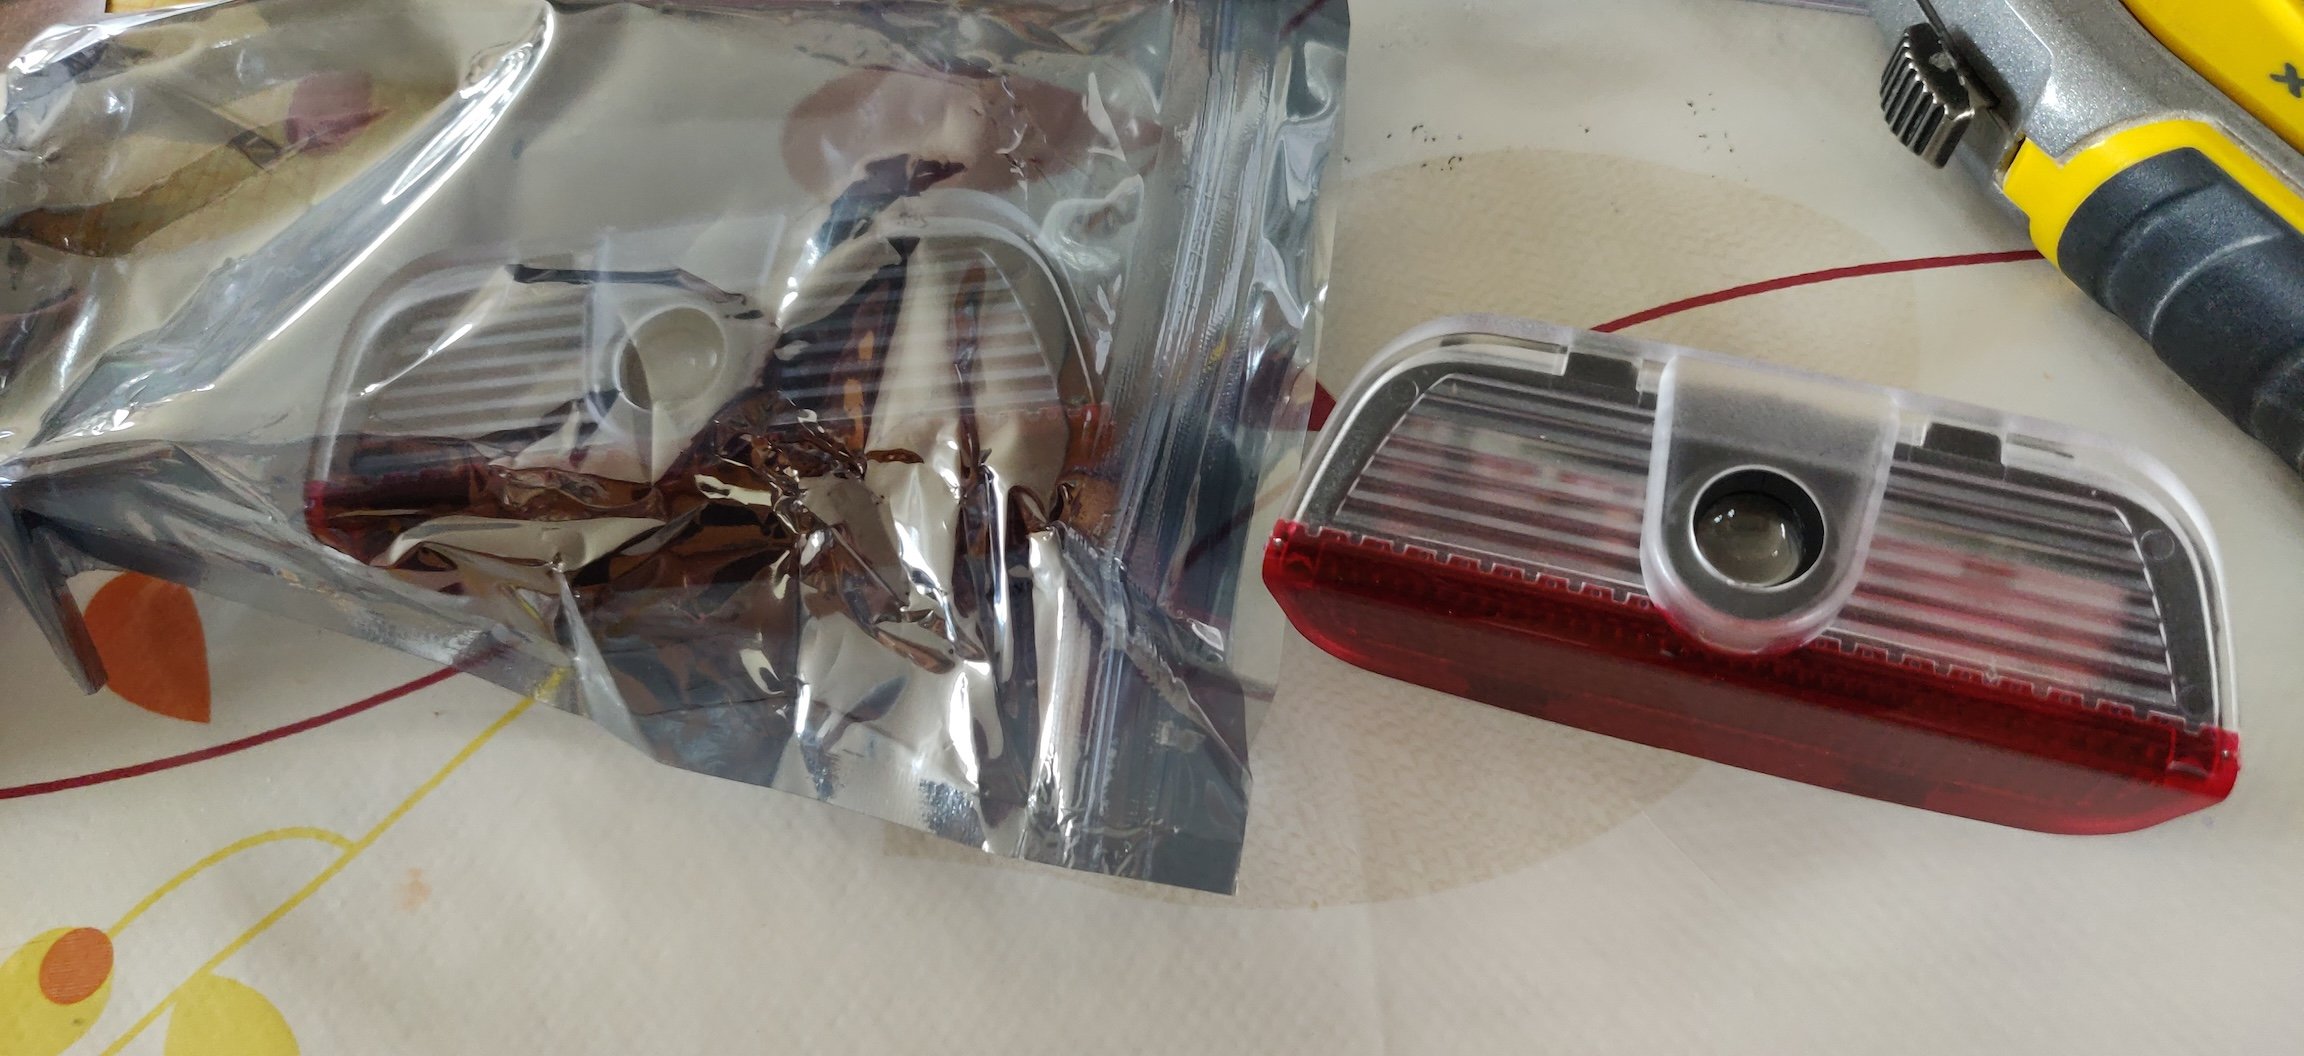
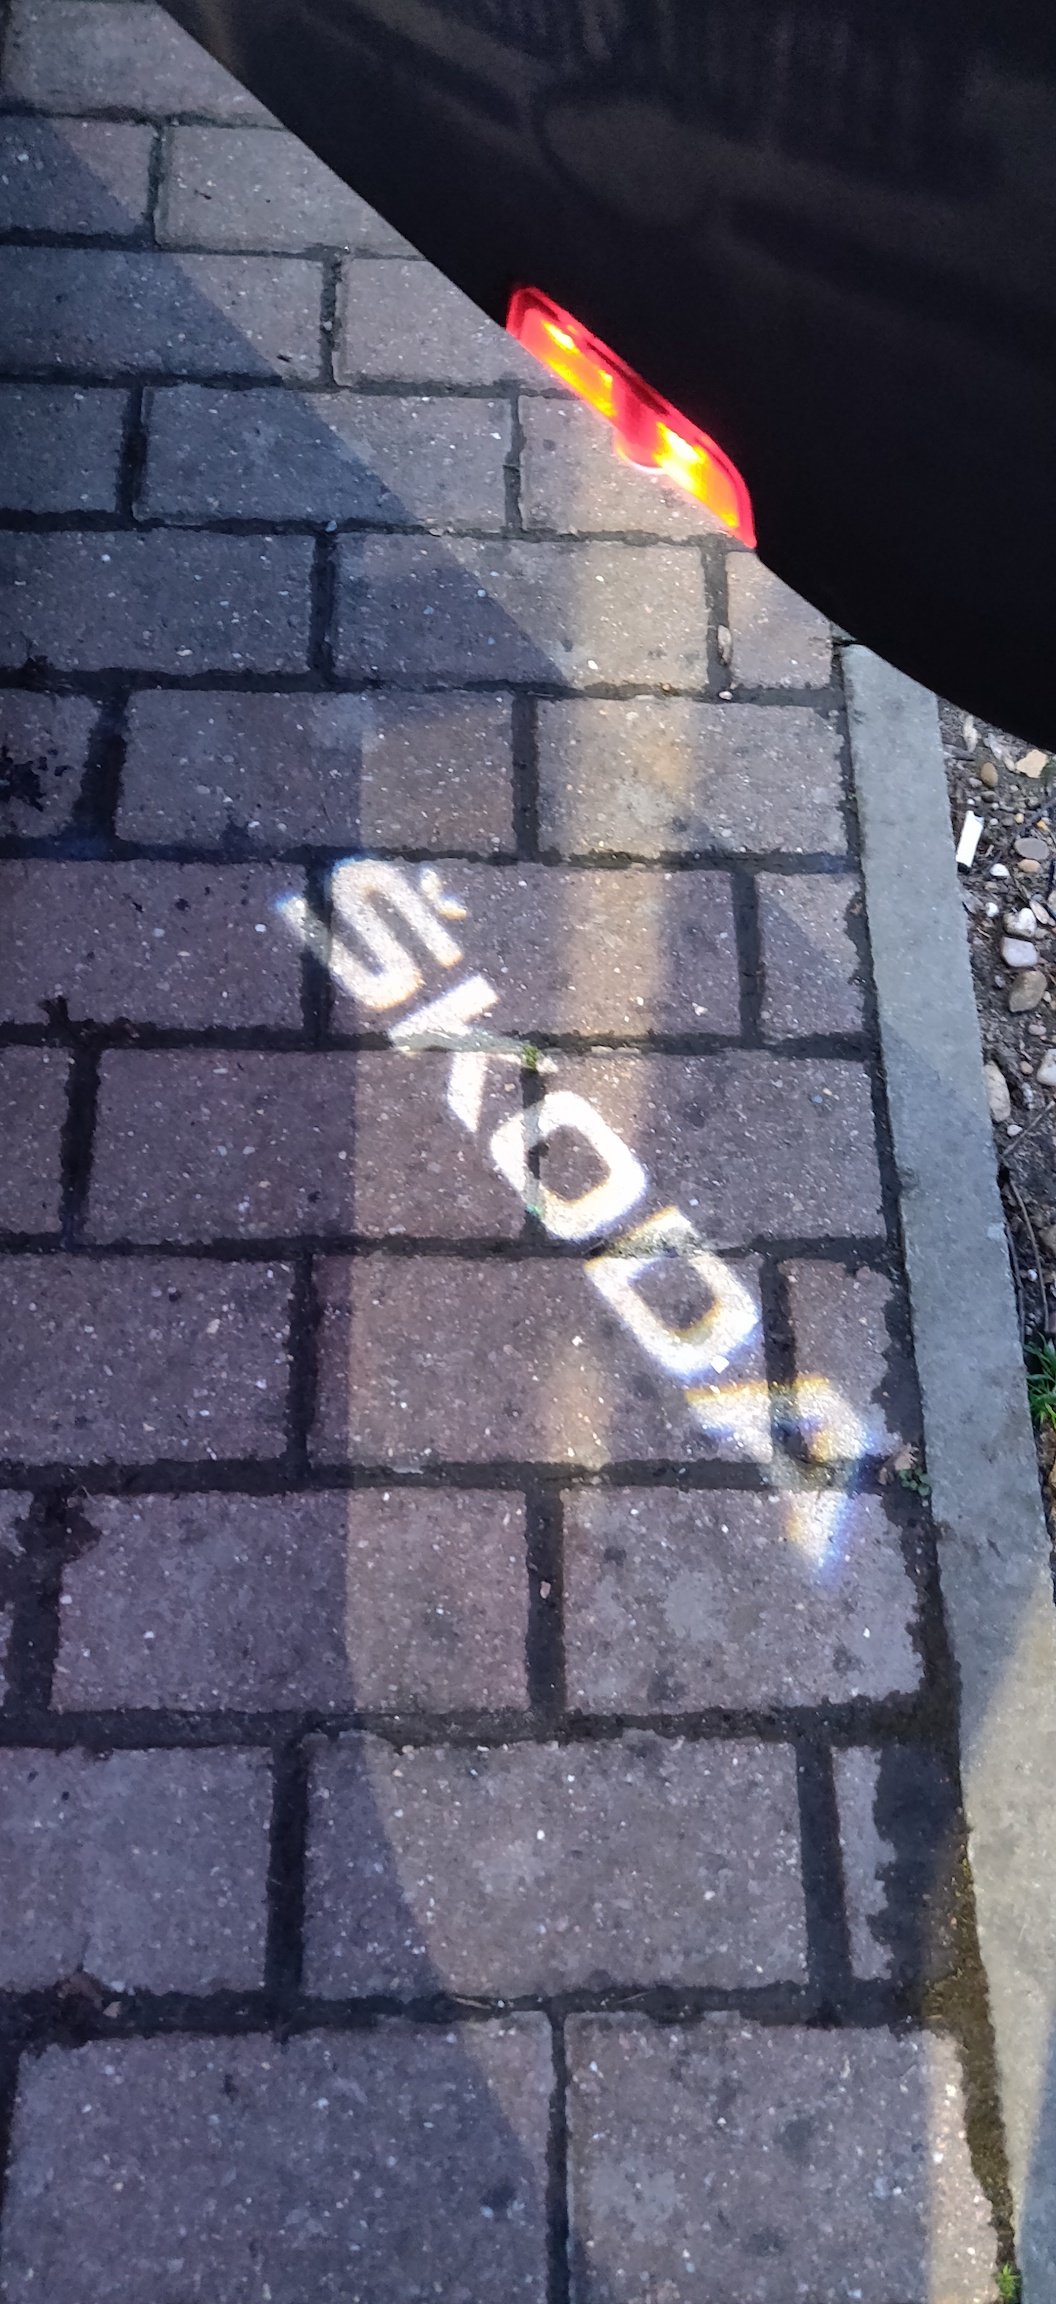
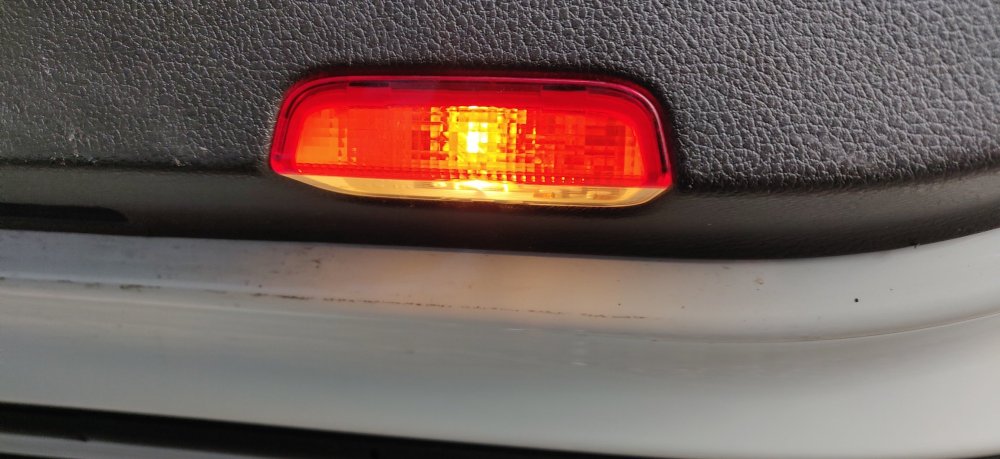
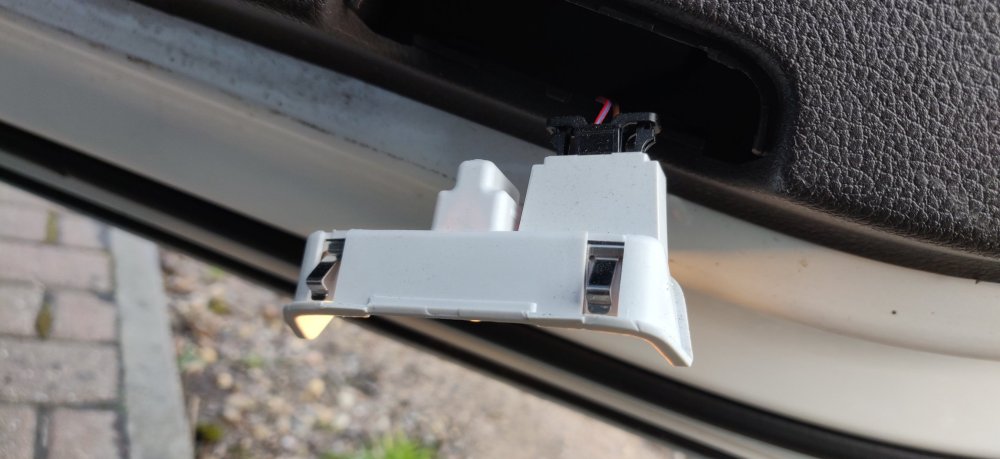
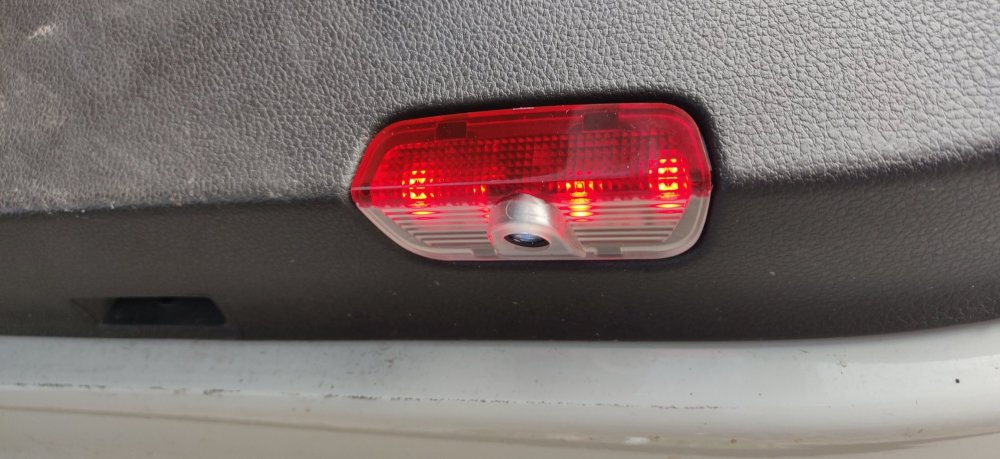
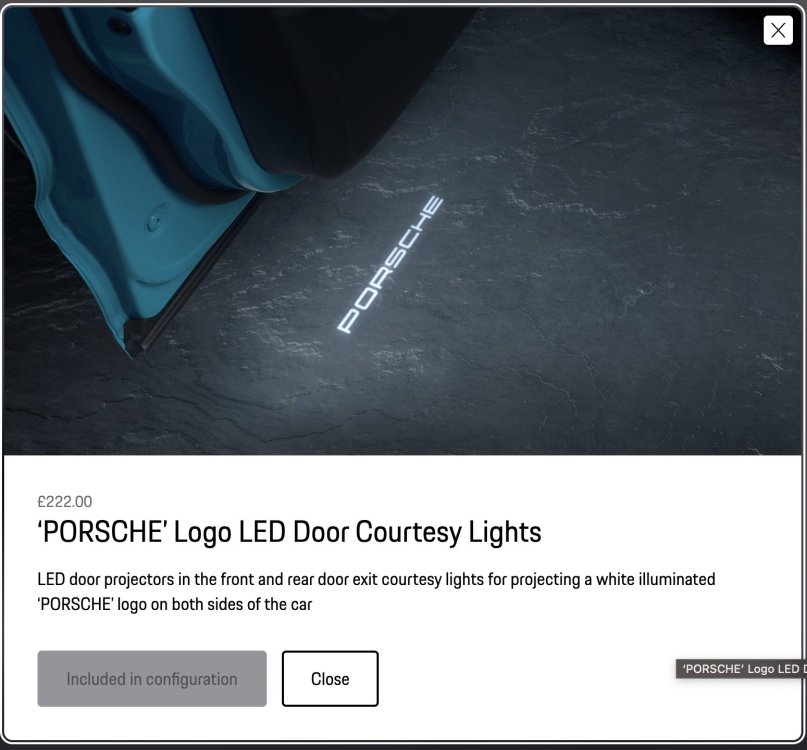
These also arrived today: Door projector lights. Now, normally I'm not one for chintzy faff like this, but I noticed the doors on the Superb have lit red reflectors that also act as puddle/courtesy lights. So decided to scour across the interwebs for the above. As feels appropriate for a Skoda, these were from Wish, https://www.wish.com/c/5fcba0ba47e062b89c859cba, two lots of these for 4 at £22.44, with a discount and postage resulting in £22.06. Pretty much go to the door: Then have at it with a trim removal tool: These original ones have metal clips to retain them, so need a bit of convincing. You'll notice the cover has slipped off, which was due to me trying this with my fingers first, hence the suggestion to use a tool. It clips on and off to allow for the bulb to be replaced so no harm done. Some silicone grease on the wiring connector, plug it in and clip it back into place: So these ones use a few LEDs for the red part of the light, and then the projector in the middle. I waited until dusk to check: Repeat for the other doors, probably 15 minutes all in really. Cheesy, sure. But this is a £222 option on a Porsche: Second mod done! Maintenance: £1336.92 Upgrades: £337.06 (+£22.06) Miscellaneous: £584.95


-
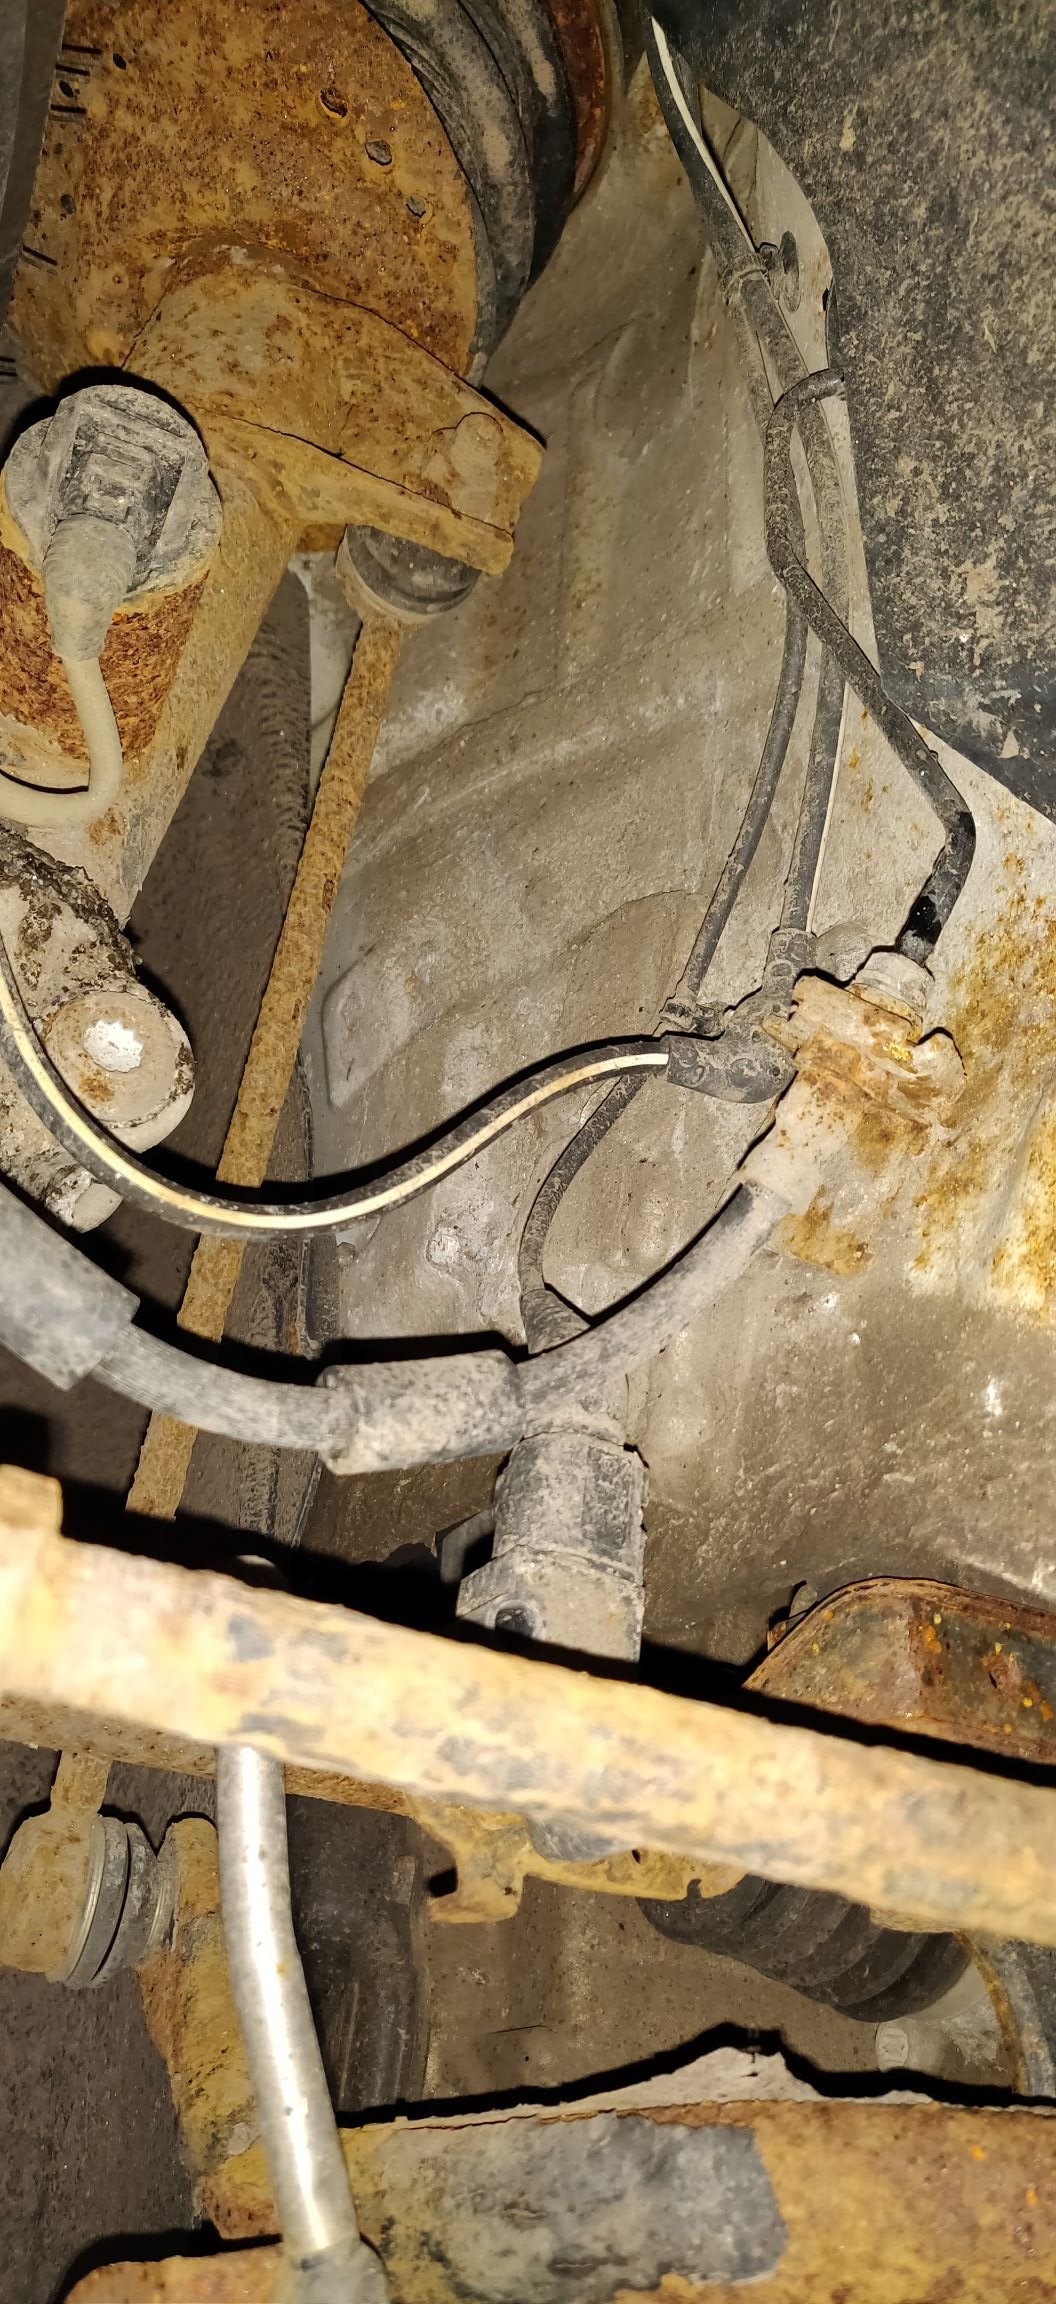
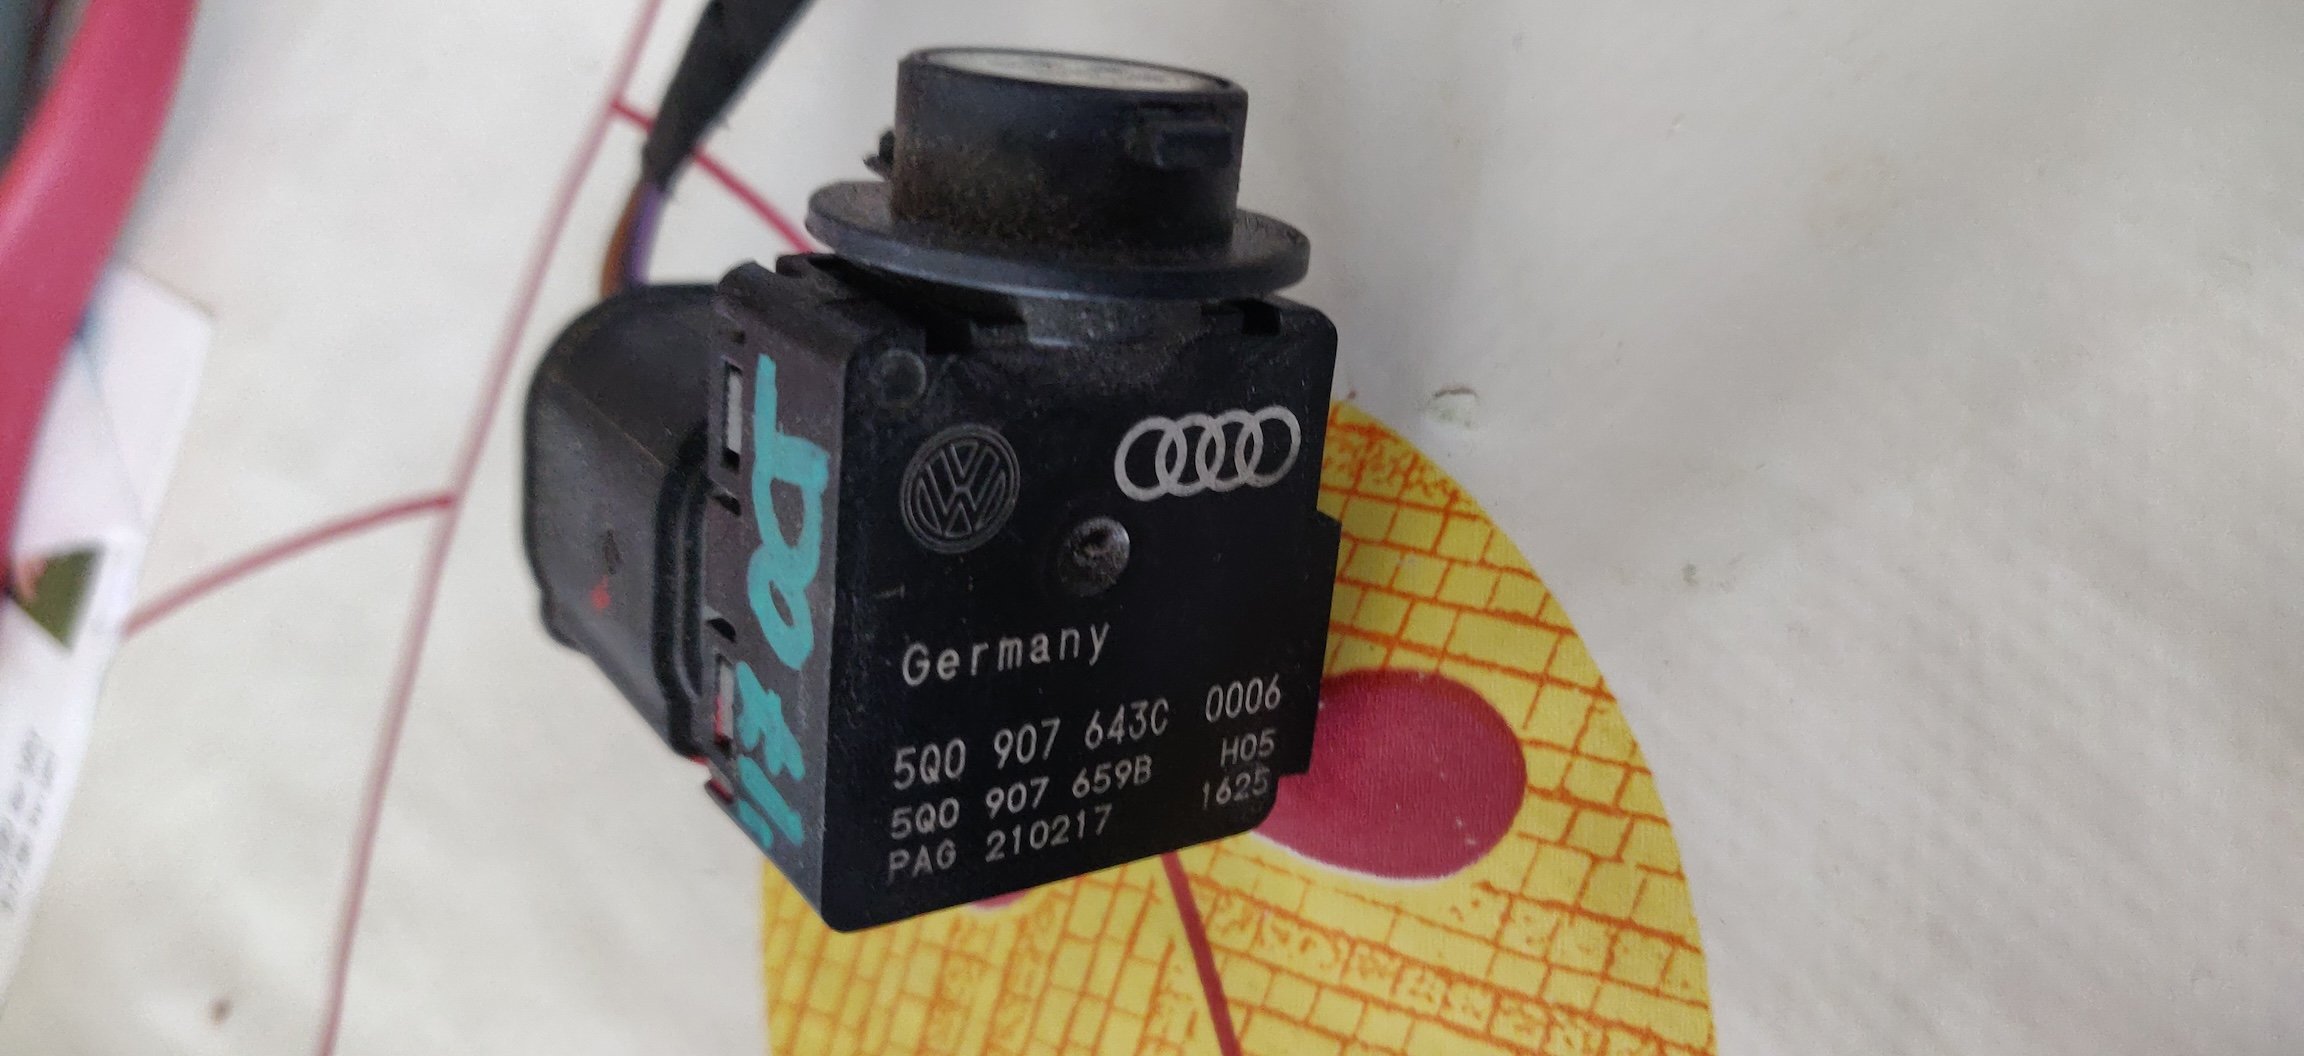
This also came in the mail: An air quality sensor. Whilst perusing VCDS, I noticed this, which remained after clearing out prevailing fault codes: Address 08: Auto HVAC (E87) Labels:| 3V0-907-044.clb Part No SW: 3V0 907 044 AJ HW: 3V0 907 044 AJ Component: AC Automat H32 3701 Revision: 20K05000 Serial number: 00000B00056520 Coding: 12110004000400011005104100101102 Shop #: WSC 73430 790 00063 ASAM Dataset: EV_ACClimaPrehVW37X 002012 ROD: EV_ACClimaPrehVW37X_002_VW37.rod VCID: FCAA18F7D669045AF3B-80A8 Rear air conditioning block 1: Subsystem 1 - Part No SW: 3V0 907 049 C HW: 3V0 907 049 C Component: E265KlimaHeck H02 0101 Serial number: 00000000000000000000 Coding: 000000 1 Fault Found: 263425 - Air Quality Sensor B10AF 04 [00001001] - Internal System Fault Confirmed - Tested Since Memory Clear Freeze Frame: Fault Priority: 3 Fault Frequency: 6 Reset counter: 254 Mileage: 164940 km Date: 2024.03.01 Time: 16:27:21 Outside temperature: 5.0 ∞C Voltage terminal 30: 11.9 V System run time-Engine running time: 0 s System run time-Terminal 15 on: 253 s Air quality status: Malfunction System run time-Engine running time: 0 s System run time-Terminal 15 on: 253 s Normally it's not good practice to just lob things at stuff because the computer tells me to, but I decided to do so anyway because: This particular second hand sensor was £15 from eBay The location is under the cowl, and when I'm changing over the suspension (and possibly investigating the windscreen washer woes I'm having), I'll probably need to remove the cowl/plenum cover. The workshop manual calls it the plenum cover so I'll probably stick with that. There's a plethora of cheap versions of this sensor, so it's one those where one could replace it 3 or 4 times before perhaps determining that a genuine replacement might have been better value. This is all assuming just replacing it will make the error go away of course. Hopefully this pops in when I sort out the front suspension. Maintenance: £1336.92 (+£15.00) Upgrades: £315.00 Miscellaneous: £584.95

-
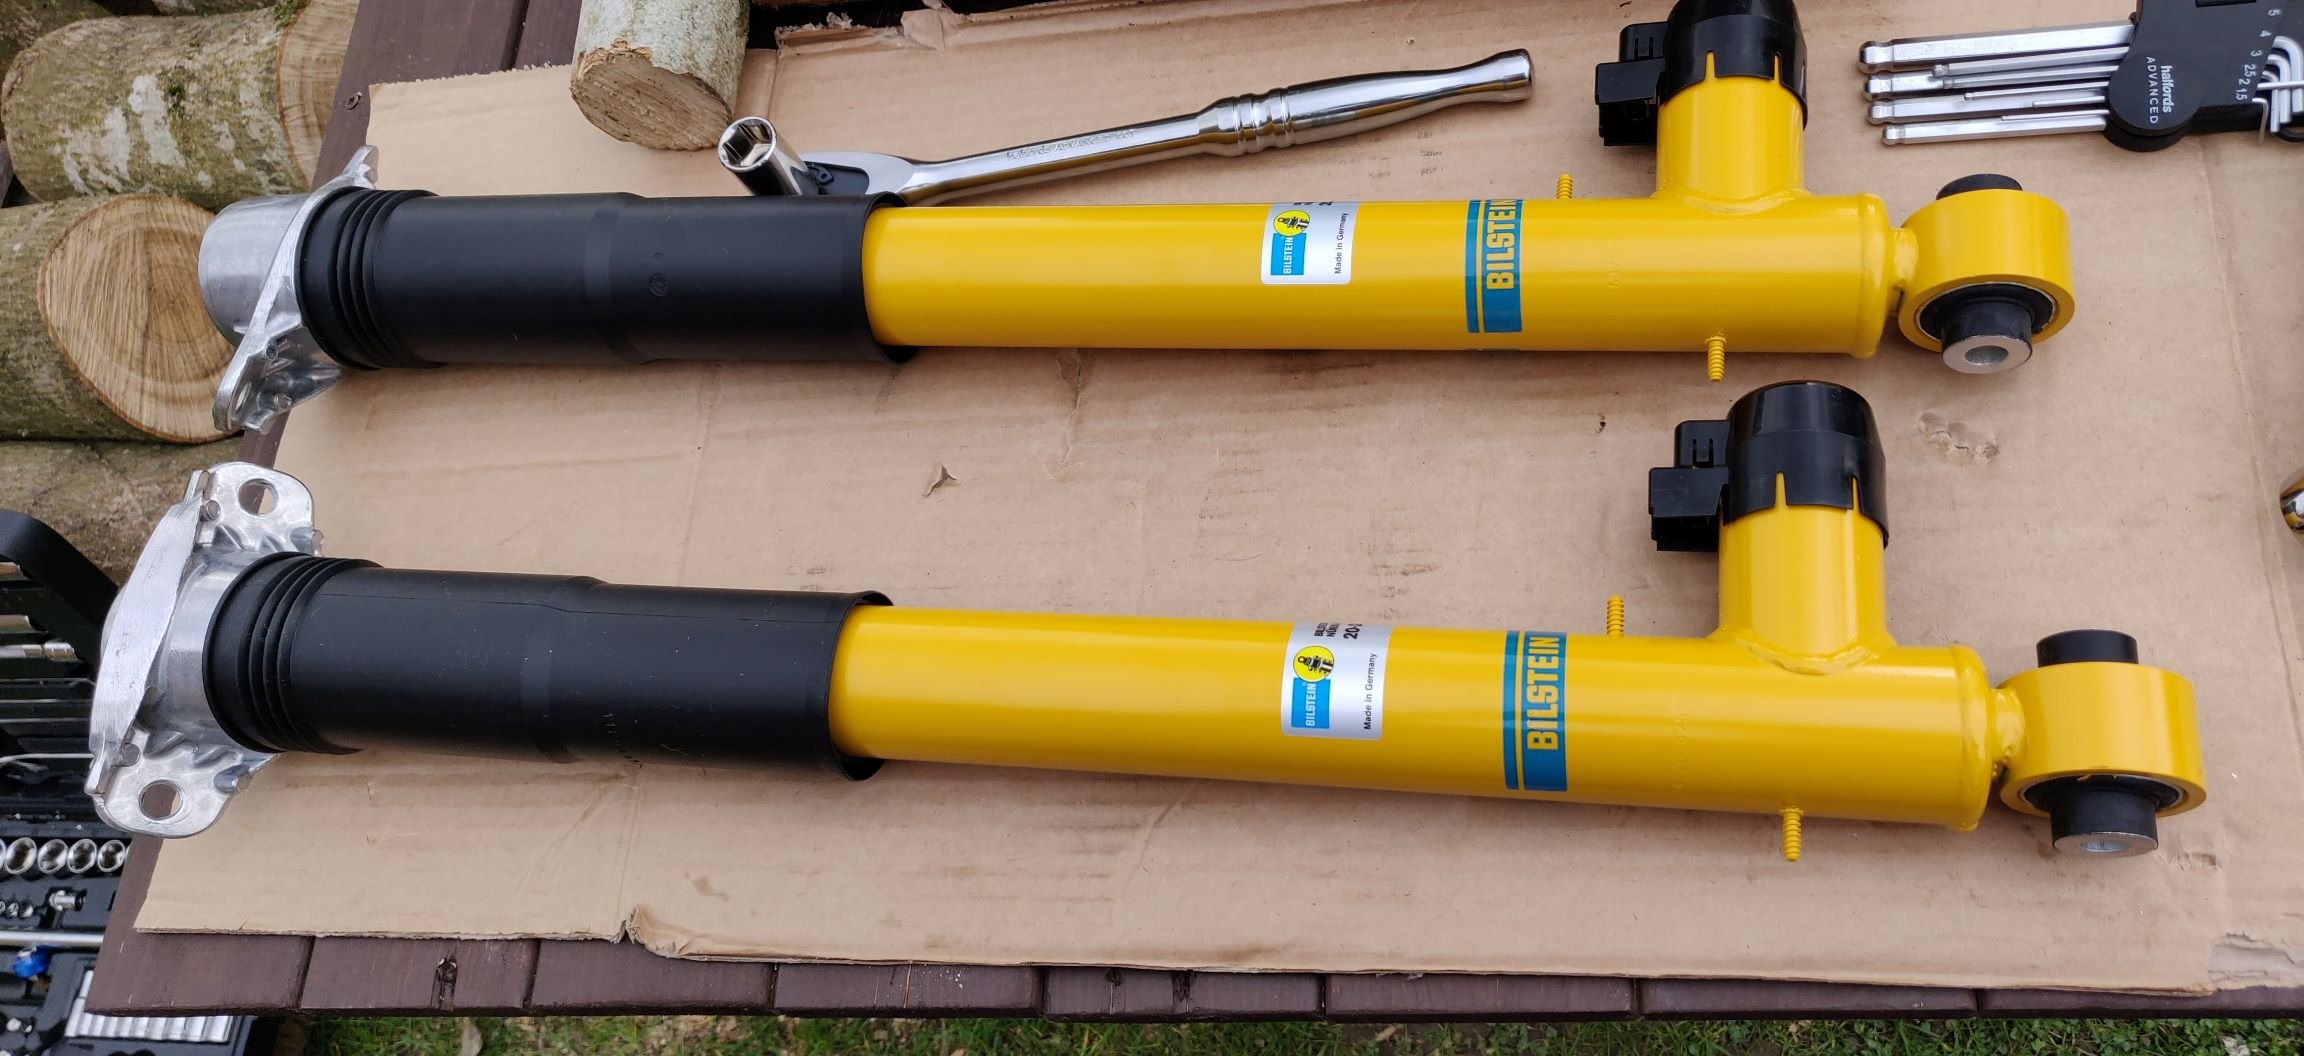
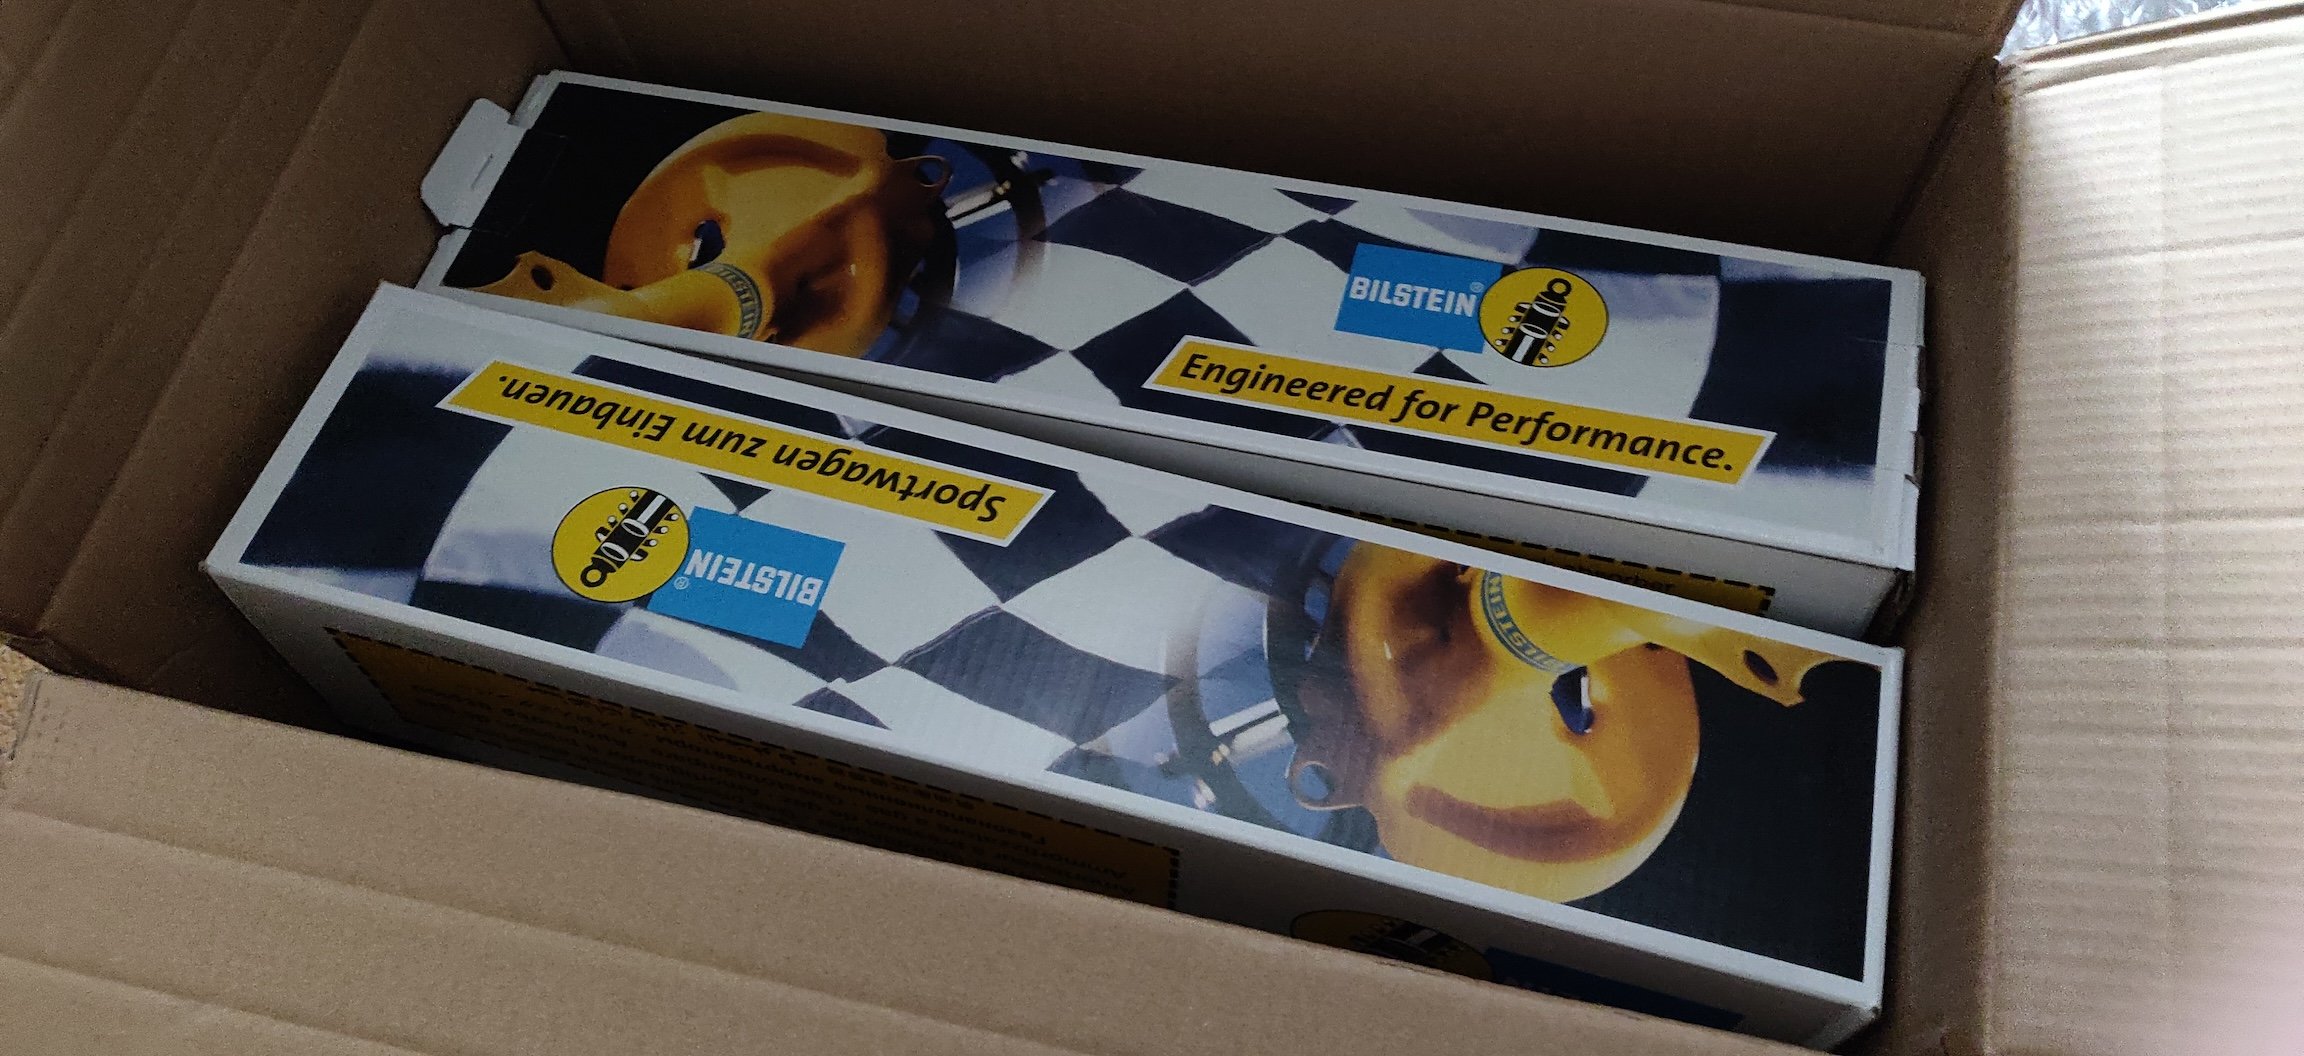
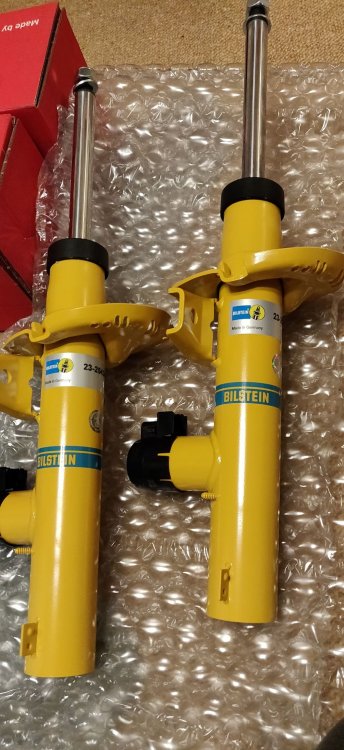
Another arrival today: From Autodoc, the rear Bilstein B6 Damptronics: So part number 20-267537 which I hope is the right ones. These came to £481.54 after a 5% discount code as well. Compared to a pair from say https://www.bilstein-shocks.co.uk/products/20-267537 coming to £627.90 it felt like too good an opportunity to skip, as it makes £481.54 + £474.95 (i.e. fronts cheaper than rears) come to £956.49, which is a bit dear I suppose but for a set of Bilsteins is probably par for the course these days. If we compare say the OEM ones for my Elise https://www.eliseparts.com/shop/genuine-br-lotus-parts-1/s2-k-bilstein-damper-spring-set/ at £1149.54 (although those do include springs), then it's less bad. Hopefully these last a little longer than the OEMs. So there's definitely nothing stopping the rear suspension components being built up ready for the install. The weekend is looking to be a bit drizzly though, so I suspect my plan is going to be to remove the front seats to give the interior carpet a proper going over, and to give the seat runners a clean out at a better angle. If anyone knows the rough weights of the seats, I'd appreciate the heads up, I don't wanna find myself overpowered by some brown seats outside my house for onlookers to point and laugh at! Maintenance: £1321.92 (+£481.54) Upgrades: £315.00 Miscellaneous: £584.95


-
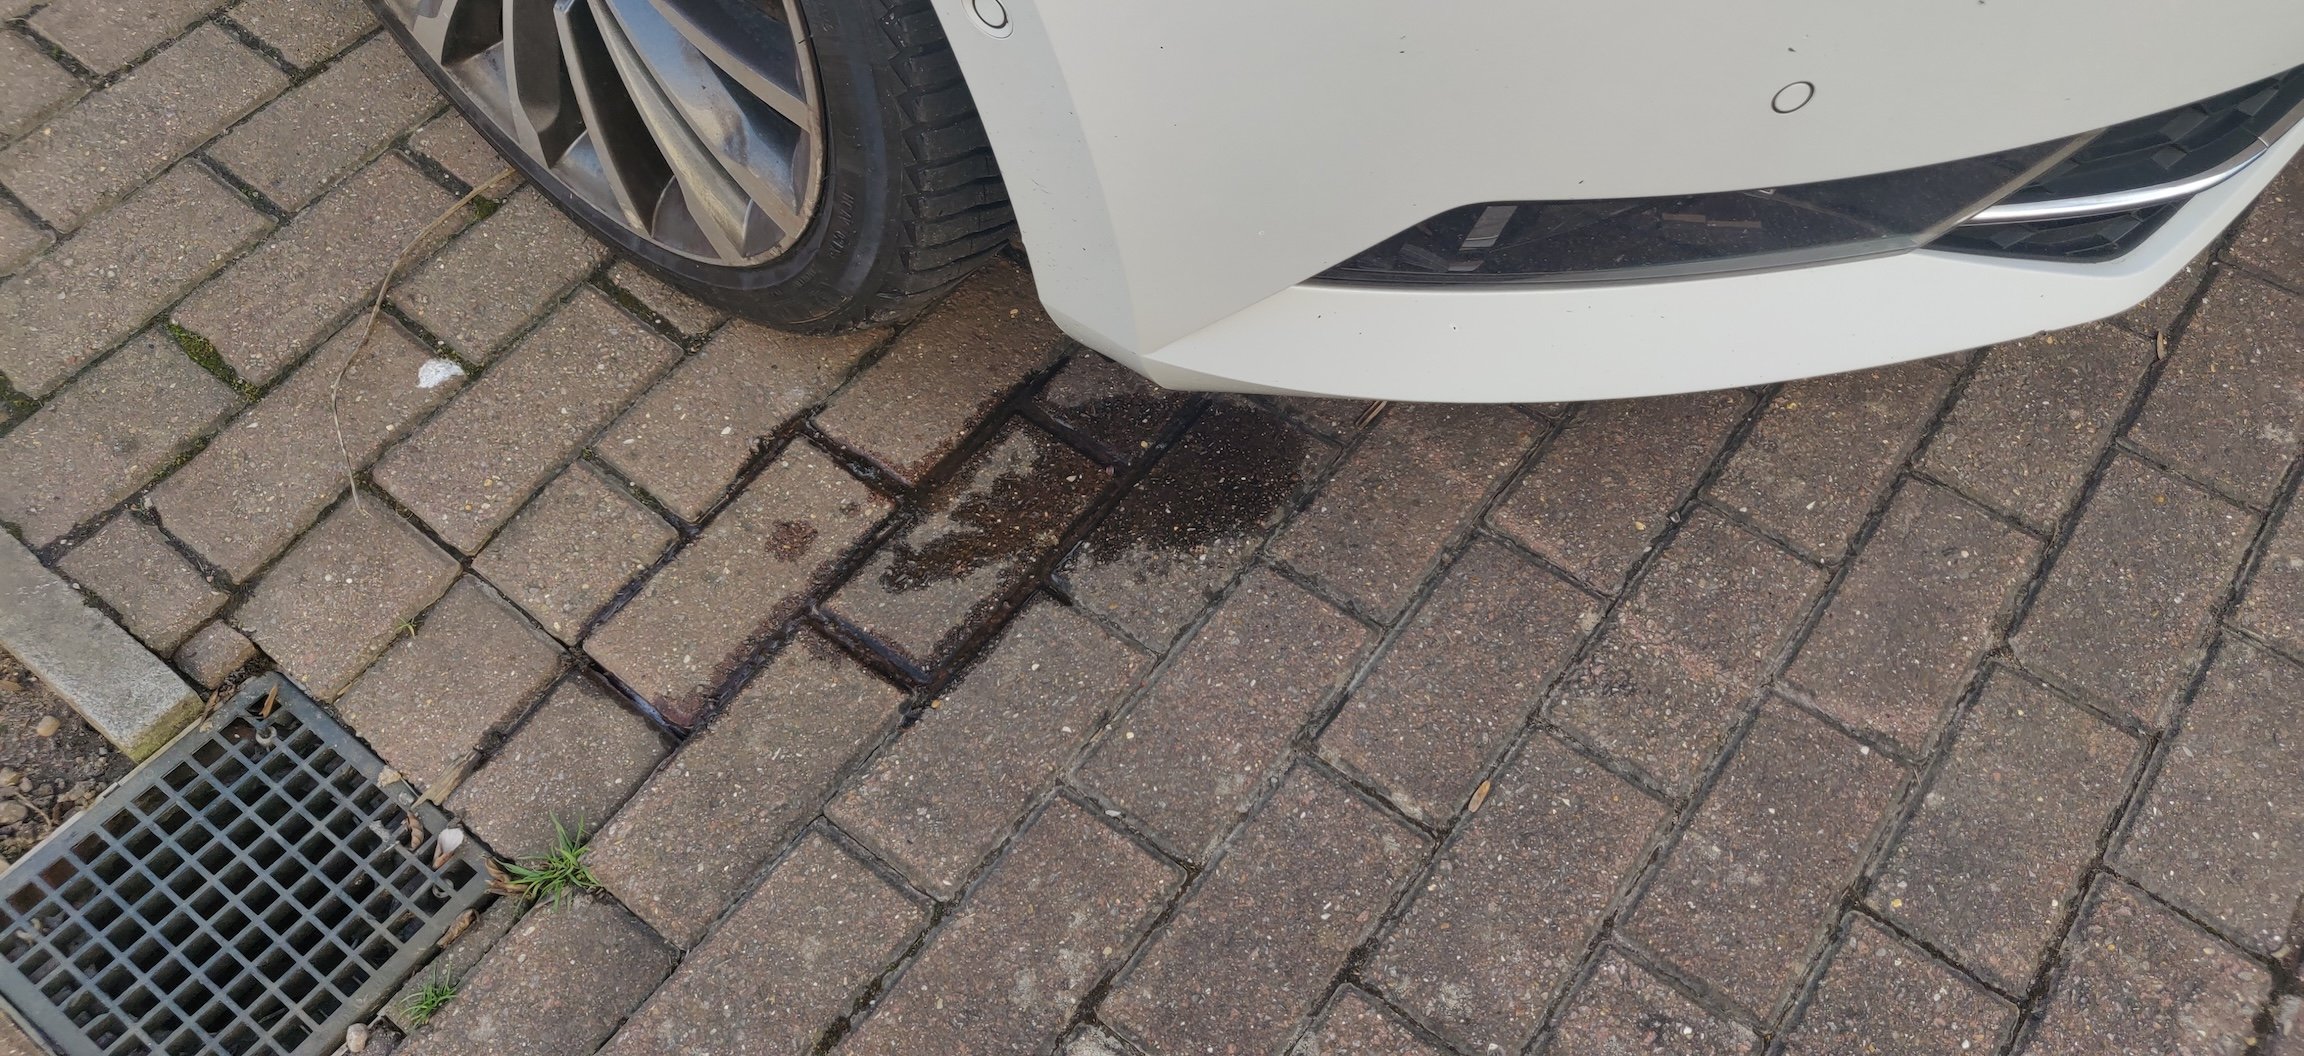
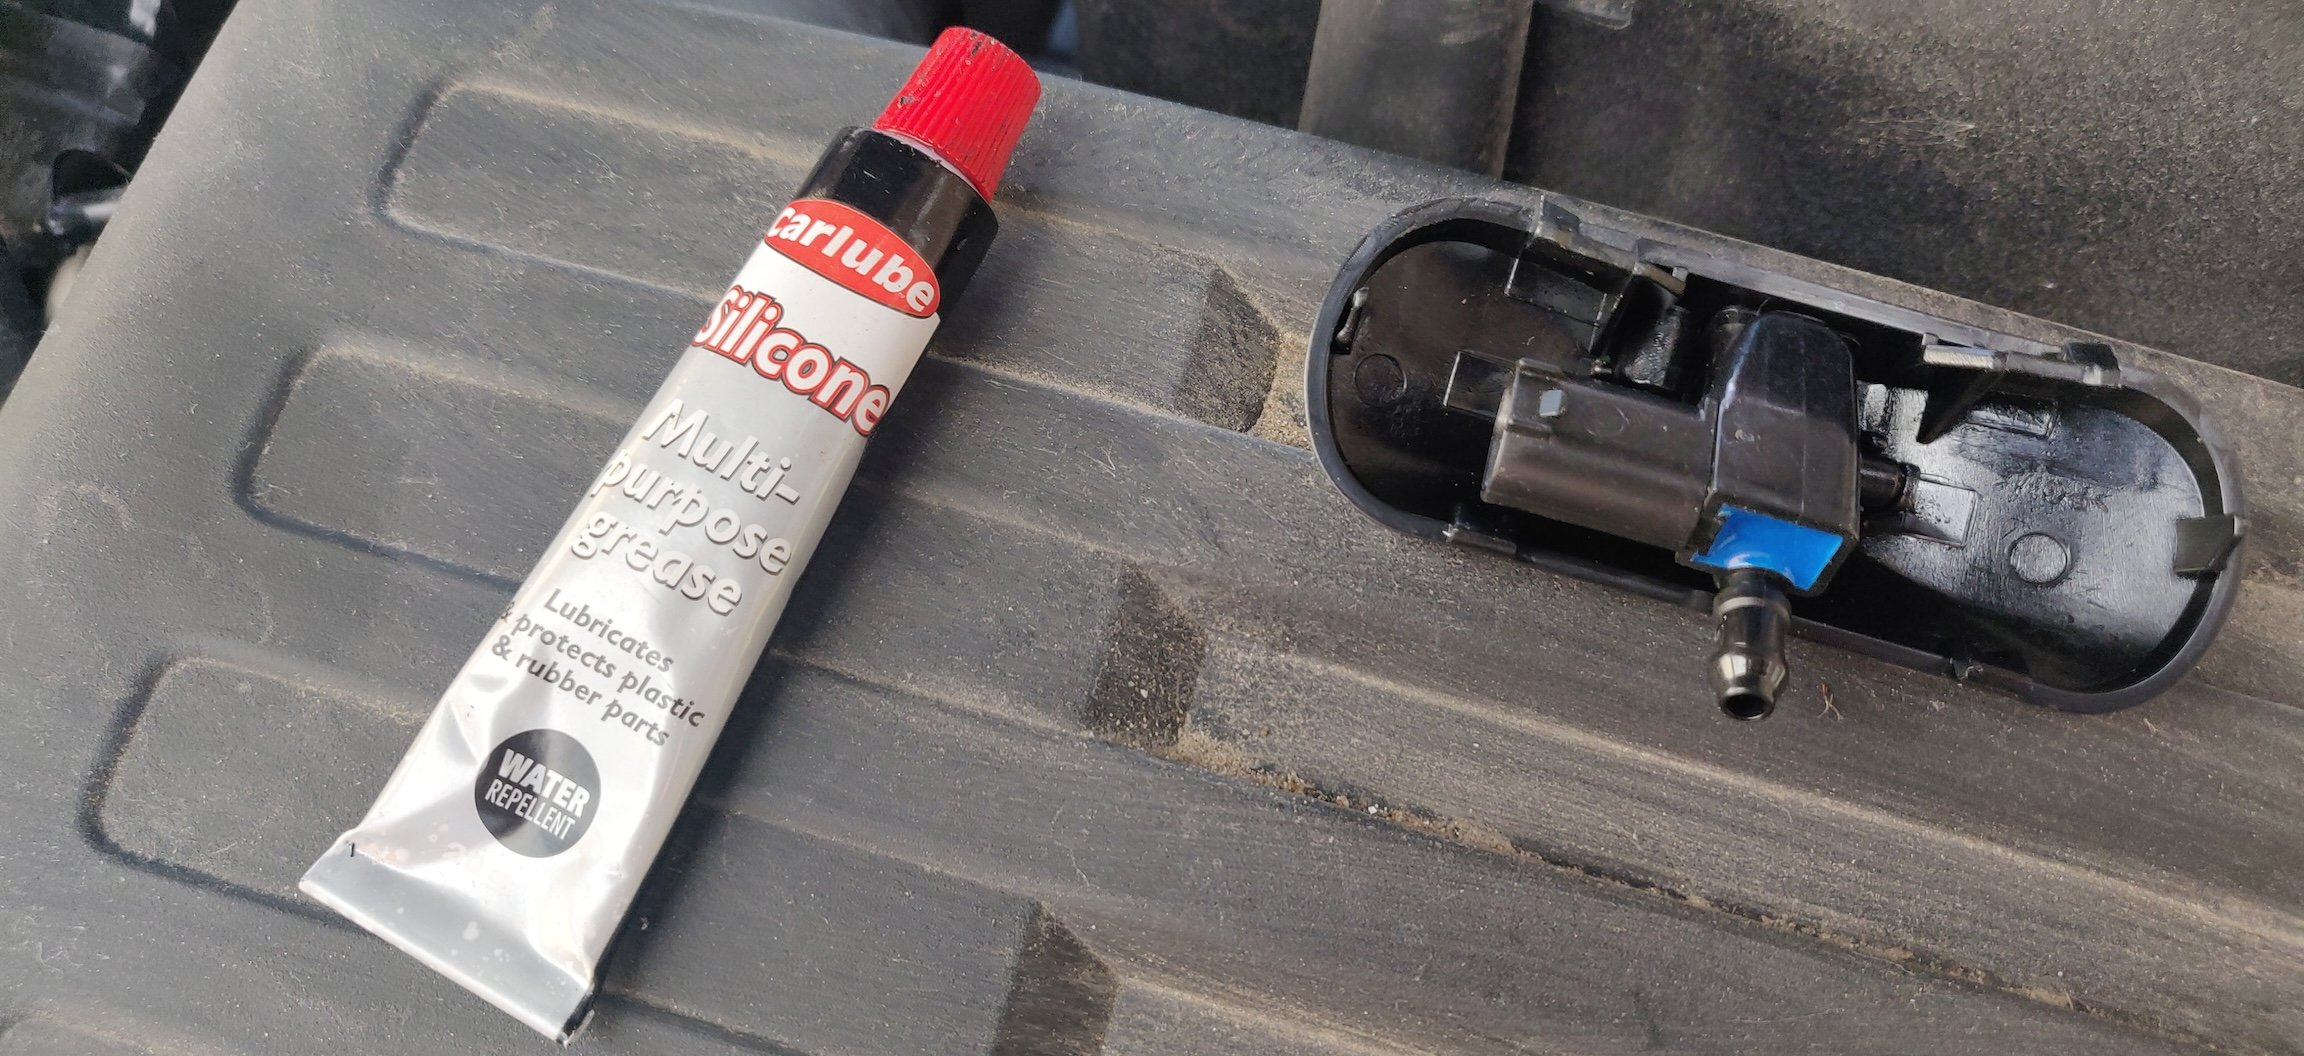
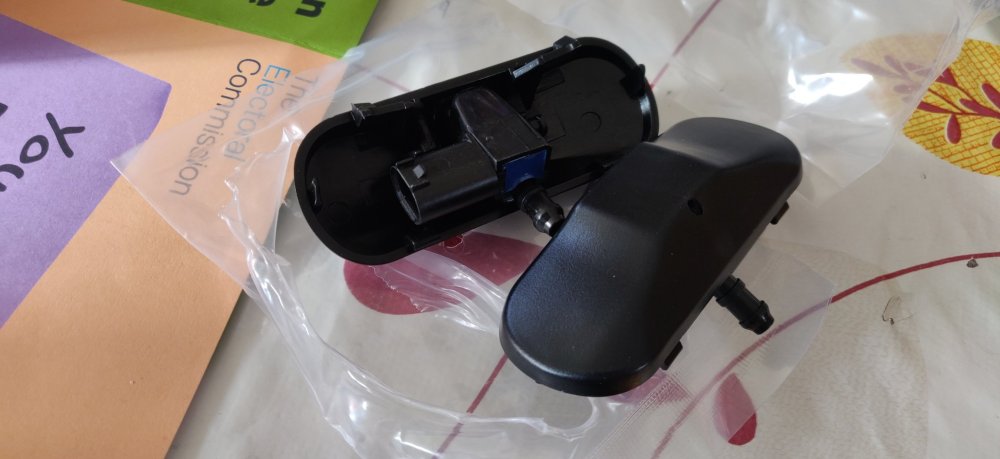
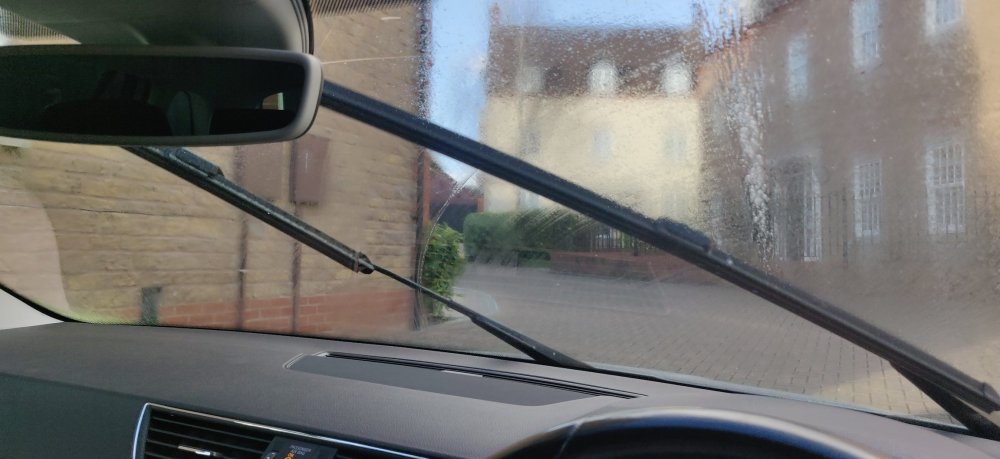
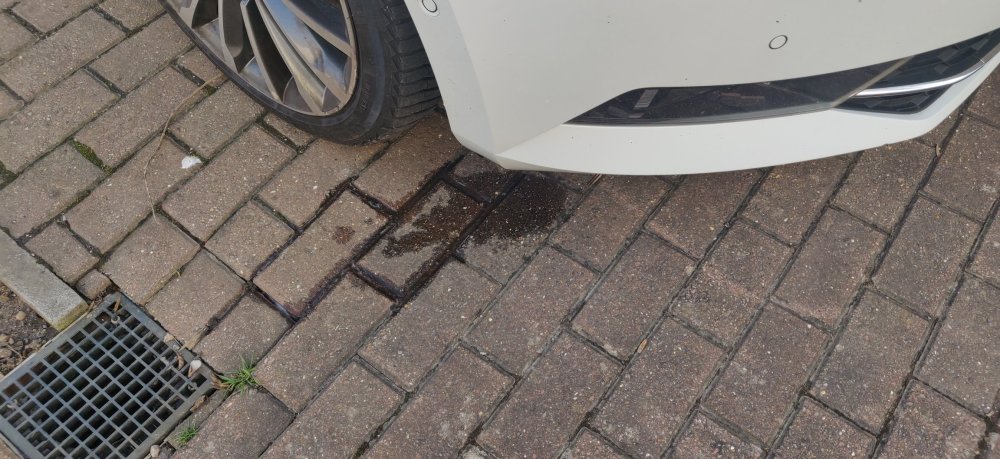
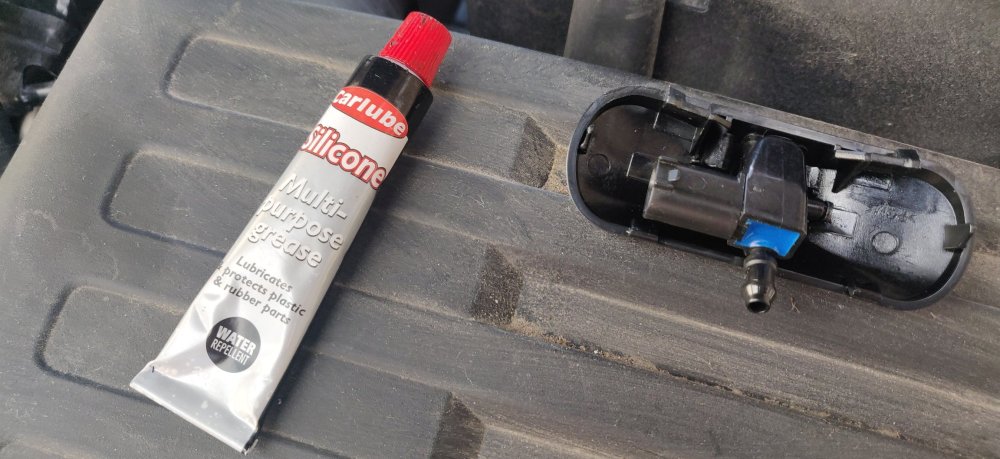
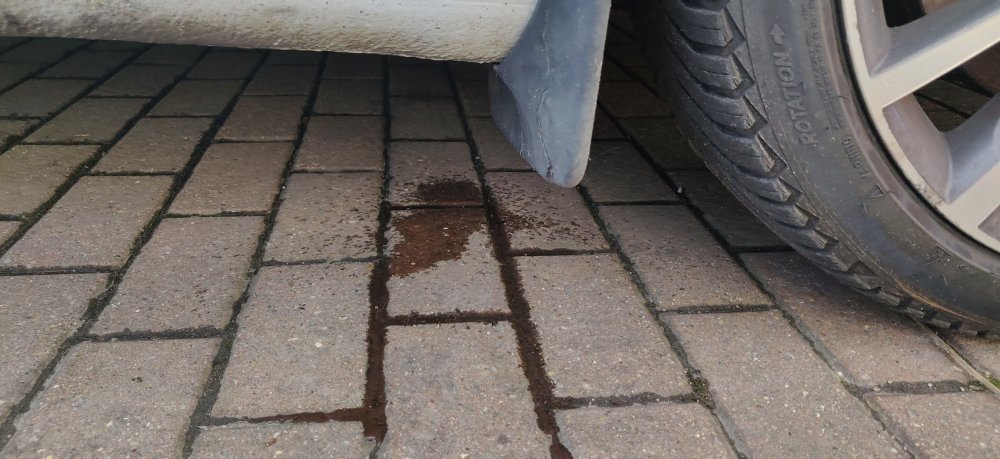
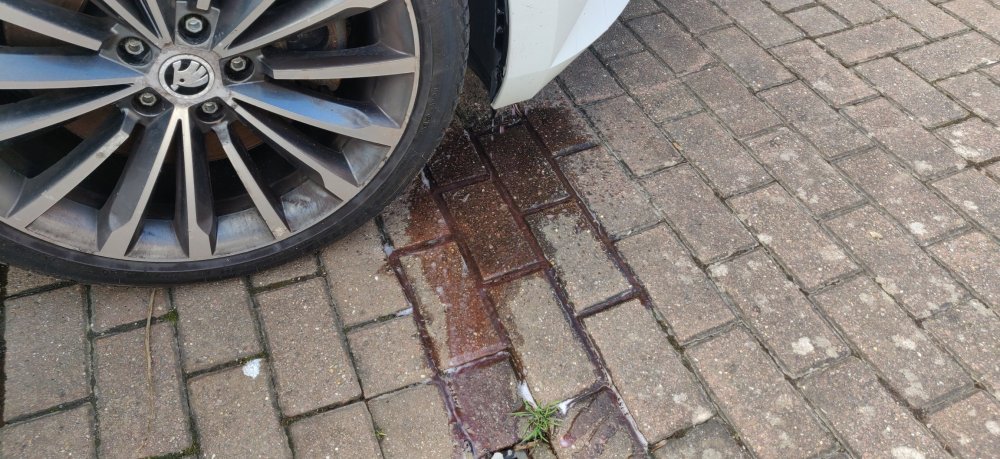
These arrived just a few hours ago: Replacement washer jets. Cheap ones from eBay at £13.55 for the pair. Even though I specifically looked for an ad with the location being in the UK, I ordered these on 25 February, so it's taken longer than the Autodoc stuff to arrive, so I reckon they came via China. Regardless, here's an attempt at showing the state of play: So just the driver side (just imagine it as I didn't think there was value in caring about this photo). So I head to the bonnet and start noticing: A sign of things to come I'm sure... The washer replacement itself is pretty bog standard I feel. Find the old ones: Then I just placed my fingernails along the front edge and pulled downwards: A bit more wiggling then brings them free. They're connected with a washer hose connector and an electrical plug, so loosen the locking ring of the hose connector and it'll come free and the socket via the tab. I then got some silicone grease and slathered it on the eletrical plug before attaching it to the new washers, force of habit from my days sorting out 205 GTI wiring: As they're not genuine ones, the plug needed some convincing to get in, but they did (who knows if it actually is). Then click the hose into the place and slide it back into the bonnet, again, with some resistance presumably because not genuine: As I head back to the car I notice a new puddle: So one fore and one aft of the front wheel, I hadn't changed the driver side one yet, so when I looked up: Bit of a dribble. I shrugged my shoulders and changed this one, and gave it a test: There we are, a sorta fan spray, but more importantly on both sides. So that's technically 50% of the MoT requirements complete. Whilst there, I stepped out of the car and pulled the rear washer, and noticed: So yeah, I'll raise my fist in the air and shout expletives at whoever was around the headlight area and subsequently messed up the washer hose setup around there and presumably then routes to the rear of the car and rear washer. Sadly also, the driver side is still dripping: Is this a TADTS situation? Maybe I haven't attached the hose solidly enough into the washer so it isn't maintaining head pressure? I'll have to have another look. So sorta done, but I've probably revealed some potential fun underneath. I'm hoping if I'm lucky, I can get away with doing whatever is needed by removing the wheel liner. If I'm not, then I may need to resort to removing the driver side wing, which probably automatically entails removing the front bumper. Fun times ahead. Maintenance: £840.38 (+£13.55) Upgrades: £315.00 Miscellaneous: £584.95


-
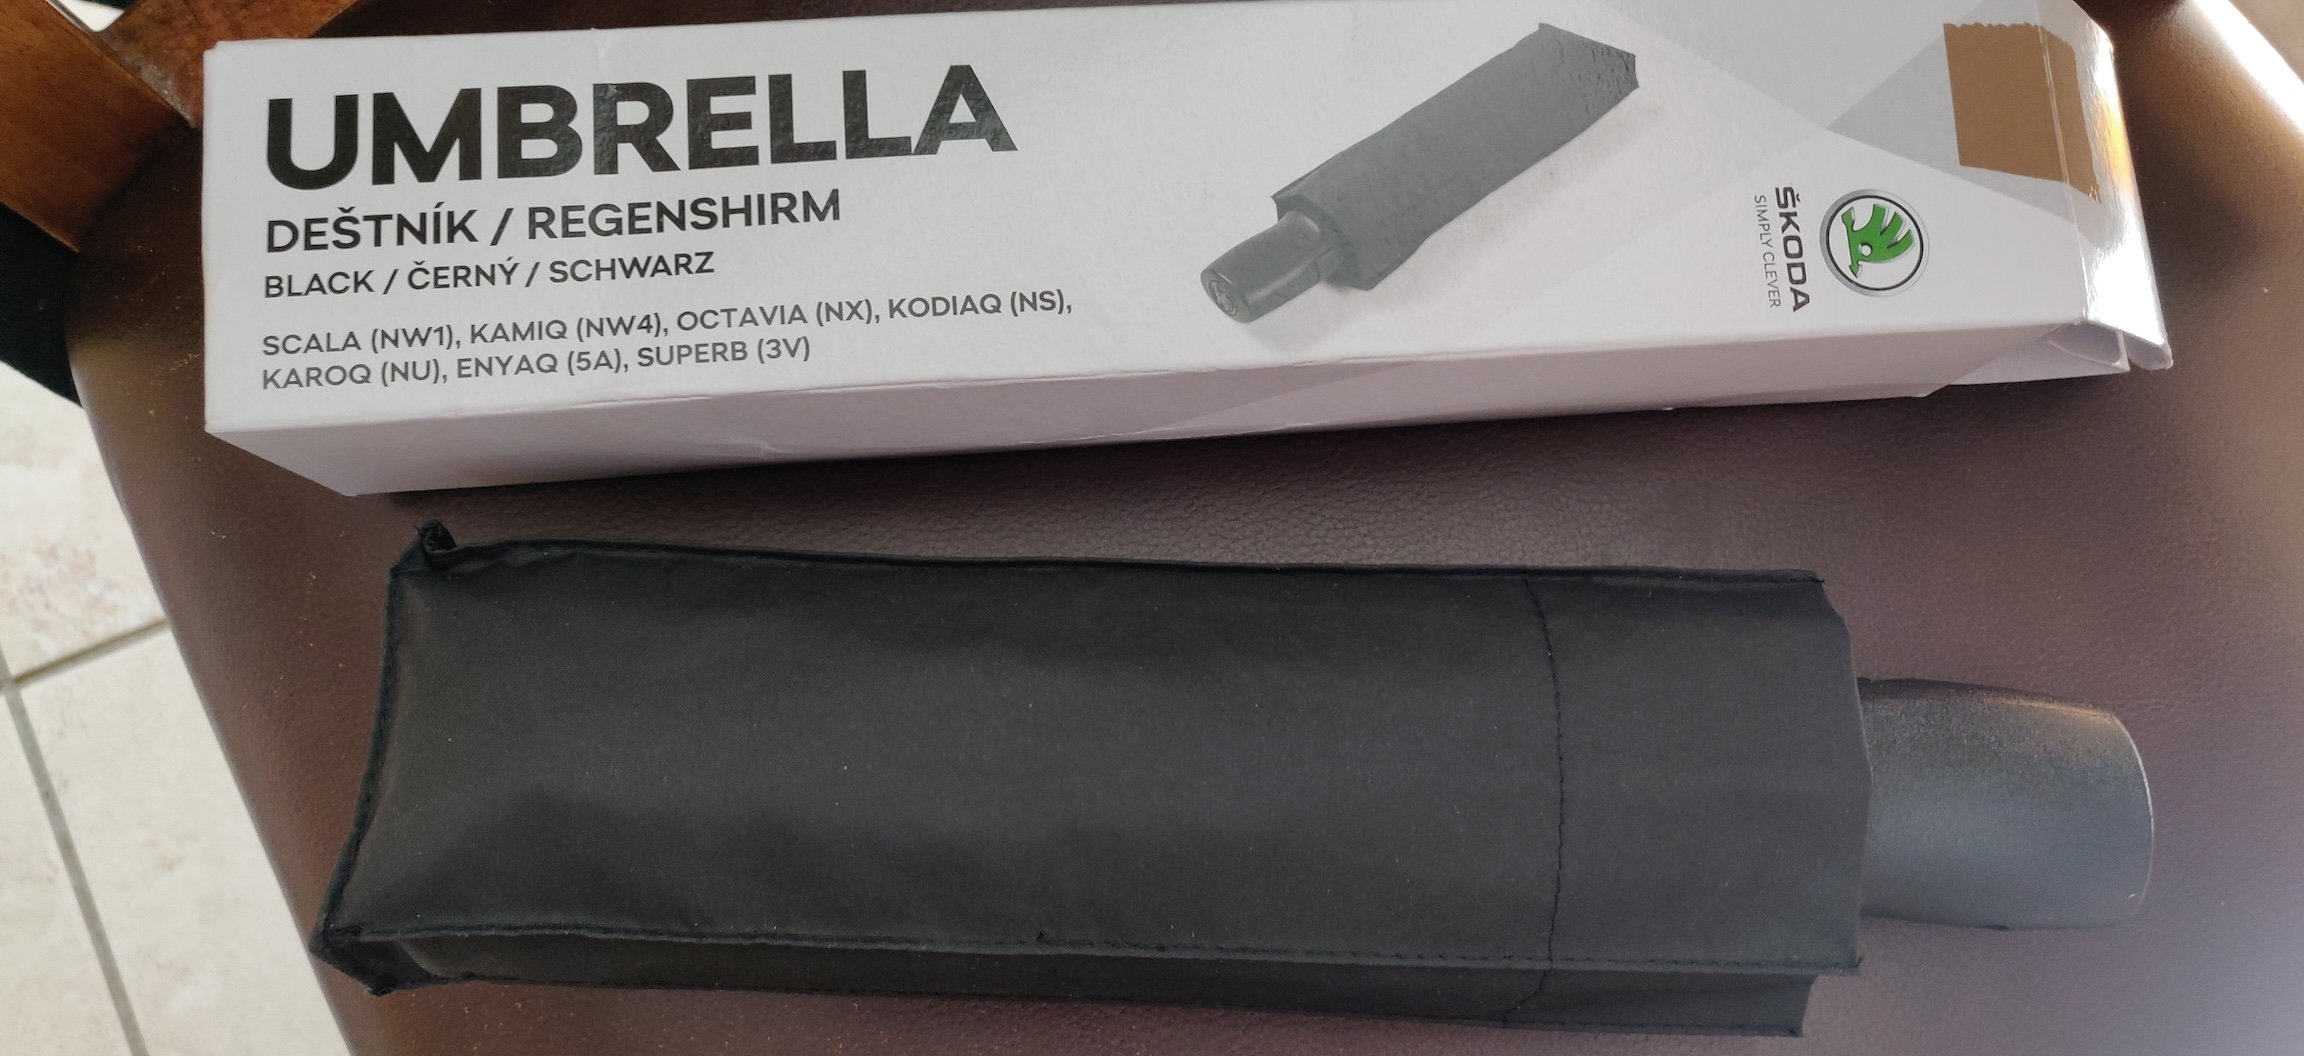
So, because of that: Yup, literally a picture of an umbrella. £27 from eBay, looks like a Skoda dealer in Doncaster. I don't think you need a picture of me inserting it into the door. Now, I'll put this into the maintenance section. I guess if I have a moment and decide to buy a second one, that would be classed as the modification! Ordered a round of stuff that I would hope means everything for a "C" service is complete. I'll elaborate once I get servicing started. Maintenance: £826.83 (+£27.00) Upgrades: £315.00 Miscellaneous: £584.95

-
Yeah, I was thinking in my head a pump that can do 600hp+ will have an easier time handling 350-400 than one that can do 450-500hp. So I guess it needing to deliberately wind it down voltage/power does makes sense, and it wouldn't be knowing to do that by default. Either I'm overthinking and overengineering the problem or really really really planning ahead.
-
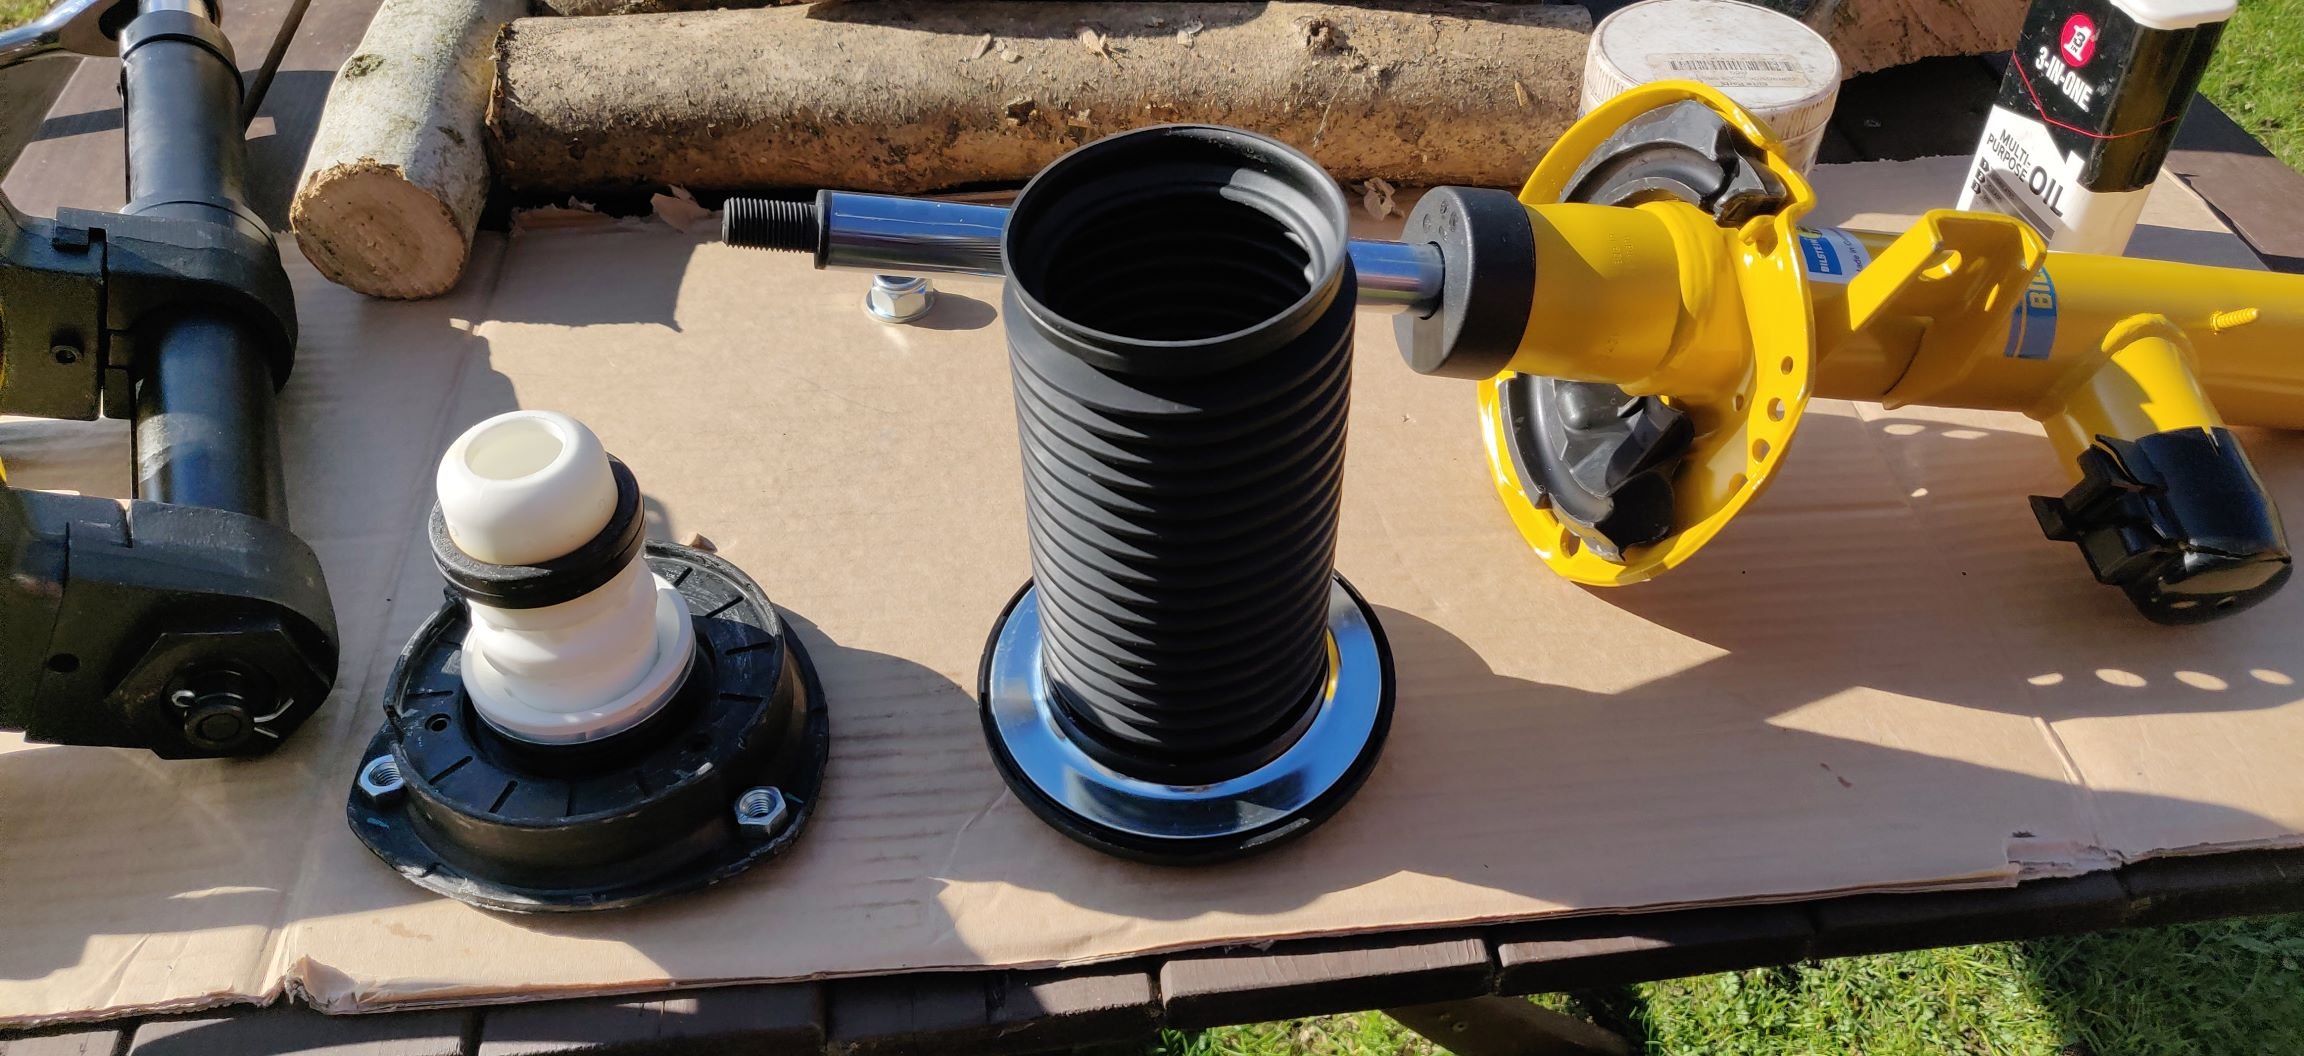
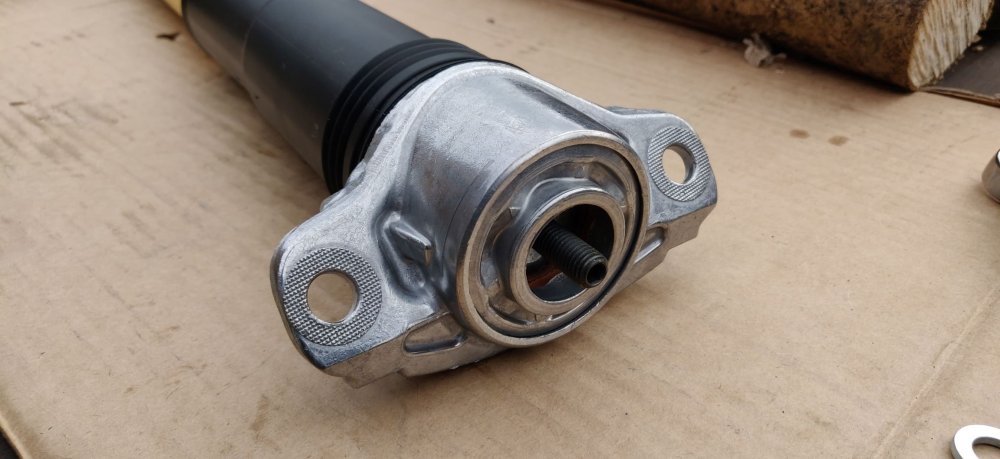
It's the 2.0 TSI EA888 engine, CXJA. I'm happy with the ride being on the soft side, although seeing two posts (including previous owner) cite it being too soft is probably suggesting a collective agreement. I'm not fussed if its too wallowy because frankly the steering is lifeless anyway. The Elise is there for those situations. Things can change of course, and springs can always be changed over if need be. Will sort out pics once done as par for the course. I've noticed whilst perusing the workshop manual that I've forgotten a bit for the front dampers, what looks like another bit of rubber that the spring seats onto. Part 5Q0 412 545 D so I'll go and source that whenever I can.
-
Looking at https://scskunkwerks.com/en-gb/products/awd-mqb-rs3-pump-hardware-and-harness-kit suggests it shouldn't be run unless there's an ECU tune. Would that be the case? Just thinking ahead, and if I was to sort this out, but before getting at least a stage 1 ECU tune, would there be any danger? Or would it actually make sense to do it after? Not sure how or if the remaps affect the fuel pumps directly. It's probably overkill this early on anyway I suppose. Maybe due to me planning seat removal for a clean, so probably good as time as any to look at the fuel pump whilst it's accessible.
-
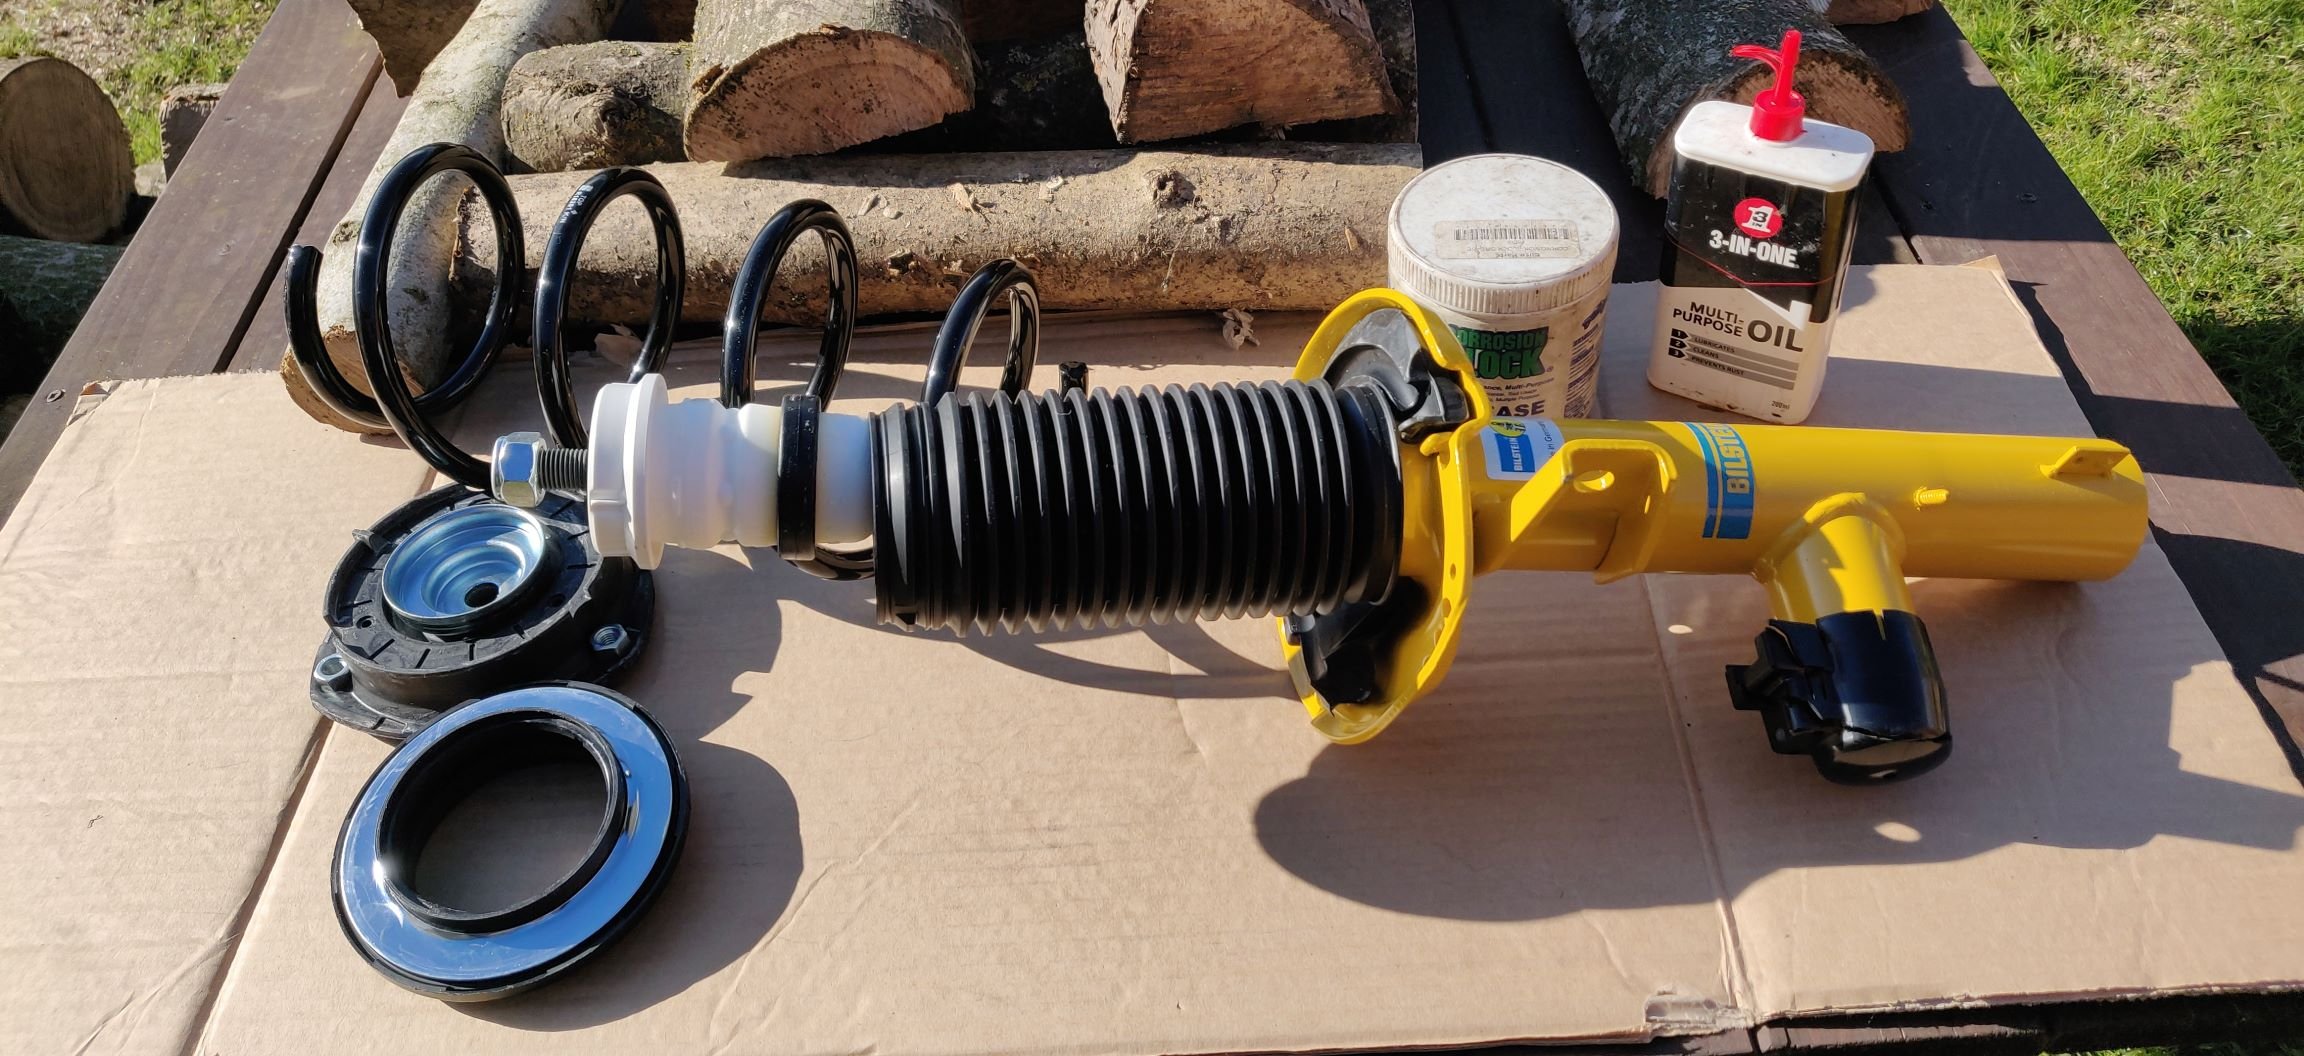
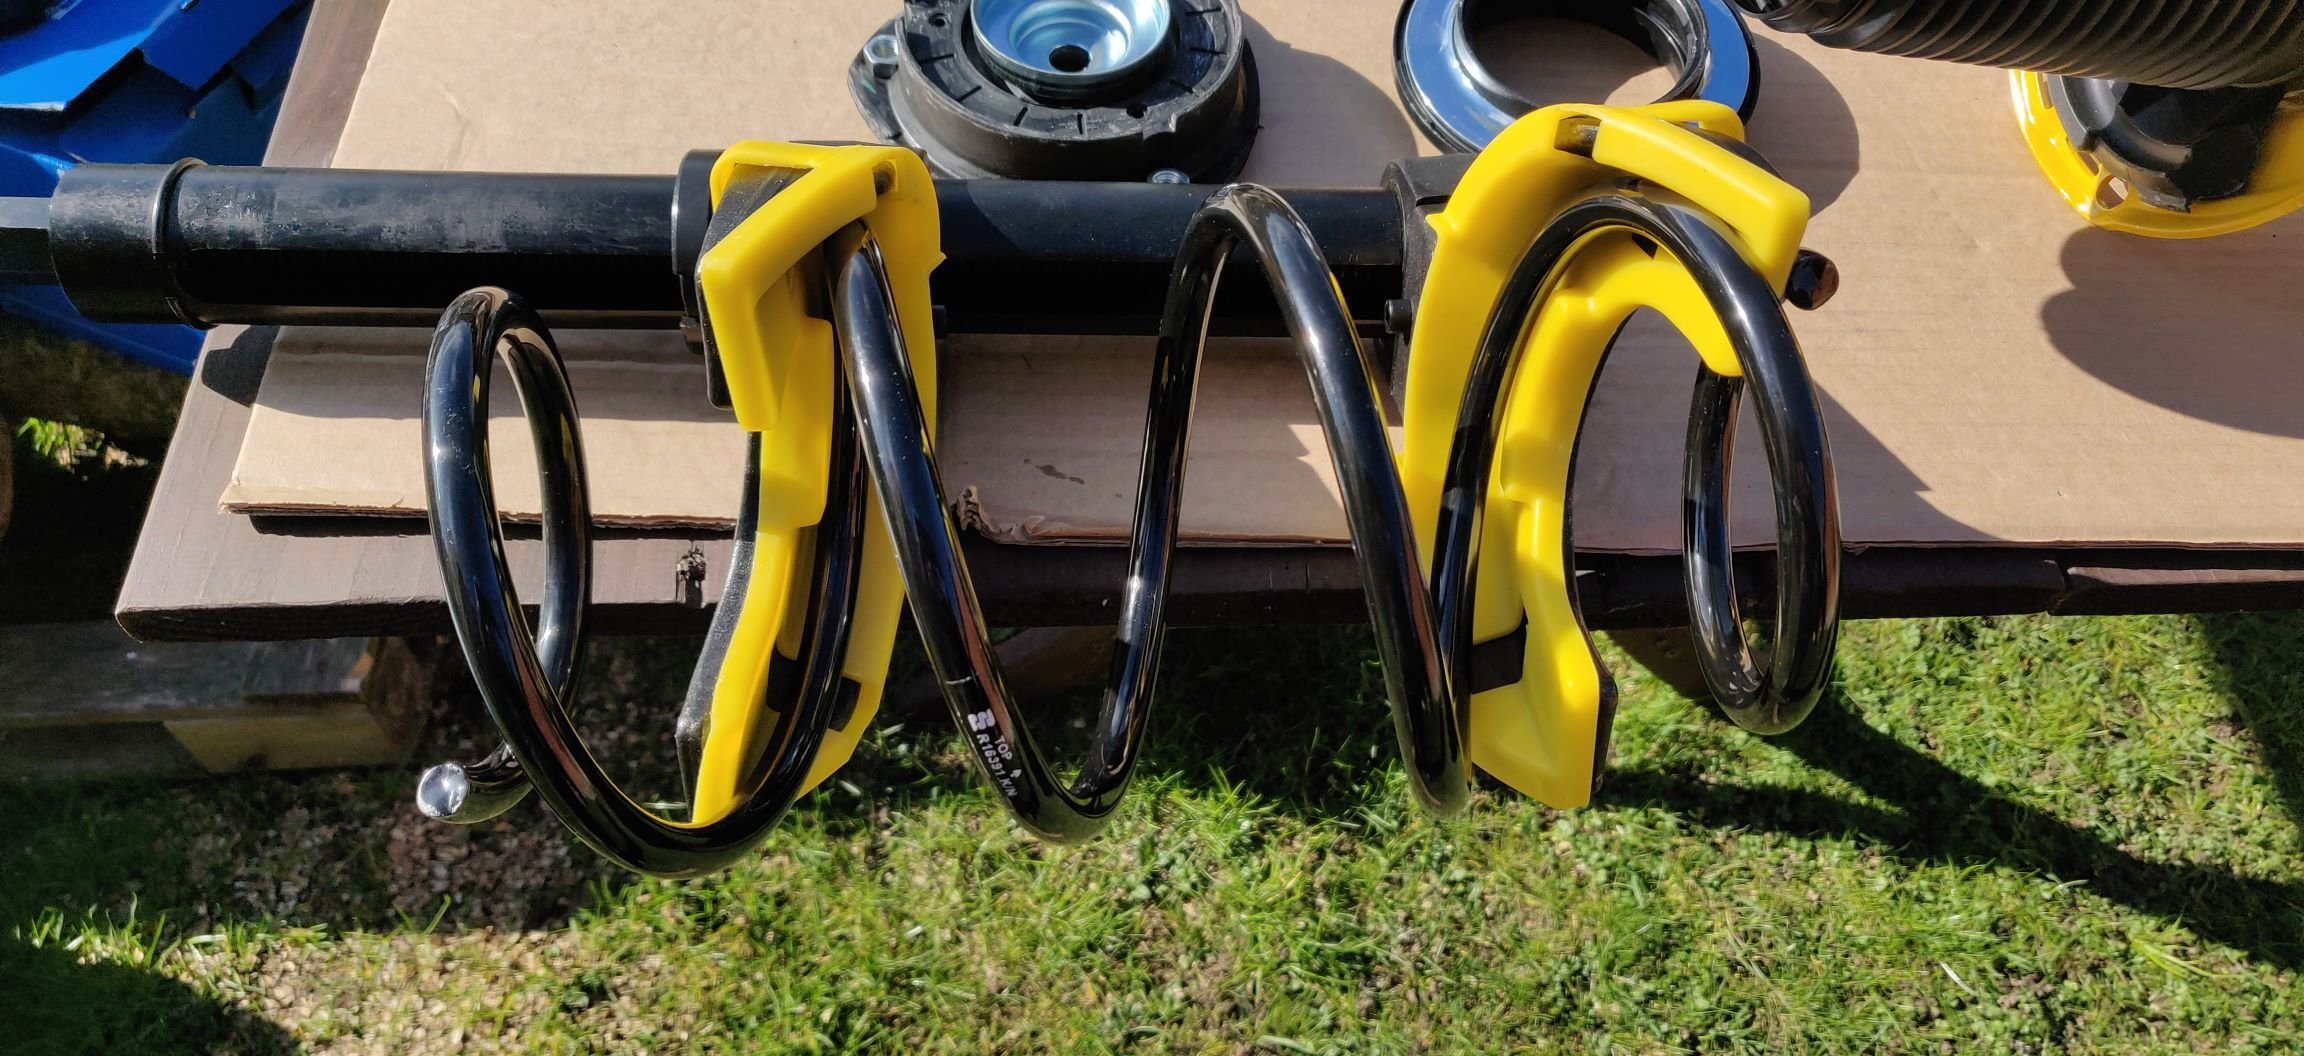
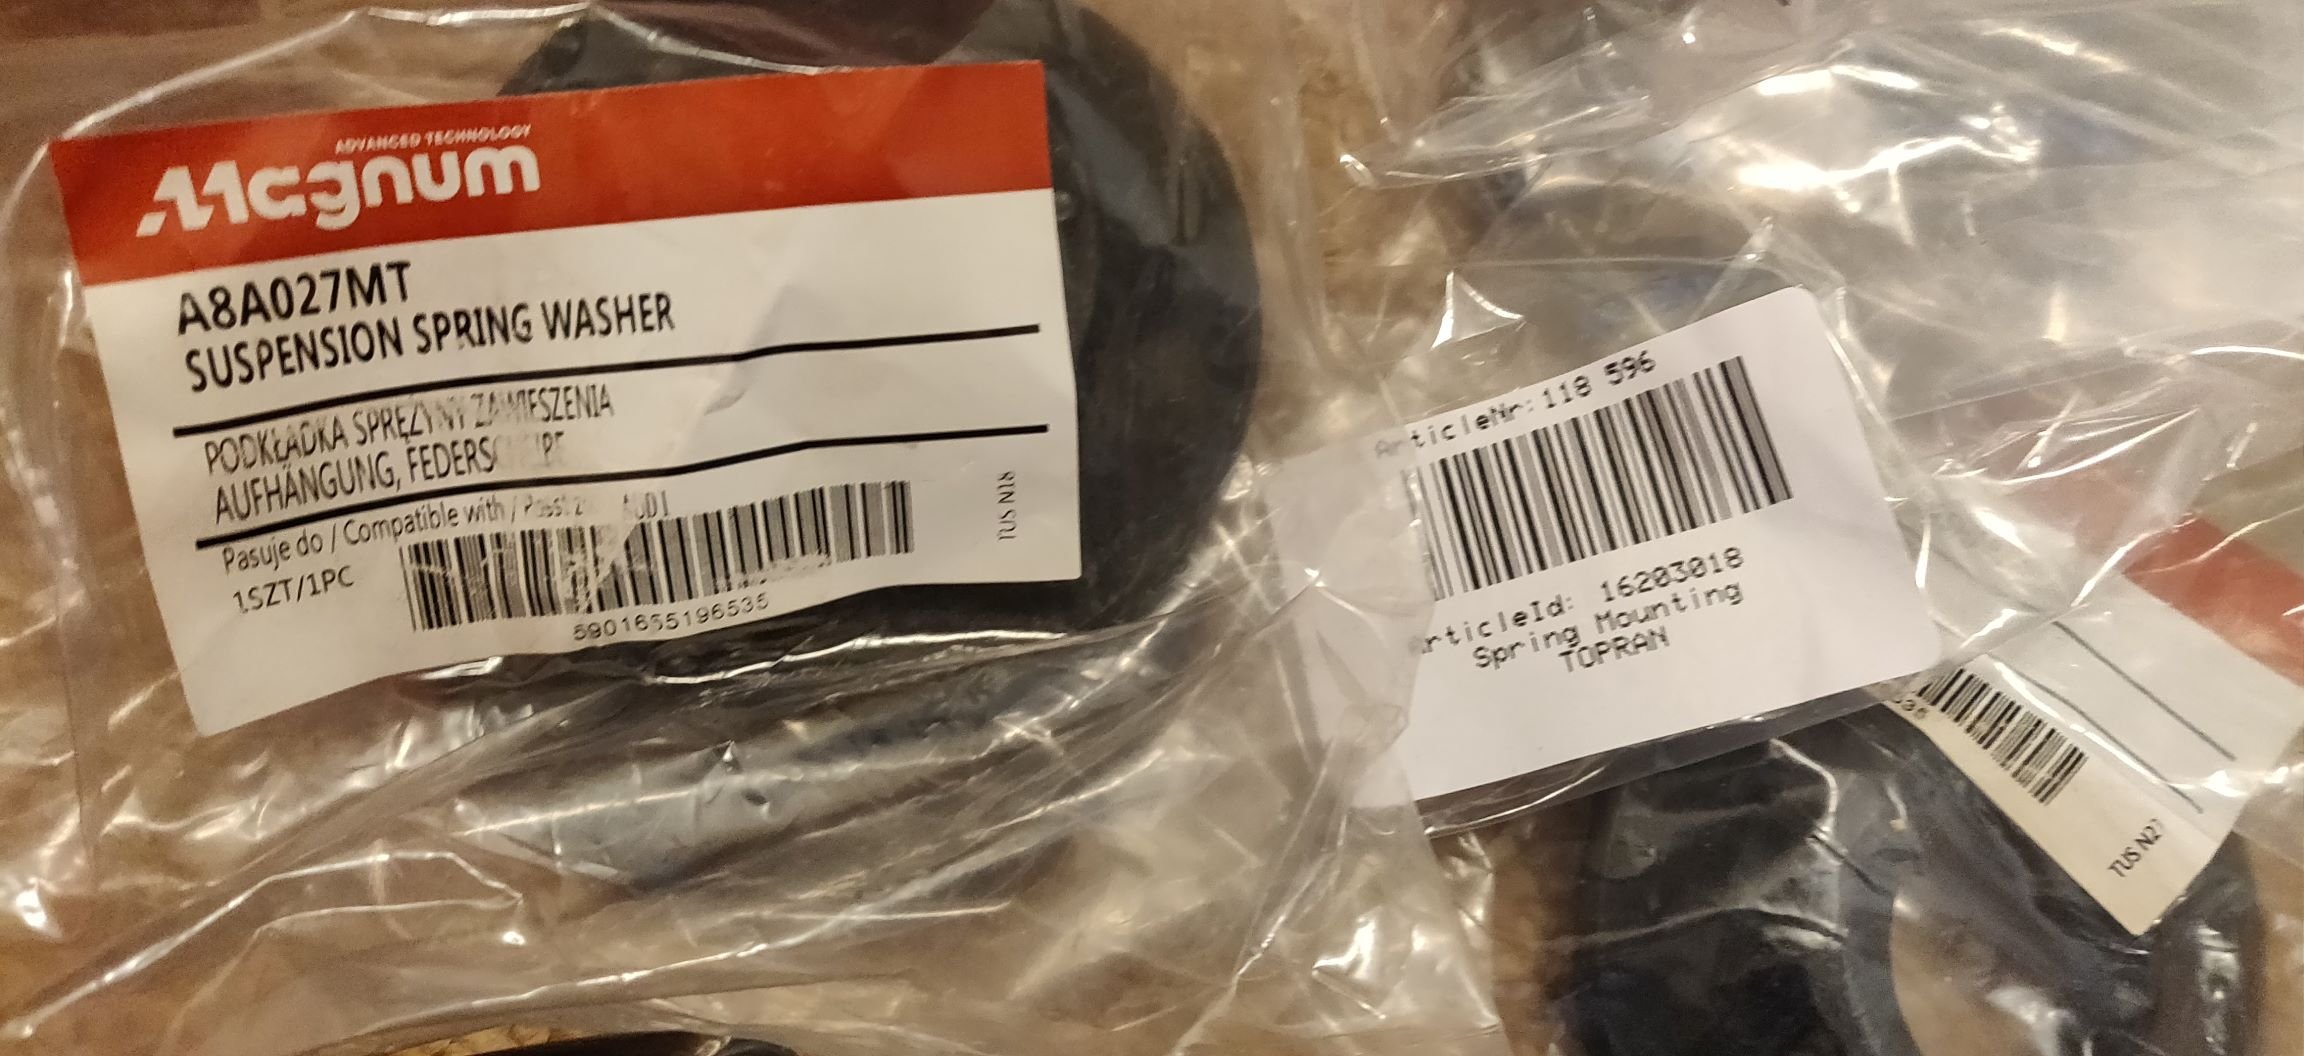
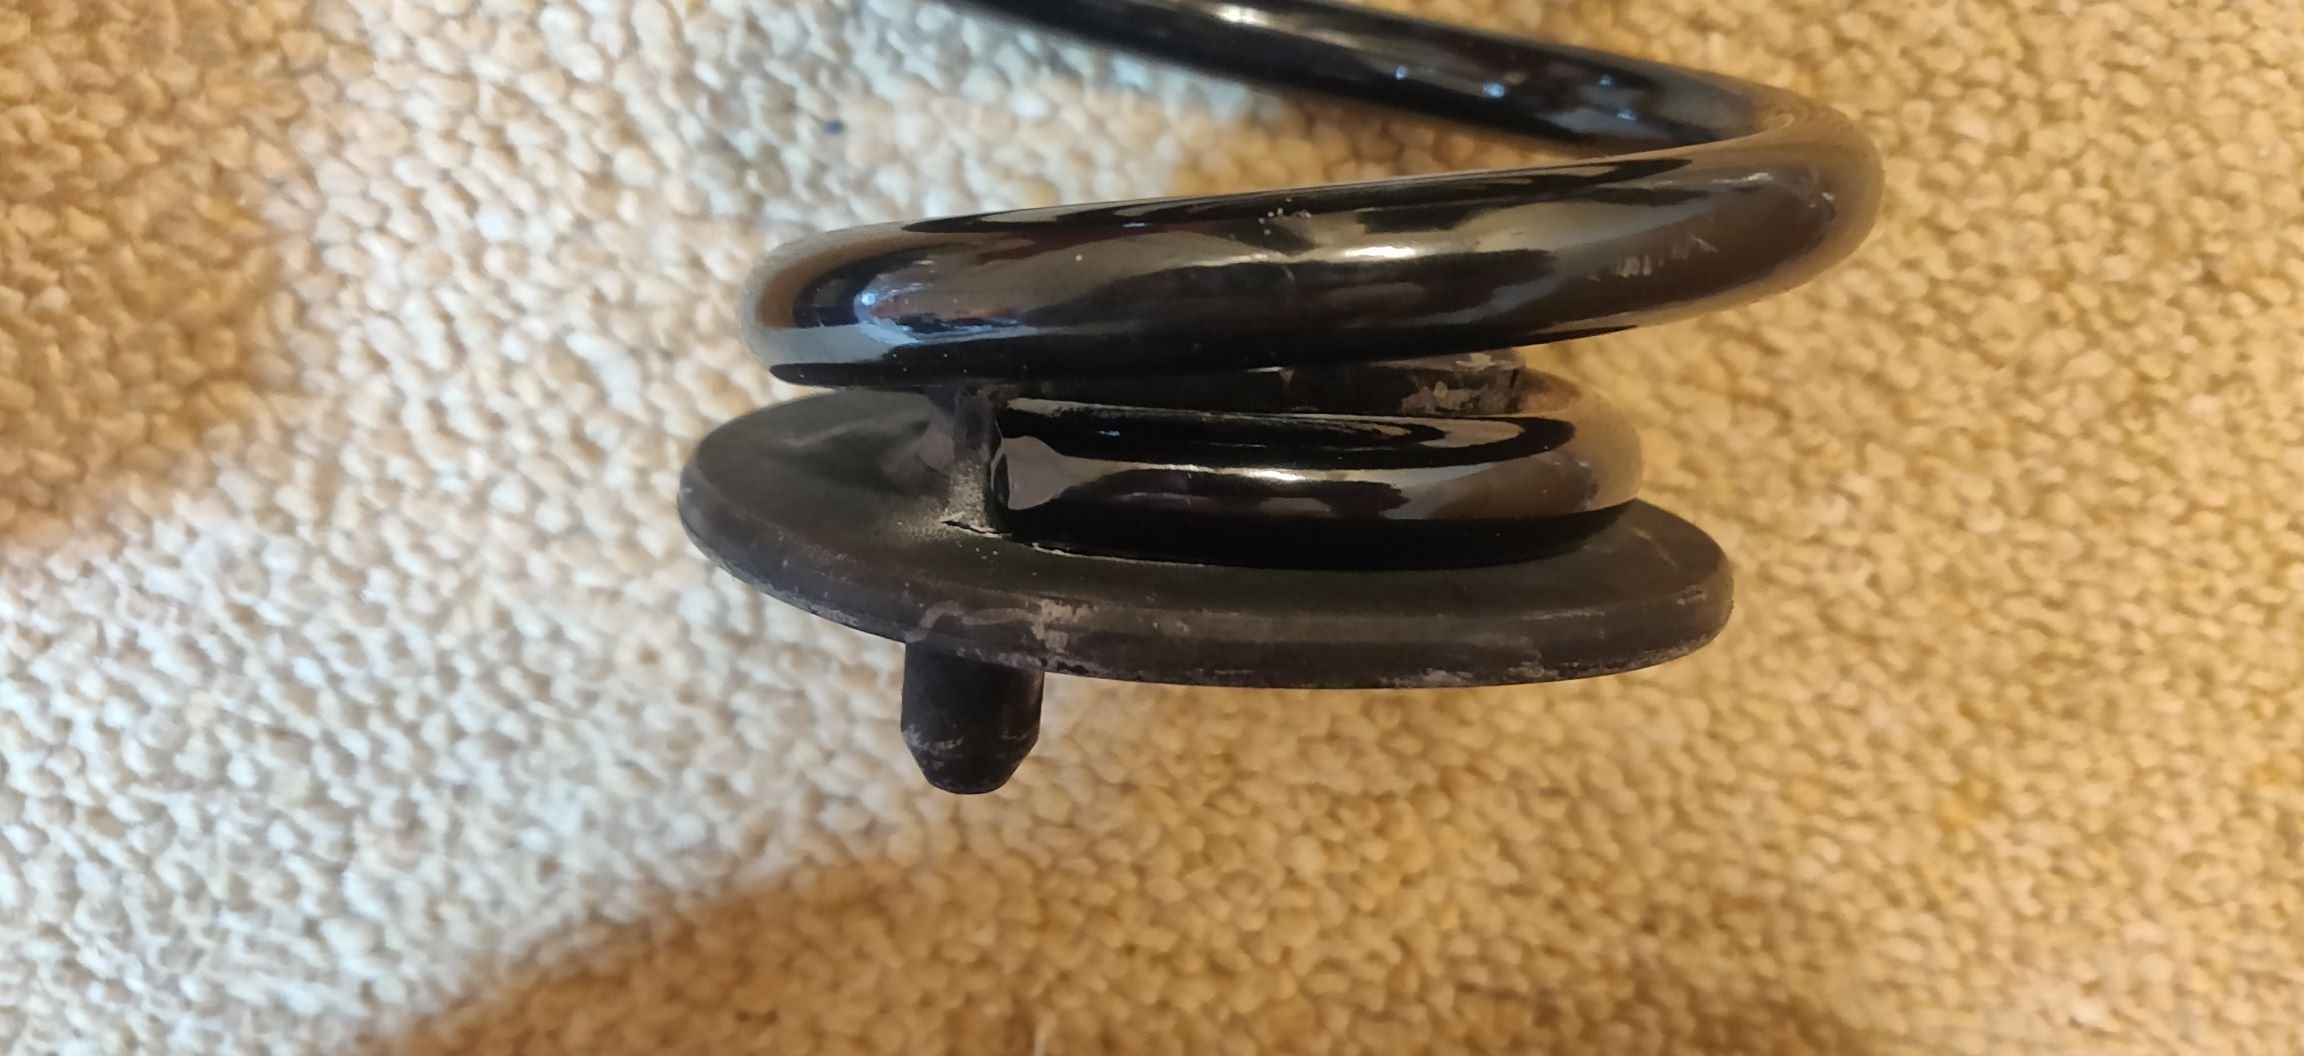
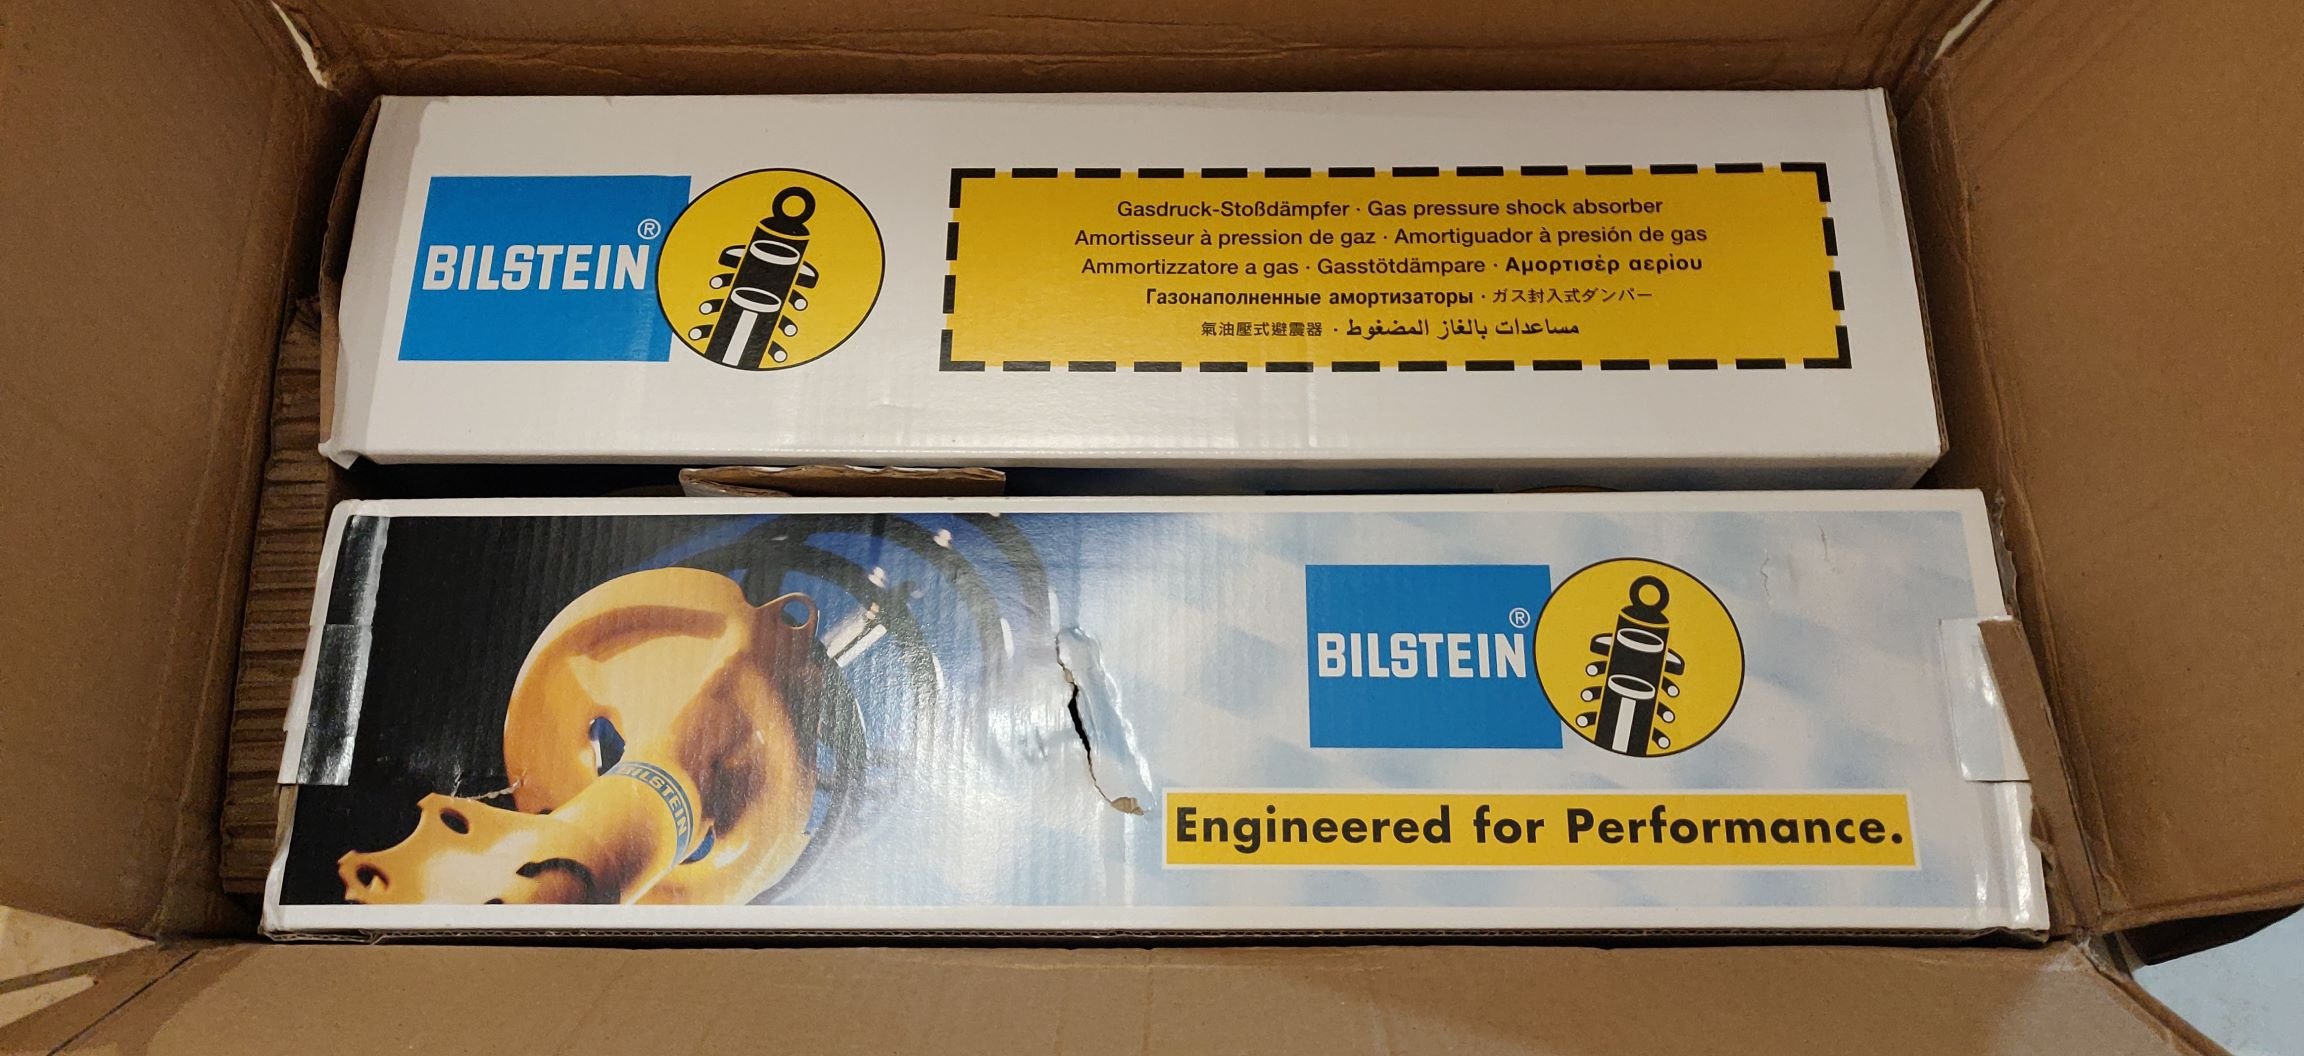
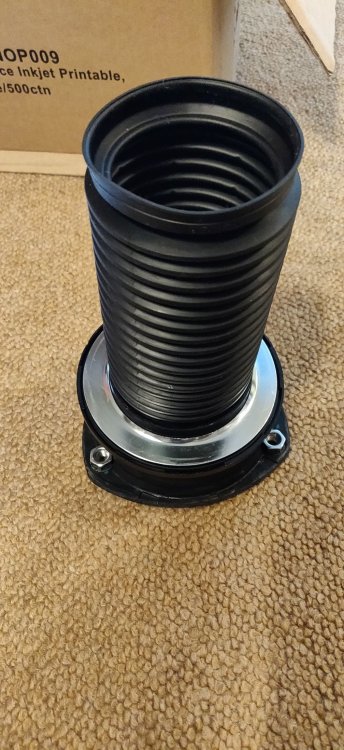
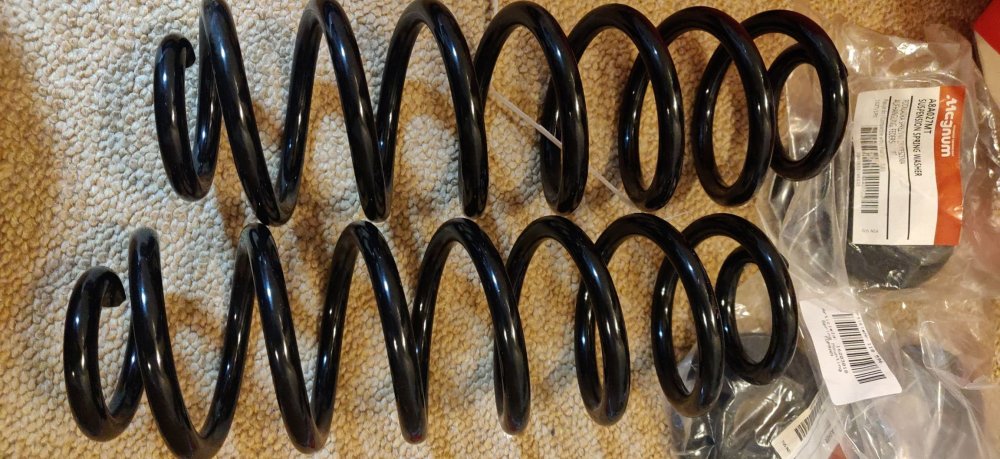
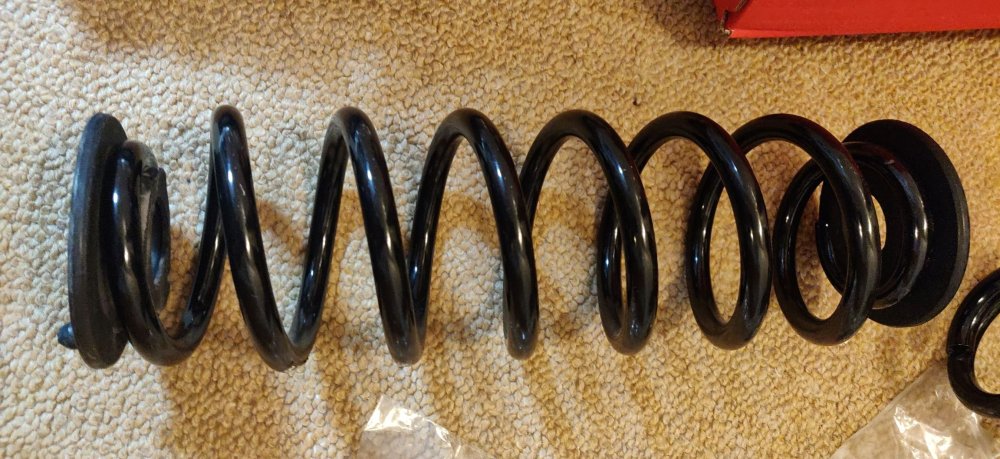
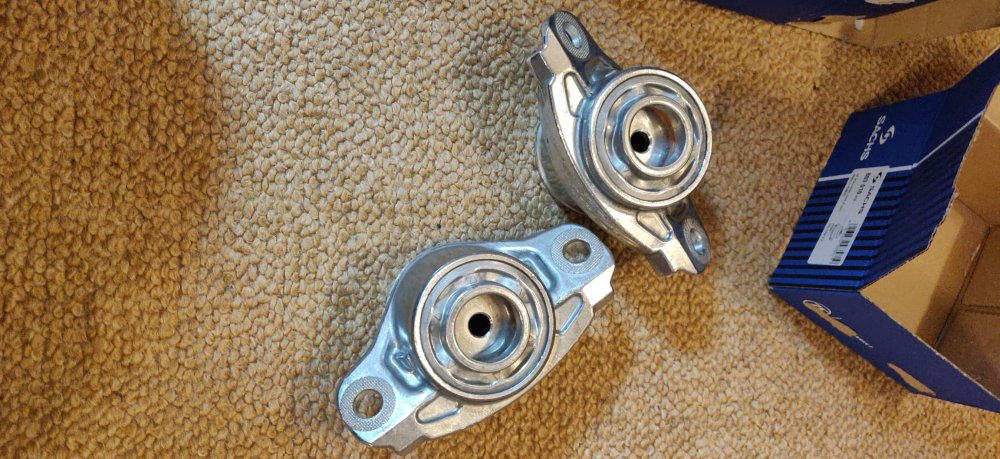
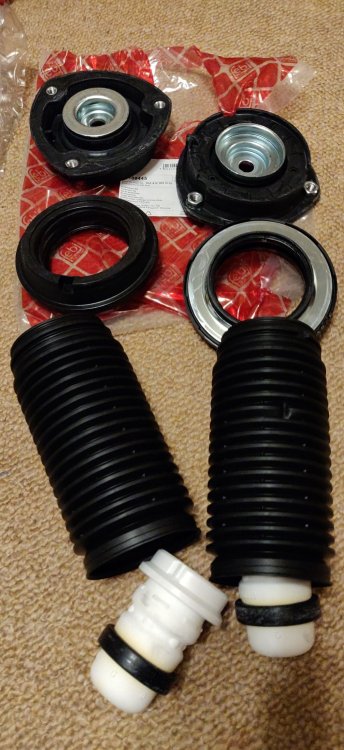
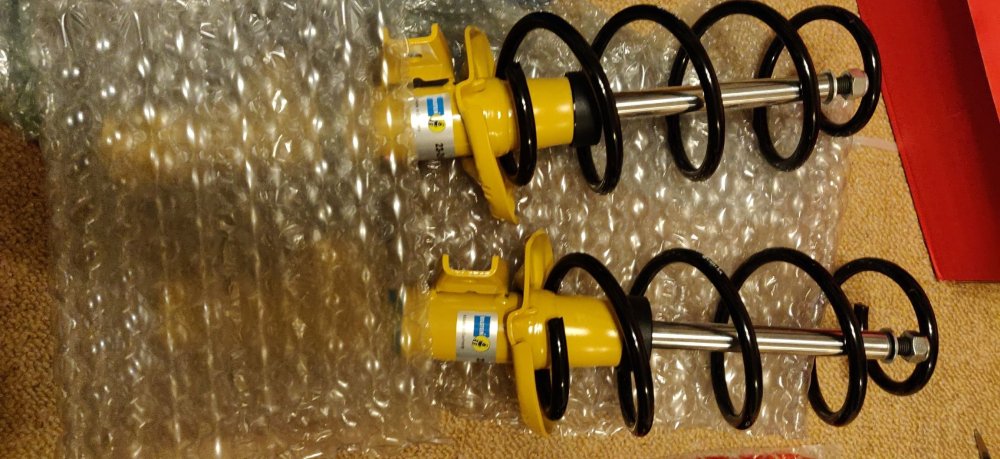
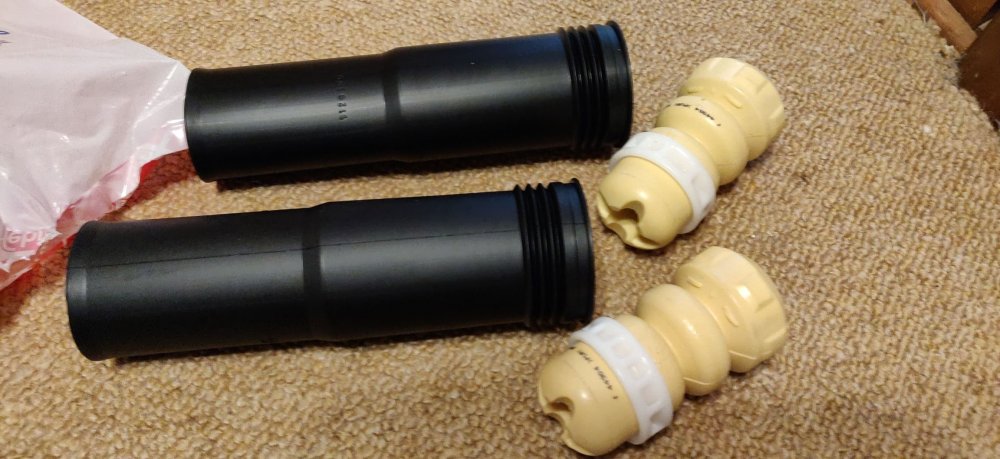
So here's a few more pics of the bits as I unpack them and try and reduce some of the clutter. The rear springs have rubber mounts top and bottom, standard fare. Autodoc had a mish mash of different brands, so it's "Magnum" for the lowers, and "Topran" for the...tops: The Eibach rear springs, R21093: With a dry fit of those rubber mounts: I expect the stub is there for alignment when installed to wherever it goes on the rear subframe. Then it's the rear damper bits, some top mounts, which I ended up going with Sachs for: With the standard bump stop and covers, Febi Bilsteins for both: No sooner had I started to pack these all up and tucked to the side, then these arrived: The front dampers! So the 23-254343 B6 Damptronics. The Eibachs are R16391, so a quick check for general fitment: With the associated gubbins for the damper, bump stops, covers, and bearings and top mounts, SKF top bits and Febi Bilstein again for the bump stop and covers: Now, I will probably be forever debating whether I should have stuck with B4s or even OEM for the sake of maintaining comfort. I spent a good few days scouring the internet and gauging up prices. If I based the prices on https://www.bilstein-shocks.co.uk/ as an example, then a B4 set was coming to £1137.42, and B6 £1232.10, so pricing wasn't going to be a massive deciding factor (it was £300-£400 difference, then sure). It was a then a case of trying to beat that, and with some creative eBaying, there are these: https://www.ebay.co.uk/itm/155045005935 for £499.95. Some additional strategy involved me adding these on my watch list, and waiting to see if the seller would send me an offer, which they did to end up with the £474.95 that I ended up paying. I felt it was too hard to ignore. So I'm now committed to the B6s. Technically, there's nothing stopping me now from assembling the front struts as all the components are there, so I'll be back to rummaging in my garage for my spring compressors and then see where the mood takes me during the week, otherwise it'll be something for the weekend! Maintenance: £799.83 (+£474.95) Upgrades: £676.49 Miscellaneous: £604.95


-
This arrived just a moment ago: It's the first bunch of suspension bits, namely the Eibach springs and associated sundries for the suspension (hopefully). These are hopefully the standard height springs, as I'm not into lowering (car's not flat as a pancake down there, so no benefit) as I'd presume the Eibach Pros are the usual go to. Has felt like an age to arrive, but I only ordered it late last week, so as expected from AutoDoc. It's usually a few days to two weeks I've found, so only good if you can really plan ahead. Back to work, so I'll divvy up and take more pictures in a more organised manner later. I've done a bit more shopping, but I'll update cost tallies as and when things arrive (or when I start doing them, to try and keep things a bit more traceable). Maintenance: £324.88 Upgrades: £676.49 Miscellaneous: £604.95
-
Nah, I'll be going for 17" wheels. I don't think F1 cars are described as slow and they've had no issue with high profile tyres. The lightest variants seem to be geared towards the Japanese cars, rare to see them in 5x112 PCD form. But there's a couple of options I can see. But the CrossClimates on the wheels now are more than sufficient for the next year or so, then I'll change them and move these wheels along. Will be doing all the service items more to baseline everything, otherwise I'll confuse myself by needing to do a "B" level service but with the DSG thrown in, The car is officially 8 years old, so it also marries up to every 4 years perfectly, mileage considerations or not.
-
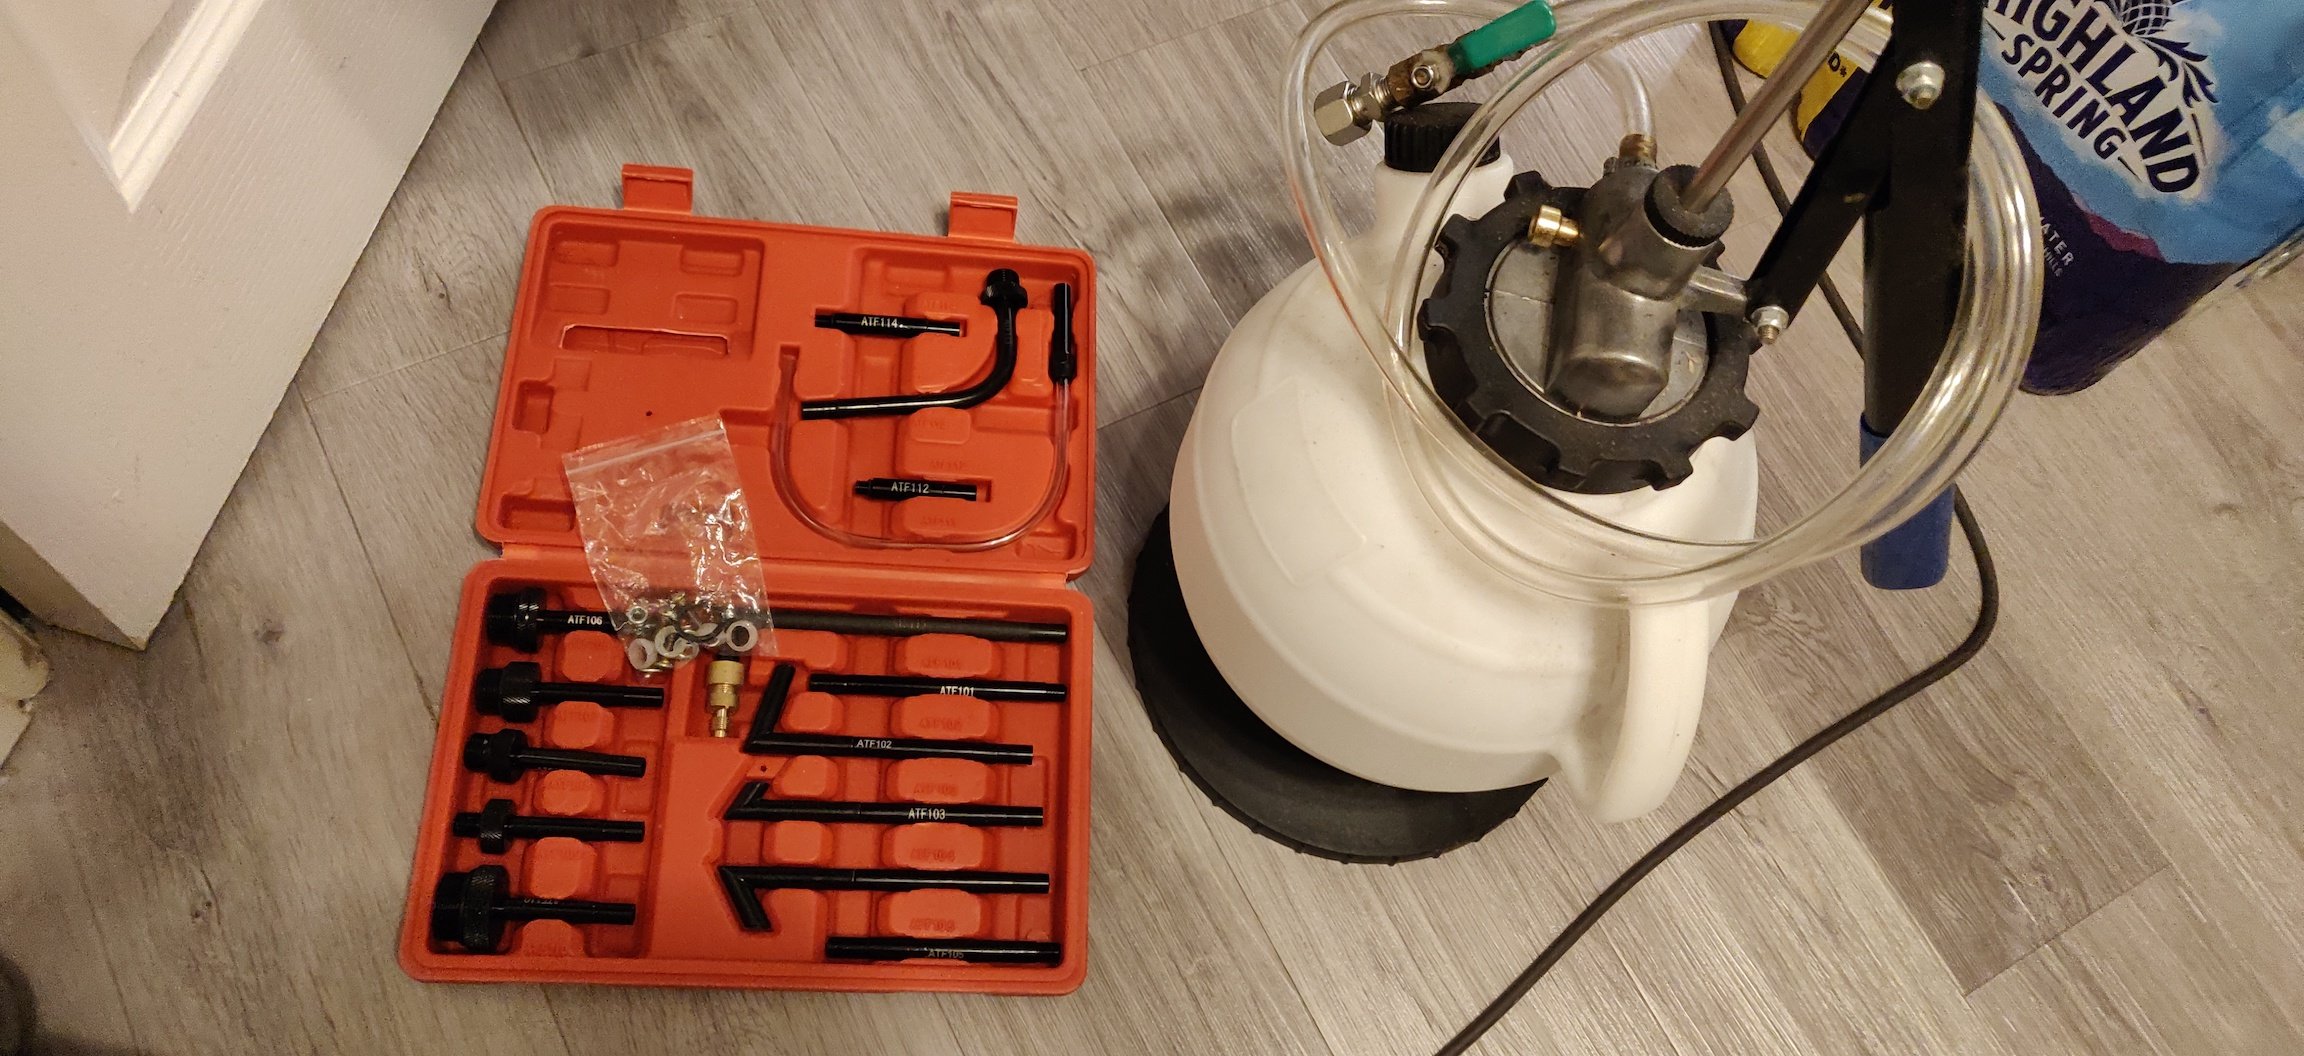
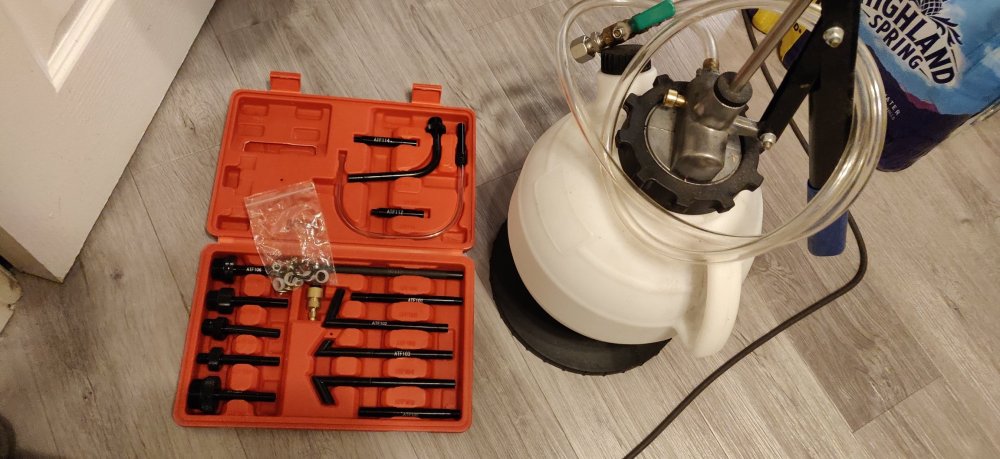
On the subject of eBay, I put an early bid on this and managed to win it for £20: Collection only but based in Leicester, and by the time I got the post code, was actually 25 minutes away, so paid up and drive over to collect. I would like to meet the person who decided that not having a specific fill hole with the drain hole, and that the oil should be filled FROM THE BOTTOM of a gearbox; was a good idea, and give him a subsequent slap in the face. The workshop manual suggests a tool that screws onto the tops of 1l canisters and essentially feeds it like a saline drip. I decided to opt for the above, which looks akin to my brake bleeder (and probably does the exact same thing). So hopefully, I fill it up with 6.5 or so litres of gearbox oil, pump up the pressure and then open the valve to fill the DSG gearbox. Then the valve can be shut once the required quantity is in. I'll have to read and re-read the steps as its just a tiny bit more of a faff in comparison to just draining and filling. The tool new appears to be circa £45-£50, so probably unnecessary penny penching, but if it works, it works, and it's one of those tools that I will literally only use once every 4 years (unless I end up using this tool on side hustles). I shall begin the process of acquiring service items in anger over the week. Whether I do any of the actual servicing, probably not immediately, there's most likely an optimal set of steps to do all this (doubly so given 4 shock absorbers will be part of the first tranche of mechanical jobs). Maintenance: £324.88 Upgrades: £676.49 Miscellaneous: £604.95 (+£20.00)
-
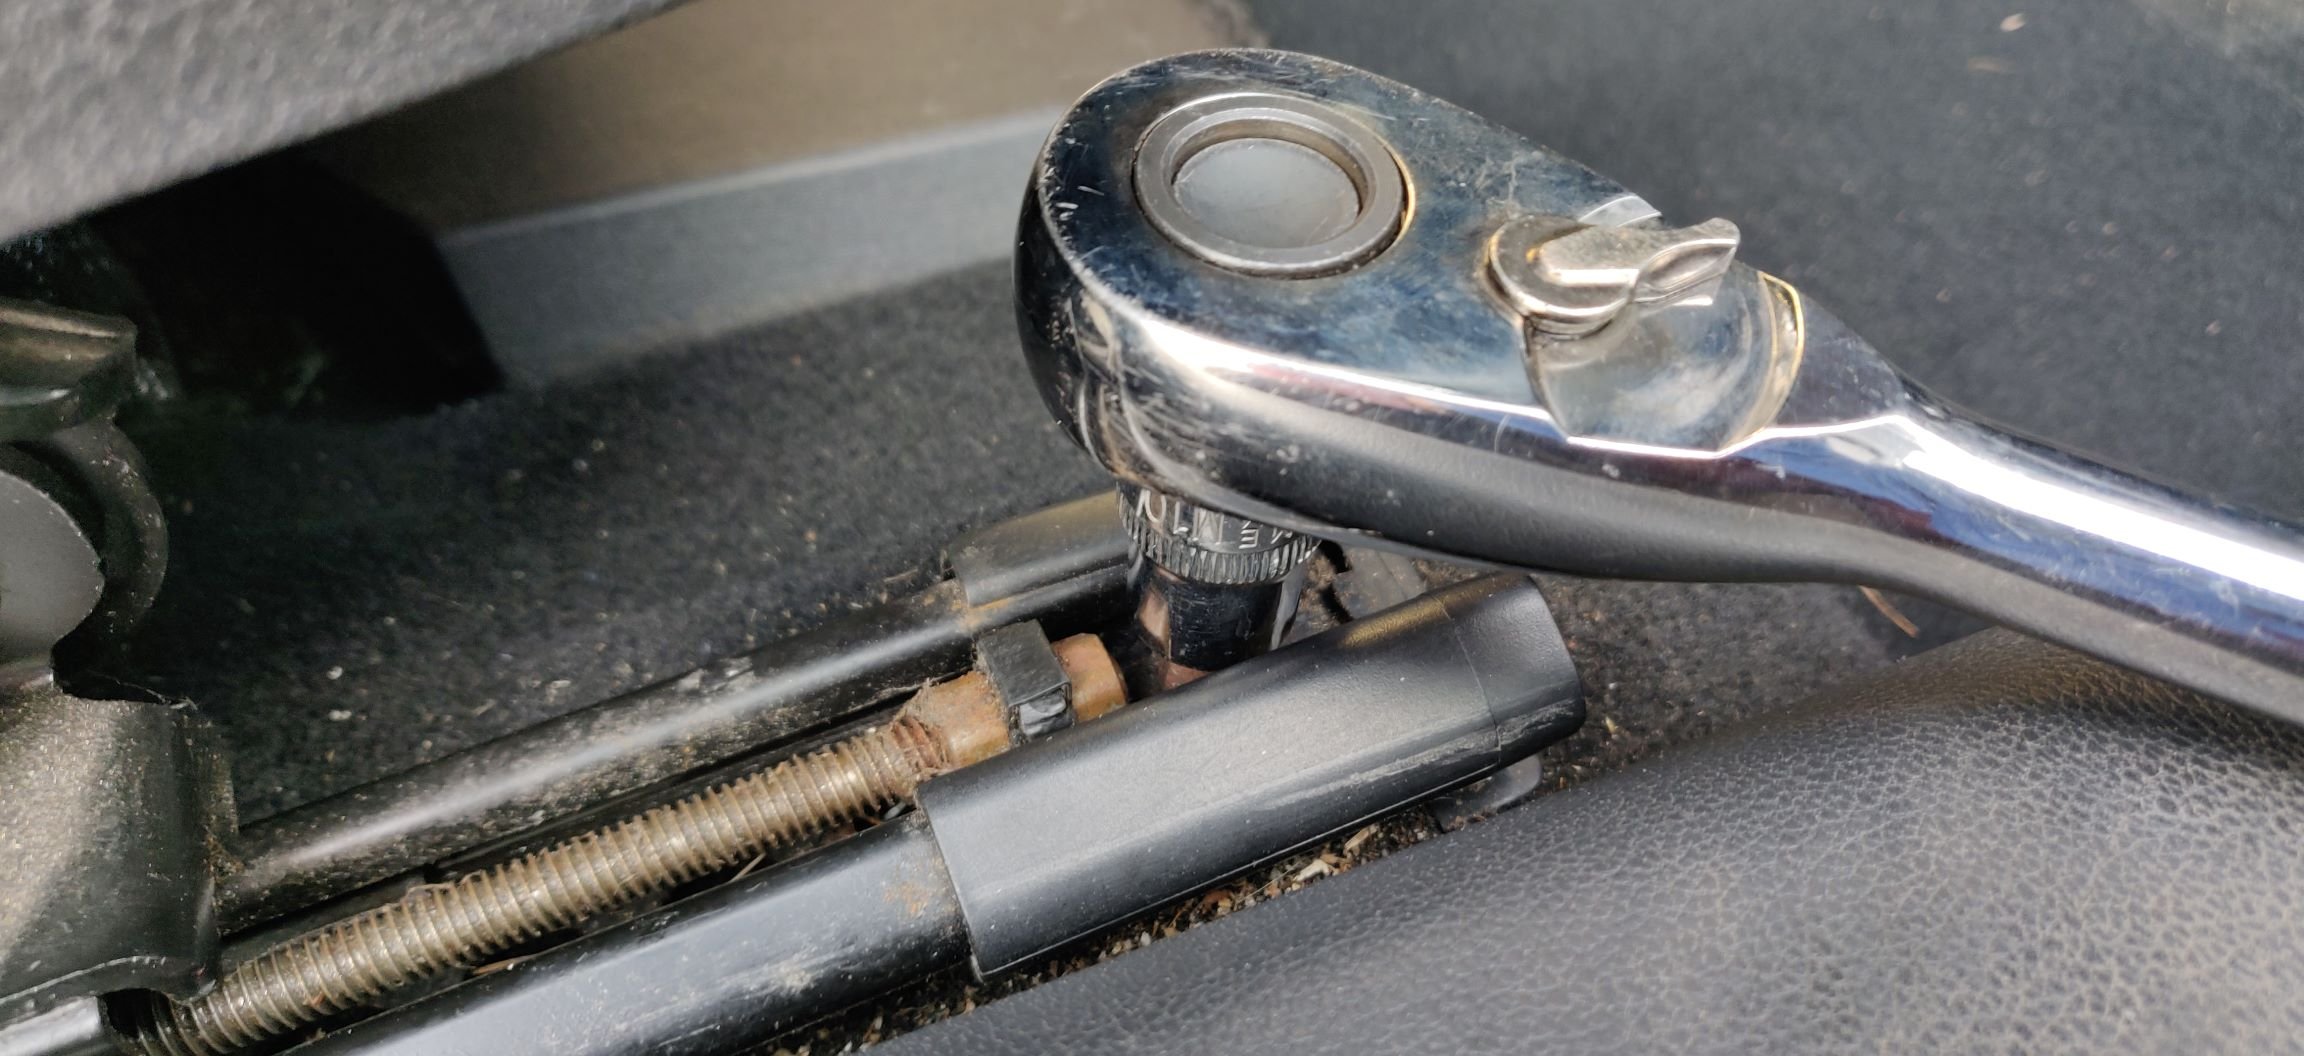
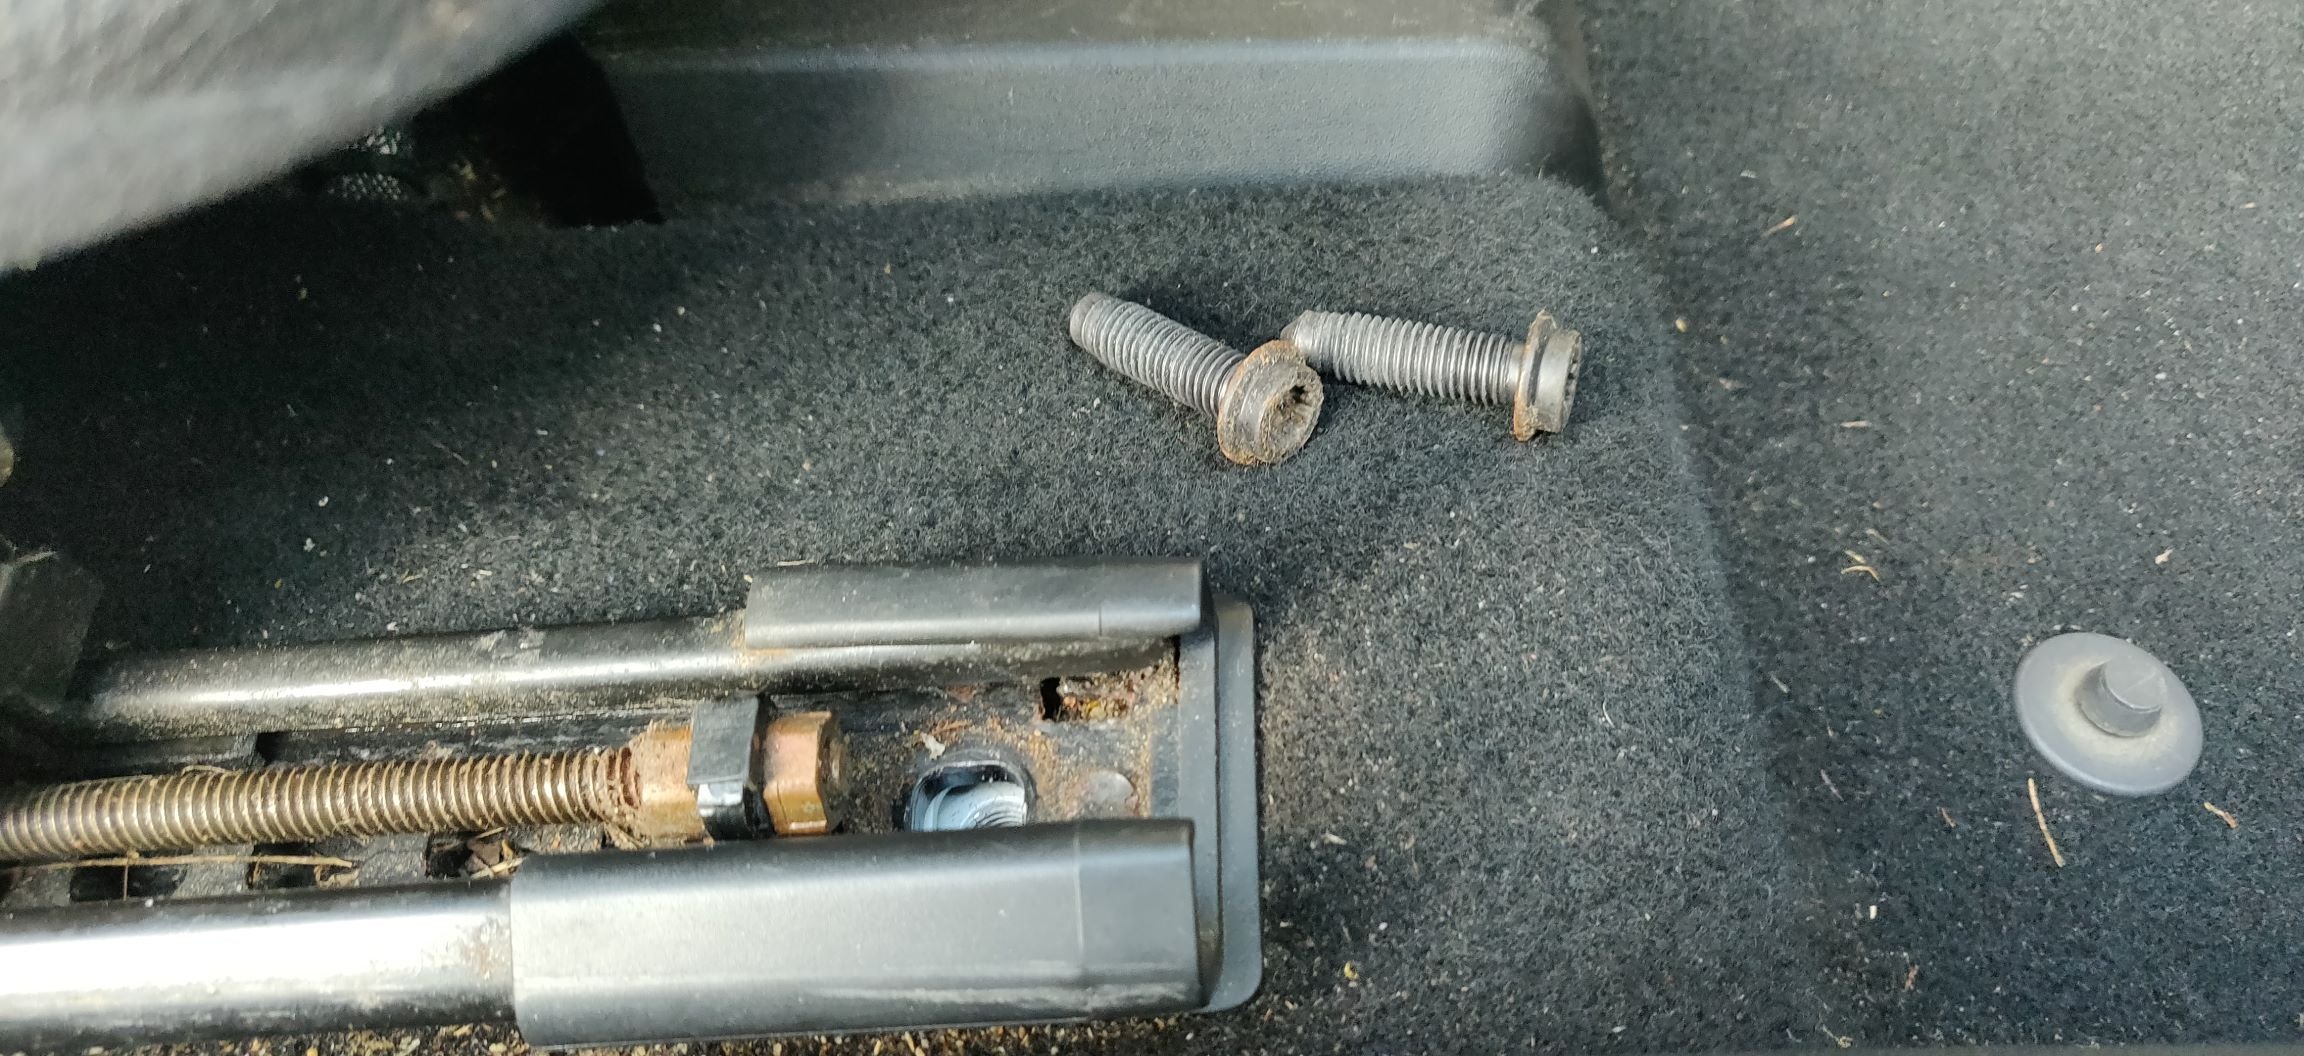
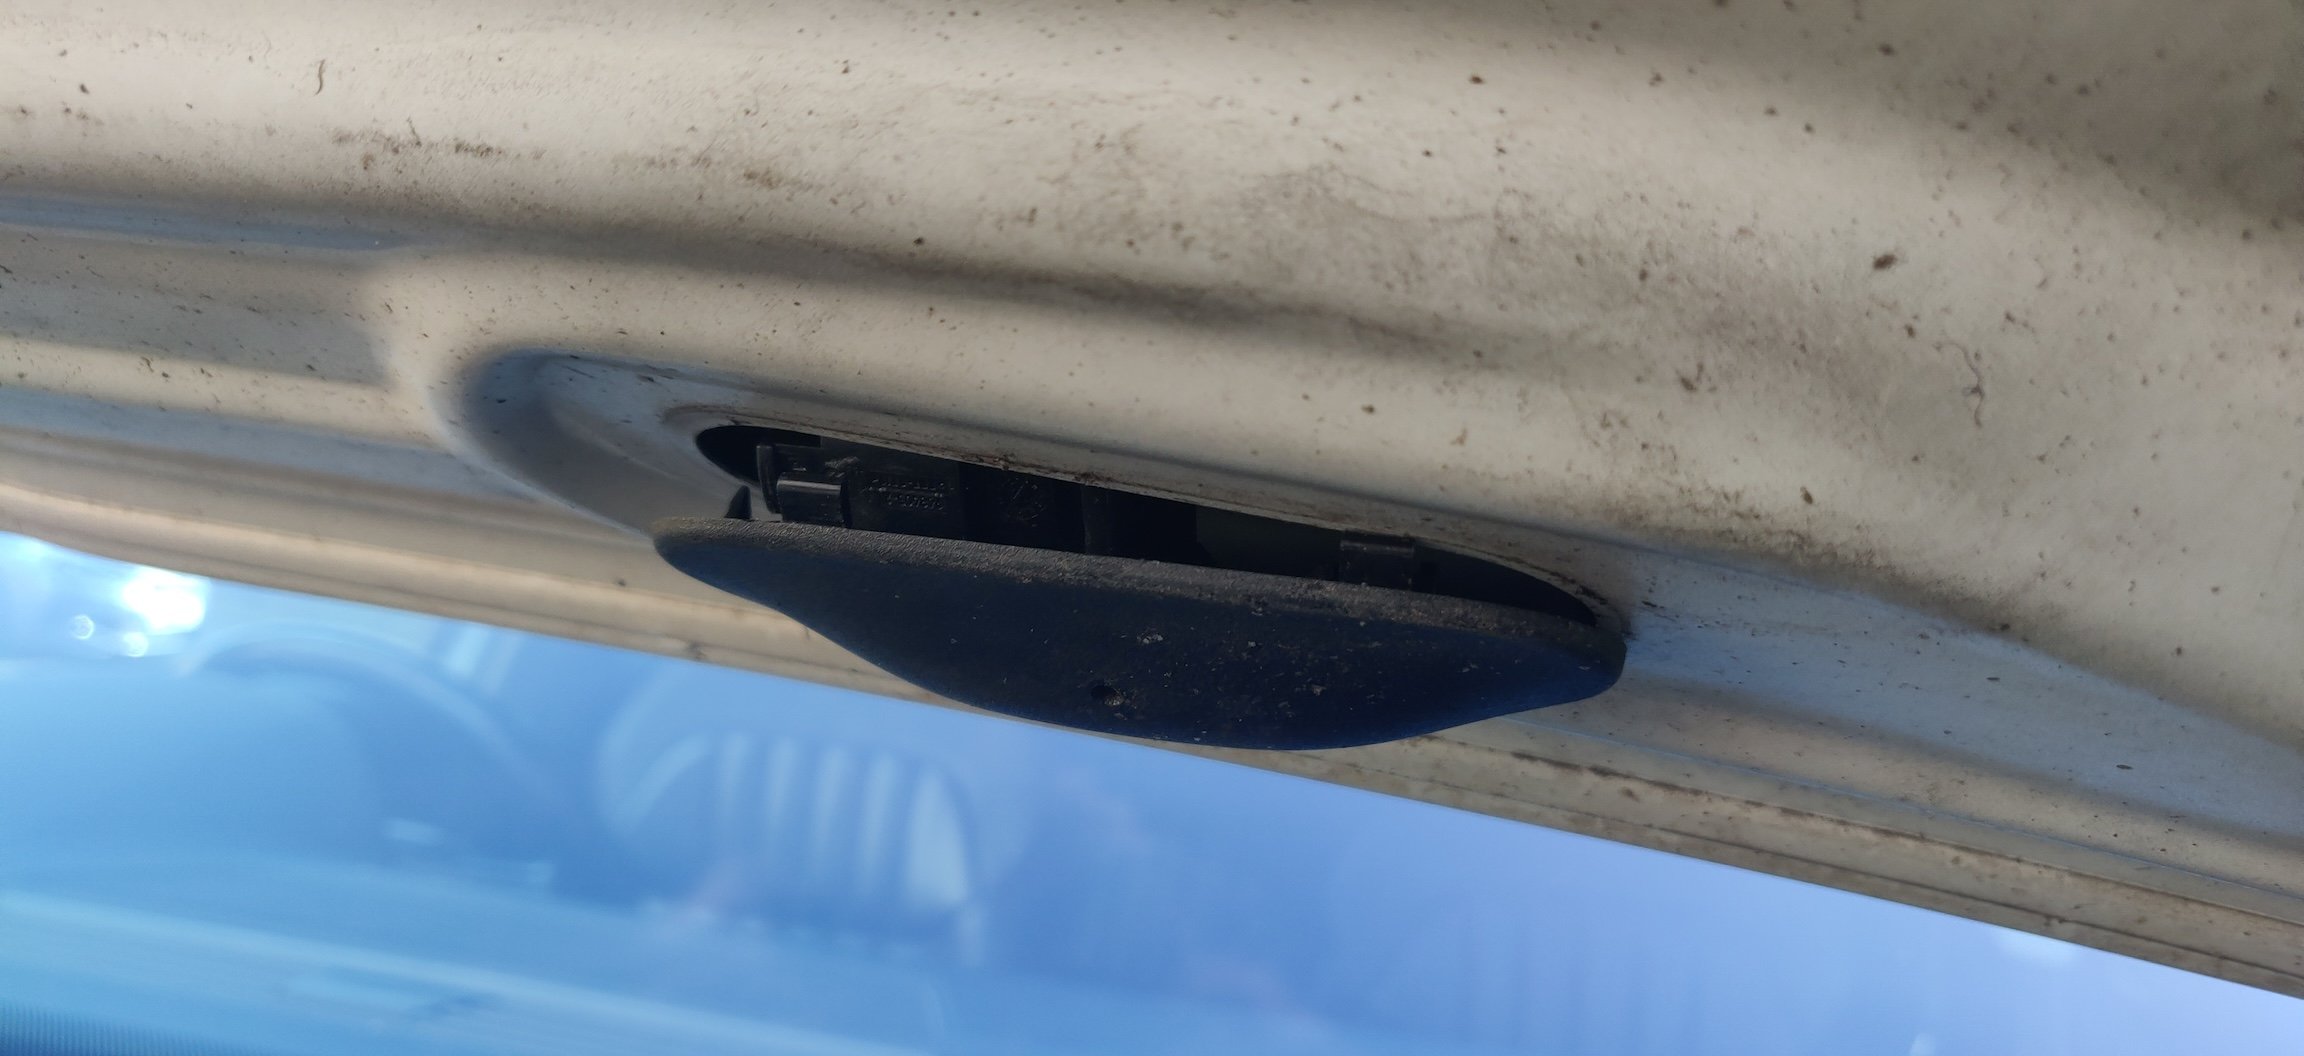
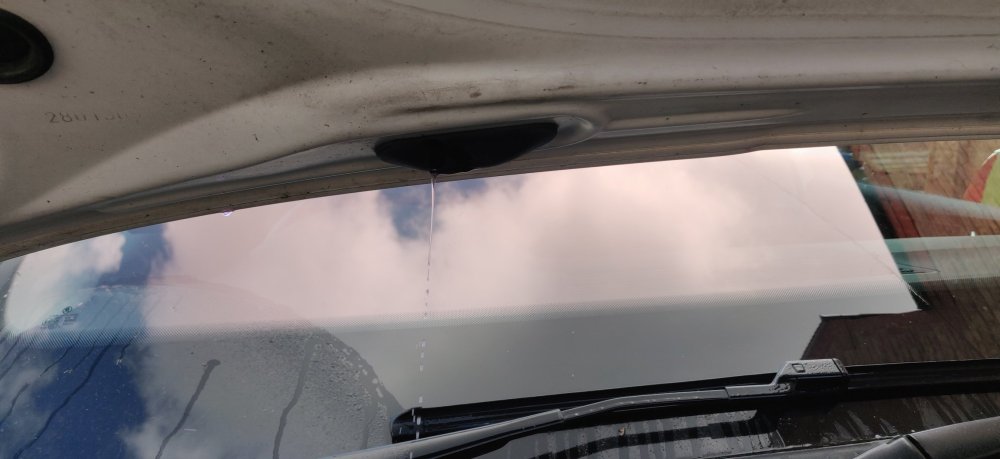
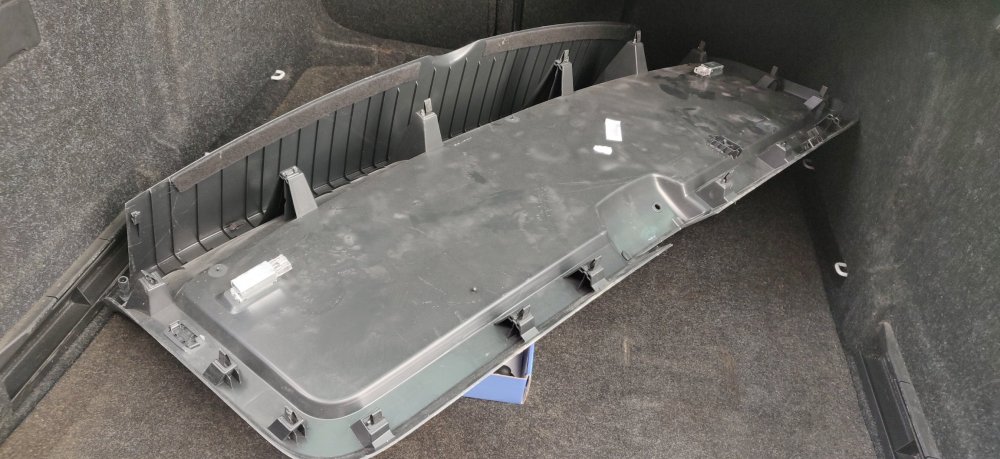
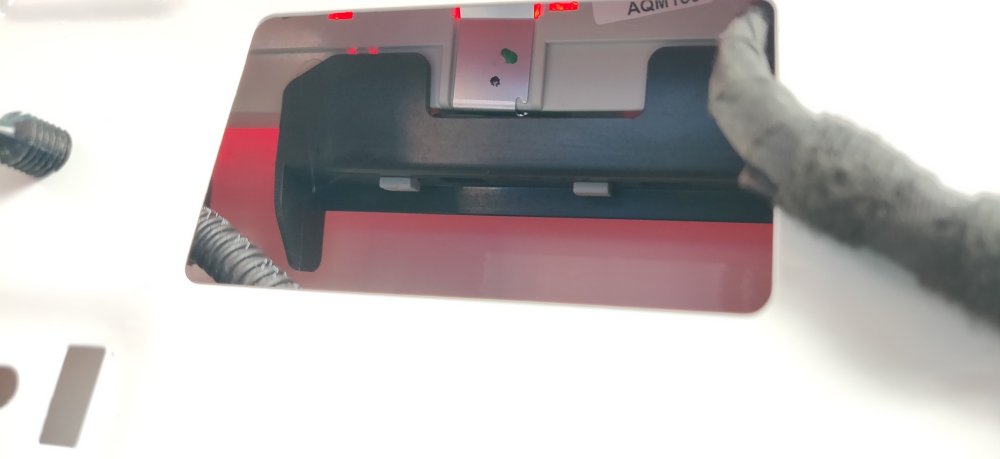
So this afternoon, decided to do some additional prep work as part of the washer jet issues. Not only is the front having an issue on one side, but the rear isn't working either. I hear the pump, but no water. I figured the easiest diagnosis point is the washer jet on the rear itself. Some initial rummaging around the wiper and I discover that its a tiny little but emerging from the third brake light. So off to attempt to pop off the rear trim: It's held on some, and the middle came free first: Now, those who've done this before will know my mistake. After a bit of brute force, the left side came free, and to my horror, I see a torx screw and its plastic retainer atteched to the upper trim. It's fastened to the dang tailgate! I feigned ignorance and quickly went to pulling at the bottom trim, which appears to just be attached with the metal clips (as far as I could see!). Disconnected the button to close the tailgate and the two lights, and: It was then a clear view to undo the remaining bolt holding the upper trim, I think it was a T25 torx, I'll be sure to note it on the reinstallation post. The upper trim then falls away, revealing the third light tucked up in there: Looking at the workshop manual (I know, it probably says remove the bottom trim panel first), it mentions some metal clips and a sliding thing, which looks to be that black plastic bit. The manual also mentions replacing the gasket, presumably because if you don't there's a risk of water ingress. I'll source some gaskets in due time, so for now, I'll leave it at that: Will give me an opportunity to give them a clean and assess whether I should scour the scrapyards. Looks like only two of the metal clips snapped in that ensuing chaos, so I'll be hoping that eBay has some available for a reasonable price. All in all, I think I got away with it. Maintenance: £324.88 Upgrades: £676.49 Miscellaneous: £584.95
-
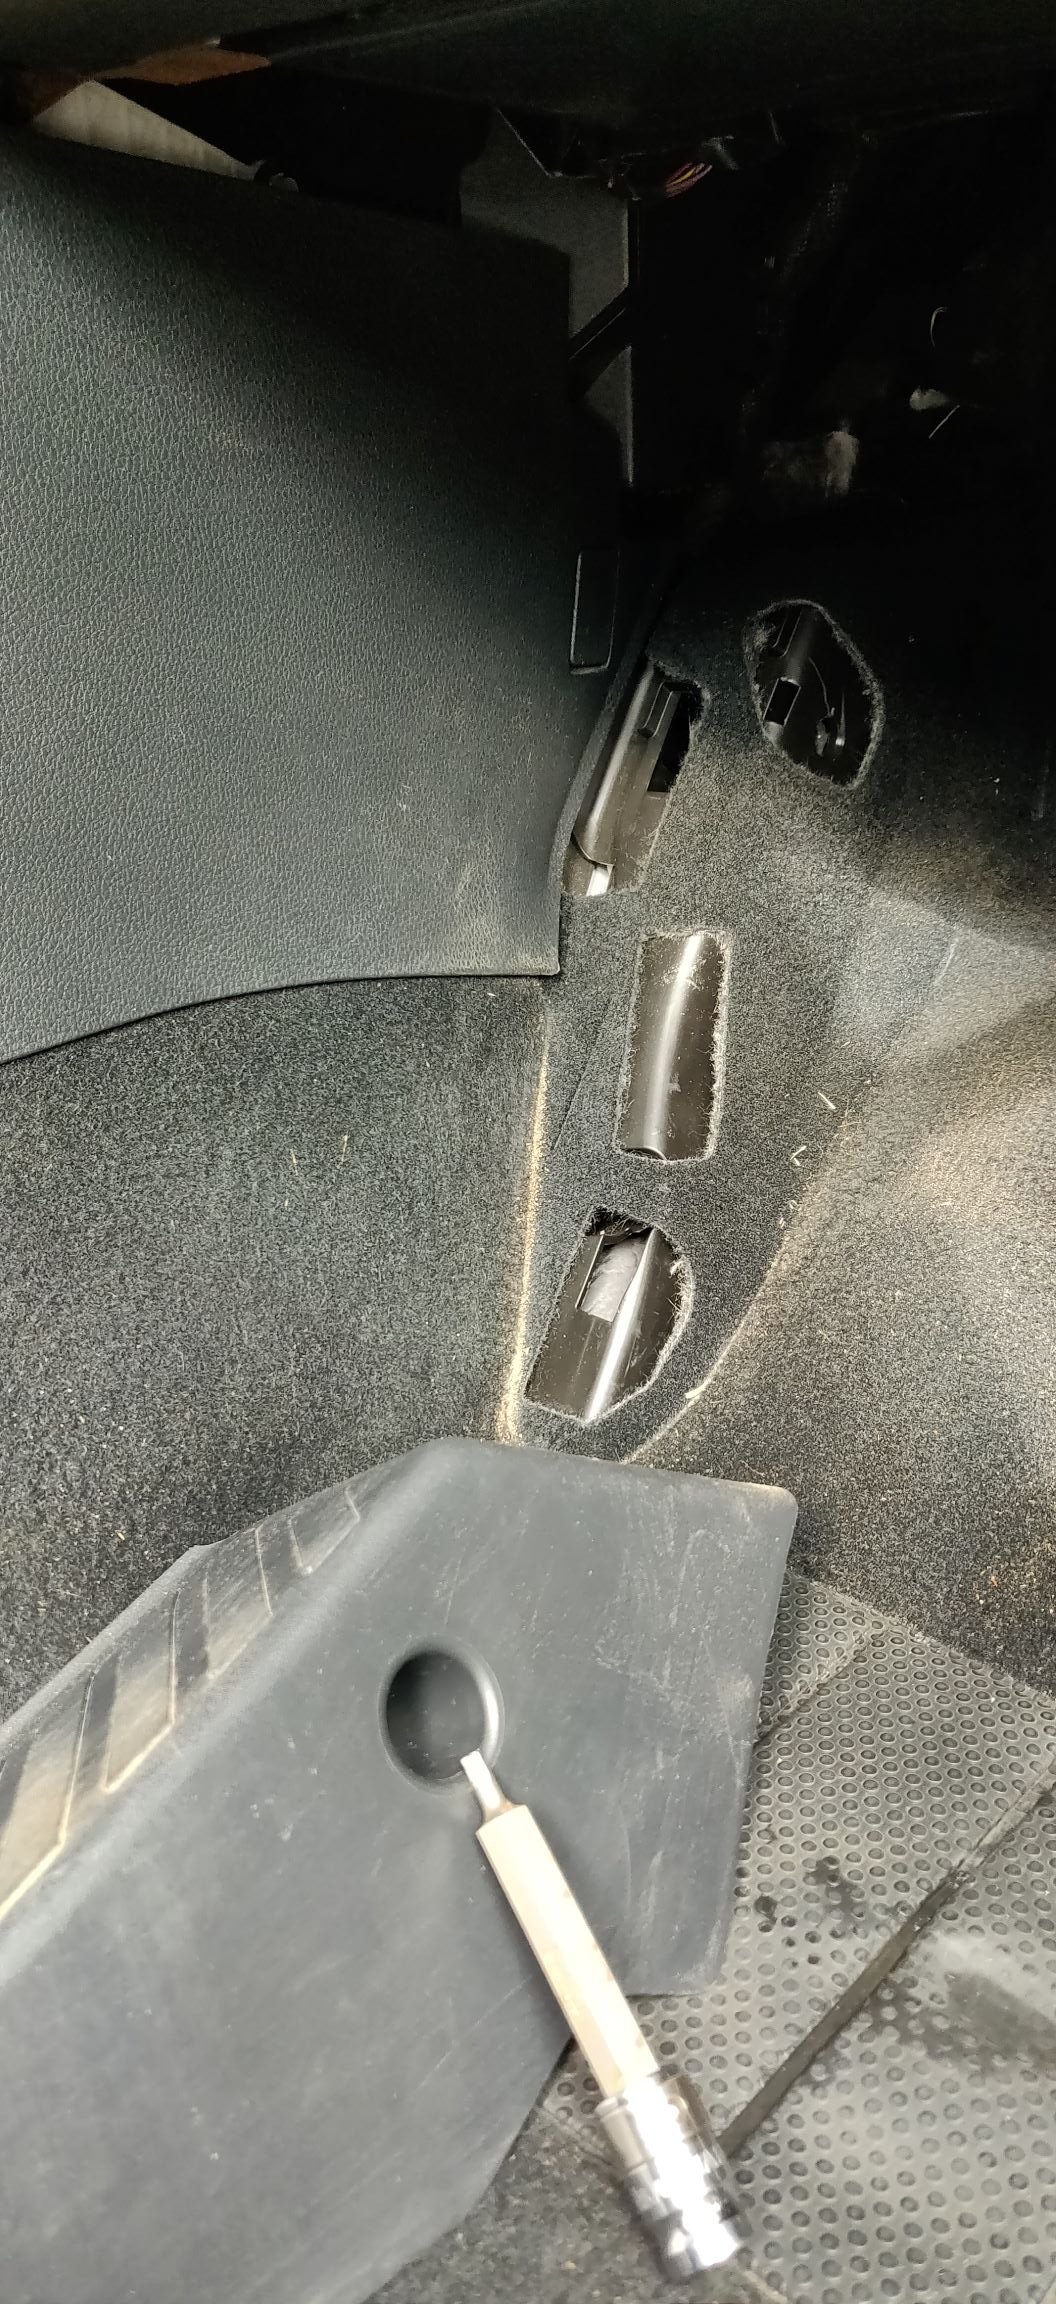
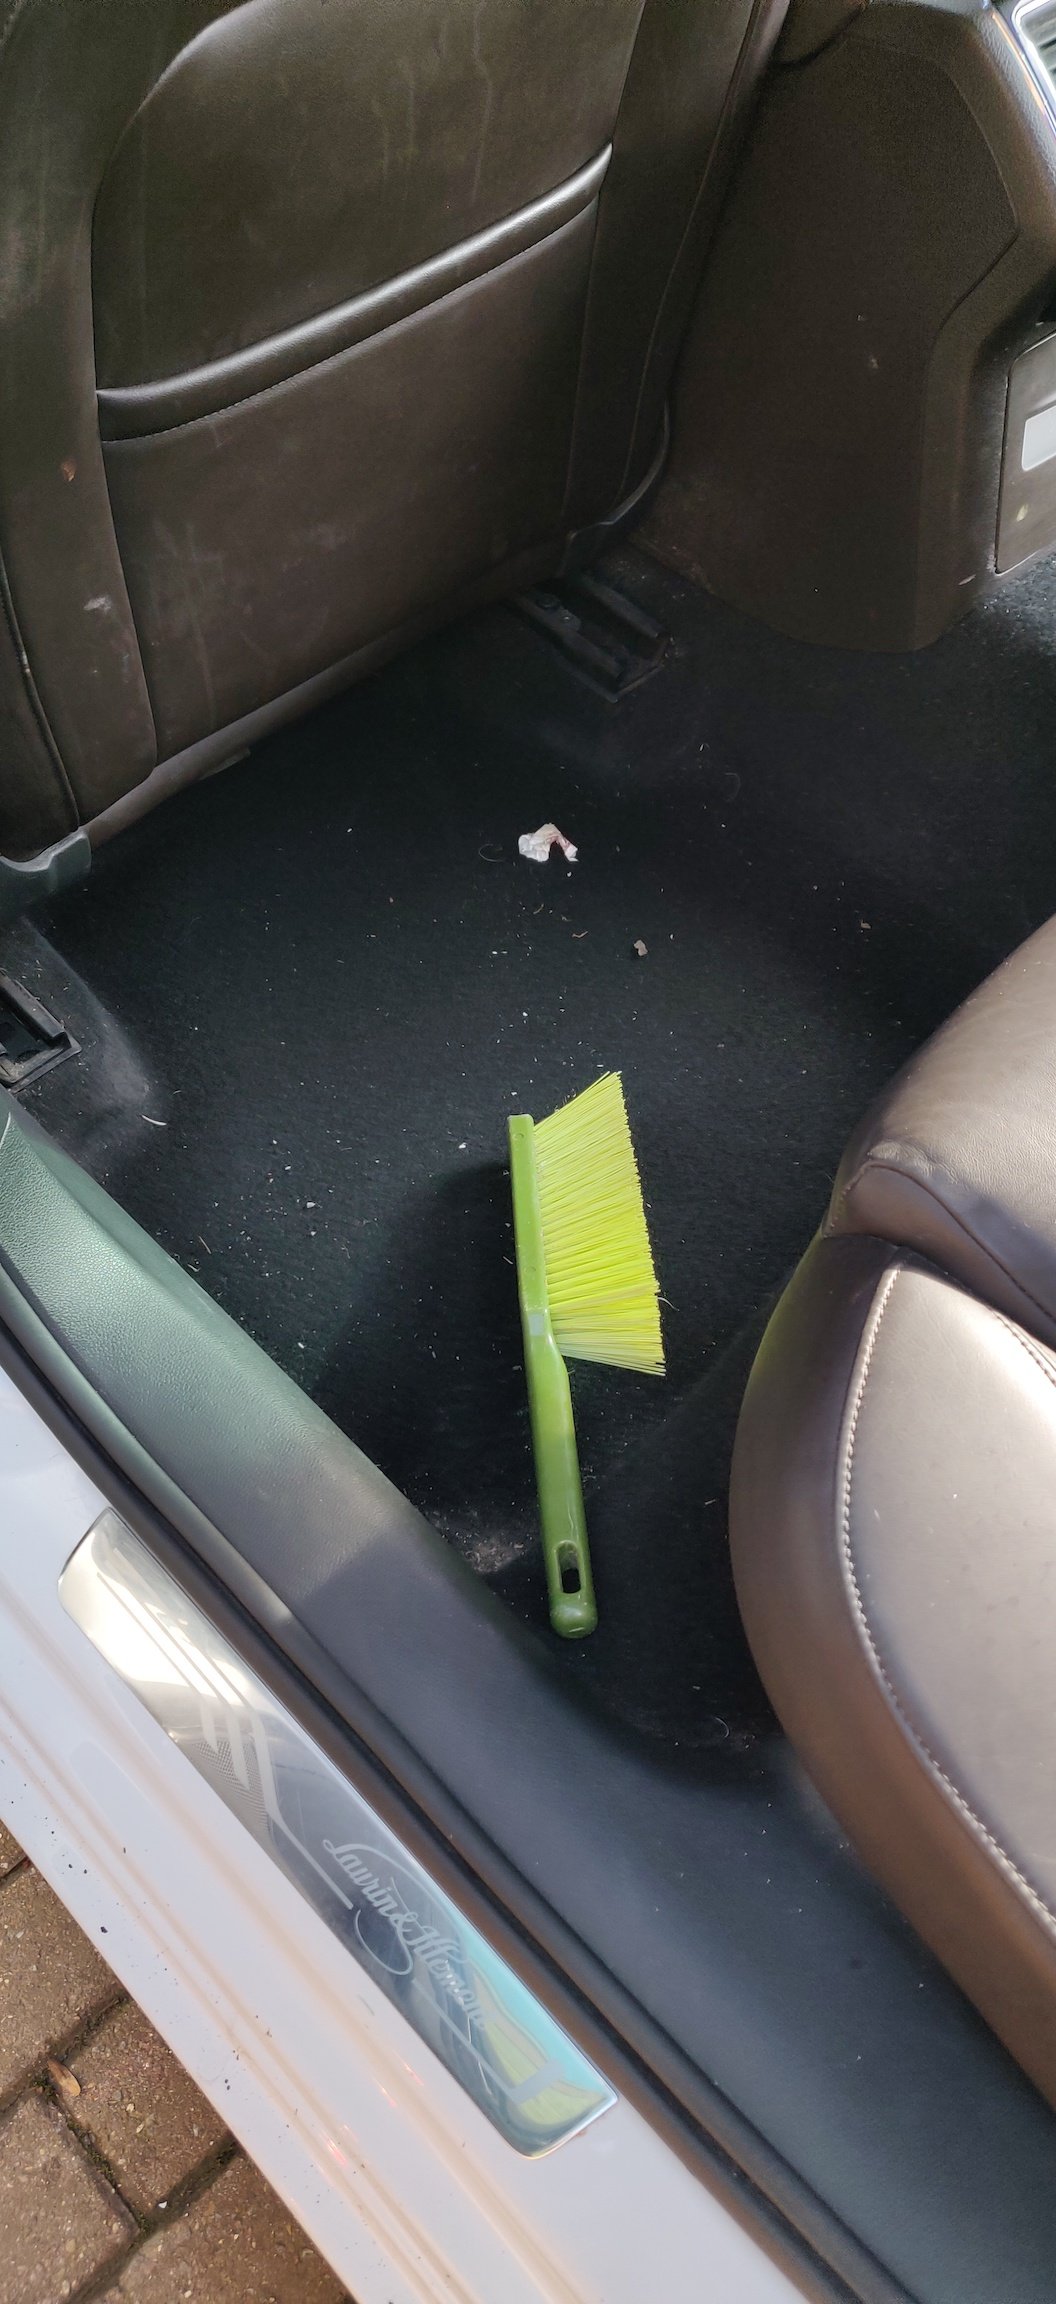
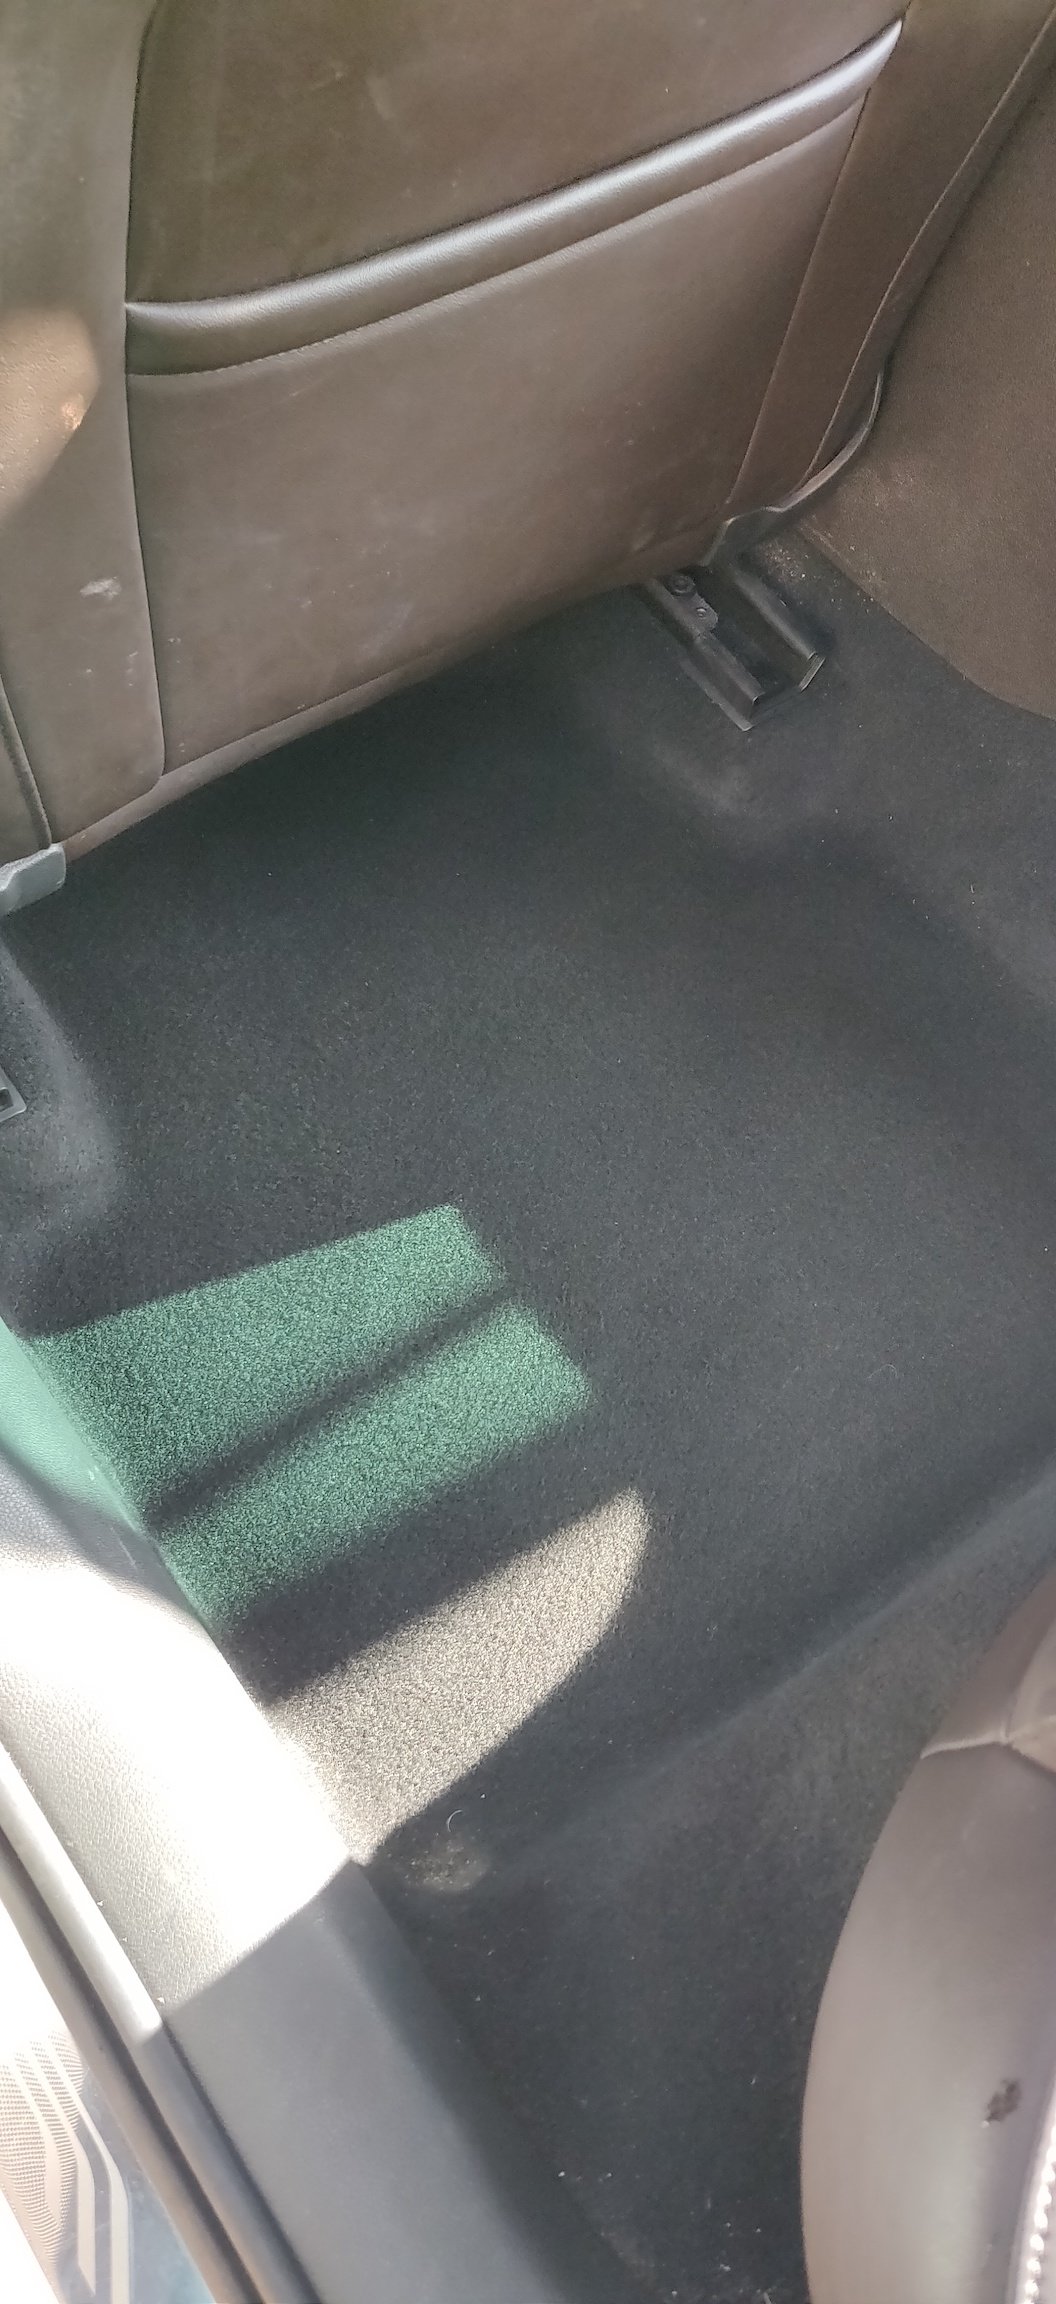
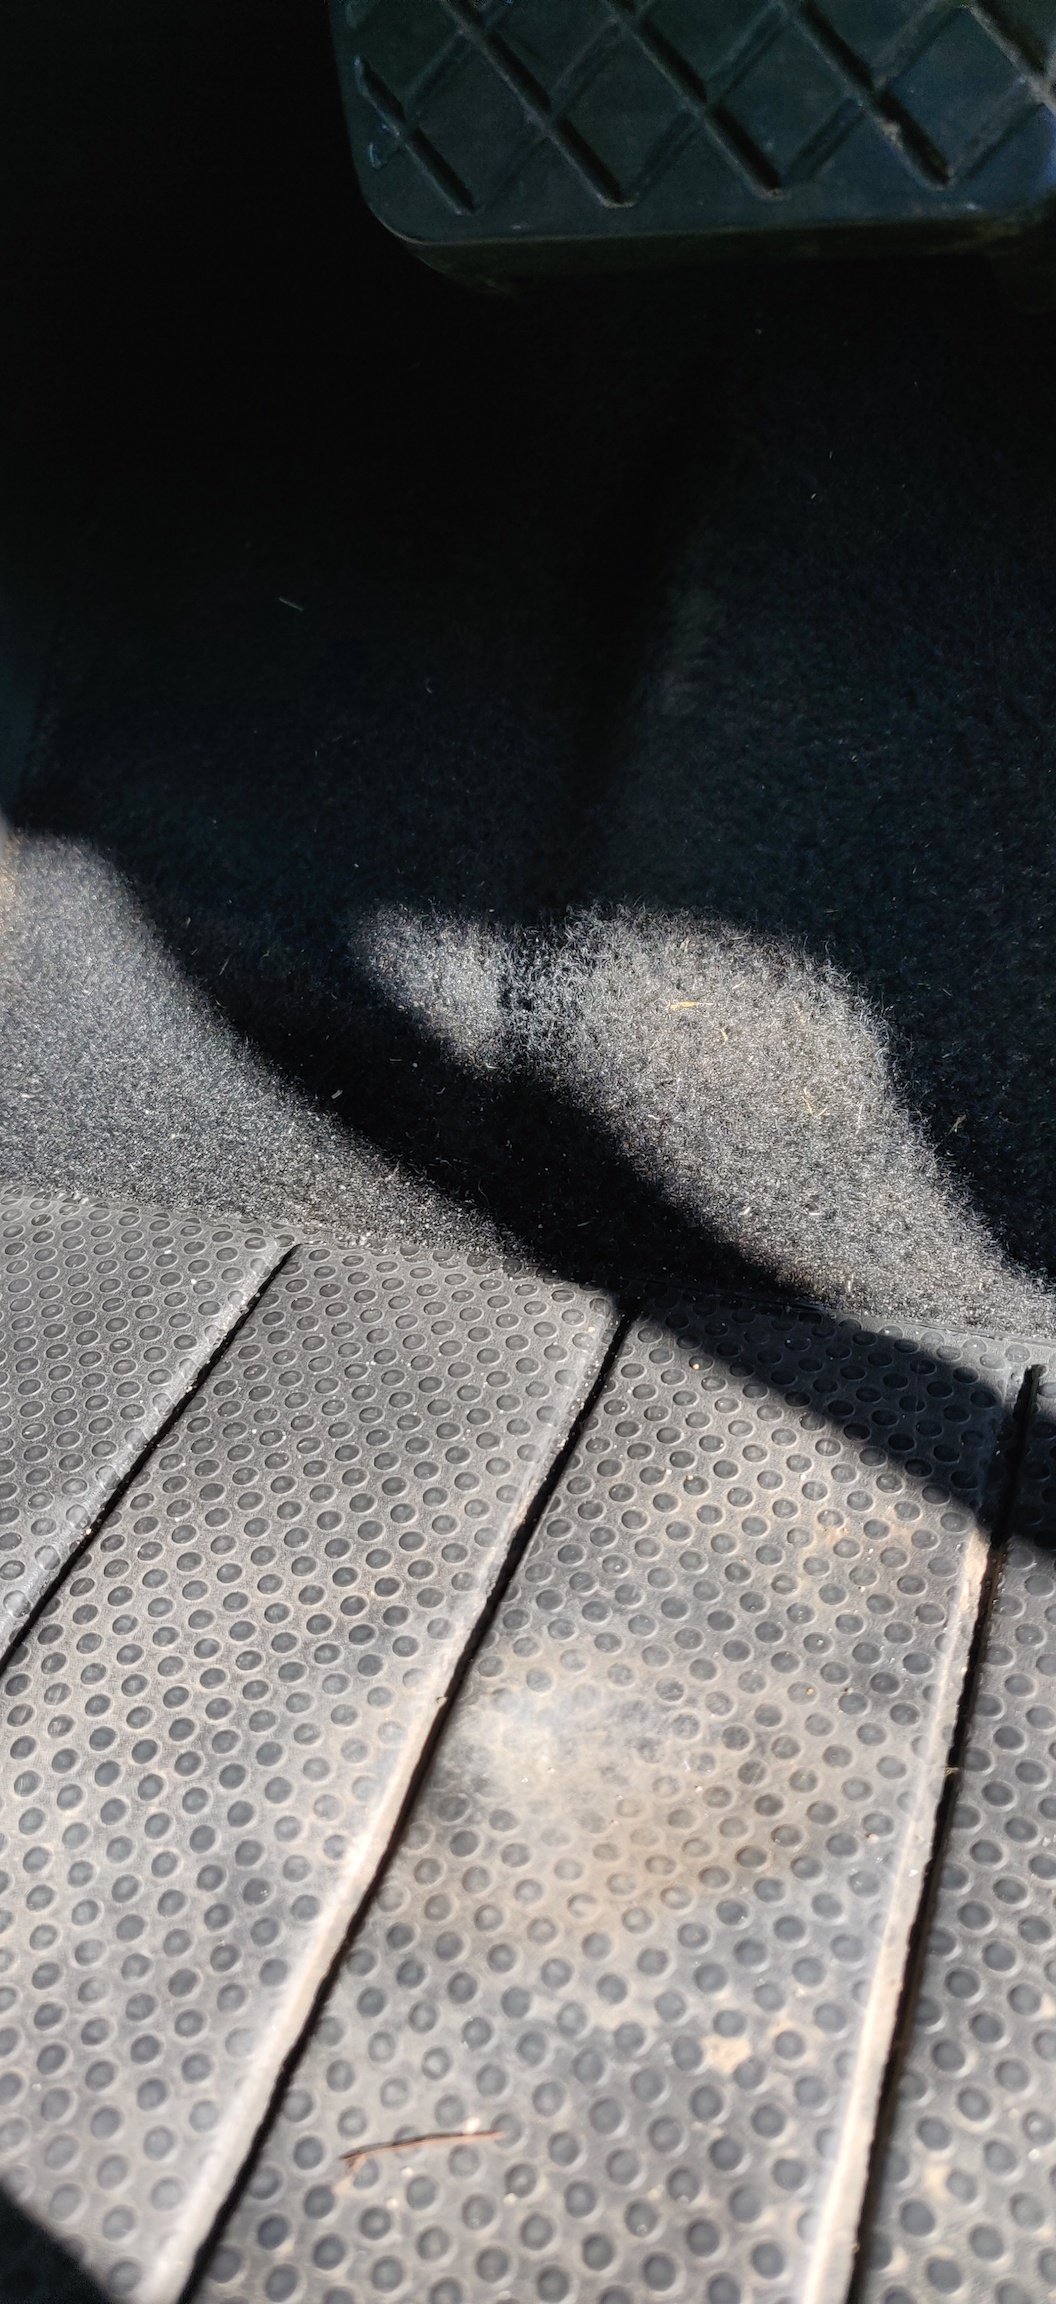
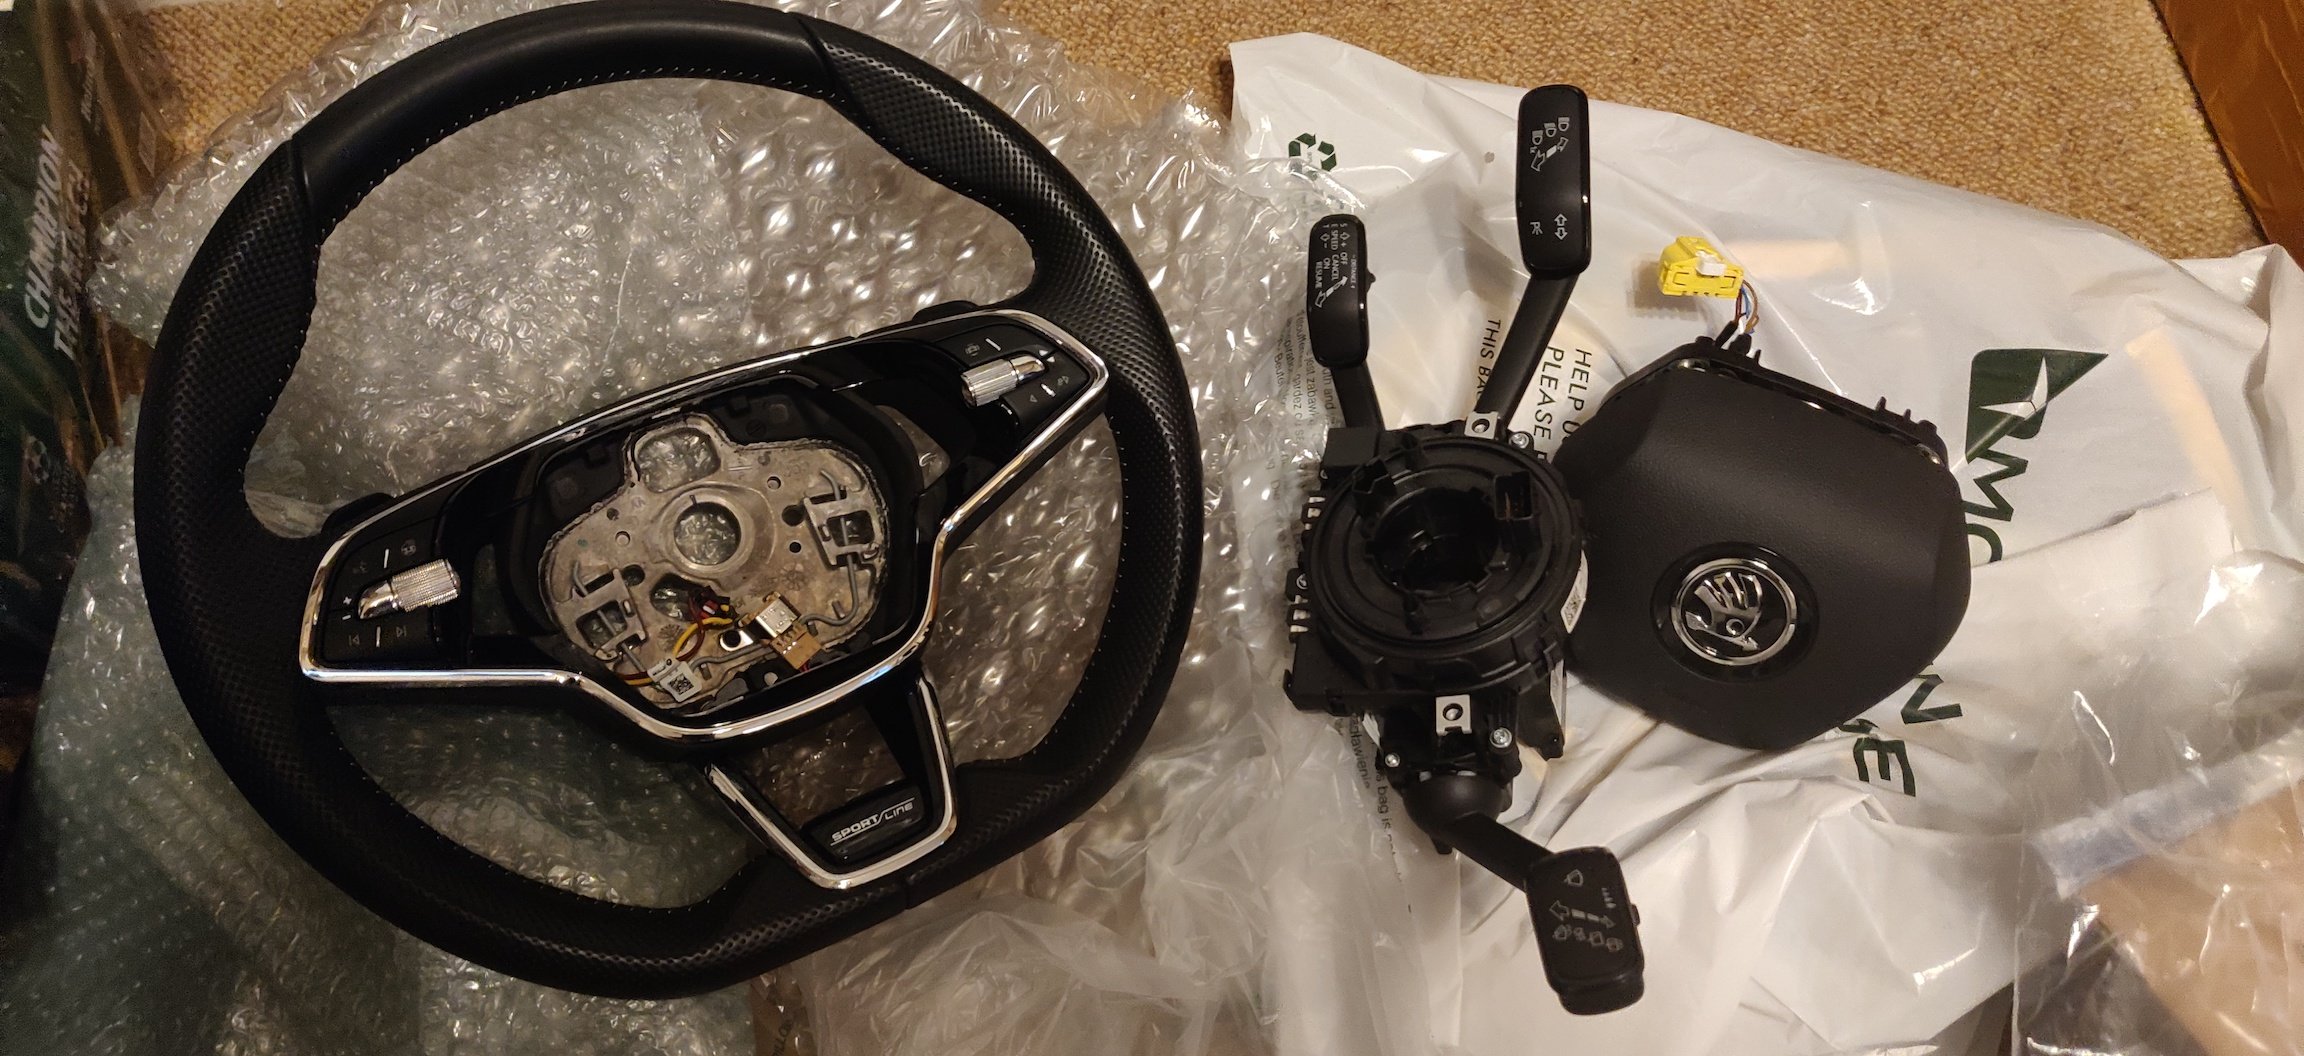
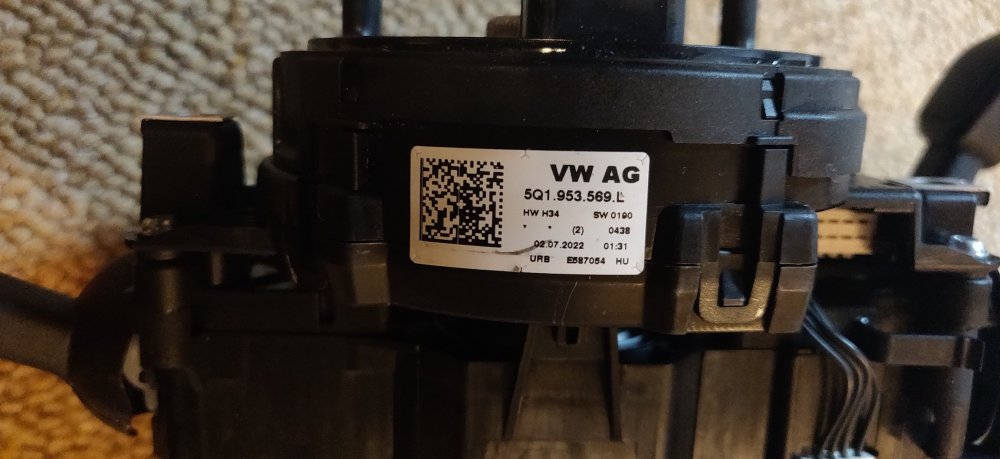
So, as I started to do a bit more swotting up, I feel a little bit of a plonker for going in head first with the above purchase. Maybe the alure of the shiny steering wheel distracted me from the potential pitfalls. Firstly, the clock spring part number: Isn't one that I've seen on the forums. I'm hazarding a guess here, but it looks like 5Q1 953 569 L is part of the facelift for these Superbs, and I can't imagine it would be backwards compatible (because otherwise it'd be the same part number, right?). I've seen specifically for this heated steering wheel retrofit, 5Q0 953 569 B (or C) and 5Q0 953 549 D so essentially either 569 or 549. So rummaging with the VCDS: It looks like the one currently installed in the car is 5Q0 953 569 A. So I really need to go for B or C, and of course they have to be more expensive than those ending 549! This could also be probably why the retrofitters have also not embarked with the facelift steering wheel. From what I can gather, it doesn't use the CAN bus anymore and does things slightly differently. Some additional research has pointed me to adapters such as https://www.cars-equipment.com/en/shop/steering-wheels-parts/jtcw1-skoda-steering-wheel-converter-octavia/ or something like https://skoda-acc.com/Skoda-steering-wheel-buttons-adapter-Full-S0001F. Also a Kufatec adapter for the heated power wiring, unless I want to DIY something there. This'll then lead to the indicator stalks. The ones on the car now are a little tired, although I guess they all do that, and I'd definitely want to put these shinier ones in given the chance. Whether they're the same or compatible though is another question. Best case scenario, an additional clock spring, heated steering wiring and adapter might be all that's needed. Worse case, the steering wheel just isn't going to work and I'll have to renege and get a pre facelift steering wheel. Either way, probably far more than the benefits are going to be I imagine, but lesson nearly learned. Anyways, given the carpet a second pass, this time with a stiff bristle brush to really agitate the carpet: Some bits haven't turned out too bad: Driver's footwell is looking a bit sorry for itself: Very very worn pretty much in line with the brake pedal. Will need at least another pass with the vacuum, but need to debate whether I'll go mad and factor in a carpet replacement. Something for the long distant future if the car is still around after say 4-5 years. I'll spare ones blushes regarding some of the things I've found under the seats. I will need to factor in seat removal to give this car a proper clean. Maintenance: £324.88 Upgrades: £676.49 Miscellaneous: £584.95

-
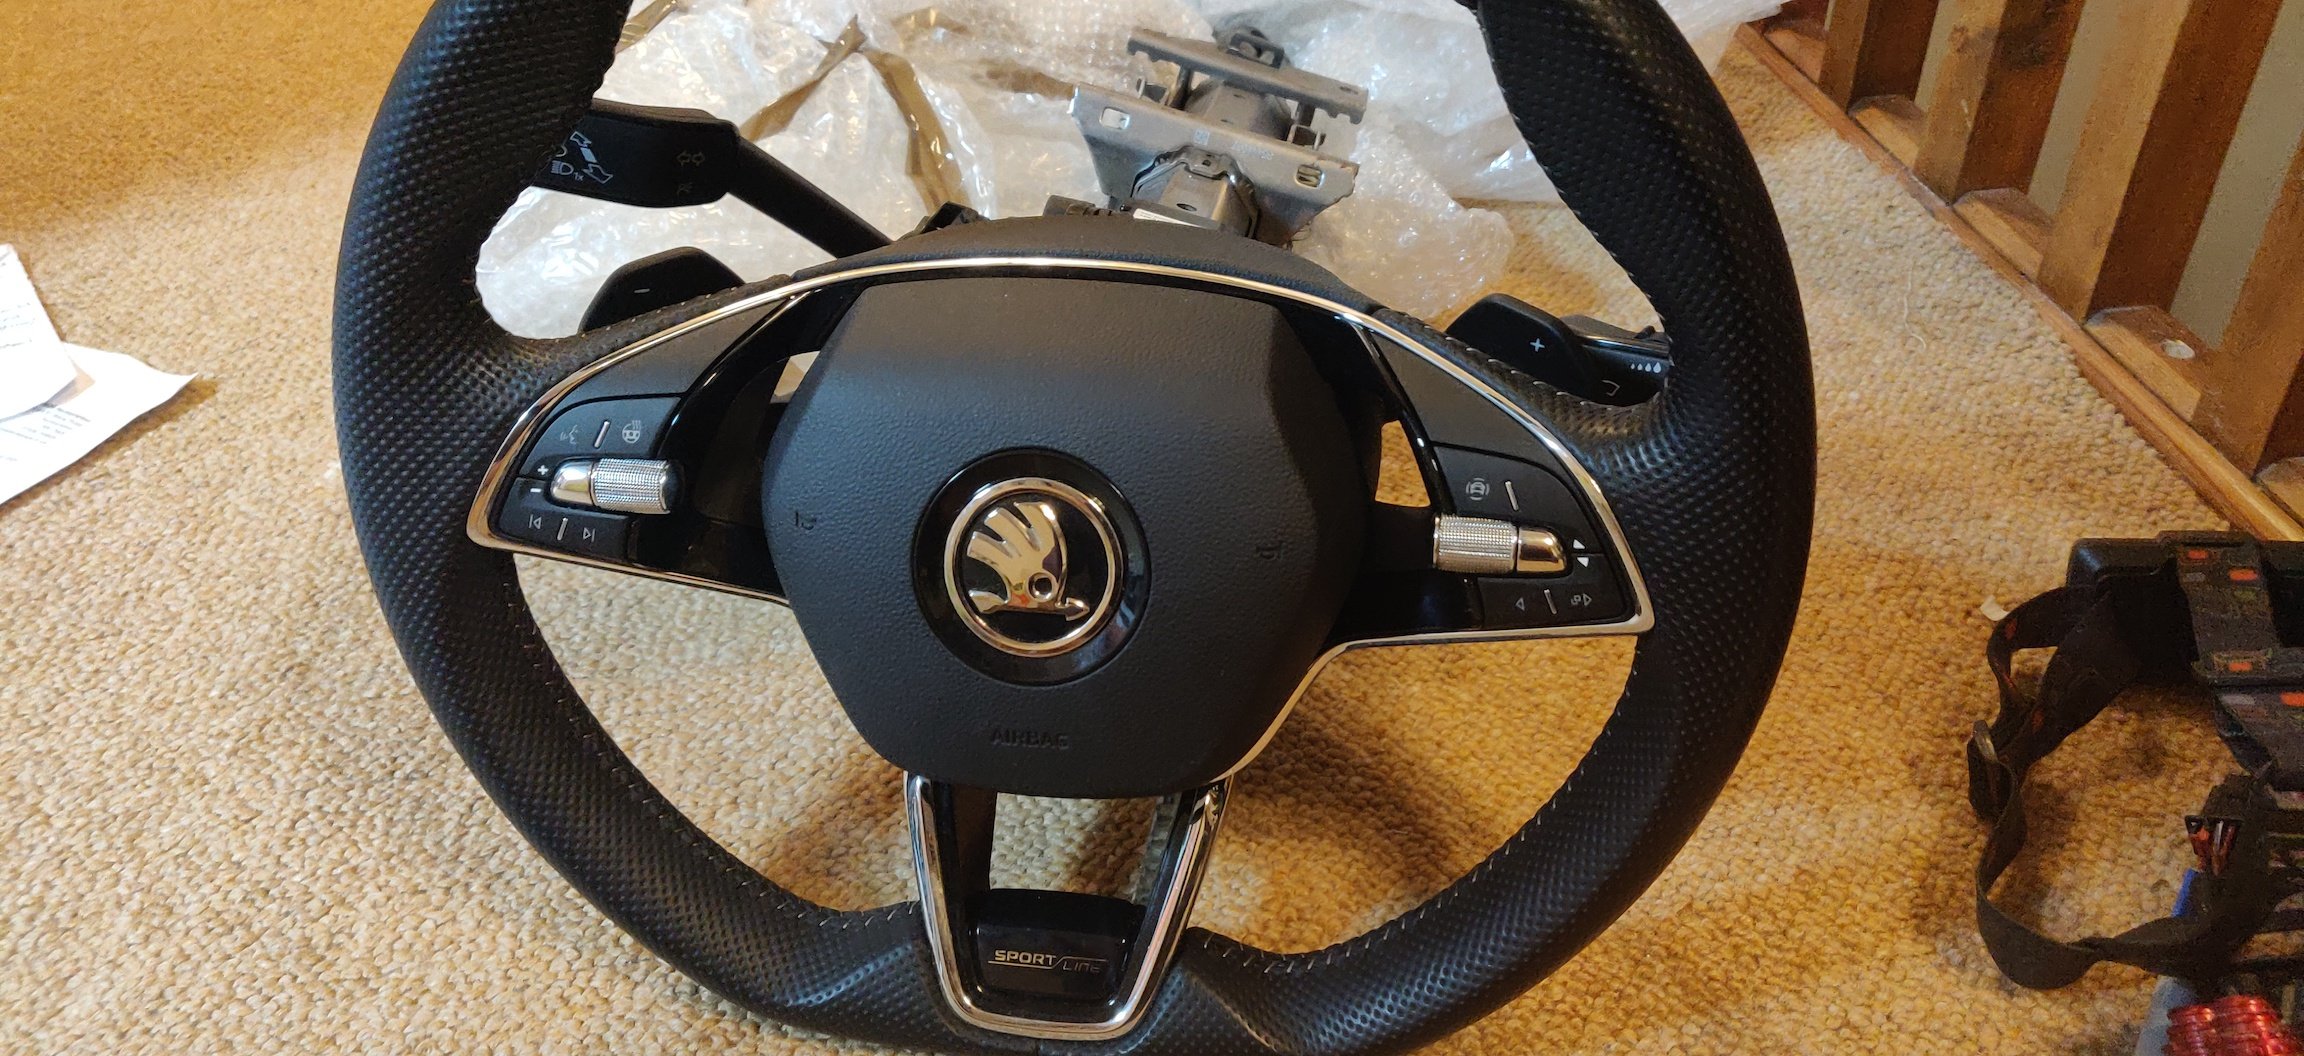
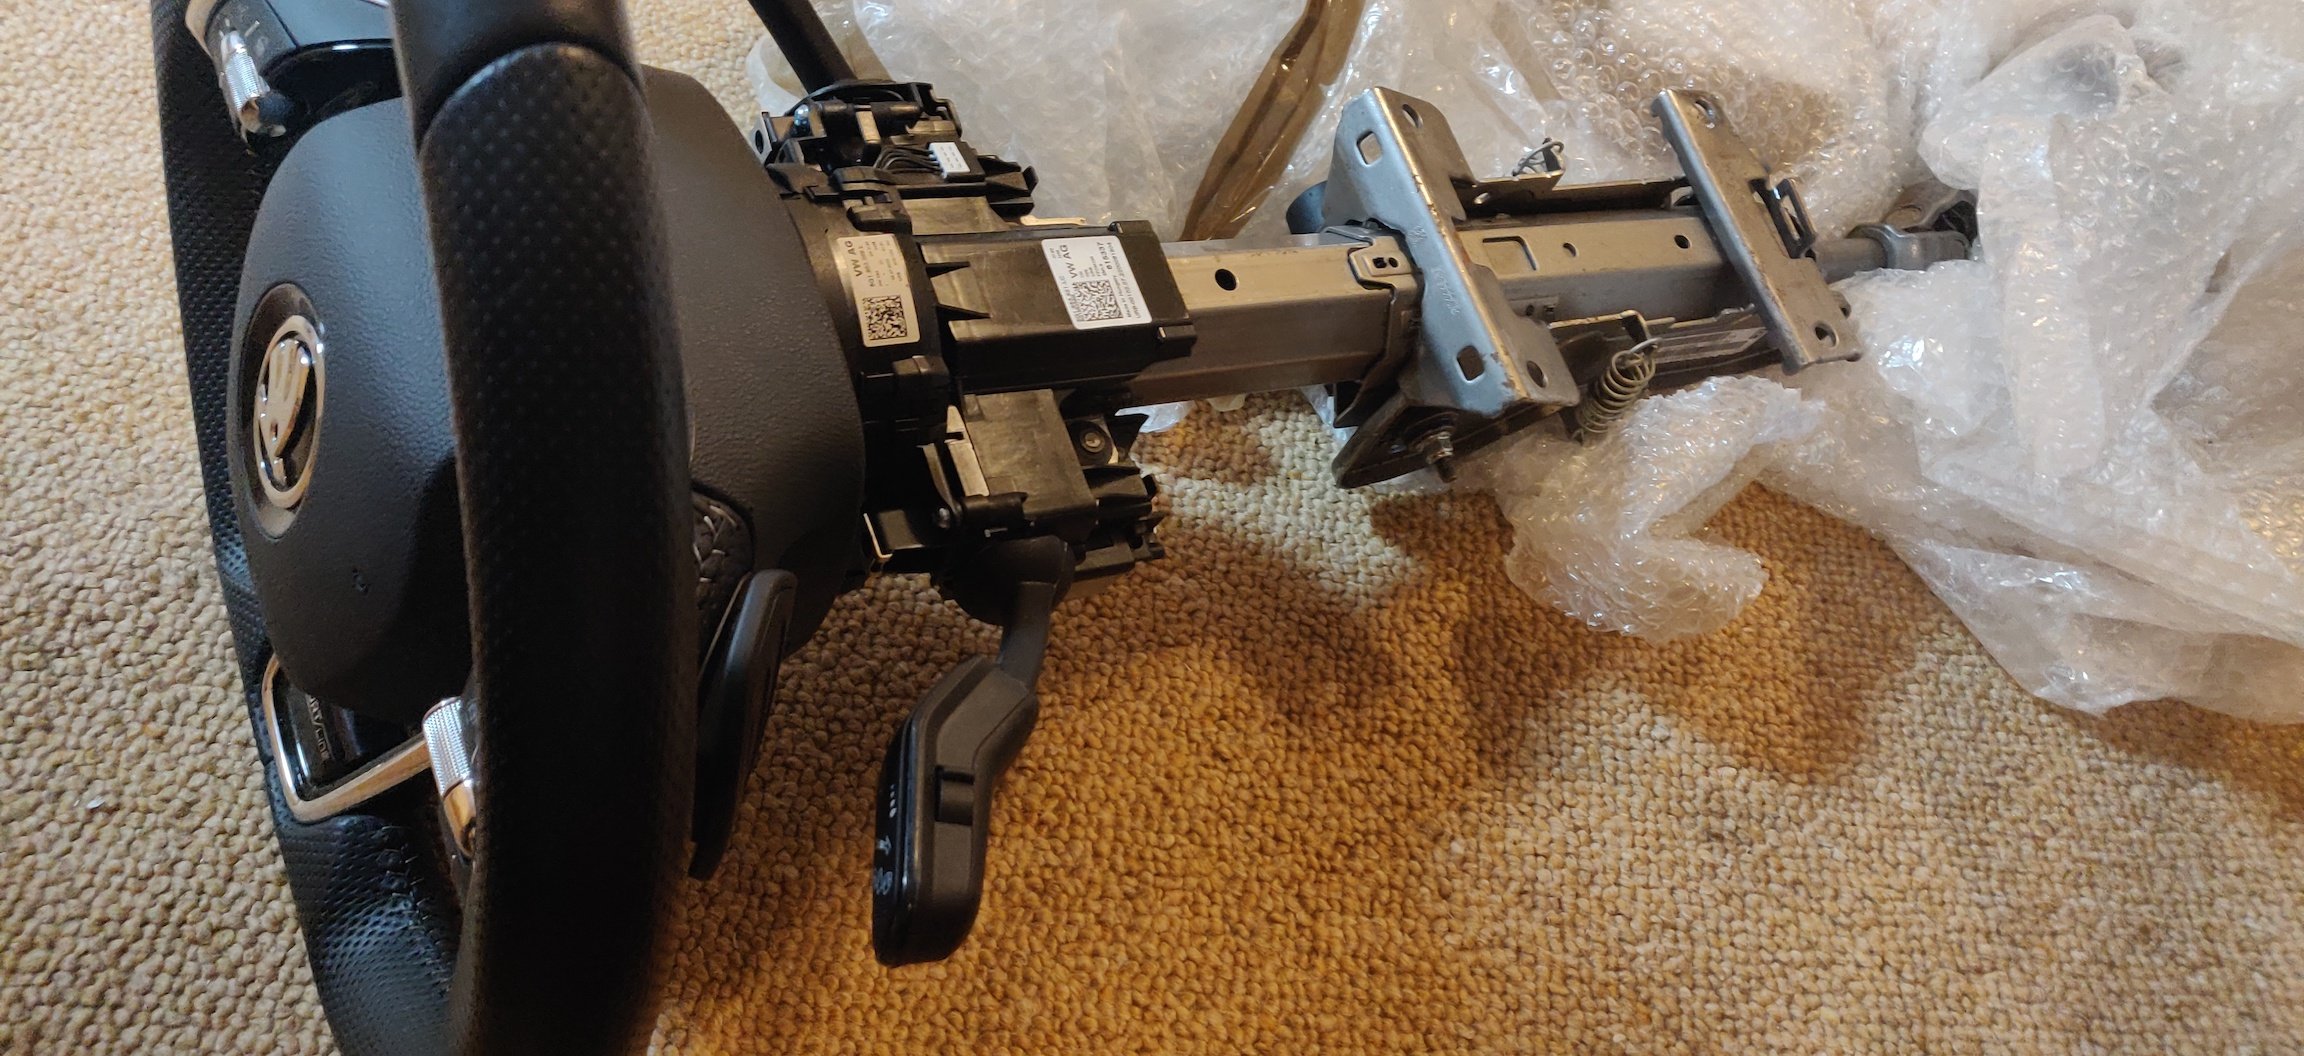
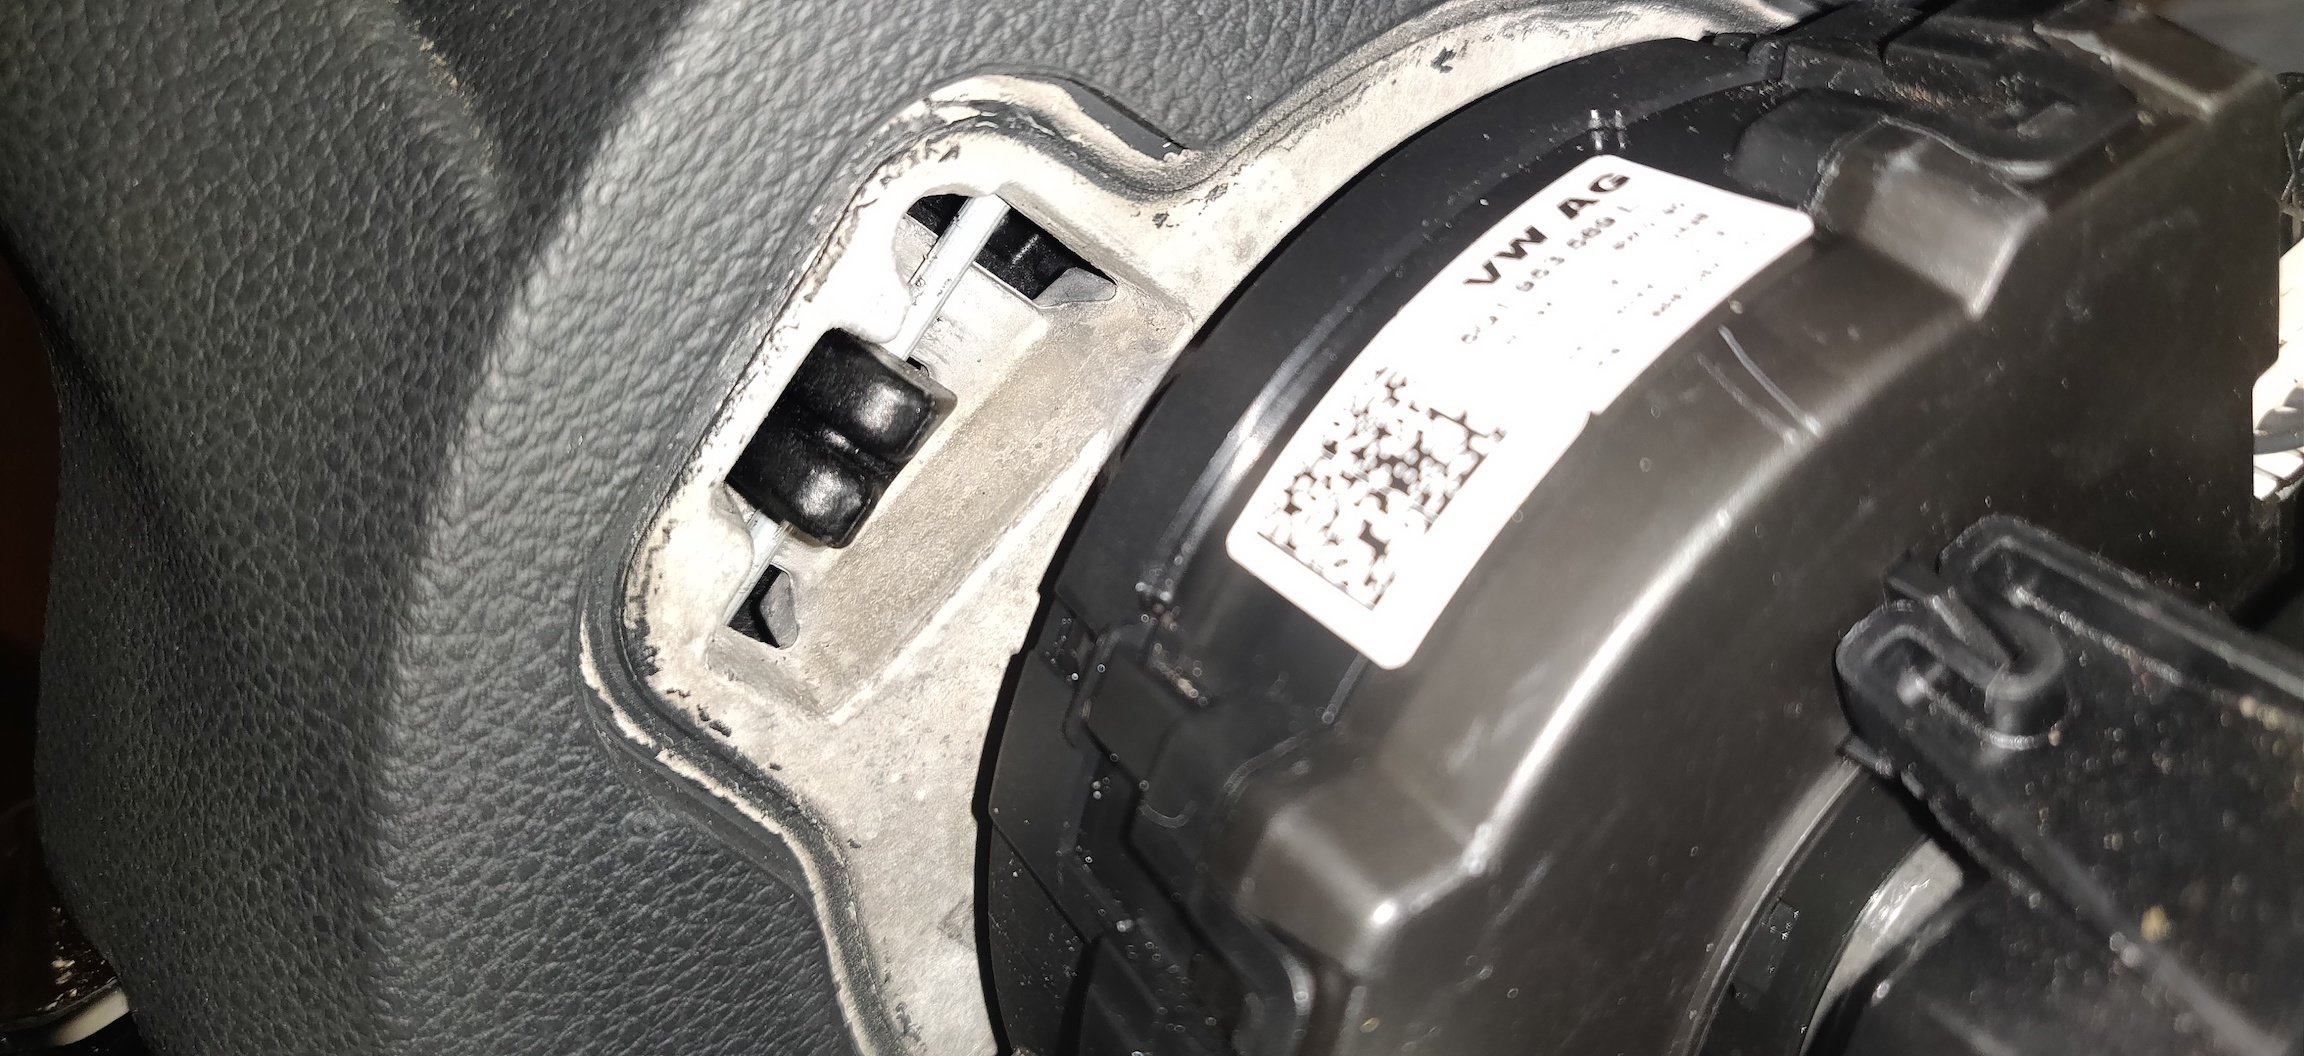
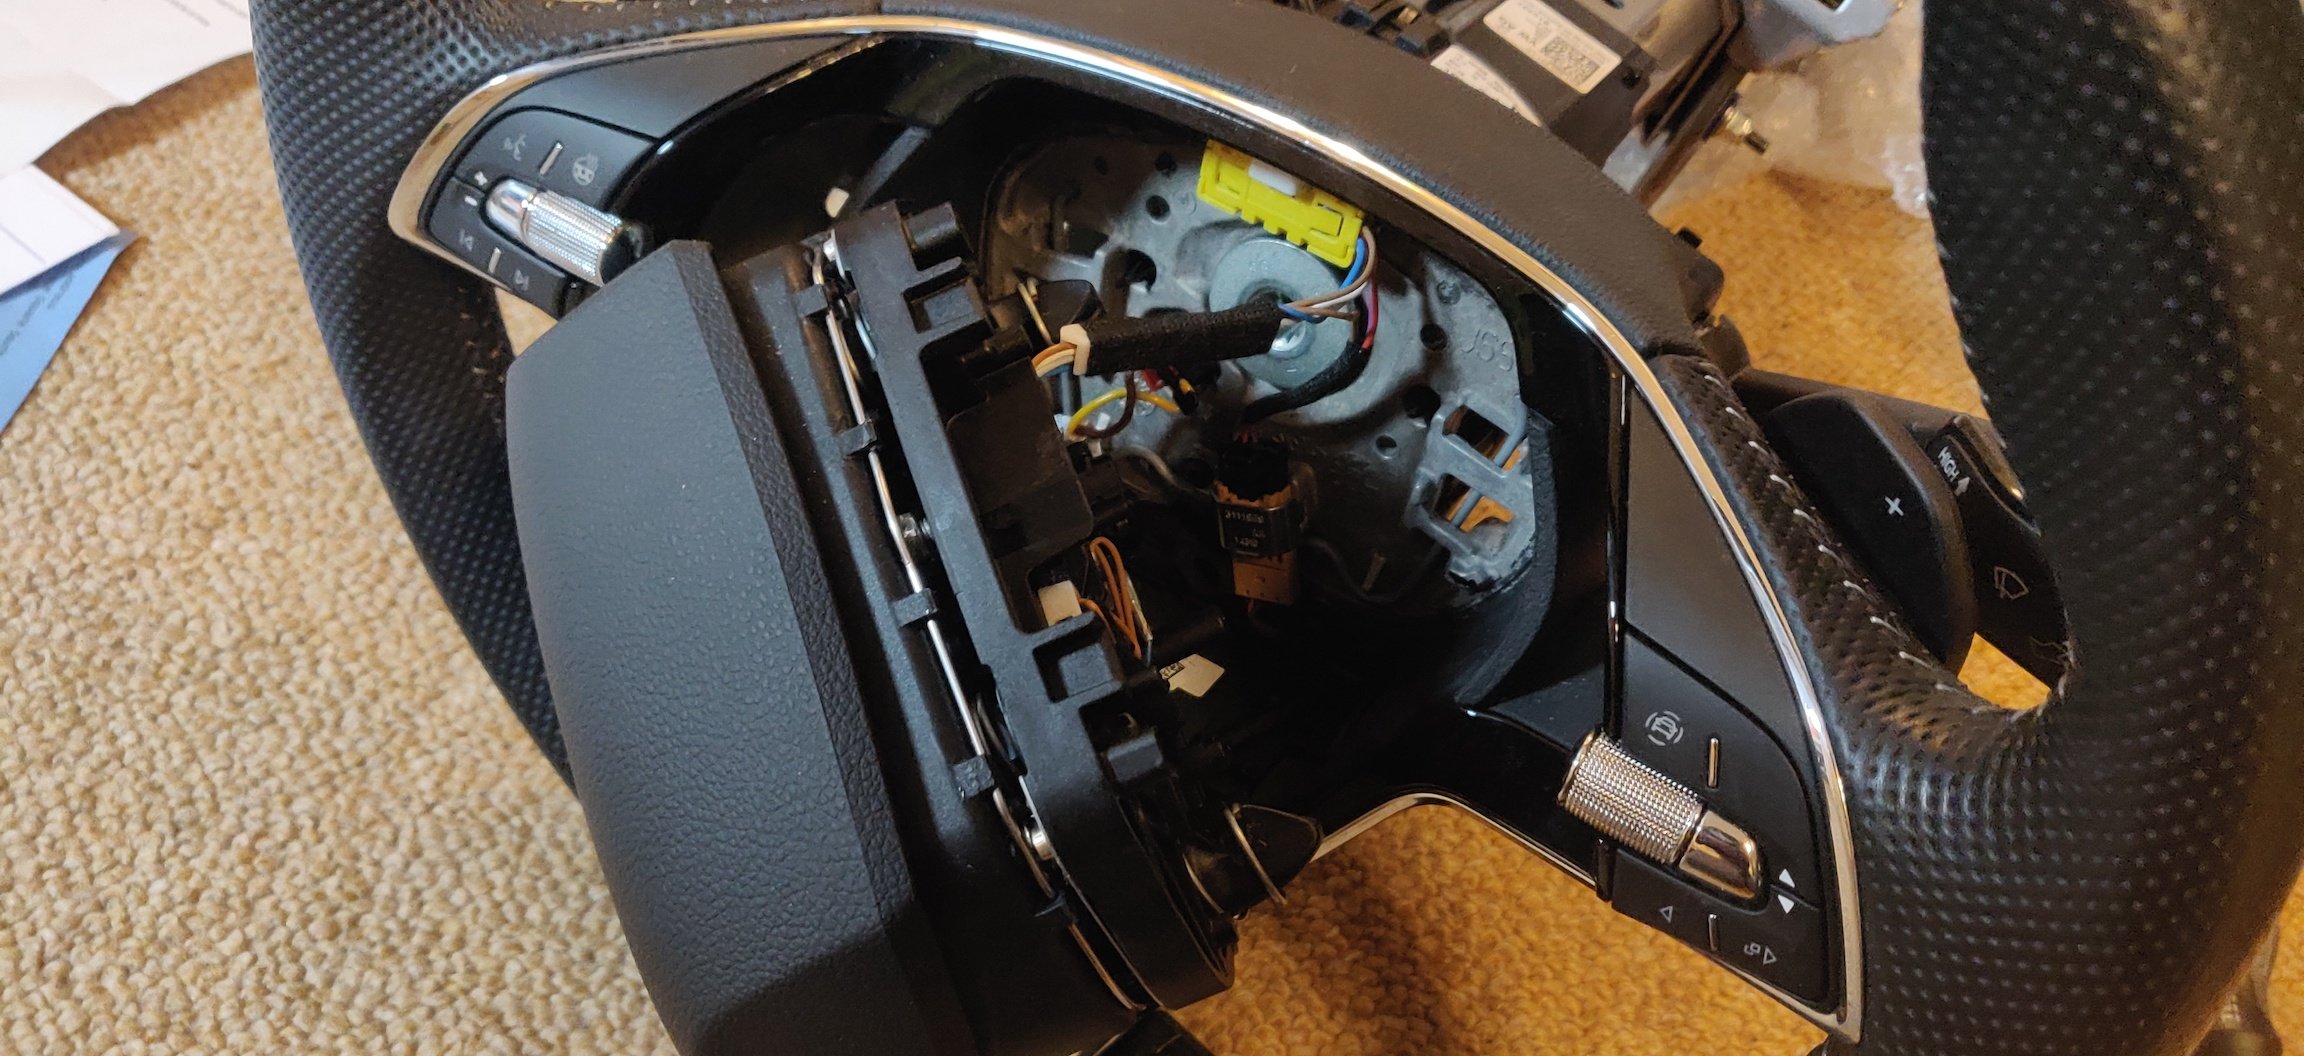
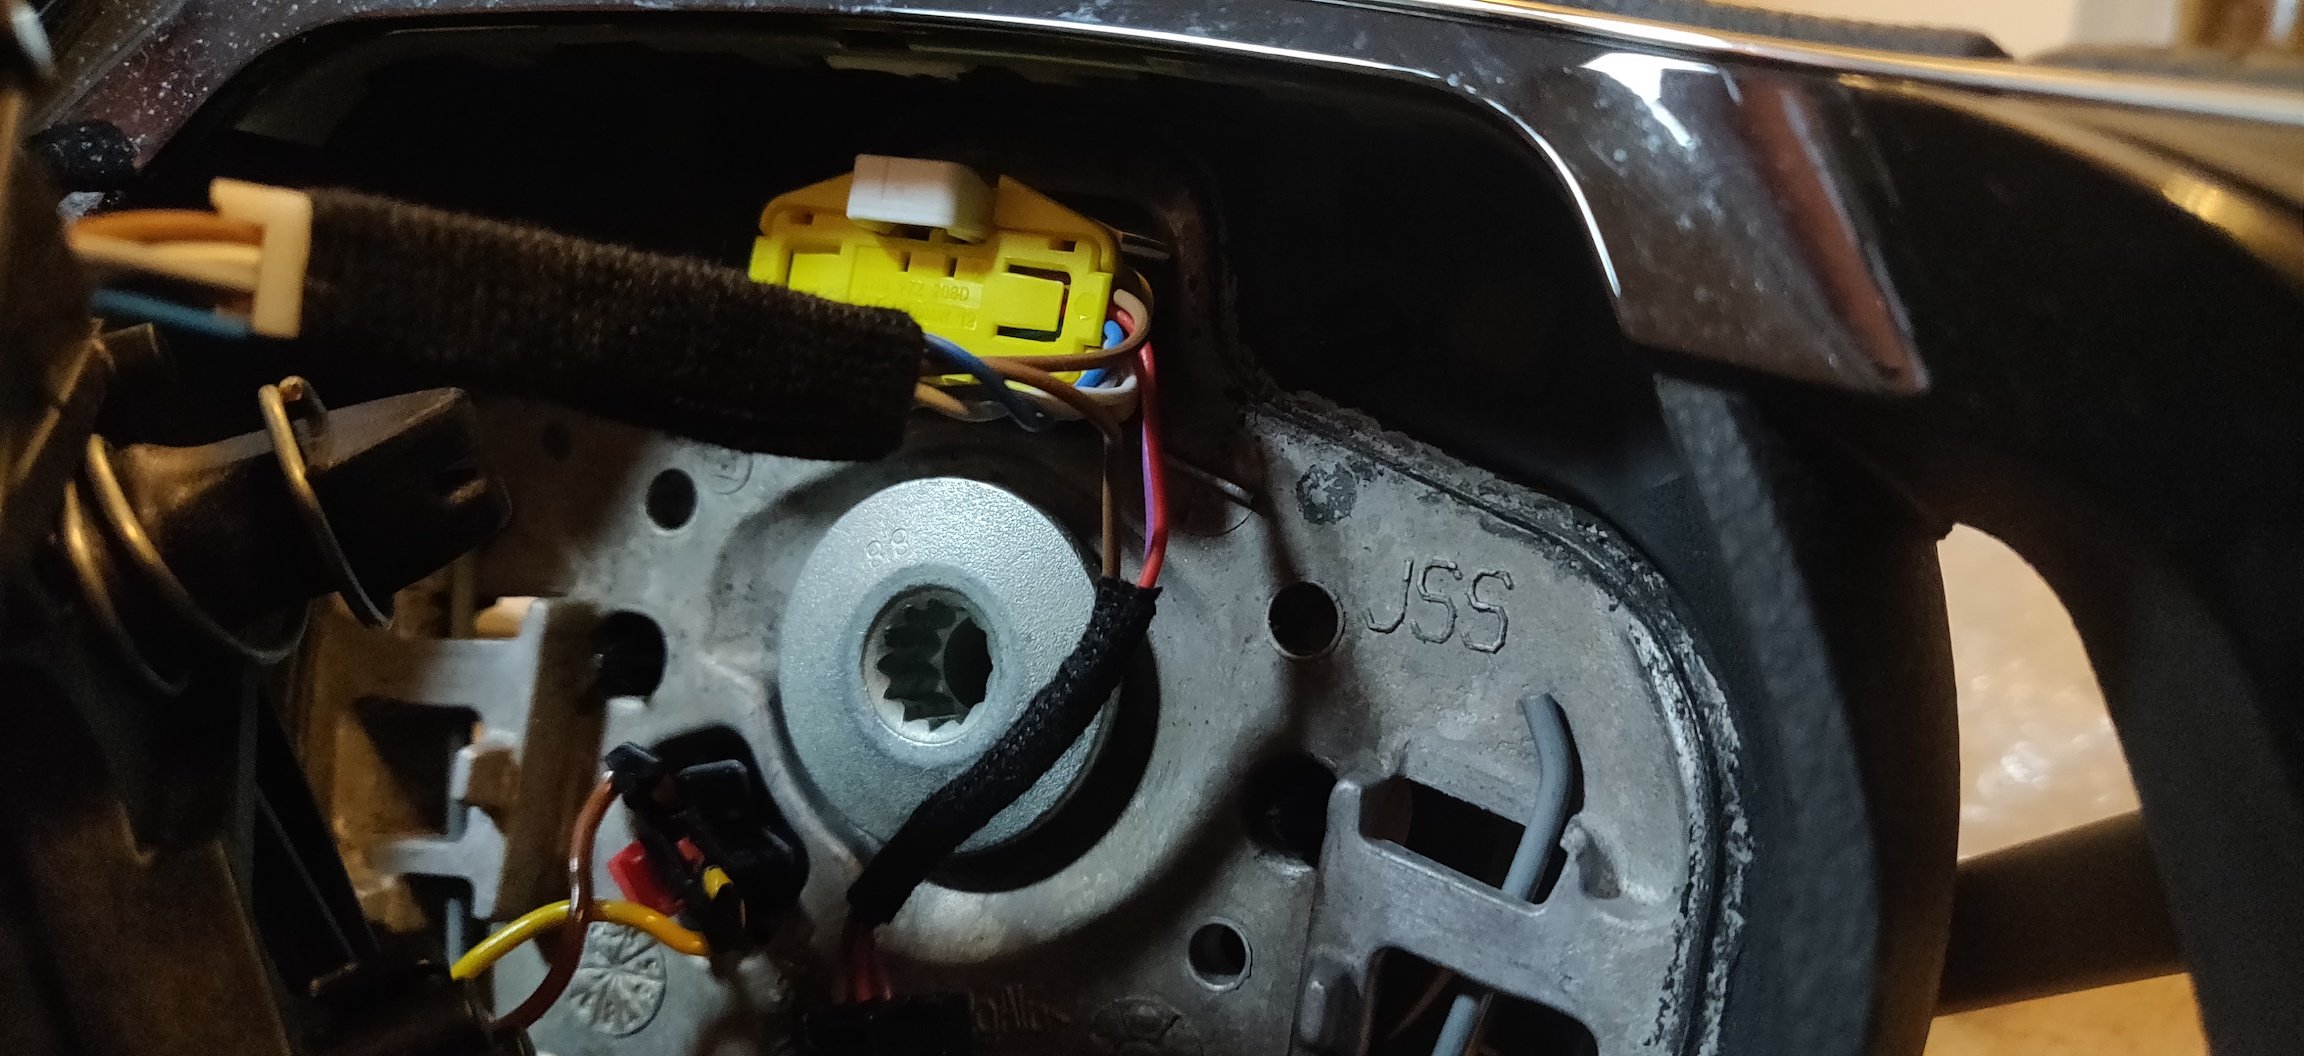
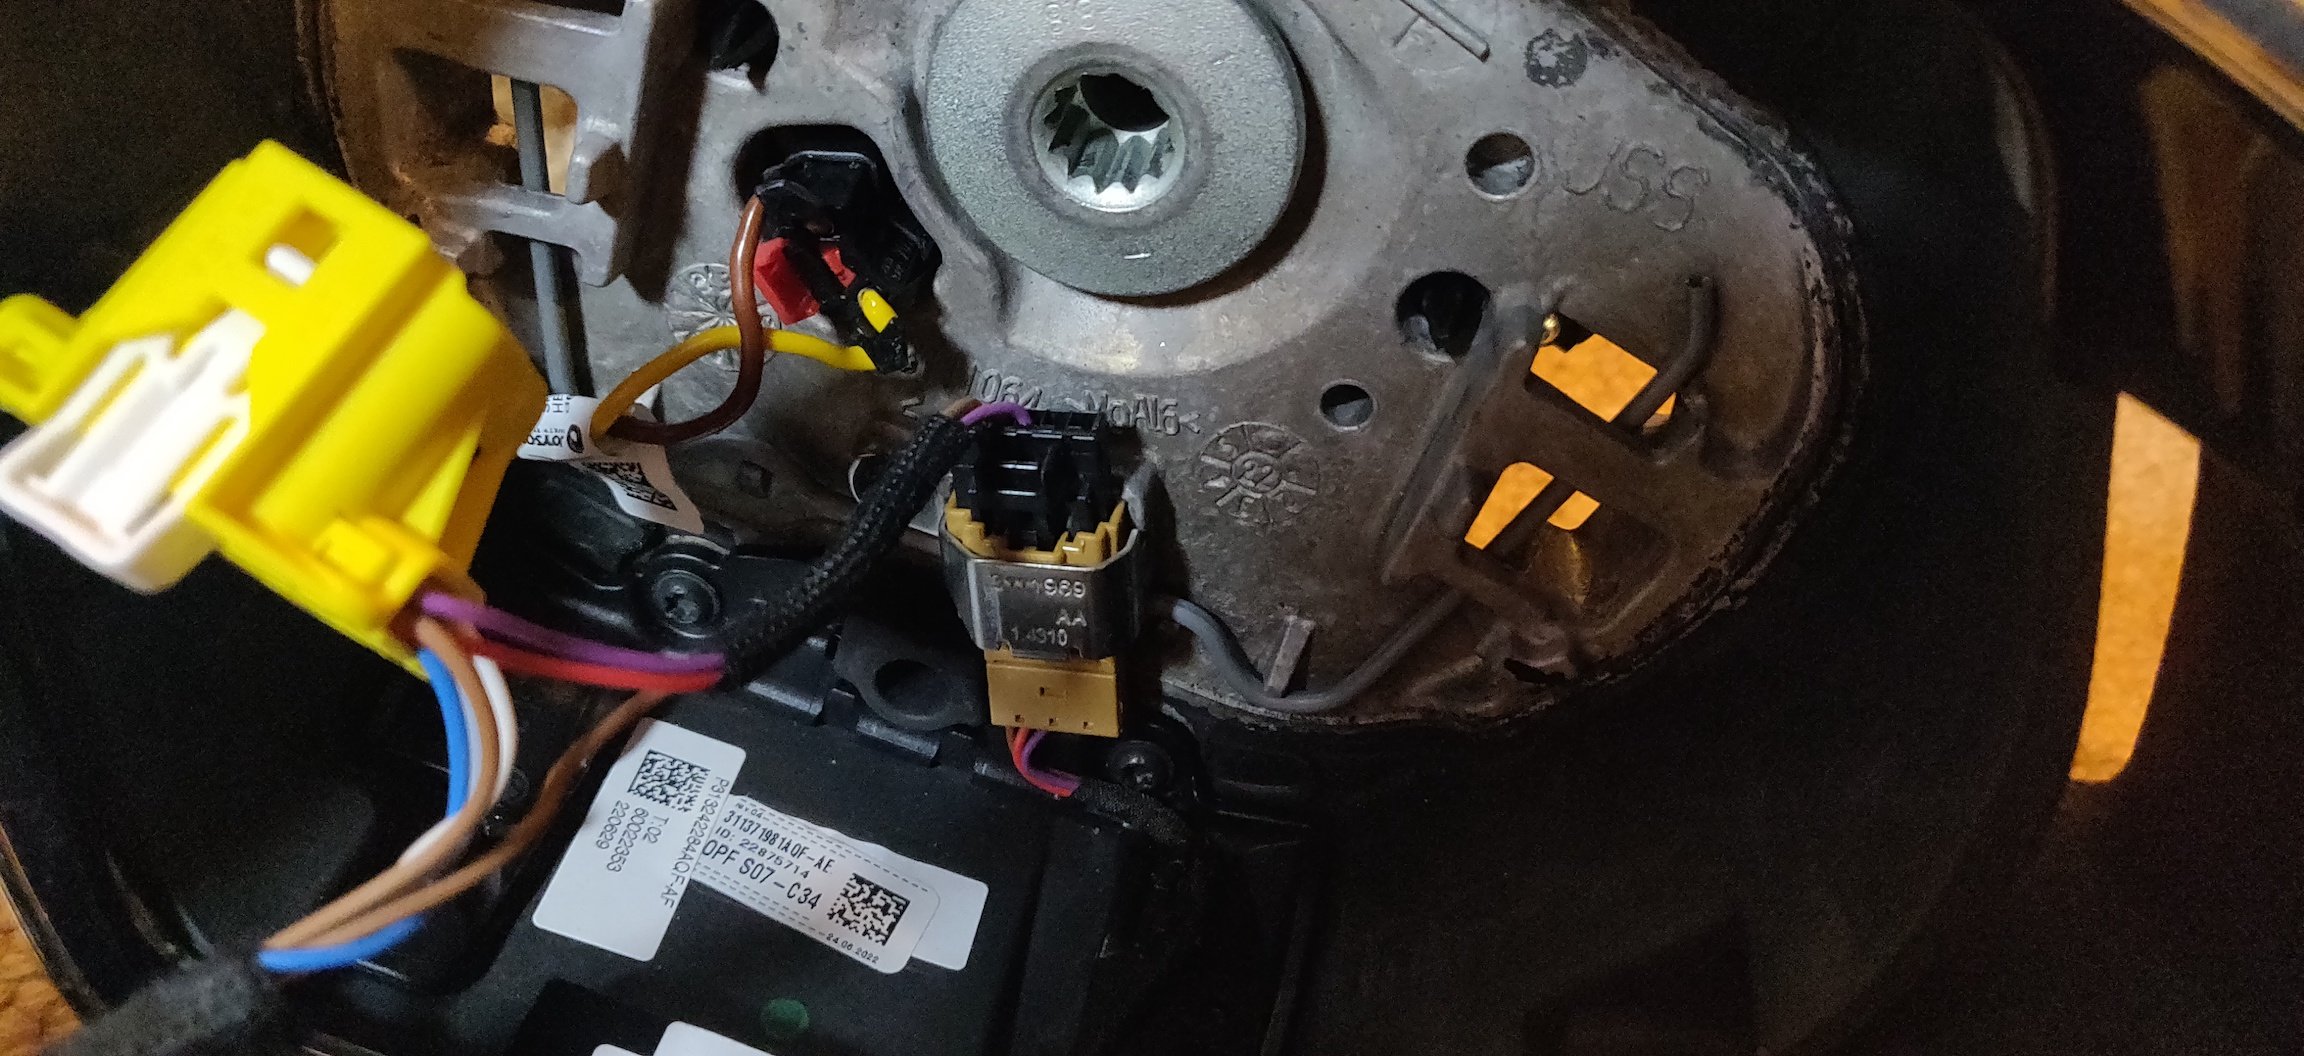
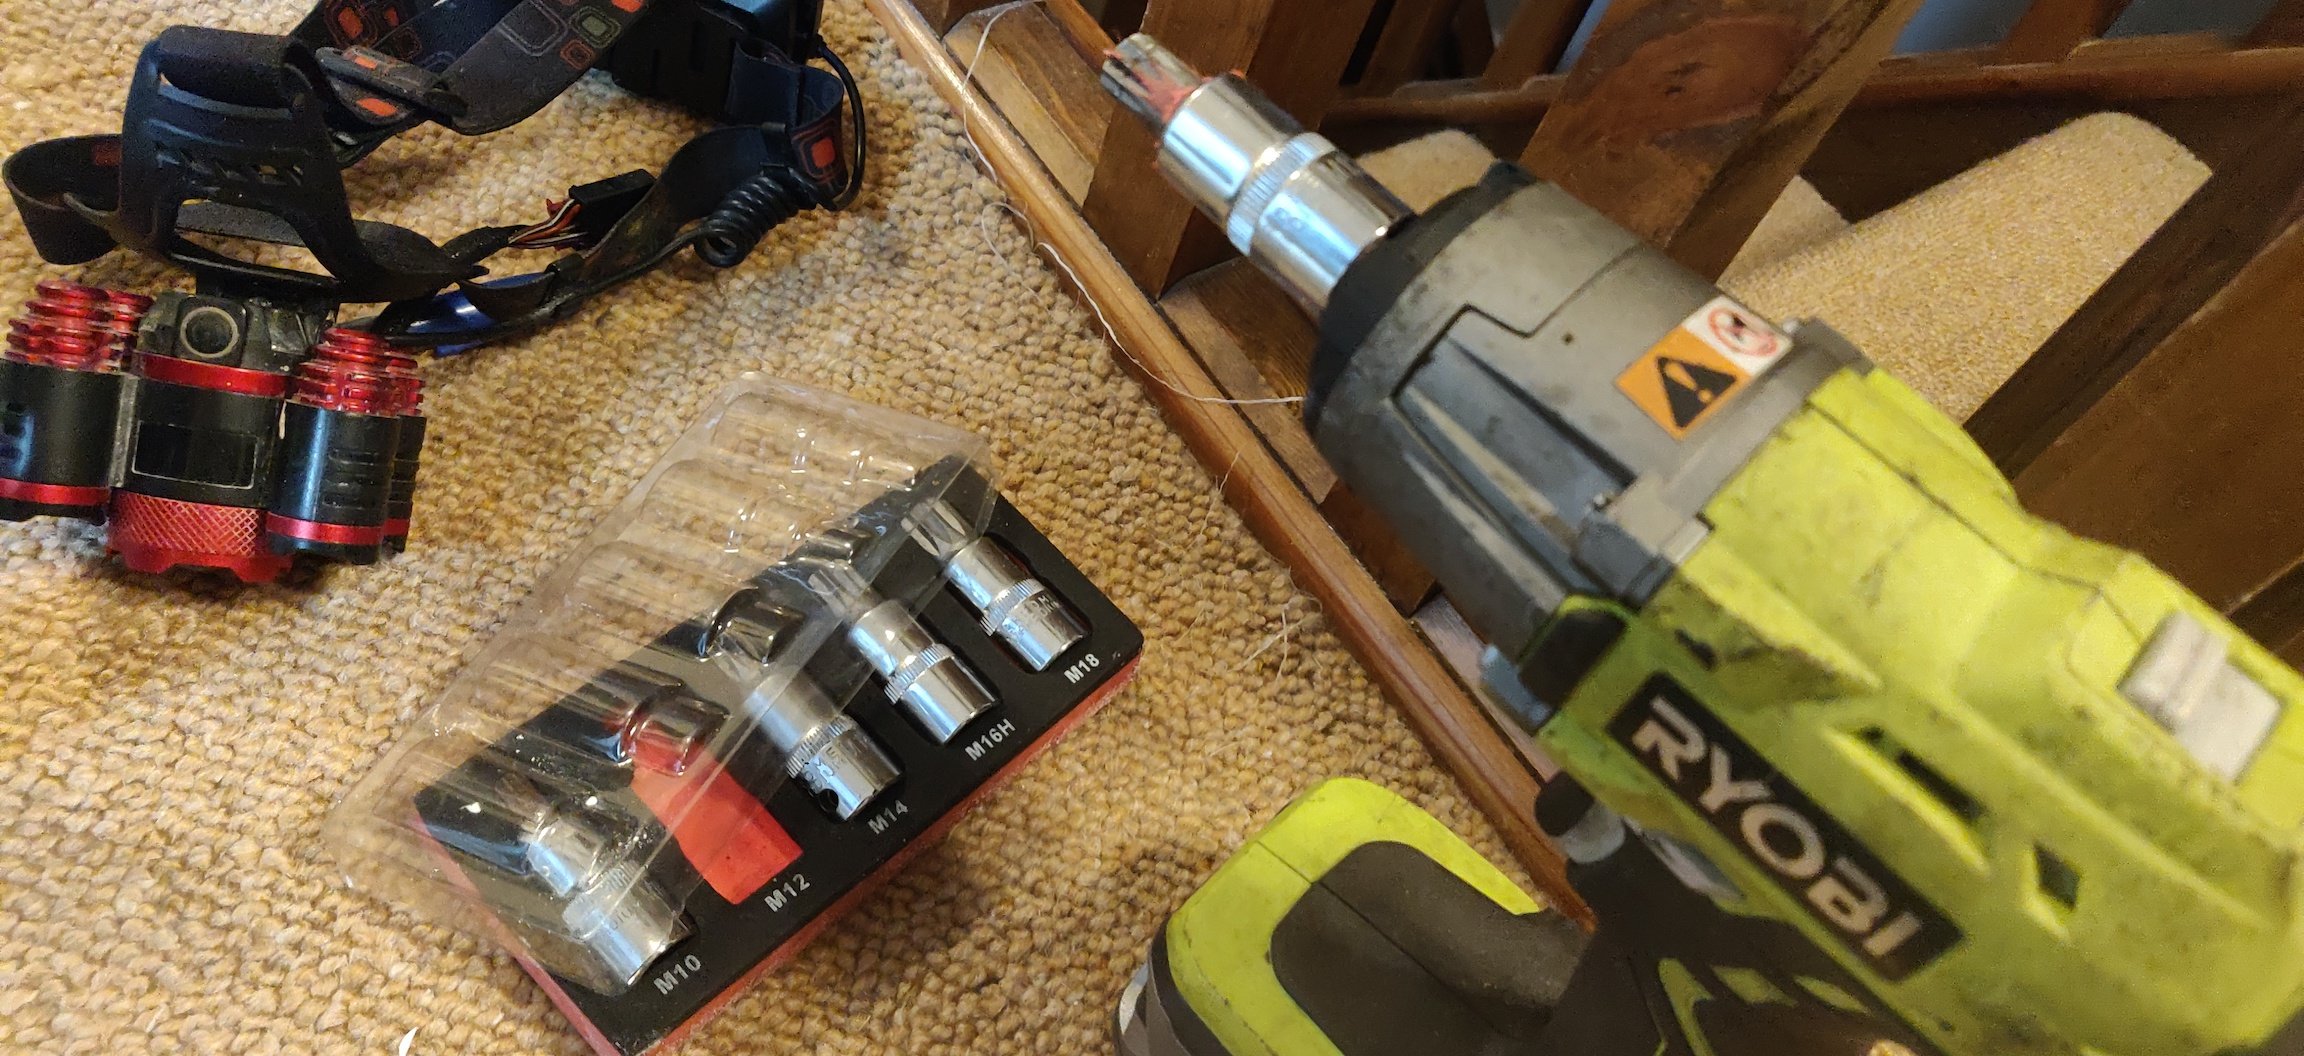
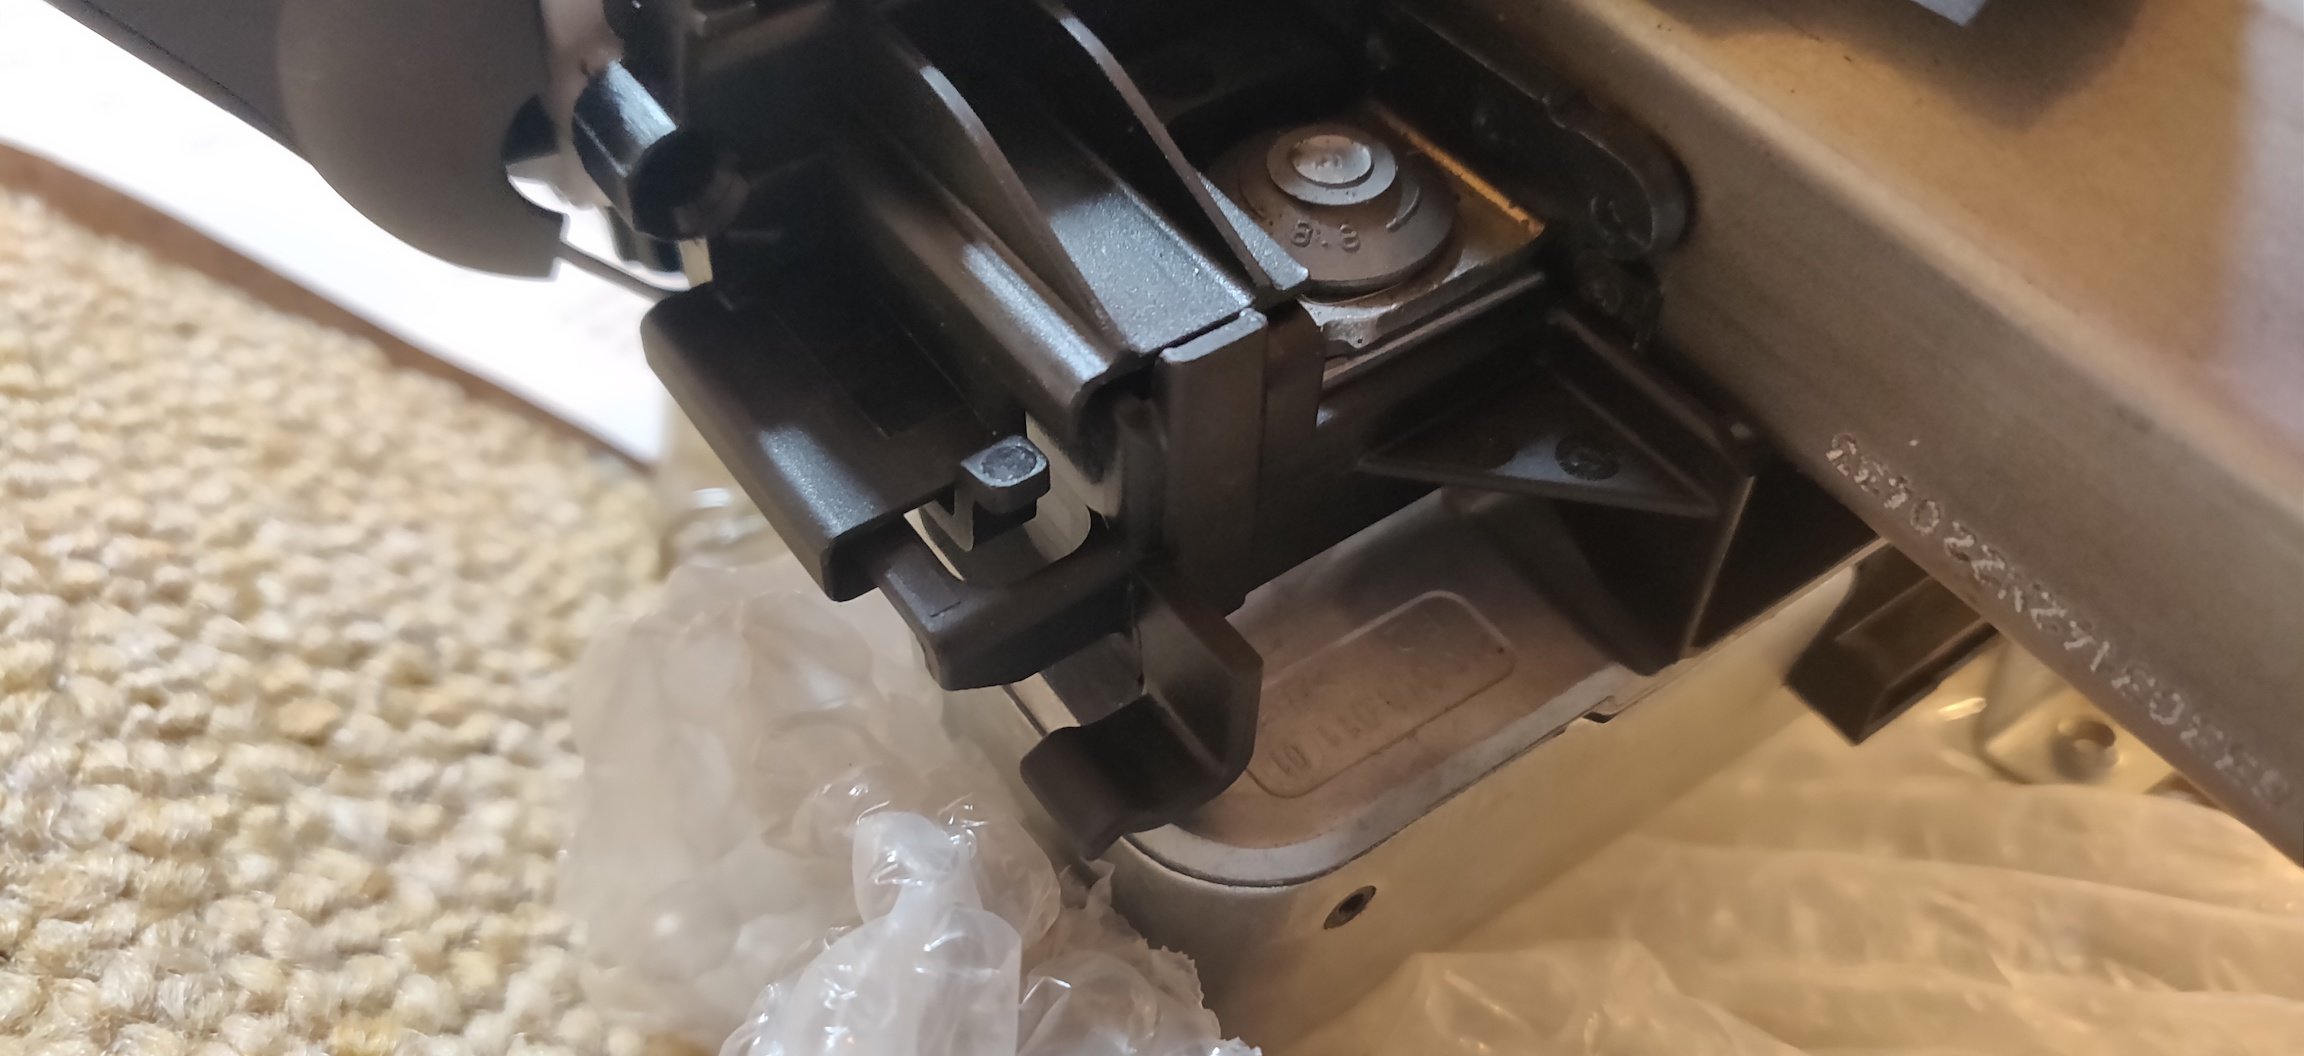
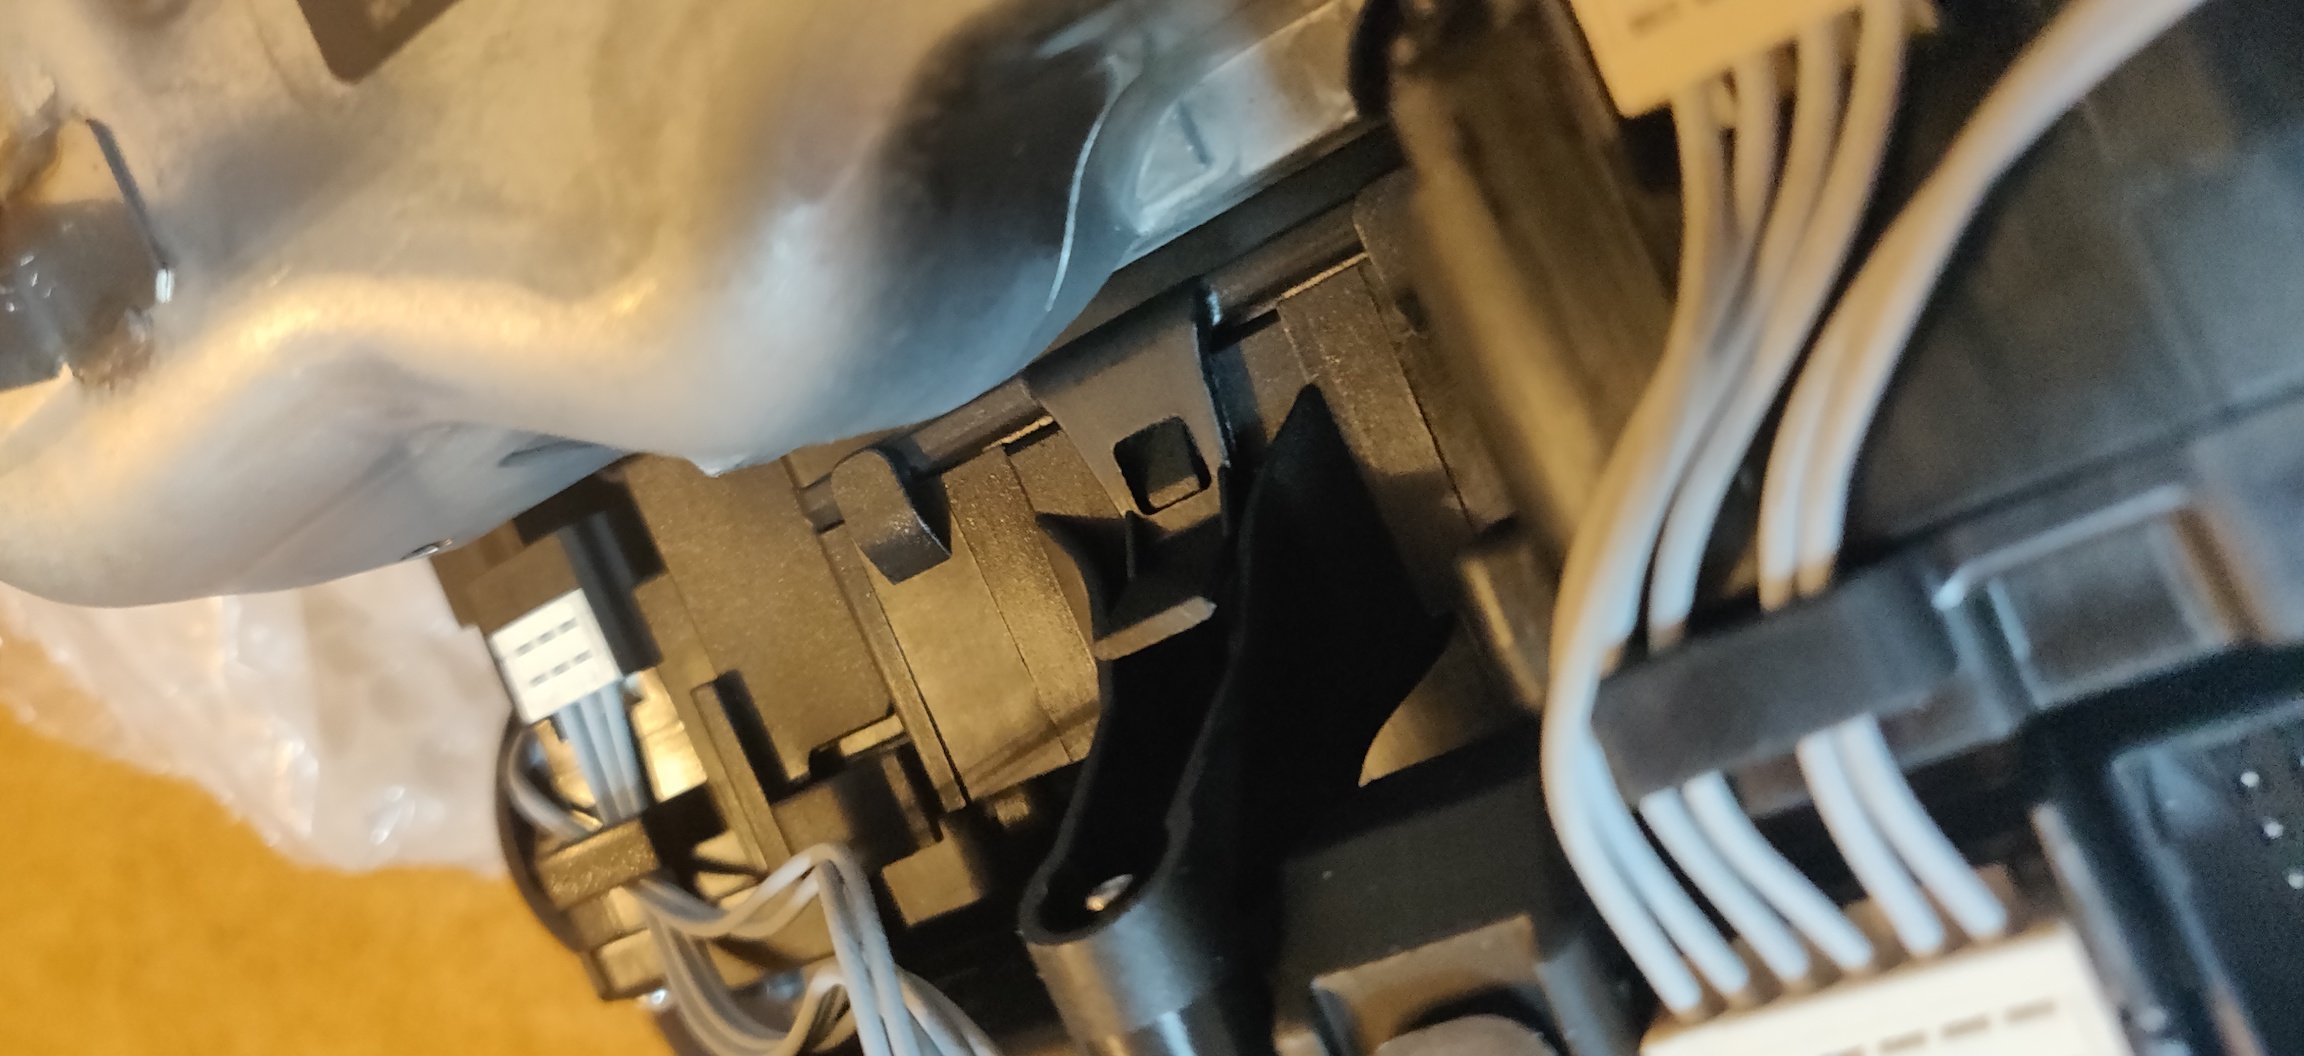
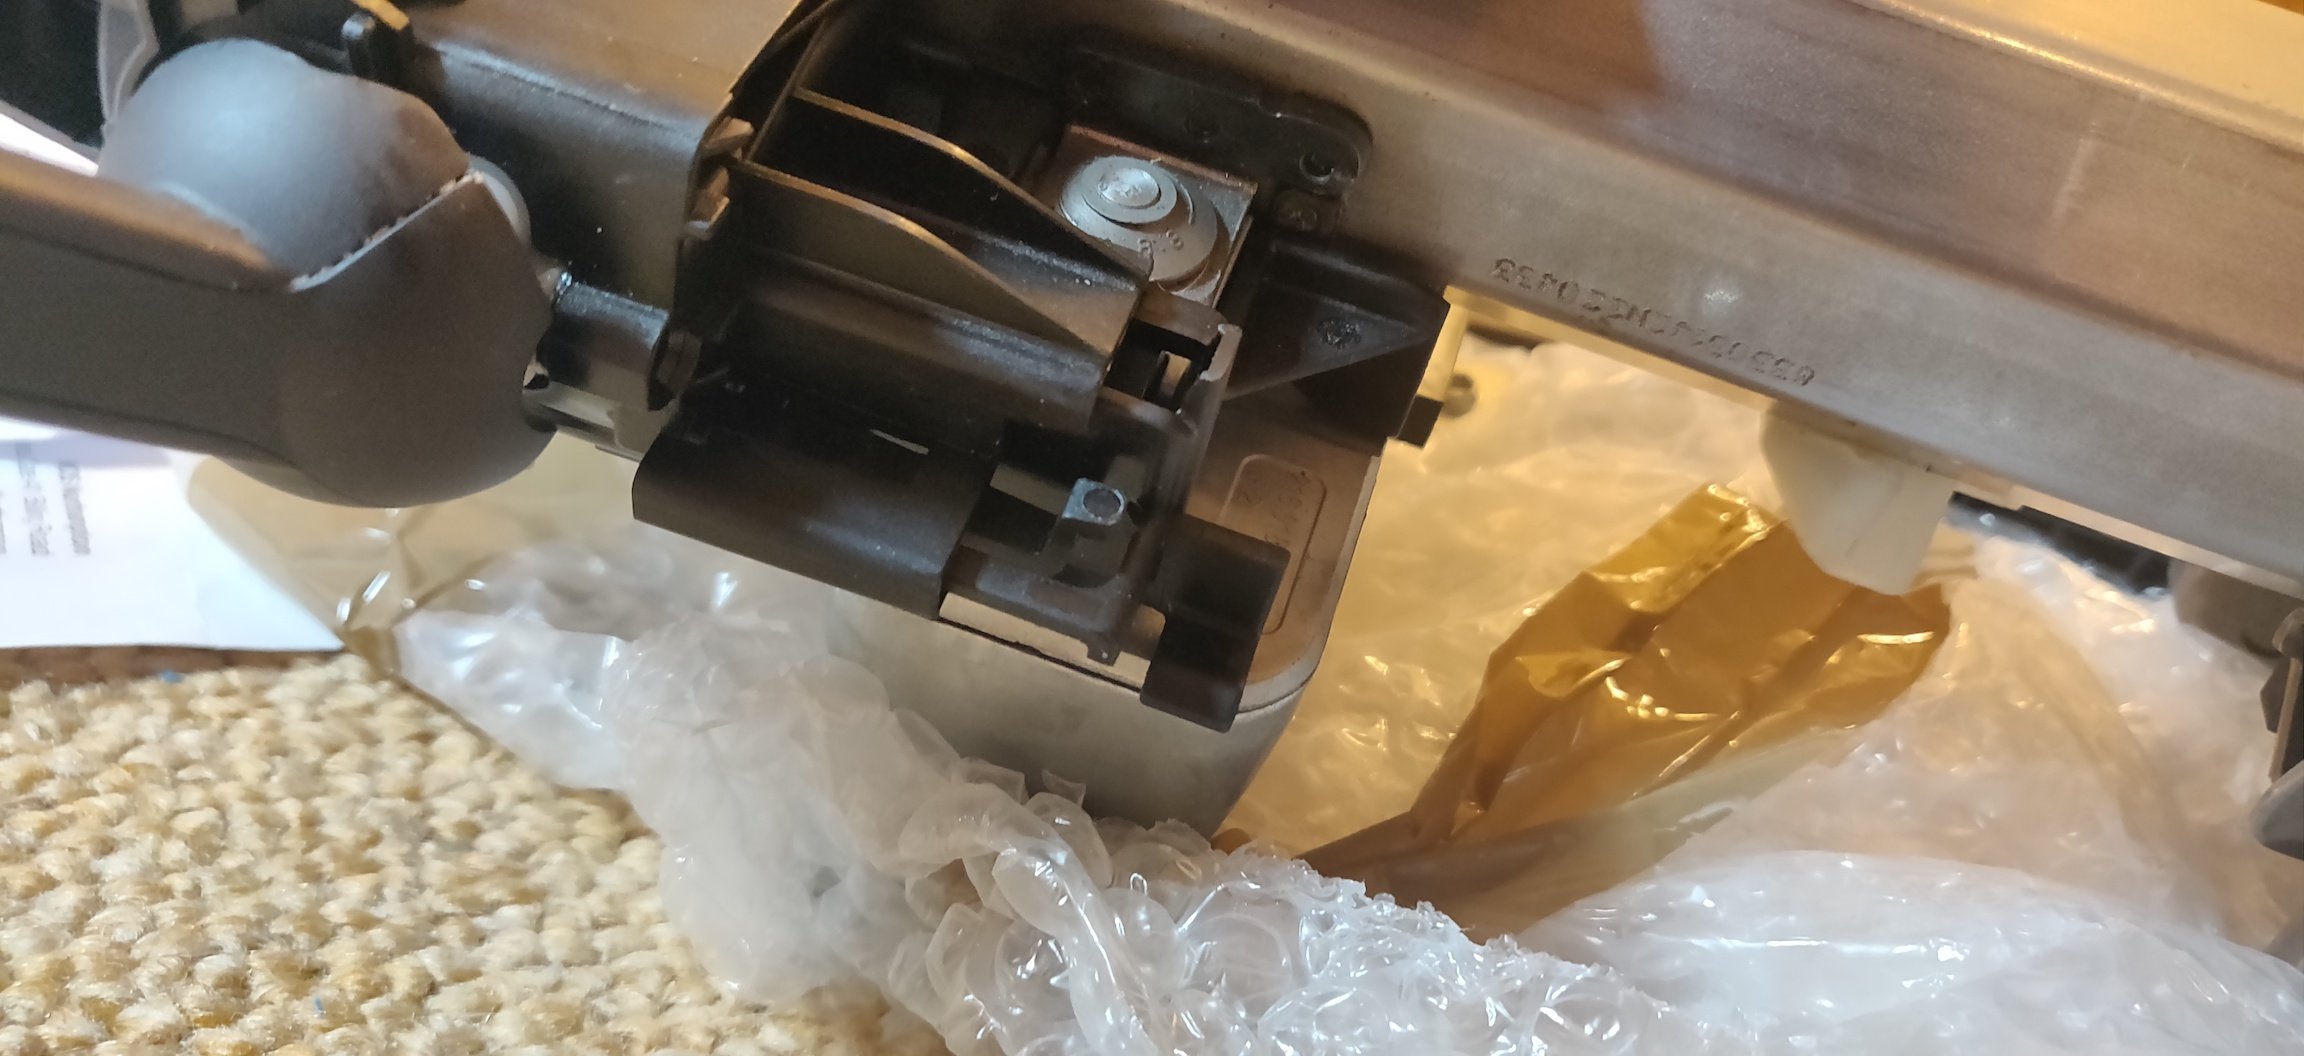
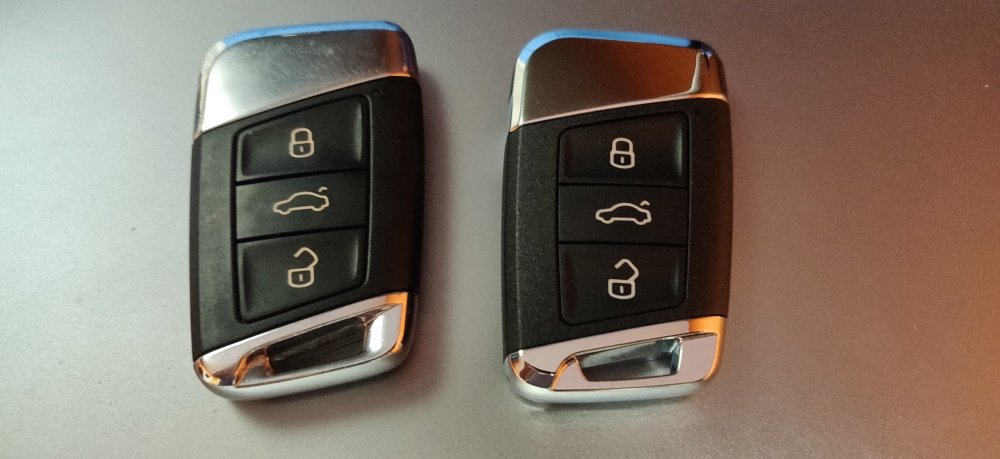
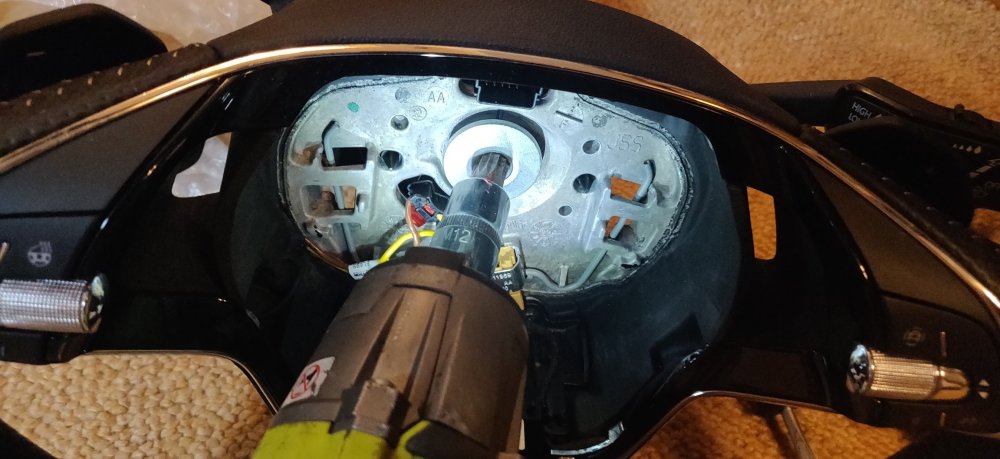
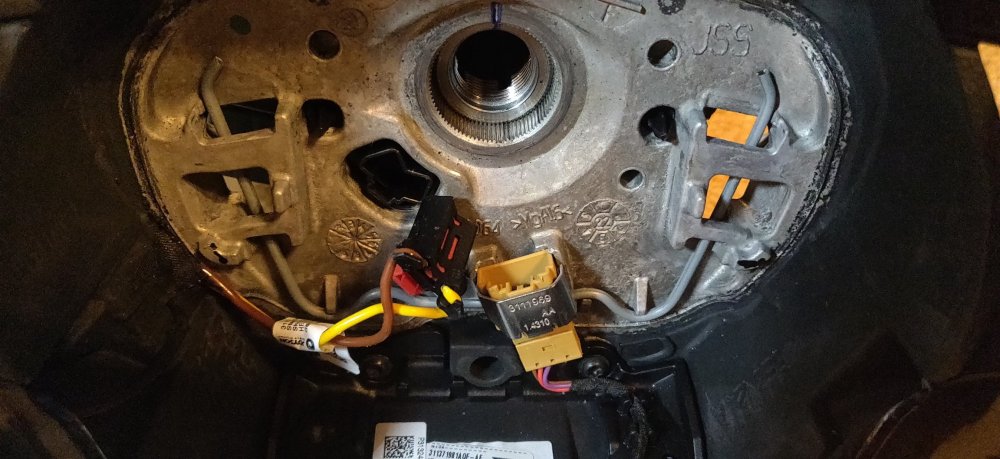
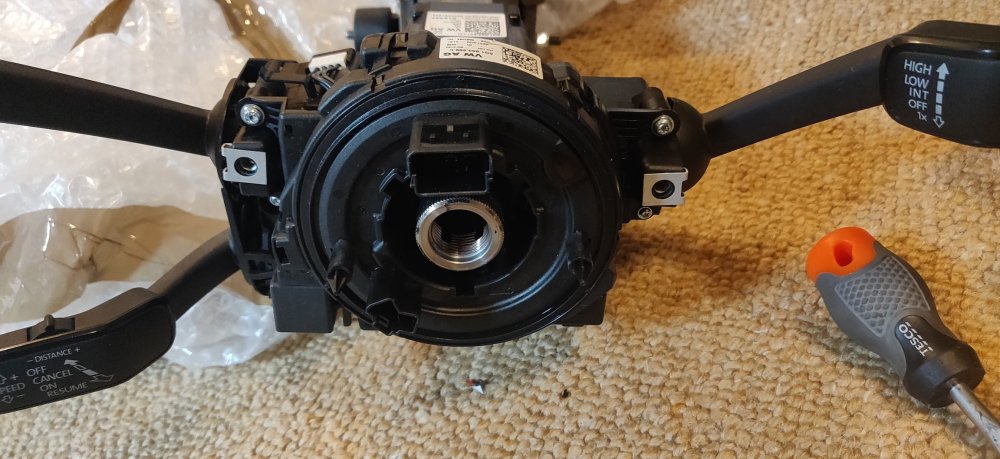
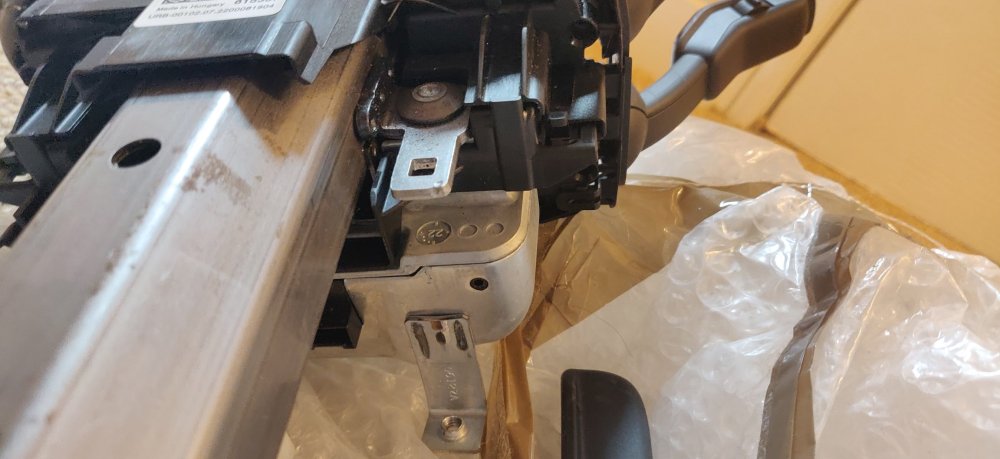
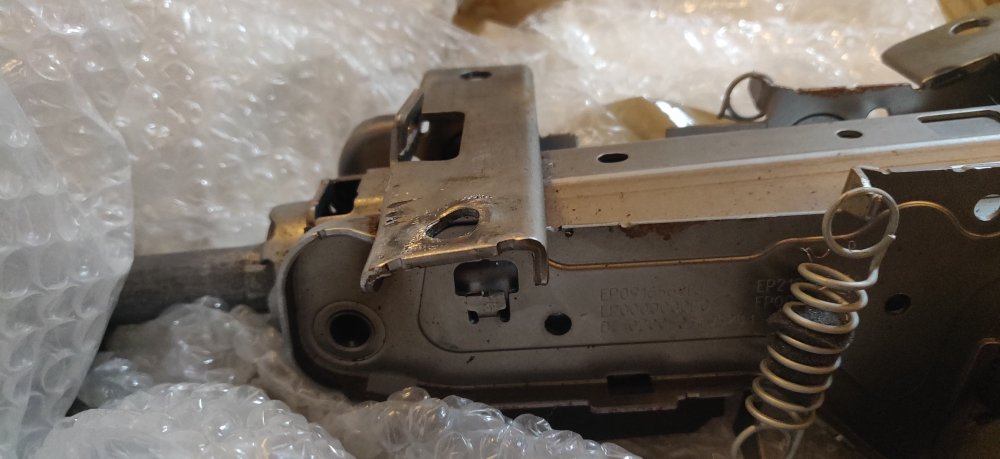
So something I ordered in anticipation of the car arrived last night, very random, couriers these days: A heated steering wheel, plus airbags and steering column. £350 plus £11.49 delivery, so £361.49 all in. At the time, I figured by the time I tally up the steering wheel, airbag (as its slightly different shape on these facelift ones), and squib, it probably comes up to about that much. I may regret this impulse buy though, I'll see if I understand and explain later. For now, this morning, decided to take it apart. There's enough on Youtube and the internet in general, but I imagine it's quite rare to get a shot of how the airbag is hooked onto steering, given there's a dashboard and stuff in the way usually: So this is with the steering wheel turned a quarter so the side is facing up, and the airbag hook is the black part, over the steering wheels metal springy bit. So you basically wedge a flathead screwdriver into there and wedge the metal towards the centre, dragging it across the hook and free: I did it with a stubby one, and did the slot it in and rotate it 90 degrees approach. That side should immediately want to come free, so repeat on the other side (you'd turn the steering wheel to the otherside if on a car I suppose), and it'll pop free: For heated steering wheels, it looks like 3 connectors. The airbag connector in yellow, which needs the flathead to gently undo the white latch: Then the other two, one for the heated steering wheel power, and the other presumably for the steering wheel controls: That should allow the airbag to come free, and you'll be presented with the retaining bolt for the steering wheel: Fortunately, the wife used to have a SEAT Ibiza, and in doing bits and bobs on that car, one needed the sockets that go into these sorts. I've called them spline bits, others call them tri-square. Regardless, seems like a typical VW group thing, presumably to annoy people than anything else. So a brief rummage in the garage and I found them, and it looks like M12: Attached to my trusty impact wrench (which is probably overkill here). The bit of red on the socket appears to be the foam from the container, as the sockets themselves haven't been used in about 7 or 8 years! The steering wheel actually made it a bit awkward to position the bolt in, the photo here looks worse mainly because I'm trying to hold the wrench and a camera phone at the same time: But no drama, and it came out easily enough, as did the steering wheel itself. The benefit of it being from a circa 2020 car I suppose: So only the bit that holds the clock spring and indicator stalks remaining. These appear to clipped in place at three locations. On on the left rear: The same on the right: With the final tab on the underside: Nothing actually difficult, but fiddly, as its 3 locations, the sides have a tab which need pushing downwards, and should be done with some gently pushing out to start the process. The underside latch can then be gently pulled downwards with maybe a thing screwdriver and it should then start coming free: That should then be it! I could have been even madder and used the steering column as well, I mean, a 4 year old one must be in better nick than an 8 year old one? Alas: One of the mountings was bent, and my attempts to straighten it was always a fools' errand. This upper steering column doesn't look like its any more componentised, so I imagine it's only destined for the scrapheap. I'll note my realisations about this could be a waste of time and money in the next post. Maintenance: £324.88 Upgrades: £676.49 (+£361.49) Miscellaneous: £584.95 Edit: oh, this process took about 15 minutes. This didn't include the 15 minutes rummaging for those spline bits. I imagine it'd take a bit longer faffing with the airbag when it's in situ.


-
Some homework this time. Went and spent £12.74 on a workshop manual from https://easymanuals.co.uk/product/skoda-superb-workshop-service-repair-manual/ think I scoured some discount code from somewhere. Fair warning: it's almost everything clumped into a single PDF, so I've been splitting things out into sections. The wiring diagrams section is in the thousands of pages, essentially going through the same systems but over different iterations depending on build date! Alarmingly comprehensive! I also went on eBay where a guy offers a VIN decode service for EUR 3.01 (so £2.57 according to my bank statement). I ordered this on Thursday, got it on the Friday. It's about 6 pages of all the codes for the car. I've mainly used this to cross reference things like parts on https://www.lllparts.co.uk/ where suspension does reference random codes (mine is L07 front and 1JP rear for example). Whilst vacuuming the first time morning, moving the seats back and forth have revealed all sorts of wonders in the rails, think crisps and sweets, so I'll probably have to resort to dedicating some spare time to remove all the seats to have a decent change of really cleaning the interior. Will shop and stockpile service items over the week. Oh, one thing I haven't mentioned. The day after we got the car home, I scoured nearby for some lighter wheels, and looked at a set of 16" wheels from an Audi A8. Super light. Unfortunately, they don't clear the front brake calipers by about 4-5mm, so frustratingly couldn't procure them, not without some drastic consideration to shrinking the front brakes from 340mm to 312mm (I suppose, if I used Porsche calipers, but then sod's law those calipers might still make 16" wheels not fit). So I'll have to plan ahead around 17" wheels. Not a fan of large wheels, and these 19's are a bit much. Fair play that Michelin's are fitted though, so kudos to @nicknorman, as usually I'd imagine what happens is that people discover the cost of wheels on larger tyres is more than they expect, and you end up with naff tyres and big wheels. I imagine there isn't a market for smaller displays from a Skoda Superb Mk3? 3V0 919 606... I'll have to wrap it up and stow it somewhere for posterity. Maintenance: £324.88 Upgrades: £315.00 Miscellaneous: £600.26 (+£15.31)
-
Time spent? Hmm I'll have to have a think, I'll remind myself to make a mental note and probably stick it on the end of certain jobs. I can't guarantee any accuracy, for example, the suspension replacement will depend on what else I find lurking underneath, etc. I'd say an hour for each of the two update processes for the head unit, so 2 hours for those.