Papez
Members
-
Joined
-
Last visited
Everything posted by Papez
-
1) you should've told him that the dashboard doesn't need to be removed. Only the panel around the instruments. 2) When talking about compromise, why don't you remove the panel yourself? It's a 10 minute job and you are apparently comfortable to work around the interior. Or do you want to hear this every time when a lightbulb in the instrument panel fails and pay for extra work to someone who doesn't know what are they doing?
-
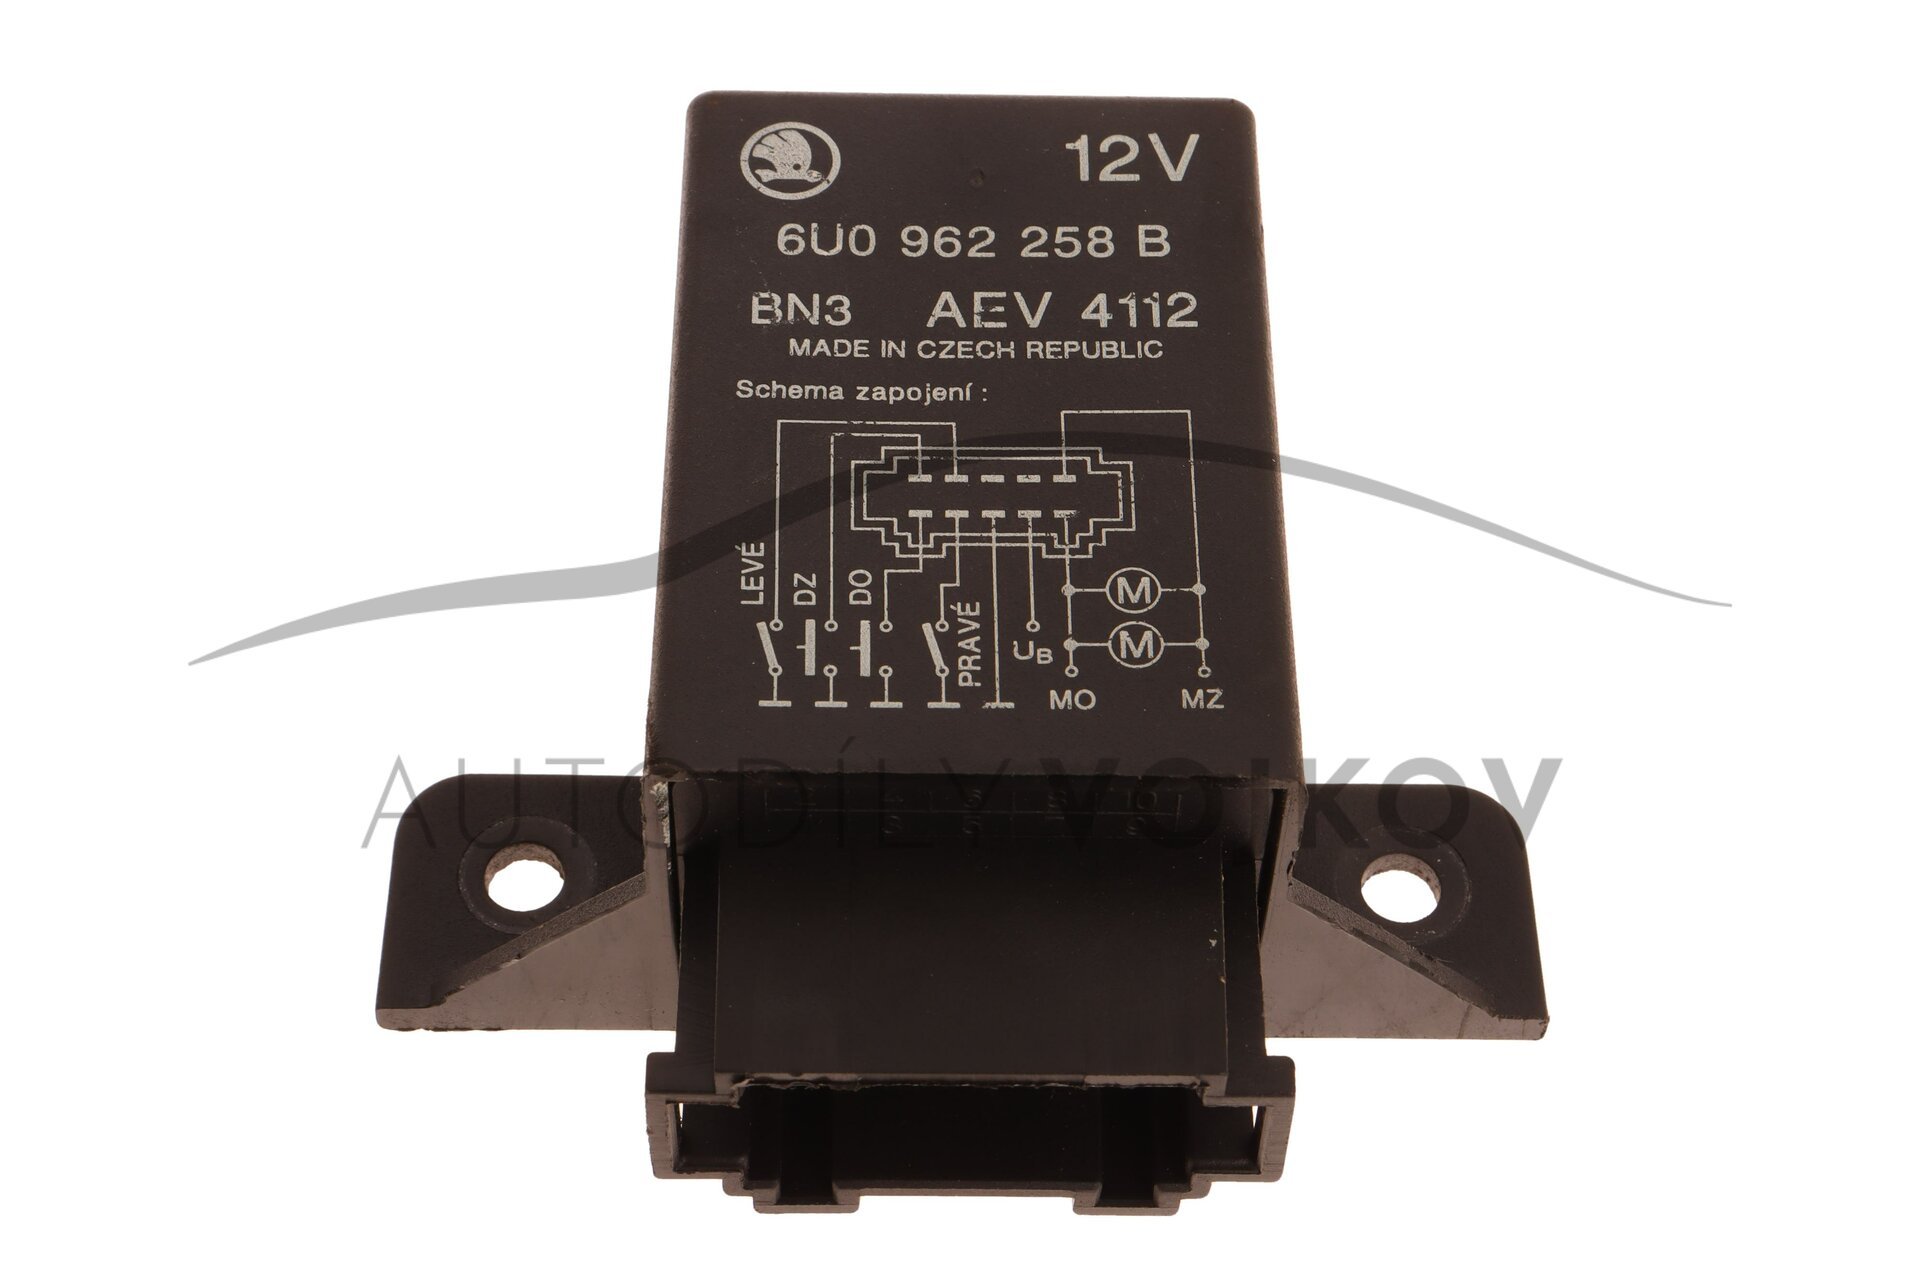
To the ground, as shown on the diagram. Doors are also pulled to the ground, both on this and in car's wiring diagram.
-
I'd say "follow the diagram on he locker unit DZ for lock, DO for unlock"
-
I don't see how going around various electricians, trying to figure out working connection and messing with wiring is less work and cheaper, than simply putting two extra pins into connector that's meant for that purpose. The factory remote is connected like that. Why do you think there's no guarantee it will work? It's more likely to work than the other solution.
-
Quick sketch from my phone. You need to check that the switch really is connected like this internally. The left side is unlock - you'll need to split the yellow cable that connects the original switch to ground. Pressing it will disconnect the switch from the ground. Right side is locks - you need to tap into yellow wire without cutting it. Pressing it will bridge the original switch. There's still risk that this will not work and you'll end up with messed up door wiring. I'm not taking any responsibility for that, you've been warned and still deliberately ignores advice for the proper installation. But I want to help and it's your decision.
.jpg.319e2144f70018c5c219f73baced66a3.jpg)
-
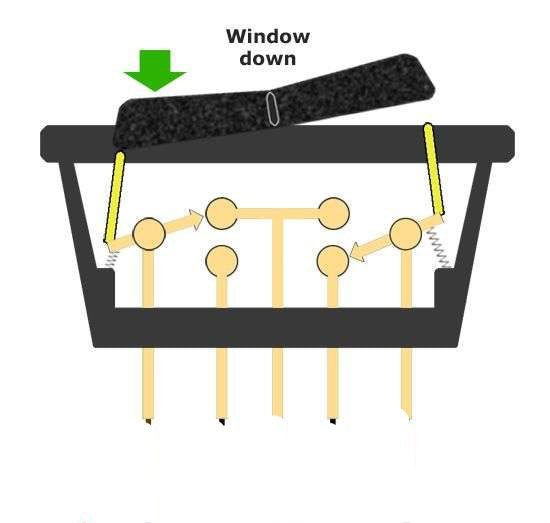
This is connection for electric window. Output switches polarity, that's not what you need. You need to do a different connection, which will disconnect the lock switch from ground for unlock, and bridge it for lock.
-
Or you could just do it the correct way. Sooner or later, you'll have to remove the instrument panel anyway when some part of instruments or one of the switches inevitably fails.
-
Because it has dedicated pins for that purpose? You cannot just connect a switch in parallel. You need one switch in parallel for lock, and one in series for unlock, because switch in the lock motor works connected to ground - locked, disconnected from ground - unlocked. The older 6-pin unit you posted earlier worked the way you'd need, precisely because it didn't have this capability. Btw, what kind of electrician "who knows Fabias and Octavias" cannot read the VW-standard wiring diagram?
-
Either that (check drain holes in the heater inlet in the engine bay) or around the rotted window frame. Sealing it up, as d.fylaktos advices, is only a temporary solution. Anyway, water in the fusebox very likely drained the battery and it's possible that some corrosion happened. Make sure it's all dry and clean before recharging the battery, corrosion can damage the fusebox.
-
You mean window switches? They are 5 pin, but different connection than standard window switches. You can get same design with standard connection (and red backlight) - they were used in Audi 80/A4
-
But you have power steering, right? Cars with PS had 90A alternator and 6PK belt. Car without PS had only 7A alternator. It's possible that the compressor will fit into factory bracket... Who knows, maybe Alex even modified the kit to use the factory bracket with spring-loaded tensioner.
-
I said it before - these AC conversions are mess 😃 The manual at one point also shows alternator on top. In stock configuration, AC compressor is beneath the alternator, in place of the servo pump. That however requires different coolant pipe and hose to get around it, so that's probably reason why Alex had to do a slightly different accessory holder, which mounts alternator and compressor quite high. Another reason to implement two speed fan. Especially when we are required to run with lights 24/7. Problem with 90A alternator is, that it fits only into PS/AC bracket - PS variants were equipped with it from factory. Not sure if Alex holder could work with 90A alternatir
-
Felicia didn't have remote central lock integrated in the key, it was an extra fob: Quite often, the rubber band fell apart and fob got lost... But it's possible that you don't have remote lock system at all - it was available only with alarm system, you can check front A-pillars if there are ultrasound sensors and alarm unit in the engine bay, near the firewall (unit on the picture is pre-facelift, later models were different, but similar placement) Front pins should move freely, rears were always a bit more sticky. Most issues with the lock are caused by motors, but hard movement may be caused by lock itself. Hard to say until you remove the panel and check yourself. You can remove the motor and keep it connected to check if it moves freely by itself.
-
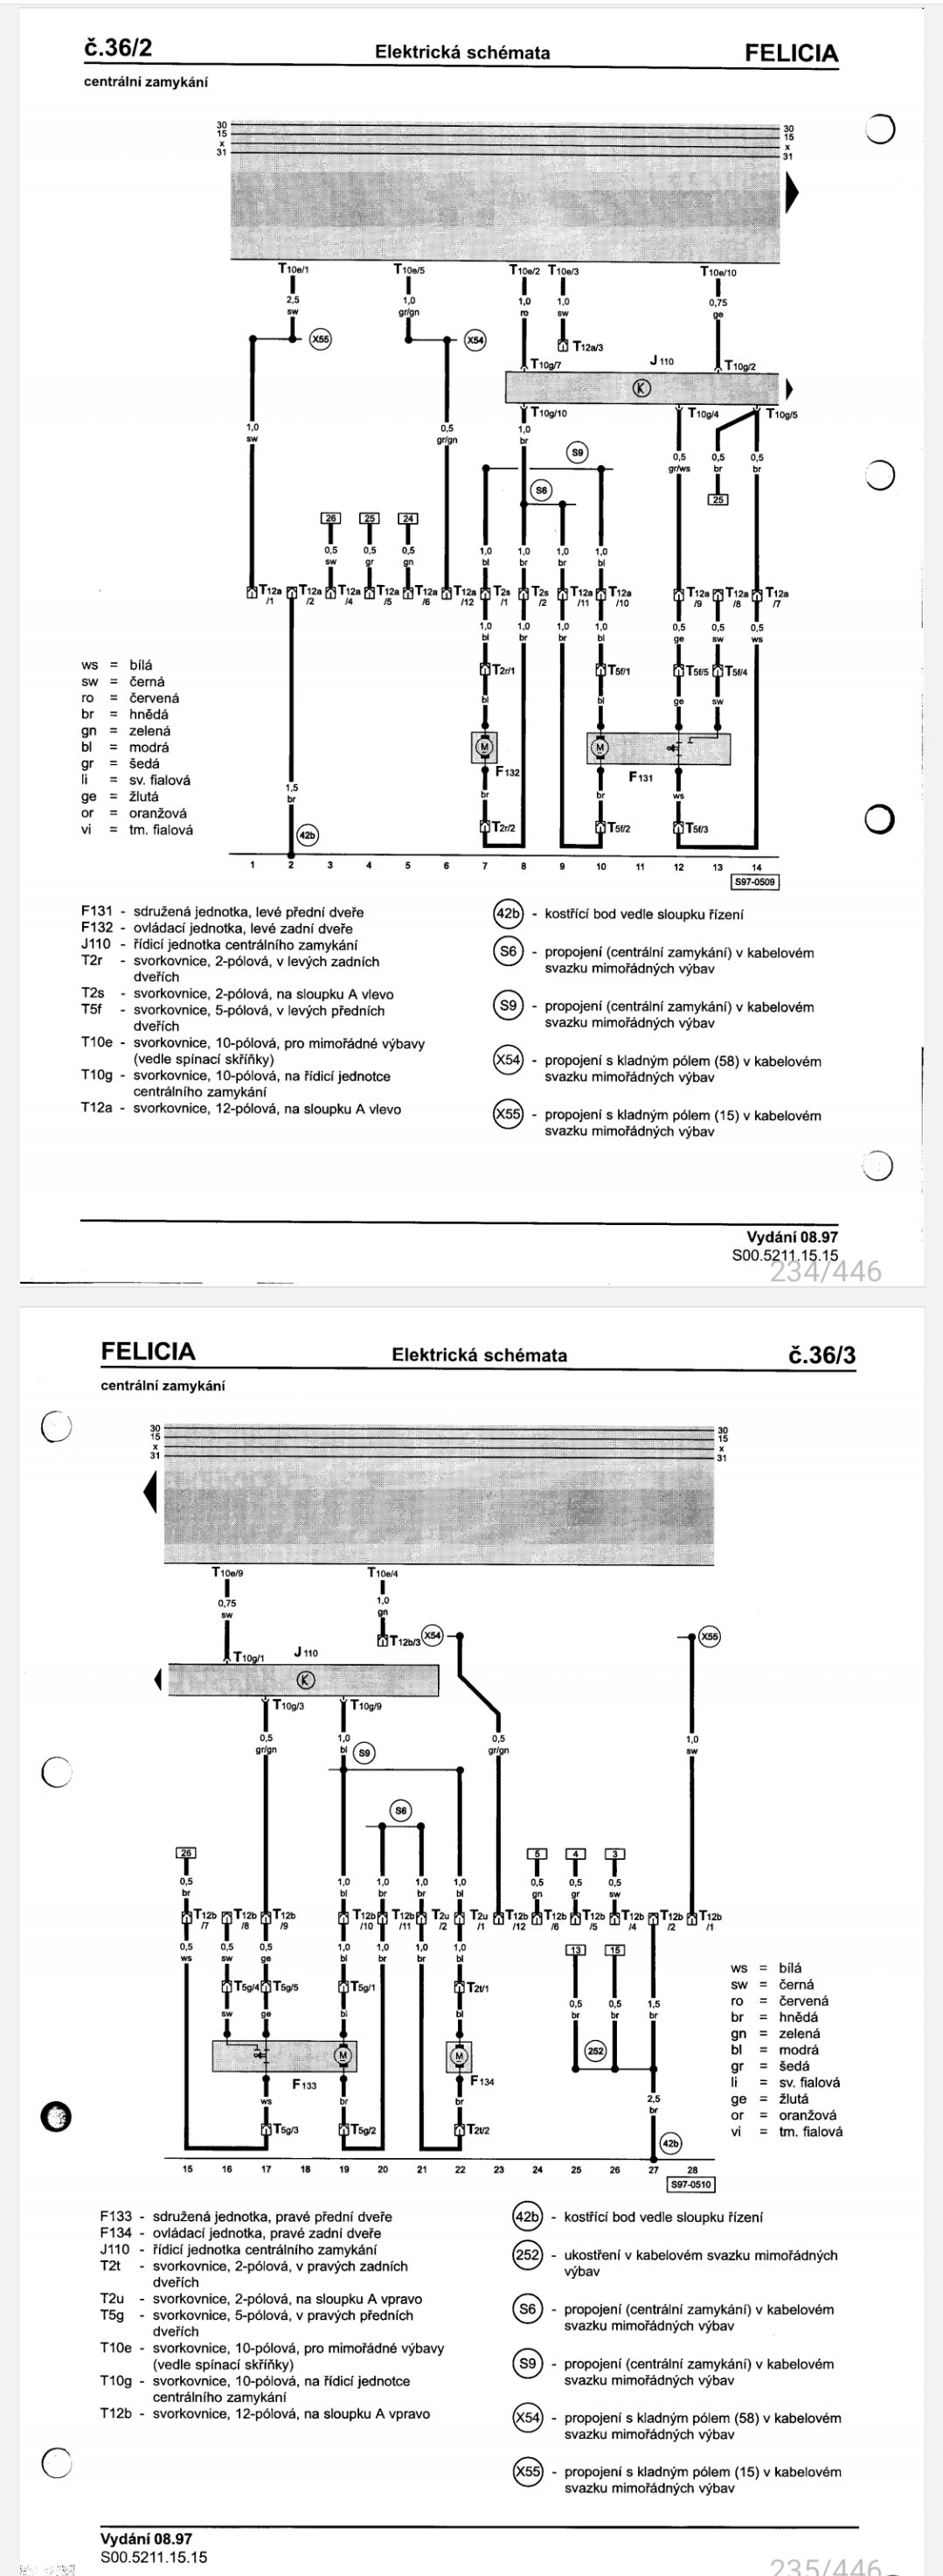
This is wrong wiring diagram, it shows pre-1997 with a 6pin unit. Plus, it doesn't show door connectors. This is the correct one: T12a and T2r are connectors under the carpet on the fron left A-pillar, T12b and T2u same on the right
-
No, you don't, you're just overriding the stock switch. There might be a problem that you'll need to hold the switch for a moment until the motor moves.. but solving that would require more than just a diode. Using inputs meant for this would be much easier.
-
If you're doing it the right way through the central unit, 3-pin or 2 momentary switches is all you need - it works by connecting either contact to ground. For the in-doornvariant, you'll have to figure it out. The wiring diagrams show that lock/unlock is just matter of connecting/disconnecting contact inside the motor to the ground, but doesn't say which is for lock and unlock. Once you figure that out, you have two options - either lock/unlock momentary buttons, one NO, parallel to the motor switch, and one NC, in series with the motor switch (you can use three pin buttons with both sets of contacts). The second option is a 5pin window switch and connect it on relevant contacts. One warning though - it's not safe to put push-to-unlock-switch on the door. It can be easily pushed if you leave window open even with small gap.
-
The 3 pin switch is just 2 switches in a single body, with 1 common contact. You can just connect 2 contacts for the lower temp, which, iirc, is 3 Deg lower than the standard switch. The pinout should be in wiring diagrams or in datasheet of Metra Šumperk, who manufactured them. The datasheet also contains exact on/off temps as does service manual (Google dílenská příručka if you didn't yet.) Since you're replacing the fan with the factory AC one, I'd also advice to modify the wiring to the two speed variant - the lower speed takes less current during start-up, which means less load on the electrical system and engine. The 2nd speed shouldn't be needed at all with AC off.
-
I think they have only one "legal" H4 model. "Legal" is in quotes because they are not certified for Felicia headlights, so they are not legal for that use.. but better than nothing at all. Other models are only for sport or off-road use, same like 100W halogens. I know, but doesn't that move brightest part of the beam too close to the car? I always try to get the beam as high as possible without blinding oncoming cars for best visibility.
-
You'll need to adjust those LEDs way lower.. I tried to crop @Thefeliciahacker's pictures to the same area, that's above the line made by the halogen lamp, which is the part relevant to blinding: The legal LEDs are not ideal either, but much closer to the halogen pattern.



-
I've seen this test, Osram have 50% more output, so the center looks overblown (especially when halogen is ran in 12V instead of 14V) due to camera settings. But it's apparent that the light is spread more uniformly compared to cheap LEDs. Iirc, it's fabia MK2 headlamp, which is certified, so according to regulations, this is correct pattern.
-
Cheap LEDs will never have good pattern. The reflector is designed for filament as the light source, si that's where's its focal point (line?) Anything outside this area will mess up the beam pattern. And cheap LED bulbs just use generic LED chips that somewhat reach desired light output, but that requires much larger area. That's what's different in "legal" LED replacements, they use specific technology that's able to get closer to halogen filament shape and light output (part of the reason why they are so expensive, besides brand). However, not the same, which is why they still need to be certified for each vehicle individually. Btw, Osram recently released gen2 of their H7 LEDs, which has wider range of certified cars, maybe they'll have new version of H4 aswell.
-
I tried to find some info, originally, the yellow sensor was "faster" - not sure if it means that it reports higher temps to the ECU or it has lower heat capacity/better conductivity, but the effect is that the ECU switches earlier from cold/rich mode. It would make sense that AC models had the blue one to account for extra load from the AC compressor.
-
You can mount an electric motor to actuate the lock to operate it with the remote. Or add a mechanism to unlock the truck with the rest of the car (which Is what I did since Skoda decided to use the second button on the remote in the most useless way possible)
-
Hi, nice to see another Czech here Have you tried to look up some info from Feliciaklub page and FB group? Regarding the fan, I think that the only difference is capability to run on lower speed - two pin variant had resistor mounted on the fan shroud to run on the low speed (or no resistor to run on full speed only), the three pin variant has low speed function integrated. Regarding the wiring, you can check factory wiring as well. @Thefeliciahacker's diagram looks similar to the factory wiring, it just uses some extra relays, that may be redundant - the factory solution, for example, uses radiator switch to run 1st speed directly, and only one relay to run 2nd speed - pressure and radiator switches are parallel and connected to the relay coil. You have some freedom there, the important part is how it works: 1st speed - triggered by the radiator thermoswitch (low) or AC switch/ compressor clutch signal 2nd speed - triggered by radiator switch (high) or AC high pressure switch It's good that you got the original Autopal radiator - I read that aftermarket radiators might be an issue on 1.3 AC cars due to poor quality and Alex condenser may have pipes situated in a way that collides with a larger radiator
-
The only positive thing about this is, that in the case of crash, you won't get the key wedged into knee.