Xsr
Members
-
Joined
-
Last visited
Everything posted by Xsr
-
My advice would be to replace the clutch assembly yourself if budget is an issue. (Preferably together with a buddy) That is the cheapest option. As it will set you back around £70 to £100. (Including fluids and a clutch alignment tool) And a couple days if you haven't done it before. Can be done with basic hand tools and jack stands. It isn't fun, but its also not impossible.
-
Could also be an intake or exhaust leak. Potentially messing up short fuel trim causing the judder.
-
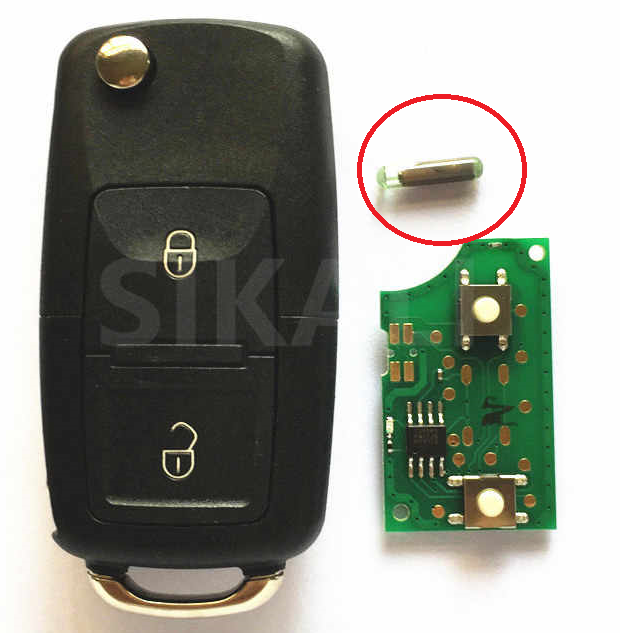
The quickest way around it is to simply replace the key with one that works. You get a 433 MHZ - 1J0959753CT / AG key. (Dirt cheap on ebay) And put the transponder from the old key into the new key. (I provided a picture of the key, and the pill like thingy with marked by a red circle is the transponder you need to move over.) And you do the relearn procedure to match the new key to the car in order to make the remote work. There are multiple methods depending on make and model. Most common is the one in which you just press the open button on the new key fob and within a minute open the driver door with the new key, put it in the ignition and move it to the run position. shut it down and press the button to close the door. (Many tutorials on YouTube as well)
-
You just need to remove the 3 bolts from the pulley and detach the pulley. Then remove the bolts holding the pump to the engine. I use blue threadlocker on waterpump bolts. Some people say you shouldn't. But then again i've never had one of them back out because of it. Neither did i have problems cracking them loose with threadlocker on them. The lowest bolt hole beneath the pump in the block is prone to catching oil and coolant. Which messes with your torque reading. So if you aren't using threadlocker at least make sure you pay extra attention cleaning and drying that hole in particular before putting a bolt back in and torquing it down.
-
I've done it and this is absolutely doable. You need to jack to engine up to get clearance to get to the top bolt of the pump pulley. (that is all you are going to get) You can then slack off the tension of the belt and rotate it to get to the next bolt by moving it to the top. put the tension back on and loosen or fasten them (depending on where you are in the process) What i will strongly advice is to get one of those cable-type flexible hose clamp pliers. to help get the hose clamp back on the hose going onto the water pump. Its a real PITA to get the clamp back on without one of those pliers. As you have limited wiggle room and limited access. Also remove the engine mount entirely for better access. Like TMB said, you are supposed to replace the bolts. But they don't warp enough to cause issues when you torque them down to factory specs (even though they are supposed to be stretch bolts) You can re-use them. But use locktite.
-
Sounds like a fitment issue. You might want to compare your new brake hardware to the old hardware.
-
-
Absolutely. If anything has lowered the quality it is that. It used to be that you would design to specification and then you would quote it. If that was undesirable concessions could be made and you work from there on the design. Then it turned into a backwards version of it as a design would be made. The engineering needed to fit to the design following specifications and then the quote would be made. Now days you get the quote. Which will determine the design and then the remaining budget is allocated to engineering. Concessions is the name of the game now days. As engineer you are structurally working from a budget deficit and must figure out a way to make it work. Hence why i quit. I started to hate the frequency at which i was forced to hand over products that i felt ashamed of building. I don't think this is any different in Germany.
-
@e-Roottoot I've had to spend 6 months abroad in Germany to finish my university thesis. Studying and working alongside German engineering students and professionals. And the first thing i thought after my first lecture was: Holy ****, these people are not ****ing around. I felt like an absolute novice in comparison. First thing i thought after my first day in the field: What the f*ck am i doing here. It will take years before i am anywhere this competent. And i was right... The amount of material and the difficulty of said material they covered was extensive and merciless to anyone without persistence. They joked: The only reason why you'd become a German Engineer is if you have no life, or no wife. Because you you won't have time for either. Which was absolutely true. They studied for 8 years where we did 6. They covered more than 3 times the material, and their testing is rigorous and merciless. Where we would study over a weekend, they would need to utilize weeks to pass their exams. If we would fail we could re-try after 4 weeks. If they failed they would have to revert back to the start of that years semester and do re-do all classes to the subject you failed on AND THEN be tested again. Only after 2 failures would they be allowed to simply retake the test. The environment these people are in. They are under continues stress to succeed. Led to believe that German Engineering is the best in the world. And to not uphold that standard is considered absolute blasphemy. Its this reason why Germans over engineer everything. They worked their asses off to be able to, and take pride in it. Anything less is simply not German. You simply do not make it that far if you aren't of that mindset. We do not hold a candle against that type of mentality and dedication to the craft, Its admirable and scary at the same time. Especially if you've seen it first hand.
-
Guess it all depends on who designed the OEM parts that were supposed to come with the car. If a german designs it you'll be able to tell as it (usually) is over engineered and nothing is left to chance. German engineering standards are rigid. And that all has to do with how german engineers are educated.
-
I was debating it from a design standpoint. That it shows it was designed with an idea in mind. Not questioning who actually uses it.
-
Of that i had no doubt
-
These filters are clearly designed to be used by the official dealer technicians. The fact it has a 'nut' on the end for the torque wrench and the actual torque setting is written on the filter. This also means you can easily put an air wrench on it for removal. Think MHO figured that in a professional setting a technician would have access to the proper tools required to tighten and undo them.
-
On the OBD socket: Do you have +12v on pin 16 (Bottom right) ? Do you have continuity between pin 4 and 5 (Both top center ones) and any other pin ? Do you have continuity between pin 4 and 5 and the battery negative terminal.
-
ASS. Autistic Spectrum Syndrome.
-
My original diagnosis is PDD/NOS and asperger syndrome If you were to get that diagnosis today they would most likely call it ASS. As there isn't a specific diagnosis when it comes to all the forms of autism. I just prefer the HFA acronym for obvious reasons. And because the term aspergers has a lot of stigma attached to it thanks to misinformation in the media. And it commonly being used as an insult.
-
I have a form of high functioning autism that doesn't quite fit in a specific box. I do however have an natural inclination to want to solve problems and repair things. Limited experience in the field. Only started working on cars 5 years ago. First out of necessity. Then as a hobby. Currently enlisted in a work learn program as i combine school and work together to become a automotive technician. I gave up a well paying job as an electromechanical engineer to do so. Now 1 year of experience in an actual shop and i love it. Before all of that i used to work in IT as a programmer. And i the future ill most likely end up combining all of the above and end up working on electric vehicles.
-
At the end of the day all that matters is that it comes loose. Not how. Though the easy way with minimal chance of permanent damage is preferable. But if you have to call your local black magic witch doctor and sacrifice some goats to get it done... You gotta do what you gotta do.
-
I dont know for sure if that is how they had done it. But it was on there really tight. Also when i say canister i mean the metal screw on type. Not the filter cartridge type. Not quite sure what both are actually called.
-
I remember the first oil filter i ever had to replace. I used one of those chain type removers and absolutely destroyed the canister as whoever put it on there must have gone absolutely berserk with an impact gun when installing it. I managed to remove it eventually by 'gently' tapping it with an air hammer on the rim while putting my entire weight on the chain tool trying to shock it loose. Luckily the threads were OK. And the shaft still straight. But i learned a valuable lesson that day. Don't ever over tighten an oil filter unless you hate the person that has to undo it.
-
Don't be intimidated by a reflow job. Its straight forward if you do not make the simple mistake of not using (enough) flux. There is no such thing as 'too much flux' Step 1: Clean the tip of the soldering iron with some abrasive cloth or steel wool while tip is hot. Step 2: Put some tin on the tip. Step 3: Put a generous amount of flux on the joint that requires re-flowing Step 4: Heat the joint until liquid/molten and remove the soldering iron. Step 5: Let cool down slowly and inspect if the joint looks shiny. If dull/hazy. Reflow again starting at step 2. If step 5 is successful clean up the remaining flux with some isopropyl alcohol. You can practice on any scrap hardware till you feel confident you'll be able to reflow the actual piece you are trying to repair. Soldering is the same thing except you add additional tin at step 4.
-
Makes sense. But that was not what i was trying to convey. Then again, English is not my native languages. Please forgive me for my occasional clumsy phrasing.
-
Even with minimal effort they'll stay on. The rubber gasket makes for a great friction lock/fit that isn't prone to comming undone. When the oil between the gasket and mating surface dries up it'll even increase the amount of force required to make them come undone. Its easy to over tighten them as they slip on easy due to the oil on the gasket. But once that dries over time it requires more force to unscrew them. Even to the point it requires tools to undo them. When you use a tool to get them on. (Air ratchets especially) Chances are when you attempt to undo them a year later the seal is dry and you'll warp the entire filter trying to get them loose. So in my opinion its easier to over tighten in this case than to under tighten. If that makes sense?
-
When you torque things down repetatively you'll get a good feel for it. At some point you don't need the torque wrench anymore. But when it comes to bolts that are under significant stress or cause catastrophic failure if they fail. I'll whoop out the torque wrench regardless. Just for peace of mind and because its good practice. But an oil filter is not one of those things. As long as you don't go caveman / ogre style on 'em you'll be fine. Its more difficult to under tighten them than it is to over tighten them.
-
And if you wonder if that is tight enough? I've had to remove oil filters using tools even though i put them on hand tight myself a year prior. They kinda settle in overtime. My theory is that when you put oil on the new seal and install the filter. They slip on easy. When that oil "dries/burns in/heat cycles", is increases the friction required to loosen it significantly. Dunno if anyone had a definitive answer to this phenomenon.