
EnterName
Resident Member
-
Joined
-
Last visited
Everything posted by EnterName
-
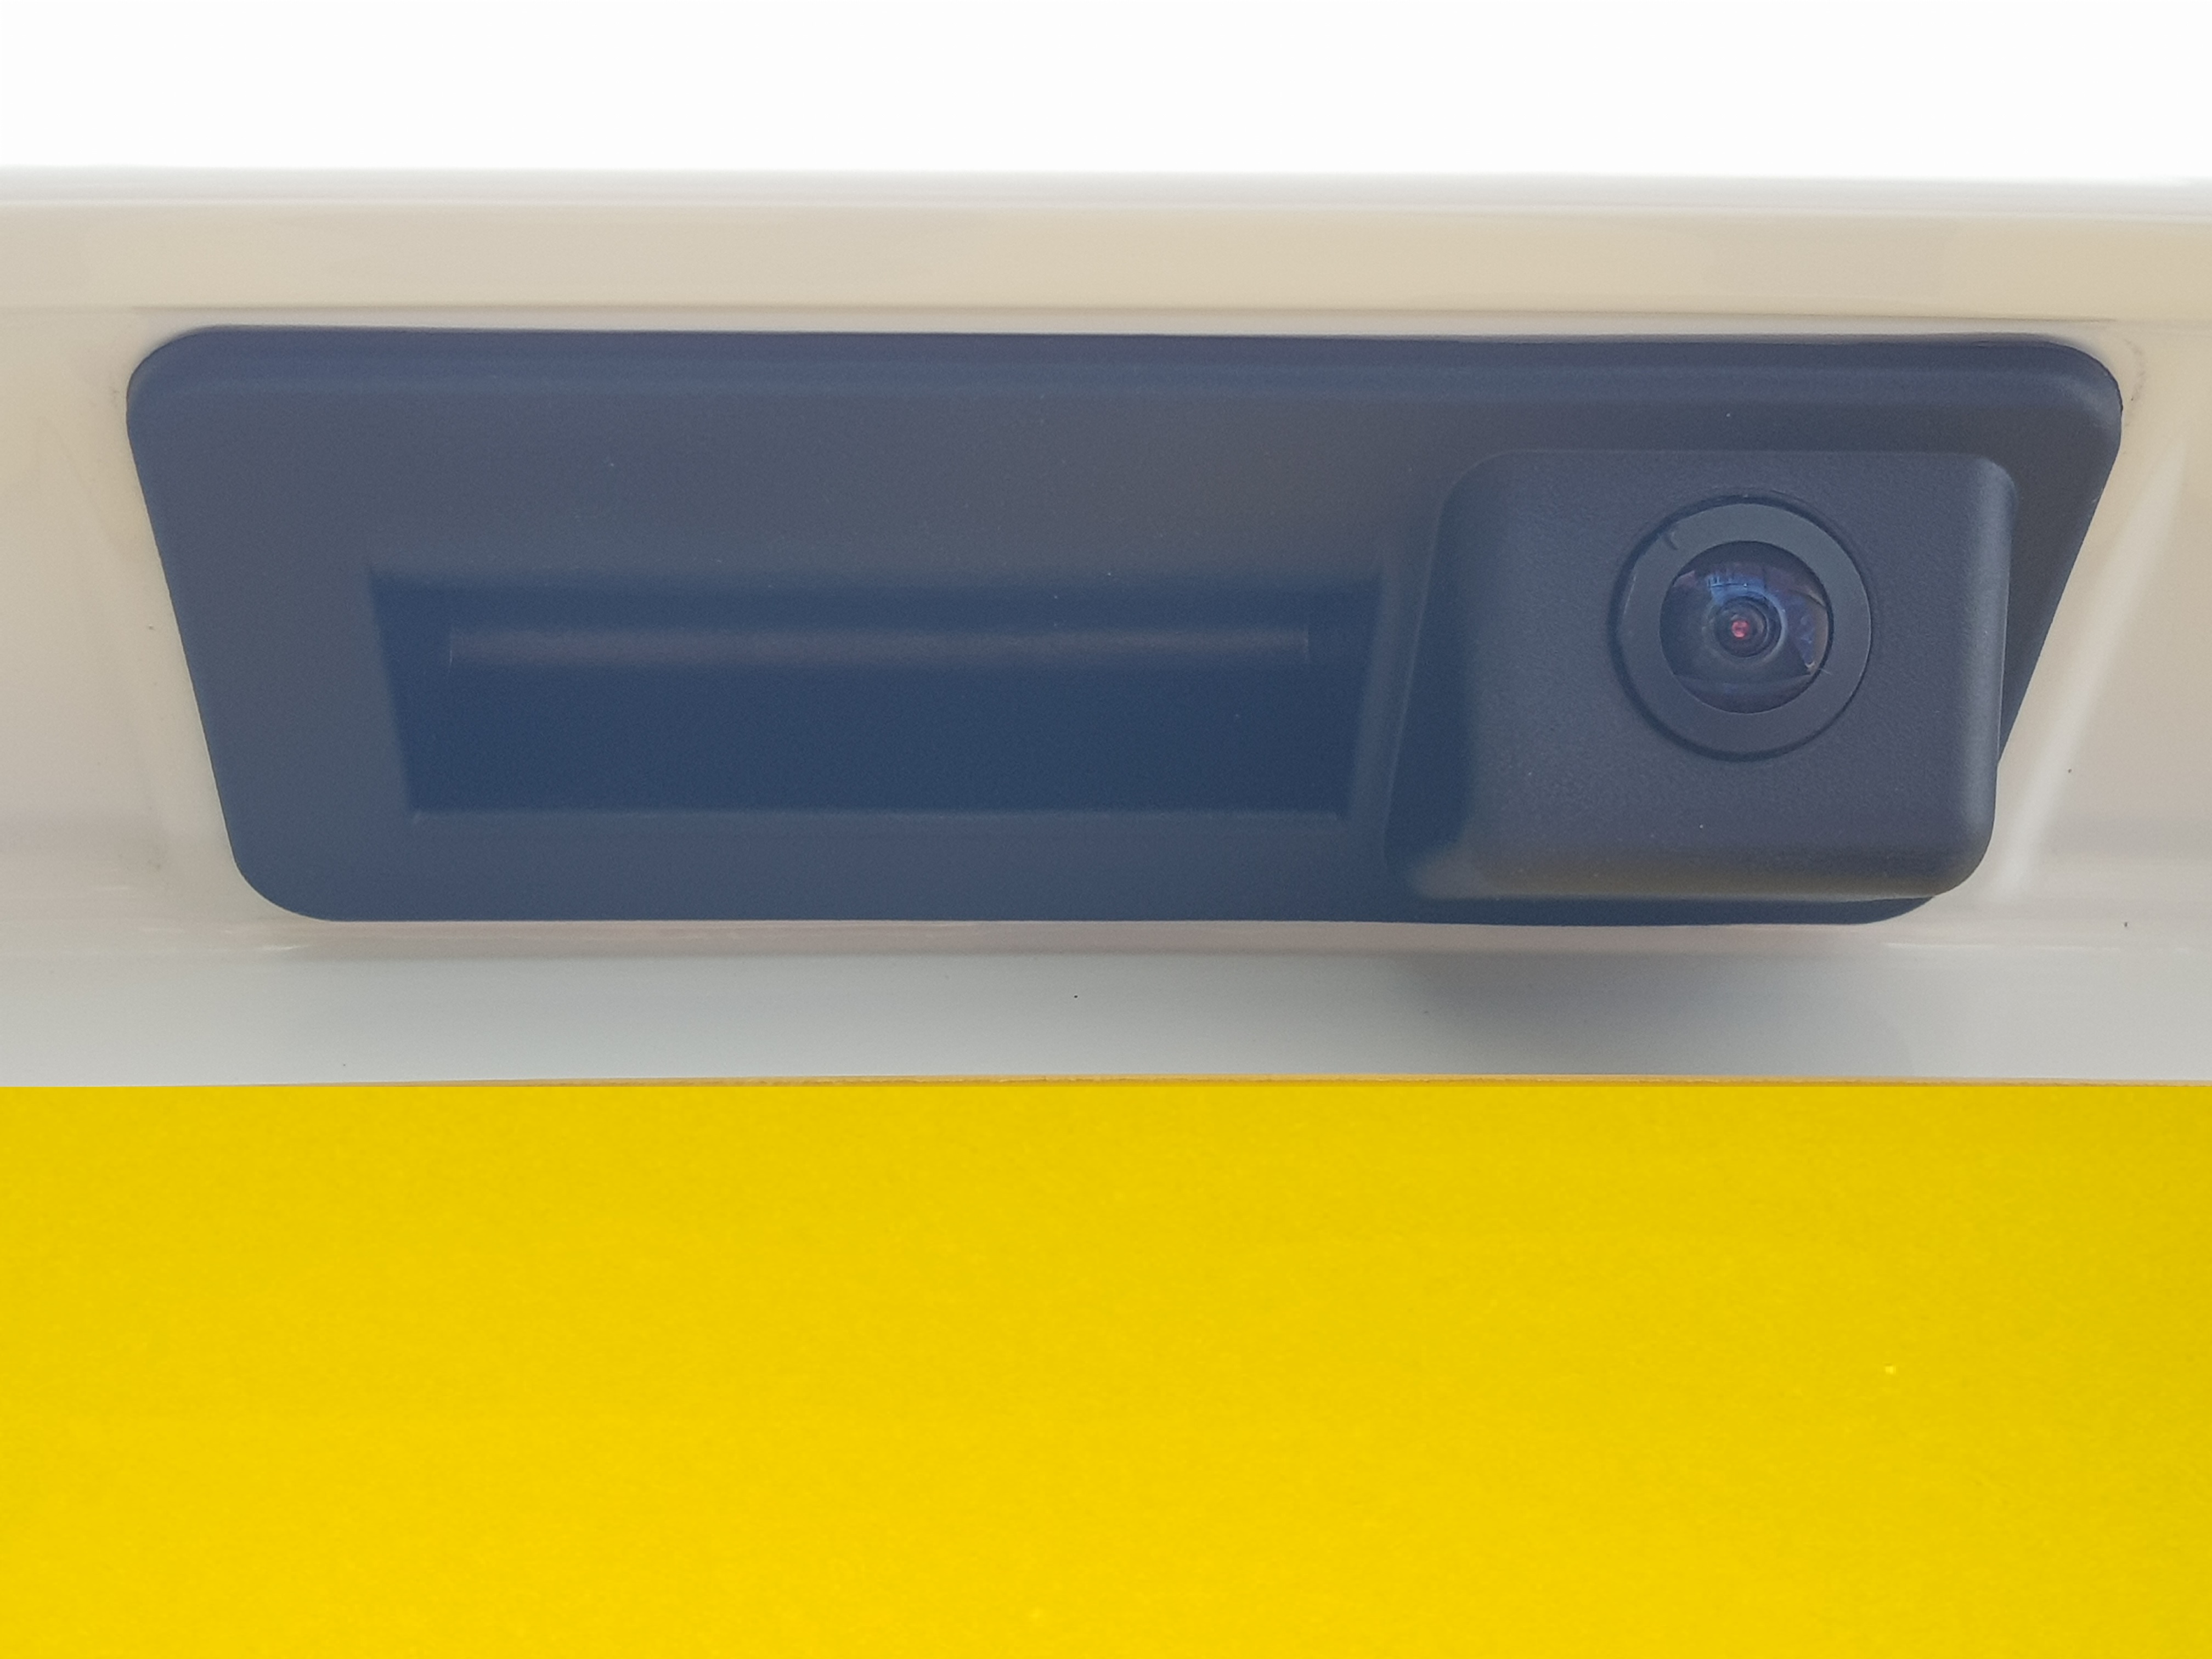
If you're interested in a reversing camera, this thread is invaluable. I fitted one and while it was a fair bit of work, it's not difficult if you buy the right camera. Some require calibration, some are plug & play. The ones requiring calibration are still easy to fit, but setting them up is a bit more of a game. (Help is available on Briskoda to do this.)
-
This may help with your decision.
-
Note that the smaller engined Octavia's have torsion beam rear suspension, while the more powerful cars have independent rear suspension. I'd also weigh up the option of a smaller-engined car against how long you intend to keep it. This is purely a personal opinion, but I don't think a small engine dragging a big car around will last as long as a larger, less-stressed engine doing the same job. If you only keep you cars 2-4 years, this won't be a problem. If you keep your cars for the best part of a decade or more, it might become one. Personally, I would not go for anything smaller than the 1.5TSI, but loads of people are happy with the 1.0TSI. (You and the Boss having a test drive to see what you think of the 1.0 is obviously the best thing to do.) One advantage of the smaller-engined cars is that they often come on 16" wheels, which are more comfortable than the equivalent 17". The car you link to is on 16" wheels, so that's a plus for comfort.
-
Okay then, so I shall top-up with G12evo, and replace with G12evo at the next service. (Unless Skoda have a reason why I shouldn't do that.) I think that solves the problem and gives me a way forward.
-
As far as I know, the silica bag was put in cars fitted with full dual climate control. (I.E. Passenger and driver can set different personal temperatures.) Does you car have dual climate control, because that would blow a hole in that idea.
-
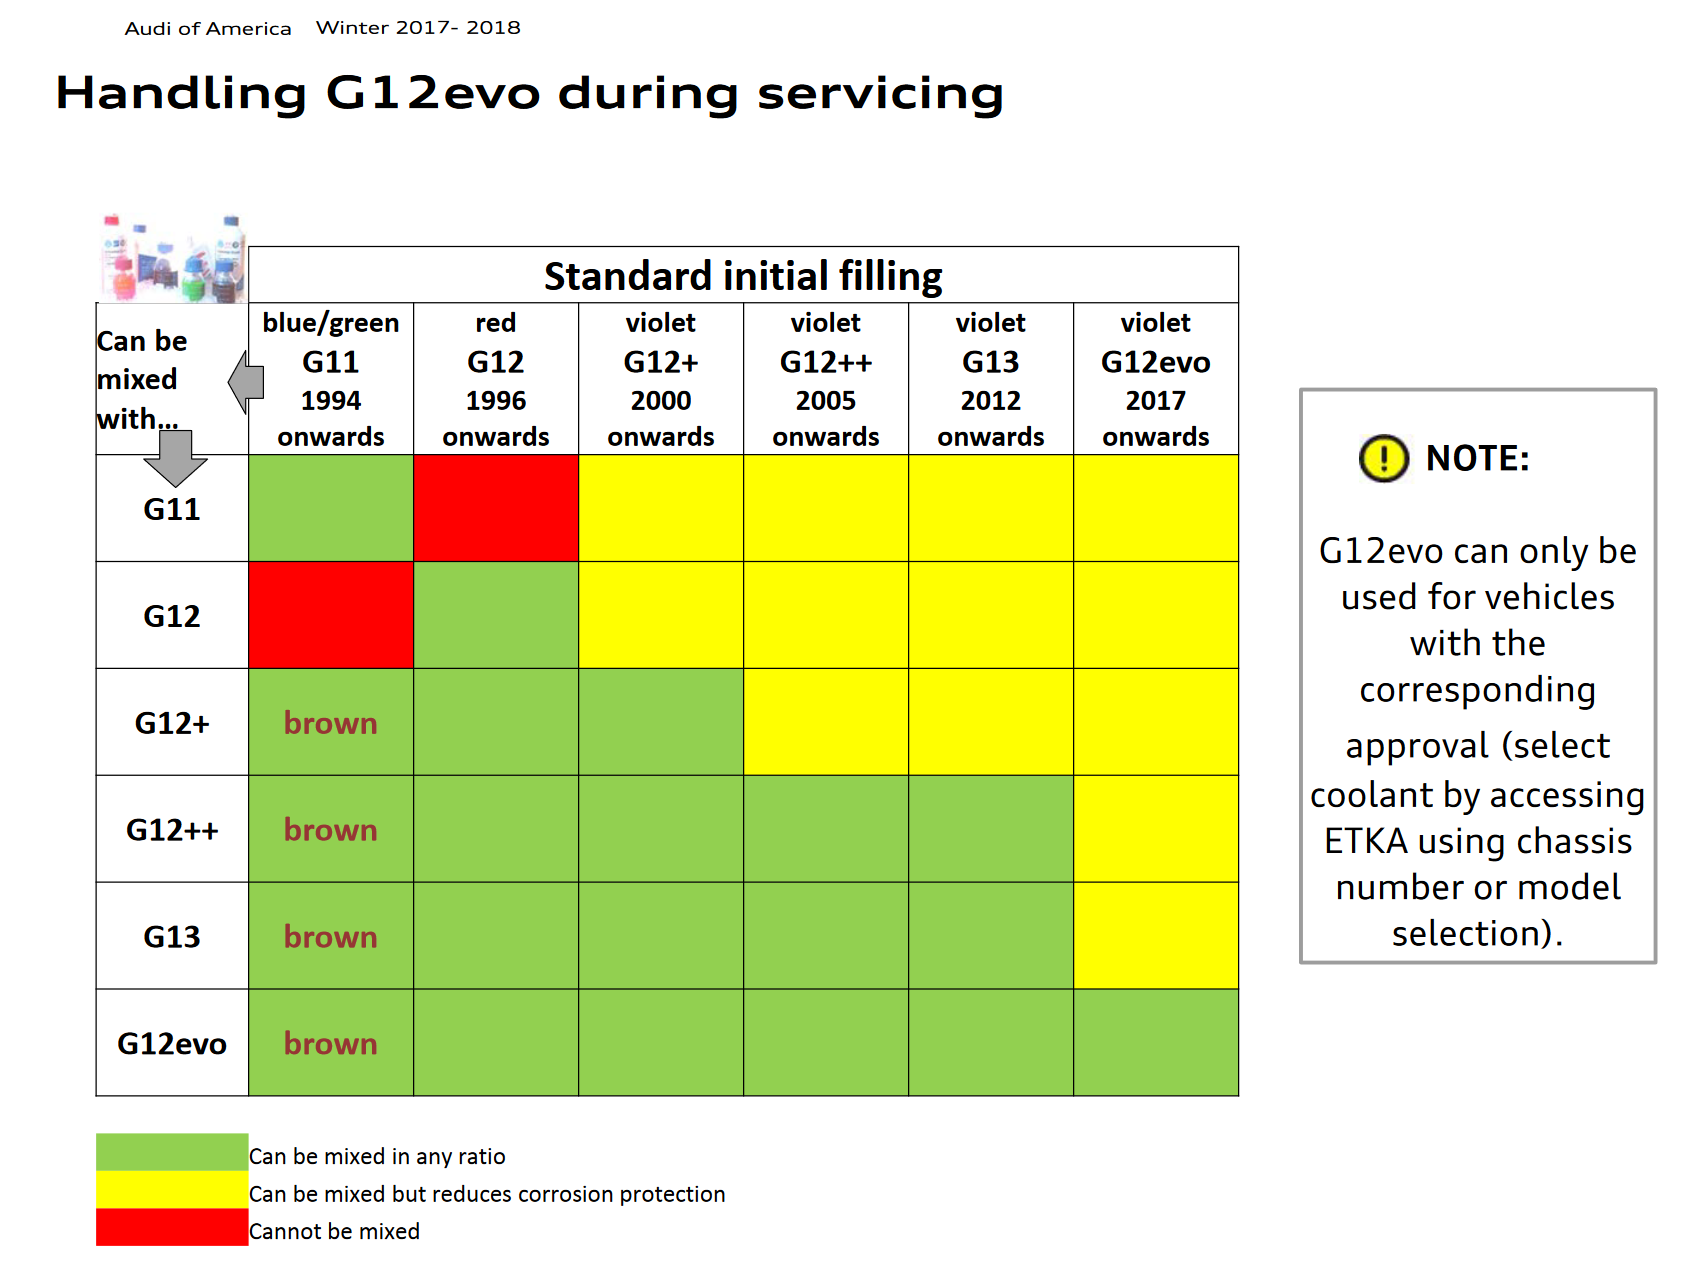
Ah! Academic just now, then. I'm doing a little research trying to work out the best way forward for servicing without a silica bag. Just found this document. https://static.nhtsa.gov/odi/tsbs/2018/MC-10138342-9999.pdf This slide in particular caught my eye. Looks like G12evo is the future, but may only be suitable for more recent cars. Edit: Trying to get my head around this chart. If your car came with G13, then mixing with G12evo at any ratio is fine. But if your car came with G12evo, then mixing in G13 reduces corrosion protection. So...if I read that correctly, G12evo has superior corrosion protection to G13, hence adding G12evo to a G13 car does not reduce corrosion protection, but adding G13 to a G12evo car does, as G13 has inferior corrosion protection to G12evo.

-
That cartridge looks like a pretty sturdy alternative to the flawed bag design. Have you used one yourself, @langers2k
-
Hi @James@RRG_Skoda_Rochdale. When you've removed the silica bag, what would you suggest are suitable coolant service intervals, and what should be used? (I have removed the silica bag from a MY19 car with G13 coolant.)
-
I've been in a car fettling mood this week, so after fitting my reversing camera yesterday, I figured I'd go fishing for the silica bag today. I dug around with my fingers as @Nomsdid, and found that almost before I knew it, the bag was loose in the header tank. Getting it out of the top without splitting was then the trick, but it wasn't too much of a pain, and I used a pair of forceps to get a good careful grip on it to allow me to wiggle it out carefully without worrying about it falling back into the tank. It was a lot easier than I expected, TBH and I'm glad I've got that little worry out of the way as my car rapidly heads towards being 3 years old. That said, the silica bag looked in perfect condition, and I almost had a pang of regret about solving a problem I didn't seem to have. (I've kept the silica bag in a sealed food bag for now.)
-
-
I specifically wanted a car without KESSY, but for security reasons. Have to admit, having a "Start" button would be cool, though.
-
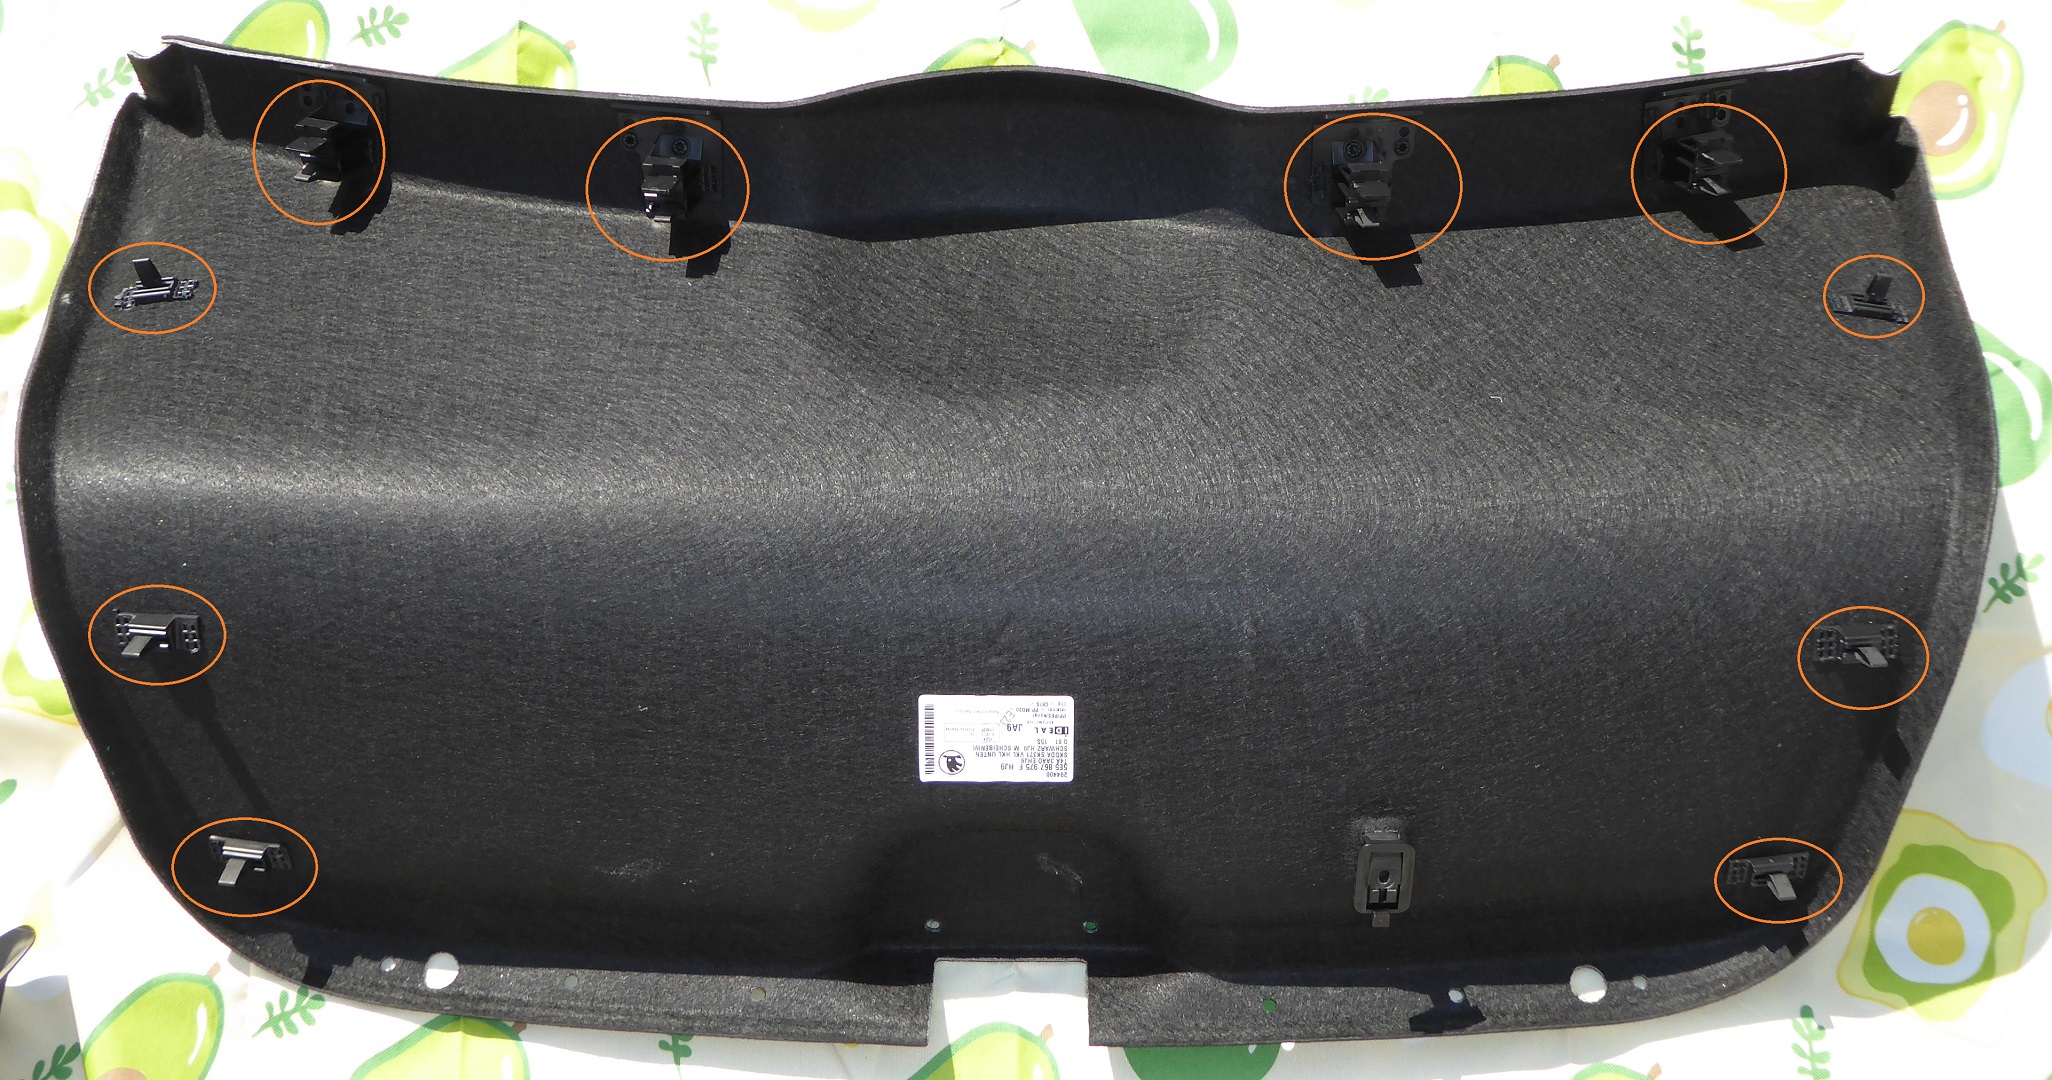
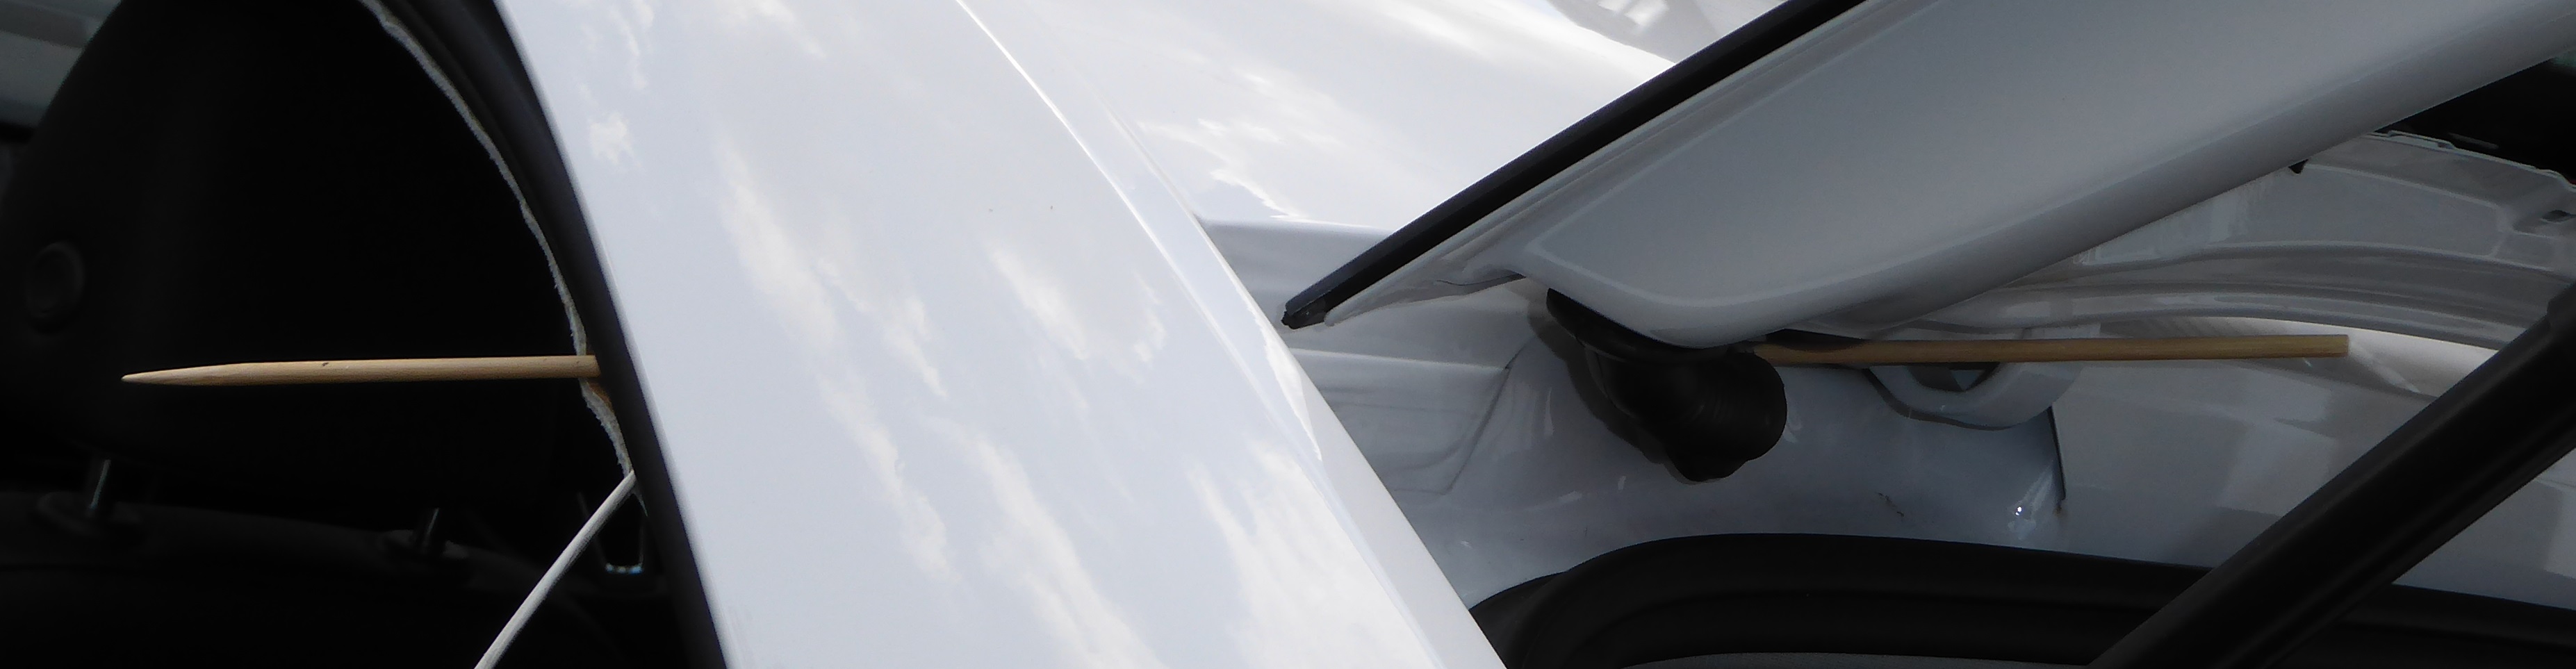
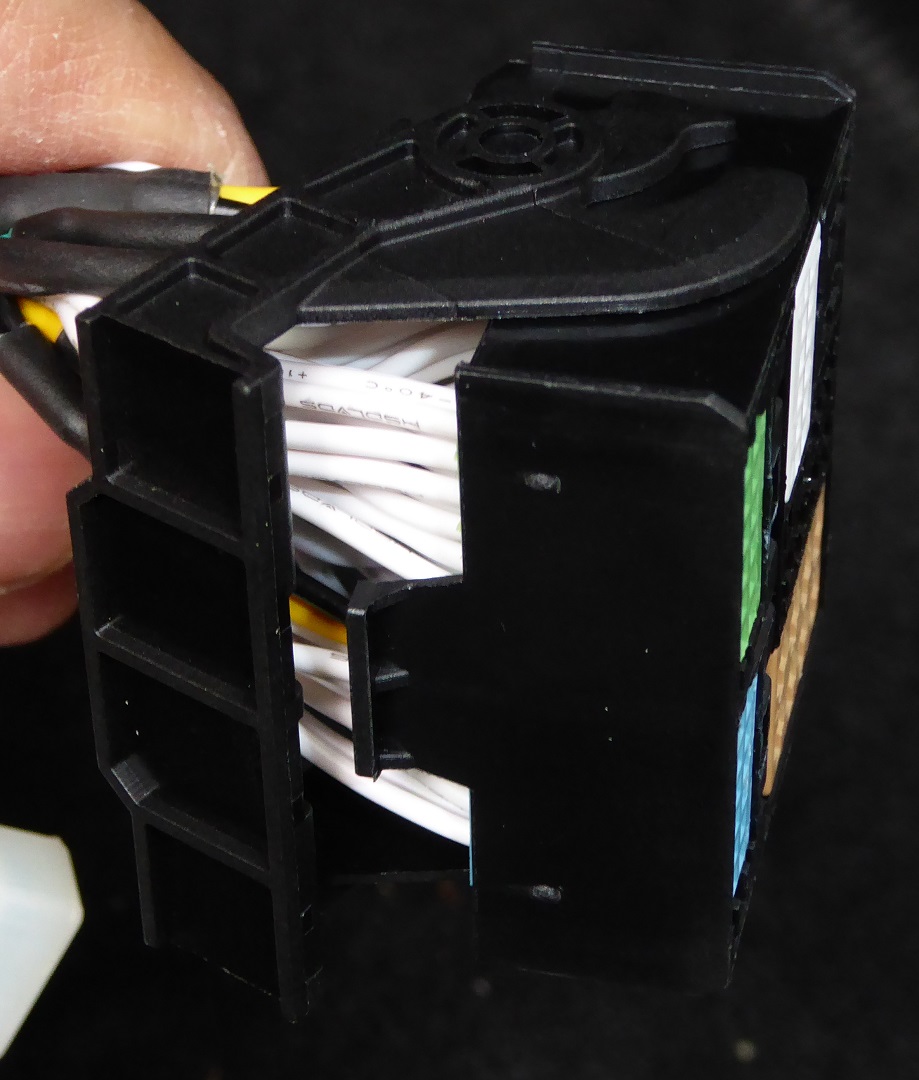
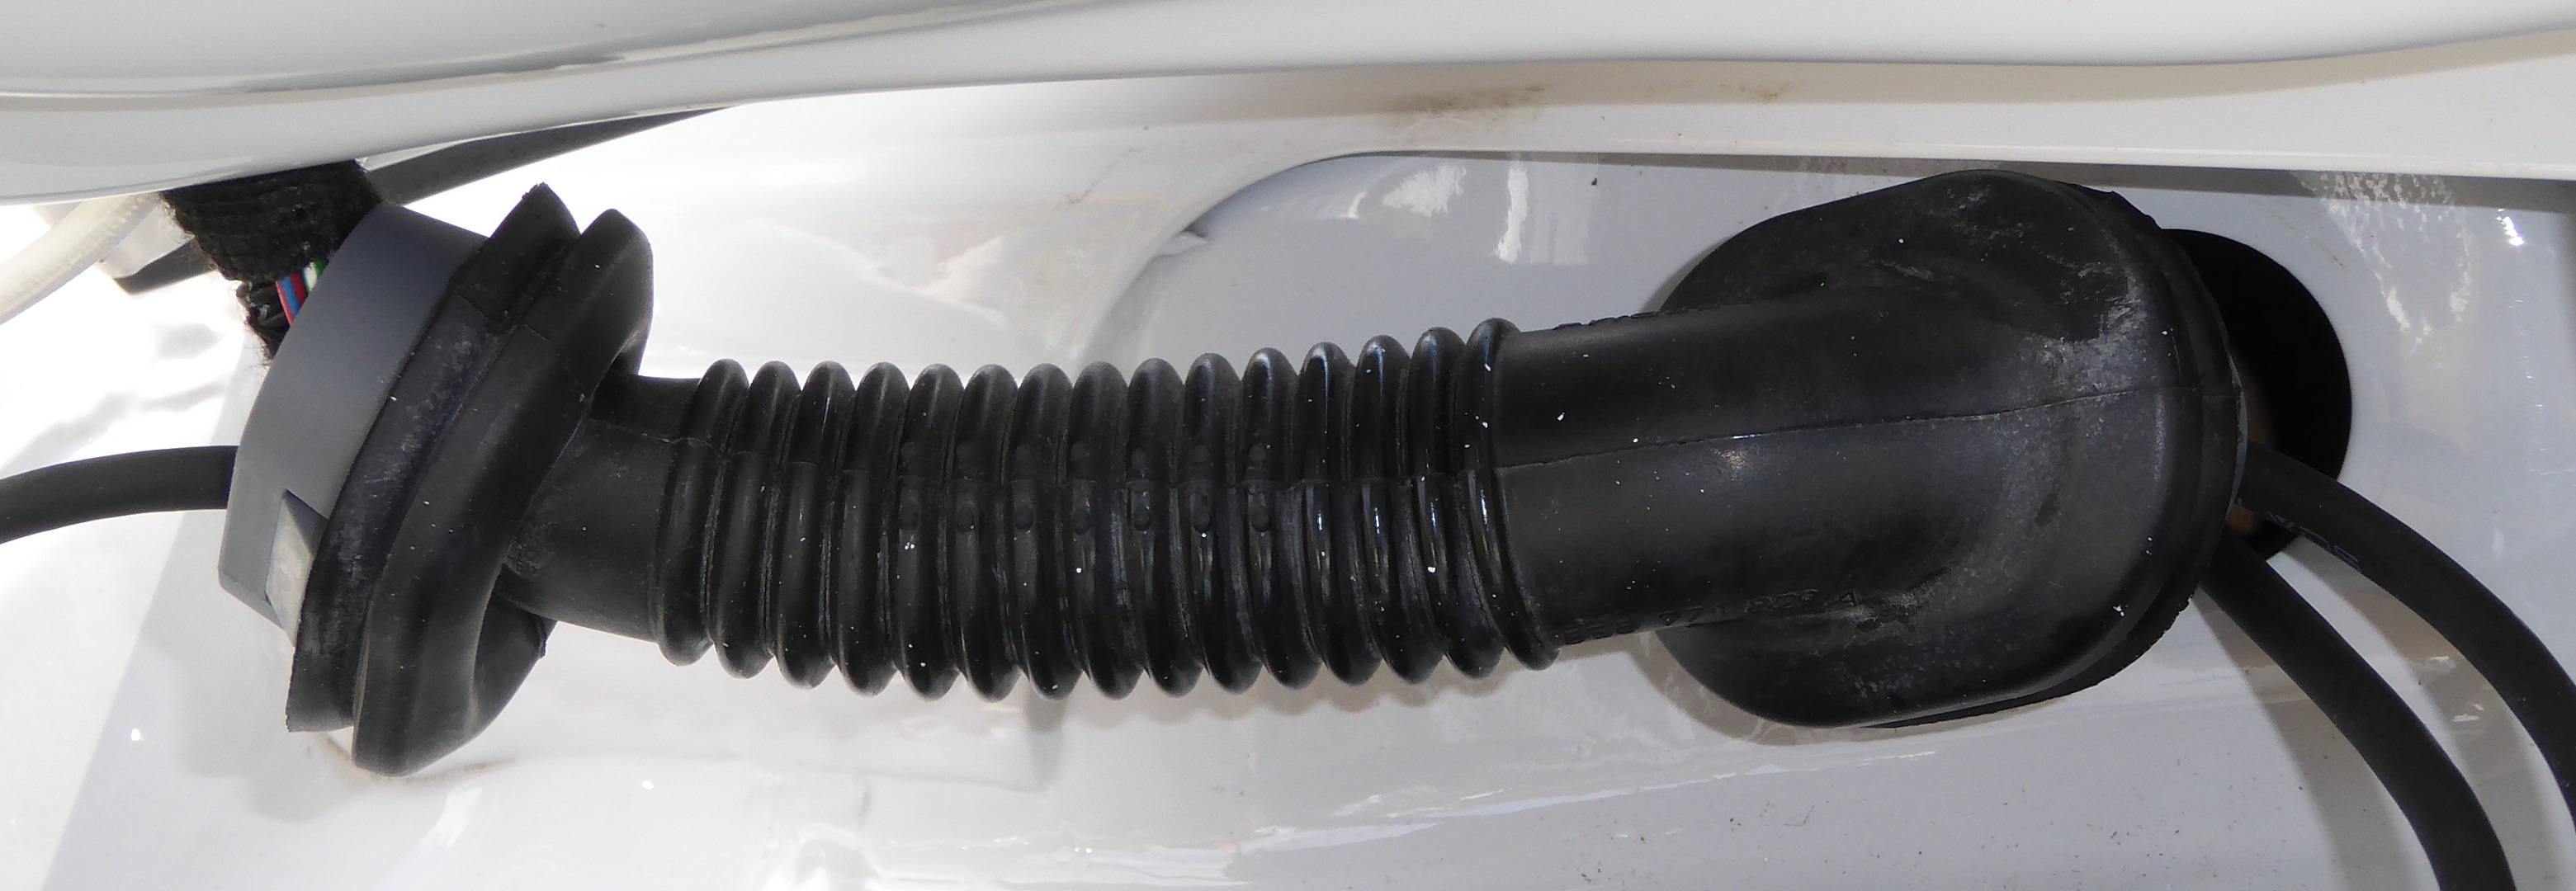
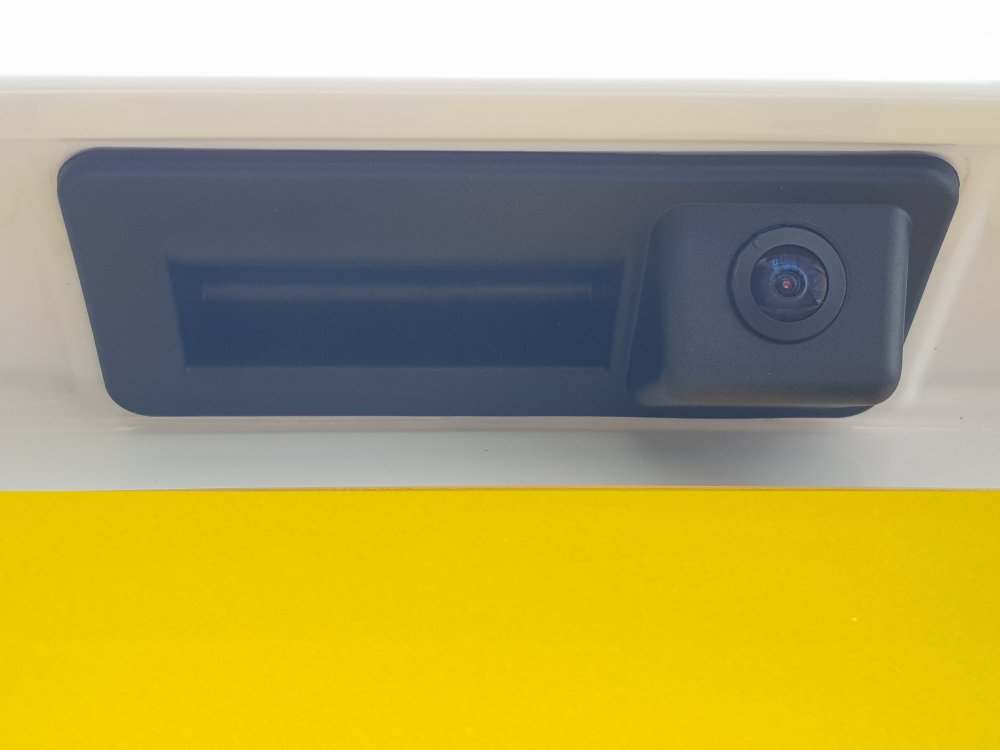
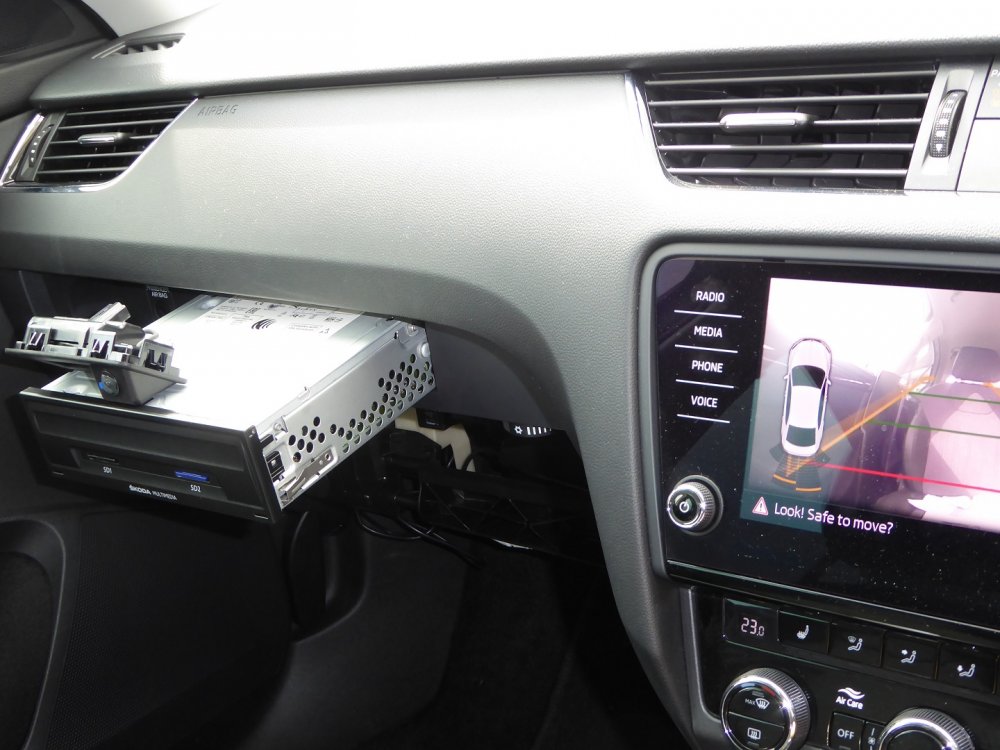
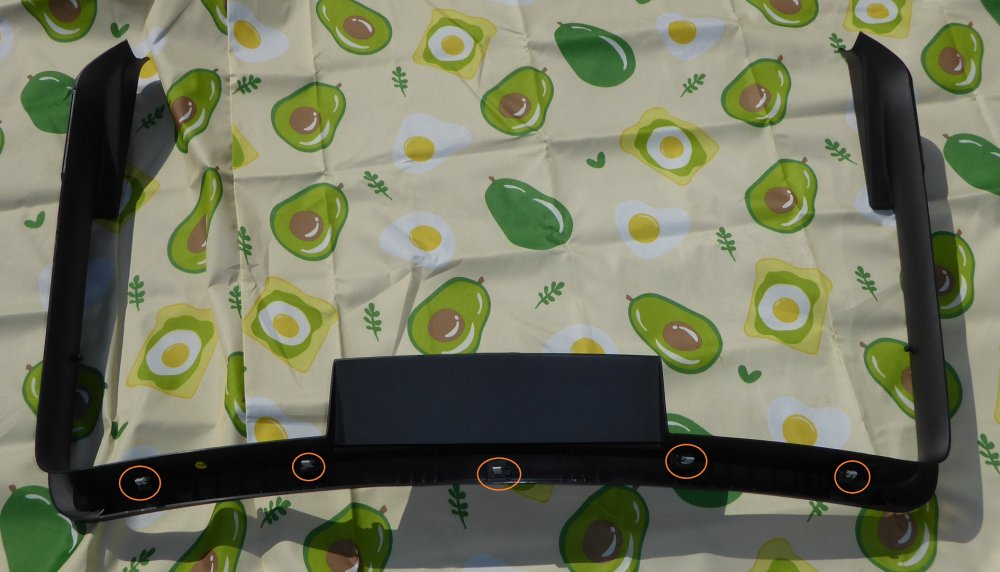
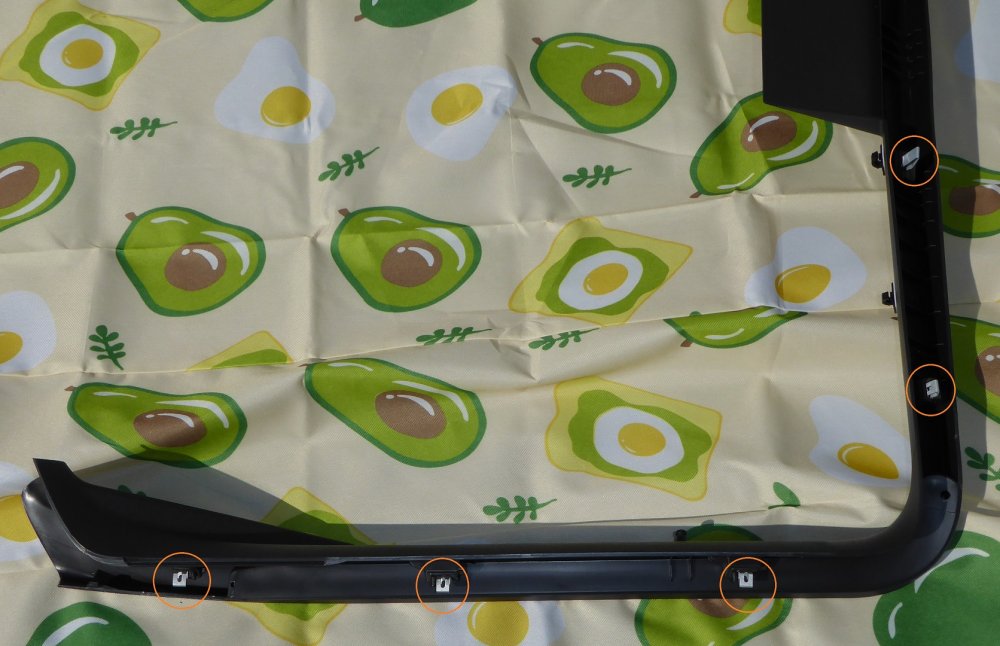
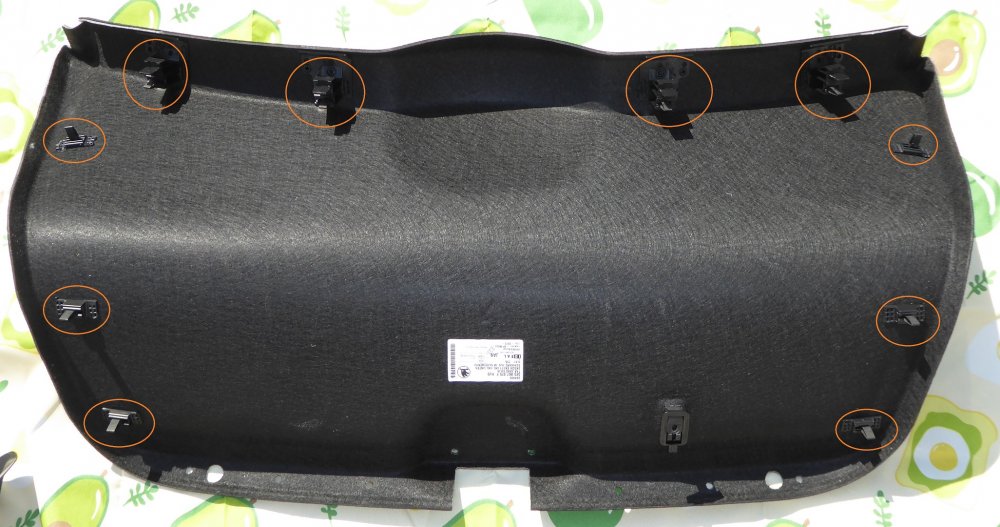
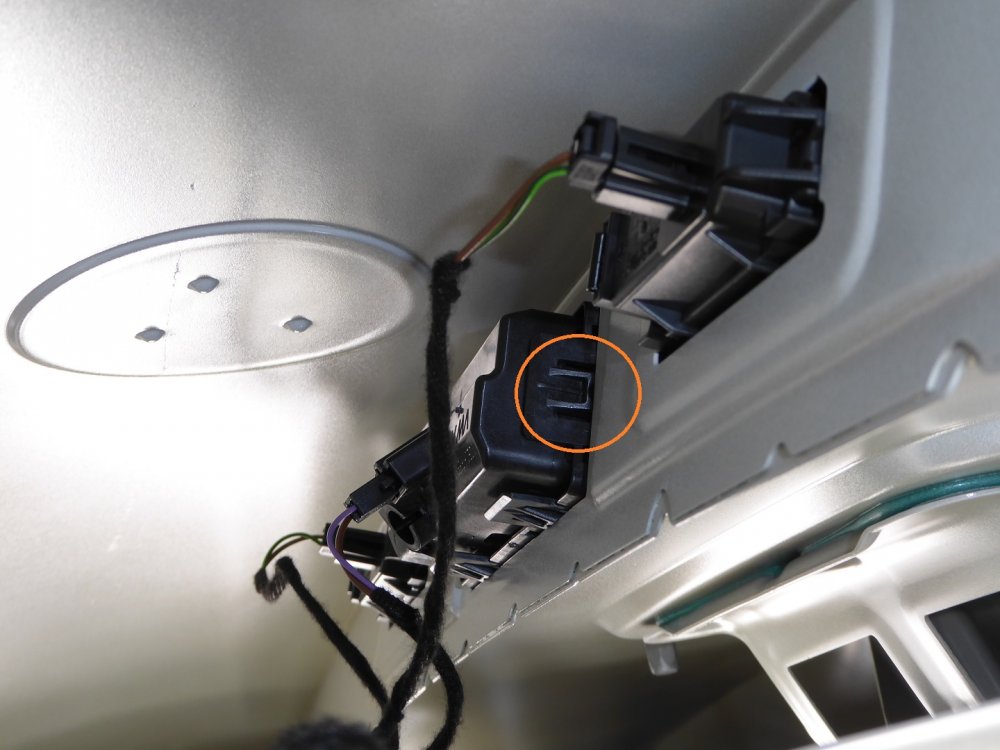
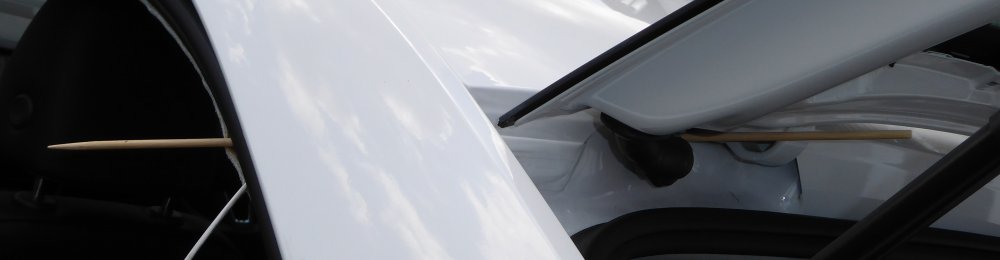
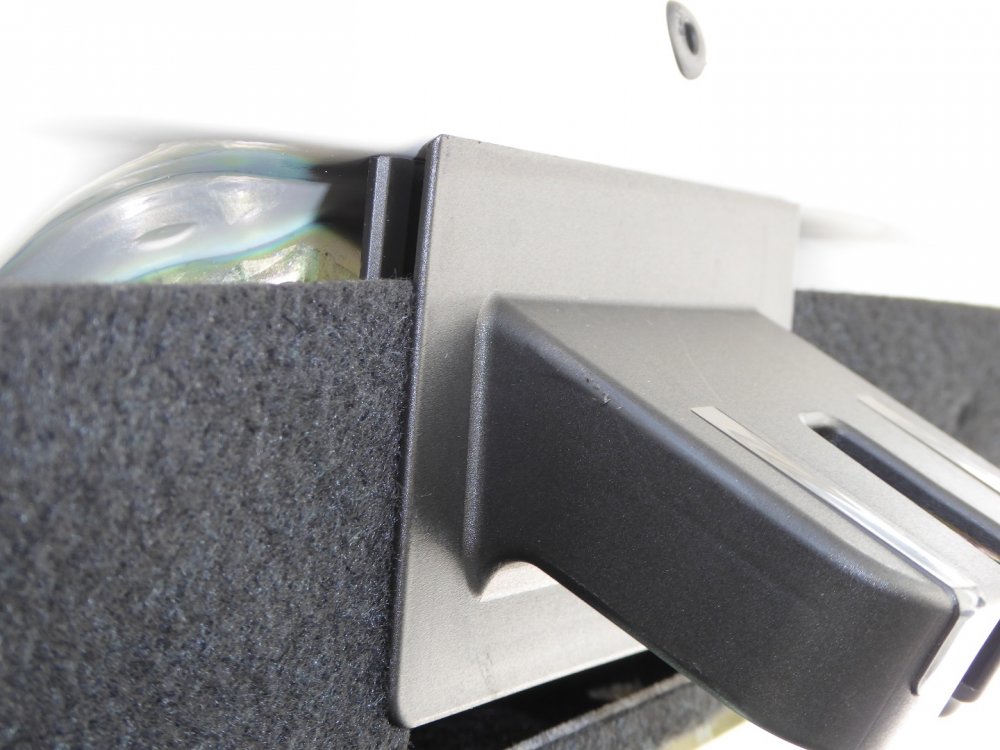
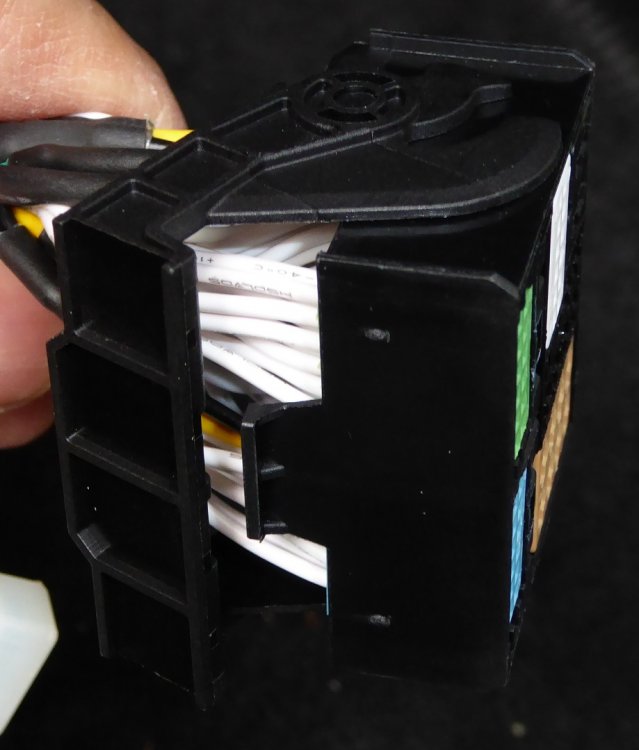
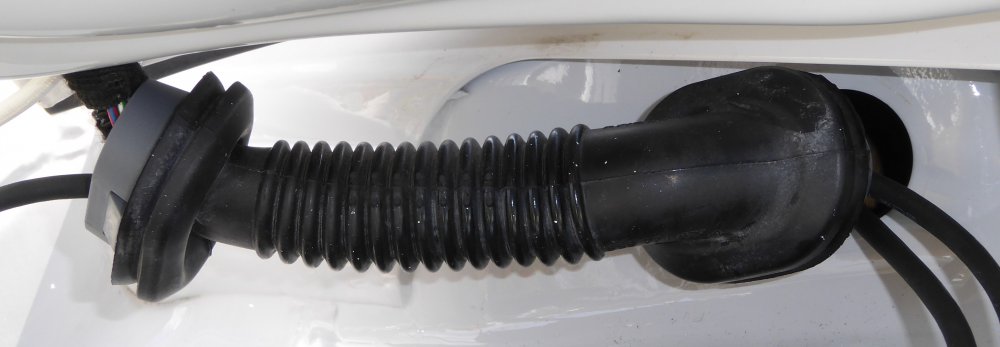
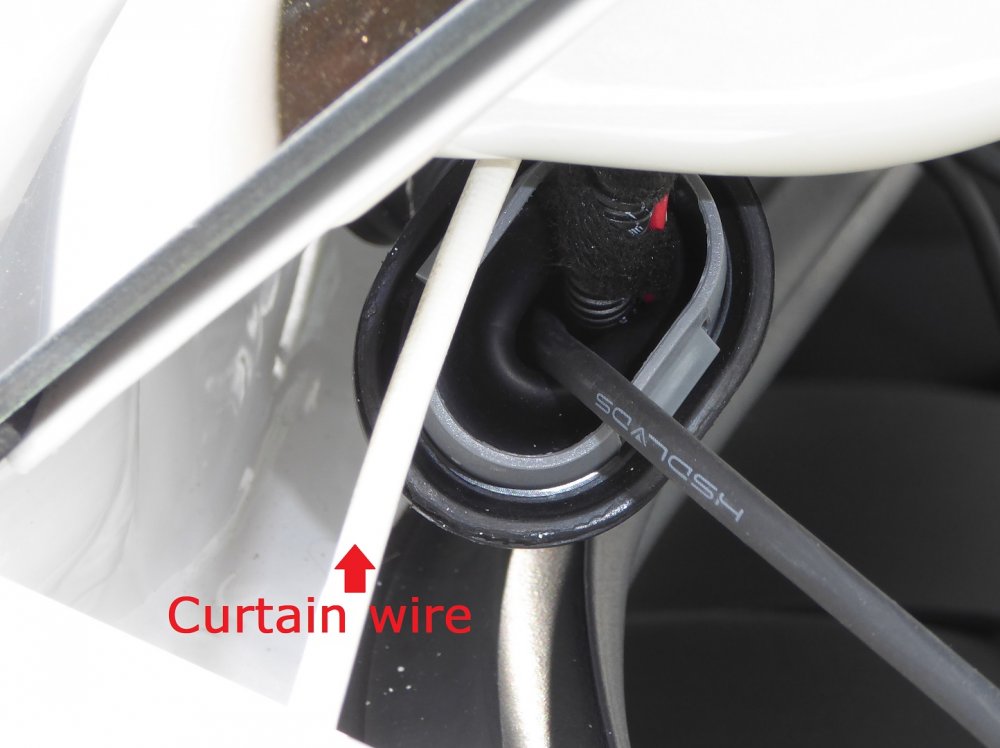
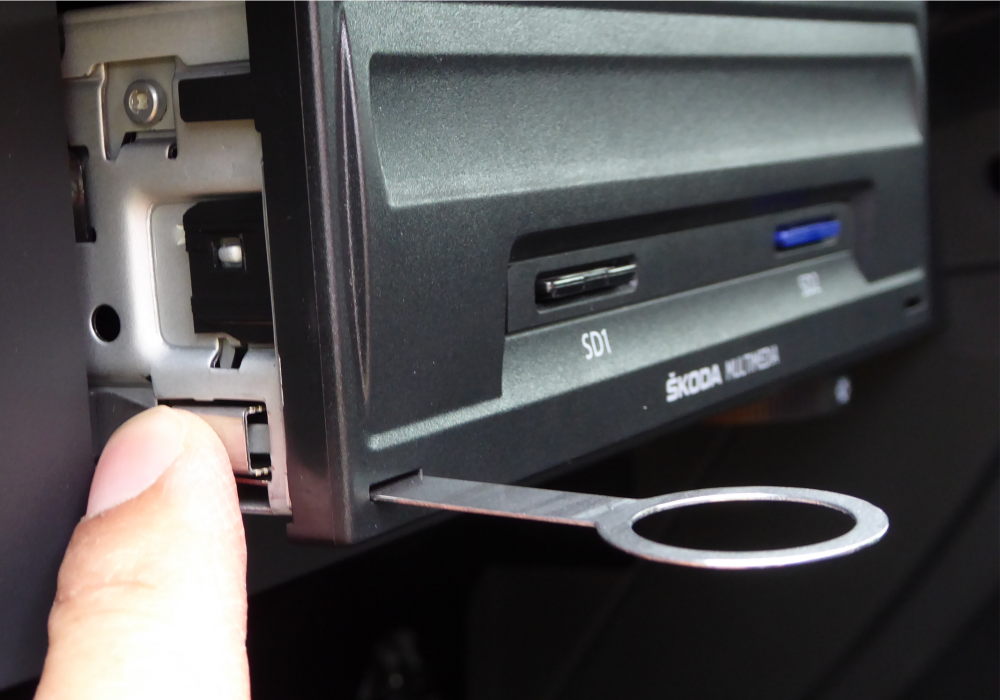
Thanks to @weyland's excellent instructions, and tips from a few other Brisky members in various threads, I fitted my (long overdue) reversing camera today. I have some observations based on my experience today that may help people fitting their camera. 1) The media unit has plenty of room behind it. Also it can be pulled quite far out with the cables still attached. However I noticed my unit had cables which were trapped behind something initially, which made getting the media unit to move more than about an inch very difficult. As Weyland suggested, getting down into the footwell and looking up with a torch allowed me to see what the problem was, and move the cables free to allow the media unit to be almost completely pulled out. 2) I tested the camera in the car. After connecting the main connector, I simply rested the camera on top of the media unit and checked to see if it worked. That way ensured I found out if I had what seems to be the most common fault, poor connection, at the earliest opportunity. When refitting the media unit, be sure to position the camera wire correctly to the side, as it can get trapped behind the media unit. Ditto the cables out of the new inline double socket. It's quite fiddly so expect it to need some care and patience. And a torch! Note the connector has a lever-lock action to secure it in place. The lever is at the bottom of the connector, so it's not hard to lift the lever to remove the socket it from the media unit. I found that with the lever lifted, the socket came out fairly easily, with little force required. I plugged the new socket in very carefully, and pushed it right in, using the lever-lock purely as a lock once connected, not as an aid to pulling the connector into place. 3) I went the Weyland/OEM up and over route, and it was fairly straightforward. I started at the head unit, and went towards the back of the car. Arguably, this is the "wrong" way to do it, as the connector for going this way is larger than the other end. Something that was a particular issue when I got to the rubber connection between the hatch and the car body. The tip to use net curtain wire as a guide to pull the cable through was invaluable, but I also used a dowel as a guide for the rear hatch hole to the C-pillar and I think around the B-pillar too. . I attached the cable to the pull wire/dowel with self-amalgamating tape, because it doesn't leave a sticky residue. I also found a "One step back, several steps forward" approach worked best, rather than simply pulling the cable through. I'd gently pull the cable back, to ensure it was moving freely, then pull it through with the curtain wire until I felt resistance. Then repeat the back/forward action. It worked pretty well. 4) Pushing an end clip on the boot handle as well as pushing out from behind (a two handed operation) worked a treat, but it's fiddly and awkward to do. Don't let the pictures fool you, there are a load of obstructions in your way and it's a pain. Be patient and use careful force on the end clip, and you'll be fine. The electrical connector into the boot handle switch has a little lock that you need to release to remove the connector. When refitting, slot the inner edge of the connector above the number plate for an easy refit. 5) Removing the rear trim from the hatch is straightforward enough, but it requires some confident force to remove those clips and it's a real PITA putting it back. A 2nd pair of hands is very useful. I've uploaded some pics so you can get an idea of where to expect the clips. Note there are four clips in the bottom (furry) half of the trim which are at a different angle. (Either side of the wiper motor bulge.) Note use of picnic mat to prevent damage/soiling to rear trim. Also the furry trim slots into the boot lock, in case you were wondering. (See pic.) 6) The dowel was very useful for finding the route from the rear hatch hole to the front of the C-pillar. 7) A particularly tricky part of the job I found, was feeding the socket through the rubber hose between the rear of the car and the hatch. It's a snug fit. Also the hose has hard plastic clips in it, it's not all rubber. Edit: I forgot to say, I used aerosol silicone spray as a lubricant to both help the cable through, and ensure the rubber seals made good watertight contact when refitted. I'd advise against using oil on rubber as it does not do it any good in the long term. https://www.amazon.co.uk/WD40-Performance-Silicone-Lubricant-250ml/dp/B00KPUBRJ8 . Allow about 4 hours, including time for struggling with tricky bits, taking pictures, and generally not rushing and damaging anything. By the time I was almost done, I was pretty fed up with the whole business, and was replacing the uncooperative rear trim in a pretty foul mood, so I had to try and chill out a bit to ensure I didn't rush putting it back and damage something. All in all, it is fairly simple to do, but being simple doesn't make it easy. Good luck!

-
So long as you got it sorted.
-
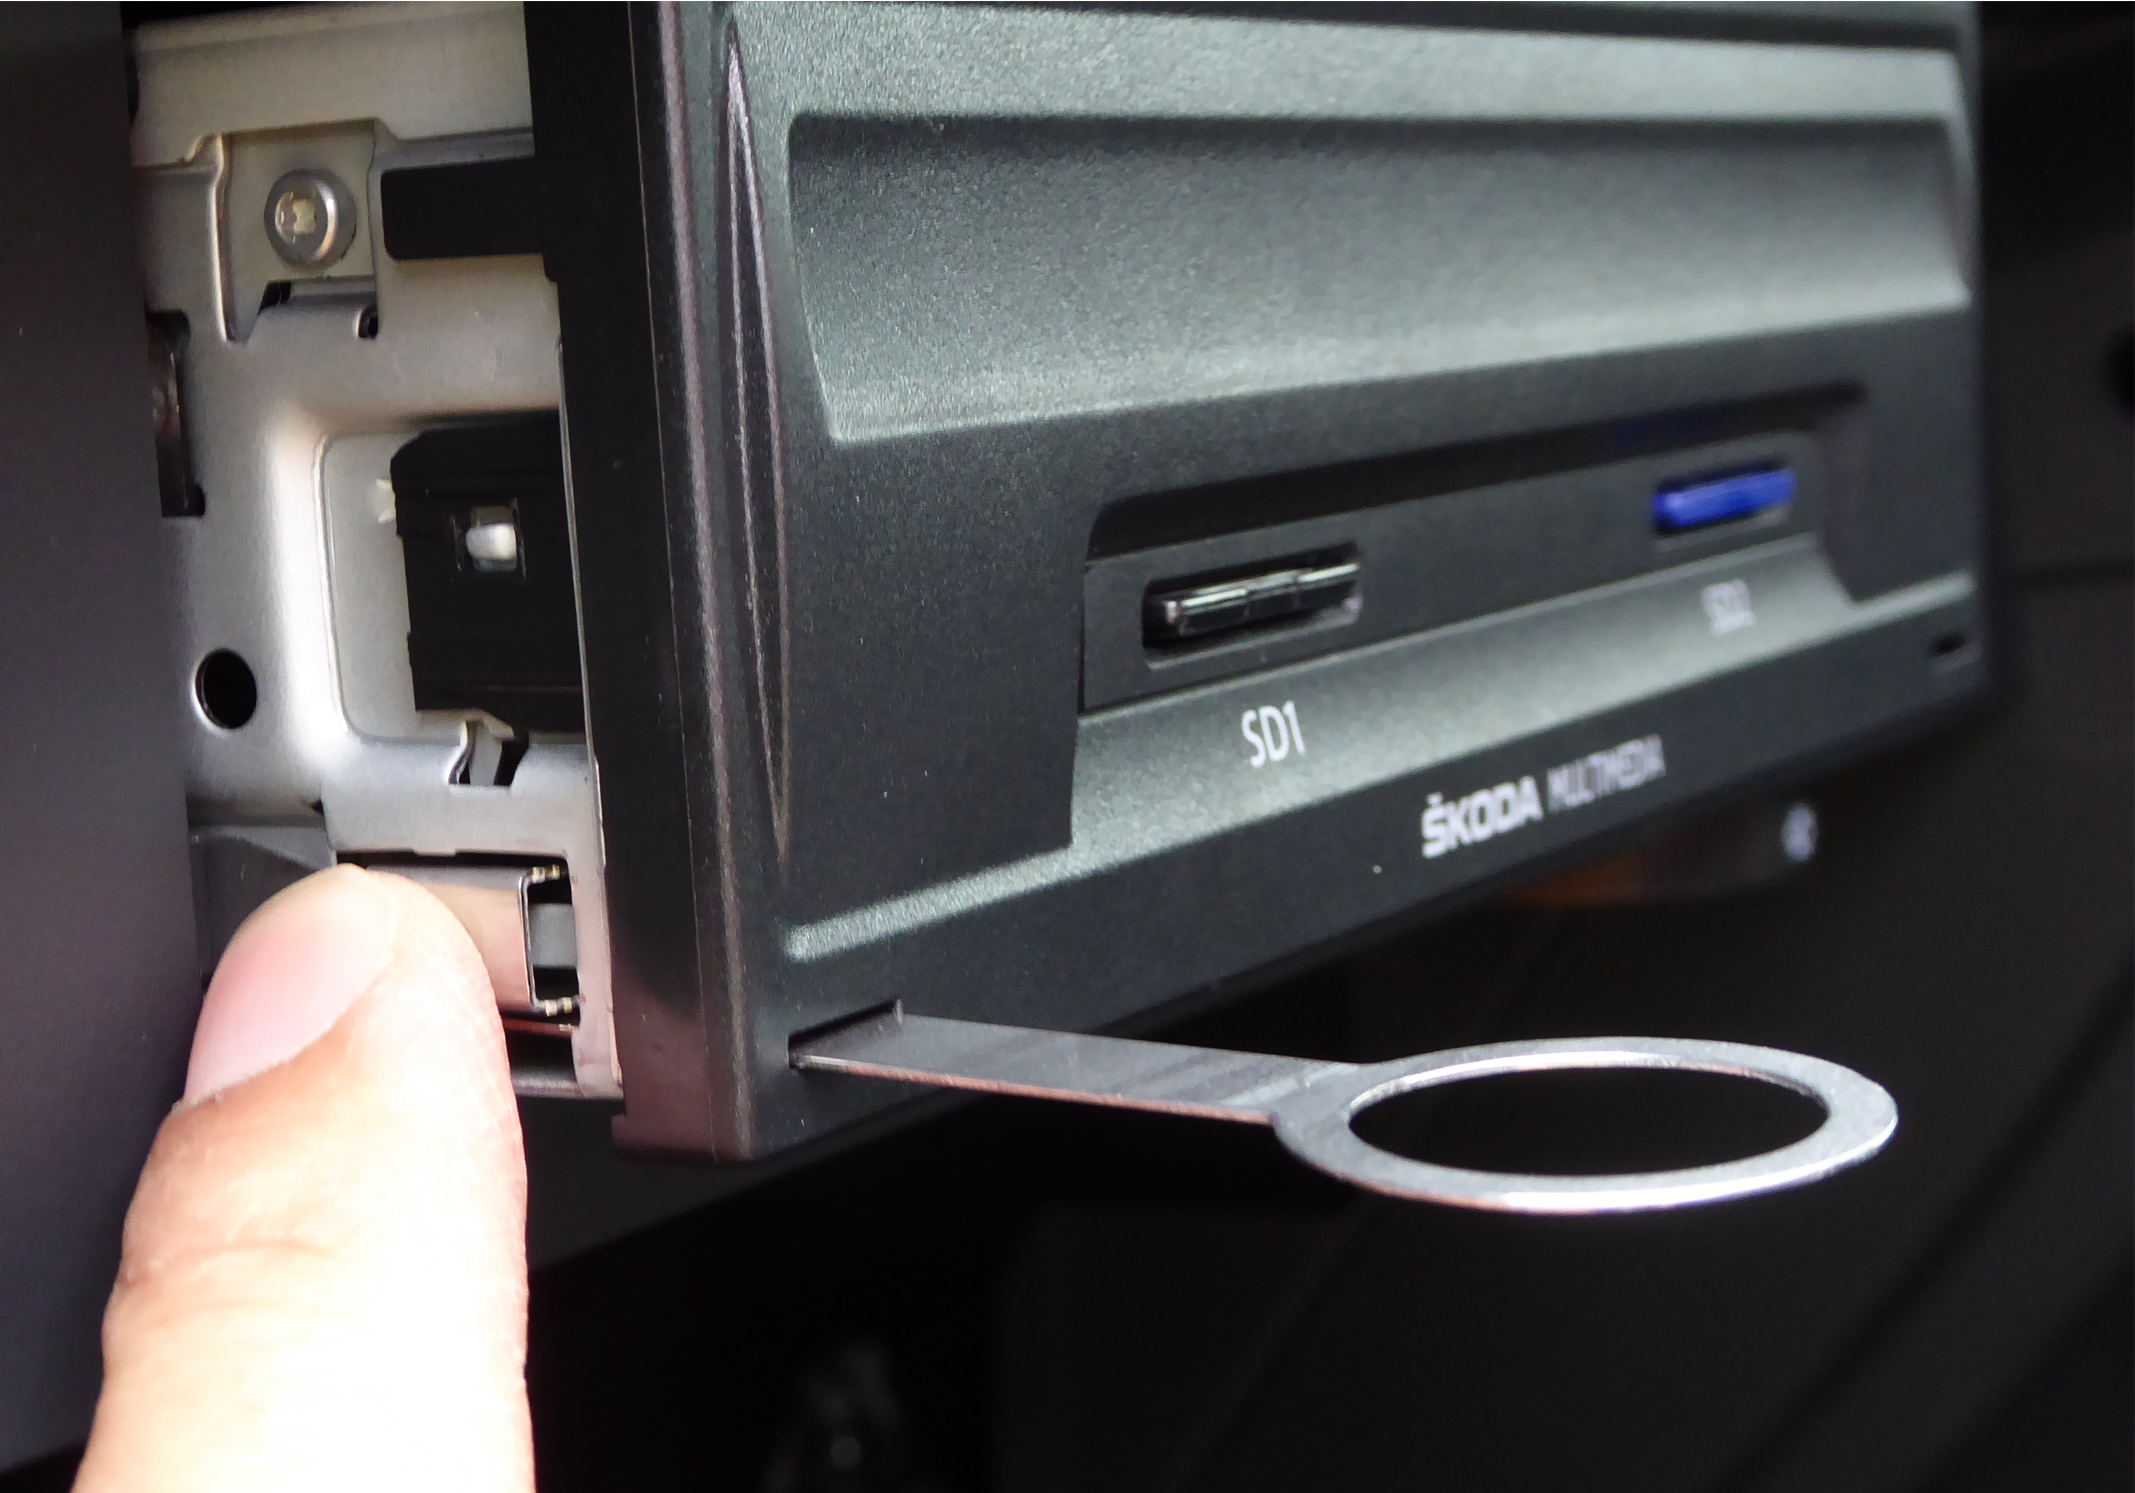
It's easy when you know how. Push here, and the tools will be released and come out easily.
-
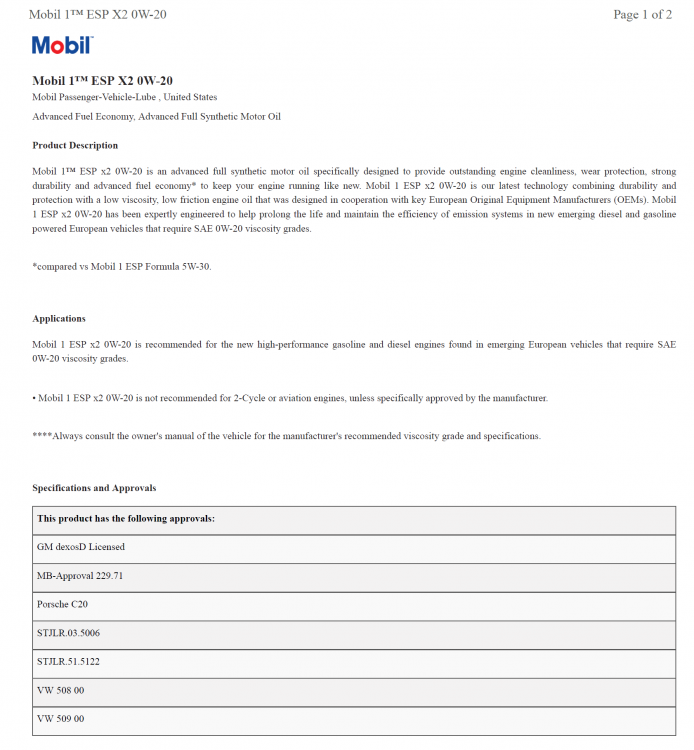
Ah! I don't have the silver oil sticker on mine, next to the black and yellow sticker.
-
The dealer put Mobil 1 ESP X2 0W-20 in my 2.0 TSI, which is a 508 approved oil. (And 509, come to that.) (Source:- https://www.mobil.com/en/lubricants/for-personal-vehicles/our-products/products/mobil-1-esp-x2-0w-20/ )
-
Good luck!
-
What's the verdict on the mystery fluid?
-
This is a very relevant point. If your starter motor or battery fails without use of start/stop, then you are almost certainly parked somewhere and not either at risk or an obstruction. If you use stop/start and your starter motor or battery fails, you will more likely be in a traffic jam or at a junction and are likely to either be at risk or an obstruction. You are certainly going to be more inconvenienced than if you were parked. I don't use stop/start because I don't like it. It bothers me, so I switch it off.
-
Bung some white paper under the leak area to get a good indication of the colour. It'll also allow you to perform a sniff test of the fluid, to see what it smells like, which may shed some light on the problem.
-
Thanks for clarifying that. (The spirit is willing but the online flesh is weak, today.)

-
I thought about this, but I couldn't see it fitting without on hell of a squeeze getting it in there, so I bottled it and stuck with the 2025.
-
I can see this happening, especially with the extra low-down grunt from a low-RPM torque increase. Regular caning might help.
-
One easy check is the coasting "E" in economy mode when you're driving (over 30mph?) and life the throttle. Can you coast in E mode at the moment? I'm not a tech, so I'm happy to be corrected, but... I understand the gearbox "learns" driving characteristics of the driver, and retains them. So first thing I'd be looking at is clearing all learned characteristics, and starting from scratch and seeing if the mode changes are happening or not. (Sport mode not only changes the gear change characteristics, but also seems to dramatically change throttle response in my car.)
-
Thanks guys, I went for a Bosch carbon filter.