
R_Blue
Members
-
Joined
-
Last visited
Everything posted by R_Blue
-
When searching for a similar problem, I dug this thread out. So I have a Felicia fan shroud and 6 blade fan. 165959455g. Exactly the same as the fan below. It has only two connectors. https://www.b-parts.com/en/store/products/883935/radiator-fan-skoda-felicia-ii-estate-6u5-13-165959455g-1998-1999-2000-2001/ After some research, I think this model is 60/100W with 3 connectors. With only two connectors, it should be 100W. With this setup, cooling is barely adequate when the temperature is over 30ºC. There are already too many threads about overheating/thermostat-thermal switch advise. I didn't want to open another one. You already have experience with stronger fans here. I have a 80ºC thermostat. 82-68 fan switch. New standard aluminum 480x285mm Fav./Felicia 1.3 radiator. Felicia fan shroud and the fan I described above. Now the temperatures are above 35ºC I'm tired of constantly looking to temp gauge. After the car reaches it's operating temperature, the fan is almost always on and when climbing at second gear, half throttle, only at 40 Km/h, the temp gauge climbs fast. These are Golf MK1 fans here with the codes: 165959455T two speed. 120/200W 165959455AM two speed 150/250W Thermal switch solutions: Behr TSW 32: 80-85 / 88-93 dual thermal switch. (The most advised 80-85 plus extra high step) Behr TSW 33: 75-80 / 80-85 dual thermal switch. (The most advised 80-85 plus extra low step) I'm %90 sure both the fans and the switches are physically compatible with current setup but will I get noticeable increase in cooling performance? If you say yes, which combination should I buy? (I'm keeping the 80ºC thermostat)
-
Thanks. That's relieving. Also relieving. But I learned a lot from here. You are one of the members here highlighted in my mind. Thanks for sharing info and making the world a more livable place.
-
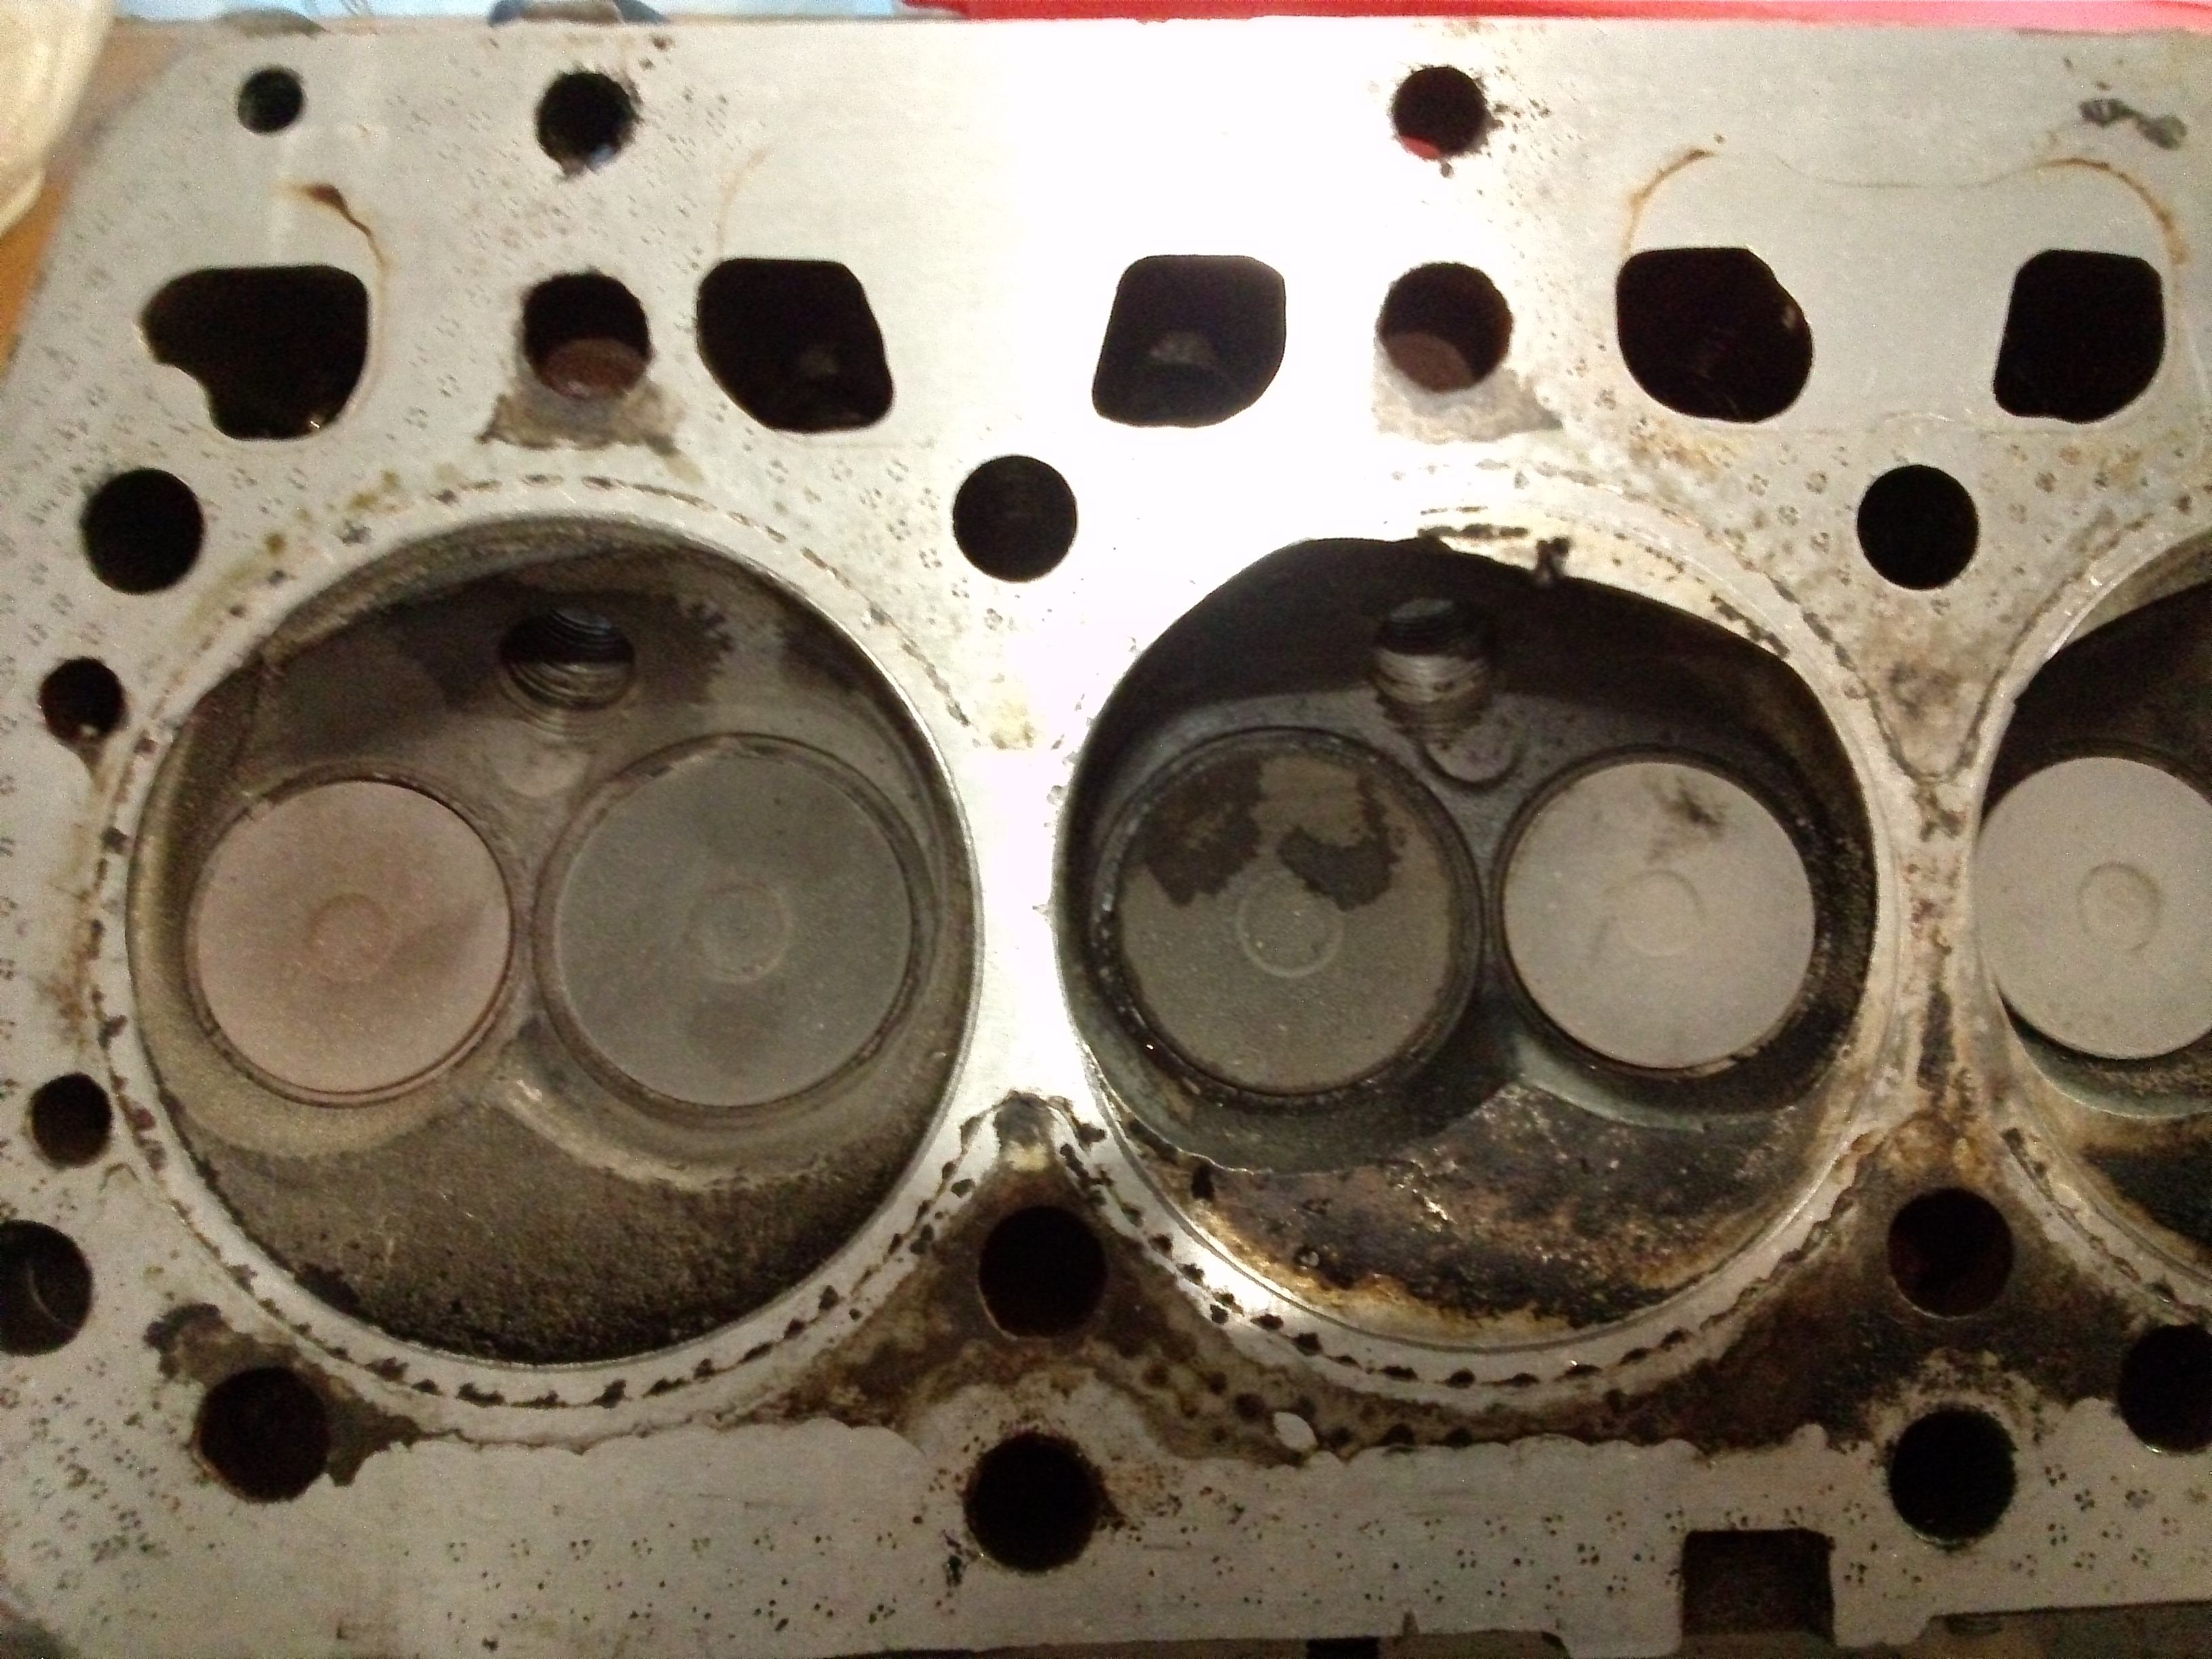
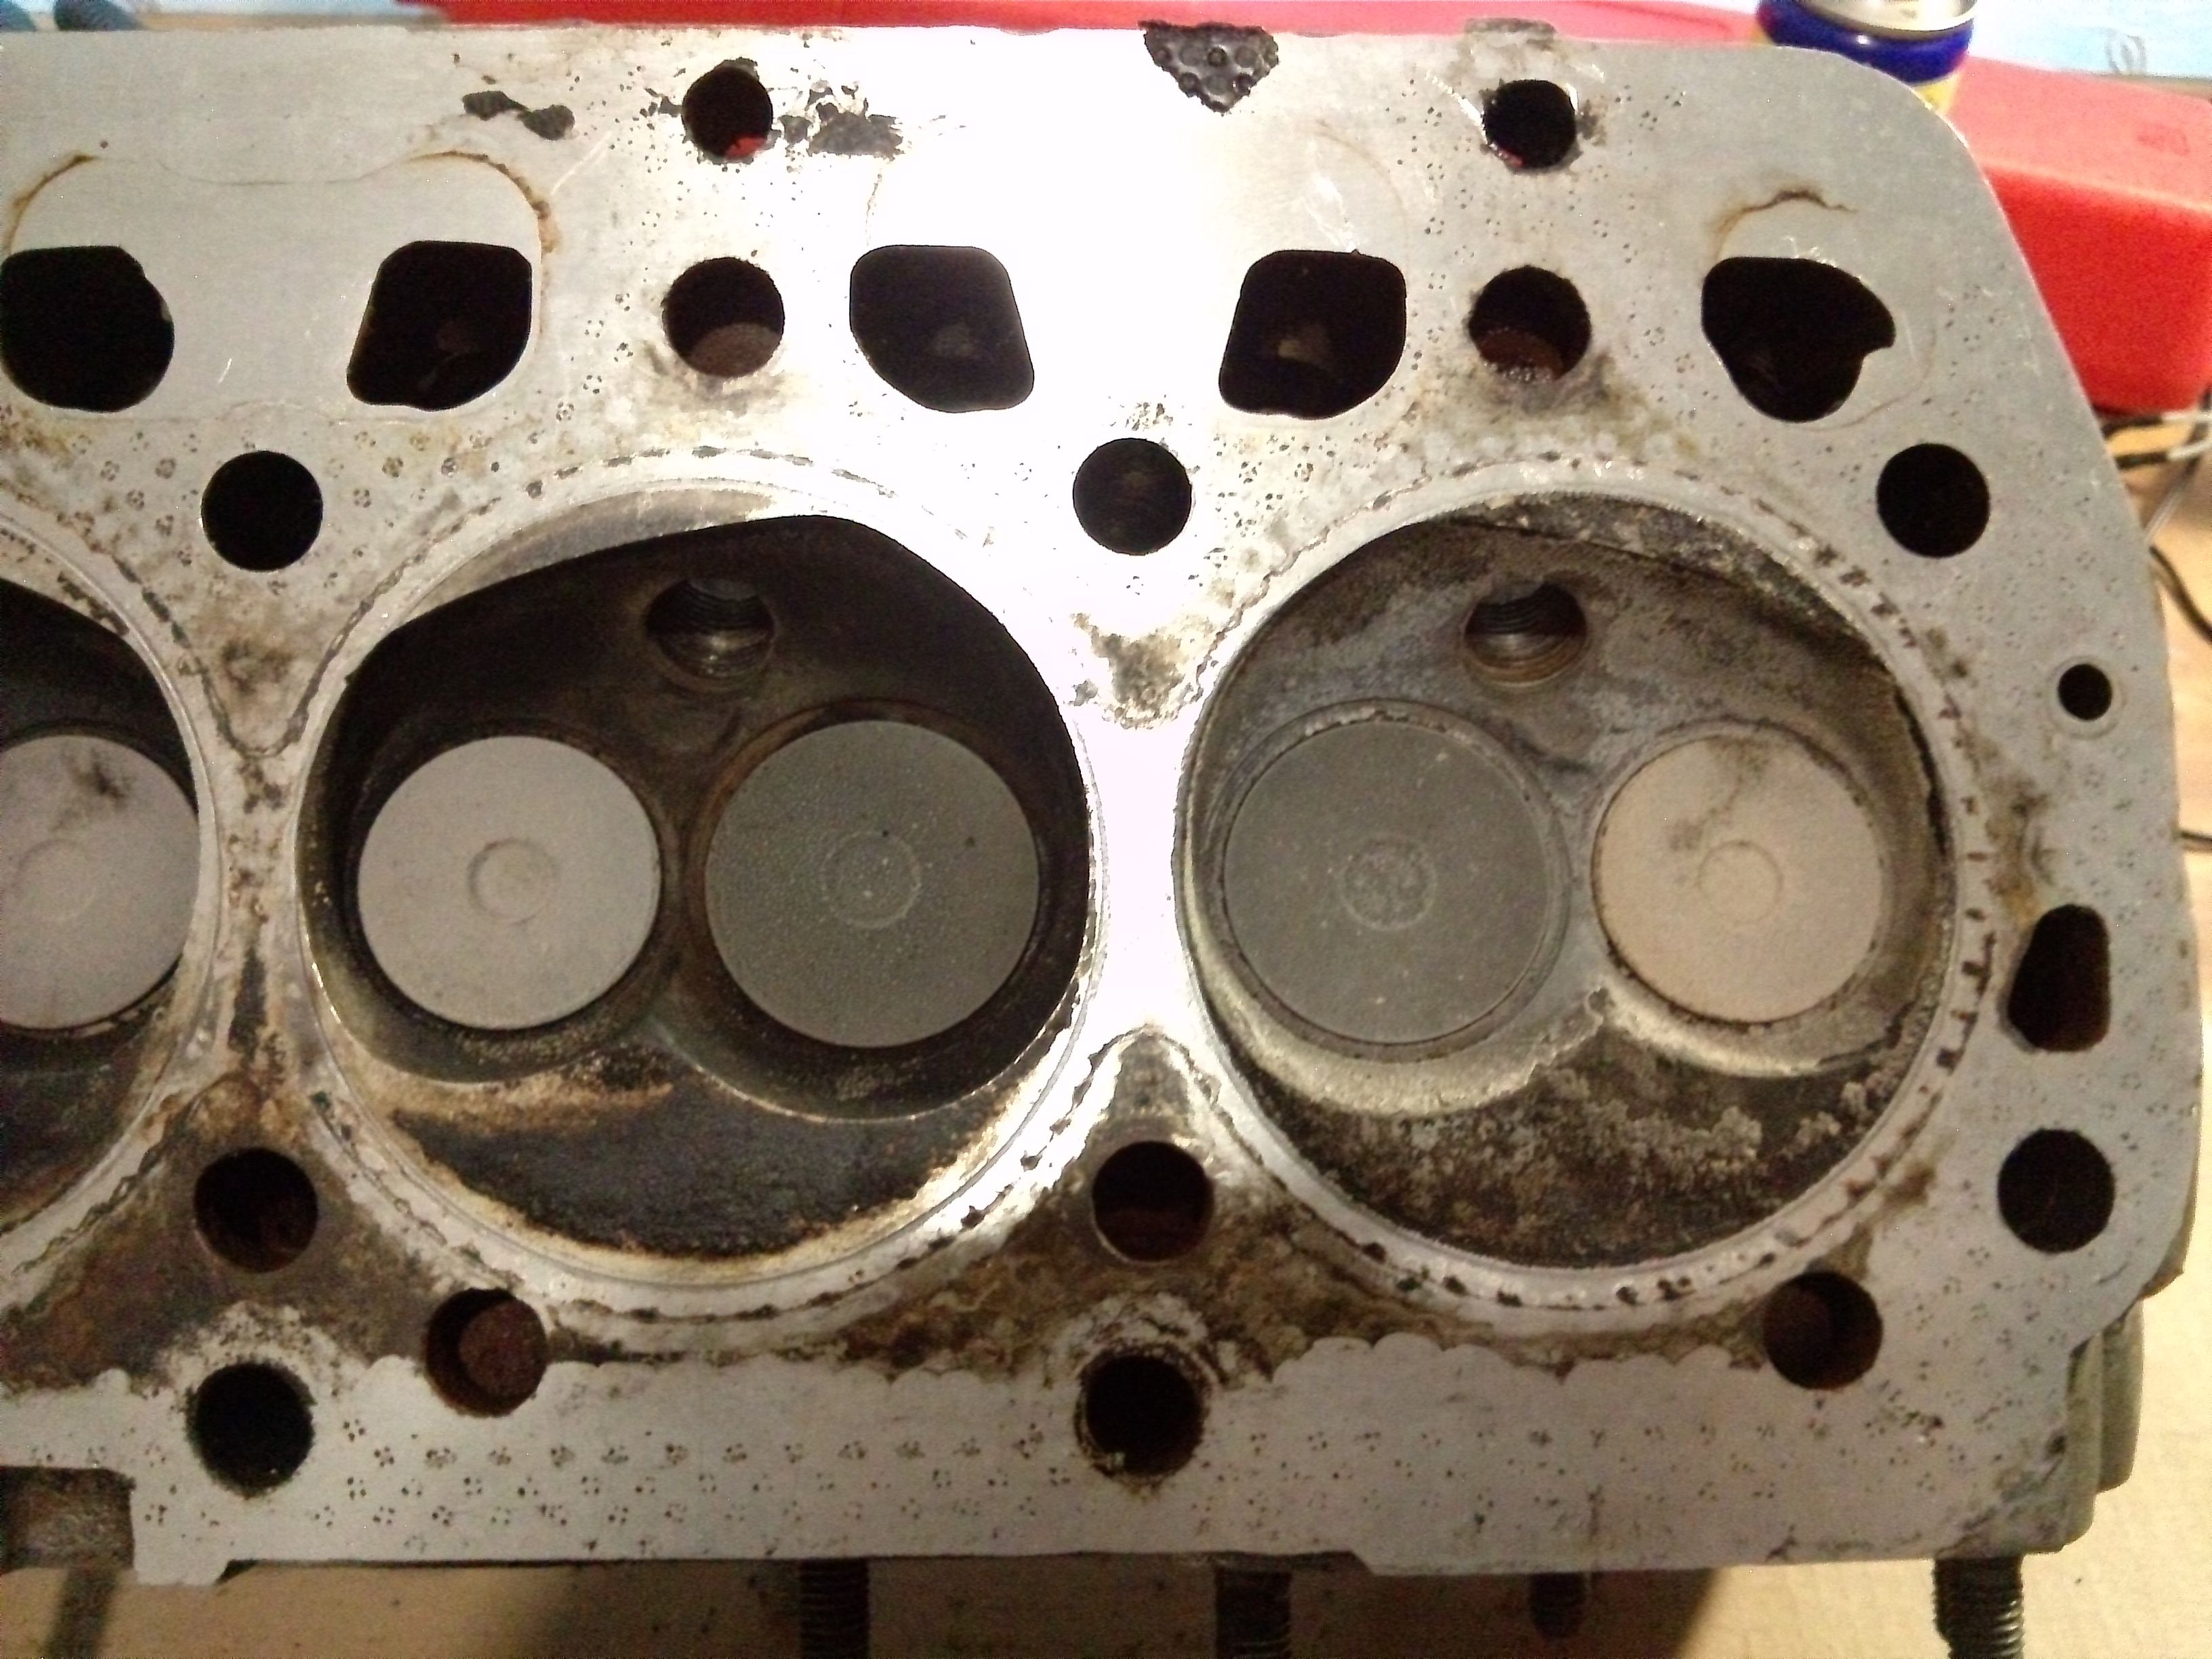
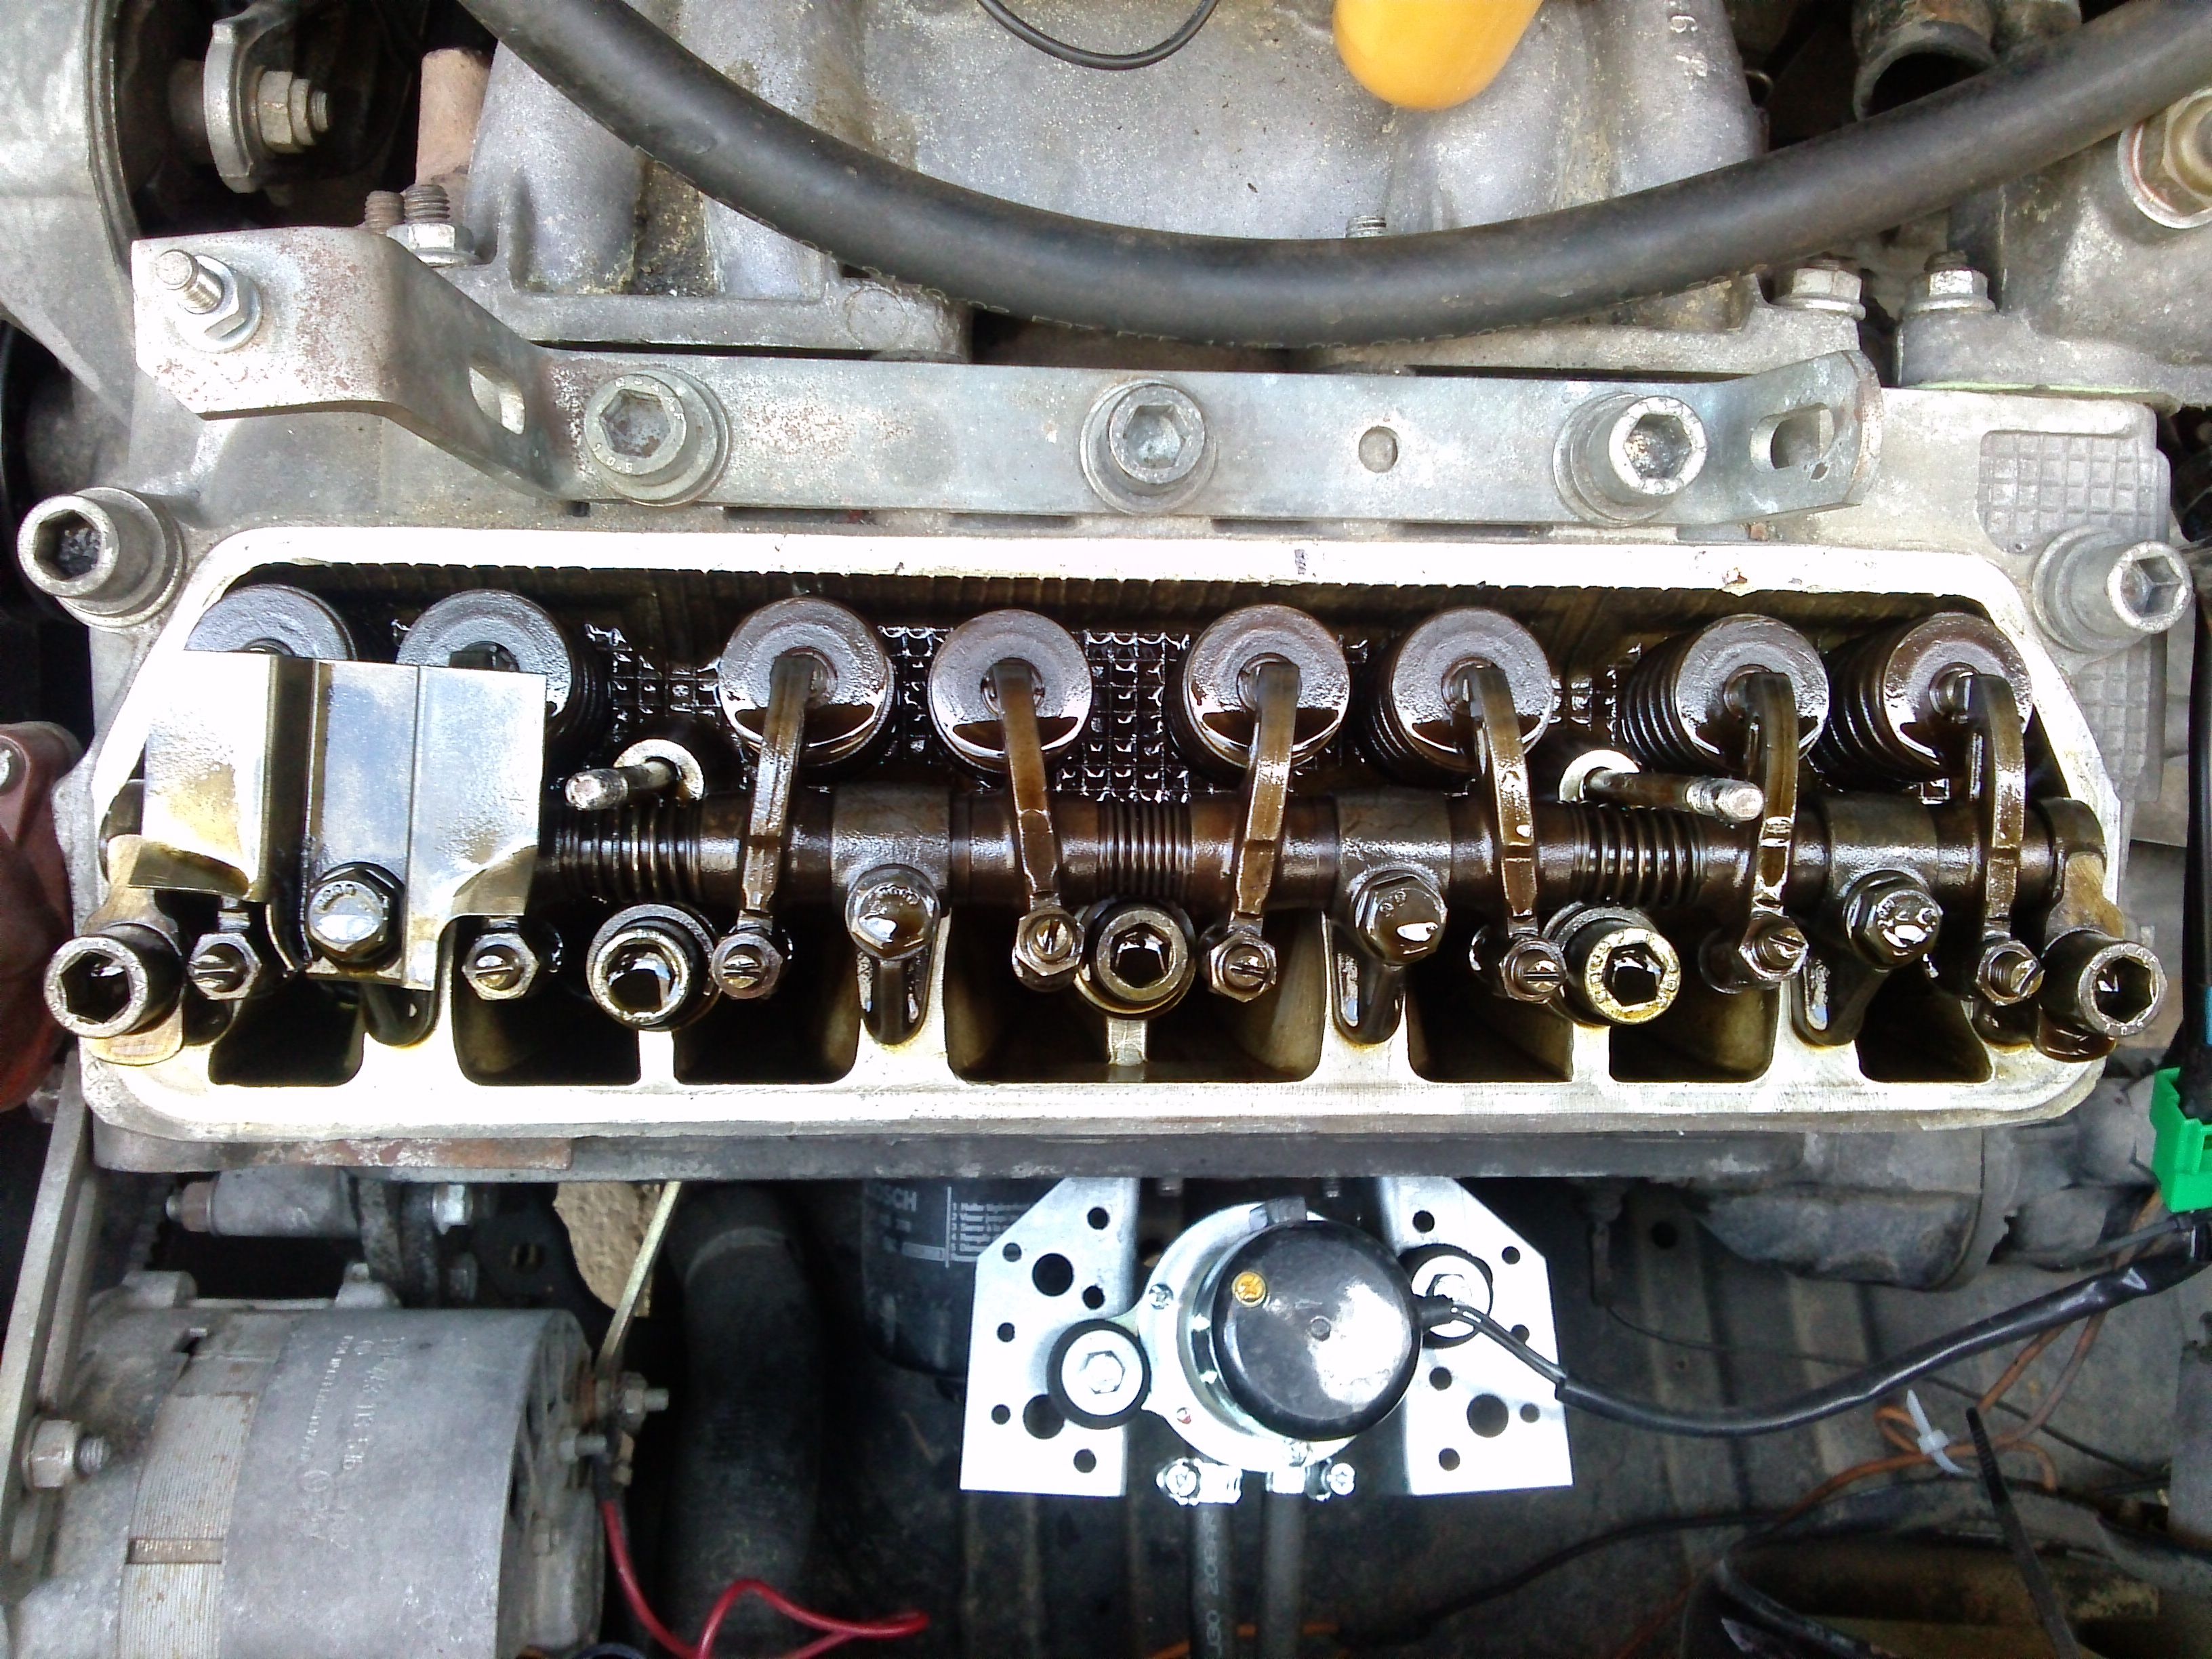
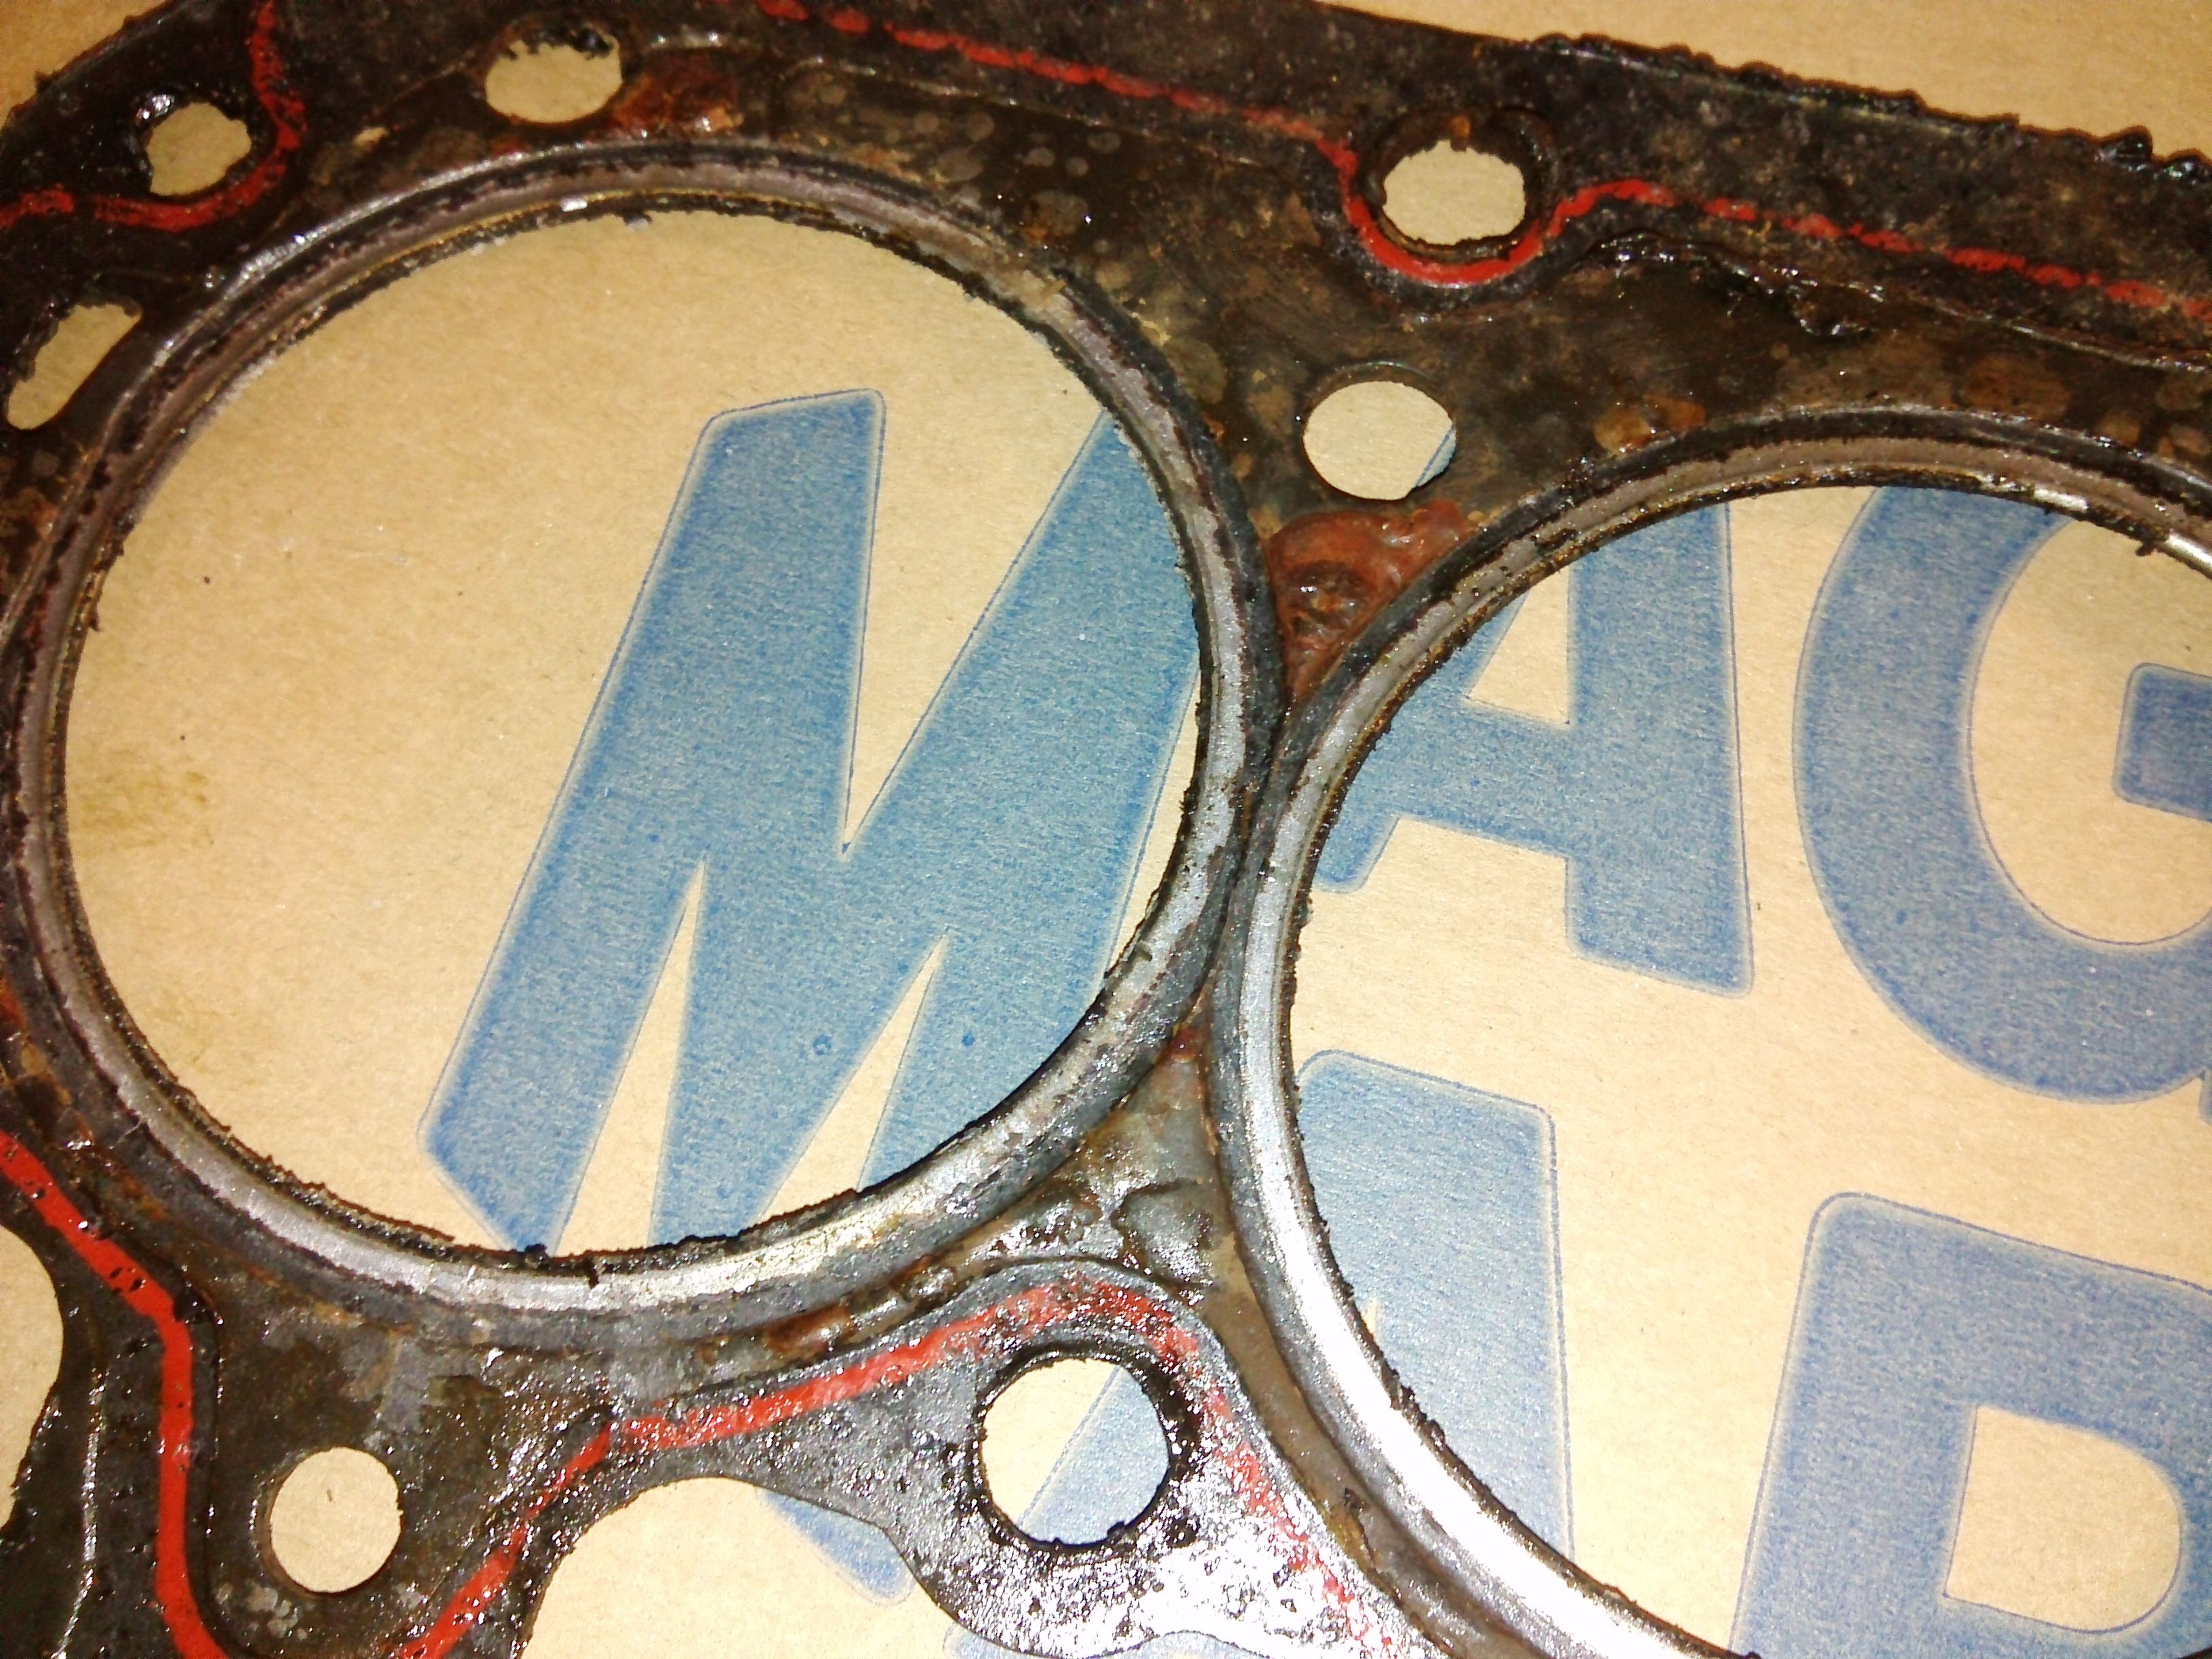
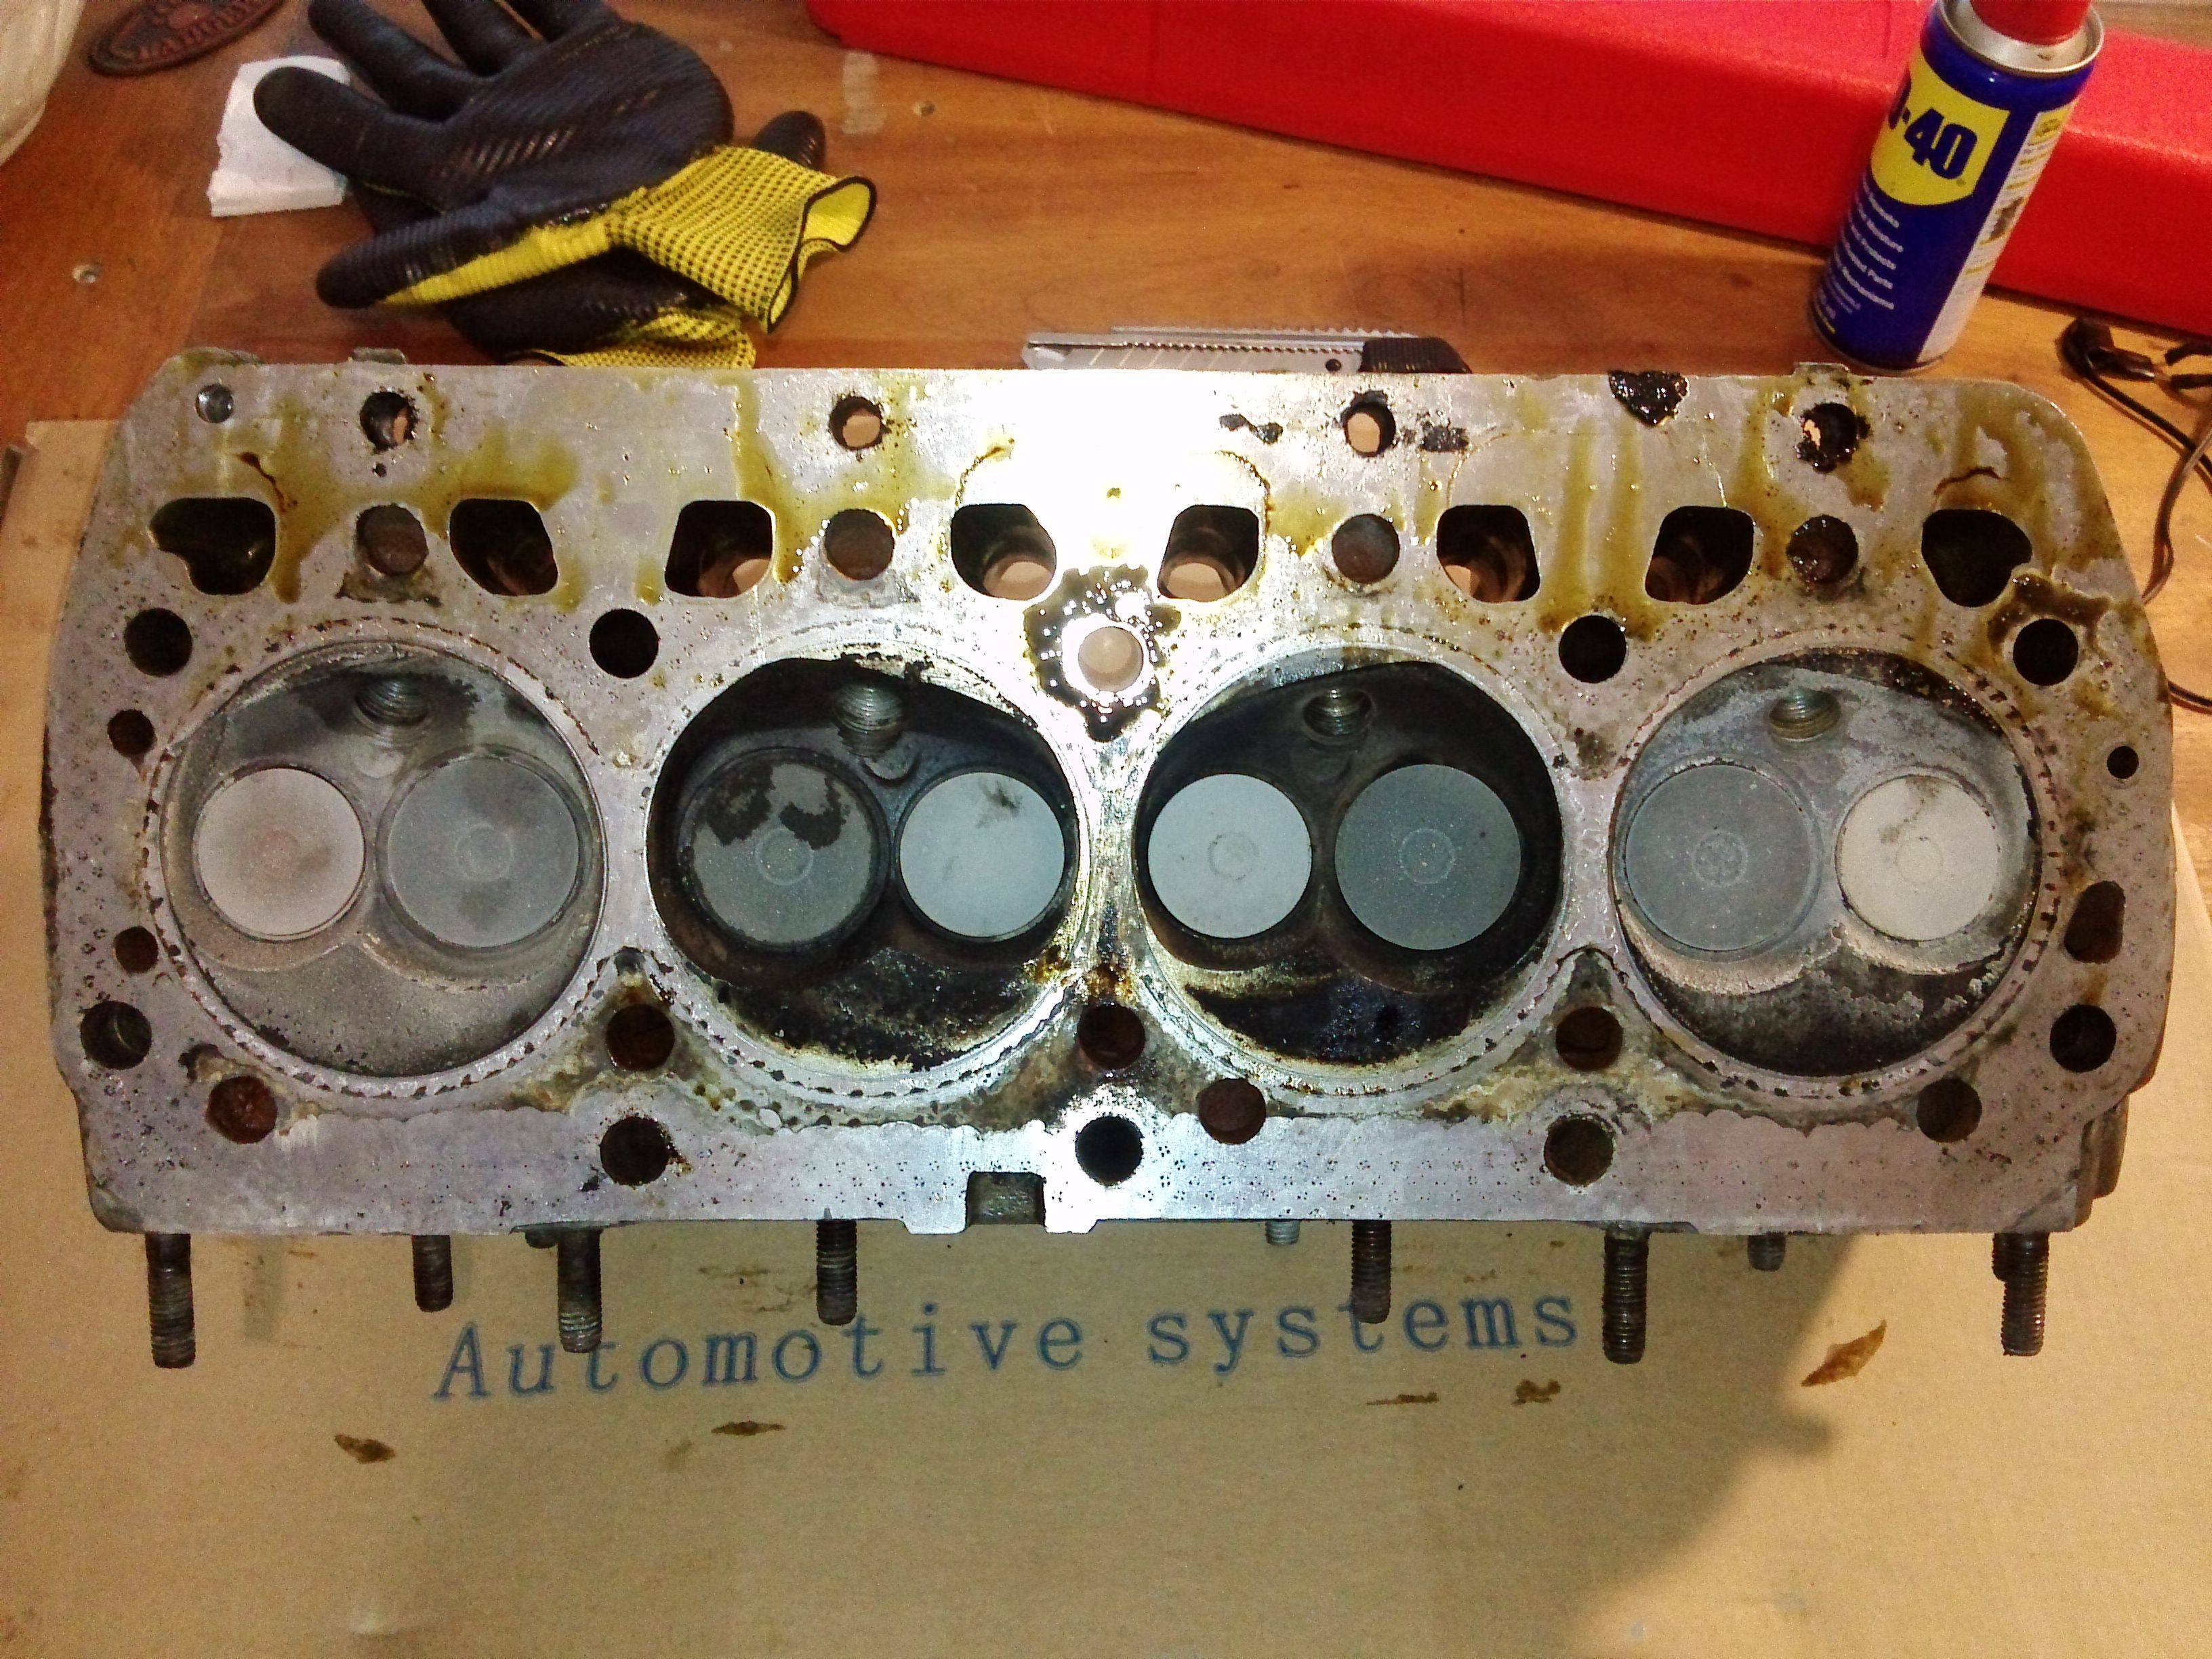
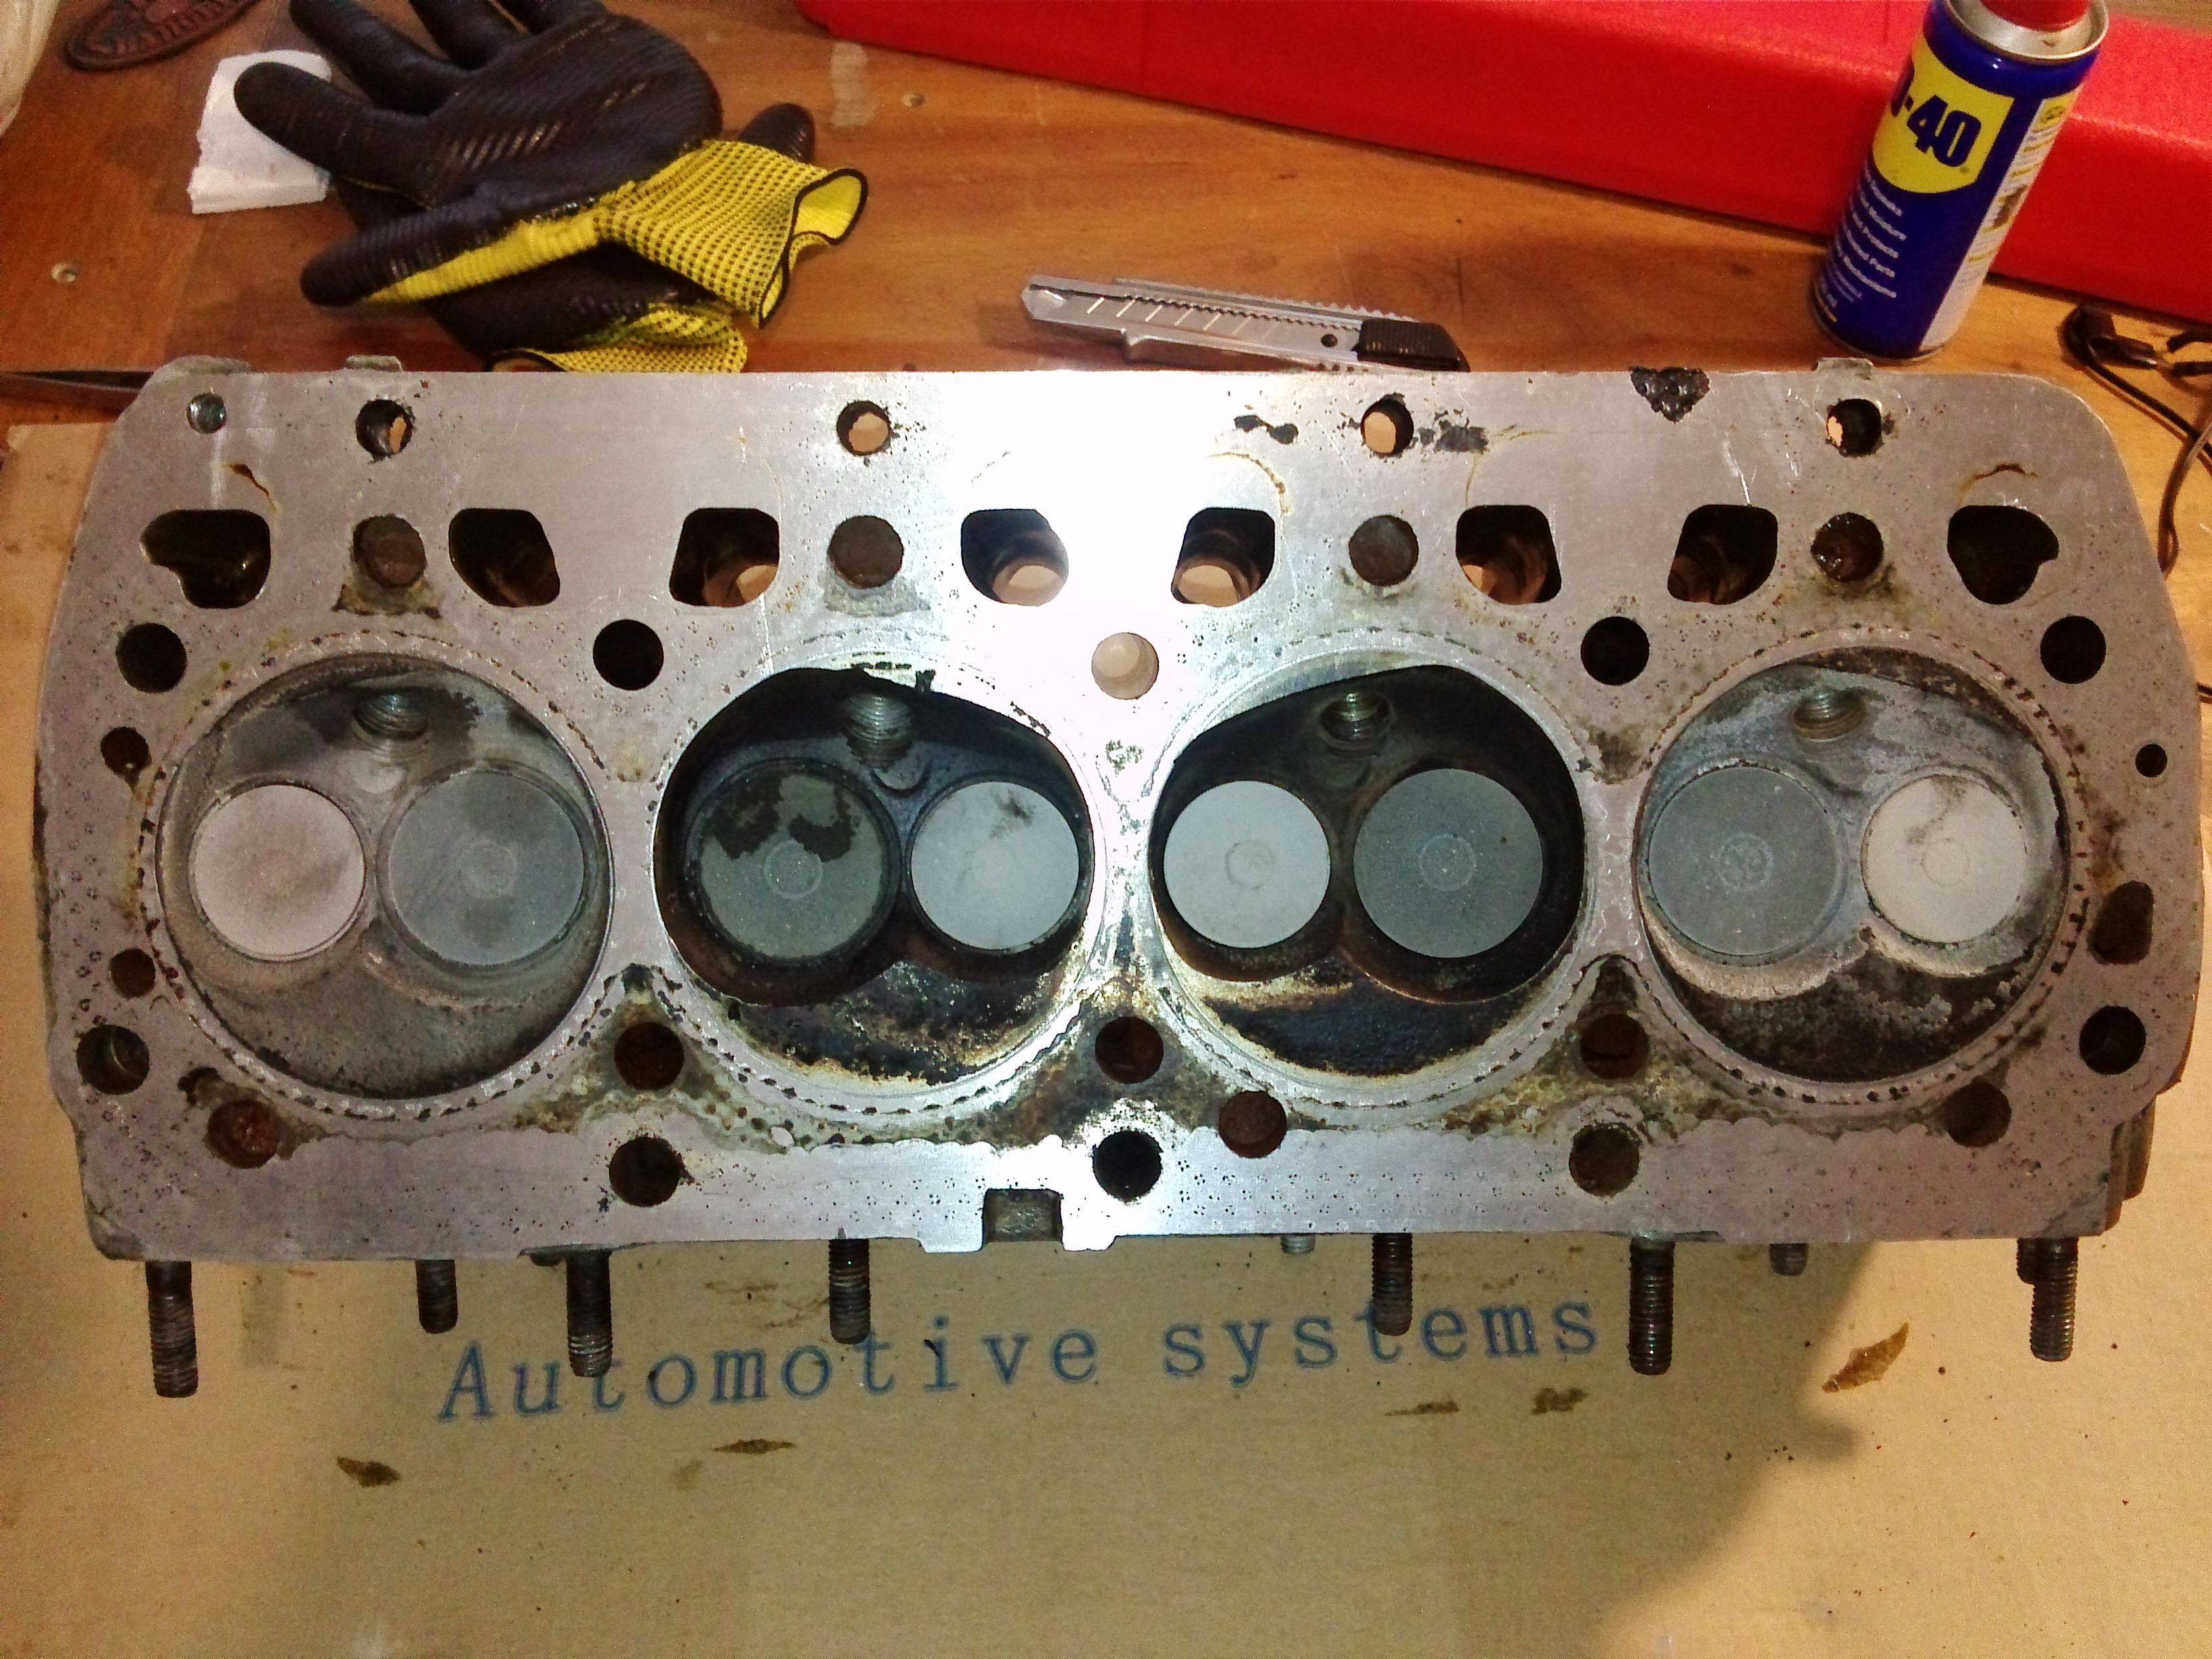
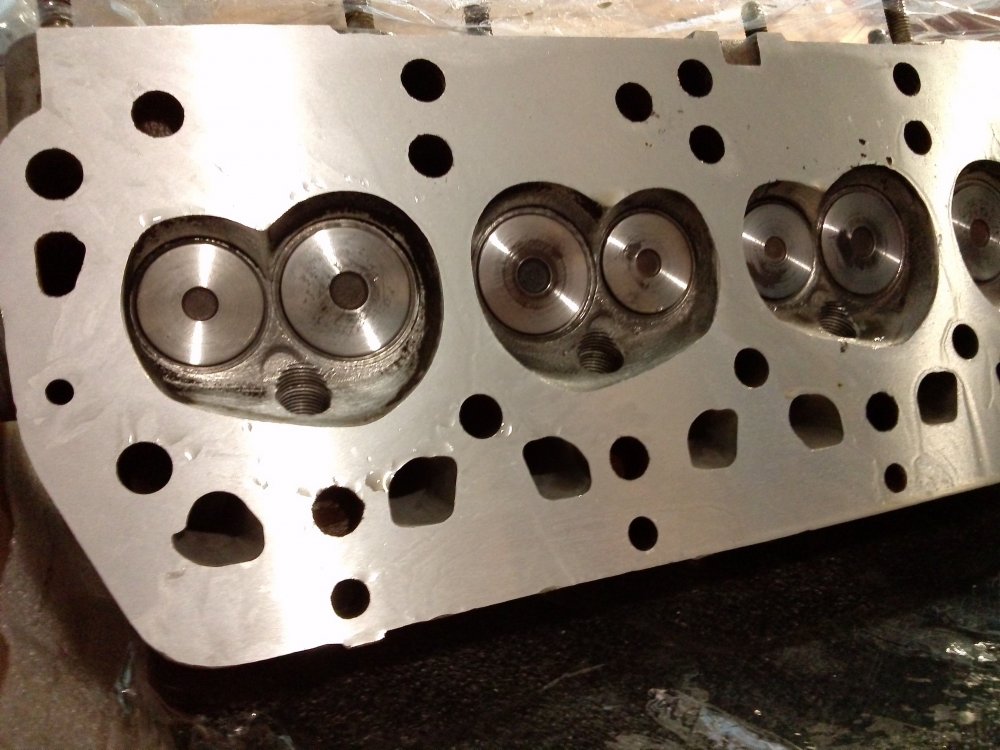
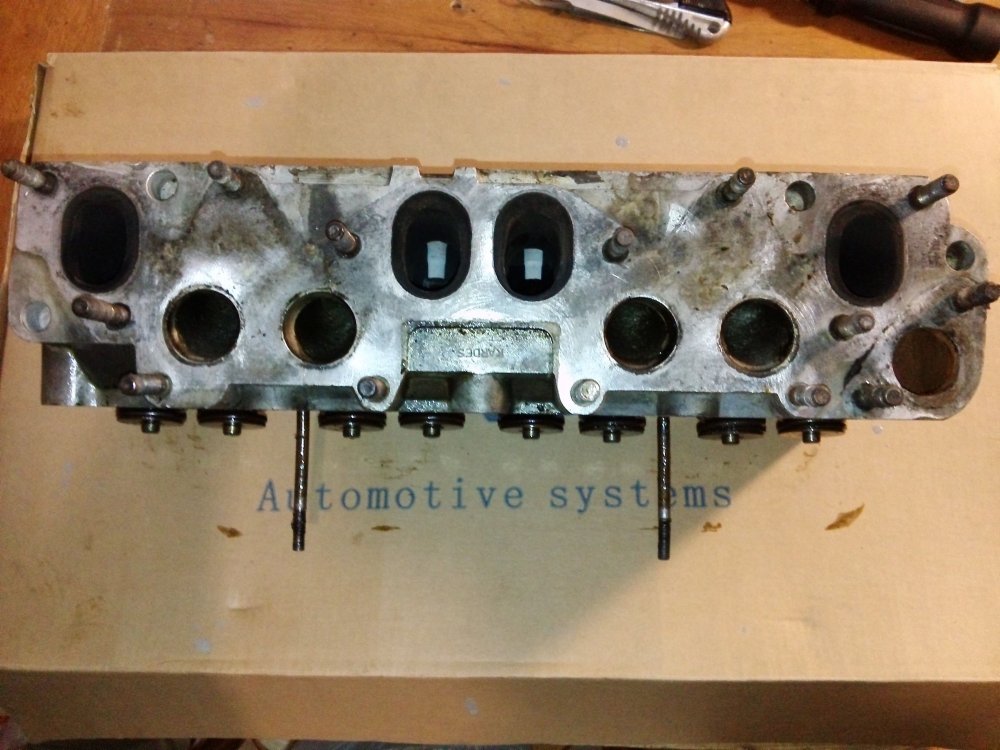
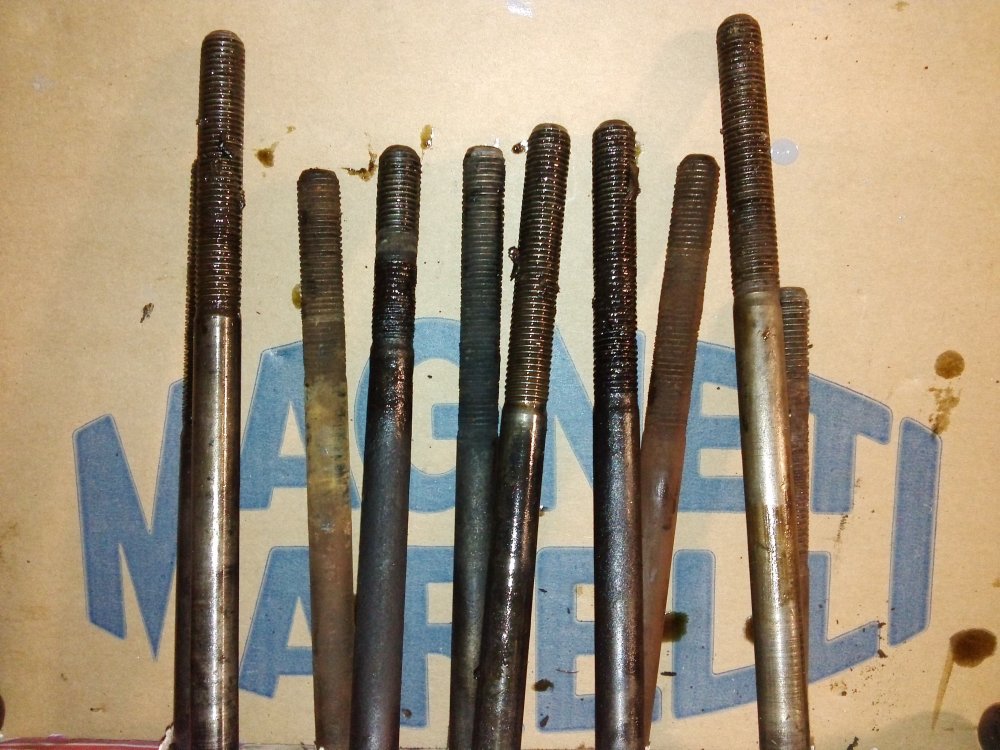
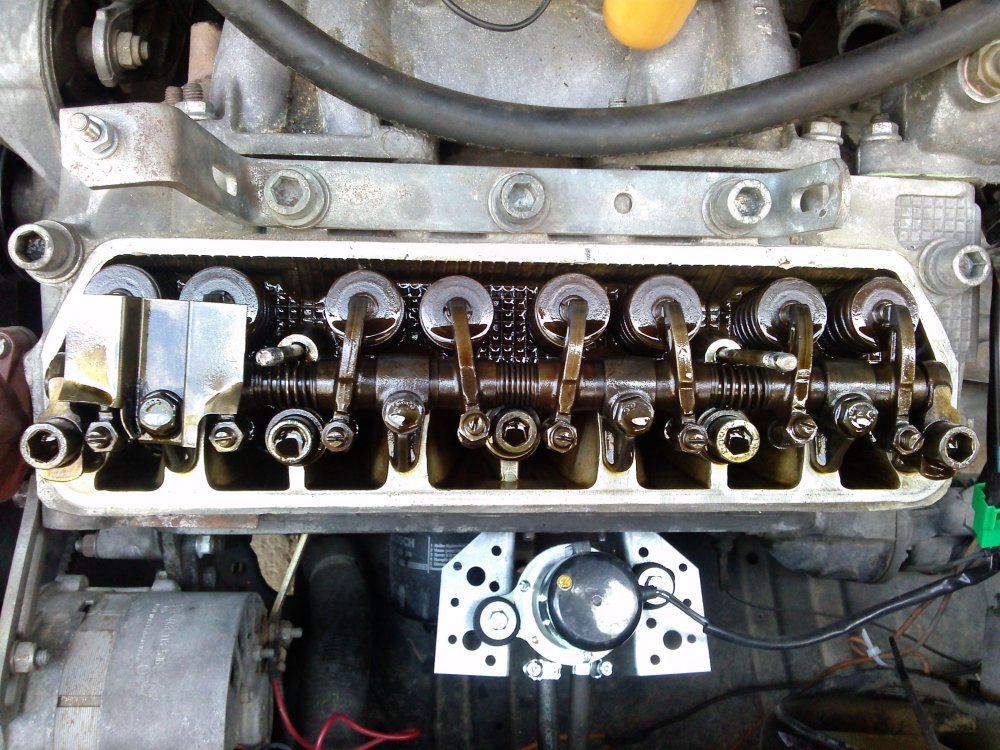
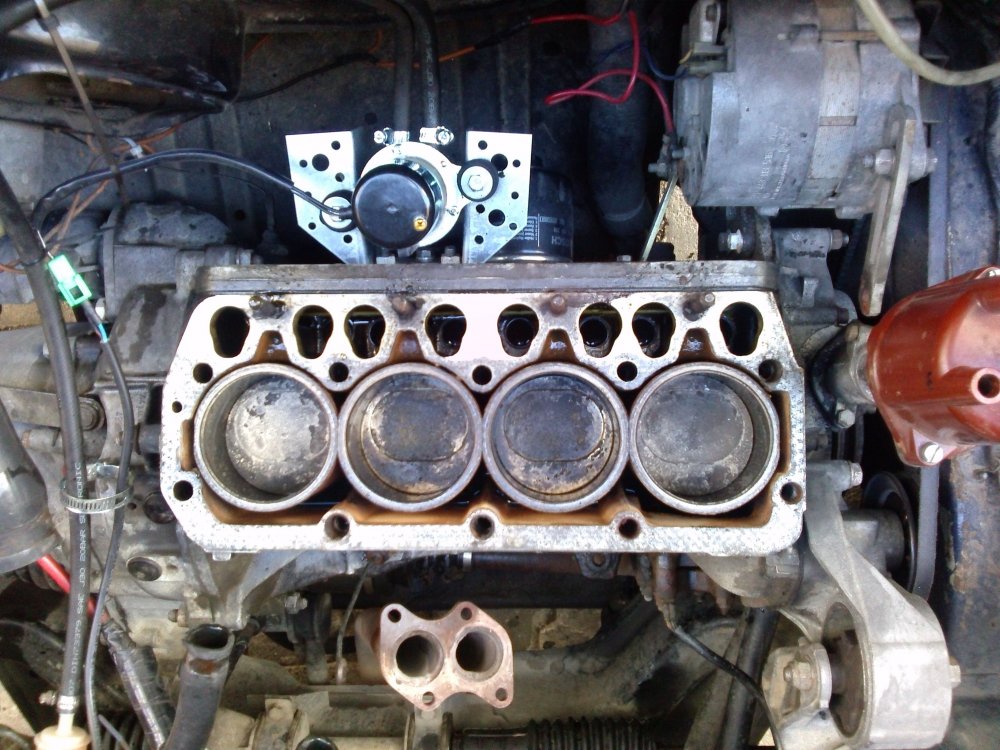
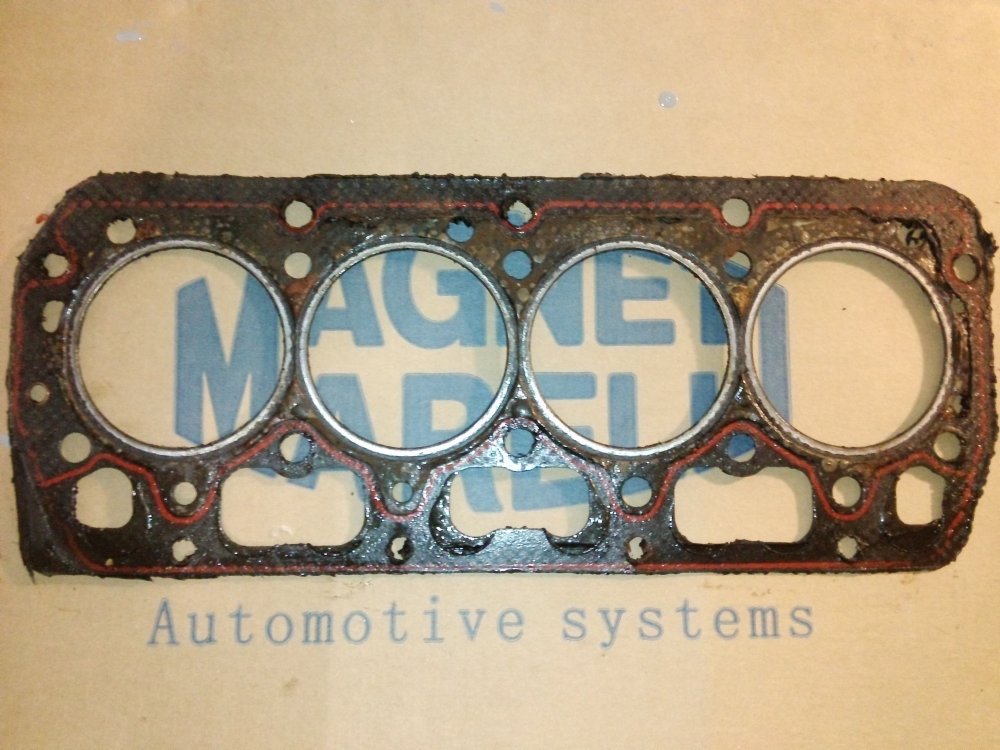
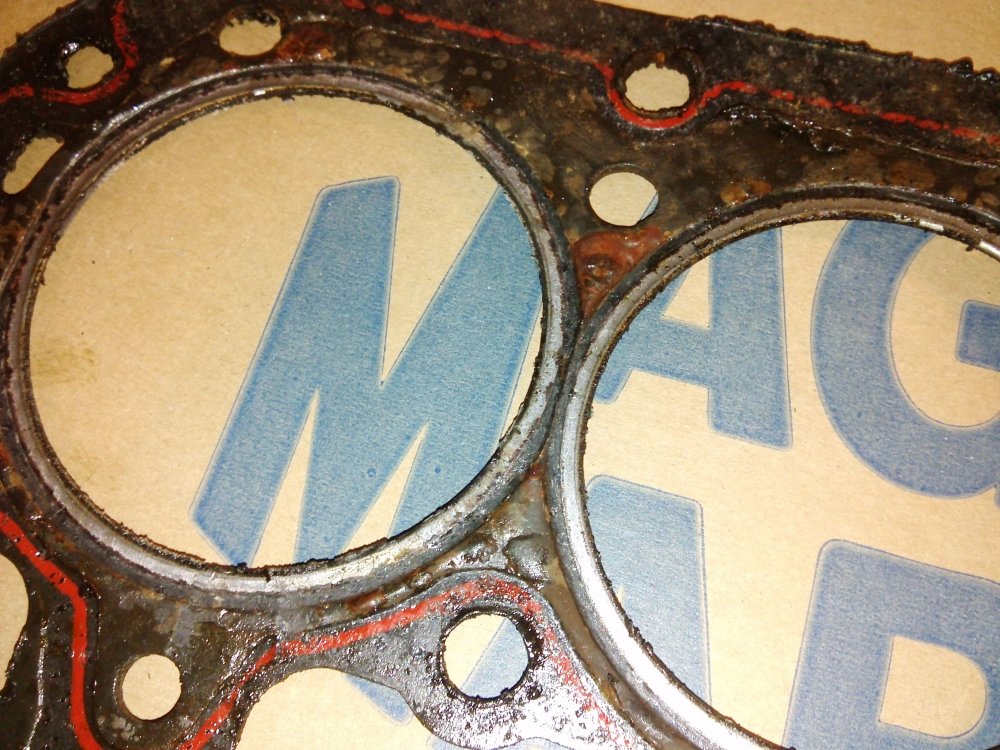
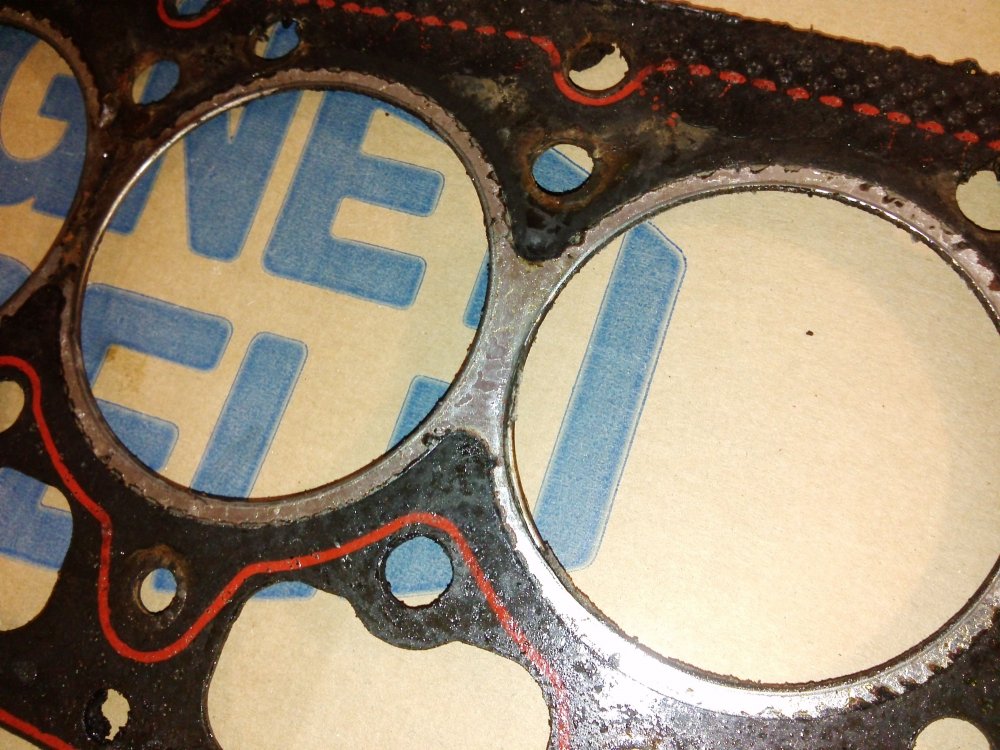
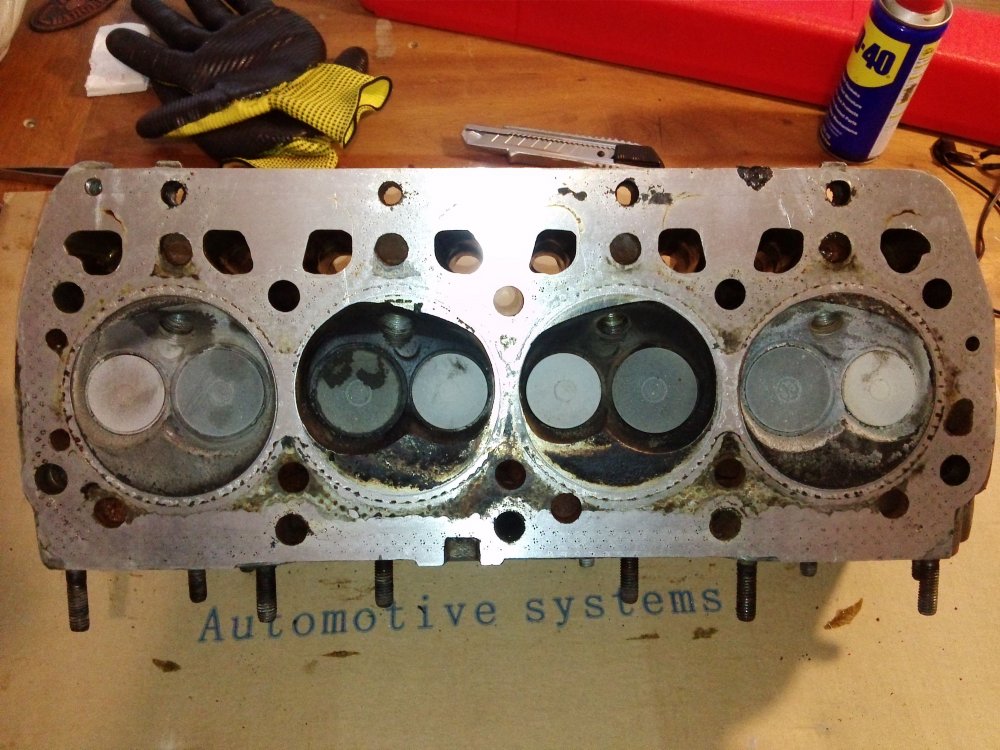
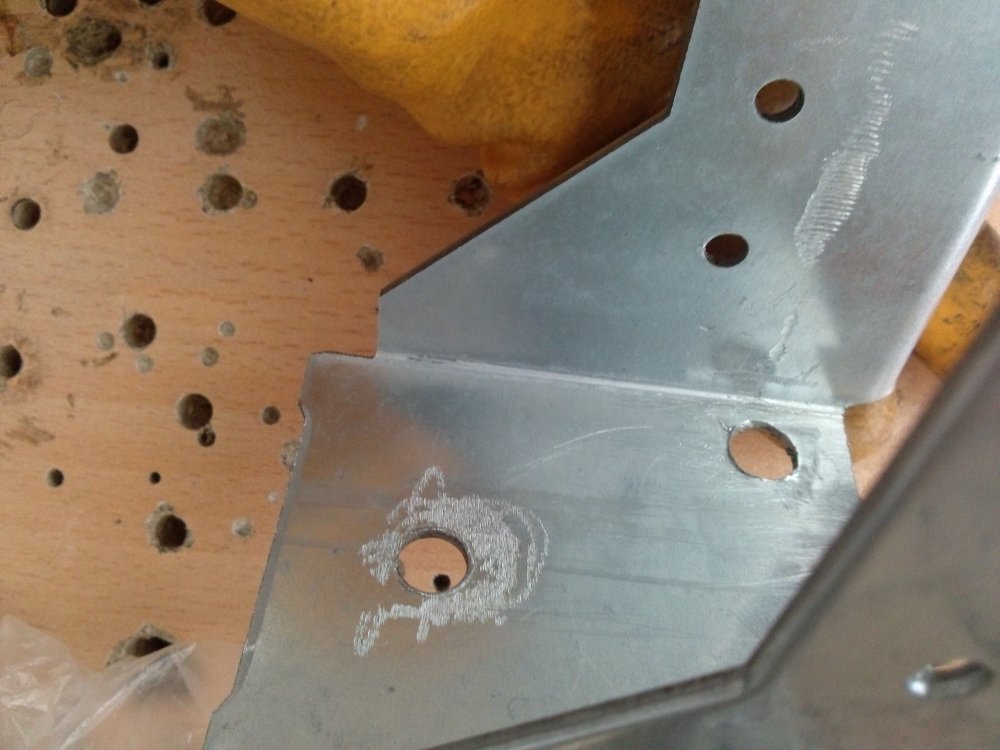
That's spot on. Well said. There is a dark area in the pictures between middle cylinders. When the mechanics measured with a straight edge, they found an unacceptable gap. If we were near, I could buy you a beer. Again, another post from you has altered the work in a good way. Again, when I read your post yesterday, I was working on cleaning the cylinders. On closer inspection, I realized that, some of the bolts are marked 10.9 but some of them are from different makers and unmarked. AND one of them had a hidden defect inside the allen head! So I quit and went to that shop. They changed the defected one, gave me more 10.9 marked ones but there was not enough stock. They showed me the new stock's bulk box and they are 10.9 too. https://pasteboard.co/KbDNMhzS.jpg https://pasteboard.co/KbDO44G.jpg This really helped me to solve an impossible looking problem. 3 of the 10 holes were terrible. One hole was filled like 1 cm from bottom with corrosion residues. It took between 10-20 screw in and out cycle to clean the worst ones. (Without a power tool It took hours to complete just doing the thread chasing) In the machine shop, made in a hurry but they did some polishing too. Going to hardware store again, postponed the work again. So last night, I worked until late hours. Markings from piston number one and two respectively: https://pasteboard.co/KbDSszN.jpg https://pasteboard.co/KbDT9LT.jpg I didn't use any power tools. Those circular marks are either from factory or someone else who cleaned them before. I used scotch brite, 220 grit sand paper and alcohol. Before working on each piston surface, I raised them to the max upper level and greased the gap around them. After cleaning, I wiped the gap with a small brush and lowered the pistons. Rest of the dusty grease stays on the liner surface so wiped it from there. I also used liner holders before making anything that would move the pistons. After finishing cleaning all piston surfaces, I cleaned all liners again gave their inner surface one last wipe with an oily cloth. How do I read these markings on the pistons? Are they from 1987? Head gasket in place: https://pasteboard.co/KbDZ8Ea.jpg This Elring head gasket is for Fabia 1.4 engine. If you can't find it for Felicia, Favorit or Forman in your local stores, ask for 1.4 Fabia with engine codes AZE AME AQW. inside of cylinder head cover: (BEFORE CLEANING!) https://pasteboard.co/KbE6ZRg.jpg Inside of the cap: See the jelly like oil buildup I mentioned. https://pasteboard.co/KbE7PWW.jpg After valve clearance adjustment: (There was zero clearance!) https://pasteboard.co/KbE9uHM.jpg Now, I want to share some important details and what failures I did: Over torquing : Late night and racing towards the end, tightening bolts and nuts one and another, carried me away and woke up the monkey inside of me. So I over tightened one bolt at valve lever shaft. You can see in the picture, there is a different bolt in there. A slightly longer bolt, rescued the day. Under torquing : Today I finished connecting everything including LPG stuff. Double checked every hose and clamp. I filled the system with coolant and before the first start, I saw coolant at the back of the engine all over the place and there was some at the back of the cylinder head cover. It was intake manifold leaking coolant all over the place. I used a new gasket for manifolds too but it seems there is a special tightening sequence for manifolds too that I didn't know. I tightened them again and the leak is gone. After the first start, engine sound was different. It sounded more like a light pick-up before. Now it sounds like a Renault R9 1.4 engine. No road tests yet. I'm not sure if the exhaust manifold is leaking or not. It was wet and smoking so I left the road test to tomorrow. Is it ok to use normal nuts for the front row of the cylinder head? Old nuts were looking rusty so I used new M8 nuts with spring washers and torqued them to 26nm.
-
So this is good news. Thanks for answering. People around here usually buy antifreeze only once maybe in two years or more. They tend to add tap water found on fuel stations to top-up their coolant. I think my car was not different before me. When I hugged bottles of distilled water from a fuel station the cashier asked me what I was going to do with all the distilled water. When I told him that I would use them all for preparing 50/50 coolant for the car. He gave me a blank look. One of the first thing when I got the car was flushing the old coolant with distilled water twice and I used 50/50 coolant and distilled water ever since. The coolant I used is Fuchs with these specifications: -ASTM D 3306 -ASTM D 4985 -AFNOR NF R 15-601 -BS 6580:1992 -BUNDESWEHRTL 6805-0038 -SAE J 1034 When I saw your post, I was busy cleaning the cylinder head. When I read your reply about oil consumption, I packed up immediately and took the way for a machine shop. The decision behind this was, valve seal replacement and the indents circling each cylinder. The mechanics at the machine shop told me that the cylinder head was crap quality. They did the polishing of the surface, valve re-seating, valve cleaning, valve seal replacement, complete cleaning with a special washing machine. They also told me there might be an overheating issue with the car. After one hour of gentle work with 2K sand paper, scotch brite and brake cleaner. Just before I went for the machine shop. https://pasteboard.co/KbkobXL.jpg Machine shop results: https://pasteboard.co/KbkqNZW.jpg https://pasteboard.co/Kbkrezg.jpg New parts: https://pasteboard.co/Kbks9ebn.jpg https://pasteboard.co/Kbkswmc.jpg Now I was thinking about thread cleaning and areed 's Felicia 1.3 Cylinder Head Corrosion Around Coolant Ways topic really helped me. Thanks! I'll prepare a DIY thread chaser like that. I'll update the progress.
-
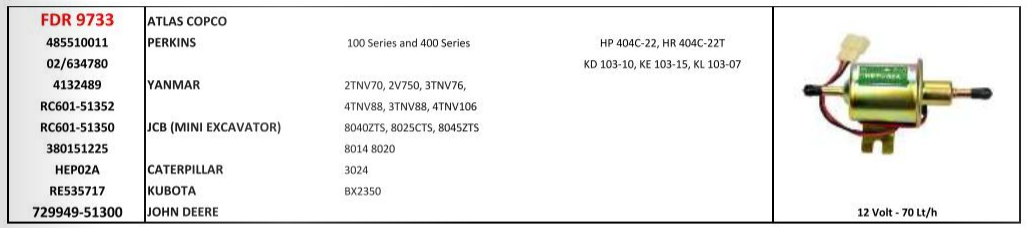
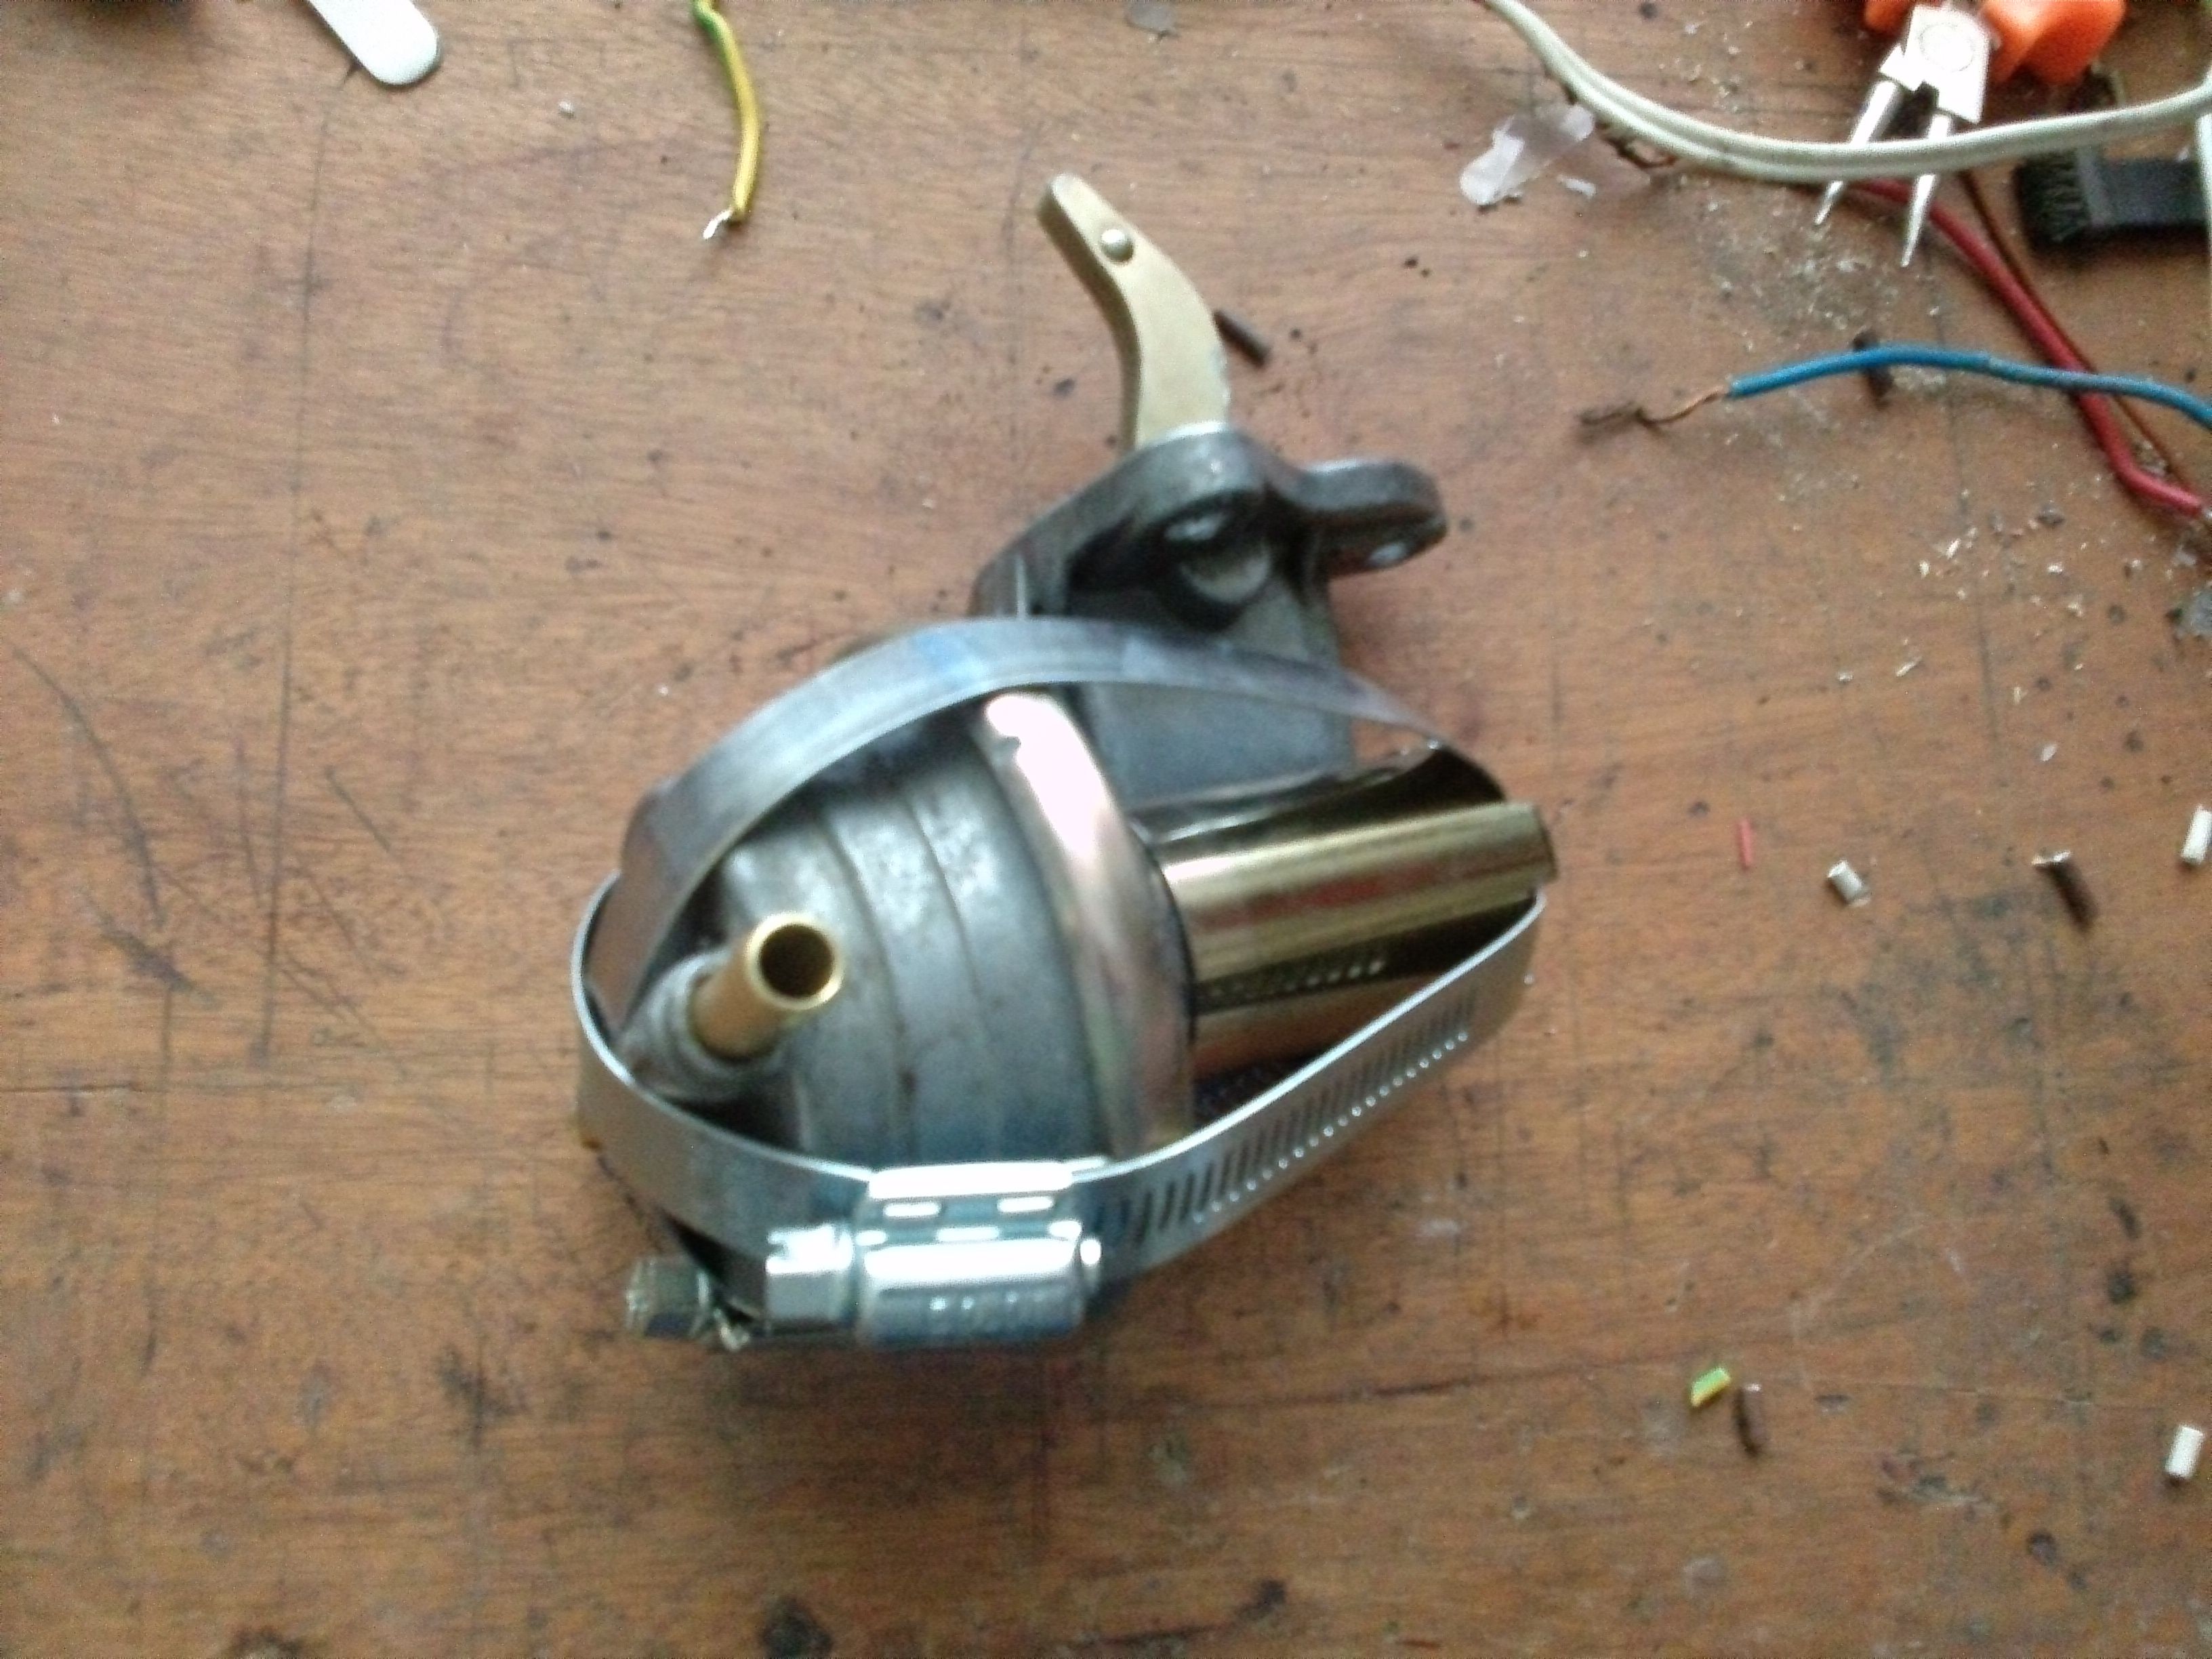
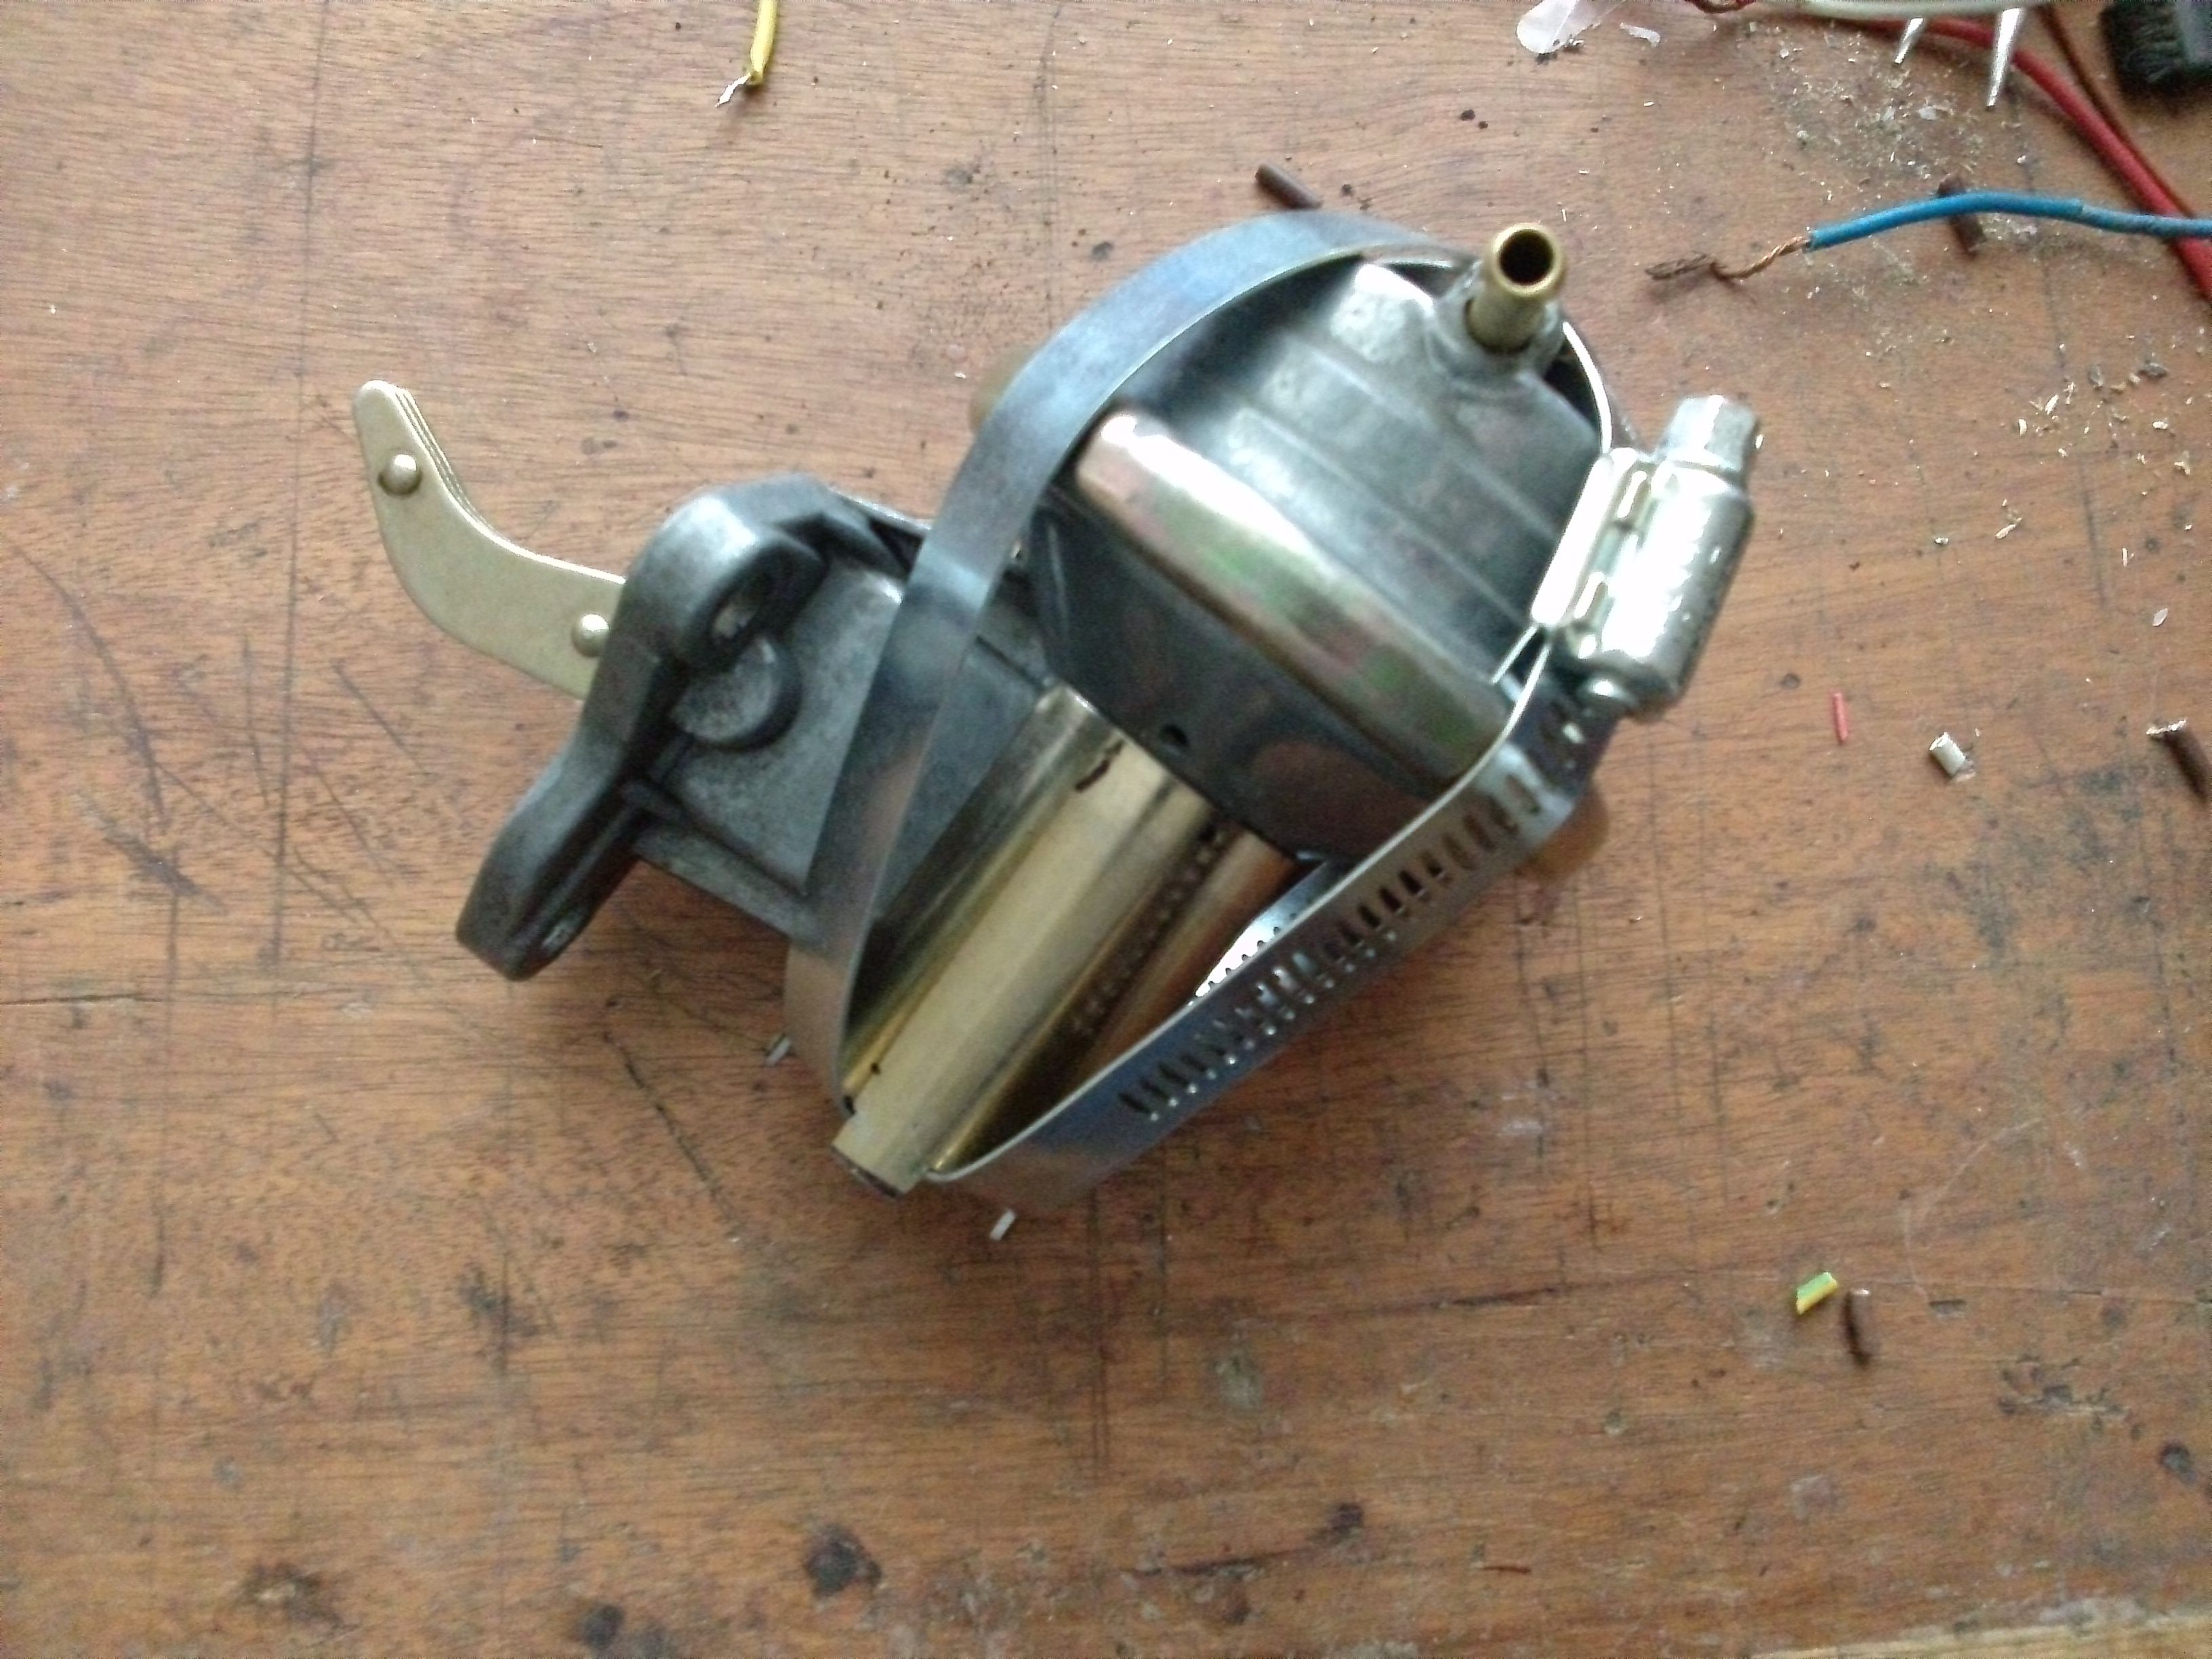
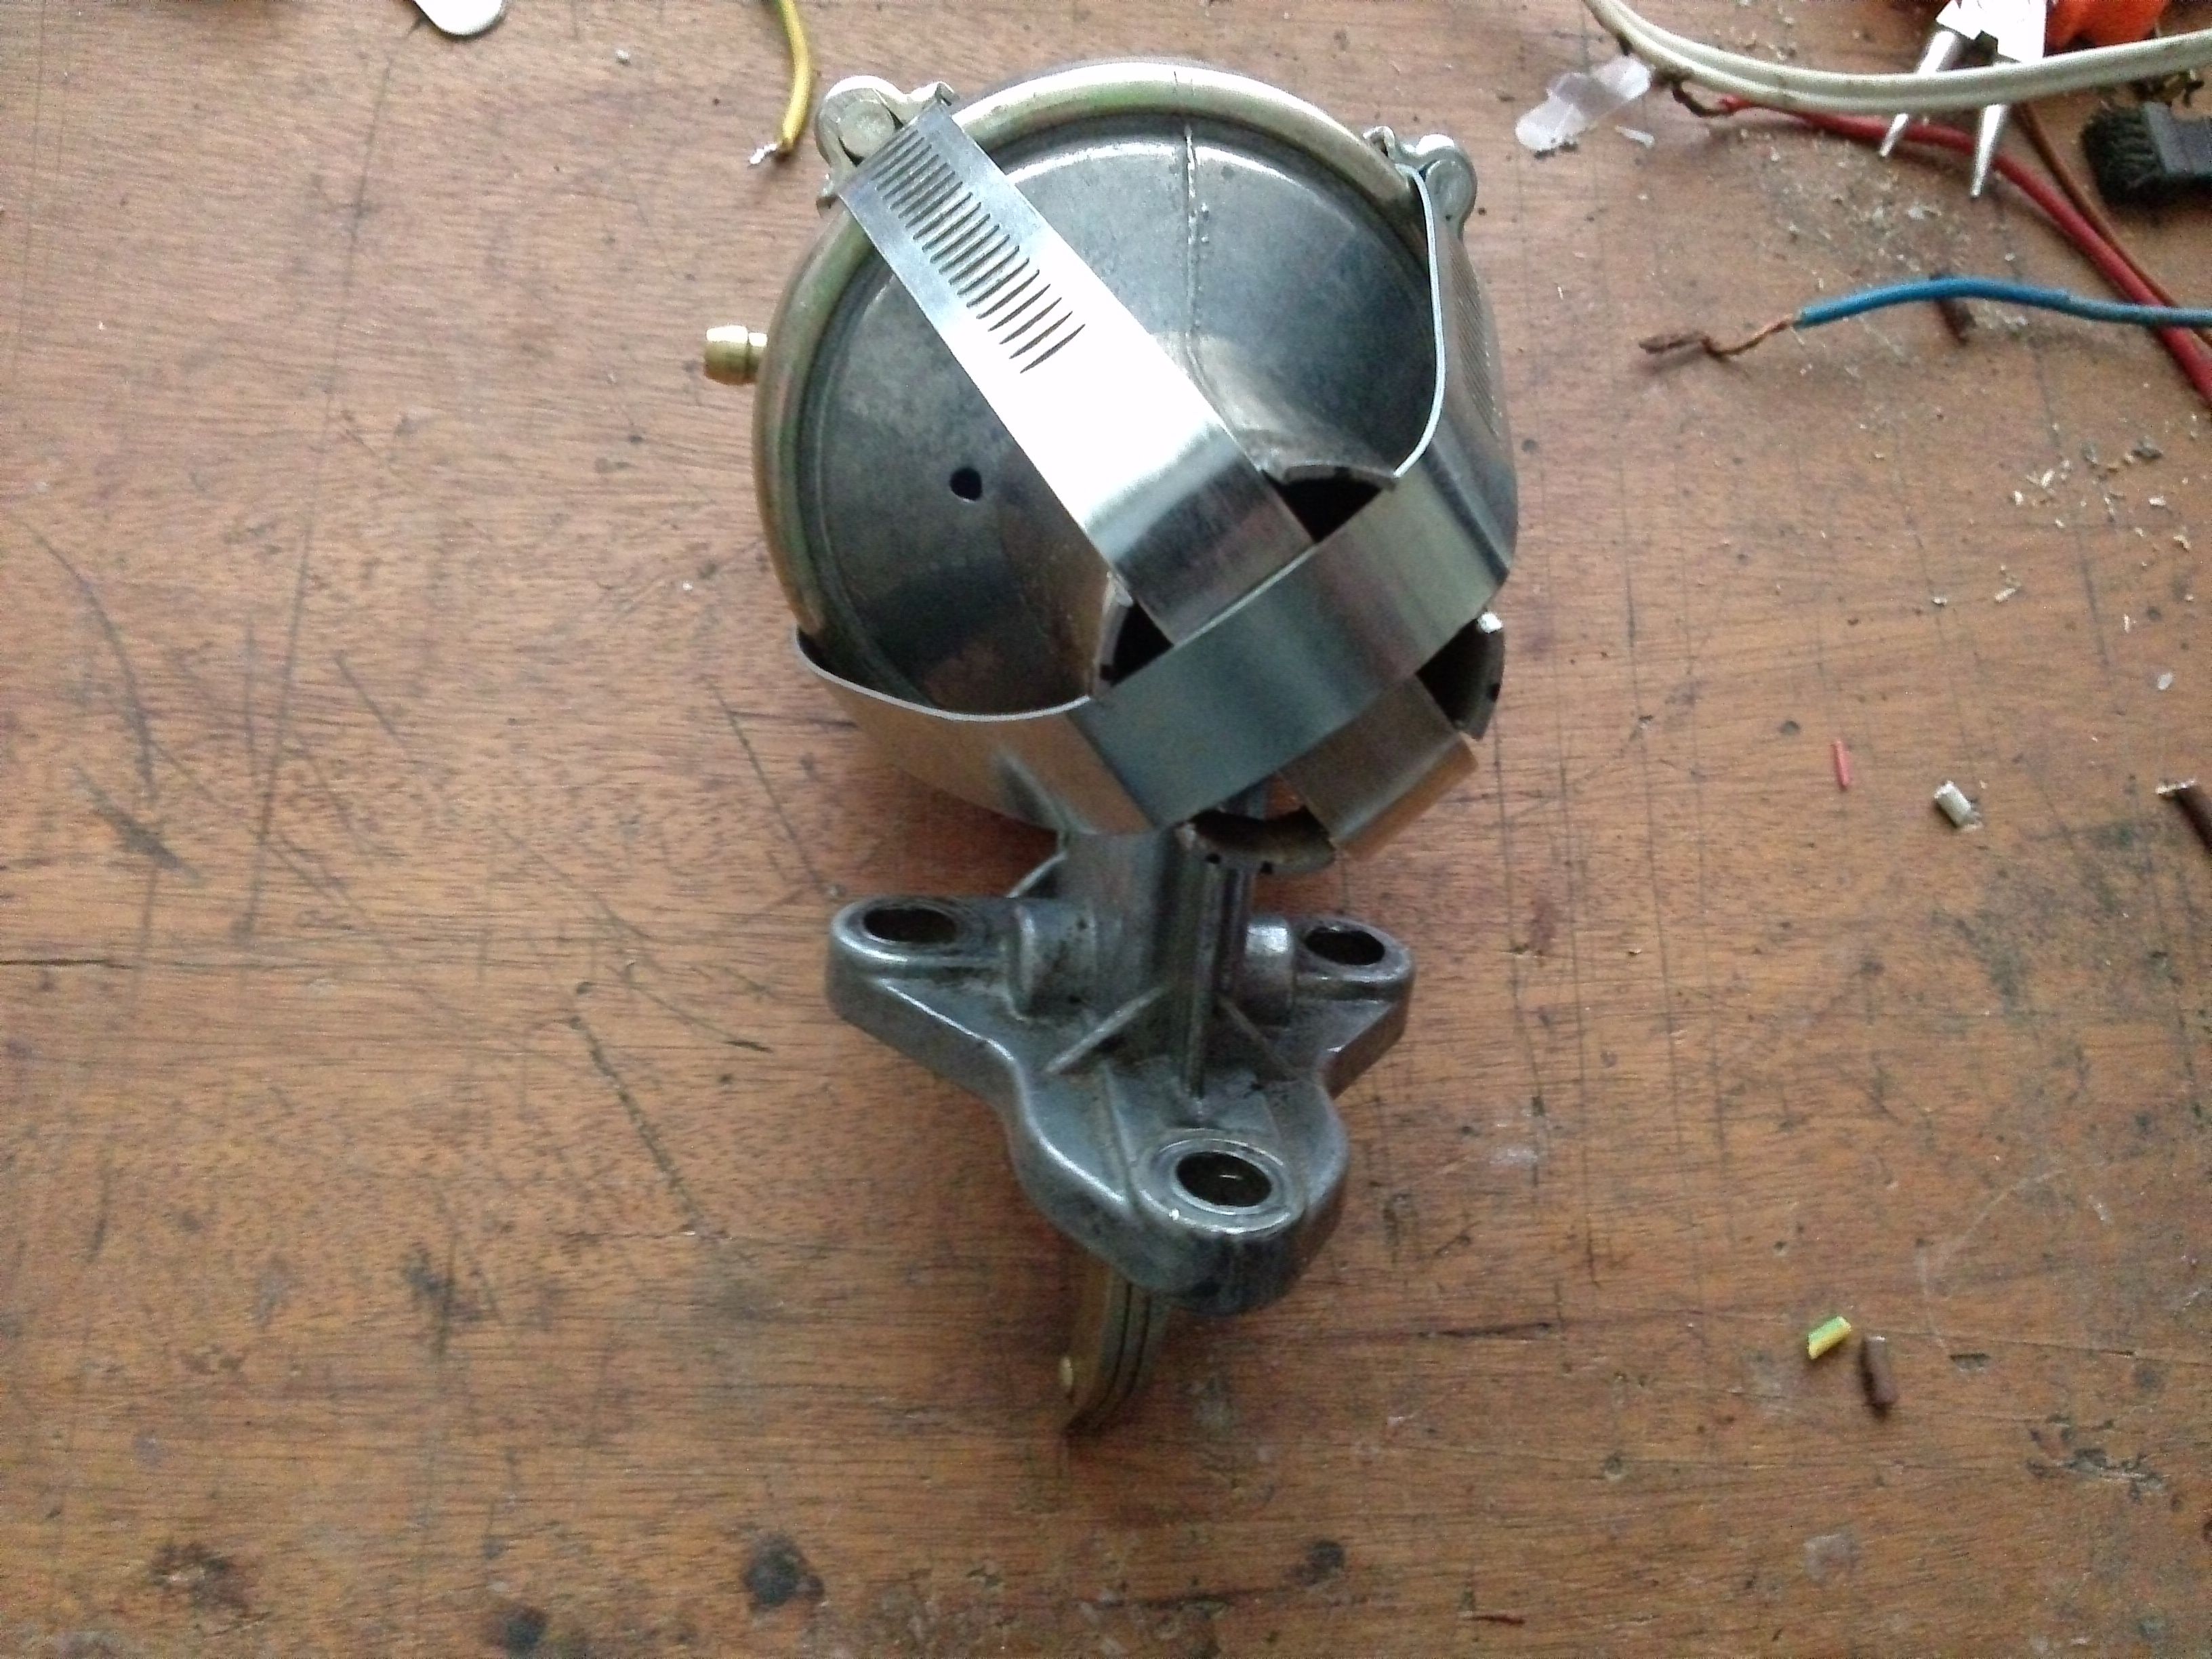
Sorry for the late answer. A lot happened since my last post. New fuel pump setup is working. It takes tremendous effort to tune the carburetor for both LPG and fuel. Just after the fuel pump installation, I've done a complete restoration to the carburetor according to guides found on internet. All for fuel only of course. The carburetor had sketchy modifications, neglected and dirty. After restoring it for fuel, it didn't go well for LPG. Auto-choke mechanism and LPG don't go well together. I'll explain this later on another topic. I only used the fuel pump twice so far. The car is almost always on LPG. But I think when I need it, it will work. You should still consider this experimental. This is the best advantage. When the car is on LPG, there is a fuel cut-off valve that redirects all fuel to the tank so carburetor goes completely dry. The LPG system has a switch inside the car. When you turn it at the fuel side, it opens the fuel cut-off valve. I attached fuel pump's cables to this valve. So before the ignition, I give the pump a good 30 seconds for filling the completely dry carburetor. After that, I pump the gas pedal a few times for priming the also-dry accelerator pump. Then, the engine successfully starts at one crank. My attempts was primarily on considering safety. When the car is on LPG, mechanical pump always circulates the fuel. There is no way to stop the mechanical pump. When you use the car on fuel, and if the fuel pump goes bad, the car will stop working and you know there is a problem. But, with LPG, all fuel may leak somewhere and you might notice it too late. Fuel hoses: https://pasteboard.co/KbjOzlE.jpg https://pasteboard.co/KbjPcBC.jpg https://pasteboard.co/KbjPTp6.jpg https://pasteboard.co/KbjQosC.jpg https://pasteboard.co/KbjRc3N.jpg I cut open the faulty fuel pump as requested by RicardoM Inside of a Vika fuel pump: https://pasteboard.co/KbjS6Vo.jpg https://pasteboard.co/KbjSKEz.jpg https://pasteboard.co/KbjT11B.jpg https://pasteboard.co/KbjTkUH.jpg https://pasteboard.co/KbjTDbE.jpg The only thing with this setup that bothers me is the affects of the fuel pump's placement to the pump itself. Mainly heat. This pump is for carburetor engine Suzuki Rascal. Pump placement on that vehicle is between the rear chassis frames, just behind the cab. A much cooler place than my setup. Does the heat kill this pump prematurely? Time will tell. So anyone who is considering to make such a modification should know that, this is an experimental setup. Do it at your own risk. Further research revealed more pump models could be used for such a project. These are low pressure diesel pumps used for small forklifts or other small machinery. It generally goes by the code HEP02A. The picture below shows alternate/interchangeable pumps or codes. This particular model may be easier to install and looks more sturdy. You may locate it elsewhere so it may work cooler than my setup. I have only heard people with old cars that use mechanical pumps use this as a general purpose electrical pump but this needs solid confirmation.

-
Additional photos: Side notes: The cylinder head is not an original one. Bolts number 8,9,1,5,4 has sludge on them. Foul smelling. Like septic water. Bolts number 6,3,10 are heavily corroded and has missing threads. Yet, They were hardest to remove. Bolts number 1 and 2 was easiest to remove with very little effort. Like not torqued very well.


-
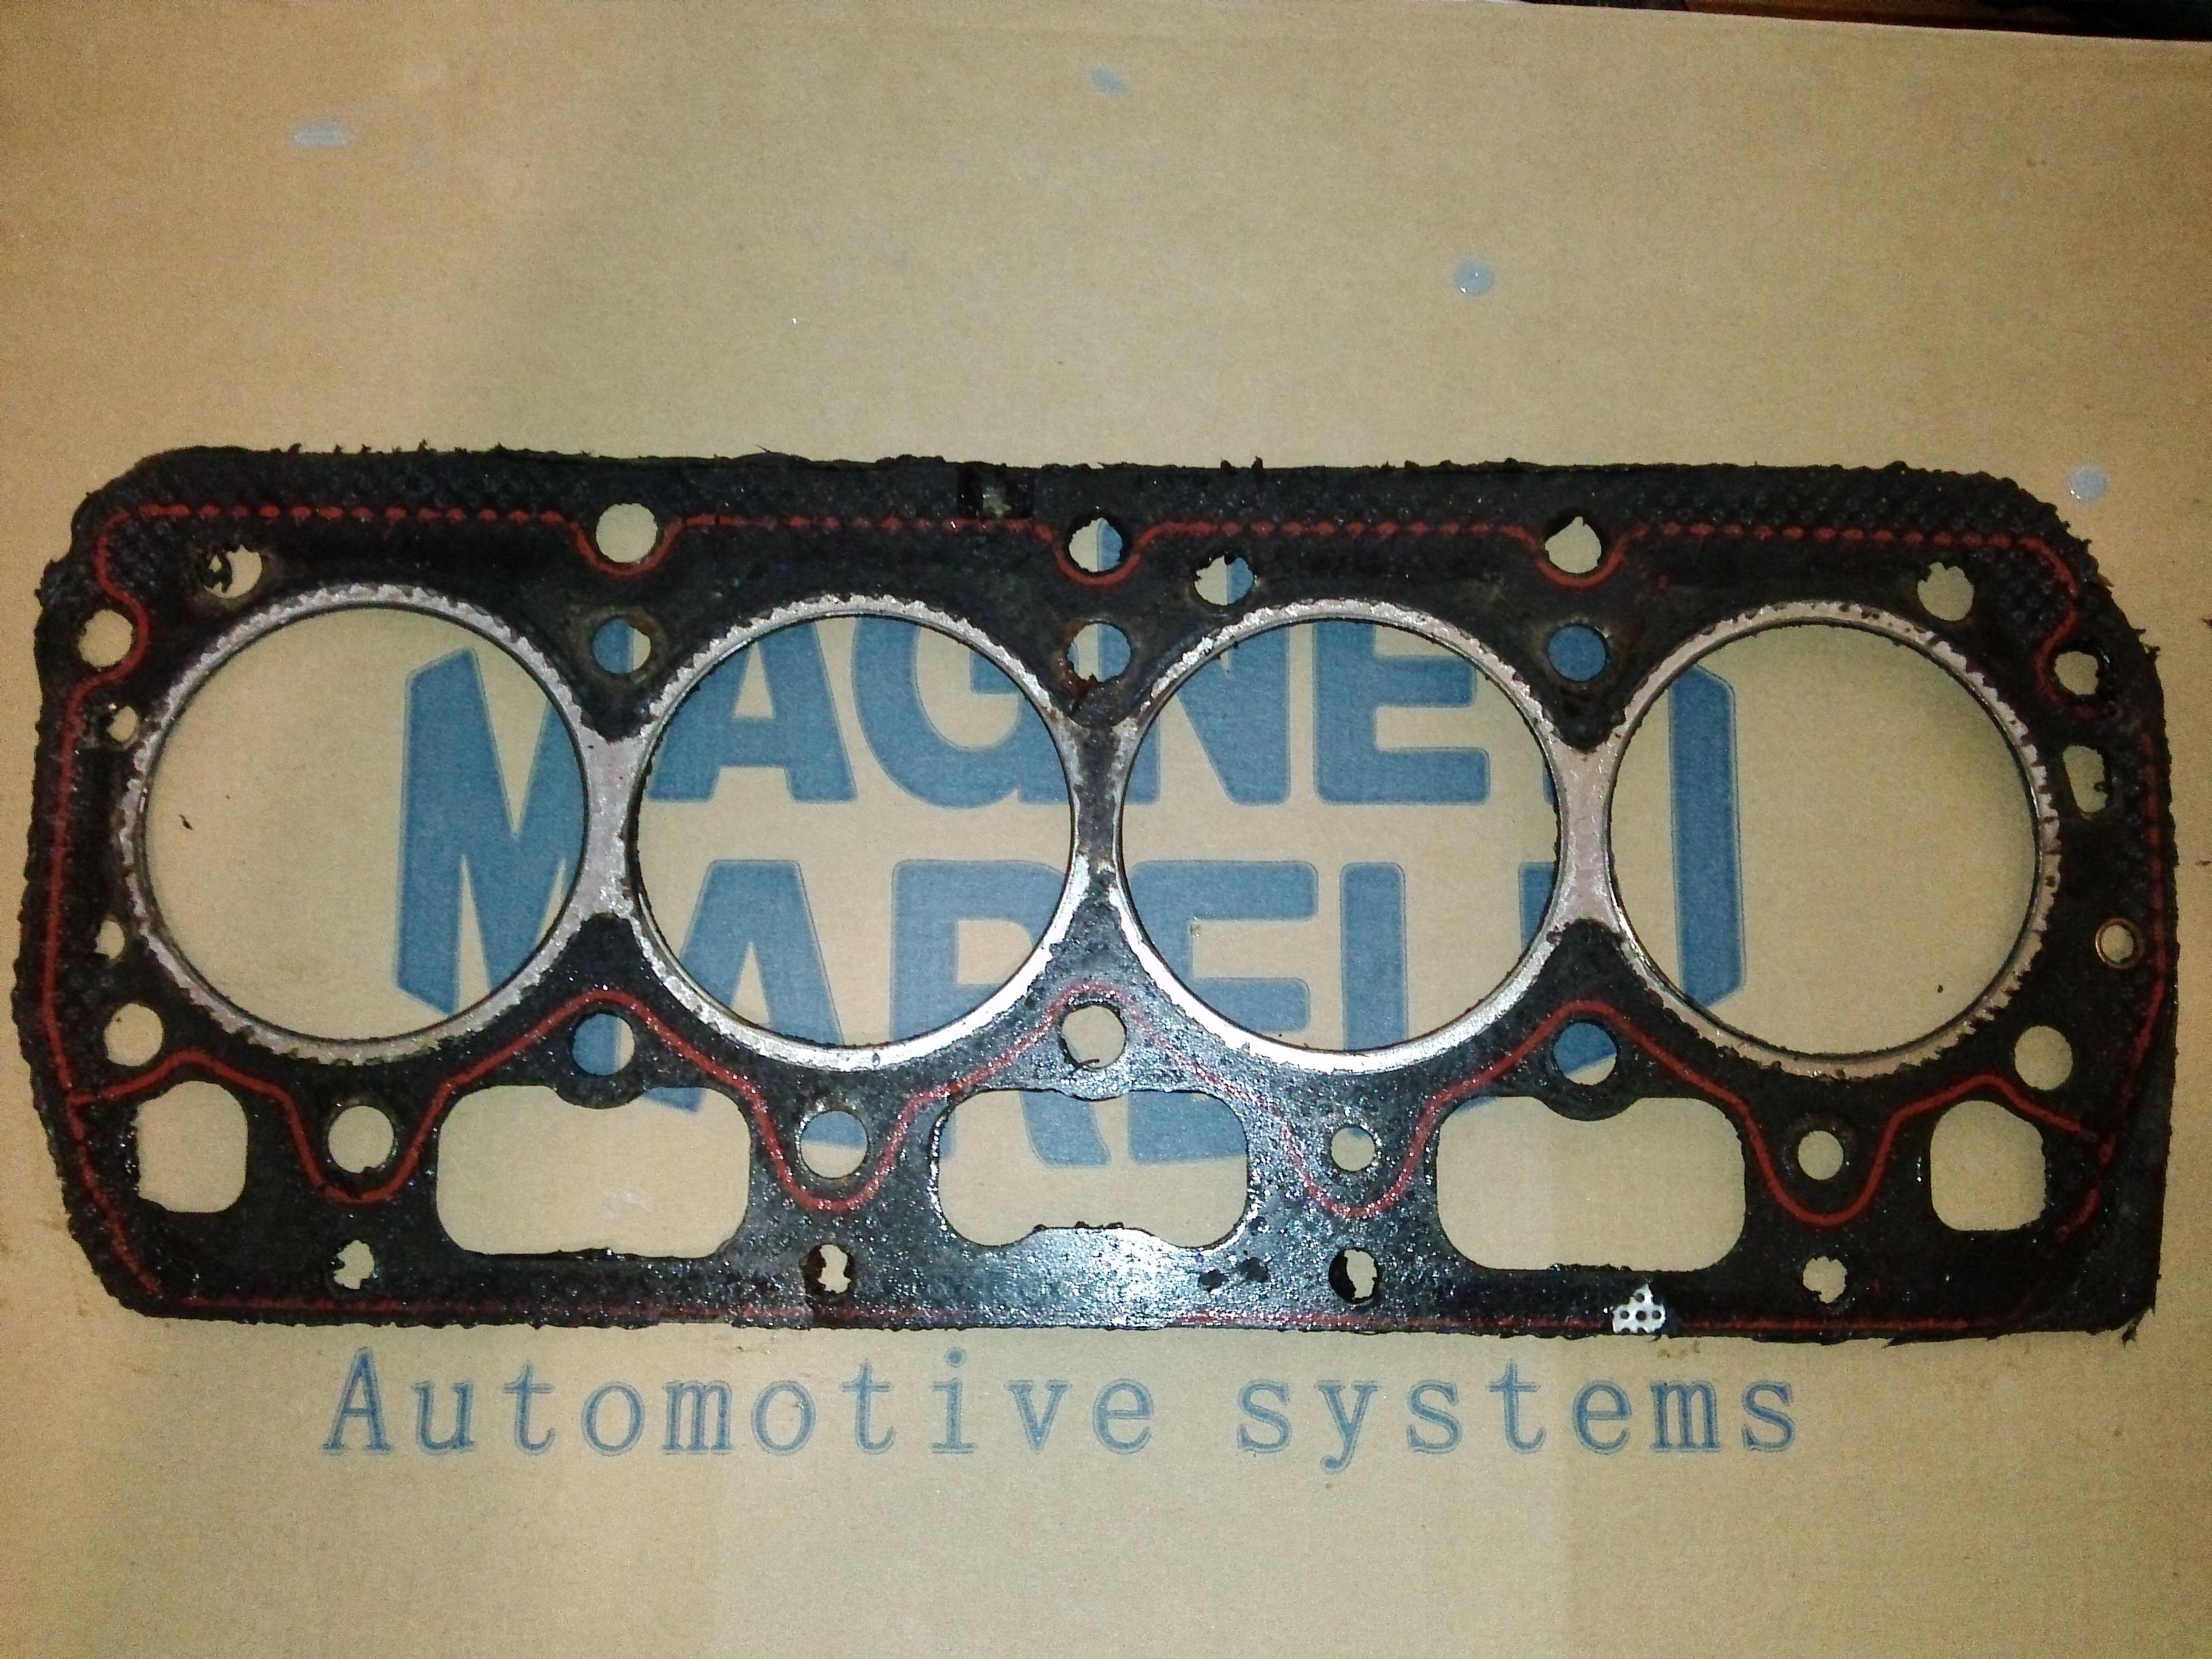
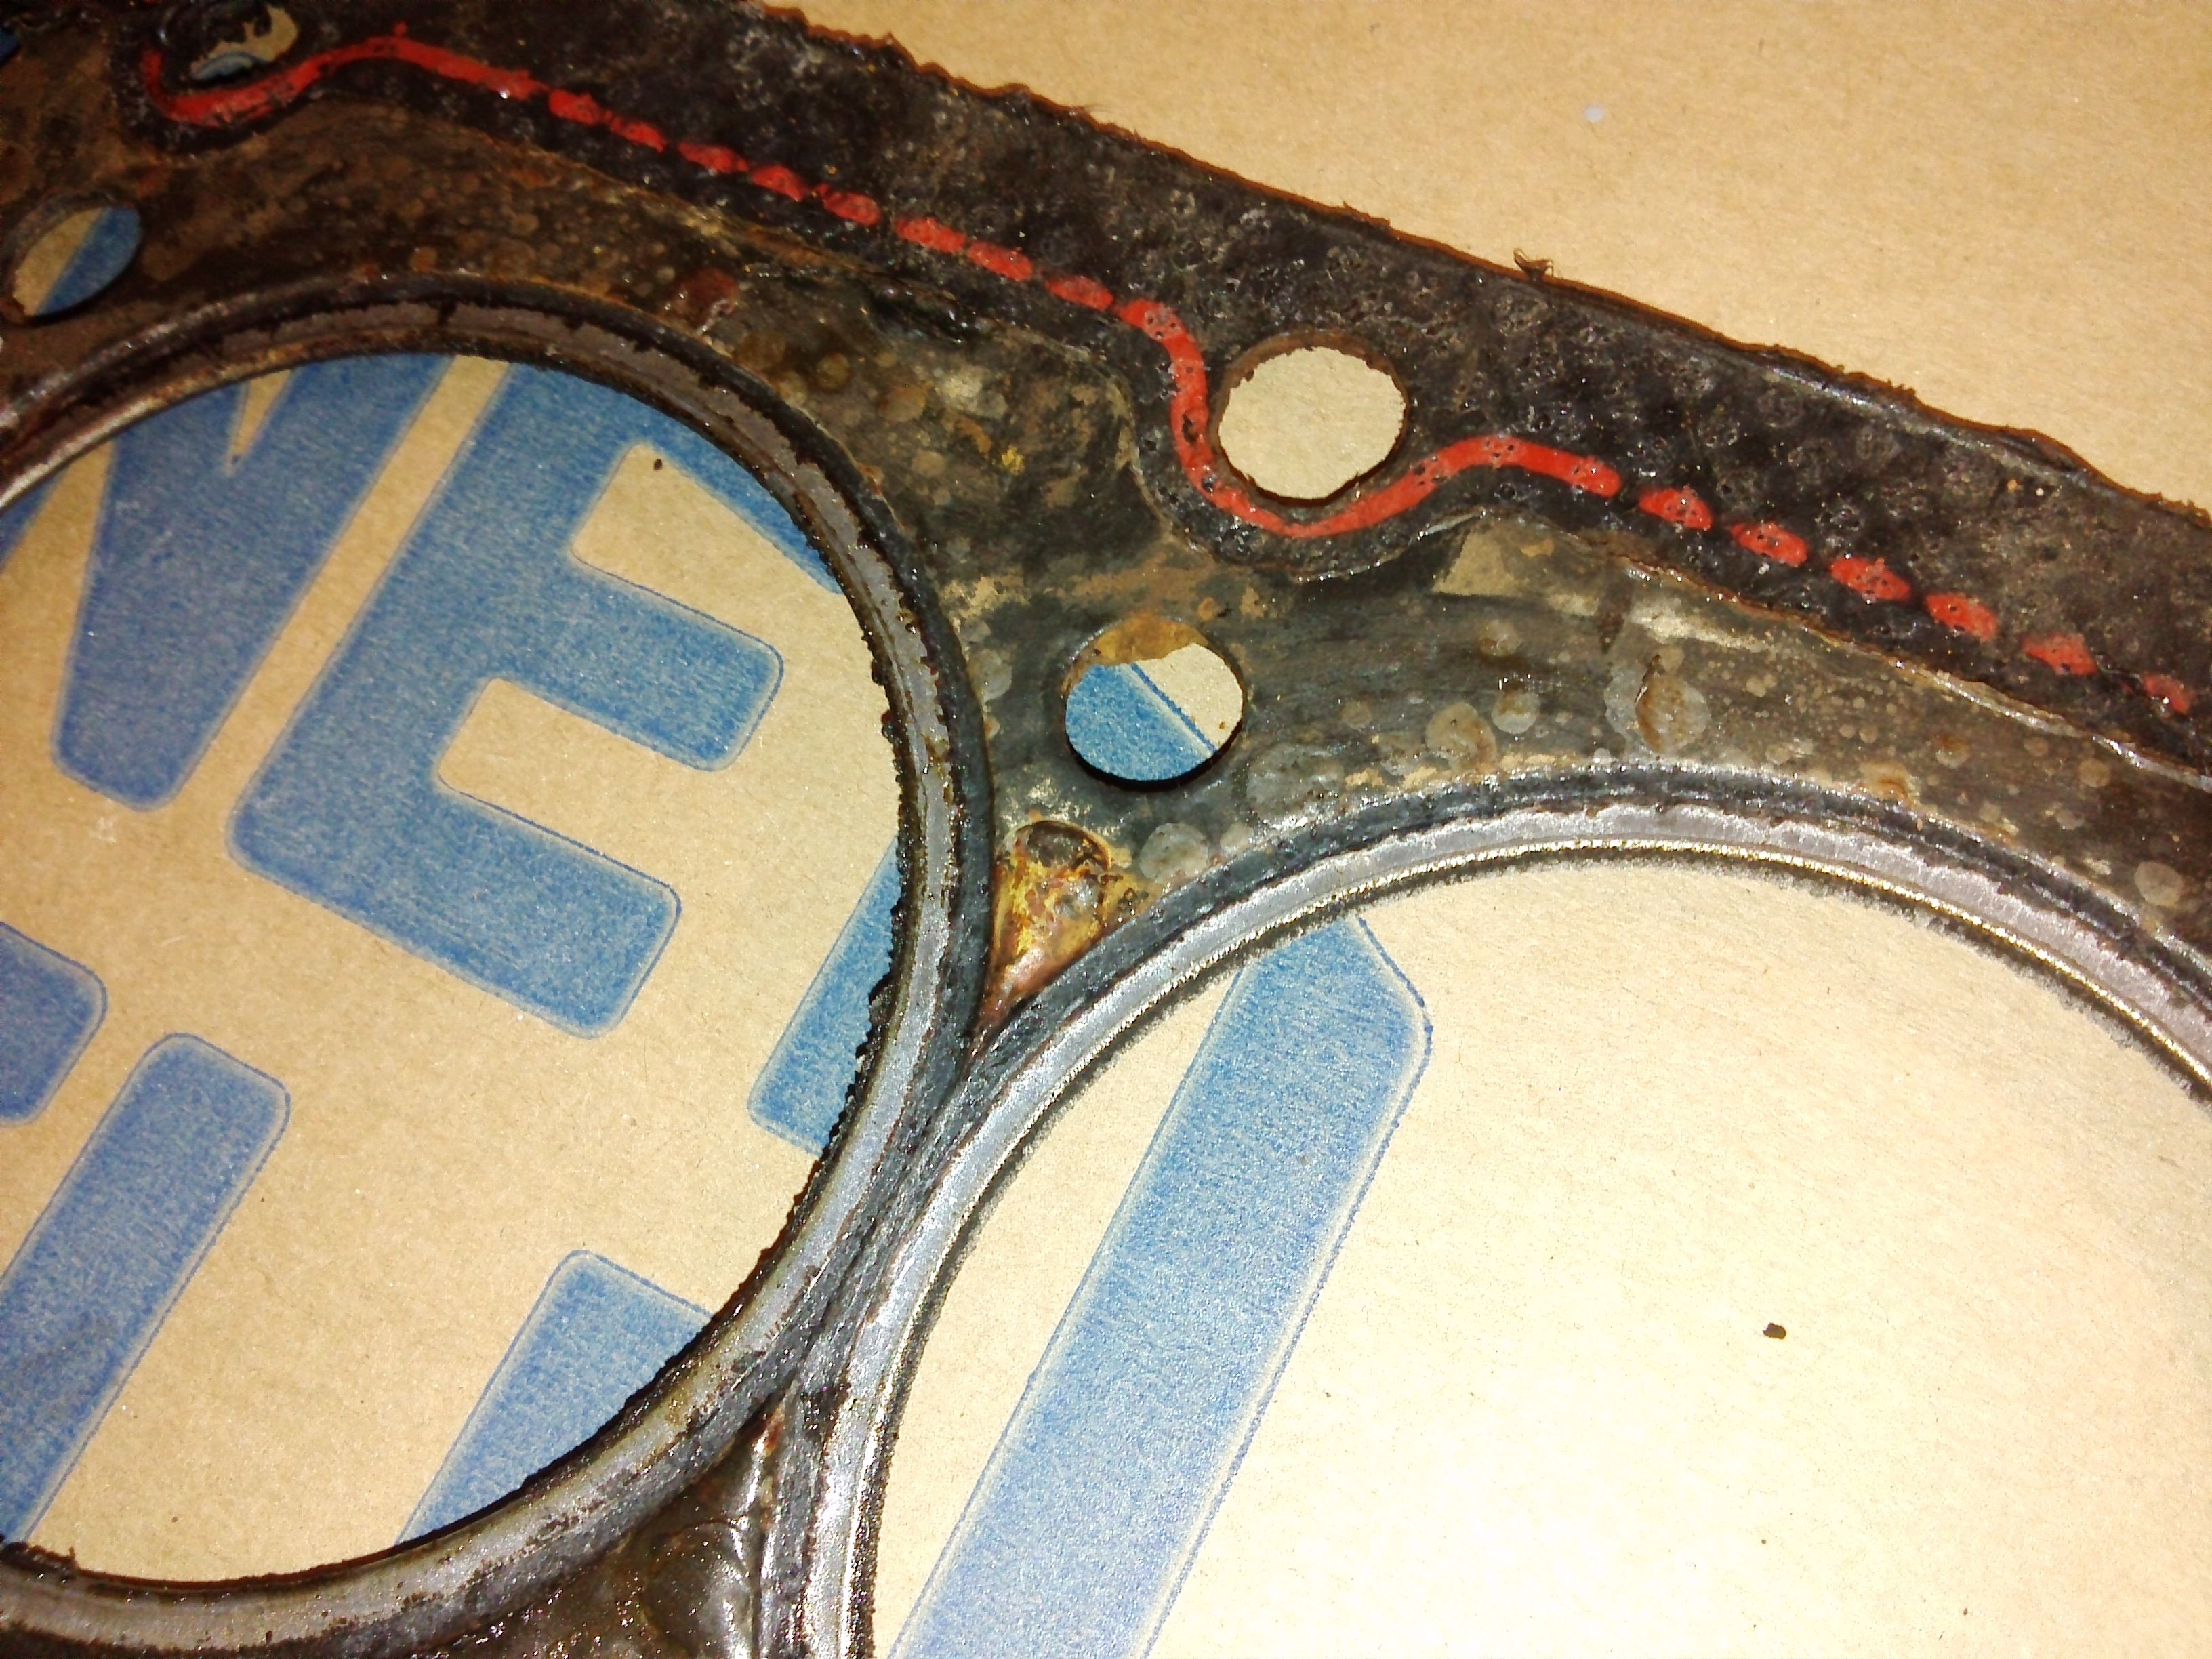
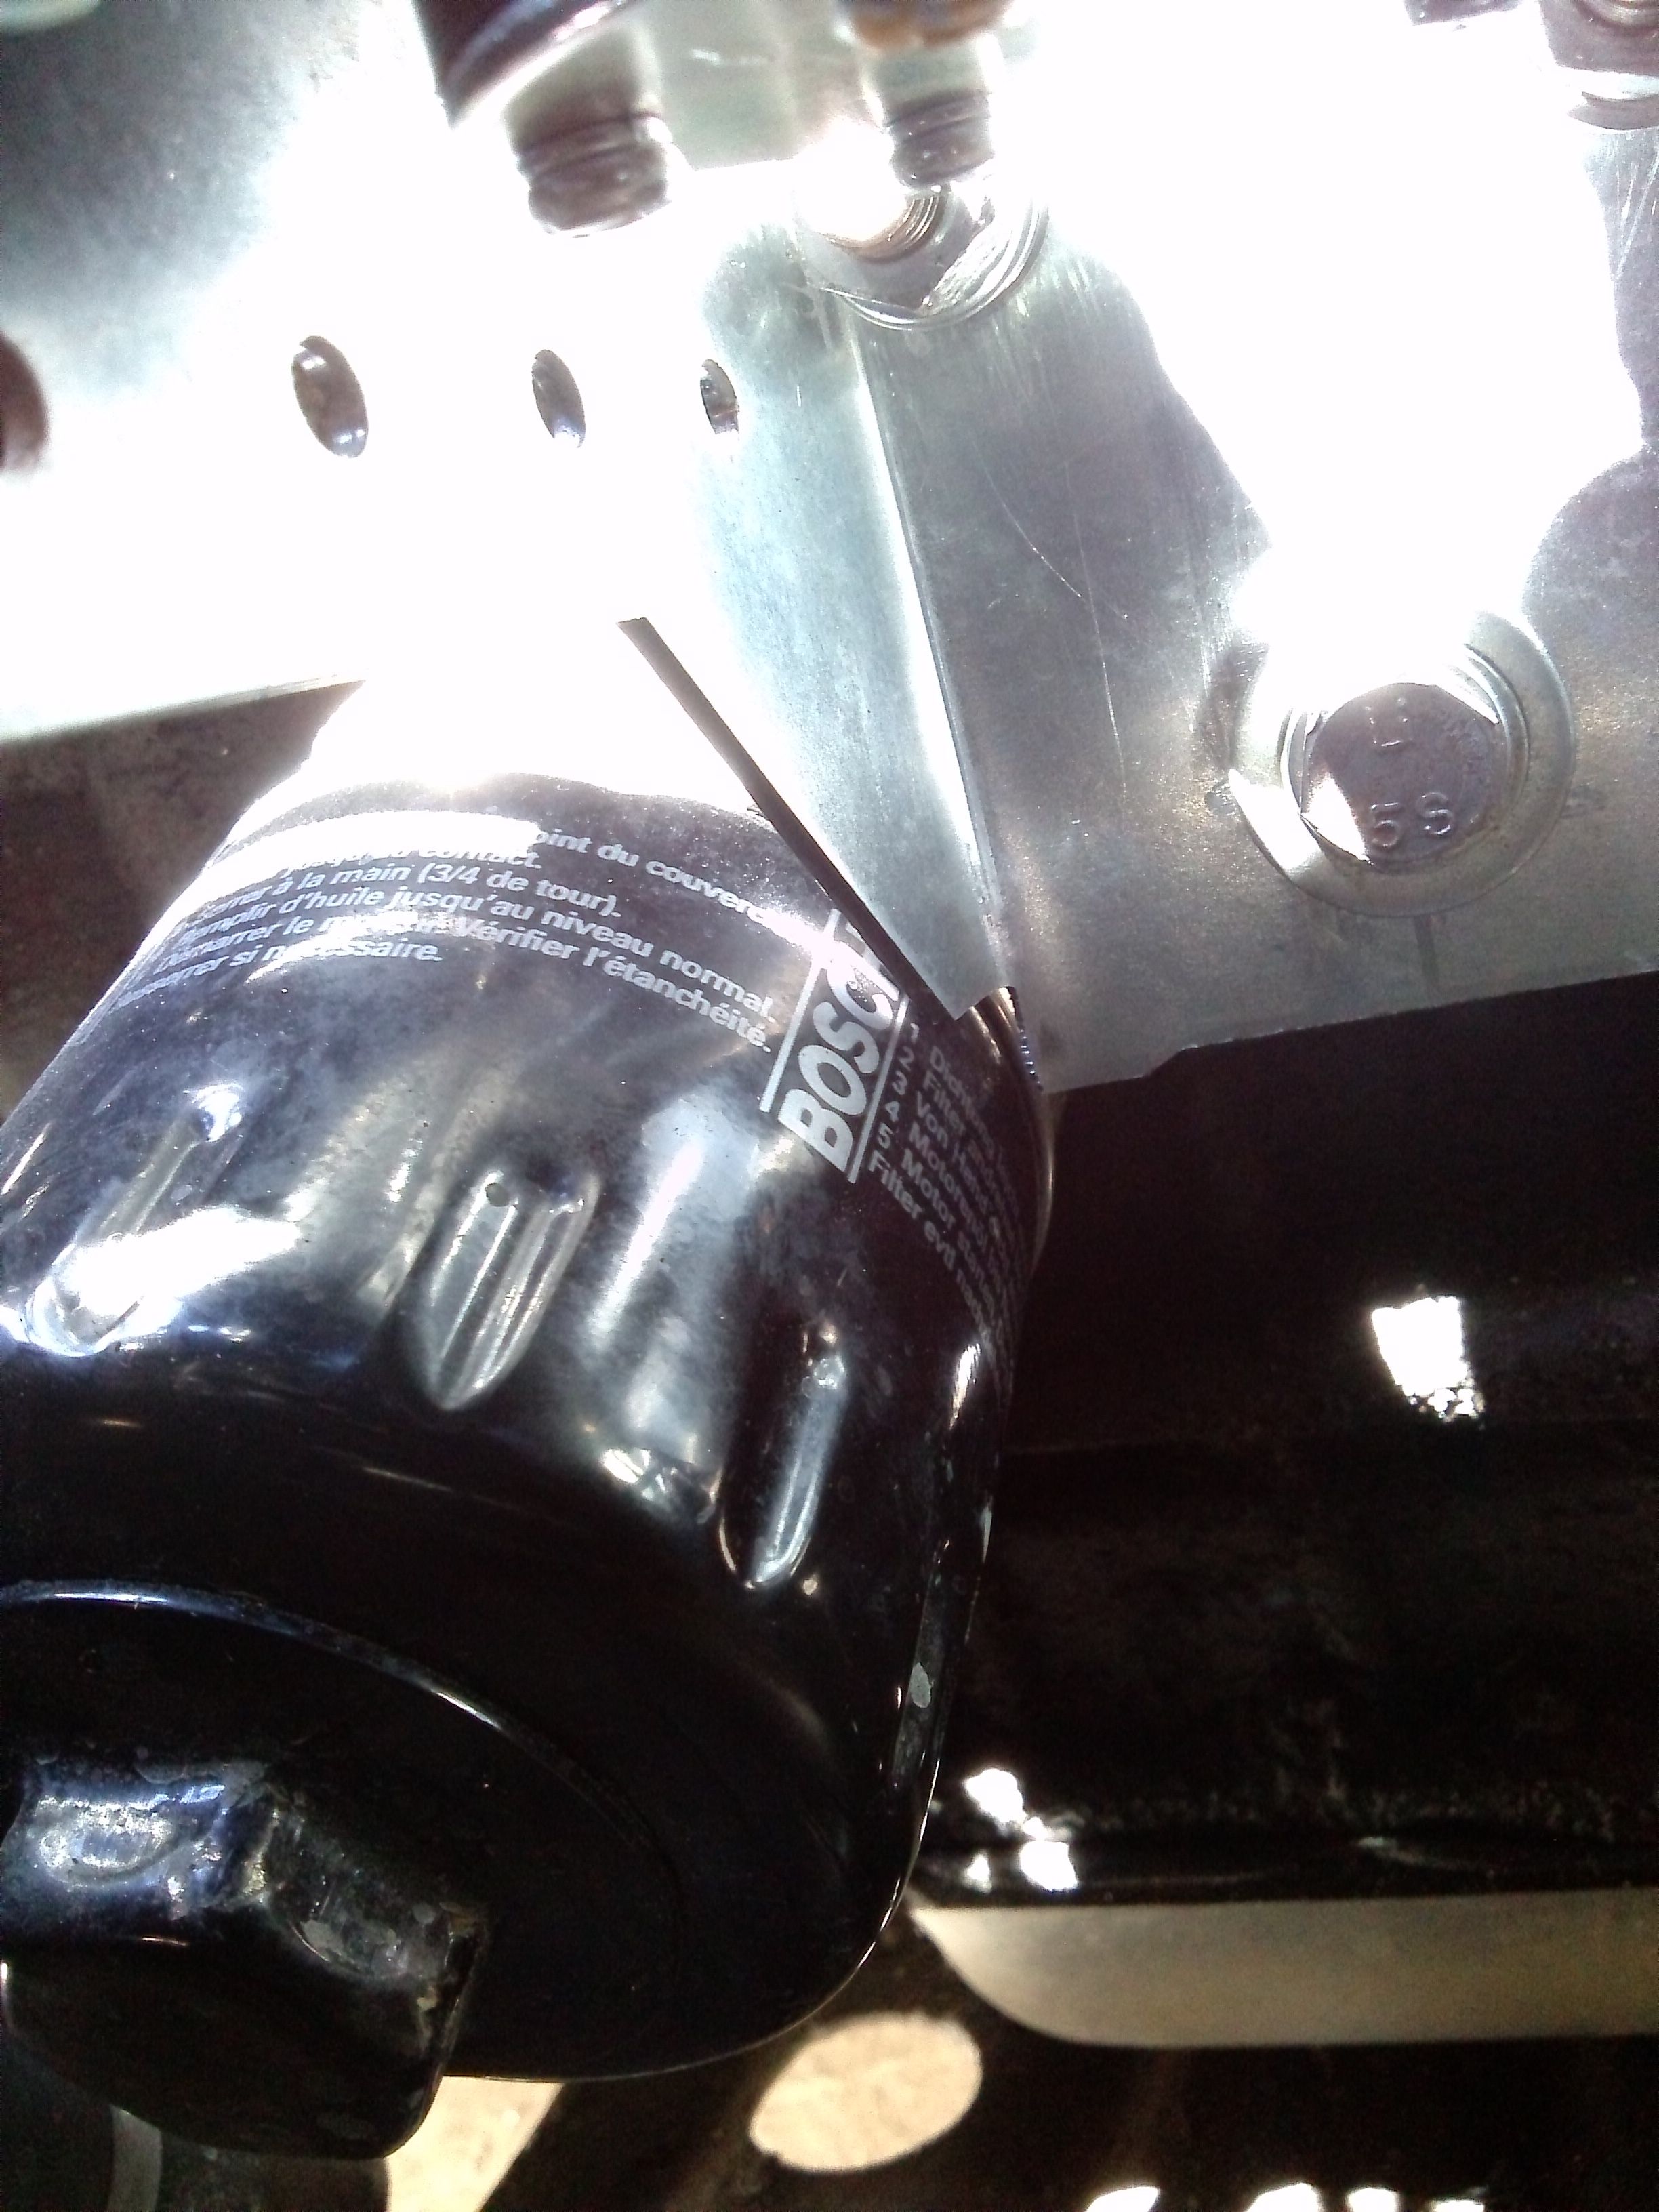
Hello everyone. With a lot going on with life and the car, an urgent situation have arisen. After cleaning the carburettor, initial crank in the mornings was hard. I thought it was LPG issue with choke mechanism. There was no white smoke. None excessive coolant drop. But I checked the oil cap some time ago and found only a little amount of jelly like grease. Not mayonnaise like. I thought its maybe the oil getting old. I wiped it and it didn't came again for some time. I checked regularly and started to see more jelly like oil under the oil cap. The frequency was increased. Finally I saw a white smoke coming from tail pipe in long bursts for the first time two days ago. There is a 74ºC thermostat so temp gauge sits at the bottom line. When climbing a hill or going full throttle on highway under scorching sun, the needle goes up until it reaches straight middle or only a a little up. It never reached the red section. White smoke happens if I stop the engine when the temp gauge is near straight middle and I start it again when the engine is still hot. I never saw white smoke on mornings. I went to a mechanic and he told me that there might be small leak from head gasket but he couldn't be quite sure. The problem is, the previous owner claimed that the head gasket had been replaced just before the car's sale. It's not even 5000Km and already HGF. Doesn't make sense. - 1993 Skoda Forman LX (I'm owner from January. Multiple previous owners. Unknown milage. I found an old bill when working inside the car. That indicates 160K Km dated 2004) Current mileage just over 100K. The car runs on LPG. - 74ºC thermostat (unknown maker. not dismantled the housing yet) - Calorstat by Vernet 68-82 new switch. (Installed for summer, the car had 87-92 before) - Brand new magneti-marelli radiator. - Fuchs Ethylene glycol based blue antifreeze with %50 distilled water. (The car had murky coolant which had -10ºC measured capacity when I got it. Flushed twice with distilled water and used 50/50 with the same brand ever since) - Castrol GTX 20W-50 LPG motor oil. Changed 3400Km ago. (I bought this 4+1 liter. the engine took 3 and near a half initially. I poured the last drop last week and oil level was between max and middle. I was assuming this will be enough for the next change at 5000Km. So, oil consumption is something like 1.5L for 5000Km) - Bosch 165959455G VW six blade fan motor with Felicia full fan cover 6U0121207. (Direct connection to battery. Runs after full stop) I've just dismantled the head gasket. Please take a look.


-
I almost forget the oem code: 15100-85501: Electric Fuel Pump This one is a low pressure electrical fuel pump. I've learned that this one is a popular pump for various modifications.
-
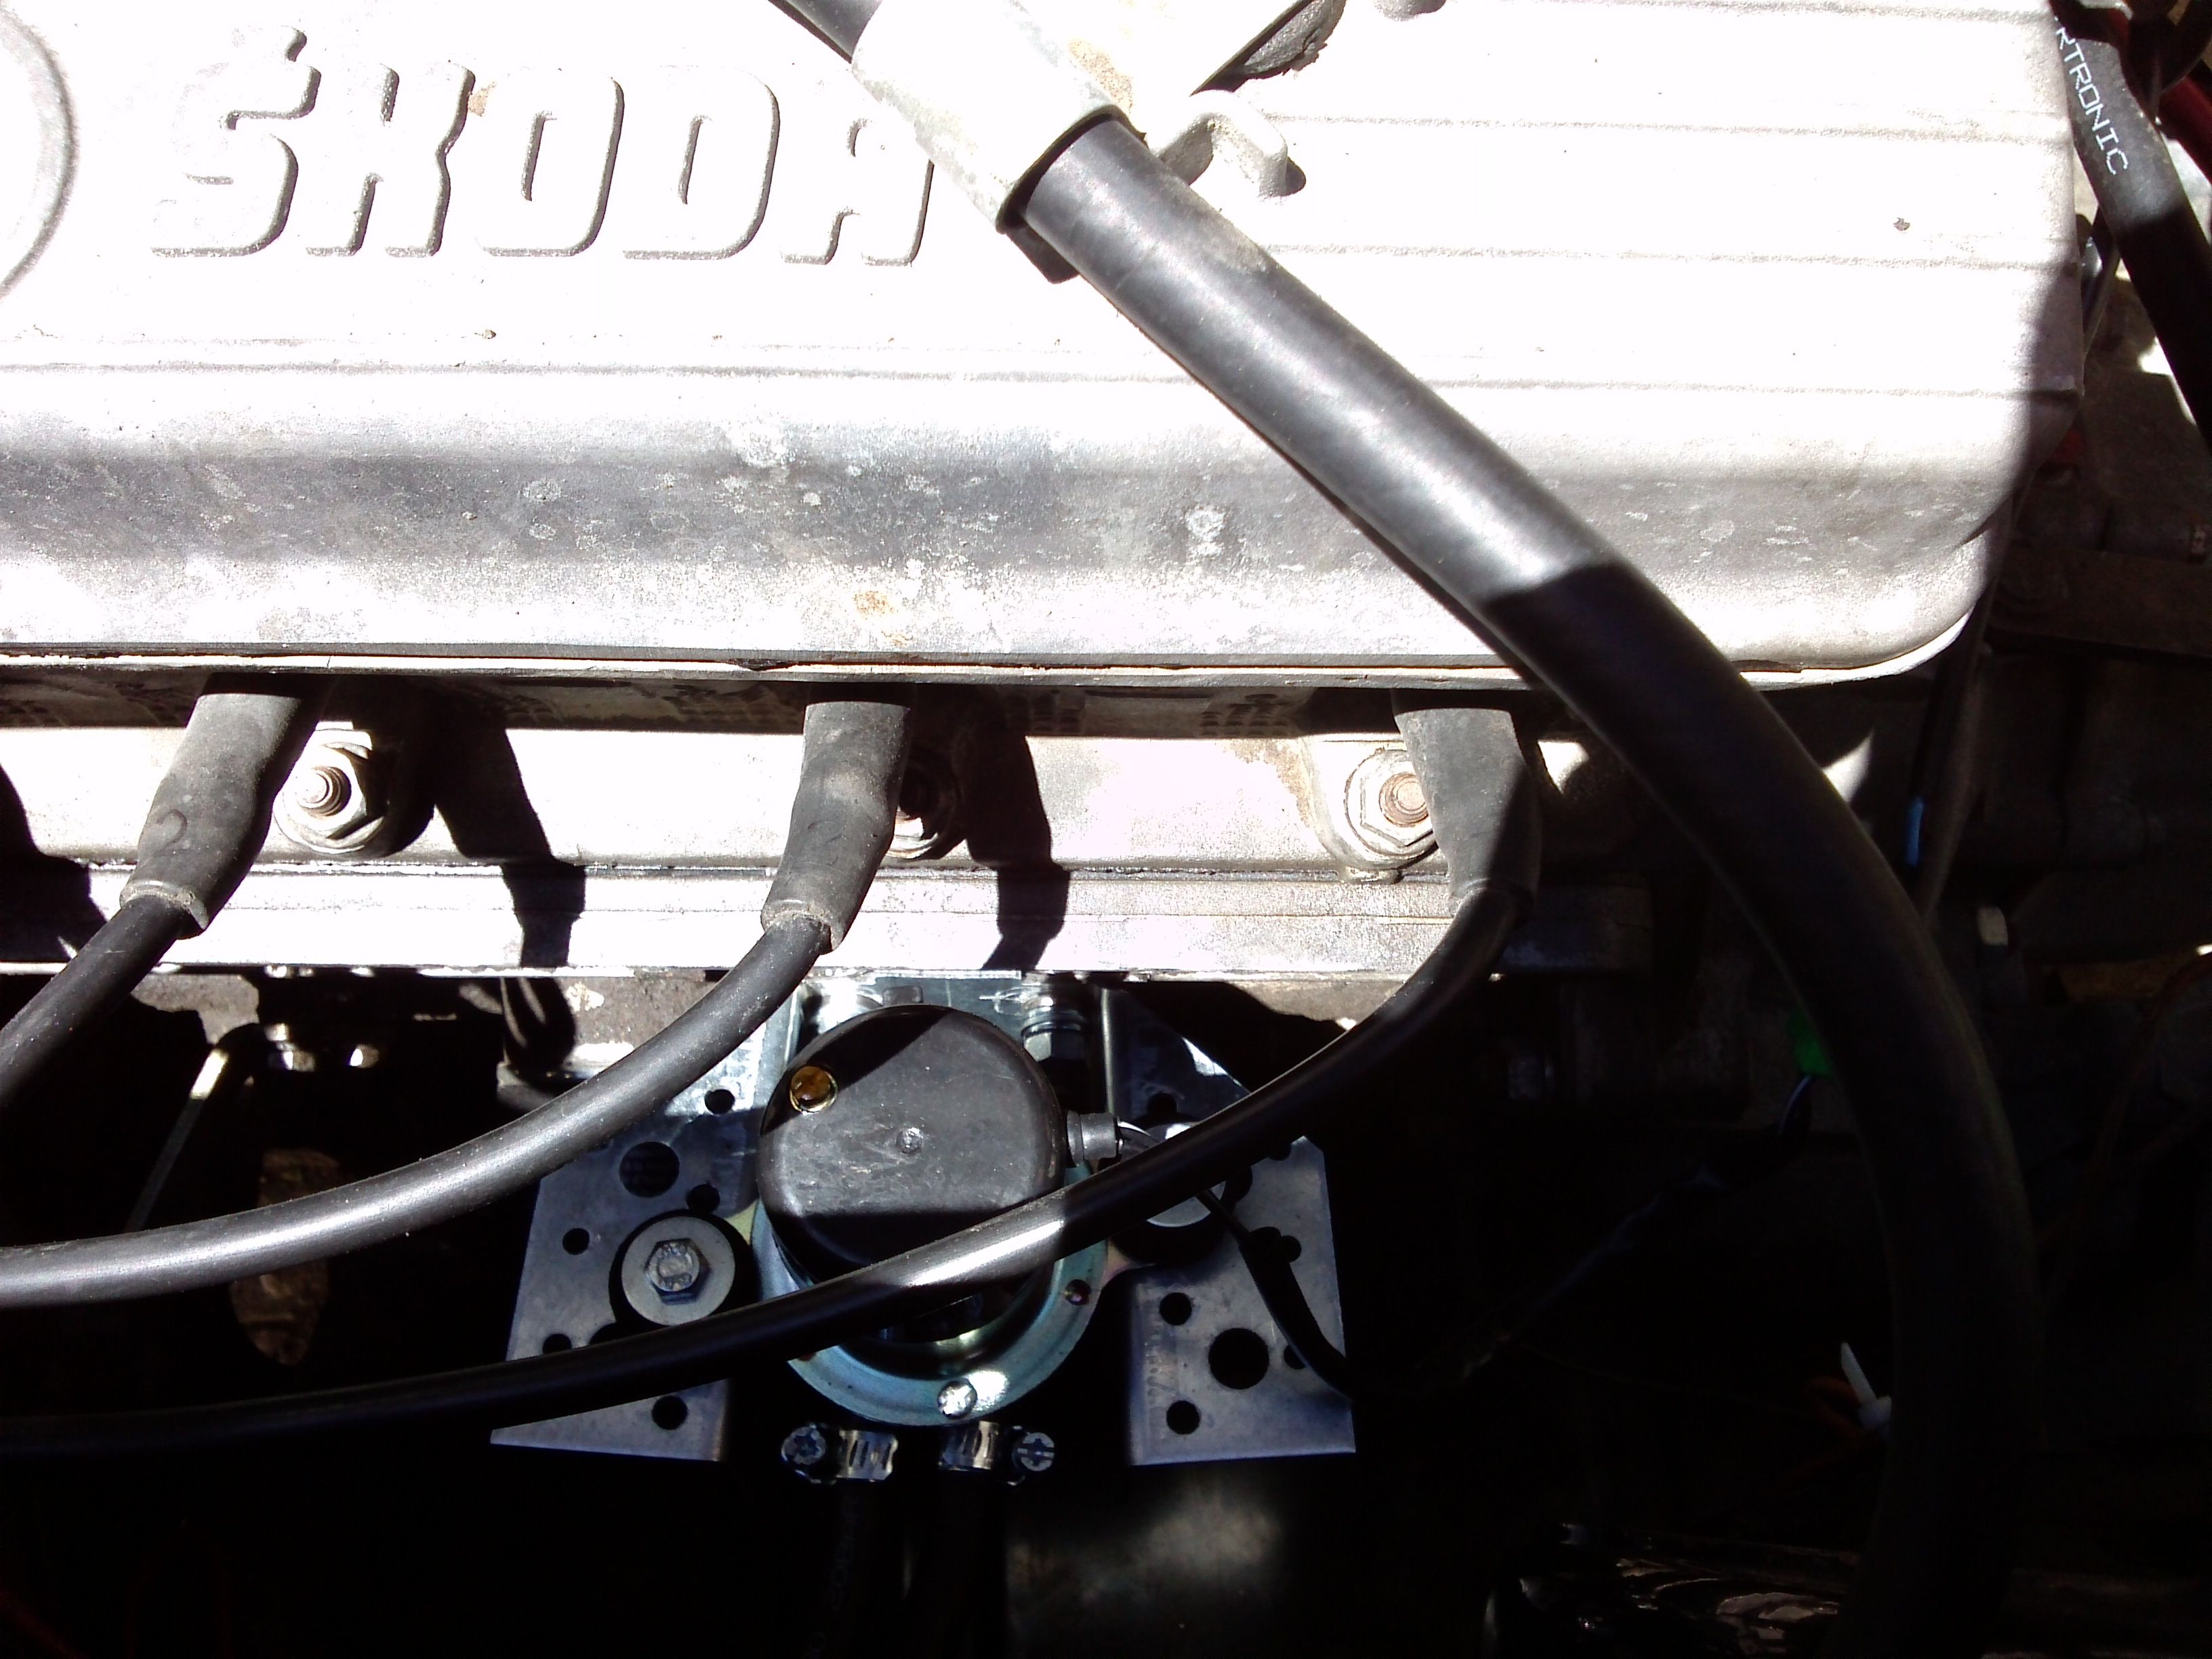
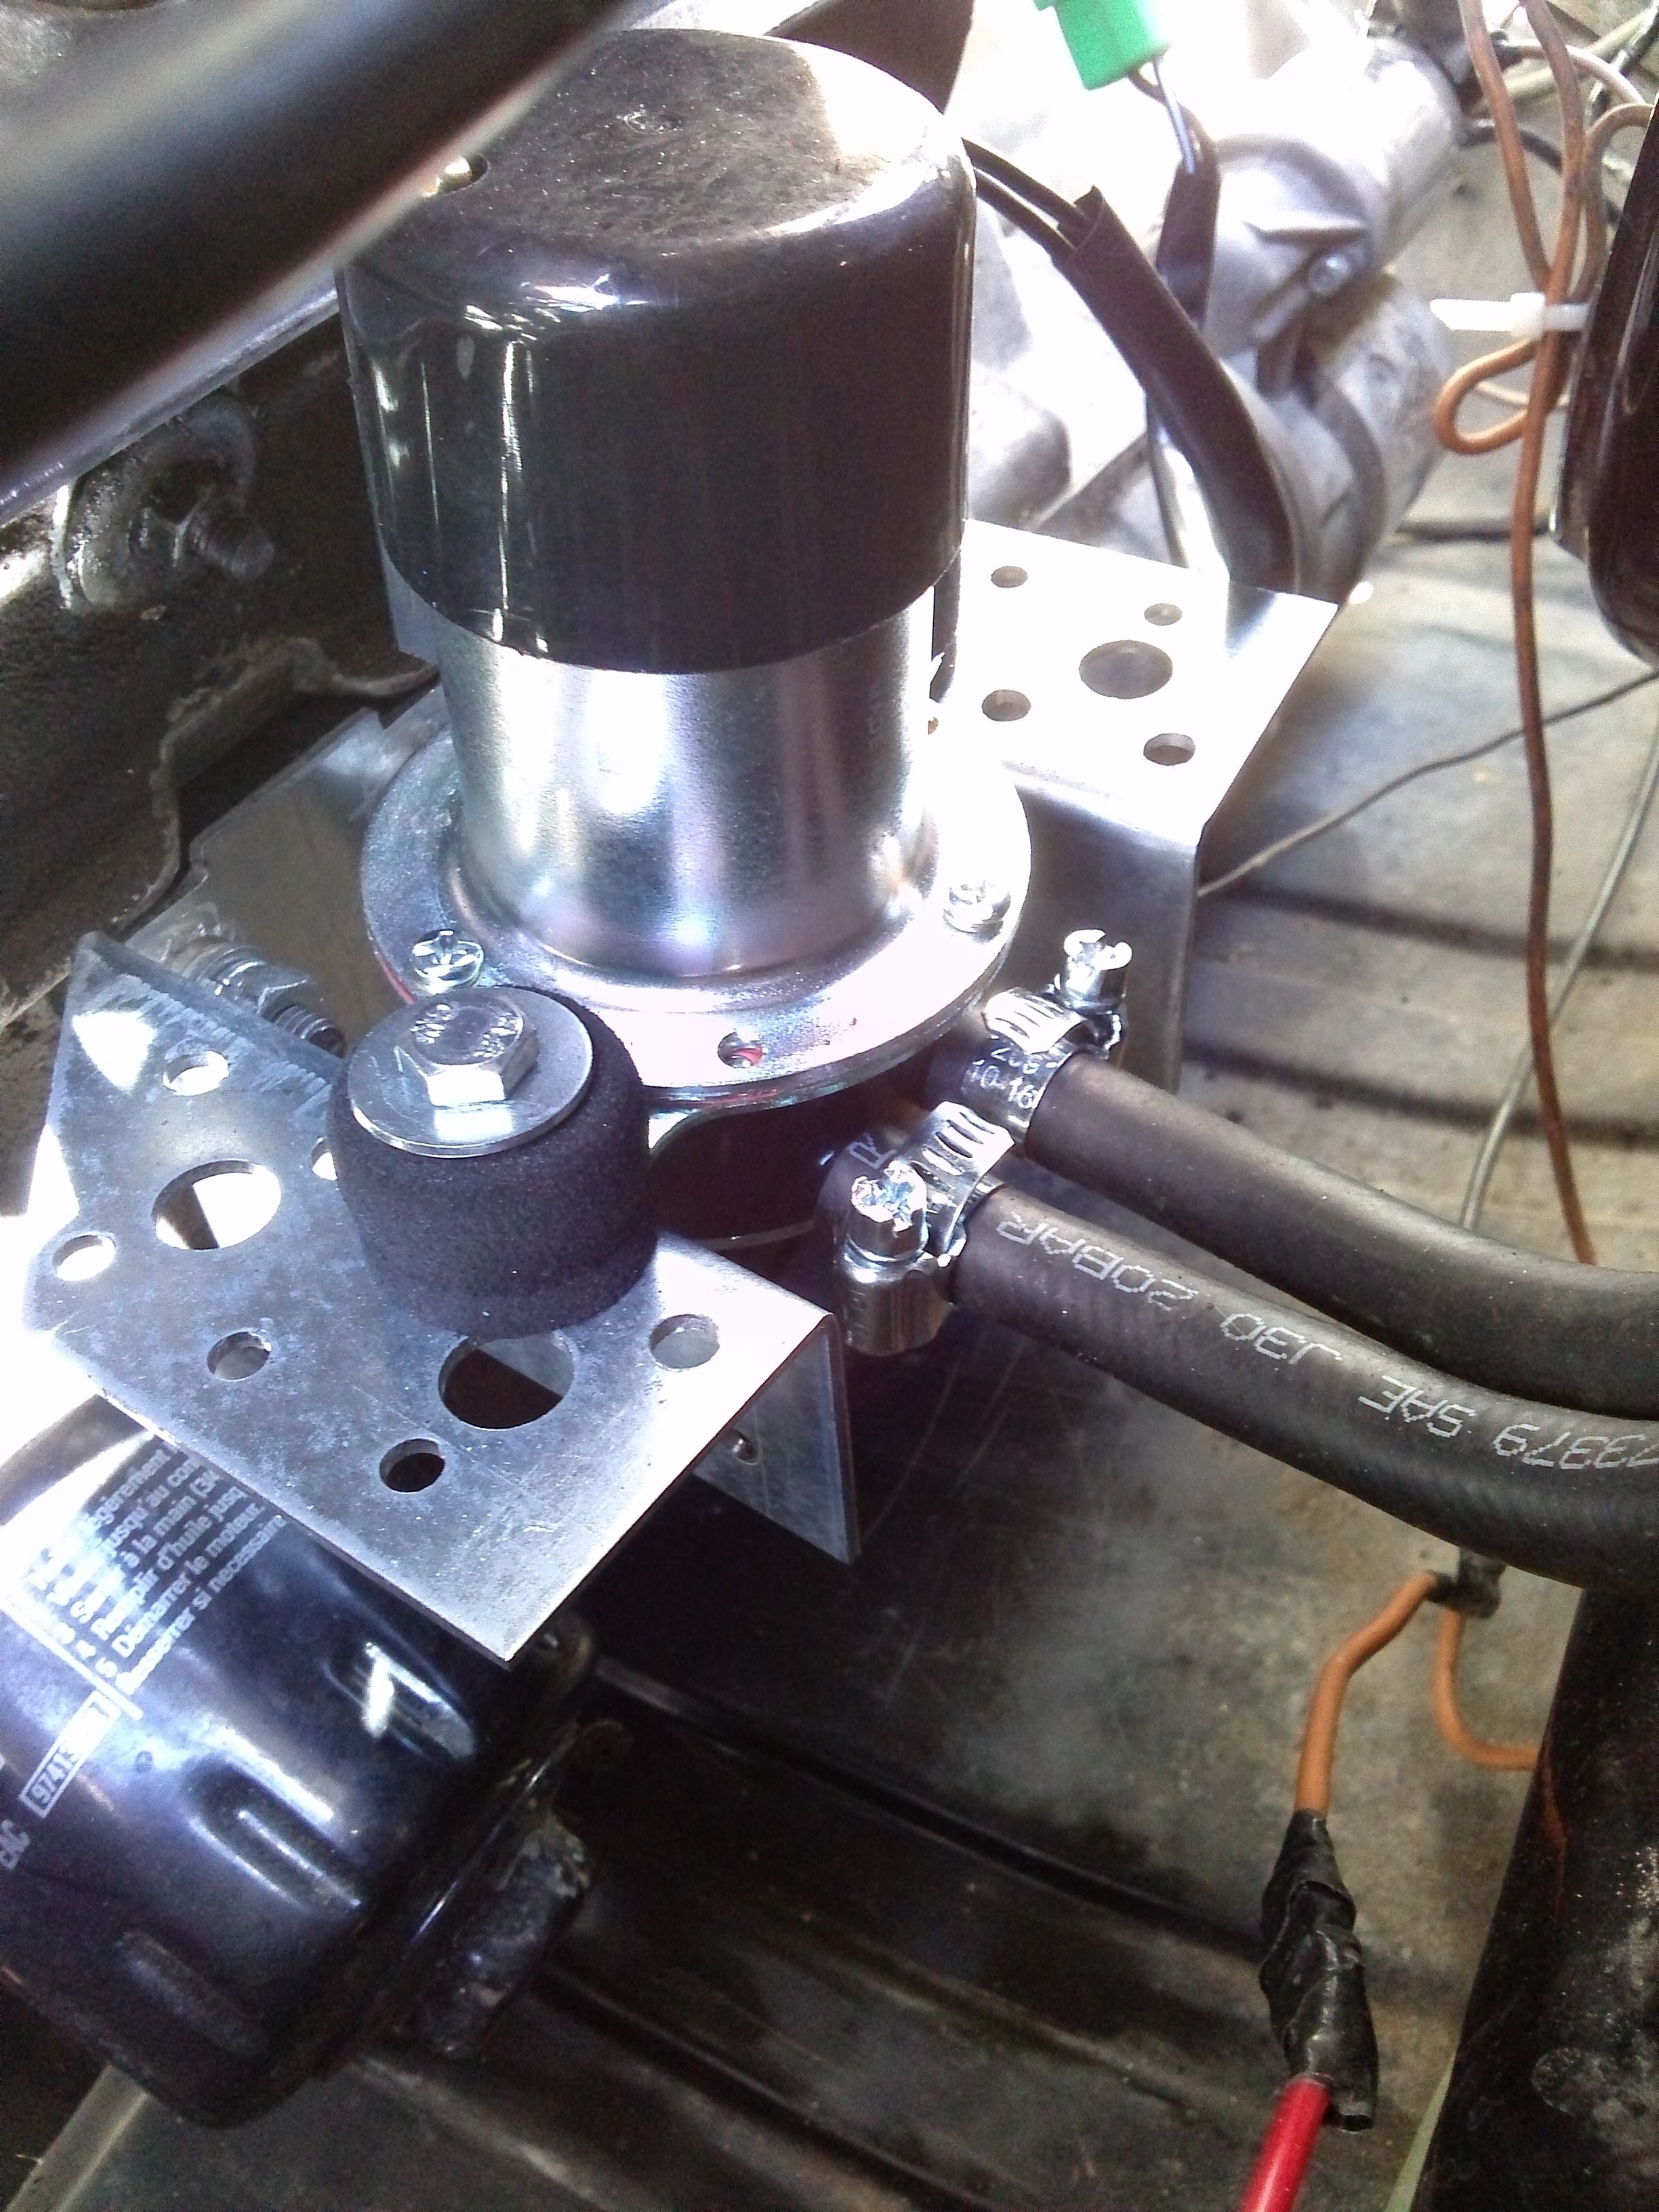
I couldn't find both the pumps you have mentioned. I've been told that, current situation affects spare part availability. My choice was another Vika or nothing. I've decided to give it a go to my project with a more simpler design. Just to try and see. I've used a metal cylinder that fits the bottom of the pump. This part is free. I've bought only two hose clamps. I've installed on the car but the result was a complete failure. As soon I cranked the engine fuel started dripping. This time directly from the holes under the pump. So from what I've learned, if you let the mechanical pump run dry, (I did this like a month or longer) the pump diaphragm gets totally destroyed. So, time for a new pump. Ennepetal/Germany item no: 070972000 One piece for both mounting a new pump, and sealing the pump mount. $1.75. I've made small modifications to this part. You can see them all in the pictures. The installation was made over the original spacer with new gaskets. It's working. But no road tests yet! I'll add pictures for fuel hose routes too. Please, share your thoughts.


-
Thanks RicardoM I've never saw that pump with reservoir before. Looks like it has a manual lever too. Pump body looks more solid with bolts, yet I have zero experience about reliability of both pumps. I'd like to take your opinion on that too. Among non-reservoir models, I've never encountered Jikov brand. I will look for those two models in the upcoming days. I'll update any progression. About oil; I've been told by a mechanic who has the same vehicle (93 favorit lx) as a daily driver, 10W40 was too thin. He told me that I would lose much oil with that viscosity. He told me, he was using 15W40 for winter and 20W50 for summer. Oil seller guy told me 20W50 is too thick for Škoda Favorit and urged me to buy 10W40 instead. I've browsed different sources on the net for answers but all I got was more confusion. Some users say, 20W50 is for trucks. Some say, it's the perfect oil for Favorit. Solid info I could find was, what the original user manual said. It's 15W40. I had to add 1 liter of 10W40 during past three months and 2000Km. It won't drop below -15ºC until next winter so I went for the 20W50. It's been 800Km with the 20W50 and oil level is still at the max. I think an engine with good condition could do better with 10W40. It's hard to find people skilled as you RicardoM. It's not a compliment. Reality. I've read a lot here on the past months before joining. I know what the "mechanics" did from my own car and from others'. You wouldn't believe If I told you.
-
Hello. First time car owner here. When I got the car three months ago, the short rubber hose at the fuel pump input was cracked. So I replaced the hose. Then a terrible fuel leak started from the fuel pump. After losing like 5 liters of fuel, I realized it and replaced the fuel pump immediately. The old fuel pump came with the car was Ruby brand. New one is Vika. I couldn't find an original part. Several weeks ago, I decided to replace the engine oil. Old oil was 10W40. Previous owner claimed it was fresh. Reading the recommendations, because of engine's technology and age, 10W40 is too thin for this engine. Constantly losing some oil confirmed this. I also made a few thousand kilometers. At the beginning of the spring, I thought it was a good time to replace the oil. I bought Castrol 20W50 LPG from a trusted vendor. They also had a free oil replacement service too. With a new oil filter, the engine oil had been replaced. After that day, a faint fuel smell appeared again. When I touched underside of the center ring of the fuel pump, I found the source of the leak. Again, fuel pump is leaking. Not like dripping before, just persistent dampness. The fuel pump body is consisted of two main parts. Upper body and lower body and they are pressed together with a ring at the center. My theory is; this is a bad design to hold together pressurized parts with a gasket in the middle. If you apply some unbalanced force from top or bottom it will bend and/or loosen the pressed middle ring and cause a fuel leak. I inspected similar era car's fuel pumps too. For example Lada Samara fuel pump has bolts securing main body parts together. https://pasteboard.co/JWFQSzM.jpg I think the guy who changed the oil filter had bumped the fuel pump while working to replace the oil filter and that was more than enough to cause a leak. He used a huge box end wrench to tighten the oil filter. I never ran the car on fuel since I got it. I don't know current state of the original fuel system. The car is up and running but I know it's important to have a working fuel system as a backup and a healthy carburator. Considering the small LPG tank I have, it's a must have. So what to do now? My options are; (from cheapest to more expensive) 1- Remove fuel pump, and try to apply press on the retaining ring with a strong vise. $0 (Maybe new gaskets for fuel pump) https://pasteboard.co/JWG1vPl.jpg https://pasteboard.co/JWG1SXv.jpg 2- Craft a framework with bolts and nuts to apply exterior vertical pressure to the pump body. $5 https://pasteboard.co/JWG5uwr.jpg https://pasteboard.co/JWG6G8S.jpg This will press the main body parts just inside ring. Not the ring itself. 3- Buy a new electrical fuel pump. Repair and preventative measure. $12 https://pasteboard.co/JWG8hSq.jpg This is a universal pump. I did my research and found this; https://www.briskoda.net/forums/topic/442681-how-install-mechanical-fuel-pump-to-the-felicia/ This owner here did it otherwise. Removed the dying universal fuel pump and installed a mechanical one. The car is a Felicia with carburator. So it can be done. Lowest pressure pump I could find is 3 bar, 90L/h universal fuel pump. I can install this, and connect the electric input to LPG system so it won't turn on unless I switch to fuel. I don't know what will happen after such a modification. 4-Last solution; buy a new mechanical pump. $20-$30 I know the solid solution is buying a new mechanical pump but will it happen again? Spending $30 for the same part in three months plus, the expectation of a fuel pump leak and the dangers of such a failure is really annoying. If you have read so far. Thanks! I've learned a lot from Briskoda and their veteran members. Current situation: https://pasteboard.co/JWGeduw.jpg https://pasteboard.co/JWGeVrC.jpg