
R_Blue
Members
-
Joined
-
Last visited
Everything posted by R_Blue
-
I liked it.
-
I've found this photo album. You may like it too. https://moje.auto.cz/?sekce=foto&im_id=im_4bb9b36019f8b&ga_id=GA_4b4cd55821504
-
Exactly. Higher pressure caps play a role for compensating the lack of anti-freeze in competition cars. Here are more caps: Blue cap is standard cap for Favorit/Felicia. 6U0 121 321A. Yellow cap was on the car when I got it. Checked it now and looks like it's not standard too. 001834583 number corresponds to Opel Vectra B cap. Also 001834583 matches with 90500007. There is huge list of cars use this cap. Blue cap is listed everywhere as 120kPa. Yellow is either 120 or 140kPa. What's inside?
-
Don't forget to check the spark plugs' condition. Good luck!
-
There is BILSTEIN 15-106384 but it's also oil. It seems gas only rear shock absorbers for Caddy 2 are hard to find.
-
The link you've provided above shows a cap that has 145kPa pressure value. It might be a completely different cap. As @Thefeliciahacker and @KenONeill stated above, higher pressure caps, provide higher boiling point. As long as the system can handle the pressure. In theory, a heavy truck part should be more reliable than a car part. They do millions of kilometers. This is the main idea but I'll see about that.
-
7C46-8100-AB It didn't make any difference in temperature for me. I'll see about longevity. Like I said above. Just FYI.
-
Monroe R2702 ?
-
I'll keep GT-85 in mind. I'd like to try it. Someone has good ears yes haha Was it in the video? I didn't know that. I was about to tell you something else. There is a compatible part in those trucks with our cars. The expansion tank cap! Who would have known that? Now the story first; All of this below are not solid info. Just what I've heard from various sources. I've kept hearing about the expansion tank caps in our cars were unreliable. The first original Favorits had a metallic cap which was reliable also they had 100kPa rating. The later plastic VW caps are either 120 or 140kPa. That's %40 more than the original spec. With only a sliver of info about Ford Cargo truck expansion tank cap might be compatible with our cars, I've visited a truck parts store to physically test it before buying. It turned out to be true. It fits. It's clearly stated 100kPa on the cap too. I've been using it since that day. It's been near 7 months. How long will it last? I don't know. I know, seven months is not enough for a long term review. This is just FYI. I'll add a pic.
-
It may not be the best but it's widely available here. Like a can of cola, it's just everywhere. Innotec Deblock Oil XS GT-85 HYLOTYTE® RED 100 I've just checked and these products seem not available here. 😞 I think you should remove the rocker assembly. It's very easy. If you don't, some of them will end up being loaded on the push rods. This will cause stress on the head which may alter initial torque setting of the head bolts. I've prepared cardboard sheets prior to work. When disassembling parts, I punctured the cardboard and pushed the bolts in. (Pictured above) Bolts have different sizes, some of them have washers, some don't. I did the same for push rods too. I even marked spark plugs with a permanent pen. Bring some zipper bags, small plastic containers with secure lids and a permanent marker pen. Catalogue your bits while disassembling. If you do this properly, this will speed up your assembly phase and make you confident that you didn't miss anything. Also if you need to stop the work and pack things up from the street to the house, this will speed up the process. Another important tip that helped me much: take pictures of everything before starting to work. When you complete mounting the head and manifolds, you'll be playing twister with different types of hoses and also cables. You will know where to connect each one, that's easy but sometimes you forget the exact original route of each hose and how they cross over each other. You will find yourself thinking like: - Was this gasoline line passing over the LPG hose here or was it passing under? Having pictures helped me a lot. I also forget to ask. In your video the engine idle sounds normal to me but tachometer inside shows a little low. Like 500rpm. Is that really idling low or the tachometer is slightly inaccurate? Also do you have Ford Cargo trucks roaming your streets? I mean is it a common truck in where you live?
-
You are welcome. Every post I submitted, you were there to help me. I won't forget that. I want to add more details about the work I've done here: - Plan and prepare both your tools and parts you need. If you don't have a private garage like me, the need to pack up everything in the middle of the job is very frustrating. - Protect yourself. Invest in protective hardware. You will never regret this. Especially when trying to loosen some aged bolt and nuts, they might suddenly move and your hands might get hurt. Buy shock and/or cut proof gloves. - WD40 is a boon to mankind. If there is a stuck bolt or nut, WD40 will help releasing it. Just don't expect immediate result. Spray and leave it for several hours. If still stuck, spray more and continue to wait. WD40 and patience helped me with %90 success with stuck bolts and nuts. - What was the hardest parts of the work? -- Exhaust manifold to down pipe connection. The nuts on that flange are repeatedly tempered with direct exhaust heat. They were hard to loosen. -- Breaking the seal between head and block. I just did as you described above. Tapped the head before pulling but it just didn't give up. The exhaust manifold was still on the head so I used another technique. I placed myself in front of the car and hugged the engine from front. Grabbed the far side of the exhaust manifold with both hands with my arms resting on the engine. Using the exhaust manifold as a leverage, I started to rock the engine back and forth gently. I didn't lift it at this stage. Contrarily, I applied some pressure on the head with my arms. When making the rocking movement, I tried to keep one edge always pushing downwards. This technique worked and HG seal was broken. Then, slowly and carefully I lifted the head with a helper. You can do it yourself but you will find that the exhaust manifold is quite heavy. -- Deciding what to do with the head surface? Should I resurface it or just put a new gasket in and continue? You are the original owner of the car. You mentioned having the original clutch still going strong after 140.000Km. I presume that your engine is "untouched" too. I remember reading somewhere head gaskets are not long lived parts in these engines. Correct me if I'm wrong but I remember correctly, they need to be changed every 60.000Km's. So your your head gasket may be at end of it's natural life rather than being damaged by other means. If you find your head surface heavily pitted. I advise making the skimming. Other parts inside the head are of course the valve oil seals. I'd say, plan a visit to an engine head specialist. Let them measure the surface. They do it using a long straight edge and feeler blades. If it's good let them change the valve seals. So your visit will be more meaningful. They also have special cleaning machines. They can make head look like brand new. Both internally and externally. My visit to the engine head specialist was worth every penny. -- Rusted bolts' residue. It was a time consuming job to clean the bolt threads using a home made thread chaser but I did this without power tools. If you face the same problem, use an electric screw driver. That will fasten the job like 5x. -- Torquing the bolts with wrong tools. Torquing the bolts is easy with proper tools. You'll need a torque wrench and a huge as5 long solid socket wrench. I did this job with a 230Nm capacity big torque wrench which is 50cm long. 50cm leverage for the final stage of angle torquing is the bottom limit. You will need Herculean strength to turn the final angles. You don't need a huge torque wrench at all. Being able to adjust 20nm in the first stage is all you need. I also don't advise using any torque wrench to make the final angle torques. Just buy a 60cm long solid socket wrench. (By solid I mean, without any mechanism) These kind of wrenches are dirt cheap and save your expensive torque wrench from possible damage.) - When assembling, it is possible to mount the head on the engine with both manifolds attached. I did like this to save time but in the end it just complicated the work and cost me more time. Install and secure the head alone on the block. Then, install the exhaust manifold. Some users say, if their conditions are good, head bolts are reusable but I strongly advise buying new nuts for manifolds. They are flanged and have serrated surface to bind the nut. The nuts on the front row of the engine head are also the same type. I used old nuts and they kept loosening. I had exhaust leaks from manifold to head connection also a minor coolant leak happened a week ago from intake manifold to engine head connection. I had to remove the manifolds to redo the work and change the intake/exhaust common gasket. I discovered that, leaks are inevitable with low quality manifold gaskets. Mine was lacking pre-applied red gasket around the intake manifold part. See the red parts over the gaskets? Some gaskets don't have it. It's soft and sticky. Some kind of pre-applied red gasket. This time I didn't take any chances. I bought a new combined manifold gasket (like above) and reinforced it with red gasket. I also used exhaust cement around exhaust holes. All liquid seals are applied on both sides as a very thin layer around the holes. After torqued with new nuts, the manifold connections are rock solid now. Exhaust cement dries quickly. You must make the connection quick. Hardest part??? When you finish the job and sit on the driver's seat for the first start. Oh, man. That pressure is intense. But, if everything is went fine, you will feel like a champion! That's the spirit! I may end up building something like Mr.Bond's Lotus Esprit. One day you might find a weird looking Škoda Forman in front of your house, covered in sea moss and crabs. I warn you.
-
No, no... It's perfectly OK. I know how you feel. I felt just the same when I had HGF issue. My biggest nightmare was disturbing liner seals in the process. Other than that, you know I did this at home so any failure that would leave the car disabled means towing. Towing means going to mechanic. Costs would pile up that way. One night, I was browsing the web, collecting info and I was like: what if the head bolts get broken? what if I disturb the liner seals? What if I find corrosion inside the block beyond repair? @RicardoM says, just bite the bullet and do the job. Hell of an advice. I remember he also said something like that; things don't always end up the worst way possible. Be positive. Personally, I found rebuilding the rear wheel assembly harder than HGF repair. HGF and MANY other issues with the car left me sleepless many nights. The HGF repair work day was also left me sleepless because I worked until very late hours. Luckily you have other cars at your disposal. I had to carry parts with bicycle. (I live on top of a hill) I just checked local sources and there is still new aftermarket engine heads here. They come complete with valves and everything. The price is around €200. PLEASE let me know if I can be of service and I mean it. I can learn if it's possible to send parts to overseas to EU. If you personally land to capital here, know that you have a friend here. I can take you from the airport and we can go anywhere you want. I promised you a beer remember? There are three large industrial sites for cars here and I know many parts stores for our cars.
-
Dear friend; when I saw the topic title, I thought your Felly was involved in an accident, fire or something like that. I felt deeply saddened. When I read the topic I felt relieved. Head gasket replacement job is not the end of your car. Please don't worry. Take my car as an example. It still has it's original block. It has unknown mileage. (Maybe over 300K Km) Multiple previous owners. It experienced HGF too many times that original head became impossible to skim further so it had been fitted with an aftermarket engine head. My very first posts here is about HGF. Due to the costs and fear of improper fixing techniques, I had to do the HGF job myself. I got zero experience back then! I did it with your help. Remember? I did thousands of KMs since the HGF repair and the engine is still working! HGF is not the end. It's just your Felly needs some attention from you. Just a side note: When I finally decided it's HGF the car had this symptom. When the engine is hot, especially just after climbing a hill, stop the engine. Wait 2-5 minutes. Fire the engine again. If you see an intense release of white smoke there is a high probability the HG is gone.
-
That's good. The more info you provide about the car's current situation the more accurate info you will get from the users. Wouldn't that affect the temp gauge inside the dashboard? Does your temp gauge work normally after starting the car? Does it reach normal operating temperature?
-
Of course. There is an unused connection on the carburetor normally where the distributor is connected. But in my case I have Renault 12 distributor retrofitted and it doesn't use vacuum so that connection is bunged off with a short hose which has a screw inside of it. It seems plug and play using that port but if there is a technical limitation that I don't know, I can always make the connection like you described above. I only mentioned that to describe hill level. Unfortunately, I don't have dyno result. For the gear ratios, I've learned that, there is a marking on the gearbox which has serial number info on it. Also that gives the info about what type of gearbox is used. I'll find it and tell you the exact final drive ratio. http://www.vseofavoritech.cz/forum/vin.php There are good gauges you have there. I'll look for other sources, like used item e-markets too.
-
I heard this too. I used to wait a minute or more before moving but now I only wait maybe 10-15 seconds after starting the engine. That's only for let the engine lubricate itself. LPG has other importance too. LPG evaporator depends on engine heat to do it's job. Evaporate. From what I read, at least 30ºC is required for LPG evaporator to convert liquid LPG to gas efficiently. Cold evaporator means, liquid LPG will pour into the engine leading to terrible MPG.
-
There are kind MPI users here will gladly help you. I have a carburetor engine. I'm not an expert but with MPI systems, when there is a problem they always check sensors and/or their electrical connections. MPI engine solely depends on sensors for working properly. It doesn't have a distributor for example. There is a sensor over the gearbox that's getting info from flywheel to determine the pistons' position. Maybe I'm wrong but even a fault with that sensor could possibly cause a problem like you described. Because if the ECU doesn't know the piston position, it can't fire the spark plugs. Like I said, I'm not expert. Let's wait and see what other owners think about this.
-
What type of engine do you have? Carburetor? SPI? MPI? Do you have LPG installed maybe?
-
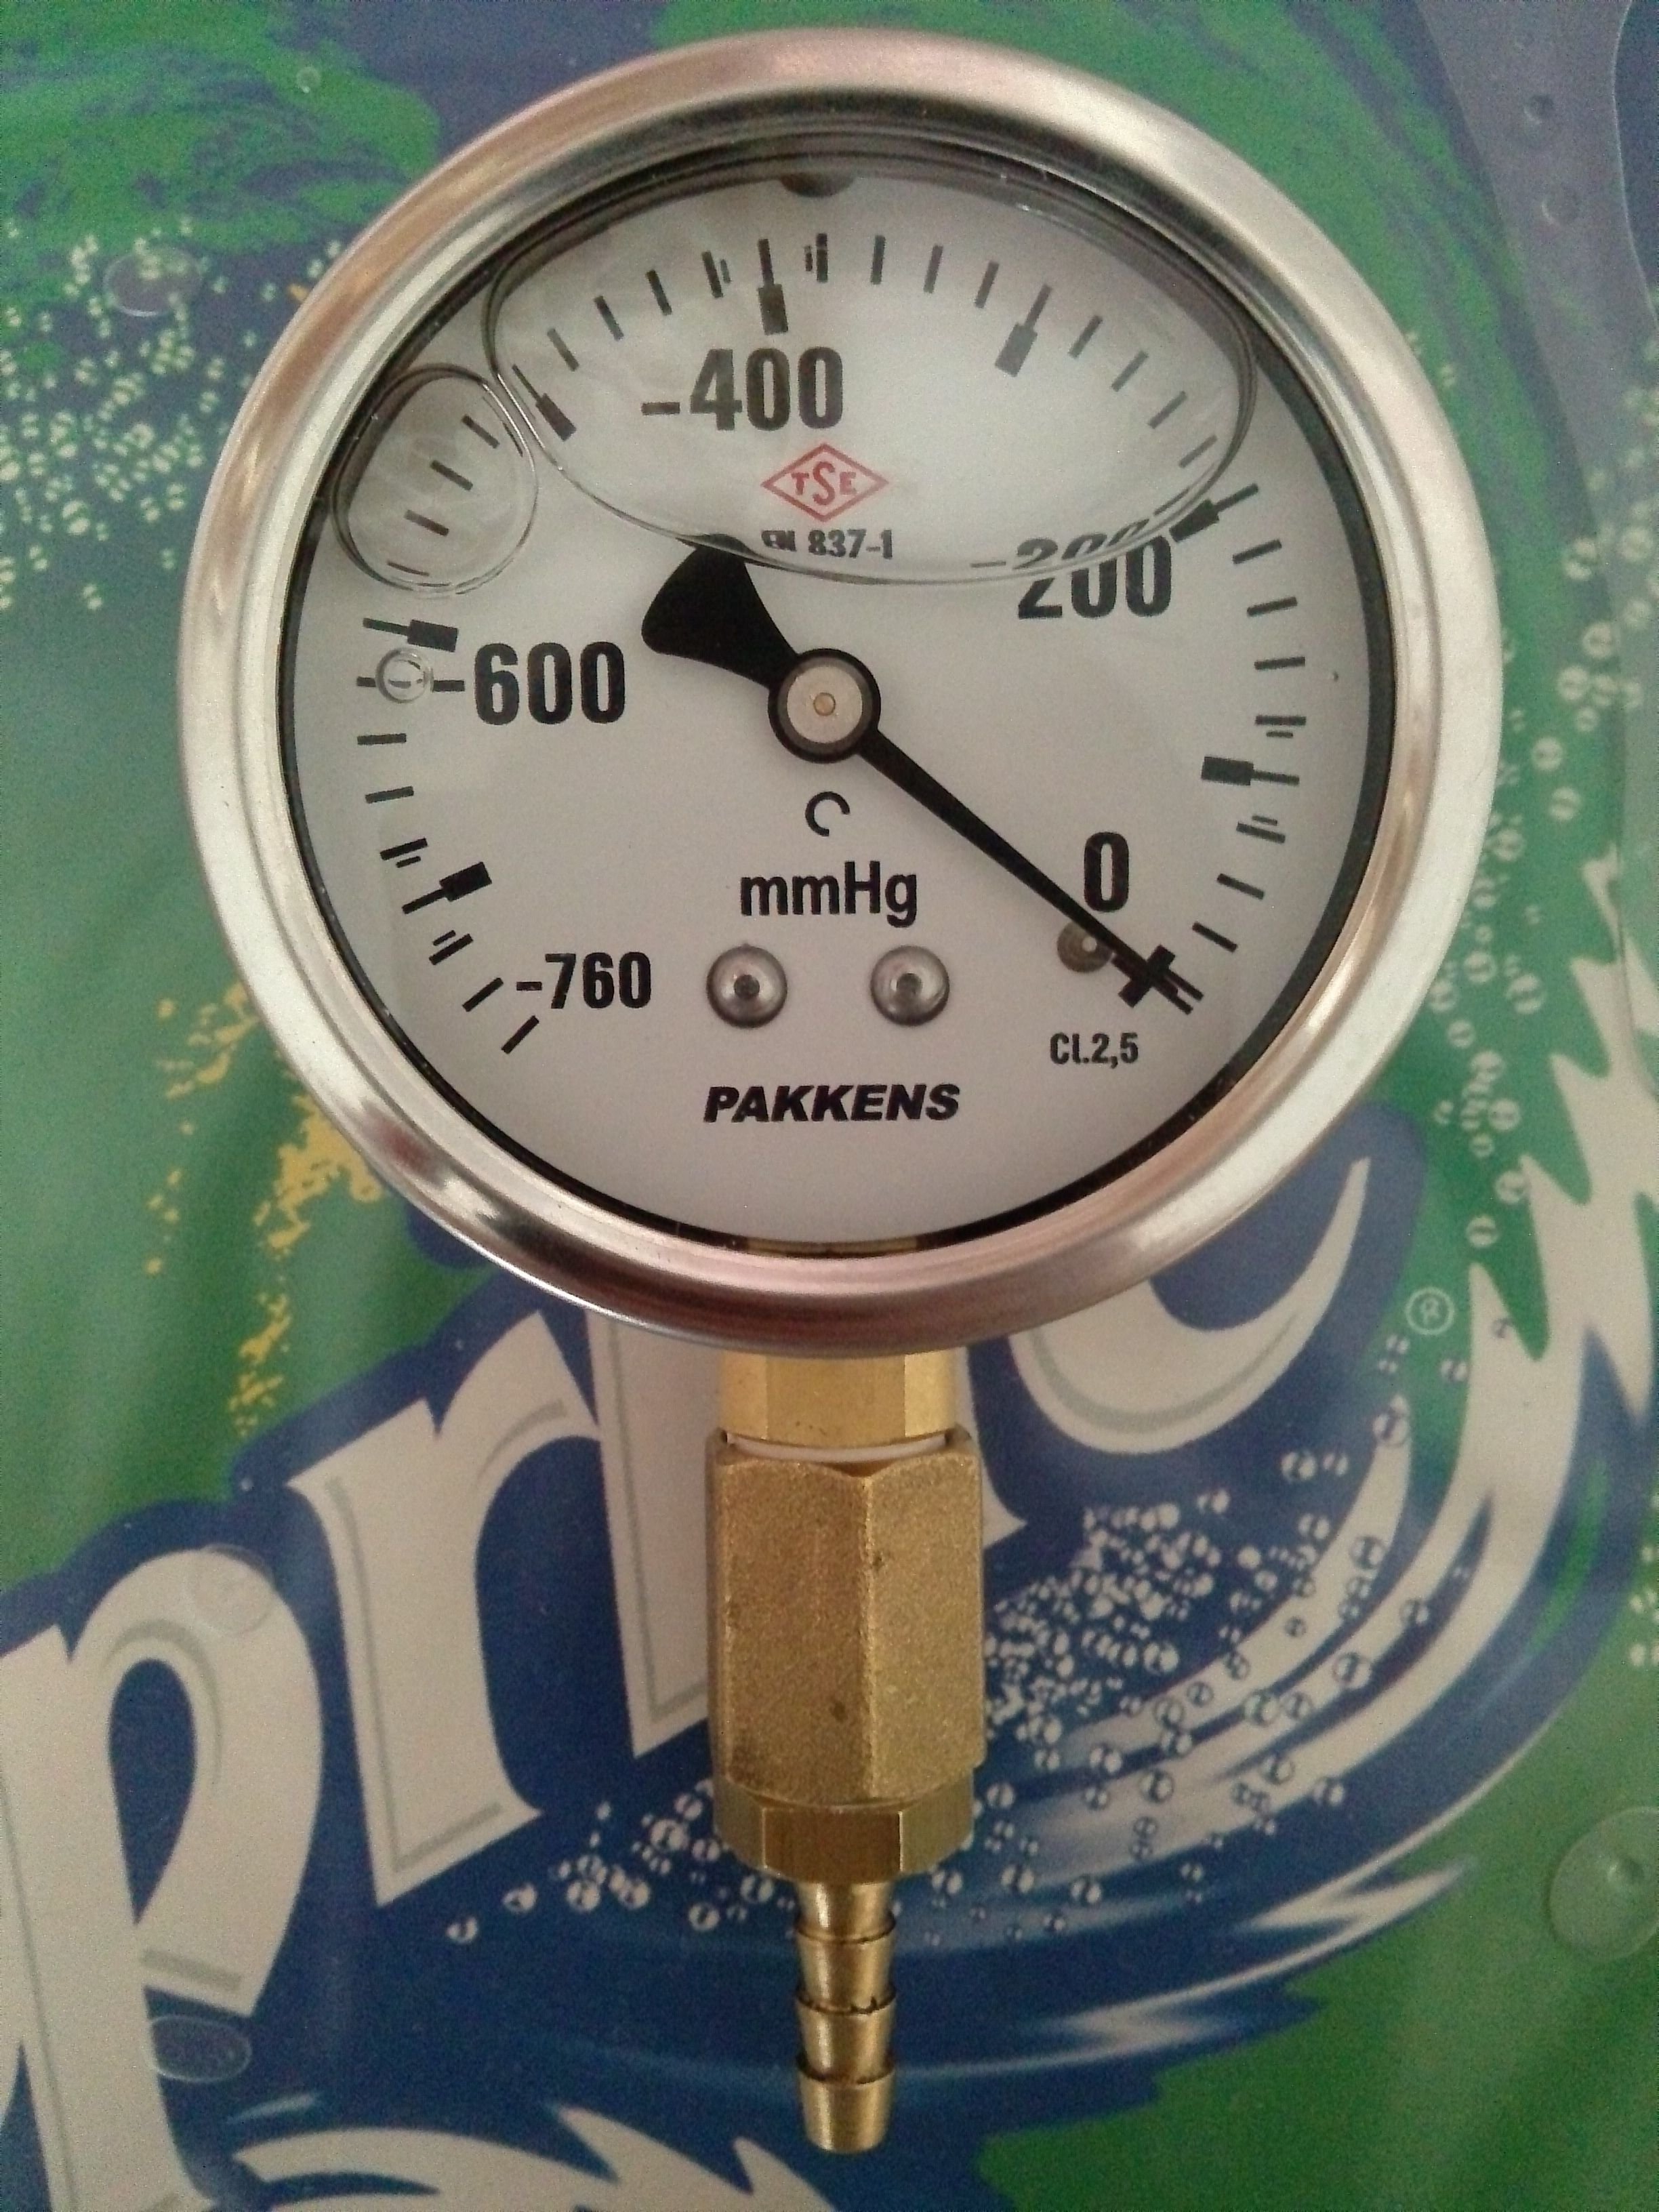
I've searched for an efficiency map for Škoda 135/136 engines but couldn't find any. That could be useful. Cheers to that. Especially on your everyday route, you can train yourself to be precisely efficient. Again, I like the way you think. Thanks. Your mods in your car are for additional vital functions but made with style. 😎 I also know from your previous posts, you make use of your gauges for better understanding the engine condition thus all adds up for fuel efficiency for you. For diagnosing and adjusting the engine, I bought this vacuum gauge. Because I have a non-vacuum distributor, the vacuum connection on the carburetor for distributor is bunged off. Technically it's child's play to make permanent connection but aesthetically it's a nightmare. I've looked for an automotive style everywhere but no one knows or interested in vacuum meters for cars around here. The vacuum meter pictured above is for milk suction machines. 🐮 They sell the same vacuum meter with the input from back. Maybe that will ease the installation but it still requires an aesthetics genius to install this. You asked just what I have in my mind. I have this climb here every day I take. I can't decide how to climb. On 2nd gear full throttle the engine can rev up to 4000 easily. If I keep the throttle less than %50, I can climb with 40Km/h around 2000rpm @ 2nd gear. If I shift to 3rd it requires pedal-to-metal to keep the speed at a steady 40-50Km/h and I can feel the heat blasting from the firewall even the blower fan is off. If the traffic is not pushing, I climb here 2nd gear and slow. I even think about recording a video to post here just to ask.

-
What is the most efficient way to climb hills? Also do you have any tips for carburetor engines please?
-
I've found a way to change the distributor's neutral position! The car started to run rough at idle after a 60Km fast travel. Ignition was the source of the problem but using sand paper on the points didn't solve issue completely. Rough idling was gone but I was unable to make the engine run completely smooth at idle. There was occasional misfires. I know part of this was because of distributor position. This happened before when some fuel and/or climate conditions are met. I decided to study distributors in general, (Kettering arc distributors, kettering arc with transistor firing, electronic firing distributor systems etc.) to feel confident enough, before removing the distributor. In the pictures below you see R12 distributor retrofitted to Škoda's original distributor extension tube. There is a coupling at the rotor shaft end. It's secured with a round pin and a snap ring. I turned the rotor 180º from rotor coupling and rearranged the HT leads and it's working! I can finally adjust distributor advance without restriction. Does this setup have any adverse effect on the engine? What if I turned the distributor 90º without changing the rotor position and install HT leads with their original position? Starting from top, clockwise: 1-3-4-2 ? This can't be that easy right???
-
Current distributor position is OK for LPG. When browsing for distributor and related parts, I've encountered this: I've never seen or heard a mod like this. From the picture, I think the distributor is Fiat Tipo/Tempra type. With vacuum advance and electronic ignition. And the air filter with LPG entrance? Never saw something like that. What do you think about this modification? I read somewhere that standard LPG mixers installed on carburetor top is engineered for backfire safety. What about this? Also any performance benefits?
-
Sir, that's overkill!
-
First 100KM impression with LPG from new plugs: (stock 8mm gap) -Engine is less affected from electrical loads from other sources. That was a real problem for me. I have a dedicated thread for that issue you know. There was electrical issues with the main cables from alternator that I've repaired. Now the rev. drop is all time minimum. -I'm expecting better fuel economy. Should I reduce the gap to 0.7mm? I've read that Kettering arc distributors' ignition coils are weaker than electronic ignition distributors' coils.
-
You can find other cars with TC-6 but I think what really makes your car unique is this: Your own creation. There is no other car with this special instrument panel. It makes me remember this: