newbie69
FREEDOM
-
Joined
-
Last visited
Everything posted by newbie69
-
I figured! That's why I wrote Sweden in the first post, to clarify the car i'm talking about has the steering wheel on the left, in the correct position that is So yeah, you should be looking to the side behind of the battery, passenger side in your case.
-
You meant LHD right? RHD has the steering wheel on the left already so no need to route anything to the other side
-
Didn't but I can get it next time I remove the wheels? Is it visible then? Can't recall where the sticker is... I don't think that the difference would be in the product number though, but rather in the DCC software, and that is probably much harder to cross-check... But I just explained to Roscio above, the reasons that made me believe that.
-
Don't mention it, that's why we spend time here, to take and give our experiences and make and help others make decisions as much as possible. Just keep in mind that the L&K DCC could be different than the Sportline DCC so maybe not all of my findings will apply to your car. For example, I was told by some members that with Eibachs on their L&K, the car was bottoming out in Comfort due to the soft damping and became unusable. I have also read that Eibachs are "too soft" for the DCC car, again that was on a L&K. Well, none of the above seems to be true in my Sportline DCC. Unless going over speedbumps at 40km/h which is A LOT, I haven't experienced any bottoming out even though I tried to induce it the other day by the fastest - yet safe - speed I could drive over the bumps. Also, too soft?! They are ideal. The car is still allowed to fully and smoothly rebound in Comfort and Normal, while Sport now feels like my old GTI somewhere in-between its Normal and Sport modes, closer to its Sport in fact. It has to be the dampers and their DCC setting that allows all that excessive suspension movement, can't be anything else really that provides so different results. ====================== Yes I get what you mean about the BBK. I love your honesty when saying don't expect crazy difference in braking power. People think bigger brakes mean so much more stopping power but it's the endurance and repeatability of the braking that you get above all. I think what I'm after is more a stronger initial bite and better pedal control so maybe I try better pads, discs and lines first. However it's true that at the current state I seriously thought of taking it to the local track for some fun and there I would definitely need a proper kit as i would not be containing myself to just 2-3 hot laps and then cool-down. I know I have failed to stick to that in the past, ending up cooking my brakes and having a scary drive back...
-
From your description of usage I'd say a Sportline with DCC will have you covered but if you say you're running B6 with Eibachs on the Octavia now, even a 272 Sportline DCC in Sport will feel softer and more willing to roll, squat and dive. If you're after a similar behaviour to your modified Octavia on the Superb, skip the DCC and go for B6 + Eibachs too. In my 272 Sportline DCC, Eibachs and a rear anti-roll bar have cured all handling and cornering complaints, the Sport mode is firming things up in a very OEM way: decisive control that doesn't allow rebounding but the damping is still smooth and not punishing. So If you were going for the 272 I'd say pick DCC as the adjust-ability is a nice thing to have, the dampers are up to the job once the springs are replaced and it will make the car a bit more desirable in terms of re-sale (maybe). But my impression from comments here is that not all Sportlines behave the same. Meaning the 190 is maybe set up differently (in terms of DCC algorithm) compared to the 272, and not just due to the different weight.
-
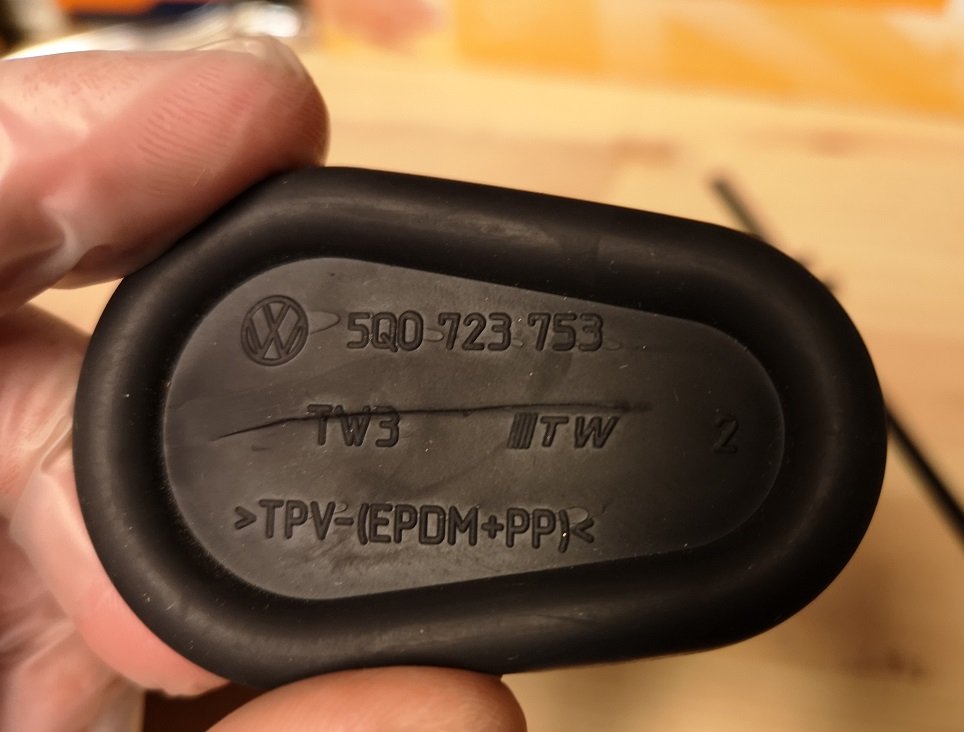
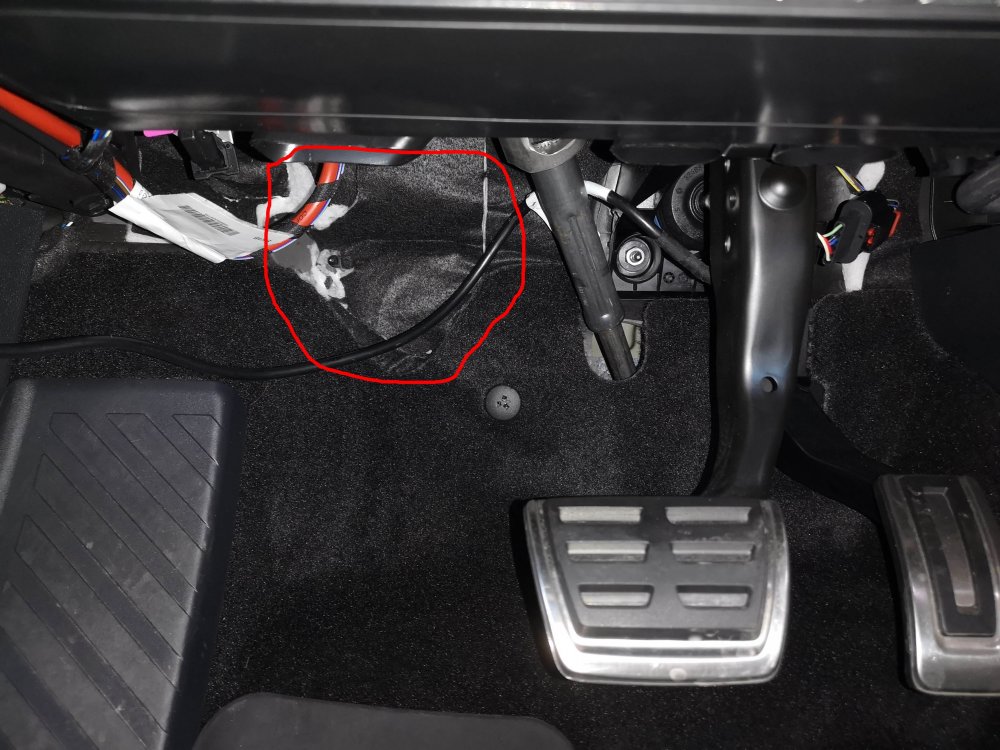
Mine is a RHD car too (Sweden). You need to remove the insulation (with the black felt on) which is stuck on the firewall, close to where the steering column goes through, then you'll find the grommet behind it. The insulation is pre-cut in the area so you can unstuck only the small bit that is in the way and not the whole thing. This is where you should be looking at: There are actually two grommets that go through there, don't mistake them as there's a small round one which is impossible to route cables through and will give you a hard time. This is the grommet to remove:
-
What are you after from your driving and what do you intend to use the car for mostly? A few different ways to go here. Also, which engine?
-
Epic! That was me trying to re-seat the strut in on Friday....
-
Good points Roscio. As of yet, I haven't found the hard data to prove that the DCC is set up a bit differently on the L&K than on the Sportline but on several occasions, reports that I have read about particular behaviours and particular upgrades on L&K's, just don't match what I see on my car so I am led to believe there should be something different there. I would love to know for sure at some point but it's hard to get that piece of information from a reliable source and not from "guestimates". On to your questions: We seem to have very similar preferences on most aspects, I don't like slammed cars or cars that seem obviously lowered. I would say the Eibachs on the 272 are exactly at the fine line between OEM sportiness/agressiveness and lowered looks. I would say the car in reality looks as if it's the uber-sport version of a Superb (if there ever was one...) and definitely not a cheap ricer's car. It's a fine line that is probably not bigger than an extra 5mm drop but still, there is a clear and uniform arch gap around the tire (at least on the top half of the wheel) and it doesn't look as if it's "touching" the top of the arch which for me is always a sign of "it's lowered". Instead it looks as if it's dropped at the absolute lowest height a manufacturer would choose to drop their top sport variant to support performance as best as they could without compomising use. Check out for example this stock RS4: You can see the arch gap is clearly the least Audi could leave to maximise looks and performance. For me that looks perfect and anything below that would shout "lowered". Also, looking at it I noted that front and rear are at the same height like mine now, and that for sure when fully loaded the top of the tire would meet the top of the arch gap, so that's probably what you get when going for max looks even within OEM ranges, so I guess we're good. In any case Eibachs won't compress as easily as stock springs but I will test load it and take a photo soon. Now check this lowered RS4: It shouts "lowered" from miles doesn't it? I wouldn't like that and I can confirm the car doesn't look like this, that's as best as I can give my real impression of the lowering. Regarding Comfort mode: I just went out to do a 20min drive in the city centre after your question to try it (ok I also wanted to drive the car ) I didn't normally use Comfort mode before as it bounced too much for my like. Comfort is one thing but rollercoaster is something else. What I can say is that anyone wanting to continue going up n down in Comfort as much as before, no you don't get that. You do still get one rebound (or two at worst) but the car settles down quicker and also the damping is of a lower range (less high and less low) but the actual settling is still as smooth as before, it is not a dry "stop" that hurts your back and makes your teeth rattle, that's where the adaptive suspension benefits come into play I guess. Also, I drove over curbs and manholes on purpose. I generally have the habbit of slowing down for these at 20km/h or less. If driving as before, there is minimal difference and minimal additional harshness. I then tried to go over them at higher speeds I wouldn't normally try. Up to 27-30km/h (sorry I just couldn't stand going any faster over those things!) it's still very bearable. More noticeable and firmer response, but still not a punishing ride. If people drive over such bumps at higher speeds they are probably looking for an excuse for new shocks (in general) I'm sorry to say... So for me and for the described driving there is really no loss of comfort at all. In fact I gained a new mode (Comfort) which I might try more often now although Normal is still just fine and better than before. Financially speaking, it's hard to see any depreciating asset like a BBK as an investment but I get you... There's also the thing that now, the extra power, and the suspension mods that provided the ability to actually use this extra power more often and at more occassions instead of just straight line blasts have highlighted the fact it wouldn't hurt to have more stopping power. But probably it's something for next year even though I have found some nice options to build a 6-pot Brembo set from various spare parts for a MUCH cheaper price than any off the self 4-pot solution, hmmm... let's see if we actually go on vacation this summer... I might need another project if not

-
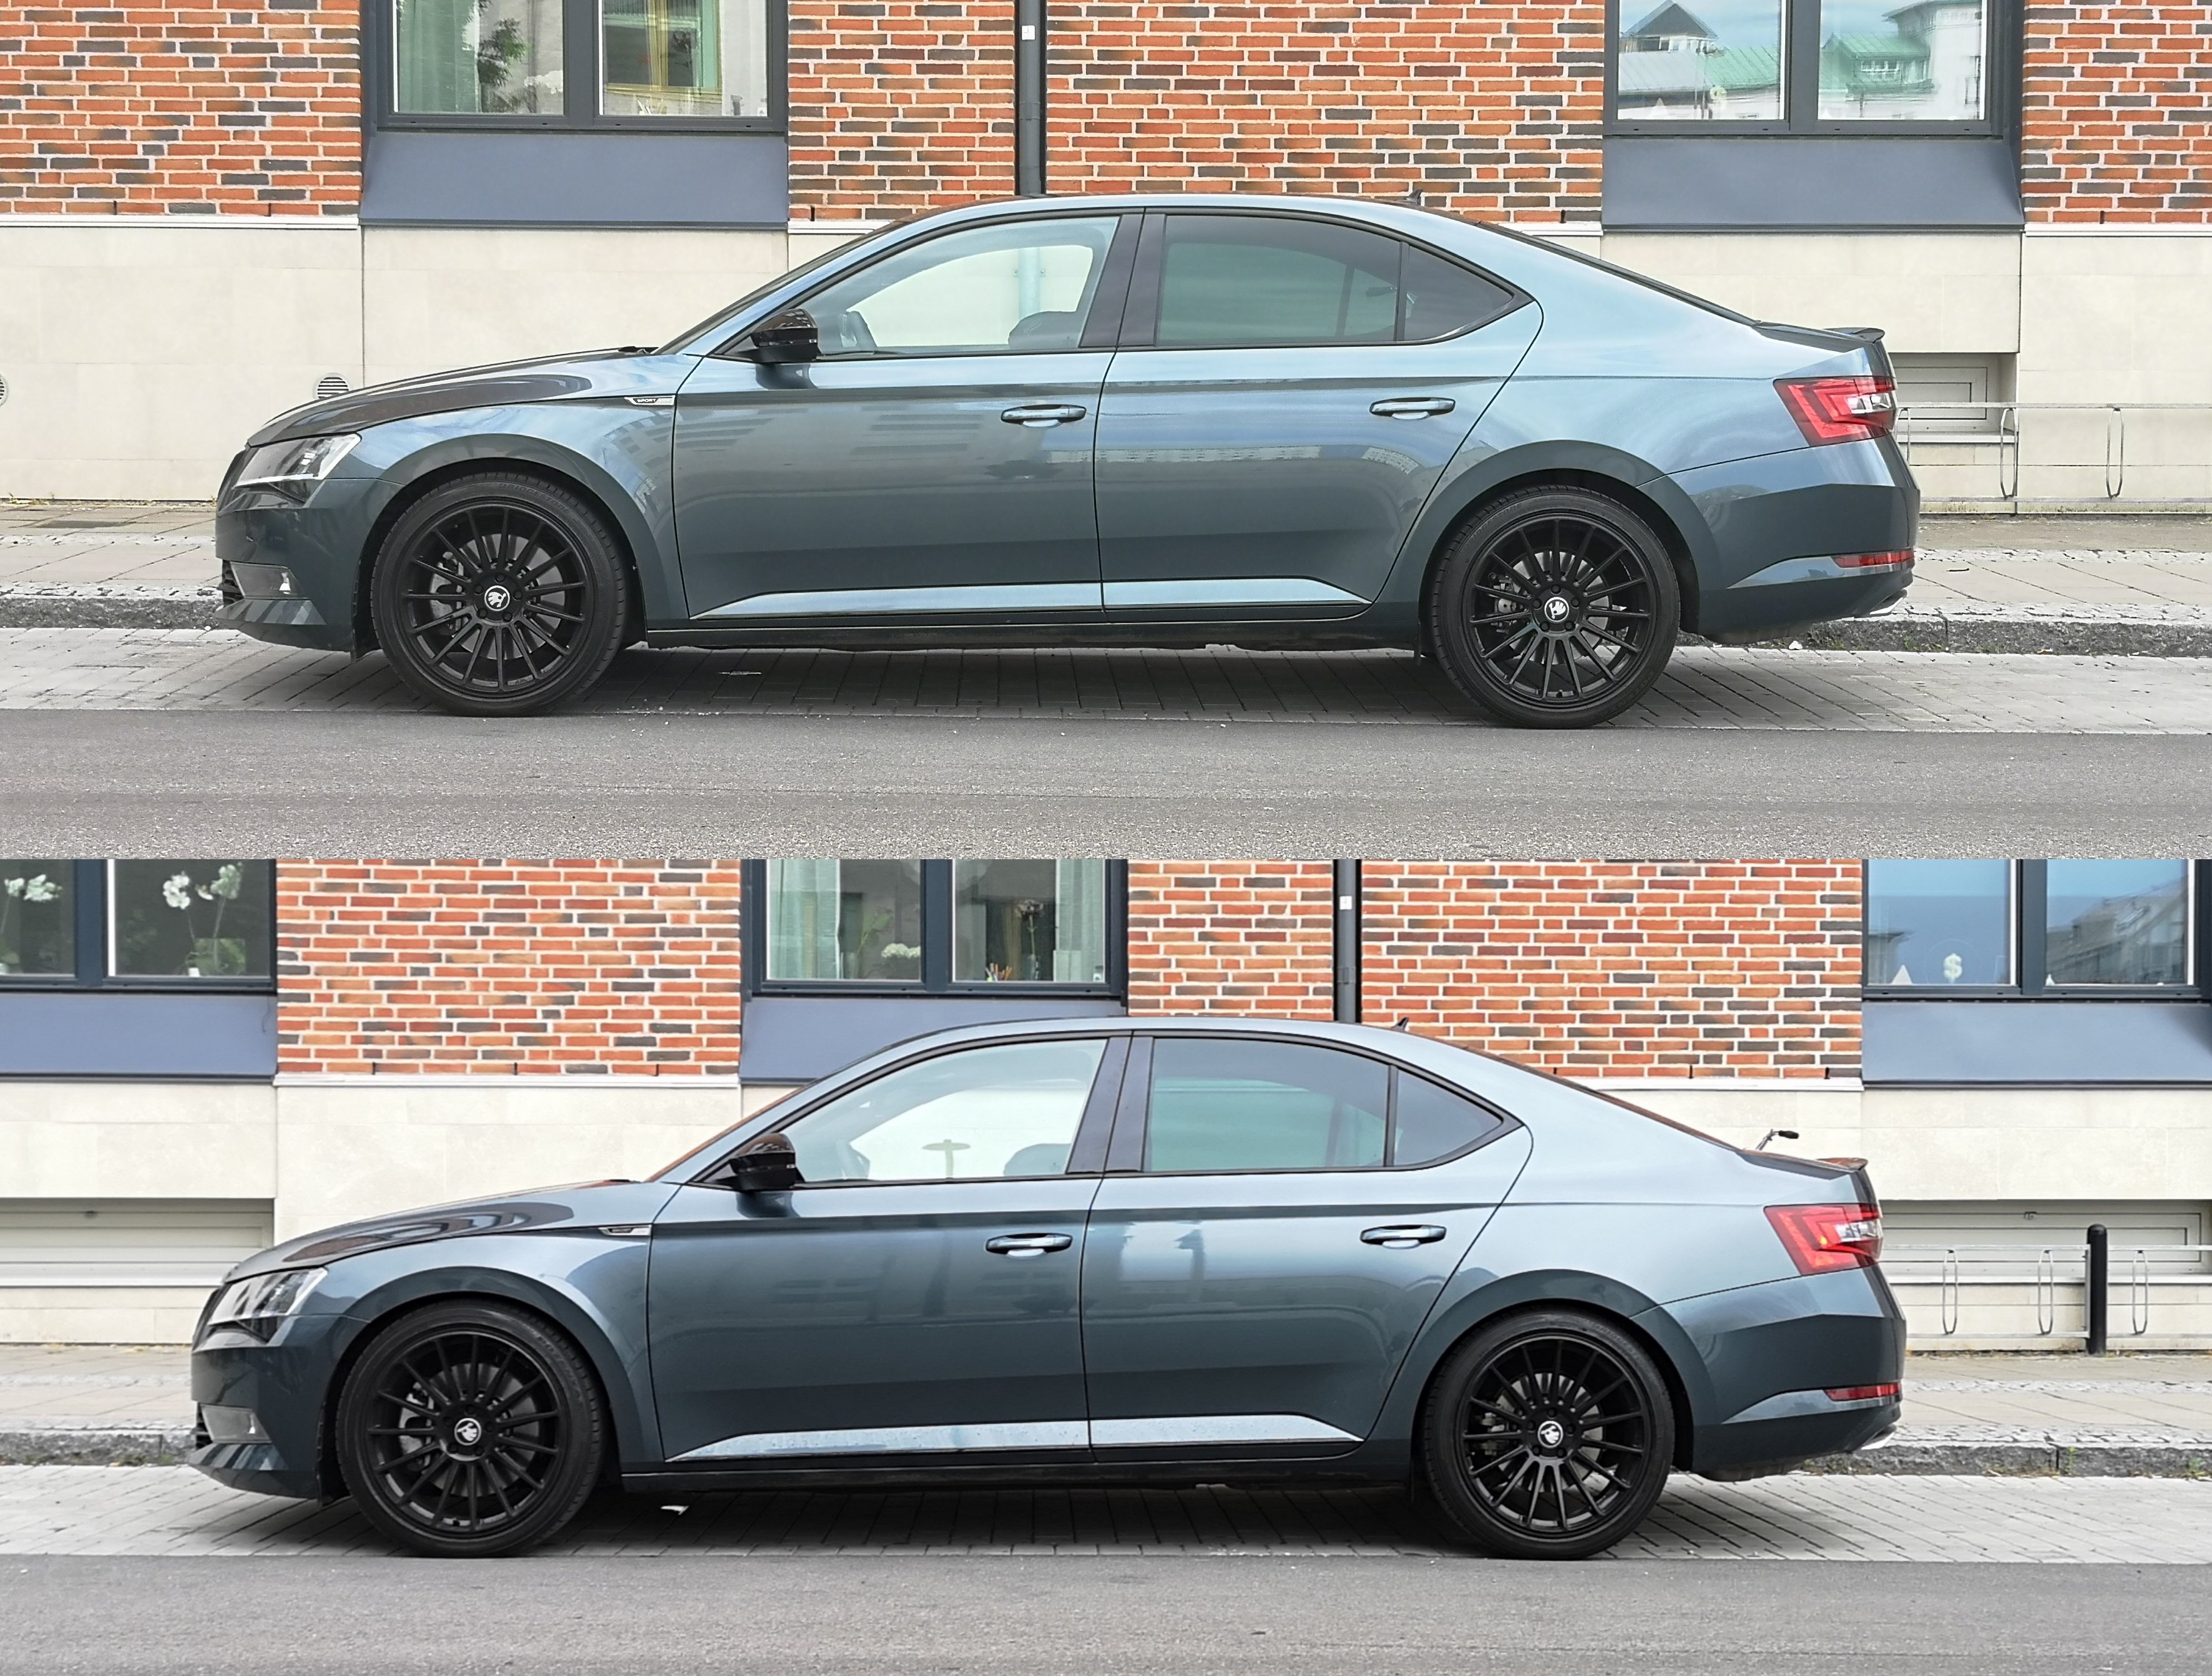
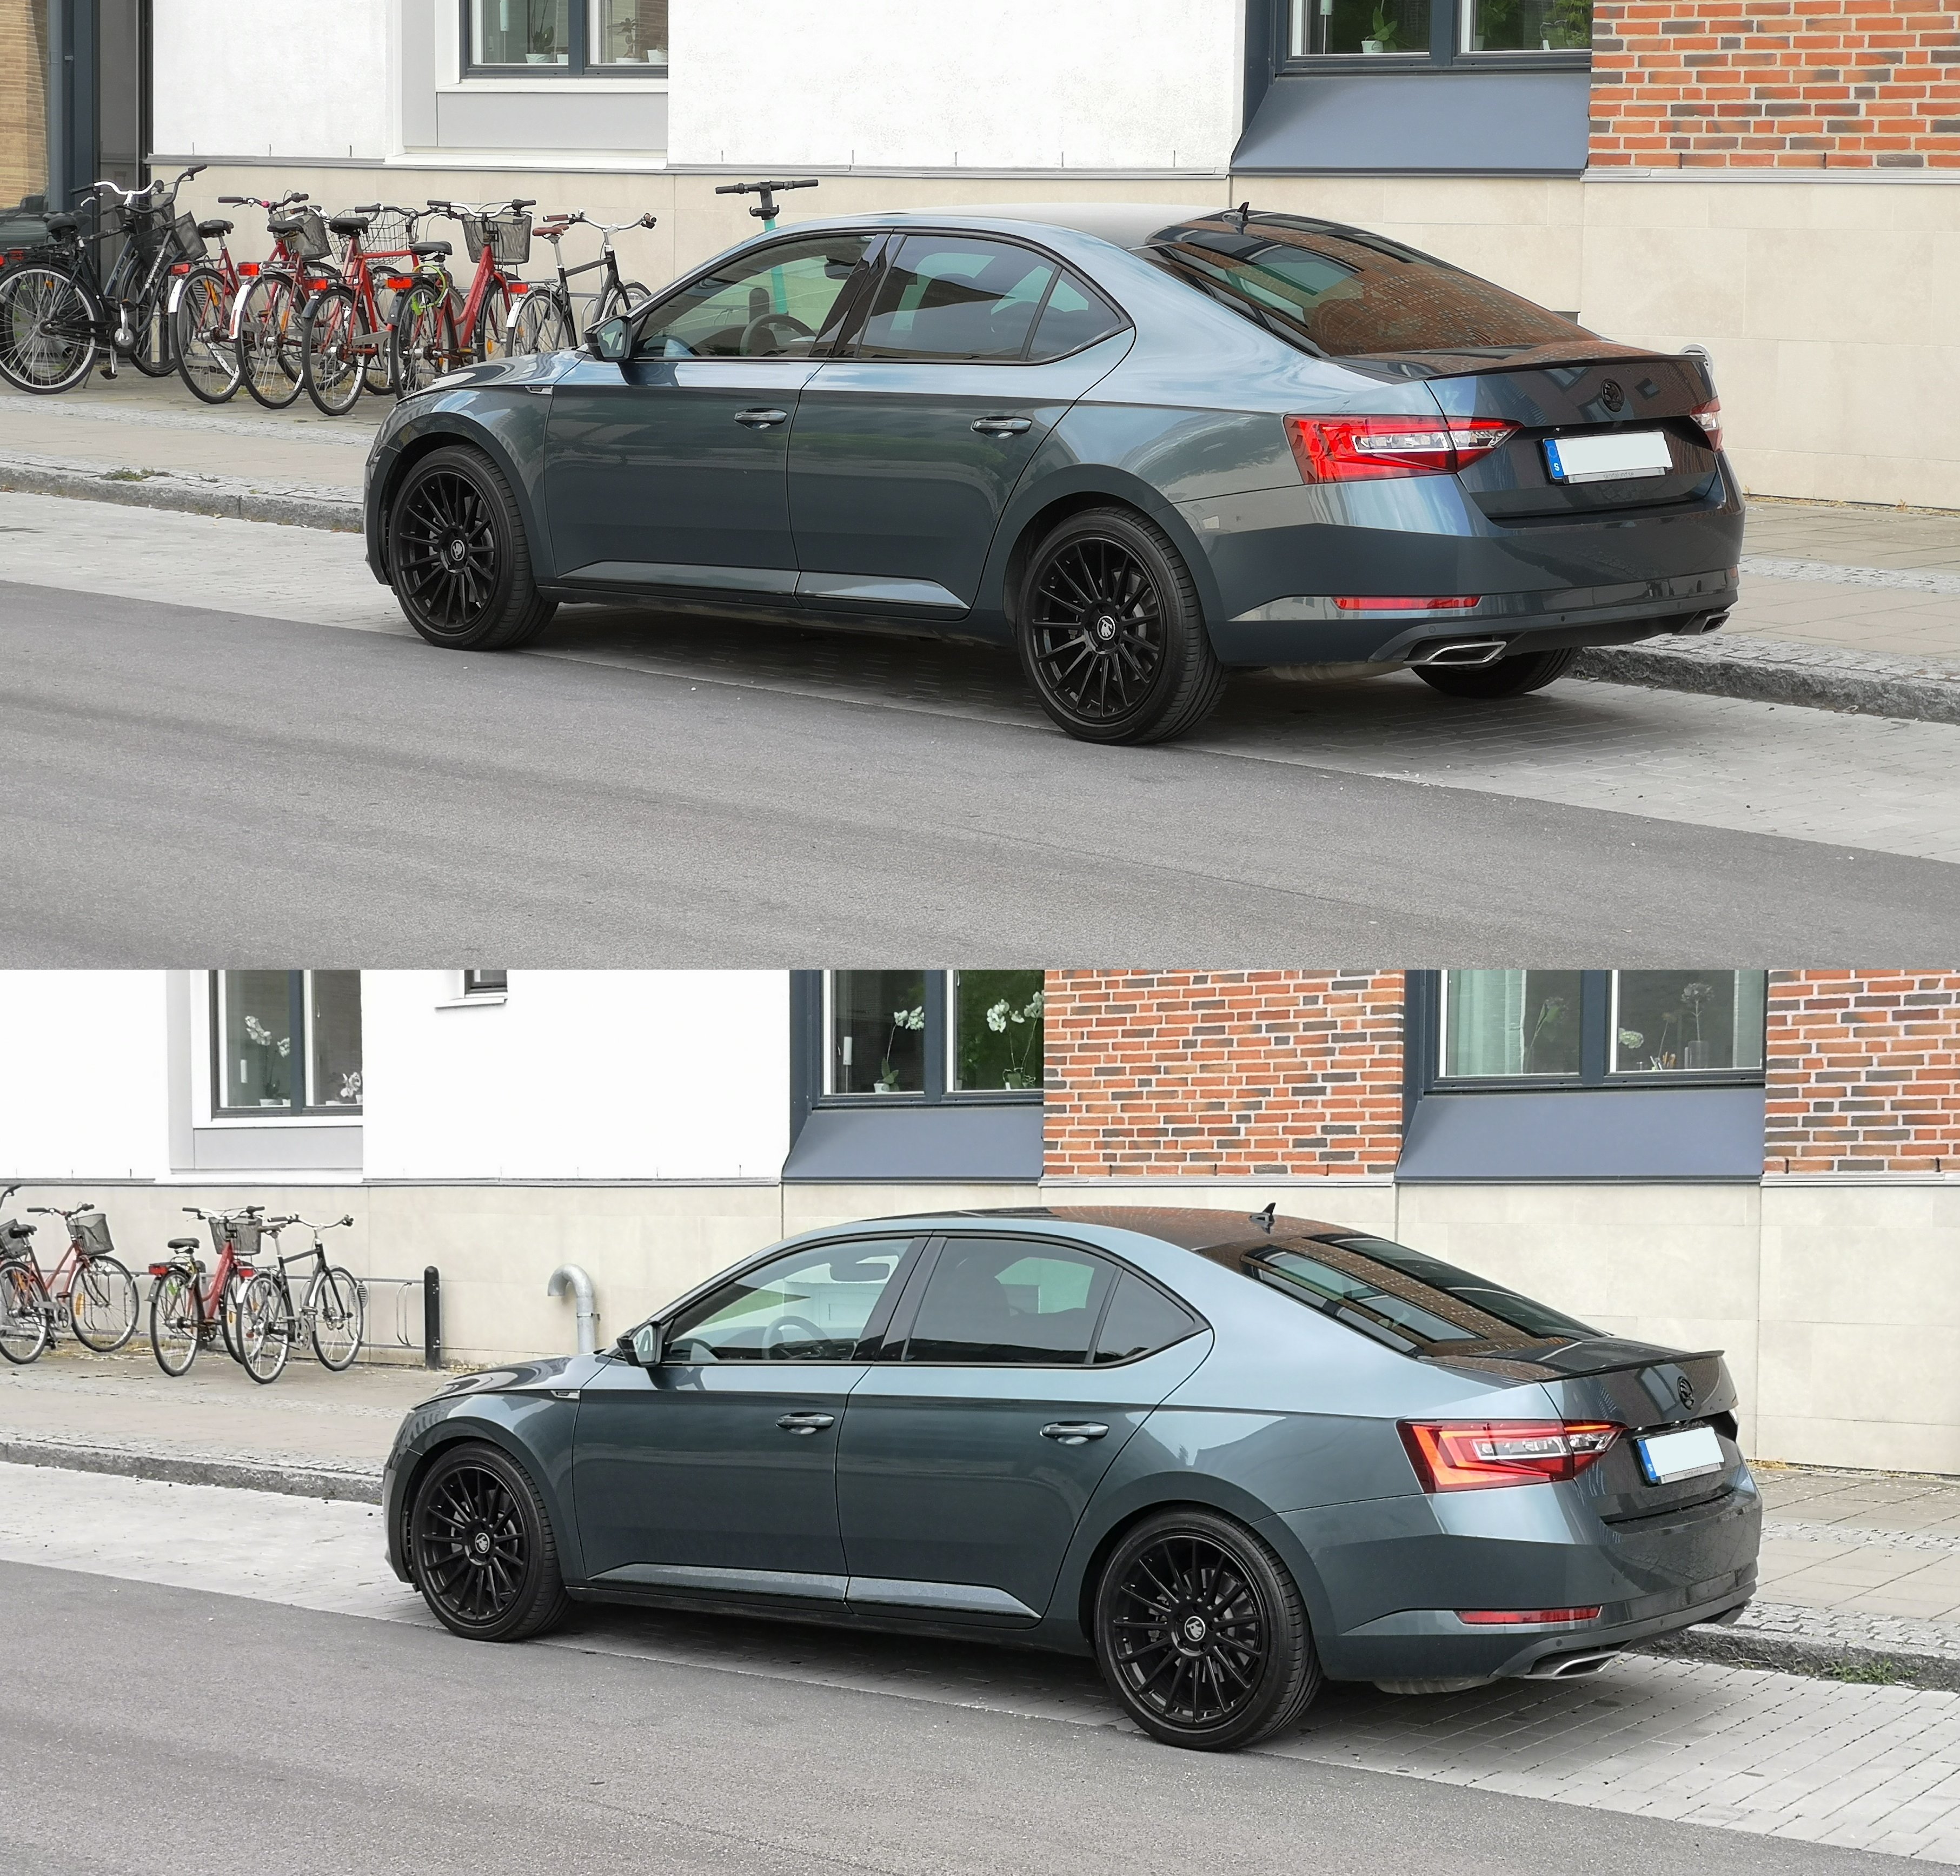
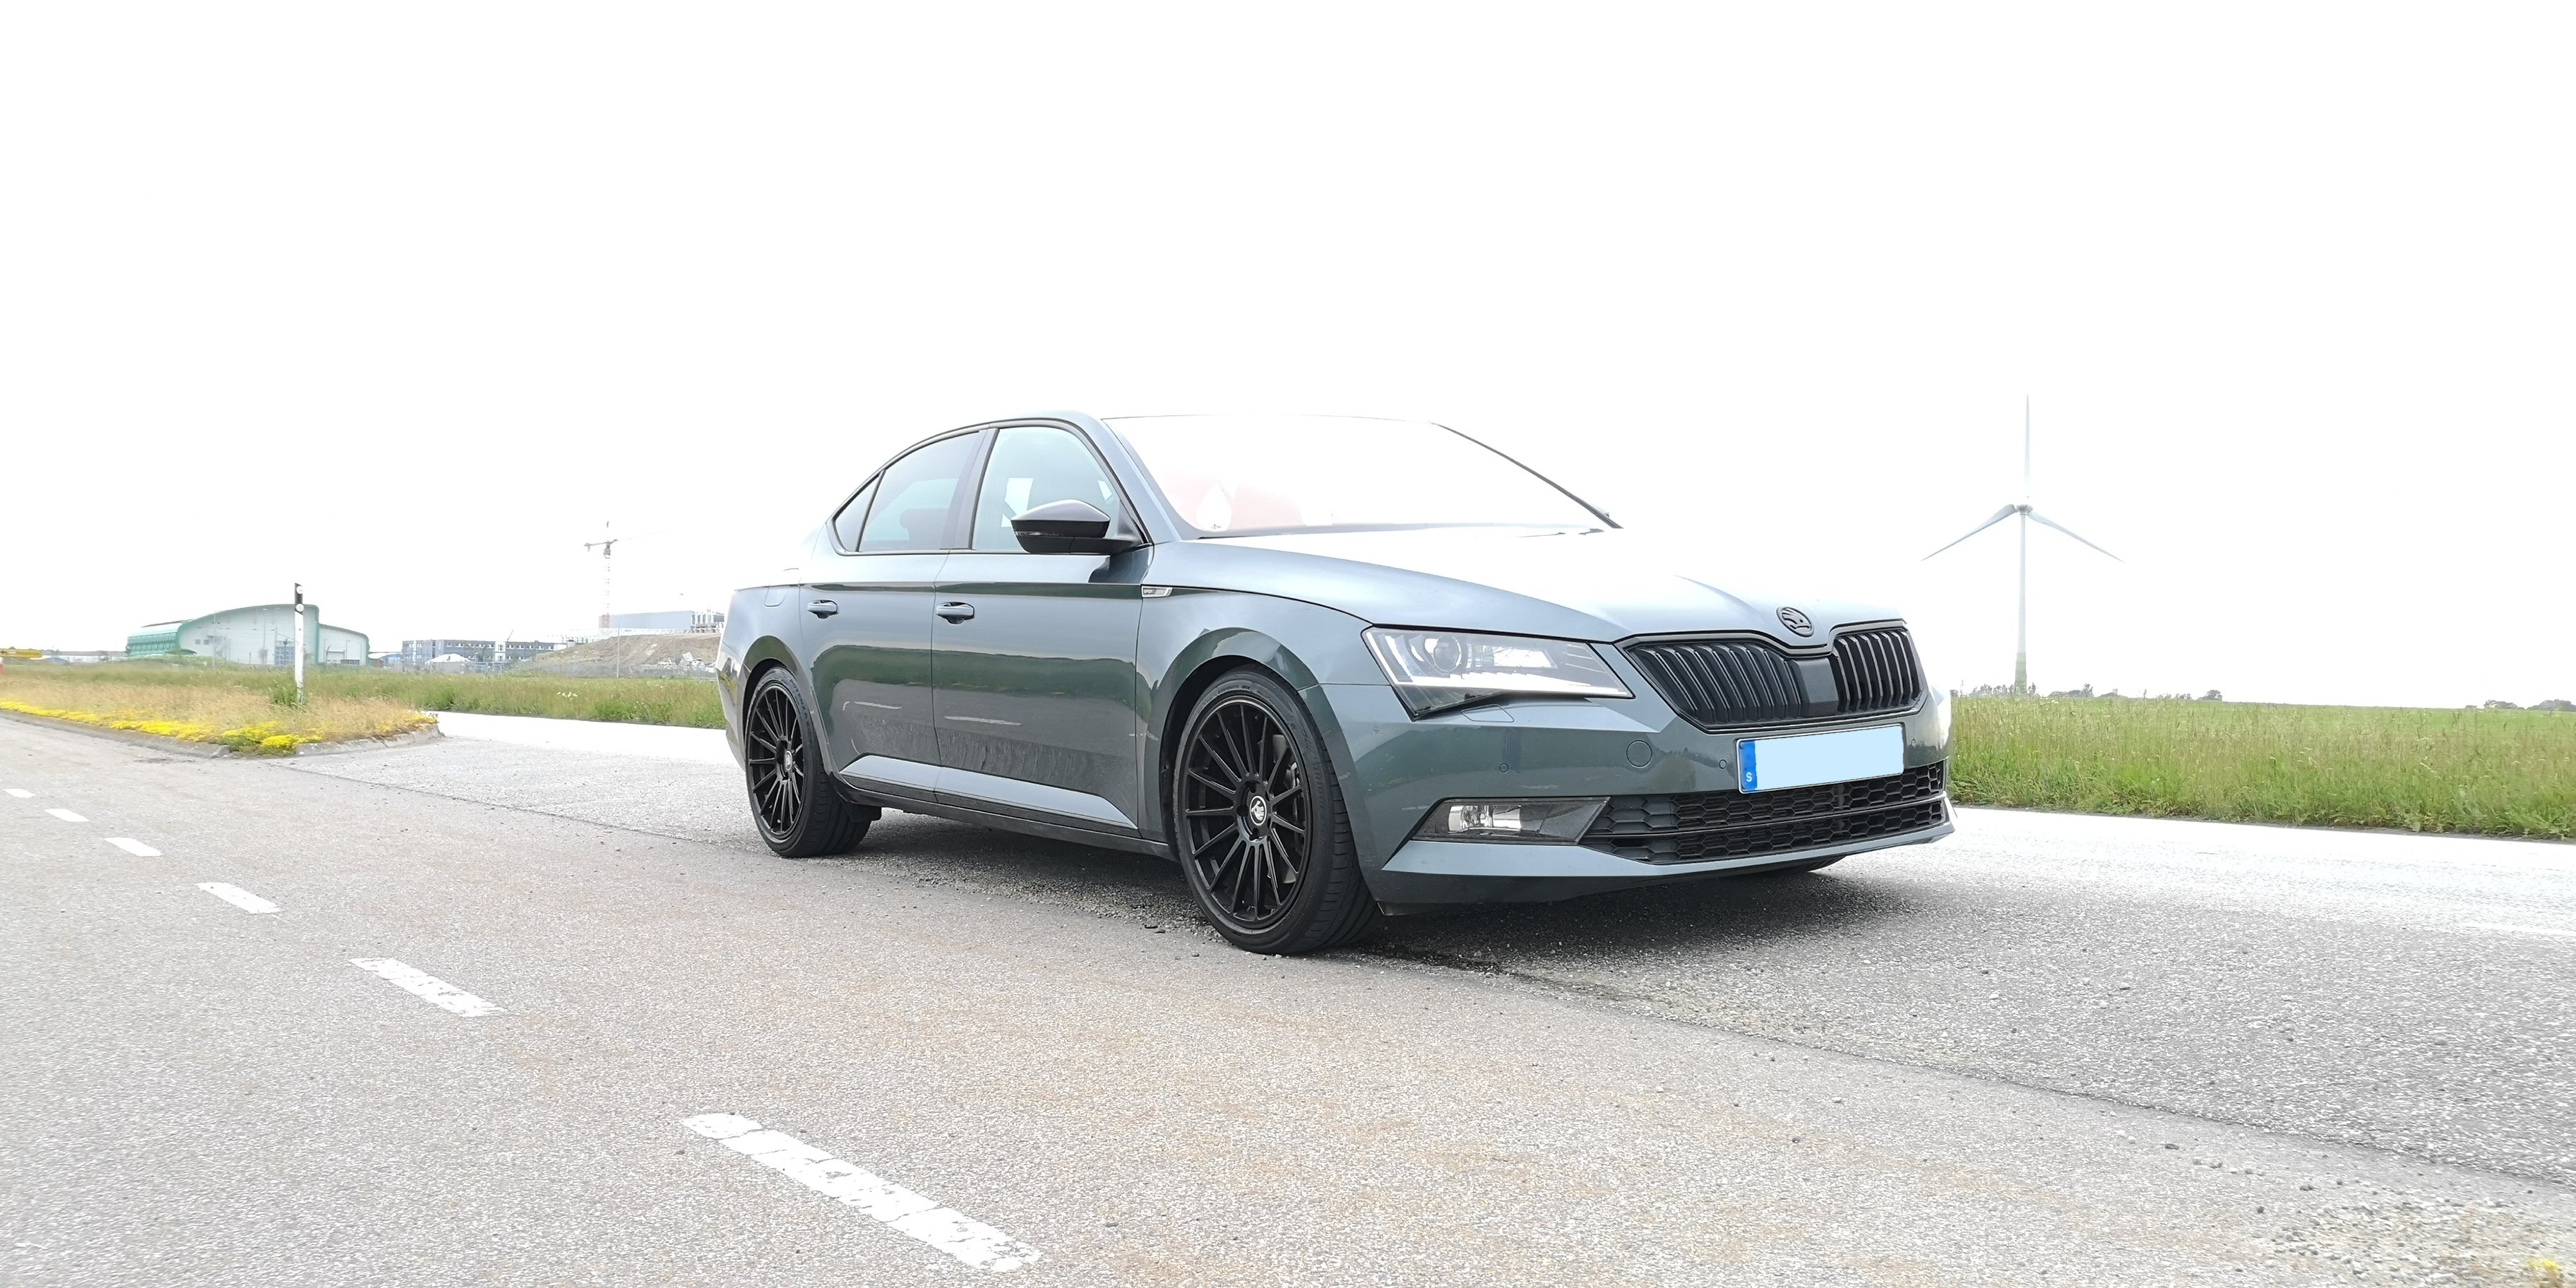
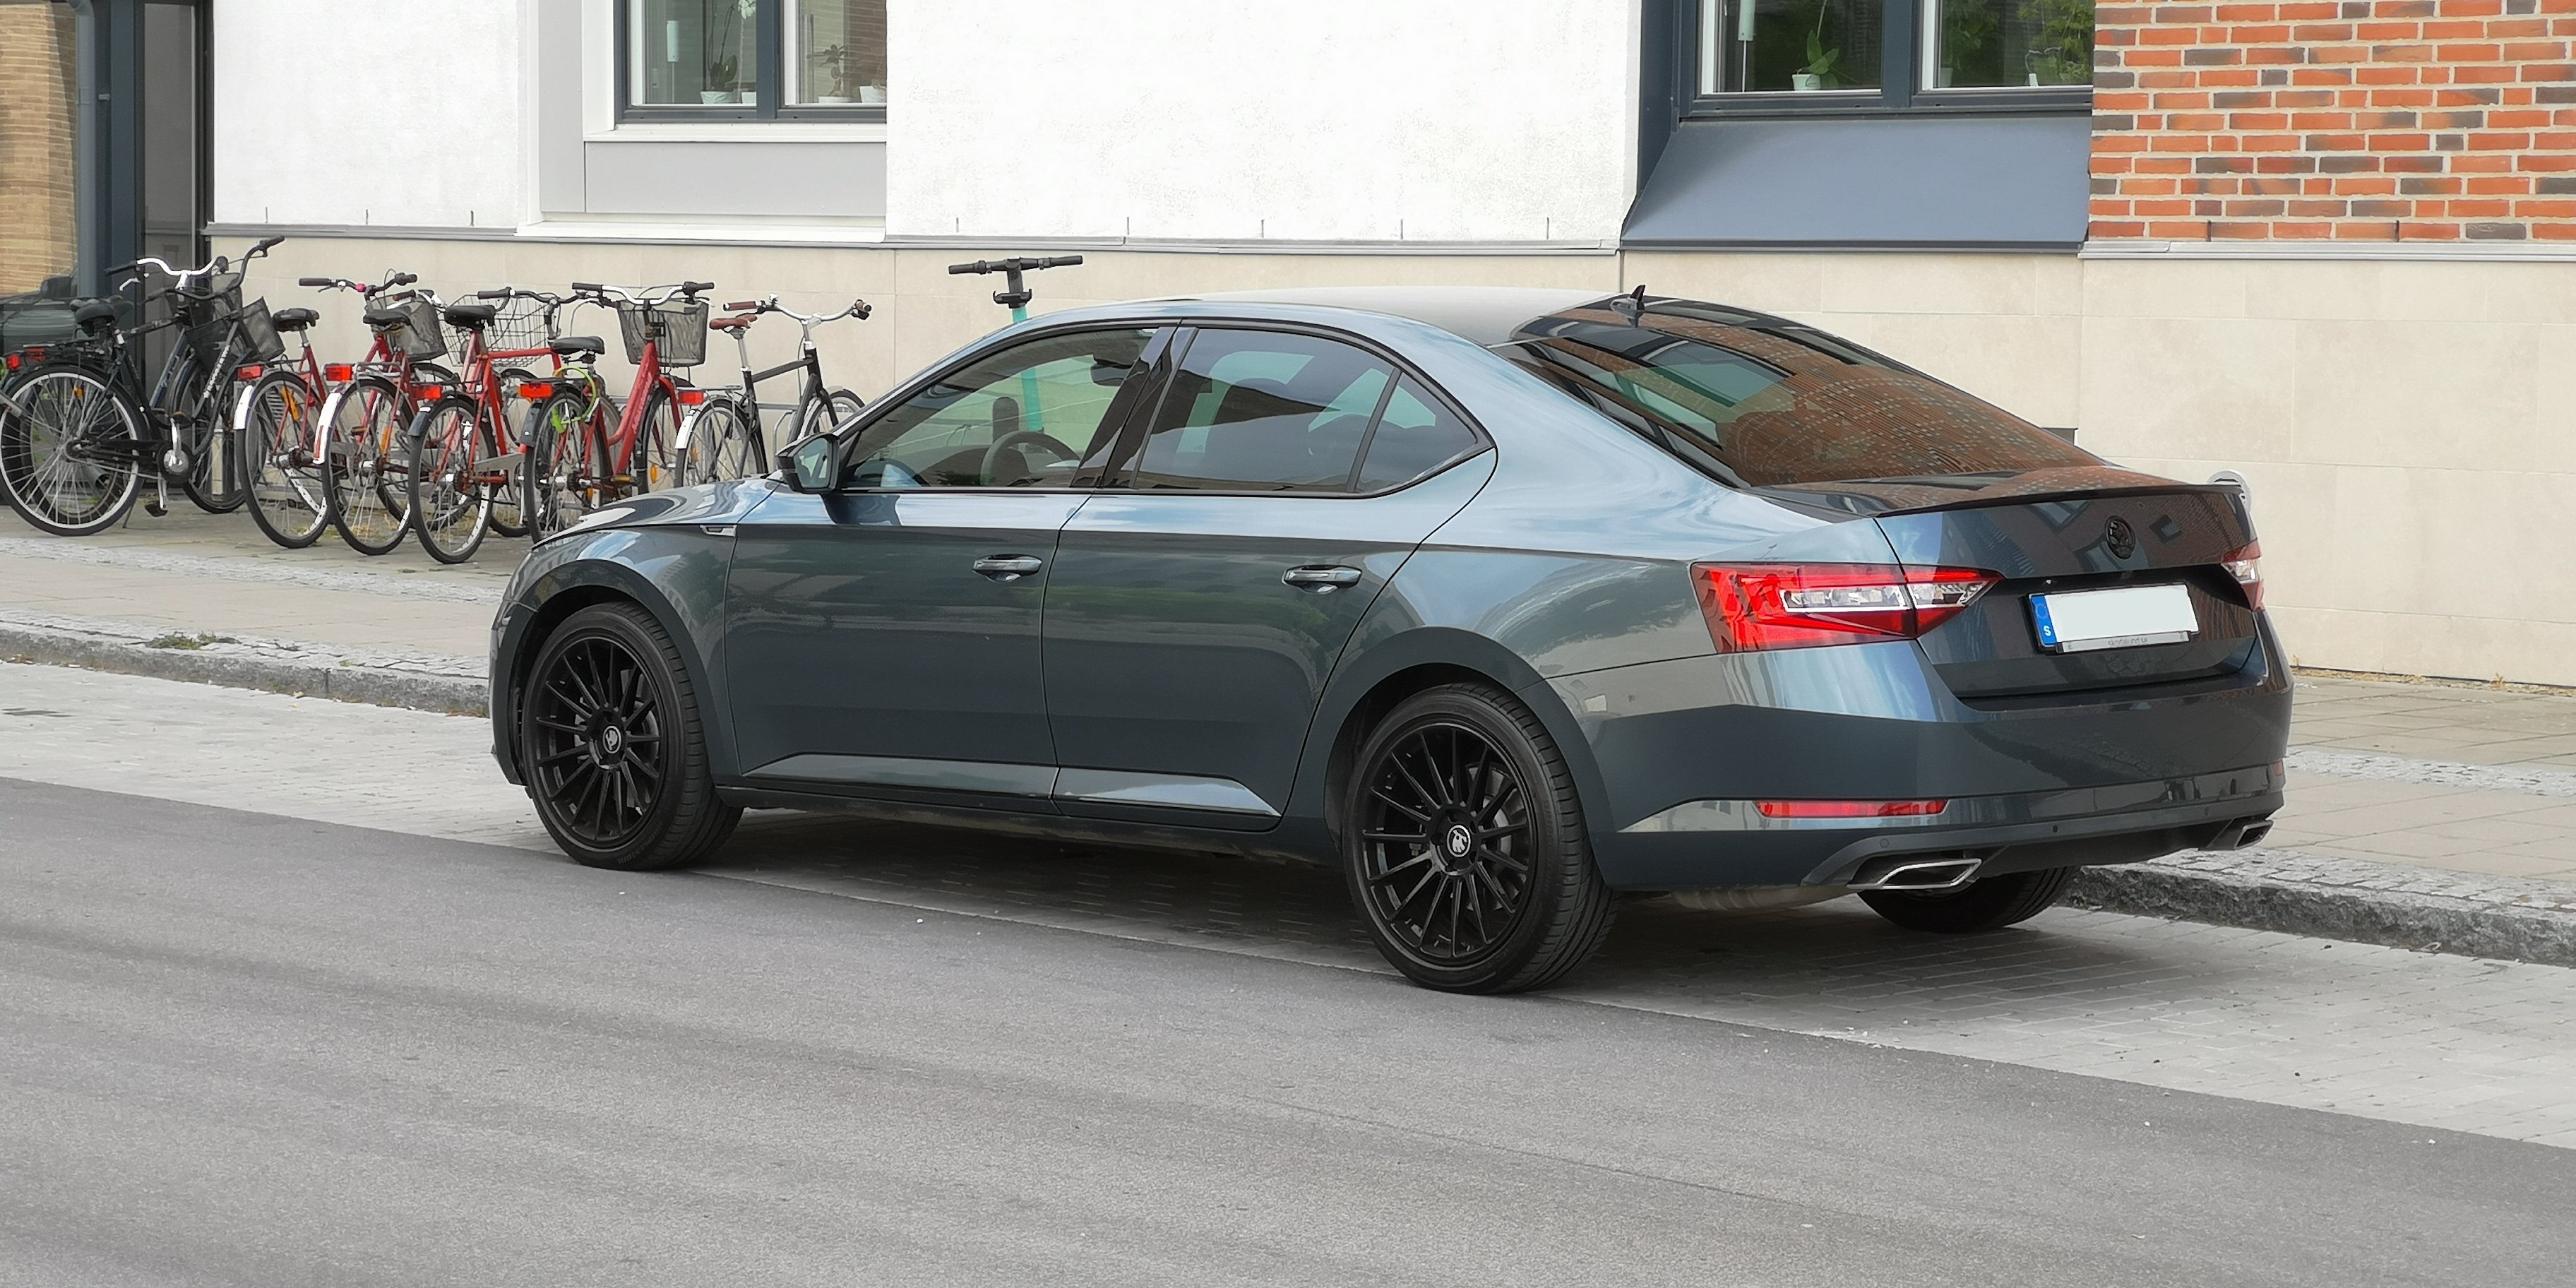
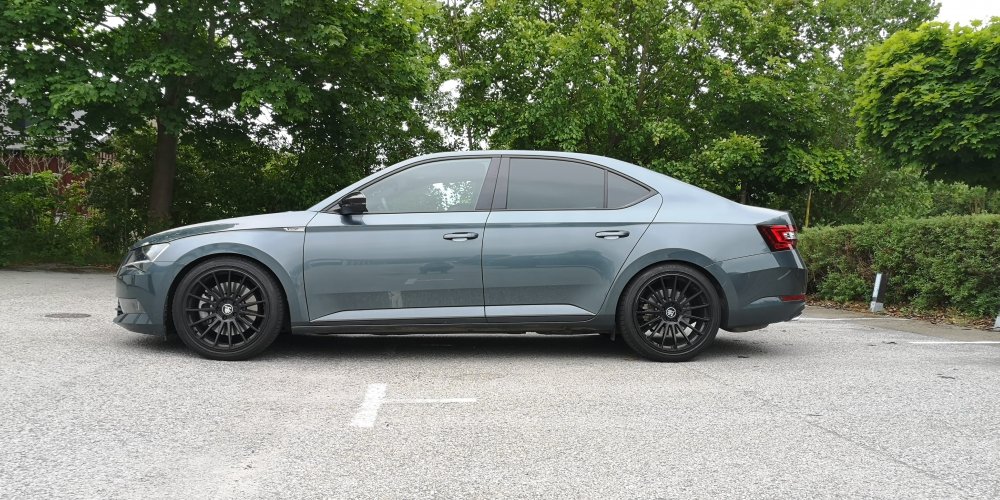
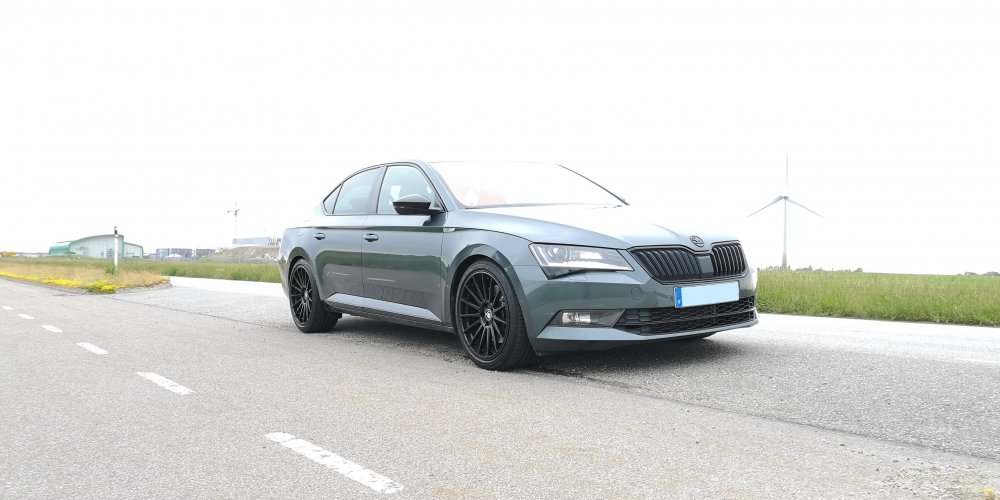
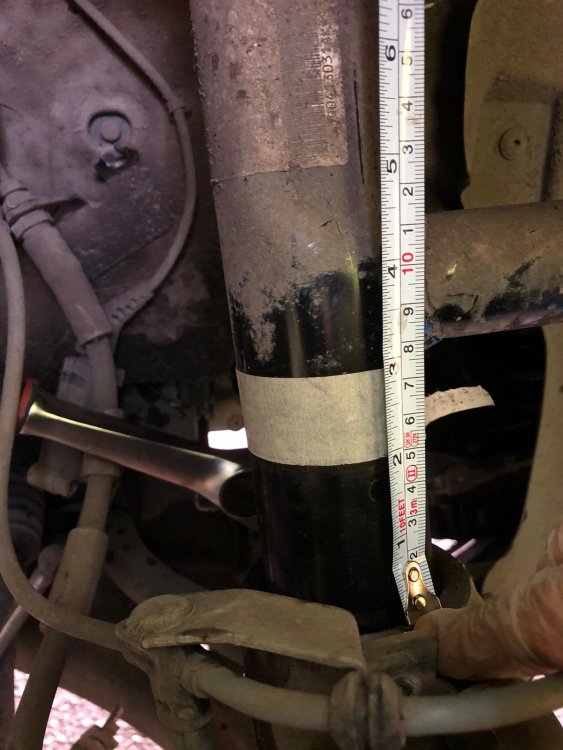
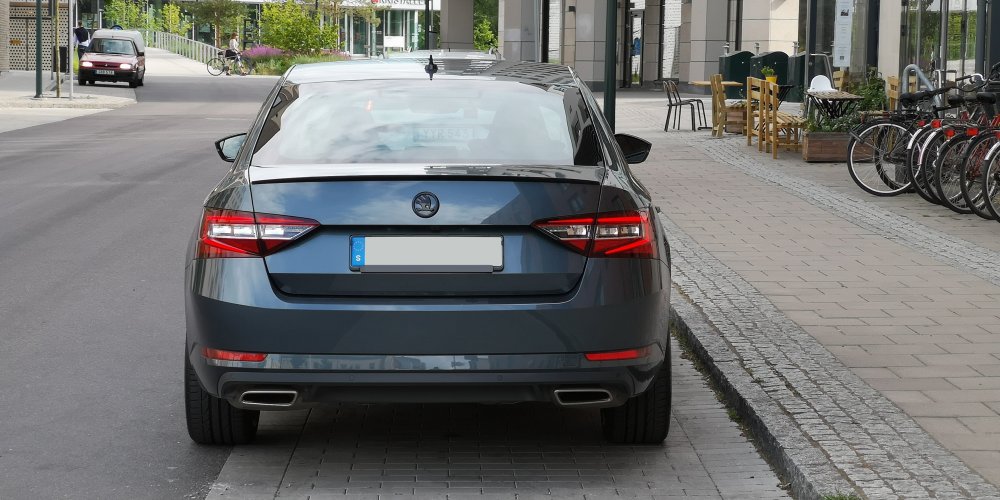
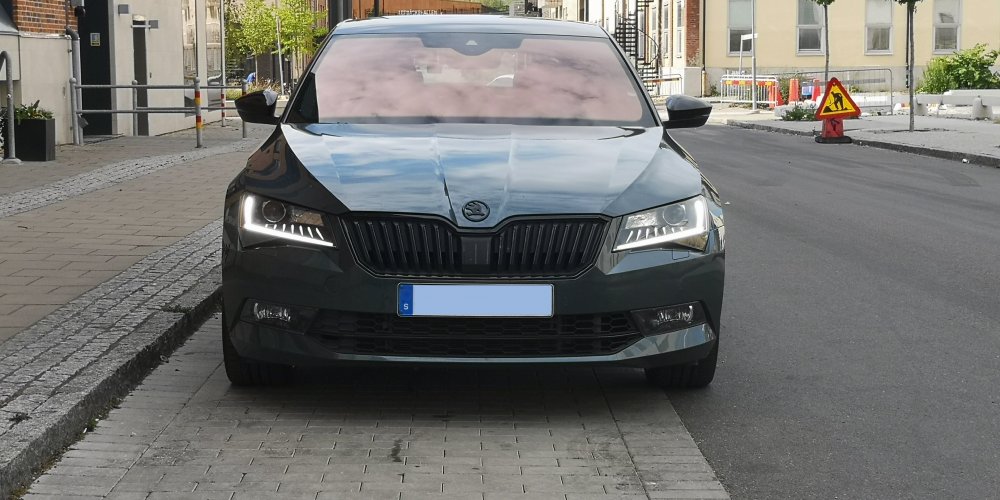
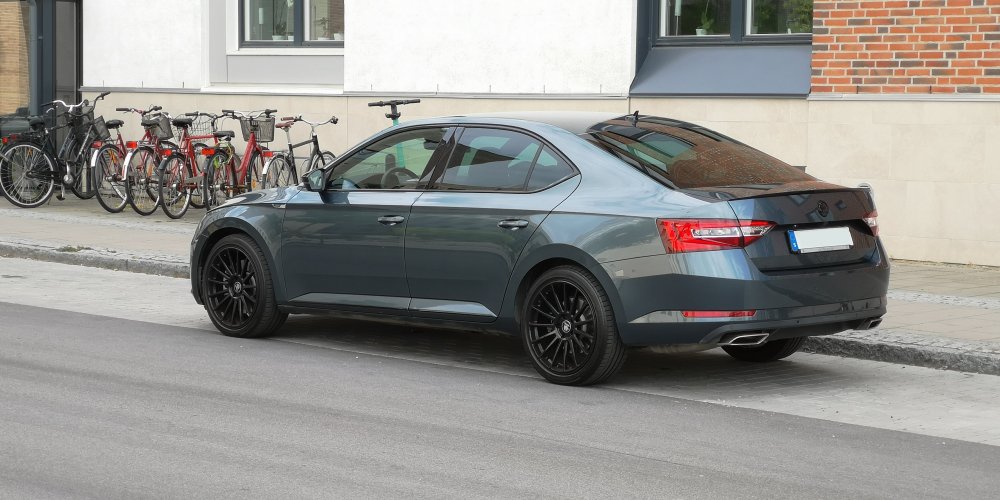
So how much did it drop and how does it look? Here are some not ideal photos I could take at the moment (from a photography point of view) but they do ok to provide the comparison: For me it's almost perfect. The front is exactly as I wish it would be: 20-25mm drop measured. The rear seems to have dropped more (in comparison) a 25-30mm in total. As stock, the rear was sitting 10mm higher than the front (clearly visible on the top part of the photos), now both ends sit at the same height. This looks pretty sweet I have to admit as the car sits level now, but I wonder how it will be once fully loaded with 4 people and luggage. Need to check this. For sure, if i hadn't opted for the 6.5mm thicker Audi TT bushings I'd be in trouble and the rear would be lower than the front so my recommendation: If you have a 272, you most probably need the Audi bushings too (they were 16 EUR in total) A couple more: I have to say I absolutely love the look of the car right now with the wider alloys and the new ride height, clearly purposeful and as aggressive as it should be (for what it is with near 400bhp) without getting too extreme. But the best thing was the handling improvement. I really didn't expect that amount of change as I've experienced in my first test drive an I can only attribute it to the Sportline's DCC set up which, has to be different than the L&K's otherwise my findings simply don't match the ones from L&K owners at all. As short as I can put it, the springs almost eliminated the effects of weight transfer during almost every change of balance. Gone is the squatting during acceleration, the brake diving and the bit of initial roll still left even after the arb upgrade. In Sport, it's a real performance machine now but the weird thing is that the comfort hasn't been compromised at all. The car turns in and corners almost flat, and what I noticed is that the point of the thicker arb's intervention became imperceptible now. No more "bit of roll - then lock yaw" behaviour, just an increased opposition to roll right from the start and much more tendency to follow whatever your input is. Driving it "blind" you would have to assume it's some focused GTI and I did live with one for 3 years so I have a good reference I think. The exploiting of the extra power now is so much nicer, you don't feel as if you're forcing the car to do something too hard but rather something it was designed to do from factory. Everything just works better and doesn't stand out. Obviously the Sportline's damping (on Sport) was set up right from the start but the stock springs were the weak link letting it down. I can't explain it any other way. I'm usually picky with suspension and handling and as it stands, changing the dampers doesn't even cross my mind, it's that good now. On the other hand, if you don't have a Sportline DCC and decide to change springs on your own, do yourself a favour and put some new shocks in (Koni Actives got great reviews recently here) while you're at it. The thought of having to do that if my DCC-springs combo wasn't up to the job made me dizzy, thankfully it wasn't the case on my car. The only other thing needed now is brakes I feel. On an open road, you are now getting so tempted to attack anything not in a straight line and once you do the limit has been raised that much that you find yourself needing to stop from higher speeds way more often than before. So it's something that needs looking at at some point. Overall a great transformation into something so much more potent and enjoyable helped by all new bits in place, looking forward to just find time to drive it now...


-
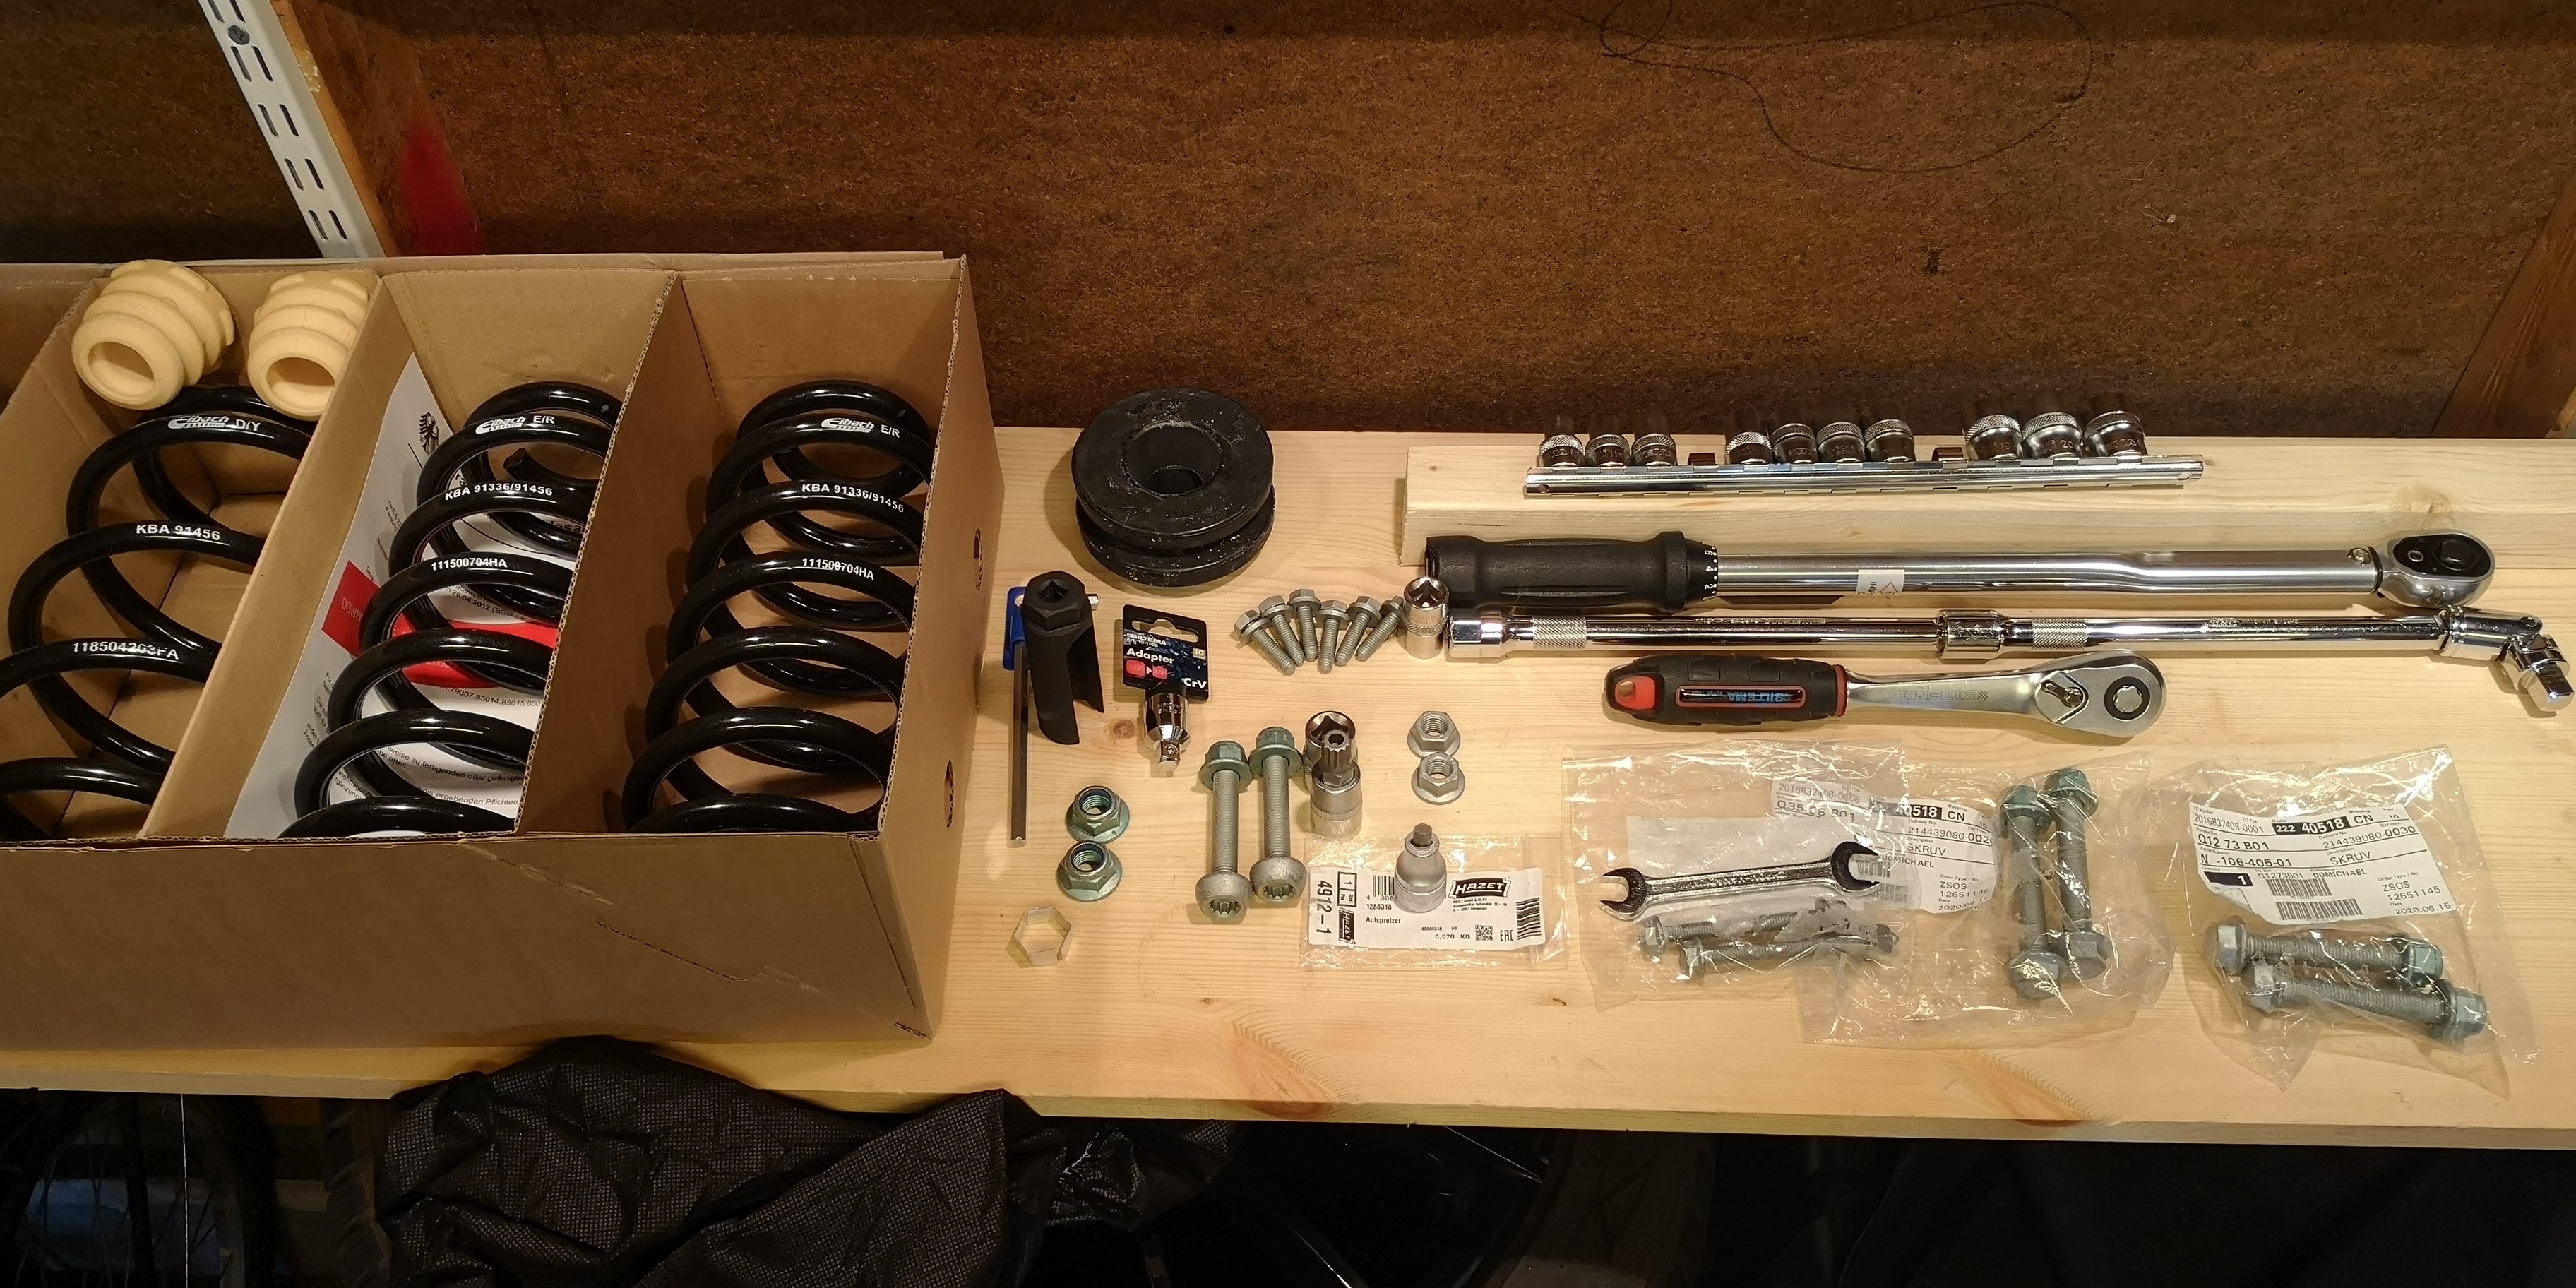
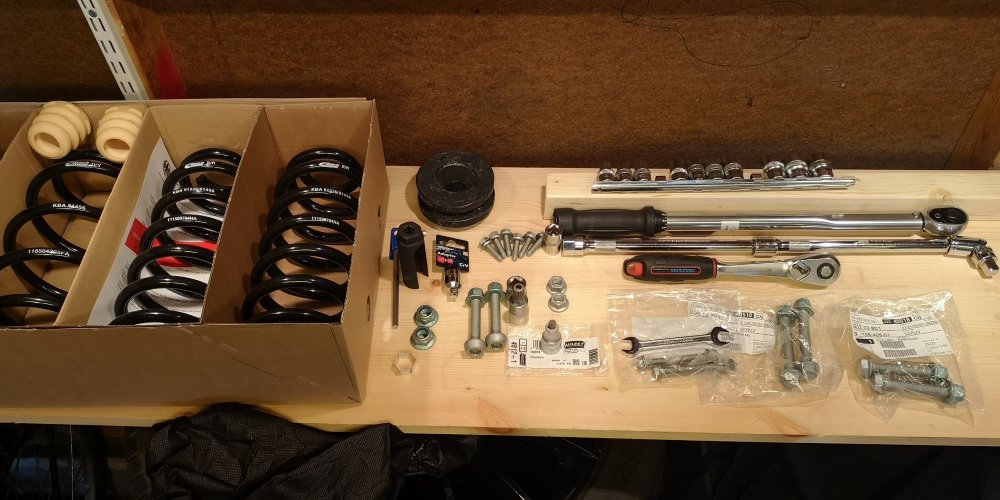
Forgot to attach a list with all the fasteners replaced as per VW/Skoda's instructions in the service manual (and their torque figures). Quantities are for both sides. FRONT strut pinch bolt N90954802 2x 70 Nm + 180° nut for strut pinch bolt N10106402 2x - end-link nut N0150816 2x 65 Nm top shock nut N91021601 2x 60 Nm top mount bolt N91246401 6x 15 Nm + 90° REAR Rear shock bolt N10628301 2x - Rear shock nut N10106402 2x 70 Nm + 180° control arm to hub bolt N10640501 2x control arm to hub nut N10106402 2x 70 Nm + 180° end-link to wishbone bolt N10776501 2x end-link to wishbone nut N90183804 2x 20 Nm + 180° TT pads 8J0512149 2x
-
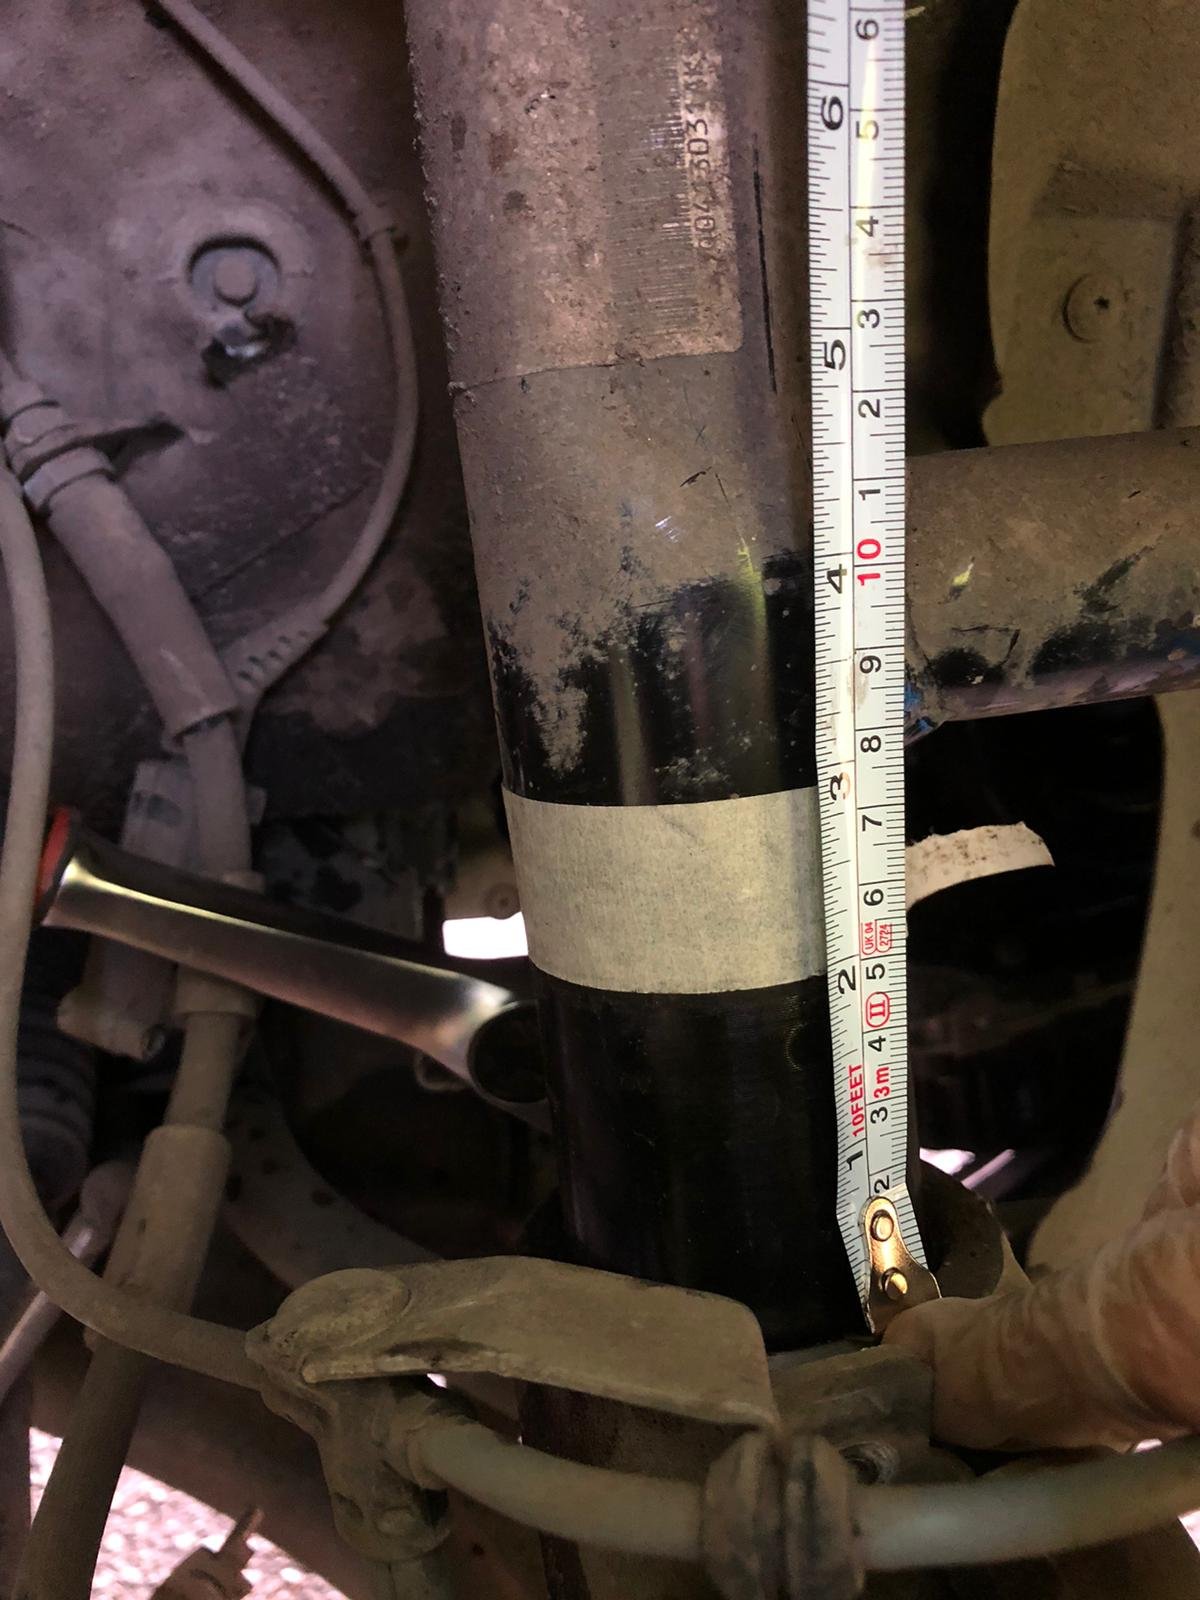
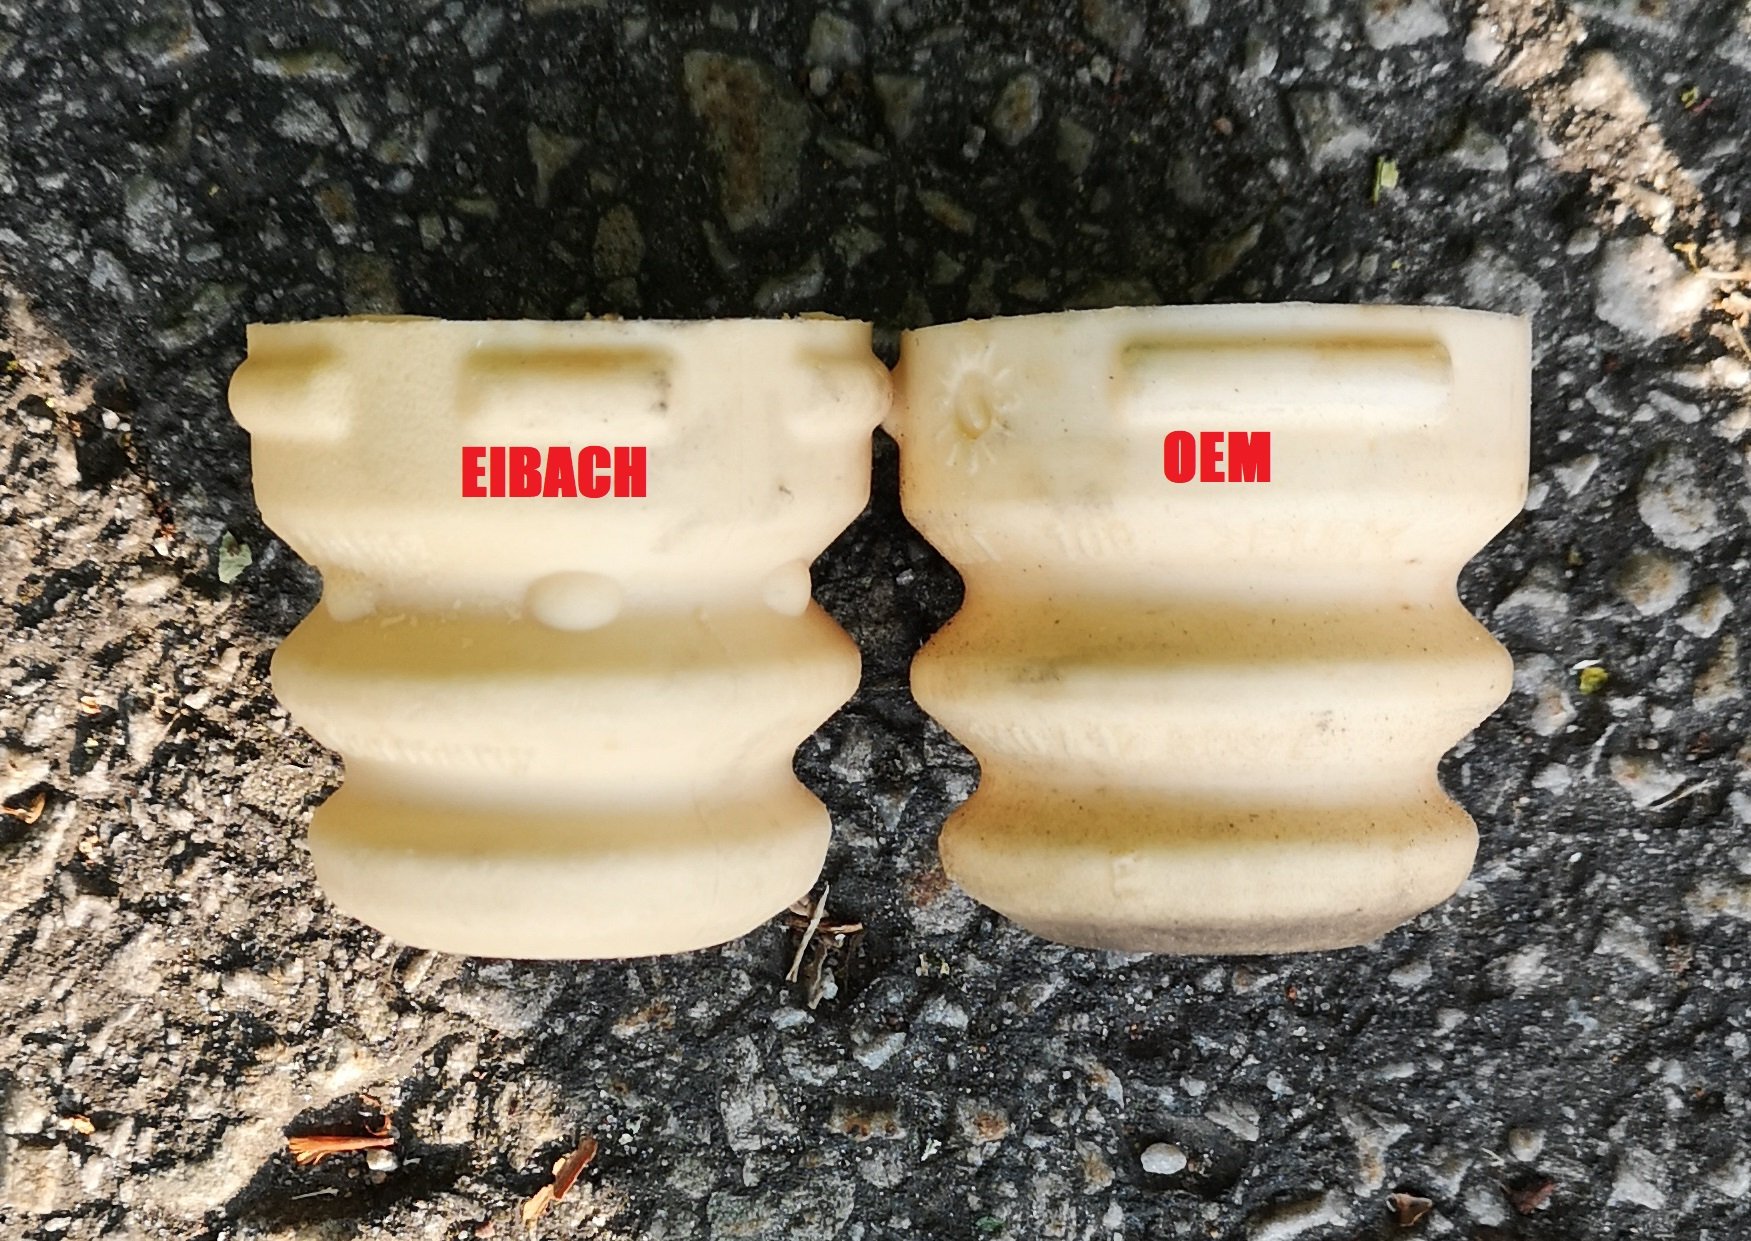
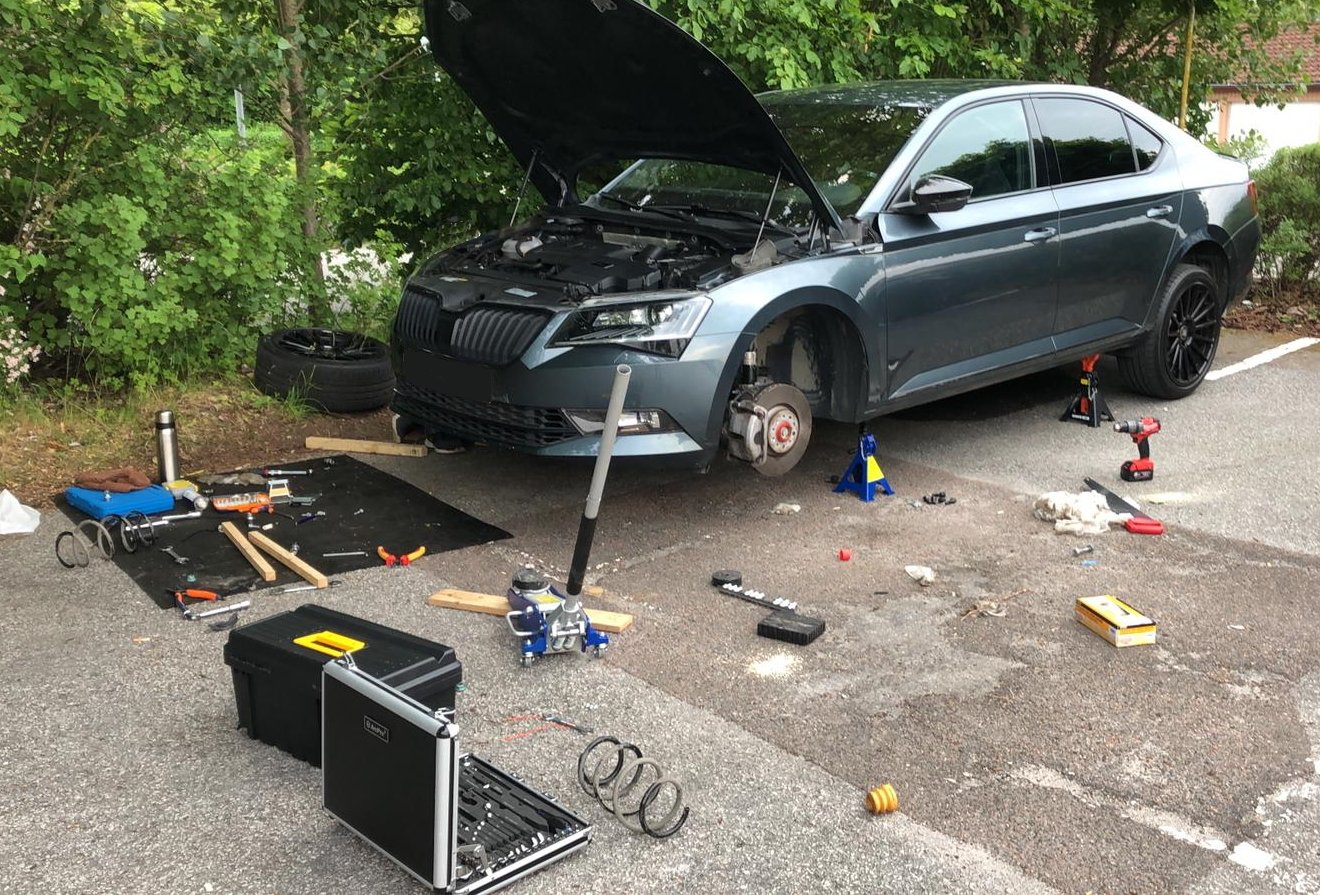
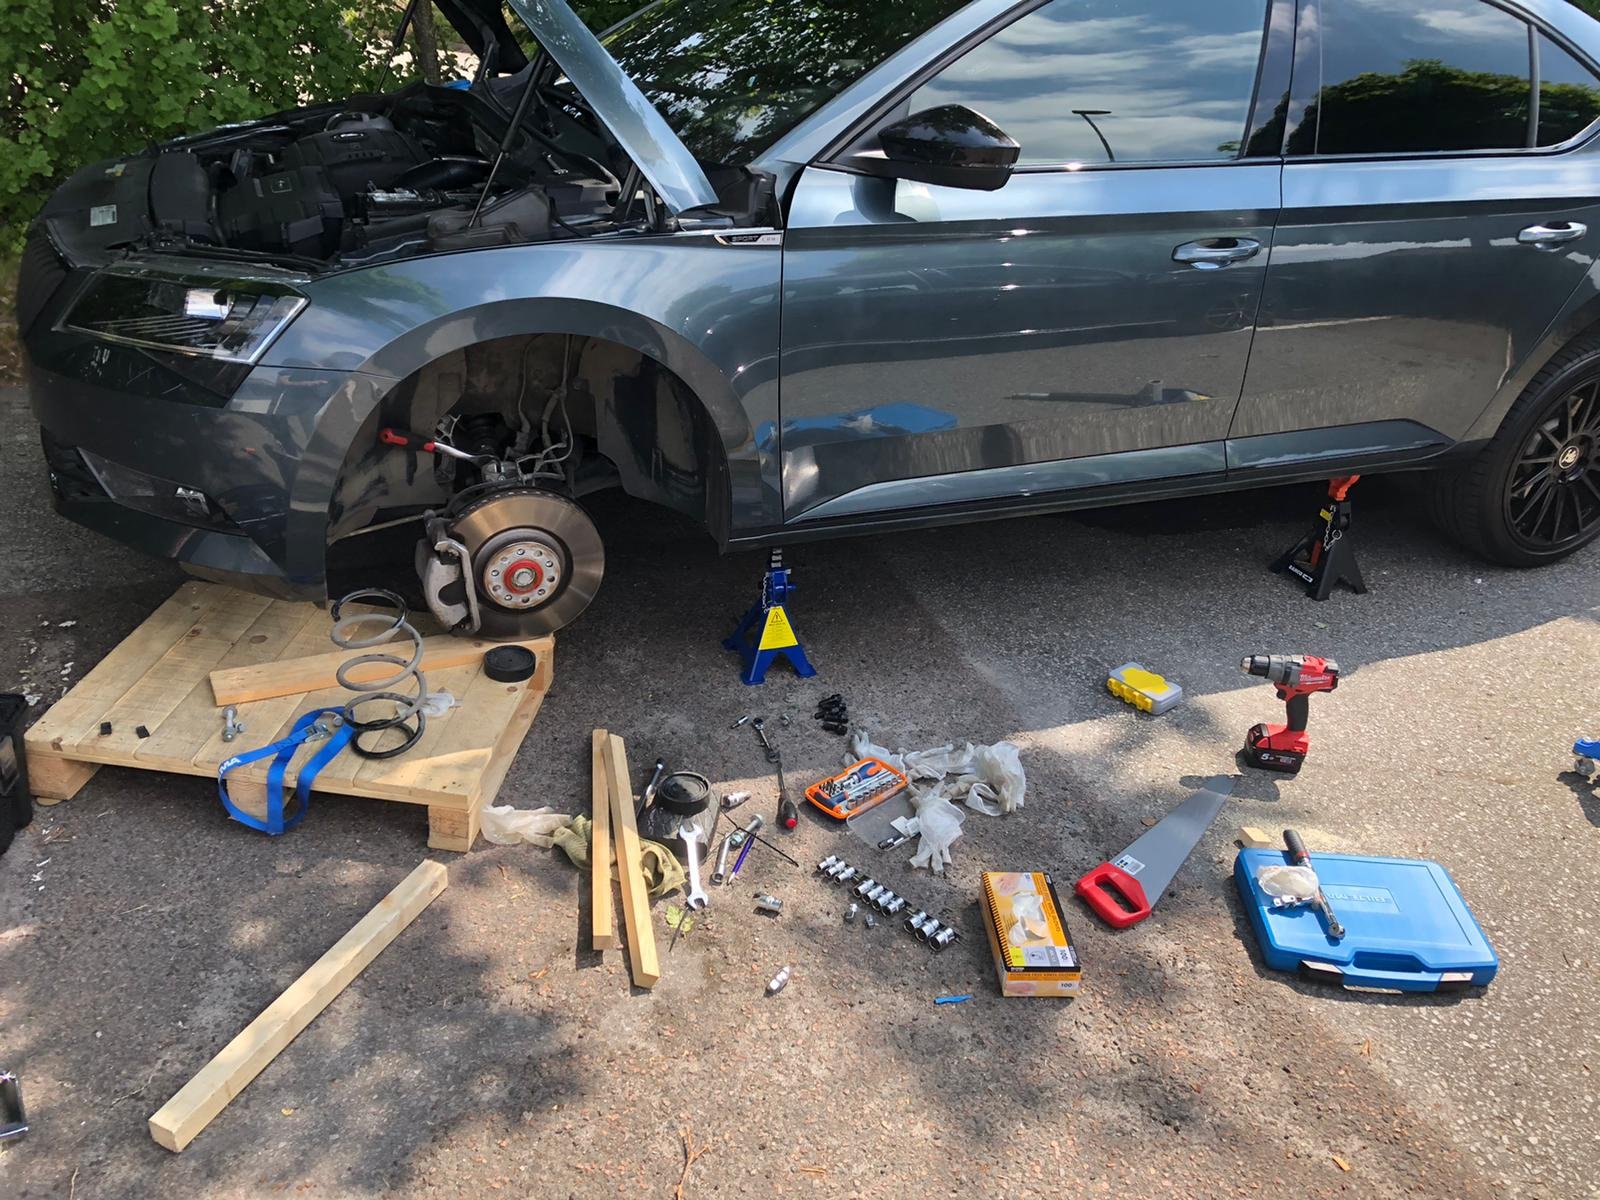
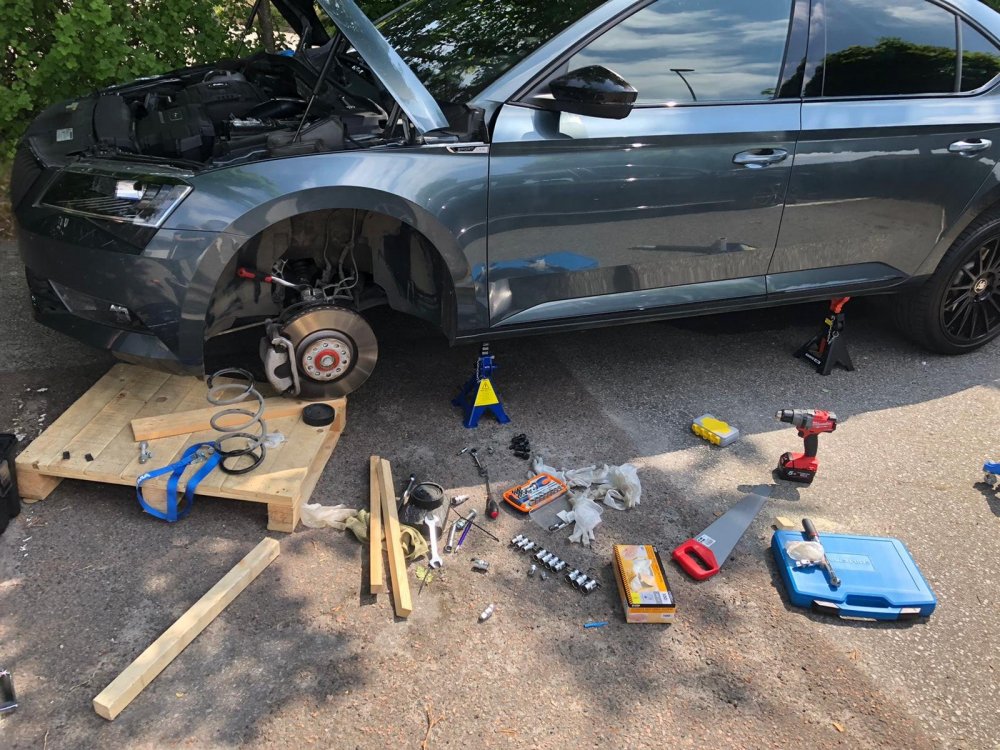
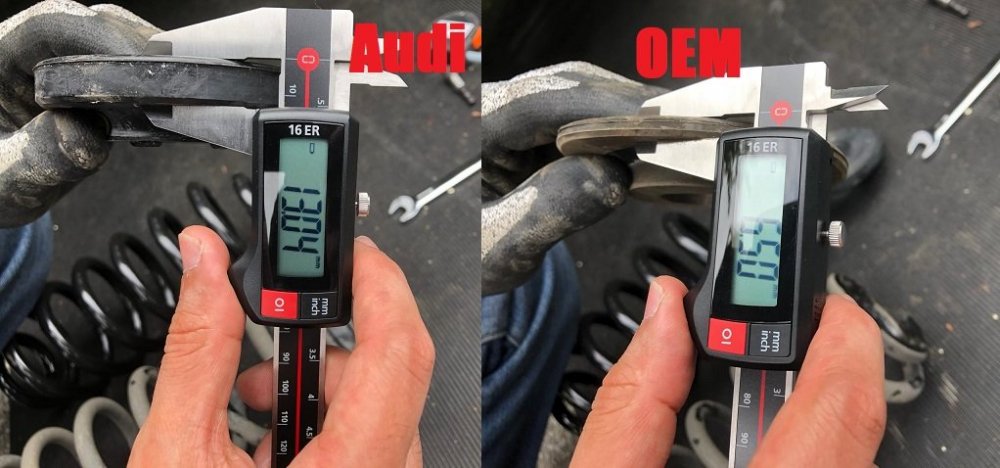
Ok so I wanted to put up a mini guide for this as all my info for this prior install came from MK7 Golf GTI's and R 's which are 95% the same but not identical. There's a few threads on the internet and YT where you can gather the big picture of the amount and type of labour involved in this job (l will link them below) and I don't plan to repeat all of it but rather build upon it with my own DIY oriented tips and findings on the 272 (280 is the same). Also because we struggled a lot at some points (probably because it was my first time messing with springs on my own) so If I could save another guy's time and trouble doing this for the first time I'd be very glad. It's a PITA job if you haven't done it before, especially if you follow the "easy" 2x4 method that seems to be so popular online like I did. As someone said it's half art half science and you have to work by feel at certain stages otherwise you might be stuck with a half removed/installed strut... It took me and a buddy that was helping me out close to 6-7hr for the two fronts but that's because we got stuck at some point, I'm pretty sure I could get them done again in 4hr max now that I know the tricks. Rears are really easy, 2hr is probably all the time you need so around 6hr in total. Getting the strut out: So the start was really easy: I removed wheel, lifted the front of the car (i did both ends to avoid working at an angle), and unscrewed the plastic leveling arm bracket, the brake line bracket on the knuckle and the DCC plug (both sides). Then I just undid the end-link nut and the triple square bolt and nut that keep the strut in place on the knuckle and ready I was for the 2x4 method. This refers to a 2x4 inch wood block, used to lift the strut up and out from the knuckle (by attaching it to the strut and jacking it up with a jack) without needing to drop the axle too low or undoing any drive shaft or ball joint bolts or brake calipets etc. It's the approach with minimum fasteners replacement so I guess that's why it's popular with the DIY-ers but retrospectively I'm not too sure it's actually quicker than removing the shaft from the knuckle, especially the first time, and especially during the re-install stage which is where we got stuck. This video shows it very well: My comments on this: * Before you start dropping the lower control arm: put some masking tape to mark the height at which the strut is seated inside the knuckle. You'll thank yourself later when it will be going in very slow and hard and you won't know how much more you should continue to drop it. Here's mine while going back in, the bottom of the mask needed to go down to the top face of the knuckle seat (50mm more at that point) * Install your spreader or 1/4" ratchet at the knuckle as shown in the vids and guides, and start wiggling the LCA via the brake disc (pull towards you and push towards the inside of the car) so that the LCA starts to drop as the spreader keeps it loose. It should do quite easily at the beginning, like 2-3cm immediately. Then reposition your spreader lower, below the strut's little tab at the back (you'll feel it blocking further drop back there) and repeat and you should have the strut out/LCA down by a total of 6-8cm (3"). The little tab will be fully ABOVE the bolt hole. Only then proceed to the 2x4" otherwise you'll need to compress the spring dangerously high. * Don't use an actual 2x4 piece (not even the guy in the vid uses one i believe), it's going to be too big for the available space. I went with a rectangular 45x45mm (1.75x1.75") piece and it worked a breeze, much easier to get in and out and position as close and as parallel as possible to the strut which is what you want in order to avoid going in at angle and end up snapping it mid-way. * Install your piece of wood as parallel and as close as possible to the strut (sorry no pic of that). Also drill as small a hole for the bolt as you can (12mm is fine, i did a 10mm and slowly "ate" a couple mill around it with the drill bit for a snug fit). That way the wood doesn't even need to lift the strut itself, it's all done via the hole and the bolt and it's still very rigid. * Now, have a friend SLOWLY jacking the wood up and keep wiggling the brake disc to help release the strut. Even with the spreader, the knuckle probably won't be that loose to simply lift the strut out by jacking so go slow and patiently. If it's not right you'll start lifting the entire LCA with the strut (and the whole car) up from the jack so back down, reposition your spreader at the top if needed, and repeat jacking and wiggling the disc. It should soon come out. * Once it does, rotate the knuckle away from the strut's axis so that it's got room to decompress once you release the jack. Then just undo the 3 small bolts at the top and the strut should drop right out. <<< STRUT OUT, that's 20% of the whole job done >>> Now on to spring removal: Videos show the GTI/R springs simply extend 1-2 cm with very little force so no spring compressors needed. The Superb however sits higher from factory, even the Sportline. I expected the release wouldn't be so light and i was right. When the last thread is out the springs decompress a couple of cm and shoot the top mount and nut a few meters forward. It's probably not going to kill you but you definitely don't want to stand in its way and trying it, it's a fiercer release than on the GTIs and Rs. Still I wouldn;t get compressors when doing it again but make sure you do as I did and have the axis of the spring clear for the release, be above it and step on it steadily and use a standard ratchet (not some sort socket) so that your hand is away from the spring's shooting path, here's a short clip of that: Re-Installation Nothing to note here, remove spring, install new spring and seat it correctly on the rubber base, use Eibach's supplied bump stops (they look identical to OEM), put back the spring bushing and top mount, ALIGN them properly by checking the alignment marks! and start screwing the top nut (you can simply compress the spring by hand for the first few mm needed. Here is where it pays to have a special 21mm pass-through socket and a 7mm Allen key as you won;t be able to put the exact amount of torque (the damper piston with the inner screw will be spinning. I didn't so I had to improvise, I tightened it up to where it felt really snug and also noticed there were installation marks from factory and I was already maybe half a turn past them so they should be good. No funny noises/clanks after anyway Once the strut is assembled again, vids say "just follow reverse order". yeah, reverse order my ar53... Notes: * DON'T tighten the 3 top mount bolts as you'll never be able to tilt the strut to the required angle to sit in the knuckle again, just a couple of threads to prevent it from dropping should be fine. * Re-insert the spreader if you removed it before, re-attach your wood to the strut, jack it up to clear the knuckle, rotate the knuckle and align the strut and knuckle as concentrically as you can by eye, then lower the jack SLOWLY so that you ensure the strut starts seating properly. Unfortunately it won't just go back in by the spring's force. First time we had a tiny small angle between strut and knuckle axes which was enough to stop anything from moving further. Moving the jack below the LCA and trying to jack it up to force the strut to drop in resulted in jacking the entire car up... After lots of swearing and re-trying we figured it out: * After the strut is in a few mm, and ONLY IF you see it;s going in straight and not at an angle, move the jack below the LCA and SLOWLY jack it up while at the same time wiggling the brake disc the same way you did for releasing, so that the strut is allowed to drop deeper every time. Re-position the spreader as you go so that you don't obstruct the tab to drop and it once it's fully in (your marking tape will tell you that without doubt) you're done. Re-tightening the bolts and connectors is straight-forward and that's 40% of the job done. The passenger side is another 40% and the rears I'd attribute a mere 10% of the total time needed for each one. A nice mess mid-way... REARS Those are probably 3x easier I'd say (actually 4x according to my time estimation above ). One leveling arm only as well as the DCC plugs το disconnect and you can start undoing the 3 bolts needed: a) end-link bolt-nut b) shock bolt-nut c) wheel bearing bolt-nut. * I'd recommend starting from the end-link on the inside and working your way out as i feel doing that last will put too much force on the end-link after everything is loose and the spring still pushing. * You will need to use your jack to align the different holes to facilitate the re-mounting as you're fighting vs the spring at that point. The arm to wheel bearing joint is a really tight fit so a screwdriver will be most probably needed to do some micro alignment for the screw to go in and out properly. >>> I opted to replace the top spring pads/bushings with the Audi TT ones (OE part number: 8J0512149 ) as suggested in some threads to avoid reverse rake. Those are ~6.5mm thicker so the rear sits 6.5mm higher. It turns out it was a wise choice as you'll see Coming back soon with photos of the end result and the handling changes


-
I didn't get that (what's a swear box?!) but there was A LOT of swearing of the worst type yesterday when trying to re-seat the strut in the knuckle, a process which is only referred to in most tutorials as "follow the steps in reverse order". It's not a reverse order follow at all!! Anyways car is lowered successfully now, i will be doing a write-up on the install as I have a few good tips to share that I didn't read anywhere plus a couple of things that are different when doing this on a Superb (all the guides and videos I had read were about Golf GTI's and Rs). Couple of quick and dirty comparisons: PS. I bought the Audi TT top spring pads to raise the rear by ~7mm and very glad I did as from the looks of it, there would be a bit of reverse rake if I hadn't and a loss of practicality for heavy loading. The full story of all the installation drama, the tips and tricks and the results and driving feel review to follow soon in a separate DIY-friendly thread. All I can say is that as much of a PITA that it was, it was so worth it in the end both visually and from a driving perspective. I expected the former but not so much the latter, very happy atm.
-
Judgement day... Plan is to install Eibachs with couple of friends today. Everything is ready, all new fasteners are going to be used, but of-course these things usually don't go as smooth as you thought. Probably because I haven't done this job before but I always wanted to give it a try. Hopefully will report success in several hours from now...
-
Badge day: a) Black Skoda badges, not full black but with body colour matching background - now this would be a really smart option for Skoda to provide, especially on the Sportlines/vRS that get all the chrome trim replaced with glossy black bits Also turned the Ispiri alloys into an "official" Skoda wheel thanks to a Portuguese guy on the internet that offers metal stick-on caps of almost every diameter (curved or flat) I suffer from aftermarket-o-phobia, it's a condition where any aftermarket badge/sticker/logo on any car looks wrong in my eyes... Liking the wheels so much more now that I don't see the striking red Ispiri logo on them, weird how something so small makes such a big difference.

-
You have to deduct atmospheric pressure from that, 1.5-1.6bar is typically where all stage 1 maps max out, with an actual 2.5bar your turbo would not still be inside your engine bay!
-
Nice! Did you do the install yourself? I'm doing my homework for a springs install this weekend and wondering about the best approach for a couple of points about it.
-
That's great news, we just need some VCDS guru to look into this and find out which adaptation controls the starting mode. @Gizmo ? @mtl ? Any ideas where could we at least have a look by browsing available adaptations?
-
I have to say it doesn't sound any different than stock, more important: it doesn't sound modified at all even when in full blast and I mean both in a good way, it completely retains the OEM tone, excellent job. In reality, i could leave with a slightly more throaty note but if you start going down that way you risk of going too far and having to put back the stock items. Definitely for anyone looking to retain the stock sound on a 500bhp setup yours is the way to go. The other important question is, no drone or boomy sounds when at a steady speed and low revs right? In fact I have found this "effect" of some aftermarket exhausts, more annyoing than a loud noise during full throttle
-
The Milltek downpipe comes in two options either for pairing with the OEM cat-back (2.5") or the Milltek cat-back (3"), if you knew the resonator's limitation in advance you would have gone for the second option that keeps a 3" diameter all along the pipe and spare yourself from some modding but you were hoping to keep the OEM res so it's understandable. For the "muffler-back" bit, you decided to enlarge the OEM pipes from 2.5 to 3 instead of fitting a 3 to 2.5 reducer on the outlet of the Vibrant correct? At that point and after all those steps I guess it makes sense, you don't want to come across any other obstacles in the flow... I like how you have kept both OEM mufflers though, that's probably why the noise has been kept at reasonable levels, very nice that you have achieved that despite having upgraded the entire exhaust system to a much better flowing one. Proves once again that mufflers are not a limiting factor even for such more powerful setups
-
Loving your determination on this Roscio, pave the way for the rest of us noise-sensitive family men! Just for me to get this clear, what you did was to remove the mid-resonator from the piping, and weld back a Vibrant muffler in its place? So in total you have a completely upgraded first half from Milltek with an upgraded downpipe and complete GPF delete (I assume that's the SSXVW513 model?), and then you join it to the Vibrant muffler (those are both 3" ?) and after that it's all stock still?
-
I transferred mine from my Mk7 Golf GTI Clubsport to my 272, works a breeze but they share the same engine (even though the 272 is a newer revision). Not sure about the diesel though, just contact DTUK and ask I guess. I'd say the effect on the 272 being AWD is more noticeable. The response on both cars significantly "woke up" with the pedal box, but on a tuned GTI, full throttle instantly could easily result in wheel-spin at low speeds. On the 272 it just goes no questions asked, i'd say it's a must on this car.
-
I doubt that was written somewhere, it's the opposite of what you describe in fact: if you upgrade the the rear arb you are effectively reducing understeer. There is no golden rule, different cars require different approaches (rear arb only, front arb only, both) you have to think of what you want to achieve by upgrading them and what is the stock behaviour on the car you're working on. In the particular case of the Superb which is AWD but behaves more like a FWD, there is under-steer dialed in from factory and ideally you would like to shift it towards a more neutral behavior where the front end will not push wide as early and the rear end will more actively help the car rotate. To do this you only need to touch the rear one (because a stiffer rear arb reduces underteer). If you do both you have a much stiffer car which is probably ok on the track but you switch back the balance to the stock undesteer behaviour.
-
Yeah I have to add: Make sure you have a low deductible on windshield replacement if you have or decide to go for the heated one. I have it on mine and a stone chip within the first 3 months nearly demanded replacement which was over 1100EUR in total, part of the increased cost was down to it having the special coating as explained from the Carglass guy. The crack got repaired as good as it could be which makes it still visilbe under certain light-angle but with the frequency wind-shields crack here on all cars, i'm not sure if I got away for good.
-
That's a very useful comment as that is exactly what happens on a stock Sportline with DCC Sport mode and I've written it in some posts of mine a while back: Going over speed bumps even at average speed the car will only rebound once as you go over it and settle immediately, doesn't happen in any other mode, Normal usually allows a second smaller bounce and Comfort can even allow a minor third one. It essentially confirms my (strong) suspicion so far, that the non-DCC suspension, even on Sportlines, couldn't have possibly been tuned as firm as the DCC's firmer setting in Sport as that would take away a bit of the all-round comfort and I understand very well the complaints about standard suspension cars which sound closer to DCC's Normal mode: it's not the best for some sporty driving (i only use it when the whole family is in). Would be very interesting to compare a non-DCC on Konis vs a DCC in Sport (provided they are both in stock springs) to see how they compare, my guess is they are pretty close (solid dampening without bounicng but not a punishing ride). Coupled with the cornering improvement (ain't the H&R great? ) I bet it feels like you drive a real sports variant now