jeallen01
-
Posts
421 -
Joined
-
Last visited
Content Type
Profiles
Forums
Gallery
Shop
Events
Downloads
Everything posted by jeallen01
-
Good afternoon It's been a year since I last (successfully!) did the above, but today, having changed the oil & filter (with the other small jobs to follow next week), I couldn't remember how exactly to do it, and my Haynes Golf MkV manual gives incorrect instructions because it refers to there being separate mileage trip and clock buttons on the speedo display console, whereas my Octy (2007 2l TDI in SE trim, so cruise control, climate control, etc.) has only one button for both functions. Therefore, as I am sure that this must have been covered many times before (although I searched but could not find the info), please could someone point me to some of the relevant posts? Thanks in advance
-
Similar notice now on the door of the Hayes TPS branch!
-
From my experience of fitting B4s to the rear of the Octy Estate, I would say that they are actually "harder" than the standard OEM ones. I had to replace the B4s with good used (!) standard ones because the combo of KYB springs, VRS/Golf Mk V GTI ARB and the B4s made the ride far too hard (especially for my old back!), but replacing the shocks made the ride much more comfortable, albeit with slightly more body roll.
-
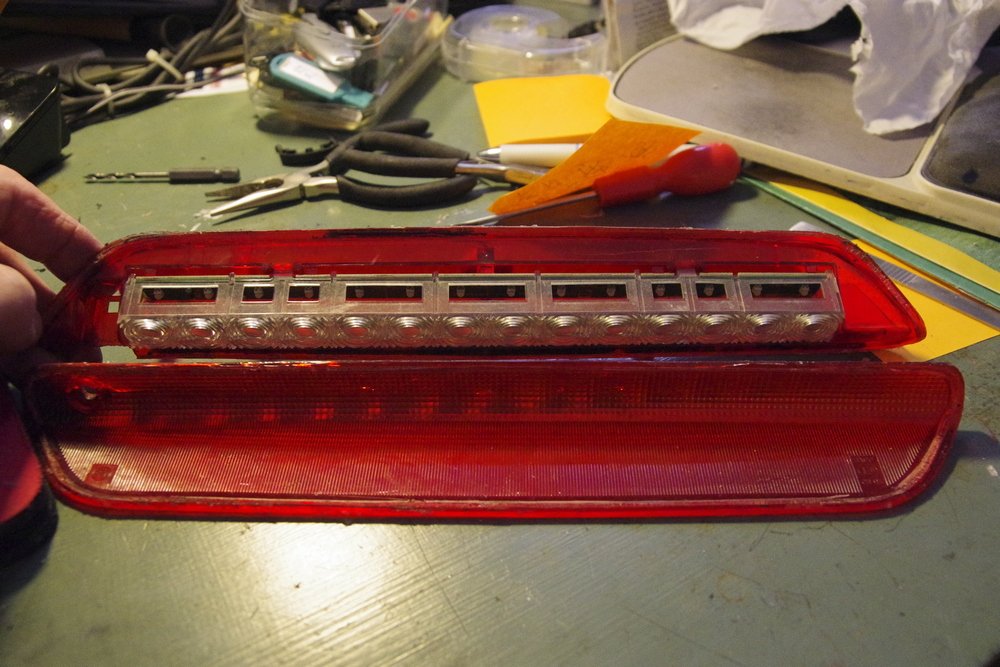
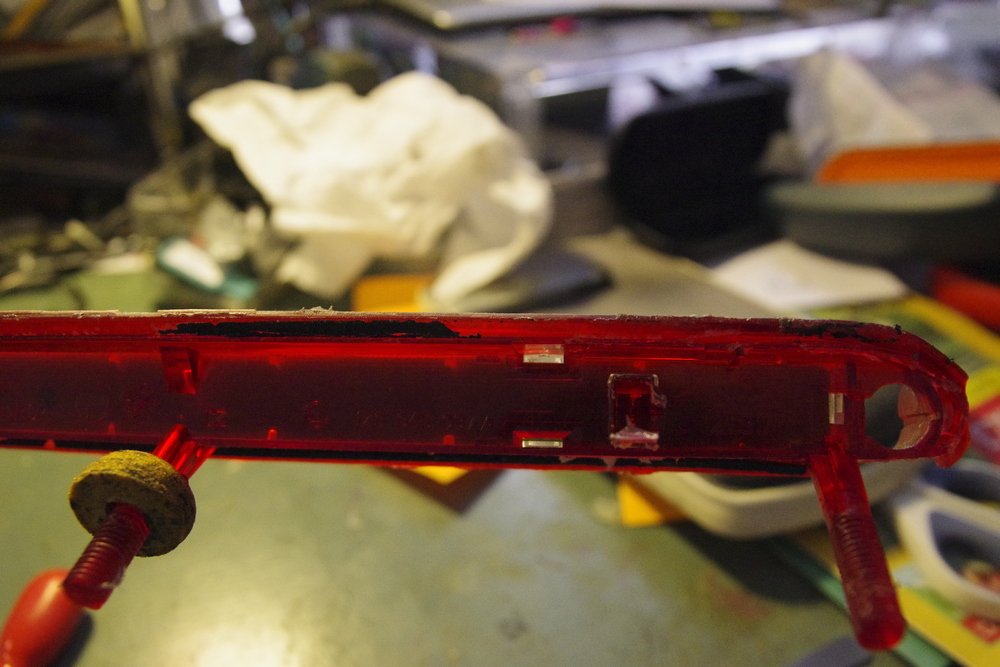
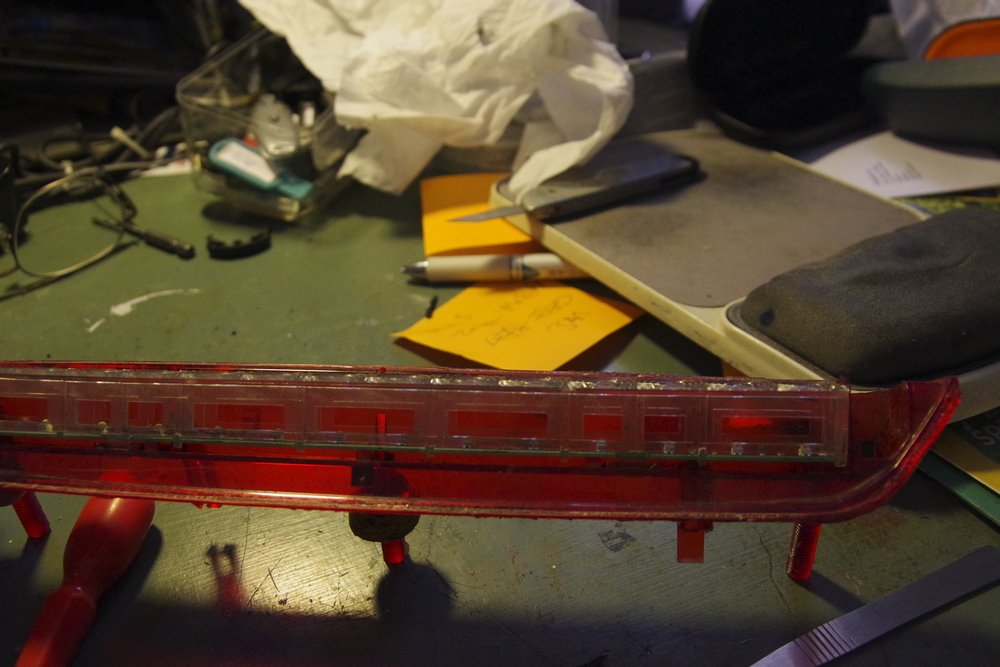
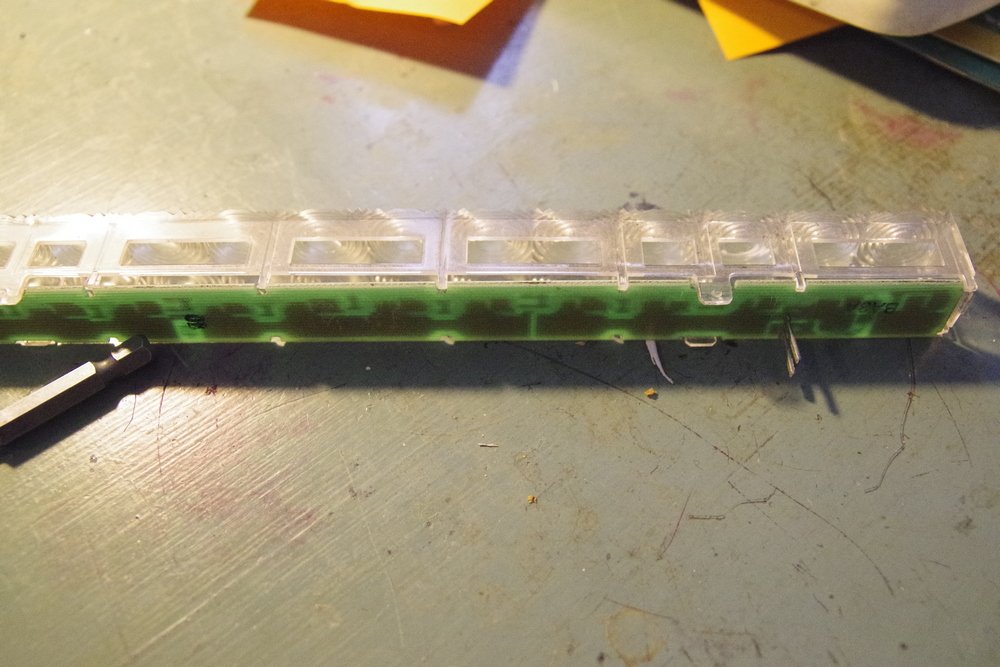
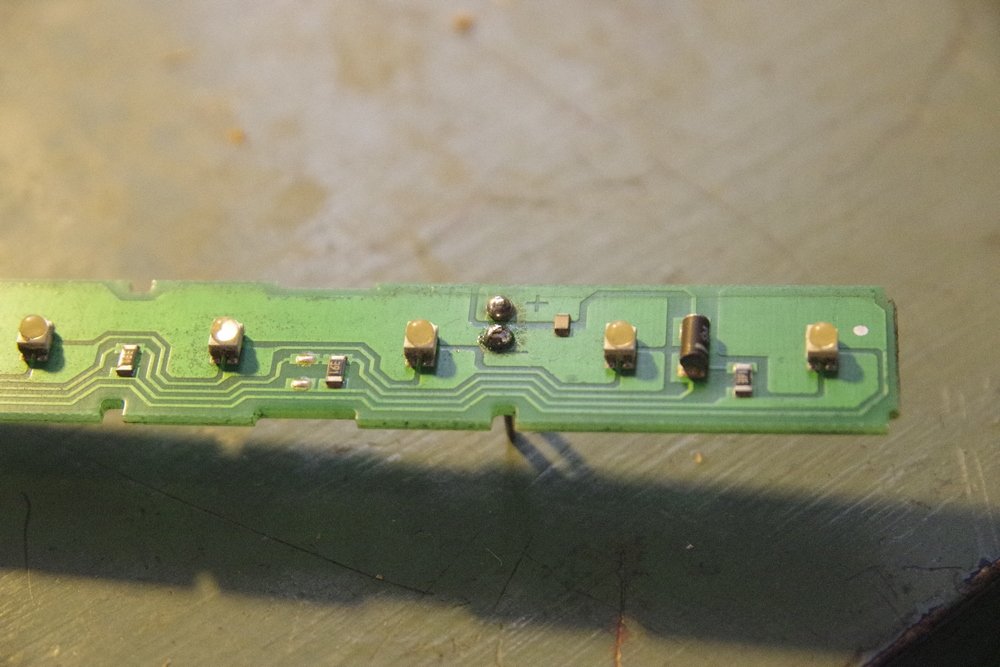
Good afternoon. This is an FYI for anyone who finds that the High Level Brake Light has totally failed (as I did in the pre-MoT check a few days ago) - Bare bones guidance only: - Remove the two interior trim panels on the tailgate - You now have access to the light fitting, and so unbolt from the tailgate (1 or more nylon nuts on threaded studs which are part of the fitting) - Run a semi-sharp blade gently around the fitting, and push from the underside, until you can push it up and out of the tailgate - be careful not to damage either the 2-core cable to the fitting or the pipe to the washer (or, of course, the paintwork!) - Carefully disconnect the plug on the 2-core cable from the fitting, and then the washer jet from the fitting - both have lugs on the sides which need to be gently released. - If the Amber outer lens of the fitting has not already come away from the main body (as mine did as I tried to get it out of the tailgate), then gently run a sharp blade around the edge until the two parts separate. - You will now see the clear inner lens assembly over the LEDs on the Printed Circuit Board (PCB) - it is held in place by lugs/latches at both ends and 1/3 of the way from each end, so gently lever the lens up whilst releasing the lugs. The PCB then simply unclips from the Lens. - Near one end of the PCB, and on the other side to all the LEDS, there is a pair of metal pins - these are marked "+" and "-" on the track side of the PCB, and are the terminals for the 12V input to the LED assembly. - Chances are that the soldered joints that attach them to the PCB are broken &/or corroded - so carefully clean the joints with a sharpish tool until you can see bright solder, and then reflow that solder with a small soldering iron whilst adding just a little more to make the soldered joints more secure. Having done that, all 14 of the LEDS should then light up (as mine did) when fed with 12V to the two power input pins.! If they don't then you have probably got the supply polarity wrong and so switch the external leads. Reassembly of the fitting is pretty much the reverse of taking it apart - probably the biggest issue is how to refit the outer lens to the main part of the fitting. Both items appear to be marked "PC" which I assume means "Polycarbonate". and a little googling indicated that you can use a wide range of adhesives, notably cyanoacrylates ("superglue") and expoxy resin, but I tried the solvent cement I use for joining PVC water pipes and it seemed to work (although I did have to clamp the parts together for a few minutes to let the adhesive set). After that, it is a matter of refitting the plug on the 2-core cable to the pins of on the fitting and then the reinserting the washer jet (with its foam sealant ring!!) into its hole in the fitting, and then remounting that on the top edge of the tailgate - having added some sealant to the edges before you finally push it into place - and finally refitting the nylon nuts which pull it snugly down onto the body of the tailgate. Then you have the relative nightmare of getting the two parts of the tailgate trim back in place - I did that on my own because I had to, but I would strongly suggest that it is really a 2-man job! PS: Don't know what the VAG price for the fitting is (dread to think) but the aftermarket part from ECP works out at around £34-£36 dependent on whether you order it off ebay, or through a branch and use a discount code. So, if you don't think you can repair your own fitting, then this is also roughly how to replace it with a new one. Some pictures are attached - these were actually taken as I reassembled the fitting, but are shown (I hope) in roughly the order you see as you take it apart - and the 2 pins to be resoldered can be seen at the top edge of the PCB in the last shot, i.e. IMG023a.jpg

-
You said your AUDI is a 54 plate - so it almost certainly doesn't have the non-return valve (my 07/57 plate Oct didn't until I fitted one)
-
Air & Pollen Filter Change Interval
jeallen01 replied to labman1001's topic in Skoda Octavia Mk II (2004 - 2013)
Probably 1-2 yrs - IF I remember (must check when I bought & fitted the last one!) -
Sudden loss of power/torque
jeallen01 replied to Krombacher's topic in Skoda Octavia Mk II (2004 - 2013)
Temporarily stuck (probably gummed up) vanes in the turbo??? (might need to remove the turbo & clean - or maybe spray EGR cleaner directly into the EGR valve intake, but that might not be permanent?). -
1) Have you tried disconnecting the battery for a few hours so as to re-set the ECU - that seemed to work for me earlier this year. 2) Early BKDs didn't have a non-return valve in between the fuel filter feed to the cylinder head and the port into the head - meant that diesel could drain back into the filter and so none gets to the injectors. OTOH later engines did have such a valve - and it's fitted to all new replacement VAG fuel harnesses (for nearly £200!) from the filter to the head. Recently fitted a valve (genuine VAG, and that's £23, but you can buy equivalents from ebay for less than a Fiver!) and that seems to have made a quite bit of a difference, even though it does occasionally take a few turns of the engine to get it to fire up. If you search my threads, you should find the one where I described doing that. PS: that thread is here
-
Re the "GTI", "that's the one" = std 2l Mk IV, but with a shorter ratio box => accerates slightly quicker, and then noisily runs out of steam at around 80-85! As for the wheels on the Octy, just remembered that because I fitted 312mm front disks (and very good they are too!) in place of the 288mm ones, I would not be able to go down to 15" rims
-
Both my previous Mk IV Golf TDI estate and the Octy had/have 16" wheels wearing 205/55/16 tyres, and the ride is noticeably harder/less comfortable than my wife's MkIV 2l Golf "GTI" (well, that's the badge on it!) with 15" wheels and 195/65/15 tyres - I would change the Octy to 15" alloys if it weren't for the cost and hassle of 4 new sets of wheels and tyres!
-
Trolley-jack to lift Octavia Mk3
jeallen01 replied to Sangrail's topic in Skoda Octavia Mk III (2013 - 2020)
Personally, I use: - at the front: one trolley jack under the alloy bracket which supports the rear end of the lower wishbone on each side - the load then goes directly through the sub-frame. - at the rear, I tend to put a thickish piece of wood under a flat part of the floor that has no pipes/cables near it and a trolley jack under that - so far (in 5 yrs) no issues/dents/damage (I have 5x small trolley jacks, or 6 if I ever get around to replacing the seals on the 6th one! ) At the rear, I also found that a small bottle jack under the spring pan can make changing the shocks, and so on, much easier as you can then gradually decompress/compress the spring. -
National Tyres & Autocare for oil change?
jeallen01 replied to Ashley64's topic in General Maintenance
Interesting articles in the latest issue of Car Mechanics about lubricants and the varying levels of confidence that one can have in the oil standards compliance claims - having read those, I definitely prefer to know exactly what is going into the sumps of our cars. PS: somewhere in the articles it is mentioned that there are "fake oils" on the market that claim to be genuine stuff, but are not! -
As mentioned in another of my threads, never had a problem buying at the Hayes branch - in fact, a week or so ago, the (older) guy kindly ordered both possible types of dipstick for the Octy, but I only had to actually buy the correct one when they arrived a couple of days later!
-
Where do you fill up? Supermarket fuel vs Brand name premium
jeallen01 replied to Eyesee's topic in General Maintenance
FWIW, the Oct 2l TDI, BKD motor, was remapped from about 140bhp to around 185bhp (possibly slightly more?) on basic TESCO diesel in 2014 - been running on that, or Sainsbury's equivalent, ever since and ran/runs fine (OTOH, blew the Turbo at around 109k miles, and the mpg dropped somewhat after replacement of that!). Can't quote mpg figures because I was doing 20k miles/year until early 2015 but now only 6-7k/years (mostly around town) since retirement. -
Also, when changing batteries, be careful not to disturb the cable harnesses running down from the top connections - Halfords changed the battery on SWMBO's Mk IV Golf 2l late one Saturday afternoon and that resulted in all sorts of dashboard warning lights, and it then took me about 2hrs to find and fix the cable connections running down the back of the battery
-
National Tyres & Autocare for oil change?
jeallen01 replied to Ashley64's topic in General Maintenance
DIY oil (Quantum Synta 5-40w in my case, and MANN filter from ECP/GSF) change = about £30, + a few quid for a socket/oil filter tool to remove the filter, and can be used again for the next change. Time = about 30 mins start to finish. -
FWIW, I bought my Octy with 73k miles on the clock, and fitted a washable foam filter (Pipercross IIRC) soon after for about £30 or so (in 2013). NEVER had an issue with filtration, and that was what was in when it was remapped to around about 185 bhp on suprmarket diesel in late 2014. Couple of weeks ago I thought I really ought to clean the filter at 125k miles - quick soak with washing-up liquid (Fairy Liquid! :) ), then a few rinses and a couple of hours outside in the Sun to dry - all good again for the next 50k miles, and so equaled about 30p/1k miles AND COUNTING DOWN FROM THERE PS: No apparent bore wear problems - currently doing about 6-7k miles per year between oil changes since retirement, and it uses about 1/2 litre between changes (and I don't tread lightly on the fast peddle when the opportunity arises ).
-
And probably also replace the foam bumpstops (and possibly even the dustcovers for those) because they generally start breaking up after a few tens of thousands of miles, or will breakup anyway when you try to change them from the old shocks to the new ones. You can get kits with both bumpstops and covers from ebay/Amazon etc., but get the apppropriate length ones as the estates have longer ones (ride height is higher than standard) , and VRS versions have shorter ones (ride height is lower than standard). From the notes I made some time ago, the VAG P/Ns and heights of the bumpstops (sometimes referred to as "stop buffers") are: 1K0511353J = 100mm, 1K0511353Q = 101mm, 1J0511353S = 103mm , 1J0511353N =118mm 1J0511353F = 118mm 1K0511353M = 133mm
-
Went to TPS (Hayes) this morning. It seems the kindly gentleman who I saw on Sat morning had actually ordered 2 types of dipstick because he could not be sure which one I needed, but he wasn't there this morning, and so the guy who was there firstly brought out one that was exactly like my "wrong" one - but, when I showed him the broken ring pull, he went back and got another, and it was the correct one!. Cost all of £11.60 inc VAT, which was cheaper than anything on ebay - I should have gone to TPS first! BTW: the part numbers for a large range of VAG dipsticks are in the "03G115611" group, and with a suffix letter to denote the particular variant - the correct one for my car is thus the 03G115611Q. PS: Lots of Pics on Google of the various sorts, many of which show the suffices if you ever break your own dipstick (talking motors of course!)
-
Trimming down and trying to fit the "new" shaft is a possibility as a last result. Ref getting another one, I did go in the local TPS on Sat morning, and they have ordered one to arrive tomorrow - but of which design it will be I will have to wait and see.
-
All "bets" on a Mk V GTI now off for the moment - found out what was wrong (ridicuolous really, it spewed out coolant with what looked like oil but was probably just leak sealant, because the header tank cap seal had broken!) with the Mk IV and they are fixed, and so she's driving it again. Still looking out for something else for the future though.
-
Unfortunately not a chance - broke off cleanly at the exit from the handle - virtually nothing to "join"
-
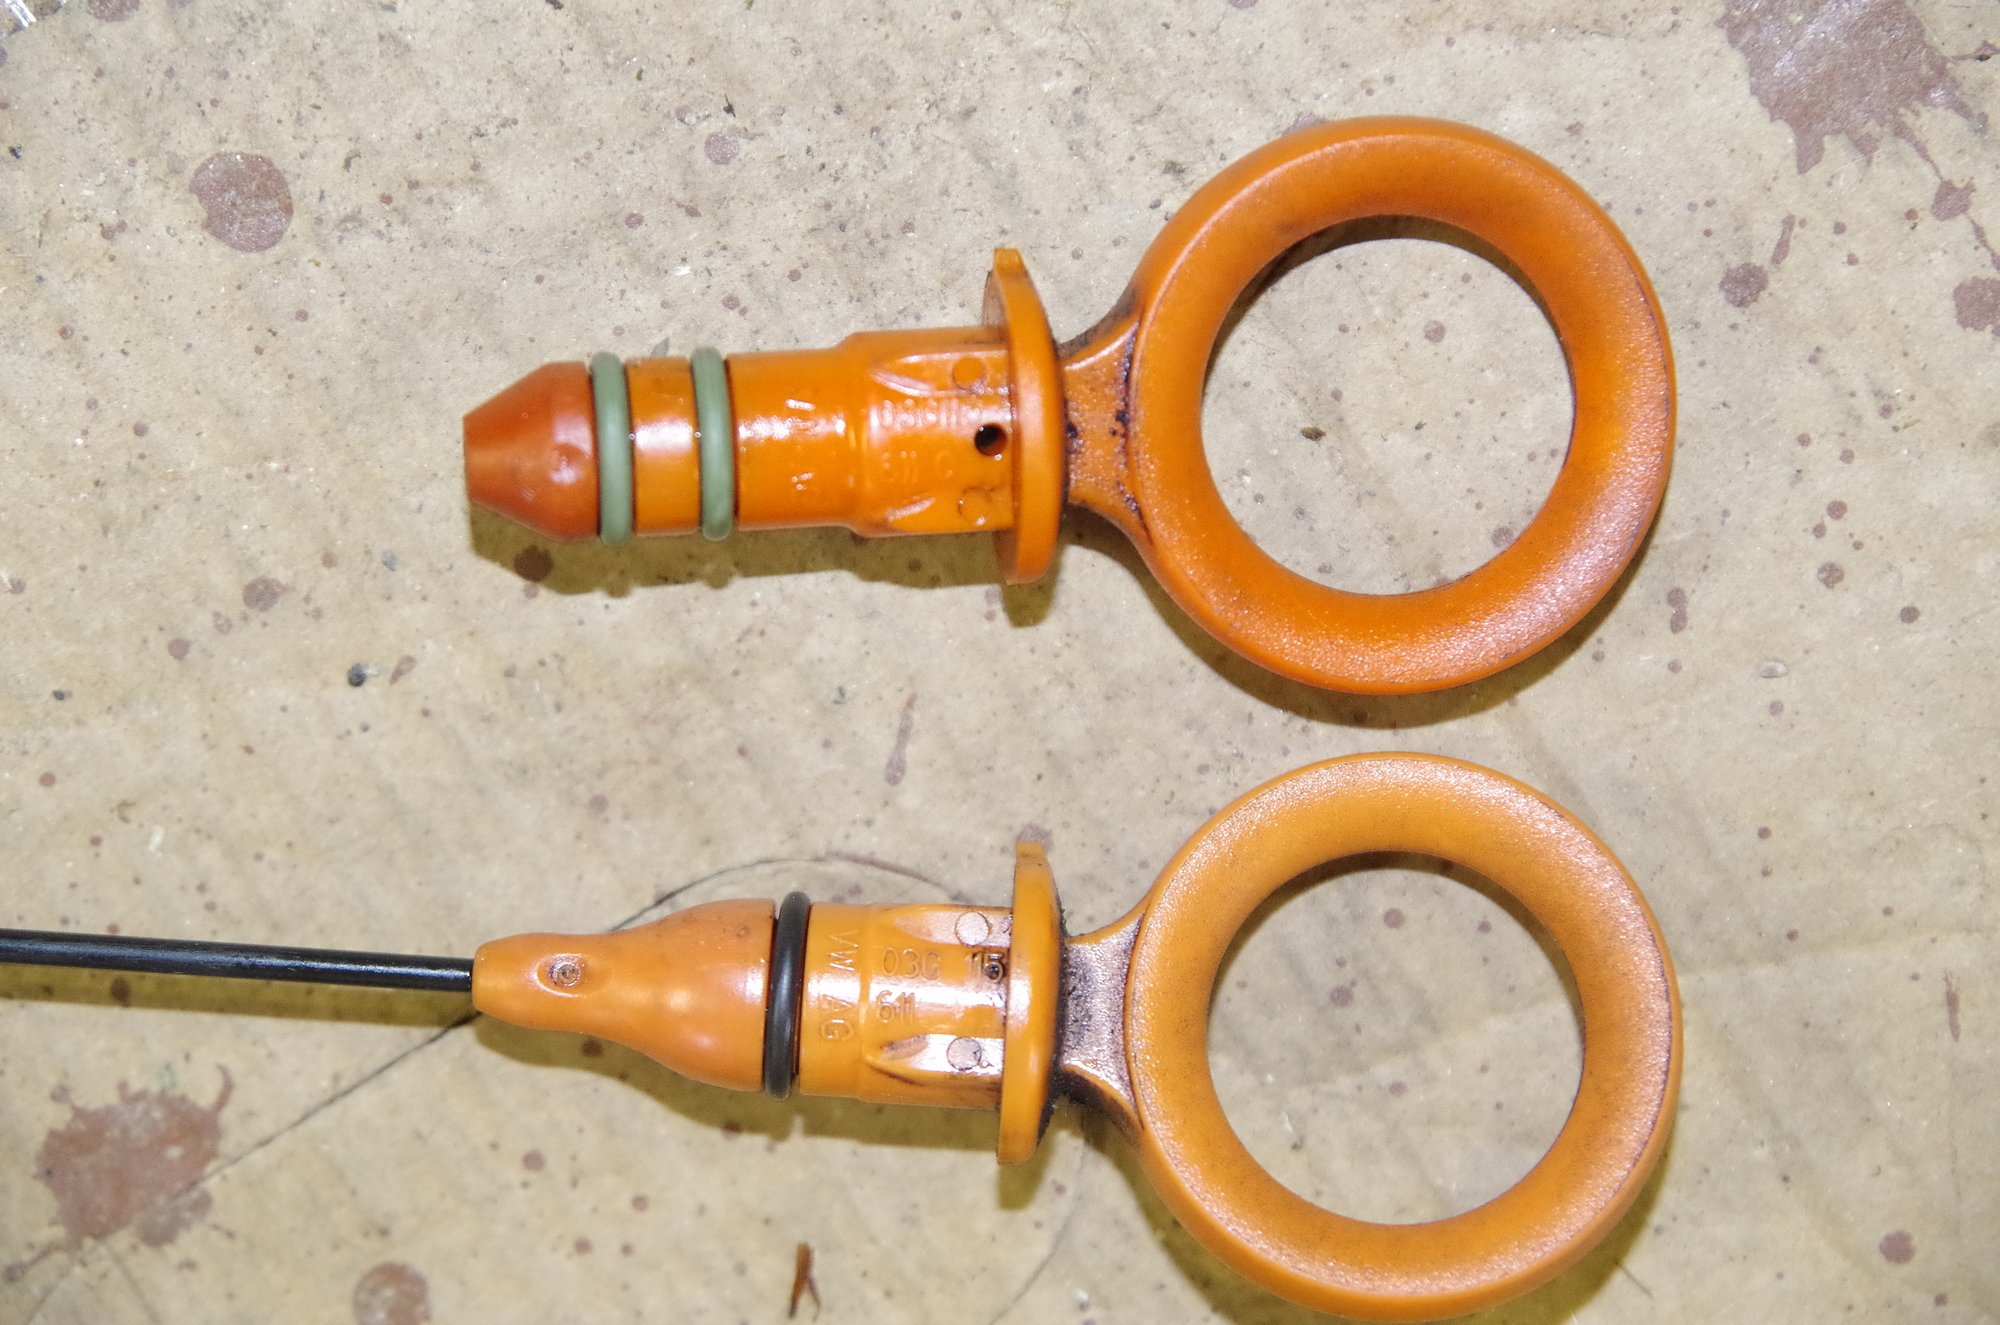
Yup, went to check the oil level last Saturday and so pulled out the dipstick - only to find that the metal shaft had snapped immediately below the ring-pull "handle"! (luckily the top of the metal shaft was still accessible and so I just pulled it out and refitted the "handle" to stop oil being sprayed around the engine compartment - and I know this engine uses hardly any oil between changes and so not worried on that account) Searched for, and then ordered a used one for a BKD motor, from a reputable dimantler and it arrived very quickly - only to find that the lower part of the "handle" has a larger diameter than the old one, and won't fit fully down in the top of the dipstick tube! The photo below shows the difference between the broken original (with 2x "O" rings) and replacement (with 1x "O" ring) dipstick "handles" Contacted the dipstick supplier, who quickly sent the matching dipstick tube without charging me any more. Went to fit the replacement dipstick tube this morning - but the tube has 2x bolted fixings. The top one is easy to access, but the lower one is halfway down the block and can't even be seen from above. Took the undertray off, but, even after disconnecting both ends of the big air inlet hose up to the EGR, and moving it as much as I could, I could not get my hand, or a spanner, anywhere near the lower fixing to remove the bolt, and I very much doubt I could then have replaced it after locating the new dipstick tube! Looks like I would have to drain the cooling system, and possibly remove the oil/water intercooler and so on, before I can get anywhere near close enough to that lower fixing bolt to be able to remove and replace it - so does anyone have any experience of replacing the tube, or even "bright ideas" as to how I could do it?
-
Not "entirely sure" about that idea - she might just take it to heart, get all-round bumpers fitted to whichever car we buy, and then "go for it!
-
She's actually already got one of those (as have I in the Octy) but even that's not high enough - we've just been to see another Mk V GTI and she had to put another cushion-type seat cover on top of the that pad before she seemed happy (and her hair was then nearly touching the headliner!