26DIPP
Members
-
Joined
-
Last visited
Everything posted by 26DIPP
-
I have read this. In Germany they say 210000Km and no time limit. Driving profiles here are not very different from Germany. Why would the UK importer go against the manufacturers guidelines?
-
Can you really do this?
-
-
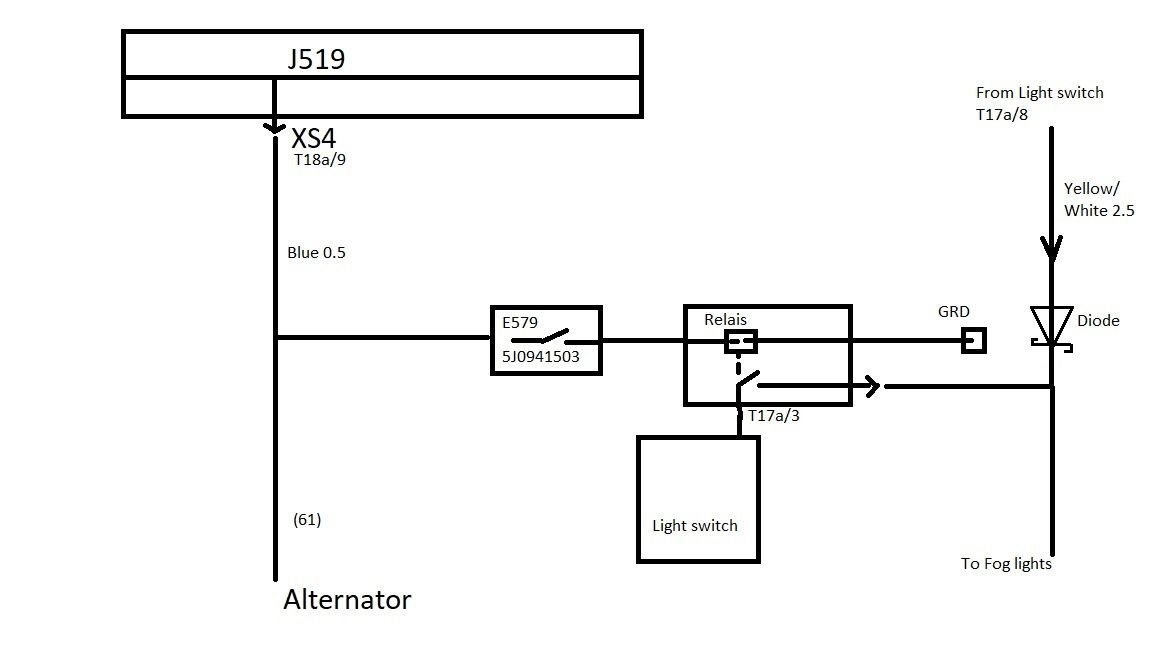
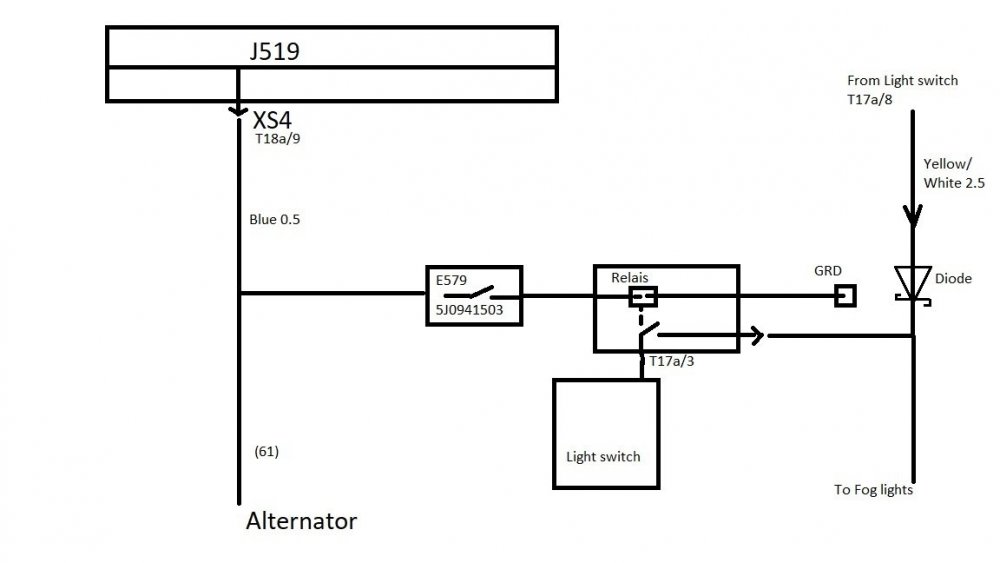
As a bored stiff Corona project I wired the fog lights in a 2009 Fabia II up to be used as DRLs. I got a 12V from the blue wire at BCM, XS4, pin T18a/9 (connection 61 in main wiring harness) which runs 12V only when the engine is running. I then connected it to the standard DRL switch in the fuse board. I used a relais to switch the DRL pin from the light switch - T17a/3 - to go onto the fog lights. In order to stop the dashboard front fog warning light to come on with the fog lights as DRLs I soldered a 30SQ045 - 30A 45V - Schottky diode in. This allows a forward current from the light switch to the fog lights and dash warning light but stops the DRL current to go back to the dash warning light. The parts needed are: DRL switch - 5J0 941 503 a relais a Shottky diode 30SQ045 a few spade connectors heat shrink tubing and some wire. Below is a DIY current flow diagram. Now while some cars that use fog lights as DRLs have an E-number stamped on the fog lights, I am using bog standard Fabia II fog lights. In the eyes of a very picky MOT tester this could be a fail, but you can always switch the DRL-fog lights off altogether.
-
As I had a spare autodimming / anti dazzle mirror from our Superb, I thought I might fit it in my daughter's Fabia pre FL. There are two types of autodimming mirrors which will fit - one with a small foot like the original Fabia mirror and the one for a RLS bracket. Mine was for the later. Parts needed: 1K0857511E - Autodimming mirror 3AA845543B - RLS windscreen bracket 4B0971833 - 6-pin connector 000979009 - Female crimp / terminal connectors to wire everyting into the 6-pin connector And wires Polyurethane windscreen adhesive - I used Autostar Germany PU 9000 Ultimate Windscreen Sealant 310ml. The pin outs for the 6-pin connector are: T6ay -Autodimming mirror /1 - ro/ge - to switched Fuse (ignition +15) /2 - Br - earth connection /3 - sw/bl - Reverse gear output, J519, XP1 T6o/2 (black) /4 - Wing mirror, not in use /5 - Wing mirror, not in use /6 - br/ro - front interior rooflight - I soldered a wire between the switch and bulb. Before you start check that the new mirror works. Connect it to 12v and earth and check the green light comes on. To remove the old mirror hold onto the foot and twist it. The RLS bracket and mirror will fit over the existing bracket. So you do not need to remove the old one. I prepared a loom from the mirror to the fuse box and J 519 above the driver's foot well and taped it with wire tape. I took it round the driver side A-pillar. To remove the trim simply pull the trim off. There are 3 metal clips holding it. They like to slip out. At the bottom you need to unclip the speaker connector. Pin 1 I soldered onto the cigarette lighter. I moved my cigarette lighter onto a switched 12V+. Pin 2 goes onto another earth. You can use the interior light, but ours was very short and I did not want to solder up there and wired it behind the dashboard. Pin 3 goes to the BCM (J519), XP1, Pin2 (T6o/2) Pin 6 as above to the roof light. This is a 12V+ into the mirror when the light is on. Once the wire is in, glue the bracket to the windscreen. Clean and degrease the glass well. The description says it has cured within 1 hour but mine was still soft and I left it over night. The new mirroe simply slides on. If it is a little stiff, use some oil on the mirror springy clamp. I did not use a harness cover – 1K0 857 593A, 1K0 857 594. I used shrink tubing instead. Connect the wire and put the trim onto the mirror. Time needed about 4 -5 hours.
-
Hi, Does anyone have a copy of a wiring diagram for a Fabia II 2009. I do not know whether the wiring was changed with the update in 2010. I am looking for the fuse board and heated washer jets in particular.